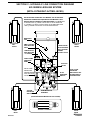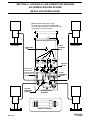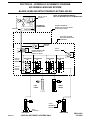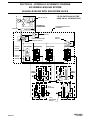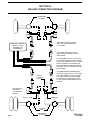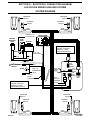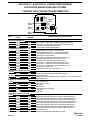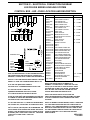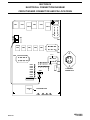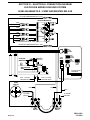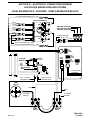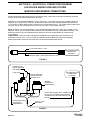
1
HW H
CORPORATION
R
COMPONENT SELECTION
AND
INSTALLATION MANUAL
HWH COMPUTER-C0NTROLLED
LEVELING SYSTEM
625 OR 625 SINGLE STEP
FOR MOTORIZED VEHICLES
625 TOUCH PANEL
625S SINGLE STEP TOUCH PANEL
HWH COMPUTERIZED LEVELING
HWH COMPUTERIZED LEVELING
R
R
HYD
LEVEL
EXCESS
SLOPE
LUBE
EXCESS
SLOPE
AUTO
LEVEL
NOT IN
PARK/
BRAKE
STORE DUMP
OFF
STEP
NOT IN
PARK/
BRAKE
AUTO
STORE
TRAVEL
MODE
CAUTION!
UNDERSTAND OPERATOR’S MANUAL BEFORE USING. BLOCK FRAME AND TIRES
SECURELY BEFORE REMOVING TIRES OR CRAWLING UNDER VEHICLE.
CANCEL
TRAVEL
MODE
CAUTION!
UNDERSTAND OPERATOR’S MANUAL BEFORE USING. BLOCK FRAME AND TIRES
SECURELY BEFORE REMOVING TIRES OR CRAWLING UNDER VEHICLE.
HWH CORPORATION
(On I-80, Exit 267 South)
2096 Moscow Road | Moscow, Iowa 52760
Ph: 800/321-3494 (or) 563/724-3396 | Fax: 563/724-3408
www.hwh.com
ML44818/MP04.2527
17JUN09
COMPONENT SELECTION AND INSTALLATION MANUAL
HWH HYDRAULIC LEVELING JACKS
625 OR 625S SERIES LEVELING SYSTEMS
THE FOLLOWING INFORMATION IS OFFERED AS SUGGESTIONS ONLY. VARIATIONS IN VEHICLE DESIGN, CHASSIS,
SUSPENSIONS, TIRES AND COACH WEIGHTS MAKE IT IMPOSSIBLE TO ANTICIPATE AND ADDRESS ALL SELECTION
OR INSTALLATION PROBLEMS AND POSSIBILITIES. SOME VEHICLE BUILDERS OR CHASSIS BUILDERS MAY USE
PRACTICES DIFFERENT FROM THOSE IN THIS MANUAL. CONSULT HWH CORPORATION OR THE VEHICLE BUILDER
FOR INFORMATION CONCERNING CORRECT SYSTEM CAPACITY AND TYPE FOR THE VEHICLE, INSTALLATION
QUESTIONS, AND INSTALLATION OF OTHER HWH EQUIPMENT.
ONLY QUALIFIED TECHNICIANS SHOULD INSTALL OR REPAIR LEVELING SYSTEMS ON VEHICLES. A KNOWLEDGE OF
HYDRAULICS, WELDING, THE VEHICLE’S SUSPENSION AND ELECTRICAL SYSTEM, AS WELL AS AN UNDERSTANDING OF THE LEVELING SYSTEM’S HYDRAULICS AND ELECTRONICS IS REQUIRED.
NOTE - HWH Corporation assumes no liability for
damages or injuries resulting from the
installation of this product.
WARNING !
READ THE ENTIRE INSTALLATION PROCEDURE BEFORE STARTING INSTALLATION.
BLOCK FRAME AND TIRES BEFORE CRAWLING UNDER VEHICLE. DO NOT USE LEVELING JACKS OR AIR
SUSPENSION TO SUPPORT VEHICLE WHILE UNDER VEHICLE OR CHANGING TIRES. VEHICLE MAY DROP AND/
OR MOVE FORWARD OR BACKWARD WITHOUT WARNING CAUSING INJURY OR DEATH.
DO NOT TURN ON POWER UNTIL INSTALLATION IS COMPLETE.
WHEN ROUTING HYDRAULIC HOSES AND WIRES, BE SURE THEY ARE NOT EXPOSED TO ENGINE EXHAUST OR
ANY HIGH TEMPERATURE COMPONENTS OF THE VEHICLE.
KICK-DOWN JACKS MAY ABRUPTLY SWING UP WHEN THE FOOT CLEARS THE GROUND OR WHEN JACK REACHES
FULL EXTENSION.
NEVER PLACE HANDS OR OTHER PARTS OF THE BODY NEAR HYDRAULIC LEAKS. OIL MAY PENETRATE THE SKIN
CAUSING INJURY OR DEATH.
SAFETY GLASSES ARE TO BE WORN TO PROTECT EYES FROM DIRT, METAL CHIPS, OIL LEAKS, ETC. FOLLOW
ALL OTHER APPLICABLE SHOP SAFETY PRACTICES.
DO NOT OVER EXTEND THE REAR JACKS. IF THE WEIGHT OF THE VEHICLE IS REMOVED FROM ONE OR BOTH
REAR WHEELS, THE VEHICLE MAY ROLL FORWARD OR BACKWARD OFF THE JACKS.
MP14.0012
17JUN09
SECTION I
625/625S SERIES LEVELING SYSTEMS
COMPONENT SELECTION
This manual is designed to aid in the selection of the correct jacks or mounting brackets and the installation of the
leveling system components including mounting brackets and/or jacks, pump/manifold control units, touch panels,
harnesses and hoses.
O.E.M. and specialty installers working with vehicles that incorporate HWH room extension mechanisms should work
directly with HWH Corporation to determine total room and leveling system requirements.
It is important to carefully read both sections of the manual before ordering or installing components. The information
in the first section, Component Selection Guide, will aid you in obtaining the necessary information needed to order
systems or system components. The second section, Installation Guide, will discuss installation of components
including: mounting heights and locations, welding procedures, hose and harness routings, pump mounting, and
adjustments including level sensing unit adjustments, jack adjustments and jack pressure switch adjustments.
Failure to read and understand this manual may result in ordering the wrong components which will delay the
installation or possibly cause improper installation of system components which may cause improper system
operation or component failure.
SECTION I: COMPONENT SELECTION
HWH has information available to aid in the selection of system components for many of the more common applications. This
information is available on the HWH web site at www.hwh.com. The information can be printed off or downloaded as necessary.
In the "Product Information" section on the HWH home page, there is a link to "Standard Leveling Systems" and "Custom
Leveling Systems (Matchmaker)". The "Standard Leveling Systems" link has information for ordering complete leveling
systems for several different chassis or vehicle options. These systems are somewhat generic in nature, designed for different
chassis types and some special vehicles. The "Matchmaker Program" is designed to help select components for specific
vehicles, mainly motor homes. In the "Online Installation School" section, you can link to the "Jack Mounting Bracket
Catalog" (ML10049). This catalog contains information and diagrams to aid in selecting kick-down style jack mounting brackets
or straight-acting jack assemblies. The catalog has specific or generic information but most of the information is not vehicle
specific. This catalog only has information about mounting brackets or jack assemblies. Information about control systems,
hoses or other system components can be obtained in the "Matchmaker Program", the "Standard Leveling Systems" link
on the HWH web site or by contacting HWH Corporation directly.
Kick-Down or Straight-Acting jacks. Basically, this is a matter of personal preference but due to available mounting
locations or mounting space and height requirements, certain vehicles will not accommodate the straight-acting jacks.
Straight-acting jacks provide somewhat better stability and are typically used if the vehicle has a room extension. The
kick-down style jacks offer a drive-off feature in case of a retract failure or in the event you forget to retract the jacks.
Straight-acting jacks are also preferable on vehicles with an air suspension
WARNING: DO NOT CRAWL UNDER A VEHICLE WITHOUT PROPERLY SUPPORTING THE FRAME OF THE
VEHICLE IF THE VEHICLE IS SUPPORTED ON THE SUSPENSION AIR BAGS. THE VEHICLE WILL RAPIDLY DROP
SEVERAL INCHES WHEN THE AIR IS EXHAUSTED FROM THE AIR BAGS. MAKE SURE THERE IS ADEQUATE
CLEARANCE TO WORK UNDER THE VEHICLE WITH THE AIR BAGS DEFLATED.
HWH Corporation has numerous pivot bracket/jack arrangements in all jack capacities. If a pivot bracket/jack arrangement
available in our Jack Mounting Bracket Catalog, the Matchmaker Component Selection Program or the Standard
Leveling System link is not suitable for your application, Contact HWH Corporation for assistance in selecting an appropriate
pivot bracket/jack arrangement. The following information is needed to assist us in this selection process.
1.) Coach make, model and year.
2.) Chassis manufacturer and model
3.) Spring or air suspension.
4.) Front and rear axle weights. (Actual not GVW)
5.) Tire size. (Height 19.5", 22.5" etc.)
6.) Frame rail height
7.) Distance from ground to bottom of frame rail. If the vehicle has an air suspension, measure with air bags empty if possible.)
8.) Distance from bottom of frame rail to floor or main vehicle platform.
9.) Available mounting area. (Refer to the Clearance and Mounting Dimension Chart- - -Straigt-acting jacks)
10.) Tag Axle?
MP24.9720
17JUN09
SECTION I
625/625S SERIES LEVELING SYSTEMS
COMPONENT SELECTION
The following chart shows the available capacities for kick-down and straight-acting jacks:
Weight capacity
Kick-down style
Straight-acting style
3,000# 4,000# 6,000# 9,000#
X
X
X
X
X
X
12,000# 16,000# 24,000#
X
X
X
X
X
To select the proper components for your application, especially when selecting mounting brackets and/or
jacks, the vehicle must be available for inspection. Ordering system components without first inspecting and
measuring the vehicle for critical component mounting and location information may result in receiving
components that may not work properly for your application.
Refer to the "CLEARANCE AND MOUNTING DIMENSION CHART" in PART I of this manual for information needed to check
available mounting locations for adequate clearance to mount and operate the jacks. Refer to the "Jack Mounting Bracket
Catalog (ML10049) located in the HWH Online Installation School for specific information concerning bracket and mounting
dimensions or jack / mounting bracket locations on frames. Information in this catalog is mainly vehicle generic in nature and is
primarily used in aftermarket installations, O.E.M. installations will usually be more vehicle specific. O.E.M.s should contact
HWH sales or engineering for specific information or drawings.
Use the combined information from the charts in PART I and the Bracket Catalog to determine a proper mounting
location with adequate mounting and operational clearance before ordering equipment.Remember, operational clearance
includes mounting heights. HWH offers kick-down and straight-acting jacks in different stroke capabilities. Use the charts and
the catalog to determine which stroke jack is needed for your application.
Vehicles with spring suspensions. The ground clearances listed in the Dimension Charts apply to vehicles with a full
load of fuel, water and equipment. If the vehicle is empty, typically 1 inch should be added to the listed dimensions. Also, if the
vehicle is new, the vehicle may settle down 3/4 of an inch or more in the first year or 10,000 miles.
Vehicles with air suspensions. Typically, straight-acting jacks are used on vehicles with an air suspension. If the
vehicle is at normal ride height when mounting heights are set, you must remember the chassis will lower between 2 and 3
inches when the suspension air bags are emptied. Ground clearances listed in the Dimensions Charts are typically figured
with the suspension air bags empty. If possible measure the difference between the bottom of the frame and the ground
with the vehicle at normal ride height and with the bags empty. This dimension is how far the vehicle will lower when the air
bags are exhausted. Add this dimension to the suggested ground clearance listed for the jacks in the dimension charts.
Example: A 13" stroke jack is typically mounted with 7 to 9 inches of ground clearance. A vehicle with an air suspension
drops 3 inches from normal ride height when the suspension air bags are emptied. The typical ground clearance for this
installation should be 10 to 12 inches with the vehicle at normal ride height.
The correct mounting location for the jacks is important for the proper functioning of the leveling system and to reduce stress
to the vehicle while leveling. Refer to Figures 1 thru 4 for typical, non-typical, not suggested and unacceptable mounting
configurations. Figures 3 and 4 refer to kick-down style jacks only.
SWING TO REAR
SWING TO REAR
SWING SIDEWAYS
SWING FORWARD
FRAME
EXTENSION
FRAME
EXTENSION
FRAME
EXTENSION
FRAME
EXTENSION
TYPICAL
Figure 1
NON - TYPICAL
Figure 2
NOT SUGGESTED
Figure 3
UNACCEPTABLE
Figure 4
MP24.9721
09JUL09
SECTION I
625/625S SERIES LEVELING SYSTEMS
COMPONENT SELECTION
System Controls, Hoses and Harnesses. Components such as control systems used for after market installations on
motor homes are predetermined by HWH once the type of vehicle and jacks are determined. There are generic hose kits
and harnesses for class C and class A vehicles. The control systems and power unit / control box assemblies are determined
by the type of chassis and the jacks used with the installation. O.E.M. or specialty installers should contact HWH for specific
control system, power unit / control box assemblies, hose and harness information. There are different size pump / motor /
tank assemblies available if mounting space is limited. For class C vehicles, the control box assembly can be removed and
mounted in a remote location. The harness allows the control box to be moved about 3 feet from the power unit assembly.
The following dimensions show how much space is needed to mount a standard power unit assembly for class C and class A
style vehicles.
Standard Class C Power Unit / Control Assembly
Side View
Top View
12.0"
12.0"
21.5"
Figure 5
Standard Class A Power Unit / Control Assembly
Side View
Top View
9.3"
13.1"
22.6"
Figure 6
The standard class C style power unit / control assembly is typically used with systems that incorporate 6,000# capacity jacks
and smaller. The standard class A style power unit / control assembly is typically used with systems that incorporate 6,000#
jacks and larger. Examples: The class C power unit would be used with a system that has four 6,000# jacks or a system with
two 4,000# and two 6,000# jacks. The class A power unit would be used with a system that has two 6,000# and two 9,000#
jacks. If the above dimensions do not allow the installation of the power unit / control assembly, contact HWH
Corporation for other options. Remember, the control box can be moved from the class C style power unit /
control assembly.
Air Suspension Air Dump System. If the vehicle is equipped with an air suspension, an air bag air dump system is
needed. Some vehicles will be equipped with a pilot air dump system. Most likely, if a pilot air dump system is used, there
will be a dump switch or button supplied by the chassis manufacturer. If the chassis has no air dump system, an HWH air
dump system will have to be used. This will have electrically controlled solenoid valves, a different touch panel, different
control box and necessary harnesses. Contact HWH with specific chassis information to obtain the proper air dump kit.
Due to variations in chassis’s, vehicle construction and vehicle equipment, typical systems, mounting brackets and
components offered by HWH may not fit every application, even when a specific application is listed. It is the installers
responsibility to address mounting requirements and issues before starting the installation. When variations are
encountered that require custom brackets or components, or typical mounting locations are not
MP24.9722
available, contact HWH Corporation for assistance.
09JUL09
SECTION I
CLEARANCE AND MOUNTING DIMENSION CHART
KICK - DOWN JACKS
SIDE VIEW
TOP VIEW
I
B
A
J
K
D
E
C
F
GROUND
LINE
G
DIMENSION "I" INCLUDES SPRINGS.
H
RETRACTED
DIMENSIONS
JACK
EXTENDED
DIMENSIONS
A
B
C
D
6000#
SHORT
12.5"
19.5"
4.5"
12.0"
6000#
TALL
14.0"
22.0"
4.5"
13.5"
9000#
SHORT
14.5"
23.0"
6.5"
13.5"
9000#
TALL
15.5"
24.5"
6.5"
14.5"
18.0"
26.0"
7.0"
16.75"
16000#
E
MIN
14.0"
MAX
16.0"
MIN
15.5"
MAX
17.5"
MIN
16.5"
MAX
18.0"
MIN
17.5"
MAX
19.0"
MIN
19.75"
MAX
21.25"
F
19.0"
21.5"
22.0"
23.5"
24.75"
G
MIN
2.0"
MAX
4.0"
MIN
2.0"
MAX
4.0"
MIN
3.0"
MAX
4.5"
MIN
3.0"
MAX
4.5"
MIN
3.0"
MAX
4.5"
STROKE
MOUNTING
WIDTH
H
I
MOUNTING BOLT
PATTERN
J
K
7.0"
6.5"
1.5"
4.5"
8.0"
6.5"
1.5"
4.5"
8.5"
8.5"
1.5"
4.5"
9.0"
8.5"
1.5"
4.5"
8.0"
12.5"
4.0"
4.0"
Dimension E is the suggested mounting height.
Dimension G is the suggested ground clearance when the jack is vertical but not extended.
* If using kick - down jacks on vehicles with full airbag suspensions, add 2 inches to this dimension.
MP24.9723
17JUN09
SECTION I
CLEARANCE AND MOUNTING DIMENSION CHART
STRAIGHT ACTING JACKS WITH SINGLE ACTING CYLINDERS
FRONT VIEW
SIDE VIEW
A
B
D
IMPORTANT: Dimensions listed here are for typical
generic style jacks installed in the after market. For
vehicle specific jacks, contact HWH Corporation for
mounting and clearance dimensions or drawings of
specific jacks.
If needed, jacks with different mounting dimensions
and spring arrangements may be available. Contact
HWH Corporation for information.
C
GROUND
LINE
* If the vehicle is equipped with an air suspension that will be dumped, add a minimum of 2" to the ground clearance dimension.
For new and or unloaded vehicles with spring suspension, add a minimum of 1" to the clearance dimensions to allow for settling
of the vehicle.
MOUNTING WIDTH
JACK
A
B
CAPACITY AND STROKE
GROUND CLEARANCE
C*
TOP CLEARANCE
D **
3,000# x 13" STROKE
8.00"
3.75"
7.00" MIN. - 9.00" MAX
2.00"
4,000# x 13" STROKE
8.00"
4.75"
7.00" MIN. - 9.00" MAX
2.00"
6,000# x 13" STROKE
8.00"
5.00"
7.00" MIN. - 9.00" MAX
2.00"
6,000# x 16" STROKE
8.00"
5.00"
10.00" MIN. - 12.00" MAX
2.00"
9,000# x 13" STROKE
8.50"
5.50"
7.00" MIN. - 9.00" MAX
2.00"
9,000# x 16" STROKE
8.50"
5.50"
10.00" MIN. - 12.00" MAX
2.00"
12,000# x 13" STROKE
10.00"
6.00"
7.00" MIN. - 9.00" MAX
2.00"
12,000# x 16" STROKE
10.00"
6.00"
10.00" MIN. - 12.00" MAX
2.00"
16,000# x 13" STROKE
12.00"
6.50"
7.00" MIN. - 9.00" MAX
2.00"
16,000# x 16" STROKE
12.00"
6.50"
10.00" MIN. - 12.00" MAX
2.00"
24,000# x 13" STROKE
13.25"
7.50"
7.00" MIN. - 9.00" MAX
2.00"
24,000# x 16" STROKE
13.25"
7.50"
10.00" MIN. - 12.00" MAX
2.00"
** This is figured from the highest point of the cylinder or component mounted to the top of the cylinder.
If the hose comes into a straight fitting, 6 to 8 inches of clearance may be needed.
MP24.9724
17JUN09
SECTION II
625/625S SERIES LEVELING SYSTEMS
COMPONENT INSTALLATION
1.) PRE - INSTALLATION CHECKS
THESE ARE ITEMS THE INSTALLER SHOULD CHECK BEFORE STARTING THE INSTALLATION:
1.) Do the jacks have the proper lifting capacity for the axle weights of the vehicle?
2.) Do the jacks have the proper stroke for the mounting heights available?
3.) Does the pump have the proper reservoir capacity for the jacks being used?
4.) Are acceptable mounting locations available for the jacks and other system components?
5.) Will the mounting brackets or jacks interfere with any vehicle components or structure?
6.) If the vehicle is equipped with an air suspension, an air dump system must be used for proper leveling. If the vehicle is not
equipped with an air dump system, an air dump system must be installed. Contact HWH Corporation for assistance.
7.) Are all components necessary for the installation, including mounting brackets, hardware kits, hoses, etc. present?
Do not start the installation only to find the touch panel is missing.
8.) Any vehicle exhaust modification that needs to be done should be done before the installation is started.
9.) Does the vehicle have a good set of batteries that are fully charged?
IMPORTANT: Jacks used with 625 or 625S series leveling systems need a pressure switch on each jack. Generic
jack kits may not come equipped with pressure switches. Make sure the appropriate jack pressure switches have
been ordered and are present for the installation.
NOTE: Do not use kick-down style jacks and straight-acting jacks on the same vehicle.
IF THERE ARE ANY PROBLEMS WITH ANY OF THE ABOVE ITEMS, CONTACT HWH CORPORATION
BEFORE STARTING THE INSTALLATION.
2.) MOUNTING THE JACKS
This section contains general mounting location and arrangement information along with information specific to kick-down
style or straight-acting style jacks. Read this section thoroughly. Mounting the jacks properly is essential to the correct
operation of the leveling system.
General Information: Refer to the "CLEARANCE AND MOUNTING DIMENSION CHARTS" in PART I of this manual for
information needed to check available mounting locations for adequate clearance to mount and operate the jacks. Refer to the
Jack mounting Bracket Catalog (ML10049) located in the HWH ON Line Installation School for specific information concerning
bracket and mounting dimensions or jack / mounting bracket locations on frames. Information in this catalog is mainly vehicle
generic in nature and is primarily used in aftermarket installations. O.E.M. installations will usually be more vehicle specific.
O.E.M.s should contact HWH sales or engineering for specific information or drawings. Use the combined information from
the charts in PART I and the Bracket Catalog to determine a proper mounting location with adequate mounting and
operational clearance before starting the installation. Having the front jacks mounted only to find there is not an acceptable
location for the rear jacks will be a frustrating experience.
Check mounting bracket or jack mounting heights before continuing with mounting bracket / jack installation.
Mounting the brackets or jacks at an improper height may interfere with correct operation of the leveling system.
Kick-Down Jack
Straight-Acting Jack
Vehicle Floor
Frame Rail
2" Minimum
Clearance
Compartment
Clearance
to Extend
Ground
Clearance *
Ground Line
* Refer to "CLEARANCE AND MOUNTING DIMENSION CHARTS" in SECTION I of this manual.
Figure 7
Ground
Clearance *
MP24.9730
17JUN09
SECTION II
625/625S SERIES LEVELING SYSTEMS
COMPONENT INSTALLATION
Vehicles with spring suspensions. The ground clearances listed in the Dimension Charts apply to vehicles with a
full load of fuel, water and equipment. If the vehicle is empty, typically 1 inch should be added to the listed dimensions. Also,
if the vehicle is new, the vehicle may settle down 3/4 of an inch or more in the first year or 10,000 miles.
WARNING: DO NOT CRAWL UNDER A VEHICLE WITHOUT PROPERLY SUPPORTING THE FRAME OF THE
VEHICLE IF THE VEHICLE IS SUPPORTED ON THE SUSPENSION AIR BAGS. THE VEHICLE WILL RAPIDLY DROP
SEVERAL INCHES WHEN THE AIR IS EXHAUSTED FROM THE AIR BAGS. MAKE SURE THERE IS ADEQUATE
CLEARANCE TO WORK UNDER THE VEHICLE WITH THE AIR BAGS DEFLATED.
Vehicles with air suspensions. Typically, straight-acting jacks are used on vehicles with an air suspension. If the
vehicle is at normal ride height when mounting heights are set, you must remember the chassis will lower between 2 and 3
inches when the suspension air bags are emptied. Ground clearances listed in the Dimension Charts are typically figured with
the suspension air bags empty. If possible, measure the difference between the bottom of the frame and the ground with the
vehicle at normal ride height and with the air bags empty. Add this dimension to the suggested ground clearance for the jacks
listed in the dimension charts. Example: A 13 inch stroke jack is typically mounted with 7 to 9 inches of ground clearance. A
vehicle with an air suspension drops 3 inches from normal ride height when the suspension air bags are emptied. The typical
ground clearance for this installation should be 10 to 12 inches with the vehicle at normal ride height.
The following are some general rules to follow for a typical installation of leveling jacks on a vehicle:
1.) The front and rear jacks should be mounted behind the front and rear axles as close to the axles as possible. Jacks are not
typically mounted in front of either the front or rear axles.
2.) The rear jacks are not typically mounted behind the end of the main frame rails on frame rail extensions.
3.) If the vehicle is equipped with a tag axle, the rear jacks are typically mounted between the drive axle and the tag axle.
4.) Front or rear jacks may be staggered several inches to accommodate vehicle equipment and compartments. If a cross tie is
required, staggering the jacks more than an inch or two may not be possible.
5.) Most mounting brackets and straight-acting jack pivot brackets are designed with specific mounting hole arrangements.
Some brackets are designed with a flange or finger that bolts to the bottom flange of the frame rail. When a mounting
bracket or pivot bracket has a specific mounting hole arrangement, use of all bolt holes, including the flange holes is
important. When mounting brackets or pivot brackets have multiple hole arrangements, the widest possible set of
holes should be used. Always bolt brackets as close to the top and bottom of the frame rail as the brackets allow.
6.) Jacks and/or mounting brackets must be mounted so they do not interfere with suspension components, springs, air bags,
linkages, etc. when retracted or extended.
7.) Front jacks and/or mounting brackets must be mounted so they do not interfere with the front tires when the tires are turned
from stop to stop. Remember as a vehicle moves up and down, the geometry of the suspension can change. Clearance with
the vehicle at rest may change as the vehicle moves up or down.
8.) Jacks should not be exposed to high temperatures such as exhaust components. Heat shields must be installed when
necessary. If heat shields are supplied with jacks or brackets, both sides should be installed. Aftermarket exhaust systems
may be installed at a later date.
9.) Normally, modification of the vehicle exhaust is not needed but if modification is needed, this should be done before the
installation of the leveling jacks.
Welding and drilling frame rails. Typically, HWH mounting brackets and jacks are designed with holes to allow a
bolt on installation. Welding to HWH supplied mounting brackets or a straight-acting jack pivot bracket is allowable but all
acceptable welding practices must be followed. Before any welding is done on the frame rail, the chassis manufacturer
must be contacted for authorization and procedures. Refer to WELDING in PART II JACK INSTALLATION for general
welding information. This section contains basic welding information including procedures to follow for several different
frame manufactures. This information may not be complete and may change from time to time so it is important to
contact the frame manufacturer for current, specific welding information and procedures. When drilling holes, do not
drill in the radius of the frame rail, do not drill closer than one bolt diameter to the edge of the frame rail flange and do not
drill next to an existing hole. Again, one bolt diameter distance should be maintained. As with welding, contact the
frame manufacturer for specific drilling information and procedures. WHEN DRILLING OR WELDING, ALWAYS
CHECK BEHIND THE OBJECT YOU ARE WELDING OR DRILLING ON FOR OBSTRUCTIONS OR EQUIPMENT SUCH
AS WIRING, HOSES, BATTERIES OR HOLDING / FUEL TANKS. THESE OBJECTS MUST BE PROTECTED FROM
WELDING HEAT OR DRILLING.
MP24.9731
09JUL09
SECTION II
625/625S SERIES LEVELING SYSTEMS
COMPONENT INSTALLATION
WELDING
Typically, mounting brackets are not welded to the frame rails. However, if any welding is done such as modifying a
jack bracket already mounted, the following precautions should be observed:
Connect welding ground to part being welded. NEVER weld to suspension parts such as spring shackles. NEVER weld across
the bottom flange of the frame rail. Brackets should be located near a cross member. For additional information on the vehicle,
chassis, brackets, and mounting location, contact the vehicle’s builder, the chassis or suspension supplier, or HWH Corporation.
WARNING:
THERE MAY BE FUEL LINES OR WIRE INSIDE THE FRAME RAIL. THEY SHOULD BE WELL
PROTECTED FROM THE HEAT CAUSED BY WELDING. DAMAGE OR PERSONAL INJURY COULD OCCUR.
The following procedures are for specific chassis manufacturers.
1. G.M.
4. GILLIG
Disconnect both battery cables. ALWAYS DISCONNECT
THE GROUND CABLE FIRST.
Disconnect both battery cables. ALWAYS DISCONNECT
THE GROUND CABLE FIRST.
Disconnect computer module wiring.
Attach the welding ground to the part to be welded.
Attach the welding ground to the part to be welded.
Do not use suspension components as ground points.
Do not use suspension components as ground points.
Keep welding cables away from electrical systems.
Keep welding cables away from electrical systems.
2. FORD
5. SPARTAN
Disconnect both battery cables. ALWAYS DISCONNECT
THE GROUND CABLE FIRST.
Disconnect both battery cables. ALWAYS DISCONNECT
THE GROUND CABLE FIRST.
Disconnect computer module wiring.
Attach the welding ground to the part to be welded.
Attach the welding ground to the part to be welded.
Do not use suspension components as ground points.
Do not use suspension components as ground points.
Keep welding cables away from electrical systems.
Keep welding cables away from electrical systems.
3. OSH KOSH
NOTE: Check with the chassis manufacturer for the
most recent information on welding precautions.
Disconnect both battery cables. ALWAYS DISCONNECT
THE GROUND CABLE FIRST.
Attach the welding ground to the part to be welded.
Do not use suspension components as ground points.
Keep welding cables away from electrical systems.
MP24.9732
17JUN09
SECTION II
625/625S SERIES LEVELING SYSTEMS
COMPONENT INSTALLATION
Mounting kick-down style jacks: Refer to drawings in the JACK MOUNTING BRACKET CATALOG for frame
placement and mounting dimensions of the different brackets. Pre-punched or drilled and tapped mounting plates are available
when on-site fabricating of a mounting system is required. Minor modification to brackets, such as making a small notch, is
acceptable but HWH Corporation should be contacted if major modification or moving the bracket to a different mounting
location is needed. Punch plates and kick-down brackets listed in the catalog are designed for use with 6000# and 9000#
jacks. If 16,000# kick-down jacks are to be used and an existing mounting bracket on the frame is not available, a mounting
bracket will have to be fabricated. Drilled and tapped mounting plates are available from HWH Corporation.
Refer to figures 1 thru 4 in section I, COMPONENT SELECTION, for typical to unacceptable mounting locations for the jacks.
Kick-down jacks must be mounted so they swing upward to the rear or the vehicle when retracting to the horizontal position.
NEVER MOUNT KICK-DOWN JACKS SO THEY SWING TO THE FRONT OF THE VEHICLE (Figure 4). Swinging jacks to
the side of the vehicle is not suggested. (Figure 3)
Ample clearance behind the jacks must be maintained in case a jack extends before swinging to the vertical position. A
horizontal adjustment is supplied with all kick-down style jacks. Jacks can be adjusted downward slightly to avoid contact with
compartments or any vehicle or chassis equipment such as tanks and suspension components in case the jack extends before
swinging vertical. These adjustments are discussed later in the manual.
Maintaining the correct ground clearance as listed in the "Clearance and Mounting Dimension Chart" for a kick-down jack is
important. This allows for parking on uneven ground and also allows the use of a pad or block under the jack when parked on
soft ground or asphalt. You must also allow for the vehicle to sag when loaded or as the vehicle ages. It is important to follow
the guidelines in the Clearance and Mounting Dimensions Chart for Kick-down Jacks. If the jacks have to much clearance,
1-1/2 and 3 inch spacer kits are available. Each kit will do two jacks.
Typical installation of kick-down mounting brackets does not require welding to the vehicle frame rail. If any welding on the
vehicle frame rail is to be done, the vehicle or chassis manufacturer should be contacted for authorization and procedures
before proceeding. Welding to jack mounting brackets is allowable but all acceptable welding and safety procedures should
be followed. Refer to "WELDING" in PART II of JACK INSTALLATION. IN NO CASE SHOULD A KICK-DOWN JACK
PIVOT BRACKET BE WELDED DIRECTLY TO A FRAME RAIL OR A MOUNTING BRACKET.
6,000# and 9,000# kick-down jacks and mounting brackets have slotted mounting holes so the jacks can be rotated slightly.
This allows the jack to be mounted so it swings up and down in line with the vehicle. 16,000# jack mounting holes are not
slotted. The brackets need to be installed as square in line with the vehicle frame as possible.
Some means of preventing the frame rail from twisting must be provided. Typically, the jack
mounting brackets are mounted near a suspension bracket or a frame rail cross tie.
Mounting brackets and jacks should be bolted using hardware supplied by HWH Corporation. Make sure all bolts are properly
tightened. A minimum of grade 5 bolt should be maintained if substituting for hardware supplied by HWH Corporation. Any
flat and/or lock washers must be used when supplied in hardware kits. Before the installation is complete, all mounting
bolts for the mounting brackets and jacks should be rechecked for tightness.
WARNING: JACKS WILL SWING UP ABRUPTLY FROM THE VERTICAL POSITION WHEN RELEASED.
BODILY INJURY CAN OCCUR WHEN CONTACT IS MADE WITH A SWING JACK.
The kick-down jack will have to pivot to the vertical position to access all mounting bolts. Loosely fasten the two rearward
pivot bracket mounting bolts first. Pull the jack to the vertical position and secure the jack so it cannot swing to the horizontal
position. A small strap or chain works the best. DO NOT jam a wrench or bar between the jack cylinder and pivot bracket.
If the bar slips, the jack will abruptly swing up. When the jack is completely fastened and the mounting bolts properly
tightened, release the retaining strap or chain and allow the jack to pivot to the horizontal position.
Mounting straight-acting style jacks: The main concerns when mounting straight-acting jacks are the ground
clearance, clearance above the jack to the vehicle floor and making sure the jack is mounted straight up and down with the
vehicle so it does not push forward or backwards as it lifts the vehicle. If a jack cylinder incorporates a straight fitting for the
hose connection, more clearance will be needed to attach the hose. Refer to the Clearance and Mounting Dimensions Chart
Straight-acting Jacks, for typical ground clearance when the jacks are retracted. If the vehicle is equipped with an air
suspension, the vehicle will lower between 2 and 3 inches when the air is dumped from the air bags. Remember to allow for
this when determining mounting heights. Typically, we like the jack to have between 5 and 6 inches of lift. This should be
taken into account when determining mounting heights.
MP24.9733
17JUN09
SECTION II
625/625S SERIES LEVELING SYSTEMS
COMPONENT INSTALLATION
Example: A 13 inch stroke jack should be mounted with 7 to 8 inches of ground clearance. Also remember there has to be
clearance above the jacks to access hose and electrical connections. When determining the mounting height it is also
important to maintain an adequate bolting pattern for mounting the jacks. A minimum of four bolts should be used to fasten
each jack to the frame rail: two upper bolts and two lower bolts.
Bolt Mounting Hole Patterns
ACCEPTABLE
ACCEPTABLE
UNACCEPTABLE
UNACCEPTABLE
Figure 8
Mounting holes are normally provided on the jack pivot bracket or if a weld on style pivot bracket is used, the mounting plate
for that style jack has pre-drilled mounting holes. Some frames may have pre-drilled holes that can be used. Typically, we like
a minimum of 3 inches between the top and bottom mounting holes for 4,000# and 6,000# jacks with a minimum of 4 ½ inches
between the top and bottom mounting holes for 9,000# and 12,000# jacks. HWH Corporation should be contacted for
applications requiring 16,000# or 24,000# capacity jacks.
Due to variations in vehicle weight, jack capacities, frame width and construction, HWH cannot address all mounting
possibilities and variations. It is the responsibility of the installer to recognize possible mounting issues such as mounting
hole patterns or mounting positions on the frame rail. Anytime an issue is suspected, please contact HWH Corporation for
assistance.
If using a jack with a weld-on style pivot bracket, a mounting plate that bolts to the vehicle frame rail should be used. First,
determine the proper mounting height of the jack and fasten the mounting plate to the frame rail in the appropriate position.
The jack can then be welded to the mounting plate. It may be best to tack the jack in place and then remove it from the fame
rail to complete the welding of the pivot bracket to the plate in a flat position instead of a vertical position. WHEN WELDING
TO A PLATE THAT IS FASTENED TO THE FRAME RAIL, PROTECT ANY TUBES, WIRES, HOSES, ETC. ON EITHER
SIDE OF THE FRAME RAIL FROM WELDING HEAT AND SPLATTER.
The jacks or jack mounting plates should be bolted using hardware supplied by HWH Corporation. Make sure all bolts are
properly tightened. A minimum of grade 5 bolt should be maintained if substituting for hardware supplied by HWH Corporation.
Any flat and/or lock washers must be used when supplied in hardware kits. Before the installation is complete, all mounting
bolts for the jacks should be rechecked for tightness.
When installing the front and rear jacks, some means of preventing the frame rail from twisting must be provided. Some jack
assemblies have a cross tie assembly built into the pivot bracket arrangement. HWH Corporation offers an assortment of
cross tie assemblies to tie the lower section of the jack pivot brackets together. If necessary, a cross tie assembly or some
type of frame rail support may need to be fabricated on site. It is allowable to weld gussets and other components of a cross
tie assembly. The cross tie assembly should not be welded to the jack pivot bracket in case the cross tie has to be removed to
access other vehicle equipment.
WARNING: DO NOT CRAWL UNDER A VEHICLE WITHOUT PROPERLY SUPPORTING THE FRAME OF THE
VEHICLE IF THE VEHICLE IS SUPPORTED ON THE SUSPENSION AIR BAGS. THE VEHICLE WILL RAPIDLY DROP
SEVERAL INCHES WHEN THE AIR IS EXHAUSTED FROM THE AIR BAGS. MAKE SURE THERE IS ADEQUATE
CLEARANCE TO WORK UNDER THE VEHICLE WITH THE AIR BAGS DEFLATED.
3.) AIR SUSPENSION - AIR DUMP INSTALLATION
Before deflating the air bags, the vehicle’s frame must be securely blocked so it cannot drop when the air is released
from the air bags. Suspension components can also move when the air is released. Make sure there is ample room
to work under the vehicle without interference from any moving suspension or vehicle component.
MP24.9734
09JUL09
SECTION II
625/625S SERIES LEVELING SYSTEMS
COMPONENT INSTALLATION
The air bags can be deflated by disconnecting the air line that goes from the height control valve to the air bag. The best
access to accomplish this is probably at the height control valve. The air dump solenoid valve tees in between the height
control valve and the air bag. The kit will contain air dump solenoid valves as needed, a tee fitting for each air dump valve
and a length of 3/8 inch air line. The tee will be 3/8’ by 3/8" by 3/8". If the air line between the height control valve and the
air bag is a different size than 3/8 inch, you will have to supply the correct tee fitting. ALL AIR LINE FITTINGS USED MUST
BE DOT APPROVED. Typically, the dump valve is located fairly close to the height control valve. The valve should be
mounted solidly to some type of frame member if possible. Ample air line is supplied to move the dump valve where it can
be mounted properly. The valve has 2 mounting screws on the bottom of the valve that can be used to attach the valve to
a mounting bracket. It is best if the valve is mounted so the exhaust port is protected from road splash. This will help keep
the exhaust port free from dirt which could interfere with the operation of the valve. IT IS IMPORTANT TO KEEP THE DUMP
VALVE AND AIR LINES AWAY FROM ANY HEAT SOURCES SUCH AS THE ENGINE EXHAUST.
Existing Height
Control Valve
Air Dump Valve by HWH
Mounting Screws
Tee Fitting by HWH
3/8" Air Line by HWH
Existing Air Line
Existing Air Bag
Figure 9
4.) POWER UNIT / CONTROL BOX ASSEMBLY INSTALLATION
Before installing the power unit assembly, you should check the length of the touch panel harness and lay out the warning
switch / pressure switch harness. The power unit assembly should be mounted in a position that allows the harnesses to reach
their designated components. HARNESS SHOULD NOT BE LENGTHENED IN THE FIELD. The warning / pressure switch
harness has wires labeled for specific jacks. The plugs should not be switched front to rear or side to side. If this happens, the
system will not function properly. Also, the control box level sensing unit should be programmed before installing the power unit
assembly. See "Programming the level sensing unit" located in this section, on this page.
The power unit assembly should be mounted away from heat sources and protected from road splash. The valves must be
accessible without having to crawl under the vehicle. This allows the valve release nuts to be used to lower the vehicle safely
in the case of an electrical failure. Also consider accessibility for hose and harness routings. Mounting the assembly so the
clear cover of the control box will be visible is desirable.
The power unit assemblies designed for class C applications can have the control box with its mounting bracket removed from
the main assembly and mounted in a remote location. The amount the control box can be moved is limited to the length of the
power unit harness. The touch panel and warning/pressure switch harness lengths should be considered when moving the
control box. When remote mounting the control box, pay attention to heat sources, road spray and accessibility issues. The
control box must be mounted to a solid surface with the "This Side Up" sticker pointing up.
Programming the Level sensing unit: The level sensing unit is located in the control box. The sensing unit must be
programmed so the control box knows where the front of the vehicle is and what type of suspension is used, air or spring.
It would be best to program the sensing unit before installing the power unit assembly or the control box if it is to
be mounted separate from the power unit. The power unit assembly or control box is to be mounted in one of four
directions. The clear cover of the control box should point to the front, rear, left (driver) side or right (passenger) side of the
vehicle. HWH refers to the front of the vehicle as "North", no matter which way the vehicle is pointed. The rear is "South",
the left side is "West" and the right side is "East". The sensing unit board has 4 programming jumpers; JP1-JP2-JP3-JP4.
Jumpers 1 and 2 are for the direction of the control box; jumpers 3 and 4 are for the suspension type. Each set of pins
has a small jumper attached to one of the pins. Use the jumpers to connect the pin sets as necessary.
PLEXIGLAS (clear cover)
Level Sensing
Unit Adjusting
Hardware
Control Box
Sensing
Unit
Figure 10
Programming
Jumpers
JP4
JP3
JP2
JP1
SHIPPED
POSITION
MOVED
POSITION
MP24.9735
17JUN09
SECTION II
625/625S SERIES LEVELING SYSTEMS
COMPONENT INSTALLATION
The clear control box cover must be removed to program the sensing unit. Program the sensing unit as follows:
Direction:
Glass cover pointed to the "North" - move JP2 only.
Glass cover pointed to the "South" - move JP1 and JP2.
Glass cover pointed to the "East" - move neither jumper.
Glass cover pointed to the "West" - move JP1 only.
Suspension Type:
Spring suspension - Do Not move JP3 or JP4.
Air suspension - Move JP3 only.
For a detailed explanation and diagrams for jumper placement see "Jumper Placement For Electronic Sensing Units",
MP44.1600 AND MP44.1601 located in SECTION IV of this manual.
When replacing the clear glass after programming the sensing unit, it is important that the rubber glass retaining
gasket is properly seated completely around the glass cover. This will help keep moisture out of the control box.
The power unit/control assembly (with or without the control box) must be mounted solidly and supported at both ends of the
mounting pan or bracket. It is also advisable to attach a brace from the top of the control box bracket to a solid frame member
or support. This brace is not necessary if the box is mounted remote from the power unit. The level sensing unit is mounted in
the control box and excess shaking or vibrations can interfere with the performance of the level sensing unit. Mounting the
power unit in a compartment is acceptable but the floor of the compartment must be solid with adequate supports under the
floor. Floor support should be added if the support supplied by the compartment floor is questionable. The class A style
power unit can be mounted with the pump mounting bolts or bolted through the pump tray. Either way, both ends of the
assembly must be solidly supported. If the pump mounting bolts are not used to secure the power unit assembly, make
sure they are properly tightened before completing the installation. The class C style power unit assembly mounting
bracket has mounting holes at the center of the assembly and at the end of the assembly. Both areas of the mounting bracket
should be solidly supported and bolted.
CLASS C STYLE UNIT
CLASS A STYLE UNIT
Attach Brace Here
Attach Brace Here
Pump Housing
Ground Stud
Pump Mounting Bolt
Support and Mounting Area
Support and Mounting Area
Pump Mounting Bolt
Support and Mounting Area
Figure 11
Proper grounding of the power unit assembly is critical. All grounding of the system including the pump motor, solenoid
valves and control box is accomplished through the pump housing. The pump housing is the square block between the pump
motor and fluid reservoir. The mounting bolts for the power unit go into the pump housing. There is also a ground stud that
screws into the pump housing. If the class A style power unit assembly is secured to a solid frame member with the pump
mounting bolts, that will probably supply an adequate ground for the system. If the power unit is secured through the pump
tray or if a class C style power unit assembly is being installed, a No. 2 ground cable or cable that is an equivalent size to the
main battery cable for the master relay, should be used to ground the power unit assembly to a main frame rail. The ground
cable can be attached to the ground stud screwed into the pump housing. A ground cable should always be applied to
the power unit assembly when the assembly is mounted in a compartment, even if the compartment is of a metal
construction. Adding the ground cable to assure a good system ground is a good idea in any installation.
IMPORTANT: No more than four ring terminals are allowed on one grounding stud or bolt. If necessary, the pump
mounting bolt can be used to attach the ground cable to the assembly. Always protect these connections from
corrosion with some type of sealant such as Red Air Dry Enamel (RANVAR), number B6-665, made by the P.D.
George Company. Refer to MI95.54 Information Bulletin which can be obtained in the Information Bulletin section
or from the HWH web site.
MP24.9736
17JUN09
SECTION II
625/625S SERIES LEVELING SYSTEMS
COMPONENT INSTALLATION
5.) TOUCH PANEL INSTALLATION
The touch panel can be mounted anywhere inside the vehicle but in the drivers area may be the most desirable when possible.
The mounting location of the touch panel should be discussed with the vehicle owner. Remember to take into account the
length of the touch panel cable when determining a mounting location for the touch panel. A spacer box is available to surface
mount the touch panel on a flat surface. The touch panel may also be flush mounted on most flat surfaces. A template is
available in the diagram section of this manual to mark the cutout for a flush mount application. Do not flush mount the panel
on any surface that is not flat. Tightening the panel down to a curved surface will damage the panel. An angled bezel plate is
available to mount the touch panel to a slightly curved surface.
It is suggested to not cut through the floor to mount the touch panel. If the panel is to be mounted on the floor, use the spacer
box to house the touch panel. When mounting the touch panel on the floor, locate the panel in an area that will protect it from
being stepped on. Seal any holes to the outside of the vehicle to protect the touch panel from dirt and water.
Before drilling or cutting holes in any surface, check for obstructions such as wires or hoses behind the surface.
Protect wires or other equipment from damage when cutting or drilling. Several inches of clearance should be allowed
behind the touch panel mounting surface. The back of the touch panel must not contact any metal object or surface.
Make sure the touch panel cable is securely plugged in before installing the touch panel. Do not over tighten the four touch
panel screws. Over tightening the screws will damage the touch panel.
6.) HYDRAULIC HOSE ROUTING AND CONNECTIONS
General Information: Improper hose routing or tightening of the hose ends can cause improper system operation and
harm the integrity of the hydraulic connections. Dirt and other contamination are huge contributors to system malfunction.
Keep hose ends plugged and hydraulic fittings capped until you are ready to attach the hose end to the component
fitting. If you are swaging your own hose, plug or seal the hose ends before routing the hose. Hoses supplied by HWH
Corporation have a part number tag near each hose end. This can be used to check that a hose connects the correct jack
and manifold fitting. If you swag your own hoses or have hoses of the same length (they will have the same part number),
it is suggested to mark the hose to ease making proper connections at the manifold. Colored tape or wire ties make good
permanent markers. Follow the hydraulic line connection diagram in this manual. Improper hose connections will cause
improper system operation.
The following rules are for proper hose routing:
1.) Do not pull hoses taut. Leave a small amount of slack when routing a hose. BUT do not leave so much slack a hose can
dangle and possibly be snagged while the vehicle is moving. Allow for jack movement when necessary. Straight-acting jacks
with pivot brackets can move several inches when they pivot. Pulling a hose taut with the jack at the normal retracted position
can cause hose or fitting damage when the jack pivots. Kick-down jacks must be free to pivot from the horizontal position to 45
degrees past the vertical position and back. Make sure hoses are routed properly and not so tight as to interfere with the
swinging motion or moving parts of the jack. For proper hose routing and connections for kick-down jacks, refer to the
"Hose Routing for Kick-down Jacks" page in this section.
2.) When possible, avoid sharp bends, loops or coiling hose. If making a loop or coiling excess hose is necessary, make
as big of loops or coils as possible. Fasten the loops or coils securely so they cannot dangle or rub. Swaging equipment is
available to custom fit hoses but approved HWH procedures must be followed when swaging hose. Crimping of hose ends
is not allowed. Contact HWH Corporation or refer to ML24976 under "Information Bulletins" on the HWH web site for hose
swaging information.
3.) Avoid twisting the hose. Twisting a hose can put a strain on the fitting connection. Use a backup wrench when necessary
to avoid twisting the hose when tightening the hose end.
4.) Do not allow the hoses to rub. Make sure hoses will not come in contact with moving parts such as suspension or engine
components. Use an adequate number of hose clamps, wire ties, etc. to prevent hoses from moving or drooping. Avoid sharp
edges when routing hoses. Dull the edge if possible and protect the hose with hose guard such as split loom.
5.) Stay away from heat sources. The general rule of thumb is to have "no direct line of sight between a hose and
exhaust or heat component." Use properly installed heat shields when necessary. Areas with a constant ambient
temperature of 180 degrees Fahrenheit, such as the engine compartment or close to the radiator, should be avoided.
Be cautious of enclosed compartments that may be too warm due to the proximity of an exhaust, turbo charger or engine
cooling component.
6.) Never fasten the hydraulic hoses to any fuel, brake or propane line.
Tightening of hose ends. When tightening a new hose end, make the hose end snug (finger tight) on the fitting, then
tighten the hose end 1/3 turn (2 flats). If tightening an existing hose end that has been tightened once, make the hose
end snug (finger tight) on the fitting, then tighten the hose end 1/4 turn (1 to 1-1/2 flats).
MP24.9737
09JUL09
HOSE ROUTING FOR KICK-DOWN JACKS
AND
JACK PRESSURE SWITCH INSTALLATION
KICK DOWN JACKS:
6000# KICK DOWN JACK- A short hose is attached to the
jack at the factory. The hose is clamped to the pivot bracket.
It can be moved to the opposite side of the jack if necessary
to avoid heat sources or other obstacles.
PRESSURE
SWITCH
ELBOW
PRESSURE
SWITCH
FIGURE 14
ELBOW
STRAIGHT ACTING JACKS :
FIGURE 12
9000# KICK DOWN JACK - When connecting the hose to the
jack, the hose should go in the upper left-hand corner, over
the pivot area and down the front of the jack. After connecting the hose to the fitting, the hose should be clamped with
a 1/4" bolt to the left side of the pivot bracket. Be sure the
hose is snug against the jack in the retracted (horizontal)
position.
ELBOW
PRESSURE
SWITCH
FIGURE 15
ROLLER
BEARING
ACTUATOR
TUBE
PRESSURE
SWITCH
SPECIAL
FITTING
FIGURE 13
16000# KICK DOWN JACK- Route the hose around the left
pivot, then across the back side of the cylinder and connect
to the actuator fitting. Attach the hose to the pivot bracket
using a hose clamp. There should be no slack in the hose.
PRESSURE SWITCHES : All automatic, computerized
systems require a pressure switch on each jack. In most cases
the pressure switch will need to be installed on the jack. It may
be easier to install the switch before mounting the jack. Refer
to FIGURES 12,13,14 & 15 for proper pressure switch
locations.
On the 6000# and 16000# kick down jacks and straight acting
jacks there is a plug that needs to be removed. Then install
the elbow and pressure switch as shown. Be sure to use
Teflon tape on all pipe threads.
On 9000# kick down jacks, remove the actuator line. Then remove
the existing elbow. Install the special fitting and pressure switch
as shown. Then reinstall the actuator tube. Be sure to use Teflon
tape on all pipe threads.
MP24.9738
17JUN09
SECTION II
625/625S SERIES LEVELING SYSTEMS
COMPONENT INSTALLATION
7.) HARNESS OR WIRE ROUTING AND CONNECTIONS
General Information: Refer to the wiring diagrams in this manual for connection information. Wiring harnesses supplied
with aftermarket kits are usually adequate for most installations. O.E.M. installers should work directly with HWH Corporation
to obtain specific harness lengths that are needed. All installation connections are a plug in type connection except the main
battery cable to the master relay and the connection to ignition power for the control box, the master warning light and the
warning buzzer.
We do not suggest altering harness lengths. The touch panel harness must never be altered for any reason. If a different
length touch panel harness is needed, contact HWH Corporation. If you choose to alter the length of other HWH harnesses,
all connections should be soldered and then protected with a glue filled shrink tube. It is important to maintain correct wire size
with insulation rated for 125 deg. Celsius (257 deg. F). If adding length to a harness, a larger gauge wire may be needed to
maintain proper current carrying capabilities. Do not eliminate harness and equipment plugs for solenoid valves, warning
switches, pressure switches or other HWH equipment. If altering a harness length, don’t cut all the wires at once. Working
on one wire at a time will eliminate the possibility of reconnecting wires incorrectly. All connectors are labeled with numbers or
letters for wire position. Wires are labeled with numbers to indicate wire function and position. Refer to the appropriate wiring
diagrams in this manual for correct wire positions in connectors when altering a harness. Maintaining correct wire positions
in all plugs or connectors is essential to the proper operation of the leveling system.
The following rules are for proper harness or wire routing:
1.) Do not pull harness or wires taut. Leave a small amount of slack when routing wiring. BUT do not leave so
much slack wiring can dangle and possibly be snagged while the vehicle is moving. Allow for jack movement when necessary.
Straight-acting jacks with pivot brackets can move several inches when they pivot. Pulling wires taut with the jack at the
normal retracted position can cause wire or connection damage when the jack pivots. Kick-down jacks must be free to pivot
from the horizontal position to 45 degrees past the vertical position and back. Make sure wires are routed properly and not so
tight as to interfere with the swinging motion or moving parts of the jack.
2.) Do not allow the harness or wires to rub. Make sure wiring will not come in contact with moving parts such as suspension
or engine components. Use an adequate number of wire ties to prevent harnesses or wires from moving or drooping. Avoid
sharp edges when routing wiring. Dull the edge if possible and protect wiring with a guard such as split loom.
3.) Stay away from heat sources. The general rule of thumb is to have "no direct line of sight between wiring and
exhaust or heat component." Use properly installed heat shields when necessary.
4.) Never fasten harnesses or wiring to any fuel, brake or propane lines.
Fuse, battery cable and wire information.
IT IS THE INSTALLERS RESPONSIBILITY TO DETERMINE FUSING REQUIREMENTS WHEN FIELD CONNECTIONS OF
WIRES OR CABLES ARE NEEDED. FOR SPECIFIC FUSING OR WIRE STANDARDS AND GUIDELINES REFER TO THE
MOST RECENT EDITION OF "ANSI/RVIA - STANDARD FOR LOW VOLTAGE SYSTEMS IN CONVERSION AND
RECREATIONAL VEHICLES". CONTACT RVIA (RECREATION VEHICLE INDUSTRY ASSOCIATION), FOR
ASSISTANCE OR THE MOST RECENT EDITION OF THIS PUBLICATION.
Most of the power outputs for the leveling system equipment, including the touch panel, are fused at the control box. The 6120
wire in the touch panel harness is Accessory/Ignition power for the control box. This is a field connection for the installer. The
6120 wire should go to the Accessory side of the ignition switch. HWH does not supply fusing for this wire. If a fuse is
installed for this wire, a 15 amp fuse (max.) should be used. When a master warning light and buzzer are used, a fused
pigtail is supplied by HWH. This pigtail has a diode and should not be altered. If replacing a fuse, never exceed the fuse
size stated on the circuit board or fuse holder.
HWH has several different size pump motors, a 3 inch dia., a 3.7 inch dia. and a 4.5 inch dia. motor. When the power unit has
a 3 or 3.7 inch motor, a minimum number 2 gauge battery cable should be used to connect the power supply to the pump
motor relays. A 150 amp fuse or circuit breaker should be used if circuit protection is required. Most aftermarket systems
utilize the 3 or 3.7 inch motor, and a 5 foot number 2 gauge battery cable is usually supplied with these power units. A longer
cable may be used, but depending on the length of cable needed, the gauge size of the cable may need to be increased to
limit voltage drop. If a 4.5 inch dia. motor is used, the battery cable size should be increased to a minimum number 1 gauge
cable with a 200 amp fuse or circuit breaker used when circuit protection is required.
It is the installer’s responsibility to determine the necessary wire gauge size needed to maintain a minimum voltage
drop when the length of the cable is increased. When it is necessary to increase the wire gauge size and circuit
protection is required, the fuse or circuit breaker size should not be increased.
MP24.9739
17JUN09
SECTION II
625/625S SERIES LEVELING SYSTEMS
COMPONENT INSTALLATION
8.) PARK BRAKE/JACK INHIBIT CIRCUIT
IMPORTANT: The park brake circuit inhibits the system from extending the jacks while the vehicle is moving. It is
important that the park brake circuit is installed as explained. It is also important that the correct function of the park
brake circuit is checked before the installation is completed.
The control box is looking for a ground signal on the #9000 park brake wire. Although most applications will have a ground
signal from the park brake switch for the dash park brake light, it is not impossible to have a + voltage signal. We will explain
an installation method that will work with a + voltage park brake signal.
Normal installation for a ground park brake signal. The park brake wire is a black wire labeled with the number 9000. This
wire is in the touch panel harness. The end of the wire has two butt connectors and shrink tube. There is also a diode assembly
at the end of the wire. Do not eliminate the diode assembly. The butt connector assembly splices into the wire between the
park brake switch and the dash park brake light. See the figure below. If necessary, contact the chassis or vehicle manufacturer
for information about the correct wire to spice the HWH park brake wire into. After cutting the park brake wire, use the butt
connectors to connect the diode assembly to the existing park brake wire. Cut the wire ties and use the shrink tube to seal the
butt connector connections.
BLACK 4000 WIRE
TO CONTROL BOX
TO PARK/BRAKE
LIGHT
TO PARK
BRAKE LIGHT
PARK
BRAKE
SWITCH
DIODE
ARRANGEMENT
FROM PARK
BRAKE SWITCH
FIGURE 16
Installation for a + voltage park brake signal. If the vehicle park brake signal is a + voltage, it is still important that the park
brake wire is installed in such a way that it will inhibit the leveling system from being able to extend the jacks while the vehicle
is moving. The diagram below shows how to use a Bosch relay to switch a ground for the HWH park brake wire using the
"ON" or "RUN" side of the vehicle’s ignition switch. For this installation, the diode assembly can be eliminated. Connect the
HWH #9000 park brake wire to terminal 87a (normally closed contact). Install a ground wire on terminals 30 and 85. Install a
wire from the "ON" side of the vehicle ignition switch to terminal 86 of the relay. When the ignition is on, there should be no
ground on the HWH #9000 park brake wire. With the ignition off, there should be a ground on the #9000 wire. The HWH
#6120 wire in the touch panel harness should be connected to the "ACC" side of the ignition switch. If this arrangement will
not work for a particular vehicle, HWH should be contacted to help make sure the HWH park brake circuit is installed properly.
IGNITION
"ON"
POWER
RELAY
87
86
9000 WIRE
87a
30 85
DIODE ARRANGEMENT
REMOVED
GROUND
FIGURE 17
TOUCH PANEL
HARNESS
MP24.973A
17JUN09
SECTION II
625/625S SERIES LEVELING SYSTEMS
COMPONENT INSTALLATION
9.) MASTER WARNING LIGHT/BUZZER INSTALLATION
A MASTER JACKS DOWN WARNING LIGHT SHOULD BE USED WITH ALL SYSTEMS. A BUZZER MUST BE USED
WITH SYSTEMS USING STRAIGHT-ACTING JACKS. The master warning light and buzzer will warn the driver that one or
more jacks are extended slightly (straight-acting jacks) or in the vertical position (kick-down jacks) with the ignition on. If only
a master warning light is used, the master warning light will work with the ignition in the "ON" or "ACC" position. The master
warning light should be mounted in the dash in a location highly visible to the driver. If a buzzer is required or used, the
buzzer will be mounted behind the dash, close to the master warning light.
If kick-down jacks are used, the touch panel harness will have two wires for the master warning light. A #6121 wire that is
+ voltage supply and a #7699 wire that is switched ground control. Do not supply power to the HWH control box until the
master warning light installation is complete. There will be +12 voltage on the #6121 wire anytime the ignition is in the "ON"
or "ACC" position.
Warning light installation (light only). Drill a 1/2 inch hole in the dash for the master warning light. Be careful to protect
wires or equipment behind the dash where the hole is being drilled. Apply the jacks down legend to the master warning
light. Use the fast on connectors supplied to attach the #7699 control wire and the #6121 voltage supply wire to the warning
light. Remove the protective film from the legend and push the warning light into the ½ inch hole.
If straight-acting jacks are used, a pigtail arrangement is supplied by HWH that enables the installer to supply power to the
warning light and buzzer from the "ON" side of the ignition switch and supply power to the control box from the "ACC" side of
the ignition switch. This way the jacks can be extended without the buzzer sounding unless the ignition is on. The pigtail has a
fuse and a diode arrangement and should not be altered. (Any of the pigtail wires can be lengthened as long as the fuse/diode
arrangement is not altered.)
Warning light/buzzer installation. Drill a 1/2 inch hole in the dash for the master warning light. Be careful to protect wires
or equipment behind the dash where the hole is being drilled. Apply the jacks down legend to the master warning light.
Make sure the ignition switch remains off until the master warning light/buzzer installation is complete. Connect the
fused pigtail to the "ON" side of the ignition switch. If supplied separately, connect the 7699 pigtail to the #7699 wire from the
touch panel harness. Attach the wires with fast on connectors to the warning light. Remove the protective film from the legend
and push the warning light into the ½ inch hole. Attach the wires with a ring terminal connector to the buzzer. Note that the
buzzer is marked with a + voltage and ground side. It is best to make a bracket for the buzzer or to wire tie the buzzer so it
is not dangling from the wires.
SEE THE MASTER LIGHT/BUZZER CONNECTION DIAGRAM IN SECTION IV OF
THIS MANUAL FOR A DETAILED VIEW OF BOTH STYLES OF INSTALLATION.
10.) FLUIDS
It is recommended to use HWH Specialty Hydraulic oil in HWH leveling systems. If not available, a good multipurpose or
Dexron automatic transmission fluid can be used. DO NOT USE brake fluid or hydraulic jack oils. These fluids can damage
seals. Fill the fluid reservoir tank to within 1 inch of the top of the tank. The fluid level will have to be topped off after running
the system a few times.
11.) INSTALLATION CHECK LIST
1.) CHECK ALL MOUNTING BOLTS AND BRACKETS FOR TIGHTNESS.
2.) CHECK THAT ALL HOSES ARE SECURELY CLAMPED OR TIE WRAPPED.
3.) CHECK THAT ALL WIRES ARE SECURELY CLAMPED OR TIE WRAPPED.
4.) CHECK THE OIL LEVEL BEFORE OPERATING THE SYSTEM.
5.) CHECK THE HYDRAULIC CIRCUIT.
a. Hoses are connected to corresponding valves and jacks.
b. All fittings and hose ends are properly tightened.
6.) CHECK THE WIRING CIRCUIT.
a. All connectors going to the right component.
b. All cables and ground wires are securely fastened.
c. All open connections protected from moisture and dirt.
MP24.973B
09JUL09
SECTION III
625/625S SERIES LEVELING SYSTEMS
SYSTEM START-UP AND ADJUSTMENTS
At any time the system will not function, refer to the 625 or 625s
repair manual in the service manual section of the HWH website.
1.) PARK BRAKE CHECK
The park brake circuit must function properly for the leveling system to function properly. The test is different between the 625
system and the 625S single step system. CHOCK THE WHEELS DURING THIS TEST SO THE VEHICLE CAN NOT ROLL
WHEN THE PARK BRAKE IS RELEASED.
625 system park brake test. Turn the ignition switch to the "ACC" position. Make sure the park brake is set. Push the "I" /
"HYD" button. The on light above the button should come on. The "NOT IN PARK / BRAKE" light should not be on. Push on
the foot brake so the vehicle can’t roll, then release the park brake. The "NOT IN PARK / BRAKE" light should come on. With
straight-acting jacks, push any manual UP ARROW. With kick-down jacks, push the "I" / "HYD" button a second time. With
either system, the pump should not run. If the pump runs with the "NOT IN PARK / BRAKE" light on, or if the "NOT IN PARK /
BRAKE" light will not come on with the park brake released, refer to the 625 repair manual.
625S system park brake test. Turn the ignition switch to the "ACC" position. Make sure the park brake is set. Push any
manual UP ARROW, the pump should run. Release the UP ARROW. Push on the foot brake and release the park brake.
Again, push any UP ARROW. The "NOT IN PARK BRAKE" light should come on while pushing the UP ARROW and the
pump should not run. If the pump runs or the "NOT IN PARK / BRAKE" light will not come on with the park brake released,
refer to the 625S repair manual.
2.) HYDRAULIC START-UP
Kick-down jacks. Make sure the ignition is in the "ACC" position and the park brake is set. Push the "I" / "HYD" button one
time. Make sure the ON light is lit. Push the "I"/ "HYD" button a second time. The pump should run. The jacks should try to
swing vertical, starting with the left front jack, then the right front jack, then the right rear jack and finally the left rear jack. The
pump should run no more than 15 to 20 seconds then shut off. The first time the system is run, the jacks may or may not
swing vertical. This is due to the priming of the pump and filling the hydraulic lines. Push the "OFF"/ "EMERGENCY STOP"
button then the "STORE" button. Make sure all jacks have retracted. Repeat the procedure until all four jacks have swung
vertical. After 2 or 3 times at the most, all the jacks should be swinging vertical. The individual red warning lights on the touch
panel should be on when the appropriate jack is in the vertical position. The master warning light should be on if any jack is in
the vertical position. With the jacks fully retracted to the horizontal position, the touch panel warning lights and the master
warning light should be out. Check the reservoir fluid level and fill as needed.
If all of the jacks will not swing vertical, check the hydraulic circuit and the touch panel warning lights. Make sure the
warning lights are off when the jacks are in the horizontal position. With the touch panel on, pull each jack to the vertical
position and make sure the appropriate touch panel warning light comes on. The warning lights must work correctly for
the jacks to swing to the vertical position and for the system to function properly. Make sure the hoses are connected to
the correct fittings.
Chock the tires so the vehicle cannot roll. Push the "I"/ "HYD" button twice to put the jacks in the vertical position. Push
the front UP ARROW to extend the front jacks to the ground and lift the vehicle 1 or 2 inches. Push the rear UP ARROW to
extend the rear jacks to the ground and lift the vehicle 1 or 2 inches. Do not raise the rear of the vehicle high enough to
lift the rear tires off the ground. The vehicle will roll forward or backwards off the jacks if the rear tires leave the
ground. Push the "OFF" / "Emergency Stop" button. Push the "STORE" button. When the jacks have fully retracted
repeat the procedure at least once more. With the jacks retracted to the horizontal position, check the fluid level and
fill as necessary. The system should now be ready to make adjustments and test the automatic function of the system.
Straight-acting jacks; 625 leveling system. Make sure the ignition is in the "ACC" position and the park brake is set. Push
the "I" / "HYD" button one time. Make sure the ON light is lit. Push and release the front UP ARROW at 5 second intervals
until both front jacks reach the ground and lift the vehicle 1 or 2 inches. When the jacks have extended approximately 1 inch,
the front red warning lights on the touch panel should be on. The master warning light should be on. Push and hold the front
DOWN ARROW until both front jacks have fully retracted. The touch panel warning lights should go out. The master warning
light should be out. Check the reservoir fluid level and fill as necessary. Repeat this with the rear up arrow and check the fluid
level and fill as necessary. Repeat the complete procedure at least once more. Now extend the front jacks then with the front
jacks extended, extend the rear jacks. Push the "Store" button and check that all the jacks will fully retract. Check and fill the
reservoir as necessary. The system should now be ready to make adjustments and test the automatic function of the system.
MP24.9740
17JUN09
SECTION III
625/625S SERIES LEVELING SYSTEMS
SYSTEM START-UP AND ADJUSTMENTS
Straight-acting jacks; 625S single step leveling system. Make sure the ignition is in the "ACC" position and the park brake
is set. Push and release the front UP ARROW at 5 second intervals until both front jacks reach the ground and lift the vehicle 1
or 2 inches. When the jacks have extended approximately 1 inch, the front red warning lights on the touch panel should be on.
The master warning light should be on. Push and hold the front DOWN ARROW until both front jacks have fully retracted. The
touch panel warning lights should go out. The master warning light should be out. Check the reservoir fluid level and fill as
necessary. Repeat this with the rear up arrow and check the fluid level and fill as necessary. Repeat the complete procedure
at least once more. Now extend the front jacks then with the front jacks extended, extend the rear jacks. Push the "Store"
button and check that all the jacks will fully retract. Check and fill the reservoir as necessary. The system should now be
ready to make adjustments and test the automatic function of the system.
3.) PLUMBING AND WARNING LIGHT/BUZZER CHECK
With kick-down jacks, when all of the jacks will swing to the vertical position and the four touch panel jack down warning
lights are working, it can be assumed the plumbing and wiring is correct. Check that the master warning light works with any
one jack in the vertical position. The ignition switch should be in the "ACC" position. If a warning buzzer is also used, with any
one jack in the vertical position, the master warning light and buzzer should not work if the ignition is in the "ACC" position but
should work if the ignition is in the "ON" position.
With straight-acting jacks, use each set of UP and DOWN ARROW buttons. Along with checking the touch panel warning
lights, visually check the jacks When using each set of UP and DOWN ARROWS. Make sure that only the pair of jacks for the
button that is being pushed is extending and retracting. It is important to use all four sets of buttons for this test, not just the
front and rear buttons. With the ignition in the "ON" position and any one jack extended about 1 or 2 inches, the master
warning light and buzzer should work.
4.) KICK-DOWN JACK ADJUSTMENTS
Each jack should be checked to be sure that it is vertical when it swings down. To do this, kick the jacks vertical then extend
the jacks until it they are close to but not touching the ground. Each jack must also be adjusted so it can extend in the
horizontal position without interfering with any suspension components, tanks, etc.
The following figures show the horizontal and vertical adjustment points for the 6000#, 9000#, 16000# and 24000# jacks.
6000# JACK
9000# JACK
UPPER
ACTUATOR
NUT
LOWER
ACTUATOR
NUT
16000# JACK
ACTUATOR
SET SCREW
VERTICAL
ADJUSTMENT
CAP
HORIZONTAL
SET SCREW
HORIZONTAL
STOP
VERTICAL
ADJUSTMENT NUT
Figure 18
Figure 19
Figure 20
1. 6000# JACKS: Always make the vertical adjustment first. If the vertical adjustment is changed at any time, be sure to
check the horizontal adjustment. The vertical adjustment is changed by adjusting the lock nuts on the actuator cable. If the
jack stopped short of vertical, tighten the lock nuts. If the jack goes past vertical, back the lock nuts off. Be sure to adjust each
nut of the actuator cable the same number of turns. Hold the actuator cable with a vice grip while turning the vertical
adjustment nuts so the cable can not twist.
The horizontal stop is adjusted by turning the set screws located just inside the cable lock nuts. Loosen the jam nuts before
turning the set screws. Tighten the set screws to move the jack down more. Loosen the set screws to move the jack up more.
Make sure to turn each set screw an equal amount. The jack can be adjusted down to provide clearance for objects which
may interfere with the operation of the jacks. The horizontal stop must be adjusted to provide clearance in case the jack
extends in the horizontal position. The jack must be able to fully extend in the horizontal position without interfering with
suspension components, tanks, etc.
MP24.9741
17JUN09
SECTION III
625/625S SERIES LEVELING SYSTEMS
SYSTEM START-UP AND ADJUSTMENTS
2. 9000# JACKS: If the jack stopped short of being vertical it can be adjusted by loosening the lower actuator nut and
tightening the upper actuator nut. If the jack goes past vertical, loosen the upper actuator nut and tighten the lower
actuator nut.
The horizontal stop can be adjusted up or down in the slot to provide clearance for objects which may interfere with the
operation of the jack. The stop must be adjusted so that the jack can be fully extended in the horizontal position without
interfering with suspension components or tank, etc.
3. 16000# AND 24000# JACKS: If the jack stopped short of being vertical, loosen the set screw at the bottom of the
actuator and turn the adjusting cap clockwise. If the jack goes beyond vertical, loosen the set screw and turn the
adjusting cap counterclockwise. After each counterclockwise adjustment, the weight of the coach must be applied to
the jack to make the adjustment effective. Do NOT adjust the cap more than one turn without cycling the jack.
The horizontal stop for the 16000# and 24000# jacks is a urethane bushing the jack hits when it swings to the horizontal
position. If the jack needs to be adjusted down, add washers under the urethane stop. Use a longer bolt if necessary.
5.) LEVEL SENSING UNIT ADJUSTMENT AND CHECK
The level sensing unit adjustment instructions are on page MP44.1610 in SECTION IV of this manual. The four yellow lights
on the touch panel are the level indicator lights. If a yellow light is on, that side or end is low. When all four yellow indicator
lights are off, the vehicle is level within the tolerance of the level sensing unit. Follow all of the instructions, including the
"tweaking" instructions, to properly adjust the level sensing unit. Make sure to check the operation of the level sensing
unit in several different out of level positions.
WHEN THE SYSTEM HAS KICK-DOWN JACKS, CHOCK THE FRONT WHEELS OF THE VEHICLE FOR THE
FOLLOWING TEST. IF THE REAR WHEELS OF THE VEHICLE ARE LIFTED OFF THE GROUND THE VEHICLE
CAN ROLL FORWARD OR BACKWARD OFF THE JACKS.
After the level sensing unit is adjusted, make sure the yellow level indicator lights are functioning properly. Use the manual UP
and DOWN ARROWS to raise one side or end of the vehicle at a time. Make sure the correct level indicator light comes on.
Example: Use the front UP ARROW to lift the front of the vehicle until the rear yellow light comes on. If the yellow level lights
are not indicating the correct low side or end, check the touch panel lights against the yellow LEDs on the level sensing unit
board. If the lights on the sensing unit board do not match the touch panel level indicator lights, the sensing unit is not
programmed properly. Refer to MP44.1600, "JUMPER PLACEMENT FOR THE ELECTRONIC SENSING UNIT" for
information to correctly move jumpers to program the sensing unit.
IMPORTANT: Discuss the tolerance of the sensing unit with the vehicle owner. It is important that the
owner understands the vehicle may not be perfectly level after every level procedure. Make sure the
owner understands how to manually operate the system to make minor level adjustments if desired.
6.) JACK PRESSURE SWITCH ADJUSTMENT AND STABILIZING CHECK
The jack pressure switches only affect the leveling system when it is operated in the automatic mode. The jack pressure
switches signal the system processor when the jacks are on the ground for stabilizing after an automatic leveling procedure.
The jack pressure switches need to be adjusted so the jacks lift the vehicle ½ to 1 inch when stabilizing.
Stabilizing Check.
a.) Move the vehicle to a level location so no yellow level indicator lights are on.
b.) Swing the jacks to the vertical position and/or manually dump the air from the air bags if so equipped.
c.) Manually extend the jacks until they touch the ground but do not lift.
d.) Mark the jack rod at the bottom of the jack barrel with a felt pen.
e.) Start the automatic leveling process.
f.) Check each jack to see how far it lifted the vehicle in the stabilize mode.
g.) Adjust switches and repeat process as necessary.
Pressure Switch Adjustment.
The jack pressure switches have a protective rubber boot at the top of the switch. Remove the boot, being careful to not put
stress on the wire protruding through the boot. Loosen the jam nut. If the jack needs to lift more, turn the threaded pressure
adjust body clockwise. If the jack lifts to far, turn the pressure adjust body counterclockwise. Only make about ¼ turn max.
before testing. When the adjustment is complete, make sure to return the rubber boot to its original position. There is a view
of the jack pressure switch on the next page.
MP24.9742
17JUN09
SECTION III
625/625S SERIES LEVELING SYSTEMS
SYSTEM START-UP AND ADJUSTMENTS
7.) FINAL CHECK LIST
1.) With all jacks fully retracted, check the oil level. The oil
level should be within 1 inch of the top of the reservoir.
JACK PRESSURE SWITCH
FOR 610 SYSTEMS
2.) Check all hose connections for leaks and check hose
routings for heat or rubbing issues. Make sure all hoses
are fastened or supported properly.
3.) Check all wiring connections for tightness and make
sure all exposed connections are protected against
moisture and corrosion. Check harness routings for heat
or rubbing issues Make sure harnesses and wires are
fastened or supported properly.
4.) Check all mounting bolts and brackets for the jacks,
power unit and/or control box are tight.
5.) Check that all indicator lights including the master
warning light and buzzer (if so equipped) are functioning
properly.
6.) Run the system with the owner to explain the correct
operation and function of the leveling system in both the
manual and automatic mode.
RUBBER BOOT
PRESSURE
ADJUST
BODY
LOCKING NUT
Figure 21
7.) Make sure the owner receives the owner’s manual.
Review the manual, especially cautions, with the owner.
SECTION IV: INSTRUCTION SHEETS - PLUMBING DIAGRAMS - WIRING DIAGRAMS
THE FOLLOWING PAGES ARE PLUMBING DIAGRAMS FOR THE HYDRAULIC LINES
AND THE HWH AIR DUMP SYSTEM, ELECTRICAL CONNECTION DIAGRAMS
AND INSTRUCTION SHEETS FOR THE LEVEL SENSING UNIT PROGRAMMING AND ADJUSTMENT.
MP24.9743
17JUN09
SECTION IV
625/625S SERIES LEVELING SYSTEMS
JUMPER PLACEMENT FOR ELECTRONIC SENSING UNIT
IMPORTANT: 325 AND 625 ELECTRONIC SENSING UNITS USED IN AFTER MARKET INSTALLATIONS OR
REPLACEMENT SITUATIONS ARE PROGRAMMABLE. DURING INSTALLATION OF A SYSTEM OR REPLACEMENT
OF AN ELECTRONIC SENSING UNIT DO NOT ASSUME THAT THE SENSING UNIT JUMPERS ARE PRE-SET. THE
MOUNTED ORIENTATION OF THE CONTROL BOX ASSEMBLY AND THE SUSPENSION TYPE MUST BE ESTABLISHED
IN ORDER TO SET THE JUMPERS AS NEEDED TO PROGRAM THE SENSING UNIT TO THE COACH.
JP1 AND JP2 - CONTROL BOX ORIENTATION (Page 1 of 2)
MOVE JUMPERS JP1 AND JP2 ACCORDING TO THE ORIENTATION OF THE CONTROL BOX. USE THE DRAWINGS
PROVIDED TO DETERMINE WHICH APPLICATION IS FOR THE ORIENTATION OF YOUR CONTROL BOX.
FOR SHIPPING PURPOSES THE (4) JUMPERS
ARE SLID ONTO ONE SIDE OF JP1 THROUGH
JP4. MOVE ONLY THE JUMPERS NEEDED TO
DETERMINE ORIENTATION AND SUSPENSION.
LEAVING THE REMAINING JUMPERS AS THEY
ARE SHIPPED WILL NOT CAUSE PROBLEMS.
JP4
JP3
JP2
JP1
SHIPPED
POSITION
MOVED
POSITION
THE FOLLOWING DRAWINGS SHOW THE SENSING UNIT, INSIDE THE CONTROL BOX, AS VIEWED WHEN LOOKING
DOWN FROM THE TOP OF THE CONTROL BOX. REMOVE THE RUBBER RING AND PLASTIC COVER ONLY IF
NEEDED. THE RING AND COVER MUST BE REINSTALLED.
FRONT OF VEHICLE
FRONT OF VEHICLE
4321
JUMPERS
MOVE - JP1 ONLY
PLEXIGLAS
1234
PLEXIGLAS
JUMPERS
LEAVE JP1
AND JP2 AS
SHIPPED
FRONT OF VEHICLE
FRONT OF VEHICLE
1
2
3
4
4
3
2
1
JUMPERS
MOVE - JP1 AND JP2
MI15.100A
PLEXIGLAS
PLEXIGLAS
JUMPERS MOVE - JP2 ONLY
NOTE: AFTER MOVING THE JUMPERS, REMOVE AND REAPPLY +12 POWER
FOR THE CONTROL BOX. THIS WILL "RE-BOOT" THE SENSING UNIT.
MP44.1600
17JUN09
SECTION IV
625/625S SERIES LEVELING SYSTEMS
JUMPER PLACEMENT FOR ELECTRONIC SENSING UNIT
IMPORTANT: 325 AND 625 ELECTRONIC SENSING UNITS USED IN AFTER MARKET INSTALLATIONS OR
REPLACEMENT SITUATIONS ARE PROGRAMMABLE. DURING INSTALLATION OF A SYSTEM OR REPLACEMENT
OF AN ELECTRONIC SENSING UNIT DO NOT ASSUME THAT THE SENSING UNIT JUMPERS ARE PRE-SET. THE
MOUNTED ORIENTATION OF THE CONTROL BOX ASSEMBLY AND THE SUSPENSION TYPE MUST BE ESTABLISHED
IN ORDER TO SET THE JUMPERS AS NEEDED TO PROGRAM THE SENSING UNIT TO THE COACH.
JP3 AND JP4 - CONTROL SUSPENSION TYPE (Page 2 of 2)
MOVE JUMPERS JP3 AND JP4 ACCORDING TO THE TYPE OF SUSPENSION ON THE VEHICLE.
JUMPERS JP3 AND JP4 DETERMINE SUSPENSION TYPE.
SPRING - LEAVE JUMPERS JP3 AND JP4 AS SHIPPED.
NEITHER JUMPER NEEDS TO BE MOVED.
AIR - LEAVE JUMPER JP4 AS SHIPPED, MOVE JP3 ONLY.
DIAGRAM BELOW SHOWS AIR SUSPENSION SETUP.
JP4
JP3
MI15.100B
MP44.1601
17JUN09
SECTION IV
625/625S SERIES LEVELING SYSTEMS
LEVEL SENSING UNIT ADJUSTMENT AND ACCURACY TOLERANCE
SENSING UNIT ACCURACY TOLERANCE
The sensing unit has an accuracy tolerance of ± 5.4 inches front to rear and
± 1 inch side to side on a 36 foot vehicle. Typical leveling results will be better.
SENSING UNIT ADJUSTMENT
Level the vehicle by placing a bubble level in the center of
the freezer floor or upon whichever surface within the vehicle
that is to be level. Using the Leveling System and the bubble
level, ignoring the yellow LEVEL lights on the Touch Panel,
level the vehicle until the bubble is centered.
NOTE: If opposing LED’s are lit, there is a problem with
the Sensing Unit.
With the vehicle level according to the bubble level, if there
are no yellow lights lit on the Touch Panel, the sensing unit is
properly adjusted. If there are yellow LEVEL lights lit on the
Touch Panel, manual adjustments to the Sensing Unit are
needed. A Phillips screw driver or sockets w/driver or box
end wrenches of 7/8, 3/4, 1/2, 5/16 or 1/4 sizes will be needed.
If LED (C) is lit: Turn the adjustment screw CLOCKWISE
until the LED is off.
The Sensing Unit is mounted inside the Control Box. The
Control Box is mounted to the power unit/valve assembly.
There are four LED’s on the Sensing Unit, A,B,C and D. Refer
to the drawing below. The Sensing Unit is adjusted by turning
the adjustment nut to turn out LED’s B and D. The adjustment
screw will turn out LED’s A and C. If the adjustment nut has
to be turned more than 1/2 flat or the adjustment screw has to
be turned more than 3/4 turn to turn the LED out, there may
be a problem with the Sensing Unit or the mounting of the
Control Box. If two LED’s are on, it is best to make the B-D
adjustments first, then hold the adjustment nut from moving
while making the A-C adjustment.
TOP VIEW - SENSING UNIT
If LED (A) is lit: Turn the adjustment screw COUNTER
CLOCKWISE until the LED is off.
If LED (B) is lit: Turn the adjustment nut COUNTER
CLOCKWISE until the LED is off.
If LED (D) is lit: Turn the adjustment nut CLOCKWISE
until the LED is off.
IMPORTANT: When all 4 LED’s are off, move the vehicle to an
unlevel position so one or two yellow lights are on. Level the
vehicle according to the yellow LEVEL lights. Recheck the
level. If more adjustment is needed, DO NOT try to adjust the
sensing unit until the yellow level lights go out, instead just
"tweak" the sensing unit, ignoring the LED’s on the sensing unit.
Example: After the initial adjustment and releveling the
vehicle, the front is still low. This means the front yellow
level light is turning off too soon. Determine which sensing
unit light is the front light, A-B-C or D. Move the adjustment
for that light very, very, slightly in the OPPOSITE direction
that is given in the above instructions for LED’s A, B, C, and
D. This will allow the front yellow light to stay on slightly
longer to bring the front up more. Again, unlevel the vehicle
then relevel the vehicle using the yellow level lights on the
touch panel. Recheck with a level. Repeat the "tweaking"
process until the system levels the vehicle properly.
The operation of the sensing unit should be checked with
the vehicle in several different out of level positions.
A
LED’S - LOCATION
MAY BE DIFFERENT
D
SIDE VIEW - CONTROL BOX
B
C
ADJUSTMENT
NUT (5/16" OLD) - (1/2" NEW)
(OLD STYLE)
ADJUSTMENT
NUT (7/8" or 3/4")
CONTROL
BOX WALL
(OLD STYLE)
ADJUSTMENT
NUT (7/8" or 3/4")
ADJUSTMENT
SCREW (Phillips or 1/4")
ADJUSTMENT SCREW
ADJUSTMENT NUT (5/16" OLD) - (1/2" NEW)
MI15.4550
MP44.1610
17JUN09
SECTION IV - HYDRAULIC LINE CONNECTION DIAGRAM
625 SERIES LEVELING SYSTEM
(WITH 4 STRAIGHT-ACTING JACKS)
NOTE: BEFORE OPERATING ANY MANUAL VALVE RELEASE
READ AND UNDERSTAND PROCEDURE FOR MANUAL JACK
RETRACTION IN OPERATOR’S INSTRUCTIONS. THIS MANIFOLD
IS SHOWN WITH (1) LARGE VALVE WITH A VALVE RELEASE
"T"-HANDLE, (2) SMALL VALVES WITH VALVE RELEASE NUTS
AND (1) LARGE VALVE WITH A VALVE RELEASE NUT.
BREATHER
CAP
LEFT
FRONT
SMALL VALVES
WITH RELEASE
NUTS
LARGE VALVE
WITH RELEASE
NUT LOCATED
UNDER
PLASTIC PLUG
LARGE VALVE
WITH RELEASE
"T" HANDLE
RIGHT
FRONT
CHECK PUMP
PRESSURE
HERE
LR
LF
RF
NOTE: SOME
MANIFOLDS
ARE EQUIPPED
WITH VELOCITY
VALVES
3000 PSI
PRESSURE
SWITCH
SHUTTLE
VALVE
RR
50 PSI
PRESSURE
SWITCH
NOTE: 50 PSI
PRESSURE
SWITCH MAY NOT
BE USED ON ALL
625 MANIFOLDS.
PUMP/MANIFOLD
ASSEMBLY
(ROOM EXTENSION MANIFOLD NOT SHOWN)
LEFT
REAR
MP65.2802
VELOCITY VALVE
RIGHT
REAR
MP64.0000
17JUN09
SECTION IV - HYDRAULIC LINE CONNECTION DIAGRAM
625 SERIES LEVELING SYSTEM
(WITH 4 KICK-DOWN JACKS)
NOTE: BEFORE OPERATING VALVE
RELEASE NUTS, READ AND UNDERSTAND
PROCEDURE FOR MANUAL JACK RETRACTION
IN OPERATOR’S INSTRUCTIONS.
LEFT FRONT
VALVE
RELEASE
NUTS
NOTE: SOME
MANIFOLDS
ARE EQUIPPED
WITH VELOCITY
VALVES
3000 PSI
PRESSURE
SWITCH
RR
RF
LF
LR
BREATHER
CAP
RIGHT FRONT
SHUTTLE
VALVE
50 PSI
PRESSURE
SWITCH
PUMP/MANIFOLD
ASSEMBLY
VELOCITY VALVE
LEFT REAR
MP65.300A
RIGHT REAR
MP64.0002
17JUN09
SECTION IV - HYDRAULIC SCHEMATIC DIAGRAM
625 SERIES LEVELING SYSTEM
BI-AXIS LEVELING WITH STRAIGHT-ACTING JACKS
NOTE: 50 PSI PRESSURE SWITCH
MAY NOT BE USED ON ALL 625 MANIFOLDS.
RELIEF VALVE
3500 P.S.I.
M
HYDRAULIC
POWER UNIT
RETURN
ROOM EXTENSION
MANIFOLD LOCATED HERE
WHEN APPLICABLE
PRESSURE
LEVELING SYSTEM
SOLENOID MANIFOLD
ASSEMBLY
*3000 PSI
SWITCH
50 PSI
SWITCH
PRESSURE/RETURN
SHUTTLE VALVE
800 PSI TO SHIFT
CHECK
VALVE
INNER
SOL.VALVE
LR
SOL.VALVE
LF
SOL.VALVE
RF
SOL.VALVE
RR
CHECK
VALVE
OUTER
LEFT
FRONT
RIGHT
FRONT
*JACK
PRESSURE
SWITCH
JACK
CYLINDER
LEFT REAR
MP65.601C
* USED ON AUTOMATIC SYSTEMS ONLY
RIGHT REAR
MP64.0004
17JUN09
SECTION IV - HYDRAULIC SCHEMATIC DIAGRAM
625 SERIES LEVELING SYSTEM
BI-AXIS LEVELING WITH KICK-DOWN JACKS
*50 PSI SWITCH MAY NOT BE
USED ON ALL 625 MANIFOLDS
RELIEF VALVE
M
HYDRAULIC
POWER UNIT
RETURN
SOLENOID MANIFOLD
ASSEMBLY
PRESSURE
3000 PSI
SWITCH
*50 PSI
SWITCH
PRESSURE/RETURN
SHUTTLE VALVE
CHECK
VALVE
INNER
SOL.VALVE
LR
SOL.VALVE
LF
SOL.VALVE
RF
SOL.VALVE
RR
CHECK
VALVE
OUTER
RIGHT
FRONT
LEFT
FRONT
JACK
CYLINDER
LEFT REAR
MP65.603C
JACK
PRESSURE
SWITCH
RIGHT REAR
MP64.0006
17JUN09
SECTION IV
AIR LINE CONNECTION DIAGRAM
SUSPENSION
AIR BAGS
AIR DUMP SOLENOID VALVES
ARE ACTIVATED (OPENED) BY
A +12 SIGNAL.
FROM WIRE HARNESS
SEE ELECTRICAL
DIAGRAM FOR
CONNECTION
BA
BA
BA
BA
HEIGHT
CONTROL
VALVE
4 AIR DUMP SOLENOID VALVES
AND 4 HEIGHT CONTROL VALVES
ARE SHOWN.
THE AIR DUMP VALVE IS TO TEE INTO
THE LINE BETWEEN THE AIR BAG AND
THE HEIGHT CONTROL VALVE. THREE
HEIGHT CONTROL VALVES ARE THE
MOST COMMON ON AIR SUSPENSION
SYSTEMS. 2, 3 OR 4 CONTROL VALVES
MAY BE USED.
THE MAIN AIR DUMP HARNESS WILL
HAVE ONE CONNECTOR AT THE FRONT
AND ONE CONNECTOR AT THE REAR.
A "Y" ADAPTOR IS AVAILABLE WHEN
THERE ARE TWO AIR DUMP VLAVES
AT THE FRONT AND/OR REAR OF THE
VEHICLE.
USE ONLY DOT
APPROVED
FITTINGS AND
TUBING.
NEW LINE
3/8" O.D. TUBE
EXISTING
LINE
SUSPENSION
AIR BAGS
MP75.2
MP74.0000
17JUN09
SECTION IV - ELECTRICAL CONNECTION DIAGRAM
625 OR 625S SERIES LEVELING SYSTEM
SYSTEM DIAGRAM
PRESSURE
SWITCH
PRESSURE
SWITCH
LF
RF
WARNING
SWITCH
WARNING
SWITCH
B A
B A
6235
2000
1000
6235
1200
2200
CONNECT TO
12V IGNITION
MASTER
WARNING
LIGHT
TOUCH PANEL
HWH COMPUTERIZED LEVELING
R
EXCESS
SLOPE
FUSE
5AMP
EXTEND
AUTO
LEVEL
NOT IN
PARK/
BRAKE
BUZZER
AUTO
STORE
RETRACT
EMERGENCY
STOP
EXTEND
MANUAL
RETRACT
TRAVEL
MODE
CAUTION!
UNDERSTAND OPERATOR’S MANUAL BEFORE USING. BLOCK FRAME AND TIRES
SECURELY BEFORE REMOVING TIRES OR CRAWLING UNDER VEHICLE.
+
_
DIODE
6120 - TO
ACCESSORY
6111
SEE 625 SERIES LEVELING
SYSTEM - LEVELING
MANIFOLD - PUMP
AND MASTER RELAYS
6111
7699
7699
7699
CN3
12 PIN
BROWN
9000
PARK BRAKE
SWITCH
9001 - TO
PARK BRAKE
LIGHT
DIODE
TOUCH
PANEL
HARNESS
SEE 625 SERIES LEVELING
SYSTEM - LEVELING
MANIFOLD - PUMP
AND MASTER RELAYS
PRESSURE
SWITCH
WARNING
SWITCH
LR
7699
9000
CN6
12 PIN
GRAY
6800
6120
PRESSURE
SWITCH
WARNING
SWITCH
RR
B A
6235
4000
MP85.056J
CN8
8 PIN
BLACK
6230 TO HWH
GROUND
STUD
B A
4200
CN7
12 PIN
BLACK
4 PIN
GRAY
3000
6235
3200
MP84.2250
17JUN09
SECTION IV - ELECTRICAL CONNECTION DIAGRAM
625 OR 625S SERIES LEVELING SYSTEM
CONTROL BOX CONNECTION INFORMATION
CN3
12 PIN
BROWN
CN7
12 PIN
BLACK
CN8
8 PIN
BLACK
PIN 1
PIN 12
PIN 1
PIN 4
PIN 12
PIN 1
4 PIN
GRAY
PIN 1
CN6
12 PIN
GRAY
PIN 12
PIN 1
PIN 8
PIN #
WIRE
COLOR
WIRE
NUMBER
4 PIN GRAY CONNECTOR
1
6800
BLACK
6800
2
BLACK
3
6230
WHITE
4
6100
RED
12 PIN BROWN CONNECTOR - CN3
BLACK
1
8500
2
BLACK
8100
3
BLACK
8101
4
BLACK
9301
5
BLACK
1400
6
BLACK
7600
BLACK
7
7601
4400
8
BLACK
BLACK
9
3400
BLACK
2400
10
BLACK
9300
11
BLACK
12
8600
12 PIN BLACK CONNECTOR - CN7
1 THRU 6
BLACK
9000
7
8 THRU 10
11
BLACK
7699
12
8 PIN BLACK CONNECTOR - CN8
1 AND 2
RED
3
6800
WHITE
4
6230
5
6
RED
6120
GREEN
7
8
YELLOW
12 PIN GRAY CONNECTOR - CN6
1 AND 2
3
BLACK
1000
4
BLACK
2000
5
1200
BLACK
6
BLACK
2200
7
BLACK
3200
BLACK
4200
8
9
3000
BLACK
10
BLACK
4000
11
12
WHITE
6235
MP85.186E
WIRE DESCRIPTION AND FUNCTION
SWITCHED +12V BATTERY POWER FROM MASTER RELAY
SWITCHED +12V BATTERY POWER FROM MASTER RELAY
GROUND FROM HWH GROUND STUD
+12 BATTERY FROM MASTER RELAY
MASTER RELAY CONTROL - SWITCHED +12
3000 LB PRESSURE SWITCH - SWITCHED GROUND
50 LB PRESSURE SWITCH - SWITCHED GROUND
SWITCHED +12 FOR TRAVEL
SWITCHED +12 FOR LEFT FRONT SOLENOID VALVE
GROUND FOR RIGHT FRONT SOLENOID VALVE
GROUND FOR RIGHT REAR SOLENOID VALVE
SWITCHED +12 FOR LEFT REAR SOLENOID VALVE
SWITCHED +12 FOR RIGHT REAR SOLENOID VALVE
SWITCHED +12 FOR RIGHT FRONT SOLENOID VALVE
SWITCHED +12 FOR DUMP
PUMP RELAY CONTROL - SWITCHED +12
NO CONNECTION
SWITCHED GROUND FROM PARK BRAKE SWITCH
NO CONNECTION
BUZZER & MASTER WARNING LIGHT CONTROL - SWITCHED GROUND
NO CONNECTION
NO CONNECTION
SWITCHED BATTERY
GROUND
CAN SHIELD
+12 ACCESSORY / IGNITION
CAN LOW
CAN HIGH
NO CONNECTION
SWITCHED GROUND FROM LEFT FRONT WARNING SWITCH
SWITCHED GROUND FROM RIGHT FRONT WARNING SWITCH
SWITCHED GROUND FROM LEFT FRONT PRESSURE SWITCH
SWITCHED GROUND FROM RIGHT FRONT PRESSURE SWITCH
SWITCHED GROUND FROM RIGHT REAR PRESSURE SWITCH
SWITCHED GROUND FROM LEFT REAR PRESSURE SWITCH
SWITCHED GROUND FROM RIGHT REAR WARNING SWITCH
SWITCHED GROUND FROM LEFT REAR WARNING SWITCH
NO CONNECTION
SHARED GROUND FOR WARNING SWITCHES
MP84.2350
17JUN09
SECTION IV - ELECTRICAL CONNECTION DIAGRAM
625 OR 625S SERIES LEVELING SYSTEM
CONTROL BOX - LED - FUSE LOCATION AND DESCRIPTION
5
6
8
F4
19
7
F3
F2
4
CRX1
LEFT
FRONT
RIGHT
FRONT
3
F1
2
CRX2
LEFT
REAR
RIGHT
REAR
1
LED
20
LED
14
12
15
18
17
F9
FUSE
16
F8
13
F7
F6
11
TRAVEL
PUMP
RELAY
MASTER
RELAY
DUMP
PF3
21
29 30 31 32 33 34 35
22
24
25
(F11)
SENSING UNIT
PF4
F10
23
26
27
28
+12V
REAR
RIGHT SIDE
FRONT
LEFT SIDE
GROUND
OLD
BOARD
LOCATION
F12
36 37 38
(39)
9
36 37 38
NOTE: FOR DETAILED INPUT / OUTPUT INFORMATION ABOUT
PIN CONNECTIONS SEE ELECTRICAL CONNECTION
DIAGRAM - CONTROL BOX CONNECTION INFORMATION.
1-YELLOW
2-RED
3-YELLOW
4-RED
5-YELLOW
6-RED
7-YELLOW
8-RED
11-YELLOW
12-RED
13-YELLOW
14-RED
15-YELLOW
16-RED
17-YELLOW
18-RED
19-YELLOW
20-YELLOW
21-YELLOW
22-YELLOW
23-YELLOW
24-YELLOW
25-RED
26-RED
27-RED
28-RED
29-RED
30-YELLOW
31-GREEN
32-RED
33-GREEN
34-RED
35-RED
36-RED
37-RED
38-RED
(39) 9-RED
RELAY DESCRIPTION
RIGHT REAR COIL
RIGHT REAR OUTPUT
LEFT REAR COIL
LEFT REAR OUTPUT
RIGHT FRONT COIL
RIGHT FRONT OUTPUT
LEFT FRONT COIL
LEFT FRONT OUTPUT
DUMP COIL
DUMP OUTPUT
MASTER RELAY COIL
MASTER RELAY OUTPUT
PUMP COIL
PUMP OUTPUT
TRAVEL COIL
TRAVEL OUTPUT
CRX 2
CRX 1
LEFT FRONT WARN SW
RIGHT FRONT WARN SW
RIGHT REAR WARN SW
LEFT REAR WARN SW
LEFT FRONT PRESS SW
RIGHT FRONT PRESS SW
RIGHT REAR PRESS SW
LEFT REAR PRESS SW
NOT USED
NOT USED
3000 LB PRESS SW INPUT
MASTER WARN CONTROL
50 LB PRESS SW INPUT
JACK INTERRUPT
PARK BRAKE
BOARD ENABLE
ACCESSORY IN
ACCESSORY OUT FOR
MASTER WARNING
LINK LIGHT
FUSE
F1 - 15 AMP
F2 - 15 AMP
F3 - 15 AMP
F4 - 15 AMP
F6 - 5 AMP
F7 - 5 AMP
F8 - 5 AMP
F9 - 5 AMP
F10 - 10 AMP
PF4 (F11)
NOTE: A LIT YELLOW LED INDICATES THERE IS A GROUND
SIGNAL TO TURN THE CORRESPONDING RELAY ON.
A LIT RED LED INDICATES THERE IS
VOLTAGE ON IT’S CORRESPONDING OUTPUT PIN.
IF A YELLOW LED IS LIT AND THE
CORRESPONDING RED LED IS OFF, EITHER
IT’S FUSE IS BLOWN OR THE RELAY IS BAD.
IF THE YELLOW LED’S ARE WORKING BUT NO RED LED
IS COMING ON THERE MAY BE PROBLEM WITH INPUT
VOLTAGE IN THE 4-PIN CONNECTOR.
IF A YELLOW LED IS NOT LIT, THERE IS A PROBLEM WITH
THE CONTROL BOX, TOUCH PANEL OR CONNECTION CABLE.
LED’S 19 AND 20 (YELLOW) WILL BE ON WHENEVER THE
TOUCH PANEL IS ON UNLESS THE "STORE" BUTTON IS
PUSHED. TWO SECONDS AFTER THE "STORE" BUTTON
IS PUSHED, LED’s 7 AND 20 WILL TURN OFF. 5 SECONDS
LATER LED’S 3 AND 19 WILL TURN OFF.
MP85.184J
NOTE: THE TRAVEL RELAY IS WIRED AS A
NORMALLY CLOSED RELAY. WHEN THE YELLOW
LED (17) IS ON THE RELAY CONTACTS WILL OPEN.
THE RED LED (18) WILL NOT BE ON. THE RED LED
WILL BE ON IF THE LEVELING SYSTEM IS IN THE
TRAVEL MODE AND THE IGNITION IS ON.
NOTE: THE TRAVEL RELAY IS NOT USED ON
VEHICLES EQUIPPED WITH HWH AIR DUMP SYSTEMS.
IT IS ONLY USED WITH PILOT OPERATED AIR DUMP
SYSTEMS.
NOTE: ON NEWER CONTROL BOXES, FUSE F11 AND FUSE
F12 HAVE BEEN REPLACED WITH POLY SWITCHES PF4
AND PF3. POLY SWITCHES PROTECT A COMPONENT OR
WIRE AS A FUSE DOES EXCEPT THE POLY SWITCH WILL
ALLOW CURRENT THROUGH WHEN THE OVERLOAD OR
SHORT IS REMOVED. POLY SWITCHES ARE NOT
REPLACEABLE.
MP84.2400
17JUN09
SECTION IV
ELECTRICAL CONNECTION DIAGRAM
CIRCUIT BOARD CONNECTOR AND PIN LOCATIONS
+12
CR1
CR2
CR3
CR4
CR10
CR11
12
1
GND
PF1
CN3
1
CR5
CR6
CR7
CR8
CR9
12
CN7
IGN OUT
CN6
1
GND
AUX
12
LD34
LD33
LD32
LD31
LD30
LD29
Y
Y
Y
Y
R
R
R
R
8
GND
(SHIELD)
CN8
2
1
3
4
PF3
R Y G R G R R
LD35
LD21
LD22
LD23
LD24
LD25
LD26
LD27
LD28
IGN CL CH
1
CN9
F10
4 PIN GRAY
CONNECTOR
PF4
T2
CN1
A32433
-5
PROGRAM CHIP
R
LD39
MP85.185J
R
R
R
LD36 LD37 LD38
MP84.2402
17JUN09
SECTION IV - ELECTRICAL CONNECTION DIAGRAM
625 OR 625S SERIES LEVELING SYSTEM
LEVELING MANIFOLD - PUMP AND MASTER RELAYS
TO 50 LB PRESSURE SWITCH - 8101
P.E.D
P.E.D
P.E.D
B
LF
LR
A
B
A
B
A
4400
6240
RF
A
1400
6240
B
2400
7600
RR
P.E.D
LEVELING MANIFOLD
3400
7601
TO HWH GROUND STUD - 6240
TO 3000 LB PRESSURE SWITCH - 8100
CN3
12 PIN
BROWN
CN7
12 PIN
BLACK
4 PIN
GRAY
LEVELING
MANIFOLD
CN8
8 PIN
BLACK
CN6
12 PIN
GRAY
HWH GROUND
STUD
TOUCH PANEL
HARNESS
6230 - TO HWH
GROUND STUD
6231 - TO HWH
GROUND STUD
PUMP
MOTOR
8600
8500
6800
+
TO PUMP
MOTOR
TO HOUSE
BATTERY
PUMP
RELAY
MP85.102K
MASTER
RELAY
MP84.2450
17JUN09
SECTION IV - ELECTRICAL CONNECTION DIAGRAM
625 OR 625S SERIES LEVELING SYSTEM
LEVELING MANIFOLD - AIR DUMP - PUMP AND MASTER RELAYS
TO 50 LB PRESSURE SWITCH - 8101
LEVELING MANIFOLD
P.E.D
P.E.D
RF
P.E.D
LF
A
B
A
AIR DUMP SOLENOID
AIR DUMP SOLENOID
AIR DUMP SOLENOID
TO HWH GROUND
STUD - 6230
P.E.D
A
LR
6230
P.E.D
B A
B
4400
6240
B
1400
6240
RR
A
2400
7600
B
3400
7601
9300
9300
TO HWH GROUND STUD - 6240
TO 3000 LB PRESSURE SWITCH - 8100
CN3
12 PIN
BROWN
CN7
12 PIN
BLACK
4 PIN
GRAY
LEVELING
MANIFOLD
CN8
8 PIN
BLACK
CN6
12 PIN
GRAY
HWH GROUND
STUD
TOUCH PANEL
HARNESS
6231 - TO HWH
GROUND STUD
6230 - TO HWH
GROUND STUD
PUMP
MOTOR
8600
6800
+
TO PUMP
MOTOR
TO HOUSE
BATTERY
PUMP
RELAY
MP85.1045
MASTER
RELAY
MP84.2452
17JUN09
SECTION IV - ELECTRICAL CONNECTION DIAGRAM
625 OR 625S SERIES LEVELING SYSTEM
TOUCH PANEL CONNECTIONS
HWH COMPUTERIZED LEVELING
R
EXCESS
SLOPE
EXTEND
AUTO
LEVEL
EXTEND
NOT IN
PARK/
BRAKE
AUTO
STORE
MANUAL
DUMP
EMERGENCY
STOP
MANUAL
RETRACT
RETRACT
TRAVEL
MODE
CAUTION!
UNDERSTAND OPERATOR’S MANUAL BEFORE USING. BLOCK FRAME AND TIRES
SECURELY BEFORE REMOVING TIRES OR CRAWLING UNDER VEHICLE.
PIN 1
PIN 4
LINK LIGHT
PIN #
WIRE
COLOR
5 PIN MTA CONNECTOR
1
YELLOW
2
GREEN
3
4
WHITE
5
RED
6 PIN UML CONNECTOR
1
2
3
4
5
6
MP85.2930
WIRE
NUMBER
6230
6800
NO CONNECTION
ACCESSORY
STORE
LED
NO CONNECTION
LEVEL
PIN 1
WIRE DESCRIPTION AND FUNCTION
CAN HIGH
CAN LOW
CAN SHIELD
GROUND FROM CONTROL BOX
+12V ACC. POWER FROM CONTROL BOX
+12V ACC FROM TOUCH PANEL
SW +12V FROM SW TO TOUCH PANEL FOR STORE
SW GND FROM TOUCH PANEL FOR LEVEL LED
SW +12V FROM SW TO TOUCH PANEL FOR LEVEL
MP84.2600
09JUL09
SECTION IV - ELECTRICAL CONNECTION DIAGRAM
625 OR 625S SERIES LEVELING SYSTEM
MASTER LIGHT/BUZZER CONNECTIONS
A MASTER WARNING INDICATOR SHOULD ALWAYS BE USED. WHEN THE LEVELING SYSTEM HAS STRAIGHT
ACTING JACKS A WARNING BUZZER MUST BE USED.
WHEN ONLY A RED MASTER WARNING LIGHT IS USED THE (+) VOLTAGE FOR THE LIGHT COMES FROM THE
CONTROL BOX. (SEE FIGURE 1 BELOW). WHEN BOTH A RED LIGHT AND WARNING BUZZER ARE USED THE
(+) VOLTAGE FOR BOTH INDICATORS IS SUPPLIED BY THE IGNITION SWITCH. THE POWER MUST COME FROM
THE "ON" SIDE OF THE IGNITION SWITCH, NOT THE "ACC" SIDE. (SEE FIGURE 2 BELOW)
NOTE : BY SUPPLYING IGNITION POWER TO THE WARNING BUZZER AND LIGHT, AND "ACC" POWER TO THE
CONTROL PANEL, THE SYSTEM MAY BE OPERATED IN ACCESSORY WITHOUT THE BUZZER SOUNDING. THE
NEGATIVE SIGNAL FOR THE WARNING INDICATORS MUST ALWAYS COME FROM THE CONTROL BOX.
CAUTION:
THE 6121 WIRE IN THE MASTER WARNING LIGHT HARNESS IS HOT WHENEVER THE
IGNITION IS "ON" OR "ACC". THE 6121 WIRE (IF PRESENT) MUST BE REMOVED FROM THE HARNESS
WHEN USING DIRECT IGNITION VOLTAGE FOR THE MASTER WARNING INDICATORS.
(+) VOLTAGE SUPPLY - 6121
SEE CONTROL BOX
CONNECTION
DIAGRAM
+
CONTROL WIRE - (SWITCHED GROUND) 7699
FIGURE 1
CONNECT THIS
END TO IGNITION
"ON" POWER
SEE CONTROL BOX
CONNECTION
DIAGRAM
5 AMP FUSE
PIGTAIL W/DIODE
AND IN LINE FUSE
HOLDER - 6110
BUZZER
INCLUDED IN
HARDWARE KIT
+
_
WITH THE PROVIDED BUTT CONNECTOR
SPLICE THE 7699 WIRE FROM THE HWH
HARNESS WITH THE 7699 WIRE OF THE
PIGTAIL
6111
JACKS DOWN LIGHT
INCLUDED IN
HARDWARE KIT
PIGTAIL - 7699
PROVIDED
FIGURE 2
MP85.5050
MP84.9970
17JUN09