1
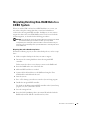
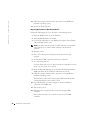
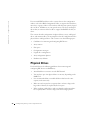
Dell™ CERC ATA100/4-channel RAID Controller
User’s Guide
w w w. d e l l . c o m | s u p p o r t . d e l l . c o m
____________________
Information in this document is subject to change without notice.
© 2002 Dell Computer Corporation. All rights reserved.
Reproduction in any manner whatsoever without the written permission of Dell Computer
Corporation is strictly forbidden.
Trademarks used in this text: Dell, the DELL logo, Dell OpenManage and PowerEdge are trademarks
of Dell Computer Corporation. Microsoft, Windows NT, MS-DOS and Windows are registered
trademarks of Microsoft Corporation. Intel is a registered trademark of Intel Corporation. Novell
and NetWare are registered trademarks of Novell Corporation. IBM is a registered trademark of
International Business Machines Corporation. ASPI is a registered trademark of Adaptec, Inc.
Other trademarks and trade names may be used in this document to refer to either the entities claiming
the marks and names or their products. Dell Computer Corporation disclaims any proprietary interest
in trademarks and trade names other than its own.
November 2002 P/N 0P854
Rev. A03-00
Contents
1 Overview
Documentation
. . . . . . . . . . . . . . . . . . . . . . . . . . .
6
2 Features
SMART Technology
. . . . . . . . . . . . . . . . . . . . . . . . .
Configuration on Disk
Compatibility
8
. . . . . . . . . . . . . . . . . . . . . . .
8
. . . . . . . . . . . . . . . . . . . . . . . . . . . .
9
Hardware Requirements
. . . . . . . . . . . . . . . . . . . . . .
9
. . . . . . . . . . . . . . . . . . . . . . . .
9
. . . . . . . . . . . . . . . . . . . . . . . .
10
. . . . . . . . . . . . . . . . . . . . . . . . .
10
. . . . . . . . . . . . . . . . . . . . . . . . . .
11
CERC Specifications
PCI Bridge/CPU
Cache Memory
CERC BIOS .
Configuration Features
. . . . . . . . . . . . . . . . . . . . . . .
Hardware Architecture Features
11
. . . . . . . . . . . . . . . . . .
12
Array Performance Features
. . . . . . . . . . . . . . . . . . . .
13
RAID Management Features
. . . . . . . . . . . . . . . . . . . .
13
. . . . . . . . . . . . . . . . . . . . . .
14
Fault Tolerance Features
. . . . . . . . . . . . . . .
14
. . . . . . . . . . . . . . . .
14
. . . . . . . . . . . . . . . . . . . . . . . . . .
15
Automatic Rebuild of Failed Drives
Manual Rebuild of Failed Drives .
Software Utilities
Operating System Software Drivers
. . . . . . . . . . . . . . . .
15
Contents
1
Onboard Speaker
. . . . . . . . . . . . . . . . . . . . . . . . .
RAID Management Utilities
. . . . . . . . . . . . . . . . . . . .
16
. . . . . . . . . . . . . . . . . .
16
. . . . . . . . . . . . . . . . . . . . . . . . .
16
BIOS Configuration Utility .
Dell Manager
16
WebBIOS Configuration Utility
. . . . . . . . . . . . . . . .
17
. . . . . . . . . . . . . . .
17
. . . . . . . . . . . . . . . . . . . . . . . . . . .
20
Dell OpenManage Array Manager
3 Hardware Installation
Requirements
Hardware Installation Steps .
Step 1: Unpack
. . . . . . . . . . . . . . . . . . .
20
. . . . . . . . . . . . . . . . . . . . . . . .
21
Step 2: Power Down
. . . . . . . . . . . . . . . . . . . . . .
21
Step 3: Set Jumpers
. . . . . . . . . . . . . . . . . . . . . .
21
. . . . . . . . . . . . . . . . . . . . . . .
22
RAID Card Layout
Step 4: Install the RAID Controller
Step 5: Set Up the IDE Devices
23
. . . . . . . . . . . . . . . .
24
. . . . . . . . . . . . . . . . . .
24
. . . . . . . . . . . . . . . . . . . .
24
Step 6: Connect IDE Cables
Step 7: Start the System
. . . . . . . . . . . . . .
Step 8: Run the BIOS Configuration Utility
. . . . . . . . . .
25
. . . . .
25
. . . . .
27
. . . . . . . . . . . . . . . . . . . . . . . . . .
32
Step 9: Install the Operating System Software Driver
Migrating Existing Non-RAID Data to a CERC System .
4 Configuring Arrays and Logical Drives
Physical Drives
. . . . . . . . . . . . . . . . . . . .
33
. . . . . . . . . . . . . . . . . . . . . . . .
33
. . . . . . . . . . . . . . . . . . . . . . .
33
Physical Device Layout .
Configuring Arrays
Arranging Arrays
Creating Hot Spares
. . . . . . . . . . . . . . . . . . . . . .
. . . . . . . . . . . . . . . . . . . .
34
Configuration Strategies
. . . . . . . . . . . . . . . . . . . .
34
Configuring Logical Drives
2
Conte nts
34
Creating Logical Drives
. . . . . . . . . . . . . . . . . . .
34
Logical Drive Configuration
Optimizing Data Storage
. . . . . . . . . . . . . . . . . .
35
. . . . . . . . . . . . . . . . . . . .
36
Planning the Array Configuration
Random Array Deletion
. . . . . . . . . . . . . . . . .
37
. . . . . . . . . . . . . . . . . . . . . .
38
5 Troubleshooting
General Problems and Solutions .
. . . . . . . . . . . . . . . . .
40
BIOS Boot Error Messages
. . . . . . . . . . . . . . . . . . . .
41
Other BIOS Error Messages
. . . . . . . . . . . . . . . . . . . .
43
DOS ASPI Driver Error Messages
Other Potential Problems
. . . . . . . . . . . . . . . . .
44
. . . . . . . . . . . . . . . . . . . . .
45
6 Appendix A: Regulatory - LSI Logic Adapters
FCC Compliance Statement
. . . . . . . . . . . . . . . . . . . .
Canadian Compliance (Industry Canada)
. . . . . . . . . . . . .
49
. . . . . . . . . . . . . . . . . . . . .
49
. . . . . . . . . . . . . . . . . . . . . . . . . . . . . . . .
50
Manufacturer Declaration
MIC
B Class Device
. . . . . . . . . . . . . . . . . . . . . . . . .
VCCI Class B Statement
Index
3
Conte nts
48
50
. . . . . . . . . . . . . . . . . . . . .
50
. . . . . . . . . . . . . . . . . . . . . . . . . . . . . . . . . . .
51
4
Conte nts
1
SECTION 1
Overview
Documentation
w w w. d e l l . c o m | s u p p o r t . d e l l . c o m
CERC (Cost-Effective RAID Controller) is a half-sized PCI adapter card
that provides a way to improve the performance and availability of your
storage subsystems. An entry-level-to-mid-range RAID controller solution,
CERC offers high transfer rates and fault-tolerant data redundancy by using
low-cost Ultra ATA drives in desktops, workstations, or low-end servers.
You can connect one to four drives in Master mode to the CERC card and
can configure these drives using a simple setup menu embedded in the
CERC BIOS. The CERC card supports the following drive modes: PIO 0-4,
Multiword DMA 0-2, and Ultra DMA 0-5. In addition, it supports RAID
levels 0, 1, 5, and 10.
Documentation
The technical documentation set includes:
•
CERC User’s Guide
•
CERC Configuration Software Guide
•
CERC Operating System Driver Installation Guide
CERC User’s Guide
The CERC User’s Guide contains information about installing the RAID
controller. It also contains general introductory information about RAID,
RAID system planning, and configuration information. Read the CERC
User’s Guide before you read the CERC Configuration Software Guide.
CERC Configuration Software Guide
This manual provides information about CERC software utility programs.
You will not need this manual until after you have planned your RAID
system and have installed the RAID controller. RAID system planning,
installation, and configuration information is provided in the CERC User’s
Guide. Read the CERC User’s Guide before you read the CERC
Configuration Software Guide.
CERC Operating System Driver Installation Guide
This manual provides all the information you will need to install the
appropriate operating system software drivers.
6
Ov e r v ie w
2
SECTION 2
Fe a t u r e s
SMART Technology
Configuration on Disk
Compatibility
Hardware Requirements
CERC Specifications
Configuration Features
Hardware Architecture Features
Array Performance Features
RAID Management Features
Fault Tolerance Features
Software Utilities
Operating System Software Drivers
Onboard Speaker
RAID Management Utilities
w w w. d e l l . c o m | s u p p o r t . d e l l . c o m
CERC is a half-size, four-channel IDE RAID card built around this proven
SCSI Dell™ PowerEdge™ RAID Controller (PERC) technology. The CERC
RAID card supports all major operating systems.
This chapter discusses the following:
•
Self-monitoring analysis and reporting technology (SMART)
•
Configuration on Disk
•
Hardware architecture
•
Array performance
•
RAID management
•
Fault tolerance
•
Utility programs
•
Software drivers
SMART Technology
SMART technology detects predictable drive failures. SMART monitors the
internal performance of all motors, heads, and drive electronics.
Configuration on Disk
Configuration on Disk (drive roaming) saves configuration information
both in non-volatile random access memory (NVRAM) on the RAID
controller and on the hard drives connected to the RAID controller. If the
RAID controller is replaced, the new RAID controller can detect the actual
RAID configuration, maintaining the integrity of the data on each drive,
even if the drives have changed channels.
8
Fe a tu r es
Compatibility
The RAID controller is compatible with the following:
•
SNMP managers
•
IDE hard drives
•
All IDE backup and utility software
Hardware Requirements
The CERC RAID controller can be installed in a system that contains the
following:
•
Motherboard with 5 V/3.3 V PCI expansion slots
•
Support for PCI version 2.1 or later
•
An Intel® Pentium II®, Celeron®, or more powerful CPU
•
A diskette drive
•
A color monitor
•
A VGA adapter card
•
A mouse
•
A keyboard.
CERC Specifications
Table 2-1. CERC Specifications contains the specifications for the CERC
card.
Ta b l e 2 - 1 . C E R C S p e c i f i c a t i o n s
Parameter
Specification
Card size
6.877" x 4.178" (half-length PCI)
Processor
Intel i960RS™ 32-bit RISC processor @ 100 MHz
Bus type
PCI 2.2
Bus data transfer rate
Up to 132 MB/s
Features
9
w w w. d e l l . c o m | s u p p o r t . d e l l . c o m
Ta b l e 2 - 1 . C E R C S p e c i f i c a t i o n s (continued)
Parameter
Specification
BIOS
AMIBIOS®
Cache configuration
16 MB ECC through a 66MHz 72-bit unbuffered
3.3V SDRAM soldered to the PCB.
Firmware
1 MB × 8 flash ROM
NVRAM
32 KB × 8 for storing RAID configuration
Operating voltage
5.00 V ± 0.25 V
IDE controller
Two IDE controllers for IDE support
IDE data transfer rate
Up to 100 MB/s
Devices per channel
One IDE device per channel. Up to four per CERC
card.
RAID levels supported
0, 1, 5, and 10
PCI Bridge/CPU
The RAID card uses the Intel i960RS PCI bridge with an embedded
80960JT RISC processor running at 100 MHz. The RS bridge handles data
transfers between the primary (host) PCI bus, the secondary PCI bus, and
CPU. The DMA controller supports chaining and unaligned data transfers.
The embedded 80960JT CPU directs all controller functions, including
command processing, IDE data transfers, RAID processing, drive
rebuilding, cache management, and error recovery.
Cache Memory
Cache memory for the RAID card resides in an unbuffered synchronous
dynamic random access memory (SDRAM.) The maximum achievable
memory bandwidth is 528 MB/s.
The RAID card supports write-through or write-back caching, selectable for
each logical drive. The default write policy is write-through. The default
read policy for the RAID card is adaptive read-ahead caching. The other
options for the read policy are read-ahead, and no read-ahead.
NOTICE: Write-back caching is not recommended for the physical drives.
When write cache is enabled, data can be lost when the power is interrupted.
10
Fe a tu r es
CERC BIOS
The BIOS provides an extensive setup utility that can be accessed by
pressing <Ctrl><M> at BIOS initialization. The BIOS Configuration
Utility is described in the CERC Configuration Software Guide.
Configuration Features
Table 2-2. Configuration Features displays the CERC configuration
features.
Ta b l e 2 - 2 . C o n f i g u r a t i o n Fe a t u r e s
Specification
Feature
RAID levels
0, 1, 5, and 10
IDE channels
Four
Maximum number of drives per channel
One
Array interface to host
PCI 2.2
Drive interface
Supports up to four ATA/UDMA 100
drives.
Four internal IDE connectors (one
drives per channel)
Drive modes supported:
• UDMA 5/4/3/2/1/0
• MDMA 2/1/0
• PIO 4/3/2/1/0
Cache size
16 MB of 32-bit, 66 MHz On-board
ECC SDRAM Memory
Cache function
Write-through, write-back, adaptive
read ahead, no read ahead, read
ahead
Multiple logical drives/arrays per
controller
Up to 40 logical drives per controller
Maximum number of CERC controllers
per system
1
Online capacity expansion
Yes
Dedicated and pool hot spare
Yes
Features
11
w w w. d e l l . c o m | s u p p o r t . d e l l . c o m
Ta b l e 2 - 2 . C o n f i g u r a t i o n Fe a t u r e s (continued)
Specification
Feature
Flashable firmware
Yes
Hot swap devices supported
Yes
Non-disk devices supported
No
Mixed capacity hard drives
Yes
Number of 16-bit internal IDE
connectors
Four
Support for hard drives with capacities
of more than 8 GB
Yes
Clustering support (Failover control)
No
Online RAID level migration
Yes
RAID remapping
Yes
No reboot necessary after expansion
Yes
Hardware clustering support on the
board
No
User-specified rebuild rate
Yes
Hardware Architecture Features
Table 2-3. Hardware Architecture Features displays the hardware
architecture features.
Ta b l e 2 - 3 . H a r d w a r e A r c h i t e c t u r e Fe a t u r e s
12
Fe a tu r es
Specification
Feature
Processor
Intel i960RS 100
IDE controller
AMI MG80649
Size of flash ROM
1 MB
Amount of NVRAM
32 KB
Direct I/O
Yes
Direct I/O bandwidth
132 MB/s
Array Performance Features
Table 2-4. Array Performance Features lists the array performance features.
Ta b l e 2 - 4 . A r r a y P e r f o r m a n c e Fe a t u r e s
Specification
Feature
Host data transfer rate
132 MB/s
Drive data transfer rate
100 MB/s
Maximum scatter/gathers
26 elements
Maximum size of I/O requests
6.4 MB in 64 KB stripes
Stripe sizes
2 KB, 4 KB, 8 KB, 16 KB, 32 KB,
64 KB, or 128 KB
Maximum # of concurrent commands
255
RAID Management Features
Table 2-5. RAID Management Features lists the RAID management
features.
Ta b l e 2 - 5 . R A I D M a n a g e m e n t Fe a t u r e s
Specification
Feature
Support for simple network management protocol
(SNMP)
Yes
Performance monitor provided
Yes
Remote control and monitoring
Yes
Event broadcast and event alert
Yes
Hardware connector
I2C
Drive roaming
Yes
Support for concurrent multiple stripe sizes
Yes
Features
13
w w w. d e l l . c o m | s u p p o r t . d e l l . c o m
Ta b l e 2 - 5 . R A I D M a n a g e m e n t Fe a t u r e s
Specification
Feature
RAID management utilities:
• BIOS Configuration Utility (operating system
independent)
• CERC Manager (Novell® NetWare®, Red Hat
Linux)
• WebBIOS Configuration Utility
• Dell OpenManage™ Array Manager on Dell
OpenManage Server Assistant® CD (Novell
NetWare, Windows NT®, Windows® 2000)
Yes
Novell NetWare server support using a GUI client
utility
Yes
Desktop management interface (DMI) support
Yes
Fault Tolerance Features
The RAID card fault-tolerance features are:
•
Automatic failed drive detection
•
Manual failed drive rebuild
Automatic Rebuild of Failed Drives
If you use hot spares, the firmware can automatically detect and rebuild
failed drives using the hot spare. The RAID controller support automatic
rebuild only on hot spare drives. The hot spare must have enough capacity
to rebuild the data that was on the failed drive. See Creating Hot Spares in
Configuring Arrays and Logical Drives.
Manual Rebuild of Failed Drives
The rebuild is not automatic under any of the following conditions:
14
Fe a tu r es
•
You don’t use hot spares.
•
The hot spares don’t have enough capacity to rebuild the failed drive,
and you replace the drive manually. You need to use the configuration
utilities to perform the rebuild.
•
IDE drive hot swap is not supported by the system or a hot swap is not
performed even though the system supports hot swap.
Table 2-6. Fault Tolerance Features lists the CERC fault tolerance features.
Ta b l e 2 - 6 . Fa u l t To l e r a n c e Fe a t u r e s
Specification
Feature
Support for SMART
Yes
Drive failure detection
Automatic
Drive rebuild using hot spares
Automatic
Parity generation and checking
Software
Software Utilities
Table 2-7. Software Utility Features displays the software utility features.
Ta b l e 2 - 7 . S o f t w a r e U t i l i t y Fe a t u r e s
Specification
Feature
Graphical user interface
Yes
Management utility
Yes
Bootup configuration
Yes
Online read-, write-, and cache- policy switching
Yes
Internet and intranet support through transmission
control protocol (TCP)/internet protocol (IP)
Yes
Operating System Software Drivers
The CERC RAID controller includes drivers for the following operating
systems:
•
Windows NT
•
Windows 2000
•
Novell NetWare 5.1, 6.x
•
Red Hat Linux 7.1, 7.2, 7.3, 2.1 Advanced Server
Features
15
w w w. d e l l . c o m | s u p p o r t . d e l l . c o m
For information about installing drivers for other operating systems, see the
CERC Operating System Driver Installation Guide.
NOTE: Be sure to use the latest Service Packs (updates) provided by the
operating system manufacturer. Visit the Dell | Support web site at
support.dell.com for the latest CERC operating system support information,
including new operating systems, and the latest service packs and drivers.
Onboard Speaker
The RAID card has an onboard speaker that generates audible warnings
when system errors occur.
RAID Management Utilities
Software utilities enable you to manage and configure the RAID system and
CERC, create and manage multiple disk arrays, control and monitor
multiple RAID servers, provide error statistics logging, and provide online
maintenance. The utilities include:
•
BIOS Configuration Utility
•
Dell Manager
•
WebBIOS Configuration Utility
•
Dell OpenManage™ Array Manager
BIOS Configuration Utility
The BIOS Configuration Utility configures and maintains RAID arrays,
formats hard drives, and manages the RAID system. It is independent of any
operating system. See the CERC Configuration Software Guide for
additional information.
Dell Manager
Dell Manager is a character-based utility that works in DOS, Red Hat Linux
7.1, 7.2, and 7.3, and Novell NetWare 5.1 and 6.x. See the CERC
Configuration Software Guide for additional information.
16
Fe a tu r es
WebBIOS Configuration Utility
WebBIOS is an HTML-based utility used to configure and manage a RAID
system on a server. See the CERC Configuration Software Guide for
additional information.
Dell OpenManage Array Manager
Dell OpenManage Array Manager is used to configure and manage a storage
system that is connected to a server, while the server is active and continues
to handle requests. Array Manager runs under Novell NetWare, Windows
NT, and Windows 2000. Refer to Dell documentation at the Dell | Support
web site at support.dell.com for more information.
Features
17
18
Fe a tu r es
w w w. d e l l . c o m | s u p p o r t . d e l l . c o m
3
SECTION 3
Hardware Installation
Requirements
Hardware Installation Steps
Migrating Existing Non-RAID Data to a CERC System
w w w. d e l l . c o m | s u p p o r t . d e l l . c o m
Requirements
You must have the following items to install the RAID controller:
•
A CERC RAID controller
•
A host computer with an available PCI expansion slot
•
The CERC RAID controller installation CD
•
The necessary IDE cables
•
An uninterruptible power supply (UPS) for the entire system
•
IDE hard drives
Hardware Installation Steps
The following is an overview about installing the controller. These steps are
described in detail in the rest of this section.
1
Unpack the RAID controller and inspect for damage.
Make sure all items are in the package. If damaged, call your Dell™
Support.
2
Turn the computer off, remove the power cord, then remove the cover.
3
Check the jumper settings on the RAID controller.
The jumper J2 should not be shorted.
4
Install the RAID card.
5
Set the IDE devices to master or cable select (CS).
6
Connect the IDE cables to IDE devices.
7
Replace the cover, connect the power cord, then turn the power on.
8
Run the BIOS Configuration Utility to configure arrays and logical
drives.
9
Install software drivers for the desired operating systems.
Perform the following steps to install the RAID card and configure the
arrays and logical drives.
20
Ha r d wa r e I n st a lla t io n
Step 1: Unpack
Unpack and install the hardware in a static-free environment. The RAID
controller is packed in an anti-static bag between two sponge sheets.
Remove the card and inspect it for damage. If the card appears damaged, or
if any item listed below is missing, contact Dell support. The RAID card is
accompanied by the following items:
•
The CERC Configuration Software Guide (on CD)
•
The CERC Operating System Driver Installation Guide (on CD)
•
The CERC User’s Guide (on CD)
NOTE: If ordered, you will receive hard-copy documentation for the
controller.
•
Dell OpenManage™ Array Manager on the Dell OpenManage Server
Assistant® CD.
Step 2: Power Down
Turn off the computer and physically remove the power cord from the back
of the power supply. Remove the cover from the chassis. Make sure the
computer is disconnected from any networks before installing the controller
card.
Step 3: Set Jumpers
Make sure the jumper settings on the CERC RAID card are correct. Table
5-1. Jumpers and Connectors displays the jumpers and connectors.
NOTE: Make sure that J2, J3, and J13 are unconnected.
Ta b l e 5 - 1 . J u m p e r s a n d C o n n e c t o r s
Connector
Description
Type
J2
Force BIOS enable
2-pin header
J3
Reserved
4-pin header
J13
Reserved
2-pin header
Ha r d wa r e In s ta l la ti on
21
w w w. d e l l . c o m | s u p p o r t . d e l l . c o m
RAID Card Layout
Figure 5-1. RAID Card Layout shows the location of the channels, jumpers,
flash BIOS, and other features on the RAID card.
Figure 5-1. RAID Card Layout
BIOS Enable/Disable
Channel 0
J2
J3
Channel 2
IO
Channel 1
Channel 3
i960 RS
J13
NVSRAM
Flash
22
Ha r d wa r e I n st a lla t io n
Step 4: Install the RAID Controller
Select a 3.3 V or 5 V PCI slot and align the RAID card bus connector to the
slot, as shown in Figure 5-3. Installation of RAID Card. Press down gently,
but firmly to make sure that the card is properly seated in the slot. The
bottom edge of the controller card should be flush with the slot. Figure 5-2.
3.3 V and 5 V PCI Slots for RAID Controller displays the PCI slots on the
motherboard.
Figure 5-2. 3.3 V and 5 V PCI Slots for RAID Controller
Ha r d wa r e In s ta l la ti on
23
w w w. d e l l . c o m | s u p p o r t . d e l l . c o m
Screw the bracket to the computer frame.
Figure 5-3. Installation of RAID Card
Step 5: Set Up the IDE Devices
Before you install the IDE devices, you must set the drive as a master or
cable select (CS). To do this, see the documentation for the IDE drive.
Step 6: Connect IDE Cables
Connect the IDE cables to IDE devices. The RAID card provides four
ATA100 IDE cables. Match pin 1 on the cable to pin 1 on the IDE channel
connector.
Step 7: Start the System
Replace the cover and reconnect the AC power cords. Turn power on to the
computer.
During boot, the CERC BIOS message appears:
24
Ha r d wa r e I n st a lla t io n
CERC ATA100/4ch RAID Controller BIOS Version x.xx date
Copyright (c) LSI Logic Corporation
Firmware Initializing... [ Scanning IDE Device ...(etc.)... ]
The firmware takes several seconds to initialize. During this time the
adapter scans the IDE channels. When ready, the following appears:
CERC Adapter-1 Firmware Version x.xx DRAM Size 16 MB
0 Logical Drives found on the Host Adapter
0 Logical Drives handled by BIOS
Press <Ctrl><M> to run CERC BIOS Configuration Utility
The <Ctrl><M> utility prompt times out after several seconds. The
RAID host card number, firmware version, and cache DRAM size are
displayed in the second portion of the BIOS message. The numbering of the
cards follows the PCI slot scanning order used by the system’s motherboard.
Step 8: Run the BIOS Configuration Utility
Press <Ctrl><M> when prompted during the boot process to run the
BIOS Configuration Utility. See the CERC Configuration Software Guide
for information about running the BIOS Configuration Utility.
Step 9: Install the Operating System Software Driver
Operating system drivers are provided on the Dell OpenManage Server
Assistant® CD that accompanies your controller.
NOTE: Be sure to use the latest Service Packs (updates) provided by the
operating system manufacturer. Also, see the readme file that comes with the
driver for any updated information.
Ha r d wa r e In s ta l la ti on
25
w w w. d e l l . c o m | s u p p o r t . d e l l . c o m
See the CERC Operating System Driver Installation Guide for instructions
for installing the operating system drivers.
NOTE: When booting the system from a drive connected to a CERC card and
using EMM386.EXE, MEGASPI.SYS must be loaded in CONFIG.SYS
before EMM386.EXE is loaded. If you do not do this, you cannot access the
boot drive after EMM386 is loaded. The MEGASPI.SYS file is provided on
the CD that comes with your CERC card..
ASPI® Driver
The ASPI driver can be used under DOS. The MEGASPI.SYS ASPI driver
supports hard drives. You can use it to run software that requires an ASPI
driver.
Copy MEGASPI.SYS to your hard disk drive. MEGASPI.SYS must be loaded
in CONFIG.SYS before EMM386.EXE is loaded. Add the following line to
CONFIG.SYS:
device=<path>\MEGASPI.SYS /v
The MEGASPI.SYS parameters are shown in Table 5-2. MEGASPI.SYS
Parameters.
Ta b l e 5 - 2 . M E G A S P I . S Y S P a r a m e t e r s
26
Ha r d wa r e I n st a lla t io n
Parameter
Description
/h
INT 13h support is not provided.
/v
Verbose mode. All messages display on the screen.
/a
Physical drive access mode. Permits access to physical drives.
/q
Quiet mode. All messages except error messages are suppressed.
Migrating Existing Non-RAID Data to a
CERC System
When you add a CERC card and several IDE hard drives to a server, you
may want to keep the existing data that is stored on the hard drives
connected to the integrated IDE controller. In addition, you may want to
migrate the data to the new CERC RAID system. There are two methods
for data migration, as described in the following procedures.
NOTICE: You should not connect the existing data drives directly to the RAID
card without backing up the data first. When you set up RAID
configuration, the existing file system and data on these hard drives may be
destroyed. You should always back up useful data before connecting the drives
to the RAID card.
Migrating Data with a Data Backup Device
Perform the following steps if you have a data backup device, such as a tape
drive:
1
Make a complete backup of the data you want to migrate.
2
Disconnect the existing hard drives from the integrated IDE
controller.
Either remove the drives or use them to connect to the RAID card.
3
Insert the RAID card in one of the PCI slots.
4
Add extra IDE hard drives as needed.
5
Connect all of the hard drives to the RAID card using the Ultra
ATA100 cables included with the card.
6
Start the system.
7
Press <F2> during system boot to enter the System Setup program.
8
Disable the integrated IDE controller.
For details on disabling integrated IDE controller in the System Setup
program, see your system User’s Guide.
9
10
Save the setting and exit.
Insert the Dell OpenManage Server Assistant CD (included with the
RAID card) into the CD drive and reboot the system.
Ha r d wa r e In s ta l la ti on
27
w w w. d e l l . c o m | s u p p o r t . d e l l . c o m
11
Follow the prompts from the Server Assistant to set up RAID and
install the operating system.
12
Restore the backed-up data.
Migrating Data Without a Data Backup Device
Perform the following steps if you do not have a data backup device:
1
Insert the RAID card in one of the PCI slots
2
Add extra IDE hard drives as needed.
3
Connect the added drives to the RAID card using the Ultra ATA100
cables included with the card.
NOTE: The CERC card may show up as a PERC controller in some System
Setup programs. If so, select the PERC controller as the boot device
controller.
4
Start the system.
5
Press <F2> during system bootup to enter the System Setup
program.
6
Set the add-in CERC card as the boot device controller.
7
Save the setting and exit.
For more details on how to set up the boot device controller in System
Setup, see your system User’s Guide.
8
Insert the Dell OpenManage Server Assistant CD (included with the
RAID controller) into the CD drive and reboot the system.
9
Follow the prompts from the Server Assistant to set up RAID and
install the operating system.
The hard drives connected to the integrated IDE controller and the
existing data display in the new file system.
10
Copy the data that you want to migrate to the new hard drives
connected to the RAID card.
11
Turn off the system.
12
Disconnect the existing hard drives from the integrated IDE
controller.
Either remove the drives or use them to connect to the RAID
controller.
28
Ha r d wa r e I n st a lla t io n
13
Boot the system.
14
Press <F2> during system boot to enter System Setup.
15
Disable the integrated IDE controller.
For more details on disabling an integrated IDE controller in the
System Setup program, see your system User’s Guide.
If you connect the existing hard drives to the RAID card, you can use
them by either expanding the existing array on the RAID card or
creating a new virtual disk on the RAID controller. For details on array
expansion or creating new virtual disk, see Configuring Arrays and
Logical Drives.
Ha r d wa r e In s ta l la ti on
29
30
Ha r d wa r e I n st a lla t io n
w w w. d e l l . c o m | s u p p o r t . d e l l . c o m
4
SECTION 4
Configuring Arrays
and Logical Drives
Physical Drives
Configuring Arrays
Planning the Array Configuration
Random Array Deletion
w w w. d e l l . c o m | s u p p o r t . d e l l . c o m
You can install IDE hard drives in the system, then use the configuration
utilties, such as the BIOS Configuration Utility, to organize the hard drives
into arrays, or groups of drives. You can then make the arrays part of a logical
drive or drives. In addition, you can span the arrays. The arrays and logical
drives that you construct must be able to support the RAID level that you
select.
This section describes configuration for physical drives, arrays, and logical
drives, and contains tables you can complete to list the configuration for the
physical drives and logical drives. This section covers the following topics:
•
Guidelines for connecting and configuring IDE devices
•
Array creation
•
Hot spares
•
Configuration strategies
•
Logical drive configuration
•
Array configuration planner
•
Random array deletion
Physical Drives
You should observe the following guidelines when connecting and
configuring IDE devices in a RAID array:
32
•
Attach hard drives as masters on each IDE channel.
•
You can place up to four physical drives in an array, depending on the
RAID level.
•
It is recommended that you include all drives that have the same
capacity in the same array.
•
Make sure any hot spare has a capacity that is at least as large as the
largest drive that may be replaced by the hot spare.
•
When replacing a failed drive, make sure that the replacement drive
has a capacity that is at least as large as the drive being replaced.
C o n fi g ur i n g Ar r a y s a n d Lo g i ca l D ri ve s
Physical Device Layout
Use Table 4-1. Physical Device Layout to record your physical device layout.
Ta b l e 4 - 1 . P h y s i c a l D e v i c e L a y o u t
Channel 1
Channel 2
Channel 3
Channel 4
Master
Device Type
Logical Drive Number
Drive Number
Manufacturer
Model Number
Firmware Level
Configuring Arrays
Organize the physical drives into arrays (groups of drives) after the drives
are connected to the RAID card, formatted, and initialized. An array can
consist of up to four physical drives, depending on the RAID level.
The RAID card supports up to four arrays. The number of drives in an array
determines the RAID levels that can be supported.
Arranging Arrays
You must arrange the arrays to organize the data on the drives and allow you
to create system drives that can function as boot devices.
You can sequentially arrange arrays with an identical number of drives so
that the drives in the group are spanned. Spanned drives can be treated as
one large drive. Data can be striped across multiple arrays as one logical
drive. You can create spanned drives using the RAID management utilities:
•
BIOS Configuration Utility
•
Dell Manager
•
WebBIOS
•
Dell™ OpenManage™ Array Manager.
C o n fi g u ri ng Ar r a y s a n d L o g i c a l D r i v e s
33
w w w. d e l l . c o m | s u p p o r t . d e l l . c o m
Creating Hot Spares
Any drive that is present, formatted, and initialized, but not included in an
array or logical drive can be designated as a hot spare. Hot spares replace
drives that fail. You can use the RAID management utilities to create hot
spares.
NOTE: For more information about using these utilities to create hot spares,
refer to the CERC Configuration Software Guide.
Creating Logical Drives
Logical drives are arrays or spanned arrays that are presented to the
operating system. You must create one or more logical drives.
The logical drive capacity can include all or any portion of an array. The
logical drive capacity can also be larger than an array by using spanning. The
CERC card supports up to 40 logical drives.
Configuration Strategies
The most important factors in RAID array configuration are drive capacity,
drive availability (fault tolerance), and drive performance. You cannot
configure a logical drive that optimizes all three factors, but it is easy to
select a logical drive configuration that maximizes one factor at the expense
of the other two factors.
Configuring Logical Drives
After you have installed the RAID controller in the server and have attached
all physical drives, perform the following actions to prepare a RAID disk
array. See the CERC Configuration Software Guide for more information.
1
Optimize the RAID controller options for your system.
2
Format the IDE drives to include in the array and the drives to use as
hot spares.
3
Press <Ctrl> <M> to run the BIOS Configuration Utility.
The Management Menu displays.
34
4
Select Easy Configuration or New Configuration to define and
configure one or more logical drives.
5
Create and configure one or more system drives (logical drives.)
C o n fi g ur i n g Ar r a y s a n d Lo g i ca l D ri ve s
6
Select the RAID level, cache policy, read policy, and write policy.
7
Save the configuration.
8
Initialize the logical drives.
After you initialize the logical drives, you can install the operating
system.
Logical Drive Configuration
Use Table 4-2. Logical Drive Configuration to record your logical drive
configuration.
Ta b l e 4 - 2 . L o g i c a l D r i v e C o n f i g u r a t i o n
Logical
Drive
Raid
Level
Stripe
Size
Logical
Drive Size
Cache
Policy
Read
Policy
Write
Policy
# of Physical
Drives
LD0
LD1
LD2
LD3
LD4
LD5
LD6
LD7
LD8
LD9
LD10
LD11
LD12
LD13
LD14
LD15
LD16
LD17
LD18
C o n fi g u ri ng Ar r a y s a n d L o g i c a l D r i v e s
35
w w w. d e l l . c o m | s u p p o r t . d e l l . c o m
Ta b l e 4 - 2 . L o g i c a l D r i v e C o n f i g u r a t i o n (continued)
Logical
Drive
Raid
Level
Stripe
Size
Logical
Drive Size
Cache
Policy
Read
Policy
Write
Policy
# of Physical
Drives
LD19
LD20
LD21
LD22
LD23
LD24
LD25
LD26
LD27
LD28
LD29
LD30
LD31
LD32
LD33
LD34
LD35
LD36
LD37
LD38
LD39
Optimizing Data Storage
Data Access Requirements
Each type of data stored in the disk subsystem has a different frequency of
read and write activity. If you know the data access requirements, you can
more successfully determine a strategy for optimizing the disk subsystem
capacity, availability, and performance.
36
C o n fi g ur i n g Ar r a y s a n d Lo g i ca l D ri ve s
Servers that support Video on Demand typically read the data often, but
write data infrequently. Both the read and write operations tend to be long.
Data stored on a general-purpose file server involves relatively short read
and write operations with relatively small files.
Array Functions
You must first define the major purpose of the disk array. Will this disk array
increase the system storage capacity for general-purpose file and print
servers? Does this disk array support any software system that must be
available 24 hours per day? Will the information stored in this disk array
contains large audio or video files that must be available on demand? Will
this disk array contain data from an imaging system?
You must identify the purpose of the data to be stored in the disk subsystem
before you can confidently select a RAID level and a RAID configuration.
Planning the Array Configuration
Fill out the following form in Table 4-3. Planning the Array Configuration
when planning an array configuration.
Ta b l e 4 - 3 . P l a n n i n g t h e A r r a y C o n f i g u r a t i o n
Question
Answer
Number of physical drives in the array
Purpose of this array. Rank the following factors:
• Maximize drive capacity
• Maximize the safety of the data (fault tolerance)
• Maximize hard drive performance and throughput
Number of hot spares
Amount of cache memory installed on the RAID controller
Are all hard drives and the server protected by an
uninterruptible power supply (UPS)?
C o n fi g u ri ng Ar r a y s a n d L o g i c a l D r i v e s
37
w w w. d e l l . c o m | s u p p o r t . d e l l . c o m
Random Array Deletion
The CERC controller supports random array deletion, which is the ability
to delete any unwanted logical drives and use that space for a new logical
drive.
NOTE: Refer to the CERC Configuration Software Guide for the procedures
for random array deletion.
NOTE: When a ‘delete’ request reaches the operating system driver, the driver
stops all the running input/output (I/O) for other logical drives and processes
the delete request first. Normal read/write operation starts after the delete
request is completed.
After you delete a logical drive, you can create a new one. You can use the
configuration utilities to create the next logical drive from the noncontiguous free space (‘holes’), and from the newly created arrays.
NOTICE: The deletion of the logical drive can fail under certain conditions.
You cannot delete a logical drive during a reconstruction. Deletion can fail
during a rebuild, initialization or check consistency of a logical drive, if that
drive has a higher logical drive number than the drive you want to delete.
The main benefit of random array deletion on the configuration module is
that you are not restricted to sequential or contiguous logical drives when
you create logical drives. You can use non-contiguous segments to create
logical drives.
You can still create sequential logical drives, without using the noncontiguous segments. The utilities provide information about sequential
segments, non-contiguous segments and physical drives that have not been
configured. You can use this information when you create logical drives.
38
C o n fi g ur i n g Ar r a y s a n d Lo g i ca l D ri ve s
5
SECTION 5
Tr o u b l e s h o o t i n g
General Problems and Solutions
BIOS Boot Error Messages
Other BIOS Error Messages
DOS ASPI Driver Error Messages
Other Potential Problems
w w w. d e l l . c o m | s u p p o r t . d e l l . c o m
General Problems and Solutions
Table 5-1. General Problems describes general problems you might
encounter and suggests solutions.
Ta b l e 5 - 1 . G e n e r a l P r o b l e m s
Problem
Suggested Solution
The system hangs during the boot
process after installation.
Make sure the CERC card is installed in
the proper PCI expansion slot.
Some operating systems do not
load in a computer with a RAID
adapter.
Check the system BIOS configuration for
PCI interrupt assignments. Make sure
some interrupts are assigned for PCI.
Initialize the logical drive before installing
the operating system.
One of the hard drives in the array
fails often.
Check the drive error counts using the
BIOS Configuration Utility. Select
Objects—> Physical Drive. After the
Physical Drive Selection Menu displays,
press <F2> to view the drive errors.
Format the drive.
Rebuild the drive.
If the drive continues to fail, replace it with
another drive of the same capacity.
After pressing <Ctrl><M>,
running Megaconf.exe, and trying
to make a new configuration, the
system hangs when scanning
devices.
Check the drive’s master/slave settings on
each channel to make sure each device is
set to Master or cable select (CS).
Pressing <Ctrl> <M> or running
megaconf.exe does not display the
Management Menu.
These utilities require a color monitor.
Cannot flash or update the CERC
card.
Call Dell™ Support for assistance.
Firmware Initializing...
Make sure that the RAID controller is
properly seated in the PCI slot.
appears and remains on the screen.
40
Troub l esh o ot i n g
Replace the drive cable.
BIOS Boot Error Messages
Table 5-2. BIOS Boot Error Messages displays the error messages that can
display when there is an error during bootup.
Ta b l e 5 - 2 . B I O S B o o t E r r o r M e s s a g e s
Message
Problem
Suggested Solution
Adapter BIOS
Disabled. No
Logical Drives
Handled by BIOS
The CERC BIOS is
disabled. Sometimes the
BIOS is disabled to
prevent booting from
the BIOS.
Enable the CERC BIOS
using the BIOS
Configuration Utility.
Host Adapter at
Baseport xxxx
Not Responding
The BIOS cannot
communicate with the
firmware on the RAID
card.
Make sure the RAID card
is properly installed.
No CERC Adapter
The BIOS cannot
communicate with the
firmware on the RAID
card.
Make sure the RAID card
is properly installed.
Configuration
of NVRAM and
drives
mismatch.
The configuration
stored on the RAID card
does not match the
configuration stored on
the drives.
When prompted, press a
key to run the BIOS
Configuration Utility.
Run View/Add
Configuration
option of
Configuration
Utility.
Press any key
to run the
Configuration
Utility.
Select Configure—>
View/Add
Configuration from the
Management Menu.
Use View/Add
Configuration to examine
both the configuration in
the non-volatile random
access memory (NVRAM),
and the configuration
stored on the hard drives.
Resolve the problem by
selecting one of the
configurations.
Trou ble sho oting
41
w w w. d e l l . c o m | s u p p o r t . d e l l . c o m
Ta b l e 5 - 2 . B I O S B o o t E r r o r M e s s a g e s (continued)
Message
Problem
Suggested Solution
1 Logical Drive
Failed
A logical drive failed to
sign on.
Make sure all physical
drives are properly
connected and are
powered on.
Run the BIOS
Configuration Utility to
find out whether any
physical drives are not
responding. Reconnect or
replace any drive that is
not responding.
X Logical
Drives Degraded
x number of logical
drives signed on in a
degraded state.
Make sure all physical
drives are properly
connected and are
powered on.
Run the BIOS
Configuration Utility to
find if any physical drives
are not responding.
Reconnect, replace, or
rebuild any drive that is
not responding.
1 Logical Drive
Degraded
A logical drive signed on
in a degraded state.
Make sure all physical
drives are properly
connected and are
powered on.
Run the BIOS
Configuration Utility to
find out if any physical
drives are not responding.
Reconnect, replace, or
rebuild any drive that is
not responding.
42
Troub l esh o ot i n g
Other BIOS Error Messages
Table 5-3. Other BIOS Error Messages displays the other BIOS error
messages that can display.
Ta b l e 5 - 3 . O t h e r B I O S E r r o r M e s s a g e s
Message
Problem
Suggested Solution
Following
disk not
found and no
empty slot
available for
mapping it
The physical disk roaming
feature did not find the
physical disk with the
displayed drive ID. No slot
is available to map the
physical drive, and the
RAID controller cannot
resolve the physical drives
into the current
configuration.
Resolve the mismatch
between controllers and
drives.
Unresolved
configuration
mismatch
between disks
and NVRAM on
the adapter
The configuration stored
in the NVRAM of the
RAID controller does not
match the configuration
stored on the drives.
Press a key to run the BIOS
Configuration Utility.
Select Configure—>
View/Add Configuration
from the Management
Menu.
Use View/Add
Configuration to examine
both the configuration in
NVRAM and the
configuration stored on the
hard drives. Select one of the
configurations.
Trou ble sho oting
43
w w w. d e l l . c o m | s u p p o r t . d e l l . c o m
DOS ASPI Driver Error Messages
Table 5-4. DOS ASPI Driver Error Messages displays the error messages
that can display when there is a problem with the DOS ASPI® driver.
Ta b l e 5 - 4 . D O S A S P I D r i v e r E r r o r M e s s a g e s
44
Troub l esh o ot i n g
Message
Corrective Action
DOS ASPI has NOT
been loaded.
The ASPI manager is not loaded. One of the
failure codes listed below is displayed next.
Controller setup
FAILED error code=
[0xab]
Correct the condition that caused the failure.
The failure codes are:
• 0x40 No RAID adapters found.
• 0x80 Timed out waiting for interrupt to be
posted.
• 0x81 Timed out waiting for CERC response
command.
• 0x82 Invalid command completion count.
• 0x83 Invalid completion status received.
• 0x84 Invalid command ID received.
• 0x85 No RAID adapters found or no PCI BIOS
support.
• 0x90 Unknown setup completion error.
'ERROR: VDS support
is *INACTIVE* for
CERC logical drives
The /h option is appended to driver in
CONFIG.SYS or this driver is used with a BIOS
that is earlier than v1.10, or no logical drives are
configured.
Other Potential Problems
Table 5-5. Other Potential Problems displays other items that might cause
problems.
Ta b l e 5 - 5 . O t h e r P o t e n t i a l P r o b l e m s
Topic
Information
DOS ASPI
MEGASPI.SYS, the CERC DOS ASPI manager, uses 6 KB
of system memory once it is loaded.
CD drives under
DOS
At this time, copied CDs are not accessible from DOS even
after loading MEGASPI.SYS and AMICDROM.SYS.
Physical drive
errors
To display the Media Error and Other Error options, select
a physical drive under the Objects—> Physical Drive menu
and press <F2>.
A Media Error is an error that occurred while actually
transferring data. An Other Error is an error that occurs at
the hardware level because of a device failure, poor cabling,
bad termination, signal loss, and so on.
Virtual sizing
The virtual sizing option enables RAID expansion. Virtual
sizing must be enabled to increase the size of a logical drive
or add a physical drive to an existing logical drive.
Press <Ctrl><M> to run the BIOS Configuration Utility
to enable virtual sizing. Select Objects—> Logical Drive,
then select View/Update Parameters. Set Virtual Sizing to
Enabled.
BSD Unix
No BSDI Unix driver is provided. The RAID controller does
not support BSDI Unix.
Multiple LUNs
The RAID controller supports one logical unit number
(LUN) per target ID. No multiple LUN devices are
supported.
CERC Power
Requirements
The maximum CERC power requirements are 5.25 - 7.875
watts at 5.25 V and 1 - 1.5 amps.
Trou ble sho oting
45
46
Troub l esh o ot i n g
w w w. d e l l . c o m | s u p p o r t . d e l l . c o m
6
SECTION 6
Appendix A:
Regulator y - LSI Logic
Adapters
FCC Compliance Statement
Canadian Compliance (Industry Canada)
Manufacturer Declaration
MIC
VCCI Class B Statement
w w w. d e l l . c o m | s u p p o r t . d e l l . c o m
FCC Compliance Statement
This equipment has been tested and found to comply with the limits for a
Class B digital device pursuant to Part 15 of the FCC rules. These limits are
designed to provide reasonable protection against harmful interference in a
residential installation. This equipment generates, uses and can radiate
radio frequency energy, and if not installed and used in accordance with the
instructions, may cause harmful interference to radio communications.
However, there is no guarantee that interference will not occur in a
particular installation.
If this equipment does cause harmful interference to radio or television
reception, which can be determined by turning the equipment off and on,
the user is encouraged to try to correct the interference by one or more of
the following measures:
•
Reorient or relocate the receiving antenna.
•
Increase the separation between the equipment and receiver.
•
Connect the equipment to an outlet different from that to which
the receiver is connected.
•
Consult the dealer or an experienced radio/TV technician for help.
NOTE: This device complies with Part 15 of the FCC Rules. Operation is
subject to the following two conditions: (1) This device may not cause
harmful interference, and (2) this device must accept any interference
received, including interference that may cause undesire operation.
CAUTION: If the device is changed or modified without
permission of LSI Logic, the user may void his or her
authority to operate the equipment.
48
Ap p e n d i x A : Re g u l a t or y - LS I Lo g i c Ad a p te r s
Canadian Compliance (Industry
Canada)
Canadian Regulatory Information (Canada Only)
This digitial apparatus does not exceed the Class B limits for radio noise
emissions from digital apparatus set out in the Radio Interference
Regulations of the Canadian Department of Communications. Note that
the Canadian Department of Communications (DOC) regulations provide,
that changes or modifications not expressly approved by Intel could void
your authority to operate the equipment. This Class B digital apparatus
meets all the requirements of the Canadian Interference -Causing
Equipment Regulations.
Cet appareil numerique de la classe B respecte toutes les exigences du
Reglement sur la material brouilleur du Canada.
Manufacturer Declaration
This certifies that this product is in compliance with EU Directive
89/336/EEC, using the EMC standards EN55022;1988 (Class B) and
EN55024;1988. This product also meets or exceeds EN60950;1992 safety
requirements. This product has been tested and certified to meet CISPR
Class B requirements.
LSI Logic Corporation
6145-D Northbelt Parkway
Norcross, GA 30071
A p p en d i x A : Re g u l a t o r y - L S I L o gi c Ad a p te r s
49
w w w. d e l l . c o m | s u p p o r t . d e l l . c o m
MIC
B Class Device
Please note that this device has been approved for non-business purposes
and may be used in any environment, including residential areas.
VCCI Class B Statement
50
Ap p e n d i x A : Re g u l a t or y - LS I Lo g i c Ad a p te r s
Index
A
compatibility, 9
firmware, 10
array performance
features, 13
Configuration on Disk, 8
formatting, 38
ASPI drivers, 26
configuring arrays, 33
ASPI manager, 44
configuring logical drives, 34
automatic failed drive
detection and rebuild, 14
connecting IDE cables, 24
hardware architecture
features, 12
connectors, 21
hardware requirements, 9
configuration strategies, 34
H
CPU, 10
B
BIOS, 10
BIOS boot error messages, 41
BIOS Configuration
Utility, 16, 25
D
Dell Manager, 16
devices per IDE channel, 10
BIOS message, 24
documentation, 6
bus data transfer rate, 9
drive roaming, 8
bus type, 9
driver installation, 25
drivers, 25
C
cache configuration, 10
cache memory, 10
card size, 9
E
error
failure codes, 44
I
IDE backup and utility
software, 9
IDE cables
connecting, 24
IDE channels, 6
IDE controller, 10
IDE data transfer rate, 10
IDE device compatibility, 9
installation steps, 21
installing the RAID
controller, 23
J
CERC BIOS, 11
CERC Manager, 16-17
F
checklist, 20
fault tolerance features, 14
jumpers
setting, 21
Index
51
2
Index
L
RAID levels supported, 10
Linux Red Hat, 16
RAID management, 16
logical drive configuration, 35
RAID management
features, 13
regulatory information, 47
N
non-volatile RAM, 10
Novell NetWare, 15
S
server management, 9
setting up IDE devices, 24
O
SMART technology, 8
onboard speaker, 16
SNMP agent, 9
operating system software
drivers, 15
software utilities, 15
operating voltage, 10
optimizing data storage, 36
other BIOS error messages, 43
specifications, 9
W
WebBIOS, 17
Windows NT/2000, 15
P
physical device layout, 33
planning the array
configuration, 37
powering down the
computer, 21
processor, 9
R
RAID card
installing, 23
RAID controller card
layout, 22
52
In d e x
CERC_backcover.fm Page 5 Monday, October 21, 2002 4:01 PM
CERC_backcover.fm Page 6 Monday, October 21, 2002 4:01 PM
Printed in the U.S.A.
P/N 0P854 Rev. A03-00
w w w. d e l l . c o m | s u p p o r t . d e l l . c o m