1
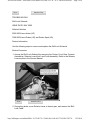
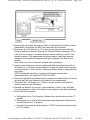
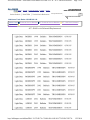
ALLDATA Online - 2000 Isuzu Truck Rodeo LS 2WD V6-3.2L - A/T - Shift Lock Solen... Page 1 of 4
DAN GRIMWOOD
DAN GRIMWOOD00002
Home | Account | Contact ALLDATA | Log Out | |">Help
Select Vehicle | New TSBs | Technician's Reference
OK
Component Search:
Conversion Calculator
2000 Isuzu Truck Rodeo LS 2WD V6-3.2L
Vehicle Level
Replacement
Technical Service Bulletins
All Technical Service Bulletins
A/T - Shift Lock Solenoid
A/T - Shift Lock Solenoid Replacement
http://alldatapro.com/alldata/PRO~V153345179~C34490~R0~OD~N/0/77993956/785370... 12/2/2010
ALLDATA Online - 2000 Isuzu Truck Rodeo LS 2WD V6-3.2L - A/T - Shift Lock Solen... Page 2 of 4
Zoom
Sized for Print
TSB SB05-05-5004
Shift Lock Solenoid
ISSUE DATE: MAY 2005
Affected Vehicles
2002-2004 Isuzu Axiom (UP)
1998-2004 Isuzu Rodeo (UE) and Rodeo Sport (UA)
Service Information
Use the following steps to remove and replace the Shift Lock Solenoid.
Service Procedure
1. Access the Shift Lock Solenoid by removing the Center, Front, Rear Console
Assemblies, Selector Lever Knob, and Cover Assembly. Refer to the Selector
Lever section in the Service Manual.
Zoom
Sized for Print
2. Set parking brake, move Selector Lever to lowest gear, and remove the Shift
Lock Cable.
http://alldatapro.com/alldata/PRO~V153345179~C34490~R0~OD~N/0/77993956/785370... 12/2/2010
ALLDATA Online - 2000 Isuzu Truck Rodeo LS 2WD V6-3.2L - A/T - Shift Lock Solen... Page 3 of 4
Zoom
Sized for Print
3. Remove the two screws securing the Shift Lock Solenoid to the Selector Lever
subassembly. Disconnect the Shift Lock Solenoid 2-pin connector.
4. Disconnect the 1-40 (Rodeo) or 1-3 (Axiom) six-pin connector and slide the
female connector off bracket. Remove the Terminal Position Assurance (TPA)
Lock from the connector. Locate the two blue wires in position 1 and 3 on the
female connector. With appropriate tool (shown above), apply light pressure
upward on the connector locking tab while gently pulling on the blue wire to
release.
Note :Never use force to remove a terminal from a connector.
5. Insert the two blues wires from the replacement Shift Lock Solenoid into the 140 (Rodeo) or 1-3 (Axiom) female connector. It does not matter which blue wire
is inserted into the 1 and 3 position. Gently tug the blue wires to make sure they
are secure.
NOTE :Discard the extra 2-pin connector sub harness included with
replacement Shift Lock Solenoid P/N 8-97181-068-2.
6. Reconnect the Shift Lock Solenoid 2-pin connector and reattach the two screws
securing the Shift Lock Solenoid to the selector lever subassembly.
7. Reconnect the 1-40 (Rodeo) or 1-3 (Axiom) six-pin connector and slide the
female connector onto the bracket.
8. Reinstall the Selector Lever Knob, Cover Assembly, Center, Front, and Rear
Console Assemblies. Refer to the Selector Lever section in the Service Manual.
9. Check Shift Lock operation:
a. With ignition key in "Lock" position, Selector lever should not move from "P"
position.
b. With ignition key in "ON" position and brake pedal depressed. Selector lever
can be moved out of "P" position.
c. Key can be removed only when turned to "LOCK" position and selector lever
is in "P" position.
http://alldatapro.com/alldata/PRO~V153345179~C34490~R0~OD~N/0/77993956/785370... 12/2/2010
ALLDATA Online - 2000 Isuzu Truck Rodeo LS 2WD V6-3.2L - A/T - Shift Lock Solen... Page 4 of 4
Warranty Claim Information
Zoom
Sized for Print
Use the labor operation shown.
NOTE :
1. Labor Time includes administrative time allowance.
2. Information released on paper and electronic format prior to bulletin release
cannot be updated. For the most current and up to date information refer to
website
3. Always refer to the Isuzu Service Policy Procedure Manual for specific details
on warranty coverage and policies.
Zoom
Sized for Print
Disclaimer
© 2010 ALLDATA LLC. All rights reserved.
Terms of Use
http://alldatapro.com/alldata/PRO~V153345179~C34490~R0~OD~N/0/77993956/785370... 12/2/2010