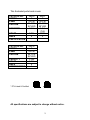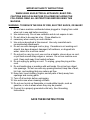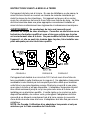
1
TORNADO® INDUSTRIES 7401 W. LAWRENCE AVENUE CHICAGO, IL 60706 (708) 867-5100 FAX (708) 867-6968 www.tornadovac.com TORNADO THE PS SERIES OF CARPET SPOTTERS (SERIES F) CATALOG NO. 64230 & 98220 (115v, 60Hz) 98221 (230V, 50Hz) OPERATIONS/SERVICE MANUAL L2700FF B/T 12/00 FOR COMMERCIAL USE ONLY 2000 Tornado Industries All rights reserved. NOTES 2 This illustrated parts book covers: CATALOG NO. SERIES PUMP VACUUM CAPACITY 98220 F 55 PSI 94 CFM 84”H2O 2 Gal 115V 8 * VOLTS AMPS CERTIFICATION CATALOG NO. SERIES PUMP VACUUM CAPACITY VOLTS AMPS CERTIFICATION 98221 F 55 PSI 82 CFM 68”H2O 2 Gal (7.6l) 230V 4 64230 F 55 PSI 94 CFM 84”H2O 2 Gal 115V 8 * * ETL Listed & Certified c All specifications are subject to change without notice. 3 TABLE OF CONTENTS: Safety Instructions Electrical/Grounding Methods Unpacking Precautions General Precautions Preparation Instructions Operating Instructions & Cleaning Tips Maintenance Instructions Main Assembly Optional Handle Assembly Vacuum/Pressure Hose Assembly Wiring Diagram (115V) & Accessories Wiring Diagram (230V) 5-6 7-8 9 - 10 11 12 13 - 14 15 16 - 17 18 19 20 21-22 Tornado® Standard Warranty Program* 10 Years: Warranties do not cover components subject to normal wear or abuse and misuse, and have other limitations not specified here. For full details , contact your Authorized Tornado Distributor, Service Center, or the Tornado Technical Service Department. All plastic tanks and rotationally-molded bodies 2 Years: Parts on all Tornado and Tornado/Karcher cleaning equipment 1) 2) 1 Year: Labor on all Tornado and Tornado/Karcher cleaning equipment 1) 2) 1 Year: Warranty on batteries, one full year, Not pro-rated. * Effective January 1st, 2001. Terms subject to change without notice. 1) Windshear™ Blower-Dryer, Insulation Blowers, CW 50, CW 100, and Duo-Upright Carpetkeepers™ are warranted for 1 (one) year for parts and labor. 2) Warranties on the ICC1, KMR 1200, KMR 1250, and KMR 1700 are 24 months parts/6 months labor OR 1000 hours of operation, whichever comes first. Warranties on the BR and BD 1000 are 24 months parts/12 months labor OR 1000 hours of operation, whichever comes first. 4 IMPORTANT SAFETY INSTRUCTIONS WHEN USING AN ELECTRICAL APPLIANCE, BASIC PRECAUTIONS SHOULD ALWAYS BE FOLLOWED INCLUDING THE FOLLOWING: READ ALL INSTRUCTIONS BEFORE USING THIS MACHINE. WARNING: TO REDUCE THE RISK OF FIRE, ELECTRIC SHOCK, OR INJURY: 1. Do not leave machine unattended when plugged in. Unplug from outlet when not in use and before servicing. 2. Use indoors only. Do not use outdoors and do not expose to rain. 3. Do not allow to be used as a toy. Close attention is 4. necessary when used by or near children. 5. Use only as described in this manual. Use only manufacturer’s recommended attachments. 6. Do not use with damaged cord or plug. If machine is not working as it should, has been dropped, damaged, left outdoors, or dropped into water, return it to a service center. 7. Do not pull or carry by cord, use cord as a handle, close a door on cord, or pull cord around sharp edges or corners. Do not run machine over cord. Keep cord away from heated surfaces. 8. Do not unplug by pulling on cord. To unplug, grasp the plug not the cord. 9. Do not handle plug or machine with wet hands. Do not put any object into openings. Do not use with any opening blocked; keep free of dust, lint, hair, and anything that may reduce air flow. 10. Keep hair, loose clothing, fingers, and all parts of body away from openings and moving parts. 11. Turn off all controls before unplugging. 12. Use extra care when cleaning on stairs. 13. Do not use to pick up flammable or combustible liquids, such as gasoline, or use in areas where they may be present. 14. Connect to a properly grounded outlet only. See Grounding Instructions. SAVE THESE INSTRUCTIONS 5 IMPORTANTES MESURES DE SÉCURITÉ L’UTILISATION D’UN APPAREIL ÉLECTRIQUE DEMANDE CERTAINES PRÉCAUTIONS: LIRE TOUTES LES INSTRUCTIONS AVANT DE FAIRE FONCTIONNER CET APPAREIL. AVERTISSEMENT. POUR RÉDUIRE LES RISQUES D’INCENDIE, DE CHOC ÉLECTRIQUE OU DE BLESSURE: 1. Ne pas laisser l’appareil sans surveillance lorsqui’il est branché. Débrancher lorsque l’appareil n’est pas utilisé et avant l’entretien. 2. Ne pas utiliser à l’extérieur et ne pas aspirer de matières humides. 3. Ne pas permettre aux enfantes de jouer avec l’appareil. Une attention particulière est nécessaire lorsque l’appareil est utilisé par des enfantes ou à proximité de ces derniers. 4. N’utiliser que conformément à cette notice avec les accessoires recommandés par le fabricant. 5. Ne pas utiliser si le cordon ou la fiche est endommagé. Retourner l’appareil à un atelier de réparation s’il ne fonctionne pas bien, s’il est tombé ou s’il a été endommagé, oublié à l’extérieur ou immergé. 6. Ne pas tirer soulever ni traîner l’appareil par le cordon. Ne pas utiliser le cordon comme une poignée, le coincer dans l’embrasure d’une porte ou l’appuyer contre des arétes vives ou des coins. Ne pas faire rouler l’appareil sur le cordon. Garder le cordon à l’écart des surfaes chaudes. 7. Ne pas débrancher en tirant sur le cordon. Tirer plutôt la fiche. 2. Ne pas toucher la fiche ni l’appareil lorsque vos mains sont humides. 3. N’insérer aucun objet dans les ouvertures. Ne pas utiliser l’appareil lorsqu’une ouverture est bloquée. S’assurer que de la poussière, de la peluche, des cheveux ou d’autres matières ne réduisent pas le débit d’air. 4. Maintenir les cheveux, les vétements amples, les doigts et toutes les parties du corps à l’écart des ouvertures et des pièces mobiles. 5. Mettre toues les commandes à la position ARRÊT avant de débrancher l’appareil. 6. User de prudence lors du nettoyage des escaliers. 7. Ne pas aspirer des liquides inflammables ou combustibles, comme de l’essence, et ne pas faire fonctionner dans des endroits où peuvent se trouver de tels liquides. 14 Ne brancher qu’à une prise de courant avec mise à la terre. Voir les instructions visant la mise à la terre. INSTRUCTIONS VISANT LA MISE À LA TERRE 6 GROUNDING INSTRUCTIONS This appliance must be grounded. If it should malfunction or breakdown, grounding provides a path of least resistance for electric current to reduce the risk electric shock. This machine is equipped with a cord having an equipment -grounding conductor and grounding plug. The plug must be inserted into an appropriate outlet that is properly installed and grounded in accordance with all local codes and ordinances. WARNING: Improper connection of the equipment-grounding conductor can result in a risk of electric shock. Check with a qualified electrician or service person if you are in doubt as to whether the outlet is properly grounded. Do not modify the plug provided with the appliance - if it will not fit the outlet, have a proper outlet installed by a qualified electrician. This appliance is for use on a nominal 120-volt circuit, and has a grounding plug that looks like the plug illustrated in sketch A. A temporary adapter that looks like the adapter illustrated in sketches B and C may be used to connect this plug to a 2-pole receptacle as shown in sketch B if a properly grounded outlet is not available. The temporary adapter should be used only until a properly grounded outlet (sketch A) can be installed by a qualified electrician. The green-colored rigid ear, lug, or the like extending from the adapter must be connected to a permanent ground such as a properly grounded outlet box cover. Whenever the adapter is used, it must be held in place by a metal screw. NOTE: In Canada, the use of a temporary adapter is not permitted by the Canadian Electrical Code SKETCH A SKETCH B 7 SKETCH C INSTRUCTIONS VISANT LA MISE À LA TERRE Cet appareil doit etre mis à la terre. En cas de défaillance ou de panne, la mise à la terre fournit au courant un chemin de moindre résistance qui réduit le risque de choc électrique. Cet appareil est pourvu d’un cordon muni d’un conducteur de terre et d’une fiche avec broche de terre. La fiche doit étre branchée dans une prise appropriée correctement installée et mise à la terre conformément aux réglements et ordonnances municipaux. AVERTISSEMENT. Un conducteur de terre mal raccordé peut entraîner un risque de choc électrique. Consulter un électricien ou un technicien d’entretien qualifié si vous n’étes pas certain que la prise est correctement mise à la terre. Ne pas modifier la fiche fournie avec l’appareil - si elle ne peut étre insérée dans la prise, faire installer une prise adéquate par une électricien qualifié. CROQUIS A CROQUIS B CROQUIS C Cet appareil est destiné à un circuit de 120 V et est muni d’une fiche de terre semblable à celle illustrée par le croquis A. Un adaptateur temporaire semblable à celui illustré par les croquis B peut étre utilisé pour brancher cette fiche à une prise bipolaire comme l’illustre le croquis B si une prise avec mise à la terre n’est pas disponible. L’adaptateur temporaire devrait étre utilisé seulement jusqu’à ce qu’une prise avec mise à la terre soit installée par un électricien qualifié. L’oreille rigide ou le crochet ou autre dispositif semblable, de couleur verte, prolongeant l’adaptateur doit étre raccordé à un élément correctement mis à la terre comme le couvercle d’une boîte de sortie mise à la terre. L’adaptateur doit étre fixé par une vis métallique. NOTE: Au Canada, l’utilisation d’un adaptateur temporaire n’est pas autorisee par le Code canadien de l’électricité. 8 WHEN THE MACHINE IS DELIVERED Check the carton carefully for signs of rough handling. Remove the machine from the carton and look for concealed damage. If the machine is damaged, notify the carrier immediately and request an inspection. Be sure to keep the carton, packing inserts, packing lists and carrier’s receipt until the inspector has verified your claim. BEFORE OPERATING THE MACHINE Read the manual carefully and completely before attempting to operate the unit. This manual has important information for the use and safe operation of the machine. Keep this manual on file and handy. This machine will assure years of satisfactory service if operated and maintained according to recommendations in the manual. If additional information is needed, please contact your local distributor or write to: TORNADO INDUSTRIES 7401 W. LAWRENCE AVE. CHICAGO, IL 60706 708/867-5100 FAX: 708/867-6968 All information and specifications printed in the manual and parts list are current at the time of printing. However because of Tornado’s policy of continual product improvement, we reserve the right to make changes at any time without notice. This machine was shipped with window washer antifreeze, during the winter months, in the solution line system to protect the pump and valves from freezing during transportation and storage. Before you use the unit, rinse the solution line system with clean water (refer to Protect From Freezing). 9 WARRANTY To protect your investment, promptly fill out the required information on the warranty card that comes with the unit and mail it back to Tornado Industries Note: Service repair and warranty work is not normally handled at the factory. WARNING The machine was designed for use in spot cleaning on carpeted floors and for upholstery extraction applications as per instructions and recommendations written in this manual. Any deviation from its proper use or purpose and the consequential damage that may occur is the sole responsibility of the end user. 10 GENERAL PRECAUTIONS • Do not use the machine for dry vacuuming. This machine is not fitted with a dry filter. • Use defoamer in the recovery tank at all times to prevent damage to the vacuum motor. • Do not use water in excess of 140 degrees F (60 degrees C). • Use only low foaming carpet and upholstery cleaners and defoamers intended for machines of this type. Do not use dyes, bleaches, ammonia or other additives. The use of powdered cleaning solution if not diluted properly may result in the intake screen clogging or damage to the pump. • Do not expose machine to freezing temperatures. • Do not attempt to repair warranted machines. All repairs must be done by a qualified and authorized repair center. Non warranted repairs will be billed back to the owner of the unit. • Do not use any replacement parts except those specified in the parts list. Unauthorized parts will void the warranty and could cause the unit not to function properly. REQUIRED CLEANING CHEMICALS Use only low foam cleaning chemicals that are designed for carpet and upholstery extraction. • General carpet and upholstery extraction cleaner added to the solution tank. • Traffic lane pre-spray usually applied with a hand or pump-up sprayer. • Spotter used with a hand sprayer. • Defoamer only goes into the recovery tank. CAUTION: Use as directed. Do not over-use the cleaning chemicals. EXTENSION CORD If an extension cord is used, the wire size must be a least one size larger than the power cord on the machine. The ProSpot is equipped with a 25’ 18-3 power cord. FAILURE TO COMPLY WITH THE ABOVE WARNING INSTRUCTIONS WILL VOID THE WARRANTY. 11 PREPARING THE MACHINE: WARNING!! To prevent possible disease hazard, before attempting to clean bodily fluid spills, you must kill any viruses, germs or bacteria present in the bodily fluid. 1. Loosen the two latches that hold the recovery tank to the solution tank. Lift the recovery tank off. 2. Pour up to 2 gallons (7.6 liters) of hot water into clean solution tank. Water temperature must not exceed 140°F (60°C). Pour in a nonfoaming cleaning concentrate to the proper dilution noted on the container. Be sure that the vacuum motor foam filter is in place (located on top of the solution tank). 3. Place the recovery tank on the solution tank and refasten the tank latches. Attach hand tool to solution and vacuum hoses. Attach solution hose to fitting on front of solution tank (98225 & 98226 only). Be sure hose coupler locks onto extractor’s coupler. Connect vacuum hose to recovery tank. 4. Plug power cord into a grounded outlet. See GROUNDING INSTRUCTIONS. 5. See “Illustrated Parts List and Wiring Diagram” for available accessories. 12 OPERATING THE PROSPOT: 1. Turn the switch, located on the rear panel, to “VACUUM/SPRAY”. 2. Place the hand tool on the surface to be cleaned and squeeze the solution lever. Move tool over surface to be cleaned. Note: Do not apply too much solution to upholstery to minimize dry time. 3. Always monitor recovered solution in the recovery tank. Excess water can be drawn into the vacuum motor resulting in damage to the motor. Turn machine off and empty recovery tank periodically. This machine is equipped with a float shut off to help prevent damage to the vacuum motor. 4. At the end of job turn switch to ‘OFF’ and disconnect power cord from outlet. Empty recovery tank (turn upside down and empty through hose intake) and solution tank of any solutions. Thoroughly rinse both tanks to remove any residue and to keep tanks fresh. CLEANING TIPS: • Check the condition of the carpeting. If the carpet is loose, heavily soiled, stained, spotted or badly worn, point this out to the person in charge. • Locate an inconspicuous spot on the area to be cleaned. Test carpet for colorfastness before proceeding. Pour the concentrated cleaning solution on the spot, cover with a white towel and place a heavy object on top to absorb the cleaning solution. Wait 10 minutes for any reaction to take place. Remove weight. If there is no color transfer, it should be safe to clean. • Clean the area first with a Clean-Air Carpetkeeper, upright vacuum. Do not use the ProSpot as a dry vacuum! Heavily soiled carpet or areas of concentrated foot traffic should be treated with • recommended pre-spotting or pre-spray chemicals, using a hand spray trigger bottle or pump up sprayer. Do not allow any spotter or pre-spray to dry on the carpet. Use a small hand held carpet brush to agitate the carpeting. Always agitate toward the center of the spot. • After spot cleaning the carpet, place a small square of aluminum foil or 6 mil poly square under the furniture legs to prevent moisture from 13 damaging the finish or rusting the metal glides, if placing furniture on moist carpeting. • Identify the type of carpet fiber to be cleaned. Most carpet fibers in use are nylon or acrylic based. Best results in cleaning would be obtained if hot water is used to clean these types of fibers. On the other hand, hot water could shrink natural fiber carpeting, like wool and cotton in particular. Exercise caution when cleaning natural fibers. Use cool water test for colorfastness and apply the least amount of cleaning solution as possible. • Furnishings have many different types of fabric. Be sure that the proper chemicals are used and that you follow the chemical manufacturer’s directions. • When the ProSpot runs out of cleaning solution, noted by streaking or no solution flow, turn off the machine and drain the recovery tank. Refill solution tank and continue cleaning. • To decrease drying time go over the carpet and/or furnishings without squeezing the spray lever or turn the power switch to “VACUUM ONLY”. To further decrease the drying time, use the Windshear 3000 Carpet Blower. PROTECT FROM FREEZING If it becomes necessary to store in temperatures that could drop below 40 degrees F, the pumping system, hoses and valves must be protected from freezing with a methyl hydrate window washer antifreeze solution. Do not use ethylene glycol or cooling system antifreezes. • Add one quart of windows washer antifreeze to the solution tank, turn on the pump and squeeze the spray lever until antifreeze solution fills the solution lines. • Always allow the unit to reach room temperature before turning on to remove the antifreeze from the system. 14 MAINTENANCE: WARNING!! Always unplug power cord before cleaning, making adjustments or repairs. AFTER EACH USE: • Thoroughly flush out both tanks. HINT: To clean the recovery tank turn upside down and lightly spray into the vacuum intake. this will “backflush” the filter screen and float shut-off ball. Drain tank through the hose intake. • Wipe down entire unit with cleaning solution. • Flush pump system with 1 quart clean water with 1 ounce white vinegar. • Remove and clean foam vacuum filter. Remove lint from vacuum motor intake screen. Store with tanks exposed in clean dry place. • Inspect power cord for damage. Replace if necessary. Wipe and coil the cord from machine to the plug then place coiled cord through molded handle for storage or transport. • Remove lint from hand tool opening. HINT: Back-flush through vacuum hose end. PERIODIC MAINTENANCE • It is highly recommended that once a month you flush the ProSpot out with a 8 to 1 ratio of water to white vinegar or anti-browning solution through the extractor. This will help to prevent the build up of alkaline residue. • If the spray jet becomes clogged, remove and wash it thoroughly and blow dry. Do not use wire or pins to clean the nozzle as this will cause the spray pattern to become distorted, thereby giving you a streaking pattern on the carpeting. • Once a month, inspect all electrical cables, hoses, filters and connections in the ProSpot. If you see something that should be repaired or replaced this should be reported and repaired. Little things are easy to forget, but as these little things add up you end up with a cluster of problems that will cost you more in the long run. • Inspect the vacuum motor carbon brushes after every 700 hours of use replace, if necessary. • Be sure to use genuine Tornado parts and that service is provided by an authorized Tornado Service Center. 1-800-VACUUMS Use of non-OEM parts will void the warranty. 15 ES SERIES CARPET SPOTTERS 64230, 98220 & 98221 MAIN ASSEMBLY (REF. DWG. 98220) ITEM NO. DESCRIPTION 1 SCREW-SLOTTED ROUND HEAD MACHINE #8-32 x ¾ 2 WASHER-LOCK (H/S) #10 3 NUT-HEX LOCK (KEPS) #8-32 4 SCREW-PHILLIPS PAN HD. MACH. # 8-32 X 3/8" 5 WASHER – SEALING ¼ 6 NUT-HEX.LOCK(KEPS) #10-24 7 WASHER-PLAIN 1/2" MOTOR-VACUUM,115V/50-60HZ (98220 & 64230 ONLY) 12 MOTOR-VACUUM,230V/50-60HZ (98221 ONLY) (12) 8 FITTING-BRASS NIPPLE 1/4"FPT X 1/4"Q.C. 9 CLAMP-HOSE(CRIMP TYPE) .433"-.512"(2-EAR) 10 FITTING-BRASS ELBOW(45D) 1/4"FPT X 1/4"MPT 11 FITTING-BRASS ELBOW 1/4"MPT X 3/8"HB 13 SCREW - PHILLIPS TRUSS HD. MACH. #10-24 X 1/2" (SS) 14 WASHER-PLAIN #10 (SS) 15 WASHER-PLAIN 5/16" (SS) 16 SCREW-PHILLIPS FLAT HD. MACH. # 8-32 X 1/2" (BLK.ZINC) TANK-SOLUTION (98220 & 98221 ONLY) 17 TANK-SOLUTION (64230 ONLY) (17) TANK-RECOVERY (98220 & 98221 ONLY) 18 TANK-RECOVERY (64230 ONLY) (18) PUMP- 55 PSI/115VAC - (64230 & 98220 ONLY) 19 PUMP- 55 PSI/230VAC - (98221 ONLY) (19) 20 LATCH-DRAW W/ KEEPER 21 WHEEL- 6" DIA. X 1-1/4" (BLACK W/ BLK HUB) 22 SPACER-5/16" DIA. 23 NUT-HEX.LOCK (NYL.INS.) 5/16-18 24 ASSEMBLY-VACUUM STACK/FLOAT CAGE 25 SCREEN-VAC.MOTOR INTAKE 26 FILTER-VAC.MOTOR INTAKE (FOAM) 27 PIPE-NIPPLE, PVC 1/4"MPT X 4" LG. 28 FITTING-BRASS ADAPTOR 1/4"FPT X 1/4" HB 29 FITTING-NYLON ELBOW 1/8"MPT X 1/4"HB 30 FILTER-SOL. SCREEN 31 HOSE-SOLUTION (SCREEN) 32 WASHER-LOCK (I/T) # 8 33 SCREW-PHILLIPS PAN HD. MACH. 5/16-18 X 2-1/2" (SS) 34 LABEL-"WARNING!TO REDUCE THE RISK OF ELECTRIC..." 35 BRACKET-PUMP MTG(RUBBER) 36 SCREW-PAN HEAD #10-16 X 1/2" LG. 37 GASKET-SOLUTION TANK 38 LABEL-"VACUUM ONLY-OFF-VACUUM/SPRAY"SWITCH(PS) 39 WASHER-PLAIN 1/2" (SS) 40 SHROUD, VAC MOTOR 41 WASHER - LOCK E/T #10 42 GASKET-VAC. MOTOR BOTTOM 43 GASKET, MOTOR TOP 44 SWITCH-ROCKER, DPDT (3 POS.) 15A 45 BRACKET-VAC. MOTOR MT'G 46 BRACKET-PUMP MT'G 47 SCREW-PHILLIPS PAN HEAD MACHINE # IO-24 x 3/8 48 DECAL-"TORNADO" LINE FILTER 50 51 HOSE-SOLUTION (PUMP) ASS'Y POWER CORD 115V (64230 & 98220 ONLY) *49 ASS'Y POWER CORD 230V (98221 ONLY) *(49) * = NOT SHOWN ( ) = ITEMS TO BE USED WHERE APPLICABLE 16 PART NO. QTY. 00600 01713 02956 02995 07741 10892 11302 12957 14800 17425 14881 15065 15075 15223 17848 17850 19191 19255 19490 30896 19491 30897 19494 19495 19504 19505 19506 19513 19516 19517 19520 19522 19523 19524 19525 19528 19530 19532 19533 19555 19565 19610 19611 19616 19937 30019 30456 30457 30472 30475 30678 30476 31067 30814 19527 19500 2 1 2 4 2 6 4 1 1 1 1 4 2 1 11 8 4 2 1 1 1 1 1 1 2 2 2 2 1 1 1 1 2 2 1 1 4 2 1 2 4 1 1 3 1 6 1 1 1 2 10 1 1 1 2 1 17 ES SERIES PORTABLE CARPET SPOTTERS 64230, 98220, & 98221 HANDLE ASS’Y (REF. DWG. 31215) ITEM NO. DESCRIPTION PART NO. QTY. 1 2 3 4 Washer-Lock E/T #10 Screw-Phillips Pan Head Machine #10-24 X 1.000 Bracket-Pump Mounting (For Reference) Handle-Transport 01713 19617 30476 31214 4 4 1 1 18 ES SERIES PORTABLE CARPET SPOTTERS 64230, 98220, & 98221 ASS'Y VAC./PRESSURE HOSE (REF. DWG. 30744) ITEM NO. 1 2 3 *4 DESCRIPTION Suction Hose, 8' Solution Hose Ass'y Tool-Utility Plastic Ties-Black * = NOT SHOWN 19 PART NO. QTY. 30735/19529 30801/19639/19535 30857 18706 1 1 1 4 ES SERIES PORTABLE CARPET SPOTTERS 64230, 98220 CIRCUIT ASSEMBLY (REF. DWG. 98220A) ITEM NO. 1 2 3 *4 5 6 7 8 9 10 11 DESCRIPTION WASHER-LOCK (H/S) #10 SCREW-TCT (F) PAN HEAD #10-32 X 3/8" TERMINAL-CLOSED END CRIMP(INS) STRAIN RELIEF(LIQ.TITE) .35 DIA. CORD LEAD-14 GA. X 3" BLACK ASSEMBLY-POWER CORD,115V (SPOTTER) (INCLUDES ITEM 4) ASSEMBLY-POWER CORD,230V (SPOTTER) TERMINAL-Q.D.FEMALE 1/4" X 22/18GA. (FUL.INS) LEAD-18 GA. X 12"GREEN LEAD-16 GA. X 12"BLACK LEAD-16 GA. X 12"WHITE PART NO. QTY. 01713 03261 06824 18793 19466 19499 1 1 1 1 2 1 19500 19503 19536 19537 19538 1 1 1 1 1 PART NO. QTY. 98341 1 98342 98343 1 1 98344 1 OPTIONS AND ACCESSORIES ITEM NO. * * * * DESCRIPTION TOOL-UTILITY DETAILER (DELUXE) 3-1/2" SPRAY/VAC. TOOL-CREVICE DETAILER SPRAY/VAC. TOOL-UPHOSTERY/CURTAIN (PERFORATED) 4"SPRAY/VAC. TOOL-UTILITY/STAIR 6" SPRAY/VAC. * = NOT SHOWN 20 ES SERIES PORTABLE CARPET SPOTTERS (230V) MODEL 98221 CIRCUIT ASSEMBLY /PARTS LIST ITEM NO. DESCRIPTION PART NO. QTY. *1 *2 3 *4 *5 *6 WASHER-LOCK (H/S) #10 SCREW-TCT (F) PAN HEAD #10-32 X 3/8" TERMINAL-CLOSED END CRIMP(INS) STRAIN RELIEF(LIQ. TITE) .35 DIA. CORD 1/4" INSOLATED FEMALE CONNECTOR(S) ASSEMBLY-POWER CORD, 115V (SPOTTER) (INCLUDES ITEM 4) ASSEMBLY-POWER CORD, 230V (SPOTTER) LEAD-14 GA. X 3" BLACK ON POWER SWITCH (INCLUDES ITEM 5 ON ONE END AND ITEM 11 ON THE OTHER END) LEAD-16 GA. X 12" BLACK (INCLUDES ITEM 5 ON EACH END) LEAD- 16 GA. X 12" WHITE (INCLUDES ITEM 5 ON EACH END) 5/16" NON-INSOLATED PIGGY-BACK FEMALE END CONNECTOR(S) LEAD- 14 GA. X 12" GREEN FROM MOTOR (INCLUDES ITEM 5 ON ONE END AND ITEM 13 ON THE OTHER END) 3/16" NON-INSOLATED LOOP END CONNECTOR(S) BLACK LEAD WIRE FROM POWER CORD (INCLUDES ITEM 5 ON THE END) TERMINAL-Q.D.FEMALE 1/4"X 22/18GA. (FUL. INS) WHITE LEAD WIRE FROM POWER CORD (ICONNECTED TO ITEM 3) GREEN LEAD WIRE FROM POWER CORD (INCLUDES ITEM 5 ON THE END) LEAD- 16 GA. X 12" WHITE FROM PUMP (INCLUDES ITEM 5 ON ONE END AND AND IS CONNECTED TO ITEM 3 ON THE OTHER END) LEAD- 16 GA. X 12" BLACK FROM PUMP (INCLUDES ITEM 5 ON EACH END) VACCUM MOTOR 230V/50-60HZ PUMP-55 PSI/230VAC FILTER POWER CORD 230V POWER SWITCH * = NOT SHOWN O1713 O3261 O6824 18793 15139 19499 1 1 1 1 9 1 19500 19466 1 2 19537 1 19538 1 15391 2 80673 1 15200 1 1 19503 1 1 7 8 9 10 *11 12 *13 14 15 16 17 18 19 20 21 22 *23 24 21 1 19538 1 19537 1 17425 31059 31067 19500 30472 1 1 1 1 1 22