1
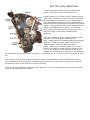
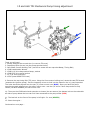
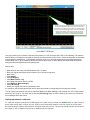
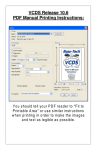
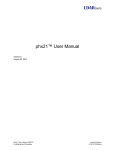
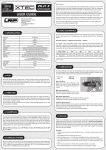
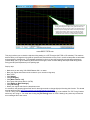
AWe strongly suggest setting the injection pumps mechanical timing to the top of the range, at the green line. This will provide the best starting as well as best overall performance with our injector settings. HP and Fuel economy and will be highest at this setting. This range also yields the lowest Temperatures at the turbo’s inlet point, which in effect extends the turbo’s life and overall durability. DBW LLC www.ROSS-‐TECH.com This plug-in allows you to check the injection timing setting on a VE TDI engine (NOT PD or CR varieties). This needs to be done after you change the timing belt or injectors and should be done every once in a while to keep tabs on belt stretch and pump/pulley misalignment. The standard procedure for this is to have the engine idling at operating temperature (coolant temp >85*C), go to measuring block 000 for the engine, switch to basic settings and report fields #2 (injection timing) and #9 (fuel temperature) on a special graph. Step by step: • Make sure you are using VAG-COM Release 303.1 or newer. • Start your engine and make sure the coolant is up to normal running temp • Start VCDS • Click [Select] • Click [01-Engine] • Click [Meas. Blocks - 08] • Go to group 000 (Group 004 for V6 TDI) • Click [Switch to Basic Settings] • Click [TDI Timing] • Select your engine code from the drop-down menu It is normal for the glowplug light to flash and for the engine sound to change slightly while using this function. This thread may be helpful as well: http://forums.tdiclub.com/showthread.php?t=163435 The TDI Timing checker does not work in Shareware Mode since Basic Settings is not available.The TDI Timing Checker works only as a “plug-in”. You must start it using the [TDI Timing] button in VCDS. Starting it any other way will result in error messages and it won’t work ALH TDI timing Adjustment To adjust injection pump timing, first shut off the engine. Take off the upper timing belt cover. Slightly loosen the 3x 13mm injection pump sprocket bolts. Only loosen them enough so that the sprocket can slide under their pressure - if you loosen them fully, the injection pump may move independently of the sprocket due to pressure from the belt and internal forces. A tip is to loosen them one at a time and then tighten it just barely with a ratchet. If you loosen them all too much, the sprocket is too free to move and timing may go from way retarded to way advanced. Then use a wrench to gently nudge the 22mm center nut that is connected to the injection pump shaft. Rotating the nut counterclockwise will decrease the block 2 value and retard timing, clockwise will increase block 2 value and advance injection timing. Refer to your service manual for the exact graph of the injection pump timing envelope for your car. Do not apply too much pressure to the center injection pump sprocket nut because it's not designed to be removed and you don't want to loosen it! Then torque the 3x 13 bolts to their final torque of 18 ft lbs Note that the service manual says to rotate the injection pump shaft/nut clockwise to advance timing, counterclockwise to retard timing. Remember that when you move the pulley or shaft in one direction, the relative motion of the shaft is in the other direction. Recheck timing by following the earlier steps. Obviously, when you are adjusting the 3 bolts or injection pump pulley, the engine must be off! 1Z and AHU TDI Mechanical Pump timing adjustment Tools you will need 1. Stubby Straight slot screw driver (to remove TB cover) 2. Inspection Mirror(to see into the pump sprocket holes) 3. Cam-Shaft Counter Holding Tool (use this to rotate the cam sprocket & Timing Belt) 4. 13MM combination Wrench 5. 13MM 1/4" drive deep socket & ratchet 6. 13MM 3/8" drive swivel socket 7. 12" 3/8" drive extension 8. VCDS (www.ROSS-TECH.com) 9. Remove the top timing Belt (TB) cover. Using the Cam counter-holding tool, rotate the cam/TB forward (towards the injection pump). Use the inspection mirror to look into the holes on the inj. pump sprocket. The holes should be aligned over the two (2) 13mm mount nuts (BLUE). Once you have the pump sprocket correctly aligned over the pulley mount nuts...use the 1/4" drive 13mm deep socket to only loosen (DO NOT REMOVE) the two 13mm nuts. 10. Then use the 13MM swivel and extension to loosen (do not remove) the bottom bolt on the underside aft side of pump below the two rear fuel lines connected to the pump outlet (RED). 11. The last bolt on the front of the pump is left tight...for now (GREEN). S 12. Start the engine... Continued on next page…. AWe strongly suggest setting the injection pumps mechanical timing to the top of the range, at the green line. This will provide the best starting as well as best overall performance with our injector settings. HP and Fuel economy and will be highest at this setting. This range also yields the lowest Temperatures at the turbo’s inlet point, which in effect extends the turbo’s life and overall durability. D BW LLC www.ROSS-‐TECH.com This plug-in allows you to check the injection timing setting on a VE TDI engine (NOT PD or CR varieties). This needs to be done after you change the timing belt or injectors and should be done every once in a while to keep tabs on belt stretch and pump/pulley misalignment. The standard procedure for this is to have the engine idling at operating temperature (coolant temp >85*C), go to measuring block 000 for the engine, switch to basic settings and report fields #2 (injection timing) and #9 (fuel temperature) on a special graph. Step by step: • Make sure you are using VAG-COM Release 303.1 or newer. • Start your engine and make sure the coolant is up to normal running temp • Start VCDS • Click [Select] • Click [01-Engine] • Click [Meas. Blocks - 08] • Go to group 000 (Group 004 for V6 TDI) • Click [Switch to Basic Settings] • Click [TDI Timing] • Select your engine code from the drop-down menu It is normal for the glowplug light to flash and for the engine sound to change slightly while using this function. The TDI Timing checker does not work in Shareware Mode since Basic Settings is not available.The TDI Timing Checker works only as a “plug-in”. You must start it using the [TDI Timing] button in VCDS. Starting it any other way will result in error messages and it won’t work Timing Adjustment continued… 12. With the engine running and VCDS logged in to read timing, Loosen the GREEN bolt on upper front of pump near timing belt, using a pry bar, push or pull the pumps rotation until the timing is at the top of the timing range, tighten the front bolt only and relax the pry bar. The timing should remain at the top of the range, if not re-adjust until timing is stabilized at the top bar. 13. Shut engine off and retighten the remaining 3 fasteners (BLUE and RED). Remember that the pump will have to be repositioned to allow access to the two aft BLUE 13mm nuts thru the pumps pulley. CAUTION: DO NOT over tighten the pumps fasteners; this can damage the counter torque plate that holds the fastener studs. Torque is only 25Nm for these fasteners. 14. Once the fasteners are secured, loosen and retighten each of the pumps fuel line fittings (8 total), this relieves the stress that develops in the lines from moving the pump around its center of rotation, FUEL LINE DAMAGE WILL RESULT if this step is skipped causing failure of the line and risk of fire or severe engine damage. 15. Attach the engine cover and your engine is now properly timed.