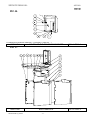
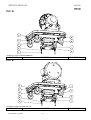
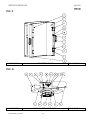
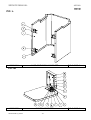
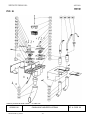
1
EKOM spol. s r.o.
Priemyselná 5031 / 18
921 01 PIEŠŤANY
Slovak republic
tel.: +421 33 7967255
fax: +421 33 7967223
e-mail: ekom @ ekom.sk
SERVICE MANUAL
ASPINA
DO M
IMPORTANT INFORMATION............................................................................................................................3
1.
WARNINGS ...........................................................................................................................................3
1.1. CE Mark of compliance ....................................................................................................................3
1.2. General warnings .............................................................................................................................3
1.3. General safety warnings...................................................................................................................3
1.4. Electrical system safety warnings ....................................................................................................3
1.5. Cautions and symbols ......................................................................................................................4
2.
PRODUCT INFORMATION...................................................................................................................5
2.1. Application ........................................................................................................................................5
2.2. Product description...........................................................................................................................5
3.
COMPONENTS .....................................................................................................................................5
4.
TECHNICAL DATA................................................................................................................................6
5.
DIAGRAM OF THE ASPIRATOR.........................................................................................................7
6.
FUNCTION ............................................................................................................................................8
6.1. Description........................................................................................................................................8
6.2. Vacuum function...............................................................................................................................8
ASSEMBLY........................................................................................................................................................8
7.
STORAGE AND TRANSPORT .............................................................................................................8
8.
INSTALLATION AND FIRST OPERATION...........................................................................................9
8.1. Environmental conditions .................................................................................................................9
8.2. Electrical connection.........................................................................................................................9
8.3. Initial start-up ....................................................................................................................................9
9.
WIRING DIAGRAM..............................................................................................................................10
USE...................................................................................................................................................................11
10. OPERATION........................................................................................................................................11
10.1. Switching on the aspirator ..............................................................................................................11
11. MAINTENANCE INTERVALS - USER / TECHNICIAN .......................................................................11
12. MAINTENANCE, CLEANING AND DISINFECTING...........................................................................12
12.1. Clean the inlet sieve .......................................................................................................................12
12.2. Disinfect the tubing and separation vessel.....................................................................................12
12.3. Replace the output pre-filter ...........................................................................................................12
12.4. Replace the output filter..................................................................................................................12
13. SHUT-OFF...........................................................................................................................................12
DISPOSAL .......................................................................................................................................................13
14. DISPOSAL OF THE APPLIANCE .......................................................................................................13
SOLVING PROBLEMS ....................................................................................................................................13
15. REPAIR SERVICE...............................................................................................................................13
16. SOLVING COMMON PROBLEMS......................................................................................................14
LIST OF ENCLOSURES..................................................................................................................................15
FIGURES OF THE MOBILE DENTAL ASPIRATOR ....................................................................................15
ASPINA DO M...............................................................................................................................................16
COVER OF THE CONSOLE COMPLETE...................................................................................................17
BOX COMPLETE..........................................................................................................................................17
CHASSIS ......................................................................................................................................................17
CHASSIS ......................................................................................................................................................17
COMPLETE DOOR......................................................................................................................................17
FAN HOLDER COMPLETE ..........................................................................................................................17
BASE COMPLETE........................................................................................................................................17
BASE COMPLETE........................................................................................................................................17
BASIC BOARD COMPLETE.........................................................................................................................17
BASIC BOARD COMPLETE.........................................................................................................................17
CASE OF THE BOX COMPLETE.................................................................................................................17
COVER COMPLETE....................................................................................................................................17
CANNULAE HOLDER LUZZANI ..................................................................................................................17
CANNULAE HOLDER CATTANI .................................................................................................................17
LIST OF SPARE PARTS ..............................................................................................................................17
SM-DO M-GB-12_02-2007
-2-
SERVICE MANUAL
ASPINA
DO M
IMPORTANT INFORMATION
1. WARNINGS
1.1.
CE Mark of compliance
Products marked with the CE mark of compliance meet the safety guidelines of the European Union
(93/42/EEC).
1.2.
•
•
•
•
•
•
General warnings
The Installation, Operation and Maintenance Manual is an integral part of the appliance and must be
kept with the aspirator. Careful review of this manual will provide the information necessary for correct
operation of the appliance.
The safety of operating personnel and trouble-free operation of the appliance are ensured only if original
parts are used. Only accessories and parts specified in the technical documentation or expressly
approved by the manufacturer can be used.
If any other accessories or consumable materials are used, the manufacturer cannot be held responsible
for the safe operation and functionality of the device.
The manufacturer’s warranty does not cover damages originating from the use of accessories or
consumable material other than those specified or recommended by the manufacturer.
The manufacturer guarantees the safety, reliability and function of the appliance only if:
- installation, calibration, amendments, extensions and repairs are performed by the manufacturer or
its representative, or a service provider authorized by the manufacturer
- the appliance is used in accordance with the Installation, Operation and Maintenance Manual
The Installation, Operation and Maintenance Manual describes the appliance and all relevant safety and
technical standards for its use. All wiring schemes, methods and names in the manual are copyrighted
and may not be reproduced without permission from the manufacturer.
1.3.
General safety warnings
The appliance is designed to operate safely when used correctly. Please note the following safety measures
to avoid damage and risk.
• Operation of the appliance must be in compliance with all local codes and regulations.
• The original packaging should be kept for the possible return of the appliance. Only the original
packaging ensures optimal protection of the appliance during transport. If it becomes necessary to return
the appliance during the warranty period, the manufacturer is not liable for damages caused by improper
packaging.
• Each time the appliance is used, the operator must ensure that the appliance is functioning safely and
correctly.
• The user must fully understand the operation of the appliance.
• If any problem occurs during use of the appliance, the user must inform his supplier immediately.
• Do not use the appliance in the presence of explosive gases or flammable liquids.
1.4.
Electrical system safety warnings
• The appliance must be connected to earth (grounded).
• Before the appliance is plugged in, ensure that the voltage and frequency specified on the apparatus are
the same as the power supply.
• Before using, check for possible damage to the appliance and the air connections. Damaged parts or
wires must be replaced immediately.
• In case of emergency, immediately disconnect the appliance from the power supply (pull out the plug).
• When performing all repairs and maintenance:
- ensure that the mains plug is removed from the power socket
- pressure pipes must be air vented
- pressure must be released from the air tank.
• The appliance must be installed by an approved, qualified technician.
SM-DO M-GB-12_02-2007
-3-
SERVICE MANUAL
ASPINA
DO M
1.5.
Cautions and symbols
In the Installation, Operation and Maintenance Manual and on the appliance and its packaging, the following
labels or symbols are used for important information.
Information, instructions and cautions for the prevention of damage to health and
equipment
Caution! Dangerous electrical voltage
Information regarding correct use of the appliance and other warnings
CE mark of compliance
Caution! Hot surface.
Handling mark on packaging – Fragile, handle with care
Handling mark on packaging – This way up (vertical position of freight)
Handling mark on packaging – Protect against moisture
Handling mark on packaging – Temperature during storage and transport
Handling mark on packaging – Limited stacking
Mark on packaging – Recyclable material
Earth (ground) connection
Fuse
Electric appliance Type B
Alternating current
Biological hazard
SM-DO M-GB-12_02-2007
-4-
SERVICE MANUAL
ASPINA
DO M
2. PRODUCT INFORMATION
2.1.
Application
The portable dental aspirator ASPINA DO M gives the user great flexibility in location and placement and
allows for the design of an ergonomic workspace. It is ideal for dental units that are not equipped with a
suction apparatus and separator. The appliance aspirates, separates and entraps waste in its built-in
separation vessel. Its mobility makes it easy to move between workstations and it can be used in areas that
lack access to a sewer system.
•
•
•
The dental aspirator is designed for operation in a dry, ventilated room with an ambient temperature
between +5°C and +40°C, and relative humidity less than 70%.
The dental aspirator must not be exposed to moisture and cannot be operated in an excessively humid
or wet environment. Do not use the unit near gases or combustible liquids.
If the appliance is used in any manner or for any purpose not described in this manual, the manufacturer
is not responsible for damage that may result. Such risk will be assumed exclusively by the
operator/user.
2.2.
Product description
The mobile dental aspirator ASPINA DO M is enclosed in a soundproof box mounted on wheels. Inside the
box is a fan-cooled motor (9), electrical wiring and a waste-trapping separation vessel (11). Under the box is
a silencer with an output filter (14) and a pre-filter (15) that filters the air from the motor. The upper part of the
aspirator contains a holder for suction tubes (2) equipped with mouthpieces (1), automatic separator and
fuse box. On the side is the mains switch (5) and illuminated indicators for the network (3) and the fill level of
the separation vessel (4). (see Enclosure 1. Fig.1)
3. COMPONENTS
•
•
•
•
•
•
•
Dental aspirator
Installation, Operation and Maintenance Manual
Output pre-filter
Fuse T 6.3 A
Antifoam tablets
Set of tips
Saliva ejector
SM-DO M-GB-12_02-2007
-5-
DO M
NP-DO M
2 pcs
2 pcs
2 pcs
1 pc
1 pc
No. 025000001
No. 038100004
No. 099000003
No. 604011371
No. 062000241
SERVICE MANUAL
ASPINA
DO M
4. TECHNICAL DATA
DO M
Voltage / frequency
V / Hz
Nominal current
VA
Maximum flow rate
230 / 50(60)
520
1100
l/min
Maximum vacuum pressure
kPa
Sound level
dB(A)
Mode of operation
12
≤48
permanent
S1
Dimensions of the aspirator
mm
Dimensions of the aspirator with
carton
(H x W x D)
mm
Weight of the apirator
kg
Weight of the aspirator with
carton
565 x 350 x 860
950 x 560 x 595
36
40
kg
Classification
STN EN 60 601-1 (IEC 601-1)
Type B, Class I.
Climatic conditions for storage and transport
Temperature: –25°C - +55°C; 24 hours up to +70°C
Relative air humidity: 10% - 90 % (without condensation)
Climatic conditions for operation
Temperature: +5°C - 40°C
Relative air humidity: under 70%
SM-DO M-GB-12_02-2007
-6-
SERVICE MANUAL
ASPINA
DO M
5. DIAGRAM OF THE ASPIRATOR
1.
2.
3.
4.
Suction cannulas
Vacuum pressure valve
Inlet sieve
Separation vessel
5.
6.
7.
8.
Motor
Output pre-filter
Output filter
Silencer
1.
2.
3.
5.
6.
4.
SM-DO M-GB-12_02-2007
-7-
7.
8.
SERVICE MANUAL
ASPINA
DO M
6. FUNCTION
6.1.
Description
When the power supply switch (5) is turned on (position ”I“) the network indicator (3) goes on. When the
suction tube (6) is removed from its holder (2) the motor (9) comes on, creating suction in the mouthpiece
(1). After replacing the suction tube in the holder the motor turns off. When the separation vessel (11) is filled
with waste, the motor turns off and the indicator light (4) goes on to signal that separation vessel is full.
Return the suction tube to its holder and empty the separation vessel. During extended use of the saliva
ejector the temperature inside the box may increase, which automatically activates the cooling fan. The fan
turns off automatically when the temperature inside the box falls.
6.2.
Vacuum function
Suction in the tubing system connected to the mouthpiece (1) draws waste from the mouth through the inlet
sieve (7) where solids are trapped. Air and liquid, free of solids larger than 2 mm, flow into the separation
vessel (11) which holds the liquid waste.
The air flows through the motor (9), the silencer, the output pre-filter (15) and the bacteria-trapping output
filter (14). Clean air, free of impurities, is blown out through an opening underneath the aspirator.
ASSEMBLY
7. STORAGE AND TRANSPORT
The dental aspirator is delivered in a transport carton that protects the apparatus from damage during
transport.
For transport, always use the original product packaging if possible.
Transport the dental aspirator in the upright position.
Protect the aspirator from moisture, dust and extreme temperatures.
The aspirator in its original packaging can be stored in a warm, dry and dust-free area.
Keep the packing material for possible future return of the unit. If this is not possible,
dispose of the packing material in an environmentally friendly way. Cardboard can be
recycled.
Always empty the separation vessel before transporting the aspirator.
SM-DO M-GB-12_02-2007
-8-
SERVICE MANUAL
ASPINA
DO M
8. INSTALLATION AND FIRST OPERATION
Before initial start-up, remove all transport stabilizers.
Initial start-up must be done by a qualified professional.
8.1.
•
•
•
Environmental conditions
The area where the apparatus is installed and operated must be dry, well ventilated and dust-free.
Install the aspirator where it is easily accessible for operation and maintenance. The label must be
visible.
Position the aspirator on a level, stable base that is capable of supporting its weight; see Item 4 in the
Technical data.
Never stretch or kink the electrical cord or the suction tubing.
•
•
To assure trouble-free operation of the aspirator, room temperature should never drop below +5˚C nor
exceed +40°C. Ideal ambient temperature is between +10°C and +25°C.
Most of the electrical energy used by the motor (9) is converted to heat. During extended use, especially
with the saliva ejector, the temperature inside the box rises above 40°C which automatically activates the
cooling fan. After the interior of the box cools to approximately 32°C the fan turns off.
8.2.
Electrical connection
The dental aspirator model 230V is equipped with a grounded safety plug. Observe all electrical regulations
when connecting the appliance to the mains. The network voltage and frequency must be in compliance with
the data on the appliance label.
• If the apparatus is hard-wired to the electrical supply, a shutoff switch must be situated near the
apparatus.
• If the apparatus is plugged into an electrical socket, the socket must be easily accessible for safety
reasons, allowing the apparatus to be safely unplugged in case of emergency.
• The distribution network must be protected by maximum 10 A.
8.3.
Initial start-up
After unpacking, place the aspirator on the floor, open the door and ensure that the separator’s cover (10)
with its sensing electrodes is attached to the separation vessel (11). If necessary, attach the cover to the
vessel and follow the instructions in Chapter 10. Close the door and connect the aspirator’s power cord to
the socket. Turn the power supply switch (5) to position “I”. The indicator lamp for the network (3) goes on
and the aspirator is ready for use.
The tips are not sterile when shipped from the manufacturer and must be sterilized before
use. See the caution attached to the product regarding sterilization (135°C).
The sterilization process must be done according to law.
SM-DO M-GB-12_02-2007
-9-
SERVICE MANUAL
ASPINA
DO M
9. WIRING DIAGRAM
Model 1/N/PE AC230V ∼
List of Devices:
M
Motor 230 V/50 Hz
EV
Fan 230 V/50-60 Hz
HL1,2 Indicator glow lamps
PS
ST
Q
Control electronics
Temperature switch
Power switch
PS
( LD50-2 )
( LD50-3 )
M
P
J1
1
2
3
4
5
6
7
8
9
J2
11 12 13 14 15 16 17
Cover of bracket
(w)
HL1
Complete bracket
ST
(g)
Q
EV
Complete cover
Plastic of box
N
U
1
X1
T6,3A
Main board
Doors of box
230V / 50Hz
SM-DO M-GB-12_02-2007
- 10 -
M
HL2
SERVICE MANUAL
ASPINA
DO M
USE
10. OPERATION
Users of the aspirator must be trained in its operation.
In case of emergency, disconnect the apparatus from the mains (unplug). The motor is hot.
Do not touch - danger of burn.
10.1.
Switching on the aspirator
Switch on the dental aspirator by turning the power supply switch (5) to position ”I“.The aspirator turns on
automatically when a suction tube (6) with a mouthpiece (1) is removed from its holder (2). The aspirator
runs until both tubes are replaced in the holders or until the separation vessel (11) is full. With continuous
use the vessel fills in 6 to 10 hours. The holder for suction tips is equipped with a vacuum regulator to control
the amount of suction according to the dentist’s needs.
When the separation vessel is full, sensors signal the motor (9) to pause, and the indicator light (4) comes on
to signal that the vessel is full. At this point it is necessary to replace both tubes in the holder and switch the
power supply switch off. Next, open the door by pulling the handles on the sides, uncouple the rubber lugs
from the separator’s cover (10) and remove the vessel. Hang the cover on the holder on the left side (8).
Drain the contents of the separation vessel into the sewer, rinse the vessel with water, and refasten the
separator’s cover. Replace the vessel in its holder (12) in the aspirator box (the holder is detachable).
Ensure that the cover is tight and the vessel is seated in its holder and close the door.
The suction mouthpieces are not sterile when shipped from the manufacturer.
Replace the used mouthpiece after each patient.
Tips that are designed for multiple must be sterilized after each patient.
The cannulas must be replaced after a maximum of 400 cycles of sterilization or after one
year, whichever comes first.
Never cover the air outlets on the upper sides of the unit.
The aspirator does not contain a backup power supply.
Before turning the unit on, the door of the box must be closed.
11. MAINTENANCE INTERVALS - USER / TECHNICIAN
Maintenance task
Chapter
Time interval
Performed by
Clean inlet sieve
12.1
daily
user
Disinfect tubing and separation vessel
12.2
daily
user
Replace output pre-filter
12.3
every 3 months
user
Replacef output filter
12.4
yearly
user
After a maximum of 400
Replace suction cannula
user
cycles of sterilization or
once a year *
Regular inspection
every 2 years
service technician
* Note: the suction end-pieces are also replaced at this time, whichever occurs first.
SM-DO M-GB-12_02-2007
- 11 -
SERVICE MANUAL
ASPINA
DO M
12.
MAINTENANCE, CLEANING AND DISINFECTING
Repairs that go beyond general maintenance must be performed by a qualified technician
or by the maufacturer’s service department.
Use only spare parts and accessories approved by the maufacturer.
Before beginning all maintenance, repairs and cleaning, disconnect the apparatus from the
network (unplug).
To maintain good hygiene and ensure that the aspirator functions correctly, the following maintenance must
be performed.
12.1.
Clean the inlet sieve
Solid particles that are drawn in with air and liquid are entrapped in the inlet sieve (7) (see Enclosure No.1,
Fig.1) which must be cleaned at the end of each shift as described in Section 11.
The inlet sieve cannot be cleaned until the moisture inside the suction tubing (6) and the sieve is removed.
Remove the tubing from the holder (2) and allow air to flow through it for a few seconds. Turn the powersupply switch (5) off (position ”O“) and slightly lift the cover of the inlet sieve. Pull the sieve out of its holder,
remove solid particles and clean the sieve. Replace the sieve in its the holder and reassemble the unit.
If the inlet sieve contains amalgam particles, empty the sieve contents into a sealed container and forward it
to the collection centre.
12.2.
Disinfect the tubing and separation vessel
To disinfect the separation vessel (11) empty it, rinse with warm water and clean it mechanically with warm
water and a disinfectant.
Disinfection of the internal suction tubing and the separation vessel should be performed daily at the end of
each shift as described in Section 11. Draw warm water containing a non-foaming disinfectant through each
suction tube (6). The disinfectant used must be in compliance with national regulations governing such use.
Follow the disinfectant manufacturer’s instructions for use. To ensure correct function of the aspirator,
perform the following tasks at the recommended maintenance intervals.
12.3.
Replace the output pre-filter
The output pre-filter (15) must be replaced once a year (see Section 11.) Before replacing the filter, turn the
aspirator’s power supply switch (5) off. The pre-filter and the filter (14) are located on the bottom left of the
aspirator’s base near the symbol
.
With one hand turn the fixing lugs (16) 90° while simultaneously pulling down. Catch the filter holder (13) in
the other hand. Remove the filter holder with the output filter. Inside the opening, remove the output pre-filter.
Also examine the output filter and replace it if necessary.
To reassemble, set the output filter in its holder, place the output pre-filter onto the filter so that the side with
the gummed cloth faces toward the filter and insert this assembly into the opening from below. Rotate the
fixing lugs back 90° so they engage, fixing the filter holder in place.
12.4.
Replace the output filter
When the equipment is used regularly, the output filter (14) must be replaced once a year (see Section 11.)
This procedure is the same as that described in Section 12.3 for the replacement of the output pre-filter (15).
13. SHUT-OFF
If the dental aspirator is not to be used for a long period of time, clean and disinfect it as described in
Sections 12.1 and 12.2. Turn the power supply switch (5) on (position “I”), remove the suction tubes (6) from
the holder (2) and let air flow through them for 15 - 20 minutes or until the suction system is fully dried out.
Replace the tubes onto the holder and turn off the power supply switch (position “0”). Disconnect the
apparatus from the network (unplug) and remove the mouthpieces (1) from the tubing.
SM-DO M-GB-12_02-2007
- 12 -
SERVICE MANUAL
ASPINA
DO M
DISPOSAL
14. DISPOSAL OF THE APPLIANCE
•
•
•
•
•
Disconnect the appliance from the mains.
Follow all rules of hygiene for working with contaminated material.
Clean the device as described in Section 12.
Separate, label, pack and decontaminate any contaminated parts, observing all health regulations.
Dispose of the unit as prescribed by law.
Inner components of the unit may be contaminated with biological material. Ensure that
the unit is fully decontaminated before disposing of it.
SOLVING PROBLEMS
15. REPAIR SERVICE
Guarantee and post-guarantee repairs must be performed by the manufacturer, its authorized
representative, or service personnel approved by the supplier.
When servicing components of the device that might be contaminated, follow the instructions below.
•
•
•
•
•
Disconnect the appliance from the mains.
Follow all rules of hygiene for working with contaminated material.
Clean the device as described in Section 12.
Separate, label, pack and decontaminate any contaminated parts, observing all health regulations.
Perform any necessary repairs.
The manufacturer reserves the right to modify the appliance in any way that will not alter the function or the
operation of the appliance.
SM-DO M-GB-12_02-2007
- 13 -
SERVICE MANUAL
ASPINA
DO M
16. SOLVING COMMON PROBLEMS
Disconnect the appliance from the network before performing all maintenance and repairs.
Repairs must be performed by a qualified service technician.
Failure
Aspirator does not work
Problem and possible reasons
No electrical power
Check the mains voltage in the socket
Restore power by replacing a fuse or via
the circuit breaker
Interruption in electrical system
Power supply switch is off
Damaged power cord
Loose clamp at terminal board
Damaged motor wiring
Defective thermal protection
Aspirator’s mains fuse is defective
Full separation vessel
High current consumption
Aspirator switchs without
removing suction tubings
from holder
Aspirator is noisy
Defective automatic control
Tighten the clamp
Replace the motor
Check the mains fuse; replace defective
fuse (fuses 2 x T 6.3 A are situated in the
upper, narrowed part of the aspirator)
Empty the separation vessel contents
Defective starting capacitor; replace the
capacitor
Replace the defective part
Box door improperly closed
Close the box door
Defective bearing in the motor
Replace the defective bearing
Incorrectly positioned separation
vessel cover
Clogged output pre-filter
Clogged output filter
Leak in the suction system
Defective control valve in the
suction tubing holder
Clogged inlet sieve
SM-DO M-GB-12_02-2007
Ensure that the power supply switch is in
position ”I“ and the network indicator light
is on
Replace the defective part
Defective microswitch in the suction
Replace the defective part
tubing holder
Incorrectly mounted filter holder
Aspirator efficiency
reduced
Solution
- 14 -
Mount the filter holder in the correct
position
Reposition the separation vessel cover
correctly
Replace the pre-filter (see Section 11)
Replace the filter (see Section 11)
Check connections, tighten or seal loose
connections
Replace the defective part
Clean the inlet sieve
SERVICE MANUAL
ASPINA
DO M
LIST OF ENCLOSURES
Enclosure No.1.
FIGURES OF THE MOBILE DENTAL ASPIRATOR
Pic.1
Pic.3
SM-DO M-GB-12_02-2007
Pic.2
Pic.4
- 15 -
Pic.5
SERVICE MANUAL
ASPINA
DO M
PIC. A.
445012000-100 equipped with motor LUZZANI AIRMATIC
445022000-100 equipped with motor CATTANI UNI-JET
SM-DO M-GB-12_02-2007
- 16 -
ASPINA DO M
SERVICE MANUAL
ASPINA
DO M
PIC. B.
L-bonded joints (anaerobic adhesives – Loctite 620, Loctite 670, ...)
603011194
COVER OF THE CONSOLE COMPLETE
PIC. A. POS. 3
BOX COMPLETE
PIC. A. POS. 5
PIC C.
602011192
SM-DO M-GB-12_02-2007
- 17 -
SERVICE MANUAL
ASPINA
DO M
PIC. D.
Chassis for motor LUZZANI AIRMATIC
601011191
CHASSIS
PIC. A. POS. 6
CHASSIS
PIC. A. POS. 6
PIC. E.
Chassis for motor CATTANI UNI-JET
603011378
SM-DO M-GB-12_02-2007
- 18 -
SERVICE MANUAL
ASPINA
DO M
PIC. F.
603011193
COMPLETE DOOR
PIC. A. POS. 4
FAN HOLDER COMPLETE
PIC. C. POS. 1
PIC. G.
603021056
SM-DO M-GB-12_02-2007
- 19 -
SERVICE MANUAL
ASPINA
DO M
PIC. H.
Base for motor LUZZANI AIRMATIC
602021051
BASE COMPLETE
PIC. D. POS. 3
BASE COMPLETE
PIC. E. POS. 1
PIC. I.
Base for motor CATTANI UNI-JET
603021156
SM-DO M-GB-12_02-2007
- 20 -
SERVICE MANUAL
ASPINA
DO M
PIC. J.
Basic board for motor LUZZANI AIRMATIC
602021052
BASIC BOARD COMPLETE
PIC. D. POS. 2
BASIC BOARD COMPLETE
PIC. E. POS. 3
PIC. K.
Basic board for CATTANI UNI-JET
602021157
SM-DO M-GB-12_02-2007
- 21 -
SERVICE MANUAL
ASPINA
DO M
PIC. L.
602021054
CASE OF THE BOX COMPLETE
PIC. C. POS. 3
COVER COMPLETE
PIC. C. POS. 2
PIC. M.
602021055
SM-DO M-GB-12_02-2007
- 22 -
SERVICE MANUAL
ASPINA
DO M
PIC. N.
Valid for products till serial number - O-4085-3-05
023000116
SM-DO M-GB-12_02-2007
CANNULAE HOLDER LUZZANI
- 23 -
PIC. A. POS. 23
SERVICE MANUAL
ASPINA
DO M
PIC. O.
Valid for products from serial number - O-4086-3-05
062000090
SM-DO M-GB-12_02-2007
CANNULAE HOLDER CATTANI
- 24 -
PIC. A. POS. 23
DO M
SERVICE MANUAL
ASPINA
LIST OF SPARE PARTS
Picture A – ASPINA DO M
A3 Cover of the console
complete
A4 Door complete
A5 Box complete
A6 Chassis
A6 Chassis
A8 Apparatus label
A9 Label IV.
A10 Foil II.
A11 Foil I.
A12 Foil of sliding P
A13 Foil of sliding L
A14 Label III.
A15 Label I.
A16 Protective earth sticker
A17 Rubber clamp
A18 Duct
A19 Fixing tape
A20 Hose 230
A21 Hose 400
A22 Hose 700
A23 Holder with hoses
A24 Stopper
A25 Elbow
A26 Separator bin
A27 Cover of the separ. -mod.
A28 Tray
A29 Covering foil
A30 Washer 4,3
A31 Washer 4
A32 Nut M4
A33 Screw M4x10
A34 Screw M5x16
A35 Screw M5x45
A36 Screw M4x8
A37 Neon indicator GR
A38 Neon indicator TR
A39 Switch
A40 Fixing lug
A41 Fixing lug
A42 Fixing lug
A43 Separator electronics
603011194
603011193
602011192
601011191
603011378
111000092
111000042
111000032
111000031
111000030
111000029
111000028
111000025
111000004
074000016
073000022
062000121
062000112
062000111
062000110
062000090
062000056
062000053
062000039
062000038
062000034
062000017
043000019
043000003
042000002
041000110
041000087
041000065
041000006
033600008
033600007
033500001
033400011
033400005
033400001
032800001
Picture B-COVER OF THE CONSOLE COMPLETE
B1 Cover of the console-raw 604021058
B2 Label of electric drawing 111000016
B3 Protective earth sticker
111000004
B6 Washer 6,4
043000010
B7 Washer 5,3
043000002
B8 Nut M6
042000005
B9 Screw M5x16
041000041
B10 Column
024000216
B11 Pin
024000108
Picture C-BOX COMPLETE
C1 Fan holder - complete
C2 Cover complete
SM-DO M-GB-12_02-2007
603021056
602021055
C3 Case of the box complete
C4 Protective earth-sticker
C5 Enclosure VI.
C6 Enclosure V.
C7 Enclosure III.
C8 Enclosure II.
C9 Washer 4,3
C10 Washer 4
C11 Nut M4
C12 Screw M4x10
C13 Listel
C14 Holder of the separat.hood
602021054
111000004
061000012
061000011
061000009
061000008
043000019
043000003
042000002
041000072
034800025
023000068
Picture D-CHASSIS
D1 Filter holder -compl.
D2 Base board complete
D3 Base complete
D4 Screw M5x40
D5 Screw M5x12
D6 Outlet filter
D7 Outlet pre-filter
D8 Fixing lug
D9 Spring
603021053
602021052
602021051
041000016
041000010
025200028
025000001
604031091
022000008
Picture E-CHASSIS
E1 Base complete
E2 Holder of the filter –compl.
E3 Base board complete
E4 Screw M5x40
E5 Screw M5x12
E6 Outlet filter
E7 Outlet pre-filter
E8 Fixing lug
E9 Spring
603021156
603021053
602021157
041000016
041000010
025200028
025000001
604031091
022000008
Picture F-COMPLETE DOOR
F1 Door of the box- raw
F2 Protective earth sticker
F4 Clamp
F5 Inclosure 15
F6 Washer 3,2
F7 Washer 6,4
F8 Nut M6
F9 Nut M3
F10 Screw M3x12
F11 Magnet clip
F12 Pin
604021072
111000004
062000057
061000002
043000015
043000010
042000005
042000001
041000002
029000002
024000108
Picture G-HOLDER OF THE FAN COMPL.
G1 Duct
073000021
G2 Cover of the thermoswitch
062000104
G3 Cover of the fan
062000009
G4 Fan inclosure 5
061000007
G5 Fan enclosure 2
061000004
G6 Fan enclosure 1
061000003
G7 Washer 4,3
043000019
G8 Washer 3,2
043000015
G9 Washer 4
043000003
- 25 -
DO M
SERVICE MANUAL
ASPINA
G10 Nut M4
G11 Screw M4x20
G12 Screw M3x6
G13 Fan
G14 Thermoswitch
G15 Holder of the fan
042000002
041000129
041000042
035300001
033510004
023000102
Picture H-BASE COMPLETE
H1 Filter cover - compl.
H2 Gasket short
H3 Gasket long
H4 Base enclosure
H5 Washer 5,3
H6 Nut rivet M5 STC-R
H7 Nut rivet M5 M5 SFL
H8 Screw M5x12
H9 Wheel fixed
H10 Wheel turning
H11 Base
603031024
074000012
074000008
061000001
043000002
042000081
042000058
041000124
029000009
029000008
023000092
Picture I-BASE COMPLETE
I1 Filter cover - compl.
I2 Gasket short
I3 Gasket long
I4 Base enclosure
I5 Washer 5,3
I6 Nut rivet M5 STC-R
I7 Nut rivet M5 M5 SFL
I8 Screw M5x12
I9 Wheel fixed
I10 Wheel turning
I11 Base
603031039
074000012
074000008
061000001
043000002
042000081
042000058
041000124
029000009
029000008
023000092
Picture J-BASIC BOARD COMPLETE
J1 Basic board complete -raw 603031031
J2 Silentblock M4
074000035
J3 Outlet element
073000023
J4 Hose mouthpiece
062000011
J5 Washer 8
043000017
J6 Nut rivet M5 SFL-RK
042000058
J7 Screw M8x20
041000067
J8 Motor
035400001
J9 Suction pump column II.
024000264
J10 Suction pump column I.
024000263
Picture K-BASIC BOARD COMPLETE
K1 Basic board complete-raw 603031031
K2 Silentblock
074000009
K3 Outlet element
073000023
K4 Hose mouthpiece
062000011
K5 Washer 8
043000017
K6 Washer 8,4
043000009
K7 Nut rivet M5 SFL-RK
042000058
K8 Nut M8
042000006
K9 Screw M8x20
041000067
K10 Motor
035400003
K11 Suction pump column V. 024000049
K12 Holder of the aspirator
023000067
Picture L-CASE OF THE BOX COMPLETE
L1 Box case - raw
603031025
SM-DO M-GB-12_02-2007
L2
L3
L4
L5
L6
Magnet washer
Washer 3,2
Nut rivet M5 SFL-RK
Nut M3
Magnet unit
Picture M- COVER COMPLETE
M1 Isolation washer - compl.
M2 Console complete
M3 Cover complete - raw
M4 Label of fuse
M5 Duct
M6 Duct
M7 Duct
M8 Gasket of the cover
M9 Lower gasket
M10 Washer 4,3
M11 Nut rivet M4 SFL-RK
M12 Screw M6x120
M13 Screw M4x20
M13 Screw M3x16
M14 Fuse
M15 Terminal board
M16 Terminal board
Picture N- CANNULAE HOLDER
N601 Plastic pin
N602 Arm
N603 Screw
N604 Microswitch
N605 Plastic part for upper left
membrane
N606 Valve
N607 Rubber membrane
N608 Plastic part for lower left
membrane
N609 Rubber gasket
N610 Stopper
N611 Support
N612 Screws
N613 Plastic connection φ30
N615+K616+K617 Filter
N618 Microswitch
N619 Plastic part for upper right
membrane
N620 Plastic part for lower right
membrane
N621 Main body
N622 Little cannula holder
N623 Large cannula holder
N624+K625+K627 Kit of suction
cannulas
N626 Adapter
N628 Screw
N629 External body
N630 Filter fastener
N631 Suction tube diam.15
N632 O-ring
062000005
043000015
042000058
042000001
029000001
604031033
603031030
603031026
111000050
073000022
073000021
073000020
062000119
062000118
043000019
042000061
041000099
041000072
041000003
038100004
033100002
033100001
LUZZANI
062000052
062000059
062000074
609000005
074000014
074000015
062000011
062000060
062000073
062000047
062000048
062000042
072000035
073000012
Picture O- CANNULAE HOLDER CATTANI
- 26 -