1
kÉï=~ë=çÑW==
NNKOMNO
pfabufp=mäìÖáå=Ñçê=uflp=ud
léÉê~íçêDë=ã~åì~ä
båÖäáëÜ
Operator's Manual, SIDEXIS Plugin for XIOS XG
Sirona Dental Systems GmbH
Operator's manual SIDEXIS Plugin for XIOS XG
Table of contents
1
2
3
Description of plugin.................................................................................................
4
1.1
SIDEXIS Plugin for XIOS XG ........................................................................
4
1.2
System requirements ....................................................................................
5
Installation ................................................................................................................
6
2.1
Installing the plugin for USB device connection ............................................
7
2.2
Installing the plugin for WiFi device connection ............................................
8
Configuration ............................................................................................................
9
3.1
Opening the configuration dialog ..................................................................
9
3.2
Configuration of XIOS XG Select ..................................................................
10
3.3
Configuration of XIOS XG Supreme .............................................................
12
3.4
Device settings ..............................................................................................
14
3.4.1 Exposure settings...............................................................................
16
3.4.1.1 Switching between 8-bit and 12-bit exposures.................................
17
3.4.1.2 Display of installed sensor calibration files.......................................
18
3.4.1.3 Installation of sensor calibration files (for type CDR2000 sensors
only)
20
3.4.1.4 Changing the binning mode (for XIOS XG Supreme only)...............
21
3.4.1.5 Display of the serial number, size and calibration files of a
connected sensor
22
3.4.2 WiFi configuration ..............................................................................
23
3.4.2.1 Display available WiFi networks and connection status of WiFi
interfaces
24
3.4.2.2 Connecting the WiFi interface to a WiFi network .............................
26
3.4.2.3 Connecting the WiFi interface to a hidden WiFi network .................
30
3.4.3 Activating/deactivating WiFi device selection via RFID......................
32
Plug-in settings..............................................................................................
33
3.5.1 Configuration of extended logging .....................................................
34
3.5.2 Activating/deactivating voice output ...................................................
36
Prior to initial startup .....................................................................................
37
3.6.1 Install the driver for the USB module .................................................
37
3.6.2 Enable the WiFi interface in SIDEXIS XG..........................................
38
3.6.3 Install the driver for the RFID reader..................................................
40
Operation..................................................................................................................
41
3.5
3.6
4
2
64 08 160 D3610
D3610.208.01.01.02 11.2012
Sirona Dental Systems GmbH
Operator's manual SIDEXIS Plugin for XIOS XG
4.1
Establishing exposure readiness with the XIOS XG Select sensor.............
41
4.2
Establishing exposure readiness with the XIOS XG Supreme sensor ........
44
4.3
Editing exposures.........................................................................................
48
4.3.1 Editing exposures with SIDEXIS XG .................................................
48
4.3.2 Editing exposures with the dynamic focus control image processing
tool (for XIOS XG Supreme only)
49
Transferring untransferred exposures to SIDEXIS XG (rescue) ..................
52
båÖäáëÜ
4.4
64 08 160 D3610
D3610.208.01.01.02
11.2012
3
1 Description of plugin
Sirona Dental Systems GmbH
1.1 SIDEXIS Plugin for XIOS XG
Operator's manual SIDEXIS Plugin for XIOS XG
1
Description of plugin
Description of plugin
1.1 SIDEXIS Plugin for XIOS XG
SIDEXIS Plugin for XIOS XG
Dear customer,
We are pleased that you use the XIOS XG intraoral X-ray system from
SIRONA.
The SIDEXIS plugin for XIOS XG offers the following functionalities:
● Image acquisition with the XIOS XG Select and XIOS XG Supreme
sensors via USB (in connection with the XIOS XG USB module)
● Image acquisition with the XIOS XG Select and XIOS XG Supreme
sensors via WiFi (in connection with the XIOS XG WiFi module)
● Unique identification of the WiFi interfaces via RFID is optionally
possible (in connection with the XIOS XG RFID reader)
● Dynamic focus control:
Image processing tool for exposures taken with XIOS XG Supreme
type sensors)
● The SIDEXIS XG image processing functions are available for all
exposures, see the "SIDEXIS XG Operator's Manual".
4
64 08 160 D3610
D3610.208.01.01.02 11.2012
Sirona Dental Systems GmbH
1 Description of plugin
Operator's manual SIDEXIS Plugin for XIOS XG
1.2 System requirements
1.2 System requirements
System requirements
In addition to SIDEXIS XG (version 2.56 and above) the SIDEXIS plug-in
for XIOS XG must be installed.
Processor:
32-bit (x86), 1 GHz
RAM
2 GB
Free hard disk
storage:
5 GB for SIDEXIS XG installation and database
Removable
medium:
CD/DVD writer
Graphics card:
> 128 MB, minimum resolution 1024x768 pixels,
16.7 million colors ("TrueColor")
Screen:
Suitable for diagnostic applications
Network card:
Network RJ45, 100 MBit/s
USB port:
in accordance with USB 2.0 standard
båÖäáëÜ
The PC should meet the following minimum requirements for
SIDEXIS XG and the SIDEXIS plug-in for XIOS XG:
The following operating systems are supported:
● Windows XP service pack 3 32-bit
● Windows Vista Service Pack 1 (32-bit)
● Windows 7 Professional SP 1 (32-bit or 64-bit)
● Windows 7 Ultimate SP 1 (32-bit or 64-bit)
If a WiFi interface is used, the WiFi network must meet the following
requirements:
Technology:
2.4 GHz FM digital data transmission, IEEE
802.11b/g, WiFi-compliant
Frequency:
2.4-2.4835 GHz, 11 channels usable
Modulation technology:
DSSS, CCK, OFDM
Modulation type:
DBPSK, DQPSK, CCK, BPSK, QPSK,
16QAM, 64QAM
Network access modes:
Ad-hoc and infrastructure
Wireless data rate:
802.11b - 11 / 5.5 / 2 / 1 Mbs
802.11g - 54 / 48 / 36 / 24 / 18 / 12 / 9 / 6 Mbs
Security protocols:
deactivated, WEP 64 and 128 bit, WPA
(TKIP), WPA (AES), WPA2 (AES)
The system requirements are also listed under www.sidexis.com
64 08 160 D3610
D3610.208.01.01.02
11.2012
5
2 Installation
Sirona Dental Systems GmbH
Operator's manual SIDEXIS Plugin for XIOS XG
2
Installation
Installation
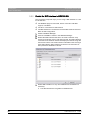
Contents of the supplied CD
The following options are available on the supplied CD ("Sirona XIOS XG
Select/Supreme 1.0 - Installation"):
● "Installing the device connection with USB support"
This option installs the XIOS XG plug-in for USB device connection,
the driver for the USB module and the Dynamic image sharpness
control image processing tool.
● "Installing the device connection with WiFi support"
This option installs the XIOS XG plug-in for WiFi device connection,
the driver for the WiFi interface and the Dynamic image sharpness
control image processing tool.
If you use the USB modules and the WiFi interface, then install both
device connections.
Overview of the Setup window
6
64 08 160 D3610
D3610.208.01.01.02 11.2012
Sirona Dental Systems GmbH
2 Installation
Operator's manual SIDEXIS Plugin for XIOS XG
2.1 Installing the plugin for USB device connection
2.1 Installing the plugin for USB device connection
Installing the plugin for USB device connection
✔ Make sure that SIDEXIS XG 2.56 or higher is installed.
1. Log onto your PC with an administrator account.
2. Insert the Sirona XIOS XG Select/Supreme 1.0 - Installation CD into
your PC's CD/DVD drive.
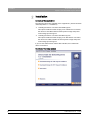
3. The setup normally starts automatically. If the setup routine doesn't
start, double-click the Autorun.exe file in the root directory of the
installation CD.
båÖäáëÜ
The "Sirona XIOS XG Select/Supreme 1.0 - Installation" window
appears.
4. Click on "Installing the device connection with USB support" in the
"Sirona XIOS XG Select/Supreme 1.0 - Installation" window.
5. Follow the further instructions.
When the installation is completed, the program will return you to
the Setup home page.
The XIOS XG plugin for device connection with USB support is
installed.
6. Click the "Quit" button to close the "Sirona XIOS XG Select/Supreme
1.0 - Installation" window.
64 08 160 D3610
D3610.208.01.01.02
11.2012
7
2 Installation
Sirona Dental Systems GmbH
2.2 Installing the plugin for WiFi device connection
Operator's manual SIDEXIS Plugin for XIOS XG
2.2 Installing the plugin for WiFi device connection
Installing the plugin for WiFi device connection
✔ Make sure that SIDEXIS XG 2.56 or higher is installed.
1. Log onto your PC with an administrator account.
2. Insert the Sirona XIOS XG Select/Supreme 1.0 - Installation CD into
your PC's CD/DVD drive.
3. The setup normally starts automatically. If the setup routine doesn't
start, double-click the Autorun.exe file in the root directory of the
installation CD.
The "Sirona XIOS XG Select/Supreme 1.0 - Installation" window
appears.
4. Click on "Installing the device connection with WiFi support" in the
"Sirona XIOS XG Select/Supreme 1.0 - Installation" window.
5. Follow the further instructions.
When the installation is completed, the program will return you to
the Setup home page.
The XIOS XG plugin for WiFi device connection is installed.
6. Click the "Quit" button to close the "Sirona XIOS XG Select/Supreme
1.0 - Installation" Setup window.
8
64 08 160 D3610
D3610.208.01.01.02 11.2012
Sirona Dental Systems GmbH
3 Configuration
Operator's manual SIDEXIS Plugin for XIOS XG
3
3.1 Opening the configuration dialog
Configuration
Configuration
3.1 Opening the configuration dialog
Opening the configuration dialog
Information on the XIOS XG Configuration configuration dialog
In the XIOS XG Configuration configuration dialog, you make all settings
● for the SIDEXIS plugin for XIOS XG
båÖäáëÜ
● for the XIOS XG sensors and modules
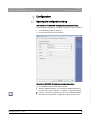
Opening the XIOS XG Configuration configuration dialog
✔ The SIDEXIS plugin for XIOS XG is installed.
1. Start the SIDEXIS Manager. You will find the SIDEXIS Manager in
the Start menu under Programs --> SIDEXIS -->SIDEXIS Manager
2. Click the "XIOS XG Configuration" button in the SIDEXIS Manager.
The XIOS XG Configuration configuration dialog box then opens.
64 08 160 D3610
D3610.208.01.01.02
11.2012
9
3 Configuration
Sirona Dental Systems GmbH
3.2 Configuration of XIOS XG Select
Operator's manual SIDEXIS Plugin for XIOS XG
3.2 Configuration of XIOS XG Select
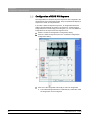
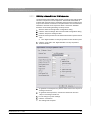
Configuration of XIOS XG Select
In the XIOS XG Select configuration dialog, you can configure the
automatic optimization of exposures. Exposures acquired with an XIOS
XG Select type sensor are then automatically optimized based on these
configurations.
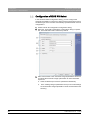
1. Start the XIOS XG Configuration configuration dialog.
2. When the "XIOS XG Configuration" configuration dialog is opened,
the "XIOS XG Select" tab is selected by default.
3. Place a check mark in the "Automatic Image Optimization" check box
to activate the Automatic Image Optimization for XIOS XG Select
exposures.
XIOS XG Select exposures are optimized automatically.
10
In the "Settings Image Optimization" area you can make settings
for the Automatic Image Optimization. These are described in the
following.
64 08 160 D3610
D3610.208.01.01.02 11.2012
Sirona Dental Systems GmbH
3 Configuration
Operator's manual SIDEXIS Plugin for XIOS XG
3.2 Configuration of XIOS XG Select
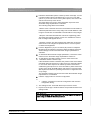
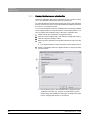
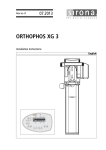
4. Define the desired filter options in the drop-down menus (B). You can
use all three filter options simultaneously or only one or two filter
options. If you do not want to use any filter options, then remove all
entries from the drop-down menus.
The image filters are used for XIOS XG Select exposures if the
Automatic Image Optimization is activated.
The following image filters are available:
"Reduce noise": This filter removes minor disturbance information or
individual pixels that cause a noisy image. The overall definition of the
image is not reduced. It is advisable to use this filter for noisy images.
"Sharpen": This filter intensifies the contrast of neighboring pixels.
The image thus appears sharper overall. It is advisable to use this
filter for images that appear blurred.
scale values in the image and optimizes them in such a way that
contrasts are heightened.
5. Use the "Brightness" (C) and "Contrast" (D) controls to adapt the
Brightness and brightness Contrast for XIOS XG Select exposures.
These settings are used if the Automatic Image Optimization is
activated.
6. To deactivate the Automatic Image Optimization, remove the check
mark from the "Automatic Image Optimization" check box.
7. To activate the Orientation marker, place a check mark in the
"Orientation marker" check box (E).
If the Orientation marker is activated, the position of the sensor will be
described during the exposure. For this purpose, a rectangle is drawn
in one corner of the exposure to make the position of the sensor
visible during the exposure. For more information, please refer to the
section of the XIOS XG USB System and Sensors or the XIOS XG
WiFi System and Sensors Operating Instructions on alignment of the
X-ray image.
The Orientation marker can be used even when the Automatic Image
Optimization is not activated.
8. Click the "Apply" button to save the configuration.
or
➢
Click the "OK" button to save the configuration and close the
configuration dialog.
The settings for the "XIOS XG Select" exposures are saved.
Exposures of the type "XIOS XG Select" are optimized based on the
settings made.
IMPORTANT
The configurations for XIOS XG Select only affect exposures that were
taken using an XIOS XG Select type sensor.
64 08 160 D3610
D3610.208.01.01.02
11.2012
11
båÖäáëÜ
"Optimize contrast": This filter analyzes the distribution of the gray
3 Configuration
Sirona Dental Systems GmbH
3.3 Configuration of XIOS XG Supreme
Operator's manual SIDEXIS Plugin for XIOS XG
3.3 Configuration of XIOS XG Supreme
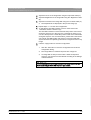
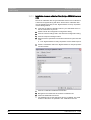
Configuration of XIOS XG Supreme
The image filters for XIOS XG Supreme exposures are configured in the
XIOS XG Supreme configuration dialog. They can optimize the display of
exposures to meet your requirements.
If you take a XIOS XG Supreme exposure, an image filter with these
settings will automatically be used for the exposure. Via the Dynamic
image sharpness control image processing tool, you can use additional
image filters for the exposure and change the focus.
1. Start the "XIOS XG Configuration" configuration dialog.
2. Click the "XIOS XG Supreme" tab in the "XIOS XG Configuration"
configuration dialog.
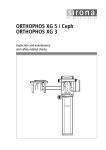
3. Click one of the image filter buttons (B) to select an image filter.
The selected image filter button is indicated by a red border. Now
the image filter can be configured.
12
64 08 160 D3610
D3610.208.01.01.02 11.2012
Sirona Dental Systems GmbH
3 Configuration
Operator's manual SIDEXIS Plugin for XIOS XG
3.3 Configuration of XIOS XG Supreme
4. Adjust the focus for the image filter using the respective slider (D).
5. Adjust the Brightness for the image filter using the "Brightness" slider
(E).
6. Adjust the Contrast for the image filter using the "Contrast" slider (F).
The adjustments are displayed in the preview image (A).
7. Repeat steps 3 - 6 for the other image filters.
8. To activate the Orientation marker, place a check mark in the
"Orientation marker" check box (C).
The Orientation marker is used to describe the position of the sensor
during the exposure. For this purpose, a rectangle is drawn in one
corner of the exposure to make the position of the sensor detectable
during the exposure. For more information, please refer to the section
of the XIOS XG USB System and Sensors or the XIOS XG WiFi
System and Sensors Operating Instructions on alignment of the X-ray
image.
båÖäáëÜ
9. Click the "Apply" button to save the configuration.
or
➢ Click the "OK" button to save the configuration and close the
configuration dialog.
The image filters for XIOS XG Supreme are configured.
An image filter is always used to take a XIOS XG Supreme
exposure. The exposure is then filtered according to the settings
contained therein.
IMPORTANT
The configurations for XIOS XG Supreme only affect exposures that
were taken using an XIOS XG Supreme type sensor.
64 08 160 D3610
D3610.208.01.01.02
11.2012
13
3 Configuration
Sirona Dental Systems GmbH
3.4 Device settings
Operator's manual SIDEXIS Plugin for XIOS XG
3.4 Device settings
Device settings
Information on the Device settings configuration dialog
In the configuration dialog Device settings you can make the following
configurations:
● Exposure settings
● WiFi configuration
● Activate/deactivate WiFi device selection via RFID
These configuration options are described later on in this section.
14
64 08 160 D3610
D3610.208.01.01.02 11.2012
Sirona Dental Systems GmbH
3 Configuration
Operator's manual SIDEXIS Plugin for XIOS XG
3.4 Device settings
All configuration options in the Device settings dialog are passwordprotected. On opening a configuration, you will be prompted to enter the
service password.
IMPORTANT
➢ Configurations should be performed in the Device settings dialog
only by service engineers.
64 08 160 D3610
D3610.208.01.01.02
11.2012
15
båÖäáëÜ
Incorrect configurations in the Device settings dialog may lead to
malfunctioning of the SIDEXIS plugin for XIOS XG.
3 Configuration
Sirona Dental Systems GmbH
3.4 Device settings
Operator's manual SIDEXIS Plugin for XIOS XG
3.4.1
Exposure settings
Exposure settings
Information on the Exposure settings
The Device settings --> Exposure settings dialog window offers you the
following options:
● Switching between 8-bit and 12-bit exposures
● Display of installed sensor calibration files
● Installation of sensor calibration files (for type CDR2000 sensors
only)
● Changing the binning mode (for XIOS XG Supreme type sensors
only)
● Display of the serial number, size and date of the calibration files for
a connected sensor
16
64 08 160 D3610
D3610.208.01.01.02 11.2012
Sirona Dental Systems GmbH
3 Configuration
Operator's manual SIDEXIS Plugin for XIOS XG
3.4.1.1
3.4 Device settings
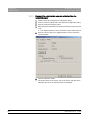
Switching between 8-bit and 12-bit exposures
Switching between 8-bit and 12-bit exposures
12-bit exposures have better image quality, but also require a larger data
volume in comparison to 8-bit exposures. Faster data transmission is
possible with 8-bit exposures. Generating 8-bit exposures makes sense
only for slow network connections. The performance of most networks is
sufficient to transmit 12-bit exposures within a short time. SIRONA
therefore recommends generating 12-bit exposures.
1. Start the XIOS XG Configuration configuration dialog.
2. Click the "Device settings" tab in the XIOS XG Configuration dialog.
3. Click the "Exposure settings" button.
4. Enter the service password in the window which then opens and click
"OK".
The "Eigenschaften von Xray Acquisition Control" window opens.
båÖäáëÜ
5. Click the "Xray" tab in the "Eigenschaften von Xray Acquisition
Control" window.
6. To generate 12-bit exposures, place a check mark in the "Acqire 12
bit image" check box.
7. To generate 8-bit exposures, remove the check mark from the
"Acqire 12 bit image" check box.
8. Do not change any other settings.
9. Click the "OK" button.
The settings are accepted.
64 08 160 D3610
D3610.208.01.01.02
11.2012
17
3 Configuration
Sirona Dental Systems GmbH
3.4 Device settings
Operator's manual SIDEXIS Plugin for XIOS XG
3.4.1.2
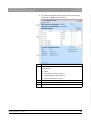
Display of installed sensor calibration files
Display of installed sensor calibration files
The sensor calibration files contain information on the correction of pixel
errors. An individual calibration file exists for each sensor.
For XIOS XG Select and XIOS XG Supreme type sensors, the calibration
files are saved on the sensor and are automatically installed the first time
the sensor is connected to the PC.
You can check whether the sensor calibration files are properly installed
via the "Eigenschaften von Xray Acquisition Control" dialog window. You
also can display the installation path for the sensor calibration files.
1. Start the XIOS XG Configuration configuration dialog.
2. Click the "Device settings" tab in the XIOS XG Configuration dialog.
3. Click the "Exposure settings" button.
4. Enter the service password in the window which then opens and click
"OK".
The "Eigenschaften von Xray Acquisition Control" window opens.
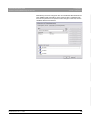
5. Click the "Calibration" tab in the "Eigenschaften von Xray Acquisition
Control" window.
The installation path for the calibration files is displayed under
"Calibration File Path" (A). This path is automatically properly
defined during the installation of the plugin. A change of the path
via the "Change Path" button is not required.
18
64 08 160 D3610
D3610.208.01.01.02 11.2012
Sirona Dental Systems GmbH
Operator's manual SIDEXIS Plugin for XIOS XG
3 Configuration
3.4 Device settings
6. To locate the serial number of a sensor, refer to the "Calibration File
List". This serial number is then printed on the sensor housing.
The serial numbers of the sensors for which calibration files are
installed are specified in the "Calibration File List" (B).
båÖäáëÜ
If the serial number of the sensor is specified in the list, the
calibration file is correctly installed for this sensor.
64 08 160 D3610
D3610.208.01.01.02
11.2012
19
3 Configuration
Sirona Dental Systems GmbH
3.4 Device settings
Operator's manual SIDEXIS Plugin for XIOS XG
3.4.1.3
Installation of sensor calibration files (for type CDR2000 sensors
only)
Installation of sensor calibration files (for type CDR2000 sensors only)
The sensor calibration files of type CDR 2000 sensors are contained on
a data carrier supplied along with them. These sensor calibration files
must be installed manually via the "Eigenschaften von Xray Acquisition
Control" dialog window.
1. Insert the CD with the calibration files for your CDR 2000 sensor in
the CD / DVD drive of your PC.
2. Start the XIOS XG Configuration configuration dialog.
3. Click the "Device settings" tab in the XIOS XG Configuration dialog.
4. Click the "Exposure settings" button.
5. Enter the service password in the window which then opens and click
"OK".
The "Eigenschaften von Xray Acquisition Control" window opens.
6. Click the "Calibration" tab in the "Eigenschaften von Xray Acquisition
Control" window.
7. Click the "Install New Calibration File" button.
8. Navigate to the inserted CD and mark the calibration file.
9. Follow the additional instructions.
The calibration file for the CDR 2000 sensor is installed. The serial
number of the sensor is specified in the "Calibration File List".
20
64 08 160 D3610
D3610.208.01.01.02 11.2012
Sirona Dental Systems GmbH
3 Configuration
Operator's manual SIDEXIS Plugin for XIOS XG
3.4.1.4
3.4 Device settings
Changing the binning mode (for XIOS XG Supreme only)
Changing the binning mode (for XIOS XG Supreme only)
2 binning modes are available for exposures with XIOS XG Supreme
sensors. Maximum image quality is attained in the 1x1 binning mode
("High Resolution Acquisition" activated). In the 2x2 binning mode, 4
pixels are combined to form a single pixel. The resolution of the exposure
is then lower and less storage space is required.
SIRONA recommends using the 1x1 binning mode.
1. Start the XIOS XG Configuration configuration dialog.
2. Click the "Device settings" tab in the XIOS XG Configuration dialog.
3. Click the "Exposure settings" button.
4. Enter the service password in the window which then opens and click
"OK".
The "Eigenschaften von Xray Acquisition Control" window opens.
båÖäáëÜ
5. Click the "Sensor" tab in the "Eigenschaften von Xray Acquisition
Control" window.
6. To generate exposures in the 1x1 binning mode, place a check mark
in the "High Resolution Acquisition" check box.
7. To generate exposures in the 2x2 binning mode, remove the check
mark from the "High Resolution Acquisition" check box.
8. Do not change any other settings.
9. Click the "OK" button.
The settings are accepted.
64 08 160 D3610
D3610.208.01.01.02
11.2012
21
3 Configuration
Sirona Dental Systems GmbH
3.4 Device settings
Operator's manual SIDEXIS Plugin for XIOS XG
3.4.1.5
Display of the serial number, size and calibration files of a
connected sensor
Display of the serial number, size and calibration files of a connected sensor
1. Start the XIOS XG Configuration configuration dialog.
2. Click the "Device settings" tab in the XIOS XG Configuration dialog.
3. Click the "Exposure settings" button.
4. Enter the service password in the window which then opens and click
"OK".
The "Eigenschaften von Xray Acquisition Control" window opens.
5. Click the "Sensor" tab in the "Eigenschaften von Xray Acquisition
Control" window.
6. Click the "Recheck" button.
The serial number of the sensor, size of the sensor and date of the
calibration files of the connected sensor are displayed.
22
64 08 160 D3610
D3610.208.01.01.02 11.2012
Sirona Dental Systems GmbH
3 Configuration
Operator's manual SIDEXIS Plugin for XIOS XG
3.4.2
3.4 Device settings
WiFi configuration
WiFi configuration
Information on WiFi configuration
The "Device settings" --> "WiFi configuration" dialog window offers you
the following options:
● Display of available WiFi networks and connection status of WiFi
interfaces
● Connecting WiFi interfaces to a WiFi network
båÖäáëÜ
● Connecting WiFi interfaces to hidden WiFi networks. The name of the
hidden WiFi network must be known for this purpose.
64 08 160 D3610
D3610.208.01.01.02
11.2012
23
3 Configuration
Sirona Dental Systems GmbH
3.4 Device settings
Operator's manual SIDEXIS Plugin for XIOS XG
3.4.2.1
Display available WiFi networks and connection status of WiFi
interfaces
Display available WiFi networks and connection status of WiFi interfaces
✔ The WiFi charging cradle is connected to the PC via USB.
✔ The WiFi charging cradle is connected to the power supply via a
power plug.
✔ The WiFi interface is located in the charging cradle.
1. Start the XIOS XG Configuration configuration dialog.
2. Click the "Device settings" tab in the XIOS XG Configuration dialog.
3. Click the "WiFi configuration" button.
4. Enter the service password in the window which then opens and click
"OK".
24
64 08 160 D3610
D3610.208.01.01.02 11.2012
Sirona Dental Systems GmbH
3 Configuration
Operator's manual SIDEXIS Plugin for XIOS XG
3.4 Device settings
båÖäáëÜ
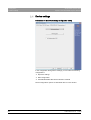
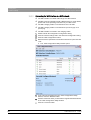
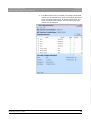
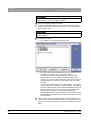
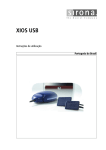
The "WiFi Configuration Utility" window opens. The following
information is displayed in this window:
A
Information on the registered WiFi interface
B
Available networks. The following information is displayed for
each network:
● Name
● Encryption ("Security" column)
● Signal strength ("Signal" column)
● Channel ("Channel" column)
64 08 160 D3610
D3610.208.01.01.02
11.2012
C
Information on the currently configured network
D
"Refresh" button. Updates the list of available networks
E
"Connect" button
25
3 Configuration
Sirona Dental Systems GmbH
3.4 Device settings
Operator's manual SIDEXIS Plugin for XIOS XG
3.4.2.2
Connecting the WiFi interface to a WiFi network
Connecting the WiFi interface to a WiFi network
✔ The WiFi interface is located within range of a WiFi network.
✔ The WiFi router is operated in the G or Mixed mode. For more details,
please refer to the operating instructions of your WiFi router.
✔ The WiFi charging cradle is connected to the PC via USB.
✔ The WiFi charging cradle is connected to the power supply via a
power plug.
✔ The WiFi interface is located in the charging cradle.
1. Start the XIOS XG Configuration configuration dialog.
2. Click the "Device settings" tab in the XIOS XG Configuration dialog.
3. Click the "WiFi configuration" button.
4. Enter the service password in the window which then opens and click
"OK".
The "WiFi Configuration Utility" window opens.
5. If not networks are displayed in the "WiFi Configuration Utility"
window, click the "Refresh" button.
6. Click the network in which you would like to register the WiFi interface
in the "WiFi Configuration Utility" window.
7. Click the "Connect" button.
26
64 08 160 D3610
D3610.208.01.01.02 11.2012
Sirona Dental Systems GmbH
3 Configuration
Operator's manual SIDEXIS Plugin for XIOS XG
3.4 Device settings
båÖäáëÜ
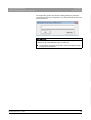
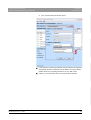
The "Connect network" window opens.
8. If the network is password-protected, enter the password. Select the
appropriate allocation method for the IP address. For more details,
please refer to the operating instructions of your WiFi router.
9. Click the "Connect" button in the "Connect network" window.
64 08 160 D3610
D3610.208.01.01.02
11.2012
27
3 Configuration
3.4 Device settings
Sirona Dental Systems GmbH
Operator's manual SIDEXIS Plugin for XIOS XG
The WiFi interface is connected to the network. A progress bar
and the text "Waiting to connect" are displayed while a
connection is being established.
You can end the connection attempt by clicking the "Stop waiting"
button.
28
64 08 160 D3610
D3610.208.01.01.02 11.2012
Sirona Dental Systems GmbH
Operator's manual SIDEXIS Plugin for XIOS XG
3 Configuration
3.4 Device settings
båÖäáëÜ
If the WiFi interface was successfully connected to the desired
network, this is indicated by two green check marks placed next
to the "Connection status" and "IP Address status" fields. The
name, IP address, MAC address, and connection type of the
network are still displayed.
64 08 160 D3610
D3610.208.01.01.02
11.2012
29
3 Configuration
Sirona Dental Systems GmbH
3.4 Device settings
Operator's manual SIDEXIS Plugin for XIOS XG
3.4.2.3
Connecting the WiFi interface to a hidden WiFi network
Connecting the WiFi interface to a hidden WiFi network
Hidden WiFi networks are not displayed in the network list by default. You
can connect WiFi interfaces to a hidden network with the corresponding
access data.
✔ Have the access data for the hidden network ready. You can obtain
this information from your network operator.
✔ The WiFi interface is located within range of a WiFi network.
✔ The WiFi router is operated in the G or Mixed mode. For more details,
please refer to the operating instructions of your WiFi router.
✔ The WiFi charging cradle is connected to the PC via USB.
✔ The WiFi charging cradle is connected to the power supply via a
power plug.
✔ The WiFi interface is located in the charging cradle.
1. Start the XIOS XG Configuration configuration dialog.
2. Click the "Device settings" tab in the XIOS XG Configuration dialog.
3. Click the "WiFi configuration" button.
4. Enter the service password in the window which then opens and click
"OK".
The "WiFi Configuration Utility" window opens.
5. Click the "File" menu in the "WiFi Configuration Utility" window.
6. In the "File" menu, select the menu option "Create a new Network".
30
64 08 160 D3610
D3610.208.01.01.02 11.2012
Sirona Dental Systems GmbH
3 Configuration
Operator's manual SIDEXIS Plugin for XIOS XG
3.4 Device settings
båÖäáëÜ
The "Connect network" window opens.
7. Enter all of the data required for the hidden network in the "Connect
network" window. Contact your network operator for more
information.
8. Click the "Connect" button.
The WiFi interface is connected to the hidden network.
64 08 160 D3610
D3610.208.01.01.02
11.2012
31
3 Configuration
Sirona Dental Systems GmbH
3.4 Device settings
Operator's manual SIDEXIS Plugin for XIOS XG
3.4.3
Activating/deactivating WiFi device selection via RFID
Activating/deactivating WiFi device selection via RFID
It is advisable to use WiFi device selection via RFID whenever multiple
WiFi interfaces are used on different PCs. The WiFi interface is paired
with the PC by holding it against an RFID reader, and does not have to
be identified based on the device number. This prevents accidental
pairing with the wrong WiFi interface. For details on pairing WiFi modules
via RFID, refer to the XIOS XG WiFi System and Sensors Operating
Instructions.
1. Start the XIOS XG Configuration configuration dialog.
2. Click the "Device settings" tab in the XIOS XG Configuration
configuration dialog.
3. Place a check mark in the "WiFi device selection via RFID" check box
to activate the WiFi device selection via RFID function. You will be
prompted to enter the service password.
4. To deactivate the WiFi device selection via RFID, remove the check
mark. You will be prompted to enter the service password here too.
5. Click the "Apply" button to save the configuration.
or
➢
Click the "OK" button to save the configuration and close the
configuration dialog.
WiFi device selection via RFID is activated.
WiFi interfaces can be paired with the PC via RFID.
32
64 08 160 D3610
D3610.208.01.01.02 11.2012
Sirona Dental Systems GmbH
3 Configuration
Operator's manual SIDEXIS Plugin for XIOS XG
3.5 Plug-in settings
3.5 Plug-in settings
Plug-in settings
Information on the Plug-in settings
The Plug-in settings dialog window offers you the following options:
● Configuring Extended logging
båÖäáëÜ
● Activate/deactivate Language output
64 08 160 D3610
D3610.208.01.01.02
11.2012
33
3 Configuration
Sirona Dental Systems GmbH
3.5 Plug-in settings
Operator's manual SIDEXIS Plugin for XIOS XG
3.5.1
Configuration of extended logging
Configuration of extended logging
All error messages are logged by the SIDEXIS plugin for XIOS XG by
default.
You can use the Extended logging option to determine what other data
will be logged.
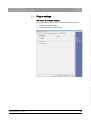
1. Start the XIOS XG Configuration configuration dialog.
2. Click the "Plug-in settings" tab in the XIOS XG Configuration
configuration dialog.
3. Place a check mark next to "Warning message" to log all warnings.
4. Place a check mark next to "Information" to log events that do not
constitute an error during a normal exposure sequence, however,
may be useful when errors occur and for troubleshooting purposes.
5. Place a check mark next to "Diagnose" to log diagnostic information.
The logging of diagnostic information can be used for troubleshooting
when errors occur.
IMPORTANT
High storage space requirement, slow system speed
The logging of diagnostic information requires a lot of storage space.
This can cause the system to slow down during an exposure.
➢ Activate the logging of diagnostic information only after consulting
with Customer Service.
34
64 08 160 D3610
D3610.208.01.01.02 11.2012
Sirona Dental Systems GmbH
3 Configuration
Operator's manual SIDEXIS Plugin for XIOS XG
3.5 Plug-in settings
6. Remove the check marks to deactivate the extended logging options.
7. Click the "Apply" button to save the configuration.
or
➢
Click the "OK" button to save the configuration and close the
configuration dialog.
båÖäáëÜ
The Extended logging option is configured.
64 08 160 D3610
D3610.208.01.01.02
11.2012
35
3 Configuration
Sirona Dental Systems GmbH
3.5 Plug-in settings
Operator's manual SIDEXIS Plugin for XIOS XG
3.5.2
Activating/deactivating voice output
Activating/deactivating voice output
The Language output emits the following acoustic signals when exposure
readiness has been established:
● "Waiting for exposure ..." (signal indicating that exposure readiness
has been established)
●
"Error" (signal indicating that exposure readiness was not
established due to an error or that an error occurred during the
exposure.)
A sound card must be installed in order to use the voice output.
1. Start the XIOS XG Configuration configuration dialog.
2. Click the "Plug-in settings" tab in the XIOS XG Configuration
configuration dialog.
3. Place a check mark in the "Language output" check box to activate
the Language output function.
4. To deactivate the Language output, remove the check mark.
5. Click the "Apply" button to save the configuration.
or
➢
Click the "OK" button to save the configuration and close the
configuration dialog.
The settings are accepted.
36
64 08 160 D3610
D3610.208.01.01.02 11.2012
Sirona Dental Systems GmbH
3 Configuration
Operator's manual SIDEXIS Plugin for XIOS XG
3.6 Prior to initial startup
3.6 Prior to initial startup
Prior to initial startup
3.6.1
Install the driver for the USB module
Install the driver for the USB module
This procedure is required only if you are using a USB module on a PC
for the first time.
✔ The SIDEXIS plugin for XIOS XG, device connection with USB
support, is installed.
1. Log onto your PC with an administrator account.
2. Connect the USB module to a USB interface of your PC.
båÖäáëÜ
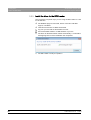
The driver for the USB module installs automatically. A confirmation
message appears once the installation has completed.
The USB module does not have to be enabled in SIDEXIS XG. No
further steps are required.
The USB module is ready for operation.
64 08 160 D3610
D3610.208.01.01.02
11.2012
37
3 Configuration
Sirona Dental Systems GmbH
3.6 Prior to initial startup
Operator's manual SIDEXIS Plugin for XIOS XG
3.6.2
Enable the WiFi interface in SIDEXIS XG
Enable the WiFi interface in SIDEXIS XG
This procedure is required only if you are using a WiFi interface on a PC
for the first time.
✔ The SIDEXIS plugin for XIOS XG, device connection with WiFi
support, is installed.
✔ The PC is connected to a WiFi network.
✔ The WiFi interface is connected to the same WiFi network as the PC.
Refer to WiFi configuration.
1. Start the SIDEXIS Manager.
2. Click the "SiXABCon" button in the SIDEXIS Manager.
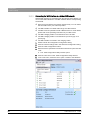
3. Enable the WiFi interfaces that are to be used to transmit X-ray
exposures to this PC on the Local approvals tab. The WiFi interfaces
connected to the wireless network are displayed in the list along with
their serial numbers. The serial number is indicated on the housing of
each WiFi interface. WiFi interfaces for which no check mark has
been placed are disabled for this PC.
4. Enable WiFi interfaces on any other SIDEXIS XG workstations if
necessary.
The WiFi interfaces are registered in SIDEXIS XG.
38
64 08 160 D3610
D3610.208.01.01.02 11.2012
Sirona Dental Systems GmbH
Operator's manual SIDEXIS Plugin for XIOS XG
3 Configuration
3.6 Prior to initial startup
båÖäáëÜ
Alternatively, the service engineer also can enable the WiFi interfaces for
other SIDEXIS XG workstations in the network via the "Attributes" tab.
The service password is required to make changes on this tab; see the
"SIDEXIS XG Service Manual".
64 08 160 D3610
D3610.208.01.01.02
11.2012
39
3 Configuration
Sirona Dental Systems GmbH
3.6 Prior to initial startup
Operator's manual SIDEXIS Plugin for XIOS XG
3.6.3
Install the driver for the RFID reader
Install the driver for the RFID reader
This procedure is required only if you are using an RFID reader on a PC
for the first time.
✔ The SIDEXIS plugin for XIOS XG, device connection with WiFi
support, is installed.
✔ "WiFi device selection via RFID" is activated.
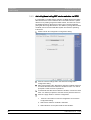
1. Log onto your PC with an administrator account.
2. Connect the RFID reader to a USB interface of your PC.
The driver for the RFID reader installs automatically. A confirmation
message appears once the installation has completed.
The WiFi reader is ready for operation.
40
64 08 160 D3610
D3610.208.01.01.02 11.2012
Sirona Dental Systems GmbH
4 Operation
Operator's manual SIDEXIS Plugin for XIOS XG
4
4.1 Establishing exposure readiness with the XIOS XG Select sensor
Operation
Operation
4.1 Establishing exposure readiness with the XIOS
XG Select sensor
Establishing exposure readiness with the XIOS XG Select sensor
✔ The SIDEXIS plugin for XIOS XG is installed.
✔ The driver for the USB module is installed or a WiFi interface is
enabled in SIDEXIS XG.
✔ When WiFi device selection via RFID(optional) is used:
The WiFi device selection via RFID is activated.
The driver for the XIOS XG RFID reader is installed.
An XIOS XG RFID reader is connected to a USB interface of the PC.
1. Start SIDEXIS XG.
3. Connect a XIOS XG Select sensor to the USB module or the WiFi
interface. See the Operating Instructions for the XIOS XG USB
System and Sensors or the XIOS XG WiFi System and Sensors.
4. Place the sensor in its exposure position. See the Operating
Instructions for the XIOS XG USB System and Sensors or the XIOS
XG WiFi System and Sensors.
5. Click the "Enable exposure readiness for an intraoral X-ray" button in
SIDEXIS XG.
The "Set tooth or program" window opens.
In the "Set tooth or program" window, the image type "Intraoral Xray exposure" is selected.
64 08 160 D3610
D3610.208.01.01.02
11.2012
41
båÖäáëÜ
2. Register a patient. See the SIDEXIS XG Operator's Manual.
4 Operation
Sirona Dental Systems GmbH
4.1 Establishing exposure readiness with the XIOS XG Select sensor
Operator's manual SIDEXIS Plugin for XIOS XG
IMPORTANT
If no patient has been registered yet, the "Register patient" window
initially appears. In this case, register a patient.
6. Click on the tooth you want to examine.
7. To examine a Mixed dentition, place a check mark in the "Mixed
dentition" check box. Then click on the tooth to be examined in the
Mixed dentition view.
IMPORTANT
For more information on the tooth displays, refer to the SIDEXIS XG
Operator's Manual.
8. Click the "OK" button.
The "Select X-ray component" window opens.
All of the USB modules and WiFi interfaces connected to the PC
are listed in the "Select X-ray component" window.
A USB module always has the designation XIOS XG USB.
WiFi interfaces have the designation XIOS XG WIFI ‘device
number‘ (e.g. XIOS XG WIFI ‘P002456‘). The device number of
the WiFi interface can be found on the bottom side of the WiFi
interface.
If a name has been assigned to the WiFi interface, it will appear
instead of the device number. For more information on assigning
names for WiFi interfaces, refer to the XIOS XG WiFi System and
Sensors Operating Instructions, Section on "Web Server and
Upgrade Utility", page on --> Adjusting a WiFi interface.
When the WiFi device selection via RFID is used, the entry XIOS
XG WIFI RFID is displayed instead of the WiFi interfaces with the
device numbers.
9. If the connected USB module/WiFi interface does not appear in the
"Select X-ray component" window, click the "Aktualisieren" button. If
necessary, check the connection and click the "Aktualisieren" button
again.
42
64 08 160 D3610
D3610.208.01.01.02 11.2012
Sirona Dental Systems GmbH
4 Operation
Operator's manual SIDEXIS Plugin for XIOS XG
4.1 Establishing exposure readiness with the XIOS XG Select sensor
båÖäáëÜ
10. Select the desired X-ray component
USB module:
Click on the XIOS XG USB entry in the "Select X-ray component"
window. Then click the button marked "OK".
WiFi interface (without WiFi device selection via RFID):
Click on the WiFi interface connected to the sensor in the "Select Xray component" window (entry XIOS XG WIFI 'device number'). Then
click the button marked "OK".
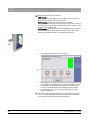
WiFi interface (with WiFi device selection via RFID):
Click on the entry XIOS XG WiFi RFID. Then hold the wireless
symbol on the WiFi interface on the RFID reader. (as described in the
figure)
The "exposure readiness" window appears.
When a green rectangle starts flashing in the "exposure
readiness" window, the XIOS XG Select sensor is ready for an
exposure.
11. Now release the exposure. See the Operating Instructions for the
XIOS XG USB System and Sensors or the XIOS XG WiFi System
and Sensors.
or
➢
Cancel the exposure readiness by clicking on the "Quit" button.
A status display appears while the sensor is acquiring the
exposure.
As soon as the exposure has been acquired, it is automatically
transferred to SIDEXIS XG.
64 08 160 D3610
D3610.208.01.01.02
11.2012
43
4 Operation
Sirona Dental Systems GmbH
4.2 Establishing exposure readiness with the XIOS XG Supreme sensor
Operator's manual SIDEXIS Plugin for XIOS XG
4.2 Establishing exposure readiness with the XIOS
XG Supreme sensor
Establishing exposure readiness with the XIOS XG Supreme sensor
✔ The Sidexis plugin for XIOS XG is installed.
✔ The driver for the USB module is installed or a WiFi interface is
enabled in SIDEXIS XG.
✔ When WiFi device selection via RFID(optional) is used:
The WiFi device selection via RFID is activated.
The driver for the XIOS XG RFID reader is installed.
An XIOS XG RFID reader is connected to a USB interface of the PC.
1. Start SIDEXIS XG.
2. Register a patient. See the SIDEXIS XG Operator's Manual.
3. Connect a (XIOS XG Select or XIOS XG Supreme) sensor to the USB
module or the WiFi interface. See the Operating Instructions for the
XIOS XG USB System and Sensors or the XIOS XG WiFi System
and Sensors.
4. Place the sensor in its exposure position. See the Operating
Instructions for the XIOS XG USB System and Sensors or the XIOS
XG WiFi System and Sensors.
5. Click the "Enable exposure readiness for an intraoral X-ray" button in
SIDEXIS XG.
The "Set tooth or program" window opens.
In the "Set tooth or program" window, the image type "Intraoral Xray exposure" is selected.
IMPORTANT
If no patient has been registered yet, the "Register patient" window
initially appears. In this case, register a patient.
44
64 08 160 D3610
D3610.208.01.01.02 11.2012
Sirona Dental Systems GmbH
Operator's manual SIDEXIS Plugin for XIOS XG
4 Operation
4.2 Establishing exposure readiness with the XIOS XG Supreme sensor
6. Click on the tooth you want to examine.
7. To examine a Mixed dentition, place a check mark in the "Mixed
dentition" check box. Then click on the tooth to be examined in the
Mixed dentition view.
IMPORTANT
For more information on the tooth displays, refer to the SIDEXIS XG
Operator's Manual.
8. Click the "OK" button.
båÖäáëÜ
The "Select X-ray component" window opens.
All of the USB modules and WiFi interfaces connected to the PC
are listed in the "Select X-ray component" window.
A USB module always has the designation XIOS XG USB.
WiFi interfaces have the designation XIOS XG WIFI ‘device
number‘ (e.g. XIOS XG WIFI ‘P002456‘). The device number of
the WiFi interface can be found on the bottom side of the WiFi
interface.
If a name has been assigned to the WiFi interface, it will appear
instead of the device number. For more information on assigning
names for WiFi interfaces, refer to the XIOS XG WiFi System and
Sensors Operating Instructions, Section on "Web Server and
Upgrade Utility", page on --> Adjusting a WiFi interface.
When the WiFi device selection via RFID is used, the entry XIOS
XG WIFI RFID is displayed instead of the WiFi interfaces with the
device numbers.
9. If the connected USB module/WiFi interface does not appear in the
"Select X-ray component" window, click the "Aktualisieren" button. If
necessary, check the connection and click the "Aktualisieren" button
again.
64 08 160 D3610
D3610.208.01.01.02
11.2012
45
4 Operation
Sirona Dental Systems GmbH
4.2 Establishing exposure readiness with the XIOS XG Supreme sensor
Operator's manual SIDEXIS Plugin for XIOS XG
10. Select the desired X-ray component
USB module:
Click on the XIOS XG USB entry in the "Select X-ray component"
window. Then click the button marked "OK".
WiFi interface (without WiFi device selection via RFID):
Click on the WiFi interface connected to the sensor in the "Select Xray component" window (entry XIOS XG WIFI 'device number'). Then
click the button marked "OK".
WiFi interface (with WiFi device selection via RFID):Click on the entry
XIOS XG WiFi RFID. Then hold the wireless symbol on the WiFi
interface on the RFID reader. (as described in the figure)
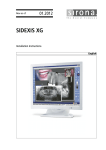
The "exposure readiness" window appears.
When XIOS XG Supreme sensors are used, buttons for selecting
an image filter are displayed in the "exposure readiness" window.
This enables you to select the image filter to be used for the
exposure. Via the Dynamic image sharpness control image
processing tool, you can then process the exposure, using
different image filter.
11. Click one of the image filter buttons (A) to select a specific image
filter. The selected image filter button is indicated by a red border.
The "Universal" image filter is selected by default.
46
64 08 160 D3610
D3610.208.01.01.02 11.2012
Sirona Dental Systems GmbH
4 Operation
Operator's manual SIDEXIS Plugin for XIOS XG
4.2 Establishing exposure readiness with the XIOS XG Supreme sensor
12. Now release the exposure. See the Operating Instructions for the
XIOS XG USB System and Sensors or the XIOS XG WiFi System
and Sensors.
or
➢ Cancel the exposure readiness by clicking on the "Quit" button.
When a green rectangle starts flashing in the "exposure
readiness" window, the XIOS XG Supreme sensor is ready for an
exposure.
As soon as the exposure has been acquired, it is automatically
transferred to SIDEXIS XG.
64 08 160 D3610
D3610.208.01.01.02
11.2012
47
båÖäáëÜ
A status display appears while the sensor is acquiring the
exposure.
4 Operation
Sirona Dental Systems GmbH
4.3 Editing exposures
Operator's manual SIDEXIS Plugin for XIOS XG
4.3 Editing exposures
Editing exposures
4.3.1
Editing exposures with SIDEXIS XG
Editing exposures with SIDEXIS XG
The SIDEXIS XG image processing functions are available for XIOS XG
Select exposures.
See the SIDEXIS XG Operator's Manual concerning this.
48
64 08 160 D3610
D3610.208.01.01.02 11.2012
Sirona Dental Systems GmbH
4 Operation
Operator's manual SIDEXIS Plugin for XIOS XG
4.3.2
4.3 Editing exposures
Editing exposures with the dynamic focus control image
processing tool (for XIOS XG Supreme only)
Editing
exposures with
with the
the dynamic
XIOS Viewer
XIOSimage
XG Supreme
only)
Editing exposures
focus(for
control
processing
tool (for XIOS XG Supreme only)
The Dynamic image sharpness control image processing tool is available
for processing exposures acquired with a XIOS XG Supreme type sensor.
Image processing via the standard functions of SIDEXIS XG is therefore
not required.
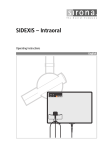
The Dynamic image sharpness control tool features 4 image filters used
to optimize exposures for different diagnostic functions:
● "Universal": Image filter for general diagnostics
● "Caries": Image filter for caries detection
● "Endo": Image filter for endodontics
båÖäáëÜ
● "Perio": Image filter for periodontology
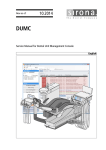
Use the image filter buttons (C) to apply an image filter to an exposure.
The selected image filter button is indicated by a red border.
Adjust the focus for the selected image filter using the slider (B).
All adjustments are displayed in the preview image (A).
The focus, brightness, and contrast for the image filters can be predefined
in the configuration dialog. See XIOS XG Supreme"Configuration".
64 08 160 D3610
D3610.208.01.01.02
11.2012
49
4 Operation
Sirona Dental Systems GmbH
4.3 Editing exposures
Operator's manual SIDEXIS Plugin for XIOS XG
Editing exposures with the Dynamic image sharpness control image
processing tool
✔ An exposure that was generated with a XIOS XG Supreme type
sensor has been opened in SIDEXIS XG.
1. Click the "IO" button (A).
2.
You also can start the tool by clicking the "Dynamic image sharpness
control" button (figure) or via the menu "View" --> "Dynamic image
sharpness control".
The exposure is opened in the "Dynamic image sharpness
control" dialog window.
3. Click an image filter button (C).
50
64 08 160 D3610
D3610.208.01.01.02 11.2012
Sirona Dental Systems GmbH
4 Operation
Operator's manual SIDEXIS Plugin for XIOS XG
4.3 Editing exposures
The button you have just clicked is indicated by a red border. The
image filter is used on the exposure.
The view in the preview image (A) changes.
4. Adjust the focus with the slider (B) until the exposure in the preview
image (A) corresponds to your requirements.
5.
Click the "Apply" button to apply the changes to the current SIDEXIS
exposure.
båÖäáëÜ
The changes are then applied to the current SIDEXIS exposure
and can be saved to SIDEXIS XG as the new view.
64 08 160 D3610
D3610.208.01.01.02
11.2012
51
4 Operation
Sirona Dental Systems GmbH
4.4 Transferring untransferred exposures to SIDEXIS XG (rescue)
Operator's manual SIDEXIS Plugin for XIOS XG
4.4 Transferring untransferred exposures to
SIDEXIS XG (rescue)
Transferring untransferred exposures to SIDEXIS XG (rescue)
During the course of normal acquisition with XIOS XG, the exposures are
transferred to SIDEXIS XG immediately after acquisition.
If an error occurs while an exposure is being transferred to SIDEXIS XG,
the exposure will be stored locally in a buffer store.
This exposure then remains available for transfer to SIDEXIS XG the next
time exposure readiness is established.
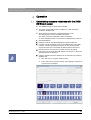
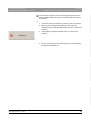
The following dialog window appears:
1. If you want to export the exposure still stored on the sensor to
SIDEXIS XG and then establish exposure readiness, click the "Yes"
button.
2. If you want to delete the exposure still stored on the sensor and then
establish exposure readiness, click the "No" button.
3. To cancel the process, click the "Cancel" button. Exposure readiness
will not be established. The message stating that an untransferred
exposure exists will appear again the next time exposure readiness
is established.
52
64 08 160 D3610
D3610.208.01.01.02 11.2012
tÉ=êÉëÉêîÉ=íÜÉ=êáÖÜí=íç=ã~âÉ=~åó=~äíÉê~íáçåë=ïÜáÅÜ=ã~ó=ÄÉ=êÉèìáêÉÇ=ÇìÉ=íç=íÉÅÜåáÅ~ä=áãéêçîÉãÉåíëK
«=páêçå~=aÉåí~ä=póëíÉãë=dãÄe=OMNO
aPSNMKOMUKMNKMNKMO NNKOMNO
péê~ÅÜÉW ÉåÖäáëÅÜ
ûKJkêKW= MMM=MMM
mêáåíÉÇ=áå=dÉêã~åó
páêçå~=aÉåí~ä=póëíÉãë=dãÄe
áå=íÜÉ=rp^W
c~Äêáâëíê~≈É=PN
SQSOR=_ÉåëÜÉáã
dÉêã~åó
ïïïKëáêçå~KÅçã
páêçå~=aÉåí~ä=póëíÉãë=ii`
QUPR=páêçå~=aêáîÉI=pìáíÉ=NMM
`Ü~êäçííÉI=k`=OUOTP
rp^
lêÇÉê=kç
SQ=MU=NSM=aPSNM