1
kÉï=~ë=çÑW==
MQKOMNR
pfabufp=Q
loqelmelp=pi=m~åçê~ã~=ÉÇáíçê
^ÇÇÉåÇìã=íç=?pfabufp=Q=rëÉê=j~åì~ä?
båÖäáëÜ
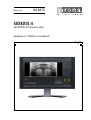
ORTHOPHOS SL, panorama editor, addendum to "SIDEXIS 4 User Manual"
=
Table of contents
Sirona Dental Systems GmbH
Addendum to "SIDEXIS 4 User Manual" SIDEXIS 4
Table of contents
1
2
About this user manual.............................................................................................
3
1.1
Scope ............................................................................................................
3
1.2
Other relevant documents .............................................................................
3
2
Functional description ..............................................................................................
4
3
Importing raw data....................................................................................................
5
4
Operating panorama editor ......................................................................................
8
4.1
Starting the panorama editor.........................................................................
9
4.2
Selecting, renaming, and deleting views .......................................................
4.2.1 Selecting the view ............................................................................
4.2.2 Renaming the view...........................................................................
4.2.3 Deleting views ..................................................................................
4.2.4 Generating a new view.....................................................................
4.2.5 Creating a "scaled" view...................................................................
4.2.6 Full frame mode ...............................................................................
11
11
12
12
13
14
15
4.3
Execute positioning corrections ....................................................................
4.3.1 Correcting the shape of the mandibular arch ...................................
4.3.2 Correcting the head position ............................................................
4.3.3 Correcting the head inclination.........................................................
17
18
19
20
4.4
Adjusting layer orientation .............................................................................
4.4.1 Shifting the layer orientation.............................................................
4.4.2 Tilting the layer orientation ...............................................................
21
23
24
4.5
Closing the panorama editor / saving the views............................................
25
65 44 550 3592
3592.208.02.01.02 04.2015
Sirona Dental Systems GmbH
1 About this user manual
Addendum to "SIDEXIS 4 User Manual" SIDEXIS 4
1
1.1 Scope
About this user manual
1.1 Scope
This User Manual is a supplement to the technical documentation
"SIDEXIS 4 Operator´s Manual" (REF 6447028).
It describes operation of the SIDEXIS 4 plugin "ORTHOPHOS SL
panorama editor".
Information about the user interface and general operation of SIDEXIS 4
or operation of the ORTHOPHOS SL X-ray unit can be found in the
corresponding technical documentation.
All technical documentation required for the safe operation of the
panorama editor can be found listed in the chapter entitled Other relevant
documents [ → 3] .
1.2 Other relevant documents
In addition to this user user manual, you need the following documents:
● "SIDEXIS 4 Operator´s Manual" : REF 6447028
● "ORTHOPHOS SL Operating Instructions" : REF 64 94 947
Online portal for technical documents
65 44 550 3592
3592.208.02.01.02
04.2015
We have set up an online portal for the Technical Documents at
http://www.sirona.com/manuals. From here, you can download this User
Manual along with other documents. Please complete the online form if
you would like a hard copy of a particular document. We will then be
happy to send you a printed copy free of charge.
Online Portal
3
båÖäáëÜ
It is essential that the warnings and safety instructions contained in these
technical documents are observed.
2 Functional description
Sirona Dental Systems GmbH
Addendum to "SIDEXIS 4 User Manual" SIDEXIS 4
2
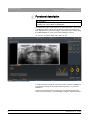
Functional description
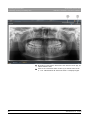
IMPORTANT
The exposures displayed in the panorama editor are previews.
A reading can only be taken in the lightbox
The SIDEXIS 4 plugin "ORTHOPHOS SL Panorama editor" offers a tool
in SIDEXIS 4, which can be used to perform position corrections and
layer adjustments in panoramic images, which have been created using
the ORTHOPHOS SL X-ray unit and the following programs:
P1, P2, P10, P12, BW1, BW2, TM1, TM3, S1, S3
"ORTHOPHOS SL Panorama editor"
In order to be able to apply the "Panorama editor" function in SIDEXIS 4
to a panoramic image, its raw data must be imported [ → 5] once into
SIDEXIS 4.
Once the raw data has been imported, the corresponding panoramic
image can be processed [ → 8] in SIDEXIS 4 using the "Panorama editor"
.
4
65 44 550 3592
3592.208.02.01.02 04.2015
Sirona Dental Systems GmbH
3 Importing raw data
Addendum to "SIDEXIS 4 User Manual" SIDEXIS 4
3
Importing raw data
The X-ray exposure could be transferred by the unit, yet was downloaded
to SIDEXIS 4 without raw data for further processing.
✔ The workstation software is installed on the workstation for the
corresponding X-ray component.
1. Start SIDEXIS 4.
båÖäáëÜ
2. In SIDEXIS 4, call the ORTHOPHOS SL configuration menu.
3. Select the "Data Import" button.
65 44 550 3592
3592.208.02.01.02
04.2015
5
3 Importing raw data
Sirona Dental Systems GmbH
Addendum to "SIDEXIS 4 User Manual" SIDEXIS 4
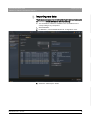
4. In the "Acquisition Server" drop-down list box, select the Acquisition
Server used to create the exposure, whose raw data you wish to
download to use in the panorama editor.
To simplify searching for the specific exposure, you can limit the
number of exposures displayed by sorting by date and transmission
state.
6
65 44 550 3592
3592.208.02.01.02 04.2015
Sirona Dental Systems GmbH
3 Importing raw data
båÖäáëÜ
Addendum to "SIDEXIS 4 User Manual" SIDEXIS 4
5. If the exposure, which is to be imported, is marked as "ready" in the
data container, click on the "Read" button to import it.
If the exposure, which is to be imported, is marked as "working" in
the data container, click on the "Reconstruct again" button to import
it.
The program tries to establish a connection to the data container.
If it is not possible to establish a connection, check the network.
Once a connection is successfully established, the data is
transmitted and becomes available in SIDEXIS 4.
65 44 550 3592
3592.208.02.01.02
04.2015
7
4 Operating panorama editor
Sirona Dental Systems GmbH
Addendum to "SIDEXIS 4 User Manual" SIDEXIS 4
4
Operating panorama editor
In order to process panoramic images in SIDEXIS 4 using the "Panorama
editor" , the following prerequisites must be met:
● In the SIDEXIS 4 database, there is a panoramic X-ray image that
has been generated by the X-ray system ORTHOPHOS SL in a
suitable exposure program (P1, P2, P10, P12, BW1, BW2, TM1,
TM3, S1, S3).
● The raw data of the panoramic image is imported into SIDEXIS 4
once [ → 5].
It is only when these prerequisites have been fulfilled, that the "Panorama
editor" button can be selected in the SIDEXIS 4 tool kit.
8
65 44 550 3592
3592.208.02.01.02 04.2015
Sirona Dental Systems GmbH
4 Operating panorama editor
Addendum to "SIDEXIS 4 User Manual" SIDEXIS 4
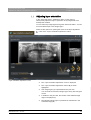
4.1 Starting the panorama editor
4.1 Starting the panorama editor
1. Start SIDEXIS 4.
2. Register your patients.
3. Open the panoramic image in the "Light Box" of SIDEXIS 4
("Examination" work phase).
The "Panorama editor" button is displayed in the "Tools" tool kit.
4. Click on the "Panorama editor" button with the mouse.
båÖäáëÜ
The "Panorama editor" starts.
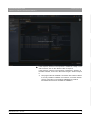
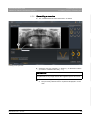
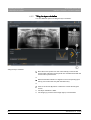
Loading an ORTHOPHOS SL exposure in the panorama editor
The data is downloaded for the "Panorama editor" .
The panoramic image is downloaded with all the views available
in the "Panorama editor" . The views can be selected via the tabs
below the panoramic image.
65 44 550 3592
3592.208.02.01.02
04.2015
9
4 Operating panorama editor
4.1 Starting the panorama editor
Sirona Dental Systems GmbH
Addendum to "SIDEXIS 4 User Manual" SIDEXIS 4
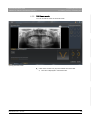
"ORTHOPHOS SL Panorama editor" After the first loading of a panoramic image
10
65 44 550 3592
3592.208.02.01.02 04.2015
Sirona Dental Systems GmbH
4 Operating panorama editor
Addendum to "SIDEXIS 4 User Manual" SIDEXIS 4
4.2 Selecting, renaming, and deleting views
4.2 Selecting, renaming, and deleting views
The views of a panoramic image are presented in index form in the
"ORTHOPHOS SL Panorama editor" . You can navigate between the
views by selecting the tabs.
The "Original" view is always displayed. This view represents the original
of the panoramic image. The "Original" view cannot be edited, renamed
or deleted.
When first opening a panoramic image, a copy of the original is
automatically generated under the name "View1" . The "View1" is
automatically selected after loading the exposure and can be edited,
renamed, or deleted.
4.2.1
båÖäáëÜ
You have the option to create additional pan views, to rename pan views,
or to delete them, and to create a scaled view based on the original
exposure.
Selecting the view
✔ The "ORTHOPHOS SL Panorama editor" is started.
Selecting the view
➢ Click on one of the tabs (A) below the panoramic X-ray image.
The selected tab is shown highlighted.
The respective view is displayed.
65 44 550 3592
3592.208.02.01.02
04.2015
11
4 Operating panorama editor
Sirona Dental Systems GmbH
4.2 Selecting, renaming, and deleting views
4.2.2
Addendum to "SIDEXIS 4 User Manual" SIDEXIS 4
Renaming the view
Views that have not yet been saved in the SIDEXIS 4 database can be
renamed in the "ORTHOPHOS SL Panorama editor" .
NOTE: The views "Original" and"Scaling" cannot be renamed in
principle.
1. Click on the tab of the view you wish to rename with the right mouse
button.
An input field appears in the tab. The name "Viewx" is preentered.
2. Enter the desired name in this field by highlighting and writing over
the displayed name.
3. Confirm your input by pressing the RETURN key.
4.2.3
Deleting views
Views that have not yet been saved in the SIDEXIS 4 database can be
deleted in the "ORTHOPHOS SL Panorama editor" .
NOTE: In principle, the view "Original" cannot be deleted.
➢ Click on the button "Delete (x)" (C) in the tab of the view that you want
to delete.
The tab and the related view are deleted.
12
65 44 550 3592
3592.208.02.01.02 04.2015
Sirona Dental Systems GmbH
4 Operating panorama editor
Addendum to "SIDEXIS 4 User Manual" SIDEXIS 4
4.2.4
4.2 Selecting, renaming, and deleting views
Generating a new view
båÖäáëÜ
✔ The "ORTHOPHOS SL Panorama editor" is started.
Creating a new pan view
1. Select the view (A) ("Original" or "View1-x" ), on the basis of which
you wish to create the new view [ → 11].
IMPORTANT
No copy can be created of a scaled view. This view can only exist once
per panoramic X-ray image and has the original exposure as a basis.
2. Click on the "Add (+)" button (B) near the tabs.
The previously selected view is copied and displayed in a new
view.
65 44 550 3592
3592.208.02.01.02
04.2015
13
4 Operating panorama editor
Sirona Dental Systems GmbH
4.2 Selecting, renaming, and deleting views
4.2.5
Addendum to "SIDEXIS 4 User Manual" SIDEXIS 4
Creating a "scaled" view
The "scaled" view presents the image structures at a constant aspect
ratio. This view enables the measurement of image structures in an
image region (see document SIDEXIS 4 Operator´s Manual, REF
6447028).
IMPORTANT
The reference test phantom (REF 63 10 838) for calibrating the
measurement function must also be used for this view.
Only one "scaled" view can be created per panoramic X-ray image. The
"scaled" view cannot be renamed. Provided the "Scaling" view has not
yet been saved in the SIDEXIS 4 database, this can be deleted again in
the "ORTHOPHOS SL Panorama editor" .
Positioning corrections and layer adjustments are not possible in the
"scaled" view.
✔ The "ORTHOPHOS SL Panorama editor" is started.
"Scaling" view
➢ Click on the "Scaling" button (F).
This creates a "scaled" view.
The "scaled" tab (G) is displayed.
14
65 44 550 3592
3592.208.02.01.02 04.2015
Sirona Dental Systems GmbH
4 Operating panorama editor
Addendum to "SIDEXIS 4 User Manual" SIDEXIS 4
4.2.6
4.2 Selecting, renaming, and deleting views
Full frame mode
båÖäáëÜ
You can look at the views in full frame mode.
Opening full frame mode
1. Click on the screen icon (A) in the header line of the view.
The view is displayed in full frame mode.
65 44 550 3592
3592.208.02.01.02
04.2015
15
4 Operating panorama editor
4.2 Selecting, renaming, and deleting views
Sirona Dental Systems GmbH
Addendum to "SIDEXIS 4 User Manual" SIDEXIS 4
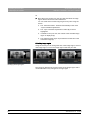
2. By clicking on the buttons "Next view" and "Previous view" (B), you
switch between views.
3. Click on the "Panorama editor" button (C) to exit full frame mode.
The "ORTHOPHOS SL Panorama editor" is displayed again.
16
65 44 550 3592
3592.208.02.01.02 04.2015
Sirona Dental Systems GmbH
4 Operating panorama editor
Addendum to "SIDEXIS 4 User Manual" SIDEXIS 4
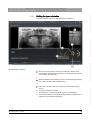
4.3 Execute positioning corrections
4.3 Execute positioning corrections
NOTE: The positioning corrections are only available for panoramic X-ray
images that have been created with the ORTHOPHOS SL X-ray system
and the exposure programs P1, P2, and P10.
In the "ORTHOPHOS SL Panorama editor" , SIDEXIS 4 offers you the
option to carry out subsequent positioning corrections to panoramic X-ray
images that have already been created.
Using the "ORTHOPHOS SL Panorama editor" , you can subsequently
adjust the dental arch shape, the head position and angle of the head.
NOTE: After starting the editor, the "Positioning correction" button and
the menu belonging to it are selected automatically.
➢ If not selected yet:
Click the "Positioning correction" (A) button.
båÖäáëÜ
The "Positioning correction" menu is displayed.
Opening the "Positioning correction" menu
65 44 550 3592
3592.208.02.01.02
04.2015
17
4 Operating panorama editor
Sirona Dental Systems GmbH
4.3 Execute positioning corrections
Addendum to "SIDEXIS 4 User Manual" SIDEXIS 4
4.3.1
Correcting the shape of the mandibular arch
Correcting the shape of the mandibular arch
➢ Click the button for the desired shape of mandibular arch in the "Jaw
type selection" window.
The selected button is shown highlighted (A).
The changed layer orientation is displayed in the schematic
diagram (B).
The pan view is recalculated.
18
65 44 550 3592
3592.208.02.01.02 04.2015
Sirona Dental Systems GmbH
4 Operating panorama editor
Addendum to "SIDEXIS 4 User Manual" SIDEXIS 4
4.3.2
4.3 Execute positioning corrections
Correcting the head position
båÖäáëÜ
You have two different options for correcting the head position.
Correcting the head position
➢ Move the mouse pointer over the control dial (K). Press the left
mouse button. Move the mouse pointer in a vertical direction with the
mouse button pressed down.
or
➢ Enter the desired movement in mm in the corresponding input field
(L) and confirm the entry with the RETURN key.
or
➢ Click on the arrows (M) above or below the control dial using the
mouse.
The position of the head is corrected.
The pan view is recalculated.
65 44 550 3592
3592.208.02.01.02
04.2015
19
4 Operating panorama editor
Sirona Dental Systems GmbH
4.3 Execute positioning corrections
Addendum to "SIDEXIS 4 User Manual" SIDEXIS 4
4.3.3
Correcting the head inclination
You have different options for correcting the head inclination.
Correcting the head inclination
➢ Move the mouse pointer over the control dial (H). Press the left
mouse button. Move the mouse pointer in a vertical direction with the
mouse button pressed down.
or
➢ Enter the desired inclination in degrees in the corresponding input
field (I) and confirm the entry with the RETURN key.
or
➢ Click on the arrows (J) above or below the control dial using the
mouse.
The head inclination is corrected.
The pan view is recalculated.
20
65 44 550 3592
3592.208.02.01.02 04.2015
Sirona Dental Systems GmbH
4 Operating panorama editor
Addendum to "SIDEXIS 4 User Manual" SIDEXIS 4
4.4 Adjusting layer orientation
4.4 Adjusting layer orientation
In the "Panorama editor" , SIDEXIS 4 offers you the option to
subsequently adjust the layer of panoramic X-ray images that have
already been created.
You can select any image region through the "Panorama editor" . You can
move and tilt the layer in this image region.
There are two options for opening the menu for the layer adjustment:
båÖäáëÜ
➢ Click on the "Layer orientation adjustment" button.
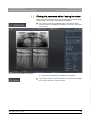
"Layer orientation adjustment" menu
The "Layer orientation adjustment" menu is displayed.
The "Layer orientation adjustment" button (B) is shown
highlighted.
One image region (A) is preselected in the pan view.
You can scale and move this image region at any time using the
mouse.
In addition to the pan view, the content of the selected image
region is displayed (C).
The selected image region is presented as a white line in the
schematic image (D).
65 44 550 3592
3592.208.02.01.02
04.2015
21
4 Operating panorama editor
Sirona Dental Systems GmbH
4.4 Adjusting layer orientation
Addendum to "SIDEXIS 4 User Manual" SIDEXIS 4
Or
➢ Move the mouse pointer over the pan view and select an image
region with the left mouse button held down.
You can scale and move the image region at any time using the
mouse.
The "Panorama editor" switches automatically to the menu
"Layer orientation adjustment" .
The "Layer orientation adjustment" button (B) is shown
highlighted.
In addition to the pan view, the content of the selected image
region is displayed (C).
The selected image region is presented as a white line in the
schematic image (D).
Selecting image region
Using the mouse you can change the size of the image region, select a
new image region or move the image region inside the pan view.
Modifying the image region
The image (C) displays the current content of the image region and is
recalculated after every change to the image region.
22
65 44 550 3592
3592.208.02.01.02 04.2015
Sirona Dental Systems GmbH
4 Operating panorama editor
Addendum to "SIDEXIS 4 User Manual" SIDEXIS 4
4.4.1
4.4 Adjusting layer orientation
Shifting the layer orientation
båÖäáëÜ
You have different options for shifting the layer orientation.
Shifting the layer orientation
➢ Move the mouse pointer over the control dial (H). Press the left
mouse button. Move the mouse pointer in a vertical direction with the
mouse button pressed down.
or
➢ Enter the desired movement in mm in the corresponding input field (I)
and confirm the entry with the Return key.
or
➢ Click on the arrows (J) above or below the control dial using the
mouse.
The layer orientation is shifted.
The image (C) (content of the image region) is recalculated.
The layer orientation of the selected image region is presented as a
white line in the schematic image (D).
65 44 550 3592
3592.208.02.01.02
04.2015
23
4 Operating panorama editor
Sirona Dental Systems GmbH
4.4 Adjusting layer orientation
Addendum to "SIDEXIS 4 User Manual" SIDEXIS 4
4.4.2
Tilting the layer orientation
You have different options for tilting the layer orientation.
Tilting the layer orientation
➢ Move the mouse pointer over the control dial (K). Press the left
mouse button. Move the mouse pointer in a vertical direction with the
mouse button pressed down.
or
➢ Enter the desired inclination in degrees in the corresponding input
field (L) and confirm the entry with the Return key.
or
➢ Click on the arrows (M) above or below the control dial using the
mouse.
The layer orientation is tilted.
The image (C) (content of the image region) is recalculated.
24
65 44 550 3592
3592.208.02.01.02 04.2015
Sirona Dental Systems GmbH
4 Operating panorama editor
Addendum to "SIDEXIS 4 User Manual" SIDEXIS 4
4.5 Closing the panorama editor / saving the views
4.5 Closing the panorama editor / saving the views
When closing the panorama editor, you can discard the modified / newly
created views or save them in the SIDEXIS 4 database.
båÖäáëÜ
➢ If you want to close the "Panorama editor" and save the newly
produced views in the SIDEXIS 4 database, click on the "Save and
close" button.
Saved views in the SIDEXIS 4 "Light Box"
The views are displayed in the SIDEXIS 4-"Light Box" .
➢ If you want to close the "Panorama editor" and discard the changes
to the views, click on the "Cancel" button.
65 44 550 3592
3592.208.02.01.02
04.2015
25
tÉ=êÉëÉêîÉ=íÜÉ=êáÖÜí=íç=ã~âÉ=~åó=~äíÉê~íáçåë=ïÜáÅÜ=ã~ó=ÄÉ=êÉèìáêÉÇ=ÇìÉ=íç=íÉÅÜåáÅ~ä=áãéêçîÉãÉåíëK
«=páêçå~=aÉåí~ä=póëíÉãë=dãÄe=OMNR
PRVOKOMUKMOKMNKMO MQKOMNR
péê~ÅÜÉW ÉåÖäáëÅÜ
ûKJkêKW= MMM=MMM
mêáåíÉÇ=áå=dÉêã~åó
páêçå~=aÉåí~ä=póëíÉãë=dãÄe
áå=íÜÉ=rp^W
c~Äêáâëíê~≈É=PN
aJSQSOR=_ÉåëÜÉáã=
dÉêã~åó
ïïïKëáêçå~KÅçã
páêçå~=aÉåí~ä=póëíÉãë=ii`
QUPR=páêçå~=aêáîÉI=pìáíÉ=NMM
`Ü~êäçííÉI=k`=OUOTP
rp^
lêÇÉê=kç
SR=QQ=RRM=PRVO