1
CONTENTS
CONTENTS ........................................................................................1
INTRODUCTION...................................................................................1
PREFACE BY MATTHIAS GROB, INITIATOR AND DEVELOPER ................... 1
Introduction to the Version 2.2 ..................................................................... 2
WHY READ THE MANUAL ....................................................................................... 4
WHY NOT READ THE MANUAL!............................................................................... 4
WHERE TO READ IN THE MANUAL ......................................................................... 4
REPRESENTATION ................................................................................................ 4
BASICS .............................................................................................5
LOOP ..................................................................................................................... 5
MULTIPLICATION.................................................................................................... 5
BEAT...................................................................................................................... 5
RESET ................................................................................................................... 5
PEDAL ................................................................................................................... 6
THE QUICKEST WAY TO THE LOOP........................................................7
STRAIGHT INTO IT................................................................................................... 7
JUST ANOTHER DELAY?........................................................................................ 7
IMPORTANT HINTS FOR BEGINNERS..................................................................... 8
STEP BY STEP ...................................................................................9
CONNECTING......................................................................................................... 9
MEANING OF THE LEDS ....................................................................................... 10
Level display ............................................................................................. 10
Function display ........................................................................................ 10
RECORD .............................................................................................................. 11
Red digits (digital display) ........................................................................... 11
FEEDBACK control ............................................................................................... 12
OVERDUB ............................................................................................................ 13
MULTIPLY............................................................................................................. 14
Green digits (digital display) ........................................................................ 15
LONG SWITCH PRESSING .................................................................................... 17
FROM ONE FUNCTION DIRECTLY TO ANOTHER................................................... 17
INSERT switch....................................................................................................... 18
SPECIAL FUNCTION REPLACE ............................................................................ 18
BREAK switch ....................................................................................................... 19
UNDO switch ......................................................................................................... 19
MODE switch......................................................................................................... 21
FROM LEFT TO RIGHT........................................................................ 22
INPUT................................................................................................................... 22
OUTPUTS............................................................................................................. 22
FEEDBACK .......................................................................................................... 23
MODE................................................................................................................... 23
FUNCTION SWITCHES.......................................................................................... 24
How to control a lot with a few switches! ....................................................... 24
RECORD .................................................................................................. 24
OVERDUB ................................................................................................ 25
MULTIPLY................................................................................................. 25
INSERT..................................................................................................... 27
BREAK ..................................................................................................... 28
UNDO....................................................................................................... 28
DISPLAY............................................................................................................... 30
LOOPTIME (red digits).............................................................................. 30
MULTIPLE ................................................................................................ 31
MIDI ...................................................................................................................... 32
SYNC JACK SOCKETS ......................................................................................... 33
BEAT SYNC.............................................................................................. 33
BROTHER SYNC....................................................................................... 33
POWER ................................................................................................................ 33
DIP-SWITCHES ..................................................................................................... 34
COMMUNICATION FACILITIES..............................................................35
RESET.................................................................................................................. 35
The Reset Parameters................................................................................ 35
AUTO UNDO ......................................................................................................... 36
SYNCHRONIZATION.............................................................................................. 37
What is Synchronization ............................................................................. 37
Synchronization levels ............................................................................... 37
Concept for Synchronisation ...................................................................... 38
The use of BROTHER SYNC and MIDI ......................................................... 40
QUANTIZE ............................................................................................................ 42
MIDI....................................................................................................................... 43
MIDI coding................................................................................................ 43
MIDI Clock.................................................................................................. 44
PLAYING HINTS .................................................................................45
IN GENERAL ......................................................................................................... 45
Modesty .................................................................................................... 45
Experience loopability ................................................................................ 45
How to learn from mistakes.......................................................................... 45
The MIX - control ........................................................................................ 45
RHYTHM SWITCH.................................................................................................. 45
APPLICATION EXAMPLES .................................................................................... 46
The Rehearse............................................................................................ 46
Building up a groove .................................................................................. 46
End a groove ............................................................................................ 46
Weaving a sound carpet ............................................................................. 46
Composing a song..................................................................................... 47
The LOOP delay as ”protocol” .................................................................... 47
Correcting ................................................................................................. 48
Sampling ................................................................................................... 48
Polyphony in a band................................................................................... 48
The Loop band .......................................................................................... 48
A process of development — from music to therapy ..................................... 49
TECHNICAL EXPLANATIONS ...............................................................50
LOOP ORGANISATION IN THE MEMORY............................................................... 50
SAMPLEMACRO................................................................................................... 51
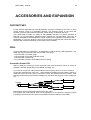
ACCESSORIES AND EXPANSION .........................................................52
FOOTSWITCHES .................................................................................................. 52
PEDAL.................................................................................................................. 52
Controller Pedal CP1.................................................................................. 52
Pedal with switch........................................................................................ 53
MEMORY EXPANSION .......................................................................................... 53
Configuration............................................................................................. 53
Inserting .................................................................................................... 53
Instructions to replace the SIMM modules .................................................... 53
SOFTWARE / UPDATE .......................................................................................... 54
APPENDIX........................................................................................55
CONNECTING EXAMPLES .................................................................................... 55
At home, using the stereo equipment ......................................................... 55
With an instrument amplifier ........................................................................ 55
From the instrument rack to two channels on the mixer ................................. 56
Inserting to a mixing desk............................................................................ 56
TABLE OF LOOP FUNCTIONS............................................................................... 57
MIDI IMPLEMENTATION CHART............................................................................. 58
INDEX..............................................................................................59
LOOP delay - Manual
1
INTRODUCTION
PREFACE BY MATTHIAS GROB, INITIATOR AND DEVELOPER OF THE LOOP
DELAY
I believe the coming together of a group of musicians to play for some listeners is the most
important acoustical event on earth. But as a preparation for these events and for his own
development, a musician spends far more time alone with his instrument. In this time he
discovers most of the secrets about the construction of music, and the ways to express his
own personality and taste. Although the LOOP delay has special features that facilitate
playing together (or with a machine), it is first a mirror, or maybe a crystal ball, for the musicians
studio.
There are quite a few musicians using delay machines to create simple loops, although
avaliable gear was very limited. Some people modified machines, others accepted that the
loop time was short or unrhythmical. I was amazed in how many different ways people use
loops. This is because the character of repetition belongs to almost all music.
Of course, loop music is not meant to remain at home and push the artists into loneliness.
Recordings I made in Rio and Switzerland with various musicians who did not know my system
yet and who probably never played with a delay demonstrate the variety of loop music. Now I
am eagerly waiting for the results when initiated loop players come together and synchronize
their LOOP delays.
I would like to exchange such recordings. Therefore, a Loop Group could help. Also, we
could reach a point where, through information in the media, the public knows what to expect
when going to a loop show.
My interest is not "to make money", but to lead an interesting life and create as much beautiful
sound as possible and to help others in doing so. You are invited to profit from it by
purchasing a LOOP delay that gives us the energy to do our development properly. You can
help us by being a mirror for our work and send a word or tape to us. Whenever the machine
does not do what you expect intuitively, we would like to know about it and try to get the
obstacle out of your way.
LOOP delay - Manual
2
Introduction to the Version 2.2
During the further development of the LOOP software, especially the communication
facilities, two basic problems came to light:
1. There are two basic ways of building a loop:
a) The intuitive, playful, unconscious, spiralling, that makes one high. Such loops usually have
no beginning and no breaks to disturb the player. He can interpret the spiral differently each
time, with each pass he can hear a different beginning.
b) The conscious, composed, structured, organised way that produces a song. With this way,
it is clear where the beginning of the theme is, and how the bars are organised. Therefore, it is
helpful that the machine remembers these moments, and adjusts to them if the operator is
not very accurate. Synchronisation also belongs to this category.
My goal was to pack those two contradictory principles into the same software package! It is
important, because all kinds of mixtures and sequences of the two extremes are possible, like
starting a structured song and getting off into the unknown, away from the defined rhythmic
pattern of the beginning.
It is interesting how the project is growing from an intuitive into an organised way.
2. The big problem of rounding of time:
It is impossible to operate a foot switch to 1.5ms of accuracy. It makes a big difference whether
the user presses the key right before or right after a mark (e.g. loop start). So rounding is a
must. The most important improvements in the program have been in this area.
Now, what does it mean, to round in real time? Either the key was pressed too late and the
past has to be changed, or it is pressed too early and the jump into the future should happen!
It means that we always have to count on the possibility that a key will still be pressed and so all
the parameters must be ready to pretend that the key was pressed earlier — or we keep the
operations cool until the right moment has come to execute them. And all should be
executed exactly at the same time! Another trick is to find the moment in the past that
corresponds to the moment in the future we want to jump to. But is it really the same?
For the user it is helpful to imagine the loop as a train that is continuously driving in a circle,
picking up notes at the locomotive end and leaving them by the last wagon.
But luckily we managed to design the LOOP delay so that in a standard application you will not
notice these problems.
LOOP delay - Manual
3
CREDITS:
Eric Obermühlner made the basic software and much more with his fanatic envolvement
and enthusiasm.
Willi Strehler of GEDDOP, Winterthur, is the tester of MIDI and SYNC section and brought
fundamental ideas and energy into the tired last phase of development.
Marco Birchler of BIRCHLER ELECTRONICS, Zug, is the patient, sincere and responsible
manager of the fabrication.
Thomas Bitterlin of DELFIN, Zürich, printed the housing carefully.
Ljubo Majstorowiç is the incredible guitar player who presents and explains our inventions
to the public, but also contributed technical ideas, function tests and loads of good mood.
Boris Bögli sensibly made the prospect and manual understandable.
Dent-de-Lion DuMidi worked the english version of the manual through and kept diging
us out of the dust with funny ideas and fantastic visions.
Thomas Oeschger is the supporting critic "outsider" judging from the listener's and
reader's point. He made his thorough knowledge of human nature available to us – not only
when correcting letters.
Rolf Spuler of PARADIS has been a perfect partner for many years. I learned so much about
business and construction with. He still assists with mechanical competence and taste for
design.
Hermann Hogg of ALPHA77 is the discrete master that years ago taught me everything
about electronics and much more.
Thank you
Matthias Grob, June 93
Musician and Certified Electronics Engineer ETH Zürich
LOOP delay - Manual
4
WHY READ THE MANUAL
The LOOP delay is unlike any existing machine. Therefore do not underestimate the
difficulties you may encounter when using it - not so much in the ways to operate it, but in the
musical applications. It will be an interesting experience!
Work yourself slowly through the functions. Study the musical applications and get used to
them before you go on.
Most functions are explained several times in different chapters. Select the chapter most
suited for your purposes and fill in the gaps with selections from other chapters.
WHY NOT READ THE MANUAL!
Even with one single footswitch (RECORD) you can realize many of your musical ideas.
It is not necessary to read a lot. With courage and talent you can start immediately. The texts
marked Important are recommended for everyone, though.
WHERE TO READ IN THE MANUAL
In case you just need a delay and you are not interested in loops, read the chapter Just
another Delay?
We will explain in Basics what we mean by "loops" and define a few words necessary to talk
about loops.
Straight into it shows you the quickest way to the LOOP delay.
Step by Step was written by Eric for those who would like to understand peacefully one
part of the LOOP delay after the other. However, you will not know the whole machine once
you have come to the end of this chapter.
Go on reading From left to right. All elements are explained in detail.
In Communication facilities and deeper understanding, we explain the functions
that run behind the curtain and all the possibilities to connect and synchronize with other
machines. If you are a MIDI freak, you are right here.
The Playing hints may not be necessary, because you will develop your own loop style.
Soon we will be listening to recordings of different people and learning about the various
styles. I simply describe the different styles so far for those who want to be as versatile as
possible.
REPRESENTATION
Words in capitals refer to OPERATING ELEMENTS of the LOOP delay (for instance a switch).
Often the same words appear in normal writing. Then we talk of the function of a switch.
Bold words refer to the respective Chapter in the manual.
Texts in boxes summarize the preceding chapter
Special!
Have a good loop!
Inserted paragraphs are are marked with Important! or similar titles and refer to
specialities you should not miss.
LOOP delay - Manual
5
BASICS
LOOP
A 'loop' is a repeating sequence in music.
Elsewhere, the word is used for the prolonging of samples and for the inserting of effects.
But first there was ”Tape Loop Art”, and this is the meaning we refer to.
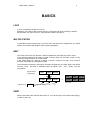
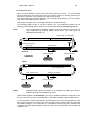
MULTIPLICATION
It is possible to build up long loops out of short units. We call this the multiplication of a stored
phrase. See example with diagram in the following paragraph.
BEAT
The "beat" is the basic loop element. Without multiplication, beat and loop are the same.
A loop is always made up of an integer number of beats. Often you will create a loop in a way
so that one beat is made up of a musical beat.
In the LOOP delay you start by recording a phrase, meaning one beat. Then create a
complete loop lenght by multiplying the beat.
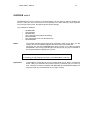
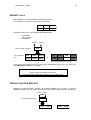
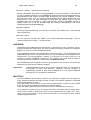
In this example we assume a microphone has been plugged into the LOOP delay. We call the
first loop ”beat”. This beat is multiplied while we speak "one”, ”two”, ”three” into the
microphone:
played while
multiplying
one
beat
two
beat
three
beat
=
one
two
three
beat
beat
beat
new loop
original loop
beat
* 3
RESET
Reset is the state of the machine after power-on. You can also get to reset state while playing,
in order to start over.
LOOP delay - Manual
6
PEDAL
A pedal is not an on/off-footswitch (in this context) but a continuous controller similar to a
volume control (see appendix).
LOOP delay - Manual
7
THE QUICKEST WAY TO THE
LOOP
For users experienced in electronic equipment
STRAIGHT INTO IT...
1.
2.
3.
4.
5.
6.
7.
8.
9.
Confirm the right tension above the power socket. Connect a power cord.
Connect an instrument or a microphone to IN and an amplifier to MIX.
Regulate the INPUT VOLUME to ensure the LED is mostly orange und
sometimes red when the music is loud.
Put MIX to middle position.
Turn FEEDBACK almost or fully up.
Connect the foot switch to RECORD.
Play a phrase or speak some words and hit the foot switch at the same time. Hit it
again at the end of the phrase - here goes your first loop!
Press the switch longer - all is quiet again. That is Reset.
Repeat point 7 or 7/8 until you feel secure.
Try the other switches while playing and observe the displays and LEDs. Be
surprised. This is the shortest key we can give you to help you understand:
LED dark: Key has no function
LED green:
Key is ready to start a new function with.
LED red: This function is active
LED orange:
A special function is active
or:
The presently active function can be terminated
in a special way.
RECORD > RECORD
Records a new loop. This loop is immediately played back.
Looping? Anything you do not understand and many tricks and ideas are in the back of the
manual.
JUST ANOTHER DELAY?
If you want to use the LOOP delay like a regular delay, you do not have to know anything
about loops.
1. Connect the machine as described in STRAIGHT INTO IT 1-5.
2. Press MODE once to make the bottom LED turn green.
3. Adjust delay time with two strokes on the RECORD switch: The interval between
your two strokes is your delay time.
4. Apply the feedback in the regular way.
-
A pedal (CP1 recommended) controls the input volume — a practical medium of
expression.
LOOP delay - Manual
-
8
The LOOP delay is not primarily developed for short delay intervals and
modulation. This can be achieved with BROTHER- and BEAT SYNC, however.
You get more information in FROM LEFT TO RIGHT, especially in the chapter MODE.
IMPORTANT HINTS FOR BEGINNERS
Maybe you are not used to operating switches at an exact moment. So far, most footswitches
have been used to switch programs. Precision was not a necessity then. In the LOOP delay,
however, the rhythmic precision of the loop directly depends on your ability to
communicate your rhythm to the machine. That is why we speak of rhythm switches. Most
beginners forget at first that the breaks have to be recorded, too. Some of them press
RECORD and start playing some time later or they press RECORD too long and bring the
delay into Reset state again. Some end their recording too early by tapping the switch on the
last note of the sequence.
Should you have problems, try using the rhythm in your leg that you feel anyway when
playing. The switch should not be struck with too much force, because it may cause you to
play the first note more loudly or to become imprecise in timing.
Guitar players are recommended to use the free left leg.
The first tap on RECORD defines the first note in your loop. The second
tap terminates the recording and repeats the loopd immediately .
Do not worry about the non-schematic organisation of the switches. Our practical experience
has lead us to this arrangement. You can experience this "musical logic" only through
playing. If you do not understand how the switches work, read the chapter From left to
right. Maybe our diagrams can help you as well.
If you want to synchronize or sequence, you have to read the respective chapter in
Communication facilities.
For sampling, read the paragraph BREAK.
The playing hints are interesting, if you do not have any more ideas or if you want to
discover one of the many ways of musical expression.
Start with few keys and short loop times. Do not overcharge yourself.
You got a new instrument and now have to learn to play it. Without a
process there is no quality. Take your time – it is nice to learn while
playing. The LOOP delay should not burden you with work but relieve
you of it.
Even with RECORD and MULTIPLY you can give great solo concerts.
LOOP delay - Manual
9
STEP BY STEP
CONNECTING
Before connecting the power cord, confirm that the right voltage (220V or 110V) is showing in
the display above the power socket (see also chapter Fuse, page 30).
Connect your instrument to the input IN with a jack cable. Connect the output MIX to an
amplifier.
Hint!
The simplest way of understanding the LOOP delay from our point of view is to
connect a microphone and to build up a loop of short spoken phrases.
While speaking it is easy to operate and control the LOOP delay. In our
examples and diagrams we will often refer to this possibility.
Turn the LOOP delay on.
Turn the input control up so that the LED is often orange and sometimes red.
Set the MIX control to middle position.
Turn the feedback control up.
Compare your LOOP delay with the illustration in the appendix. There the three controls are
set correctly.
Your LOOP delay includes at least one footswitch. Connect it with RECORD. In case you
have ordered several footswitches, plug them into the OVERDUB, MULTIPLY, INSERT,
BREAK and UNDO sockets. The frontpannel keys have the same functions as the
footswitches. Therefore you can use all LOOP delay functions with only one footswitch, but
the switches on the front can only be operated by hand — another reason for starting with a
microphone.
Operate the footswitches (and of course the hand switches) rhythmically, i.e. only strike them
gently. Do not relax on the switches. Many have special functions when pressed for a longer
time.
The connected footswitches (FSP1) do correspond to the functions of
the front panel switches.
Tap the switches shortly, do not press longer than one second for
normal functions.
LOOP delay - Manual
10
MEANING OF THE LEDS
The LOOP delay has three kinds of LED displays:
•
•
•
level display
mode display
function display
Here we are only going to explain level display and function display which are LED dots. We
will come back to mode display in the chapter MODE switch.
All dot LEDs have three colours: green, orange and red.
Level display
The input gain LED displays the level of the incoming sound. It will often burn orange, driven
by loud passages.
The loop level LED (also called feedback level) displays the volume of the running loop. If
FEEDBACK is fully open, to much overdubbing will take it to burn red and to distortion.
Function display
The other LEDs serve as switch and function displays.
The different colours generally indicate the following:
• Off
• Green
• Red
• Orange
The switch has no function at the moment.
The switch has the function written on the front panel.
Tapping the switch activates the function.
The switch has been struck once before and the function is active. A
second stroke ends the function.
The switch has a special function. Tap it only when you are sure (or to try
it out).
Generally:
The green displayed switches (functions) are ready to be started, the
red ones are active and ready to be ended.
LOOP delay - Manual
11
RECORD SWITCH
•
•
•
Tap the RECORD switch
Play for a while (e.g. one beat)
Tap RECORD again
Now you should be hearing the same beat over and over again.
This is what we call a basic loop.
As long as the LOOP delay is recording, the LED next to RECORD is red. At your second tap
it turns back to green.
Now you can play on without changing the loop.
Once you have become sick of the loop tap again:
•
tap RECORD
•
playing
•
tap RECORD
You have deleted the old loop and replaced by a new one.
This is the most important function of the LOOP delay. You would get the same result by
recording the same sequence onto a tape recorder over and over again — with the
LOOP delay you can do this live!
RECORD > RECORD
records a new basic loop. This loop is played over and over again.
Red digits (digital display)
As long as the LOOP delay was recording, the red digital display kept counting. It indicates
the current loop length in seconds. After the recording, the counting stops and shows the
present loop time. It will change again when you record a new loop (or starts MULTIPLY or
INSERT which will be explained later on).
Hint!
Users may sometimes have trouble to realize whether the LOOP delay is
recording or not. The red digital display can tell you. It is only counting when
RECORD is active (or MULTIPLY or INSERT).
Display LOOPTIME
the length of the loop is indicated in seconds by red digits.
LOOP delay - Manual
12
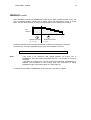
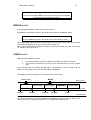
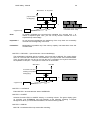
FEEDBACK control
When feedback is turned up (FEEDBACK control on the right or pedal pressed down), the
loop is repeated infinitely without loss of quality. When the FEEDBACK control is turned
down, the loop fades out step by step (the steps depend on the setting of the control).
loop
volume
time
feedback at max.
feedback reduced
loop never fades
loop fades
Feedback reduction does not react immediately, it takes one loop lenght to respond.
Consequently, the loop is repeated exactly once when feedback is set to 0.
FEEDBACK determines the speed of fade-out.
Hint!
Long loops (> 20 seconds) need special attention for proper use of
FEEDBACK. Since the reaction time takes one loop, it is not easy to control its
decrease.
A fast fade-out of long loops could be rhythmically disturbing if FEEDBACK is
reduced just somewhere in the running loop. We recommend to adjust
FEEDBACK right at the starting point of a rhythmical loop.
For advanced controlling of FEEDBACK we recommend to use the CP1 pedal.
LOOP delay - Manual
13
OVERDUB switch
OVERDUB gives you the chance to record anything over the old loop without deleting the
old one. Thus you can record a second voice and more to a basic harmony. Such layers do
not consume memory time, the basis loop time will not change.
Let us restart our example:
•
•
•
•
•
•
•
Note!
tap RECORD
play the basis
tap RECORD
play a second voice (without recording)
tap OVERDUB
play the second voice over the basis loop
tap OVERDUB
Do not keep overdub active longer than necessary. Open it only when you are
ready to record your additional phrase and close the function after that.
Of course you can use OVERDUB all the time, but then you ought to reduce
FEEDBACK. This is a very special style: Everything that you play is repeated in
the loop and fades out slightly one by turns.
OVERDUB > OVERDUB
Everything you play between two taps is recorded over the old loop.
Important!
At this stage it is important to put the manual aside and to take a constructive
break. Take your instrument and practice with the switches that you know by
now. There are numerous variations with RECORD and OVERDUB. Maybe you
will never need any more switches for your style of music.
LOOP delay - Manual
14
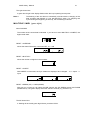
MULTIPLY switch
You have created your basic loop (beat) with RECORD > RECORD. With MULTIPLY you can
now multiple that beat several times and join to an expanded loop. While multiplying,
everything you play is also recorded, similar to OVERDUB.
The operating is simple: You tap the MULTIPLY switch to start the multiplication and tap it
again to end it. The time passing between your two taps defines how many beats your loop is
composed of.
•
•
•
tap MULTIPLY
play for a while together with your basic loop
tap MULTIPLY
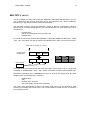
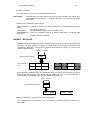
Let us call your basic loop (created with RECORD > RECORD) a beat. Tap MULTIPLY, speak
”one”, ”two” and ”three” into the microphone and tap MULTIPLY again. You will now hear this:
MULTIPLY exactly on "beat "
played while
multiplying
one
beat
two
beat
three
beat
original loop
beat
=
one
two
three
beat
beat
beat
new loop
* 3
The LOOP delay has exactly tripled the basic loop "beat" and summed it up to a single loop
consisting of "beatbeatbeat". ”One”, ”two”, ”three” have been recorded over this tripled loop.
We said the expanded loop is exactly three times as long as the original loop. But what
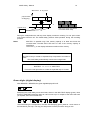
happens when you tap MULTIPLY inexactly?
•
•
•
•
tapMULTIPLY
play
tap MULTIPLY inxactely
the LOOP delay rounds to the next beat.
The LOOP delay automatically rounds to an integer beat. When you tap MULTIPLY quite
precisely you probably won't even notice. Tap it in the middle of a beat and you can observe
the rounding process:
LOOP delay - Manual
15
MULTIPLY at any time
played while
multiplying
one
two
three
one
rounding
beat
beat
beat
beat=
beat
original loop
beat
* 3
two
beat
three
beat
beat
new loop ("one" and "beat"
not at the same time)
During the multiplication the red loop time display continues counting. Do not panic when
most of the LEDs turn off: The LOOP delay prevents false operation during the rounding
process.
Note:
MULTIPLY is possible only if the memory capacity is at least tree times the
recorded beat. The MULTIPLY LED turns to dark if the memory capacity is
insufficient.
Three bars (---) in the display indicate an overflow of the memory.
MULTIPLY > MULTIPLY
MULTIPLY lets you create an expanded loop composed of a number of
beats
The LOOP delay automatically rounds to an integer beat.
RECORD > RECORD = 1
MULTIPLY > 1...2...3...4... MULTIPLY
This is the usual procedure to create an expanded loop of 4 beats.
Green digits (digital display)
After RECORD > RECORD, the green digital display still is off.
Multiplying the LOOP delay counts each beat, shown in the MULTIPLE display (green). Note
that the LOOPTIME (red digits) starts at 0 and counts up to a multiple of the basic beat until
you tap MULTIPLY for a second time.
After terminating the multiplication, the MULTIPLE display (green) starts at 1 and counts to
the last beat of your loop. This way you always know in which part of the loop you are.
LOOP delay - Manual
16
Display MULTIPLE
The green digits tell you in which beat your music is.
LOOP delay - Manual
17
LONG SWITCH PRESSING
Up to now you have only tapped the switches. Strange things happened when you
accidentally pressed them for a long time. Most switches offer special functions when pressed
long:
• long RECORD
• long OVERDUB
->
->
Reset
Overdub is only active while pressed
Reset is similar to a turn off ⁄ turn on of the LOOP delay. It takes the LOOP delay is in the
original state and you can start over.
Long OVERDUB helps you to play single notes onto the loop. Press it while playing and
release it when the overdubbing should end.
We will discuss the special functions of the other switches in the following chapters.
Long pressing of switches activates special functions.
long RECORD
->
Reset
long OVERDUB ->
Overdub as long as pressed
FROM ONE FUNCTION DIRECTLY TO ANOTHER
You normally end a function by tapping the same switch for a second time.
RECORD ... recording ... RECORD
MULTIPLY ... multiplying ... MULTIPLY
With the LOOP delay you can end a function with another switch. In this case the second
function becomes active at the same time:
RECORD ... recording ... MULTIPLY ... multiplying ... MULTIPLY
You do not only avoid one extra stroke but it also helps you prevent an interruption of your
recording.
This principle goes for most switches. All active functions (the corresponding LED is red) can
be ended by switches with green LEDs. This second function gets active immediately. You
cannot use the switches with orange LEDs, however: they have got special functions.
Here a second example:
•
•
•
•
•
tap RECORD
play the basis
tap OVERDUB
carry on playing, the LOOP delay records over the old loop
tap OVERDUB
An active function can be ended by another switch when its LED is
green. The function of this switch gets active at the same time.
LOOP delay - Manual
18
INSERT switch
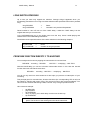
With INSERT you can insert additional beats into your loop.
Let us assume your a loop is composed of three beats:
one
two
three
beat
beat
beat
Tap INSERT after ”two”, play a beat and tap INSERT again.
•
•
•
tap INSERT
play one beat
tap INSERT
INSERT ... INSERT
and
played while inserting
old, multiplied
loop
one
two
three
beat
beat
beat
=
one
two
beat
beat
and
three
beat
new loop (rounded to 4 beats)
“And“ is the new inserted beat. The LOOP delay automatically rounds up to the next beat.
See MULTIPLY switch for "rounding".
INSERT > INSERT
What you play is inserted into the loop.
The LOOP delay automatically rounds up to an integer beat.
SPECIAL FUNCTION REPLACE
Replace is a special function. Activate it by pressing INSERT for a long time. As long as
INSERT is pressed, the part of the loop currently running is replaced by what you are playing.
press ... release
INSERT
played while replacing
new
old
loop
=
new
loop
LOOP delay - Manual
19
long INSERT (= REPLACE)
As long as you press INSERT, this part of the running loop is replaced
by what you are simultaneously playing.
BREAK switch
Active BREAK turnes the output volume of the loop off.
Tap BREAK causes silence from the loop until a second tap on the BREAK switch.
BREAK > BREAK
As long as BREAK is active, the output of the LOOP delay is muted.
The LOOP delay silently continues running when break is active. Thus, you keep the same
rhythm after the break (e.g. when your drum machine plays on).
When you press BREAK for a while, the output is only turned off while you press. As soon as
you release it, the loop goes on.
UNDO switch
UNDO has two different functions.
1.
2.
You have activated a function by mistake. Tap UNDO to cancel the function.
The previous movements in your loop can be cancelled when you are in regular
play.
Try out the first case, for instance with MULTIPLY. Tap MULTIPLY, wait for a while, then tap
UNDO. You have gone back to the old loop without multiplication.
The following diagram may help you to understand the second case.
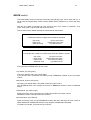
Kwrlt
hello loop
What you play
hello loop
hello loop
Kwrlt
hello
loop
hello loop
What you hear
RECORD
RECORD
OVERDUB
OVERDUB
UNDO
What you strike
You have, for instance, recorded a mistake with OVERDUB. Now you want to delete it but
save the rest of your carefully composed loop. Tap UNDO and it will be gone.
LOOP delay - Manual
20
UNDO
UNDO cancels the previous movements in your loop.
If a function is active, UNDO cancels it.
Note!
It depends on the memory capacity how often you can strike UNDO
successively. Cancelling a previous movement in the loop needs at least the
half memory free.
The exact application of UNDO can only be learned through experience, because the
machine has its own way to decide, whether you made a change in the loop composition or
just played it. (See chapter AutoUndo if you want to know more)
LOOP delay - Manual
21
MODE switch
The LOOP delay can do more than just recording and playing loops. As its name tells you, it
can be used as a regular delay. Switch with the MODE button between loop mode and delay
mode.
With the CP1 pedal connected,you have access to even four modes of operation: loop
mode, delay mode, output mode and advanced mode.
The two LEDs next to MODE indicate the actual state of this function.
MODE (STANDARD)
Pressing this button changes three modes of operation:
• loop mode
• delay mode
• advanced mode
top LED burns green
bottom LED burns green
top LED burns red
MODE (EXPANDED)
Connected with a pedal, the LOOP delay offers four different modes:
• loop mode
• delay mode
• output mode
• advanced mode
top LED burns green
bottom LED burns green
top LED burns orange
top LED burns red
A long pressing of MODE sets it to loop mode.
Loop Mode (top LED green)
This is the regular mode of the LOOP delay.
If you have the CP1 connected, this pedal controls FEEDBACK instead of the front panel
control.
Delay Mode (bottom LED green)
No looping, but regular delay. The pedal controls the input volume.
The OVERDUB switch now changes its function to HOLD that works as used to traditional
delays.
Output Mode (top LED orange)
Similar to the loop mode, except the CP1 pedal controls the loop output volume.
FEEDBACK can be controlled with the front knob.
Advanced Mode (top LED red)
Similar to the loop mode, except FEEDBACK is always fully open although the front control is
setted backwards. FEEDBACK reduction only happens if OVERDUB is activated.
If a pedal is connected, it controls the input volume.
LOOP delay - Manual
22
FROM LEFT TO RIGHT
In case you are not sitting in front of the LOOP delay, we recommend taking the enclosed
LOOP delay diagram when reading this chapter.
Each operating element on the front corresponds to a connection on the back.
INPUT WITH LIMITER (INPUT / INPUT VOLUME / LED)
Connect any sound source by a jack cable. The sensitivity allows connecting microphones. At
the same time the input has a sufficiently high impedance in order to conserve the sound
quality of piezo pick-ups. For sensitive applications we recommend feeding the LOOP delay
from an auxiliary output (AUX) of a mixing desk or a pre-amp. For electric guitars we
recommend inserting the LOOP delay into an amplifier (Insert-socket) or controlling it from
the output of effects. (See Important in the next paragraph). Connecting synthesizers is
straight (There are connecting examples in the appendix ).
Adjust the INPUT VOLUME so that the LED most often is orange, but sometimes turns red.
Since there is a limiter you will not get a distorted sound even when the LED is red.
The limiter can be used as well as an effect: This serves to make "loop carpets", (so called
"sound clouds") formed out of non-dynamic sounds.
Note!
The limiter works for the loop only. It does not affect the direct signal.
The limiter provides no absolute security against distortion: you still can overload
the loop with too many OVERDUB layers.
OUTPUTS (MIXOUT / DIR. OUT / MIX CONTROLLER)
Important!
The output should not be connected to an overdriving guitar amp except if you
want to build very dirty loops — so called ”thick walls". We recommend
connecting all effects before the LOOP delay except for reverb. Then you
should connect a system that is as linear as possible, for instance a PA or HiFi
system.
The MIX output is always in use. The DIRECT OUT is only in use when the direct signal is
processed separately from the loop signal. This allows you to separate acoustically the loop
from your current playing by panning them or using different amounts of reverb.
In case you have only connected the MIXOUT, the MIX knob controls the relation of direct and
loop signal. If both outputs are connected, MIX controls the loop volume.
TIP
DIR
•
RING
OUT
TIP
IN
•
LOOP
MIX
LOOP delay - Manual
23
FEEDBACK
Feedback means sending information from the output to the input of the system. The amount
determines:
›1
high feedback. Continuous growth (e.g. population explosion).
=1
consistent waves (e.g. natural growth in a healthy forest).
‹1
slow fade-out (e.g. echo in a valley).
The FEEDBACK control sets the feedback value between 0 and 1. Thus, you control the
number of loop repetitions between 1 and ∞. In intermediate positions the loop fades out.
The feedback/loop level LED indicates the volume of the loop and should hardly ever turn
red. The limiter does not prevent the eventual distortion when overdubbing many layers. The
feedback LED points this out by turning red.
loop
volume
time
feedback at max.
feedback reduced
loop never fades
loop fades
Important !
When OVERDUB is active, the feedback will automatically be reduced to a
maximum of 95% . (see OVERDUB, page 22)
Hint:
If a loop is faded out and you want to discover it again, press UNDO several times
- it will come up again.
MODE
You can switch between four modes. Each stroke switches to the next one.
A long pressing of MODE sets it to loop mode.
Loop Mode
This is the default mode selected when the LOOP delay is turned on (top LED is green). Most
of this manual is about the loop mode. An additionally connected pedal controls FEEDBACK.
Delay Mode
It is indicated by the bottom green LED. The LOOP delay becomes a regular delay. The
RECORD switch now determines time setting. An additionally connected pedal controls the
delay input. This is very helpful when extending or prolonging notes during solo play, or when
playing short licks.
The overdub function is turned to a regular HOLD: Regular state (green) is delay. In HOLD
(red), the loop just played is frozen and repeated infinitely.
Output Mode
The output mode (orange top LED) is close to the loop mode, the CP1 pedal controls the
output volume, while FEEDBACK is controlled by the front panel control.
LOOP delay - Manual
24
Advanced Mode
The advanced mode simplifies the use of FEEDBACK without pedal: The adjusted
FEEDBACK reduction (on the front knob) only becomes effective by activating OVERDUB.
If a pedal is connected, it controls the input volume.
FUNCTION SWITCHES
How to control a lot with a few switches!
We had to develop a new manner of operating switches: a combination of the well known
radio-buttons (which start each other respectively) and of engaging press-buttons. The
former have the disadvantage in that only one can be active at the same time; the latter that
you have to operate several ones in order to achieve a certain state.
We have done research concerning the question of what switch-combinations make sense at
all, and what combination should be used in what situation. The resulting scheme while not
appearing systematic, is highly practical.
The most important functions are turned on and off with one switch.
When turning off a function with another switch, there are two variations:
In standard cases (LED is green), a new function is selected and the old function is
terminated. You will never have to operate two switches at the same time.
When the LED is orange, tapping the respective switch activates a less important variation of
the function.
A third variation is the long pressing of a switch: The function is terminated as soon as you
release the switch.
Each main switch function and its variations are now explained in detail:
RECORD
Operating this switch is the basis of each loop. It determines the beat length. A first tap starts
the recording, a second one ends it, and immediately the recording is played. The interval
between your two taps is called beat time. This replaces the circumstantial adjusting with ”up down” in regular delay effects. The LOOP delay takes up the rhythm directly from the
musician's foot.
Long pressing causes reset.
Instead of tapping RECORD a second time, you can end the recording in any of the following
ways:
RECORD > OVERDUB
Record is terminated, but the recording goes on uninterrupted and makes a layer over this
loop.
RECORD > MULTIPLY
Record is terminated, the recording goes on uninterrupted and MULTIPLYbecomes active.
LOOP delay - Manual
25
RECORD > INSERT -> special function Rehearse
Record is terminated, but instead of activating INSERT, you go into Rehearse. In this state, all
you play is repeated exactly once (as if FEEDBACK were turned down and OVERDUB active).
Apply Rehearse to get used to the beat length: By listening to the single repetition, you will
get used to the timing. Thus, you can try out different ideas until you feel comfotable with your
starting theme. Once you have developed a musical idea, tap INSERT again to exit the
Rehearse state and to continue in ordinary playing state. Pressing OVERDUB instead of
INSERT allows you to exit the Rehears state and continue simultaneously with active
OVERDUB.(see chapter Correcting).
RECORD > BREAK
The timing (beat) is determined, your recording is finished, but remains mute — like a sample
stored for later use.
RECORD > UNDO
You can regain an old loop with UNDO if you pressed RECORD accidentally! It will not
continue straight in the rhythm — a limited miracle.
OVERDUB
OVERDUB records additional layers (background or lead tunes) as many as desired. All your
playing is mixed to the existing loop. The loop increases its intensity but does not change its
length, thus does not consume additional memory.
Long OVERDUB: overdub is only active while you press the switch — this is interesting when
overdubbing single notes. You can always feel if you are overdubbing without depending on
optical control. For most applications, however, it is annoying not to have a foot free. It is
possible to operate OVERDUB exclusively in this manner. You would have to switch a
miniature switch in the inside of the LOOP delay (see DIP-Switches).
The OVERDUB function is special, because it can terminate all other functions, but cannot be
affected by any other function (Reset excepted).
Important!
Infinite overdubbing cannot cause a sound quality decrease, but can cause an
accumulation of noise and distortion. Therefore, maximal feedback is
automatically reduced to 95% while OVERDUB is on. This minimal feedback
decrease is of no consequence whatsoever.
MULTIPLY
Just like OVERDUB, the recording continues, but MULTIPLY changes the loop length! Its
length is always rounded to an integer number of beats. The rhythmic regularity is conserved
and there are certainly no clicks!
The LOOP delay normally rounds up to the next multiplied number of beats and only rounds
down when the exact multiplying is overshot by less than 600ms.
The green display (MULTIPLE) shows in which beat your expanded loop currently is.
Let us assume for instance that a microphone has been connected with the LOOP delay.
The first loop consists of ”beat” and is going to be multiplied while you speak ”one”, ”two”,
”three” into the microphone. You can even start MULTIPLY in the middle of "beat" without
introducing rhythmical errors.
LOOP delay - Manual
26
MULTIPLY at any time
played while
multiplying
one
two
three
one
rounding
beat
original loop
beat
beat
beat
beat=
beat
two
beat
three
beat
new loop ("one" and "beat"
not at the same time)
* 3
Hint !
An already multiplied loop can always be multiplied for a second time — to
reduce or expand it again. Thus, you can cut any number of beats out of an
expanded loop with multiply.
Important !
As you can see in the diagram, the beginning of the Loop does not necessarily
coincide with the beginning of the beat.
Limitation:
Multiplication is possible only if the memory capacity is at least three times the
recorded beat.
MULTIPLY > RECORD -> special function Unrounded Multiply
The multiplication is finished without rounding, and a new beat is defined. The green display
turns off. The new beat contains the music between your taps of MULTIPLY and RECORD.
Thus, any part of the loop can be cut out from the loop. Completely new rhythms result from
the repetition of this part — a new piece of music out of old sounds.
RECORD
MULTIPLY
recorded over the
existing loop while
multiplying
new beat
new beat
old
old
old
=
old
old
o
new loop (unrounded)
original loop
old
beat
* 3
MULTIPLY > OVERDUB
Ends MULTIPLY and activates the state of OVERDUB.
MULTIPLY > INSERT
Switches from MULTIPLY to INSERT direclty, no rounding is done. The green display goes
on counting. Just FEEDBACK turns off internally so the following recording is without
background. When you terminate with INSERT, the usual rounding is done.
MULTIPLY > BREAK
MULTIPLY is ended and the loop mutes after rounding.
LOOP delay - Manual
27
MULTIPLY > UNDO
The loop goes on as if you never had pressed MULTIPLY.
Note again:
With MULTIPLY you cannot fill up the whole memory, because the original loop
has to remain in the memory — otherwise MULTIPLY could not be cancelled
with UNDO.
The MULTIPLY LED turning dark tells you:
While Recording: It makes no sense to go directly to MULTIPLY, because more than one
third of
the memory is used up.
While Playing:
It is not possible to expand the loop by MULTIPLY.
While Multiplying: It will not be possible anymore to add an intire beat. You should stop
MULTIPLY
or better cancel it with UNDO.
INSERT / REPLACE
Additional beats are inserted into the loop. Tapping this switch stops the loop and starts new
recording. The green display is counting. At a second tap, the loop goes on and the time is
rounded as in MULTIPLY. This function is great to insert breaks or a B-part of your tune into
already multiplied loops.
INSERT ... INSERT
and
played while inserting
old, multiplied
loop
one
two
three
beat
beat
beat
=
one
two
beat
beat
and
three
beat
new loop (rounded to 4 beats)
A long pressing of INSERT does not change the timing, but replaces the existing part of the
loop with the actual playing. We call this function REPLACE. You can correct mistakes or
insert variations in multiplied loops (see also Correcting page 39).
press ... release
INSERT
played while replacing
new
old
loop
=
new
loop
INSERT > RECORD -> special function Unrounded Insert
The inserted part is not rounded. Thus, a new beat is defined (similar to MULTIPLYRECORD).
LOOP delay - Manual
28
INSERT > OVERDUB
INSERT ends with regular rounding. At the same time OVERDUB reacts its state.
INSERT > MULTIPLY
Direct jump from INSERT to MULTIPLY. No rounding is done. Some part before or of the
Insert comes back as background of the multiplication. Sometimes not very musical.
INSERT > BREAK
INSERT ends after rounding and the loop runs on mute.
INSERT > UNDO
INSERT is canceled.
BREAK
The loop goes on, but muted. At a second tap the loop restarts sounding. In fact, only the
loop output is turned off and on.
After a long pressing of BREAK the loop restarts sounding as you release the switch.
BREAK > OVERDUB
BREAK is ended, and simultaneously OVERDUB reverses its state.
If you want the loop to start over, select one of the following special functions:
BREAK > MULTIPLY -> special function TriggerSample
Nothing happens until a SYNC signal comes. Then the loop will be played once.
Subsequently it falls back and waits for the next SYNC.
If there is a new SYNC signal before the loop is played, it starts over.
Note !
This special function corresponds to a sampler. For SYNC read page 29
following.
BREAK > INSERT -> special function PlaySample
Nothing happens until a SYNC signal comes either from a BEAT SYNC or via MIDI. Then the
loop is played once before returning to BREAK state. It is especially usefull with a regular
SYNC signal like MIDI SYNC.
BREAK > UNDO -> special function Replay
The loop is set to its starting point and is replayed. (Only possible if the loop does fill at most
the half of memory capacity)
UNDO
During a TIMING-function (RECORD, MULTIPLY, INSERT)
You may have pressed a wrong switch and you want to save the loop. UNDO was developed
for this purpose.
LOOP delay - Manual
29
During RUNNING state
When you press UNDO, you jump one entire loop back in the memory — all you recorded
since you have been in the same part of the loop is erased. There is a rounding so that if you
tap next to a loop start, you jump back to the start of the last loop.
If you press UNDO long, it erases always the current and the whole last loop. So if you press it
long, it does not matter when you press it.
This function is helpful if you have made a mistake in a carefully built loop.
You can apply UNDO as part of your own creativity, too: try out different phrases onto an
existing loop and delete them in case you do not like them (see also Correcting page 39).
Hint !
If your LOOP delay has sufficient memory, you can go back to the history of the
loop composition by pressing UNDO several times. The same goes for
FEEDBACK (see page 19).
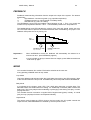
oldest loop is overwritten
third but last loop
UNDO
second but last loop
last loop
current loop
before
reading sample
writing sample
UNDO
output
input
after
new last
loop
new second but last loop
new current loop
reading sample
output
Note!
last complete loop
being overwritten
writing sample
input
Changed timing cannot be reverted. As a consequence, UNDO goes back in
different steps after a multiplication (try out!).
UNDO works together with AutoUndo. You may be amazed sometimes in what part of the
song you end up, if you do not understand the co-operation between Undo and AutoUndo.
If it is not possible to execute this function correctly (maybe not a whole loop passed since the
last change of beat time or maybe there is not enough memory capacity) the LED goes dark
and nothing happens if you press the key. Sometimes the LED may blink, because the
conditions for UNDO keep changing during the loop runs. Synchronisation can change the
conditions, too.
LOOP delay - Manual
30
DISPLAY
LOOPTIME (red digits)
The display shows the length of the present loop in seconds:
Three dashes in the display indicate OVERFLOW: The memory capacity was insufficient to go
on recording. The function causing OVERFLOW is undone and the loop carries on
unchanged. The display --- remains in order to inform you about your mistake. Press any key
(preferably OVERDUB tochange nothing) to get the previous loop time back on the display.
The next change of the loop time is displayed normally.
memory overflow
When turning the LOOP delay on, it will always inform you first about the total available delay
time:
maximal loop time
In Reset state there is just a little dot
Reset
A dash in the center of the display (-) indicates that a BROTHER SYNC has been connected
and that your LOOP delay is waiting for the brother to start:
waiting for brother
The display HLP 00 indicates that the memory modules have not been put in correctly (see
Memory expansion):
no memory accessible
The display HLP 01 indicates that a switch has been pressed at startup. The LED of the
corresponding switches sparkles red. The bottom MODE LED indicates a shortcut at the ring
of BrotherSync, e.g. a mono instead of a stereo cable.
Switch pressed at startup
LOOP delay - Manual
31
The right decimal dot
A green dot all right in the display flashes when the loop is passing its start point.
Note !
The flashing of the dot does not necessarily coincide with the changing of the
beat numbers that depend on your last MULTIPLY action. For sampling and
synchronising the beginning of the loop, the dot flashing is relevant.
MULTIPLE / MIDI (green digits)
when RUNNING
The number of the current beat is indicated. If you have not used MULTIPLY or INSERT, the
digits remain dark.
RESET > OVERDUB
shows the state of Quantize: 0.0 means OFF, 0.1 = ON
Quantize OFF
Quantize ON
RESET > MULTIPLY
shows the number of eighths in the measure.
Beat measure
RESET > INSERT
With INSERT in reset state, the Sync Modes are displayed and changed. -O = output -I =
input:
Sync Mode= Output
Sync Mode = Input
Sync Mode = Slave
RESET > BREAK (UP) > UNDO (DOWN)
After turn-on or reset you can select the MIDI channel with UP (BREAK-switch) and DOWN
(UNDO-switch). The green display shows the selected channel (e.g. Channel 14):
MIDI channel
The left decimal dot
A flashing dot at the left green digit informs you about SYNC:
LOOP delay - Manual
32
In Reset it indicates the incoming SYNC signal. Thus you can tell your partners beat before
you start playing. If you are working with MIDI you can see whether you have chosen the right
beat.
Furthermore, you know after the first flash that temporary quantizing is turned on.
While playing it indicates when synchronisation has its effects, i.e. the dot flashes each time
there is a time change. If it does not flash does not mean you are playing unprecisely.
However you will see that the dot never shows during OVERDUB — and in fact
synchronization is impossible.
MIDI
The usual three sockets receive (IN), send (OUT) and transmit (THRU) MIDI control signals.
THRU is an exact copy of IN
All switch activities and FEEDBACK information are sent to MIDI OUT to register them on a
sequencer or to control a second LOOP delay.
IN receives the same signals for reproducing the switch activities or to follow the master LOOP
delay.
It is recomended to use MIDI channel 16 but it can be modified in Reset state with UNDO
(DOWN) and BREAK (UP).
MIDIclock is received and can be used to synchronise with a sequencer or drum computer.
Further informations follow under the title
understanding.
Communication facilities and deeper
LOOP delay - Manual
33
SYNC JACK SOCKETS
BEAT SYNC
BEAT SYNC can be used for the synchronization of non-MIDI instruments.
In Reset you can choose with INSERT whether the BEAT SYNC shall be input or output. The
MULTIPLE display shows -O when output and -I when input.
Beat Sync as input -I
BEAT SYNC reacts to a footswitch (we recommend FSP1) or to a sound signal with line
volume.
When the loop is running, all signals near the beginning of a beat are interpreted as
synchronization signals, and return the loop back to its start point. Thus, the loop can adapt to
the speed of a signal (e.g. the bass drum).
In case the loop has been stopped with BREAK and set to TriggerSample with MULTIPLY,
you can play it with each BEAT SYNC exactly once and wait again— just like a sampler.
When you tap INSERT while BREAK (PlaySample), the loop is played once and then returned
to BREAK.
Note!
We cannot guarantee the noisefree functioning of synchronization
connections. In order to correct the beat time, blocks have to be deleted or
inserted. Depending on the kind of music, clicks or blips can be heard. Usually,
at the beginning of a loop, there is a sound attack that covers the cut.
Beat Sync as output -O
A digital impulse is given with each beat. The signal can be amplified directly and serve as a
metronome, its sound is not very pleasant, though. It can trigger any sound producing
machine.
BROTHER SYNC
By connecting several independent LOOP delays through a stereo jack cable, they can play
on the same beat! Through the tip of the plug, the machines are synchronized on sample
level. Therefore they have the same time basis. Through the ring the synchronisation signal is
exchanged to allow the players to find a common beat. The player opening the session gives
his beat to his fellow musicians by a recording. All can then build their own loops
independently. If the Brothers follow each other, -O is recommended to avoid unnecessary
synchronisation; if they follow an instrument, -I is needed.
Hint!
The BROTHER SYNC input can be ”abused” for modulation. With a variable
generator producing a 5V signal with pulses at 20kHz to 45kHz the sampling
frequency can be changed from the outside. Thus, speed and frequency of the
loop can be changed — not much higher but more than an octave lower if the
generator creates a short positive pulse. It is impossible to retain the sound
quality, however.
LOOP delay - Manual
34
POWERCORD / VOLTAGE / FUSE
The power socket is made for standard power cords. The voltage is displayed in the small
rectangle above the socket (110V/220V). To change it, press the two clips at the short sides
of the rectangle with your fingernails, remove the rectangle and turn the square containing
the fuse by 180º, so that the correct voltage appears. Put the rectangle back in.
This fuse is the only one in the LOOP delay.
DIP-SWITCHES
In the interior of the LOOP delay, there are five miniature switches. You can get to the
switches by unscrewing the bottom of the LOOP delay. They are placed near the overdub
plug. To switch them you need a good fingernail or a pen. These switches have the following
functions:
DIP-switch 1
Calls test programs for service.
DIP-switch 2
Defines the start value for the SYNC MODE: OFF -> -O, ON -> -I. This is a help for users that
work a lot with synchronisation. The values can always be achieved by INSERT, too.
DIP-switch 3
Switches off the normal toggling Overdub. OVERDUB is then only active when the key is
pressed, with the advantage that the function never stays on by accident. The disadvantage
is, that the foot is not free anymore, and that no other function can be called during
OVERDUB (see OVERDUB).
DIP-switch 4
There is a rather logical and also a rather practical interpretation of UnBreak. So we give you
the possibility to exchange BREAK>UNDO and BREAK>BREAK according to your taste. In
position ON, the functions are inverted as follows:
BREAK > UNDO: The loop continues in the same timing pattern, as if BREAK had
never been pressed.
BREAK > BREAK:
The loop starts playing from its beginning.
(and may fall out of sync!)
DIP-switch 5
Switches the input on during rounding. In position ON, all you play during the rounding up at
the end of multiplication is still recorded into the loop. The advantage is, that MULTIPLY can
be pressed too early to terminate, the disadvantage is that you do not define the end of the
recording with your foot.
.
Caution!
To switch the DIP-switches you will have to remove the bottom of the housing.
Therefore unplug the power cord! Most DIP-Switches will have no effect if you
switch them while the machine is running.
LOOP delay - Manual
35
COMMUNICATION FACILITIES AND
DEEPER UNDERSTANDING
RESET
After turning it on, the LOOP delay is in Reset state:
•
•
•
•
•
•
Input off
Output off
loop time = 0, Max. available loop time is shown
OVERDUB turned off
MIDI channel 16
SYNC MODE = input
After pressing the RECORD switch long, you also return to the Reset state and the following
happens
•
•
•
•
•
Input off
Output off
loop time = 0, red display shrinks to a dot
OVERDUB turned off
The SYNC input stays awake, but no SYNC is sent
The Reset Parameters
The parameters for communication are displayed by pressing the respective key in Reset
state and modified at the second pressing.
Reset > RECORD = RECORD
The normal function — the only one to exit Reset.
Reset > OVERDUB
Quantizing off:
Quantizing on:
O.O
O.I
(at startup)
Reset > MULTIPLY
MIDI Sync 1/1 Note:
MIDI Sync 1/8 Note:
MIDI Sync 1/4 Note:
...up to 20/8 Note: 20.
8.
1.
2.
(at startup)
Reset > INSERT
SYNC OUT
SYNC IN
BeatSync = Output:
BeatSync = Input:
-O
-I
(at startup if DIP 2 OFF)
(at startup if DIP 2 ON)
LOOP delay - Manual
36
Reset > BREAK (UP)
MIDI channel up
(at startup: channel16)
Reset > UNDO (DOWN)
MIDI channel down
(at startup: channel 16)
To reset the Reset - parameters
All these parameters can be set to initial value with a long pressing on the corresponding key.
This feature does not only speed up the operation but allows it to operate blindly: After
pressing it long you know where it stands and how many times you have to press it shortly to
get what you want. With MIDI programming this is essential because it allows you to set
parameters in the beginning of your sequencer program in an extremely simple way.
Example:
If the song is programmed in a 3/4 measure, and when the sequencer is
running, do the following operations before you play:
long RECORD; long MULTIPLY; 6 times short MULTIPLY
MODE has the same function in Reset as while running.
AUTO UNDO
A big improvement for UNDO is a trick you do not notice when you use the other functions:
Each time an entire loop passes by without any move made, AutoUndo automatically jumps
one loop back in memory. No move means: FEEDBACK must be open all the time and no
other function has been activated — apart from BREAK. As a result, you can always erase the
previous loop modification immediately although you have played together with your loop for
several rounds.
In other words: Only modified loops are kept in the memory. The history of the loop
composition is not erased any more by the repetition of a constant loop. UNDO always jumps
back to where something was really different. UNDO permits you to go further back in the loop
composition.
Remember the pattern of the beats. AutoUndo cannot be done continuously, it is done at the
end of a beat or not, depending on the moves during that period.
Moves mean: FEEDBACK is reduced / OVERDUB is on / any other function that adds some
recording to the loop.
LOOP delay - Manual
37
SYNCHRONIZATION
What is Synchronization?
Synchronization is the coordinated swinging of independent systems. Synchronization of
orchestral musicians is the basis to create a rhythm. It is not easy. We need a conductor or a
drummer to give the beat. In small ensembles a conductor is not necessary. We think it is
important to find similar forms in the technical synchronization between musical machines.
There are different levels of synchronization. An image may serve to illustrate this: You could
even call the simultaneous showing up of the musicians in the concert hall as synchronization.
If it goes deeper than the rhythm, the musicians may breathe synchronically. Even their
heartbeat can get synchronical.
Synchronization levels in loops
Sample
Unfortunately, the word sample has two meanings in music. In this chapter we do not speak
about recording and playing back short musical phrases, but about the resolution of the
digitized signal that represents the sound. For CDs 44’100 samples/second is the norm.
Even though CD players are very accurate, they are not synchronized. Only when a CD is
digitally copied to a DAT, synchronization happens. Then, the CD player is the master and
dictates the sample clock to the DAT.
In the case of two LOOP delays playing together, synchronization at the sample level is
important to avoid clicks and rhythmical inaccuracies.
Since no machine controls another one by nature we have developed BROTHER SYNC: All
machines are connected by a so-called ”open collector”. Each LOOP delay informs the others
when it is ready to execute the next sample. Only when all are ready, the connection changes
state and all execute the next sample. Thus, all are waiting for the slowest "brother". Maximum
synchronization is about 5 brothers (because the ”pullup” resistors are in parallel connection).
Block
For technical reasons 64 samples have been collected into an inseparable block. Since a beat
always starts at the same place in a block, the machines are synchronized at block level
automatically when synchronized on sample and beat level.
Beat
An easy way of synchronization is to correct differences at the end of each loop (as in
samplers). However, clicks can be heard, because information has to be inserted or deleted.
Luckily, at the end of a loop the sounds are normally fading and at the beginning of the next
loop the clicks cannot be heard because of the attacks.
The rhythm within a loop does not get corrected, only the end. Speed increases, etc.
become meaningless.
At the very least the loop can be synchronized by strokes of a bass drum, a footswitch or the
rhythm of a drum computer.
LOOP delay - Manual
38
Concept for Synchronisation
Signals involved
SYNC is made up of the following synchronisation signals:
BEAT SYNC, BROTHER SYNC, MIDI BEAT SYNC or MIDI SYNC.
They almost do the same thing, but cannot be received and sent out all at the same time.
Therefore you can control the desired application with the 2 SYNC MODES -I and -O, that are
selected with INSERT during Reset.
Limitation:
For synchronisation, remember that each adjustment means a jump in the
memory that can be audible.
Synchronisation can only happen backwards! In consequence, a SYNC arriving
too early can only be satisfied by jumping almost one entire loop back. So it can
only be executed if there was nothing new in the last loop, otherwise the
addition would be erased.
As a result, during OVERDUB,MULTIPLY, INSERT, and when FEEDBACK is
not fully open, synchronisation does not work properly.
Suggestion:
If you need to have a fading loop synched to the sequencer, reduce the speed
of the sequencer a little bit after you have made the first recording, so the SYNC
signal is always late that makes correction possible.
Note!
Synchronisation or triggering may be disabled if the loop takes more than the
half the memory capacity, and jumping back is not possible. In BREAK this
situation is indicated with a dark UNDO LED.
Temporary Quantisation of Record
In Reset, the first arriving SYNC makes the RECORD commands temporary quantized. Thus, it
is possible to record any number of SYNC periods at any time and the beat length will be
adjusted to the SYNC coming from the master. Afterwards, synchronised playing can go on,
no matter whether you choose to quantize or not. The temporary quantizing is switched off
when going to Reset (when RECORD key is released again after holding it).
Hint:
If you want to be free again from the beat of the sequencer or brother musician,
go to Reset and hold the RECORD key until you start your new thing, so that no
SYNC sets you to quantized while you release the RECORD key.
The connections of the SYNC signals
If you want to do special applications, you maybe need to understand the internal functioning
of the SYNC. The following diagrams shows how delicate is really is to create something
simple to use:
LOOP delay - Manual
39
MIDIBeat
BeatSync
MIDIBeat
Trigger
Sync
BeatSync
BEAT
BrotherSync
BrotherSync
TempQuantize
MIDIBrother
MIDIClock
MIDIClock
arriving SYNC signals
internal functions
transmitted SYNC signals
The Sync Output (-O) connection diagram
MIDIBeat
BeatSync
MIDIBeat
Trigger
BeatSync
shuts off !
Sync
BrotherSync
BEAT
BrotherSync
TempQuantize
shuts off !
MIDIBrother
shuts off !
MIDIClock
arriving SYNC signals
MIDIClock
internal functions
transmitted SYNC signals
The Sync Input (-I) connection diagram
Arriving BrotherSync is ignored, when a MIDIclock or Beat Sync signal is received.
Arriving Beat Sync is not used for SYNC, when a MIDIClock signal is received.
Quantisation happens on internal BEAT except for the first RECORD.
LOOP delay - Manual
40
The use of BROTHER SYNC and MIDI
Between two LOOP delays BROTHER SYNC should be connected with a stereo jack cable.
That makes the LOOP delays' hearts beat together and additional synchronisation between
them unnecessary. Even so we transmit the SYNC through the plug's ring of BROTHER
SYNC. With it, RECORD can be quantized.
Also, BROTHER SYNC transmits SYNC, in case you want several LOOP delays to follow the
same external SYNC (-I).
So there are the following three applications of connections of several LOOP delays:
Stereo Connection
Both LOOP delays are set to -O so they do not sync each other but run in parallel. The MIDI
Out of the main LD-1 is connected to MIDI In of the other to transmit the switch functions.
MIDI In
LD-1
Beat IN
Brother In
MIDI In
MIDI Out
Beat Out
-I
-O
Beat IN
Brother Out
Brother In
LD-1
MIDI Out
Beat Out
-I
-O Brother Out
Through MIDIclock, it is possible to control the speed of a connected sequencer from any one
of the LOOP delays.
MIDI In
MIDI Out
SEQUENCER /
DRUM MACHINE
MIDI In
LD-1
Beat IN
Brother In
-I
MIDI Out
MIDI In
Beat Out
Beat IN
Brother Out
Brother In
LD-1
MIDI Out
Beat Out
-I
Brother Out
LOOP delay - Manual
41
Brother Connection
Several musicians each with their own LOOP delay play together in the same beat, but use
the functions independently. All machines are set to -O to avoid SYNC.
Through MIDIclock, it is possible to control the speed of a connected sequencer from any one
of the LOOP delays.
MIDI In
LD-1
Beat IN
Brother In
MIDI In
MIDI Out
Beat Out
-I
-O
LD-1
Beat IN
Brother Out
Brother In
MIDI In
MIDI Out
Beat Out
-I
-O
MIDI Out
SEQUENCER /
DRUM MACHINE
Brother Out
If one of the brothers wants to starts his own beat, independent of the family, he only has to
hold RECORD (reset) so that no SYNC comes in before his RECORD. Then he starts
unquantized RECORD and creates a new time base. The other brothers can join by resetting,
waiting for a SYNC (a flash of the left green decimal dot) and quantize into the new beat.
Brother Connection with external synchronisation
If the brothers are playing with a sequencer, all can follow the MIDI SYNC: One LOOP delay
receives the MIDIclocks (-I), and sends the derived SYNC through BROTHER SYNC to the
others, (also set to -I) - all brothers follow the oldest dancing with MIDI!
MIDI In
MIDI Out
SEQUENCER /
DRUM MACHINE
MIDI In
LD-1
Beat IN
Brother In
-I
MIDI Out
MIDI In
Beat Out
Beat IN
Brother Out
Brother In
LD-1
MIDI Out
Beat Out
-I
Brother Out
The same goes for synchronisation to a sound source or key connected to BEAT SYNC of
one of the LOOP delays.
MIDI In
TRIGGER-SIGNAL/
SOUND-SOURCE
LD-1
Beat IN
Brother In
-I
MIDI Out
MIDI In
Beat Out
Beat IN
Brother Out
Brother In
LD-1
MIDI Out
Beat Out
-I
Brother Out
Note!
The BROTHER SYNC does not trigger Samples (BREAK - MULTIPLY, see page
25). If you want all brothers to be triggered together when they are waiting in
BREAK, you have to connect the sound source to all BEAT SYNC jacks or use
MIDI BeatSync.
Hint:
Connected brothers can be partly independent and partly mastered if you
connect the LOOP delays through a MIDI filter. For example BREAK and BEAT
SYNC could be transmitted to allow the leader to stop and start the band
precisely, while MULTIPLY and OVERDUB is filtered out of the MIDI line to leave
the musicians independent.
BROTHER SYNC is also transmitted through MIDI, but never received. So far, there is no
concrete use for it, except that it is handy as a guide on the screen of the sequencer and a
base signal for your synchronising creativity.
LOOP delay - Manual
42
QUANTIZE
Users initiated a completely new way of operating the LOOP delay: All the commands can be
quantized on the beat. It means that these commands are executed and terminated only at
the start of the next beat. In the meantime the LEDs remain dark.
Turning Quantizing on: go to reset state (long RECORD), tap OVERDUB until the
MULTIPLE/MIDI display (green) shows 0.1.
Turning Quantizing off: go to reset, tap OVERDUB until the display shows 0.0.
MULTIPLY key is pressed anytime
one
Quantize lets the
function only happen at
the end of the Beat
Beat
original loop
beat
two
beat
= Beat
beat
one
two
beat
beat
beat
beat
The following functions are quantizable:
Replace.
MULTYPLY, INSERT, RePlay (BREAK-UNDO),
Like a metronome, quantizing is a limitation of freedom and expression at first glance. It can
assist structural composing in themes. Quantize allows to tap the LOOP commands
prematurely and have the foot free again, knowing that the functions will be executed with
maximum accuracy. For some musicians it will be interesting to learn to deal with the discipline
of the beat.
Quantizing makes that some functions are executed precisely at the
beginning of the next beat and they have to be called early.
Quantizing is switched in Reset with OVERDUB.
The green display shows its state:
O.O
O.I
(Q=0) Quantizing OFF
(Q=1)
Quantizing ON
Received SYNC signals are used to temporarly quantize the record
function. (see page 34)
LOOP delay - Manual
43
MIDI
MIDI coding
All keys are sent as white notes of the lowest octave of an ordinary keyboard (MIDI Notes
36...47). They are received as the same notes repeated over 4 octaves. FEEDBACK is
patched to the Modulation Wheel.
FB-SW
MODE
FEEDBACK
REC
BROTHER
BEAT
OVERD MULTI INSERTBREAK UNDO
C1
The MIDI channel at startup is set to 16 and can be modified in Reset state with UNDO
(DOWN) and BREAK (UP). A long pressing on one of them resets to channel 16.
Stop RECORD sends a StartSong, Start RECORD and Reset send a StopSong. StartSong is
received to restart MIDIclock.
MIDI Notes 123...127 switch hanging notes off which could happen when you turn the
sequenzer off while the loop is running.
A further type of synchronisation works with the BEAT SYNC jack. Its signal is transmitted by
MIDI key G#. Programming this note anywhere into the sequencer is helpful to call samples
from the LOOP delay. (If MIDIclock is on, it is also used for synchronisation - rather chaotic)
Brother Sync is transmitted as F#, as a way of orientating yourself on the sequencer screen or
for special purposes. It is not received.
For better understanding of the sequencer data, PEDAL MIDI controller additionally transmits
a O at Start RECORD and a 127 at Start BREAK and so on.
Note!
Don't imagine you could draw a Feedback curve in the sequenzer to be
executed during Insert, for example. It is internally fixed to 0 and independent
on MIDI Controller
Quantizing is extremely helpful when working with MIDI SYNC, especially for fitting the loop
into the sequencer timing.
LOOP delay - Manual
44
MIDI Clock
MIDIclocks can be used to synchronise with a sequencer or drum computer, without any
additional programming on these. A controllable beat counter divides the quick MIDIclock
signal into a musically reasonable MIDI SYNC (usually 1 Beat). The switching between the
various measures of beats is done in Reset with MULTIPLY. The number of measures is
displayed in the green display.
Incoming MIDIclocks (LOOP delay setted to -I):
- They are passed directly to MIDI Out. The internal generation is switched off
- BrotherSync is not received at all
- Beat Sync is only received to trigger samples
If MIDIclocks are not received during 400ms (about the slowest possible application) we
assume that none are coming and start the internal. At the next Reset, the Brother and Beat
Syncs are switched on again.
To prevent overloading the sequencer, we do not send out the internal MIDIclock if it would
push the sequencer beyond 300beats/sec. So for very short loops, use MIDIBeat.
Note:
For low measures (Reset - Multiply: 1 or 2) the internal MIDIclock becomes very
inaccurate.
LOOP delay - Manual
45
PLAYING HINTS
IN GENERAL
Modesty
Start with a few switches and short loops. You have purchased a new instrument and you
have to learn to play it. No quality arises without a process. But this learning can happen in a
playful way. The LOOP delay ought to facilitate your playing — not render it more difficult. Let
intuition grow through accidents and incidents.
Even with just the two switches RECORD and MULTIPLY you can give impressive solo
concerts.
Do not forget to reset sometimes and just play alone.
Experience loopability
Not every tune sounds nice when repeated. In general, glissandos (gliding notes) soon get
obtrusive. Take your time to experience the effects of different kinds of looped musical
themes.
How to learn from mistakes
Not everything we think of as a mistake really is a deadlock. Often it is interesting to see which
way you are going when starting with a mistake.
Therefore do not stop an ”awful” loop immediately, but work with it or change it round by
looking for a positive interpretation of your mistake. Once you have fought your way through
the thicket you might arrive at a new area — and the great view you get will explain why you
made the ”mistake”. In music we also express our faults and can be made aware of them by
musical treatment. This is a way to wake up. Often the music expressing the break-through
after a thorny thicket is extraordinary beautiful and can be published as an interesting result of
a process.
The MIX - control
The relationship between loop signal volume and direct signal seems trivial. But think of it: if
the volume is unbalanced, the first repetition of your loop is either louder or softer than the
original.
In the first case you will have the tendency to play even more loudly. Then the next loop will
be even louder! Thus, your loop will push you up and up, until it distorts or until you go mad.
In the second case you will probably play the loop more quietly — your music will grow more
delicate..
Of course you can get used to an unbalanced volume. In polyphonic loops it is very
reasonable to turn up the solo voice — turn MIX a little down.
RHYTHM SWITCH
Up to now there have been few footswitches to determine a rhythm. It has not been important
to be very exact when switching an effect.
We have modified a regular footswitch to our purposes: FSP1 has an extremely short stroke
requiring little force. No undefined time period will pass. In addition you have a better rhythm
feeling when tapping than when pressing.
LOOP delay - Manual
46
If you have trouble operating the footswitch, try taking advantage of the rhythm in your leg:
Strike the floor as usual with the tip of your foot and move your foot over the switch at the
beginning of the beat. You are able to tap the switch without any extra effort. Otherwise, you
will have the tendency to play the first note more loudly and to lose your timing.
Sitting electric- and western-guitar players are recommended to use their free left leg.
APPLICATION EXAMPLES
The Rehearse Trip
Traditional delays have commonly been applied in two ways that are helpful at the beginning
of a song:
You start with a musical theme to be looped, but the rhythm is not yet perfect. When recording
the theme it may be correct but it will not have the necessary drive. It has to be played over for
a while until it is ready to be recorded. In Rehearse state you keep getting confronted with
your own irregularities. Only when the LOOP delay and yourself are playing exactly the same,
will the theme be ready to record. Leave Rehearse with INSERT and conserve the musical
theme.
The other application is the exact opposite: You have no idea what to play but you feel the
beat. Tap RECORD, play anything, then INSERT. First you have the impression of a great
chaos. But each phrase will be a reaction to what you have just played before. Suddenly, you
play a new theme. Maybe you could not even replay it. But it is conserved in the LOOP delay.
In order not to lose it tap INSERT as soon as you have heard it once, or tap OVERDUB to
continue directly with activated overdubbing.
Building up a groove
Select the most simple element to start with. In a salsa for instance, the bell. Record one or
two beats at the most with RECORD. You could end the recording with MULTIPLY and
immediately start recording a second instrument. Then multiply with four. You may use
OVERDUB to record several instruments over these four beats. Then you will probably record
bass line and harmonies, let us say over 16 beats (a second multiplication). This kind of music
is often building towards a climax which is very convenient, because it is hard to simplify the
groove.
End a groove
Using the CP1 as a volume pedal, you can reduce the loop volume while your actual playing
undertakes the loop-theme, after fadeout you close with a coda. An other possibility is to
reduce feedback and reoverdub several instruments while it fades out.
Weaving a sound carpet
Sound carpets have been the most common electronic loop until now. Use feedback,
overdub and a volume pedal to construct sound carpets.
Start with RECORD (for this application, precision is not that important). Play a loop length of 2
to 5 seconds. End RECORD with OVERDUB in order to get a clean transition of the sounds.
Sometimes you do not want any attacks at all. The looped sound carpet will then be very
even. Advanced MODE is recommended. Use the pedal to control input volume: Each note
will be faded in, take also advatage of the dynamic of the instrument. This can also be done in
Delay MODE.
The limiter is helpful when weaving an even carpet. Overdrive the input, so that with each
attack the LED turns red. Then the limiter will even up your carpet.
In this application FEEDBACK is not fully open. Otherwise your carpet will grow too thick.
Control the development: Quicker change requires a feedback turned rather down, opening
feedback makes the carpet grow.
LOOP delay - Manual
47
Composing a song
Build up a groove (as described before), multiply it to get a verse. Add a chorus with INSERT,
maybe in several layers with OVERDUB. Append several verses and choruses with
MULTIPLY. Record an intro or an end with INSERT.
The LOOP delay as ”protocol”
It is possible to record the last few minutes of playing in the practice room in order to listen to
new ideas or to settle arguments about what just happened. This is another application of the
LOOP delay: Connect a mixing desk output or a room microphone. Tap RECORD, wait for the
maximum recording time to elapse, then tap INSERT. In order to listen to it, tap OVERDUB
twice.
LOOP delay - Manual
48
Correcting
UNDO and Replace both are correcting functions.
Replace renews a part of the loop completely. UNDO deletes your last recording.
Replace is quite difficult to apply in loops with a great number of layers, often you can hear that
there has been a correction. Sometimes this does not matter, because you may want to make
some experiments. At least even your correction can be cancelled with UNDO.
You can apply Replace in a creative way: for instance, you have recorded a beat of two chords
and have multiplied it by 4. Now you think this sounds too boring, so you exchange a chord
with another one: press INSERT, play the chord and release INSERT exactly at the start of the
next chord.
There is a risk with UNDO as well: Maybe you do not know where you are jumping back to
when using UNDO. To prevent clicks, it is important to tap it exactly on an attack of your
previous recording and not at any time after the mistake.
Sampling
If you want to record a sample, we recommend starting the loop with RECORD and ending it
with INSERT. That way you get into Rehearse and you can play the sample until it is exact.
Then you save it with BREAK. When tapping MULTIPLY, the LOOP delay is ready to play
your sample each time it is told to by a MIDI or BEAT SYNC signal (TriggerSample). This is
possible only if the actual loop does not fill more that the half of memory capacity.
You can connect any instrument to the BEAT SYNC input, for instance the drummer's second
bass drum. He can then release your sample at his pleasure.
You can release it yourself with a footswitch (best is FSP1).
Leave sample state with BREAK to go back to your loop.
Polyphony in a band
In a band, the musicians often do not want to adapt to a machine and reject the LOOP delay
as a rhythmic base — very understandable. However, you can transform your solo instrument
to a multi-voice instrument for a short while.
You can either go into Delay MODE, tap RECORD twice in the short rhythm of the beat and
control the doubling with the pedal.
Or you remain in Loop MODE and record a phrase (start with RECORD, end with OVERDUB)
and immediately play a second or third voice. One singer can thus build huge soul choirs.
Leave that state with a long RECORD (Reset) pressing.
You can also record the first chorus with RECORD, end the recording with BREAK, and
release this first chorus with UNDO to accompany it with a second voice.
The Loop band
The dream of synchronizing several LOOP delays (with BROTHER SYNC) was one of the
greatest impulses to develop the LOOP delay. We are still unable to foretell the variety of
sound to be made from this connection. It is very unique to be rhythmically connected and at
the same time have all the liberties of a solo play.
Rhythm musicians could be overdubbing short loops, while the harmonic musicians might be
multiplying long loops. While the harmonies and solos go on, the rhythm musicians
continuously change their short loops.
You can experience polyrhythm, when one musician builds a loop of 4 beats, and another
one of 5 beats.
LOOP delay - Manual
49
A process of development — from music to therapy
I have discovered a very special, freely improvised musical style which obviously is connected
to the effect of loops to audience and players. It may be very personal, but I would like to
explain it, because it has become a ritual and oracle and has changed my life in a very
interesting way.
I rediscovered music starting with the OM (for technical reasons — there was no
LOOP delay!). OM is a carpet of floating notes. Then there were short tunes. The harmonies
grew out of the notes I overdubbed, because they matched each other. Later there were
rhythms. This process of the musical setup lasted about one year. At the same time I
developed an application for this musical style you might try out as well.
As an important precondition you should not worry about the quality of your music. Start with
simple rhythms and tunes and do not think of success. You see now why I started with OM,
the origin, the emptiness. Meanwhile, OM is not the only way to start a loop. Often I doodle
around with a few notes to get in the right state. For somebody not knowing the process I
would recommend the OM. You can build up an OM by fading in a certain note or octave notes
in different sound colours, over and over again, with overdub and much feedback into a loop
of 2-3 seconds. No attack should give a rhythm. However the wave of slowly changing sound
colour will give you the feeling of the exact loop length. The OM calms you down and opens
the channel to another world, flowing over with tunes and rhythms. You can play them until
you find an interesting theme to be overdubbed with multiply (and reduced feedback). This
theme might come from your interior and express a momentary state of mind. Thus it can start
thoughts and feelings that may consciously or subconsciously worry you. This first theme of
course is not the last. It may be simply a trifle: you fade it out and search on. Probably you find
a second theme which may be even deeper in your mind. With feedback you control how long
you want to remain in that theme and how quickly you go on to the next one.
In the beginning there are often nice thoughts to lead you onto a long journey with
deadlocks, obstacles, yes even an accident — awful sounds and chaos. I used to interrupt the
loop, until someone pointed out to me that such chaos is also a part of myself and interesting.
So I started working with these shocks and vales of tears. I started colouring them, making
them even more awful and learning to feel what actually is going on inside of me. When
playing or listening to the loop I can think of my problems, because I consistently create the
proper climate for myself. The reverb serves for the same purpose, because it creates the
proper space which I consistently change by adapting reverb time and intensity with the foot
pedal. Using phones you can put yourself into an acoustic prison and free yourself to fly on a
wave of long reverb.
The continous repetition can be something harassing. Often this hurricane can calm down
without knowing what has happened. Then it it is easy for me to continue to play beautifully,
honestly, without cheap simplicity — while a new solution might come into my thoughts — and
a new story.
Normally I play between 20 minutes and infinity without stopping!
In that way I have taken all my essential decisions in the past few years, have digested sorrow
and problems in order to overcome them more quickly and have even solved technical
problems — for the LOOP delay.
The LOOP delay grew under the influence of loops.
The effect of acoustic feedback has fed back to the material world.
LOOP delay - Manual
50
TECHNICAL EXPLANATIONS
LOOP ORGANISATION IN THE MEMORY
The register medium of the LOOP delay is circular. i.e. it starts over when reaching the end.
Imagine an endless tape. It depends on the SIMM memory configuration how much space
there is in your LOOP delay.
Digitized music is written into memory on one spot. On another one the digital information is
read and transformed back into music. In computer slang we call these two spots reading
address and writing address.
In a tape recorder you could realize the same with two heads. One of them is recording, the
other one is playing back the same data. The tape runs over the heads, while in the LOOP
delay, reading and writing address move over the memory.
The distance between writing and reading address defines the loop length. The LOOP delay
displays the loop length in seconds. Maximum reachable loop length is defined by the
memory capacity; of course shorter loops can be made.
circular storage
third but last loop
loop length
second but last loop
last loop
current loop
reading sample
DA
writing sample
AD
Tape delay machines work the same way. Feedback is done by writing the value from the
memory, added to the new sample, back into the memory. Modern machines as the LD1 do
this in the digital plane, in order to not loose sound quality with each repetition.
LOOP delay - Manual
51
SAMPLEMACRO
The samplemacro is the heart of the software: A single sample is read from the analog-digitalconverter (ADC), saved in the memory, and read out to the digital-analog-converter (DAC).
•
•
•
•
•
•
read sample from memory
send value to DAC
multiply with feedback value
read sample from ADC
add both samples (ADC + memory*feedback)
write result into memory
Since the family of computer users has grown tremendously, here the same in a simple
PseudoCode:
MemSample ‹-- Memory
DA
‹-- MemSample
MemSample ‹-- MemSample * FeedbackPedal
NewSample ‹-- AD
NewSample ‹-- NewSample + MemSample
Memory
‹-- NewSample
and now graphically:
DA
Ouput
Pedal
AD
*
+
Memory
Input
LOOP delay - Manual
52
ACCESSORIES AND EXPANSION
FOOTSWITCHES
For the rhythmic application we have developed a new kind of footswitch, the FSP1. It looks
normal, though, inside it is completely different. The switching action is ultra short and
sensitive, a precise switch element has been placed directly underneath the lever.
The LOOP delay includes one FSP1 for the RECORD function. For further functions as
MULTIPLY or synchronization, additional FSP1 switches are recommended. The FSP1 is
made as an edgewise case that allows to couple several boxes together to one switch panel.
Depending on your loop technics, some of the functions maybe are less critical and can be
operated with normal footswitches (close contact when pressed).
PEDAL
For an enhancement of expression, we designed a multi functional pedal application. The
pedal jack socket at the back panel can be used in four ways:
- connected with a controller pedal
- connected with a controller pedal with switch
- connected with a switch only
- not connected ( functions accessible at the front panel)
Controller Pedal CP1
With our pedal you can bring your loop music into action more expressive - either as volume or
feedback controller (depending on the MODE, see page 19).
If you want to recycle your old volume pedal (we love recycling): here is our hint to modify it!
Control the potentiometer value:10K - 100K resistance (20Kohms mean). Make a special Ycable that unites two mono jacks to one stereo. Note: The pedal jack socket is stereo: One
lead (tip) conducts the power and test voltage (5V), the other one (ring) the control voltage (05V).
TIP RING
More elegant would be a directly inserted stereo jack cable.
If the range of the potentiometer does not work properly, try to adjust it by changing (maybe
just taking out) the resistor R28 (close to the DIROUT socket) inside the LOOP delay.
LOOP delay - Manual
53
Pedal with switch
Connecting the tip of the jack with ground switches the MODE. With some skill you can modify
your controller pedal and add a function:
stereo jack
socket in
pedal
TIP
•
RING
pedal potentiometer
10...100kΩ
•
•
MEMORY EXPANSION
The LOOP delay is equipped with RAM-memory modules, that are also used in PC, Macintosh
and certain samplers: SIMMs. Various sizes and prices offer different memory capacities:
256k, 1Meg, and 4Meg fit to the LD1. Their speed is uncritical, it should not be more than
120ns.
Configuration
The LOOP delay contains of four SIMM places, which are fitted with 256 k SIMMs (=12.5
seconds) in the standard version.
To expand the loop capacity, 'bigger' SIMMs have to be installed. The modules must be
replaced by pairs of identical SIMMs (we call them sets), but two different sets are accepted.
The maximum of 199 seconds results from four SIMMs of 4Meg.
Inserting
The exchange of SIMM modules is quite a bit difficult and needs some practice. It shall be our
pleasure to replace them for you.
In case you are far away from PARADIS: also in computer shops and in certain music shops
you can get assistance.
Do not hesitate to order your LOOP delay with the desired memory already fitted.
Instructions to replace the SIMM modules
Disconnect the power cord! Then unscrew the bottom of the LOOP delay and open it.
At the left front corner of the print you find four module places with installed SIMMs.
The two sockets at the edge of the print have allways be fitted with SIMMs, otherwise the red
display would show HLP 00 as error after turn-on.
To take out the SIMMs from their upright sockets you need a fine screwdriver and patience.
The modules have a hole at both lenghtsides in which a small hook locks them. Insert the tip
of the screwdriver through the left hole, unlock the hook and simultaneously lift this side
slightly. Change to the right hole and repeat the process. Change again alternating left and
right, untill it looses gradually.
Inserting SIMMs is much easier and needs no trick: simply push them down into lock position.
Make sure that the part side of the modules looks left, to the prints edge.
LOOP delay - Manual
54
SOFTWARE / UPDATE
The software is burned into one pair of EPROM. In case of an update this EPROMs have to be
replaced.
Open the box like described before. You find the two EPROM chips at the rightside of the
SIMM places, towards the center of the LOOP delay. Use the lever that you get together with
the update. Put it under an EPROM and lift it slightly but not fully, then change to the other
side and lift it the same way, change again... Take care to not put the lever under the socket
but only between socket and chip.
Push the new EPROMs down into the sockets. Take attention to the polarity: EPROM 'A' to
socket 'A', the notch at the front of the chip must look to the front panel.
LOOP delay - Manual
55
APPENDIX
CONNECTING EXAMPLES
At home, using the stereo equipment
SYNC
BROTHER
BEAT
OUT
THRU
PEDAL
SWITCHES
MIDI
IN
UNDO
BREAK
INSERT
HIFI AMPLIFIER
MULTIPLY OVERDUB RECORD
FEEDBACK
MIXOUT
DIR. OUT
INPUT
AUX INPUT
With an instrument amplifier
INSTRUMENT
SYNC
BROTHER
BEAT
OUT
THRU
RETURN SEND
SWITCHES
MIDI
IN
UNDO
BREAK
OUT
IN
Instrument
Amplifier
INSERT
MULTIPLY OVERDUB RECORD
PEDAL
FEEDBACK
MIXOUT
DIR. OUT
INPUT
LOOP delay - Manual
56
From the instrument rack to two channels on the mixer
INSTRUMENT
SYNC
BROTHER
BEAT
SWITCHES
MIDI
OUT
THRU
IN
UNDO
BREAK
INSERT
PEDAL
MULTIPLY OVERDUB RECORD
FEEDBACK
MIXOUT
DIR. OUT
INPUT
IN
REVERB
OUT
Inserting to a mixing desk
MIX control at max.
SYNC
BROTHER
BEAT
SWITCHES
MIDI
OUT
THRU
IN
UNDO
BREAK
INSERT
MULTIPLY OVERDUB RECORD
PEDAL
FEEDBACK
MIXOUT
DIR. OUT
INPUT
AUX SEND
LOOP delay - Manual
57
TABLE OF LOOP FUNCTIONS
The following table is a summary of LOOP delay functions after a certain switch activation.
StartX
starts the timing function X, LED goes red.
StopX
stops the timing function X, LED becomes green again.
The functions 'Multiply' and 'Insert' automatically round to the next beat.
UStopX
stops the timing function X without automatic rounding. LED becomes
green again.
YOn
starts the running function Y, LED goes red.
Running functions do not get influenced by timing functions.
YOff
stops the running function Y, LED becomes green again.
These functions are executed when the respective switch gets tapped.
Record
Overdub
Multiply
Insert
Break
Undo
StartRecord
OverdubOn
StartMultiply
StartInsert
StartBreak
JumpBack
These functions are executed when a switch is pressed long.
Press:
Release:
Record
Overdub
Multiply
Insert
Break
StartRecord
Reset
OverdubOn
OverdubOff
StartMultiply
StartReplace
StopReplace
StartBreak
PlayOn
These functions are executed when another function has already been activated:
2: Record
2: Overdub
2: Multiply
2: Insert
2: Break
2: Undo
1: Record
1: Overdub
1: Multiply
1: Insert
1: Break
StopRecord
StopRecord
OverdubOn
StopRecord
StartMultiply
StopRecord
RehearseOn
StopRecord
StartBreak
UndoRecord
StartRecord
OverdubOff
StartMultiply
UStopMultiply
StopMultiply
OverdubOn
StopMultiply
UStopInsert
StopInsert
OverdubOn
StartMultiply
StartRecord
PlayOn
OverdubOn
TiggerSample
StartInsert
StartInsert
StopInsert
PlaySample
StartBreak
StopMultiply
StartBreak
UndoMultiply
StopInsert
StartBreak
UndoInsert
PlayOn
JumpBack
RePlay
LOOP delay - Manual
58
MIDI IMPLEMENTATION CHART
Function
Basic Channel
Transmitted
1-16
Mode
Notes
Prog. Ch.
Controllers
36-46
1
Sys. Ex.
System Common
System Real Time
MIDI Clock
Recognised
1-16
Remarks
Default 16
poly
1, 24-82*
1
123 - 127
Start Song
MIDI Clock
Mod wheel
All keys off
to start sync
* Notes interpreted as Control Keys :
Key
Sent and received
additionally received
MODE
RECORD
OVERDUB
MULTIPLY
INSERT
BREAK
UNDO
36
38
40
41
43
45
47
C1
D1
E1
F1
G1
A1
B1
C0, C2, C3
D0, D2, D3
E0, E2, E3
F0, F2, F3
G0, G2, G3
A0, A2, A3
B0, B2, B3
FBSwitch (MODE)
BROTHER
BEAT SYNC
37
42
46
C#
F#1 (only sent)
A#1
C#0, C#2, C#3
FEEDBACK
Contr 1
Modulation wheel
Note 1 = C#-1
A#0, A#2, A#3
17.12.03
LOOP delay - Manual
1
INDEX
(-) 30
AUTO UNDO 36
band 48
bass drum 33
BEAT 5
BEAT SYNC 33, 43
blips 33
Block 37
BREAK 28
BREAK > UNDO 34
BREAK switch 19
BROTHER SYNC 33, 37, 43
circular 50
clicks 33
comMunication facilities 35
Delay Mode 23
DIRECT OUT 22
DISPLAY 30
distortion 22
electric guitars 22
FEEDBACK 23, 25
FOOTSWITCHES 52
FUNCTION SWITCHES 24
FUSE 34
guitar amp 22
HiFi system 22
HLP 30
HLP 00 53
INPUT 22
INPUT VOLUME 22
INSERT 27
INSERT switch 18
LEDS 10
LIMITER 22
LONG SWITCH PRESSING 17
LOOP 5
LOOP FUNCTIONS 57
Loop Mode 23
LOOP ORGANISATION IN THE MEMORY 50
measures 44
MEMORY EXPANSION 53
metronome 33
microphones 22
MIDI 32, 43
MIDI channel 43
MIDI SYNC 44
MIDIclocks 44
MIX 22
MODE 23
MODE switch 21
Modesty 45
modulation 33
Modulation Wheel 43
MULTIPLE 31
MULTIPLICATION 5
MULTIPLY 14, 25
Output Mode 23
OUTPUTS 22
OVERDUB 13, 25
OVERFLOW 30
PEDAL 52
playing hints 45
PlaySample 28
QUANTIZE 42
RECORD 11, 24
REPLACE 18, 27
Replay 28
REPRESENTATION 4
RESET 35
Reset Parameters 35
reverb 22
RHYTHM SWITCH 45
rounding 2, 28
rounding, 26
Sample 37
SAMPLEMACRO 51
sampler 28, 33
Sampling 48
sensitivity 22
sound clouds" 22
SYNC JACK SOCKETS 33
SYNC MODES 38
SYNC signal 28
Synchronisation 38
Synchronization 37
Synchronization levels 37
therapy 49
thick walls". 22
total available delay time 30
TriggerSample 28, 48
UNDO switch 19