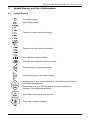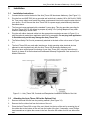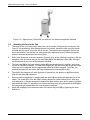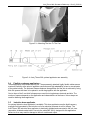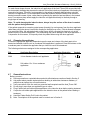
1
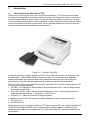
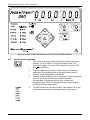
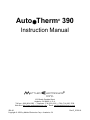
AutoTherm 390 ® Instruction Manual ® 1333 South Claudina Street Anaheim, CA 92805, U. S. A. Toll free: (800) 854–9305 • Telephone: (714) 533–2221 • FAX: (714) 635–7539 Web Site: http://www.mettlerelectronics.com • Email: [email protected] IR9–36 Copyright © 2005 by Mettler Electronics Corp.—Anaheim, CA Rev.D_07/02/12 Mettler Electronics Corp.— Rev.D_07/02/12 FCC Frequency Interference Statement Warning: This equipment generates and uses radio frequency energy, and if not installed and operated in strict accordance with the manufacturer’s instructions, may cause radio frequency interference. Notice 1: This equipment has been verified to comply with the specifications in Part 18 of FCC Rules, which are designed to provide reasonable protection against radio frequency interference. However, there is no guarantee that interference will not occur in a particular installation. Notice 2: If this equipment is found to be the source of radio frequency interference, which can be determined by turning the equipment off and on, the user should try to correct the interference by one or more of the following measures: • Reorient the receiving antenna (as applicable). • Relocate the Auto*Therm with respect to the receiver. • Move the Auto*Therm away from the receiver. • Plug the Auto*Therm into a different outlet than the receiver. • If necessary, the user should consult with the dealer or manufacturer for additional suggestions. (The user may find FCC’s “Interference Handbook” helpful. It is available from the U.S. Government Printing Office, Washington, D.C. 20402, Stock No. 004–000–00450–7.) Notice 3: The manufacturer is not responsible for any interference caused by unauthorized modification to this equipment. Mettler Electronics Corp. 1333 S. Claudina St. Anaheim, CA 92805 Toll Free: (800) 854–9305 Or (714) 533–2221 2 Auto*Therm 390, Shortwave Diathermy— Rev.D_07/02/12 TABLE OF CONTENTS 1 1.1 1.2 1.3 1.4 1.5 1.6 1.7 2 2.1 2.2 FCC Frequency Interference Statement (Domestic Only) 2 Introduction 5 Introduction to the Auto*Therm® 390 Introduction to this manual Safety precautions Caution Shipping damage Package contents Limited Warranty 5 6 6 6 6 6 7 Symbol Glossary and List of Abbreviations 9 Operational controls, displays, receptacles and symbols Abbreviations 9 10 Installation 11 Installation Instructions Attaching the Auto*Therm 390 to the Optional Cart Attaching the Arm to the Cart Flexible condenser applicators Inductive drum applicator 11 11 12 13 13 Operating Instructions 15 Shortwave diathermy applications Preparing the patient Heat effect of the applicators Capacitive method of application with the soft rubber applicator Inductive method of application Choosing the applicator General instructions Instructions for operation 15 15 15 15 16 17 17 18 Indications, Contraindications and Precautions for Shortwave Diathermy 21 5.1 5.2 5.3 Indications Contraindications Precautions 21 21 22 6 Maintenance and Troubleshooting 23 Cleaning and disinfecting Protecting other electronic devices from the output of the Auto*Therm 390 Routine Maintenance Troubleshooting 23 23 23 23 3 3.1 3.2 3.3 3.4 3.5 4 4.1 4.2 4.3 4.4 4.5 4.6 4.7 4.8 5 6.1 6.2 6.3 6.4 3 Mettler Electronics Corp.— Rev.D_07/02/12 7 Specifications 25 8 Accessories 27 Ordering Information Auto*Therm 390 Accessories 27 27 8.1 8.2 LIST OF FIGURES 1.1 3.1 3.2 3.3 3.4 4.1 4 The Auto*Therm 390 Auto*Therm 390, Controls and Receptacles Located on the Back of the Unit Optional Auto*Therm 390 Cart with unit, arm and drum applicator attached Mounting the Arm to the Cart Auto*Therm 390, Optional Applicator Arm Assembly Auto*Therm 390 Membrane Control Panel and LED Indicators 5 11 12 13 13 16 Auto*Therm 390, Shortwave Diathermy— Rev.D_07/02/12 1 Introduction 1.1 Introduction to the Auto*Therm® 390 Thank you for purchasing the Auto*Therm 390 shortwave diathermy. This unit features soft rubber electrodes for the application of shortwave diathermy energy. The unit may be used for continuous or pulsed shortwave diathermy with a variety of frequencies and pulse widths to choose from. An easyto-use membrane panel guides the user through setup. A patient pullcord allows the patient to stop all output if the treatment becomes uncomfortable. There is a handle molded into the case to allow the clinician to carry this shortwave diathermy around the clinic. Figure 1.1— The Auto*Therm 390 An optional accessory package upgrades your Auto*Therm 390 to do inductive coil diathermy using the same device. This package includes a multi-jointed arm, a 14 cm diameter drum applicator, special coaxial cable and a cart with large locking wheels that allows the Auto*Therm 390 to be moved easily around the clinic and supports the arm and drum applicator during treatment. The Auto*Therm 390 has been certified by Intertek Testing Services to meet the requirements for ETL Listing per the following standards: UL 60601-1 UL Standard for Safety Medical Electrical Equipment, Part 1: General Requirements for Safety Second Edition. CSA C22.2 NO 601.1-M90 – Medical Electrical Equipment – Part 1: General Requirements for Safety General Instruction No 1; Supplement 1; 1994 R(1997) IEC60601-2-3 – Safety of Shortwave Therapy Equipment In addition, the Auto*Therm 390 meets the following standards for radio frequency emissions: FCC Part 15–A IEC/EN 60601-1-2 Mettler Electronics Corp. has been certified by VTT Expert Services LTD to be compliant with EN ISO 13485:2003 and MDD 93/42/EEC Annex II requirements. In addition, Mettler is certified by DQS Medizinprodukte GMBH to be compliant with ISO 13485:2003 (CMDCAS) Canadian Medical Device requirements. 5 Mettler Electronics Corp.— Rev.D_07/02/12 1.2 Introduction to This Manual Read the contents of this manual before treating patients with the Auto*Therm 390. This manual has been written to assist you with the safe operation of the Auto*Therm 390. It is intended for use by the owners and operators of the Auto*Therm 390. The goal of this manual is to direct the correct operation and maintenance of this unit. The specifications and instructions presented in this manual are in effect at the time of its publication. These instructions may be updated at any time at the discretion of the manufacturer. To ensure that you have the most up-to-date information about your product, please go online to register it at http://www.mettlerelectronics.com/product-registration/ . 1.3 Safety Precautions The Auto*Therm 390 operates with high voltages. Qualified biomedical technicians with training in service of shortwave diathermy equipment should perform servicing of the Auto*Therm 390 or it should be returned directly to the factory. To maximize safety during use, the unit should be plugged into a grounded wall outlet. General safety guidelines for medical electronic equipment should be followed. Service may be obtained from the manufacturer by sending the Auto*Therm 390 in its original shipping container to Mettler Electronics Corp., 1333 South Claudina Street, Anaheim, CA 92805, ATTN: Service Department. (Telephone toll free: (800) 854–9305, Alternate telephone number: 1 (714) 533–2221) NOTE: All warranty repairs must be performed by Mettler Electronics Corp. or by a service facility authorized by Mettler Electronics to perform warranty repair work. A service manual for the Auto*Therm 390 is available from Mettler Electronics Corp. for a nominal charge. 1.4 Caution Federal law restricts the sale of this device to, or on the order of a physician, dentist, veterinarian or any other practitioner licensed by law of the state in which he practices. Use of controls or adjustments or performance of procedures other than those specified herein may result in hazardous exposure to radio frequency energy. Treatment should be administered only under the direct supervision of a health care professional. 1.5 Shipping Damage Your new Auto*Therm 390 is shipped complete in one or more cartons. Upon receipt, please inspect the cartons and the unit and its accessories for visible and hidden damage. If you discover any damage, hold all shipping materials, including the carton, and call the shipping agent who delivered the unit. They are responsible for all damage in transit; therefore, all claims should be filed directly with them. The factory will not be responsible for any damage in shipment, nor allow any adjustments unless proper formal claim has been filed by the receiver against the carrier. The carton in which your new Auto*Therm 390 was received is specially designed to protect the unit during shipping. Please retain all shipping materials in the event that you will need to return your unit for servicing. NOTE: All warranty repairs are to be performed by Mettler Electronics Corp. or an authorized Mettler Electronics warranty repair center. 1.6 Package Contents Your new Auto*Therm 390 comes complete with all the necessary components to perform shortwave diathermy. Below is a list of items that are included in the shipping carton. There are also other optional accessories available for this unit. They are listed at the back of this book. 1. Auto*Therm 390 2. Two each, 12 x 18 cm soft-rubber plate applicator complete with flexible cable (3963) 3. Six each, 14 x 20 cm felt spacer for soft-rubber plate applicators (3965) 6 Auto*Therm 390, Shortwave Diathermy— Rev.D_07/02/12 4. 5. 6. 7. 1.7 Two each, 18 x 26 cm cloth cover for soft-rubber plate applicators (3967) Two each, 48 inch Velcro receptive elastic straps (2009) One detachable hospital grade line cord (7293) Instruction manual and warranty card Limited Warranty The Auto*Therm 390 shortwave diathermy unit is warranted against defects in materials and workmanship for a period of two years from date of purchase, one year on applicators and accessories. During the applicable warranty period Mettler Electronics Corp. will, at its discretion, either repair or replace the Product without charge for these types of defects. For service under this warranty, the Product must be returned by the buyer within the applicable warranty period to Mettler Electronics Corp. Shipping charges to Mettler Electronics Corp. under this warranty must be paid by the buyer. The buyer must also include a copy of the sales receipt or other proof of the date of purchase. If the Product is returned without proof of the date of purchase, it will be serviced as an out–of–warranty product at Mettler Electronics Corp.'s prevailing service rates. Alteration, misuse, or neglect of the Product voids this warranty. Except as specifically set forth above, Mettler Electronics Corp. makes no warranties, express or implied, including without limitation any implied warranty of merchantability or fitness for a particular purpose, with respect to the Product. If any implied warranties apply as a matter of law, they are limited in duration to one year. Mettler Electronics Corp. shall not be liable for any indirect, special, consequential or incidental damages resulting from any defect in or use of the Product. Any legal action brought by the buyer relating to this warranty must be commenced within one year from the date any claim arises and must be brought only in the state or federal courts located in Orange County, California. Some states do not allow limitations on how long an implied warranty lasts, or the exclusion or limitation of incidental or consequential damages, so the above limitations or exclusions may not apply to the buyer. This warranty gives the buyer specific legal rights, and the buyer may also have other rights which vary from state to state. 7 Mettler Electronics Corp.— Rev.D_07/02/12 8 Auto*Therm 390, Shortwave Diathermy— Rev.D_07/02/12 2 Symbol Glossary and List of Abbreviations 2.1 Symbol Glossary Time display symbol Output display symbol Treatment frequency selection indicators Treatment pulse width selection indicators Drum applicator selection indicator Soft rubber plate applicators selection indicator Go back one step in the setup procedure. Go forward one step in the setup procedure. Increase value for time, watts and beeper. Go up for selection of Frequency, Pulse Width and applicators. Decrease value for time, watts and beeper. Go down for selection of Frequency, Pulse Width and applicators. Press “Enter” to select a value or selection. Press “Start” to begin a treatment. 9 Mettler Electronics Corp.— Rev.D_07/02/12 Press “Hold” to stop a treatment. Parameters that have been chosen will be retained. Press this selector to change the volume of the beeper. I O Main Power On. Main Power Off. Not suitable for use in the presence of a flammable anesthetic mixture with air or with oxygen or nitrous oxide. IPX0 Attention, consult instruction manual. Non–ionizing radiation Type BF Equipment—Class I Year of manufacture ETL and C–ETL Listed or 2.2 Abbreviations CW Hz LED µs MHz min POUT s Ser. No. W V 10 — — — — — — — — — — — Continuous wave (100 % duty cycle) Hertz (pulses per second) Light Emitting Diode Microsecond (1 x 10⁻⁶ second) Megahertz (1 x 10⁶ pulses per second) Minutes Output power Seconds Serial Number Watts Volts Auto*Therm 390, Shortwave Diathermy— Rev.D_07/02/12 3 3.1 Installation Installation Instructions 1. Connect the line cord to the back of the Auto*Therm 390 shortwave diathermy. (See Figure 3.1) 2. Plug the line cord (ME 7293) into a grounded wall outlet that is rated at 100 to 240 Volt AC 50/60 Hz. Your power supply must match the voltage requirements listed on the serial number label of your device. Do not connect the Auto*Therm 390 to a power supply rated differently than that described above. 3. The line cord comes equipped with a standard 3–prong plug. This plug provides grounding for the Auto*Therm 390. Do not defeat its purpose by using 3–to–2 prong adapters or any other means of attaching to a wall outlet. 4. Plug the soft rubber electrode cables into the appropriate receptacles as seen in Figure 3.1 or plug the optional coaxial drum applicator cable into its receptacle. Do not plug both applicators in simultaneously as this may damage the Auto*Therm 390. 5. The Patient Safety Pull-Cord is permanently attached to the back of the unit as seen in Figure 3.1. 6. The Auto*Therm 390 may emit radio interference. Avoid operating other electrical devices adjacent to and simultaneously with the Auto*Therm 390 shortwave diathermy unit. 7. Once you have verified proper functioning of your Auto*Therm 390, using the instructions in Section 4, please fill in the enclosed self–addressed Warranty Registration Card and mail it to Mettler Electronics. Figure 3.1— Auto*Therm 390, Controls and Receptacles Located on the Back of the Unit 3.2 Attaching the Auto*Therm 390 to the Optional Cart 1. Remove the model 96 cart from the packing material. (See Figure 3.2) 2. Remove the five rubber feet from the bottom of the unit. 3. Place the Auto*Therm 390 on top of the cart. Attach it to the top of the cart by screwing four of the rubber feet to the bottom of the unit from the inside of the cart. If necessary, use a Phillipshead screwdriver to tighten the screws in the feet. Save the fifth rubber foot for use without the cart. 11 Mettler Electronics Corp.— Rev.D_07/02/12 Figure 3.2— Optional Auto*Therm 390 Cart with unit, arm and drum applicator attached. 3.3 Attaching the Arm to the Cart 1. The optional arm is mounted on the side of the cart by means of keyhole type connectors. See Figure 3.3 for positioning. After slideing the arm into position, tighten the nuts using the wrench provided with the cart to secure the arm to the cart. The inductive drum applicator requires the arm to be installed. The clinician can safely position the applicator in many differing treatment positions because the arm has five locking joints. 2. Refer to the illustration of the arm assembly (Figure 3.4) for all the following instructions. With the exception of the horizontal swing of arm and hinge (20) of the applicator hoIder (19), all hinges can be adjusted by the user as the treatment demands. 3. The lock knob (26) on the lower rotating hinge (25) locks the whole arm in position, even when the arm is maximally extended. The other main hinges (21; 23) that control the length and height of the arm can be adjusted after the appropriate knobs have been loosened. To do this, it is practical to support the arm above the hinge that has been loosened (20) or (21). 4. The shaft of the inductive coil drum applicator is inserted into the aperture of applicator holder (19) until the slide (18) snaps shut. 5. Remove the drum applicator by pushing back the slide (18) and pulling the applicator out of the holder. The central joint of the arm (23) is factory-adjusted to a basic braking force. After longterm application, it may be necessary to readjust the basic braking force due to wearing of plastic parts and brake disks. To adjust this joint, remove the blue cover using a screwdriver and tighten the hexagonal bolt located below the cover by about a half turn. 6. Adjust the breaking of the horizontal motion of the arm at the joint (25) by tightening the lower slotted nut. 12 Auto*Therm 390, Shortwave Diathermy— Rev.D_07/02/12 Figure 3.3—Mounting The Arm To The Cart Figure 3.4—Auto*Therm 390, optional applicator arm assembly 3.4 Flexible condenser applicators These applicators are available as one pair. The permanently attached, highly flexible cables ensure maximum flexibility at the point of applicator connection and high adaptability to bent or curved parts of the patient‘s body. The optimum distance between the applicator and the skin is achieved by using thick felt spacers that have to be placed in a cloth bag together with the applicator. One to three of the 5 mm thick felt spacers are used for tuning between electrode and skin. The number of spacers depends on the application and characteristics of the tissue. Velcro straps are used for fastening these applicators. 3.5 Inductive drum applicator An optional inductive drum applicator is available. This drum applicator uses the high frequency magnetic field generated by the inductive coil of an electrical resonant circuit for therapy. The Auto*Therm 390 inductive drum applicator is electrically shielded and connected to the unit via a removable, shielded coaxial cable. Use only the cable (ME 1881), designed for this application. Failure to do so may result in damage to the unit or abnormal output. 13 Mettler Electronics Corp.— Rev.D_07/02/12 14 Auto*Therm 390, Shortwave Diathermy— Rev.D_07/02/12 4 4.1 Operating Instructions Shortwave diathermy applications The Auto*Therm 390 is a shortwave diathermy device that operates at 27.12 MHz. It provides traditional shortwave diathermy therapy using condenser and electromagnetic inductive coil fields in both continuous and pulsed modes of operation. Therefore, it is suited for all diathermy treatments in both the clinic and the medical practice. The use of shortwave diathermy for heat therapy has the advantage of penetrating deeper than other conventional methods, such as hot packs, infrared lights and heating pads, and even microwave diathermy. The heat generated by shortwave diathermy induces a whole range of physiological effects. It relaxes muscles, tendons and other connective tissues, and increases blood circulation in the treatment area. When shortwave diathermy is applied in short, high-energy pulses the depth of penetration is increased, having a particularly positive effect on the blood circulation, while the temperature sensitive skin hardly feels the heat. Shortwave diathermy can be applied over a large area of the skin’s surface. Avoid allowing the flexible cables or soft-rubber applicators to touch each other during treatment. 4.2 Preparing the patient For optimum therapy, ensure that the patient is in a comfortable and relaxed position. To accomplish this either have the patient in a seated or supine position. Patients shall never be treated on metal chairs, tables or beds. For safety reasons, remove all hearing aids, watches, rings, chains, bracelets and other metal objects before starting the treatment. The clinician should also take care to remove metallic objects while operating the Auto*Therm shortwave diathermy. Do not treat patients through their clothing. Remove clothing from the treatment area. Clothes made of synthetic materials should especially be removed because they insufficiently absorb moisture, allowing moisture to pool on the skin causing local overheating. Use a single layer of absorbent toweling between the patient and the applicator to absorb any perspiration produced during the treatment and to prevent the development of hot spots due to pooling of perspiration on the skin’s surface. Hand the Patient Safety Pull-Cord to the patient before starting the treatment so that the patient can shut off the Auto*Therm 390 if any discomfort is felt such as overheating or nausea. Do not leave children or patients who cannot pull the cord, unattended while operating this device. 4.3 Heat effect of the applicators Evaluating the heat effect of various applicators is based on the heat felt by the patient. This is strongly influenced by a number of factors, e.g. the thickness of fat Iayers, treatment through clothes or bandages, blood circulation, temperature of the skin, etc. Therefore, the following sections generally explain the operation of the applicators used with the Auto*Therm 390. The heat effect of the electrodes differs fundamentally between the inductive and capacitive method of application. 4.4 Capacitive method of application with the soft rubber applicators The capacitive method of application transforms the shortwave energy into heat in tissues of low blood circulation (e.g. fat, connective tissues). Thus, tissues near the skin’s surface are heated so that 15 Mettler Electronics Corp.— Rev.D_07/02/12 not only the transformed energy but also the distance between applicator and skin is important for the subjective sensation of heat. For best results place soft-rubber electrodes parallel to the skin’s surface. This will spread out the energy over the entire treatment area and prevent hot spots. Do not allow the soft-rubber applicator cables to come into contact with the patient. If necessary, insulate the patient from the cables using several layers of toweling. 1. Place the rubber plate electrodes inside the cloth cover. Place one felt spacer on each side of the electrode inside the bag. The electrode should be “sandwiched” between the two felt spacers. Press the two Velcro squares to close each bag. 2. Plug the cables into the back of the Auto*Therm 390. The cables plug into the grey receptacles and should be plugged in as far as possible. 3. Place the covered rubber plate electrodes directly on the skin, not over clothing. Strap the electrodes to the patient using the Velcro straps or the patient can lay or sit directly on the pads. Always try to maximize contact with the entire area of the electrode. The better the connection, the better the treatment. Pads can be positioned in any manner on the patient. They do not have to be opposite each other or even on the same plane of the body. Greater distance between the pads will increase the treatment area. 4.5 Inductive method of application The shortwave magnetic field of an inductive drum coil applicator generates eddy currents that are transformed to heat in the tissues. These currents increase with increasing electric conductivity of the corresponding tissue region (tissues with good blood circulation, e.g. muscle tissue and inner organs). 16 Auto*Therm 390, Shortwave Diathermy— Rev.D_07/02/12 To reach these deeper tissues, the inductive coil applicators of the Auto*Therm 390 are provided with an electrostatic shielding that prevents the electric field of the inductive coil applicator from heating the upper-skin fat tissue. Therefore, heat sensation by the patient is basically delayed when using the inductive coil applicators. It is recommended to start the treatment with an intensity level below the desired one and increase it later, rather than be guided by the patient’s heat sensation in the treated area. For maximum deep effects apply the inductive coil applicator directly to the body through a single layer of toweling. Note: To avoid damaging the inductive drum, always keep the surface of the drum in contact with the patient during treatment. If the patient responds to excessive output power (intensity) by moving away from the drum applicator rather than pulling the ripcord, insufficient coupling to the body may occur. If this is allowed to happen over a period of time, the adjusted electric output power will be converted into heat not only in the patient but also in the drum applicator. This overheating may cause damage to the drum applicator. It is imperative for this reason, to frequently check the patient when using the drum applicator. 4.6 Choosing the applicator Choose the appropriate applicator dependent upon the area and volume of the body parts to be treated and whether inductive coil or condenser field application is preferred. Press the buttons on the membrane panel to indicate the applicator that you intend to use for this treatment. The following selectors are assigned to the corresponding applicators: P/N Applicator Description 3980 14 cm diameter inductive coil applicator 3963 Soft rubber 12 x 18 cm condenser applicators 4.7 Applicator Illustration Symbol General Instructions Before you start… a) Review precautions, contraindications and side effects/adverse reactions listed in Section 5. b) Ask patient about possible implants before deciding to administer shortwave diathermy. If patient has an implant, do not use this device. c) Verify connection of the line cord to a grounded wall receptacle and the Auto*Therm 390. d) Do not plug in more than one applicator type at a time. e) Plug in either both soft-rubber plate applicators or the inductive drum before starting treatment. f) Couple the soft-rubber plate applicators or the inductive drum to the patient before starting a treatment. g) Hand the Patient Safety Pull-Cord to the patient. h) Note: Descriptions of the symbols used on controls are in Section 2. 17 Mettler Electronics Corp.— Rev.D_07/02/12 Figure 4.1— Auto*Therm 390 Membrane Control Panel and LED Indicators 4.8 18 Instructions for operation 1. Turn on the main power switch located on the back of the unit by pressing “I” icon on switch. The timer will display “0000”, the intensity will display “0” and the LED indicators to the left of “CW” and will be blinking. 2. Plug in the applicator(s) that you will be using for the treatment. Apply them to the treatment area on the patient taking care to securely couple the applicator to the patient. 3. Hand the Patient Safety Pull-Cord to the patient. Instruct the patient to pull on the cord if the diathermy treatment becomes uncomfortable. If the patient pulls the cord, all output will immediately stop. “E232“ will be displayed in the output window and there will be an audible alarm. 4. The LED to the left of CW will be blinking. Select either CW or one of the pulse frequencies by pressing the up and down arrows. Auto*Therm 390, Shortwave Diathermy— Rev.D_07/02/12 5. Once the LED of the desired frequency is lit, press the next arrow to go to the Pulse Width selection. 6. Press the up and down arrows to select the Pulse Width that you would like. Please note: if “CW“ is selected, then the unit will automatically skip this selection. 7. Once the LED of the desired pulse width is lit, press the next arrow to go to the Applicator selection. 8. Press the up and down arrows to select the applicator that is plugged into the Auto*Therm 390 for use during this treatment session. 9. Once the LED of the installed applicator is lit, press the next arrow to set the Timer. 10. Press the up and down arrows to select the treatment time that you would like. Please note: time can be set in whole minutes only. 11. Press the Volume button to increase or decrease the loudness of the beeper. Press the up and down arrows to adjust the volume to your surroundings. This is an optional step during the operation of this device. 12. Make sure that the applicator(s) is(are) plugged in and coupled to the patient. Press start to begin treatment. 13. The Auto*Therm 390 will first tune to the patient. During this time little dashes will move around the perimeter of the output display. At the end of tuning a “5” will be displayed in the output window if tuning is successful. If any problems are encountered during this time an error code will be displayed in this window. 19 Mettler Electronics Corp.— Rev.D_07/02/12 14. Use the “Up“ arrow to adjust the output in Watts. In the “CW” mode the maximum is 100 Watts. In any of the pulsed modes the maximum is 200 Watts. Press “Enter” to stop blinking the intensity display. 15. Press the “Hold“ button to momentarily stop a treatment. The Auto*Therm 390 will remember all the treatment parameter settings. However, the output display will reset to 0 watts. You will need to repeat steps 12 through 14 to resume the session. While you are in the hold mode, you can also adjust any of the other parameters before restarting the treatment session. 16. At the end of treatment an alarm will sound and the time and output displays will return to zero. 20 Auto*Therm 390, Shortwave Diathermy— Rev.D_07/02/12 5 Indications, Contraindications and Precautions for Shortwave Diathermy 5.1 Indications Shortwave diathermy delivers energy in the radio band of 27.12 MHz to provide deep heating therapeutic effects to body tissues. When shortwave diathermy is delivered to the body at intensities capable of generating a deep tissue temperature increase, it can be used to treat selected medical conditions such as: 1. Relieving pain 2. Reducing muscle spasm 3. Increasing range of motion of contracted joints using heat and stretch techniques. 4. Increasing blood flow to tissues in the treatment area. 5.2 Contraindications 1. Diathermy must not be applied over areas of the body which may contain metal (implants, surgical staples, etc.) for heat will become concentrated in that area increasing the possibility of tissue damage and deep burns. 2. Any patient with an implanted electronic device such as a cardiac pacemaker, bladder stimulator, spinal cord stimulator or electrodes for a myoelectric prosthesis, or implanted metallic leads, must not be treated with shortwave diathermy and should not be in the vicinity of the Auto*Therm® 390 when it is in operation. Do not use on patients who have had an implant in the past unless you are absolutely certain that the implant and all leads in their entirety have been removed. Note that leads are often left implanted after the implant is removed. 3. Do not treat on a metal treatment table, mattress with metal springs, wheel chair or a metal stool. Make sure that the patient cannot come into any contact with metal during treatment. The patient should not be allowed to come into contact with conductive parts which are grounded or have an appreciable capacitance to ground and which may provide unwanted pathways for the radiofrequency current. 4. Remove clothing from the treatment area. Any metal contained in the clothing, such as zippers, bra hooks or rivets may cause burning. In addition remove jewelry and watches during treatment. 5. Remove hearing aids and watches during treatment to prevent interference with or damage to these devices. 6. Do not treat over the pelvic or low back area when an IUD is present. 7. Shortwave diathermy should not be applied over the pregnant or potentially pregnant uterus. Therefore, shortwave diathermy should not be applied over the uterus unless specific assurance can be attained from the patient that she is not pregnant. 8. Shortwave diathermy should not be applied to the eye. 9. Neoplastic tissues or space occupying lesions should not be exposed to shortwave diathermy. 10. Shortwave diathermy should not be applied to the testes to avoid increases in temperature. 11. Do not treat ischemic tissues in individuals with vascular disease where the blood supply would be unable to follow the increase in metabolic demand and tissue necrosis might result. 12. Shortwave diathermy should not be applied over the epiphyseal areas (bone growth centers) of the bones of growing children. 21 Mettler Electronics Corp.— Rev.D_07/02/12 5.3 Precautions 1. Shortwave diathermy should not be applied in areas of reduced sensation or circulation. Patients having reduced sensation will not be able to notify the practitioner of discomfort if the intensities are too high. Patients with compromised circulation may have an excessive heat buildup in the treatment area. 2. Any bleeding tendency is increased by heating because of the increase in blood flow and vascularity of the heated tissues. Care, therefore, should be used in treating patients with therapeutic shortwave diathermy who have bleeding disorders. 3. Heating of the joint capsule in acute or subacute arthritis should be avoided. 4. Use a single layer of toweling to absorb moisture during treatment with the inductive drum applicators. 5. Shortwave diathermy may interfere with other electronic therapeutic devices such as neuromuscular stimulators and therapeutic ultrasound units. Never use another electronic device on the same patient when shortwave diathermy is being applied. 6. Use caution when treating obese patients with capacitive plate electrodes since this method of application may heat fat excessively. 22 Auto*Therm 390, Shortwave Diathermy— Rev.D_07/02/12 6 Maintenance and Troubleshooting 6.1 Cleaning and disinfecting Turn off the unit and unplug it from the main power supply before cleaning or disinfecting it. Clean and disinfect the unit and its accessories (except for the felt spacers) with commerciaIly available surface disinfectants. To prevent damage to the surface materials of the Auto*Therm 390, use only surface disinfectants based on agents like aldehydes, alcohol or ammonium compounds that are suitable for wipe and spray disinfection. Use them according to their instructions for use and duration of action. To prevent possible material damage, avoid the use of products based on halogen-splitting compounds, strong organic acids and oxygen-splitting compounds, solvents, benzene and similar agents. ATTENTION: Do not allow any liquids to penetrate the unit or its accessories while cleaning and disinfecting. Dry all sockets and connectors that have become wet before any further use! 6.2 Protecting Other Electronic Devices from the Output of the Auto*Therm 390 The Auto*Therm 390 generates high frequency electric and magnetic fields that can penetrate walls, ceilings and floors. lt cannot be prevented that components of these fields exist in the vicinity of the device. Sensitive electronic instruments, that are in the immediate vicinity of the Auto*Therm 390, can be adversely affected by these fields. This danger largely depends on the distance between the devices. Therefore, the Auto*Therm 390 must not be installed any closer than 5 meters from other sensitive devices, if possible farther. The applicators should never be applied to sensitive devices, e.g. neuromuscular electrical stimulators or their electrodes or cables. This problem can be completely eliminated when the Auto*Therm 390 is installed in a shielded room, i.e. one containing a Faraday cage. (A Faraday cage is enclosed by a metal housing or grid that prevents the penetration of electric fields.) Use of absorbing curtains is enough for most treatment rooms. We recommend that operators and other persons keep a distance of at least 2 meters to applicators and cables while they are in use. In case of doubt, it is recommended to measure the field strength. 6.3 Routine Maintenance 1. Standard medical electrical safety checks should be performed annually by qualified biomedical engineers or technicians trained to perform these procedures. 2. Inspect cables and associated connectors for damage. 6.4 Troubleshooting the Auto*Therm 390 Symptom Action 1. Nothing lights when main power switch is turned on. Is line cord connected to outlet? 2. E232 displays in the Output Display Window. Patient pulled Patient Safety Pull-Cord to stop the unit’s output. Find out why the cord was pulled and check the patient’s skin under the applicator(s), if necessary. 3. E233 displays in the Output Display Window. Coupling error - Can occur during RFM treatment Does the outlet have power? 23 Mettler Electronics Corp.— Rev.D_07/02/12 4. E234 displays in the Output Display Window. Inductive drum applicator is connected with capacitive soft rubber pad selected on membrane panel. 5. E235 displays in the Output Display Window. Inductive drum applicator not connected when the inductive drum is selected on the membrane panel. 6. E20, 21, 100, 201, 209, 210, 216-219 or 224226 displays in the Output Display Window. Try turning the unit on and off again to see if the error code is resolved. If not the unit requires servicing. If problem is not addressed above, or if additional troubleshooting guidance is desired, call (800) 854– 9305 or 1-714-533-2221 (outside the USA), or email our service department at [email protected]. 24 Auto*Therm 390, Shortwave Diathermy— Rev.D_07/02/12 7 Specifications Input: 100–240 VAC, 50-60Hz ETL and C-ETL Listed: Model ME 390 (9801427) Fuse For continuous protection replace fuse with the same type and rating. 6.3A, 250V, GDC/S506 5 x 20 mm, time delay 2 x T6.3 , AL250V Weight: Unit Cart 15 lbs. 45 lbs. Dimensions: Unit Cart 7 in (H) x 14 in (W) x 16.5 in (D) 30.25 in (H) x 19 in (W) x 19 in (D) Frequency: 27.12 MHz HF output: Continuous mode Pulsed Mode 100 W Average Power 200 W Peak Power Pulse frequency: 10 Hz, 20Hz, 50Hz, 100Hz, 400Hz Pulse duration range: 65 µs, 100 µs, 200 µs, 300 µs and 400 µs Treatment time: 1–30 minutes Operating Temperature: +50º F to +104º F Humidity: Operating, 30% to 75% Relative Humidity at 104ºF Non-operating, 5 to 95% Relative Humidity, Non-condensing Storage / Shipping Temperature: -40º F to 167º F Storage Humidity: Storage, 30% to 90% Relative Humidity at 104ºF, Non-condensing Storage Pressure: 700-900 mB Environmental Disposal: The device contains lead in the form of solder used to produce electrical contact between components. To avoid adverse environmental impact utilize a disposal facility that performs complete incineration of the device at a temperature in excess of 1000º C. The shipping materials are fabricated of cardboard and may be disposed of with other paper products. Standard Accessories: 2—12 x 18 cm soft-rubber plate applicators with flexible cables 6 felt spacers 2 cloth covers 2—48 inch elastic, Velcro® receptive straps Optional Accessories: 1—Instrument cart 1 four-joint folding arm 1—14 cm diameter coil applicator 1 special field coil cable 25 Mettler Electronics Corp.— Rev.D_07/02/12 26 Auto*Therm 390, Shortwave Diathermy— Rev.D_07/02/12 8 Accessories 8.1 Ordering Information: Therapy products and accessories are available from Mettler Electronics authorized Distributors. For information regarding either Mettler products or a distributor near you, please call toll free, (800) 854– 9305 or phone (714) 533–2221 in areas outside the continental United States. Ask for Customer Service. Mettler Electronics is open from 7 AM until 5 PM Pacific Time for your convenience. The email address for Customer Service is [email protected]. 8.2 Part # 2009 3963 3965 3967 3980 3981 3982 3983 3984 7293 96 Auto*Therm 390 Accessories Description 4 each, 48 inch Velcro receptive straps 12 x 18 cm soft-rubber plate applicator complete with flexible cable 14 x 20 cm felt spacer for soft-rubber plate applicators 18 x 26 cm cloth cover for soft-rubber plate applicators 14 cm diameter coil applicator, without cable Special coaxial cable for coil applicator 3980 Four-joint arm Lanyard for Patient Safety Switch Strap for securing 14 cm coil applicator to the patient Detachable hospital grade line cord Cart for use with arm and coil applicator 27 Mettler Electronics Corp.— Rev.D_07/02/12 28