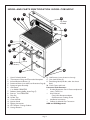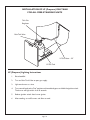
1
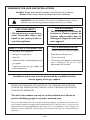
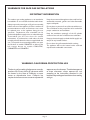
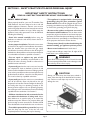
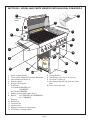
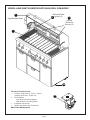
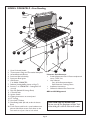
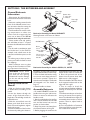
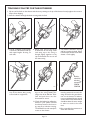
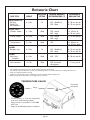
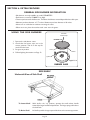
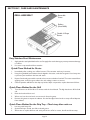
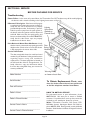
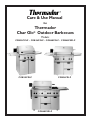
Care & Use Manual
for
Thermador
Char Glo® Outdoor Barbecues
Models:
CGB30CZLP • CGB36FZLP • CGB48FZLP • CGB48FSZLP
CGB30CZLP
CGB36FZLP
CGB48FSZLP
A Special Message to Our Customers
Thank you for selecting the Thermador Char Glo® outdoor barbecue. We
recommend that you take time to read this entire booklet before using your
new appliance for the first time.
This booklet contains suggestions we believe will be helpful as well as
directions for using all the features of your appliance. Keep it in a handy place
as it has the answers to questions that may occur when you start to cook.
Let us know if we can help you. When you write please include the model and
serial numbers of your barbecue.
Sincerely,
Thermador Test Kitchen Consumer Scientists
TABLE OF CONTENTS
Warnings for Safe Gas Installations .......................................................... 2
For Your Safety ........................................................................................................... 2
What To Do If You Smell Gas ................................................................................. 2
Important Information ............................................................................................. 3
Warnings for Safe Gas Installations ....................................................................... 3
Warning: California Proposition 65 B .................................................................. 3
Section 1: Safety Practices to Avoid Personal Injury ....................... 4
Important Safety Instructions .......................................................................... 4 – 5
Section 2: Model and Parts Identification ............................................. 6
Model CGB48FSZLP ................................................................................................. 6
Model CGB48FZLP ................................................................................................... 7
Model CGB30CZLP .................................................................................................. 8
Model CGB36FZLP ................................................................................................... 9
Installation of LP (Propane) Gas Tank ................................................................. 10
LP Lighting Instructions .......................................................................................... 10
Section 3: Using Your Char Glo® Barbecue ......................................... 11
Before The First Use ............................................................................................... 11
Lighting Instructions with Automatic Ignition ................................................... 12
Lighting Instructions for Manual Lighting ........................................................... 13
Section 4: The Grill ........................................................................................ 14
General Grill Information ...................................................................................... 14
Using the Grill .......................................................................................................... 14
General Smoker Information ................................................................................ 15
Using the Smoker .................................................................................................... 15
Grilling Chart ................................................................................................. 16 – 17
Section 5: The Rotisserie ............................................................................. 18
Using the Rotisserie ................................................................................................ 18
General Rotisserie Information ........................................................................... 18
Rotisserie Assembly ................................................................................................ 18
Trussing Poultry ....................................................................................................... 19
Rotisserie Chart ...................................................................................................... 20
Thermometer Gauge .............................................................................................. 20
Section 6: Extra Features ........................................................................... 21
General Side Burner Information ........................................................................ 21
Using the Side Burners ....................................................................................... 21
Side Shelf.................................................................................................................... 21
Section 7: Care And Maintenance ........................................................... 22
Quick Clean Method for Grates ......................................................................... 22
Quick Clean Method for the Grill ....................................................................... 22
Quick Clean Method for the Drip Tray .............................................................. 22
Cleaning Chart ......................................................................................................... 23
Section 8: Service ............................................................................................ 24
Before Phoning for Service ................................................................................... 24
Troubleshooting ....................................................................................................... 24
Section 9: Warranty ....................................................................................... 25
Page 1
WARNINGS FOR SAFE GAS INSTALLATIONS
Installer: Please leave these instructions with the unit for the owner.
Owner: Please retain these instructions for future reference.
!
▲
WARNING: If the information in this manual is not followed exactly, a fire or
explosion may result causing property damage, personal injury or death.
AVERTISSEMENT
✓ Ne pas entreposer ni utiliser de
l‘essence ni d’autres vapeurs ou
liquides inflammables dans le
voisinage de l’appareil, ni de tout
autre appareil.
FOR YOUR SAFETY
✓ Do not store or use gasoline or
other flammable vapors and
liquids in the vicinity of this or
any other appliance.
S’IL Y A UNE ODEUR DE GAZ:
WHAT TO DO IF YOU SMELL GAS
•
Shut off gas to the appliance.
•
Coupez l’admission de gaz de l’appariel.
•
Extinguish any open flame.
•
Ènteindre toute flamme nue.
•
Open Lid.
•
Ouvrir le couvercle.
•
If odor continues, immediately phone your
gas supplier.
•
•
If you cannot reach your gas supplier, call
the fire department.
Si l’odeur peraiste, appeler immediatement
votre compagnie de gaz ou votre
departement des incendies.
Installation and service must be performed by a qualified installer,
service agency or the gas supplier.
TESTED IN ACCORDANCE WITH ANSI Z21.58-1998, STANDARD FOR OUTDOOR
COOKING GAS APPLIANCES AND CAN/CGA 1.6-M98, STANDARD FOR OUTDOOR
COOKING GAS APPLIANCES.
This unit is for outdoor use only in a well-ventilated area. Not to be
used in a building, garage or any other enclosed area.
Check your local building codes for the proper method of installation. In the absence of local codes this
unit should be installed in accordance with the National Fuel Gas Code No. Z223.1 Current Issue and
National Electrical Code ANSI/NFPA No. 70 Current Issue or the CAN/CGA - B149.1 Natural Gas
Installation Code or CAN/CGA - B149.2 Propane Gas Installation Code and C22.1 Canadian Electrical
Code Part 1.
Page 2
WARNINGS FOR SAFE GAS INSTALLATIONS
IMPORTANT INFORMATION
This outdoor gas cooking appliance is not intended to
be installed in or on recreational vehicles and/or boats.
Always inspect the natural gas or LP gas hose assembly
before each use of the appliance. If there is evidence of
excessive abrasion or wear, or if the hose is cut, it must
be replaced prior to the appliance being put into
operation. Replacement hose assemblies can be
purchased at barbecue supply stores, or ordered through
Thermador® (see the rear cover for contact
information). If purchased at a retail outlet, the hose
assembly must be identical to the one supplied with the
unit. To inspect the hose assembly inside the unit, open
the left door on model CGB30CZLP or slide out the
left storage drawer on models CGB36FZLP,
CGB48FSZLP and CGB48FZLP.
Keep the area around the appliance clear and free from
combustible materials, gasoline and other flammable
vapors and liquids.
Do not place any items in front of the unit while in use.
This could obstruct the proper flow of air needed for
proper combustion and ventilation.
Keep the ventilation opening(s) of the LP cylinder
enclosure free and clear of obstructions and debris.
Keep any electrical supply cord and the fuel supply hose
away from any heated surfaces.
Do not leave the grill unattended while cooking.
The appliance shall not be located under overhead
unprotected combustible construction.
WARNING: CALIFORNIA PROPOSITION 65 B
The burning of gas cooking fuel generates some byproducts that are on the list of substances which
are known by the State of California to cause
cancer or reproductive harm. California law
requires businesses to warn customers of potential
Page 3
exposure to such substances. To minimize exposure
to these substances, always operate this unit
according to the instructions contained in this
booklet and provide good ventilation when cooking
with gas.
SECTION 1: SAFETY PRACTICES TO AVOID PERSONAL INJURY
IMPORTANT SAFETY INSTRUCTIONS
READ ALL INSTRUCTIONS BEFORE USING YOUR BARBECUE
SAFETY PRECAUTIONS
When properly cared for, your new Thermador Char
Glo® barbecue has been designed to be a safe and
reliable appliance. However, extreme care must be
used as the grill produces intense heat and can increase
the potential for accidents or injury. When using this
appliance, basic safety precautions must be followed,
including the following:
• Read this manual carefully before using the
barbecue to reduce the risk of fire, electric shock, or
injury to persons.
• Insure proper installation. Follow the instructions
in Sections 3 through 5 in the Installation Instructions.
Have the installer show you where the gas supply
shutoff valve is located, and how to shut off the gas to
the barbecue. Always adhere to the minimum clearances
to combustible materials as specified in Section 3.
• This appliance is equipped with a three-prong
(grounding) plug for your protection against
shock hazard and should be plugged directly into a
properly grounded three-prong receptacle. Do not cut
or remove the grounding prong from this plug.
• Be aware that spiders and insects can nest in
the burners of this barbecue. This can obstruct the
proper flow of gas into the burner and cause improper
operation, fire hazard and potential damage to the unit.
Inspect the burners periodically, or immediately if any
of the symptoms denoted in Section 8 exist.
• The top cover (hood) is to be closed during the
outdoor cooking gas appliance preheat period.
• Never move barbecue with hood raised.
• Keep hands and fingers away from all edges of the
hood when it is in raised position.
• Do not repair or replace any part of this
appliance unless specifically recommended in this
manual. All other servicing should be referred to a
qualified service technician.
• If you smell gas when the unit is not in use, have the
unit checked for leaks as defined in Section 4 and
Section 5 of the Installation Instructions. Finding a gas leak
is not a do-it-yourself procedure as some leaks can only
be found with the burner control in the ON position.
This must be done by a qualified technician.
• If you smell gas when the unit is in use, immediately
shut off all controls. Open the lid and let the gas
dissipate for at least five minutes. Relight the burner(s)
and verify that they are operating properly. If the
burner(s) fail to relight or are not operating properly,
shut of the gas to the unit and have the unit checked by
a qualified service technician. See Section 9.
• Children should not be left unattended in the
area where the barbecue is being used. Never
allow children to sit, stand or play on or around the
barbecue at any time. When in use, portions of the grill
get hot enough to cause severe burns. Children should
never be allowed to crawl inside the cart or enclosure.
• To avoid the potential for a grease fire, frequently
clean the drip tray. Be sure to let the unit cool
completely before removing the tray for cleaning.
Page 4
! WARNING
▲
Never block vent opening at rear of hood. Use with
the vent opening blocked will result in damage to the
unit and may cause a fire or injury.
! CAUTION
▲
Always use wood chips that have been soaked in
water. Place the chips in the back half of the smoker
tray. Failure to soak chips may result in a fire and
damage the unit.
Wood Chip
Smoker
Tray
• LP tank supply system must be arranged for
vapor withdrawal.
FOR YOUR SAFETY
• LP tank used must include a collar to protect the
tank valve.
• The gas supply must be turned off at the
LP-gas supply tank when this outdoor cooking gas appliance is not in use.
FOR YOUR SAFETY
AVERTISSEMENT
• L’alimentation du gaz doit étre fennée a
la bouteille de gaz de pétrole liquéfié,
lorsque cet appareil de cuisson extérieur
n’ est pas utilisé.
An LP tank not connected for use shall not
be stored in the vicinity of this or any other
appliance.
LP TANK REQUIREMENTS
All free-standing units are provided with an LP tank
from the factory. All other units can be converted for
use with an LP tank which can be purchased locally at a
barbecue supply store or other retail outlet. The
maximum tank capacity for use with
Thermador® Char Glo® barbecues is twenty
pounds (five gallons). The tank must be constructed
and marked in accordance with the specifications for
LP-gas tanks of the U.S. Department of Transportation
(DOT) or the National Standard of Canada, CAN/CSAB339, tank, Spheres and Tubes for the Transportation
of Dangerous Goods. To minimize the potential for fire
or an explosion, the following precautions should be
observed when using, filling or storing an LP tank:
• Never use a dented or rusty LP tank. If there is
any question as to the soundness of the tank, have it
checked by your LP supplier.
• Never use a tank with a damaged or defective
shut off valve.
• Always close the tank shut off valve after use.
Une bouteille de propane qui n’est pas
raccordée en vue de son utilisation, ne doit
pas etre entreposée dans le voisinage de cet
appareil ou de tout autre appareil.
AVERTISSEMENT
• The LP tank must be disconnected and removed
from the appliance if the appliance is to be stored
indoors.
• Always check for leaks after every tank change.
See Section 5 of Installation Instructions.
• Do not overfill the LP tank. Never fill the LP tank
beyond eighty percent (80%) of its capacity. Overfilling
will cause the pressure relief valve on the tank to vent
excess gas vapor. This vapor is combustible and can
ignite, causing a fire.
• When transporting an LP tank, insure it is in an
upright position and away from any sources of high heat.
• Do not store additional LP tanks inside the cart
of the unit. Tanks must be stored outdoors in a wellventilated area out of direct sunlight and/or sources of
high heat, and out of the reach of children. Disconnected
cylinders must have threaded valve plugs tightly installed
and must not be stored in a building, garage or any other
enclosed area.
Page 5
FOR YOUR SAFETY
For Outdoor Use Only. If stored indoors,
detach and leave tank outdoors.
AVERTISSEMENT
Pour utlilisation a la l’extérieur seulement.
Si l’appareil est entreposé à l’intérieur,
enlever les bouteilles et les laisser a
l’extérieur.
CAUTION
Simultaneous operation of rotisserie
burners, smoker burner and grill burners on
the HI setting is not recommended.
Excessive temperatures could result.
SECTION 2: MODEL AND PARTS IDENTIFICATION MODEL CGB48FSZLP
2
16
Front of
hood
5
1
3
17
4
9
11
6
10
8
15
13
19
14
20
1.
2.
3.
4.
5.
6.
7.
8.
9.
10.
11.
12.
13.
14.
12
Hood / Lid with Handle
Thermometer Gauge and Thermador Nameplate
Infrared Rotisserie Burner (1)
Rotisserie Motor
Rotisserie Glow Igniter
Grill Grates:
6 on Model CGB36FZLP and
CGB48FSZLP
8 on Model CGB48FZLP
Radiants (heating baffles shown Page 7)
Burners: 3 on CGB36FZLP and CGB48FSZLP
4 on CGB48FZLP
Drip Pan
Smoker Tray
Control Knobs
Ignition Switch
Lighting Instructions on control panel
LP Container / Storage Cabinet
Page 6
15.
16.
17.
19.
Storage Drawers
Side Burners (cover shown in close up)
Sure-Lock™ shelves (2)
Data Rating Label (left side, under the chassis
floor)
20. Front Caster with Lock.
MODEL AND PARTS IDENTIFICATION MODEL CGB48FZLP
Rotisserie Glow
5 Igniters (2)
1
Ergo Balanced Hood
3
Infrared
Rotisserie
Burners (2)
7
20
Literature Pack Contents:
✓ Product Registration Card – Please
complete and return. Thank You.
✓ User's Manual:
Care & Use Recommendations
Grill /Rotisserie Cooking Charts
✓ Installation Instructions
✓ Orifices for Natural Gas Conversion
AGA and CGA Approved
20
Page 7
MODEL CGB30CZLP – Free Standing
2
Front of
hood
5
1
17
3
4
12
11
9
6
8
7
13
19
1.
2.
3.
4.
5.
6.
7.
8.
9.
11.
12.
13.
14.
17.
19.
20.
Hood / Lid with Handle
Thermometer Gauge and Thermador Nameplate
Infrared Rotisserie Burner
Rotisserie Motor Assembly
Rotisserie Glow Igniter
Grill Grates:
5 on Model CGB30CZLP
Radiants (heating baffles shown on Page 7)
Burners: 2 on CGB30CZLP – Packaged for LP
use only
Drip Pan (Behind LP Storage Door)
Control Knobs
Ignition Switch
Lighting Instructions on control panel
LP Storage
Sure-Lock™ Shelves
Data Rating Label (left side, under the chassis
floor)
Front Casters with Locks - move barbecue into
place and lock front casters. Push down on the
lever with toe of your shoe to lock wheel.
20
14
Literature Pack Contents:
✓ Product Registration Card – Please complete and
return. Thank You.
✓ User's Manual:
Care & Use Recommendations
Grill /Rotisserie Cooking Charts
✓ Installation Instructions
✓ Orifices for Natural Gas Conversion
AGA and CGA Approved
CAUTION FOR LP HOOK-UPS:
Do not turn off Gas Regulator or Main Tank
Valve while grill is still hot. Wait until it cools.
Page 8
MODEL AND PARTS IDENTIFICATION MODEL CGB36FZLP
4
6
2
8
7
On front
of hood
1
3
5
11
13
9
10
12
14
19
(inside drawer)
20
15
1.
2.
3.
4.
5.
6.
7.
8.
9.
10.
11.
12.
13.
14.
15.
Hood / Lid with Handle
Thermometer Gauge and Thermador Nameplate
Infrared Rotisserie Burner (1)
Rotisserie Motor (not visible, see illustration, Page 8)
Rotisserie Igniter Assembly
Grill Grates:
6 on Model CGB36FZLP
Radiants (heating baffles shown Page 7)
Burners: 3 on CGB36FZLP
Drip Pan
Smoker Tray
Control Knobs
Ignition Switch
Lighting Instructions
LP Container / Storage Cabinet
Storage Drawers
16. Side Burners (cover shown in close up)
17. Sure-Lock Shelves (2)
19. Data Rating Label (left side, under the chassis
floor)
20. Front Caster with Lock.
Literature Pack Contents:
✓ Product Registration Card – Please complete and
return. Thank You.
✓ User's Manual:
Care & Use Recommendations
Grill /Rotisserie Cooking Charts
✓ Installation Instructions
✓ Orifices for Natural Gas Conversion
AGA and CGA Approved
Page 9
INSTALLATION OF LP (Propane) GAS TANK
FOR ALL FREE-STANDING UNITS
Tank Gas
Regulator
Main Tank Valve
LP Gas Hose – 24"
LP Gas Tank
LP (Propane) Lighting Instructions
1.
Raise hood/lid.
2.
Turn on Main Tank Valve to open gas supply.
3.
Light one burner at a time.
4.
Turn control knob to the "Lite" position and immediately press and hold the ignition switch.
The burner will light within 4 to 10 seconds.
5.
Release ignition switch after burner ignites.
6.
After cooking, turn off burners and allow to cool.
Page 10
SECTION 3: USING YOUR CHAR GLO® BARBECUE
WARNING
Open hood/lid before attempting to light the appliance. Failure to
open the hood could allow gas to accumulate which could cause an
explosion.
Before the First Use
If you smell gas, do not attempt to
light any burners.
1. Make sure that all control knobs are turned to
the OFF position.
1. Record model and serial number of your barbecue
for future contacts with Thermador® or an
authorized servicer (Located on left-side LP
storage drawer).
2. Open the hood to allow any accumulated gas to
dissipate and wait five minutes before trying to
light the unit.
2. Burn off residual manufacturing oils. Follow Main
Burner Lighting Instructions:
3. If the smell of gas is still present, turn off the gas
supply to the unit at the manual shut off valve.
✓ Turn all burners on HI setting for 15 - 20
minutes with hood/lid down.
4. Check the unit for leaks by following the
instructions in Section 5 in the Installation
Instructions or call your authorized servicer or
the gas company.
✓ Cool.
3. Prepare for use.
✓ Optional step: Line drip tray with heavy-duty
aluminum foil and a thin layer of sand or bird
gravel.
✓ Protect the finish with a stainless steel cleaner
or protective polish. See care suggestions
Page 23.
Page 11
SECTION 3: USING YOUR CHAR GLO® BARBECUE
LIGHTING INSTRUCTIONS WITH ELECTRONIC IGNITION
– Read Before Lighting –
Main and Smoker Burners:
Infrared Rotisserie Burner:
1. Raise hood/ lid.
1. Raise hood / lid.
2. Light only one burner at a time.
2. IMPORTANT NOTE: Make sure the control
knob is set to the “LITE” position when lighting
the infrared burner. Confirm that the burner
lights within 30 - 45 seconds. The flame will be
blue initially.
3. Always turn control knob to the “Lite” position and
immediately press and hold the ignition switch. The
burner will light within 4 -10 seconds.
4. Release ignition switch after burner ignites. Look
for the flame to check that it is lit. For the smoker
burner, pull drawer open to see the flame.
5. Repeat procedures until desired number of burners
are lit.
6. Adjust control knobs to the suggested preheat
flame setting. Refer to the Grill Cooking Chart
Pages 16 and 17.
3. Allow the burner to operate on "HI" until it
begins to glow orange/red (typically 2-3 minutes)
before adjusting the control knob to the desired
flame setting.
3. Adjust control knob to the suggested flame
setting. Refer to the Rotisserie Cooking Chart
Page 20.
Side Burner/s:
1. Remove stainless steel cover; set aside.
2. Turn control knob to the “Lite” and immediately
press ignition switch. The burner will light
within 4 -10 seconds.
3. Adjust control knob to the desired flame setting.
Page 12
SECTION 3: USING YOUR CHAR GLO® BARBECUE
MANUAL LIGHTING INSTRUCTIONS**
– Read Before Lighting –
Follow these steps to manually light the Main Burners:
1. Turn off all the burners.
2. Wait 5 minutes to allow any accumulated gas to dissipate.
Middle section
of radiant
Access Hole for Manual Lighting
Follow these steps to manually light the
Smoker:
Use a long stem match to manually light:
3. Remove the grill grates.
1. Turn off all the burners.
4. Find the ports on top of the burner by looking
through the opening at the end of the radiant.
Keep your hands and face as far away
from the burner as possible.
2. Wait 5 minutes to allow any accumulated gas
to dissipate.
3. Remove the smoker tray.
4. Find the ports on top of the smoker. Keep
your hands and face as far away from the
burner as possible.
5. Place the lighted long-stem match through
the hole in the radiant (see illustration above).
This position is near the burner ports.
5. Place the lighted match through the opening
for the smoker tray and next to the burner
ports.
6. Turn the knob to the LITE position. The
burner will light within 4 to 10 seconds.
6. Turn the knob to the LITE position. The
burner will light within 4 to 10 seconds.
** NOTE: The infrared rotisserie burner cannot be lit manually.
Page 13
SECTION 4: THE GRILL
GENERAL GRILL INFORMATION
•
•
•
•
•
•
•
•
•
•
Thaw food items before grilling.
Preheating provides the high heat needed to brown and seal in juices.
After preheating, reduce the flame to setting listed on Grilling Chart.
The flame setting positions on the knobs are infinite.
The degree of doneness is influenced by the type of meat, cut of meat (i.e. size, shape and
thickness), heat setting selected, and length of time on the grill.
Shorten the preheat time when grilling high-fat cuts of meat or poultry, such as chicken thighs.
This will help reduce flare-ups.
Lightly oil grill when cooking low-fat cuts of meat, fish or poultry, such as lean hamburger
patties, shrimp or skinless chicken breasts.
For best results food should be turned only once.
Avoid puncturing or cutting meat to test doneness. This allows juices to escape.
Select the “Heating Method.”
Place food
over center
burner
Left burner ON
Center
burner OFF
Right burner ON
Indirect Heating Method – Model CDB36FZLP
◆
•
Direct Heat means that the food is cooked directly over one of the heated burners.
1. Hood can be up or down.
2. Hood position affects total cooking time.
◆ Indirect Heat means the food is placed to either side of the heated area, as on the
CGB30 (30" wide) model. On 36" or 48" width models, the food is placed in the middle
and one or both outer grill burners are turned on.
•
For best results, turn on at least two burners even when cooking over just one.
Cook with the hood down. This will speed up the cooking time.
•
Do not select Indirect Heat when it is windy.
When using a high flame, add barbecue sauce to food 10 minutes before removing from grill.
CAUTION: Never attempt to move barbecue with hood raised.
USING THE GRILL
1. Refer to the Grilling Chart, Pages 16 and 17, to select the heating method: Direct or Indirect.
2. Follow directions for lighting the burner/s on Page 13.
3. Preheat a minimum of two adjacent burners about 10 minutes with the hood down.
4. After preheating with indirect heat, turn off burner that is under the food.
4. Estimate the grilling time according to the suggestion on the Grilling Chart.
5. For CGB30 models using a propane gas tank, close the valve on the tank after grill cools.
Note: If all grill burners are in use, a five gallon LP tank can be used for 3-1/2 hours of cooking.
Page 14
GENERAL SMOKER INFORMATION
•
The Smoker is used with the hood down and in combination with the grill or rotisserie.
WARNING: Never block vent opening at rear of hood. Use with the vent
opening blocked will result in damage to the unit and may cause a fire or injury.
•
•
•
•
•
•
The smoker is used to enhance flavors.
The smoker tray is designed for small size wood chips.
The type of wood chips (mesquite, hickory, etc.) will determine the smoke flavor.
The amount of chips, flame setting and length of cooking time determine the degree of smoke
flavor.
Always soak wood chips in water prior to use in the smoker tray.
Additional chips can be added every 15 minutes to the back of the tray during cooking to
maintain continuous smoke.
! CAUTION
▲
Always use wood chips that have
been soaked in water. Place the
chips in the back half of the
smoker tray. Failure to soak chips
may result in a fire and damage the
unit.
Wood Chip
Smoker
Tray
USING THE SMOKER
1.
2.
3.
4.
5.
6.
7.
8.
9.
Soak wood chips in water as directed on the package. This may take as long as 30 minutes.
Prepare the food for cooking on the grill or rotisserie.
Once chips are soaked, fill back half of tray.
Light smoker burner according to directions on Page 12, then close tray.
Set smoker control to the HI setting.
Light the grill or rotisserie according to the directions on Page 12.
Add a handful of soaked chips every 15-20 minutes.
Do not pull drawer out completely to avoid spilling hot embers. Open about 12 inches
only.
Turn smoker to medium if chips burn away too quickly.
After cooking is complete, let the appliance cool before cleaning. To remove ashes, simply remove
the tray by sliding it forward.
Page 15
Grilling Chart
FOOD ITEM
THICKNESS/ GRILL
WEIGHT
METHOD
BURNER INTERNAL DONENESS
APPROXIMATE
SETTING OR TEMPERATURE (ºF) GRILLING TIME*
BEEF:
Ground Beef Patties
3/4" thick
Direct
Med Hi
No pink color
10 - 15 min. total
4 to 6 lbs
Indirect
Med/0/Med
140° Med Rare
150° Med
15 - 20 min. per lb.
20 - 25 min. per lb.
2" thick
Indirect
Med/0/Med
Medium Rare
25 - 35 min. total
Direct
Med Hi
135° Rare
150° Medium
8 - 12 min. total
Roasts:
Rib Eye, Sirloin
Tri Tip
Steaks:
Porterhouse, Rib,
T-Bone, Top Loin
1" thick
Porterhouse, Rib,
T-Bone Top Loin
1-1/2" thick
Direct
Med Hi
135° Rare
150° Medium
14 - 18 min. total
Top Round or
London Broil
1-1/2" to 2"
thick
Direct
Med
135° Rare
150° Medium
14 - 18 min. total
18 - 22 min. total
3/4" to 1" thick
Direct
Med
140° Med Rare
150° Medium
10 - 15 min. total
15 - 20 min. total
Chops
1-1/4" - 1-1/2"
Indirect
Med/0/Med
160° Well Done
35 - 40 min. total
Ribs
2 1/2 to 4 Ibs.
Indirect
Med/0/Med
Well Done
1 to 1-1/2 hours total
Roasts, boneless
Top Loin - Single
2 to 4 lbs.
Direct
Med
160° Well Done
30 min. total
Roasts, boneless
Double Loin (tied)
3 to 5 lbs .
Indirect
Med/0/Med
160° Well Done
2 – 3 hours total
1" thick
Direct
Med
165º Well Done
16 - 18 min. total
Flank
PORK:
Ham Steak
USING THE CHART:
•
•
* •
•
Knobs have HIGH, MEDIUM and LOW setting for flame adjustment.
Heat settings indicated above are approximate.
Grilling time based on heating two adjacent burners with food placed on grate between
burners (Direct).
Timings are affected by weather conditions.
Page 16
Grilling Chart
THICKNESS/ GRILL
WEIGHT
METHOD
BURNER INTERNAL DONENESS
SETTING OR TEMPERATURE (ºF)
pounded to 3/4
inch thick
Direct
Medium
Juices run clear
8 - 12 min. total
Pieces
2 - 3 lbs.
Direct
Med Low
170° - breast
180° - thigh
25 - 45 min. total
Halves
1 1/2 - 2 Ibs.
each half
Direct
Med Low
170° - breast
180° - thigh
35 - 60 min. total
Whole
2 - 3 pounds
3 - 5 pounds
Indirect
Med /0/ Med
170° - breast
180° - thigh
50 min. - 1-1/4 hrs. total
1 - 1-1/2 hrs. total
170° - breast
180° - thigh
Juices run clear
35 - 50 min. total
45 - 60 min. Total
FOOD ITEM
APPROXIMATE
GRILLING TIME
CHICKEN:
Breasts, boneless
CORNISH GAME
HENS:
Halved
Whole
Direct
Indirect
Medium
Med/0/Med
10 - 13 pounds
Indirect
Med/0/Med
170° - breast
180° - thigh
11 - 13 minutes
per lb.
Breast, half
2 - 3 pounds
Indirect
Med/0/Med
170° - breast
18 - 22 minutes
Breast, whole
5 - 8 pounds
Indirect
Med/0/Med
170° - breast
16 - 19 minutes
per lb.
1" thick
Direct
Med
145° - Med Rare
160° - Medium
10 - 14 min. total
14 - 16 min. total
2" thick
Direct
Medium
145° - Med Rare
160° - Medium
13 - 16 min. Total
15 - 19 min. Total
1/2" - 1-1/2"
Direct
Medium
Flakes with a fork.
4 - 6 minutes per
each 1/2" of fish
More than 1 lb.
Direct
Medium
Flakes with a fork.
10 - 15 min. per
inch thick
Scallops
Direct
Med Hi
Opaque
4 - 8 min. with
hood up
Shrimp
Direct
Med Hi
Opaque
4 - 8 min. with
hood up
TURKEY, whole:
LAMB:
Chops
(Loin, Rib, Sirloin)
Chops
(Loin, Rib, Sirloin)
FISH:
Fillets, Steaks,
Chunks
Whole
SHELLFISH:
Page 17
SECTION 5: THE ROTISSERIE AND ASSEMBLY
Heat edge
indicator
General Rotisserie
Information
• Glow igniter for Infrared burner
remains on entire time the rotisserie
is on.
• Rotisserie cooking rotates food in
front of the Infrared burner. It creates an intense heat for searing the
outside and sealing in the juices.
• The Infrared burner reaches cooking temperatures in about one
minute and the orange-red glow
evens out in about 5 min. Do not
preheat when using the rotisserie.
• Select tender meat and poultry
that will allow at least 1" of space
between the Infrared burner and the
grates.
• Can be used in combination with
the Smoker and / or the Grill. For
example, cook a beef roast on the
rotisserie and chicken pieces on the
grill.
• To make a gravy or clean up easier,
place a pan under the food to catch
the drippings.
• Add a barbecue sauce or glaze
during the last 10 minutes of cooking to prevent it from burning.
WARNING: Never block
vent at the rear of the hood.
Use with the vent opening
blocked will result in damage
to the unit and may cause a
fire or injury.
Arrange Food on the
Skewer
1. Slide one fork onto the skewer
as shown above, according to the
model.
2. Insert the skewer through the
center of the food and center it
lengthwise.This will align it with the
Infrared burner.
3. Slide the second fork onto the
skewer; push both forks into the
food. Centered lengthwise, tighten
the thumb screws.
4. Check the balance of the food on
the skewer by rolling the skewer in
Skewer with
center line
indicator
Heat edge
indicator
Rotisserie Assembly for Model CGB48FZ
Showing Position of Grooves on Skewer
On/Off Switch
Motor
Drive Shaft
Motor
Cord
Motor Support
Bracket
Slot to insert
motor support
bracket
Fork
Thumb Screw
Slot that
rests on
support
arm
Handle
Rotisserie Assembly for Models CGB30, 36, 48FSZ
the palms of your hands. Food not
evenly balanced will not cook evenly.
5.Truss the food with kitchen string
to ensure an even shape and secure
the food in position. Tighten the
thumb screws with pliers to flat side
of hexagonal rod. See details on
Page 19.
6. Attach handle to skewer.
Assemble Rotisserie
• On model CGB48FSZ, remove the
handle when using the side burner.
Failure to remove it will cause the
handle to melt.
1. Raise hood and place the steel leg
of the motor between the left side
trim and the burner box, into the
pocket, as shown above.
2. Keep the power cord away from
the heated sections of the grill.
3. Before plugging the cord into the
Page 18
receptacle, be sure that the On / Off
switch on the motor is turned Off.
4. Place the pointed end of the
skewer into the motor drive shaft.
Make sure it is fully engaged.
5. Rest the handle end of the skewer
in the support bracket notch on the
right side of the grill.
6. Turn on motor to check for
smooth rotation. Readjust to balance
rotation, if necessary. Turn off until
Step #7.
7.Turn Rotisserie burner to Lite then
turn on the motor. Do not push ignition.The infrared burner lights automatically when knob is set at Lite
position. Once lit, adjust knob to
heat setting.
8. Close hood. Refer to Rotisserie
Chart page 20. Use meat thermometer to check for doneness.
TRUSSING POULTRY FOR THE ROTISSERIE
I. Slip one of the forks on the skewer with the tines pointing to the tip of the skewer. Loosely tighten the screw to
keep it from slipping.
2. Insert the skewer through the bird securing with the fork
go to frame 80
go to frame 80
3. Cut 24" of kitchen string and lay
it under the bird, breast side up,
with equal lengths of string on
each side.
4. Wrap each end of the string
around each of the wings; catch
each wing tip as the string is
brought tightly together at the
top and knotted. Do not cut off
the extra string.
5. Cut another 20 inches of string
and lay it under the back. Wrap
it around the tail then around the
skewer. Cinch tightly.
Doublesided fork
included
except for
CGB30/
CGBD30
Chic
Chicken Tie-4
6. Pull legs forward; cross them on
top of the skewer; bring string
around and tie a tight knot.
7. Connect the string holding the
legs to the string holding the
wings; then knot. Add the other
fork and push tines into the
drumsticks to secure.
8. Check the balance by rolling the
skewer in your palms. The bird
should not rotate or be loose in
any way. If so, redo the trussing.
The bird will not cook evenly if it
moves on the skewer.
Page 19
9. If two birds are done simultaneously, position them with the
wings and tail in the same direction on the skewer. To balance,
truss one bird with breast up and
second with breast down. Birds
should be about the same weight
in order to cook at the same
time.
10. Use a portable thermometer to
check the doneness.
ke
Chic
Rotisserie Chart
WEIGHT
ROTISSERIE
SETTING
BEEF ROASTS:
Rib Eye
Sirloin Tip
Rib, Boneless
4 - 6 lbs.
Hi
POULTRY**
Chicken, whole
3 - 5 lbs
Turkey, whole
Turkey breast
MEAT ITEM
INTERNAL DONENESS
OR TEMPERATURE (ºF)
APPROXIMATE
GRILLING TIME
145º - Med Rare
150º - Med
15 - 20 min. per lb.
20 - 25 min. per lb.
Med
170º - breast
180º - thigh
1 hr. 10 min. to
1hr. 45 min. total
11-13 lbs.
Med
170º - breast
180º - thigh
11 - 13 min. per lb.
3 - 5 lbs.
Med
170º
1 hr. 20 min. to
1 hr. 45 min. total
LAMB:
Boneless Leg
4 - 5 lbs.
Hi
145º - Med Rare
150º - Med
18 - 22 min. per lb.
22 - 28 min. per lb.
PORK:
Loin roast,
boneless
4 - 6 lbs.
Med
160º - 170º
20 - 30 min. per lb.
4 - 5 lb.
Med
150º or heated
throughout
9 - 11 min. per lb.
Ham, boneless
• Use portable meat thermometer to check internal doneness of the item.
• Turn off the rotisserie burner 5º F. before internal temperature is reached. Continue rotating with the hood
down for 10 minutes before carving.
• Timings are affected by weather conditions such as wind and outside temperature.
** Refer to Page 19 for directions on trussing poultry to skewer.
TEMPERATURE GAUGE
Thermador
Nameplate
Gauge
•
•
•
Use this feature to view the temperature
under the hood/lid during cooking.
Gauge pointer rests between Fº and 1000º
when cool.
Gauge can be affected by weather conditions.
Page 20
SECTION 6: EXTRA FEATURES
GENERAL SIDE BURNER INFORMATION
• Side burners are only available on model CGB48FSZLP.
• Each burner is rated at 15,000 BTU on High.
• Choose a pan base to fit the flame size. The flame should never extend beyond the base of the pan.
• Minimum pan base diameter is 5-1/2 inches. Maximum pan base diameter is 10 inches.
• Never turn on a side burner without removing the cover.
• When not in use, place the stainless steel cover over the grates.
USING THE SIDE BURNERS
Porcelain
Enamel Cap
BURNER CAP
1. Remove the side burner cover.
2. Check that the burner caps are in the
correct position. Tab A on the cap fits
notch B on the base.
3. Put grate in position.
4. Follow Lighting Instructions on Page 12.
Ports
TAB A
Igniter
NOTCH B
BURNER BASE
SIDE SHELF
Underside View of Side Shelf
To Lower Shelf:
To Raise Shelf:
With shelf in the “up” position, squeeze the small release handle
towards the larger handle and push down. The hinge springs will release
the shelf lock.
Lift shelf up until the hinge snaps and locks into the countertop position.
Page 21
SECTION 7: CARE AND MAINTENANCE
GRILL ASSEMBLY
Reversible
Grate
Radiant
(Heat Baffle)
Double U-Shape
Burner
Easy Stainless Steel Maintenance
1.
Apply stainless steel polish before first use. Re-apply after each cleaning to prevent permanent damage
to surface.
2.
Use cover to protect finish from weather.
Quick Clean Method for Grates
1.
2.
3.
4.
Immediately after cooking, turn off the burners. Fill a container with very hot water.
Using a long handled, brass barbecue brush dipped in hot water, scrub the hot grates. Use a heavy mitt
to protect your hand from the heat and steam.
Repeat. Scrub each grate with the wire brush to remove cooked on food soil. The steam created from
applying water to the hot grate softens the soil, making it easier to remove.
Charred particles will fall into the drip tray below. Wipe out particles; replace aluminum foil liner.
Quick Clean Method for the Grill
1.
2.
3.
4.
Turn all burners on HI for 10 to 15 minutes with the hood closed. The high heat burns off the food
soil.
Raise the hood and let it cool.
When cool, use the wire brush to remove ash from the grates.
Remove the grates to expose the radiants. Use the flat edge of wire brush to scrape off soil deposits
from radiants.
Quick Clean Method for the Drip Tray - Check tray after each use
1.
2.
3.
Line tray with heavy foil.
Spread thin layer of sand over foil to absorb grease.
When time to replace foil liner and sand, pull corners of foil to center, bundle and throw away.
Page 22
CLEANING CHART
As a safety measure, do not store cleaners
in the storage drawers in the barbecue.
PART and MATERIAL
SUGGESTED CARE
Exterior Finish Stainless Steel
Stainless Steel Finish Protector: Stainless Steel Magic® and EZ Brite®
The quality of this material resists most stains and pitting, providing
the surface is kept clean and protected. Apply to a clean surface.
Nonabrasive Cleaners: detergent and water, Fantastik®, 409®, vinegar.
Mild abrasive Cleaners: liquid Kleen King®,
Drip Tray –
Stainless Steel
Tip: Keep a thin layer of sand or bird gravel on top of foil liner to absorb
grease.
Cool barbecue. Remove tray and set on a flat surface. Remove foil
liner. Wipe up excess grease with paper towels. Wash with detergent
and hot water or multipurpose cleaner, i.e. 409® or Fantastik®. Rinse
and dry; reline with heavy-duty foil. Replace tray. Clean often to avoid
possibility of a grease fire.
Knobs, Skewer Handle
Plastic
Wash with detergent and warm water; rinse and dry.
Reflectors,
Burner Box –
Stainless Steel
Discoloration of stainless steel on these parts is to be expected,
due to the intense heat from the burners.
Grates/Grill –
Porcelain on steel
Refer to the Quick Clean Method.
Grates may also be scrubbed with an SOS® pad and hot water when
cool.
Double-U™ shape
Grill Burner
Stainless Steel
Cool barbecue. Remove grates, radiant baffles and remove hex nuts at
the rear ends of grill burner. Lift grill burner from the rear and remove
wire igniter. Clean the exterior of the grill burner with a wire brush.
Use a straightened paper clip to clear clogged ports. Shake out any
debris through the air shutter. (Do not use a wooden toothpick to clear
any debris in the clogged ports.)
Page 23
SECTION 8: SERVICE
BEFORE PHONING FOR SERVICE
Troubleshooting
Power Failure - In the event of a power failure, the Thermador Char Glo® barbecue may still be used by lighting
the burners with a match according to the Lighting Instructions on Page 13.
If Burners Fail to Ignite - If the burners fail to ignite
as outlined in the Lighting Instructions on Page 12,
verify that the unit is connected to a properly
grounded duplex outlet. If electricity is present,
look for spark to jump from the spark ignitor to
the burner when the ignition switch is depressed
and held. Make sure that the spark ignitors and
burners are clean and dry. On model CGB48FSZLP,
verify that the side burner caps are properly
installed into the burner bases.
If the Rotisserie Motor Does Not Rotate - Verify
that the motor is connected to a properly grounded
duplex outlet. Check to be sure that the skewer
is fully engaged in the motor drive shaft.
Lighting
Instructions
(Etched on
Control Panel)
Data
Rating
Label
Service Information
The data rating label shows the model and serial
number for your barbecue.. It also gives information
regarding burner rating and installation
requirements.. The data rating label is located on
the left hand side of the LP storage drawer. For
handy reference, copy the information below
from the data rating label. Keep your invoice for
warranty validation.
__________________________________
Model Number
__________________________________
Serial Number
__________________________________
Date of Purchase
__________________________________
Dealer’s Name
__________________________________
Dealer’s Phone Number
__________________________________
Service Center’s Name
__________________________________
Service Center’s Phone Number
Warning Label
on Lower chassis floor
To Obtain Replacement Parts,
order
from the dealer where the unit was purchased
or dial the telephone number listed below.
HOW TO OBTAIN SERVICE
For authorized service or parts information, phone
800/735-4328. We want you to remain a satisfied
customer. If a problem does come up that cannot be
resolved to your satisfaction, please let us know.
Write: Thermador® Customer Call Center, 5551
McFadden Avenue, Huntington Beach CA 92649 or
phone 800/735-4328. Please provide us with the Model
Number, Serial Number and Date of Original Purchase/
Installation.
Page 24
SECTION 9: WARRANTY
Warranty
Full One Year Warranty
Covers one year from the date of installation or date of
occupancy for a new previously unoccupied dwelling.
Save your dated receipt or other evidence of the
installation/occupancy date.
5- Year Limited Warranty
Covers the rotisserie burner system which includes
these parts:
Infrared Burner
Valve
Rotisserie Motor
Skewer (excludes handle)
Skewer fork
Lifetime Limited Warranty
(Stainless steel Double-U™ burners and
stainless steel components against rust
through)
Thermador Will Pay For:
All repair labor and replacement parts found to be
defective due to materials and workmanship during first
year. Extended warranties cover parts only, not incurred
labor. Service must be provided by a Factory Authorized
Service Agency during normal working hours. For a
Service Agency nearest you, please call 800/735-4328.
Thermador Will Not Pay For:
1. Service by an unauthorized agency. Damage or
repairs due to service by an unauthorized agency or
the use of unauthorized parts.
3. Damage caused from accident, alteration, misuse,
abuse, improper installation or installation not in
accordance with local electrical codes or plumbing
codes, or improper storage of the appliance.
4. Repairs due to other than normal home use.
5. Any service visits and labor costs during the limited
warranty.
6. Travel fees and associated charges incurred when
the product is installed in a location with limited or
restricted access, (i.e., airplane flights, ferry charges,
isolated geographic regions).
This warranty applies to appliances used in residential
application; it does not cover their use in commercial
installations.
This warranty is for products purchased and retained
in the 50 states of the U.S.A., the District of Columbia
and Canada. Should the appliance be sold by the original
purchaser during the warranty period, the new owner
continues to be protected until the expiration date of
the original purchaser’s warranty period. The warranty
applies even if you should move.
THERMADOR DOES NOT ASSUME ANY
RESPONSIBILITY FOR INCIDENTAL OR
CONSEQUENTIAL DAMAGES. Some states do not
allow the exclusion or limitation of incidental or
consequential damages, so the above limitation or
exclusion may not apply to you. This warranty gives you
specific legal rights and you may also have other rights
which may vary from state to state or province to
province.
2. Service visits to:
• Teach you how to use the appliance.
• Correct the installation. You are responsible for
providing electrical wiring and other connecting
facilities.
• Reset circuit breakers or replace home fuses.
Page 25
Thermador reserves the right to change specifications or design without notice. Some models are certified for use in Canada.
Thermador is not responsible for products which are transported from the United States for use in Canada. Check with your
local Canadian distributor or dealer. Thermador, 5551 McFadden Avenue, Huntington Beach, CA 92649.
CANADIAN GAS ASSOCIATION
®
For the most up to date critical installation dimensions by fax, use your fax handset
and call 702/833-3600. Use code #8030.
APPROVED
®
5551 McFadden Avenue, Huntington Beach, CA 92649 • 800/735-4328
ECO 16305 • 5040004760 • © 2002 BSH Home Appliances Corp. • Litho U. S. A. 6/02