1
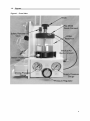
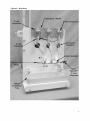
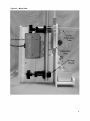
SOM Pump (Sphincter of Oddi Manometric Pump) Operating and Service Manual For Model # PIP-5-2SS 0120 Mui Scientific EC REP 145 Traders Blvd. E., Unit #33-34 Advena Ltd. Mississauga, Ontario, Canada L4Z 3L3 Pure Offices, Plato Close, Warwick, Tel: (905) 890-5525 CV34 6WE, United Kingdom Toll Free: (800) 303-6611 Fax: (905) 890-3523 Email: [email protected] Website: www.muiscientific.com Manual P4-J-101, Rev.4 “Federal law (U.S.) restricts the sale of this devic e to, or by the order of a physic ian.” 1 Sphincter of Oddi Manometric Pump and Air Compressor READ ENTIRE MANUAL BEFORE OPERATING SOM PUMP 2 Table of Contents Section 1 Introduction 1.1 Introduction.............................................................................................................................. 4 1.2 Figures ....................................................................................................................................6 Section 2 Description of Pump 2.1 Physical Description ................................................................................................................9 2.2 General Requirements………………………………………………………………….………….10 Section 3 Initial Installation 3.1 Initial Unpacking .................................................................................................................... 11 3.2 Assembly of SOM Pump ....................................................................................................... 11 Section 4 Preparation Procedures 4.1 Filling the Water Reservoir .................................................................................................... 13 4.2 Connecting Medical Air Outlet / Compressor ........................................................................ 14 4.3 Adjusting Water Reservoir Pressure ..................................................................................... 14 4.4 Filling Pump and Transducers with Water............................................................................. 15 4.5 Functional Check- Pinch Test................................................................................................ 16 4.6 Calibration of Recording System........................................................................................... 16 Section 5 Operation 5.1 Normal Operation Before and During the Study ................................................................... 17 5.2 Functional Troubleshooting with the Pinch Test .................................................................... 19 5.3 Calculation of Pressure Rise Rate ........................................................................................20 5.4 Post Study: Daily Blow-dry Shut-down Procedure ................................................................ 21 Section 6 Service Maintenance 6.1 High-level Chemical Disinfecting Procedure ......................................................................... 22 6.2 Alternate Component Autoclaving / Disinfecting Procedure ................................................. 25 6.3 Care and Cleaning of the SOM Pump .................................................................................. 26 6.4 Inspecting the Compressor’s Drying Cylinder ....................................................................... 26 Section 7 7.1 Parts List Pump Parts List ..................................................................................................................... 28 3 Section 1.1 1 Introduction Introduction The Mui Scientific Sphincter of Oddi Manometric (SOM) pump is part of the motility system used for Sphincter of Oddi manometric studies. It is used in conjunction with a computerized motility system and a SOM catheter or the Toouli Sleeve catheter. The SOM pump uses regulated compressed air to deliver sterilized water through a compact resistor. The pressurized water from each compact resistor passes through a pressure transducer and then proceeds through one lumen’s single opening or sleeve into the Sphincter of Oddi of the patient. The pressure changes in the sphincter or bile duct are transmitted through this fluid path back to the externally mounted transducer on the SOM pump; i.e. the water serves as a pressure-transmission medium. Each lumen of the motility catheter is connected to its own pressure transducer and all the pressure transducers are connected to a computerized recording system. The computer will display the pressure waveform on the monitor and generate analysis report. The pressure profile of the 1 or 2 channel tracing provides useful diagnostic data for evaluation of the normal or abnormal motor function of the Sphincter of Oddi according to pressure amplitude and cycle per minute. Basal pressure of 40 mmHg or higher is considered abnormal. This SOM pump provides a high static hydraulic pressure background at 7 psi to ensure a high pressure rise rate as well as recording accuracy and repeatability. It can record the fast pressure changes of the Sphincter of Oddi, and will ensure a minimum of 120 mmHg per second rise rate. The small bore of the compact resistor also ensures a very low infusion rate of 0.4mL/min. This will minimize the amount of water entering the bile duct. The Toouli SOM sleeve is a reversed sleeve; all the water is discharged into the duodenum and no fluid enter the Sphincter of Oddi or bile duct. During a motility study, the actual flow rate varies due to the varying amount of obstruction caused by muscle contractions. The SOM pump is a constant pressure pump. The flow rate is only a function of fidelity of the rise rate. The pressure rise rate of the pump, measured as pressure change per unit of time i.e. mmHg/sec, varies directly with the water reservoir pressure. A higher water reservoir pressure will produce a higher pressure rise rate but also a higher flow rate. To achieve measurement accuracy, the pressure rise rate of the recording system must exceed the actual physiological rise rate of the organ being studied. The recommended water reservoir pressure for the Sphincter of Oddi is 7 psi, with a flow rate of 0.4mL/min. The pump allows the operator to change the water pressure for different physiological applications in order to optimize the pressure rise rate and flow rate. An infusion rate table is provided (Section 4.3 - Adjusting Water Reservoir Pressure) to enable an estimate of the total volume 4 of water infused into the patient in a given period of time. The lower water reservoir pressure and lower pressure rise rate still permit reliable measurement accuracy of the Sphincter of Oddi, which has a lower physiological contraction rate of less than of 120mmHg/sec. This also minimizes the volume of fluid bring perfused. 5 1.2 Figures Figure 1 – Front View Metal Quick-Connect Valve Medical Air Quiick··Cclnnect Bottom PIIIStiS;;:'=---"" Driving Pres upply Pressulre; Gauge ressure Regulator 6 Figure 2 – Side View ransducer Holder 3-way ~ompact 2-way Resistor I •• .. ON/OFF 2-way Co~~~~==;=;=;=;=;=~~~~~~~~~ Tray 7 Figure 3 – Back View Calibration Tube 8 Section 2.1 2 Description of Pump Physical Description The yellow medical air hose attaches from the medical air wall outlet to the red quick-connect on the right side of the SOM pump. (With the air compressor option: the black hose from the air compressor is connected to the red quick-connection on the right side of the SOM pump). The pressurized air can be regulated with the manually adjustable pressure regulator. The medical air pressurizes the water reservoir, which delivers pressurized water to a manifold, and then connects to a set of compact resistors. The compact resistors connect to the bottom of the transducers, located on the top of the pump, which connects to the SOM catheter. The pressurized air is regulated with a manually adjustable regulator (the black knob on the front bottom of the pump). This sets the final pressure in the water reservoir, i.e. The Driving Pressure gauge (left side) shows the actual pressure in the water reservoir. (Refer to Figures 1 and 2 in Section 1.2).The Supply Pressure gauge (right side) shows the pressure from the compressed air supply from the compressor or wall outlet. The water reservoir is removable, simply resting between the black pegs, which sits atop the control box. The chamber float acts as a barrier to minimize air absorption into the water under pressure. The lid of the water reservoir is removable to facilitate filling and cleaning. The 2-way stopcock on the right side of the metal manifold provides the main on/off control of the water flow to the manifold. The outlet of the manifold is connected to the compact resistors which connect to the bottom of the transducers. The 2-way stopcock at the bottom of the transducers function as individual shut-offs for each of the transducers. The SOM catheter is connected to the top of each transducer (Refer to Figure 2 in Section 1.2). The top 3-way stopcock allows the sterile water to flow through the transducer and into the SOM Catheter or Sleeve. The top 3-way stopcock should have the handle point to the side luer outlet. This ensures the water flow through the transducer to the catheter. Caution: Do not turn the top stopcock handle downward toward the transducers. This will turn off the flow of water and the full pressure of the SOM pump will be applied to the transducer. Damage to the transducer may result. 9 2.2 General Requirements The SOM pump should be positioned at approximately the same height as the patient’s bed. The height of the transducers should be level with the height of the patient’s stomach. This will reduce the hydrostatic pressure artifact on the transducer and on the recording. CAUTION: No electrical equipment should be located beneath the SOM pump. Some water from the SOM catheter is likely to drip down during the procedure. A danger of electric shock could result. Use only sterilized irrigation water in the water chamber or sterilized distilled water. Never use tap water as it contains minerals which can cause blockages in tubng and/or can support bacterial growth. Electrical requirements for Air Compressor Unit (if included): (a) 115 Volt Model: A grounded, hospital grade, 115 Volt, 60 Hz, 15A electrical outlet is required. The pump is rated at 2A. Hospital grade power cord with IEC plug is included. (b) 220 Volt Model: A grounded, hospital grade, 220 Volt, 50 Hz electrical outlet is required. The pump is rated at 2A. Hospital grade power cord with female IEC plug is required. (c) 240 Volt Model: A grounded, hospital grade, 240 Volt, 50 Hz electrical outlet is required. The pump is rated at 2A. Hospital grade power cord with female IEC plug is required. 10 Section 3.1 3 Initial Installation Initial Unpacking Remove any remaining packing material. Place the main pump assembly on a table. Unpack the following: Calibration Rod (with 2 tubes and 2 thumb screws) Water Collection Tray Compact Resistors (Package of 3) Water Reservoir Silicone Reservoir Outflow Main Tube Assembly Yellow Medical Air Hose Disinfectant Flushing and Draining Kit 3.2 Assembly of SOM Pump Attach the accessories in the following order (refer to Figures 1 to 3 in Section 1.2): Place the calibration rod against the left back of the pump and secure the rod to the pump using the 2 thumb screws provided. Slide the calibration tubes onto the upper and lower holders on the rod. Place the water collection tray in the left bottom tray holder. Ensure the 3 transducer holders are labeled accordingly from left to right: Ch.#1/Red/Proximal, Ch.#2/Yellow/Distal, and Ch.#3/Black. In the 2-channel model: Ch.#1/Red/Proximal, and Ch.#2/Yellow/Distal For SOM pumps equipped with PVB transducer holders: Remove the transducer holders by unscrewing the 3 thumb screws on top. Slide a PVB transducer downward into each transducer holder with the blue cord pointing down until it clicks into place. Slide all 3 blue transducer cables into the slot on the pump housing, with the blue connectors hanging out the back. Secure the transducer holders back into place with the 3 thumb screws on top. For SOM pumps equipped with Universal transducer holders: Depending upon type/shape of transducer, install as per the diagram below. 11 Connect transducer cable connectors to corresponding channel cable that lead to your computer motility system. Attach the compact resistor to the bottom of the transducer (female luer) and to the top of the metal manifold (male luer). Place the water reservoir onto the top housing of the SOM pump so the bottom plastic luer sits in between the two pegs on the left. Connect the silicone reservoir outflow main tube assembly from the white plastic luer at the bottom of the water reservoir to the right end of the metal manifold. Connect the black hose from the pressure regulator to the metal quick-connect on the lid of the water reservoir. Push the two metal fittings together until they snap into the latched position. 12 Section 4.1 4 Preparation Procedures Filling the Water Reservoir Ensure that the 2-way stopcock on the right side of the metal manifold is in the OFF position. Ensure the 3-way stopcocks on top of the transducers and the 2-way stopcocks below the transducers are open, as shown in Figure 4 below. Unscrew the knob of the water reservoir and remove the lid and round float by tipping the water reservoir on its side. Ensure that the inside of the water reservoir is clean. Fill three-quarters full with sterilized irrigation water only. Replace the float in the water reservoir to avoid any bubbles being trapped under the float. CAUTION: Never use the pump without the float in the water reservoir. Air bubbles will form at the transducer and will reduce the pressure rise rate and the accuracy of measurement. Replace the lid and screw the knob back on and tighten securely. Ensure the bottom plastic luer located at the bottom of the water reservoir is connected. Ensure the top metal quick-connect located on the lid of the water reservoir is connected by pushing the two metal fittings together until they snap into the latched position. Figure 4 – PVB Transducer and Stopcock Assembly 13 4.2 Connecting Medical Air Outlet / Compressor Connect the yellow medical air hose to the red quick-connect on the right side of the SOM pump. The two metal fittings must be pushed together until they snap into the latched position. With the other end of the yellow medical air hose, connect the nut fitting to the medical air outlet on the wall. (NOTE: At this point, the water reservoir will become pressurized) The hose end is a universal fitting: an adaptor from the BioMed Department may be required to convert it into your hospital standard fitting. Optional: If using an air compressor, attach the black extension tube from the compressor to the red quick-connect on the right side of the SOM pump. Push the two metal fittings together until they snap into the latched position. (NOTE: SOM pump will not be pressurized until air compressor is turned ON) 4.3 Adjusting Water Reservoir Pressure To select water reservoir pressure for optimal recording accuracy of pressure rise rate for your recording site or organ, refer to Table 1 below and adjust the water reservoir pressure accordingly. 7 psi is the recommended pressure for sphincter of oddi studies. CAUTION: Do not set water reservoir pressure higher than 10 psi. Patient will receive excessive water. Table 1: Water Reservoir Pressure Selection vs Infusion Rate/Pressure Rise Rate RECORDING APPROXIMATE RECOMMENDED MINIMUM SITE INFUSION WATER RESERVOIR PRESSURE RISE (ORGAN) RATE PRESSURE RATE WITH COMPACT pound/square inch AT CATHETER RESISTORS (kPa) OPENING ml/min mm Hg/sec UES 0.6 15 (103) 400 Esophagus 0.6 15 (103) 400 Stomach 0.6 15 (103) 400 Small Bowel 0.4 7 (48) 120 Bile Duct 0.4 7 (48) 120 Colon 0.3 5 (35) 60 14 Table 2: 4.4 Pressure Conversion Chart Psi cm of H2O mm of Hg kPa 20 1408 1034 138 15 1056 776 103 7 493 362 48 5 352 259 35 Filling Pump and Transducers with Water Be sure the water collection tray is placed under the transducers to catch any water that may drip out. Ensure the 2-way stopcock to the right of the metal manifold is in the OFF position. Ensure all 3-way stopcocks on top of the transducers and 2-way stopcocks below the transducers are open. (See Figure 4 in Section 4.1) After the water reservoir pressure has been adjusted to 7psi, open the main ON/OFF 2-way stopcock leading into the right side of the metal manifold. Partially unscrew the end plug on the left of the metal manifold to purge any air bubbles that may be trapped at the end of the manifold. CAUTION: Water will spray out as the end plug is unscrewed. Cover the female luer on the manifold with a towel. Retighten end plug. Allow 2-3 minutes for the water pressure to purge any air inside the compact resistors. Ensure the water is flowing out of the top of the transducers and no trapped air bubbles are in the transducers. Attach SOM motility catheter to transducers. CAUTION: If using a Wilson-Cook Lehman SOM Catheter – DO NOT connect the middle Green Aspiration Port to the SOM pump. The Green Aspiration should be left open to air or attached to a syringe for aspiration. If using a Toouli sleeve catheter, the single channel can be attached to any one of the transducers. The catheter can be pre-filled with a large syringe with sterilized water. The pump system is now filled with water and ready for a functional check. Fill the catheter with water and flush out any remaining air bubbles until water drips off the catheter. 15 4.5 Functional Check-Pinch Test It is recommended that this pinch test be performed routinely at the beginning of each motility study. This test confirms that the entire system is functioning properly, including the pump, the transducers, and the recording system, and gives a permanent record of the functional performance of the system. This pinch test is also useful during a study whenever the clinical tracing is abnormally inactive and the performance of the system is in question. Run the recording program as you normally would for a motility study. Set the recording system pressure amplitude as you would for a study and SOM pump on, water dripping out of the catheter Turn the top 3-way stopcock handle pointing downward to the transducer momentarily. Then quickly return to the right hand position. The pressure tracing should respond immediately with a virtually vertical rise to the full-scale pressure amplitude as set. This response confirms that the entire system is functioning properly, with no leakage or major trapped air bubbles in the system. Caution: Prolonged pressure may cause damage to the transducers To check performance of catheter, use finger to pinch end of sleeve (or opening) Refer to Section 5.2 – Functional Troubleshooting for detailed explanations of unsatisfactory pressure tracings, and to Section 5.3 for Calculation of Pressure Rise Rate. Repeat this test for all channels. The pump is now in standby mode ready for calibration. 4.6 Functional Check- Pinch Test Refer to the manufacturer’s instructions for your computerized data processing system. Follow the recommended calibration procedure. Use of Hydrostatic Calibration System (0-68 cm H2O) With pump ON and water dripping, slide catheter into the bottom calibration tube. The bottom calibration tube is fixed to the same height as the transducers. This position simulates 0 cmH2O or 0 mmHg pressure. Select low calibration on computer or adjust baseline on recorder to 0 cmH2O or 0 mmHg position for each channel. Slide catheter into the top calibration tube. This position generates 68 cmH2O or 50 mmHg pressure. Select high calibration on computer, or adjust the recorder to 68 cmH20 or 50 mmHg for each channel. The pump is now calibrated and in stand-by mode ready for a study. 16 Section 5.1 5 Operation Normal Operation Before and During the Study Check that there is sufficient water in the reservoir to complete the study. Refill the water reservoir if necessary. The Driving Pressure gauge should be set at 7 psi. The SOM catheter should be firmly attached to the stopcocks on the top of the transducers and all air bubbles should have been flushed out. Calibrate the recording system if necessary (Refer to Section 4.6 – Calibration of Recording System, and see instructions from the manufacturer of the motility computer system). Make sure that all the tracings are at 0 pressure (baseline position). Run the computer as for a motility study. Set the baseline tracing to 0. This establishes the true hydrostatic baseline of 0 pressure. With the pump ON, all tracings should show an increase from the baseline of 2-10 mm Hg. This is known as the infusion artifact. It is caused by friction and restriction of the water flow passing through the catheter. If an abnormally high infusion artifact occurs, blockage may have occurred within the motility catheter. (Refer to Figure 5 below). Set the infusion baseline tracing to 0 again. This is the infusion baseline, the baseline pressure with the infusion artifact removed. This is the baseline to be used for the study. Pinch Test: Pinch the motility catheter immediately above the transducer and observe a sharp rise in the tracing. Repeat the pinch test to all channels. If the tracing does not rise sharply full-scale (refer to Figure 6 below), the SOM pump and/or computerized recording system are not functioning properly. Troubleshoot the problem before proceeding with the study (Section 5.2 – Functional Troubleshooting with the Pinch Test). If the tracings are acceptable, the SOM catheter can be placed into the holding tube directly below the metal manifold until the patient is ready for insertion, or it can be immediately inserted into the patient through the biopsy channel of the endoscope. You can repeat the pinch test again, or start the motility procedure according to your protocol. 17 Figure 5 - Infusion Artifact Figure 6 – Pinch Test: Normal and Slow Pressure Rise Rate 18 5.2 Functional Troubleshooting with the Pinch Test When the tracing following the pinch test does not rise sharply to full-scale deflection, the system is not functioning properly. If only one tracing is affected, the problem is most likely to be in the individual compact resistor, the transducer, or the SOM catheter. If all channels are affected, then the problem is probably with the water reservoir, or the recording system. (To ensure measurement accuracy of the physiological contractions, for SOM studies the pressure rise rate should be 120 mmHg/sec or better.) A. No pressure rise in recording – Possible causes: Supply Pressure or Driving Pressure is abnormal: -if the Supply Pressure gauge is zero check the yellow medical air hose to ensure both ends are connected properly. -if the Driving Pressure gauge is less than 7 psi, adjust it to 7 psi. Top quick-connect to water reservoir is disconnected or water reservoir is not pressurized: -make sure that the metal quick-connect on the side of the water reservoir lid is connected properly. Push the connector together hard, until it snaps. Bottom plastic luer to water reservoir is disconnected: -reconnect the bottom plastic luer. Main ON/OFF 2-way stopcock on compact resistor/transducer/SOM catheter is closed: -open stopcock to correct the problem Transducer malfunction: -if any individual channel has a poor or no response rate, then there could be a transducer malfunction. -interchange the transducer of a poor response channel, with one from a channel that is responding properly to confirm malfunction. Recording system malfunction: -if all channels have no response, then the possible cause is a recording system malfunction. - troubleshoot following manufacturer’s instructions B. Slow pressure rise in recording – Possible causes: Air bubbles in fluid path: -carefully inspect for air bubbles in system. If in doubt, flush system thoroughly. Leakage in fluid path: -carefully inspect all luer connections for leakage of water. Tighten all connections; replace any components that leak. Wipe all luer connections dry and wait again. Supply Pressure gauge too low, i.e. 1-2 psi: 19 -if the Driving Pressure is less than 7 psi, turn the pressure regulator control knob clockwise to increase the pressure output from the regulator to the water reservoir. -if the pressure on the Supply Pressure gauge is less than 7 psi, ensure the medical air hose is properly connected and that there is proper air flow through the system. Blocked compact resistor (in channels with slow rise rate): - remove any blocked compact resistors, attach the flush support tool around the silicone luer, and flush them using a 1cc syringe filled with sterilized irrigation water. If any compact resistors are still blocked, replace them. -check that the 3-way stopcocks on top of the transducers are in fully open position -disconnect the catheter from the transducers. Observe water dripping from each transducer. At 7 psi the flow rate should be about 0.4 ml/min. Leaking or blocked catheter: -connect the catheter to the transducer and lay it horizontally on top of the transducers. -the artifact should be similar for all channels. -any channel that has an unusually low infusion artifact is likely to have a leaking lumen or valve connection. Repair or replace leaking component. -any channel that has an unusually high infusion artifact is likely to be blocked in that lumen of the catheter. Remove the catheter, place it in a basin of hot water, and flush the channel with a small syringe and hot water until the channel is cleared. 5.3 Calculation of Pressure Rise Rate The pressure rise rate is defined as the pressure rise rate in mmHg or cmH2O per second. Run the recording system at a high speed such as 15 mm/sec in order to capture a one-second slope. With infusion on, block the opening of the SOM catheter with your finger to create a rise in pressure. For the Toouli sleeve catheter, block the sleeve at the proximal end. Do not hold the sleeve for an excessive length of time. The high pressure from the SOM pump could damage the sleeve. The pressure tracing in the figure rises from 0 mmHg at the beginning of the rise to 410 mmHg at the 1-second mark. The pressure rise rate is therefore (410)/(1)=410 mmHg/sec. To ensure measurement accuracy of the physiological contractions, the pressure rise rate for Sphincter of Oddi studies should be 120 mmHg/sec or better. 20 Figure 7 - Calculation of Pressure Rise Rate 5.4 Post Study: Daily Blow-dry Shut-down Procedure Release all pressure in the pump system by disconnecting and reconnecting the metal quick-connect on the water reservoir lid several times until the pressure in both gauges on the control box (and the gauge on the compressor, if included) drop to zero. Empty all the water in the water reservoir. Reconnect the empty water reservoir and pressurize by reconnecting the metal quick-connect on the water reservoir lid. Open all valves and stopcocks. Flush the whole system with air for 5 minutes until no more water is dripping out of the transducers. Disconnect and reconnect the water reservoir metal quick-connect several times and depressurize the pump system. Remove empty water reservoir. Store dry with lid off. Store pump system dry with all stopcocks and valves open. CAUTION: Do not leave any water in the pump system or water reservoir overnight. Retained water in the pump system may cause the growth of bacteria to unacceptable potable water standards. SERVICE MAINTENANCE According to clinical standards, the water in the water reservoir has to meet the acceptable levels of potable water. The proven method to keep bacterial levels down is to store the pump tubing system dry when not in use. The drying protocol alone can maintain the daily sterilized irrigation water within acceptable potable water standards. 21 Section 6.1 6 Service Maintenance High-level Chemical Disinfecting Procedure The SOM pump is designed specifically to perfuse water into the duodenum only. Therefore the requirement for the water is to meet the potable water standard. If the daily blow dry procedure is maintained and only sterilized water is used, then the potable water standard will be met. Therefore, high level disinfection between patients is not necessary. For good clinical infections control practice, the requirement of high level disinfection of the SOM pump system should be determined by the institution’s own guideline. High-level disinfection once every 1-3 months is typical. CAUTION: Do not use alcohol to clean the water reservoir. Alcohol may cause cracks in the water reservoir material. CAUTION: Do not use any disinfectant or solution in the fluid path of the pump which is incompatible with the following materials: silicone, acetal, acrylic, Buna-N, epoxy adhesive, polycarbonate, high-density polypropylene, polyurethane, TFE, Brass-Nickel, polyvinylchloride. Confirm compatibility of the disinfectant with the disinfectant manufacturer before use. Mui Scientific is not liable for any damage to the pump, or harm to patients or personnel, caused by improper use of a disinfectant or procedure. Clinical evaluations have verified the following disinfectants for use: Cidex OPA Sporox II Korsolex Extra A disinfectant which is compatible with flexible endoscopes will be compatible with the SOM pump. Note: DO NOT autoclave the water reservoir; damage may result to the plastic components. Step 1: Purge system with air (approx 5-10 minutes) (Skip Step 1 when starting with a dry pump) Depressurize system by disconnecting the reconnecting the metal quick-connect on the water reservoir lid several times until the pressure in both gauges on the control box (and the gauge on the compressor, if included) drop to zero. Empty the water reservoir. Reconnect the empty water reservoir and reconnect the top and bottom quick-connect to the water reservoir to pressurize. 22 Purge the whole system with 7 psi air for 5-10 minutes, or until no more water is dripping out of the compact resistors. Step 2: Fill system with disinfectant (approx 50 minutes; includes 30 minutes disinfectant soaking time) Disconnect and reconnect the water reservoir metal quick-connect several times and depressurize the system. Fill water reservoir 1/3 full with disinfectant and swirl within water reservoir to rinse all surface area (including underside of lid) Replace lid and reconnect water reservoir top and bottom plastic quick-connect to pressurize. Perfuse at 7 psi through pump tubing system for 20 minutes, allowing the disinfectant to drip out through the compact resistors into a container. Allow the disinfectant to sit within the system for the additional length of time recommended by the disinfectant manufacturer (30 mins or longer is common for high-level disinfection) Step 3: Purge system with air again Depressurize by disconnecting and reconnecting the water reservoir metal quick-connect several times. Empty water reservoir and rinse with sterilize water Reconnect empty water reservoir and reconnect the metal quick-connect to pressurize Purge system with 7 psi air for 20 minutes or until no more disinfectant is dripping out of the compact resistors and transducer Step 4: Rinse system with sterilized irrigation water (approx 25 minutes) Disconnect and reconnect the water reservoir metal quick-connect several times and depressurize system. Remove water reservoir. Rinse with sterilized irrigation water, Fill water reservoir 1/3 with sterilized irrigation water. Replace lid and reconnect water reservoir top and bottom plastic luer, and to top metal quick-connect to pressurize. Perfuse at 7 psi for 20 minutes to rinse disinfectant. Open all stopcocks to rinse. Step 5: Purge system with air again (for storage or immediate use) Depressurize by disconnecting and reconnecting the water reservoir metal quick-connect several times. Empty water reservoir. Reconnect empty water reservoir to bottom plastic luer, and top metal quick-connect. Purge tubing system with 7 psi air for 20 minutes, or until no more water is dripping out of the compact resistors. 23 Disconnect and reconnect the water reservoir metal quick-connect several times to depressurize. Replace used transducers with new PVB transducers. Reconnect compact resistors to new PVB transducers. For storage: Remove empty water reservoir and store dry with lid off. For immediate use: Fill water reservoir with fresh sterilized irrigation water and continue with start-up procedure. 24 6.2 Alternate Component Autoclaving / Disinfecting Procedure A typical SOM pump chemical disinfecting procedure can take up to one and a half hours, due mainly to the slow fitting and flushing through the compact resistors with disinfectant and water. To shorten the disinfecting procedure time, it is recommended that the hospital purchase the optional Autoclavable Components Kit (Part #P4-S-001), and follow the alternate disinfecting procedures below. The Autoclavable Components Kit consists of 3 compact resistors (Part #P4-H-REC060), 1 stainless steel manifold (Part #P4-C-305), and 1 silicone reservoir outflow main tube assembly (Part #P4-B-601). The advantage of the spare Autoclavable Components Kit is that it will provide uninterrupted usage of the SOM pump while the original set is in the autoclaving process. NOTE: The PVB transducers are single-use and must be replaced after each study. The only component that would still require the chemical disinfection would be the water reservoir. CAUTION: DO NOT autoclave the water reservoir; damage may result to the plastic components. A) Water Reservoir Disinfecting Procedure 1. Remove water reservoir from the pump deck and empty water out. Connect the reservoir draining tube to the bottom of the water reservoir with the 2-way stopcock in the “CLOSED” position. 2. Fill one-third of the water reservoir with Cidex OPA. Close lid and swirl the disinfectant within the water reservoir to rinse all surface areas including the underside of the lid. Open the 2-way stopcock of the reservoir draining tube to fill the reservoir draining tube with Cidex OPA and then close the 2-way stopcock. 3. Allow the disinfectant to remain in the water reservoir according to the disinfectant manufacturer recommended soaking time (30 minutes or longer is common on high-level disinfection). 4. Empty out all the disinfectant from the water reservoir and fill it two third full with sterile irrigation water. Close lid and swirl water in the water reservoir to rinse all surface areas including the underside of the lid. Open the 2-way stopcock of the reservoir draining tube and drain all the water out of the water reservoir. 5. Repeat Step #4 three (3) times. The water reservoir is now high-level disinfected. 25 B) Compact Resistors / Stainless Steel Manifold / Silicone Tubing Autoclaving Procedure 1. Remove compact resistors / stainless steel manifold / silicone reservoir outflow main tube from the SOM pump. Discard the 2-way stopcock and water filter. Make sure all components are dry and free moisture inside by flushing compact resistor with air using a large syringe. 2. Pack these components for autoclaving 3. After autoclaving, attach a new sterile 2-way stopcock and a new water filter to the silicone reservoir outflow main tube. 4. Re-assemble all the components onto the SOM pump. 5. Refill the water reservoir with sterile irrigation water and flush the entire system for five (5) minutes. 6. Now, the system is disinfected and ready to be used. 6.3 l Care and Cleaning of the SOM Pump Use a soft cloth moistened slightly with water and mild soap to wipe down any spots that may accumulate on the outside of the pump. Wipe off any soap residue with sterilized irrigation water. l Rinse out the water reservoir with fresh clean water and wipe out using a soft cloth. l DO NOT USE ALCOHOL. 6.4 Inspecting the Compressor’s Drying Cylinder For SOM pumps using a compressor, inspect the drying cylinder through the port on the back of the air compressor. - If the color of the drying cylinder is orange, the desiccant is in satisfactory condition. - If the color of the entire drying cylinder is dark green, it indicates that the desiccant has absorbed excessive amounts of moisture from the air, and it must be regenerated. (The length of time before the desiccant needs to be regenerated will vary, depending on the operating environment and the frequency of pump use. The desiccant may last several years before regeneration is needed.) To Regenerate Desiccant l Remove the lid of the air compressor housing. l Remove the drying cylinder from the air compressor. 26 l Unscrew the cylinder cap. CAUTION: The cap is spring loaded. l Pour out the granules on a tray and spread evenly, one granule deep. l Heat the granules for 5 hours at 125°C (250°F) in a conventional oven. When all the water has been driven out the granules will be orange again. To ensure maximum effectiveness of desiccant, do not regenerate more than five times. l Cool the desiccant in a tight container before refilling the drying cylinder. l Pre-dry the felt filters at 100°C for 30 minutes before assembly of the drying cylinder. l Reassemble the drying cylinder and connect to the air compressor. Pressurize the pump and check that the cap of the drying cylinder is on tightly, with no leakage. l Reconnect to the SOM pump. 27 Section 7.1 7 Parts List Pump Parts List Replacement Parts List Part Number Description P4-D-222T PVB Transducer P4-H-RECO60 Compact Resistor - 0.60ml/min P4-B-600 Medical Air Hose (9ft.) P4-A-RES Water Reservoir – 500ml with fittings P4-C-551 Open-Flow Male Connect with O-ring P4-C-601 2-way Stopcock P4-H-304 Flushing Connecting Tube – 3 Transducers Reservoir Draining Tube with 2-way Stopcock P4-H-306 Silicone Reservoir Outflow Main Tube Only P4-B-601X 3-Gang Metal Manifold P4-C-305 P4-C-545X Water Filter – 20 microns P4-P-503 C-clamp for IV Pole Air Compressor P4-F-203/204 P4-CONBOX Regulator Control Box P4-H-640 Calibration system (Scale 0-68 cmH2O, or 0-50 mmHg) Water Collection Tray P4-D-400 Autoclaving Components Kit Part Number Description Part Illustration Autoclavable Components Kit P4-S-001 3X Compact Resistors - 0.60ml/min 1X Stainless Steel Manifold 1X Silicone Reservoir Outflow Main Tube Only 28