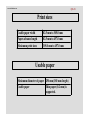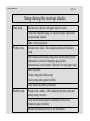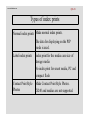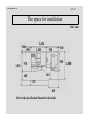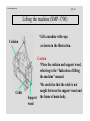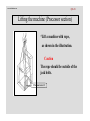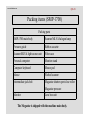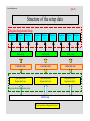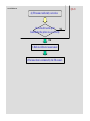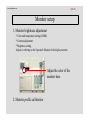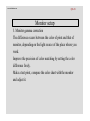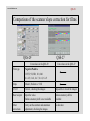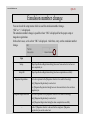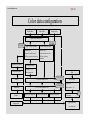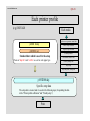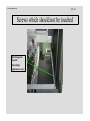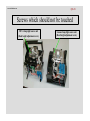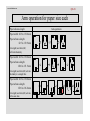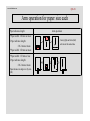
1
QSS-29_
www.minilablaser.com
QSS-29 Training Materials
Published: 2001.04
[Third edition]
Technical Training Department
Technical Support Group
QSS-29
www.minilablaser.com
QSS-29 Training Materials
No part of this manual may be copied or
reproduced without permission
Published
January, 2001 [Draft Limited shipment edition]
February, 2001 [Second edition]
April, 2001 [Third edition]
Published by
Noritsu Koki
Technical Training Department
www.minilablaser.com
Chapter 1
Specifications
www.minilablaser.com
The point of this chapter
Purpose of study
• Study the specifications of the QSS-29.
Processing capacity
Main options
Spec of PC
How to carry out the training
• Explain, using the Training material.
• Refer to the “Specifications” manual for the details.
www.minilablaser.com
QSS-29
Concept
Full digital mini-lab system which outputs from scanning image to
the photographic paper by digital signal.
The QSS-29 is designed for a general-purpose machine which can
process up to 305 mm paper width.
This is the succeeded machine with the QSS-27.
QSS-2901 : 127 x 89 1,500 prints / hour
127 x 89 708 prints / hour Digital camera/media
www.minilablaser.com
QSS-29
Types of QSS-2901
Name of the machine
QSS-2901 Digital
QSS-2901SM Digital
Specification
Standard type
SM type
www.minilablaser.com
QSS-29
Explanation of the QSS-2901 system
The QSS-29 consists of the scanner & MLVA printer and
the processor.
Name of system:SMP-1700 (Scanner & MLVA printer)
PP-1216 (Paper processor)
www.minilablaser.com
QSS-29
What can you do in the QSS-29?
Reflective
FB scanner
Print
Positive films
135 roll/mount
IX240 roll/mount
120
Output
Index prints
B/W films
135
120
Negative films
135 (F/H/P/HD)
IX240 120, 110
Digital camera
PC card
Smart media
Compact flash
Storage media
FD, CD-ROM, CD-R,
CD-R/W, MO, ZIP,
DVD-RAM
Network
correspondence
File sharing
Mail function
Output
Writing the image data
FD, MO
ZIP, CD-R, CD-R/W,
DVD-RAM
ID Prints
Package Prints
Post Cards (Greeting Cards)
Calendars
Multi Prints
Letter Prints
Business Cards
WB Prints
Contact Print Style Photos
Time schedule of
new functions
www.minilablaser.com
QSS-29
Usable media
x = available
Input
Output
FD
x
x
CD-ROM
x
CD-R
x
x
The CD-R/RW drive (option) is necessary.
CD-RW
x
x
The CD-R/RW drive (option) is necessary.
MO
x
x
The MO drive (option) is necessary.
ZIP
x
x
The ZIP drive (option) is necessary.
DVD-RAM
x
x
The DVD-RAM drive (option) is necessary.
Compact flash
x
x
The card reader (option) is necessary.
Smart media
x
x
The card reader (option) is necessary.
PC card
x
x
The card reader (option) is necessary.
Reflective
x
Types of media
Note
Standard equipment
CD-ROM (standard) or CD-R/RW (option) is
necessary.
The flatbed scanner (option) is necessary.
*Explain the spec of each drive, etc. separately.
www.minilablaser.com
QSS-29
Processable Format
Image format
Input
Exif 1.0
JPEG (including Progressive JPEG, CMYK Format)
FlashPix
Bitmap
PSD (including Photo Shop Document, CMYK Format)
PCD (Photo CD)
PCX, DCX (Paint Brush Format)
TGA (Targa)
Output JPEG (except Progressive JPEG, CMYK Format)
FlashPix
Bitmap
www.minilablaser.com
QSS-29
Processable DVD
Processable DVD
DVD-RAM
Capacity
Format
Single side 2.6G TYPE1
Double side 5.2G (Cartridge-type, Impossible to
remove the disk)
TYPE2
(Cartridge-type, Possible to
remove the disk)
Disk-type
(“Play” only)
www.minilablaser.com
QSS-29
Main options
Types of
masks
Film type
Size
Note
135240
AFC
Negative/Positive/Black&
White/(Roll)
Sepia/Black&White
(orange base)
135F, H, P,
HD
IX240
Minimum number of frames:2-frame
120AFC
Negative/Positive/Black&
White/(Roll)
Sepia/Black&White
(orange base)
6x4.5, 6x6,
6x7, 6x8,
6x9
Minimum advance length:43 mm
(6 x 4.5 1 frame)
110AFC
Negative
110
Minimum number of frames:3-frame
135/240M
MC
Positive (mount)
135F, H,
IX240
Length of mount
50 mm x 50 mm
Thickness: 1.0 mm – 3.2 mm
Glass mount is not available.
Show each AFC.
www.minilablaser.com
QSS-29
Options (related to PCs)
Name
DIMM
Description/Explanation
ZIP drive unit
Unit to save/read the image data to a ZIP
This is compatible with the QSS-28.
MO drive unit
Unit to save/read the image data to a MO
This is compatible with the QSS-28.
DVD-RAM drive unit
Unit to save/read the image data to a DVD-RAM
This is compatible with the QSS-28.
CD-R/RW drive unit
Used to save/read the image data to the CD-R/W
This is compatible with the QSS-28.
PC card reader/writer
Flatbed scanner
Unit to save/read the image data of digital camera
*The spec, etc is mentioned separately.
Extended memory unit for 256MB Personal Computer, for the
stable use of the Photoshop. This is compatible with the QSS-28.
Used to read the reflective (e.g. photograph) as image data
(This is compatible with the QSS-28.)
www.minilablaser.com
QSS-29
Package contents of image edition
Name
Card/Calendar Creation
Software
(Package-A)
Description/Explanation
Calendars
Poster card prints
Business Cards
Frame Prints
Letter printing
Card Prints
Multi-Frame Print
Creation Software
(Package-B)
Multi-frame Prints
Album Prints
Package Prints
Contact Print Style Photos
ID Photos
Red Eye Removal
Software
Red eye removal function
www.minilablaser.com
QSS-29
Others
Name
Description/Explanation
Digital ICE
Used to remove scratches, etc. from image in negative or positive
which is scanned by the built-in scanner. (Software and sticker)
CVP, Ribbon cassette
The ribbon cassette is compatible with the QSS-28.
Monitor hood
This is compatible with the QSS-28.
Pricing unit
Used to calculate prices and issue statements automatically
Extension table
Kit to extend the table in the printer section
Negative cleaner
3-type
100V, 120V, 220V-240V specifications
Sorter modification kit (for
82 prints)
Kit for modifying the print sorter unit to that for 82 prints in one order.
Number of orders which can be stocked: 14 (Standard = 17)
This is compatible with the QSS-28.
Storage cabinet
2 AFCs can be stored.
One-touch dark bag
Used when paper is repacked to paper magazine (Frame type) This is
compatible with the QSS-28.
Cabinet
Cabinet for FBS (Flatbed scanner)
www.minilablaser.com
QSS-29
Magazine
Standard magazine
Compatible between Normal and Kodak specification. (Carry out
the unit replacement only as it is already adjusted.)
QL magazine
For QL paper (Carry out the unit replacement only as it is already
adjusted.) The core unit is different from the standard magazine.
Width Regulation Guide Kit (1)
Name
Magazines
Paper width
Width Regulation Guide Kit (1)
(For standard magazine)
Roller guide (1)
Width Regulation Guide (movable length:1 mm)
82.5 to 178 mm
Width Regulation Guide Kit (2)
(For standard magazine)
Roller guide (2)
Width Regulation Guide (movable length:1 mm)
203 to 254 mm
Width Regulation Guide Kit (3)
(For standard magazine)
Roller guide (3)
Width Regulation Guide (movable length:2 mm)
279 to 305 mm
Width Regulation Guide Kit (4)
(For QL magazine)
Roller guide (1)
Width Regulation Guide (movable length:1 mm)
For QL paper only
89 to 165 mm
Width Regulation Guide Kit (5)
(For QL magazine)
Roller guide (2)
Width Regulation Guide (movable length:1 mm)
For QL paper only
203 to 254 mm
www.minilablaser.com
QSS-29
Compatible table of the consumable parts
Scanner + Printer section
Name
QSS-29
Scanner lamp
W407223-01
Air filters (scanner)
A056917-01
MLVA lamp
W407223-01
Air filters (MLVA)
A056917-01
Ribbon cassette
H086035-01
QSS-28
QSS-27
= compatible with the QSS-29
The connector code of scanner lamp is different between the QSS-28/29 and QSS-27.
*For QSS-28/29: White
*For QSS-27:
Black
www.minilablaser.com
QSS-29
Print sizes
Usable paper width
82.5 mm to 305.0 mm
Paper advance length
82.5 mm to 457.0 mm
Maximum print sizes
305.0 mm to 457.0 mm
Usable paper
Maximum diameter of paper 250 mm (180 mm length)
Usable paper
Thin paper (0.2 mm) is
supported.
www.minilablaser.com
QSS-29
Specifications of personal computers
PC spec table
Product name
Specifications
CPU
Pentium III
733MHz
Mother board
CT-6BJM
Memory
PC133
256MB
3.5FDD
TC3MODE PLUS
3 modes
Hard disk
QML-20400LC-A
20GB
CD-ROM drive
CDV-PB40T
40x
Video board
CARD Expert TM64AGP/32 VRAM 32MB
Keyboard (Japanese)
FKB8724-501
Keyboard (English)
FKB8725-401
Mouse
Microsoft PS/2 mouse
OS
Windows 2000 professional
www.minilablaser.com
QSS-29
Spec table of peripherals
Machine type
Maker
MO
MCE3064SS
FUJITSU
Zip
Zip250
Iomega
CD-RW
CDRWSB124BG
PC card
reader
PCD-47B
DVD
LF-D103JD
Types of
media
Data capacity
Interface
640MB
540MB
230MB
128MB
SCSI-2
ZIP
250MB
100MB
IDE
(ATAPI)
I-O DATA
CD-ROM
CD-R
CD-RW
640MB
SCSI-2
Microtek
International
Smart
media
2 to 64MB
SCSI-2
Compact
flash
4 to 128MB
PCMCIA
10 to 85MB
DVDRAM
Single side 2.6GB
Double side 5.2GB
DVDROM
Single side 4.7GB
Panasonic
SCSI-2
www.minilablaser.com
QSS-29
Spec of flatbed scanner (option)
Machine type
Astra3400
Maker
UMAX
Color scanning way
Color CCD (Single Pass)
Maximum area of scanning
216 x 297 mm (8.5 x 11.7-inch)
Optical resolution
600 x 1200 dpi
Maximum resolution
9600 x 9600 dpi
Interface
USB
•AC adapters which are necessary for the flatbed scanner are divided into
8 types depending on the shapes of power supply and plug socket.
When you order the flatbed scanner, check the type of power supply and
the shape of plug socket for each country.
www.minilablaser.com
Chapter 2
Outline of the system
www.minilablaser.com
The point of this chapter
Purpose of study
• Explain the outline of the system for the
QSS-29.
Each AFC, MMC, scanner, MLVA, supported media, image size, paper
size, Digital-ICE, paper advance system
How to carry out the training
• Explain the items referring to the training
materials and using the actual machine.
www.minilablaser.com
QSS-29
Light source section in the printer section
(Scanner + MLVA)
Light source :
The halogen lamp of 30.5V and 370W is used for the light
source of film scanner.
The lamp and socket are assembled in one, and the heat sink
is attached. This is compatible with the QSS-28 scanner.
(Refer to the “Compatible table of the consumable parts”.)
Light source parts :
The reflector is not a consumable part, so it is not need to
replace it.
The lens box is slit condenser type. This is compatible with
the QSS-28.
www.minilablaser.com
QSS-29
Structure of scanner unit
Negative/Positive Filter
Mirror
Halogen lamp
Lens box
Lens
Diffuser
Heat-absorbing filter
Film carrier
Scanner lens
CCD
for detecting scratches
Mirror
CCD
RGB frame detection
www.minilablaser.com
QSS-29
Scanner
Image capture
method
Optical resolution (Main
or the CCD line)
Input the one line image with line CCD.
Scan pitch (Sub scanning) Film is moved.
Scan RGB each with line CCD (5,000 pixels).
CCD
Others
ISL filter*1 is available.
Automatic dust and scratch removal for films
is available. (Digital ICE) (option)*2
Sticker for permission of use
QSS
*1
*2
www.minilablaser.com
QSS-29
AFC scanning movement
Differences between the QSS-29 and 28
AFC for the QSS-29
AFC for the QSS-28
Scanning
movement
Pre-scanning + Final
Scanning
Final scanning only
Film ejection
direction
Return to the film
Ejection to the monitor side
insertion direction side
www.minilablaser.com
QSS-29
Resolution of the image
• Input resolution (resolution of the image) is different
depending on the film size and paper size each.
Change the resolution of the image by the zoom lens of
scanner.
7058
3104
2085
to
4680
Resolution of the image when scanning 135 film (Unit: pixel)
www.minilablaser.com
QSS-29
Resolution of the image (film size each)
Film size
Minimum
Maximum
135F
2058 x 3104
4680 x 7058
135H
2058 x 1451
4680 x 3299
240
1394 x 2093
3170 x 4758
110
1250 x 1645
2500 x 3290
6 x 4.5
4591 x 3362
6x6
4599 x 4530
The resolution of
the image is fixed.
6x7
4666 x 5617
6x8
4666 x 6290
6x9
4620 x 6727
135 mount
1397 x 2939
240 mount
1260 x 2215
www.minilablaser.com
QSS-29
Minimum necessary pixels for each paper size
Size (mm)
82.5
89
102
127
152
Pixel
1300
1402
1606
2000
2394
Size (mm)
178
203
254
305
457
Pixel
2803
3197
4000
4803
7197
www.minilablaser.com
QSS-29
Scanning
• The zoom value of scanner is decided on the basis of
the smallest among the paper sizes, which are
registered in the print channel (C/P/H).
Example)
In the 135F, when setting “C: 89 x 127” and “P: 305 x 457”, the resolution
of image is 2058 x 3104.
The resolution of image for 305 x 457 channel only is 4680 x 7058.
The quality is different depending on the combination
of print channel.
www.minilablaser.com
QSS-29
Print channel and scanning
In the case of interspersed channel (3R and maximum paper size)
2017
3104
2058
1337
236
%
7340
In the case of CH for maximum paper only
7058
4867
104%
4680
Input data
Output data
www.minilablaser.com
QSS-29
Pre-scanning
Film sizes
Resolution
135F C/HD/P
257 x 388
135H
257 x 181
240C/HD/P
252 x 442
110
312 x 411
6 x 4.5
286 x 210
6x6
286 x 283
6x7
291 x 351
6x8
291 x 393
6x9
291 x 424
135 mount (F/HD/P)
239 x 367
135 mount (H)
239 x 156
240 mount
157 x 276
www.minilablaser.com
QSS-29
Digital ICE
Original image
Film
RGB scanning data
Lens
Mirror
CCD
for detecting
RGB images
The data with scratch
Corrected image
CCD for detecting scratches
The technology to make the images without scratch, dust, etc.
In addition to the CCD which takes the color information of RGB, the another CCD is
added. It detects the dust, scratch, etc. on the film. This corrects the scanned image
information.
www.minilablaser.com
QSS-29
Corrections by Digital ICE
Comparison table with the conventional models
QSS-29, 28
QSS-27 (DLS)
Correct function
The image is corrected
automatically by Digital ICE
(option)
No correct function.
Option software for DLS
Processing ability
The processing ability does not
change even when this is
functioned.
Processing ability is decreased at
20 %.
The conditions for functioning the Digital ICE
QSS-29
QSS-28
QSS-27 (DLS)
PCB, power
supply
Already attached
when shipping from
the factory
Replace the image input PCB with
the D-ICE PCB (option).
Attach DC power supply 3.
None
Installing the
software
Reading the
software of Digital
ICE (Z809072-01)
Read the system software program of
D-ICE PCB. (The program is
included in the same CD with the
other program.)
Install the software
from CD.
Registration
in the mode
Mark the check box
in the “Operator
selection” .
Mark the check box in the “Operator
selection” .
Register it in the
“Key Operator Mode”
www.minilablaser.com
QSS-29
Scratches and dust which can be corrected
Light source side
Light
Light Light Light Light
Dust
Base
Red photosensitive
Green photosensitive
Blue photosensitive
Protective coat
The function of D-ICE: Effective
Negative
Effective Effective
When it is possible to correct
Not
effective
Not
effective
Scanner side
(Example: In case of color negative)
www.minilablaser.com
QSS-29
Colorimeter
* The colorimeter is adopted for the precise color matching
when carrying out the CMS.
* The conventional colorimeter measures the density of the color
of the paper. Therefore, there is a difference
between the actual print and the measured value.
*This colorimeter has an ability to distinguish like from the human's
eye, and the precision of color matching between the monitor and print
is up.
* There are three types of colorimeter
– spectrophotometer, colorimeter, densitometer.
The colorimeter is used for the QSS-28.
* The colorimeter can measure the color in CIE-XYZ/Lab value,
and color matching for difference devices is possible.
www.minilablaser.com
QSS-29
Paper sizes and advance way
Paper advance
In the QSS-29, there are two types of advance way.
Paper advance in single row, Paper advance in double rows
The condition of paper advance is basically as follows.
Condition of paper advance
Advance way
Paper width : 82.5 mm to 152 mm
Paper advance length: 216 mm or less
In double rows
Paper width : 165 mm or more
Paper advance length: 216.1 mm or more
Explain in the “Movements” for the details of movements.
In single row
www.minilablaser.com
QSS-29
Paper
The paper lane selection is carried
out in the paper advance section
before exposure.
The lane is selected by the arms.
Paper advance
in double rows
Paper advance
in single row
Paper advance in
double rows
Check the actual machine.
www.minilablaser.com
QSS-29
MLVA
MLVA: Abbreviation of Micro Light Valve Array
Exposure engine which is also used for the QSS-27.
A set of shutters controlled by voltage.
The MLVA of the QSS-29 is small, comparing with
that of the QSS-27.
The MLVA is not compatible between the QSS-27 and
the QSS-29.
www.minilablaser.com
QSS-29
MLVA exposure engine (Exposure section)
Exposure way
Output
gradation
Maximum
exposure width
Print resolution
Exposure speed
Halogen lamp
Line exposure method by the MLVA engine
1024 gradation
323.088 mm±0.1 mm
400 dpi
25.4 mm/sec
30.5V, 370W
www.minilablaser.com
QSS-29
MLVA unit structure
Halogen lamp
Condensor lens
Filter wheel
Dichroic filter
Integrator
Polarized plate
Cellfoch lens
Optical fiber
MLVA PCB
www.minilablaser.com
QSS-29
Explanation of the MLVA unit
Halogen lamp
Original light source for the image exposed to the
paper.
Dichroic filter
Adjust the density for paper each type.
Fan
Integrator cooling fan
Condensor lens
Collect the light together effectively.
Filter wheel
It rotates 12,000 times in a minute, and the white
light is diffracted into BGR.
Integrator
Role like a mirror tube
Optical fiber
It transmits the light from integrator to MLVA.
Polarized plate
It penetrates the vibration of light in certain direction.
MLVA PCB
By turning the voltage ON to the polarized light,
change the vibration direction of light, and adjust the
light intensity of transmission.
Cellfoch lens
Refracting lens to expose the light onto the paper.
www.minilablaser.com
QSS-29
MLVA differences between the QSS-29 and the 27
MLVA (QSS-29)
MLVA (QSS-27)
Cellfoch lens
Arranged in 4-line
Arranged in 2-line
Filter wheel unit
Frosted glass is added
for improving the
diffusion
Glass tube
Optical fiber
The arrangement of fiber The arrangement of fiber is
is not fixed.
fixed.
Condenser lens
Attached
None
Fan
Attached
None
MLVA (QSS-29)
MLVA (QSS-27)
www.minilablaser.com
QSS-29
Improvements/modification and effects of QSS-29
Improvements
/modification
Effects
Note
Condenser
Increase the intensity.
Added from the QSS-29
Diffuser
Remove the unevenness of light for
halogen lap.
Added from the QSS-29
Fan
Protect the integrator from the high
temperature.
Added from the QSS-29
Integrator
Diffuse and mix the light.
Similar with the QSS-27
Optical fiber
Change the position whether the light
is gathered by the optical fiber.
Comparing with the QSS-27, the
diffusion status is improved by
changing the route of optical fiber
Cellfoch lens
The light amount is increased.
QSS-29: 4-line
Only one part blinks.
QSS-27
Light
The whole blinks equally.
QSS-29
Light
Effect by changing the route of optical fiber
QSS-27: 2-line
www.minilablaser.com
QSS-29
Structure of the MLVA (shutter)
Polarized plate
(Only longtudinal wave can pass through.)
Cellfoch lens
Paper
Polarized plate
(Only transverse wave can pass through.)
?
Light
MLVA PCB If the voltage is not turned ON, the
light cannot pass thorough.
Light has the characteristics of
polarized light. Natural light is
vibrated at 360° in any direction.
If the light passes through the polarized
plate, the light only in certain direction
can pass through.
?
If the voltage is turned ON, the wave direction of
light is changed and the light can pass through.
www.minilablaser.com
QSS-29
Exposure section of the MLVA
32 shutters on the right and left side on the
masking part.
MLVA head
5088 shutters on the head
MLVA head cellfoch lens
Collect the light from the shutter
with the cellfoch lens.
www.minilablaser.com
QSS-29
Cellfoch lens
QSS-27
QSS-29
Cellfoch lens
In the QSS-27, the cellfoch lens is in double rows.
In the QSS-29, the cellfoch lens is in four rows.
So, the light intensity is increased.
Comparing with the QSS-27, the value of D max. is improved
by increasing the light intensity.
www.minilablaser.com
QSS-29
Shutter (A line)
As for the characteristic of cellfoch
lens, the incidence angle and
outgoing beam angle are same.
Shutter (B line)
Cellfoch lens
www.minilablaser.com
QSS-29
MLVA exposure
Model figure of
exposure
MLVA head
B
Unexposed
paper
A
B
A
B
A
A
B
B
A
B
A
B
A
A
B
B
A
Paper advance direction
The advanced paper is
half exposed by head A.
The half exposed paper is advanced
by 5-dot, then the remained part is
exposed by head B.
www.minilablaser.com
Chapter 3
Operations
www.minilablaser.com
The point of this chapter
Purpose of study
• Study the operations for users.
Printing operations
Turning ON/OFF the power supply
Status display of LED
Setup during the start-up checks
Input from the flatbed scanner
Printing in the “Edit” mode
Details of back print data
Index prints
How to carry out the training
• Carry out the practical training, or explain the items using
the sample prints.
www.minilablaser.com
QSS-29
Explanation of operations
* Explain with the actual machine.
- Start-up checks
- Explanation of [ORDER] display
- Explanation of [MENU] display
- Explanation of [HELP]
* Explanation of printing operations
- Carry out the practical training.
www.minilablaser.com
QSS-29
ON/OFF procedure of power supply
Shutdown of PC
Close down
checks
12 minutes
Turned OFF
The time to start
temperature adjustment
200V power
supply
5
minutes
Blinking
PC ON
3
minutes
Turned ON
Manual sorter switch
Blinking
Turned OFF
www.minilablaser.com
QSS-29
Normal shutdown movement
(Close-down check is completed.)
Lamp is OFF.
“Program timer is activating.” is displayed (on the monitor).
The PC is shutdown. (12 minutes later after the close-down
check)
The switch of QO is turned ON.
The power supply (200V supply) is OFF. (17 minutes later after the closedown check.)
The power supply of peripheral CPU and cooling fan is OFF.
www.minilablaser.com
QSS-29
Normal start up movement (when the program timer is activated.)
During the Program timer
(“17 minutes later after the close down check” to “The time to
start the temperature adjustment”)
(The time to start the temperature adjustment)
The power supply is ON. (200V supply) The power supply of
peripheral CPU is ON.
The PC is started up. (3 minutes later after the power supply is ON.)
“The processing solution temperatures are being adjusted” is displayed (on the
monitor).
After the temperature adjustment is completed, “Would you like to proceed to the
operation mode?” is displayed (on the monitor).
Press [YES] key to go to the operation mode.
www.minilablaser.com
QSS-29
How to start-up except from the program timer
(when the breaker is turned ON)
•When starting up during the program timer
(“17 minutes later after the close down check” to “The time to start the
temperature adjustment”)
The power supply of input section and output section is turned ON by pressing
the QO switch for 2 seconds or more.) Then, the PC starts up 3 minutes later.
•When starting up during the shutdown of PC
(“For 17 minutes after 12 minutes have passed after the “Close down check”
Until “The power supply is turned OFF”)
Press the QO switch for 2 seconds or more. The power supply is turned OFF,
and the power supply of printer section and processor section is turned ON.
Then, the PC starts up 3 minutes later.
•When starting up in the cases below
“The processing solution temperatures are being adjusted”
“12 minutes have passed after the close down check is completed.”
“Would you like to proceed to the operation mode?” is displayed by pressing the
key of keyboard. Press [YES] key to go to the operation mode.
www.minilablaser.com
QSS-29
How to start-up after the breaker is turned OFF
* When turning the breaker OFF during the program timer
(“17 minutes later after the close down check” to “The time to start the
temperature adjustment”)
The program timer becomes activating by turning the breaker ON. The
power supply of printer section and processor section is turned ON by
pressing the QO switch for 2 seconds or more. Then, the PC is started up 3
minutes later.
* When turning the breaker OFF except the case “during the program timer”,
The power supply of printer section and processor section is turned ON by
turning the breaker ON.
Then, the PC starts up 3 minutes later.
*When the PC does not start up (error)
Turn the breaker OFF and attach the jumper for start-up on the J/P678 of
power PCB 2. Then, turn the breaker ON.
www.minilablaser.com
QSS-29
Cautions when turning OFF the breaker
* When turning OFF the breaker in the case of trouble shooting, etc.,
Turn OFF the scanner lamp and MLVA lamp. After 10 minutes or
more have passed, turn OFF the breaker. If you do not do so, the
lamp may be damaged.
www.minilablaser.com
QSS-29
How to turn OFF the breaker
* How to turn OFF the breaker after the close down check
(e.g. When you do not use the function of the program timer)
When 12 minutes have passed after the close down check is completed, the
shutdown of PC is started. When 17 minutes have passed after the close
down check is completed, the power supply is turned OFF. At this time,
turn OFF the breaker.
* When turning the breaker OFF in the case of troubleshooting, etc, press [F]
key in the “Close down check” mode and select “Turn OFF the power
supply”. After confirming that the power LED of PC is OFF, turn OFF the
breaker.
www.minilablaser.com
QSS-29
How to turn OFF the breaker when the PC is locked
1.
Check the LED of HD.
When the LED of HD is lighting or blinking, the HD is activating.
If turning the power supply OFF when the HD is activating, the HD may be
damaged.
Wait until the LED is turned OFF.
2.
Turn OFF the power supply of PC by pressing the SW of PC for
4 seconds or more.
3.
Turn OFF the breaker of processor.
Wait for approx. 10 seconds after turning the breaker OFF. And then
turn the breaker ON.
www.minilablaser.com
QSS-29
How to turn OFF the breaker in an emergency
* When turning OFF the breaker in an emergency, turn OFF the
breaker of the processor.
The UPS starts up and the PC is shutdown. (for a few minutes to 20
minutes)
www.minilablaser.com
QSS-29
Status display of the processor
Status lamp of processor
Condition of display
Lighting Green
The temperature adjustment is completed.
Blinking Green
During the program timer
Note
Slow blinking
(From “After the close down checks is completed.” to “The time
to start the temperature adjustment”)
Blinking Green
The temperatures are being adjusted.
Fast blinking
Blinking Red
When it is impossible to activate the temperature adjustment
(When the error occurs or the interlock switch is activated.)
Slow blinking
Dark
The input section is not started-up.
Sorter switch
Condition of display
Dark
The PC is functioning.
Blinking
While the PC is being started-up, 5 minutes after
turning OFF the PC in the close down checks.
Lighting
During the program timer or the power supply of PC
is turned OFF.
Note
Slow blinking
www.minilablaser.com
QSS-29
Status display of AFC
Ready lamp
Condition of display
Lighting Green
Processing films is possible. (You can insert a film.)
Blinking
Film is being processed. (You cannot inset a film).
Green
Blinking Red
Films cannot be processed. (You cannot process a film.)
*The error occurs. (You cannot process a film.)
* The error occurs. (You cannot print.)
Dark
Films cannot be processed.(You cannot process a film.)
*When the “Film” is not selected for “Image input” in the print channel setting.
*During the start-up checks and close-down checks
*During the program timer
*When the message “Insert a film.” does not appear on the adjustment mode.
*During the initial movement
www.minilablaser.com
QSS-29
Setup during the start-up checks
Daily setup
Weekly setup
Monthly setup
Execute once a day for each paper type to be used.
Correct the temporary aging of exposure engine, light source
and processing solution.
Make a 18-step test print.
Execute once a week. This is displayed instead of the daily
setup.
After carrying out the daily setup, carry out the printer profile
calibration to correct the temporary aging of data
characteristics for each printer. (Execute it for each paper type).
Make test prints.
18-step setup prints (daily setup)
16-step setup prints (printer profiles)
Carry out the uniformity (calibrator).
Execute once a month. After completing the daily setup and
weekly setup, execute it.
Carry out the monitor profile calibration to correct the
temporary aging of monitor.
Measure the monitor directly by the calorimeter.
www.minilablaser.com
QSS-29
Daily setup flow
Make a test print (18-step setup print)
When the light source
upgrading (auto) (135 lane)
is carried out during the
program timer
Light source upgrading
(135 lane)
When the light source
upgrading (auto) (135 lane)
is not carried out during the
program timer
Calorimeter calibration
Measure a test print.
Registration
Uniformity (calibrator)
When the
uniformity is not
carried out during
the program timer.
www.minilablaser.com
QSS-29
Weekly setup flow
Daily setup is completed.
Make a test print. (16-step setup print)
Measure a test print.
Update the Printer profile data.
Uniformity (calibrator)
Registration
When the
uniformity is not
carried out during
the program timer.
www.minilablaser.com
QSS-29
Monthly setup flow
Daily or weekly setup is completed.
Monitor color and temperature adjustment
Monitor brightness adjustment
Measure the monitor display.
Monitor calibration
and updating the monitor profile
www.minilablaser.com
QSS-29
Printing in the Edit mode
Post cards
Package prints
INDEX1
Others
*Calendar Prints
*Letter prints
Yesterday
Composite prints of
frame and letter
*Photo Business Cards
INDEX3
*ID Photos
www.minilablaser.com
QSS-29
Details of the back print
* Film and media except 240
NORITSU <12> 005
(X)
?
FBS 12
(I) (K) (D) (E)
(F)
284 15 +1+1+1+1 +30 AC01 Acs –10 Ach -10 AS02 SA200 GR10 RE01 SF02 FC01 XF02 R090 Z80
(J) (L)
(M)
(N)
(O)
(P)
(Y)
(Z)
(Q)
C
CD 12
(R)
(S)
(T)
* For 240 (TYPE1)
BIRTHDAY EL25 MGhi FFn BVvh Alh PAc SUn CH1 LAB01
(A)
(B)
(C)
(D) (E) (F)
01.05.29 11:57A 001-001 (12) 284 005 15 +1+1+1+1 +30 *Digital correction data
(G)
(H)
(I)
(J) (K) (L)
(M)
* For 240 (TYPE2)
BIRTHDAY EL25 MGhi FFn BVvh Alh PAc SUn CH1
(A)
(B)
29/MAY/01 11:57A ID001-001 (12)FTPM LAB01
(G)
(H)
(I)
(C)
?
(D)
(N)
(Same with films except 240)
(V)
(W)
www.minilablaser.com
QSS-29
Details of the back print
* Editing
BIRTHDAY 123 ? 12
(A)
(K)(D)(F)
284 15 < CUSTOMERINFO.mdb 1234
(J) (L)
(1)
(2)
* Back print data only for editing
(1) File name for customer
information
(2) Customer number for customer
information
www.minilablaser.com
QSS-29
(A)
Title
(K)
Print count
(B)
Camera information
(L)
Print channel
(C)
LAB ID
(M)
Color, density correction (YMCD)
(D)
Copyright mark
(N)
Scanner correction
(E)
Input medias
(O)
Auto contrast correction value
(F)
Template
(P)
Auto sharpness correction value
(G)
Date, Time
(Q)
Red-eye correction value
240 TYPE2: the month is displayed in 3
letters (English letter).
(R)
Soft focus correction value
(S)
Color conversion
Color image: FC
Monochrome: MoF
Sepia: SeF
(H)
(I)
(J)
Film ID (FID)
(T)
Cross filter correction value
240TYPE2: ”ID” is displayed before
the number.
(V)
Rotation angle of the image
Frame number
(W)
Zoom and crop of the image
240TYPE2: FTPM or SERIES is
displayed after the frame number.
(X)
Backprint
(Y)
Chroma correction
Order number
(Z)
Graininess repression correction
www.minilablaser.com
QSS-29
Index print sizes
* Normal index prints
Name
3HS
3R
3HD
3W
4R
4HD
5R
Sizes
82.5 x 158
89 X 127
89 x 158
89 x 178
102 x 152
102 x 178
127 x 178
-
-
135/120/110
-
240
-
Medias
-
-
-
-
Name
6R
6HD
6W
8R
8HD
Sizes
152 x 203
152 x 254
152 x 305
203 x 305
203 x 356
-
-
-
135/120/110
240
Medias
: Available
: Available with 20 frames or more
: Not available
-
www.minilablaser.com
QSS-29
Types of index prints
Normal index prints Make normal index prints.
The data for displaying on the PJP
mode is used.
Label index prints
Index print for the media case size of
storage media
No index print for smart media, PC and
compact flash
Contact Print Style
Photos
Make Contact Print Style Photos.
IX240 and medias are not supported.
www.minilablaser.com
QSS-29
Background color for index prints
*8 colors can be selected as a background color of
an index print.
1. Gray
5. Orange
2. White
6. Green
3. Pink
7. Light blue
4. Yellow
8. Purple
www.minilablaser.com
QSS-29
Label index prints
Types of media
Size
Format
FD
MO
Zip
CD
89 x 114
89 x 117
97 x 120
120 x 120
6, 20, 35
6, 20, 35
6, 20, 35
80
(number of frames)
Note
The number of
frames are
switched
automatically.
The number of
frames are
switched
automatically.
The number of
frames are
switched
automatically.
The number of
frames are
fixed.
www.minilablaser.com
QSS-29
Index print sizes for Contact Print Style Photos
Paper sizes for 6-frame
Name
Paper width
(minimum width)
Paper advance
length
CP6_1
CP6_2
CP6_3
CP6_4
CP6_5
CP6_6
CP6_7
82.5 mm
or more
82.5 mm
or more
120 mm
or more
165 mm
or more
203 mm
or more
240 mm
or more
240 mm
or more
228.6mm
228.6mm
228.6mm
228.6mm
228.6mm
228.6mm
263 mm
Paper sizes for 4-frame
CP4_1
CP4_2
CP4_3
CP4_4
CP4_5
CP4_6
CP4_7
CP4_8
Paper width
82.5 mm
or more
82.5 mm
or more
120 mm
or more
152 mm 152 mm
or more or more
152 mm
or more
152 mm
or more
152 mm
or more
Paper advance
length
152 mm
152 mm
152 mm
152 mm
227 mm
263 mm
300 mm
Name
CP4_9
CP4_10
CP4_11
Paper width
152 mm
or more
152 mm
or more
152 mm
or more
Paper advance
length
336 mm
372 mm
407 mm
Name
191 mm
Size:
When printing the paper to be used with the
minimum necessary paper width.
Only 135F is supported.
www.minilablaser.com
QSS-29
Index print sizes
*Contact index prints
CP4_1
CP6_1
CP4_8
CP6_3
www.minilablaser.com
QSS-29
Practical training
*Carry out the practical training.
- How to exit from the close down checks mode.
- How to finish the application.
- When carrying out the close down checks, set the
135/240AFC to 135 lane.
www.minilablaser.com
QSS-29
Explanation of modes
* Explain the modes, checking the actual machine.
CH export data
www.minilablaser.com
Chapter 4
Installation
www.minilablaser.com
The point of this chapter
Purpose of study
• Study so that the trainees can install the QSS-29 (SMP-1700, PP-1216).
The width for carrying a machine
Outdrawing
Parts required when installing a machine
PC peripherals
Setting the language specification
How to carry out the training
• The trainee will provide an oral explanation of the caution points,
referring to “Installation Manual” and a machine.
• Carry out the mechanical adjustment or installation of options in the
other chapter. You do not carry out the practical training here.
www.minilablaser.com
QSS-29
The width to carry a machine
Unit : mm
System name
The minimum
height
The minimum
width
SMP-1700
1,350
970 (770*)
PP-1216
1,500
780
*As for the SMP-1700, when removing the table, front cover and PC
main body, the minimum width for carrying a machine is 770 mm.
www.minilablaser.com
QSS-29
The space for installation
Unit : mm
100
1,820
2,820
1,300
500
920
100
950
970
610
480
270
820
Refer to the Specification Manual for the details.
1,480
www.minilablaser.com
QSS-29
Lifting the machine (SMP-1700)
*Lift a machine with rope,
Cushion
as shown in the illustration.
Caution
*Place the cushion and support wood,
referring to the “Indication of lifting
the machine” manual.
Cable
Support
wood
*Be careful so that the cable is not
caught between the support wood and
the frame of main body.
www.minilablaser.com
QSS-29
Lifting the machine (Processor section)
*Lift a machine with rope,
as shown in the illustration.
Caution
The rope should be outside of the
jack bolts.
Processor cover 1
www.minilablaser.com
QSS-29
Packing items (SMP-1700)
Packing parts
SMP-1700 main body
Scanner/MLVA halogen lamp
Pressure guide
Ribbon cassette
Scanner/MLVA light source unit
Filter case
Personal computer
Monitor stand
Computer keyboard
Mouse pad
Mouse
Flatbed scanner
Intermediate jack-bolt
Magazine shutter open/close roller
Magazine pressure
Monitor
Lens box unit
The Magazine is shipped with the machine main body.
www.minilablaser.com
QSS-29
Packing items (PP-1216)
Chemical filters
Print conveyor unit
Print classification unit
Dryer rack (upper) (depending on
the shipping condition)
www.minilablaser.com
QSS-29
Packing items (accessories)
Types
Name
Description
INITIAL DATA 1
For SMP
Contains the adjustment data for each machine
INITIAL DATA 2
For PP
One FD for the printer section and processor
section each.
MLVA DATA1
Contains the adjustment data for MLVA inner
calibration.
MLVA DATA2
Contains the necessary data for uniformity.
MLVA DATA3
SYSTEM PROGRAM
Contains the necessary system files to activate
the system
PROFILE DATA
Contains the profile data
PC attachments
Recovery CD for OS, Operator?s Manual, driver
software, etc.
Necessary for the maintenance of the PC
attachments
www.minilablaser.com
QSS-29
Packing items (Sample prints)
Magazine
Magazine
mount A
mount B
Zigzagging check of magazine
mount A and B
Exposed image correction
Arm Vertical Error Correction
(Master)
Sample 1
Uniformity
Sample 2
Banding
Sample 3
For checking the print
Sample 4
www.minilablaser.com
QSS-29
Practical training
* Install a machine, referring to the Installation Manual.
www.minilablaser.com
QSS-29
Location of PC peripherals
Card reader
PC case
ZIP
Terminator
DVD-RAM
CD-ROM R/RW
Floppy connector
MO
FD
HD
SCSI board
Primary IDE
Mother board
Secondary IDE
www.minilablaser.com
QSS-29
SCSI ID No.
Drive
MO
CD-ROM, CD-R/W
PC card
Smart media
Compact flash
None
DVD-RAM
SCSI board
ZIP
HD
FD
Flatbed scanner
ID No.
0
1
2
3
4
5
6
7
-
Note
Not in use
Secondary IDE
Primary IDE
FD connector
USB
www.minilablaser.com
QSS-29
Cautions when attaching the PC peripherals at site
= necessary
Drive
ZIP
MO
CD-R/RW
DVD-RAM
Card reader
Flatbed scanner
Installing the drives
Confirming the SCSI ID
settings
www.minilablaser.com
QSS-29
Allocation of drives
• The drive letter differs depending on the installing turn of the drive.
• Set the drive allocation in the “Media setting” of “Option registration”
by the drive letter of OS.
If you set the wrong drive letter, the malfunction occurs. (e.g. it accesses
to the wrong drive.)
Be sure to set the drives correctly. Set the same drive with the drive
letter of OS.
• The drive letters below are fixed.
A: FD
C: Hard disk
• Refer to the Service Manual [3871] for the allocation of drives.
www.minilablaser.com
QSS-29
Setting the language specifications
• When you use it in the other languages except English, it is
necessary to set the dictionary of language which is to be
used. And install the translated QSS message data.
• When the various kinds of functions (e.g. postal code
dictionary) are necessary, carry out the setting again.
www.minilablaser.com
Chapter 5
Setup
www.minilablaser.com
The point of this chapter
Purpose of study
• Study about the setup.
Print channel setting
Monitor setup
Paper specification registration
Initial setup
Emulsion number change
Scanner slope correction
How to carry out the training
• Carry out the practical training, or explain
the items using the sample prints.
www.minilablaser.com
QSS-29
Setup when installing a machine
• There are two patterns of setup procedure when installing a
machine to shorten the installing time. There are two
procedures for the conditions below.
During the temperature adjustment
After the setup is completed.
• It is not always necessarily to follow the procedure except
for the setup when installing a machine.
www.minilablaser.com
QSS-29
Structure of the setup data
Magazine Registration/Setup
Magazine
(1)
Magazine
(2)
Magazine
#
Magazine
(1)
Magazine
(2)
Magazine
#
Magazine
(1)
Magazine
(2)
Magazine
#
Daily setup
Daily setup
Daily setup
Uniformity data
Uniformity data
Uniformity data
Paper Specification
Registration/Type1
Paper Specification
Registration/Type2
Paper Specification Registration/Setup
Initial Setup
Paper Specification Registration/Type1
Paper Specification
Registration/Type3
www.minilablaser.com
QSS-29
Setup flow
Explain the setup flow when carrying out the installation.
(e.g.) The prepared paper types
Paper type1 : EDGE8
89 mm
127 mm
Paper type 2: ROYAL8
102 mm
254 mm
Paper type3: FA9
203 mm
305 mm
This time, carry out the setup for 3 types of paper and 6 paper
magazines.
Here, the main paper type which is used for the initial setup is
EDGE8 89 mm.
www.minilablaser.com
QSS-29
Paper type 1 Registration
Paper Specification Registration / Setup
Paper type 1 Registration [1]
Initial setup
Paper type 1 setup [2]
89(1)-
89 mm
89 mm (1)
Register “EDGE8” for [Paper type 1] and set
“89(1)” for [Paper magazine Registration].
Next, carry out the setup for the other paper
types except [Paper type 1] [3]
Or carry out the setup for the paper with
different paper width and different surface. [4]
89 mm (1)
89 (1)-
89 mm (1)
89 (1) OK
www.minilablaser.com
Other paper type registration except Paper type 1
QSS-29
Paper Specification Registration / Setup
Other paper type except paper type 1 Registration [3]
102 (2) -
102 mm
102 mm (2)
Register “ROYAL8” for
[Paper type 2] and set “102(2)”
for [Paper magazine
Registration].
102 mm (2)
102 (2) OK
203 (3) -
203 mm
203 mm (3)
Register “FA9” for [Paper type
3] and set “203 (3)” for [Paper
magazine Registration].
Paper Specification
Registration /Setup
203 mm (3)
203 (3) OK
Next, carry out the setup for the paper with different paper
width and different surface. [4]
www.minilablaser.com
QSS-29
Paper with different paper width and surface Registration
Paper Magazine Registration / Setup
Paper with different paper width and surface Registration [4]
Magazine Registration 254 mm
254 mm (2)
Magazine Registration 127 mm
127 mm (1)
Paper Magazine
Registration/Setup
254 mm (2)
Magazine Registration 305 mm
305 mm (3)
Paper Magazine
Registration/Setup
127 mm (1)
305 mm (3)
Paper Magazine Registration
Paper Magazine Registration
Paper Magazine Registration
OK
OK
OK
www.minilablaser.com
QSS-29
Initial setup flow
1. Reading the initial data
2. Load voltage adjustment
(1) Gain adjustment
(2) Load Voltage adjustment
(3) Uniformity (Built-in calibrator)
(The correction is done roughly in the first correction.)
(4) Creating the uniformity data
This mode is not in use.
www.minilablaser.com
QSS-29
3. Paper Type Selection/Magazine Selection
4. Filter setup
5. Paper gamma setup
6. Printer profile calibration
7. Uniformity (Built-in calibrator)
(1) Uniformity
(Built-in calibrator)
The correction is carried out.
Max: 2 times
OK
NG
www.minilablaser.com
QSS-29
7. Uniformity (Built-in calibrator)
OK
(2) Creating the uniformity data
8. Daily setup
Paper Specification Registration Setup
Magazine Registration Setup
When adding the new type paper
When adding the sub paper
9. Paper Type Selection/Magazine Selection
10. Gamma setup
www.minilablaser.com
QSS-29
Details of the Initial setup
1. Load Voltage adjustment (approx. 13 minutes)
The most appropriate load voltage for R, G, B each of MLVA head is calculated by
the built-in calibrator.
2. 18-gradation print
The specific characteristics of each MLVA is calculated by fixing the dichroic
position.
3. Filter setup (maximum: 3 times)
Based on the inner data, adjust the position of dichroic filter to get the standard
density.
www.minilablaser.com
QSS-29
3. Paper gamma setup (max: 3 times)
The difference of color characteristics (paper + solution + light amount) for each
machine is corrected, and make a rough estimate of the parameter to get the target
density.
4. Printer profile (complete in 1 time)
Carry out the printer color matching for each paper type. This is carried out based
on the profile data which has already been registered.
This graph is the result of test print measurement. Three
lines for B, G, R are displayed.
It is ideal if all of three lines slant at the angle of 45°.
This is the standard for checking the tendency of calibrated
data.
www.minilablaser.com
QSS-29
5. Uniformity (calibrator data)
Carry out the uniformity calibration with the calibrator of MLVA unit.
6. Daily setup
Correct the color and density which are changed when carrying out the uniformity
calibration.
www.minilablaser.com
QSS-29
Uniformity flow
1. Paper Type Selection/Magazine Selection
Paper size is selected
automatically.
2. Uniformity (FB scanner)
(1) Output the cleaning print and the
uniformity print.
(2) Cut the uniformity print.
(3) Set the uniformity print onto the FB scanner.
OK
www.minilablaser.com
QSS-29
(4) FB scanner uniformity correction
Check the dirt on the print
NG
Confirm that the prints are set correctly.
OK
3. Built-in calibrator measurement
4. The inner data is calculated by the FB scanner.
www.minilablaser.com
QSS-29
Paper registration and setup
Kinds of registration
Contents
Paper Specification
Registration/Setup
Register the paper type and the magazine which are to be
used. Up to 3 types can be set.
Magazine Registration/Setup
When newly adding the paper with different paper width
and different paper surface, register a new magazine and
carry out the correction.
Emulsion number change
Correct this when the paper specification and the emulsion
number is changed.
www.minilablaser.com
QSS-29
Print channel setting
QSS-29
QSS-27
Name of CH
Input freely
Input freely
Paper setting
Input freely
Input freely
Print type
Select from “Normal Print”, “Edit”, “Package”
and “Album”.
When making a special print, go from
the “Image Edition”
Input media
Select from 15 types (films and storage media)
When printing from the storage media,
go from the “Image Edition”
Print name
Set and input freely
Set freely
Print size
3 types (C, P, H)
Set freely
WB width
3 types (C, P, H)
This can be set only for “Normal Print”.
3 types (C, P, H)
Image magnification 3 types (C, P, H)
This can be set only for “Normal Print” and
“Album”.
Input range: 1 to 200 %
Initial value: 100%
The rate of image magnification is calculated
automatically depending on the paper advance
length and paper width.
This can be set from “Print size” in the
“Printing from negative/positive”
Input range: 0 to 400 %
Initial value: 100%
Exposure position
correction
3 types (C, P, H)
3 types (C, P, H)
www.minilablaser.com
QSS-29
QSS-29
CVP ON/OFF
Set for each channel
Front print
Set only for “Normal Print”
Common for C, P, H
Index size
Can be set for 135/120/110, 240, media
each.
Contact print setting can be set for
135/120/110.
Normal index print: 13 kinds
Contact Print Style index print: 18 kinds
Set for “Normal Print” and “Package”
only.
Paper magazine for
index print
Set the magazine for outputting the index
print
Output media
The compression level of images can be
set when saving the data to the media.
When storing the images to media, the
label index print is made automatically.
Quality
The image size and quality can be set for
each media.
QSS-27
Set by pressing F1 in the
“Printing from negative
(positive)”
Normal index print: 8 kinds
Set by pressing F2 in the
“Printing from negative
(positive)”
Normal index print: 6 kinds
www.minilablaser.com
QSS-29
Monitor setup
1. Monitor brightness adjustment
* Color and temperature setting (6500K)
* Contrast adjustment
* Brightness setting
Adjust it, referring to the Operator?s Manual of the display monitor.
Adjust the color of the
monitor here.
2. Monitor profile calibration
www.minilablaser.com
QSS-29
Monitor setup
3. Monitor gamma correction
The difference occurs between the color of print and that of
monitor, depending on the light source of the place where you
work.
Improve the precision of color matching by setting the color
difference freely.
Make a test print, compare the color chart with the monitor
and adjust it.
www.minilablaser.com
QSS-29
Comparison of the scanner slope correction for films
QSS-29
Corrections in the QSS-29
QSS-27
Corrections in the QSS-27
Film type
Negative/Positive
135F, P, H, HD, 110, 240
6 x 4.5, 6 x 6, 6 x 7, 6 x 8, 6 x 9
Slope
Master, Reference + DX
U.N.O
Correct, checking the images.
Impossible to check the images
How to input
Input the value.
Balance memory shift is not available
Balance memory shift is
available
Other
corrections
Carry out the contrast and saturation
adjustment, checking the images.
No function
www.minilablaser.com
QSS-29
Emulsion number change
You can check the setup status which is used for emulsion number change.
“OK” or “-” is displayed.
The emulsion number change is possible when “OK” is displayed for the paper setup or
magazine registration.
In the other cases, set it so that “OK” is displayed. After that, carry out the emulsion number
change.
Sign
Setup Setup OK
Magazine Registration -
Magazine Registration OK
--
[Paper Specification Registration Setup] has never been carried out or has not
been completed yet.
[Paper Specification Registration Setup] has been completed successfully.
Not to be registered in the [Magazine which is to be used for the setup].
Only [Magazine Registration] is carried out.
But, [Magazine Registration Setup] has never been carried out or has not been
completed yet.
Not to be registered in the [Magazine which is to be used for the setup].
Only [Magazine Registration] is carried out.
And, [Magazine Registration Setup] has been completed successfully.
Both of [Magazine which is to be used for the setup] and [Magazine
Registration] are not be carried out.
www.minilablaser.com
QSS-29
Color data configuration
Negative films
Positive films
Storage media
Light source control data
U, N, O
U, N, O
Brightness adjustment
Contrast adjustment
Negative slope correction
Positive slope correction
Scanner slope
Scanner slope
(for master and size each)
DX slope, contrast, saturation
(for master and size each)
DX slope, contrast,
saturation
Scanner parameter
Parameter 1, 2, 3
Service parameter
Print
N (C, H, P)
Profile
MLVA setup
OO Channel balance value
Profile data
N (C,H, P)
Gamma table
Monitor
Storage media
Paper gamma 1, 2, 3
01 to 99 Channel balance value
Negative key change ratio
Positive key change ratio
Media key change ratio
N
Paper setup
Paper temperature
correction Rate
www.minilablaser.com
QSS-29
DSA data configuration
DSA PJP
DSA master data
Negative
Type 1, 2, 3
Positive
Type 1, 2, 3
Media
Type 1, 2, 3
FB scanner
Type 1, 2, 3
Negative
Contrast (Highlight, Shadow, Whole), Sharpness,
Saturation, Graininess repression
Positive
Contrast (Highlight, Shadow, Whole), Sharpness,
Saturation, Graininess repression
Media
Contrast (Whole), Sharpness, Saturation
FB scanner
Contrast (Whole), Sharpness, Saturation
DSA 00 print channel
Negative
Print size C, P, H
Positive
Print size C, P, H
Media
Print size C, P, H
FB scanner
Type 1, 2, 3
DSA 01 to 99 print channel
Negative
Print size C, P, H
Positive
Print size C, P, H
Media
Print size C, P, H
FB scanner
Type 1, 2, 3
DSA reprint
Negative
Contrast (Highlight, Shadow, Whole), Sharpness, Saturation,
Graininess repression
Positive
Contrast (Highlight, Shadow, Whole), Sharpness, Saturation,
Graininess repression
The limits of total value for each correction value are as
follows.
Auto contrast (The whole): -10 to +10
Auto contrast (Shadow) : -10 to +10
Each DSA correction value exists separately.
On the DSA screen of PJP, the total correction value is
displayed. And, you can also do the correction here.
Auto contrast (Highlight) : -10 to +10
Auto sharpness
: -10 to +10
Saturation
: 50 to 200
Graininess Repression
: 0 to 10
www.minilablaser.com
QSS-29
Printer profile
The profile data which is gotten from the initial setup is stored in the
following place.
The printer profile calibration data only is stored in the file which was made
automatically in the setup procedure during the installation.
PRN_DIR
(The place where the printer profile data and the printer calibr ation data is stored)
File name
Contents
p009####.nkp
Basic data for making the printer profile (The data
which was registered when shipping from the
factory.)
p009####.cal
Basic data for the printer calibration data (Cal
which was registered when shipping from the
factory)
p109####.nkp
Printer profile calibration (The file which is to be
stored at site)
Note
This setup is for service
personnel
www.minilablaser.com
QSS-29
Printer profile form
p 0 09 2D 00.nkp
Chemical specification (No setting for chemical type each)
Number which means paper type (e.g. ROYAL8
Refer to the next page.)
Number which means the QSS-29 Make “p109##00.nkp” based on 2 files.
File which is registered when shipping a machine from the factory
P009##00.cal
Only “extension” is different from the “p009##00.nkp”, and be sure
to use those as a set.
p1 09##00.nkp
The file which is created and stored at site
(This is created and stored when carrying out the “Printer profile calibration” and
“Weekly setup”.)
www.minilablaser.com
QSS-29
Sign which means the paper type
BA-03Y
1A
SUPRA3
29
Crystal Archive type 60
38
QA7
1B
PRESTIGE
2A
Crystal Archive type 6C
39
SA-C
1C
ULTRA3
2B
Crystal Archive professional MP
3A
PORTRA3
1D
EDGE8
2C
Konica writable mat
3B
QX3
1E
ROYAL8
2D
Konica post card
3C
EDGE7
1F
DURA LIFE
2E
AGFA Professional Laser Paper
3D
ROYAL7
20
EXTAMAX RA
2F
Portrait
3E
QA-GD
21
SUPER FA TYPE-D
30
Russel Color paper type 2
3F
FA9
22
FA9 CLP C
31
Russel Premium color paper
40
TYPE11
23
FA9 CLP P
32
IP RA_1M
41
BA-02A
24
Crystal Archive professional type SP (EU)
33
IP RA_24M
42
CRYSTAL ARCHIVE
25
Crystal Archive professional type SP
(USA)
34
IP RA.1K
43
DIGITAL2976
26
Crystal Archive professional type C
35
Shared file
00
Kodak DAYLIGHT
27
Crystal Archive professional type S
36
DIGITAL3
28
Fuji Color Professional SFA-P
37
The above numbers are allocated for each specification by selecting the specification of
printer profile.
In the above table, all of the paper type is not supported with the QSS-29.
You have to check whether the profile data is available or not for paper type each.
www.minilablaser.com
QSS-29
Each printer profile
(e.g.) ROYAL8
Each media
Light source registration control data
p0092D 00.nkp
Positive slope correction
Negative slope correction
p0092D00. cal
Scanner parameter
Standard data which is used for the setup
There are“nkp.file” and “cal.file” as a set for each paper type.
Each channel balance value
Each key change ratio
Paper setup
Paper temperature change ratio
p1092D00.nkp
Specific setup data
The setup data is created, and it is used in the following steps (for updating the data
in the “Printer profile calibration” and “Weekly setup”).
Print
www.minilablaser.com
QSS-29
Monitor profile
Brightness adjustment/Monitor profile calibration
From the QSS-28, the colorimeter is used for the color
management between the monitor and print.
The data which is gotten from the colorimeter is stored into the following
place.
MON_DIR
(The place where the monitor profile data and the monitor gamma adjustment data is stored)
File name
Contents
m0010000.nkp
For making the monitor profile (The data which
was made when shipping from the factory.)
m1010000.nkp
Monitor profile calibration (File which is created
at site)
Data control file for service personnel
m2010000.nkp
File which is created at the same time of monitor
profile calibration
Data control file for users
Update the data when carrying out the Monthly
setup.
Note
www.minilablaser.com
QSS-29
Monitor profile form
m 0 01 ## ##.nkp
Number which means monitor of the QSS-29
0: File which is registered when shipping a machine from the factory
1: File for monitor profile calibration which is executed at site
2: File for monthly setup which is executed at site
About the monitor profile, the other files are created based on “m001###.nkp”.
www.minilablaser.com
QSS-29
Monitor profile flow
m0010000.nkp
Each media
Basic data
Light source registration control data
Positive slope correction
m1010000. nkp
Specific data
When carrying out the monitor profile calibration
during installation, the specific data is made
based on the basic data
Negative slope correction
Scanner parameter
Each channel balance value
Each key change ratio
Paper setup
Paper temperature change ratio
m2010000.nkp
Updating data of monthly setup which was made
based on the specific data
Gamma table
Monitor
www.minilablaser.com
QSS-29
Paper distribution for uniformity
Paper width to
be used
Uniformity
range
Number of
prints
82.5 mm
255.6 mm
6
89 mm
262.0 mm
5
102 mm
274.6 mm
3
114 mm
287.0 mm
3
117 mm
290.0 mm
3
120 mm
293.0 mm
3
127 mm
300.0 mm
3
130 mm
303.2 mm
3
152 mm
325.4 mm
3
165 mm
171.0 mm
2
178 mm
184.0 mm
2
203 mm
209.0 mm
2
210 mm
216.0 mm
2
216 mm
222.0 mm
2
240 mm
246.0 mm
2
254 mm
260.0 mm
2
279 mm
285.0 mm
2
305 mm
311.0 mm
2
When using the paper with 152 mm paper width
325.4 mm
152 mm
MLVA head
When using the paper with 165 mm paper width
171 mm
165 mm
MLVA head
www.minilablaser.com
Chapter 6
Mechanical adjustment
www.minilablaser.com
The point of this chapter
Purpose of study
• Study about the mechanical adjustment.
135/240AFC
Scanner/MLVA lamp section
Paper advance section
How to carry out the training
• Carry out the practical training mainly and
explain the cautions, referring to the
materials.
www.minilablaser.com
QSS-29
Practical training
* Remove and attach the scanner.
- Swing and Tilt Adjustment
- Light axis adjustment
- Light source registration
- Focus adjustment
* Show the scanner unit for disassembling to the trainee.
www.minilablaser.com
QSS-29
Practical training
* Adjustment of each AFC.
- Remove and attach the advance unit.
- Remove and attach the turn belt (lower).
- MMC head height adjustment
* Mechanical adjustment (Paper Supply Section)
- Remove the magazine mount.
- Remove and attach the paper supply unit.
- Adjust the paper cutter and replace the manual cutter.
* Remove the Lane Select Advance Unit.
- Show the arm section for disassembling to the trainees.
www.minilablaser.com
QSS-29
Practical training
* Remove the Exit Advance Unit.
- Position adjustment
* Remove the intermediate advance unit.
- Pressure adjustment
- Cautions when replacing and attaching the motor.
* Remove and attach the MLVA.
* Remove and attach the Exposure Advance Unit.
- Caution when handling the flat cable.
- When attaching the Exposure Advance Unit, tighten the screws
with pressing them against MLVA head side.
www.minilablaser.com
QSS-29
Mechanical adjustment
1. AFC
Point 1: In some of the sensor, only connector section itself can be replaced.
The other sensor should be replaced as a whole of sensor PCB.
Point 2: After replacing the AFC, the AFC focus adjustment for
each magnification is necessary for each AFC to be used.
2. Scanner lamp light source unit
Point 1: No need to replace the reflector (Cleaning only)
3. Scanner unit
Point 1: No disassembling (If you disassemble it, it will result in the
warranty becoming invalid.)
4. Calorimeter
Point 1: The colorimeter has its own data. (The attached FD contains it.)
www.minilablaser.com
QSS-29
Mechanical adjustment
5. MLVA lamp light source unit
Point 1: After replacing the dichroic filters, the stop position adjustment
of the dichroic filter is necessary.
Point 2: The stopper is added for Y and M filters.
Point 3: No need to replace the reflector (Cleaning only)
6. Filter wheel unit
Point 1: There is no compatibility with the filter wheel unit of
the QSS-27.
The shape of connection section with the MLVA head is
different from that of the QSS-27.
Point 2: Improvement
The uniformity will not be defective only after removing and
reattaching the filter wheel unit.
(The uniformity will not be defective also when removing and
reattaching the MLVA lamp light source unit.)
www.minilablaser.com
QSS-29
Mechanical adjustment
7. Magazine mount
Point 1: Possible to remove and reattach the magazine amount without tools.
Point 2: Zigzagging adjustment of paper supply unit is possible by
adjusting the positions of positioning pins (for magazine mount
A, B).
Point 3: When carrying out the zigzagging adjustment of magazine mount,
the following adjustments are necessary.
Head height adjustment of magazine mount
Position adjustment of magazine mount
Position adjustment of magazine detection sensor
Point 4: The position adjustment of paper end sensor A is necessary for
magazine mount A.
8. Paper supply unit
Point 1: The position adjustment is not necessary even after removing and
reattaching the unit. Because the position of unit is regulated by the
positioning pins.
www.minilablaser.com
QSS-29
Mechanical adjustment
9. Paper advance unit
Point 1: The position adjustment is not necessary even after removing
and reattaching the unit. Because the position of unit is
regulated by the positioning pins.
Point 2: There are two pressure pins in the arm section of paper
advance unit. Impossible to adjust the pressure power
adjustment of pressure pins only itself.
10. CVP (Correction Value Print) unit
Point 1: The ink ribbon cassette is smaller than the conventional ones.
Point 2: The special ink which will not stick around is used. It is
improved, comparing with the conventional ones.
11. Intermediate advance unit
Point 1: When removing the intermediate advance unit, remove it
after moving the exposure advance unit to the escape position.
www.minilablaser.com
QSS-29
Mechanical adjustment
12. Exposure advance unit
Point 1: Carry out the exposure advance unit zigzagging
adjustment in the “Exposure Advance Unit Zigzagging
Adjustment”mode.
13. MLVA unit
Point 1: The MLVA unit is replaced only itself, so no adjustments are
required after replacing the MLVA head (only itself), MLVA
temperature control unit and calibrator.
Point 2: The light amount of MLVA light source is increased. So two
cooling fans are attached for preventing the optical fiber cable of
MLVA unit from the heat.
Point 3: The interlock switch is attached to the MLVA cooling fan.
When the MLVA cooling fan malfunctions or the interlock
switch of MLVA cooling fan is removed, the lamp of MLVA
does not turn ON.
www.minilablaser.com
QSS-29
Mechanical adjustment
14. Exit advance unit
Point 1: When attaching the exit advance unit, attach it so that you
can put the positioning pins (two) into the holes on the
positioning plate (frame section) smoothly.
www.minilablaser.com
QSS-29
Mechanical adjustment (options)
1. 135/240MMC
Point 1: Explain the position adjustment of AF sensors.
2. Paper magazines
Point 1: The paper guide is different depending on the paper sizes to be used.
Point 2: The magazine should be replaced as a whole set.
(It is impossible to replace one part only itself.)
www.minilablaser.com
QSS-29
Tools for assembling the QSS-29
? Decide the following positions.
* Rail of paper advance unit
* Rail of magazine mount B
* The position where the paper is loaded
www.minilablaser.com
QSS-29
Tools for assembling the QSS-29
? Decide the position of positioning pin (forward) for
magazine mount A.
www.minilablaser.com
QSS-29
Screws which should not be touched
Positioning pins of paper
advance unit
Rail of paper
advance unit
Magazine drive unit
(magazine B side)
www.minilablaser.com
QSS-29
Screws which should not be touched
Rail of magazine
mount A
(Head height
adjustment screws)
Magazine drive unit
(magazine A side)
www.minilablaser.com
QSS-29
Screws which should not be touched
Rail of magazine
mount B
(Head height
adjustment screws)
www.minilablaser.com
QSS-29
Screws which should not be touched
Exit advance unit
Positioning plate
www.minilablaser.com
QSS-29
Screws which should not be touched
MLVA lamp light source unit
(Head height adjustment screw)
Scanner lamp light source unit
(Head height adjustment screw)
www.minilablaser.com
QSS-29
Maintenance and adjustment
* Paper Advance length Correction
* Dichroic filter Position Adjustment
* Inner Calibrator Gain Adjustment
* Scanner filter Position Adjustment
* Paper Pressure Operation Correction
As for the correction value, input the following number.
“Print No. which the banding does not appear on” added “2” makes
[Correction value].
www.minilablaser.com
QSS-29
Practical training
* Recovery
* Install the QSS software.
* Install the driver.
* Software upgrading
www.minilablaser.com
Chapter 6-1
Paper zigzagging adjustment
www.minilablaser.com
The point of this chapter
Purpose of study
• Study about the paper zigzagging adjustment
in the “Printer mechanical adjustment”.
How to carry out the training
• Carry out the practical training mainly and
explain, referring to the materials.
www.minilablaser.com
QSS-29
Zigzagging adjustment (Printer section)
1. Zigzagging adjustment of the magazine mount
Point 1: Carry out the zigzagging adjustment between magazine mount A, B
and the loading unit.
2. Zigzagging adjustment of the exposure advance unit
Point 1: Carry out the zigzagging adjustment of exposure advance unit only.
3. Zigzagging adjustment in single row
Point 1: Hold the paper by the both of arms in the paper advance unit.
Carry out the zigzagging adjustment of paper width.
4. Exposure center correction (master)
www.minilablaser.com
QSS-29
Zigzagging adjustment (Printer section)
5. Paper supply unit
Point 1: Carry out the zigzagging adjustment of the intermediate
advance unit.
www.minilablaser.com
QSS-29
Zigzagging adjustment (Magazine mount)
Zigzagging adjustment of magazine mount A, B
Procedure 1: Adjust the positioning pins.
Positioning pin
Positioning pin
Magazine mount (A) side
Magazine mount (B) side
NOTE
Carry out the zigzagging adjustment of magazine mount A, B
by moving the positioning pins toward the arrow direction.
www.minilablaser.com
QSS-29
Zigzagging adjustment (Magazine mount)
Procedure 2: Adjustment of magazine mount A
(Adjust so that the you can take the positioning pins in and out smoothly.)
Loosen 2 fixing screws.
(Magazine mount A)
Loosen 4 fixing screws of the metal
fittings for fixing the rail.
(Magazine mount A)
www.minilablaser.com
QSS-29
Zigzagging adjustment (Magazine mount)
Procedure 3: Adjustment of magazine mount B
(Adjust so that the you can take the positioning pins in and out smoothly.)
Loosen 4 fixing screws of the metal
fittings for fixing the rail.
(Magazine mount B)
Adjust 4 adjusting screws.
(Magazine mount B)
www.minilablaser.com
QSS-29
Zigzagging adjustment (Magazine mount)
Procedure 1: Set the magnet with the upper cover open.
Magnet
www.minilablaser.com
QSS-29
Zigzagging adjustment (Magazine mount)
Procedure 2: Make a print with the minimum width which is used in the
“Exposure Center Correction (Master)” ? ”FUNCTION”.
NOTE
The error message “No. 6036 Paper has jammed in the Exit Paper
Advance Section” appears, but clear the error and continue.
www.minilablaser.com
QSS-29
Zigzagging adjustment (Magazine mount)
Procedure 3: Put the both side of test print together, and check the
zigzagging.
CVP
(Correction Value Print)
NOTE
Adjust the positioning pins of magazine A, B each so that the
gap (width) of CVP on the test print is within 0.3 mm.
www.minilablaser.com
QSS-29
Zigzagging adjustment (Exposure advance unit)
Zigzagging adjustment of exposure advance unit
(pressure roller 2, 3)
Procedure 1: Make a print with the maximum width which is used in the
“Exposure Advance Unit Zigzagging Adjustment”
? ”FUNCTION”.
Procedure 2: Check the paper zigzagging amount of test print which is
made in the Procedure 1.
NOTE
As shown in the left illustration, tear the test print in half.
And, check the zigzagging amount on left and right side.
www.minilablaser.com
QSS-29
Zigzagging adjustment (Exposure advance unit)
Procedure 3: Adjust the zigzagging, losing the fixing screw and lock nut
of pressure roller 2, 3. Then, adjust with the adjusting screw.
Pressure roller (2)
Pressure roller (3)
Adjusting screw
Lock nut
www.minilablaser.com
QSS-29
Zigzagging adjustment in single row
Zigzagging adjustment in single row
Procedure 1: If the adjustment is necessary, make a print with the
maximum width which is used in the “Arm Vertical Error
Correction (Master)”? ”FUNCTION”.
NOTE
Check the position of standard line on the print.
The gap should be within 0.3 mm, as shown in the illustration.
(The gap of standard line between the leading edge and rear edge of the paper)
gap
www.minilablaser.com
QSS-29
Zigzagging adjustment in single row
Procedure 2: If the adjustment is necessary, make a correction for
“Magazine A” and “Magazine B” in the “Arm Vertical
Error Correction (Master)” mode.
NOTE*****************
“Arm Vertical Error Correction (Master)” is effective for the paper width
with 120 mm or more.
* The paper with the width 120 mm or more is advanced by both
arms (right/left) in single row.
* The paper with the width 117 mm or more is advanced by arm (left) only.
www.minilablaser.com
QSS-29
Exposure Center Correction (Master)
Adjustment Procedure
Exposure Center Correction (Master)
Procedure 1: Make a print in the “FUNCTION” of
“Exposure Center Correction (Master)”.
NOTE
Check that the length of arrow on the test print is half of the name of paper width.
As for the paper to be used as a test print, use the paper with minimum width
which is used in the machine.
www.minilablaser.com
QSS-29
Zigzagging adjustment (Printer section)
Procedure 2: If the adjustment is necessary, make a correction for
“Magazine A” and “Magazine B” in the “Exposure Center Correction
(Master)” mode.
NOTE*****************
The Exposure Center Correction should be carried out for magazine
mount A, B each.
www.minilablaser.com
QSS-29
Pressure balance adjustment of intermediate advance unit
Pressure balance adjustment of intermediate advance unit
Procedure 1: Make a print in the “Exposure Center Correction (Master)”
? ”FUNCTION”.
LEFT
RIGHT
NOTE
Check that the length of arrow on the test print is within + 0.5 mm to –0.5 mm.
www.minilablaser.com
QSS-29
Pressure balance adjustment of intermediate advance unit
Pressure balance adjustment of intermediate advance unit
Procedure 2: Make a print in the “Exposure Center Correction (Master)”
? ”FUNCTION”.
Roller (outside)
Roller (outside)
Roller (inside)
LEFT
Within 0.2 mm
Adjustment
screw
RIGHT
Within 0.2 mm
Adjustment
screw
www.minilablaser.com
QSS-29
Zigzagging adjustment (Printer section)
•
Fasten the set screws on the cam on the right side
and left side.
Adjust so that the gap between the pressure roller
(outside) and advance roller is 0.01 mm to 0.2 mm.
Total: 4 points
www.minilablaser.com
Chapter 7
Service items
www.minilablaser.com
The point of this chapter
Purpose of study
• Study each data flow when printing.
Movement sequence
Data calibration
Data flow for each print
Maintenance and adjustment
• Study the cautions when replacing PCBs.
How to carry out the training
• Explain the items, referring to the training materials
and a machine.
• Explain the PCBs which are necessary to be
replaced with care.
www.minilablaser.com
QSS-29
Movement sequence
* Have the trainees read Chapter 5, and give a test.
www.minilablaser.com
QSS-29
Cautions when replacing PCBs
Printer section
PCB
D J S B V
Others
Image processing PCB
1
1 1
-
-
Replace after removing it with the plate.
Image correction PCB
1
-
-
-
Replace after removing it with the plate.
Printer control PCB
1
1 1 1
-
D-ICE PCB (option)
1
1 1
-
-
Replace after removing it with the plate.
AFC/scanner control PCB
1
- 1 1
-
Sensor standard adjustment for each AFC
Colorimeter control PCB
1
- 1
-
“Paper Front End Advance Length
Correction” and “Paper Feed Error
Correction” in the “Colorimeter Unit
Adjustment”
D:
J:
S:
B:
V:
1
-
: DIP switch setting (Set it as same as before replacing.)
: Confirming the connector for the jumper (Set it as same as before replacing).
: Reading the System program
Reading the backup data
Necessary to adjust the potentiometer
1: Execute
- : Not execute
www.minilablaser.com
QSS-29
Cautions when replacing PCBs
Printer section
PCB
D
J
S
B V V
Others
Printer I/O PCB 1
-
-
-
-
- -
Printer I/O PCB 2
-
-
-
-
-
-
Printer I/O PCB 3
-
-
-
-
-
-
Pre-amplifier PCB
-
-
-
-
-
-
Carry out the inner calibrator gain
adjustment.
Calibrator connecting
PCB
-
-
-
-
-
-
Be careful of connecting the sheet
cable.
Scanner lamp power
supply
-
-
-
-
-
-
Confirm that the voltage (scanner lamp
connector section) is DC+27.7V±0.3V.
MLVA lamp power
supply
-
-
-
-
-
1
Adjust VR2 so that the voltage is
DC+27.7V±0.3V at the connector in the
MLVA lamp house.
www.minilablaser.com
QSS-29
Cautions when replacing PCBs
Printer section
PCB
D J S V
Others
Multi power supply
-
-
-
1 Adjust VR1 so that the voltage is
DC+5.15±0.05V at the connector in
the power supply section.
Printer power supply
-
-
-
-
D-ICE power supply
-
-
-
-
Processor section
PCB
D J S B V
Processor control PCB
1 1 1 1 -
SM I/O PCB
-
-
-
-
Processor power supply
-
-
-
- 1
Others
- Sensor sensitivity adjustment for
replenisher solution sensor
www.minilablaser.com
QSS-29
Cautions when replacing PCBs
Options
PCB
D J S B V V
PU control PCB
1 - 1
1
-
-
CVP PCB
-
-
-
1
-
-
Others
www.minilablaser.com
QSS-29
Cautions when replacing PCBs
Personal computers
PCB
D
J
S
B
V
Others
ATX mother board
-
1
-
-
-
BIOS setting
ATX power supply battery pack
-
-
-
-
-
Turn ON the ATX power supply
Hard disk drive
-
1
1
1
-
Following the recovery procedure, it is
necessary to carry out the items below.
Reading the OS
Reading the QSS software
Reading the DVD-RAM driver (option)
Reading the driver of flatbed scanner (option)
Reading the profile data
Reading the backup data
Setting each drive allocation
SMP-1700 Components of service parts (Z019507-01)
Mother board (For PC-NRT- 3)
Video card
CD-ROM drive
CPU (Pentium III 733MHz)
SCSI card
Floppy disk drive
DIMM (256MBPC133)
Non-stop power supply
Hard disk drive
Mouse
www.minilablaser.com
QSS-29
Data flow when printing (Negative, Positive)
When the optional D-ICE PCB is
attached, it detects and corrects the
dusts and scratches on the images.
Scanner unit
Editing the image
data
D-ICE PCB
Image processing
PCB
Image correction (e.g. color
and density correction, DSA)
Image correction PCB
Memory PCB
Negative, Positive
AFC scanner control
PCB
Storing the image data
temporarily
Control each AFC and
peripheral
Control the scanner unit
and the scanner lamp
PCI-LVDS conversion PCB
ATX mother board
Data output PCB
Transfer the image data which is inputted from
the image processing PCB to the MLVA
Video board
MLVA unit
Image data
Power signal
Communication control
between PC and SMP-1700
Monitor
www.minilablaser.com
QSS-29
Data flow when printing (Media)
Editing the image
data
Storing the image data
temporarily
Image processing
PCB
Image correction (e.g. color
and density correction, DSA)
Image correction
PCB
Memory PCB
Communication control
between PC and SMP-1700
Media
PCI-LVDS conversion
PCB
ATX mother board
Data output PCB
Video board
Transfer the image data which is inputted from
the image processing PCB to the MLVA
Monitor
Digital printer
MLVA unit
Image data
Power signal
Storage media drive
www.minilablaser.com
QSS-29
Data flow when storing the images
When the optional D-ICE PCB is
attached, it detects and corrects the
dusts and scratches on the images.
LVDS
Scanner unit
D-ICE PCB
Image correction (e.g. color
and density correction, DSA)
Editing the image
data
Image processing
PCB
Image correction PCB
Communication control
between PC and SMP-1700
Negative, Positive
LVDS
PCI-LVDS conversion PCB
AFC scanner control
PCB
Control each AFC and
peripheral
Control the scanner unit
and the scanner lamp
ATX mother board
Storage media drive
Media
Image data
Power signal
www.minilablaser.com
QSS-29
Illustration (Printer advance section)
Pressure roller 5
Pressure roller 4
Pressure roller 3
Pressure roller 2
Ready sensor
Exit advance unit
Paper exposure start sensor
Roller (Drive side)
MLVA unit
Arm (right)
Paper advance unit
Arm (left)
Roller (Pressure side)
Pressure roller 1
CVP
CVP roller
Cutter unit
Paper advance direction
Paper end sensor
Paper magazine (A)
Paper magazine (B)
Advance roller
Loading sensor
Paper supply unit
www.minilablaser.com
QSS-29
Arm operation (paper advance unit)
Standard arm position (paper advance unit)
Arm (left)
Receiving position
Receive waiting
position
Elevator sensor (left)
Horizontal advance
sensor (left)
Horizontal advance
sensor (right)
Paper advance direction
Printer cover side
Arm (right)
Elevator sensor (right)
www.minilablaser.com
QSS-29
Arm operation (paper advance unit)
Standard arm position (paper advance unit)
Receiving position
(Left)
Intermediate
waiting position
(Left)
Intermediate
waiting position
(Middle)
Receiving position
(Right)
Intermediate
waiting position
(Right)
Receiving escape
position
www.minilablaser.com
QSS-29
Arm operation for paper size each
Paper advance length
Paper width: 82.5 to 152.0 mm
Paper advance length:
82.5 to 119.9 mm
Arm (right) and Arm (left)
activate alternately.
Paper width: 82.5 to 152.0 mm
Paper advance length:
120.0 to 151.9 mm
Arm (right) and Arm (left) activate
alternately in a straight line
Paper width: 82.5 to 152.0 mm
Paper advance length:
152.0 to 216.0 mm
Arm (right) and Arm (left) activate
at the same time
Arm operation
www.minilablaser.com
QSS-29
Arm operation for paper size each
Paper advance length
*Paper width: 120 mm or more
Paper advance length:
216.1 mm or more
*Paper width: 152 mm or more
*Paper width: 117 mm or less
Paper advance length:
216.1 mm or more
Paper advance in single row by arm
(left)
Arm operation
Arm (right) and Arm (left)
activate at the same time.
www.minilablaser.com
QSS-29
Errors and countermeasures
*Film jam
*Paper jam
www.minilablaser.com
QSS-29
Maintenance
*Time to replace
*Cleaning the drives
Service Manual 8001
www.minilablaser.com
Chapter 8
QSS-NET
www.minilablaser.com
The point of this chapter
Purpose of study
• Study the QSS-NET
How to carry out the training
• Explain, using the training materials and
machine.
www.minilablaser.com
Outline
QSS Remote Service tool (QSS-NET+pcAnywhere)
*This has two functions below.
Data collection function of QSS-NET
Remote control function of pcAnywhere
However, it functions only under the Windows 2000 (which is the same
OS with the QSS).
www.minilablaser.com
Components
(Customer?s site)
*Modem
*Driver of modem
*QSS Remote Service tool
(Each service base)
*Windows 2000
*Modem
*Driver of modem
*pcAnywhere (goods on the market)
*QSS-Net 2000
www.minilablaser.com
Comparison (support tool)
*QSS-2701
QSS-NET
*QSS-2711DLS
pcAnywhere
*QSS-2801/02
QSS Remote Service Tool
*QSS-2901
QSS Remote Service Tool
www.minilablaser.com
Comparison between QSS-NET and pcAnywhere
Support
tool
In case of ONline
Data
collection
Software upgrading
Mail
function
Supported
OS
QSS2701
QSS-NET
Only maintenance
data can be
checked/set. (You
can operate only QSS
data.)
Historical error,
maintenance
data collection
can be possible.
Remote software upgrading
(It is possible to send all
data in one time.)
Possible to
send a mail
both from the
QSS-2701 and
QSS-NET
Win95/98
QSS2711DLS
pcAnywhere
Setting is possible
with all remote on the
DLS PC
Impossible
(Possible only
in the on- line)
When upgrading, you can
select the necessary data
separately.
Chatting is
available.
Win3.1 to
Win2000
QSS2801/02
QSS Remote
Service tool
Setting is possible
with all remote on the
PC
Historical error,
maintenance
data collection
can be possible.
Remote software upgrading
(It is possible to send all
data in one time.
When upgrading, you can
select the necessary data
separately.)
Possible to
send a mail
both from the
QSS-2801/02
and QSS-NET
Chatting is
available.
Win2000
QSS2901
www.minilablaser.com
Setting procedure
(Customer?s site)
1. NMC2 setting
2. Registration of modem
3. Installing the modem driver
4. Installing the QSS Remote Service tool
5. NMC setting (on the QSS)
(Each service base)
1. Installing the modem driver
2. Installing the pcAnywhere
3. Installing the QSS NET 2000
www.minilablaser.com
Necessary hardware
Use modems and TAs which are for Windows2000.
www.minilablaser.com
Support route
Head office
Host
Branch shop
Branch shop
Branch shop
QSS customer
QSS customer
QSS customer
NMC
NMC
NMC
Overseas
subsidiary
companies
FTS
Head office
Technical
Support
Division
NKC
www.minilablaser.com
Telephone lines
QSS-NET
Host PC
QSS-customer
NMC
Modem
QSS-NET
Host PC
Modem
QSS-customer
NMC
TA
TA
www.minilablaser.com
Practical training
•Installation (setting)
•Operation way
*Remote connection
How to input the special password
How to invalid the keyboard operation on the QSS side
•Receiving and sending the mail
•Chat
•Collecting the data (Historical errors,etc.)
•Remote upgrading
www.minilablaser.com
Cautions
•When remote connected, do not use the function of ”Output
check”.
•The color and resolution of the scanning display (e.g. PJP) is
not same with the QSS.
•You cannot check the display of “Input check” on time from
the Remote side.
•When remote connected, the connection will be cut
compulsory if you do not do anything for 5 minutes or more.
•When remote connected, lock the keyboard of the QSS side.
www.minilablaser.com
Chapter 9
Replenishment devices
www.minilablaser.com
The point of this chapter
Purpose of study
• Study the change points from the conventional SM
machines.
How to carry out the training
• Explain using the training materials.
QSS-29
www.minilablaser.com
Change points from the conventional machines
SM Forced replenishment
•Purpose
To reduce what the processing solution remains in the SM Replenishment package.
1. Environmental regulation measures in the Northern America
If the users throw away the package, it is necessary to keep the condition
– remained amount < 3% of package amount -.
2. Problem of solution control
•Software switch [SM replenishment setting ON/OFF]
There is the software switch [SM replenishment setting ON/OFF] in the [Machine Specification].
ON: The Forced replenishment is carried out.
OFF: The Forced replenishment is not carried out.
With this switch, you can select ‘ON’ or ‘OFF’ for the Forced replenishment, to avoid the problem temporarily
when the error occurs. It should usually be set “ON”.
• [SM Forced Replenishment amount setting ON/OFF]
(Scheduled to available after the mass production shipping)
When the processing solution level is too low, the Forced Replenishment Movement activates the replenishment pump
to replenish the other solution in the same package forcely.
The processing solution level detection is carried out and the solution level is detected for each chemical.
Or, the replenishment pump is stopped for each chemical when it reaches at the limit amount.
The limit amount of the forced replenishment is set in the [SM Forced Replenishment Amount setting] of
[Total Replenishment Amount].
QSS-29
www.minilablaser.com
Change points from the conventional machines
•Attention [Replace the Replenishment Package with a new one.]
This attention is displayed in the conditions below.
Attention No.
The condition of occurrence
SM Replenishment
setting
700-##
Forced Replenishment was not carried out.
705-##
Forced Replenishment was carried out.
OFF/ON
ON
•The Replenishment pump is changed and the separate detection function
for each solution sensor is added.
Type-O belloz pump is changed to type-2.
Purpose: Reducing the time for forced replenishment
: Improving the stability of remained capacity
And, the solution level is detected separately for the processing solution sensor each.
(Change of SM I/O PCB: Refer to page 7.)
•Amount Remaining Detection is removed. (Scheduled to available after the mass production shipping)
The Package Amount setting is removed because the package amount may be changed in the future.
At the same time, the remained detection errors and the mode below are removed.
Check the remaining amount.
Reset the amount?
Package Remaining setting mode