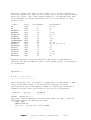
1
Trs8bit Hi everyone and welcome to this ‘BUMPER’ 32 page edition, which starts off our 7th year! I don’t like starting off with sad news, but I’m sorry to report the untimely death of Lance Wolstrup. He’s known to many Tandy fans in the UK as the editor in chief of the TRSTIMES magazine, which was published in the states from the late 1980’s to 1995. He was a big supporter of all things ‘Tandy’ and will be sadly missed. I feel there’s a ‘Big Hole’ left in the Tandy scene, which will be very difficult, if not impossible to fill. There’s quite a bit to report on the news front. Although ebay, UK, has been quiet, apart from the sameold adverts for cassette software at £90 a time etc etc, I noticed a Model 100 In this is sue of T R S8 B I T Large numera ls Model 1 RS23 2’s MacInk er Laurie Sh Assem ield’s NOTES bler Pt.1 Keyboa practi rd ce M3 & M 4 Hard dis partit k ions selling for just under £50. Matthew Reed has issued various upgrades to his TRSREAD/WRITE software and TRSTOOLS. Miguel Dutra has released V1.6 of his VDK-80 software. The Model100 Club is running a programming competition. Entries must be in by 15MAR13 so by the time you read this, you’ll be needing to get your ‘skates’ on! Neil Pinner has a Tandy LPVIII printer for sale. Email me if you want further details. ‘DROID-TRS’ should be available on beta testing shortly. Terry Stewart has a great article on his website re semi-virtual diskettes (SVD) which ‘sit’ between a PC and a system-80. For further details on any of the above items, please check out the individual websites. there are links ready to use on trs-80.org.uk For those of you who will recall, in the last issue, the excitement, on the runup to Xmas, when I though I might be running ‘real’ disks on my M1. Well, I’m sorry to report that Santa got it wrong, just a bit! The twin disk drive I received was from a switchable 40/80 track, ex BBC bit of kit. Mav did warn me about that possibility. I managed to find a BBC disk (Continued on page 2) TRS8BIT - volume 07 Issue 01 - March 2013 - page 1 drive guide on ebay and the diagram below shows the problem. It seems it can read and write a 40 or 80 track disk which it has written itself, quite happily, but it’s not able to read ‘old style’ 40 track disks. Not to worry too much though, I’ve still got my virtual disks on Matthew Reed’s emulator, it’s just that I would have liked to try and read my old disks from the 1980’s. It’s no good, I shall have to send them off to Ira for conversion! the second is on hard disk partitioning on the M3 & M4’s. The latter has step by step instruction to help as you go along. It’s a very impressive article, with a lot of technical detail and Quite mind blowing to me! And while I’m telling you all my woes, another slight disappointment was with the MacInker! It seems that the main ribbon I wanted to reink, for my Tandy LPVII, needs a specific re-inker and not the universal one. Anyway, Dee has promised to try and replace the ribbon in the cartridge as soon as her hand is better. What would we do without these women eh? J ust in case you haven’t come across the MacInker, I’ve reprinted, on page 9 and 10, one of their brochures from the 1980’s. most good teachers, of inspiring enthusiasm in everyone around him. And so to details of this ‘bumper’ edition. Ian Mavric has sent a couple of articles. The first on M1 RS232 cards and TRS8BIT - Then, there’s part one of Laurie Shields ‘Assembler Notes’ from the 1980’s. If you want to start or wish to brush-up your assembler programming skills, this is where to begin. I remember attending a couple of talks given by Laurie in the 1980’s, he had the patience of J ob and that knack, like There’s also a couple of ’BASIC’ article on printing large numerals and also one to help improve your keyboard skills. Well, that about wraps up this, biggest yet, issue. I hope you find it informative and enjoyable. J ust to wet your appetite for the J une 2013 edition, Mav has promised an article on the Model 2000. That will be a first for TRS8BIT. I, for one, can’t wait. Take care Dusty volume 07 Issue 01 - March 2013 - page 2 While I was delving into an old edition of Personal Computer World, during all the Christmas festivities, this little program caught my eye. I though it might be of interest for me when I'm playing about with label printing. Mind you, I'm always very wary of the usual caveat stating something like, "should convert quite easily for use on other machines". As the program was originally written for the Commodore PET, I was quite happy to 'have a play' and see how I managed to get on. I've a little program conversion book, which I've had for years, and I thought I could refer to it, if and when needed. for instance, line 100 is the PET equivalent of CLS. low and behold, it didn't take too long and turned out to be quite a nice little program. The only cosmetic change I thought might be required, was to reduce the print matrix from 6x7 to 5x7. This seemed to give a much more balanced display on my Model 1. Then the usual thought crossed my mind! I wonder if I would be able to make it into a one-liner. There certainly wouldn’t be enough room for all those data statements. those pesky commas take up far too much room!. so it was going to need a complete re-think and re-write! TRS8BIT - volume 07 Issue 01 - March 2013 - page 3 I decided, instead of building an array of information for the formation of the characters, I would place it all in one string. (B$ in the program below). I could then extract the information using ‘VAL’ and ‘MID$’ functions. In order to run the program continuously, the ‘L’ ‘for-next’ loop was also added. I also took the opportunity to change the matrix layout to 5x7. Once again, it was producing a number clearly and reasonably quickly, but there still remained one main problem. I would always need to print more than one number at a time. Up to seven would be ideal, though there is room for eight! A reasonably simple task in the usual run of things, but I still wanted to keep the program as a one-liner! so; I changed the input statement to a string, x$, and calculated the length of the input-number string. Then I added an additional loop (FOR NEXT t) to print each number’s 7th part formation across the screen. once again, I extracted the information using TRS8BIT - volume 07 Issue 01 - March 2013 - page 4 ‘VAL’ and ‘MID$’ functions. I also needed to add a couple of spaces to the print statement to fill-out the numbers. I also had to fill-out the single “*” to the 5 character matrix size. Because of these changes, I had to sacrifice the continuous loop. However, since it’s only a matter of typing ‘run’ each time I wanted to produce a label, I wasn’t too worried. I also decided to change the “*” to a “@” for no other reason than I preferred it! As you’ve seen, these little programs can turn out a bit like ’topsie’, but they are such great fun! Don’t forget, to change the print to lprint when needed. TRS8BIT - volume 07 Issue 01 - March 2013 - page 5 IN MAV’S WORKSHOP - SUPPLEMENTAL by Ian Mavric CURING MODEL 1 RS232C SERIAL BOARD WOES - PART 1 In my capacity as a TRS-80 repair specialist1 I see lots of hardware and many variations of it that the more casual TRS80 user may not be aware of. Take the humble Model 1 RS232 board2 which fits inside the Expansion Interface in its own little compartment. Most people only think there is one type, but there are actually two, an early one and a later one. Today's discussion will centre around the Baud Rate Generator (BRG) chip and its power supply circuitry. Three main things go wrong with the RS232 board: the BRG, the UART, and the line drivers. The most common one being the BRG. I was called in to help John Benson and Terry Stewart solve a problem which manifested itself as a serial port with a BRG which was overheating and otherwise not working3. The boys noticed that early M1 RS232 boards from 1978-79 had a very pale bluey-green circuit board and a BR2941 BRG. They were comparing with a later board which has a dark-green circuit board and a BR1941 BRG. I was able to compare both boards side by side, due to having both on hand, and could quickly see three extra components on the early version, R10, R11 and C9. Examination of these parts revealed that they are required to feed -5V to Pin 10 of the BRG (U10/10). The early BR2941 BRG needs -5V on U10/10 but the later BR1941 BRG doesn’t. Examination of the data-sheets for the two BRG’s shows that this is the only difference. Terry tested this theory by installing a BR1941 in the early board with Pin 10 bent out so it didn’t go into the socket and it worked. Wanting to set some steadfast rules for replacing the BRG in the future I compared the data sheets for a number of compatible devices including the COM8116, COM5016, AY-58116, and the WD1943PD, which is the BRG in the Model 4P4. And while the all vary in capabilities, they are all backwards compatible with the BR1941/2941. So I have summarised it in this statement: “When replacing any BRG in any M1 RS232 board with a modern equivalent, always bend out Pin 10.” I tested this first by installing the BRG out of an unused 4P motherboard I had in my parts-bin and it worked, and then I bought some COM8116 BRG’s off eBay and tested one of those which also worked. COM8116 seems to be the most common BRG available for purchase online. TRS8BIT - volume 07 Issue 01 - March 2013 - page 6 NEXT TIME I will discuss issues pertaining to the Uart, Line drivers and other aspects of the M1 RS232 board. [email protected] REFERENCES: 1. http://ianmav.customer.netspace.net.au/trs80/ 2. "TRS-80 Catalog" RSC-5, Sept 1981 pp. 13. 3. http://www.classic-computers.org.nz/blog/2011-10-29trs80-model1-rs232.htm 4. Model 4/4P Technical Reference Manual, Tandy Corp, Cat No. 26-2119, 1985, pp. 142-3 "4.2.16: RS-232-C Circuit". Early RS232 with BR2941 and R10 R11 and C9 Late RS232 with BR1941 and no R10 R11 C9 TRS8BIT - volume 07 Issue 01 - March 2013 - page 7 Model 4P BRG installed in a M1 RS232 board Notice pin 10 away from the socket. Ian Mavric is an IT Specialist who also restores and collects TRS-80's and classic cars. He live with his wife and kids in Melbourne, Australia. TRS8BIT - volume 07 Issue 01 - March 2013 - page 8 TRS8BIT - volume 07 Issue 01 - March 2013 - page 9 TRS8BIT - volume 07 Issue 01 - March 2013 - page 10 ASSEMBLER NOTES Laurie Shields Introduction "We have not yet succeeded in answering all your questions ... Indeed; we feel that we have not yet answered any of them. The answers we have found only serve to raise a whole new set of problems. In some ways we feel we are as confused as ever, but we believe that we are confused on a higher plane, about more important things." Assembler Programming One school of thought defines assembler programming as the nearest thing to the tortures of the Spanish Inquisition, in its ability to deprive its sufferers from sleep and recognisable human social behaviour; but this opinion cannot truly be relied upon because it totally disregards the self inflicting masochistic aspect of the disease. Perhaps though we ought to at least consider how the external symptoms are displayed. Usually they take the form of the sufferer ceaselessly keying in at the nearest computer some totally meaningless expressions, that they fondly believe to be 'English type words' and then asking the computer to change the words into equally meaningless numbers. When finished the net effect of their efforts is to achieve the same result as switching the computer off but without the benefit of saving any electricity. Some of the more expert practioners in the art form have even been known to fill the video picture with one thousand and twenty four '@' characters and generate a buzzing noise as the penultimate climax to their hours of unceasing toil. Ordinary BASIC programmers, who can't get beyond fifty '@' characters before the dreaded 'Out of String Space' appears on their videos, go in awe and trembling before the amazing powers of the assembler. The following pages on assembler programming and machine code in general on the TRS80 are the result of some considerable pressure from Brian to put down on paper the content of some of the talks and discussions on Zen that have occurred over the past eighteen months. I am deeply indebted to a large number of people especially John Hawthorne who wrote the original Zen and also to Radio Shack for producing the TRS80 and Scripsit as well as countless others who gave me help when I started and didn't know the difference between a Byte and a Bootstrap. Laurie Shields. Chesterfield. September 1981. TRS8BIT - volume 07 Issue 01 - March 2013 - page 11 Chapter 1 To get the best use from these notes you really ought to have a live TRS80 with Zen powered up and working. As there are a number of different versions of Zen with differing degrees of sophistication I shall try to refer only to the original fundamental commands which to a great degree are all upwardly compatible. Zen in its original cassette only form is marketed by Newbear for the TRS80 and other Z80 machines (Sharp, Nascom etc) and in its upgraded enhanced format for the TRS80 Cassette, Aculab or Disc by Laurie Shields Software. Just to get started and at the same time to use Zen to explore the inside of the TRS80, key the following: Q5712 <E> and also, by itself X <E>. Now we have some explaining to do as your video looks like a meaningless jumble of numbers and letters. It actually is displaying part of the Leve12 Rom, a few other bits as well and should be: 1650 1658 1660 1668 1670 1678 1680 1688 C5 53 53 4F 54 49 54 C9 4E 45 C3 4D 41 4D C7 46 44 54 4D CE C9 D2 4F D2 C6 D3 44 45 4E 45 54 45 4F 45 D2 58 50 41 4F 53 52 54 41 54 55 44 D2 54 D2 C3 4E C4 54 CC 55 4F 45 4C 44 41 C4 45 4E 52 ENDFORRE SETSETCL SCMDRAND OMNEXTDA TAINPUTD IMREADLE TGOTORUN IFRESTOR .ND.OR.E SET.ET.L S.MD.AND OM.EXT.A TA.NPUT. IM.EAD.E T.OTO.UN .F.ESTOR HL DE BC AF RI IX IY SP PC 0000 0000 0000 0000 0000 0000 0000 0000 0000 0000 0000 5514 402D If the numbers you have on display for the last two lines are a bit different, DON'T PANIC. It only means that you're on cassette, or floppy tape or are using a different Dos from the one I was using when this was written. In order to understand any of what Zen is trying to tell us we must first of all make the effort to comprehend the way information, be it program or data, is stored in the computer and the conventions used to present it at the human interface. Right down at rock bottom most if not all computers store and evaluate numbers in simple binary 0's and 1's. However most of the time we and the computer operate not with these individual Bits but with eight of them at a time called Bytes. Invariably however, just to break the first rule TRS8BIT - volume 07 Issue 01 - March 2013 - page 12 straight away and purely for our convenience, these bytes are split into half bytes called nibbles, so that we can avoid having to do mental arithmetic to base 256. By thinking in terms of 4 bits at a time, the powers-at-be have forced us into straining the brain and understanding hexadecimal arithmetic (base 16), which isn't really too bad, and not much worse than feet and inches. Consider the eight bits below with their numeric values when the bit is set (i.e. equal to 1 rather than 0): Bit number: Decimal val. Hex value. 7 6 128 64 80 40 5 32 20 4 16 10 3 8 08 2 4 04 1 2 02 0 1 01 Now it doesn't take an overdose of grey matter to see that the values of bits 0 to 3 can be represented by the right hand half of two hexadecimal digits and the bits 4 to 7 by the left hand one. Even if all the bits 0 to 3 were set giving a value of 1 + 2 + 4 + 8 = 15 this would not exceed the ability of hexadecimal notation, where 15 is represented by F. Crib Sheet for the newcomers: Decimal: 0 1 2 3 4 5 6 7 8 9 10 11 12 13 14 15 Hexadecimal: 0 1 2 3 4 5 6 7 8 9 A B C D E F Even Better Crib Sheet for beginners and experts: U N I T S Ascii Value Tens 0 1 2 3 4 5 6 7 8 9 00 00 01 02 03 04 05 06 07 08 09 Printer & 10 0A 0B 0C 0D 0E 0F 10 11 12 13 Display 20 14 15 16 17 18 19 1A 1B 1C 1D Codes 30 1E 1F 20 21 22 23 24 25 26 27 1"4$%&, 40 28 29 2A 2B 2C 2D 2E 2F 30 31 ()-+,-./Ol 50 32 31 34 35 36 37 38 39 3A 3B 23456789:; 60 3C 3D 3E 3F 40 41 42 43 44 45 <=>7@ABCDE 70 46 47 48 49 4A 4E 4C 4D 4E 4F FGHIJRLMNO 80 S0 51 52 53 54 55 56 57 58 59 PQRSTUVWXY 90 5A 5B 5C 5D 5E 5F 60 61 62 63 Z abc 100 64 65 66 67 68 69 6A 6B 6C 6D defghijklm 110 6E 6F 70 71 72 73 74 75 76 77 nopgrstuvw 120 78 79 7A 7B 7C 7D 7E 7F 80 81 xyz 130 82 83 84 85 86 87 88 89 BA BE 140 8C 8D 8E 8F 90 91 92 93 94 95 Graphic 150 96 97 98 99 9A 9B 9C 9D 9E 9F Codes 160 A0 Al A2 A3 A4 A5 A6 A7 AS A9 128 to 191. 170 AA AB AC AD AE AF B0 B1 B2 B3 180 B4 B5 B6 B7 B8 B9 BA BB BC BD 190 BE BF C0 C1 C2 C3 C4 CS C6 C7 Space TRS8BIT - volume 07 Issue 01 - March 2013 - page 13 200 210 220 230 240 250 CB D2 DC E6 FO FA C9 D3 DD E7 Fl FB CA D4 DE E8 F2 FC CB D5 DF E9 F3 FD CC D6 E0 EA F4 FE CD D7 El EB F5 FF CE D8 E2 EC F6 CF D9 E3 ED F7 DO DA E4 EE FS Dl Compression DB Codes E5 192 to 255 EF F9 In one eight bit byte we have the ability to store any number from 0 (decimal), OOH (hexadecimal) or 0000 0000 (binary) up to 255 (decimal), OFFH (hexadecimal) or 1111 1111 (binary). We have now gone and confused you by putting a 0 in front of the FFH and someone wants to know why. Well the answer is relatively simple and it doesn't mean that we have squired an extra ninth bit of value zero, it simply follows on from our normal programming convention that if something begins with a letter it is a variable and something beginning with a numeric digit is a number. So to avoid any possible confusion we always (well nearly) put a leading zero in front of any hex number that begins with a letter. Now this convention is purely one way, is from human to computer. This is because the computer cannot guess as to whether when we key FFH we mean a number, a label or variable or just a plain expletive deletive. When the computer is giving us information the assumption is made that we know what we have asked for and should recognise it when we see it. So what happened after we keyed Q5712 ? Well the first thing Zen did was to check whether or not we had put an 'H' at the end of our input. Had we done so the Zen would have treated it as hexadecimal; since there wasn't it was treated as an ordinary base ten decimal number and Zen turned the 5712 into hex and rounded the last digit down to the nearest 0 or 8. Decimal 5712 converts exactly to 1650 Hex, in this case no rounding was necessary. The letter Q was interpreted by Zen as a 'Query memory' command so Zen started by printing the value, 1650 and then examined the TRS80's memory starting at 1650 and displaying in hex each byte from 1650 to 1658. The right hand half of the display is an Ascii representation of the same 8 bytes of memory but shown so that the bytes whose values are greater than 127 and not normally considered as displayable Ascii art. depicted in two formats for maximum information. On the extreme, right is the academically correct display where any bytes greater than 127 are shown as full stops. On the left is a much more TRS8BIT - volume 07 Issue 01 - March 2013 - page 14 interesting presentation as all the bytes are displayed as recognisable letters. This conversion from unprintable to printable is achieved by Zen subtracting the value 128 from any number greater than 127. Now this is no accident or defect in the ROM because if we look closely at the letters we see that what is shown is a listing of some of BASIC's instruction codes such as END FOR RESET etc. except that there are no spaces in between. This is a look-up table used by Leve12 BASIC to check on the spelling in your Basic program and if what you key in doesn't match any of the words in the table you get a syntax error. By squashing all the words together Microsoft saved themselves quite a lot of ROM that would been just spaces but they then had to figure out a way of knowing when they had come to the end of one keyword and the start of the next. This they did by adding 126 or 80Hex to the first letter of each word and then, simply by testing if any letter was bigger than 127, they knew where each word started and so to get the correct spelling all they had to was deduct 128 to obtain the correct Ascii value. This in machine code is the equivalent of starting every word with an enormous 'capital' letter. Now adding, subtracting and testing for this magical 128 is not very difficult in machine code as it depends solely on whether Bit 7 is set or not, a condition that is very readily detected with the Z80 chip. So Zen will tell us anything we want to know about the memory in our TRS80, just key the letter Q followed by the address and there it all is. If you want the next 64 Bytes there's no need to give the address again as Zen remembers where the last block finished so just key Q <E>. Should you require a printout of the Q display then key Shift Q instead of Q and the display will be routed to the lineprinter driver in Zen. TRS8BIT - volume 07 Issue 01 - March 2013 - page 15 Chapter 2 Now what on earth are we to make of the second part of the display: HL DE BC AF RI IX IY SP PC 0000 0000 0000 0000 0000 0000 0000 0000 0000 0000 0000 5514 402D Well lets think of a BASIC program that has the line: 100 LET Y = 4 + 3 * 3 and imagine that we stopped the program with the Break key just as the Z80 had finished working out that line. We could then tell the computer to PRINT Y and get the answer 13. Obviously, the variable Y has had it's value stored somewhere, after it was evaluated and, of course that somewhere is in a few bytes of RAM that BASIC has allocated from the memory that was not needed for other things. Now in the middle of processing that line of code the computer had first of all to get the number 4 on one hand, then calculate 3 times 3 (probably using it's toes); add the two numbers together (somebody else's toes); check whether there were any more sums to do and then, and only then, put the result into RAM. Thus releasing the fingers, toes and brain for the next sum. In the Z80 chip the arithmetical brain is known as the Accumulator or, register, where any numbers in the range 0 to 255 can be added, subtracted, compared or fiddled about with. Since the A register can only hold numbers up to the value 255, consider what will happen if the Z80 tries to evaluate the sum 250 + 20. The result is like adding say 95 and 8 pence. We get 3 pence and an overflow or carry of 1 into the pounds. The result of 250 - 20 in the Z80 is 14 with carry i.e. 250 + 20 = 270 = too big. therefore 270 - 256 = 14 + Carry. the same in hexadecimal: Carry Sixteens Units F A add 1 4 ===================== E 0 1 ========================= 0 E TRS8BIT - (15*16 + 10 = 250) (01*16 + 4 = 20) ( A+4 = 10+4 = 14) (15+1 = 16 = 0 + C) with carry. volume 07 Issue 01 - March 2013 - page 16 Since there isn't any room in the A register (remember there's just 8 bits) to store the information about the carry condition we have to have another register alongside where interesting things such as Zero, Carry, Positive or Negative states are brought to the Z80's attention. As this register is effectively waving flags at, or because of the Accumulator, it is known as the Flag or F register. These two registers are the best of friends and very little activity in the A register is not known about in the F. However there is one very important exception and that is the simple loading of data into the A register. F couldn't care a fig - he's only bothered about exiting events like adds, subtracts and compares. That's sorted the brain out, where are the fingers and toes. Well theses are the other registers and we have quite a few. Just to make life simple forget completely about RI (that's something to do with refresh and interrupts - all very nasty), forget nearly completely about. IX and IY, and just put to one side for the moment SP (this stands: for stack pointer - very important). PC stands for program counter and is simply the address of the next byte of machine code that the Z80 would execute. That leaves HL, BC and DE with a repeat underneath alongside another AF Those on the bottom line are there just to confuse you, they are known as the alternative set of registers and represent the fact that the Z80 is very nearly two microprocessors in one with a duplicate set of registers available for use if necessary. Since Microsoft didn't find it necessary to use them to get the TRS80 to work I doubt if we will need them either. So we are left with HL, BC and DE. These can be used as 6 independent 1 Byte (8 bit) registers H, L, B, C, D and E or as 3 combined 16 bit ones depending on what you want them for. The HL pair ( H stands for High and L for Low - tens and units if you like except the tens are two hundred and fifty sixes) is the cleverest of the three and has a limited brain of it's own. Liken it to the fingers, right hand for H and left for L. The others BC and DE are relatively dumb but we couldn't get along without them. B is perhaps the most useful and has a great propensity for counting. Just the thing for stepping through a program and keeping a count of the number of steps. Unfortunately it's a little bit more complicated than just pressing the break key to stop in the middle of a machine code program and find out just what are the values held in the various registers but it can be done when using the de- TRS8BIT - volume 07 Issue 01 - March 2013 - page 17 bugging facilities that Zen offers us. It is then that the 'X' display becomes meaningful because it shows us just exactly what the Z80 was up to at the stage of the program when we set the breakpoint to interrupt it. So until we have used the de-bugger to jump into and break out of a program the values displayed by the X command are just as meaningless as telling the computer to PRINT Y would be before we ran the BASIC program that gave Y its value. Just before we leave the registers we should note that as the register pairs HL, BC, and DE can perform as 16 bit registers, it is possible for them to comprehend a number as big as FFFFH or 65536 and as little as 0. This makes them very useful in pointing to a particular byte in memory for storage or retrieval. HL, remember the pair with very little brain, can also do adds and take-aways in 16 bit arithmetic provided the other number is stored in either BC or DE. PC (program counter), SP (stack pointer), IX and IY (index registers) are all inseparable 16 bit registers intended for storing memory addresses. It is best not to try and grasp the whole complexities of the Z8O chip in one go. Instead just get to know each register in turn as you use them in your programs. To start with it is sufficient to know that A holds a small number and can do clever sums with the help of the F, and that HL and BC can hold big numbers. If we need to store a lot of small numbers HL and BC can be treated separately as H, L, B and C. TRS8BIT - volume 07 Issue 01 - March 2013 - page 18 Chapter 3 Negative Numbers Negative numbers are a concept that the Z80 would rather do without. Either there's a 1 there, in which case something is there, or there's a 0 and there's nothing there. The preposterous idea that there is less than something there is just too ridiculous. But since we humans insist on using this hair brained idea then the Z80 tries its best to comply. Picture the number 255 Dec or OFF Hex in binary notation, (remembering that that leading zero is just to stop the computer thinking you're swearing at it): OFF Hex = Binary 1111 1111 Beautiful! Since we always write our minus signs on the left of a number lets turf the leftmost bit over on its side like this: -111 1111. Now we are getting somewhere. That's a negative number if ever I saw one; but what is it? The easy way to find out is to add 1 to it and see what happens. Ready? - 1 1 1 1 1 1 1 add 0 0 0 0 0 0 0 1 ---------------- Left blank for you to fill in. ---------------Stand by to check your answer: One plus one equals zero with carry. One plus zero plus carry equals zero with carry. One plus zero plus carry equals zero with carry. One plus zero plus carry equals zero with carry. That's half of it done. One plus zero plus carry equals One plus zero plus carry equals One plus zero plus carry equals Remember that the minus sign is on its side so the last one: zero with carry. zero with carry. zero with carry. really just a Bit = 1 lying One plus zero plus carry equals zero with carry falling off the end (advanced students might guess that it didn't really fall off it went into the Carry flag, more about that later). Answer: 0 0 0 0 0 0 0 0 = 0 Dec. TRS8BIT - volume 07 Issue 01 - March 2013 - page 19 So if adding 1 makes the original number 0 then the original number must have been -1. (Get out of that.) OK I know it didn't look like minus one but I did warn you that the Z80 wasn't happy about it either. The following is the way the Accumulator would store the number -128 if you wanted it to: 1 0 0 0 0 0 0 0 ie 80 Hex. (Try adding 1 a hundred and twenty eight times.) Minor Diversion to talk about flags: ----------------------------------As we have a potentially dangerous situation here, since a number in the A register could be treated as a large positive one (between 121 and 255) or a smaller negative one we had better do some flag waving to check on where we are. To help us is the friendly unassuming F register with a very useful flag which is waved whenever one of the instructions that can affect the flags detects that Bit 7 is set at 1, i.e. negative. We can use this flag in our assembler program decision making by utilising instructions like: JUMP if POSITIVE to ADDRESS, or CALL SUBROUTINE if MINUS. The trio of flags Zero, Sign and Carry form the backbone of virtually all the logic in most machine code programs. There are three other flags: Parity/Overflow or P/V which some clever people understand. Half Carry or E used in decimal arithmetic I think. Add./ Subtract or N again used in decimal type arithmetic, but as I've never had occasion to use them, their exact function and usefulness hasn't. sunk in yet. Back to working out negative numbers —----------------------------------Right you've got the picture. Treat Bit 7 (the leftmost) as a sign bit, work out what the others would come to if positive, subtract it from the value of Bit 7 and you've got the negative decimal equivalent. Just to show off the Z80 can do the same sort of thing with 16 Bit (two byte) numbers like OFFFF Hex or 65535 as well. In binary it looks like: 1 1 1 1 1 1 1 1 1 1 1 1 1 1 1 1 as before for the sign: - 1 1 1 1 1 1 1 1 1 1 1 1 1 1 1 If we added 1 to it like last time we would get 0 so this must be the way -1 Dec would be stored as a 16 Bit two byte number. TRS8BIT - volume 07 Issue 01 - March 2013 - page 20 Now sixteen bit numbers are used a lot in the Z80 for memory addresses and one of the things that baffles most BASIC programmers for a while is the problem of PEEKS and POKES above the 16K boundary. Lets examine the numbers in that region; firstly the last byte in 16K and then the next one and finally the last byte in 48K (These sizes of course refer to RAM, we must add another 16K to them for the ROM, keyboard, video etc). Top of 16K - 7FFFHex = 0 1 1 1 1 1 1 1 1 1 1 1 1 1 1 1 Next Byte - 8000Hex = 1 0 0 0 0 0 0 0 0 0 0 0 0 0 0 0 Top of 48K — 0FFFFHex = 1 1 1 1 1 1 1 1 1 1 1 1 1 1 1 1 If the Z80 has been told to interpret these as 'human' numbers then the second two are obviously negative. Setting these numbers out with the values of each bit, we get: B I T S Sign 14 13 12 11 10 9 8 7 6 5 4 3 2 1 0 32768 16384 8192 4096 2048 1024 512 256 128 64 32 16 8 4 2 1 7FFF = 0 1 1 1 1 = Positive = 32767 1 1 1 1 1 1 1 1 1 1 1 8000 = 1 0 0 0 0 0 0 0 0 = Negative = -( 32768 - 0 ) = -32768 0 0 0 0 0 0 0 FFFF = 1 1 1 1 1 1 1 1 1 = Negative = -( 32678 - 32767 ) = -1 1 1 1 1 1 1 1 Don't worry if it doesn't all sink in first time, but when it eventually does penetrate the grey matter you will have a sound grasp of how BASIC handles its Integers, known in the trade as 'Signed 16 Bit Integers' and you will also appreciate why in Basic, the range of values that an integer can hold is limited to -32768 to +32767. FOR ADVANCED BASIC PROGRAMMERS ONLY 10 DEFINT=A - Z 20 Y - 7 + 256 * 8 30 V - VARPTR( Y ) 40 PRINT PEEK( V), PEEK( V + 1 ) 50 INPUT 'NEW VALUE "; Y 60 GOTO 30 70 END TRS8BIT - volume 07 Issue 01 - March 2013 - page 21 Explanation. 10 20 30 40 50 Make everything Integers Give Y the value 0807Hex and store it in RAM. Find out where Y is stored. Have a peek at what's there. Try your own numbers. Alternatively you could try POKEing some values into V and V+l and then finding out what Y had become. What you should observe is that any value of Y is held in RAM such that the remainder from dividing by 256 is stored at the byte in memory pointed to by VARPTR(Y) and the number of 256's in Y is stored at the next byte i.e. VARPTR(Y)+1. This is VERY IMPORTANT and we shall use this fact in PART 2 with USR routines. TRS8BIT - volume 07 Issue 01 - March 2013 - page 22 The BEST in TRS-80s Call The Right Stuff Ask for Ian The number is +61 416 184 893 That's The Right Stuff And he's in Melbourne http://ianmav.customer.netspace.net.au/trs80/ TRS8BIT - volume 07 Issue 01 - March 2013 - page 23 KEYBOARD PRACTICE The grand-kids have both (the boys that is), joined the i.t. club at their school and are finding the pc’s keyboard layout somewhat confusing. I briefly told them about the original reason for the ‘qwerty’ layout, (showing how the keys could jamb on my old typewriter) and I’m sure they were both suitably unimpressed! They do manage reasonably well, but I thought, if finding the correct key can be fun, it would make remembering that much easier. So, I came up with an idea which I thought might help. I wanted the boys to press a specific, chosen key, without looking at the keyboard and by way of confirmation that it was the correct key, the screen would be filled with 1024 of them! Nothing too major, I’m sure you’ll agree. The only problem I could think of was that BASIC would be just a bit too slow at filling the screen. so, there would be only one thing for it. It would require a few lines of assembler to speed things up a bit. As always, ‘ZEN’ came to the rescue and with the ‘LDIR’ command this was achieved easily. (A bit too easily as it turned out— see the next page!) Page 1 1 2 ORG 7F00H LOAD 7F00H 3 7F00 21003C 4 7F03 11013C 5 7F06 01FF03 6 7F09 EDB0 7 7F0B C9 8 ;prog placed in ;memory here LD HL,15360 ;start of screen LD DE,15361 ;start + 1 LD BC,1023 ;no. of times ;to loop round LDIR ;fill screen RET ;back to BASIC END The little program, above, confirms that. I think this was my first, ever, assembly program that assemble first time, error free! All that was left to do was calculate the decimal values (from the 3rd column, viz. 21 00 3c etc, which had been placed in memory at 7f00H by ZEN). I would then place them in my BASIC program as data statements and load them into an array. For this, I’m totally amazed to report that I used a multi-function calculator from ‘Poundland’. Yeh, believe TRS8BIT - volume 07 Issue 01 - March 2013 - page 24 it or not, this bit of kit, (for £1) has a 10 digit display, processes trig. functions, and operates in octal, binary, hex and decimal. They were also selling 8 packs of 2-finger plain chocolate ‘KitKats’ too, which, needless to say, I couldn’t resist! As you can see from the small, 7 line program below, it was soon up and running. The screen happily refreshed just about as quick as I could type and the boys seemed to enjoy themselves. After all the excitement had died down, I got to thinking, would this turn into a ‘good-old’ one-liner? And yes, as you can see below, with a couple of minor changes, (replacing line 40 with a loop instead of a goto), it did. Then I started to get a bit too clever, as mentioned earlier. I thought about using a ROM call within the assembler program to replace the inkey$ routine. Needless to say, I got into a bit of a mess but thanks to Peter Stone, I was put on the right track again. (As usual, I’d got a push and pop in the wrong place!). Then I realised I’d need to get an exit routine into the program as the BREAK key was ‘locked out’ and a system reboot was the only way to quit the program. Not good programming practice eh? At this point, the data statements seemed to be growing exponentially, so I decided to quit while I was ahead so to speak and stick to the one-liner, as originally produced. J ust press the BREAK key when you’ve has enough. TRS8BIT - volume 07 Issue 01 - March 2013 - page 25 IN MAV’S WORKSHOP by Ian Mavric SETTING UP TRS-80 MODEL III AND 4 HARD DRIVE PARTITIONS Ok so you've procured your hard drive from eBay, CraigsList, or one of the other myriad of places where they come up for sale from time to time. You've made new cables and following the steps outlined in the last issue1, have a hard drive which powers up and it’s ready to partition for use on your TRS-80 Model III or 4. DOS AND HARD DISK DRIVER CHOICES Just about every operating system for the TRS-80 can be made to work with a hard drive, this includes NEWDOS/80, DOSPLUS, TRSDOS 6, CP/M, and even MultiDos. But to my mind only two operating systems work properly with hard drives, having the least number of compatibility issues, and that is LDOS 5.3.1 for the Model III and LS-DOS 6.3.1 for the Model 4. That is not to say the other operating systems mentioned don't do the job, but I have used LDOS and LS-DOS for 20+ years with no issues, and to me it is the de-facto OS for hard disk users. I should also point out that when Tandy first released the TRS-80 5Mb hard drive in 1982, LDOS was Tandy's official OS (called HDOS at the time) so there is a certain lineage which is why it works so well. Just as NEWDOS/80 is probably the best (certainly the fastest) OS for a floppy based Model I or III, LDOS is the best OS for a hard disk TRS-80 even though its floppy operation is slightly slower than NEWDOS/80. Conversely NEWDOS/80 can be set up on a hard drive but its complicated and in my opinion clumsy to use. The choice of hard disk driver software I have similar views, and the only one which consistently allows me to set up and use standard and modified TRS-80 hard drives is RSHARD5/6 by Misosys2. Again I've been using it for more than 20 years and it has never let me down. It's compact and bug free, and very few programs have shown problems running software off hard disk with RSHARD5/6 residing in memory. Radio Shack's drivers are suitable for use with hard drives with the standard 5Mb or 15Mb Tandon MFM drive installed but are somewhat limited beyond the capabilities of those drives. In other words if you modify your hard drive with a non-original MFM hard disk, you will need RSHARD5/6. TRS8BIT - volume 07 Issue 01 - March 2013 - page 26 PARTITIONING THE HARD DRIVE Partitioning simply means dividing up the storage space on your hard drive. Within that framework we have a number of limitations to work with and various ways to work around them. RSHARD5/6 allows you to customise partitioning so that just about any MFM hard drive up to about 70Mb can be used with the TRS-80. Rule 1: LDOS and LS-DOS allow up to 8 disk volumes on a TRS-80 and each floppy drive is 1 volume. So this means if you have a dual floppy drive Model III then can have up to 6 partitions on the hard drive. If you have four floppys on your Model III you can have up to 4 partitions on the hard drive. Rule 2: RSHARD5/6 is limited to a maximum of 406 cylinders per partition. Most smaller hard drives have less than that, eg. Tandon TM602S (5Mb) has 153 cylinders, and Tandon TM503 (15Mb) has 306 cylinders. If you upgrade the MFM hard drive to, say, a Seagate ST-225 (20Mb) or ST-251 (42Mb) which have 615 and 820 cylinders respectively, you can see that the only way to make use of all the capacity of the hard drive is to partition it. Rule 3: LDOS and LS-DOS limit the number of files per logical drive to 256. Clearly even on a small 5Mb drive, if set up in a single volume, all 256 file slots will be filled before the all of the space is allocated. By making as many partitions as possible we maximise the space used on the hard drive, we can also divide the partitions into categories… say Partition 1 (drive :0) has the DOS, Partition 2 (drive :1) has Superscripsit and Visicalc, Partition 3 (drive :2) has games, Partition 4 (drive :3) has EDAS, PRO-DUCE etc., and drives :4, :5, :6, and :7 are floppy drives. While one can set up a hard drive with as little 1 partition, it’s in our interest to have as many as possible. USE THESE RULES TO DETERMINE HOW TO PARTITION YOUR HARD DRIVE SMALLER DRIVES – PARTITION BY HEAD – example 1. On smaller drives the simplest way to set up partitions is to allocate a head (and therefore all the tracks under that head) to that partition. So on a 5Mb TM602S, which has 4 heads, the 4 partitions each have one head reading 153 tracks. It’s easy to remember your partitioning because a hard drive has a fixed number of tracks and heads. If you lose or ruin your HD boot floppy it’s easy to deduce that on a drive which has 4 heads TRS8BIT - volume 07 Issue 01 - March 2013 - page 27 and 153 tracks per head, each partition will be 1 head with 153 tracks. This is in fact how Radio Shack set up their hard drives from the factory and it works well for hard drives in the 5Mb, 10Mb, 12Mb and 15Mb range. Notice I didn’t say cylinders – cylinders represent all the tracks which carry the same number on each drive platter… see diagram: LARGER DRIVES – PARTITION BY CYLINDER – example 2. On a drive with more than 406 cylinders, even if you wanted to partition it by head, you are restricted by Rule 2, so unless you wish to give up a large proportion of hard drive space, partitioning by cylinder is the only way to achieve this. Say you have a ST-251 40Mb which has 820 tracks and 6 heads, if you specify 406 cylinders and one partition per head, yes you end up with 6 partitions, but lose 20Mb of disk capacity. The way to make full use of the disk capacity is to specify fewer cylinders and spread them across all 6 heads. So when RSHARD asks for how many cylinders for the partition, instead of replying 820 we would say 136 and when RSHARD asks how many heads for the partition instead of replying 1 we would say 6. That way you send up with your partitions spanning cylinders 0-135 for partition 1, cylinders 136-271 for partition 2 and so on. Once you decide on how your partitioning will be you need to record it, because if you lose or ruin the HD Boot disk it can be a real nightmare to remember where all the partitions start and finish. THEN MANIPULATE YOUR HARD DRIVES The driver is invoked via the command: SYSTEM (DRIVE=x,DISABLE,DRIVER=”RSHARDn”)<Enter> Where x is the TRS8BIT - volume 07 Issue 01 - March 2013 - page 28 volume number and n is the version (5 for Model III LDOS 5.3.1 or 6 for Model 4 LS-DOS 6.3.1). See examples 1 and 2. Formatting the hard drive is accomplished by using the command: RSFORMn :x<Enter> Again n is the version and x is the volume number. Once the first partition is formatted you can copy the DOS to partition 1 and make it the system partition thusly: BACKUP :0 :x (NEW,S,I,Q=N)<Enter>, and change the system drive so the hard drive is now drive zero: SYSTEM (SYSTEM=1) <Enter> . WHAT HAPPENED TO MY FLOPPY DRIVES? As you built your hard drive partitions and they started to take over volume (drive) numbers :0, :1, :2, and :3 the floppy drives were disabled as the numbers were given to hard drive volumes. This is normal. After you have set up all your hard drive partitions you need to bring your floppy drives back online with new numbers, and this is done using the command: SYSTEM (DRIVE=x,DRIVER="MOD3") or SYSTEM (DRIVE=x,DRIVER="FLOPPY"). The former being for Model III LDOS and the latter being for Model 4 LS-DOS. COMPLETING THE SETUP Those familiar with LDOS / LS-DOS will be familiar with the SYSGEN command - it saves your current configuration in a CONFIG/SYS file, so that next time you boot that floppy the previous configuration is restored. This is even more important for hard drives because as well as saving the hard and floppy drive configuration, it also transfers control of drive zero to the hard drive partition 1 upon boot. In Model III LDOS the command is: SYSTEM (SYSGEN, DRIVE=x)<Enter>, where x is the floppy drive you normally boot from (drive 0 on a floppy system and probably drive 4 or 6 on a hard disk system). The equivalent command on Model 4 LS-DOS is: SYSGEN (DRIVE=x)<Enter>. UAL BOOT BOTH LDOS AND LS-DOS ON A SINGLE HARD DRIVE As you play around with setting up a hard drive, it soon becomes apparent that you can enable and disable hard drive partitions in any order you like. An interesting side effect of this is that it doesn't take long to realise that you install two operating systems and have two boot disks, one for LDOS and one for LS-DOS. So you aren't then restricted to having your hard drive set up for Model III or 4 mode, you can boot Model 4 mode LS-DOS for serious work like Multiplan, Superscripsit and Profile 4 Plus, and boot LDOS to run your favourite Model III mode games. Here's how its done: Let's say we have a standard Model 4D and a 5meg hard drive with 4 partitions. TRS8BIT - volume 07 Issue 01 - March 2013 - page 29 * Starting in Model 4 mode we format all 4 partitions and install LS-DOS in partition 1. * Disable partition 2 (that's where LDOS will go) so we have 3 partitions and 2 floppy drives, and SYSGEN your boot floppy label it Model 4 HD Boot. * Boot LDOS and bring online all 4 partitions and install LDOS on partition 2. * Disable partition 1 (which is where LS-DOS is and not needed for Model III mode) so again we have 3 partitions and 2 floppy drives, and SYSTEM (SYSGEN,DRIVE=x) your boot floppy - label it Model 3 HD Boot. What you have now is made the opposing DOS invisible to each operating system, so both can co-exist on the hard drive but not over-write or interfere with each other. A lot of commands in each DOS have the same names so if you were to accidentally issue FORMAT from LDOS while in LS-DOS mode the system will error out. Two of the hard drive partitions remain visible to both DOSes, and this works because both LDOS and LS-DOS share the same file structure. Check my video on YouTube showing a dual-boot hard drive3. EXAMPLE 1: Partitioning by HEAD 1. Power on Hard disk then the TRS-80 Model 4. 2. Boot Model 4 with LS-DOS 6.3.1 disk which has RSHARD6/DCT and RSFORM6/ CMD on it. 3. Configure the Hard disk by entering the SYSTEM command: SYSTEM (DRIVE=1,DISABLE,DRIVER="RSHARD6") Prompt as follows: Enter drive address <1-2> and F/R [1;F] -----------> <enter> Enter the STEP RATE <10us-7.5ms> [10] -------------> <enter> Enter the physical TRACKS per surface [306] -------> 153 Enter the total number of HEADS [4] ---------------> 4 Enter partition's number of heads <1-4> -----------> 1 Enter partition's number of cylinders [153] -------> <enter> 4. Format the Hard disk using the TRSFORM6 command: RSFORM6 :1 Prompt as follows: Disk pack name: HARDA Password: PASSWORD Manual Lockout: N 5. Repeat the process for remaining partitions: SYSTEM (DRIVE=2,DISABLE,DRIVER="RSHARD6") SYSTEM (DRIVE=3,DISABLE,DRIVER="RSHARD6") SYSTEM (DRIVE=4,DISABLE,DRIVER="RSHARD6") (answering 1 head and 153 cylinders each time) 6. Format the partitions you just created: RSFORM6 :2 Prompt as follows: Disk pack name: HARDB Password: PASSWORD TRS8BIT - volume 07 Issue 01 - March 2013 - page 30 Manual Lockout: N RSFORM6 :3 Prompt as follows: Disk pack name: HARDC Password: PASSWORD Manual Lockout: N RSFORM6 :4 Prompt as follows: Disk pack name: HARDD Password: PASSWORD Manual Lockout: N 7. Relocate the Second Floppy Drive to :6 using the SYSTEM command: SYSTEM (DRIVE=6,DRIVER="FLOPPY") Prompt as follows: I/O ADDRESS: 2 8. Perform a disk backup to the Hard disk to copy the files over: BACKUP :0 :1 (NEW,S,I,Q=N) 9. Identify the Hard Disk as the system disk SYSTEM (SYSTEM=5) 10. Generate the configuration file on the boot floppy for the hard disk: SYSGEN (DRIVE=5) EXAMPLE 2: Partitioning by CYLINDER 1. Power on Hard disk then the TRS-80 Model 4. 2. Boot Model 4 with LS-DOS 6.3.1 disk which has RSHARD6/DCT and RSFORM6/ CMD on it. 3. Configure the hard disk by entering the SYSTEM command: SYSTEM (DRIVE=1,DISABLE,DRIVER="RSHARD6") Prompt as follows: Enter drive address <1-2> and F/R [1;F] -----------> <enter> Enter the STEP RATE <10us-7.5ms> [10] -------------> <enter> Enter the physical TRACKS per surface [306] -------> 820 Enter the total number of HEADS [4] ---------------> 6 Enter partition's number of heads <1-4> -----------> 6 Enter partition's number of cylinders [153] -------> 136 4. Format the Hard disk using the TRSFORM6 command: RSFORM6 :1 Prompt as follows: Disk pack name: HARDA Password: PASSWORD Manual Lockout: N 5. Repeat the process for remaining partitions: SYSTEM (DRIVE=2,DISABLE,DRIVER="RSHARD6") SYSTEM (DRIVE=3,DISABLE,DRIVER="RSHARD6") SYSTEM (DRIVE=4,DISABLE,DRIVER="RSHARD6") SYSTEM (DRIVE=5,DISABLE,DRIVER="RSHARD6") SYSTEM (DRIVE=6,DISABLE,DRIVER="RSHARD6") (each time specifying 6 heads and 136 cylinders) TRS8BIT - volume 07 Issue 01 - March 2013 - page 31 6. Format the partitions you just created: RSFORM6 :2 Prompt as follows: Disk pack name: HARDB Password: PASSWORD Manual Lockout: N RSFORM6 :3 Prompt as follows: Disk pack name: HARDC Password: PASSWORD Manual Lockout: N RSFORM6 :4 Prompt as follows: Disk pack name: HARDD Password: PASSWORD Manual Lockout: N RSFORM6 :5 Prompt as follows: Disk pack name: HARDE Password: PASSWORD Manual Lockout: N RSFORM6 :6 Prompt as follows: Disk pack name: HARDF Password: PASSWORD Manual Lockout: N 7. Relocate the Second Floppy Drive to :7 using the SYSTEM command: SYSTEM (DRIVE=7,DRIVER="FLOPPY") Prompt as follows: I/O ADDRESS: 2 8. Perform a disk backup to the Hard disk to copy the files over: BACKUP :0 :1 (NEW,S,I,Q=N) 9. Identify the Hard Disk as the system disk SYSTEM (SYSTEM=6) 10. Generate the configuration file on the boot floppy for the hard disk: SYSGEN (DRIVE=6) NEXT TIME I will discuss how to fix or upgrade a hard drive by replacing the original MFM with a different one and what to do with those 3 wires. [email protected] REFERENCES: 1. " EXPANDED DISCUSSION ON TRS-80 MODEL III AND 4 HARD DRIVES", TRS8Bit December 2012 pp. 8-14. 2. http://tim-mann.org/trs80/doc/rshard.pdf 3. http://www.youtube.com/watch?v=0_JbYGis0a8 TRS8BIT - volume 07 Issue 01 - March 2013 - page 32 Trs8bit Flaming June arrives together with the latest edition of TRS8BIT! Both, I hope, putting a smile on your faces. Welcome, to what is turning out to be a most exciting year! First I'd like to mention, what I consider to be the really exciting news, of 2 brilliant pieces of hardware just developed which are available from Mav's website. The first is a new double power supply, which Mav and David Cooper have developed, for the Model 1. No more panicking when the 'old' power brick dies. It's made to sit neatly in the Expansion Interface using the space taken by the 2 old power supplies. The second is a 'virtual' hard disk for the Model 3 or the Model 4. A neat piece of electronic engineering plugs into your M3 or M4 via the 50way connector and combined In this is sue of TRS8BI T TNMOC Laurie Sh Assemb ield’s NOTES ler Pt.2 Mav’s Hard D upgrad rive e Seria printel driverr trsmodel 80 2000 TRS8BIT - with an SD card acts just as an original hard disk! The 4 guys who deserve an honourable mention for developing this fantastic bit of kit are Fred Vecoven, Andrew Quinn, David Cooper and Ian Mavric (Mav). Full information and ordering details of both these bits of kit are on Mav's web site. Matthew Reed has released various upgrades. his PC Z80 assembler is now on V1.2. TRSTOOLS is at V1.09 and TRSREAD/WRITE is now at 4.33 Two new emulators appeared. One for Jim Eadie and one Android operating Arno Puder. have the PC by for the system by I noticed the other day that the Club100 are offering a conversion service for anyone who can no longer read their TPDD and TPDD2 3 ½ disks and would like to use them on their NAdSBox. Check out the Club100 website for further details. The UK’s Ebay has seen a bit more life during the last 3 months. A Model 3 with twin disk fetched £63 and a Model 1 with an Expansion Interface (no disks or monitor) fetched £73. There has been a couple of Model 100’s fetching around the £50 mark and a Model 102 which only made just over £40! John Pye has had a Model 1 advertised on the website for nearly a month and so far there’s been no interest shown! volume 07 Issue 02 - June 2013 - page 1 Following on from the March edition and the saga of my somewhat unimpressive attempt, to upgrade my Model 1 system to disks, I’m pleased to report that my next course of action cheered me up no-end! I decided to send all my old, personal, M1 disks, which have been stored away for over 30 years, together with a few others, donated to the site, to Ira for conversion and then, take advantage of them via Matthew Reed’s emulator. There was one specific program that I really did want to have available again, (which features as an article on page 27). So I duly packed them up and popped down to the Post Office. What a shock! Postage would be over £120, no guaranteed delivery but should arrive within 28 days “if all goes well”, no tracking and no insurance! (How may I help you sir, eh!!) Well, back to the drawing board or rather Google, where I came across the ‘Parcel2Go.com’ website. The package could be collected from my home, delivery should take 3 working days, fully tracked and insured for free up to a value of £25. The cost, just in case you wondered, was just under £34. So, I duly paid using a card and on the agreed date, a Friday, the man and van arrived, picked up the package and off he went into the sunset so to speak! Now here’s the remarkable bit, Monday evening (UK time), I had an email from Ira to say that the package had arrived and Tuesday evening (UK time) I was browsing an email from Ira containing a ‘zipped’ file of my 70-odd 5 ¼ disks. TRS8BIT - What brilliant service all round eh! Once again, thanks Ira, for such dedicated service which was truly well above and beyond normal expectation. So the moral of this little tale is; if you’ve a stash of old 5 ¼ disk with nothing to read them on, or which you would like to use with an emulator, send them off to Ira for conversion before it’s too late and they become unreadable. I hope you’ve noticed I’ve recently placed a ‘Clustrmap’ on the website. I noticed the first one on Miguel’s site and though it was a brilliant idea. I thought it would be interesting to know what, if any, world-wide interest there is in the U.K. site. It took me totally by surprise! I think just about every continent is represented. A big warm welcome to you all, I’m so delighted that the ‘old Tandys’ still attract so much interest. so; down to this issue. There’s a quick note about the ‘National Museum of Computing’ which I’m hoping to visit shortly. Laurie Shield’s assembler notes moves on to part two. Mav completes his trilogy on the TRS-80 hard drives. There’s a serial driver for all us 4k or 16K users. Mav wonders if the Model 2000 was the best TRS-80 ever and finally, would your believe it? Take care everyone Dusty volume 07 Issue 02 - June 2013 - page 2 Hi Dusty, I thought you might be interested to hear about the ‘National Museum of Computing’ which is in the same grounds as Bletchley Park. I was lucky enough to go on a guided tour of both Bletchley Park and the museum quite recently and found the computer displays in the museum most fascinating. The only disappointment was the fact that I couldn’t see a ‘Tandy’ anywhere. Neither was there any mention of TRS8BIT too! I don’t think they are aware of anyone using early micro computers other than displaying them as ‘old technology’ Perhaps if you emailed them the latest copy of TRS8BIT, it would put our name on the map, so to speak. One thing which did catch my eye, was an ICL 2960 series computer with edsk60 disk drives. 60 Meg. and as big as a double fridge/freezer! (Requiring much more electrical power though). They told me they hope to get it running in the not too distant future. I’ve enclosed a photo of their ICL 2900 setup, just to remind you of those ‘Happy Times’ we had running ‘RJE’ and ‘George 3’. Best wishes. E.T. Fonehume. thanks for the email E.T. the photo takes me back a while! I’ve many happy memories of that time. I can still remember the wonderful meals in the staff canteen and you having to load all those ‘George chapters’ with their check digits, every time an upgrade was required! I’ve put a link to the TNMOC on the website. The national museum of computing TRS8BIT - - volume 07 Issue 02 - June 2013 www.tnmoc.org - page 3 THE NEW POWER SUPPLY FROM: THE RIGHT STUFF LOST ONE OR BOTH OF YOUR MODEL I POWER SUPPLIES? ARE YOURS WORN OUT OR JUST PLAIN BUSTED? DID YOU JUST BUY OR INHERIT A MODEL I AND IT DIDN'T COME WITH THEM? BUY THIS ONE - IT POWERS YOUR MODEL I SYSTEM! * TAKES ONLY 1 POWER POINT * * LIVES IN THE EXPANSION INTERFACE * * AND POWERS BOTH THE KEYBOARD AND E.I. * ONLY $A145.00 + shipping AVAILABLE FROM: http://ianmav.customer.netspace. net.au/trs80/ TRS8BIT - volume 07 Issue 02 - June 2013 - page 4 ASSEMBLER NOTES Part 2 Laurie Shields Chapter 4 Assembler Programming Like all good stories we must have a beginning, an end and something in the middle. It's the middle part that's rather awkward so let’s dispose of the easy bits first. First Simple Rule: -----------------All assembly language programs must finish with the simple statement END. This tells the assembler (more about him later) that it has come to the end and nothing else is of any consequence and can be ignored. Without an END to your program you will get an error message EOF. Of course if you are using the dreaded E....m you will know that just as it was being put on the shelf for sale somebody spotted there was a bit missing and it had to be added on after the END so the END wasn't the end after all and it set the scene for all the other incomplete bits of software from 2.0 to the M....3 Dos. Second Simple Rule -------—---------All assembly language programs need a beginning which tells the assembler (he's here again) the position, (location or address) in memory for which the machine code program is written. This beginning or origin statement takes the form: ORG value Whence 'value' can be any decimal, hexadecimal number in the range 0 0FFFFH. (It could also be a label with an associated numeric value known to the assembler). This is the big difference in thinking between Basic and machine code. Basic programs are completely position independent and to a large extent machine or even type of computer independent. Machine code is written not just for a particular central processor but also very likely for a particular configuration of computer and further more to occupy and work in only one part of that computers memory. This often raises the question "Why bother ?" but we won't go into that just yet. The value used for the ORG of your program depends on the TRS8BIT - volume 07 Issue 02 - June 2013 - page 5 purpose of the program. If you were re-writing the whole of the Level 2 Rom you would start with an ORG 0, not caring whether it was Hexadecimal or ordinary numbers and then grow old gracefully. Most of the time however we want to create a program to work in a section of unused memory and a convenient place is the upper part of the 16K Ram as this is not used by the Aculab, cassette or any of the Disc operating systems. All our programs therefore will be based on an ORG of 7800Hex but of course you could change it if you wanted to. Our assembly language source code (notice the crafty way these new words creep in) now looks like this: ORG 7800H ? ? ? END and as some folk might say: "It certainly looks impressive but what does it do ?". There's a definitive answer to that question, that goes back to time immemorial or at least to Babbage, and it is: "Well it doesn't do anything yet ... but wait till I get the bugs out." Third Simple Rule Assembly language programming isn't a bit like BASIC. Don't cry about it - there's nothing anybody can do - and remember you couldn't understand ON ERROR GOTO and PRINT USING once. Sooner or later we are going to want to change a Hex number into decimal so lets do it with 7800H: 7000H 800H 00H 0H = 7 = 8 = = 7 8 0 0 Hex = 0 4096 256 16 0 1 = = = = 28672 2048 0 0 30720 Decimal Now that wasn't too hard was it ? I leave you to work out for yourself how to do get back from decimal to hex. There's a tradition build up with the TRS80 that the first machine code program example should be whiting out the screen in no-time-at-all, so just to be that bit different we will fill the video with a chequer-board pattern. In order to achieve this laudable objective we need to know how the video is connected to the computer ... AND ... I don't mean that silly little plug on the end of a bit of wire. TRS8BIT - volume 07 Issue 02 - June 2013 - page 6 Fourth simple rule -----------------Most apparently straight forward bits of English don't mean, what they used to mean when talking about computers. What we mean is the logical connection between the Z80 and the video character generator. Fortunately the Level 2 manual comes to our aid and informs us that the video is treated as if it were a chunk of ordinary RAM of 1024 bytes starting at 3000 Hex (or 15360 Dec) and finishing at 3FFF Hex (16383 Dec). So our object is to write in assembler the nearest equivalent of the following BASIC program: 10 FOR X = 15360 TO 16383: PORE X,161: NEXT Now just hold on there a little! That's far too complicated for an assembler programmer to understand. Can't we simplify it a little first ? Well we could try: 10 FOR X = 15360 TO 16383 20 PORE X ,161 30 NEXT X 40 END That's getting better but I'm afraid all this FOR / NEXT business is just a little too .. how shall we say .. intricate .. can't we get there in singles. Third time lucky ? 10 REM Simple BASIC 20 LET HL = 15360 30 LET BC = 1024 40 POKE HL,161 50 HL = HL + 1 60 BC = BC - 1 70 IF BC <> 0 THEN GOTO 40 80 END For those who didn't skip the earlier chapters, the letters used for the variables might seem familiar; they are of course the same as those used for two of the Z80 registers. Before we can go much further there is one important concept. that we must master and that is the complete irrelevance of line numbers in assembler programming. Whereas in BASIC we have the ability to refer to line numbers in the program to change the flow of control by GOTO's and GOSUB's, in assembler we must identify the particular line with a label and then refer to that label. Labels or symbols can be called anything you like, they can be as long as you like provided they begin with a letter and aren't one of the assembler's reserved words like END or LOAD etc. TRS8BIT - volume 07 Issue 02 - June 2013 - page 7 In our BASIC program that we are going to copy the program keeps jumping back round in a loop until BC is exhausted so let us use the label LOOP. To convey to the assembler that a particular collection of letters is to be referred to later we must add a colon immediately after the label as a means of declaring it to the assembler. First GOLDEN rule of assembler programming. -----------------------------------------You will never learn ANYTHING by reading until you have actually keyed it into the machine yourself. So stop reading, put the cat out, switch on the computer, get your copy of Zen, and System load, @Run or Zen/cmd now ! Make sure you have a clean cassette, formatted floppy tape or disc with some room on it as we shall save the source file for future use. From here on in <E> means the Enter (TRS80) or New Line (Video Genie) key. To switch Zen into the text entry mode key: E <E> (Enter the Editor). Zen responds in a similar fashion to the AUTO mode in BASIC by printing the number 1 for the first line and waits for you to key in anything you like, so key in the following except for the line numbers, which Zen does for you. 1 ORG 7800H <E> 2 LD HL, 15360 <E> (let HL = 15360) 3 LD BC, 1024 <E> (let BC = 1024) 4 LOOP: LD (HL),161 <E> (poke HL,161) 5 INC HL <E> (HL = HL+1) 6 DEC BC <E> (BC = BC-1) 7 LD A, H <E> (if 8 CP 0 <E> BC 9 JP NZ,LOOP <E> < 10 LD A,C <E> > 11 CP 0 <E> 0 12 JP NZ,LOOP <E> GOTO) 13 END <E> 14 . <E> The full stop tells Zen that we have come to the end and there's no more text input. Zen ignores the full stop and switches control back to the command level. Let's step through the program nice and gently to see what we've done, forgetting all about ORGS and ENDS for the time being. 2 The LD instruction loads the HL register pair with the value 15360 which is the address of the top left hand corner of the video. The LD part of the instruction is known as the OPCODE and the 15360 part is the OPERAND. TRS8BIT - volume 07 Issue 02 - June 2013 - page 8 3 Likewise BC becomes 1024, which is our Byte Count. 4 This is the tricky line. LOOP: is a label LOOP because it has a ':' after it. LD we know means load but what does (HL) imply. Well its beautifully simple (it needs to be) once you get the hang of it. HL by itself means the register pair HL. (HL) means the byte in memory that HL is looking at, so for the first time round HL=15360 and the load instruction means that particular byte, next time round it will be 15361 etc. 161 is simply the value of the graphics character that is to be loaded into the byte pointed to by HL. 5 & 6 Add one (INCrement) to HL and subtract one (DECrement) from BC. Since the Flag registers generally go on strike when we are doing 16 bit arithmetic the Z flag will not be triggered when BC becomes zero, so the only way to find out if the whole of the 1024 in BC has gone is to check B and C separately and if either of them are not zero then carry on looping. 7 Load the clever A reqister with the value held by B. 8 ComPare means for the Z80 'test for the difference between the A register and' in this case 0. If in testing the Z80 finds no difference then the Z flaq will be set. 9 Is it, because if not there's work still to be done. 10 11 12 13 Check the value in C the same way. Compare. Keep up the good work. Everybody happy ? Fifth simple rule ---------------Condition testing causes most of the headaches in assembler. At the end of our program we would have filled the video completely and the Z80 world then execute the next machine code instruction which, if we do nothing about it would be just whatever the next byte in Ram just happened to be. The fact that we have put an END in our code does not mean that the computer will respond with >READY the way it would in Basic, when control is passed back to the keyboard. In machine code the only way to stop the Z80 chip is to switch the computer off, this being rather a drastic measure. We can however hand control back to Zen provided we arrange it before we go blasting the video with graphics. How to do it you will find out later. TRS8BIT - volume 07 Issue 02 - June 2013 - page 9 Meanwhile the video is displaying Z>, which is Zen's way of saying 'Master I am here to do your will - What is your command ?". We must now understand that Zen has got a singularly one track mind when it comes to manipulating source code. If we want Zen to display, print or alter any line we have to tell Zen in simple language whether to go to the Top line, or Up so many, or Down so many lines. To review our text which conveniently, is less than one video page enter the following: T <E> (This tells Zen to point to the Top line) <E> (Enter by itself tells Zen to clear the Video) P13 <E> (Print thirteen lines) At this point lets assume that we have an error in line 4, say there's a semicolon ';' instead of a colon ':' How do we fix it ? First get Zen's mind concentrating on line 4 by keying U9 <E> (Up nine lines) and line four is displayed. Now key N <E> (for New) and depending on what version you have, either line four will be zapped and you can key it in afresh or it will be displayed with the cursor at the end so you can backspace to the error and retype the line from the error onwards. Our program should now look like this: 1 ORG 7800H 2 LD HL,15360 3 LD BC,1024 4 LOOP:LD(HL),161 5 INC HL 6 DEC BC 7 LD A,B 8 CP 0 9 JP NZ,LOOP 10 LD A,C 11 CP 0 12 JP NZ,LOOP 13 END To turn these Mnemonics into actual machine code bytes we activate the assembler in Zen by keying A <E>. Disc users will be prompted by Zen for Source File> to which the answer is simply <E>, unless they want to assemble direct from disc and then they wouldn't be reading this chapter. Then Zen asks OPTION. Since you might want to just check for errors, or display the assembled code on the video, or write it to cassette as a System tape etc, this is the stage at which you tell Zen where to send the output. Since we want it on the Video, key V <E> and you will get the complete program assembled as shown below except for the headings, or an error message such as OPERAND or HUH ? where Zen can't decipher your typos. TRS8BIT - volume 07 Issue 02 - June 2013 - page 10 Line Memory Object Label Opcode Operand # Address Code 1 ORG 7800H 2 7800 21003C LD HL,15360 3 7803 010004 LD BC ,1024 4 7806 36A1 LOOP: LD (HL),161 5 7808 23 INC HL 6 7809 OB DEC BC 7 780A 78 LD A,B 8 780B FE00 CP 0 9 7800 C20678 JP NZ,LOOP 10 7810 79 LD A,C 11 7811 FE00 CP 0 12 7813 C20678 JP NZ,LOOP 13 END Note that Zen has understood the decimal numbers but in generating the machine code program these have all been changed into hexadecimal. Now somebody at the back is bound to ask whether it really takes as much effort to find out if something has been done (lines 7-12) as it does to do it (lines 2-6). In all honesty the answer must be 'not quite' but we don't want to run before we know which direction we should be walking. Lets prove that the program actually works before we go any further. To do that with E.... m or M....80 or very nearly any other assembler the technique is to assemble to cassette or disc, go back to the operating system, (system) load the object code, power up Debug or Supermon and jump to your program start address. Now that is just too much like HARD WORK so we will get Zen to do it all for us. First we need to tell Zen that the object code bytes should be loaded into memory as they are evaluated during assembly. To do this we need to insert one line of code into our source file between line 1 and 2. Here's how: Goto line 2 (T <E> for Top, then D1 <E> for Down 1) Zen should be displaying line 2. Key E <E> to enter the editor and we get the prompt 2. Key LOAD 7800H <E> followed by the full stop . <E>. Assemble the program again, using if you have a printer the E option, so that you can frame the printout for posterity as the your first working machine code program. The result of the assembly should look exactly as before except the line 2 to 13 now have the numbers 3 to 14 and there's the new line 2 'LOAD 7800H'. To check that the code is in memory use Zen's Query command TRS8BIT - volume 07 Issue 02 - June 2013 - page 11 Q7800H <E>. You should get: 7800 7808 7810 21 00 3C 01 00 04 36 Al !.<...6. 23 0B 78 FE 00 C2 06 78 4.x....x 79 FE 00 C2 06 78 xx xx y.... X.. !.<...6! i.x..Q.x y..Q.x.. The xx figures aren't important, except that if we don't intercept the Z80 after its done our program then they are what will happen next. The Ascii representation on the right will be different as Scripsit can't print the graphics that you get on your video. To execute the program we want to instruct Zen to Jump or Goto the address 7800 Hex and let the program do its thing and when address 7816 Hex is reached to return to Zen. There's a minor complication here as very early versions of Zen used the single command letter G whence you were then prompted for the address, later versions included the address with the G (Goto) like this G7800H <E> and finally the versions of Zen with the Global replace facility use the command format J7800H <E> (Jump). Since you can all refer to your manuals I don't expect that this will be too problematical. Depending on your version, key one of the following: J7800H <E>, or G7800H <E>, or G <E> followed by 7800H <E>. Zen will then ask for a Breakpoint, key 7816H <E>, and faster than the eye can blink your video will be filled with spots. Unfortunately if you didn't buy your Zen from me, the screen will, even more quickly, be cleared so that you might not catch it; but you know the answer to that. Before we dash off and celebrate lets write the source code to tape or disc. Prepare your magnetic bulk storage device for recording and make sure the cassette, floppy tape or disc has some space on it and key W <E>. Zen will then ask you for a name or filespec as appropriate and then record your source file. Cassette and floppy tape users have the V command to verify that the recording is a good one and does not generate any checksum errors. Sixth simple rule. ---------Assembler is so fast that five minutes of programming will take at least five hours to get right. This is known as the advantage in speed of Assembler over Basic. TRS8BIT - volume 07 Issue 02 - June 2013 - page 12 TRS8BIT - volume 07 Issue 02 - June 2013 - page 13 Chapter 5 Now that it works lets change it ------------------------------But first we will review what we have 1. The registers A, B, C, H, L, etc. HL, BC, etc. can be loaded with a instruction (LD BC,1024). 2. The contents of the registers can decremented (INC HL). learnt. or the register pairs value using the LD be incremented or 3. Data can be transferred between the registers, again using the LD Instruction (LD A,B) 4. The contents of the A register can be compared with some other value (CP 8), and if they are the same the Zero flag is set (1), otherwise it is reset (0). 5. Instead of executing the next instruction the program can jump to a different location that has been identified with a label. The next few pages are going to be the hardest to grasp for some time, so make sure you've got some peace and quiet before you start; and until you've grasped OR, XOR and AND you'll never make the grade. These three very powerful instructions do Bit by Bit checks and comparisons between the A register and some other data. The other data can be virtually anything from a fixed numeric value, the contents of any register (including the A itself) or the contents of a byte in memory pointed to by either the HL or one of the index registers (IX or IY) Let us assume that the A register contains 49 decimal and we will see what happens if we carry out OR, XOR and AND with 26 decimal. Now 49 Dec = 31 Hex and 26 Dec = 1A Hex As the instructions are going to operate at Bit level we had better convert to binary 0's and 1's. 49 Dec = 31 Hex = 26 Dec = 1A Hex = 0 0 1 1 0 0 0 1 0 0 0 1 1 0 1 0 With all three instructions we ignore the 0's and fix our minds on the 1's. TRS8BIT - volume 07 Issue 02 - June 2013 - page 14 The OR instruction means take the 1's from either the first value OR the second OR both and put them in the A register. So we get OR 0 0 1 1 0 0 0 1 = 31H 0 0 0 1 1 0 1 0 = 1AH --------------0 0 1 1 1 0 1 1 which is 3B Hex. Its something like the 'lowest common multiple'. In that the result is bigger than either of the two starting numbers and it has got 'set' bits common to both. The XOR instruction, abbreviated from EXCLUSIVE OR, means take the 1's from either the first value OR the second value but EXCLUDE those where both values have a 1, and put the result in the A register. So we get 0 0 1 1 0 0 0 1 = 31H XOR 0 0 0 1 1 0 1 0 = 1AH --------------0 0 1 0 1 0 1 1 which is 2B Hex ^ this bit was excluded. This operation can be considered most like a two-way switch. Any bits that are set in the second number will ensure that the result for those particular bits will be the dead opposite of whatever they were with the first number and visa-versa. The most commonly seen example is blinking 'star' on the cassette load. The AND instruction is simpler and means take the 1's where they occur in both the first valve AND the second value with the result into the A register. So we get 0 0 1 1 0 0 0 1 = 31H AND 0 0 0 1 1 0 1 0 = 1AH --------------0 0 0 1 0 0 0 0 which is 10H ^ this is the only bit set in 31H AND 1AH This operation is very akin to a filter. Any bits set in one of the numbers that don't match those set in the 'filter' are not set in the result. Now part of the importance of these operations lies in the fact that the Zero flag in the F register is triggered to set or reset depending on whether the resultant value in the A register is zero or not. Also as none of the three instructions can generate a carry condition the C flag is automatically reset irrespective of the final value. TRS8BIT - volume 07 Issue 02 - June 2013 - page 15 Back to our program. We left it with a lot of coding just to check if the BC register pair had reduced to zero. Consider now what would be the result of doing an OR operation between the B and C registers. If either of the registers had just one bit not equal to zero the final result would reflect this condition and it would not be zero. So we now have a means of checking BC in one go .... or have we? Well we nearly have; remember one of the values for the OR command needs to be in the A register first, so it looks like this: 7 LD A,B (load the contents of the B register into A) 8 OR C (test if either of them is not zero) 9 JP NZ,LOOP 10 END You have now been introduced to the true assembler's abiding passion - trying to save the odd byte here and there. In general the main objective of Basic programmers is to get their creations working without any error messages. Until the OM appears very few ever worry about how much memory is being used. With true machine code it is very different. Whilst the program is being assembled the hard facts are there on the screen and every byte that is used is open to criticism. There are of course the people who use macros, relocatable object modules and linking loaders who neither know nor care about such niceties, but we will have none of their ways of working here. The designers of the Z8O haven't finished with us yet though. Being true men of spirit, they have provided yet another means of saving one byte out of our program. The instruction JP NZ,LOOP takes up a hulking three whole bytes just to tell the Z80 to jump back six or so steps. We have available a two byte instruction that will do just that. It uses the OPCODE JR (Jump Relative) and is used in exactly the same way. Since in two bytes we cannot include all the details for an instruction to jump and the address of any of the 65536 addressable memory locations the use of this command is limited to jumps of plus 127 or minus 128 bytes. Now we have a plan so power up Zen and read in the old source file by keying R <E> and answering the prompts for a filename. Since there are only a few lines to change at the end of the program the simplest way is to zap the lines we don't need and key in the new ones. Get Zen pointing to line 8 CP 0, which is the first of the ones we don't want and key Z5 <E> (zap five lines). This should leave you with just END for line 8. Press E <E> to enter the editor and key in the following lines: TRS8BIT - volume 07 Issue 02 - June 2013 - page 16 8 OR C <E> 9 JR NZ,LOOP <E> 10 . <E> Again, note the use of the fullstop to terminate text entry. We have now got it into the most compact form so just to make life difficult we are going to incorporate this extremely useful routine (?) into a USR function from Basic. There are, as you might have guessed just a couple of problems. i) How do we link our program to Basic ? ii) How do we ensure our program will not upset Basic ? Lets tackle the second one first. When Basic hands control over to a USR routine it always ensures that there is nothing important in the AF or HL registers, so we can do what we like with those. As for the BC and other registers we do not know whether what they contain is of any consequence or not so we had better save the contents of BC before we use it and restore whatever was there when we are finished. Fortunately the Z80 has a very useful technique of saving and restoring the contents of a register pair. It is known as the 'stack' and works a bit like a spring loaded moneybox allowing you to push values into storage and pop them back again afterwards. The stack is also used by the Z80 itself for remembering return addresses from subroutines. Most machine code programmers at one stage or another get their pushes and pops crossed with their calls and returns generating something that resembles more of an infestation than a bug, but more of that later. Sufficient to say that with our program all we need to know and do is PUSH BC at the start and POP BC at the end. But what happens at the end ? How do we get back to Basic ? Well the way Basic processes a USR statement is to call it like a subroutine. A subroutine in machine code works just like one in Basic and needs at least one happy return, abbreviated to RET. Make the necessary changes to your source file so that after assembling it looks like this: TRS8BIT - volume 07 Issue 02 - June 2013 - page 17 1 ORG 2 LOAD 3 7800 C5 4 7801 21003C LD 5 7804 010004 LD 6 7807 36A1 LOOP: LD 7 7809 23 INC 8 780A 0B DEC 9 7808 78 LD 10 780C B1 OR 11 780D 20F8 JR 12 780F C1 POP 13 7810 C9 RET 14 END 7800H 7800H PUSH BC HL,15360 BC,1024 (HL),161 HL BC A,B C NZ,LOOP BC If you haven't got a printer write down the object code bytes: C5, 21, 00, 3C etc. as we are now going to change the ORG to another value, say 8700H and re-assemble. Comparing the object code generated for the two addresses should show no difference. This is VERY IMPORTANT. It means that our program, unlike most m/c ones, will function correctly anywhere in memory. We are not tied down to a particular block of Ram that might be needed for something else. Now as for linking it with Basic we have a number of different techniques available but all of them require us to know the individual values of our code in decimal rather than hex. If you are using E.... m, M....80 or one of the other very powerful assemblers then you will have no doubt large reference tables in the manuals to help with the conversion process. That's not how we do it with Zen however, simply get back to Basic and the TRS80 will do it for you. To get to Basic from cassette or Aculab do a Jump or Goto memory address 114, from disc Zen return to Dos first and then Basic. Having got to >Ready prompt, key the following to extract from memory the decimal values of the program that Zen loaded into memory on the last assembling operation: AD = 30720 :FOR X = 0 TO 16 :PRINT PEEK(AD + X); :NEXT and you should get: 197 33 0 60 1 0 4 54 161 35 11 120 177 32 248 193 201 This is obviously some very important data so lets turn it into Data statements: TRS8BIT - volume 07 Issue 02 - June 2013 - page 18 60 DATA 197,33,0,60,1,0,4,54,161 70 DATA 35,11,120,177,32,248,193,201 If you haven't forgotten we discovered earlier that Basic stores integers in memory with each one being allocated two bytes. Well since we have seventeen bytes to put somewhere lets reserve some memory for 9 integers by setting up an array US%(8) - US for USR, % makes it integers and subscripts 0 to 8 give nine values i.e. eighteen bytes of Ram, so: 10 DIM US%(8) OK we've got 18 bytes - where is it? Well the problem is that it is likely to move about depending on whether or not any other simple variables come asking Basic for storage space. But wherever it is, Basic will always give us its position via VARPTR, and simply asking for VARPTR(US%(0)) will point to the first byte of the 18. To put the decimal values back into memory we simply execute, with Pokes, something similar to the Peeks that got them out. 10 20 40 50 60 70 80 DIM US%(8) FOR X = 0 TO 16 30 READ C POKE (VARPTR( US%(0) + X), C NEXT X DATA 197,33,0,60,1,0,4,54,161 DATA 35,11,120,177,32,248,193,201 rest of program There's a 1 in 5000 chance that this routine would fail should the result of (VARPTR(US%(0) +X) be greater than 32767 and what we ought to do is test it first before executing the Poke, but I leave that to you. When line 80 is reached the whole of our machine code program is safely in memory and we now set up a subroutine at say line 1000 which can be called at any stage in the main Basic program. Disc users have it easy in setting up USR routines and their subroutine would be: 1000 DEFUSR = VARPTR( US%(O)) 1010 X = USR(0):RETURN Level 2 programmers have a bit more work to do, which involves, as you might have guessed, dividing the VARPTR value by 256 and Poking the result and the remainder in the USR vectors given in the manual: TRS8BIT - volume 07 Issue 02 - June 2013 - page 19 1000 1002 1004 1010 X = INT( VARPTR( US%(0))/256) PORE 16527, X POKE 16526e VARPTR( US%(0)) - 256 - X X = USR(O):RETURN It is necessary for us to set up the USR address every time we need to access this routine due to Basic's memory allocation procedures mentioned earlier. TRS8BIT - volume 07 Issue 02 - June 2013 - page 20 IN MAV’S WORKSHOP by Ian Mavric HOW TO UPGRADE A TRS-80 HARD DRIVE To conclude this trilogy of articles on the TRS-80 hard drive, I'm going to talk about how to change the MFM hard drive in your TRS-80 5Meg (26-1130) or 15Meg (26-4155W) unit to something else. A large amount of the information in this article comes from the late Roy T. Beck who wrote a ground-breaking series of hard drive articles in Computer News 80 in the early 1990s1. These articles are very hard to find and so I am presenting elements of them here. WHY CHANGE THE MFM HARD DRIVE? The MFM hard drive has been installed in the TRS-80 5 or 15Meg disk system for around 30 years. The Tandon TM602S (5meg) and TM503 (15meg) drives were robust and reliable for the time, but Tandon designed them with a 5 year lifespan, which is a duty cycle of around 11,000 hours MTBF (mean time between failures)2. In case you don't have a calculator handy that works out to about 458 days continuous use. Since most people used the drive about 8 hours a day, 5 days a week ((8*5)*260 = 10,400) this is how Tandon arrives at an approximate 5 year lifespan (5 years being 260 weeks). Beyond that the drive is living on borrowed time. The drives were super expensive when new and hence usually had a hard life, often used for more than 8 hours a day and in certain cases (like a database for a BBS) run continuously. Long story short, they are very often worn out by the time I get them and often need replacement due to stiction3 (google it), platter surface breakdown (bad blocks), or just plain worn out. The solution will be to replace it. THOSE THREE WIRES Pretty soon after pulling apart a TRS-80 hard drive you notice three wires connected to various points on the hard drive logic board. If you have worked on old XT and 286 PCs which have MFM drives you know you don't have these three wires to worry about. Tandy complicates things because once the three wires have been removed from the MFM logic board the drive will refuse to format, crashing out with a Write Protect error. So what is going on here. Once I explain what these wires do it becomes much clearer. TRS8BIT - volume 07 Issue 02 - June 2013 - page 21 ORANGE WIRE The orange wire connects up with the protect switch on the front panel of the hard drive, when disconnected from the hard drive the controller board believes its getting no signal (equivalent of the write protect button pressed in) so won't permit any data to be written to the hard drive. This wire is important and can't be ignored4, and Roy found if you solder it to a place on the HDC then you can restore its functionality. On the 5Meg 26-1130 and 15Meg 26-4155W (early "Radio Shack") drives with the big 8x300 HDC you need to solder that wire to R27 pin 6, which is the pin closest to the 8x300 CPU (see Picture 1). On the later small WD1010 HDC you need to solder the orange wire to the leg of R54 closest to J10 (see Picture 2). While you are at it you need to bend J1 pin 5 (8x300 HDC) or J6 pin 5 (WD1010 HDC) over so it no longer goes into the 20-way data cable to the hard drive. This prevents +5VDC being sent to the hard drive and shorting it out. WHITE AND YELLOW WIRES These two wires go to the Active light on the front panel so the light flashes when the head on the hard drive steps in or out. They can actually be taped off and not connected if you don't want the Activity light but to my mind that's a lazy solution. A much better practice is to solder them to the right places to make the light work again. On the 5Meg 26-1130 and 15Meg 26-4155W (early "Radio Shack") drives with the big 8x300 HDC you need to solder the white wire to J6 solder-pad 6 and the yellow wire to J6 solder-pad 26 (see Picture 3). On the later small WD1010 HDC you need to solder the white wire to the leg of R38 closest to U28 and the yellow wire to the leg of R23 closest to U23 (see Picture 4). WHAT TO EXPECT Once these modifications have been made, the drive should still power up and go through its test sequence normally. On the 8x300 the Active light stays off until the selfchecking is done, then the light stays on, unless the drive is stepping, in which case the light flashes off momentarily. On the WD1010 the Active light is on when powered up and when all self checking is complete the light goes out - only flashing momentarily while the drive is stepping. You can now set aside the Tandon MFM and replace it with any MFM hard drive you can find on eBay, Craigslist etc. My TRS8BIT - volume 07 Issue 02 - June 2013 - page 22 personal preference is for Seagate ST-225 (20Meg) and ST251-1 (42Meg) hard drives, as well as NEC D3142, D5136H, Miniscribe 8438, and Microscience HH-1050. The Redhill web site5 has many good MFM hard drive recommendations as well. Before you start setting it up you need to know the specs for the replacement hard drive as they are not always indicated on the drive itself - in fact drives which are labelled with how many heads and cylinders they have are quite rare. Fortunately google is your friend and you can find the specs on just about any MFM hard drive in a few moments. It is handy as well to check if you are installing a voice-coil MFM hard drive - it will always have an odd number... as one platter surface is lost for head positioning data. Case in point is the Microscience HH-1050 which has 3 platters/6 heads but only 5 heads are used, and 1024 cylinders. You can tell RSHARDx (see my article from last issue) the drive has 6 heads but when you format it every track will fail because the drive itself will not allow data to be written to the 6th head. It's read only, with positioning information for the other 5 heads. A NICE SIDE-EFFECT A somewhat unexpected side-effect of upgrading your MFM hard drive to a newer one is typically in an increase in speed, sometimes as much as 30%. Here's why: during the years 1981-1989 the technology of MFM drives increased rapidly from small 5Mb and 10Mb hard drives up to 40, 70 and eventually 115Mb hard drives. The MFM interface is inherently fast and the drive always spins at the same speed: 3600 rpm, so the higher capacity the drive, the more densely packed the information on the platter, so more is transferred per unit time. Also the stepping speed of the heads increased as stepper motors became faster and more accurate, and eventually gave way to voice-coil actuation. The Tandon TM602S and 503 are examples of early hard drive technology circa 1982, but installing a larger drive from the late 1980s will almost always result in a noticeable increase in speed. CONCLUSION To my mind, hard drives really bring out the best in a TRS80 system, when working well they are a delight to use, fast and reliable. The average file size being so small on a TRS-80 most users would have a hard time filling a 15Mb hard drive, let alone something larger like 40Mb. If you have any more questions about how to repair or keep your hard drive operational, or want one of your own, feel free to drop me a line. TRS8BIT - volume 07 Issue 02 - June 2013 - page 23 NEXT TIME: Project to build a Model 1 Power Supply Please email me at - [email protected] REFERENCES: 1. 2. 3. 4. 5. "My Adventures with Hard Drives - Part 8", Computer News 80, Vol 4. No. 8, pp.19-23. http://nemesis.lonestar.org/computers/tandy/hardware/ storage/mfm.html http://en.wikipedia.org/wiki/Stiction "Radio Shack Service Manual: 5 Meg disk system 26-1130", pp. 27-29. http://redhill.net.au/d/c1.php Ian Mavric is an IT Specialist who also restores and collects TRS-80's and classic cars. He live with his wife and kids in Melbourne, Australia. 0o --== o TRS8BIT - ==-- volume 07 Issue 02 - June 2013 - page 24 Orange wire in the 8x300 HDC Orange wire on the WD1010 HDC TRS8BIT - volume 07 Issue 02 - June 2013 - page 25 White and Yellow wire on the 8x300 HDC White and Yellow wire on the WD1010 HDC TRS8BIT - volume 07 Issue 02 - June 2013 - page 26 The BEST in TRS-80s Call The Right Stuff Ask for Ian The number is +61 416 184 893 That's The Right Stuff And he's in Melbourne http://ianmav.customer.netspace.net.au/trs80/ TRS8BIT - volume 07 Issue 02 - June 2013 - page 27 SERIAL PRINTER DRIVER Here’s a super little program, which has a lot of sentimental value for me! It was one of the programs which Ira rescued for me from my old floppy disks. It was given to me, many year ago, by Freddie Nichols, of Optronics, in Twickenham, when I was attending an open-day with NATGUG. I remember at the time, it was a god-send as I had just built the cassette port serial interface which Leon Heller designed (see TRS8BIT Vol 1, Issue 2) and having only a 4K M1 Level 2 system, there wasn’t much software available, as you can no doubt imagine! The program was always cassette based as I didn’t have a disk system, but I clearly remember copying it to disk at a later date, “just in case”. I don’t think I envisaged the ‘case’ being 30 years hence though! If you would like a copy of it (to save you typing it in), please email me. I’ll sort out a virtual disk or cassette file for you. If you need a ’real’ cassette program, once again, please email me. 10 CLS 15 PRINT"MEMORY SIZES ARE :" 16 PRINT 20 PRINT" 4K - 20360" 30 PRINT" 16K - 32650" 40 PRINT" 32K - 49030" 50 PRINT" 48K - 65420" 60 PRINT 70 PRINT"BAUD RATES ARE 110 450 2400" 80 PRINT" 150 600 4800" 90 PRINT" 300 1200 9600" 100 PRINT"PENCIL BAUD RATES (BX)" 110 PRINT" 110 (B1) 150 (B2) 300 (B3)" 120 PRINT" 450 (B4) 600 (B5) 1200 (B6)" 1000 'BASIC PROGRAM FOR INITIALIZING TRS232 PRINTER INTERFACE 1020 'MADE UNDER LICENCE 1040 'BY --- OPTRONICS --- TWICKENHAM 1060 'SET MEMORY SIZE (LEAVE AT LEAST 110 BYTES) 1080 POKE 16553,255 :INPUT "ENTER MEMORY SIZE";MS :MS=MS+1 1100 HB=INT(MS/256):LB=MS-256*HB 1120 POKE 16422,LB: POKE 16423,HB 1140 IF MS>32767 THEN MS=MS-65536 1160 ' 1180 'POKE PROGRAM INTO MEMORY 1200 FOR I=0 TO 105 :READ D 1220 POKE MS+I,D :NEXT 1240 ' 1260 'SET BAUD RATE 1280 INPUT "BAUD RATE";B :BR=1 1290 IF B=110 THEN 1500 TRS8BIT - volume 07 Issue 02 - June 2013 - page 28 1300 1320 1340 1380 1420 1440 1480 1500 1540 1560 1580 1600 1620 1640 1660 1680 1700 1720 1740 1780 1800 1820 1840 1880 1900 1920 1940 1960 1980 2000 2020 2040 2060 2080 2100 2120 IF B=150 OR B=300 OR B=450 OR B=600 THEN 1380 IF B=1200 OR B=2400 OR B=4800 OR B=9600 THEN 1440 PRINT "INVALID SELECTION" :PRINT :GOTO 1280 BR=BR+1 :B=B-150 :IF B<>0 THEN 1380 GOTO 1500 BR=BR+1 :B=B/2 :IF B<>600 THEN 1440 BR=BR+4 FOR I=1 TO BR :READ D :NEXT DH=INT(D/256) :DL=D-256*DH ' 'POKE BAUD RATE CODE POKE MS+24,DL :POKE MS+25,DH POKE MS+66,DL :POKE MS+67,DH POKE MS+76,DL :POKE MS+77,DH ' INPUT "ADD LF AFTER CR (Y/N)";Q$ IF Q$="Y" THEN 1800 IF Q$<>"N" THEN 1680 FOR I=1 TO 4 :POKE MS+48+I,0 :NEXT ' INPUT "NUMBER OF NULLS (0-127)";N IF N<0 OR N>127 THEN 1800 POKE MS+42,INT(N+1) :END ' 'MACHINE LANGUAGE PRINT PROGRAM DATA 243,121,254,13,40,3,254,32,216,245,229,197,6,9,55 DATA 245,245,33,1,252,205,33,2,33,222,0,43,124,181,32 DATA 251,241,31,245,48,19,33,0,252,24,19,14,2,175,13,40 DATA 2,24,219,62,10,24,215,24,47,198,0,33,1,252,205,33 DATA 2,0,0,33,222,0,43,124,181,32,251,16,212,17,222,0 DATA 203,74,40,11,33,0,252,205,33,2,27,122,179,32,251 DATA 241,241,254,13,40,198,183,40,197,193,225,241,201 ' 'BAUD RATE TABLE DATA 615,450,222,146,108,51,23,8,1 'END OF PROGRAM The Ne x TRS8BI t issue of T w out ea ill be rly Septem ber 20 13. Any ch anc in a ce you could ontrib ution?send TRS8BIT - volume 07 Issue 02 - June 2013 - page 29 IN MAV'S RETROSPECTIVE WORKSHOP THE TANDY TRS-80 MODEL 2000 Was it the finest TRS-80 ever? by Ian Mavric By 1982 the microcomputer world was in a state of change, not just for Tandy but for all computer manufacturers. Prior to 1981 there was just two main markets for micros, namely that of powerful home and small business computers and small cheap home computers. In the former category you have computers like the Apple II, Commodore Pet 4032 and TRS-80 Model III, and the latter category was contested by computers like the Commodore VIC-20, TRS-80 Color Computer, and Sinclairs. Just about this time IBM decided to join the market with its IBM PC aimed squarely at the market enjoyed by the Apple II, Pet and TRS-80 Model I/II/III, and its computer was a run-away success. It was anything but cheap and so had little effect on sales of cheap home computers, though it did have an effect on most other business orientated micros. Suddenly CP/M, monochrome screens, 64K ram and single sided disk drives looked very old fashioned. IBM was onto a winner and software companies flocked to the machine. Compatible machines were produced and very quickly a new standard for microcomputing emerged which is still with us today, the PC. Most manufacturers realised to survive they needed to make PC compatible machines and out of that came companies like Compaq and Dell. But going back to '82, even Tandy realised that it's new powerhouse products for 1983 (the Model 4, 4P, 12 and 16) were going to be eclipsed by the IBM PC and may have a limited lifespan beyond about 1984. You have to hand it to Tandy for sticking to their beliefs and we have some of the finest Z80-based computers ever made in the Model 4 and 4P, but faced with dwindling sales projections they decided to bite the bullet and produce a PC of their own, but not just any PC, this would be the super-est PC of them all. No detail would be overlooked and every aspect of the computer needed to be an improvement on the IBM PC/XT (which was the version on the market in January 1984) but sell for around the same price as the IBM. In November 1983 Tandy proudly announce the newest, greatest TRS-80 yet, the Model 2000. It would outdo IBM from every angle, but had one major flaw, it wasn't properly compatible; it was only somewhat compatible. The 2000 graced the cover of 80micro in January 1984 and in fact the computer was well received by the computing press TRS8BIT - volume 07 Issue 02 - June 2013 - page 30 at the time, who were growing bored of plain compatibles which did nothing in particular better than the IBM PC/XT. The 8MHz 80186 CPU had the 2000 running rings around the IBM, the 720K disk drives held twice in information the IBM drives did, and the display was sharper and if you went the whole nine yards and added hi-resolution colour graphics and a CM-1 monitor you got 16 colour 640x400 graphics (not related to VGA which was still 4 more years away) which made the IBM’s CGA 4-colour 320x200 graphics look positively lame. Priced competitively with the IBM PC/XT and much cheaper than the soon-to-be released IBM PC/AT it looked like the 2000 was going to be THE machine to have, but that software compatibility problem came back to bite Tandy on the ass. Testing most software for the IBM PC/XT, some 90% didn’t work, but in fact if the software companies took the time to patch their programs to run on the 2000, you often got the best result. A good example of this was 1983’s killer app Lotus-1-2-3, which didn’t run on the 2000 in its standard form. It took Lotus programmers only 6 hours to patch it work on the 2000, after which they proudly declared the 2000 to be the finest machine to run 1-2-3 on. Even Bill Gates sung the praises of the 2000, appearing in an advert for Tandy, saying how his latest and greatest invention, Windows, worked best on a powerful computer with lots of memory and sophisticated graphics, and that the 2000 was ideal. The only problem was that by the time the computer had been out for 4 months (March 1984) it was clear that not many people were buying it. It turns out that the minimum requirement to be successful in the PC compatibles world was indeed to be compatible and for most of the software it wasn’t. If software companies could be bothered to make their software compatible with the 2000 then it worked well exceptionally well (look at Microsoft’s Flight Simulator 1.0 and Windows 1.0, AshtonTate’s dBASE II, and Autodesk’s AutoCAD), but along with not many people buying the 2000, software companies lost interest in patching their programs for the 2000. In April 1984 Tandy, recognising the problem, had an emergency meeting with its computer design teams and laid down the plans for a new project “August”, which was to be a properly PC compatible computer that was much cheaper, and be ready to announce in four months and on the shelf in six. We know it as the original Tandy 1000. Those who have used the Tandy 2000 often have favourable memories of it and indeed I was mightily impressed by it when I got mine. I didn’t see it as a replacement for the Model 4, that wasn’t until later on when the Tandy 1000 came along and it was clear from the pricing that the 1000 was TRS8BIT - volume 07 Issue 02 - June 2013 - page 31 going to impact on Model 4 sales. The 2000 was always an expensive beast. A basic dual drive Tandy 2000 with 128K could be had for a "modest" $A4450 but you could easily spend over $A10,000 by the time you got the fully expanded Tandy 2000HD, upgraded it to 768K, hi-resolution graphics, colour monitor, etc. It never seemed to be a serious threat to the $A2299 Model 4 – the jobs both computers excelled at were vastly different. In my study of the history of Radio Shack and its computing products and their place in microcomputing, I found some interesting titbits of information about the TRS-80 Model 5, obviously planned as a replacement for the Model 4. Looking at feedback from TRS-80 Model III and 4 users, they compiled a wish list of specifications for the new machine and reading through them they look strangely familiar: Increased memory past 128K, preferably 256K or more A 16-bit CPU of around 6-8MHz Hi Resolution graphics as standard Colour and sound, better than the Apple IIe and IBM PC/XT Vastly increased disk storage capacity Internal hard disk drive More function keys Backwards compatibility with the Model III/4 Reading this list, except for the last item, reads like the specs list for the Tandy 2000. With projects like August on the drawing board, no wonder future development of Z800 (which Zilog was lazy to release anyway) based advanced TRS80s was shelved. Examined in this context the Tandy 2000 really does appear to be the zenith of TRS-80 development, and although a failure in the marketplace, it’s a success from a performance and reliability aspect, as well as setting very high final standards for ergonomics and user eye, neck and hand fatigue (these becoming big issues in the mid 1980s). So next time you see a sad looking Tandy 2000 languishing on eBay, CraigsList or a thrift store, give thought to what was at the time one of the most powerful and expensive TRS-80s, one of the last real signs that Radio Shack was trying to be a force to be reckoned with, producing innovative new products. Instead of just languishing in the small-butcomfortable monochrome Z80 world, or the “me too!” plain PC compatible zone, tried to really make a really stunning, classy TRS-80. [email protected] TRS8BIT - volume 07 Issue 02 - June 2013 - page 32 TRS8BIT - volume 07 Issue 02 - June 2013 - page 33 TRS8BIT - volume 07 Issue 02 - June 2013 - page 34 Believe it or not! Bob Boyd bought a hard drive off eBay and it didn't work, so he had someone there perform the ‘Roy T Beck’ 3-wires modification (which is explained in this issue, see page 21) but they did it wrong, so Bob sent me the hard drive unit from Philadelphia, USA to Melbourne, Australia but the WD1010 HDC board had been shorted out and was not fixable. Bob then located another hard drive on eBay but when he got it home found a couple of hornet's nests inside it and it was the earlier 8X300 HDC anyway. He sent it to me to see what I could do with it and after some hours cleaning the board and drying it in the hot Australian sun, I cautiously plugged it in and it worked! It needed a few fine adjustments but it worked well and within a week was on its way back to Philadelphia, where its in daily use now. Before After TRS8BIT - volume 07 Issue 02 - June 2013 - page 35 TRS8BIT - volume 07 Issue 02 - June 2013 - page 36 Trs8bit Welcome, one and all to the September 2013 edition! There’s so many exciting things to report, I’ll get straight down to the ‘nitty gritty’. Mav and colleagues have been working hard to push the development of ‘FREHD’ forward to such a point, that, as at publication, the M1, 3 and 4 versions are up and running. They are available from Mav’s website, in either kit form or complete and ready to use. I understand that a ‘mod’ is required for the M1 version but the others just ‘plug-in and go’. The M4 P version is even selfbooting! Mav also can supply any necessary additional cables too. To me, this is an outstanding achievement and I’m pleased to hear that In this is sue of TRS8B I T Model 1 RS23 2C Assemb ler No part 3 tes M1 Tor oid supplypower Model repair 3 3 into s 2! TRS8BIT - there seems to be enough interest shown to justify all their hard work and efforts. I believe that this has to be good news for everyone involved with Trs80’s. Matthew Reed has released various upgrades to most of his software. V1. 28 for the emulator, V1. 11 for Trstools and V4 . 34 for trsread/write. Full details are available from his website. The Model 1 has just had it’s 36th birthday. I hope they had lots of cake at the party! I’ve come across a firm, based in the UK, who have offered to help with Tandy repairs. ‘candu-ict. com’ are based in Lincoln. I’ve placed contact details on the hardware support page of our website. For the next edition, Mav has generously offered to run a column entitled “ask Mav”, where he’ll endeavour to answer your history and hardware compatibility questions. Please contact him directly, via his website. On the trs-80 forum, there has been various postings regarding a 4 8K upgrade within the keyboard using 4 164 chips. I’ve come across various hardware ‘add-ons’ which increased memory using 4 116 chips over the years, but I’d never seen any information regarding the use of 4 164 chips. I’ll try and obtain details for the December edition. volume 07 Issue 03 - September 2013 - page 1 Dee and I managed to visit both Bletchley Park and the National Museum of Computing during July. BP, as you’ll probably guess, was fascinating and we thoroughly enjoyed the guided tour. The NMC was just up our street too, even though there was very little information about trs-80’s. They have a vast library of reference material, both books and UK magazines which is available for members to use free of charge. I only wished we lived a little nearer! I’m pleased to report that, once again, there has been over 120 downloads of the last edition of the newsletter. Thank you all for your continued support. so, down to this issue. Mav concludes his series of articles on the problems which can be encountered with the M1 RS232C interface. This article was missed out from the last issue. This was entirely my fault for which I offer my apologies and hope it hasn’t spoilt your enjoyment of the series too much. Just for all of us struggling trainee assembler programmers, Laurie Shields has kindly updated and revised part 3 of his ‘Assembler Notes’ series. Laurie takes us through the ‘call’ subroutine and placing output to the video. Mav gives us detailed instruction on how to build the toroid Model 1 power supply. and finally, Mav, in his usual expertly detailed manner, talks us through various problems, with their solutions, he encountered when repairing trs-80’s. Well, that’s just about it for now. I’d just like to remind you all that the next edition will be the Xmas one, so if there’s anything in particular you’d like to see, please email me and I’ll try my best to help. Take care, Dusty Here’s a photo Mav emailed to me, of a FreHD, housed in a standard 5 1/4 ” disk drive case. TRS8BIT - volume 07 Issue 03 - September 2013 - page 2 IN MAV’S WORKSHOP by Ian Mavric CURING MODEL 1 RS232C SERIAL BOARD WOES - PART 2 Last time1, I talked about the Baud Rate Generator as installed in the TRS-80 Model I RS232 board, and how to replace it if it goes bad on you. Today's discussion will centre around the UART2 (Universal Asynchronous Receiver/ Transmitter) chip and its line drivers. SIMPLE TESTS SAVE TIME AND HELP NARROW DOWN THE PROBLEM Every so often I find that the RS232 is completely unresponsive to testing. The way I test an RS232 is to short together pins 2 and 3 (Rx and Tx) and run a comms program on the TRS-80 and see if what is typed appears on the screen. It's called a loopback test. If I get no response on the loopback test I connect the RS232 to another known-good TRS-80 via a null-modem cable, both computers running comms programs, and see if there is one way communication. This should be your first step before starting to suspect problem parts. If there is no communication there could be problems with the BRG, UART or line drivers, but if you get 1-way communication, you've already eliminated the BRG as the culprit. UART OR LINE DRIVER? This then points to a problem with the UART or line drivers. The UART is easy to spot, its that big socketed 40pin chip and in a Model I RS232 its a TR1602 which design and implementation dates back to the 1970s. It works well at all common baud rates (300, 600, 1200 and 2400) but like a lot of early devices doesn't like to get too hot and is pretty unforgiving if shorted out. Radio Shack in its infinite wisdom puts it an un-vented compartment under a hot monitor so its life in the TRS-80 application is arduous. Then the RS232 manual3 shows how to build custom cables for serial applications like connections to serial printers and modems, which if you build wrong or short can easily blow the UART. There is not much to testing the UART, but if you know your BRG is good then 90% of the time the problem will lie with the UART. They can be purchased on eBay for about $15 but be sure to request a warranty of some sort, as many have date codes going back to the mid-70s and are "pulls" meaning they are 2nd hand and removed from used office equipment - not in itself a bad thing if the parts are OK. Despite being electronically fragile, the UART is easy to TRS8BIT - volume 07 Issue 03 - September 2013 - page 3 replace because its in a socket so if you have spares on hand it can be changed in around 10 seconds. The line drivers however are soldered to the board. WHY ARE LINE DRIVERS PRESENT? A line driver4 is an amplifier used to improve the strength of an analogue or digital signal at its source by driving the input to the transmission line with a higher than normal signal level. This increases the quality of a transmission over a long run of cable, and is especially important for RS232 cables more than a few metres long. Basically they give the signals going out of the RS232 port a bit of extra oomph so without that function there may be no result in the lookback test even though the BRG and UART are functioning correctly. On the Model I RS232 board they are U3 and U4 (which are MC1489 chips) and U12 (which is a MC1488 chip). Since they are soldered in, if you suspect one is causing a problem, unsolder and replace all three - they are easy to find and inexpensive. COMPATIBLE DEVICES What do you do if you can't find a TR1602 for your Model I RS232 board? Luckily the backwards compatible nature of some newer more readily available UARTs can help us out. The TR1865 (which is found in the 4P and gate-array 4 and 4D)5 just drops in and works a treat. Another device you may see is by SMC called the COM8017 and COM8018, these work fine with the Model I, and also can be used to substitute a failed UART in all Model III, 4, 4P and 4D TRS-80s. The only thing you actually need to remember about UART chips on TRS-80s is that the TR1602 will only work on the Model I. I've tried it on a Model 4, it doesn't. OTHER AREAS FOR CONCERN ON THE MODEL I RS232 There are a couple of other things which can go wrong with the Model I RS232 and I'll cover them quickly. Sometimes Y1, the 5.0688MHz crystal can cause problems, if it doesn't work everything will appear dead because the BRG uses it for timing the baud rates. Also L1 and L2, circular induction loops can cause a short when they are bent over - this isn't really a fault, but the exposed legs of the inductors, when bent over, lean against the exposed circuit traces on the component side of the board, so check them carefully and straighten them out. This problem comes from rough handling of the board when its not installed in the EI. The TERM/COMM switch causes TRS8BIT - volume 07 Issue 03 - September 2013 - page 4 confusion sometimes, as it switches the polarity of pins 2 and 3 on the RS232. In the TERM position the RS232 acts as per standard specifications6, in the COMM position it acts like a null modem adaptor7 has been added to the cable. Finally, the solder coated edge connector can oxidise like all connectors on the Model I and needs occasional cleaning with a pink pearl eraser. If you have any questions concerning the serial ports on 8-bit TRS-80s, feel free to drop me a line. [email protected] -------------REFERENCES: 1. 2. 3. 4. 5. 6. 7. TRS8Bit March 2013, pp. 6-8 http://en.wikipedia.org/wiki/ Universal_asynchronous_receiver/transmitter Radio Shack, 26-1145 Model I TRS-80 RS-232-C Interface manual, 1978, p.31 http://en.wikipedia.org/wiki/Line_driver Model 4/4P Technical Reference Manual, Tandy Corp, Cat No. 26-2119, 1985, pp. 142-3 "4.2.16: RS-232-C Circuit". RS-232 Made Easy: Connecting Computers, Printers, Terminals and Modems, Martin D. Seyer, 1984, pp.77-88, 171-173. http://en.wikipedia.org/wiki/Null_modem Ian Mavric is an IT Specialist who also restores and collects TRS-80's and classic cars. He live with his wife and kids in Melbourne, Australia. thing Up to som e ew w ith n r o special ? your Tandgy us all lettin How about about it? know TRS8BIT - volume 07 Issue 03 - September 2013 - page 5 THE NEW POWER SUPPLY FROM: THE RIGHT STUFF LOST ONE OR BOTH OF YOUR MODEL I POWER SUPPLIES? ARE YOURS WORN OUT OR JUST PLAIN BUSTED? DID YOU JUST BUY OR INHERIT A MODEL I AND IT DIDN'T COME WITH THEM? BUY THIS ONE - IT POWERS YOUR MODEL I SYSTEM! * TAKES ONLY 1 POWER POINT * * LIVES IN THE EXPANSION INTERFACE * * AND POWERS BOTH THE KEYBOARD AND E. I. * ONLY $A14 5. 00 + shipping AVAILABLE FROM: http://ianmav. customer. netspace. net. au/trs80/ TRS8BIT - volume 07 Issue 03 - September 2013 - page 6 ASSEMBLER NOTES Part 3 Laurie Shields Chapter 6 Using the ROM Routines ---------------------So far we've learnt how to load registers and memory, count, jump and perform certain logical operations like ADD and XOR etc. Now for the machine language equivalent of Basic's GOSUB. In machine code these are still called subroutines but instead of accessing them with a GOSUB we use a CALL instruction. As with the jump commands we must provide a reference to the memory address either absolutely in hexadecimal or by means of a label such as CALL SUBR1 or CALL OUTPUT. Just like in Basic when the subroutine has done its job it needs to instruct the Z80 to return to the command immediately following the call and this is achieved with a RET instruction. Now the Level 2 ROM is jam-packed with hundreds if not thousands of subroutines, most of which are inextricably interlinked and which form the Basic Interpreter. Some of these routines however are available for general use and the first ones we shall meet are to do with data input from the keyboard and data output to the video and printer. The easiest to get to know is the routine for printing a character on the video at the current cursor position and moving the cursor on to the next. It starts at memory address 0033H and as the leading zeros aren't necessary it is nearly always referred to as simply 33H. This routine will save us a lot of work as it not only finds the current cursor location, puts our character there and increments the cursor but it also looks after any scrolling of the video that should be needed if we do any printing on the bottom line. To use 33H we simply load the A register with the character we want to display and then CALL 33H. On encountering our CALL instruction the Z80 pushes the address of the next instruction onto the stack so that it knows where to come back to, and then it jumps to 33H and starts following the machine code instructions there. Let’s test this routine to prove that it really works. Use R TRS8BIT - volume 07 Issue 03 - September 2013 - page 7 to kill off any source file you have in memory and then enter the editor and key in the following code: 1 ; TESTING ROM 33H 2 ORG 7800H 3 LOAD 7800H 4 7800 3E2A LD A,'*' 5 7802 CD3300 CALL 33H 6 7805 00 NOP 7 END The semicolon in line 1 is the Assembler's equivalent to REM in Basic, and the NOP pseudo-op generates a 00 byte, which is a No Operation code as far as the Z80 is concerned. We've put it there just to give us an address for the breakpoint when we test the routine. Assemble the program and check, with Q7800H, that it has loaded into memory. Now before we jump or goto 7800H to test it, use X to examine the registers first and pay particular attention to the values of AF and DE. Now jump to 7800H and set a breakpoint at 7805H. Key X again to examine the registers and the video should look like this: Z>X HL DE BC AF RI IX IY SP PC Flags 0000 0000 0000 0000 0000 ------0000 0000 0000 0000 0000 0000 5627 402D ------Z>J7800H Brkpnt>7805H Z>X HL DE BC AF RI IX IY SO PC 0000 401D.0000 2A20 7200 0000 0000 0000 0000 0000 0000 5627 7805 Flags --1---------- Well apart from the fact that only the most recent disc version of Zen has the Flag register decoding, what are we to make of this ? Firstly, the routine worked and if we look hard enough we can see that the "*" got printed at the cursor position following the last input before Zen jumped to our program. Which, since our last keystroke was an <Enter> or carriage return, was at the start of the line after the 'Brkpnt>7805H". Secondly the AF, DE, PC and R registers came back with different values to those they initially had on leaving Zen. The A register was of course altered by our program but what about the others ? TRS8BIT - volume 07 Issue 03 - September 2013 - page 8 We should have expected the F register to alter as that register responds to most sorts of activity, except loading memory and registers, and there must have been a fair bit of it going on with checking on cursor position, displaying the character, incrementing the cursor etc. Likewise the Refresh register and Program Counter have simply behaved in the normal way they would be expected to, but what is 401D doing in the DE register pair ? Well it's a long story but here goes: Just imagine that you were designing the TRS-80 and were writing the Level 2 ROM. You are faced with the problem of implementing a video display routine using just upper-case characters but you know that sooner or later the computer will be fitted with a lower-case character generator about which you have no information. It is impossible to write a display routine that will handle a chip about which you know nothing and once the Rom is finalised there's no way of altering it. The solution is to have dedicated address in Rom which will point to your fixed upper-case only Rom video driver program. So that when we want to display a character we call a fixed address in the computer, such 33H, this in turn looks to an address in Ram, say 401DH, to find out where the video driver routine is really located. Normally of course the answer will be the address of your routine in Rom but if some time hence a computer has been fitted with lower-case or there's some other reason for not using the Rom routine then all that is necessary is to put the details of the new display program into 401DH and everything will still work perfectly. There are actually 8 bytes starting at 401DH dedicated to the video display routine. This block of memory is called 'Device Control Block' usually abbreviated to DCB. It contains some identifying information, the address of the actual subroutine to handle the character output, the current cursor location and a few other bits and pieces. There are two other DCB's in that area doing much the same thing, at 4015H there is the keyboard DCB and at 4035H the lineprinter DCB. Keyboard debounce was a problem on the early TRS-80's and a number of programs were written that intercepted the keyboard scan by picking up the address from the DCB and simply executing a delay count before carrying on with the Rom routine. Likewise if your printer needs some special treatment then all you have to do is to put the address of your printer driver module into the DCB at 4026H and all printing from Basic or machine code programs will go to your routine. (all that is, that do their printing properly by calling the ROM). TRS8BIT - volume 07 Issue 03 - September 2013 - page 9 The BEST in TRS-80s Call The Right Stuff Ask for Ian The number is +61 416 184 893 That's The Right Stuff And he's in Melbourne http://ianmav.customer.netspace.net.au/trs80/ TRS8BIT - volume 07 Issue 03 - September 2013 - page 10 So what happens when we call 33H. Well the Rom loads the DE registers with the address of the Video DCB (401DH) and jumps to a sort of DCB handler routine that looks at the DCB, checks on whether it is input or output, most of the other registers are saved on the stack, the actual driver program address is loaded into HL and then we jump to where HL is pointing. On return all the saved registers are restored and we are back to our program - except that DE is different. This highlights one of the problems of using somebody else’s subroutines, in that occasionally they use some registers, changing the values in them that we had put there and then not restoring them on the return to our program. We must therefore be very certain, before we use any ROM routines, which registers they use and whether or not they are restored on return. Now, if we refer to Tandy's documentation they tell us that the IY register may be altered as well, so we must be prepared to look after both DE and IY if we want to use 33H. Since we will probably use it over and over again during a program we may as well set up a general purpose subroutine labeled, say, OUTPUT that we can simply CALL for output. It will look like this, OUTPUT:PUSH DE PUSH IY CALL 33H POP IY POP DE RETURN By pushing the contents of DE and IY onto the stack, we can allow the ROM to do what it wills with them as after it has finished we simply pop them back off the stack, being careful not to get them crossed over, and thus we are in total control. There are two other routines concerned with data input/output that are used in a very similar fashion. The first is located at 3BH and outputs to the lineprinter. The difference between this and the one for the video is that 33H is bomb-proof and if we call it then as sure as eggs is eggs the character in the A register will appear instantly on the video even if the whole screen needs to be scrolled, if we call 3BH and a printer isn't connected then the computer will hang up for ever and a day waiting for one to be attached. And what's more even if the printer is there TRS8BIT - volume 07 Issue 03 - September 2013 - page 11 and working some of them don't get round to actually doing any printing until a carriage return is sent to signal the end of the line. The second routine is, of course, to do with keyboard input and is located at 2BH. Keyboard input is somewhat different from data output in that should a key not be being pressed when we call this routine then there will not be any data. This keyboard scan is therefore identical in approach to the INKEY$ function available in Basic. To use it we must first save the DE and IY registers, then call 2BH, restore the registers and test the contents of the A register to see if it contains any data. It is then up to us to decide if we want to hang around repeating the operation until a key is depressed or to carry on with something else and come back to the keyboard again later. A typical scan the keyboard / display on the video routine with our usual ORG 7800H and LOAD 7800H at the start might look like this: 1 2 3 7800 CDOA78 4 7803 B7 5 7804 28FA 6 7806 CD1478 7 7809 00 8 9 780A D5 10 780B FDE5 11 780D CD2B00 12 7810 FDE1 13 7812 Dl 14 7813 C9 15 7814 D5 16 7815 FDE5 17 7817 CD3300 18 781A FDEl 19 781C D1 20 781D C9 21 ORG 7800H LOAD 7800H GETCRAR:CALL KEYSCAN OR A JR Z,GETCHAR CALL OUTPUT NOP ; Just to give a breakpoint ; Rest of Program KEYSCAN:PUSH DE PUSH IY CALL 2BH POP IY POP DE RET OUTPUT:PUSH DE PUSH IY CALL 33H POP IY POP DE RET END Test this routine as we did the others by Jumping or Going to 7800H and setting the breakpoint at 7809H. What should happen is that the TRS-80 will appear to go into suspended animation until a key is depressed whence the character corresponding to the keystroke will be displayed and then control returns to Zen from the breakpoint. Let’s look at TRS8BIT - volume 07 Issue 03 - September 2013 - page 12 the program in more detail. Line 3 : This is a call to our subroutine KEYSCAN. Note we have not saved any registers so should there have been anything important in A or F then we have lost it. Lines 9 to 14 : This is the subroutine KEYSCAN. First the DE and IY registers are pushed onto the stack and the ROM keyboard scan is called. If a key is pressed whilst 2BH is executing the character will be in the A register, otherwise it will contain a zero. The state of the flags in the flag register are not meaningful. The IY and DE registers are popped off the stack and then the routine returns. Line 4 : We must now check on whether the A register contains a zero which means no key depression, or non-zero. To do this is it necessary to trigger the Flag register to the contents of the Accumulator. The quickest and easiest method is simply to OR the A register with itself. If A is zero then the Z (zero) flag will be set, otherwise it will be NZ. Line 5 : If the A register is zero then jump back and do it all again, otherwise carry on. This call, test and jump back loop, is typical of a keyboard input routine. Line 6 : The A register now has the character for the video so call the display routine. Line 7 : Just there to give a breakpoint address. Lines 15 to 20: The video display routine. Saving DE & IY and calling 33H, then restoring IY & DE before returning. Examining the registers before and after we test this program should show that the only ones that do not return their initial values are the A and F ones, where the A will contain the keystroke character and the F could be anything. The problem with this routine is that it is limited to just one keystroke and more often that not we will want to input something more meaningful such as a name or a quantity. The first thing we need to do is to keep on accepting characters until the <Enter> key is pressed. Insert the extra lines to the program so the beginning looks like this: 1 2 3 7800 CD0E78 4 7803 B7 TRS8BIT ORG 7800H LOAD 7800H GETCHAR:CALL KEYSCAN OR A - volume 07 Issue 03 - September 2013 - page 13 5 7804 6 7806 7 7809 8 780B 9 780D 10 28FA CD1878 FEOD 20P3 00 JR Z,GETCHAR CALL OUTPUT CP 13 JR NZ,GETCHAR NOP : Rest of Main Program etc. Now test it as before but this time the program will carry on accepting characters from the keyboard until the <Enter> key is pressed. We have made some progress but if you think about it not all that much, firstly you will find that by repeated pressing of the back-arrow key you can wipe out everything on the video and secondly, even if we key in something useful, our program hasn't remembered it. All the characters were only 'known' by the computer for a brief instant between the key being pressed and their appearing on the video. To be really useful our program must store each key depression somewhere so that they can all be handed onto the next part of the program. It must also keep a count of the characters so that backspacing beyond the first one is not allowed. Later on there will be further complications about such things as unprintable characters or those keys which mean special things such as <Clear>, but all of that will wait for the next session. The Ne xt which issue of T one, w will be the RS8BIT, ill Xma Decemb be out earl s y er 201 Any ch 3. ance you contri could send bution in a ? TRS8BIT - volume 07 Issue 03 - September 2013 - page 14 LOOKING FOR FAST, INEXPENSIVE, UNLIMITED MASS STORAGE FOR YOUR TRS-80 MODEL I/III/4/4P/4D? The amazing "FreHD" -Emulates a TRS-80 hard drive, but faster than any hard drive! -Works with your favourite DOS (LS-DOS, LDOS, CP/M, Newdos/80 2.5) -Uses SD card for storage medium -Bonus free Real Time Clock function! -Designed in Belgium and proudly built and shipped from Australia -Kit form or fully assembled Order yours today: http://ianmav.customer.netspace.net.au/trs80/emulator TRS8BIT - volume 07 Issue 03 - September 2013 - page 15 Chapter 7 Putting it on the Video ----------------------- Now that we are all at home calling the ROM lets develop a few more complete routines to display and input messages. Display first as that's the easy one. The simplest technique involves a straight forward message ending with a carriage return or CR as it is usually abbreviated. Assembler has a command similar to the LET in Basic for allocating a value and takes the form EQU. In future we will always refer to ASCII 13 as CR and use the EQU pseudo op at the beginning of our programs to initialise it. OK we want to display a message, say, "PRESS ENTER" in our machine code masterpiece. Obviously somewhere in memory we will have to have these 11 characters stored and we will need to refer to them so we will use the label MESSAGE to have the start address of the message, i.e. the address in Ram of the letter "P". Since our program might also want to display other messages of differing lengths we must include some means of identifying the end of the message and for that purpose we will use the CR. Review the problem: 1, Put the characters "PRESS ENTER", followed by CR into memory. 2, Start displaying the characters on the video one by one. 3, Keep checking on whether or not a CR has been displayed. 4, If it’s a CR then STOP displaying and return. It should be obvious by now that what we want is to set up a register pair to point to the message and go round a loop getting the character pointed at, displaying it, checking for a CR and if not incrementing the pointer and looping back. The program looks like this: 1 2 3 4 5 6 7 7 7 8 7800 7803 7806 7807 780B 780F 7813 ORG 7800H LOAD 7000H CR: EQU 13 210778 LD HL,MESSAGE CD1378 CALL VIDEOUT 00 NOP ; For Breakpoint 50524553 MESSAGE:DB "PRESS ENTER",CR 5320454E 5445520D 7E VIDEOUT:LD A,(HL) TRS8BIT - volume 07 Issue 03 - September 2013 - page 16 9 7814 23 10 7815 CD1D78 11 7818 FEOD 12 781A 20F7 13 781C C9 14 781D D5 15 781E FDE5 16 7820 CD3300 17 7823 FDE1 18 7825 D1 19 7826 C9 20 INC HL CALL OUTPUT CP CR JR NZ,VIDEOUT RET OUTPUT:PUSH DE PUSH IY CALL 33H POP IY POP DE RET END By now you should be so expert at assembling these programs, that jumping to them with the de-bugger and getting back from the breakpoint will be taken for granted, but note the value returned in the HL register of 7813H. This is the next byte in memory after the last character displayed. I suppose that it is worth mentioning that there is really no need to be pushing and popping DE a IY as neither are being used in our programs for anything important, but it should become second nature whenever calling 2BH, 33R or 38B to save these two registers otherwise one day you WILL be caught out. The fun starts, I suppose, with line 4 where the HL register is given the label Message to take with it on line 5 where VIDEOUT is called. VIDEOUT doesn't get involved with the complications of actually outputting to the video, that's left to OUTPUT. There's enough to be getting on with just picking up the characters pointed to by HL and checking, after OUTPUT has done with them, on whether or not to get some more. Line 7 is also of interest as we have used Zen's all purpose DB (Define Bytes) pseudo-op. This supercedes the DEFM (DEFine Message) and the DEFB (DEFine Byte) of the more primitive assemblers, and allows the mixture of different operands as long as they are separated by commas. Also notice that for each character in the DB statement there is a corresponding hexadecimal value generated in the object code listing. VIDEOUT, starting at line 8, is the important routine and has a few points of note. Firstly the HL register arrives with the address of the start of the string of characters for output. The first character is loaded into the A register and immediately HL is incremented. This is a fairly universal convention of maintaining a pointer, be it stored either in memory or in a register, as always pointing to the next character. Once the current character has been loaded from, or to memory or wherever and reference to it is no longer required, the pointer is 'bumped' to the next one. The output TRS8BIT - volume 07 Issue 03 - September 2013 - page 17 subroutine is then called and whatever was in the A register is now on the video. We know from earlier programs that the output routine will return with the value still in the A register so we check on whether it was a CR and if not, loop back for the next character. If it was a CR then VIDEOUT finishes with a return. There is a weakness with this program in that all our strings for output must finish with a CR otherwise VIDEOUT doesn't know when to stop. To make our routine more useful it would be nice if we could detect the end of a string in mid-line so to speak. Since our old friend zero is an easily detected non printable character we can use it to flag the end of a string where we do not want a CR. We must make a small addition to our VIDEOUT program, first: immediately after loading A with each character execute an OR A command and if it is zero then return. Now we meet one of the many aspects of the Z80 that makes life easy for us. We want to return if the zero flag is set, i.e. the equivalent of: IF Z = 1 THEN RETURN. In assembler it's as simple as RET Z. Thus we have two exits from VIDEOUT, the first is to leave immediately if the next character it gets is zero and the second exit is following the output of a CR. The program, with a few added messages now becomes: 1 ORG 7800H 2 LOAD 7800H 3 CR: EQU 13 4 7800 211378 LD HL,MESS1 5 7803 CD3378 CALL VIDEOUT 6 7806 211F78 LD HL,MESS2 7 7809 CD3378 CALL VIDEOUT 8 780C 212878 LD HL,MESS3 9 780F CD3378 CALL VIDEOUT 10 7812 00 NOP ; For Breakpoint 11 7813 50524553 MESS1: DB "PRESS ENTER",CR 11 7817 5320454E 11 781B 5445520D 12 781F 54455354 MESS2: DB "TESTING»» ",0 12 7823 494E473E 12 7827 3E3E3E00 13 782B 3C3C3C2E MESS3: DB "<<.>>>",CR 13 782F 3E3E3E0D 14 7833 7E VIDEOUT: LD A,(HL) 15 7834 23 INC HL 16 7835 B7 OR A TRS8BIT - volume 07 Issue 03 - September 2013 - page 18 17 18 19 20 21 22 23 24 25 26 27 28 7836 7837 783A 783C 783E 783F 7840 7842 7845 7847 7848 C8 CD3F78 FE0D 20F5 C9 D5 FDE5 CD3300 FDE1 D1 C9 RET Z CALL OUTPUT CP CR JR NZ,VIDEOUT RET OUTPUT: PUSH DE PUSH IY CALL 33H POP IY POP DE RET END Testing this version in the usual way will give the following on the VDU. Note that Mess3 follows immediately after Mess2: Z>J7800H Brkpt>7812H PRESS ENTER TESTING>>>><,<.>>>> >>> Z> There are of course other ways of achieving the same objective. If you should examine a machine code program generated by a compiler or program generator then you will find that usually each message is preceded by a single byte value giving the number of characters for output. This quantity is loaded into the B register and the output routine goes round a loop displaying and decrementing B until B becomes exhausted. There's a nice little Z80 instruction, specifically for the B register, called Decrement and Jump If Not Zero which does it all for us in one go. Taking our original example and rewriting this way it becomes 1 2 3 4 7800 210778 5 7803 CD1478 6 7806 00 7 7807 0C505245 7 7808 53532045 7 780F 4E544552 7 7813 0D 8 7814 46 9 7815 23 10 7816 7E 11 7817 CD1D78 12 781A 10F9 13 781C C9 TRS8BIT ORG 78008 LOAD 78008 CR: EQU 13 LD HL,MESSAGE CALL VIDEOUT NOP ; For Breakpoint MESSAGE: DB 12,"PRESS ENTER",CR VIDEOUT: LD B,(HL) VID1: INC HL LD A,(HL) CALL OUTPUT DJNZ VID1 RET - volume 07 Issue 03 - September 2013 - page 19 14 15 16 17 18 19 20 781D 781E 7820 7823 7825 7826 D5 FDE5 CD3300 FDEl Dl C9 OUTPUT: PUSH DE PUSH IY CALL 33H POP IY POP DE RET END If we didn't want the CR at the end of the message it could easily be omitted provided we reduce the counter from 12 to 11. This particular technique is used in Scripsit to display all the various prompts and messages on the bottom line. It suffers, as does the earlier example, in needing an extra byte, be it the counter at the beginning or the special marker at the end, to indicate the length of the message string. To do the job really efficiently we need a technique that somehow can manage without any extra bytes. The secret is in appreciating that all displayable ASCII characters have values less than 80H (decimal range 32 to 127), so if we add 128 to the last character of each string then simply by testing if greater than 127 we will know whether or not the whole message has been displayed. To add 128 or 80H to an ASCII character causes just the seventh bit to become set, everything else stays the same so by simply testing the condition of Bit 7 will be enough to indicate the end of a string. We must of course make sure that we clear this bit before we try to display the character otherwise we would get some weird graphics instead of letters. Obviously our display routine is going to get a little bit longer and more involved, but the reward is in the saving in memory by not needing an extra byte with every message. So once again we will rewrite our simple example: 1 ORG 7800H 2 LOAD 7800H 3 7800 210778 LD HL,MESSAGE 4 7803 CD1278 CALL VIDEOUT 5 7806 00 NOP ; For Breakpoint 6 7807 50524553 MESSAGE: DB "PRESS ENTE","R".80H 6 7808 5320454E 6 780F 5445D2 7 7812 7E VIDEOUT: LD A,(HL) 8 7813 E67 AND 7FH 9 7815 CD1E78 CALL OUTPUT 10 7818 CB7E BIT 7,(HL) 11 781A 23 INC HL TRS8BIT - volume 07 Issue 03 - September 2013 - page 20 12 13 14 15 16 17 18 19 20 7818 781D 781E 781F 7821 7824 7826 7827 28F5 C9 D5 FDE5 CD3300 FDE1 D1 C9 JR Z,VIDEOUT RET OUTPUT: PUSH DE PUSH IY CALL 33H POP IY POP DE RET END Line 7 looks interesting and may take some working out. First of all the CR has gone just to make it easier to explain. DB "PRESS ENTE","R".80H the fun comes after the comma "R".80H. Well here is the best explanation you're going to get. As we want to manipulate the last character 'R' we have to separate it from the rest of the letters "PRESS ENTE". To generate the letter 'R' with its bit 7 set could have been achieved by using "R"+80H but there is a convention with some sense behind it (that I wont go into here) that it is better to use logical operators wherever possible in preference to arithmetical ones. So we are using the assembler's equivalent to the Z80's OR operation. The full stop '.' is used to signify that the bits corresponding to the letter 'R' are to be ORed with 80H, which will always result in bit 7 being set. VIDEOUT, starting at line 7, gets the character pointed to by HL but before displaying it must ensure that bit 7 of the A register is not set. This could be done either by the command RES 7,A (RESet bit 7,A) but again the logical operation AND is preferred, so we have AND 7FH, thus filtering out bit 7. The character in A can now be displayed, but after being output the A register is of no use to us as a check on the bit 7 end of string marker. To do that we have to refer to the actual string of characters and fortunately the HL register is still pointing to the particular character we are interested in. To test bit 7 then is quite easy with the questioning command BIT 7,(HL). The result will be either a Zero or NonZero condition in the flag register. If it is zero we go back for the next character having incremented HL first, if it is non-zero then that was the last character and the subroutine having done its job can return. There are of course, as one might expect, equivalent complete routines available in the ROM and also for disk users in the DOS, which will output complete character strings to the video with just a single call. But there are problems in that the conventions for treating the end of string markers are not TRS8BIT - volume 07 Issue 03 - September 2013 - page 21 consistent, the ROM routine at 28A7H doesn't work under Newdos and as Tandy do not declare these routines as being available they might change them one day and not tell anybody. As the amount of coding involved in setting up one's own general purpose output using the official supported 33H is quite minimal, then I would always recommend doing it. That way your programs will need little updating when the Model 99 TRS-80 comes out and should you change computers altogether then the alterations needed, will be kept to a minimum. 0o --== o TRS8BIT - ==-- volume 07 Issue 03 - September 2013 - page 22 IN MAV'S WORKSHOP MODEL 1 TOROID POWER SUPPLY PROJECT - HARDWARE PROJECT FOR ELECTRONICS ENTHUSIASTS by Ian Mavric (words) and Dean Bear (design) ASSEMBLY PROJECT Legal note: if any of the following terms alarm you, please get a professional to build the power supply for you: "Lethal Voltages", "Poisonous, corrosive PCB etchant", "hot soldering iron", "possible damage to computer or yourself if built wrong", "the authors and editor bear no responsibility", and "make sure building a power supply like this is within your skill set". PREAMBLE The TRS-80 Model 1 uses an external power supply to bring the mains AC voltage (120V in the USA and 240V in Australia/UK) down to approx. 15VAC and 19VDC to power the computer. If you have an Expansion Interface, you need a 2nd one of these power supplies. The power supplies themselves are very simple and for the most part very reliable. Most were made back in the 1970s and still work now. Radio Shack made the US 120V power supplies, and Ferguson in Terrey Hills, NSW made the 240V ones supplied with Australian Model 1s. Ira, from www.trs-80.com, had been emailing me about the growing number of requests he had been receiving for an alternative power supply for people who needed them. It turns out there was a large number of enthusiasts out there who had either lost their power supplies, or their great eBay purchase didn't come with them, or they only had 1 and needed 2 to run an Expansion Interface, or their own supplies had just plain worn out and failed. Ideally an over-the-counter wall-wort type power adapter would be great but due to the dual output voltage of the original power supply, this is not possible, or convenient. I decided the best course of action was to design a supply based around 2 transformers (each providing one of the two voltages needed), that had enough power to run both the Model 1 computer and Expansion Interface, but was compact enough to fit inside the Expansion Interface if needed. A great side effect is that only one mains outlet would be needed instead of two. TRS8BIT - volume 07 Issue 03 - September 2013 - page 23 Dean Bear, a TRS-80 enthusiast from Canberra, came up with a simple design that meets all the design requirements above, and all the parts are easily obtained. I have used one of these for over 6 months now on my main (daily use) Model 1 and have had no bad side effects. Others who have used the supply include David Cooper in Seattle, WA, and Andrew Quinn in Auckland, New Zealand. In addition, Dean's design uses toroidal transformers which are the latest design in PCB mount transformers. Moulded in blue plastic they are compact, powerful, and don't generate much heat, vibration or electrical noise. They are ideal for installation in the Expansion Interface as they won't cause it to overheat like the US 120V ones tend to do. They also won't make your Model 1 display wobble all over the place. PARTS LIST: I bought all my parts for this project from Altronics (www.altronics.com.au) but all the parts except for the two toroid transformers are easily bought from any electronics supplier in the world. The toroid transformers are a little harder to locate but most countries will have a supplier who has them. Also note with the toroid transformers you need the 30VA versions. There are 10VA versions which are a little cheaper, but will not have the capacity to power a TRS-80. TRS8BIT - volume 07 Issue 03 - September 2013 - page 24 QTY 1 PART 7.5v + 7.5V PCB 30VA Toroidal Transformer (Center Tap) 6.0v + 6.0V PCB 30VA Toroidal Transformer (Center Tap) 1K Resistor LED 1000uF 35V Electrolytic Capacitor Fuses (250mA for 240V/500mA for 120V – on each transformer) 3AG/AGC Fuseholder (Optional) 5-Pin DIN Line Plug PO4 6A 400V Bridge Rectifier 1 1 1 1 2 2 2 1 From Altronics $A30.00 Each $A30.00 Each $A0.80 Each $A0.21 Each $A2.00 Each $A2.50 for 10 $A2.30 Each $A1.00 Each $A2.25 Each THEORY OF OPERATION Basically one transformer (a 7.5-0-0-7.5) supplies the 15VAC output and the other transformer (a 6.0-0-0-6.0) supplies a bridge rectifier and an electrolytic capacitor supplies the 19VDC supply. The reason this is done is because the standard single transformer inside an original TRS-80 power supply has two secondary windings to give two different output AC voltages from the 1 transformer. The bridge rectifier changes the AC output to DC, and the capacitor smooths out the ripple current coming from the bridge down to something palatable to the Model 1. The Model 1 itself, due to its 1970s design, is not very picky about how close to ideal the voltages are supplied to it, it is more concerned about the AC and DC being fed, so as long as 1417VAC is supplied across pins 1 and 5 of the power connector, and 19-21VDC is supplied across pins 2 and 3, the computer will run. Since the power supply needs to work in either a 120V or a 240V environment, Dean came up with two PCB artworks and two schematic diagrams, the difference being how the primary side of the transformers is connected. On the 240V version the TRS8BIT - volume 07 Issue 03 - September 2013 - page 25 transformer primaries are wired in series, on the 120V version they are wired in parallel. This allows us to specify the same parts list for both versions, it's only the PCB artwork which is different. PCB ARTWORK Scale up this artwork so that it fits onto a 150mm X 75mm single sided copper clad board and etch it any normal way (I use the toner transfer method and etch with good old Ferric Chloride). Note there are two different artworks, the top one is for the 240V design and the bottom one is for the 120V design. TRS8BIT - volume 07 Issue 03 - September 2013 - page 26 ASSEMBLY The 7.5-0-0-7.5 transformer goes in the centre - over the area which reads: M1 POWER SUPPLY, and the 6-0-0-6 transformer goes on the end, over the area which reads: 120V or 240V POWER PCB. Pay attention to the polarity of the bridge and the capacitor, and the LED if you are installing it (it's optional but a nice touch). TESTING Prior to plugging it into a TRS-80, look for the correct voltages on the output connector, which is around 15-17VAC TRS8BIT - volume 07 Issue 03 - September 2013 - page 27 across points A and B, and 17-19VDC across points C and D (D being ground and C being 17-19VDC). Make up your power cables to the TRS-80 and test one last time, and you should be in business. MOUNTING IN THE EXPANSION INTERFACE Dean noted if you remove the black power supply holder from the EI, some common sense will show that a small amount of carpentry is needed to mount the power supply in the compartment. NEXT TIME: I talk about FreHD - the Hard Drive Emulator for the Model I/III/4/4P. [email protected] TRS8BIT - volume 07 Issue 03 - September 2013 - page 28 IVAN KENNEDY'S MODEL IIIs by Ian Mavric, contributing writer This article first appeared in SYDTRUG News. Back in February Ivan emailed me saying he had a number of old TRS-80 systems which he would like to get fixed, and asked if I was up to the task. After a few more details were sent back and forth between Ivan and I, we made plans for a visit to my workshop with a Subaru Forester full of TRS-80s. The actual count was 6 Model 4s, 3 Model IIIs, a Model 1 system, a Model 4P portable TRS-80, a Tandy 200 notebook, and boxes or spare parts and a small consignment of software. My briefing was simple: fix as many as I could before Ivan had to return to Sydney two weeks later. I first had a look at the Model III computers, two looked complete, a 16K cassette-based machine and a very rare 48K disk-based machine with the optional factory high-resolution graphics kit (cat. no 26-1125) installed. For those who can't remember, the graphics option was super expensive, $549 in 1982, and not many people bought it because there was no software support for it. The few computers which have the graphics option fitted are considered to be priceless restoreat-all-costs relics, so to me this one was a must-fix. Checking with Ivan, I found that this computer was owned by Graham Read and had not been in service since 1995. First I thought I would deal with the easy machine, the 16K, and had a look inside to find it surprisingly clean. Nothing looked out of place so I plugged it in and was soon greeted with the familiar Cass? prompt and flashing block cursor. The picture was shaky but the machine seemed to work quite well, despite a few unresponsive keys. I made a list of the nonresponsive keys and powered the machine down. Shaky picture on this type of computer is usually the result of ineffective ripple current filtering in the power supply and it didn't take long for me to find the culprit, a bulging electrolytic capacitor. I replaced it as well as the A/C line filter caps, re-installed it in the computer and was pleased to see a rocksolid picture. After fixing the keys I tested the machine further by loading some software the old fashioned way off cassette and was pretty pleased with my work. The computer had been stored in direct sunlight at some time in its life so both Enter keys were yellow, and it had also lost its Model III nameplate. After bleaching the Enter keys finding a spare Radio Shack TRS-80 Model III Microcomputer nameplate the computer was finished. Not a bad start I thought. Next I had a look at the hi-res Model III and jeez they are TRS8BIT - volume 07 Issue 03 - September 2013 - page 29 complicated beast. The hi-res board mounts to an aluminium chassis which sits over the motherboard. It's all a very tight fit inside the cabinet. Graham had modified his Model III with extra cables coming out of the hi-res board. I wasn't entirely sure what they were for but I'm guessing to drive an external monitor... perhaps for classroom presentations or the like. The cables were a mess and once I had removed them all I had the hi-res board removed from the machine. At this point it’s just a regular Model III 48K disk system, which I powered up and it was in a very unhappy state. Model IIIs have 24 16Kx1 bit Ram chips arranged in three banks of 8 chips, each bank providing 16K of memory. After some swapping and changing, I ended up throwing out 14 bad Ram chips, replacing them with good used one and finally after some hours was greeted with Cass? on the screen. The power supplies both (Model III disk systems have dual 35W power supplies in them) had blown A/C line filter caps which were changed, but the disk drives were both unhappy. I sourced a couple of good used disk drives from Ivan's collection of spare parts and before long the computer was booting up to TRSDOS 1.3 and running memory test routines. Enough work for one afternoon so I called it a day. The next day I ran memory testing routines for most of the day while I restored the trace cuts and re-wiring Graham had done to the hi-res graphics board. The moment of truth was when I attempted to re-connect the hi-res board and loaded up Tandy's Service Centre diagnostic disk which has test patterns for the hi-res board. A pattern loaded up, it was high resolution, but none of the test patterns looked remotely like they should. A closer look at the patterns that did show up displayed alternating black and white blocks interspersed with sections of what the pattern should have been. Knowing that the memory on the hi-res board is "visible" memory, white blocks indicate a bit stuck high and a black block represents a bit stuck low. Given the poor state of the main RAM in the Model III it was reasonable to suspect the RAM on the hi-res board suffered the same fate, and so replacing the memory chips on the hi-res board cured the problem and displayed the proper test pattern. I put the computer back together and was working on it a bit when I decided the brightness needed to be turned up a little, so I reached under the computer where the brightness/contrast controls are, only to find the brightness control stuck solid. I've seen this before, where the control just seizes-up inside, and there is little you can do other than replace the control with a good used one. Once again the lid was removed from the computer and the faulty brightness control replaced. Satisfied everything had been done to make this computer happy again I put it together one last time and that is how it is now at Ivan's. TRS8BIT - volume 07 Issue 03 - September 2013 - page 30 The last Model III? It was missing many parts, had no disk drives and no power supplies installed, it also had major scratches in the silver paintwork on one side and so I pretty quickly realised this one was going to be a parts machine to fix other TRS-80 Model IIIs. Key switches from it were used to fix the 16K cassette machine, and RAM chips, brightness control, and various other screws etc. were used to fix the hi-res Model III. Some parts were used to fix the Model 4, which I will talk about next time. Ian. [email protected] TRS8BIT - volume 07 Issue 03 - September 2013 - page 31 TRS8BIT - volume 07 Issue 03 - September 2013 - page 32 Trs8bit Welcome to the 2013, Xmas edition. Dee and I wish you all a very Merry Christmas and a Happy New Year. Thank you all for your help, support, contributions and encouragement throughout the year. SPECIAL thanks go to Mav, down there in Oz, for all his contributions over the year. They are written in such a professional manner and show such keen interest and enthusiasm for all things Tandy. I just can’t wait until the next issue to see what he’s come up with! Thanks also to those of you who contacted me regarding the M1 internal upgrade using 4164 chips. It seems there was, at least, 2 In this is sue of TRS8BI T Inform ation over T not en here’s jus load! t ough r oom HE RE!! Please checko u t p for fu age 2 ll det ails It’s T HE bigges t E DITION YET! versions and details of the one in CQ magazine, sent to me by Larry Kraemer, are in this issue. It also reminded Larry of a memory checking program which first appeared in 80Micro. He remembered amending it for the Model 3, so, in true trs8BIT fashion, both the programs are featured in this issue. Larry also sent details of replacing the internal ROM’s with EPROMS. With his permission and support, details should appear in the March 2014 issue. Yeh, stuff already in the pipeline for out 8th year!! Due to the size of this issue, I’ll keep these notes on the short-side. A full contents listing, just for this issue, now appears page 2. The UK’s Ebay has been reasonably busy over the last 3 months, much of it with very silly prices THOUGH, (ie £50 for a cassette game!), however, a Video Genie fetching £160 was NICE to see. Well, at 56 pages, this is the biggest, and I hope you’ll agree, best edition yet. Please keep sending in any Tandy related article for what id about to become our 8th year Bye for now and Happy Christmas everyone Dusty TRS8BIT - volume 07 Issue 04 - December 2013 - page 1 Contents Page 3 Watermarking BASIC programs AJ Harding This article first appeared in the Molimerx catalogue and is a simple way of protecting your BASIC programs. Page 5 Ivan Kenney’s Model 4 Ian Mavric Mav first wrote this article for Sydtrug news. Just how does he sort out all those problems? Page 8 Assembler Notes - Part 4 Laurie Shields The final part of Laurie’s brilliant introduction to assembler programming. Laurie had kindly given permission for the 4 parts to be made into a booklet for downloading. It will be available from the website (trs-80.org.uk, just in case you’d forgotten) in the new year. Page 24 In Mav’s workshop Ian Mavric The next instalment of Mav’s hard disk series. This will make all us Model 1 fans smile. page 30 It’s Christmas! Dee and I wish you all a very merry Christmas page 32 Upgrading a Model 1 using 64K chips Lew Mccoy & Fred Treasure An extract from CQ magazine Page 34 Virtual floppy disk using a Raspberry PI Alan Page Alan ‘blogs’ details of a Model 1 upgrade Page 39 Missile Dodge Author(s) unknown A truly brilliant one-liner with full explanation. It’s just has to be an Xmas Day special treat! Page 42 Ask Mav - Hardware questions on the Model 4 Ian Mavric Mav itemises some of the M4 questions he’s been asked. Hopefully, we can make this a regular feature for all types of hardware. Page 44 Goodbye hard disk, hello FreHD Garry Howarth Garry finds a new lease of life for his old hardware, using the latest upgrade Page 48 Mav’s believe it or not Ian Mavric Mav comes up with a real Model 1 ‘find’ Page 50 Babyroot Dennis Bathory Kitsz & Larry Kraemer The original article by Dennis appeared in 80microcomputing and was amended by Larry for the Model 3 TRS8BIT - volume 07 Issue 04 - December 2013 - page 2 Watermarking BASIC programs AJ Harding I believe this article first appeared in the Molimerx catalogue You would be surprised at the amount of flak I get from customers for devoting too much time to tape owners and contrary wise to disk owners. therefore, I will try and concentrate on one matter which applies to both and is, I always think, a rather glamorous tip! It is a method whereby a line can be hidden in the program so that when that program is listed a false line is shown. In fact, any of you who bought our very early programs - circa 1978/79 - may have come across the anomaly which I am going to describe, because at one time we did use it as a method of protecting our software. It does not in any way hinder the running or copying of a program. What it does do - if it is not spotted by the user - is to successfully prove beyond all doubt that the program emanated originally from a particular source. In other words, if somebody illegally copies a program, then if it contains this watermark the true owner can always prove that a copy which he comes across later is illegal. Somewhat like shutting the stable door after the horse has bolted, but in one Court case we used it successfully, so it is worth while. As I have said the overall concept is that a line is TRS8BIT - inserted in the program which is over-written by a nonsensical line. It is this latter which appears on a VDU display. Unfortunately the anomaly shows up on a line print, but one cannot have everything. The best way of explaining how to do this is to actually carry it out on a computer. It does not matter whether it is a tape or a disk machine, nor whether it is Model I or Model III. It also works on the Video Genie and Genie I. I would suspect also on the Genie 11, but I have never tried it. So switch on your machine and go into Basic. LOAD any program that you want, or if you prefer simply carry out the instructions from the keyboard. Which ever course you adopt we are interested in inserting a line, so for the sake of argument we will call it line 10, but of course it may be any number. If you are inserting into an existing program then, of course, make sure you are not over-writing an existing line number. Before you actually start typing you must decide on what watermark you want. It is best to use some sort of inscription for otherwise if one goes through Memory with a monitor then whatever the watermark is will quickly show up. We used to use the ASCII numbers representing the first four letters of my name. HARD in ASCII is 72 65 82 68. For the sake of this demonstration you might as well use the same, but you can use anything else if you like. After you have typed the line number and space, type REM. This makes certain that the program will ignore the line, for you must volume 07 Issue 04 - December 2013 - page 3 remember that it is the line that we are now entering that will actually form part of the program, in other words if it were a valid command the program would recognise it and act upon it. So we typed REM and continue, with or without a space, to the ASCII representation mentioned above. Hit the Enter key and we will now have the following: 10 REM 72658268 This, therefore, is the watermark and we must now proceed to cover it up. Type EDIT 10. As you know the line number will appear on the next line. From now on you must be a bit careful and before proceeding it would be wise to decide upon the contents of the masking line. I always used to look at the general context of the program to make sure that the line did not stand out. Try and avoid, for instance, the opening of a loop because you will not be closing it. Anyway this I must leave to you. For the purpose of this discussion we will assume that our mask is going to be IF X= 1 THEN 500. We left the procedure where we had the line number and the machine waiting for entry. Press the X key. This will take you to the end of the line, press the Shift key and the '. In other words we are making another REM statement. Keep your finger on the Shift button and using the left hand arrow, back space to the beginning of the watermark, that is to say, to the R in REM. Note that the characters have not been erased as you TRS8BIT - back space, but now that you have got to the R it has disappeared. Release the Shift key and type in your masking line. As you do this the watermark line will disappear. When you have got to the last 0 of 500, press the Enter key and you are finished. To test it, do a list and you will see that the masking line IF X etc. is listed. THAT line has no relevance to the program whatever. It will have no affect. So far as the display is concerned the only way of finding the watermark is to edit that line again, so type EDIT 10 and just for fun hit the L key for List. You will see that you still have the masking line. Now, however, space through the line with the space bar and you will see the underlying watermark appear. And that is how it is done. A simple, easily installed, but no longer little known gimmick of the Microsoft interpreter. One final word. If you intend to use this gimmick seriously, make the line as short as possible for in fact as it is listed it does display the watermark but this is so quickly overwritten by the mask that you do not notice it. If you have a long watermark and, therefore, a long masking line there can be a slight imperceptible flicker which, to the knowledgeable, will be a dead give away. 0o --== o volume 07 Issue 04 - December 2013 - ==-- page 4 IVAN KENNEDY'S MODEL 4 by Ian Mavric, contributing writer This article first appeared in the Oct 2013 edition of SYDTRUG News Back in February Ivan emailed me saying he had a number of old TRS-80 systems which he would like to get fixed, and asked if I was up to the task. Among the initial delivery was 6 Model 4s. My briefing was simple: Ivan wanted a good working Model 4 to return to Sydney with. The Model 4s dropped off had clearly been in heavy usage by passionate enthusiasts at Sydtrug. It was explained that some had belonged to Greg Read, some from Ivan, at least one was from a local airbase, but something thing was clear, they had all been modified to keep running and some had been ratted for parts to keep others alive. Some were missing disk drives, others were missing power supplies or motherboard, and others we missing even more. Rather than talk about each machine individually, I'll talk about how I assess a machine's suitability for repair, restoration or junking. First thing to do was to set up each machine, take the lids off and assess what was inside, and also take stock of what would potentially make a nicely restored machine. Things which get noted at this point in time: - Case condition (is it damaged or will it come up nice after cleaning? has it been modified?) - Serial number and Catalogue number (low serial numbers are generally more desirable and the catalo number helps determine what the original configuration of the Model 4 was - 26-1067 is a 16K diskless machine, while a 26-1069 is a 64K dual drive Model 4) - Does the CRT have screen burn (it makes sense to use a CRT without annoying images burnt into it) - Which version video board is installed (the later digital board gives a clearer image than the early analogue board) - What is the keyboard like (yellowed? missing keys? missing its RAM size badge?) Next thing I do is put power to a system which looks the most complete. In most cases with Ivan's computers, the mains filter capacitors had blown, so at this point I removed a power supply which looked pretty good and replaced its filter caps (C1, C2 and C12) and found myself greeted with a happy Cass? prompt from one of the motherboards. I earmarked this system to be one to fix for Ivan to return to Sydney with. Once at this point its easy to test the CRTs just be plugging them in and seeing what sort of image you get. Three showed a TRS8BIT - volume 07 Issue 04 - December 2013 - page 5 decent image (two had green CRTs and one had a B&W CRT), two showed nothing at all - no signs of life - and one had arcs and sparks going on - what I call signs of life... just the wrong ones. A nice case with a clear green CRT was chosen for Ivan. At this point one can plug in all the keyboards one after the other and make notes about which keys don't work. I was fortunate that in addition to all the keyboards in the machines, Ivan supplied me with an additional, new/unused keyboard from a US TRS-80 Model 4D. A quick test showed it to be perfect in way so it was given the nod to go in Ivan's pride-and-joy. With a sharp CRT, new board, and re-capped power supply, I was on the way to putting together a nice machine. Finding good disk drives can be a deal breaker for people doing their own TRS-80 restorations. The Model III and 4 come with Texas Peripherals disk drives, which are a cost-reduced version of the Tandon TM100-1A disk drive. Cost-reduced meaning they are cheaply made, and while most Tandon TM100-1A and 2A disk drives I find are still working, the cheaper TPs don't stand the test of time very well. In this instance though Ivan supplied a large quantity of disk drives. Lots had markings like "formats but doesn't read" or "worked 1/4/87" etc. but I did eventually find some disk drives which worked well and just needed some cleaning and a little recalibration. I installed a beige Teac FD-55BR 40 track double sided unit is drive 0 and a black Teac FD-55GFR 80 track double sided unit as drive 1. Once I'm at this stage where the hardware has essentially been selected and tested, the next step, putting it all back together, is where the fun starts. Tandy made a really excellent set of Radio Shack Service Centre diagnostic disks which tests all facets of the machine. It is THE best program for testing the memory and located some bad memory chips in the upper 64K of this 128K machine. TRS-80s don't extensively test their memory, so a machine can appear OK but may crash on certain programs and run fine with others, if they reside in different areas of the memory. Only a proper test program can find them out. With the computer together and booting regularly I was pretty pleased with the results but given the age of the machine I ran some diagnostics on the floppy disk controller which gave a pretty ordinary result. This happens a lot with old systems as parts degrade over time. Replacing the FDC on a Model 4 necessitates removing the motherboard, which I did, and replace the FDC and ran the tests again and got similarly ordinary results. Fiddlesticks! I noticed the results change on the test program and scope readouts as I leaned on the TRS8BIT - volume 07 Issue 04 - December 2013 - page 6 white interconnect cable which joins the FDC to the motherboard. Eureka! I changed the flaky white cable and the problem went away. In no time it was running MultiDos, Ivan's favourite OS, and the computer was finished off ready to return to its happy owner. Ian. Ian Mavric is an IT Specialist who also restores and collects TRS-80's and classic cars. He live with his wife and kids in Melbourne, Australia. TRS8BIT - volume 07 Issue 04 - December 2013 - page 7 ASSEMBLER NOTES, Part 4 Laurie Shields Chapter 8 Getting it from the Keyboard ----------------------------------- Now that we are all at home putting it on the video, the next step is to get it from the keyboard. We got an inkling of the possible complications earlier and now it’s for real. Prising the cap of one of the keys (only if you have an early TRS-80) is the nearest you will ever come to seeing a 'bit'. The keyboard is logically connected to a block of memory and each key, arranged in sets of eight, makes or breaks a little contact. This sets or clears one bit of the eight that make up the byte at its memory address. It all sounds very complicated and believe me decoding the keyboard is no game for amateurs. Fortunately we don't have to as Tandy have provided 2BH for us to save all the trouble. Now saving us all the trouble is perhaps not quite as you would express it if you knew what was coming, as all that Tandy have given us is a very fundamental call that just instantaneously scans the keys and returns with the value of whatever key was being pressed. If we weren't quick enough with our fingers then hard luck and what's more we have to save DE & IY first. That's the sum total of the official machine code keyboard input information. Let’s set ourselves the problem of accepting, from the keyboard, a string of characters that we need to save for use later in our program. As the characters are keyed in we will arrange to display them on the video as that isn't automatic either. We must consider carefully just which keys on the keyboard we are prepared to recognise. As apart from the normal visible characters from a space (value 20H) all the way through the numbers (30H to 39H) and the alphabet both upper and lower case, there are the arrow keys - penny plain and two pence shifted. If we don't set our thoughts out carefully at the beginning our programming will have some unpredictable effects. This Basic program will demonstrate the decimal value returned by these keys: 10 X$ = INKEY$ 20 IF X$ = “” THEN 10 30 PRINT ASC(X$); 40 GOTO 10 TRS8BIT - volume 07 Issue 04 - December 2013 - page 8 With the exception of the up-arrow by itself, which returns a value of 91 as it is a displayable up-arrow character, all of the others including <Clear> and the big white one give values less than 32. These are known as the various control codes for the output devices, such as the video or a printer, and do weird things like clearing the screen, or throwing a page, or blanking out a line, etc. Handling all of that first time is just too much, so to keep things relatively simple we shall restrict our input so that it recognises just the back-arrow (value 8) as a backspace/delete and the Enter key as the end of input. As we want to retain the input, assume it's the name of the person who is playing our 'Vacuum Deserters' game, we need to allocate some memory space for storage. As soon as we do this however we are then faced with making sure that the number of characters keyed in does not exceed the size of this buffer. Just to keep up the excitement we must also provide a prompt on the video such as Enter Name :, we must make sure the rest of the line has been blanked out before we ask for keyboard input and last but not least make sure the cursor is switched on! Don't laugh, just see Zap 22 in Apparat's Newdos80 version 2 for their Edtasm fix. A crafty peek at your Leve1 2 manual gives us the three very useful numbers 14, 30 and 31. The value 14 will switch the cursor on, 30 will clear from the current cursor position to the end of the line and 31 will clear from the cursor to the end of the video. We will use just 14 and 30 for the time being. Taking our previous routine we can easily alter it to display our new message "ENTER NAME :" but lets add the 14 and 30 to the message and see what. happens. We may as well add the storage buffer as well, which introduces us to a new pseudo-op DS or DEFS for Define Storage. This must be followed immediately by the number of bytes to be reserved so let’s fix it now at say 25 bytes - just under half a line. Now we get the tricky bit. We will use the C register to hold the maximum number of characters to key in and HL will have the address of the buffer, so it goes like this: Set B reg. equal to zero, call keyboard and wait for key to be pressed. If it’s a CR jump to end of the routine. If it’s a backspace, deal with it. If it’s a character we are prepared to accept (if not ignore it), is there room in the buffer for one more and if so put it there. Display it and go back for another one. TRS8BIT - volume 07 Issue 04 - December 2013 - page 9 1 2 3 4 6 7800 213D78 7 7803 CD6578 8 7806 214C78 9 7809 OE19 11 780B 0600 12 780D CD7B78 13 7810 B7 14 7811 28FA 15 7813 FEOD 16 7815 2825 17 7817 FE08 18 7819 2000 19 781B 05 20 781C FA0B78 ORG 7800H LOAD 7800H CR: EQU 13 BS: EQU 8 LD HL, MESS1 CALL VIDEOUT LD HL, BUFFER LD C, 25; Length of BUFFER TEXTIN: LD B, 0; Character count KEYIN: CALL KEYSCAN OR A JR Z, KEYIN CP CR JR Z, TEXTEND CP BS JR NZ, CHECK DEC B ; If lst key, makes B negative JP M, TEXTIN ; so back to ; beginning 21 22 781F CD7178 23 7822 2B 24 7823 3620 25 27 28 29 30 31 32 33 34 35 7825 18E6 7827 FE20 7829 38E2 36 37 38 39 40 41 42 7830 F1 7831 18 DA 7833 7834 7835 7836 F1 77 23 04 43 44 45 46 46 7837 783A 783C 783D 7841 CD7178 18D1 00 TEXTEND: 454E5445 MESS1: 52204E41 782B 782C 782D 782E P5 78 B9 3803 TRS8BIT CHECK: CALL OUTPUT ; Display backspace DEC HL ; Go back one LD (HL)," " ; clear character in Buffer JR KEYIN 26 CP 32 ; If less then 32 dec. JR C, KEYIN ; we don't want it ; We now need A reg to check if Buffer full ; so save the character on the stack first PUSH AF LD A, B CP C JR C, NOTFUL ; Carry if B is less than C POP AF ; Restore the stack JR KEYIN ;Wait for CR or BS NOTFUL: - POP AF LD (HL), A INC HL INC B ; ; ; ; Restore character Put in Buffer Bump the pointer Add 1 to the counter CALL OUTPUT ; Put it on the video JR KEYIN ; Go for next one NOP ; For Breakpoint DS "ENTER NAME :`, 30,14,0 volume 07 Issue 04 - December 2013 - page 10 46 7845 4D45203A 46 7849 1E0E00 47 BUFFER: 48 49 7865 7E VIDEOUT: LD A, (HL) 50 51 52 53 54 55 56 57 58 59 60 61 62 63 64 65 66 67 68 69 INC HL OR A RET Z CALL OUTPUT CP CR JR NZ, VIDEOUT RET PUSH DE PUSH IY CALL 33H POP IY POP DE RET PUSH DE PUSH IY CALL 2BH POP IY POP DE RET END 7866 7867 7868 7869 786C 786E 7870 7871 7872 7874 7877 7879 787A 7878 787C 787E 7881 7883 7884 23 B7 CS CD7178 FEOD 20F5 C9 D5 FDE5 CD3300 FDE1 D1 C9 D5 FDE5 CD2B00 FDE1 D1 C9 OUTPUT: KEYSCAN: DS 25 ; As we had before The first point to watch with this program is for disc users in particular but it applies in a general way to all others. With the source file growing larger the end is getting very close to 7800H (use Q to ask Zen for the Start & End) and should the end of the file go beyond 7800H some funny things will happen when we assemble. As the object code is generated the Load command will place it in memory from 7800H onwards obliterating the letter part of the source file and, whilst being perfectly understandable it is damned annoying when it happens. So whenever you are using the Load pseudo-op ALWAYS check on memory usage to ensure you are loading into free memory. Free memory being between the end of the source file and the top limit of high memory, everything below the start of the source file is in use, broadly as follows: TRS8BIT - volume 07 Issue 04 - December 2013 - page 11 Start ----- Stop ---- Used by --------- 0000H 4000H 4450H 4450H 3FFFH 4350H (Mod 3) 4000H 5200H 51FFH Rom, Keyboard, video, Printer etc. (Mod 1) Level 2 cassette operating system. Start of Source Cassette Zen. Or for disc DISC operating system. Start of source Disc Zen. Meanwhile back at the program, TEXTIN starts with setting B to zero and calling the keyboard until a key is pressed. Check first of all if it is the big white one as in that case we can pack up. Next check for a back-arrow as this is the only other key less than 32 that we will accept. Now if it is a back-arrow there are two possibilities, either it is the first keystroke and there isn't anything there to rub out or it isn't and there is. We will decrement B anyway and see what happens. If B was zero to begin with then we dropped a clanger and it has gone minus so the simple way to recover is to jump back to the very beginning of TEXTIN and start afresh. Note we have to use JP M, instead of JR C, as just DECrementing a register does not trigger the Carry flag. If B hasn't gone negative then there must be a character to delete, so first of all CALL OUTPUT to do it on the video and then we must move the value in HL back one and zap the character in the buffer, before going round again for the next character. That has disposed of the keys less than 32 that we are interested in so now to check on what is in the A register and simply ignore anything less by going back to KEYIN. OK we have a valid character but have we got room in the buffer to store it? To find out means doing sums with the A register but we can't do that without losing the important character in A, so the best thing to do is PUSH it on to the stack. Comparing B with C by putting one of them in A first will give the answer in the Carry flag to the state of the buffer. We now have two things to do and if we get them in the wrong order we are in trouble. The wrong way would be to POP AF to get the character back and then jump back to KEYIN on No Carry if the buffer was full. Why wrong? Well the important carry condition in the F register would be altered when the old values off the stack were popped, so we must decide on whether or not there is room in the buffer before Popping AF. TRS8BIT - volume 07 Issue 04 - December 2013 - page 12 If there is room, then we put the character into the buffer using the neat instruction load the contents of the memory address in HL with the A register. Increment the value in HL to point to the next available space, add one to B as our character count and go back for the next character. Nothing to it really, so assemble it and jump to 7600H with breakpoint at 783CH to see it all work. We can of course tidy up TEXTIN to a little subroutine that simply needs HL and C initialising to come back on return with the string input into the buffer and the number of characters in B: TEXTIN: LD B,0 KEYIN: CALL KEYSCAN OR A CP CR RET Z; This is the exit from the routine. CP BS JR NZ, CHECK DEC B JP M, TEXTIN DEC HL LD (HL),’ ‘ JR PUTONVDU CHECK: CP 32 JR C, KEYIN PUSH AF LD A, B CP C JR C, NOTFUL POP AF JR KEYIN NOTFUL: POP AF LD (HL), A INC HL INC B PUTONVDU: CALL OUTPUT JR KEYIN That was the easy one, in case you hadn't noticed, now it gets a little bit trickier as the next problem is inputting numeric data. Instead of any character from the keyboard we now only want to accept the digits 0 to 9, but once having keyed them in convert the digits in decimal format to a numeric quantity that the Z80 can understand. Actually it's not going to be that bad considering what we've already been through. TRS8BIT - volume 07 Issue 04 - December 2013 - page 13 First of all we can re-use most of the preceding program for reading the keyboard with some additions and alterations to label names etc. The first change is to reject any characters less than '0' with CP '0' rather than CP 32; we must also add an extra test to reject anything bigger than '9' so Check becomes: CHECKNUM: CP '0' JR C, KEYIN2 ;The new name for KEYIN CP '9'+1 ;Anything bigger than a 9 JR NC, KEYIN2 PUSH AF etc This will allow input from the keyboard and only accept the 0 to 9 digits. If you want to use plus, minus and decimal points then you're reading the wrong chapter. Having got them in though they are still just characters and we have to do some nifty footwork to turn them into a useful numeric quantity. What we shall do is to start with zero and work from left to right through the string of digits multiplying the value we already have by ten and then adding the number represented by the digit to our value. As the final answer could end up bigger than 255 we shall have to use the HL register pair (remember they can do adds) for most of this operation. Let's address ourselves to the problem of multiplying the contents of HL by ten. Doubling HL is easy as we have the instruction ADD HL,HL and if we did it again we would have four times. If only we had saved the first value we could add that to get five times and then double it again for ten. Well the DE registers have been lazing about doing nothing let's use them: TIMESTEN: PUSH HL POP DE ;DE has original HL value ADD HL,HL ; HL is now doubled ADD HL,HL ; HL is now four times ADD HL,DE ; HL is now five times ADD HL,HL ; HL is now ten times Just hold it a minute. HL is doing sums, DE is helping, B knows how many digits to process - who's left to tell us where the buffer is with the characters in it? Time to use IX or IY, I suppose and since we've been pushing and popping IY like there was no tomorrow we'll use that one. Assume IY points to our string of digits - this is what you do: Get the character pointed to by IY into the A register. Subtract the 30H from it so that we're left with just 0 to 9 Add it to HL - no that isn't allowed! TRS8BIT - volume 07 Issue 04 - December 2013 - page 14 The BEST in TRS-80s Call The Right Stuff Ask for Ian The number is +61 416 184 893 That's The Right Stuff And he's in Melbourne http://ianmav.customer.netspace.net.au/trs80/ TRS8BIT - volume 07 Issue 04 - December 2013 - page 15 Add L to A, load L with A, if Carry then increment B That is all just too messy! Try it this way: Load the E register with A, make sure D equals zero Add DE to HL - much tidier. The only point to watch is that IY never expects to be pointing in the right direction and always thinks that you're going to want the one just to the left or half a dozen to the right like this: (IY-1) or (IY+6). If we really do want the memory address that IY is actually pointing to then we must use (IY+O); so the next bit: LD A, (IY+O) SUB 30H LD E, A LD D, 0 ADD HL, DE INC IY again for the next digit, so: DJNZ TIMESTEN This will cause a monumental disaster if for some reason the user had just pressed <Enter> instead of inputting some numbers, as B would start at zero, after the first DJNZ would get the value 255 and we would do the conversion on the whole two hundred and fifty six bytes starting at the buffer address and ending up, who knows where. We can handle that though by checking on B first; so putting it all together with a prompt, say 'ENTER QUANTITY :' it looks like this: 1 2 3 4 6 7800 211978 7 7803 CD8678 8 7806 212C78 9 7809 0E05 10 780B CD5578 11 780E 00 12 13 14 15 17 17 780F 7812 7815 7818 7819 781D ORG 7800H LOAD 7800H CR: EQU 13 BS: EQU 8 5 LD HL, HOWMANY CALL VIDEOUT LD HL, NUMBUFF LD C, 5 CALL NUMBERIN NOP ; For breakpoint halfway 212C78 LD HL, NUMBUFF CD3378 CALL CONVERT 223178 LD (QUANTITY), HL 00 NOP ; For Breakpoint 16 454E5445 HOWMANY: DB 'ENTER QUANTITY :',14,30,0 52205155 TRS8BIT - volume 07 Issue 04 - December 2013 - page 16 17 17 17 18 19 20 21 22 23 24 7821 414E5449 7825 5459203A 7829 0E1E00 NUMBUFF: 7831 0000 QUANTITY: DS 5 DW 0 7833 7835 7836 7838 PUSH IY PUSH HL POP IY LD HL, 0 FDE5 E5 FDEl 210000 CONVERT: 25 26 27 28 29 30 31 32 33 34 35 36 37 38 39 40 41 42 43 44 45 46 47 48 49 50 51 52 53 54 55 56 57 58 59 60 61 62 ;Check first if B=0 i.e. no input 7838 76 783C B7 783D 2813 LD A, B OR A JR Z, CONVERTEND 783F 7840 7841 7842 7843 7844 7845 7848 784A 784B 784D 784E 7850 7852 7854 E5 D1 29 29 19 29 FD7E00 D630 5F 1600 19 FD23 TOED FDEl C9 TIMESTEN: PUSH HL POP DE ADD HL, HL ADD HL, HL ADD HL, DE ADD HL, HL LD A, (IY+0) SUB 30H LD E, A LD D, 0 ADD HL, DE INC IY DJNZ TIMESTEN CONVERTEND: POP IY RET 7855 7857 785A 785B 785D 785F 7860 7862 7864 7865 7868 7869 786B 0600 CD9C78 B7 28FA FE0D C8 FE08 2009 05 FA5578 2B 3620 1814 NUMBERIN: KEYIN2: 786D FE30 786F 38E6 7871 FE3A TRS8BIT CHECKNUM: - LD B, 0 CALL KEYSCAN OR A JR Z, KEYIN2 CP CR RET Z CP BS JR NZ, CHECKNUM DEC B JP M, NUMBERIN DEC HL LD (HL)," " JR NUMBVDU CP '0' JR C, KEYIN2 CP '9'+1 volume 07 Issue 04 - December 2013 - page 17 63 64 65 66 67 68 69 70 71 72 73 74 75 76 78 7873 7875 7876 7877 7878 787A 787B 30E2 F5 78 B9 3803 Fl 18DA 787D 787E 787F 7880 7881 7884 7886 Fl 77 23 04 CD9278 18D1 7E JR NC, KEYIN2 PUSH AF LD A, B CP C JR C, NOTFUL POP AF JR KEYIN2 NOTFUL: NUMBVDU: VIDEOUT: POP AF LD (HL), A INC HL INC B CALL OUTPUT JR KEYIN2 LD A,(HL) etc. An alternative approach might be to use the original TEXTIN routine for any input and check it for numeric validity before conversion. This would probably produce a more universal solution but would have added to the complexity. For storing the final answer we have asked for two bytes of memory to be reserved with the pseudo-op DW (Define Word). A Word in Z80 jargon is two bytes (one high order, one low) and in our case we have initialised them at zero. When we test this routine we will discover the peculiar way the Z80 puts the contents of a register pair into memory. In human terms it appears to be back-to-front, i.e. the most significant byte comes second when displayed left to right. A better way to think of it though is to realise that the highest order (most significant) byte goes into the highest address of the two bytes of storage and the lowest (least significant) byte goes into the lowest address. Right oh - assemble and jump to 7800H with a breakpoint at 7818H (or 780EH if you want to stop half way), key in any number you want and then check with Q7831H on what has been stored at the location labelled Quantity. Now that we've assembled some programs with a reasonable number of labels in them let's look at something else Zen has got for us. The first is the simple sorted Symbol Table listing which tabulates all the labels we have used and their hexadecimal values: Label value Label value BS 0008 CHECKNUM 786D NUMBUFF 782C OUTPUT 7892 TRS8BIT Label value CR OOOD HOWMANY 7819 NUMBERIN 7855 QUANTITY 7831 - Label value CONVERT 7833 KEYIN2 7857 NOTFUL 787D TIMESTEN 783F volume 07 Issue 04 - December 2013 CONVERTEND 7852 KEYSCAN 789C NUMBVDU 7881 VI DEOUT 7886 - page 18 With the later versions of Zen there is a cross-reference listing capability that lists every label in the symbol table with its value, the line number where it is defined and the line numbers of every reference to it in the whole of the source file: Label CR BS HOWMANY NUMBUFF QUANTITY CONVERT TIMESTEN CONVERTEND NUMBERIN KEYIN2 CHECKNUM NOTFUL NUMBVDU VIDEOUT OUTPUT KEYSCAN value 000D 0008 7819 782C 7831 7833 783F 7852 7855 7857 786D 787D 7881 7886 7892 789C occurrence 3 4 17 18 19 21 30 43 46 47 60 71 75 78 86 92 references 50 83 52 6 8 12 14 17 13 42 28 10 55 49 61 63 69 76 53 67 58 7 84 75 82 47 Anybody getting this far without the help of Assembler's Aspirin (Pt No 26-XXXX at your local Tandy shop) is entitled to celebrate. Appendix 1 R O M C A L L S --------------------- The following list is simply a catalogue of the Model l Rom calls that have come to my attention through various publications and other means. Some of these may be Model 3 compatible and some are bound to be totally different. Address Action Comments ----------------- OOOBH Where am I ? Pops the return address into HL and Jumps to (HL). Used to determine where in memory you are: CALL 0BH HERE:PUSH HL POP IX; IX now has value HERE TRS8BIT - volume 07 Issue 04 - December 2013 - page 19 LOOKING FOR FAST, INEXPENSIVE, UNLIMITED MASS STORAGE FOR YOUR TRS-80 MODEL I/III/4/4P/4D? The amazing "FreHD" -Emulates a TRS-80 hard drive, but faster than any hard drive! -Works with your favourite DOS (LS-DOS, LDOS, CP/M, Newdos/80 2.5) -Uses SD card for storage medium -Bonus free Real Time Clock function! -Designed in Belgium and proudly built and shipped from Australia -Kit form or fully assembled Order yours today: http://ianmav.customer.netspace.net.au/trs80/emulator TRS8BIT - volume 07 Issue 04 - December 2013 - page 20 0013H Device Input Usually used for 1 byte read from disc file. LD DE, File control block of open file CALL 13H; Byte returned in A Zero flag set if no error JP NZ, Disc error routine. 001BH Device Output Similar to above for 1 byte to disc :Character in A register LD DE, File control block CALL 1BH JP NZ, Disc error routine. 002BH Keyboard scan Scans keyboard and returns character in A Very similar to Inkey$ from Basic. Uses DE and IY registers, char in A reg and Zero set if key pressed. Does not hang around waiting, usually used with a loop: KBSCAN: PUSH DE PUSH IY CALL 2BH POP IY POP DE OR A JR Z,KBSCAN RET ; character in A 0033H Video Ouput Outputs character in A to current cursor pos. Uses DE & TY: ;character in A DISPLAY: PUSH DE PUSH IY CALL 33H POP IY POP DE RET 003BH Printer Output Exactly the same as for video but this routine will hang up if printer not connected. On Model 3 the hang up can be broken with <Break>. 0040H Line Input Keyboard line input terminated with <Entry>. Entry HL points to your buffer, B - No bytes. Exit HL -> buffer and B = No of characters. Uses DE register. 0049H Key Input Similar to Keyscan but waits for key stroke. TRS8BIT - volume 07 Issue 04 - December 2013 - page 21 0060H Delay Decrements BC until = 0 then returns. Uses just BC and AF registers. 0072H Basic Ready Jump to 72H instead of IA19H. Jumping to 1A19 is OK if you've tidied everything up first. If you haven't and you want to get back to Basic from a System load or other m/c routine 72H does all the housekeeping for you. 01C9H Screen clear On model 3 all registers altered. Usually switches cursor off on Model 1. 01F8H Cassette Off Switches cassette off. 0212H Cassette On Switches cassette on. It is probably best to XOR A before calling either of these. I don't know how the second cassette via the expansion interface is addressed. 022CH Blink Flashes the '•'. 0235H register. Byte in Reads byte from cassette into A 0264H Byte out Outputs byte in A register to tape. 0287H Write sync Outputs the leader and sync byte to tape. Uses BC registers. 0296H Reads sync Reads the leader and sync byte from tape. 0314H Address read Reads two bytes into HL. Used for the load address in system tapes. 37E8H Printer addr. Model 1 parallel printer connected here. Model 3 puts printer status here. For Bit 7 = 0 Not busy. both Bit 6 = 0 Paper OK. Model 1 Bit 5 = 1 Device select (whatever that means) & Model 3 Bit 4 - 1 No fault. TRS8BIT - volume 07 Issue 04 - December 2013 - page 22 Keyboard Matrix Address 3801 3802 3804 3808 Bit0 Bit1 Bit2 A I Q Y B J R Z C K S D L T E M D F N V G O M 0 ! 1 “ 2 # 3 $ 4 % 5 & 6 ‘ 7 ( 8 ) 9 * : + ; < , = - > . ? / DA LA 3840 Enter Clear Break UA 3880 Shift 3C00H to 3FFFH Bit6 Bit7 @ H P X 3810 3820 Bit3 Bit4 Bit5 Video RA Space Bar If Bit 7 = 1 (is Set) then Graphics Video Memory Note :- UA, DA, LA and RA are the arrow keys! Viz. up, down left and right thing Up to som e ew w ith n r special o and y? your T g us all lettin How about about it? know TRS8BIT - volume 07 Issue 04 - December 2013 - page 23 IN MAV’S WORKSHOP by Ian Mavric Part 4 of the HARD DRIVE Trilogy HARD DRIVES AND THE TRS-80 MODEL I Last time1 I concluded my trilogy of hard drive articles for the Model III and 4. I focussed on the Model III and 4 since 99% of hard drives sold to the 8-bit Z80 systems were used on those computers. In fact not many people know that a hard drive could be even connected to a Model I. Obviously I own one, I use it a few times a week, and I was part of the team who helped make the FreHD2 hard drive emulator work with the Model I, so I think I know a bit about them. HISTORY In 1977 when Tandy designed and built the first few machines with Level I BASIC and 250 baud cassette storage they could hardly have imagined that only 5 or 6 years later Winchester hard disk storage, similar to that available on minicomputers, was going to be affordable and store megabytes of data. When you are designing a 4K microcomputer 5 megabytes must have sounded like a miracle. When Tandy went back to the drawing board to design the Model III, it was clear that the large 50-way I/O bus was designed around connecting a hard drive. The Model III hit the showrooms in 1980 and the hard drive in late 1982 as our old favourite 5 Meg Disk System 26-1130 in RSC-8 Sept 1982. Something as expensive as a hard disk drive normally needs a killer-app in order to hook in potential buyers and in the case of the Model III it was Profile III Plus HD, and early database management system that was fast and with a hard drive, capable of building enormous databases. There was no such app for the Model I and since the computer had been forced into retirement in 1980 by the FCC, Tandy could probably have overlooked making the hard drive work with the Model I and not many people would have cared. This is where you see the clever minds at work at Radio Shack pulling yet another trick out of their hat for Model I owners. A small adapter kit called, blandly enough, the "Model I Hard Disk Adapter Kit" (26-1132) was sold for only $70 (see below). Once you own the hard disk, you are kind of locked-into the TRS-80 product for the next few years. It is no co-incidence that 5Mb hard drive works perfectly on the soon-to-be-released Model 4. So what if the owner had a lot of money invested in their Model I, and didn't feel like TRS8BIT - volume 07 Issue 04 - December 2013 - page 24 buying a Model III - no problem - our next machine will blow your socks off and in addition, your expensive hard disk drive will plug straight in. Tandy also gets kudos for producing products well into the 1980s for their first computer, much the same as Apple was still producing peripherals which worked on the original (1977-78) Apple ][. THE INTERFACE The 26-1132 kit comprises of a small adapter board (see photos, below) with 2 resistors and 2 transistors on it, a 3 disk-set of what Radio Shack calls "Hard Disk OS" but is really LDOS 5.1.3 with hard disk drivers (TRSHD1/DCT and TRSFRM1/CMD) and a JCL to install he hard drive on the Model I, and a manual. If you follow the instructions you can't go wrong and in about 15 minutes you are up and running with 5Megs of storage in four 1.25Mb partitions, and a boot floppy to get the system started. While the kit was only listed in the RSCC for only 1982-3, it was available for a couple of years after that while the 5 Meg Disk Systems were still being sold. It's hard to say when it was officially no longer available but I suspect sometime around 1986. TRS8BIT - volume 07 Issue 04 - December 2013 - page 25 INTERESTING QUIRKS Yes, there are a few. If you have used a Model III or 4 with a hard drive, you know that if you want to use your floppy DOS and not the hard drive, you just leave the hard drive switched off and boot your floppy disk and play a round of Frogger or Zaxxon. NOT SO with the Model I - the adapter will not allow your Model I to boot unless the hard drive is switched on and up to speed. So if you want to play a floppy only game you have two choices: power up the hard drive and let it sit there humming away next to you, or disconnect it from the Expansion Interface. The first is a waste of electricity and the 2nd is just inconvenient. The other one stems from a problem which I'm still trying to understand, but seems to manifest itself as an inability to properly write the hard drive configuration file on Model Is which use the later design Expansion Interface. Let me try to explain it. When I bought my Model I it came with the early design EI, the one with the buffer box. When I bought my hard drive and read the instructions it clearly stated that if you had a very early EI it needed to be modified to use the buffer box, which in turn made it compatible with the hard drive. Since my EI had already been modified I just plugged in the hard drive and off it ran. Some years later I tried to use my hard drive on a Model I with the later design non-buffer-box EI and found that if you booted with a boot disk created with the early EI, it worked, but if you attempted to create a boot disk with the later EI, it wouldn't work properly. No biggie, I just put the later EI away and used the early buffer-box version all these years. Note to self, investigate in the future. That future arrived when we were trying to make the FreHD hard drive emulator work with the Model I. I noticed the same problem - if I set the FreHD up on a Model I based around a buffer-box EI then I could configure boot disks easily. When I went to do the same thing on a similar system based around a late EI the same problems showed up as using a real hard drive. At least we know the FreHD emulates a TRS-80 hard drive so closely even its foibles are shared. THE (TEMPORARY) SOLUTION turns out to be a bit awkward but does work. Plug in an early buffer box EI and create your boot disk, then replace it with the later model EI. That way you get the reliability of the later EI and hard disk storage. To backup the boot disk you DON'T need to plug in the old buffer box EI, just QFB :6 :7 and it will backup the disk without hesitation. TRS8BIT - volume 07 Issue 04 - December 2013 - page 26 MODERN REPLACEMENT FOR THE M1 HD ADAPTER Over the years people asked me about adding hard drives to their Model Is and my usual response was "Sure! Go find a M1 HD adapter kit 26-1132 and we can get started." I think two or three came through my workshop between 1987 and 2013. This year with the popularity of the FreHD hard drive emulator, people began asking us about making a FreHD version for the Model I, but to my mind this would require a re-design of the board and result in two products on the market. Most people who own a Model I also have a Model 4, and wanted to use the FreHD on either machine as they saw fit. It made more sense to use the 26-1132 adapter so work was taken to make FreHD work on the Model I that way. Without boring you with details, by changing one chip on the emulator (U3) to a 74LS245 the FreHD works on a Model I with the adapter. So we had a workable solution but the same issue whereby we now needed those hard drive adapters again. Fortunately Bill Buzbee & Larry Fosdick3 had done all the work in 1992 drawing up the schematic for the 26-1132 adapter, and Fred Vecoven designed a small PCB which does the job very nicely. I named it the Benson box, after the worlds most prolific collector/ hoarder of TRS-80 memorabilia. TRS8BIT - volume 07 Issue 04 - December 2013 - page 27 VINTAGE DRIVER SOFTWARE As with the Model III and 4, there are a number of different hard disk drivers out there and they all do pretty much the same thing the same way as each other, except that later drivers offer much more flexibility. Early drivers were called TRSHD1/DCT and only supported the old 5 Meg hard drive. They work fine if you only want 5 megabytes on your hard drive or FreHD. Since most people want to utilise more than 5 megabytes an article in CN804 shows how to patch various drivers to use on the Model I. TRSHD1/DCT can be patched to configure a Tandy 15Meg (264155) hard drive called TRSHD15/DCT. Around the mid-1980s Radio Shack released a Model III hard disk driver called TRSHD5/DCT, which can also be patched to become TRSHD51/DCT and for the first time allows you to dynamically configure a hard drive with both heads and cylinders. But really, messing around with old drivers is not a consistent approach, and the best solution would be to use RSHARDx, which we already use on the Model III and 4. MODERN DRIVERS Fortunately the work has already been done for us and in the same CN80 article4 the authors explain how to patch RSHARD5/ DCT to become RSHARD1/DCT and it works well. As well as being able to specify heads and cylinders, you can also partition by head or cylinder, maximising the use of your hard drive or FreHD. 40Mb hard drive partitioning is easy and with some thought a hard drive can be partitioned up to 65Mb capacity over 7 partitions. Not bad for an ancient computer originally released with 4K of memory and 250 baud cassette tape storage. CONCLUSION Hard drives had been available for the TRS-80 Model I during a very brief period from 1982-84, and have since been rare and almost forgotten. With the advent of FreHD technology the desire to add a hard drive to the Model I generated new interest among enthusiasts, and now with my M1 Hard Drive adapter and updated drivers, adding a hard drive to a Model I is no more difficult than adding one to a Model III or 4. NEXT TIME: FreHD and how to build it [email protected] TRS8BIT - volume 07 Issue 04 - December 2013 - page 28 REFERENCES: 1. 2. 3. 4. "In Mav's Workshop", TRS8Bit, Vol 7. No. 2, June 2013 pp.21-26. http://ianmav.customer.netspace.net.au/trs80/emulator Model I HD Adapter.pdf "A Really Hard Model I ", Computer News 80, Vol 4, No. 5, pp. 7-10. Ian Mavric is an IT Specialist who also restores and collects TRS-80's and classic cars. He live with his wife and kids in Melbourne, Australia. The Ne xt i will b ssue of TRS 8BIT e o March ut early 2014. Any c hance you contri could send bution in a ? TRS8BIT - volume 07 Issue 04 - December 2013 - page 29 TRS8BIT - volume 07 Issue 04 - December 2013 - page 30 20 30 40 50 60 70 80 90 CLEAR500 M$="MERRYXMASMERRYXMASMERRYXMASMERRYXMASMERRYXMASMERRYXMAS" GOSUB 220 READ S IF S=0 GOSUB 160 READ L T$=MID$(M$,S,L) X=PEEK(VARPTR(P$)+1)+PEEK(VARPTR(P$)+2)*256 100 REM THIS AND THE NEXT LINE ARE NOT NEEDED ON 16 OR 4K SYSTEMS 110 IF X>32767 THEN X=X-65536 120 130 140 150 160 170 180 190 200 210 220 230 240 250 260 270 280 290 300 310 320 330 FOR Y=1TOL POKE X+S+Y,ASC(MID$(T$,Y,1)) NEXT Y GOTO 50 LPRINT P$ GOSUB220 READ S IFS=0THENLPRINTP$:READS IF S=99 THEN END RETURN P$=STRING$(75,32) RETURN DATA 13,1,0,9,1,17,1,0,6,1,21,1,0 DATA 4,1,24,1,0,2,1,25,1,0,1,1,26,1,0,13,1,26,1,0 DATA 1,1,13,2,27,1,0,0,1,1,12,3,27,1,0 DATA 2,1,13,1,26,1,0,3,1,13,2,25,1,0,4,1,13,2,24,1,0 DATA 5,1,11,6,0,10,3,17,1,0 DATA 10,1,12,1,17,1,0,10,1,12,1,17,1,0 DATA 12,1,17,1,0,12,1,17,1,0,12,1,17,1,0,12,1,17,1,0 DATA 12,1,17,1,0,12,1,17,1,0,12,1,17,1,0,12,1,17,2,0 DATA 10,9,0,9,2,13,7,0,6,22,0 DATA 99 we Hope you like the Xmas Candle It’s just to wish you all a very Merry Christmas and a Happy New Year The Model 1 will be 36 years young in 2014! Dusty & Dee TRS8BIT - volume 07 Issue 04 - December 2013 - page 31 TRS8BIT - volume 07 Issue 04 - December 2013 - page 32 TRS8BIT - volume 07 Issue 04 - December 2013 - page 33 Virtual Floppy disk using a Raspberry Pi Alan Page Introduction to the project Last winter I started a project to create a Virtual Floppy disk emulator for the TRS-80 Model I using a Raspberry Pi. The project was inspired by several similar projects based on Arduino and other microcontrollers and because my ancient TRS-80 Model I was having problems reading and writing floppy disks as the electronics and hardware aged. It's also rather difficult to transfer software to and from the TRS-80 without such a system. The advantage of the Raspberry Pi is that it is a complete system with video, USB, keyboard, mouse and storage support. The disadvantage is that the current available operating systems are not ideal for real-time. But the hardware features of the processor help overcome that limitation as will be seen later. TRS-80 Floppy Disk Interface (Model I) The TRS-80 Model I expansion interface (which supported the first floppy drives for the TRS-80) was created around 1978. It was designed to use existing floppy disk drives (with perhaps some minor customizations) connected by ribbon cable to the expansion interface. It used a Western Digital 1771 floppy disk controller IC which supported single density only, running at a clock speed of 1 MHz. (The timing diagrams on the 1771 data sheet are for 2 MHz so you have to adjust them for the slower speed of the Model I.) Interface Signals For this discussion I will refer to output signals as signals output from the Raspberry Pi emulator that input to the TRS-80 expansion interface and input signals as signals coming into the Raspberry Pi emulator from the expansion interface. Because several floppy drives could be connected to the same line the TRS-80 used open collector TTL interfacing with 150 ohm pull-up resistors to 5 volts. This meant that 'active' signals pulled the voltage down to zero. TRS8BIT - volume 07 Issue 04 - December 2013 - page 34 Note: The connectors on the TRS-80 Expansion Interface are flat two-sided card-edge connectors but the schematic in the technical reference manual refers to "Pin numbers" so "Cable pin" refers to the pin numbers from the schematic. The output signals are: Index Pulse. Cable Pin 8. This short (4 millisecond) pulse is sent at the beginning of every track. On a real floppy drive this is generated by a photocell pointed at a LED shining through the index hole on the floppy disk. Track Zero. Cable pin 26. Active when the R/W/ head is at track zero (the home position). This is used by the floppy disk controller when seeking. Write Protect. Cable pin 28. Also generated by a photocell/LED combination when the write protect notch on the disk is covered. Read Data. Cable pin 30. This is the data from the disk R/W head that has been transformed from the raw analog signal to digital pulses by circuitry in the floppy disk drive. Because drives may vary slightly in speed from the ideal 300 rpm the floppy disk controller is somewhat tolerant of variations from the ideal signal. My system has an add-on data separator board from Percom that improves the performance in this area. Because more than one floppy drive can be connected to the cable, a drive should only pull an output signal low when it has been made active (selected) by the drive select signal. The TRS-80 supported up to four drives, numbers from 0 to 3. The input signals are: Drive Select 0. Cable pin 10. Selects drive 0 when active. In an actual drive this would cause the R/W head to press against the disk surface. DS0 on the schematic. Drive Select 1. Cable pin 12. Selects drive 1 when active. DS1 on the schematic. Drive Select 2. Cable pin 14. Selects drive 2 when active. DS2 on the schematic. Drive Select 3. Cable pin 32. Selects drive 3 when active. DS3 on the schematic. Motor On. Cable pin 16. Turns all drive motors on. The emulator should only be transmitting track data on the Read Data pin and accepting data on the Write Data pin when both Motor On and the appropriate Drive Select signals are active. The expansion interface contained a timer circuit that would automatically shut off this signal after a few seconds if the operating system was not using the drive interface. Direction Select. Cable pin 18. Selects the direction of movement of the R/W head when the step signal is pulsed. Step. Cable pin 20. This short (about 8 microseconds) pulse indicated that the R/W head should be moved one step in the direction indicated by the Direction Select pin. Fortunately TRS8BIT - volume 07 Issue 04 - December 2013 - page 35 the Raspberry Pi has programmable edge detect triggers that will watch for this and set a bit when the line is pulsed. Since an actual floppy disk takes a couple of milliseconds (or more) to move the physical head from one track to the next but the emulator can move the virtual R/W head almost instantly, the timing is not critical. I have been able to poll the edge detect signal rather than trying to use interrupts (which are not well documented). Write Data. Cable pin 22. Not yet implemented. This would contain the data to be written to the disk surface. Write Gate. Cable pin 24. Not yet implemented. Signals that the write data is valid and should be written to the disk. Stays low for the duration of the write operation. Interface Circuitry There were two main considerations when choosing what ICs to interface between the Rasperry Pi and the TRS-90 expansion interface. The first was the TTL logic (5v) used by the TRS-80 which is not compatible with the lower voltage (3.3v) logic on the Raspberry Pi. The second was the very low resistance (150 ohm) of the pull-up resistors. This results in a fairly high current and I needed to use 74LS06 to drive the output signals. Also, many level translation chips, especially bidirectional ones, would not work with such low resistance pull-up values. Fortunately I found I was able to avoid level translation chips in my design. While I could have used a 74LS05 for the input signals I found it was simpler to use a 74LS06 for both input and output so I could chose the IC that was most convenient. Originally I put a level translation between the Pi and the 74LS06 for the output signals but it turned out not to be necessary and the Pi seems to be able to drive the 74LS06 directly. The input signals use the open collector of the 74LS06 (could be a 74LS05, but easier to use the same IC for both) and rely on the pull-up resistors on the GPIO pins to perform the level translation to the correct voltage. The Pi has programmable pull-up resistors on the GPIO pins so I just program them in the initialization code. Two GPIO pins also have pull-up resistors on the board itself, so it's convenient to use these two as input pins for the floppy drive interface. Note: all Raspberry Pi pins refer to the Rev 2 pins. Current configuration is shown below. Read Data must be connected to GPIO pin 10. Write Data must be connected to GPIO pin 9. GPIO pin 11 (which is the SPI clock) should be left alone. I connect it to a pin for use with a logic analyzer to help me see what's happening. TRS8BIT - volume 07 Issue 04 - December 2013 - page 36 I also leave GPIO pins 7 and 8 alone as they are part of the SPI interface and unavailable as I am using that interface for read and write data. GPIO 2 and 3 have pull-up resistors on the board itself so I use them as inputs. Note: All outputs are pulled up to 5v by 150 ohm resistors on the Expansion Interface. Write Protect (output) connected to GPIO 18 - Header pin P112. Track 0 (output) connected to GPIO 23 - Header pin P1-16. Read data (output) connected to GPIO 10 - Header pin P1-19. Index Pulse (output) connected to GPIO 24 - Header pin P118. Drive Select 0 (input) connected to GPIO 2 - Header pin P103. (has 1K8 pull-up on the board) Drive Select 1 (input) connected to GPIO 25 - Header pin P122. Motor On (input) connected to GPIO 4 - Header pin P1-07. Direction Select (input) connected to GPIO 17 - Header pin P1-11. Direction Step (input) connected to GPIO 27 - Header pin P113. Drive Select 2 (input) connected to GPIO 22 - Header pin P115. Write Gate (input) connected to GPIO 15 - Header pin P1-10. Write Data (input) connected to GOIP 9 - Header pin P1-21. Update Sept 30. I found that using GPIO 3 as an input caused Rasbpian to hang while booting so I have changed Drive Select 1 to use GPIO 25, header pin P1-22 instead. This problem doesn't exist under RISC OS so perhaps a driver needed to be disabled. One of the drives connected to the cable should have 150 ohm pull-up resistors to 5v. Only one drive should have the pull-up resistors and generally it is the last drive on the cable. I put a set of pull-up resistors on my interface board and a jumper between the resistors and 5v from the Pi power supply. The TRS-80 drive cable does not provide +5 volts so it's necessary to use +5 volts from the Pi board. Not listed here are the ground signals from the cable which should be connected to ground on the Pi. TRS8BIT - volume 07 Issue 04 - December 2013 - page 37 This is a picture of the top of the original prototype (plugged into the Raspberry Pi beneath it). The IC on the left is a level translation board which I found was not necessary. The connector to the Pi is at the bottom left. The cable that connects to the Expansion Interface is at the top. The resistors are pull-up resistors and the yellow jumper connects them to +5v. The board itself is just a plain prototype board with a cutout for one of the Pi connectors that is too high for the pin header. This is a picture of the bottom of the original prototype. The connector that is plugged into the Pi is at the left. The floppy disk connector is at the right. TRS8BIT - volume 07 Issue 04 - December 2013 - page 38 MISSILE DODGE I’m sorry but I can’t trace the author(s) of this super little program. The website from where it was found has now vanished! I think you’ll agree, it’s a really clever bit of coding and as you all know, I just love my one-liners! I set myself a challenge of writing a program using a single line of BASIC code. After writing a few simple programs I wondered if it was possible to write a game in one line of code? It turns out it was possible. I wrote “Missile Dodge”, where a player at the top of the screen has to move left or right to dodge missiles being fired at him from the bottom of the screen. Although my original code was long since passed into the ether, I was reminded of the challenge recently. I decided to dig out a TRS-80 emulator and try to re-create Missile Dodge. It turns out all the old programming tricks came flooding back to me, and I’m pretty confident that this code is faithful to my original program: I wrote the program on this emulator: http://ht.homeserver.hu/bin/emu/ht1080z_v1.6.2.zip But I also tested them on TRS32: http://www.trs-80emulators.com/ so it should work on almost anything. (Although I have been told that some emulators run too fast for the game to be playable – the two emulators I mention seem to simulate the clock speed of the original TRS-80, so the game plays fine.) TRS8BIT - volume 07 Issue 04 - December 2013 - page 39 A few notes: (1) the maximum line length for a BASIC program on these is 254 characters, but the standard input buffer for entering commands isn’t that big, so you have to input part of the line, then edit the line to complete it! To edit a line do “EDIT 0?. Then “x” will take you to the end to append more. (2) in this basic the parser doesn’t require spaces to correctly identify commands, so there is a saving there. Doesn’t make it very readable though! (3) the screen is 64 characters across by 16 rows down. The PRINT @ command allows you to place output anywhere on the screen, with position 0 at the top left and 1023 at the bottom right (4) PEEK(X) allows you to read memory address X. Address 14344 is part of the keyboard memory map and allows me to see if a key is pressed or not. I don’t use the built in INKEY$ function in BASIC because that doesn’t allow you to hold down a key, you’d have to stab the key repeatedly to move. (5) the 1024 characters of the screen memory are from 15360 to 16363, so I can PEEK at that to see if there is a missile at the point where I’m about to draw the player to detect a missile collision (6) PRINT moves the cursor to a new line unless you terminate it with a “;”. If you PRINT on the last line of the screen and don’t use “;” then the screen will scroll. I use this functionality to scroll the screen and therefore animate the game. Because the player is on the top line it disappears so I don’t need to blank it out before I draw it at the new position. Both of these give me very cheap animation! If I’d had it scrolling the opposite way (missiles coming down at you) then it would have been much harder – and indeed I wouldn’t have been able to do it without using machine code. I know – I tried. Back in the day I ended up writing some machine code libraries to scroll the screen in an arbitrary direction, and it still wasn’t quite as fast. Anyone else want to have a go writing a game in this severely limited medium? TRS8BIT - volume 07 Issue 04 - December 2013 - page 40 Here’s a guide to the BASIC: http://www.trs-80.com/trs80-info-level2.htm These give details of that keyboard map: http://home.online.no/~kr-lund/Genial_Joystick.htm http://www.classic-computers.org.nz/system-80/ manuals_tm3_page21.jpg http://www.classic-computers.org.nz/system-80/ manuals_tm3_page22.jpg And some other useful technical stuff: http://www.classic-computers.org.nz/system-80/ manuals_technical.htm Tips for beginners :(1) write the program on multiple lines and only condense it when it works! (2) using the emulators you can copy the code out of the emulator, edit it in your favourite editor, and then copy it back – although I kinda like the clunky editor in the BASIC, it takes me back to my youth! TRS8BIT - volume 07 Issue 04 - December 2013 - page 41 ASK MAV - MODEL 4 HARDWARE QUESTIONS by Ian Mavric 1. Q. I have a 16K cassette-based Model 4, how do I upgrade it with disk drives? A. To upgrade a Model 4 disk drives, in addition to the disk drives themselves, you need the following: disk drive towers, disk controller (FDC), disk drive cable, motherboard-to-FDC cable, 2nd power supply, power cables for the FDC and each disk drive, grounding cables, and assorted screws and washers to mount the new parts. Since a 16K disk-based computer makes no sense you also need 8x 4164 Ram chips to upgrade the computer to 64K. While the computer is open you may as well upgrade it to 128K, so make that 16x 4164 Ram chips. Your motherboard will need a PAL chip installed at U72, so contact me if you need one, or any instructions on how to upgrade the Model 4 to a 64K disk system. 2. Q. I imported a Model 4 from the USA and it has a B&W CRT not a green one? It's got screen burn and I want to change it, how do I change the CRT? A. The first few production runs of Model 4 computers for the US domestic market came with B&W CRTs, so this is normal. The rest of the world got green CRTs from the get go. You can easily replace the CRT if you watch and follow all the steps in my YouTube video: http://youtu.be/9sMXSMSsCZU Finding replacement tubes can be difficult to find. I sell them but if you are looking for them from electronics parts supply firms in your locale, the green tube carries the part number 12VCMP31, and the B&W tube is part number 12VCMP4. 3. Q. My Model 4 RS232 serial board doesn't work, can I use one from a Model III? A. Yes, you can use a serial board from a Model III, they are interchangeable. If you have one of those Model IIIs or 4s sold without a serial board, you can install one from any Model III or 4 computer, or any serial board listed in eBay for a Model III on a Model 4 and vice-versa. 4. Q. Where are the brightness and contrast controls on a Model 4? A. Under the left-hand side of the computer. TRS8BIT - volume 07 Issue 04 - December 2013 - page 42 5. Q. The cassette cable from my Model I won't plug into my Model 4, is this right? A. Yes that is right, the cassette cable supplied to Model I computers has a black hard plastic boss on it with a thick plastic ring. It fits into the Model I "Tape" plug but it won't fit in anything else. You need to buy the later type cassette cable which has the thin metal ring protruding from the black flexible plastic boss. Tandy sold the Model I cassette cable up until about 1980, so all cassette cables made after that time is the one you want. [email protected] TRS8BIT - volume 07 Issue 04 - December 2013 - page 43 Goodbye hard drive, Hello FreHD By Garry Howarth, Sydney, NSW After 25+ years of trouble free service my faithful old Toshiba hard drive finally went out in a blaze of glory. Time to look for a replacement MFM drive. Calls to contacts in the computer game yielded zero success and I wasn't prepared to chance my luck on a 'it worked when it was removed' hard drive from eBay. Not long after the old Toshiba went to god the FreHD appeared on the scene. The FreHD is a basically a solid state drive with a battery backup RTC for the TRS-80 and System-80/PMC/Video Genie computers that uses a common garden variety SD card for storage. Designed by Fred Vercoven, built and sold by Ian Mavric with input from many including Andrew Quinn, David Cooper, Malcolm McLeod, Raymond Whitehurst and a cast of thousands. Apologies to anyone I forgot to mention but if you have contributed to this project then take a bow. A solid state drive for the old 4P, this could be the way to go. I swapped a few emails with Ian Mavric, exchanged the necessary down-under dollars and a few days later the postie arrived with a present. Installation was as easy as. Unplug the smouldering remains of the old hard drive and using the existing 50 pin cable, plug the FreHD into the expansion slot on the rear of the 4P and connect it to a suitable 5 volt supply. ATM I'm using a variable bench supply but any common REGULATED 5 volt wall wart should do the job. Ian supplied a CD-ROM with various utilities, a 40trk LS-DOS 6.3.1 boot floppy and a 128meg SD card with the appropriate hard drive image. Other operating systems and boot disks are available including LDOS 5.3.1, Newdos/80 2.5, and CP/M 2.2. I have also tested DOSPLUS IV, DOSPLUS 3.5 for the Model 3 as well as Newdos/86 and all seem to work flawlessly. The hard drive image on the supplied SD card is configured as 6 partitions named HARDA - HARDF. Each partition having TRS8BIT - volume 07 Issue 04 - December 2013 - page 44 140 cylinders * 6 heads giving a total of 40 megs of storage. With a little bit of work it is possible to max it out to 1024 cylinders and 8 heads giving a total of 64 megs. Insert the SD card and power-up the FreHD, after a couple of seconds the green led will flash and she’s good to go. Place a BACKUP of the supplied boot floppy into drive '0' and press reset. We can now remove the floppy and run the computer entirely from the FreHD. Backing up data from the FreHD is as simple as inserting the SD card into a card reader connected to a PC. All very quick and easy and no more wasting hours copying files to floppy. Now while all this is fine and dandy, the whole point of having a hard drive or a FreHD is so we don't have to play around with floppies especially boot floppies. The boot rom on my 4P has been hacked to allow loading of the ModelA/III rom image from either the hard drive or floppy and Adam Rubin's patches have been applied to LSDOS 6.3.1 to allow booting directly from the hard drive without the use of a floppy. Naturally I wanted to see if I could get the 4P to both load the Model III Rom image and to boot LS-DOS directly off the FreHD. Diving head first into the junk box I found the backups of my old hard drive and transferred them over to the FreHD. Took a deep breath and pressed reset. BINGO The computer booted directly off the FreHD without a boot floppy. Smiles all round. Boosted by this I next loaded a Model III system disk into drive '0' took another deep breath, pressed reset and the 4P loaded the MODELA/III file from the FreHD in about one second. Not having a working hard drive I could not do any comparison tests but according to my notes it took the computer nearly 3 seconds to load the MODELA/III file from the old hard drive, so this is a big improvement. Happy that all was working OK, I sent a copy of the 'self booting' FreHD image to Ian for testing. Having used Adam Rubin's mods to LS-DOS for over 20 years without having a single problem I was surprised when Ian could not get them to work on his computer. A problem with the later GA versions of the 4P was causing drive '0' to hang. After a lot of work trying different drivers I managed to track down a later copy of Adam's patches that cured the problem. TRS8BIT - volume 07 Issue 04 - December 2013 - page 45 Fred Vercoven has now developed patches for the Model III and 4/4P ROM that will allow booting any operating system directly from the FreHD via a menu, which makes all of the above hard work redundant - oh well, as Edward Kelly said "such is life". Getting back to the aforementioned utilities. VHDUTL/CMD allows for reading of the root directory of the SD card, setting and reading the built in RTC, displaying the firmware version as well as creating and mounting various hard drive image files. IMPORT2/CMD and EXPORT2/CMD are used to transfer individual files to and from the TRS-80 and SD card. These utilities TRS8BIT - volume 07 Issue 04 - December 2013 - page 46 make the job of transferring files between the TRS-80 and a PC extremely easy. FUPDATE/CMD is used to update the FreHD's firmware. A quick search of the net will show that nearly all the software for the TRS-80 is now available for downloading from various websites. The problem has been how to get this software transferred to disks that will run on the 80. Using a combination of Matthew Reed's TRS32 emulator, Trstools, Newdos/80 and Super-Utility I have been able to make images of .DSK files including self-booting disks based on Percom's MicroDOS and transferring these image files to and from the TRS80/System-80 and PC via the RS232. Slow and cumbersome but it worked and worked well. MULTIDOS being the only exception and that is possibly due to conflicts with the XLR8er card in my 4P. The job of transferring these .DSK images has now been made extremely simple thanks to a programme supplied with the FreHD - DSK/DCT Copy the required .DSK image files from the PC to the SD card and install DSK/DCT on the TRS-80 using the following LSDOS system command SYSTEM (DRIVE=x,DISABLE,DRIVER="DSK/DCT") Reply to the prompt with the name of the appropriate .DSK image file. DSK/DCT will allow you to load any .DSK image file saved on the SD card and have it treated as a normal floppy which can then be copied to a physical floppy using DISKCOPY/CMD After the failure of the old hard drive I was convinced that my 4P would be a floppy-only machine but the FreHD (funny name) has put some life back in the old beast. If anything it is now a faster more versatile computer and jobs that were previously a major pain have become a very simple task. Finally, many many thanks must go to all the people that freely contribute their time and expertise in keeping these machines alive, long after their use by date. Gazza [email protected] TRS8BIT - volume 07 Issue 04 - December 2013 - page 47 MAV’S BELIEVE IT OR NOT! by Ian Mavric SYDTRUG'S MODEL I COMPUTER Sydtrug, the Sydney TRS-80 and MS-DOS user's group1 were in the process of moving premises and found they had a lot of old TRS-80 equipment, software, and manuals which I managed to acquire. You find the most unique things this way, and under a dust cover I found what seems to me to be the most modified TRS-80 Model I that I have ever seen. Looking at the photos I can see the following modifications: * Orcim Systems hi-resolution graphics character generator upgrade board * the 16K ram bank has been replaced with 4164 ram chips for 64K on board * CP/M rom/switchout which allows full use of 64K Ram all ram mode * Z80B CPU replaced the standard Z80, and the computer has a s speedup mod * Radio Shack lowercase modification * Radio Shack Level II ROM upgrade (computer carries cat. no. 26-1001 so was originally Level I) * Screen de-glitchifier * relocated reset button * pin header connection on the expansion bus * keyboard connector so the keyboard can be disconnected from the mainboard Does it work? Unfortunately some wires were disconnected and the Level II Rom chips removed so I think its fair to say this machine was not running when put aside. Without the schematics to the modifications it's hard for me to work out what is wrong so I thought I would just let this computer be, and it's now a showpiece in John Benson's TRS-80 collection. How many super modified Model Is are out there? I can only think of who which are more modified than this one, neither of which I have seen in person. The most well known one would be Dennis Bathory-Kitsz Custom TRS-80 he wrote the book about2, and the other would be Don McKenzie's original Model I which he talks about on his web site3. [email protected] REFERENCES: 1. 2. 3. www.sydtrug.org http://www.trs-80.com/cgi-bin/down-ok-books.pl?Custom_TRS80_and_Other_Mysteries_(1982)(Dennis_Bathory_Kitsz).zip http://www.dontronics-shop.com/is-this-australias-first-pc.html TRS8BIT - volume 07 Issue 04 - December 2013 - page 48 TRS8BIT - volume 07 Issue 04 - December 2013 - page 49 TRS8BIT - volume 07 Issue 04 - December 2013 - page 50 TRS8BIT - volume 07 Issue 04 - December 2013 - page 51 ; ;Modified Babyroot for Model 3, and to continuously move ;from Low to High testing the remaining memory. ; ;You will need to set this Diagnostic for the RM size that ;is in your Model 3/4 ; ;Original babyroot was in the May 1980 80Microcomputing ;Pages 76 & 77. ; ;Assembled with Z80asm on Debian 7 ;z80asm -l -i babyroot.asm ; ;Larry Kraemer ; ORG 5000H LD HL,3C00H LD DE,3C01H LD BC,03FFH LD (HL),20H LDIR LD IX,5090H LD A,(3FFEH) XOR 0AH LD (3FFEH),A LD SP,IX LD B,7FH H501D: INC SP DJNZ H501D LD HL,6001H XOR A LD (HL),A LD C,A H5026: PUSH AF LD A,C LD (HL),A INC HL LD (3C22H),HL LD A,H ;Change this for RAM Size xxK CP 00H ;80 C0 00 JR Z,H5062 ;16K 32K 48K PUSH HL ;4000+4000 4000+8000 4000+C000 PUSH IX POP HL CP H JR Z,H5062 POP HL POP AF TRS8BIT - volume 07 Issue 04 - December 2013 - page 52 LD (HL),A DEC HL DEC HL LD (HL),A LD B,A LD A,(HL) CP B JR Z,H5049 LD D,1BH PUSH DE JR H5064 H5049: INC HL INC HL LD A,(HL) CP B JR Z,H5054 LD D,10H PUSH DE JR H5064 H5054: DEC HL INC (HL) INC C LD A,(HL) LD B,A CP 00H JR NZ,H5026 INC HL LD C,00H JR H5026 H5062: JR H50C8 H5064: LD A,H AND 0F0H RRCA RRCA RRCA RRCA LD D,22H JR H5091 LD A,H AND 0FH LD D,1BH JR H5091 LD A,L AND 0F0H RRCA RRCA RRCA TRS8BIT ;MAKE 20 TO WATCH IT WORK - volume 07 Issue 04 - December 2013 - page 53 RRCA LD D,10H JR H5091 LD A,L AND 0FH LD D,09H JR H5091 POP DE LD A,0D3H SUB D LD (IX+00H),A JR H5091 H5091: PUSH DE PUSH AF LD DE,3C00H H5096: LD A,(DE) CP 20H JR Z,H509E INC DE JR H5096 H509E: LD A,E CP 04H JR NZ,H50AD LD A,20H DEC DE LD (DE),A DEC DE LD (DE),A DEC DE LD (DE),A DEC DE LD (DE),A H50AD: POP AF CP 0AH JR NC,H50B6 ADD A,30H JR H50B8 H50B6: ADD A,37H H50B8: LD (DE),A PUSH BC LD B,0FFH H50BC: DJNZ H50BC POP BC TRS8BIT - ; VERIFY this instruction with ; babyroot.src ; 18FFH vs 1800H volume 07 Issue 04 - December 2013 - page 54 POP LD SUB LD JR DE A,0C9H D (IX+37H),A H50C8 ; VERIFY this instruction with ; babyroot.src ; 18FFH vs 1800H H50C8: PUSH IX PUSH IX POP HL POP DE LD A,D XOR 20H LD D,A PUSH DE PUSH DE LD B,90H H50D6: DEC HL DEC DE DJNZ H50D6 LD BC,00FFH LDIR POP HL ; POP IX ;CHANGED FOR MODEL 3 LD L,22H ; LD A,20H ; XOR (HL) ; LD (HL),A ; LD BC,000DH ADD HL,BC LD A,70H ;F0 B0 70 30 XOR (HL) ;16K 32K 48K 64K LD (HL),A LD L,11H JP (HL) NOP NOP NOP NOP NOP NOP NOP NOP Larry Kraemer is an ex-Military NOP USAF Officer, and a retired NOP Electronics & Instrumentation NOP Technician, that has a hobby of NOP Amateur Radio (Advanced Class), NOP and Computers, with Computer END Repair experience. TRS8BIT - volume 07 Issue 04 - December 2013 - page 55 TRS8BIT - volume 07 Issue 04 - December 2013 - page 56