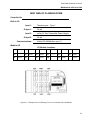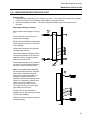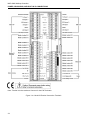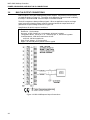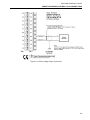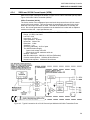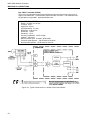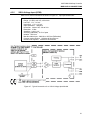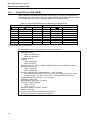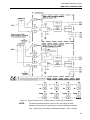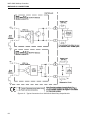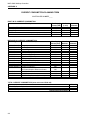
1
MOD 30ML™ Multiloop Controller Product Description, Installation and Wiring for 1800R, 1803R Split Architecture and Associated Hardware Installation MicroMod Automation & Controls, Inc. The Company MicroMod Automation & Controls Inc. is dedicated to improving customer efficiency by providing the most cost-effective, application-specific process solutions available. We are a highly responsive, application-focused company with years of expertise in control systems design and implementation. We are committed to teamwork, high quality manufacturing, advanced technology and unrivaled service and support. The quality, accuracy and performance of the Company's products result from over 100 years experience, combined with a continuous program of innovative design and development to incorporate the latest technology. Use of Instructions Warning. An instruction that draws attention to the risk of injury or death. Note. Clarification of an instruction or additional information. Caution. An instruction that draws attention to the risk of the product, process or surroundings. i Information. Further reference for more detailed information or technical details. Although Warning hazards are related to personal injury, and Caution hazards are associated with equipment or property damage, it must be understood that operation of damaged equipment could, under certain operational conditions, result in degraded process system performance leading to personal injury or death. Therefore, comply fully with all Warning and Caution notices. Information in this manual is intended only to assist our customers in the efficient operation of our equipment. Use of this manual for any other purpose is specifically prohibited and its contents are not to be reproduced in full or part without prior approval of MicroMod Automation, Inc. Licensing, Trademarks and Copyrights MOD 30 and MOD 30ML are trademarks of MicroMod Automation & Controls, Inc. MODBUS is a trademark of Modicon Inc. Health and Safety To ensure that our products are safe and without risk to health, the following points must be noted: The relevant sections of these instructions must be read carefully before proceeding. 1. Warning Labels on containers and packages must be observed. 2. Installation, operation, maintenance and servicing must only be carried out by suitably trained personnel and in accordance with the information given or injury or death could result. 3. Normal safety procedures must be taken to avoid the possibility of an accident occurring when operating in conditions of high pressure and/or temperature. 4. Chemicals must be stored away from heat, protected from temperature extremes and powders kept dry. Normal safe handling procedures must be used. 5. When disposing of chemicals, ensure that no two chemicals are mixed. Safety advice concerning the use of the equipment described in this manual may be obtained from the Company address on the back cover, together with servicing and spares information. All software, including design, appearance, algorithms and source codes, is copyrighted by MicroMod Automation & Controls, Inc. and is owned by MicroMod Automation & Controls, Inc. or its suppliers. MOD 30ML Multiloop Controller CONTENTS CONTENTS Page SECTION 1 - PRODUCT DESCRIPTION 1.1 OVERVIEW........................................................................................................................... 1.1.1 Features............................................................................................................................. 1.1.2 Related Documents ........................................................................................................... 1.2 EXPLANATION OF CATALOG NUMBERS ......................................................................... 1.2.1 General .............................................................................................................................. 1.2.2 Electrical Codes................................................................................................................. 1.3 BASIC HARDWARE ............................................................................................................. 1.3.1 MOD 30ML MULTILOOP CONTROLLER......................................................................... 1.3.2 MOD 30ML Standard, Narrow Bezel and Split Architecture Catalog Numbers ................ 1.3.3 MOD 30 RetroPAK ............................................................................................................ 1.3.4 1800P MOD 30ML Identity Module ................................................................................... 1.3.5 1800F Housing and Termination Assembly ...................................................................... 1.3.6 2010P Portable Memory Module ....................................................................................... 1.3.7 Downloading Cable ........................................................................................................... 1.4 I/O MODULES....................................................................................................................... 1.4.1 2001A Voltage Input Module ............................................................................................. 1.4.2 2002A Current Input Module ............................................................................................. 1.4.3 2012A Current Input Module (with 2-wire transmitter power)............................................ 1.4.4 2013A Thermocouple Input Module (with upscale burnout detecton)............................... 1.4.5 2003A Current Output Module........................................................................................... 1.4.6 2004A Solid-State Relay Input Module ............................................................................. 1.4.7 2005A Solid-State Relay Output Module........................................................................... 1.4.8 2006A Nonisolated Digital Input Module ........................................................................... 1.4.9 2007A Nonisolated Digital Output Module ........................................................................ 1.4.10 2011A Mechanical Relay Output Module .......................................................................... 1.4.11 2009A RTD Input Module .................................................................................................. 1.4.12 2020N Remote I/O Interface Module................................................................................. 1.5 COMMUNICATIONS MODULES.......................................................................................... 1.5.1 2030N ICN Communication Module.................................................................................. 1.5.2 2032N RS-485 Communication Module for Modbus (2-Wire) .......................................... 1.5.3 2033N RS-232 Communication Module for Modbus......................................................... 1.5.4 2034N RS-485 Communication Module for Modbus (4-Wire) .......................................... 1.5.5 2030F ICN Terminator....................................................................................................... 1 1 4 6 6 6 7 7 8 9 10 10 11 11 12 12 12 13 13 14 15 15 16 16 17 17 18 18 18 19 19 20 20 SECTION 2 - MECHANICAL INSTALLATION 2.1 GENERAL ............................................................................................................................. 2.1.1 Displays and Cleaning....................................................................................................... 2.1.2 Environmental Specifications ............................................................................................ 2.2 UNPACKING......................................................................................................................... 2.3 INSTALLING MODULES ...................................................................................................... 2.3.1 I/O Module Planning .......................................................................................................... 2.3.2 I/O Module and Memory Module Installation Procedure ................................................... 2.4 MOUNTING........................................................................................................................... 2.4.1 Mounting Instruction for 1803R............................................................................................. 21 21 21 21 22 22 23 26 29 SECTION 3 - POWER, GROUNDING, AND BUILT-IN I/O CONNECTIONS 3.1 GENERAL ............................................................................................................................. 3.2 CONNECTION GUIDELINES ............................................................................................... 3.3 POWER CONNECTIONS..................................................................................................... 33 33 37 i MOD 30ML Multiloop Controller CONTENTS CONTENTS (Cont’d) 3.4 3.4.1 3.4.2 3.4.3 3.4.4 3.5 3.5.1 3.5.2 3.5.3 3.5.4 3.5.5 3.6 GROUND CONNECTIONS................................................................................................... Chassis and Shield Grounds ............................................................................................. Circuit Common Connections ............................................................................................ Electrical Noise .................................................................................................................. Noise Prevention Measures ............................................................................................... BUILT-IN PROCESS INPUT CONNECTIONS ..................................................................... Built-In Voltage, Millivolt and Thermocouple Inputs........................................................... Built-In RTD Input............................................................................................................... Built-In Current Input - 2-Wire Transmitter......................................................................... Built-In Current Input - Non 2-Wire Transmitter ................................................................. Built-In Resistance Input .................................................................................................... BUILT-IN OUTPUT CONNECTIONS .................................................................................... Page 38 38 38 38 39 40 42 43 44 46 47 48 SECTION 4 - MODULAR I/O CONNECTIONS 4.1 GENERAL.............................................................................................................................. 4.2 MODULAR I/O CONNECTION GUIDELINES ...................................................................... 4.3 MODULAR PROCESS INPUT CONNECTIONS .................................................................. 4.3.1 2013A Thermocouple Input (TIM) and Cold Junction Compensation................................ 4.3.2 2004A SSR Input (DIM) ..................................................................................................... 4.3.3 2006A Nonisolated Digital Input (DIM)............................................................................... 4.3.4 2002A and 2012A Current Inputs (VCIM) .......................................................................... 4.3.5 2001A Voltage Input (VCIM) .............................................................................................. 4.3.6 2009A RTD Input (RIM, WRIM) ......................................................................................... 4.3.7 2020N Remote I/O Interface Module (RIO) ....................................................................... 4.4 MODULAR OUTPUT CONNECTIONS ................................................................................. 4.4.1 2003A Current Output (AOM) ............................................................................................ 4.4.2 2005A SSR Output (DOM)................................................................................................. 4.4.3 2007A Nonisolated Digital Output (DOM) .......................................................................... 4.4.4 2011A Dual Mechanical Relay Outputs (DDOM)............................................................... 4.4.5 2011A Form C Mechanical Relay Outputs (WDOM) ......................................................... 51 51 53 54 56 58 59 61 62 64 66 66 67 69 70 72 SECTION 5 - COMMUNICATIONS CONNECTIONS 5.1 GENERAL.............................................................................................................................. 5.2 COMMUNICATION CONNECTION GUIDELINES ............................................................... 5.3 FRONT PANEL RS-232 COMMUNICATIONS CONNECTION............................................ 5.4 INSTRUMENT COMMUNICATIONS NETWORK (ICN) CONNECTIONS ........................... 5.4.1 Cable Requirements .......................................................................................................... 5.4.2 Addresses .......................................................................................................................... 5.4.3 Termination ........................................................................................................................ 5.5 MODBUS NETWORK CONNECTIONS................................................................................ 5.5.1 General............................................................................................................................... 5.5.2 RS-232 Modbus Communication ....................................................................................... 5.5.3 RS-485 2-Wire Modbus Communication ........................................................................... 5.5.4 RS-485 4-Wire Modbus Communication .......................................................................... 75 77 78 79 79 79 81 81 81 82 85 87 APPENDIX A A.1 MAINTENANCE .................................................................................................................... A-1 A.2 PLANNING FORMS .............................................................................................................. A-1 ii MOD 30ML Multiloop Controller CONTENTS ILLUSTRATIONS Figure 1-1 1-2 2-1 2-2 2-3 3-1a 3-1b 3-2a 3-2b 3-3 3-4 3-5 3-6 3-7 3-8 3-9 4-1a 4-1b 4-2 4-3 4-4 4-5 4-6 4-7 4-8 4-9 4-10 4-11 4-12 4-13 4-14 4-15 5-1a 5-1b 5-2 5-3 5-4 5-5 5-6 5-7 5-8 5-9 5-10 A-1 A-2 A-3 Location of Controller Components ...................................................................................... MOD 30ML Split Architecture Version .................................................................................. Example of an I/O Planning Form for a Controller with I/O Modules.................................... 1800R Controller Mounting Dimensions ............................................................................... 1803R Split Architecture Mounting Dimensions ................................................................... Model C Electrical Connection Terminals............................................................................. Models A & B Electrical Connection Terminals .................................................................... Model C Terminal Identifications for Built-in I/O ................................................................... Models A & B Terminal Identifications for Built-in I/O ........................................................... Built-in Voltage, Millivolt and Thermocouple Input Connections........................................... Built-in RTD Input Connections............................................................................................. Built-in 2-Wire Milliampere Current Input Connections......................................................... Built-in Non 2-Wire Current Input Connections .................................................................... Built-In Resistance Input Connections.................................................................................. Built-in Milliampere Output Connections............................................................................... Built-in Voltage Output Connections ..................................................................................... Model C Terminal Identifications for Modular I/O ................................................................. Models A & B Terminal Identifications for Modular I/O ......................................................... Typical Connections for a 2013A Thermocouple Input Module, and a 2009A RTD Module for Cold Junction Compensation.............................................................................. Typical Connections for a 2004A Solid State Relay Input Module ....................................... Typical Connections for a 2006A Nonisolated Digital Input Module..................................... Typical Connections for a 2012A Current Input Module with 2-Wire Transmitter Power ..... Typical Connections for a 2002A Current Input Module....................................................... Typical Connections for a 2001A Voltage Input Module...................................................... Typical Connections for a 2009A 2-Wire or 3-Wire RTD Input Module................................ Typical Interface Circuit for 2020N Remote I/O Interface Module (RIO) .............................. Typical Connections for a 2003A Current Output Module .................................................... Recommended Connection to Solid State Relay.................................................................. Typical Connections for a 2005A Solid State Relay Output Module .................................... Typical Connections for a 2007A Nonisolated Digital Output Module.................................. Typical Connections for a 2011A Mechanical Relay Output Module (Dual SPST, NO/NC) Typical Connections for a 2011AZ10200A Mechanical Relay Output Module (Form C) ..... Model C Terminal Identifications for Communications Network Connections...................... Models A & B Terminal Identifications for Communications Network Connections ............. Locations for Port 1 Communications Jumper...................................................................... ICN Connections for Built-in and Modular Communication Circuits .................................... Typical Network Connections for Built-In Modbus RS-232 Communication ....................... Typical Network Connections for Modular Modbus RS-232 Communication ..................... Typical Modbus Connections for an RS-485, 2-Wire Network ............................................. Simplified Diagram, 2034N RS-485, 4-Wire Module ............................................................ Typical Modbus Connections for an RS-485, 4-Wire Network (Slave Controller)................ Typical Modbus Connections for an RS-485, 4-Wire Network (Master Controller).............. Typical Modbus Connections for a 4-Wire Master with 2-Wire Slaves................................. Module Location Planning..................................................................................................... Model C Termination Wiring Planning .................................................................................. Models A & B Termination Wiring Planning.......................................................................... Page 3 4 25 27 28 34 35 40 40 42 43 45 46 47 48 49 52 52 55 57 58 59 60 61 63 65 66 67 68 69 71 73 75 76 78 80 83 84 86 88 89 90 91 A-3 A-4 A-5 iii MOD 30ML Multiloop Controller CONTENTS TABLES Table 2-1 4-1 4-2 4-3 iv Module Types and Valid Locations ....................................................................................... Temperature Range Limits for Thermocouple Input Modules............................................... Supported RTD Materials and Standards and Sample RTDs............................................... Supported Remote I/O Modules............................................................................................ Page 24 55 62 64 MOD 30ML Multiloop Controller PRODUCT DESCRIPTION 1 PRODUCT DESCRIPTION 1.1 OVERVIEW MOD 30ML 1800R Standard Version: The MOD 30ML Multiloop Controller, Figure 1-1, is a 3x6 instrument with a 6 line 3 bar graph configurable display, removable rear terminations, and built-in communications. The controller has two built-in universal analog inputs and two analog outputs, room for eleven additional modular I/O positions (single point or remote I/O interface) and an optional memory module. MOD 30ML 1803R Split Architecture Version: The split-architecture version of the MOD 30ML is the combination of the instrument chassis and a remote display assembly as shown in figure 1.2. The rear termination and the display unit are as shown in Figure 1.1. 1.1.1 Features Instrument 3X6 (72mm X 144mm) instrument with behind panel depth of 15.75 inches (400mm) in the standard version. 3X6 (72mm X 144mm) display with remote mounting up to 8 feet from the instrument chassis in the Split Architecture version. Motorola 68302 processor, including on chip RISC communications processor Universal ac power supply (85 to 250VAC/ 50 to 400 Hz, 20-50VDC) 11 I/O sockets available for process I/O and communications modules 64K bytes non volatile database RAM Embedded real-time clock with 1ms resolution Remote I/O Interface module option which supports up to 100 discrete I/O points. A Service Manual switch under the front panel which allows a single point output to be manually adjusted and displayed (Jumper J5 for NEMA 4 as shown in Figure 1-1). NEMA 4 option. Removable rear terminations. Portable Memory Module Optional plug on module that provides 64K bytes of redundant, removable non volatile RAM for database backup, portability and integrity (allows a data base to be ported from one instrument to another) Updated every 50 ms Process I/O Built-in I/O of two direct connected universal analog inputs and two control outputs. Single point direct connected I/O modules for wide variety of process signals Embedded microprocessor provides high-resolution signal conversion Individually Opto-isolated to 250Vrms, continuous Per-point, configurable fail-safe and power fail/restart settings Provide loop power for 2-wire transmitters 1 MOD 30ML Multiloop Controller PRODUCT DESCRIPTION Communications Built-in communications driver circuitry supporting either the ICN or Extended Modbus communication with other instruments and host devices. Modular communications supporting a second communications channel, either ICN or Extended Modbus, via a plug-in module. An RS-232 capable port under the front panel permitting easy connection of a portable computer for data base configuration (requires RS-232 be setup on port 1). Configuration Front panel setup of resident control strategies (see operation book). Full data base configuration capability using configuration software running on a personal computer (see data base reference books). Display development for custom user defined displays 2 MOD 30ML Multiloop Controller PRODUCT DESCRIPTION Front Panel Back of Housing Figure 1-1. Location of Controller Components 3 MOD 30ML Multiloop Controller PRODUCT DESCRIPTION Controller Display Unit Display Cable Figure 1-2. MOD 30ML Split-Architecture version 1.1.2 Related Documents Instructions on the operation and setup activities performed at the front panel of this instrument are found in the following document: IB-1800R-OPR Operation/Setup Manual Reference information on the data base structure and configuration parameters for this instrument can be found in the following documents: IB-1800R-APP Data Base Reference for MOD 30ML Functions IB-23G600 Data Base Reference for Logic, I/O and Communication Functions IB-23G601 Data Base Reference for Advanced Control Functions IB-23G602 Data Base Reference for Algorithms, Sequencers and Table Functions Reference information on ICN/Link communications for this instrument can be found in the following documents. 4 IB-23A160 ICN Planning IB-23C001 ICN Communication Link Instruction Book for 1720N MOD 30ML Multiloop Controller PRODUCT DESCRIPTION IB-23C003 ICN Mini Link Board Instruction Book for 1731N, 1732N IB-23C004 ICN Mini Link External Instruction Book for 1733N, 1732N The following books are supplied as a bound set for the MOD 30ML: 98280-418 MOD 30ML Multiloop Controller User’s Guide (Includes binder, tabs, IB-1800R-INS, IB-1800R-OPR, IB-1800R-APP, IB-23G600, IB-23G601, IB-23G602 and IB-23A160) 5 MOD 30ML Multiloop Controller PRODUCT DESCRIPTION 1.2 EXPLANATION OF CATALOG NUMBERS 1.2.1 General The products described in this book have catalog numbers that help identify specific features. In addition, some products are assigned a serial number which can be used to track manufacturing data. The general format of the catalog number is described in this section. Specific product descriptions are provided in the following sections. The catalog number stamped on the product data plate contains a series of single and multiple-character codes. These codes provide specific information concerning various electrical and/or structural options. Certain code combinations are not allowed, and options and combinations are subject to change. An example of a typical catalog number is as follows: Sample Catalog No. 1800R Z 21 1 0 0 A Base Number Unused Approvals Power Supply Enclosure Mounting Model/Design Level 1.2.2 Electrical Codes Code 21 - FM Approved and CSA Certified The Electrical Code 21 form of the 1800R MOD 30ML Controller is Factory Mutual (FM) Approved and Canadian Standards Association (CSA) Certified for installation in Class I, Division 2, Groups A, B, C or D Hazardous (Classified) locations. This Approval/Certification includes all modules described in Sections 1.3, 1.4, and 1.5, and listed in Table 2-1. Code 12 - EU EMC Compliant The Electrical Code 12 form of the 1800R MOD 30ML Controller complies with the requirements for European Union (EU) Electromagnetic Compatibility (EMC) when installed in accordance with the instructions in Sections 2, 3, 4, and 5. This compliance includes all modules described in Sections 1.3, 1.4, and 1.5, and listed in Table 2-1. 6 MOD 30ML Multiloop Controller PRODUCT DESCRIPTION 1.3 BASIC HARDWARE 1.3.1 MOD 30ML MULTILOOP CONTROLLER The 1800R, Figure 1-1, is designed for mounting in a panel with a 15.75-inch depth. The instrument housing contains a termination facility accepting all instrument I/O, communications, and power connections. This assembly is designed to allow termination signal entry from either top or bottom, allowing for flexibility in signal separation for wiring considerations. The instrument connects to the terminals via an edge connector at the back of the carrier board, permitting interchangeability without disconnecting field wiring. The 1801R has a narrowed display bezel for installations where horizontal spacing is an issue. The 1803R split-architecture model allows the display to be remotely mounted (up to 8 ft/243 cm) from the remainder of the controller. The carrier board provides the connection locations for the modular I/O. There are eleven locations for single width I/O modules. Ten of the locations are arranged in pairs to accept as many as five double-width modules. The carrier board also contains the built-in I/O and communications circuits. Two direct connected analog inputs accept thermocouple, RTD, millivolt and volt dc, milliamp dc and resistance inputs. A 24V dc transmitter power supply for 2-wire transmitters is available on both inputs. Two outputs provide either a 20 mA dc signal or a 50 mA dc signal. The built-in communications circuits terminate in five multi-purpose terminals permitting connection to any of the following networks: ICN, RS-232 Modbus, and 2-wire or 4-wire RS-485 Modbus. The instrument CPU is a 16MHZ 68302 microprocessor. An identity module (1800P) provides the functionality that gives the instrument the capability to execute a user-configured database. The CPU supports 64K bytes of nonvolatile RAM for database storage, and a time-of-day clock with battery support. A high speed communications channel is used between the CPU and both the built-in I/O and any I/O modules installed on the instrument. The CPU board provides for connection of an optional plug-in memory module. 7 MOD 30ML Multiloop Controller PRODUCT DESCRIPTION 1.3.2 MOD 30ML Standard, Narrow Bezel and Split Architecture Catalog Numbers Catalog Number Description for 1800R BASE NUMBER 1800R 1801R 1803R MOD 30ML Multiloop Controller MOD 30ML Multiloop Controller with Narrow Bezel MOD 30ML Multiloop Controller with Remote Faceplate1 UNUSED Z Unused Character APPROVALS 10 12 21 General Purpose CE (European Community destinations only) FM Approved and CSA Certified Class I, Division 2, Groups A, B, C, D POWER SUPPLY 0 1 24 Vdc (20 – 50 Vdc) 85 – 250 Vac, 50 – 400 Hz ENCLOSURE 0 3 4 Standard Terminations Standard Terminations, NEMA4 Standard Terminations, NEMA4 with conformal coating UNUSED 0 Unused Character MODEL A B Available for General Purpose, FM/CSA (discontinued) Available for General Purpose, FM/CSA and CE Certification (discontinued) Available for General Purpose, FM/CSA (CE pending)2 C Sample Number 1800RZ10100C (Product is serialized) Notes: 1. 1803R available only with General Purpose approval 2. CE approval for Model C not available at time of printing of this manual 8 MOD 30ML Multiloop Controller PRODUCT DESCRIPTION 1.3.3 MOD30 RetroPAK The MOD 30 RetroPAK provides the easiest migration path from Taylor MOD 30 instruments to the latest technology. It combines the functions of the 1700 Series Controller, Controller XL, Math Unit, and Sequence and Logic Unit (SLU) into one instrument, and offers all the features that made the Taylor MOD 30 so popular. In addition, it offers a host of other powerful features and up-to-date communication strategies that make RetroPAK the logical choice for replacing aging MOD 30 controllers. Refer to IB-1800R-M30 - MOD30ML Replacement for MOD30 Instruments manual for more information. Catalog Number Description for MOD30 RetroPAK BASE NUMBER M30RETRO MOD 30ML Controller APPROVALS 10 12 General Purpose CE (European Community destinations only) I/O OPTIONS 1 Standard I/O only (two universal analog inputs, two current outputs) Pre-installed I/O modules (one additional analog input, 2 digital inputs, 3 digital outputs) Standard I/O only NEMA 4, conformal coating 2 5 DESIGN MODEL A B PROGRAMMING/ SPECIAL FEATURES STD M30 Available for General purpose, FM/CSA approvals (discontinued) Available for General purpose, FM/CSA approvals and CE Certification None Configured to customer’s MOD 30 specifications 9 MOD 30ML Multiloop Controller PRODUCT DESCRIPTION 1.3.4 1800P MOD 30ML Identity Module The identity module, Figure 1-1, gives the instrument a specific level of process and communications functionality. The 1800P module is factory installed and provides the capability to execute a user-configured database which consists of built-in and modular I/O handling capabilities, PID functionality, and a collection of other control related functions. These include process alarms, input signal linearization, timers, totalization, signal selection, lead/lag filtering, dead time compensation, and automatic tuning. These functions reside in a group of basic data base elements called function blocks. Catalog Number Description for 1800P BASE NUMBER 1800P MOD 30ML Identity Module 1.3.5 UNUSED Z Unused Character ELECTRICAL CODE 10 General Purpose FUNCTION 1 Advanced Control FIRMWARE VERSION 01 02 Version 1 Version 2 MODEL A C Design Level A Design Level C Sample Number 1800PZ10102C (Product is serialized) 1800F Housing and Termination Assembly The 1800F Housing and Termination assembly consists of the instrument housing and the termination assembly for the controller. It does not include the instrument. Catalog Number for the 1800R Standard version Sample Number 10 1800FZ00003A MOD 30ML Multiloop Controller PRODUCT DESCRIPTION 1.3.6 2010P Portable Memory Module The optional memory module plugs directly into the CPU board, Figure 1-1, and provides a mechanism for porting a database from one instrument to another. An instrument with this option can upload from or download to this module. The memory module has a write protect setting to prevent accidental erasures. When a memory module is installed in an instrument with the write protection off, the operating software keeps the module up-to-date with all real time changes in the instrument. Enhanced security is thereby provided through this backup database copy. Data retention is typically 10 years with instrument unpowered. Catalog Number Description for 2010P BASE NUMBER 2010P Memory Module 1.3.7 UNUSED Z Unused Character ELECTRICAL CODE 10 General Purpose UNUSED 102 Unused Characters MODEL C Design Level Sample Number 2010PZ10102C (Product is serialized) Downloading Cable The MOD 30ML downloading cable is used with the built-in RS-232 port in the front of the instrument. This cable cannot be used with the NEMA4 version of the controller as the front port is not available in the NEMA4 version. The ViZapp Configuration Software includes one cable. Catalog Number for the Downloading cable Sample Number 109S1854 11 MOD 30ML Multiloop Controller PRODUCT DESCRIPTION 1.4 I/O MODULES The descriptions included in this section give a brief overview of the functions and features of the I/O modules. 1.4.1 2001A Voltage Input Module The voltage input module provides dual ranges of ±10V dc and ±100 mV dc selectable by configuration. Input to the module is scaled and then applied to an integrating analog to digital converter. Line cycle integration can be performed at either 50 or 60 Hz line frequencies to reject any line frequency noise. Transformer isolation from the +5 volt supply is used to derive all the internal voltages to run the isolated front end. Optical isolation is used to transfer the information from the A/D converter serially to the microprocessor. The microprocessor takes the raw A/D voltage, compares it to the reference, and then presents it to the host as requested over the serial communications bus. This module uses the Voltage/Current Input Module (VCIM) Block for configuration of input parameters. VCIM Catalog Number Description for 2001A BASE NUMBER 2001A Voltage Input Module 1.4.2 UNUSED Z Unused Character ELECTRICAL CODE 10 General Purpose INPUT RANGE 10 ±100 mV or ±10 Vdc ISOLATION 1 Isolated MODEL B Design Level Sample Number 2001AZ10101B 2002A Current Input Module The current input module is identical to the voltage input module except for the addition of a 250 ohm resistor across the two input leads. This allows the standard 4-20 mA DC input range to be accommodated by the module. This module uses the Voltage/Current Input Module (VCIM) Block for configuration of input parameters. VCIM Catalog Number Description for 2002A BASE NUMBER 2002A Current Input Module 12 UNUSED Z Unused Character ELECTRICAL CODE 10 General Purpose INPUT RANGE 10 4 – 20 mA ISOLATION 1 Isolated MODEL B Design Level Sample Number 2002AZ10101B MOD 30ML Multiloop Controller PRODUCT DESCRIPTION 1.4.3 2012A Current Input Module (with 2-wire transmitter power) This module is designed specifically for two-wire transmitters and provides the necessary 24 V DC current limited supply to power the transmitter. An internal current sense resistor converts the current to a voltage for application to the A/D converter. All other features are the same as the voltage input module. This module uses the Voltage/Current Input Module (VCIM) Block for configuration of input parameters. VCIM Catalog Number Description for 2012A BASE NUMBER 2012A Current Input Module (with 2-wire transmitter power) 1.4.4 UNUSED Z Unused Character ELECTRICAL CODE 10 General Purpose INPUT RANGE 10 4 – 20 mA ISOLATION 1 Isolated MODEL B Design Level Sample Number 2012AZ10101B 2013A Thermocouple Input Module (with upscale burnout detection) The thermocouple input module is identical to the ±100 mV voltage input module except for the addition of upscale burnout detection circuitry. Thermocouple types allowed are: B, E, J, K, N, S, or T. This module uses the Thermocouple Input Module (TIM) Block for configuration of input parameters. Cold junction compensation (CJC) for all thermocouples is provided automatically by the controller when this feature is enabled by connection of a thermocouple to built-in input 1. If automatic CJC is not enabled, a 2009A RTD Input Module with a 2-wire CJC sensor must be used to sense the temperature at the terminal block and provide CJC. TIM Catalog Number Description for 2013A BASE NUMBER 2013A Thermocouple Input Module (with upscale burnout detection) UNUSED Z Unused Character ELECTRICAL CODE 10 General Purpose INPUT RANGE 10 ±100 mV ISOLATION 1 Isolated MODEL B Design Level Sample Number 2013AZ10101B 13 MOD 30ML Multiloop Controller PRODUCT DESCRIPTION 1.4.5 2003A Current Output Module The current output module provides an isolated 0-20 mA or 4-20 mA current output. An internal A/D converter reads back the output value to check for open outputs or broken wires. This module uses the Analog Output Module (AOM) Block for configuration of output parameters. AOM Catalog Number Description for 2003A BASE NUMBER 2003A Current Output Module 14 UNUSED Z Unused Character ELECTRICAL CODE 10 General Purpose OUTPUT RANGE 10 4 – 20 mA ISOLATION 1 Isolated MODEL A Design Level Sample Number 2003AZ10101A MOD 30ML Multiloop Controller PRODUCT DESCRIPTION 1.4.6 2004A Solid-State Relay Input Module The Solid-State Relay Input module provides the necessary interfacing for AC or DC digital inputs when high isolation voltages are required (250V rms isolation limitation through connection terminals). This module uses the Digital Input Module (DIM) Block for configuration of input parameters. DIM Catalog Number Description for 2004A BASE NUMBER 2004A Non-isolated Digital Input Module 1.4.7 UNUSED P Unused Character ELECTRICAL CODE 10 General Purpose INPUT RANGE 10 11 12 13 14 15 2.5 to 28 VDC 4 to 16 VDC 10 to 32 VDC, 12 to 32 VAC 35 to 60 VAC / VDC 90 to 140 VAC / VDC 180 to 280 VAC / VDC UNUSED 0 Unused Character MODEL A Design Level Sample Number 2004AP10100A 2005A Solid-State Relay Output Module The Solid-State Relay Output module provides the necessary interfacing for AC or DC digital outputs when high isolation voltages are required (250V rms isolation limitation through connection terminals). This module uses the Digital Output Module (DOM) Block for configuration of output parameters. DOM Catalog Number Description for 2005A BASE NUMBER 2005A Nonisolated Digital Input Module UNUSED P Unused Character ELECTRICAL CODE 10 General Purpose OUTPUT RANGE 10 11 12 13 14 5 to 60 VDC 5 to 200 VDC 12 to 140 VAC, SPST, NO 24 to 280 VAC, SPST, NO 24 to 280 VAC, SPST, NC UNUSED 0 Unused Character MODEL A Design Level Sample Number 2005AP10100A 15 MOD 30ML Multiloop Controller PRODUCT DESCRIPTION 1.4.8 2006A Nonisolated Digital Input Module The Nonisolated Digital Input Module is primarily intended for instrument-to-instrument signaling. The module interfaces 24-volt on/off signals with no isolation or accepts switch contact closures without external power requirements. This module uses the Digital Input Module (DIM) Block for configuration of input parameters. DIM Catalog Number Description for 2006A BASE NUMBER 2006A Nonisolated Digital Input Module 1.4.9 UNUSED Z Unused Character ELECTRICAL CODE 10 General Purpose INPUT RANGE 10 2.2 V to 24 VDC UNUSED 0 Unused Character MODEL A Design Level Sample Number 2006AZ10100A 2007A Nonisolated Digital Output Module The Nonisolated Digital Output Module is primarily intended for instrument-to-instrument signaling. The module interfaces 24-volt on/off signals with no isolation or works as an open collector switch that also supports 5V TTL. This module uses the Digital Output Module (DOM) Block for configuration of output parameters. DOM Catalog Number Description for 2007A BASE NUMBER 2007A Nonisolated Digital Output Module 16 UNUSED Z Unused Character ELECTRICAL CODE 10 General Purpose OUTPUT RANGE 10 24 V, 50 mA TTL UNUSED 0 Unused Character MODEL A Design Level Sample Number 2007AZ10100A MOD 30ML Multiloop Controller PRODUCT DESCRIPTION 1.4.10 2011A Mechanical Relay Output Module The Mechanical Relay Output Module may have dual SPST relays or a Form C relay. This module uses the Dual Digital Output Module (DDOM) Block for configuration of dual SPST output parameters or the Wide Digital Output Module (WDOM) Block for configuration of Form C output parameters. DDOM WDOM Catalog Number Description for 2011A BASE NUMBER 2011A Mechanical Relay Output Module 1.4.11 UNUSED Z Unused Character ELECTRICAL CODE 10 General Purpose TYPE 10 11 12 20 Dual SPST, NO/NO Dual SPST, NC/NC Dual SPST, NO/NC Form C UNUSED 0 Unused Character MODEL A Design Level Sample Number 2011AZ10100A 2009A RTD Input Module The RTD Input Module is available in two basic forms, 2-wire 0 to 4000 ohm (single wide) and 3-wire 0 to 400 ohm (double wide). RTD sensors use the Wide Resistance Input Module (WRIM) Block for configuration of 3-wire input parameters and the Resistance Input Module (RIM) Block for configuration of 2-wire input parameters. RIM Catalog Number Description for 2009A BASE NUMBER 2009A RTD Input Module UNUSED Z Unused Character ELECTRICAL CODE 10 General Purpose REF. RESISTANCE 1 2 100 Ohm (3-wire 0 to 400 only) 1000 Ohm (2-wire 0 to 4000 only) CONNECTION 2 3 4 2-Wire (0 to 4000 Ohm) 3-Wire (0 to 400 Ohm) 2-Wire CJC Sensor (1000 ohm RTD, Table 4-2) MODEL B Design Level WRIM Sample Number 2009AZ10130B 17 MOD 30ML Multiloop Controller PRODUCT DESCRIPTION 1.4.12 2020N Remote I/O Interface Module Remote Input and Output Modules expand the I/O capability of a MOD 30ML Multiloop Controller to a total of 100 discrete points. The remote modules communicate to the controller over the CS-31 Remote I/O Network, an RS-485 bus which connects the remote I/O base units to the 2020N Remote I/O plug-in module. This module is not required to reside in a communications slot, leaving the two communications channels on the controller open for host or peer-to-peer communications. See Section 4.3.7 for remote I/O interface connections. Remote I/O digital connections are described in IB-23C601. This module uses the RIO block for configuration. A maximum of 2 RIO modules are allowed per instrument. RIO Catalog Number Description for 2020N BASE NUMBER 2020N Remote I/O Interface Module 1.5 UNUSED Z Unused Character ELECTRICAL CODE 10 General Purpose UNUSED 000 Unused Character MODEL B Design Level Sample Number 2020NZ10000B COMMUNICATIONS MODULES The descriptions included in this section give a brief overview of the functions and features of the communication modules. These modules can be used to add a second communication channel to the MOD 30ML. 1.5.1 2030N ICN Communication Module The ICN Communication module provides Instrument Communication Network (ICN) communications capability for the MOD 30ML Multiloop Controller. The ICN is a proprietary network that allows peer-to-peer communications between the controllers and can be used with the MOD 30 Instrument line. It also uses a communication link to a computer running the configuration or operator interface software. The ICN Baud rate is 31,250 bits per second. The Model B ICN requires an external terminator such as the 2030F ICN Terminator. ICN Catalog Number Description for 2030N BASE NUMBER 2030N ICN Communication Module 18 UNUSED Z Unused Character ELECTRICAL CODE 10 General Purpose UNUSED 000 Unused Character MODEL B Design Level Sample Number 2030NZ10000B MOD 30ML Multiloop Controller PRODUCT DESCRIPTION 1.5.2 2032N RS-485 Communication Module for Modbus (2-Wire) This RS-485 Communication module is a bidirectional transceiver that provides 2-wire Modbus communications capability for the instrument. This module can be used for either a point-to-point or point-to-multipoint network. The Modbus communications supported by this module are used only for reading and writing controller attributes. MSC Catalog Number Description for 2032N (discontinued) BASE NUMBER 2032N RS-485 Communication Module for Modbus (2-Wire) 1.5.3 UNUSED Z Unused Character ELECTRICAL CODE 10 General Purpose UNUSED 000 Unused Character MODEL C Design Level (optically isolated) Sample Number 2032NZ10000C 2033N RS-232 Communication Module for Modbus The RS-232 Communication module is a driver/receiver that provides Extended Modbus communications capability for the instrument. The RS-232 module can be used for a pointto-point Modbus network. The Extended Modbus communications supported by this module include data base downloading, reading diagnostics, reading the system event queue, and reading and writing controller attributes. MSC Catalog Number Description for 2033N BASE NUMBER 2033N RS-232 Communication Module for Modbus UNUSED Z Unused Character ELECTRICAL CODE 10 General Purpose UNUSED 000 Unused Character MODEL A Design Level Sample Number 2033NZ10000A 19 MOD 30ML Multiloop Controller PRODUCT DESCRIPTION 1.5.4 2034N RS-485 Communication Module for Modbus (4-Wire) This RS-485 Communication module contains a driver and receiver that provide Extended Modbus communications capability for the instrument. This module can be used for either a point-to-point or point-to-multipoint Modbus network. The Extended Modbus communications supported by this module include data base downloading, reading diagnostics, reading the system event queue, and reading and writing controller attributes. MSC Catalog Number Description for 2034N BASE NUMBER 2034N RS-485 Communication Module for Modbus (4-Wire) 1.5.5 UNUSED Z Unused Character ELECTRICAL CODE 10 General Purpose UNUSED 000 Unused Character MODEL A Design Level Sample Number 2034NZ10000A 2030F ICN Terminator The ICN Terminator is used to provide a termination scheme for an ICN network. One termination is required per ICN. Catalog Number Description for 2030F BASE NUMBER 2030F ICN Terminator 20 UNUSED Z Unused Character Unused 0000 Unused Characters FORMAT 1 1800R (also for Modcell Eurocard) MODEL A Design Level Sample Number 2030FZ00001A MOD 30ML Multiloop Controller MECHANICAL INSTALLATION 2 MECHANICAL INSTALLATION 2.1 GENERAL Read these instructions thoroughly before starting installation. Installation personnel should be qualified technicians. Mechanical installation involves: 2.1.1 Unpacking (Section 2.2) Planning and Installing optional I/O and memory modules if these items are being used (Section 2.3) Mounting (Section 2.4) Displays and Cleaning The display is protected by an overlay that can be removed after installation. The face of the display, while made of scratch-resistant plastic, can be abraded by harsh materials such as paper towels and industrial wipes. Lens cleaning tissues and soft cloths are suitable for cleaning displays. Remove dust from the rear of the instrument by removing it from the instrument housing and spraying exposed surfaces with non-corrosive, non-toxic, nonflammable inert dusting gas. 2.1.2 Environmental Specifications Operating Temperature: Storage Temperature: Humidity Altitude: Ingress Protection: Pollution degree: 2.2 0 to +50°C (32 to 122°F) –40 and+75°C (–40 and 167°F) 5 to 95 % RH, non condensing 2000 meters max Options 0,1,2 Front: IP22 Option3 (NEMA 4) Front: IP56 2 Rear: IP20 Rear: IP20 UNPACKING Unpack and visually inspect the instrument housing, controller, and associated modules for any damage. The instrument may be removed from its housing, if necessary, to install modules or change the communication jumper. Remove the controller from its housing by loosening the retaining screw(s) in the front panel and pulling the unit out of the housing. Save packing materials for any reshipment, or to support any claim of shipment damage. All damage claims are made against the carrier and are the responsibility of the customer. Included in the shipping container is a bag containing mounting brackets and screws, and an information package. A card containing several copies of a writeable instrument identification tag is included in the information package. Write required data on the tag and insert it under the translucent strip at the bottom of the front panel after the controller is installed. 21 MOD 30ML Multiloop Controller MECHANICAL INSTALLATION 2.3 INSTALLING MODULES The controller can accommodate as many as eleven I/O modules. These optional plug-in modules expand the built-in I/O capacity of the controller. An optional memory module is also available. The I/O modules mount on the carrier board, and the memory module mounts on the CPU board as shown in Figure 1-1. The modules must be installed before placing the controller into operation. 2.3.1 I/O Module Planning In general, there is a high degree of flexibility in locating the I/O modules. The only specific location restrictions are as follows: Field I/O circuits for locations S7 through S11 must not operate at voltages above 30V rms, 42.4V peak, or 60V dc to comply with safety approval/certification requirements. Communications modules have a dedicated location determined by the communications port being used. Special attention should be given to the 2003A current output and the 2012A active current input modules to ensure adequate air flow for heat dissipation. It is recommended they be installed in a slot that has no module in either adjacent slot, or in slot 11 as long as slot 10 is not a 2003A or a 2012A. If installing these modules without recommended spacing, it may be necessary to install fans in the cabinet or panel to maintain temperatures below the maximum ambient operating limit. Refer to the Mounting section of this manual for details. To guarantee the accuracy of the built-in cold junction compensator, when used, there should be no module in slots 1 or 2 and no 2003A or 2012A in slots 3, 4 or 11. Table 2-1 lists the available I/O module types, their associated data base memory block identifications, and the valid locations for each module type. An I/O planning form is provided to document the planned I/O configuration. An example of the form, listing built-in I/O assignments and the module layout for a controller with five I/O modules, is shown in Figure 2-1. See Appendix A for a blank copy of all planning forms. WARNING Do not use any I/O module which is not listed in Table 2-1. When used in MOD 30ML systems, the listed modules are FM Approved and CSA Certified for use in Class I, Division 2, Group A, B, C or D hazardous (classified) locations. Substitution of a module not on the list voids the Approval/Certification. Some other factors which influence I/O module requirements are as follows: 22 If the controller requires thermocouple inputs, the first thermocouple should be connected to built-in input 1 to provide automatic cold junction compensation for all inputs. If automatic cold junction compensation is not enabled, an I/O module must be installed to provide the compensation. See Section 4.3.1 for more information. The layout of module locations on the carrier board, Figure 2-1, divides locations 1 through 10 into pairs allowing double-wide modules to occupy only five different locations. Communications port 1 serves either the built-in communications circuits or module location S10 (S10 and S9 if module is double-wide). If the communications function is being used, connections should first be made to the built-in communication circuit. This leaves module locations S9 and S10 available for other I/O functions. Location S8 (S8 and S7 if module is double-wide) is always available for communications via port 2. See Section 5 for more information. MOD 30ML Multiloop Controller MECHANICAL INSTALLATION WARNING Do not use a 2011A Mechanical Relay Output Module when the installation environment contains chemicals which can degrade the materials used to seal the relay in the module. The sealing materials are as follows: Polybutylene Terephthalate, Polyplastics Co. Ltd., Compound No. 3270 Polyphelene Suffide, Summitomo Chemical Co. Ltd., Compound No. 3601GL30 Epoxy Resin, Summito Bakelite Co. Ltd., SUMIMAC ECR-9107K Degradation of the relay seal voids the Approval/Certification of the instrument for use in Class I, Division 2, Group A, B, C or D hazardous (classified) locations. The controller power supply has the capacity to handle the base instrument load of 1220 mA plus any mix of built-in and modular I/O loads such that the total current consumption does not exceed 5000 milliamps (5 amps). Add the current consumption for the base instrument, built-in I/O, and each I/O module using the planning form in Appendix A, Verify that the total does not exceed 5000 milliamps. 2.3.2 I/O Module and Memory Module Installation Procedure Install the modules as follows: 1. Loosen the retaining screw(s) in the front panel, Figure 1-1, and pull the instrument out of its housing. ! CAUTION: Support the instrument from the front and bottom whenever the instrument is outside its housing. Do not allow the full weight of the circuit boards to be suspended unsupported from the front panel as this may overstress the brackets at that end. 2. Place the instrument on a flat surface with the front panel overhanging the edge of the surface so that the circuit board is firmly supported. This positioning assures that the instrument is not damaged by the force applied when inserting I/O modules. 3. Plug each I/O module into its required location on the carrier board and tighten the retaining screw. 4. Use the memory module as described in IB-1800-OPR Operation/Setup Manual. * NOTE: When installing the memory module it is important to orient it so that the catalog number label is visible when the module is plugged into the connector on the CPU board. 23 MOD 30ML Multiloop Controller MECHANICAL INSTALLATION Table 2-1. Module Types and Valid Locations Module Type Data Base Block Type VCIM Module Width Single Module Location VCIM AOM DIM Single Single Single DOM Single DIM DOM RIM WRIM DDOM WDOM TIM Single Single Single Double Double (Note 4) (Note 4) S1 through S6 (Note 1) S1 through S6 (Note 1) Any Location Any location Any Location Any pair of Locations S1 & S2, S3 & S4,or S5 & S6(Note 2) Any Location RIO ICN Double Double 2032N RS-485 2-Wire Modbus Communication (discontinued) MSC Single 2033N RS-232 Modbus Communication 2034N RS-485 4-Wire Modbus Communication MSC Double 2001A Voltage Input 2002A Current Input 2012A Current Input with 2-Wire Transmitter 2003A Current Output 2004A Solid State Relay Input 2005A Solid State Relay Output 2006A Nonisolated Digital Input 2007A Nonisolated Digital Output 2009A RTD Input (2 Wire) 2009A RTD Input (3 Wire) 2011A Mechanical Relay Output (SPST) 2011A Mechanical Relay Output (Form C) 2013A Thermocouple Input with Upscale Burnout Detection 2020N Remote I/O Interface Module (discontinued) 2030N ICN Communication Single Any Location Any Pair of Locations S7&S8 (Port 2) or S9&S10 (Port 1) (Note 3) S8 (Port 2) or S10 (Port 1) (Note 3) S7 & S8 (Port 2) or S9 & S10 (Port 1) (Note 3) * NOTES: 1. The maximum working voltage between adjacent terminal of circuits rated less than 30 V rms or 42.4 V peak or 60 Vdc must not be more than 150 V. The maximum working voltage between adjacent terminal of circuits rated greater than 30 V rms or 42.4 V peak or 60 Vdc must not be more than 300 V. 2. If I/O circuit voltage is 30V rms, 42.4V peak, 60V dc or less, location pairs S7-S8 and S9-S10 can also be used. 3. If a communications module is installed in location S10, built-in communication drivers are not available. 4. Though 2003A and 2012A modules can be installed in any location, special attention should be given to ensure adequate air flow for heat dissipation. Refer to the I/O Module Planning section of this manual for details. 24 MOD 30ML Multiloop Controller MECHANICAL INSTALLATION MOD 30ML I/O PLANNING FORM Controller No. Built-in I/O Input 1: Output 1: Input 2: Output 2: Communications: Thermocouple - Type J 20 mA mA w/ 24 Vdc Transmitter Power Supply 20 mA 4-Wire RS-485 Modbus (port 1) Modular I/O I/O Module Locations No. Module No. Module S1 S2 S7 2001A S8 2005A No. Module No. Module S3 2009A S4 S9 2012A S10 >--------- No. Module No. Module S5 S6 S11 2006A 2003A //////////// Figure 2-1. Example of an I/O Planning Form for a Controller with I/O Modules 25 MOD 30ML Multiloop Controller MECHANICAL INSTALLATION 2.4 MOUNTING The controller must be installed in an approved enclosure or installed in a means acceptable to the authority having jurisdiction for electrical installations. WARNING Do not install a MOD 30ML controller in a residential, commercial or light industrial environment in the European Union. Select a mounting location where: There is minimum vibration. The ambient temperature is between 32 and 122°F (0 and 50°C) with a relative humidity of 5-95% RH (noncondensing). The ambient temperature and humidity requirements apply to the air directly below the controller. The installation allows for free air flow above and below the controller If it is necessary to mount two or more controllers above each other, and the room ambient temperature is above 70°F, heat generated by the lower instruments may raise the ambient of the upper instruments above the 122°F limit. To assure that operating temperatures are within specified limits, it is recommended that a fan be installed below the instruments to force air circulation over the instruments in an upward direction. Air velocity should be at least 100 to 200 feet per minute. The panel provides rigid support for a fully loaded 5.5-pound (2.5 kg) controller and any other panel devices. Electrical wiring routing and support are planned. Mount the controller as follows: 1. Prepare the panel as indicated in Figure 2-2. Be sure to allow enough clearance under the front panel of each controller to access the communications jack in the bottom of the front panel (not present with NEMA 4 option). 2. Draw a 1/4" boundary around cutout for reference when caulking. Apply a 1/4“ bead of silicon caulking (Loctite # 59530 or equivalent) on the panel around the cutout. * NOTE: If NEMA 4 is not required, the controller can be installed without the gasket or the caulking. 3. Slide instrument housing only into panel cutout. 4. Insert brackets into slots in top and bottom of instrument housing. Be sure the housing gasket is not pinched or twisted between the instrument housing and the front of the panel. 5. Tighten retaining screws to a torque of 5 inch-pounds (0.6 Nm) or 1-1/2 turns after contact is made with the back of the panel. 6. Wipe the excess silicon caulking to form a smooth fill and allow it to dry for 24 hours. 7. After the caulking has dried, insert the instrument into the housing and tighten the jack screw(s) to 7 to 10 inch-pounds (0.8 to 1.1 Nm) or 1-1/2 turns after the front face draws into the gasket (two screws for NEMA 4 option, one on top otherwise). 26 MOD 30ML Multiloop Controller MECHANICAL INSTALLATION MOUNTING DIMENSIONS FOR 1800R 1.5 inch (38.1mm) clearance for optional communications jack. NOTES: 1. When mounting housing in panel cutout or rack and panel mounted bezel, turn retaining screws until point of screw touches rear of panel or bezel. Overtightening of retaining screws will distort housing. Housing must be square after retaining screws are tightened. 2. Only the NEMA 4 option contains the gasket and lower front panel screw. Also, communication jack and service manual switch are not present on NEMA 4 option. 3. The 1801R has a bezel width of 2.735in (69.47mm) and uses the same panel cutout as the 1800R. Figure 2-2 1800R Controller Mounting Dimensions 27 MOD 30ML Multiloop Controller MECHANICAL INSTALLATION MOUNTING DIMENSIONS FOR 1803R Panel cutout for the display assembly Hole pattern for the instrument chassis mounting bracket Instrument chassis with mounting bracket Figure 2-3 1803R Split-Architecture Mounting Dimensions 28 MOD 30ML Multiloop Controller MECHANICAL INSTALLATION 2.4.1 MOUNTING INSTRUCTIONS FOR 1803R Parts Included: 1. Display/Faceplate assembly to be mounted on the panel – This includes a flat gasket which is glued to the bezel to provide a seal between the faceplate and the panel surface. 2. Instrument assembly and cable – This will be installed behind the panel and connected to the faceplate. Mounting the Display Assembly: Refer to the Mounting Diagram in Figure 2-3. 1 The two holes (0.152 inches) are for positioning the faceplate. Remove the two #6 Phillips head screws which attach the metal cover to the back of the faceplate. Remove the hex spacers from between the display and the cover. The cables between the display and the circuit board inside the cover can be left attached. Pass the display through the panel hole from the inside. Assemble the faceplate to the outside of the panel. The two faceplate screws go through the holes in the panel cutout. Gasket Panel Note: The faceplate/display assembly can be mounted anywhere on the panel where there is clearance behind the panel for the cover and the cable. It is generally possible to complete the installation without disconnecting the flat cables. If it is necessary to disconnect a cable, use a small screwdriver to carefully pry the connector from the circuit board. Pulling it off by the cable may damage the connector. 2 Re-attach the two hex studs to the faceplate screws, with the counter-bored end towards the display. Tighten the screws enough to compress the gasket slightly. Panel 29 MOD 30ML Multiloop Controller MECHANICAL INSTALLATION Reattach the cover to the back of the hex spacers with the #6 Phillips head screws. 3 Panel WARNING! Ensure red stripe on cable lines up with Pin 1 on connector WARNING! Ensure red stripe on cable lines up with Pin 1 on connector Note: When re-assembling the cable be sure that the red striped edge of the cable is at pin 1 end. This pin is either marked with the number 1 or with a dot. 4 5 Panel 30 MOD 30ML Multiloop Controller MECHANICAL INSTALLATION Mounting the Instrument: Note: If I/O modules or a memory module are to be installed in the instrument, the instrument must be removed from its housing. The wiring connections to the instrument terminal blocks can be done either before or after the instrument is mounted. Ensure CPU board and plugin I/O modules (if any) are visible from this side of housing 7 6 Mount the instrument assembly to the panel or the surface using the three #10-32X1/2 screws provided. Re-attach the cable to the connector on the instrument as shown in the figure. Note: The red stripe on the cable should line up with the Pin 1 of the connector. This pin is either marked with the number 1 or with a dot. WARNING! Ensure red stripe on cable lines up with Pin 1 on connector 9 8 31 MOD 30ML Multiloop Controller MECHANICAL INSTALLATION 32 MOD 30ML Multiloop Controller POWER, GROUNDING, AND BUILT-IN I/O CONNECTIONS 3 POWER, GROUNDING, AND BUILT-IN I/O CONNECTIONS 3.1 GENERAL Read this section thoroughly before making any connections. Installation personnel should be qualified technicians. Observe all electrical code requirements and safety standards applicable to these wiring procedures. Specific instructions and connection diagrams for the various built-in inputs and outputs are provided in Sections 3.3 through 3.6. A listing of the applicable electrical specifications is included in each section. 3.2 CONNECTION GUIDELINES The wiring connections described in this section are made with the controller installed in its operating location and with the power off. All connection terminals are on the back of the instrument housing. See Figure 3-1a for Model C and Figure 3-1b for Models A & B. On Models A & B the terminals are located under a cover. Figure 3-1b shows the cover removed. ! CAUTION For Models A and B, do not connect any wires to terminals 23, 24, 48, and 49. Connections to these terminals can cause an instrument malfunction. This does not apply to Model C. The recommended procedure for making power, grounding, and built-in I/O connections is as follows: 1. Make a copy of the wiring planning sheet, Appendix A, and list each wire connection. It is recommended that the planning sheet be used to plan and document all wiring connections: power, grounding, built-in I/O, modular I/O, and communications. Connection instructions for modular I/O and communications are provided in Sections 4 and 5. 2. The power wire size must be from 14 AWG (1.6 mm) to 18 AWG (1.0 mm) with a 600V, -20°C +105°C UL, CSA approved rating. 3. The signal wire size can be as small as 22 AWG (0.65 mm). All analog input wiring must be shielded twisted pairs. Shields must be connected to a good noise free ground (the chassis ground terminal at the upper right hand corner of the housing is recommended). See Section 3.4.4 for more information. 4. Route signal wiring less than 30 V rms, 42.4 V peak or 60 V dc from top left. Route signal wiring greater than 30 V rms, 42.4 V peak or 60 V dc from bottom right. Distribute to appropriate terminals. 33 MOD 30ML Multiloop Controller POWER, GROUNDING, AND BUILT-IN I/O CONNECTIONS Note: Terminal 4 is also used as a Common for the ICN Terminator Figure 3-1a. Model C Electrical Connection Terminals 34 MOD 30ML Multiloop Controller POWER, GROUNDING, AND BUILT-IN I/O CONNECTIONS Figure 3-1b. Models A & B Electrical Connection Terminals 35 MOD 30ML Multiloop Controller POWER, GROUNDING, AND BUILT-IN I/O CONNECTIONS 5. Use a small flat-head screwdriver to loosen appropriate connection screws and clamps on terminal blocks. 6. Strip approximately 5/16 inch (8 mm) of insulation from the end of each wire, insert wires at assigned terminals and secure terminal screws and clamps. 7. Make wiring connections using the following procedures: a. Power connections - Section 3.3. b. Ground and shield connections - Section 3.4. c. Built-in process input connections for various types of inputs - Section 3.5 d. Built-in output connections - Section 3.6 8. After all connections are completed and checked, do the following: a. If modular I/O and communications are required, follow the procedures in Sections 4 and 5. b. If all connections are completed, the ac power wiring can be connected at the distribution panel (ac source). NOTE: Before putting the controller into operation, it must be configured using either the front panel keys or the PC configuration Software. See Section 1.1.2 for related documents. Instrument Common (terminal 25) should not be left floating. Tie it to chassis or a separate instrument ground if available. 36 MOD 30ML Multiloop Controller POWER, GROUNDING, AND BUILT-IN I/O CONNECTIONS 3.3 POWER CONNECTIONS WARNING Avoid electrical shock. AC power wiring must not be connected at the distribution panel (ac source) until all wiring procedures are completed. All power wiring must be in compliance with the requirements of the National Electrical Code or Canadian Electrical Code. In any installation where the power source does not have one side of the line connected as a neutral conductor, both sides of the line must be overcurrent protected. The controller does not contain a power disconnect switch. Install a disconnect switch or circuit breaker between the controller and its power source. Choose an accessible location as near to the controller as practical, and identify the switch or breaker as the disconnecting device for the controller. The ac power connections are made to the power terminals shown in Figure 3-1 Route power cable from the bottom right hand side of the housing. Power specifications for the controller are: Power Supply Input: Instrument Power Code 1: 85 to 250 V rms, 50 to 400 Hz Instrument Power Code 0: 20 to 50 Vdc ( ————— ) Power Consumption (120V rms, 60 Hz): 50 VA maximum Transient Overvoltages: Classified as Installation (Overvoltage) Category II per IEC 664 (Specifies a maximum impulse withstand voltage of 1500 V for phase to earth voltage of 150 Vrms) Interruption: No effect from 2-cycle dropout at 120V rms, 60 Hz. Interference: No permanent effect from exposure to IEC 801-4 fast transients level 3, or IEC 801-5 surges level 3. Internal Fuse: DC Version: 4 amps, 250 V Slow Blow, soldered in AC Version: 2.5 amps, 250 V Slow Blow, soldered in External switch or circuit breaker rating: DC Version: 3 amps, 28 VDC AC Version: 1 amp, 250 VAC 37 MOD 30ML Multiloop Controller POWER, GROUNDING, AND BUILT-IN I/O CONNECTIONS 3.4 GROUND CONNECTIONS On Model C instruments, connect ground terminal on the lower right side (Fig 3-1a) directly to the plant safety ground system. On Models A & B, a protective ground terminal (green metal stud) is provided at the bottom of the terminal blocks near the power connections (Figure 31b). Connect this terminal directly to the plant safety ground system. This terminal is to be used only for the protective ground conductor. Keep the ground wire as short as possible and use the largest practical wire gage. 3.4.1 Chassis and Shield Grounds Model C controllers have a chassis terminal on the upper right of the termination (Figure 31a). Model A and B controllers have chassis terminals on the upper and lower right of the termination (Figure 3-1b). The protective ground connects directly to the metal instrument chassis, and to the power input filter in the instrument power supply. Terminals identified as chassis in Figure 3-1a and Figure 3-1b are also internally connected to the protective ground. The chassis terminals can be used for shield connections. 3.4.2 Circuit Common Connections The instrument circuit common is isolated from the protective ground. This makes it easier to avoid dc ground loops, and helps isolate the instrument from noise which may be present on the protective ground. Instrument common is the negative return for both built-in analog output circuits. Common is available on terminals 18 and 39 for Model C, and 16 and 41 for Models A & B (see Figures 3-1a and 3-1b and Section 3-6). Circuit common is also available at terminal 25 for connection to an instrument system ground. If the installation does not include an instrument system ground, then connect circuit common to one of the terminals identified as chassis in Figures 3-1a and 3-1b. Never leave circuit common completely floating. Circuit common must always have some dc path to ground to prevent the possible build up of static charges, and to reduce noise pickup. 3.4.3 Electrical Noise Electrical disturbances can be caused by lightning, motors and motor driven devices, relays, solenoids, and communication equipment. These disturbances often introduce electrical noise in power lines, transmission lines, and site grounds. The successful operation of any microprocessor-based device depends, in part, on the precautions taken to minimize the effect of these disturbances. Often called "transients" or "voltage spikes", this form of noise is infinitely variable in terms of amplitude, frequency, and duration. Common sources of this type of noise are: 38 loose or poor quality connections (especially power connections) arc welding equipment switches operating inductive loads relays, solenoids and other coil operated devices high current conductors – electric heater circuits fluorescent or neon lamps motors and motor driven devices switch mode devices – SCRs, thyristors lightning or electrostatic discharges MOD 30ML Multiloop Controller POWER, GROUNDING, AND BUILT-IN I/O CONNECTIONS 3.4.4 Noise Prevention Measures Primary power circuit distribution system: Ideally, each microprocessor-based device should be provided with an independent dedicated power source. Where this approach is not feasible due to space availability or cost per device, an acceptable alternative is to install constant voltage, isolation transformers in the branch circuit where the microprocessor-based device is installed. In addition to the above, install a combination transient surge suppressor and noise filter in the instrument side of the power distribution system. The combination device suppresses transients and effectively reduces other noise forms such as electromagnetic (EMI) and radio frequency (RFI) interferences. These devices can be connected to multiple units to reduce overall cost. Input signals Twisted wire pairs are essential. The wire type should be stranded, not solid. The largest wire gauge allowed is best and the more twists per foot the better. A 2-inch lay (6 twists per foot) should be the minimum used. In addition to the above, signal wires should be physically isolated from all power conductors (separate conduit, cable race, etc.) Shielded wire is also essential. Shields must be terminated at the instrument or in the field in accordance with local regulations. ! CAUTION 1. Never terminate a shield at both ends. One end must always be left "floating" or ground currents may be introduced. 2. Thermocouple shields should be terminated at the process measurement end. Most thermocouples are constructed where the sensor is electrically equivalent to the process connection (grounded junction). Equipment grounding: Grounding practices defined by the National Fire Protection Agency (NFPA) in their National Electrical Code (NEC) handbook or State agency amendments to this code should be strictly observed. Existing ground conductors and ground paths should be periodically inspected and tested to insure continuity and compliance with current code requirements. For best noise reduction performance, the microprocessor-based device's ground terminal should be connected to a nearby grounded large metal structure, using the shortest length wire possible. If a three-wire cordset is used to power the microprocessor-based device through a receptacle, the ground wire is generally too long and too noisy to be a good ground. 39 MOD 30ML Multiloop Controller POWER, GROUNDING, AND BUILT-IN I/O CONNECTIONS 3.5 BUILT-IN PROCESS INPUT CONNECTIONS Built-in inputs 1 and 2 are isolated universal analog inputs which accept volts dc, millivolts dc, milliamps dc (includes 2-wire transmitters), RTD, Thermocouple, and resistance signals. Connections to these inputs are made to the terminals shown in Figure 3-2a (Model C) and 3-2b (Models A & B). The input circuit diagrams in this section (Figures 3-3 to 3-9) identify Input 1 terminals as I/O 1 and Input 2 terminals as I/O 2. Each of the two built-in analog input circuits is isolated from every other circuit. It is recommended that either Input– or mA Input + be connected to ground at some point in the system to prevent possible build-up of static electricity and reduce the pickup of noise. Figure 3-2a Model C. Terminal Identifications for Built-in I/O Figure 3-2b Models A & B. Terminal Identifications for Built-in I/O 40 MOD 30ML Multiloop Controller POWER, GROUNDING, AND BUILT-IN I/O CONNECTIONS The input circuit and input signal specifications for each input type are shown in the following sections: Volt, Millivolt and Thermocouple Input - Section 3.5.1 RTD Input - Section 3.5.2 Current Input from a 2-Wire Transmitter - Section 3.5.3 Current Input from a Non 2-Wire Transmitter - Section 3.5.4 Resistance Input - Section 3.5.5 General specifications for built-in process inputs are: Input Isolation: Galvanic isolation using transformers and optical isolators. Input Common Mode Rating: 45V dc Common Mode Rejection: 120 dB @ 50/60 Hz Normal Mode Noise Filter: 20 dB minimum @ 60 Hz Maximum Normal Mode Voltage: 30V dc (except current input) Display Accuracy: Input accuracy ± one least significant display digit 41 MOD 30ML Multiloop Controller POWER, GROUNDING, AND BUILT-IN I/O CONNECTIONS 3.5.1 Built-In Voltage, Millivolt and Thermocouple Inputs Make volt, millivolt and thermocouple input connections as shown in Figure 3.3. Always connect the first thermocouple input to the I/O 1 terminals to enable automatic cold junction compensation for all thermocouple inputs. Figure 3-3. Built-in Voltage, Millivolt and Thermocouple Input Connections Volt input specifications are: Input Range: –10 mV to +6 Vdc Input Impedance: 10M ohms minimum Resolution: less than 50 microvolts Accuracy: 0.05% of input or 100 microvolts, whichever is greater Temperature Effect: 0.01% per °C or 10 microvolts per °C, whichever is greater Burnout Detection: Reading goes downscale when any lead opens. Millivolt and Thermocouple input specifications are: Input Range: –10 to 120 mVdc Temperature range limits for thermocouple inputs: See Table 4-1 Input Impedance: 10M ohms minimum Resolution: less than 1 microvolt Accuracy: 0.08% of input or 20 microvolts, whichever is greater Temperature Effect: 0.01% per °C or 1 microvolt per °C, whichever is greater Burnout Detection: Configurable for thermocouple inputs and millivolt signals which represent thermocouple inputs. Choices are upscale or downscale excursion of reading when any lead opens, or no detection. 42 MOD 30ML Multiloop Controller POWER, GROUNDING, AND BUILT-IN I/O CONNECTIONS 3.5.2 Built-In RTD Input Make RTD input connections as shown in Figure 3-4. See Section 4.3.6 for a listing of materials, standards and sample RTDs supported by the instrument software. Figure 3-4. Built-in RTD Input Connections RTD input specifications are: RTD Type: 3-Wire or 2-Wire Range: Configurable Normal Range: 0 to 430 ohms Low Range: 0 to 55 ohms Resolution: less than 0.004 ohms Accuracy: ±0.05% of input resistance or 0.1 ohms whichever is greater Temperature Effect: ±0.01% per °C or 0.01 ohms per °C whichever is greater RTD Current: 250 microamps typical Burnout Detection: Reading goes upscale when any lead opens 43 MOD 30ML Multiloop Controller POWER, GROUNDING, AND BUILT-IN I/O CONNECTIONS 3.5.3 Built-In Current Input - 2-Wire Transmitter Make input connections from a 2-wire transmitter as shown in Figure 3-5. 22 mA Maximum Loop Current When the maximum required loop current is 22 mA or less, make connections as shown in the left hand view of Figure 3-5. In this connection arrangement, the 2-wire loop receives its current from a 24V supply in the controller. The current supply is automatically connected in the circuit when the 2-wire input connection is made. 50 mA Maximum Loop Current If the maximum required loop current is 50 mA, make connections as shown in the right hand view of Figure 3-5. In this connection arrangement, an external power supply must be used to meet the 50 mA requirement. Current input and transmitter power supply specifications are: Input Range: 0 to 20 mA dc, Limited to below 70 mA Input Impedance: 100 ohms nominal Resolution: less than 1 microamp Accuracy: ±0.1% of input or 2 microamps, whichever is greater Temperature Effect: 0.01% per °C or 0.2 microamps per °C, whichever is greater Transmitter Power Supply: Isolated 24V dc, 20 mA transmitter power supply is built into controller. For current inputs above 20 mA, a separate external power supply must be used. 44 MOD 30ML Multiloop Controller POWER, GROUNDING, AND BUILT-IN I/O CONNECTIONS Figure 3-5. Built-in 2-Wire Milliampere Current Input Connections 45 MOD 30ML Multiloop Controller POWER, GROUNDING, AND BUILT-IN I/O CONNECTIONS 3.5.4 Built-In Current Input - Non 2-Wire Transmitter Make current input connections from a non 2-wire transmitter as shown in Figure 3-6. Note that the transmitter must be powered from an external source which meets the transmitter power specifications. Figure 3-6. Built-in Non 2-Wire Current Input Connections Current input specifications are: Input Range: 0 to 54 mA dc, Limited to below 70 mA Input Impedance: 100 ohms nominal Resolution: less than 1 microamp Accuracy: ±0.1% of input or 2 microamps, whichever is greater Temperature Effect: 0.01% per °C or 0.2 microamps per °C, whichever is greater 46 MOD 30ML Multiloop Controller POWER, GROUNDING, AND BUILT-IN I/O CONNECTIONS 3.5.5 Built-In Resistance Input The resistance input can be used to monitor a resistance which changes in proportion to a process related value such as a set-point. Make resistance input connections as shown in Figure 3-7. The resistance input can also be used for a 2-wire RTD, which is not on the list of supported RTDs in Section 4.3.6. Make the 2-wire RTD connections as shown in Figure 3-4. When using an RTD not supported by the instrument software, the database must be configured to provide a user defined linearization using the PC configuration software. Refer to Section 1.1.2 Related Documents. Figure 3-7. Built-In Resistance Input Connections Resistance input specifications are: Range: Configurable Normal Range: 0 to 430 ohms Low Range: 0 to 55 ohms Resolution: less than 0.004 ohms Accuracy: ±0.05% of input resistance or 0.1 ohms whichever is greater 47 MOD 30ML Multiloop Controller POWER, GROUNDING, AND BUILT-IN I/O CONNECTIONS 3.6 BUILT-IN OUTPUT CONNECTIONS Built-in outputs 1 and 2 are milliamp analog control outputs. Connections to these outputs are made as shown in Figure 3-2. The output circuit diagrams, Figures 3-8 and 3-9 identify the Output 1 terminals as I/O 1 and the Output 2 terminals as I/O 2. The built-in outputs are always milliamp signals. When an application requires a voltage signal, a precision dropping resistor must be connected across the output terminals to generate the required voltage as shown in Figure 3-9. Specifications for built-in outputs 1 and 2 are: Range: 0 to 20 mA maximum, non-isolated Resolution: 14 microamps Accuracy: ±0.2% of setting or 14 microamps, whichever is greater Temperature Effect: 0.01% per °C or 1 microamp per °C , whichever is greater Load Resistance: 1000 ohms maximum at 22 mA at 54 mA: 400 ohms maximum Open Circuit Voltage: 25.5 volts typical Ripple: 20 millivolts peak to peak at 100K Hz typical Figure 3-8. Built-in Milliampere Output Connections 48 MOD 30ML Multiloop Controller POWER, GROUNDING, AND BUILT-IN I/O CONNECTIONS Figure 3-9. Built-in Voltage Output Connections 49 MOD 30ML Multiloop Controller POWER, GROUNDING, AND BUILT-IN I/O CONNECTIONS 50 MOD 30ML Multiloop Controller MODULAR I/O CONNECTIONS 4 MODULAR I/O CONNECTIONS 4.1 GENERAL Read this section thoroughly before making any connections to modules. Installation personnel should be qualified technicians. Observe all electrical code requirements and safety standards applicable to these wiring procedures. Specific instructions and connection diagrams for the various input and output modules are provided in Sections 4.3 and 4.4. A listing of the applicable electrical specifications is included with each diagram. 4.2 MODULAR I/O CONNECTION GUIDELINES The wiring connections described in this section are made with the controller installed in its operating location and with the power off. Figure 4-1a shows the modular I/O connection terminals for Model C and Figure 4-1b shows the modular I/O connection terminals for Models A & B with the cover removed. The recommended procedure for making, connections to I/O modules is as follows: 1. The diagrams for single width modules show connections to a sample location (usually location 1). The terminal numbers for the actual location being used must be determined by matching pin numbers 1 and 2 in each diagram to the terminal numbers for the selected location as shown in Figures 4-1a and 4-1b. 2. The spacing of module locations on the carrier board divides locations 1 through 10 into pairs allowing double wide modules to occupy only five different locations. The terminal numbers applicable to each dual location are shown on the connection diagrams for double wide modules. 3. Route low-level signal wiring from the top left hand side of the housing and ac voltage wiring from the bottom right hand side and distribute to appropriate terminals. 4. Use a small, flat-head screwdriver to loosen appropriate connection screws and clamps on terminal blocks. 5. Strip approximately 5/16 inch (8 mm) of insulation from the end of each wire, insert wires at assigned terminals, and secure terminal screws and clamps. WARNING All wiring connected to the controller terminals must be rated for the maximum voltage present, or alternately, wiring in circuits operating at greater than 30 volts must be rated for at least twice the circuit voltage. 6. After all connections are completed and checked, do the following: a. If communications are required, follow the applicable procedure in Section 5. b. If all connections are completed, the ac power wiring can be connected at the distribution panel (ac source). * NOTE: Before putting the controller into operation, it must be configured using either the front panel keys or the PC configuration software. See Section 1.1.2 for related documents. 51 MOD 30ML Multiloop Controller MODULAR I/O CONNECTIONS Figure 4-1a. Model C Terminal Identifications for Modular I/O Figure 4-1b. Models A & B Terminal Identifications for Modular I/O 52 MOD 30ML Multiloop Controller MODULAR I/O CONNECTIONS 4.3 MODULAR PROCESS INPUT CONNECTIONS This section describes the process input connections for the following input module types: 2013A Thermocouple Input Module with upscale burnout detection - Section 4.3.1 2004A Solid-State Relay Input Module - Section 4.3.2 2006A Nonisolated Digital Input Module - Section 4.3.3 2002A Current Input Module - Section 4.3.4 2012A Current Input Module with Two-Wire Transmitter - Section 4.3.4 2001A Voltage Input Module - Section 4.3.5 2009A RTD Input Module - Section 4.3.6 2020N Remote I/O Interface Module - Section 4.3.7 53 MOD 30ML Multiloop Controller MODULAR I/O CONNECTIONS 4.3.1 2013A Thermocouple Input (TIM) and Cold Junction Compensation Make thermocouple sensor connections as shown in Figure 4-2. The controller has automatic cold junction compensation which must be enabled by connection of a thermocouple to built-in input 1. When enabled, the automatic cold junction compensation provides compensation for both built-in and modular inputs, and use of a cold junction compensation module is not required. For any application requiring one or more thermocouple inputs, it is recommended that the first thermocouple be connected to built-in input 1 so that a cold junction module is not required. In the event that a thermocouple cannot be connected to input 1, installation of a 2-wire RTD module with a CJC sensor is required for cold junction compensation. This module senses the temperature at the terminal block and provides cold junction compensation for all thermocouples connected to the controller. The RTD sensor used for cold junction compensation is a platinum 1000 ohm RTD with an alpha of 0.00385. The sensor is Class B (0.12%) and has an operating temperature range of –50°C to +650°C (–58°F to +1202°F). It is connected to a 2-wire RTD input module and installed in the housing. Thermocouple input specifications are: THERMOCOUPLE INPUT (with upscale burnout detection) Types: B,E,J,K,N,R,S,T Range: ±100 mV DC (See Table 4-1 for temperature range limits ) Low limit: - 110 mV Upper limit: + 110 mV Input Resistance: 10 Megohms Noise filter: 3 db at 3 Hz Resolution: 16 bits Sensitivity: 4 uV Accuracy (calibrated): ±0.1% of span Isolation : 250 Vrms Max Survivable Input: ±300 VDC or 250 VAC (Differential) Common mode rejection: 100 db at 60 Hz typical Normal mode rejection: 40 db at 60 Hz typical RTD MODULE for COLD JUNCTION COMPENSATION (not required when automatic compensation is enabled) Operating range: 0 to 50°C Overrange: -20 to 70°C Noise filter: 3 db at 4 Hz Resolution: 16 bits Sensitivity: 0.002°C Accuracy: ±0.5°C Isolation : 250 Vrms 54 MOD 30ML Multiloop Controller MODULAR I/O CONNECTIONS Figure 4-2. Typical Connections for a 2013A Thermocouple Input Module, and a 2009A RTD Module for Cold Junction Compensation Table 4-1. Temperature Range Limits for Thermocouple Input Modules Thermocouple Type B Type E Type J Type K Type N Types R and S Type T Measuring Range Limits °C Lower °C Upper °F Lower °F Upper 200 1820 392 3308 –200 1000 –328 1832 –210 760 –346 1400 –200 1372 –328 2501 0 1300 32 2372 0 1768 32 3214 –257 400 –430 752 55 MOD 30ML Multiloop Controller MODULAR I/O CONNECTIONS 4.3.2 2004A SSR Input (DIM) Make Solid-State Relay (SSR) connections as shown in Figure 4-3. These input modules are used for sensing ON/OFF voltage levels. Each module provides optical isolation between the field devices and the control logic. This isolation is limited to 250 Vrms at the terminal block. Typical uses and applications for these input modules include sensing voltage and contact conditions from: proximity switches, limit switches, selector switches, push buttons, photoelectric switches, TTL compatible devices, float switches, or thermostats. Wire rating: 600 V, -20°C +105°C UL, CSA approved WARNING All wiring connected to the controller terminals must be rated for the maximum voltage present, or alternately, wiring in circuits operating at greater than 30 volts must be rated for at least twice the circuit voltage. 56 Input specifications are: DIGITAL INPUTS (ISOLATED) Input voltage ranges mA Input current at Max Line Max Logic Low Input Input Resistance (Ohms) Module Response Time (msec) _10_ 2.5-28Vdc 30 1V, 0.2 mA 900 1.5 _11_ 4-16Vdc 45 1V, 0.7 mA 300 0.1 _12_ 10-32Vdc, 12-32Vac 25 3V, 1 mA 1K (dc), 1.5K (ac) 5 DIGITAL INPUTS (ISOLATED) Input voltage ranges mA Input current at Max Line Max Logic Low Input Input Resistance Module Response Time (msec) _13_ 35-60Vac/dc 6 (dc), 25 (ac) 9V, 0.8 mA 10K Ohms 10 (dc), 15 (ac) _14_ 90-140Vac/dc 11 45V, 3 mA 14K Ohms 20 _15_ 180-280Vac/dc 7 80V, 1.7 mA 43K Ohms 20 MOD 30ML Multiloop Controller MODULAR I/O CONNECTIONS Figure 4-3. Typical Connections for a 2004A Solid State Relay Input Module 57 MOD 30ML Multiloop Controller MODULAR I/O CONNECTIONS 4.3.3 2006A Nonisolated Digital Input (DIM) Make nonisolated digital input connections as shown in Figure 4-4. Input specifications are: DIGITAL INPUTS (NONISOLATED) Input range ON 2.2 to 24 VDC or 50 maximum OFF 0 to 0.65 VDC or 50K minimum Max Input current 2.5 mA DC Max Output current 20 mA DC Response time 1 msec Figure 4-4. Typical Connections for a 2006A Nonisolated Digital Input Module 58 MOD 30ML Multiloop Controller MODULAR I/O CONNECTIONS 4.3.4 2002A and 2012A Current Inputs (VCIM) Make current input connections as shown in Figure 4-5 for 2-Wire Transmitter (2012A) and in Figure 4-6 for Non 2-Wire Transmitter (2002A). 2-Wire Transmitter (2012A) The 2-wire version of the milliampere input receives its loop current from a 24V dc current supply built into the module. This current supply is automatically connected in the circuit when the 2-wire input connection is made. The load on the transmitter is nominally 100 ohms. Due to heat generated, this module must be installed in a location with no adjacent module on either side. Input specifications are: ANALOG INPUT (CURRENT WITH 2-WIRE TRANSMITTER POWER) Range: (0-100%) 4 to 20mA Low limit: 0 mA Upper limit: 27.5 mA Input Resistance: 50 ohms Noise filter: 3 db at 5 Hz Resolution: 14 bits Sensitivity: 1 uA Accuracy (calibrated): ±0.2% of span Two Wire Excitation Supply Open circuit voltage: 24V ±5% Short circuit current: maximum at 38 mA Isolation: 250 Vrms Max Survivable Input: ±300 Vdc or 250 Vac (Differential) Common mode rejection: 100 db at 60 Hz minimum Normal mode rejection: 40 db at 60 Hz minimum Figure 4-5. Typical Connections for a 2012A Current Input Module with 2-Wire Transmitter Power 59 MOD 30ML Multiloop Controller MODULAR I/O CONNECTIONS Non 2-Wire Transmitter (2002A) The non 2-wire transmitter version of the milliampere input receives its loop current from a supply in the transmitter. The transmitter load is nominally 100 ohms. The transmitter may be grounded or ungrounded. Input specifications are: ANALOG INPUT (CURRENT) Range: (0-100%) 4 to 20 mA Low limit: 0 mA Upper limit: 24 mA Input Resistance: 2.5 ohm Noise filter: 3 db at 5 Hz Resolution: 13 bits Sensitivity: 1.6 uA Accuracy (calibrated): ±0.2% of span Isolation : 250 Vrms Max Survivable Input: 50 mAdc (Differential) Common mode rejection: 100 db at 60 Hz minimum Normal mode rejection: 40 db at 60 Hz minimum Figure 4-6. Typical Connections for a 2002A Current Input Module 60 MOD 30ML Multiloop Controller MODULAR I/O CONNECTIONS 4.3.5 2001A Voltage Input (VCIM) Make volt or millivolt connections as shown in Figure 4-7. Input specifications are: ANALOG INPUT (VOLTAGE) Range: (0-100%) ±10 Vdc, ±100 mVdc Low limit: -11V, -110 mV Upper limit: +11V, +110 mV Input Resistance: 1 Megohm Noise filter: 3 db at 5 Hz, 3 db at 3 Hz Resolution: 16 bits Sensitivity: 0.4mV, 4uV Accuracy (calibrated): ±0.1% of span Isolation: 250 Vrms Max Survivable Input: ±300 Vdc or 250 Vac (Differential) Common mode rejection: 100 db at 60 Hz minimum Normal mode rejection: 40 db at 60 Hz minimum Figure 4-7. Typical Connections for a 2001A Voltage Input Module 61 MOD 30ML Multiloop Controller MODULAR I/O CONNECTIONS 4.3.6 2009A RTD Input (RIM, WRIM) Make resistance input connections as shown in Figure 4-8. The 2 wire input module (RIM), uses a single wide case and the 3 wire input module (WRIM) uses a double wide case. Table 4-2 summarizes the RTD support standards and shows some sample RTDs. Table 4-2. Supported RTD Materials and Standards and Sample RTDs Sample RTDs and Appropriate Module @ 0°C Approx. Range RTD Module 1000 184.94 to3902.61 2 Wire 500 92.47 to 1951.31 2 Wire 1000 555.00 to 3169.25 2 Wire 100 18.49 to 390.26 3 Wire 98.129 16.66 to 311.87 3 Wire 100 17.07 to 332.62 3 Wire 100 17.26 to 403.70 3 Wire 120 66.60 to 380.31 3 Wire Supported RTD Materials and Standards Material Alpha (/-/°C) Standard Platinum 0.003850 DIN 43760 (Note 1) Platinum 0.003850 DIN 43760 (Note 1) Nickel 0.006720 Minco (Note 2) Platinum 0.003850 DIN 43760 (Note 1) Platinum 0.003923 SAMA RC21-4 Platinum 0.003902 Burns Platinum 0.003911 Minco (Note 2) Nickel 0.006720 Minco (Note 2) 1. Also meets IEC 751 and BS 1904 Standards. 2. Sometimes called U.S. Industrial Standard. Input specifications for the 2 wire and the 3 wire input modules are: RTD INPUT Range (0 to 100%): 2 Wire: 0 to 4000 Ohms 3 Wire: 0 to 400 Ohms Low limit: 0 Ohms High limit: 2 Wire: 4200 Ohms 3 Wire: 400 Ohms Module Counts (0 to 100%): –25000 to 25000 (converted to 0 to 50000 in controller) Sensitivity (One Count) 2 Wire: 0.08 Ohms 3 Wire: 0.008 Ohms Accuracy, calibrated at 5V supply and 25°C: ±0.05% of Range (This equals an absolute accuracy of ±25 counts or ±2 ohms for the 2 wire input or ±0.2 ohms for the 3 wire input or ±0.519°C for the Platinum DIN 43760 curve) Temperature Effect (0°C to 50°C): 0.1% of Range Noise filter: 3 db at 5 Hz Max Resistance Each Lead: 100 Ohms Excitation Current (maximum) 2 Wire: 0.25 mA 3 Wire: 0.6 mA Burnout Detection on all leads: Upscale Isolation: 250 Vrms Common mode rejection: 100 db at 60 Hz minimum Normal mode rejection: 40 db at 60 Hz minimum 62 MOD 30ML Multiloop Controller MODULAR I/O CONNECTIONS Figure 4-8. Typical Connections for a 2009A 2-Wire or 3-Wire RTD Input Module * NOTE: The lead wire resistance effect is about +0.001 / (ohms per lead). Assuming 20 ohms per lead, the total error could be calculated as follows: Error = ((0.001 / × 20 /lead) 400 Module Span) × 100% = 0.005% 63 MOD 30ML Multiloop Controller MODULAR I/O CONNECTIONS 4.3.7 2020N Remote I/O Interface Module (RIO) (discontinued) Make remote I/O interface connections as shown in Figure 4-9. One remote I/O interface module is required for each remote I/O network. The remote I/O interface module is scanned every 50ms by the controller. A maximum of 2 RIO modules are allowed per instrument. Specifications are: REMOTE I/O INTERFACE RS485 SERIAL NETWORK Bus Master 2020N Remote I/O Interface Module (end of bus) Bus Slaves Remote I/O Digital Modules Maximum Length 500 meters (1600 feet) Baud rate 187.5K Max addresses 32 (31 slaves + 1 RIO master at address 0) Termination 120 ohm resister is required across the two conductors at the end of the cable (2 shipped with RIO module) Shield Required over 50 meters (160 feet) REMOTE I/O INTERFACE CABLE Indoor use Belden #9182 Indoor plenum use Belden #89182 Underground use Belden #9815 twisted twinax Outdoors above ground use NOT recommended Wiring Use same cable type throughout network. Avoid interruptions (wire to same terminals if necessary). Do not wire through terminal blocks. Table 4-3. Supported Remote I/O Modules (discontinued) Module Digital Input Modules .....................ICSI 08 D1 ICSI 08 E1 ICSI 08 E3 ICSI 16 D1 ICSI 16 E1 Description 8 non-isolated 24VDC input channels 8 isolated 24VDC input channels 8 isolated 120VAC input channels 16 non-isolated 24VDC input channels 16 isolated 24VDC input channels Digital Output Modules ..................ICSO 08 R1 8 relay output channels 2A ICSO 08 Y1 8 transistor output channels 24VDC 2A Digital Input/Output Modules ........ICSK 20 F1 12 non-isolated 24VDC input channels and 8 isolated relay output channels ICSC 08 L1 8 user-configurable channels for 24VDC input or 24VDC 500mA transistor output * NOTE: 64 Modules are available in three forms: -120 for 110/120Vac external power, -230 for 220/230Vac external power and -24 for 24Vdc external power. All modules mount on a ECZ remote I/O module carrier. See IB-23C601 for details on Remote I/O module installation and connection. MOD 30ML Multiloop Controller MODULAR I/O CONNECTIONS Figure 4-9. Typical Interface Circuit for 2020N Remote I/O Interface Module (RIO) (discontinued) * NOTE: For wiring at the remote unit, refer to the Remote I/O Manual IB-23C601 and the tech note Remote I/O Wiring. 65 MOD 30ML Multiloop Controller MODULAR I/O CONNECTIONS 4.4 MODULAR OUTPUT CONNECTIONS This section describes the process input connections for the following input module types: 4.4.1 2003A Current Output Module - Section 4.4.1 2005A Solid-State Relay Output Module - Section 4.4.2 2007A Nonisolated Digital Output Module - Section 4.4.3 2011A Dual Mechanical Relay Output Module - Section 4.4.4 2011A Form C Mechanical Relay Output Module - Section 4.4.5 2003A Current Output (AOM) Make current output connections as shown in Figure 4-10. Due to heat generated, this module must be installed in a location with no adjacent module on either side. When the instrument is installed in the European Union, an interface filter must be connected in the signal wires to the module to comply with European Union (EU) Electromagnetic (EMC) requirements. Use a Phoenix Contact FILTRAB NEF1-1 or equivalent. Reference Phoenix Contact Ltd., P.O. Box 131, D32819, Blomberg, Lippe, Germany, Phone 52-35320510. Output specifications are: ANALOG OUTPUT Range: (0-100%) 4 to 20 mA Low limit: 0 mA Upper limit: 25 mA Open circuit voltage: 26 Volts maximum load limit: 800 Ohms Isolation : 250 Vrms Resolution: 12 bits Sensitivity: 5 uA Accuracy: ±0.2% of span Figure 4-10. Typical Connections for a 2003A Current Output Module 66 MOD 30ML Multiloop Controller MODULAR I/O CONNECTIONS 4.4.2 2005A SSR Output (DOM) Recommended connections to a customer relay are shown in Figure 4-11. Make SSR output connections as shown in Figure 4-12. DC output modules are used for controlling or switching DC loads. Each module provides optical isolation between the field devices and the control logic. This isolation is limited to 250 Vrms at the terminal block. Typical uses and applications for DC output modules include switching the following loads: DC relays, DC Solenoids, DC motor starters, or DC lamps or indicators. Wire rating: 600 V, -20°C +105°C UL, CSA approved. Module Fuse rating: 4 Amps, 250V. DC DIGITAL OUTPUTS (ISOLATED) Output voltage ranges Max Output current Turn-off time Max Output voltage drop Off-state leakage at max V _10_ 5-60 V 1A 0.75 msec 1.6 V 1 mA _11_ 5-200 V 0.55A 0.75 msec 1.6 V 2 mA AC output modules are used for controlling or switching AC loads. Each module provides optical isolation between the field devices and the control logic. This isolation is limited to 250 Vrms at the terminal block. Typical uses and applications for AC output modules include switching the following loads: relays, solenoids and contactors, motor starters, heaters, lamps, or indicators. Wire rating: 600 V, -20°C +105°C UL, CSA approved. Module Fuse rating: 4 Amps, 250V. AC DIGITAL OUTPUTS (ISOLATED) Output voltage range Max Output current Off-state leakage (2.5 at 120V) Minimum load current Response time Max Output voltage drop Form Type _12_ 12-140 V 1A 5 mA _13_ 24-280 V 1A 5 mA _14_ 24-280 V 1A 5 mA 20 mA 1/2 cycle 1.6 V A (Make) SPST-NO 20 mA 1/2 cycle 1.6 V A (Make) SPST-NO 20 mA 1/2 cycle 1.6V B (Break) SPST-NC Figure 4-11. Recommended Connection to Solid State Relay 67 MOD 30ML Multiloop Controller MODULAR I/O CONNECTIONS Figure 4-12. Typical Connections for a 2005A Solid State Relay Output Module 68 MOD 30ML Multiloop Controller MODULAR I/O CONNECTIONS 4.4.3 2007A Nonisolated Digital Output (DOM) Make nonisolated digital output connections as shown in Figure 4-13. Output specifications are: DIGITAL OUTPUTS (NONISOLATED) Output voltage range +5 to +24 Vdc Max Output current 100 mAdc Response time 100 usec Maximum leakage current 100 uAdc Figure 4-13. Typical Connections for a 2007A Nonisolated Digital Output Module 69 MOD 30ML Multiloop Controller MODULAR I/O CONNECTIONS 4.4.4 2011A Dual Mechanical Relay Outputs (DDOM) Make mechanical relay output connections as shown in Figure 4-14. Output specifications are: DUAL MECHANICAL RELAY OUTPUTS Configuration Dual relays (NO/NO, NC/NC, NO/NC) Power supply range + 5 VDC ±10% Max Input Current -10.0 mA DC Contact load 3A at 60 VAC or 30 VDC Contact resistance 0.10 ohms maximum Isolation 250 Vrms (contacts to coil) Current rating 3A per relay Response time 10 msec 70 MOD 30ML Multiloop Controller MODULAR I/O CONNECTIONS Figure 4-14. Typical Connections for a 2011A Mechanical Relay Output Module (Dual SPST, NO/NC) 71 MOD 30ML Multiloop Controller MODULAR I/O CONNECTIONS 4.4.5 2011A Form C Mechanical Relay Outputs (WDOM) Make mechanical relay output connections as shown in Figure 4-15. Wire rating: 600 V, -20°C +105°C UL, CSA approved. Output specifications are: FORM C MECHANICAL RELAY OUTPUT Configuration Form C single relay Power supply range + 5 VDC ±10% Max Input Current -10.0 mA DC Contact load 3A at 60 VAC or 30 VDC Contact resistance 0.10 ohms maximum Isolation 250 Vrms (contacts to coil) Current rating 3A per relay Response time 10 msec 72 MOD 30ML Multiloop Controller MODULAR I/O CONNECTIONS Figure 4-15. Typical Connections for a 2011AZ10200A Mechanical Relay Output Module (Form C) 73 MOD 30ML Multiloop Controller MODULAR I/O CONNECTIONS 74 MOD 30ML Multiloop Controller COMMUNICATIONS CONNECTIONS 5 COMMUNICATIONS CONNECTIONS 5.1 GENERAL Read this section thoroughly before making connections. Installation personnel should be qualified technicians. The controller provides communications capability for both ICN and Modbus networks. Two serial communication ports are available permitting the controller to communicate on two different networks simultaneously. Port 1 can use either built-in or modular communication drivers. Port 2 requires a modular driver. Communications connections are made to the terminals shown in Figures 5-1a (Model C) and 5-b (Models A & B). The communications network diagrams in this section show connections for both the built-in and modular communications circuits. In addition to the network communications capability, the controller provides an RS-232 communications port in the bottom of the front panel. This port permits connection of a portable computer for data base configuration using the PC configuration software. Figure 5-1a. Terminal Identifications for Communications Network Connections - Model C 75 MOD 30ML Multiloop Controller COMMUNICATIONS CONNECTIONS Figure 5-1b. Terminal Identifications for Communications Network Connections - Models A & B 76 MOD 30ML Multiloop Controller COMMUNICATIONS CONNECTIONS 5.2 COMMUNICATION CONNECTION GUIDELINES The wiring connections described in this section are made with the controller installed in its operating location and with the power off. All connection terminals are located under a cover on the back of the Model A & B instrument housing. Model C instruments do not have a cover over the terminals. Figure 5-1b shows the Model A & B communication connection terminals with the cover removed. The recommended procedure for making communications connections is as follows: 1. Communications port 1 serves either the built-in communications circuits or I/O module location S10 (S10 and S9 if module is double wide). It is recommended that the built-in communication circuit be used for port 1. This leaves the module locations available for other purposes. 2. Communications port 2 serves I/O module location S8 (S8 and S7 if module is double wide). If required, a second communication network can be supported via this modular connection. 3. When using communication port 1, a communications jumper on the carrier board, Figure 5-2, must be positioned to select the communication type for the built-in circuits, or to deselect the built-in circuit if a module is used. 4. The built-in communications circuits are isolated from all other circuits. Terminal 1 (TX & RX common) is the communications circuit common for these built in circuits. When builtin communication is used, connect terminal 1 of each instrument on the communication bus together. This common line must be connected to ground at some point in the system to prevent the possible build up of a static charge, reduce noise pick up, and comply with EU EMC requirements. 5. Communications wiring should be shielded twisted pairs. Detailed cable requirements are provided in Sections 5.4 and 5.5. 6. The cable shields must be connected to a good noise free ground. Normally this should be one of the terminals identified as chassis in Figure 3-1. Alternatively, it is acceptable to use the shield to connect the commons among the instruments. If this arrangement is used, noise rejection may not be optimal. 7. Route communications wiring from the top left hand side of the housing and distribute to appropriate terminals. 8. Use a small, flat-head screwdriver to loosen appropriate connection screws and clamps on terminal blocks. 9. Strip approximately 5/16 inch (8 mm) of insulation from the end of each wire, insert wires at assigned terminals, and secure terminal screws and clamps. 10. Make wiring connections using the following procedures: a. Front Panel RS-232 Communications Connections - Section 5.3. b. Instrument Communications Network (ICN) Connections - Section 5.4. c. Modbus Network Connections - Section 5.5. 11. After all connections are completed and checked, the ac power wiring can be connected at the distribution panel (ac source). * NOTE: Before putting the controller into operation, it must be configured using either the front panel keys or the PC Configuration Software. See Section 1.1.2 for related documents. 77 MOD 30ML Multiloop Controller COMMUNICATIONS CONNECTIONS Jumper locations for Communications Port 1 Built-in Circuit Modular Circuit RS-232 RS-485 ICN Jumper Removed Figure 5-2. Locations for Port 1 Communications Jumper 5.3 FRONT PANEL RS-232 COMMUNICATIONS CONNECTION The RS-232 communication port in the instrument front panel, Figure 1-1 (NOT present with NEMA 4), is used exclusively for data base configuration via connection of a portable computer. Use of this RS-232 port is subject to the following requirements: 78 Connection to the port must be made using a cable which is available as an accessory to the instrument. The cable is terminated at one end with a plug-in connector for the instrument port, and at the other end with a connector compatible with a computer serial communication port. The communication jumper, Figure 5-2, must be positioned for RS-232 communication. MOD 30ML Multiloop Controller COMMUNICATIONS CONNECTIONS If connections are made to the built-in communication terminals, Figure 5-1, the connections must support RS-232 communication as shown in Figure 5-4, otherwise the RS-232 port in the front panel is not functional. The instrument data base must be configured to provide RS-232 communication on the built-in circuit; this is the default configuration. When the built-in RS-232 circuit is being used for network communication, making a connection to the front panel RS-232 port disables the network receive function so that the instrument can receive data only from the device connected to the port. The transmit line is not affected. 5.4 INSTRUMENT COMMUNICATIONS NETWORK (ICN) CONNECTIONS An example of a typical ICN configuration with both modular and built-in connections is shown in Figure 5-3. 5.4.1 Cable Requirements The length of the ICN is the sum of the lengths of the physical two-wire bus between each node on the ICN. If the network includes MOD 30 instruments, the length of any MOD 30 instrument cables between the nodes and the instruments must be included in the total length. This length can be up to 2000 ft (609.6 m). Cable requirements for an ICN are dependent upon the length of the ICN as described below. 5.4.2 When the total length is 500 ft (150 m) or less, use 18 AWG (1 mm) shielded twisted pair cable. When the total length is between 500 and 1500 ft (150 and 450 m): - Entire length of the ICN must be at virtually the same potential and voltage drop between any two points on ICN must not exceed 3V. - Cable capacitance for an ICN must be between 18 and 25 pf/ft (60-83 pf/m). When the total length exceeds 1500 ft (450 m) or if the ICN must be routed through high noise (EMI/RFI) environments, use 22 AWG (0.64 mm) shielded cable. If an ICN must be run next to power lines or other unusual noise frequencies, contact your service representative for assistance. Addresses Each device on an ICN must be assigned a unique address. Addresses are in the range of 0 through F hex (0 through 15 decimal). The address for the built-in circuit is configured through the front face of the instrument in Device Setup (see IB-1800R-OPR Setup Section). Addresses for modular circuits are set at the module as shown in Figure 5-3. 79 MOD 30ML Multiloop Controller COMMUNICATIONS CONNECTIONS Figure 5-3. ICN Connections for Built-in and Modular Communication Circuits 80 MOD 30ML Multiloop Controller COMMUNICATIONS CONNECTIONS 5.4.3 Termination One set of ICN termination resistors must be installed on each ICN to prevent noise from being picked up by the ICN circuitry and generating a diagnostic alarm. The ICN termination scheme requires a nominal 24 volt DC power supply that can supply 15.4 mA. This supply is provided by both the built-in and modular circuits. The termination resistor network is provided in a 2030FZ00001A ICN Terminator. The terminator can be conveniently connected to an ICN at built-in terminals 2 - 5 as shown in Figure 5-3. Note that the terminator is connected to common via terminal 4 which is internally connected to terminal 1 (communications common) for ICN communication. The terminator can also be connected at the appropriate four terminals when a communications module is used. Other factors affecting the termination scheme are as follows. The ICN cable shields should be connected directly to chassis ground at one end only. Be sure each network has only one terminator. If the controller is connected to an existing MOD 30 ICN, the network is already terminated and a terminator must not be connected to any new device. 5.5 MODBUS NETWORK CONNECTIONS 5.5.1 General Numerous Modbus network connection arrangements are possible. Selection of a specific arrangement depends on the requirements of the application. The connection diagrams shown in this section provide typical examples of connection schemes which meet all the functional requirements of the Modbus protocol and the built-in and modular communication circuits. Master and Slave Designations The controller can function as either a Modbus master or Modbus slave. This functionality is determined by the configuration of the MSC block. Communications Parameters The baud rates available are: 150, 300, 600, 1200, 2400, 4800, 9600, 19200 or 38400. Parity can be none, even or odd, and there can be either 1 or 2 stop bits. These parameters are configurable via the MSC block. The transmission mode of Modbus networks using either the built-in or modular circuits is RTU (Remote Terminal Unit). RS-485 Network Considerations The RS-485 specification allows as many as 32 devices on any given network. The number of devices can be increased by the use of repeaters. The Modbus network supports as many as 247 slave devices. 81 MOD 30ML Multiloop Controller COMMUNICATIONS CONNECTIONS RS-485 Cable Requirements For short runs of 10 to 25 ft (3 to 6m), virtually any 2-wire shielded or twisted pair is suitable. For runs up to 1000 ft (305 m), Belden 9502 Cable or an equivalent cable is recommended. This cable is a dual 24 AWG (0.5 mm) twisted pair with an overall foil shield. A drain wire is provided for grounding the shield. For runs up to 4000 ft (1219.2 m), Belden 9729 Cable or an equivalent cable is recommended. This cable is a dual 24 AWG (0.5 mm) twisted pair with a foil shield for each pair. The cable insulation is low dissipation (polypropylene). Two separate drain wires are provided for grounding the shields * NOTE: Heavy braid shield cable may be required for certain noisy environments. Addresses Each slave on a Modbus network must have a unique address. Addresses 1 through 247 (01 through f7 in hexadecimal) are supported by the Modbus protocol. Addresses for the built-in circuit are assigned by configuration of a data base attribute. Addresses for modular circuits are set at the module as shown in Figure 5-7. Communication Defaults The 2033N and 2034N RS-485 modules have a COMM DEFAULTS switch which provides for communication with the module when its configuration is unknown. When the switch is set at YES, a set of default parameters is invoked. The parameters are: 9600 Baud, no parity, one stop bit, eight data bits, and the port functionality is slave. 5.5.2 RS-232 Modbus Communication The built-in and modular circuits for RS-232 communication use a driver/receiver which supports a point-to-point Modbus network. The modular circuit is contained in a 2033N communications module. These circuits meet all RS-232C and V.28 specifications. They have a±9V output swing with a+5V supply, and±30V receiver input levels. All field connection terminals are optically isolated from the instrument circuitry. The maximum network cable length is 50 feet. Both the built-in and modular circuits support the Extended Modbus protocol which provides full communications functionality between controllers, and between the controllers and any PC software. ! CAUTION: If the modular communication option is used, be sure the module is wired properly before applying power. Although this module is isolated, it can be damaged if excessive voltage is applied across the input pins. This module is not a drop-in replacement for the ICN module (2030N), and will be damaged if ICN level voltages are applied to the input pins. Connections for a typical RS-232 Modbus network using the built-in circuit is shown in Figure 5-4, and connections using the modular circuit are shown in Figure 5-5. Either a computer or the controller can act as the Modbus master. 82 MOD 30ML Multiloop Controller COMMUNICATIONS CONNECTIONS Figure 5-4. Typical Network Connections for Built-In Modbus RS-232 Communication 83 MOD 30ML Multiloop Controller COMMUNICATIONS CONNECTIONS Figure 5-5. Typical Network Connections for Modular Modbus RS-232 Communication 84 MOD 30ML Multiloop Controller COMMUNICATIONS CONNECTIONS 5.5.3 RS-485 2-Wire Modbus Communication The built-in and modular circuits for RS-485 2-wire communication use a transceiver which supports a 2-wire point-to-point or point-to-multipoint Modbus network. The modular circuit is contained in a 2032N communications module. All field connection terminals are isolated from the instrument circuitry. ! CAUTION: If the modular communication option is used, be sure the module is wired properly before applying power. Although this module is isolated, it can be damaged if excessive voltage is applied across the input pins. This module is not a drop-in replacement for the ICN module (2030N), and will be damaged if ICN level voltages are applied to the input pins. Connections for a typical RS-485 2-wire Modbus network are shown in Figure 5-6. In this network, the personal computer acts as the Modbus master and the controller is the slave. The master is responsible for providing the bus stabilizing pull-up and pull-down resistors which keep the bus in a MARK/IDLE state when all the transmitters are tri-stated. Connect 120 ohm termination resistors across the transmission line at both ends as shown. The termination resistors may not be required if the line length is very short. The built-in communications circuit provides a communications common connection at terminal 1 to provide improved noise resistance. The modular circuit does not use a communications common. When using the built-in circuit, connect the communications common as follows: Connect to terminal 1 of all instruments communicating on the network via the built-in circuit. Connect to the RS-485 interface board in the personal computer if a communications common terminal is available. Connect to ground at some point in the system. 85 MOD 30ML Multiloop Controller COMMUNICATIONS CONNECTIONS Figure 5-6. Typical Modbus Connections for an RS-485, 2-Wire Network 86 MOD 30ML Multiloop Controller COMMUNICATIONS CONNECTIONS 5.5.4 RS-485 4-Wire Modbus Communication The built-in and modular circuits for RS-485 4-wire communication use a pair of transceivers which support a 4-wire point-to-point or point-to-multipoint Modbus network. The modular circuit is contained in a 2034N communications module. All field connection terminals are isolated from the instrument circuitry. Both the built-in and modular circuits support the Extended Modbus protocol which provides full communications functionality between controllers, and between a controller and any PC software. ! CAUTION: If the modular communication option is used, be sure the module is wired properly before applying power. Although this module is isolated, it can be damaged if excessive voltage is applied across the input pins. This module is not a drop-in replacement for the ICN module (2030N), and will be damaged if ICN level voltages are applied to the input pins. P C Master The diagram in Figure 5-8 shows connections for a typical RS-485 4-wire Modbus network in which a personal computer acts as the Modbus master and the controller is the slave. The master is responsible for providing the bus stabilizing resistors. When using the modular communications circuit, the module provides the slave function, and the TERM switch on the module must be set at NO to disconnect the resistors inside the module. Connect 120 ohm termination resistors across the transmission line at both ends as shown. The termination resistors may not be required if the line length is very short. Controller Master The diagram in Figure 5-9 shows connections for a typical RS-485 4-wire Modbus network in which one controller acts as the master, and the other controllers on the network are slaves. In this network, it is recommended that the modular communications circuit be used in the master because the 2034N module provides the required bus stabilizing resistors. The TERM switch on the master module must be set at YES to connect the resistors to the network. The TERM switch on each slave module must be set at NO to disconnect the resistors inside the module. Connect 120 ohm termination resistors across the transmission line at both ends as shown. These resistors may not be required if the line length is very short. Communications Common The built-in communications circuit has a communications common connection at terminal 1 to provide improved noise resistance. The modular circuits do not use a communications common. When using the built-in circuit, connect a communications common line as follows: Connect to terminal 1 of all instruments communicating on the network via the built-in circuit. When a personal computer or other host device is on the network, connect to the RS-485 interface board if a communications common terminal is available. Connect to ground at some point in the system. 87 MOD 30ML Multiloop Controller COMMUNICATIONS CONNECTIONS 4-Wire/2-Wire Network When several slaves on a network require only read and write capability, a mixture of 2-wire and 4-wire communication can be used to save slot space and transmission cable as shown in Figure 5-10. This arrangement allows a series of 2-wire slave controllers to be connected to a 4-wire master controller. The master provides the required bus stabilizing resistors via a 2034N module. The slaves are adequate for the read/write function using either the built-in circuit or a 2-wire 2032N single wide module. Figure 5-7. Simplified Diagram, 2034N RS-485, 4-Wire Module 88 MOD 30ML Multiloop Controller COMMUNICATIONS CONNECTIONS Figure 5-8. Typical Modbus Connections for an RS-485, 4-Wire Network (Slave Controller) 89 MOD 30ML Multiloop Controller COMMUNICATIONS CONNECTIONS Figure 5-9. Typical Modbus Connections for an RS-485, 4-Wire Network (Master Controller) 90 MOD 30ML Multiloop Controller COMMUNICATIONS CONNECTIONS Figure 5-10. Typical Modbus Connections for a 4-Wire Master with 2-Wire Slaves 91 MOD 30ML Multiloop Controller COMMUNICATIONS CONNECTIONS 92 MOD 30ML Multiloop Controller APPENDIX A APPENDIX A A.1 MAINTENANCE CAUTION. Disconnect power before servicing. Use lens cleaning tissue or a soft cloth for cleaning the display overlay. Do not use paper towels or industrial wipes. Remove dust from the rear of the instrument by removing it from the instrument housing and spraying exposed surfaces with non-corrosive, non-toxic, nonflammable inert dusting gas. A.2 PLANNING FORMS The forms included in this appendix may be copied as necessary to record controller current consumption, the I/O plan, and wiring connection data. A-1 MOD 30ML Multiloop Controller APPENDIX A CURRENT CONSUMPTION PLANNING FORM CONTROLLER NUMBER ____ BUILT-IN I/O CURRENT CONSUMPTION Description Transmitter Power Supply 20 mA Output 50 mA Output ICN Terminator Max. Supply Current (mA) 150 140 410 100 /////////// Built-in I/O Current Subtotal MODULAR I/O CURRENT CONSUMPTION Catalog No. Description 2001A Model B 2002A Model B 2003A Model A 2004A Model A 2005A Model A 2006A Model A 2007A Model A 2009A Model B 2011A Model A 2012A Model B 2013A Model B 2020N Model B 2030N Model B 2032N Model C 2033N Model A 2034N Model A Max. Supply Current (mA) Voltage Input 80 Current Input 80 Current Output 350 Solid State Relay Input 12 Solid State Relay Output 12 Nonisolated Digital Input 10 Nonisolated Digital Output 20 RTD Input 80 Mechanical Relay Output 140 Current Input with 2-Wire Transmitter 350 Thermocouple Input 80 Remote I/O Interface 400 ICN Communication With terminator 500 ICN Communication Without terminator 300 RS-485 2-Wire Communication 180 RS-232 Communication 180 RS-485 4-Wire Communication 180 ////////// Modular I/O Current Subtotal No. Used (1 or 2) /////////// No. of Modules Current Subtotals ////////// TOTAL CURRENT CONSUMPTION (must not exceed 5000 mA) Base Instrument Load Built-in I/O Current Subtotal Modular I/O Current Subtotal Total Current Consumption A-2 Current Subtotals 1220 mA mA mA mA MOD 30ML Multiloop Controller APPENDIX A MOD 30ML I/O PLANNING FORM Controller No. Built-in I/O Input 1: Output 1: Input 2: Output 2: Communications: Modular I/O I/O Module Locations No. S1 S7 Module No. S2 S8 Module No. S3 S9 Module No. S4 S10 Module No. S5 S11 Module No. S6 Module ////////// Figure A-1. Module Location Planning A-3 MOD 30ML Multiloop Controller APPENDIX A Wiring Connections for MOD 30ML Controller __________ Figure A-2. Model C Termination Wiring Planning A-4 MOD 30ML Multiloop Controller APPENDIX A Figure A-3. Models A & B Termination Wiring Planning A-5 MOD 30ML Multiloop Controller APPENDIX A A-6 The Company’s policy is one of continuous product improvement and the right is reserved to modify the information contained herein without notice, or to make engineering refinements that may not be reflected in this bulletin. MicroMod Automation & Controls assumes no responsibility for errors that may appear in this manual. © 2011 MicroMod Automation & Controls, Inc. Printed in USA IB-1800R-INS, Issue 7 12/2011 MicroMod Automation & Controls, Inc. 75 Town Centre Drive Rochester, NY USA 14623 Tel. 585-321 9200 Fax 585-321 9291 www.micromod.com