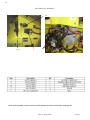
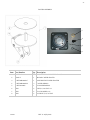
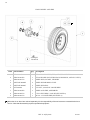
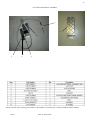
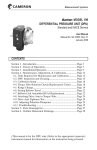
1
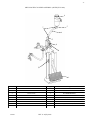
EAGLE TUGS RTT-18 PARTS & SERVICE MANUAL 2050 COMPLIANT V e hicle T ype : R T T - 1 8 Mot o r T ype : A C E L E CT R I C 2 This page was intentionally left blank REV 15 8-July-2015 RTT18B 3 I NTRODUCTION From everyone at Eagle Tugs, we would like to say Thank You for purchasing an Eagle RTT-series tow tractor. We take a lot of pride in the quality of the products that we build, as well as our continued customer service. Our goal is to build a long term relationship with our customers. We want you, the customer, to be 100% satisfied with your Eagle experience. To us, this means that your Eagle RTT-series tractor is functionally superior to any other products you have used. This also means that your Eagle product is continually supported in a professional, timely manner. P URPOSE & U SE OF T HIS M ANUAL This manual is designed as a reference guide to make the reader more familiar with the components of the Eagle RTT tow tractor model. This manual includes part numbers and descriptions to assist the reader in ordering component spare/service parts. The manual also outlines the Scheduled Maintenance Intervals recommended by Eagle in order to keep your vehicle running properly. In this manual you will also find the Eagle Standard Warranty on the RTT-series tow tractor. However, for more detailed information on the Eagle Warranty and procedure, as well as information pertaining to the safe operation of your Eagle product, please see the Eagle Operations Manual that was also included with your tow tractor. T ECHNICAL A SSISTANCE When addressing a repair procedure or operational problem, please remember that Eagle technical support is only a phone call away. Eagle technicians are available to assist you in vehicle diagnostics and recommended repair procedures. We encourage you to use this service to reduce machine down-time and to gain a better understanding of proper repair procedures. O RDERING S PARE /S ERVICE P ARTS Eagle inventories the component parts found in its RTT-series tow tractors, and most spare/service parts can be shipped the same day the order is received. Parts orders need to be received at Eagle by 12:00 pm (Noon) EST in order for the parts to be shipped that same day. Parts ordered after 12:00 pm EST will most likely be shipped the following day. C ONTACT I NFORMATION Eagle Corporate Office 26111 Northline Rd Taylor, MI 48180 (800) 671-0431 www.eagletugs.com Customer Service [email protected] (734) 442-1000 -- (800) 671-0431 RTT18B Parts & Service [email protected] (734) 442-1000 -- (800) 671-0431 REV 15 8-July-2015 Technical Support [email protected] (734) 442-1000 -- (800) 671-0431 4 T ABLE OF C ONTENTS WARRANTY ................................................................................................................................ 6 Vehicle ID Information ......................................................................................................................................6 Warranty Registration ........................................................................................................................................6 Warranty Information ........................................................................................................................................7 SERVICING PROCEDURES .................................................................................................... 8 Resetting PM Hours Instruction ....................................................................................................................... 8 HST & Optical Display Error Messages ...........................................................................................................9 SERVICE PARTS ILLUSTRATIONS & DETAIL IDENTIFICATION KEY............................................................................................................................................... 10 HEAD LIGHT, TAILAMP AND BEACON POLE .......................................................................................................... 11 Headlight, Taillamp & Beacon Pole Assembly ............................................................................................ 11 Beacon Pole Mounting Assembly ................................................................................................................... 12 BRAKES, WHEELS & TIRES ....................................................................................................................................... 13 Rim & Tire Assembly ....................................................................................................................................... 13 Parking Brake Bracket Assembly.................................................................................................................... 14 Brake Line Tee Assembly................................................................................................................................. 15 Brake Assembly Service Parts ......................................................................................................................... 16 DRIVE CABLES ......................................................................................................................................................... 17 Motor Drive Lead Cables ................................................................................................................................. 17 AXLES & SPRINGS.................................................................................................................................................... 18 Mounting Shaft Assembly ............................................................................................................................... 18 Spring Assembly ............................................................................................................................................... 19 Newage Axle Breakdown ................................................................................................................................ 20 Newage Axle .................................................................................................................................................... 21 Axle Service Parts ............................................................................................................................................. 22 BATTERY................................................................................................................................................................... 26 Battery Plug Assembly & Jumper Cable for Contactor ............................................................................... 26 STEERED CASTER & ACCELERATOR ...................................................................................................................... 27 Caster Assembly ............................................................................................................................................... 27 Front Wheel and Tire ....................................................................................................................................... 28 Accelerator Pedal Assembly ............................................................................................................................ 29 STEERING SYSTEM & HORN .................................................................................................................................... 30 Horn Assembly ................................................................................................................................................ 30 Steering Box Assembly..................................................................................................................................... 31 Steering Column ............................................................................................................................................... 32 Steering Column Assembly ............................................................................................................................. 33 Steering Column Support ................................................................................................................................ 34 CYLINDER ASSEMBLY .............................................................................................................................................. 35 Master Cylinder Assembly .............................................................................................................................. 35 ELECTRICAL............................................................................................................................................................. 39 Electrical Component Assembly ..................................................................................................................... 39 Instrument Panel Assembly ............................................................................................................................ 41 OTHER ASSEMBLIES ................................................................................................................................................. 42 Seat Assembly ................................................................................................................................................... 42 Towbar Assembly ............................................................................................................................................. 47 REV 15 8-July-2015 RTT18B 5 T ABLE OF C ONTENTS Rear Hitch Assembly ........................................................................................................................................48 Front Hitch Assembly ......................................................................................................................................49 Chassis Components ........................................................................................................................................50 Switch Mat .........................................................................................................................................................51 Wiring Diagram ................................................................................................................................................52 Revision Log ......................................................................................................................................................54 RTT18B REV 15 8-July-2015 6 W ARRANTY V EHICLE ID I NFORMATION This information can be found on the tractor’s I.D. Plate located on the fender left of the driver’s seat. Additionally, there is a permanent serial number located on the front chassis plate inside the steering compartment. MODEL SERIAL # MFG DATE W ARRANTY R EGISTRATION I NFORMATION Please visit Eagle Tugs website at www.eagletugs.com and fill our your warranty registration information. NOTE: At the time a warranty claim is filed it may be necessary for Eagle Tugs to request a copy the maintenance records kept on your tug. For your convenience a printable Preventative Maintenance Schedule page is available in the Maintenance section of this manual. REV 15 8-July-2015 RTT18B 7 W ARRANTY WARRANTY INFORMATION Please read the Eagle Tugs warranty statement (available on our website) carefully. When contacting Eagle Tugs for warranty or parts service, please have the following information ready: Tractor model number Tractor serial number Current hour reading RTT18B REV 15 8-July-2015 8 S ERVICING P ROCEDURES See the attached appendix for Preventive Maintenance schedule. Instructions for Resetting the PM Hours on an RTT Using The OPT10 1. Press * and then enter 555 (hourglass) as the password 2. Select menu item #4 PM RESET from the menu using up and down arrows 3. Click the right arrow to enter the menu 4. Select RESET PM HOURS from the menu using up and down arrows 5. Click the right arrow to enter the menu 6. Using the up and down arrows to change the digits and the right and left arrows to select digits, set the code to 026111 7. Press * to reset the PM For RTT Without OPT 10: Items Needed 1. OPT10 2. Connection wire for each RTT A. Insert wire into pin #31 on VCM-20 plug B. Use OPT 10 to reset PM or for diagnostics (see instructions above) REV 15 8-July-2015 RTT18B 9 S ERVICING P ROCEDURES RTT18B REV 15 8-July-2015 10 S ERVICE P ARTS I LLUSTRATIONS & D ETAIL I DENTIFICATION K EY The following abbreviations are used throughout the parts lists in this section. Abbreviation Meaning NL Not Listed NPN No Part Number AR As Required Purpose Part required but not shown on diagram Parts shown and numbered, but not stocked and sold by Eagle. Typically used for bolts, clamps, etc… REV 15 8-July-2015 RTT18B 11 HEADLIGHT, TAIL LAMP & BEACON POLE ASSEMBLY 16 ITEM 3 TO BE WIRED AS SHOWN BELOW Item Qty Description 1 BEACON POLE TAIL LIGHT BRACKET (SOLD AS WELDMENT ONLY) A-RTT12E-00298 1 BEACON POLE TUBE 3 A-RTT12-00294 1 LED BEACON 4 A-RTT12E-00292 1 STOP/TAIL LAMP 5 A-RTT12E-00287 1 TAIL LIGHT GROMMET 6 NPN 3 HCS, #10-32 UNF X 1 7 NPN 3 FLAT WASHER, #10 8 NPN 3 LOCK NUT, #10-32 UNF 9 NPN 1 HCS, 5/16-18 UNC X 1.75 10 NPN 2 FLAT WASHER, 5/16 11 NPN 1 LOCK NUT, 5/16-18 UNC 12 RT00-05-001-SA 1 BEACON POLE WIRE HARNESS (S/N 1817 AND LATER) 13 DTM04-2P 1 STROBE CONNECTOR (WHEN EQUIPPED WITH ITEM 12) 14 WM2P 1 STROBE CONNECTOR LOCK (WHEN EQUIPPED WITH ITEM 12) 15 0460-202-20141 2 STROBE CONNECTOR PINS (WHEN EQUIPPED WITH ITEM 12) 16 A-RTT12E-00291 1 HEADLIGHT 1 2 Part Number A-RTT12E-00293 / A-RTT12E-00296 * Note: Part # 11-12, 14 must be purchased as fabricated. RTT18B REV 15 8-July-2015 12 BEACON POLE MOUNTING ASSEMBLY 2 4 1 REV 15 8-July-2015 RTT18B 13 REAR RIM AND TIRE ASSEMBLY 1 2 3 * Option: Soft Shoe Tires Available Upon Request. Tire & Rim Not Sold Separately. RTT18B REV 15 8-July-2015 14 PARKING BRAKE BRACKET ASSEMBLY 8 5 1 2 3 9 7 6 REV 15 8-July-2015 RTT18B 15 BRAKE LINE TEE ASSEMBLY 1 RTT18B 2 3 REV 15 8-July-2015 16 BRAKE ASSEMBLY SERVICE PARTS Item Part Number Qty. Description 1 24868.01 2 BACKING PLATE 2 D7980.002 4 SPRING WASHER, DIN 7980 3 D912.033 4 SHCS, M6 X 10, GALV 4 44569.03 4 PIPE PLUG 5 35161.01 2 BRAKE SHOE (WITH LEVER) 6 D125.004 2 WASHER, B10.5 7 45229 2 HCS, M10 X 34 8 45200 4 ADJUSTER BLOCK 9 44826 2 READJUSTER BLOCK 10 44015 2 WHEEL CYLINDER 11 43351 2 TENSION SPRING 12L 43352.01 2 BRAKE TAPPET, LH 12R 43352.02 2 BRAKE TAPPET, RH 13 35162.01 2 BRAKE SHOE (WITHOUT LEVER) 14 42861.01 4 COMPRESSION SPRING 15 45531 2 TENSION SPRING REV 15 8-July-2015 RTT18B 17 MOTOR & DRIVE LEAD CABLE SET ASSEMBLY 7 6 8 2 RTT18B 1 REV 15 8-July-2015 18 AXLE MOUNTING SHAFT ASSEMBLY 1 2 REV 15 8-July-2015 3 4 RTT18B 19 SPRING ASSEMBLY 6 5 4 3 7 2 1 RTT18B REV 15 8-July-2015 20 This page intentionally left blank. REV 15 8-July-2015 RTT18B 21 NEWAGE AXLE 2 1 RTT18B REV 15 8-July-2015 22 AXLE SERVICE PARTS TORQUE TO 107 ft-lb TORQUE TO 30 ft-lb TORQUE TO 44 ft-lb REV 15 8-July-2015 RTT18B 23 AXLE SERVICE PARTS Item Part Number Qty. Description 1 90-0100 1 AXLE SHAFT SHORT 2 90-0101 1 AXLE SHAFT LONG 3 90-2680 1 PRIMARY WHEEL 4 0540253 2 TAPER BEARING 5 0041013ZP 2 BOLT ZINC, GD8, M10 X 50 LG 6 0041011ZP 7 BOLT ZINC, GD8, M10 X 40 LG 7 0191006 9 FLAT WASHER, M8 8 0210815 2 DOWEL, 8 X 15 LG 9 90-2130 2 DIFF SPIDER 10 360-2100 4 DIFF PINION 11 250-2120 4 THRUST WASHER 12 250-2110 2 THRUST WASHER 13 360-2090 2 DIFF WHEEL 14 90-2080 1 DIFF CASE RH 15 055U049 2 BEARING CUP 16 055C028 2 TAPER BEARING 17 0191107 6 SPRING WASHER, M12 18 0041211ZP 6 BOLT ZINC, GD10, M12 X 40 LG 19 CP1224 1 BONDED SEAL, 1/8” BSP 20 GW1061 1 MAGNETIC PLUG 21 0081460L 12 HCS, M8 X 60 LG 22 90-2660 1 OUTPUT WHEEL 23 90-2070 1 DIFF CASE LH 24 0430693 1 O-RING, FACE SEAL RTT18B REV 15 8-July-2015 24 AXLE SERVICE PARTS B TORQUE TO 103 ft-lb C A TORQUE TO 9 ft-lb A Install specified components using Loctite® Threadlocker 243™ or 245™ thread retaining compound or comparable. B Oil seals face same direction. Pack grease between oil seals. C No washer fitted under screw adjacent to brake adjuster. REV 15 8-July-2015 RTT18B 25 AXLE SERVICE PARTS Item Part Number Qty. Description 1 90-2730 2 SEAL HOUSING 2 0400453 4 OIL SEAL 45 X 60 X 7 3 0513540* 2 SUPER PRECISION BALL BEARING 4 90-2142 2 COLLAR BEARING RETAINER 5 90-2141 2 BEARING SPACER 6 0191004S 20 PLAIN WASHER, M6 7 0081320/G10 22 HCS, M6 X 20 LG 8 0430721 2 O-RING DOWTY 9 90-0170 10 PITCH NUT, M14 X 1.5 10 90-0450 10 WHEEL STUD, M14 X 1.5 11 01207035 8 HCS, M12-1.75 X 35 12 90-0541 2 BRAKE DRUM * Substitution of alternative bearings will result in reduced life and possible axle damage. RTT18B REV 15 8-July-2015 26 BATTERY PLUG ASSEMBLY 4,5 3 ,3A 1 2 *Note: A-RTT12-00410 is for the entire set which includes motor drive lead cables from page 14 REV 15 8-July-2015 RTT18B 27 CASTER ASSEMBLY 7 6 5 8 Item Part Number Qty. Description 1 A-RTT18B-00050 1 FRONT STEERABLE WHEEL FRAME 2 R5925-T 1 MYLAR CASTER SPACER 3 A-RTT18B-00050-C 1 AXLE BOLT KIT WITH SPACERS 4 A-RTT18B-00050-B 3 CASTER SPRING 5 A-RTT12-00105 1 FLANGE BEARING 6 NPN 4 FHCS, 1/2-13 UNC X 2 7 NPN 4 FLAT WASHER, 1/2 8 NPN 4 LOCK NUT, 1/2-13 UNC RTT18B REV 15 8-July-2015 28 FRONT WHEEL AND TIRE A TORQUE TO 90 ft-lb Item Part Number Qty. Description 1 RT18-04-005-AA 1 RTT-18 FRONT WHEEL, TIRE, AND HUB ASSEMBLY 2 RT18-54-001-KA 1 RTT-18 HUB KIT (INCLUDES SEALS, BEARINGS, AND LUG NUTS) 3 RT18-04-001-CA 1 WHEEL HUB, 5-4.50 BC, STUDDED 4 A-RTT12E-00049D 2 WHEEL HUB BEARING CONE 5 A-RTT12E-00049G 2 WHEEL HUB SEAL 6 A-TT4-00123 5 LUG NUT, 1/2-20 UNF X 60 DEGREES 7 RT18-54-003-KA 1 WHEEL AND TIRE, ASSEMBLED 8 RT18-04-002-CA 1 3.75 X 8 SPLIT RIM, 5 X 4.50 BC (SEE NOTE A) 9 RT18-04-003-CA 1 400 X 8 - 3.75 SOLID TIRE (SEE NOTE A) A When the tire or wheel are ordered separately it is the responsibility of the end customer to assemble the tire to the rim. Note that this assembly requires specialized equipment. REV 15 8-July-2015 RTT18B 29 ACCELERATOR PEDAL ASSEMBLY 2 7 1 5 6 3 4 *Please note that when ordering part number A-RTT-00281-1 it includes part # A-RTT12-00422 & A-RTT12-00424 RTT18B REV 15 8-July-2015 30 HORN ASSEMBLY 1 REV 15 8-July-2015 RTT18B 31 STEEERING BOX ASSEMBLY 14 13 12 1 8 9 10 2 3 7 4 RTT18B REV 15 8-July-2015 5 11 32 STEERING COLUMN 2 3 1 Wheel nut not seen (Inside wheel) *If horn brush assembly (A-RTT12-00399-A) is serviced at any time it is best to thoroughly clean the contact ring (through the horn brush hole-a cotton swab may be helpful) to remove any wear debris and grease residue. Add new grease before installing a new horn brush assembly. REV 15 8-July-2015 RTT18B 33 STEERING COLUMN ASSEMBLY 2 1 RTT18B REV 15 8-July-2015 34 STEERING COLUMN SUPPORT 8 7 2 1 3 6 REV 15 8-July-2015 5 4 RTT18B 35 MASTER CYLINDER ASSEMBLY (PRIOR TO JULY 2012) 1 2 10 11 5 9 3 8 4 6 Note: Item # 12-18 Continued on (2 of 2) RTT18B REV 15 8-July-2015 7 12 36 MASTER CYLINDER ASSEMBLY (PRIOR TO JULY 2012) 14 15 16 13 17 18 19 Item 13 14 15 Part Number A-TT4-00163 A-TT4-00167 A-TT4-00165 Qty 1 1 1 Description SWITCH TEE 90 DEGREE BRAKE LINE BRAKE HOSE CLIP 16 A-TT4-00166 1 BRAKE HOSE 17 NPN 1 HOSE BRACKET (EAGLE FAB PART) 18 5/16-18 2 LOCK NUT 19 5/16-18X1 G5 HCS 1 BOLT Note: Use 5/16-18X1.5 on Master Cylinder for clamp space on assembly (RH side) REV 15 8-July-2015 RTT18B 37 MICO MASTER CYLINDER ASSEMBLY (AFTER JULY 2012) 4 5 7 6 5 8 9 2,3 1 Item Part Number Qty Description 1 A-RTT12-00181 1 BRAKE PEDAL 2 C-TT4-10182 1 PEDAL PIVOT PIN 3 C-TT4-10188 1 NYLINER BEARING 4 RT00-13-002-CA 1 BRAKE RESERVOIR 5 129HB-5-2 2 ADAPTER, 1/8 NPTF-5/16 HOSE 6 A-RTT12-00164 1 TUBING 15 INCHES 7 A-RTT12-00165 2 FI HOSE CLAMP 1/4" 8 48IFHD-3-2 1 ADAPTER, 1/8 NPT F - 3/16 INV FLARE 9 RT00-13-004-SA 1 BRAKE LINE CENTER RTT18B REV 15 8-July-2015 38 MICO MASTER CYLINDER ASSEMBLY (AFTER JULY 2012) 17 14 16 CUSHION BAND CLAMP FOR U,V,W MOTOR CABLES 15 16 19 20,21,22 18 10 12 13 11 Item Part Number Qty Description 10 RT00-13-001-CA 1 MASTER CYLINDER 11 RTT00-13-003-SA 1 MASTER CYLINDER BRACKET 12 NPN 1 3/8-24 HEX JAM NUT 13 NVSP-24-008-CA 1 CLEVIS 14 A-TT4-00173 1 BRAKE SWITCH 15 A-TT4-00163 1 SWITCH TEE 16 A-TT4-00167 2 90 DEGREE BRAKE LINE 17 A-TT4-00165 1 BRAKE HOSE CLIP 18 A-TT4-00166 1 BRAKE HOSE 19 A-TT4-00168 1 BRAKE LINE TEE 20 NPN 2 5/16-18 X 2 HCS 21 NPN 4 5/16 FLAT WASHER 22 NPN 2 5/16-18 LOCK NUT REV 15 8-July-2015 RTT18B 39 ELECTRICAL COMPONENT ASSEMBLY Item Part Number Qty Description 1 A-TT4-00299 1 FUSE BLOCK 2 A-TT4-00300 2 BUS BAR 3 A-RTT-00282 1 DRIVE CONTACTOR 4 A-RTT-00283 1 CONTACTOR BRACKET 5 A-RTT-00370* 1 TRACTION DRIVE 6 A-RTT-00411* 1 VEHICLE MASTER CONTROLLER 7 A-RTT12-00408 1 LIGHT RELAY SOCKET 8 A-RTT12-00409 1 LIGHT RELAY 9 A-RTT12-00417 1 DRIVE FUSE, 400A 10 RT00-82-001-KA** 1 PRE-CHARGE RESISTOR 11 A-TT3-0010 3 AGC 25 AMP FUSE *Vehicle serial number and hours must be provided when ordering these components. **Prior to 2014 production the Pre-Charge Resistor part number was A-RTT12-00429. RTT18B REV 15 8-July-2015 40 ELECTRICAL COMPONENT ASSEMBLY 1 Item Part Number Qty Description 1 A-RTT-00414 1 DC-DC CONVERTER 20 AMP REV 15 8-July-2015 RTT18B 41 INSTRUMENT PANEL ASSEMBLY 3 2 RTT18B 1 4 REV 15 8-July-2015 42 SEAT CUSHIONS A A Item 7 installed view shown from rear of seat. Item Part Number Qty. Description 1 A-RTT12-0048-L 1 UPPER SEAT FRAME 2 A-RTT12-0047-A 1 BACK SEAT CUSHION 3 A-RTT12-0047-B 1 BOTTOM SEAT CUSHION 4 A-RTT12-0047-C 1 SEAT CUSHION, RH WING 5 A-RTT12-0047-D 1 SEAT CUSHION, LH WING 6 A-RTT12-0048-M 1 SEAT PIVOT SHAFT 7 A-RTT12-0048-B 1 TORSION SPRING 8 A-RTT12-00483 2 EXTERNAL RETAINING RING 9 A-RTT12-00481 6 PHS, 1/4-20 X .75 10 A-RTT12-00486 6 PHS, 1/4-20 X 1.25 N/A A-RTT12-0047 N/A SEAT CUSHION SET (4 PIECES, INCLUDES SEAT BOTTOM) REV 15 8-July-2015 RTT18B 43 SEAT MOUNT TO FRAME B A A A Items 8 and 9 must be installed after the seat guides are installed. B Use Loctite® Krytox® RFE lubricant or equivalent. Item Part Number Qty. Description 1 A-RTT12-0048-K 1 MID-SECTION SLIDE 2 A-RTT12-0048-H 1 LH SEAT GUIDE W/BOSS 3 A-RTT12-0048-J 1 RH SEAT GUIDE 4 A-RTT12-0048-A 1 T-HANDLE 5 NPN 4 HCS, 3/8-16 UNC X 1 6 NPN 8 FLAT WASHER, 3/8 7 A-RTT12-00482 2 SQUARE TUBE PLUG 8 NPN 2 HCS, 1/4-20 UNC X .75 9 NPN 2 LOCK NUT, 1/4-20 UNC RTT18B REV 15 8-July-2015 44 BELL CRANK AND RELEASE LEVER A A A Use Permatex® Anti-Seize Lubricant or equivalent at interface between items 4 and 3. Item Part Number Qty. Description 1 A-RTT12-0048-G 1 SEAT MOUNTING FRAME 2 A-RTT12-0048-F 1 RELEASE LEVER 3 A-RTT12-0048-E 2 GUIDE BLOCK 4 A-RTT12-0048-D 2 DETENT SHAFT 5 A-RTT12-0048-D2 2 DETENT SHAFT SPRING 6 A-RTT12-0048-C 1 BELL CRANK 7 NPN 4 BHCS, 1/4-20 UNC X .75 8 NPN 2 SET SCREW, 1/4-20 REV 15 8-July-2015 RTT18B 45 SEAT ASSEMBLY TO SEAT FRAME A A Use Loctite® Krytox® RFE lubricant or equivalent. Item 1 RTT18B Part Number A-RTT12-00480 Qty. 1 Description SEAT ADJUSTMENT SPRING REV 15 8-July-2015 46 SEAT INSTALLATION TO REAR BUMPER A A Item 7 can be added to correct slide function if required. Item Part Number Qty. Description 1 AE-OPT-0036-18A 1 REAR HITCH ADAPTER 2 NPN 4 LOCK NUT, SERRATED FLANGE, 1/2-13 UNC 3 NPN 4 HCS, 1/2-13 UNC X 1.75 4 NPN 8 FLAT WASHER, 1/2 5 NPN 2 HCS, 1/2-13 UNC X 2 6 NPN 2 LOCK NUT, 1/2-13 UNC 7 NPN 2 FLAT WASHER, 1/2 REV 15 8-July-2015 RTT18B 47 TOW BAR RAMP, FRONT AND REAR E HITCH ASSEMBLIES 3 2 4 1 5 6 Item 1 Part Number AE-OPT-0036-21 Qty 1 Description TOWBAR RAMP COMPLETE ASSEMBLY 2 AE-OPT-0036-21A 1 1/2-13 X 6 GR 8 HCS BOLT 3 AE-OPT-0036C 1 1/2 FLAT WASHER 4 AE-OPT-0036D 1 1/2-13 LOCK NUT 5 OPT-RT18-002-A 1 FRONT E-HITCH W/REMOTE HANDLE COMPELTE ASSY 6 AE-OPT-0036-18D 1 REAR E-HITCH W/REMOTE HANDLE COMPLETE ASSY RTT18B REV 15 8-July-2015 48 REV 15 8-July-2015 RTT18B 49 RTT18B REV 15 8-July-2015 50 CHASSIS COMPONENTS 9 2 8 4 REV 15 8-July-2015 1 5 3 RTT18B 51 SWITCH MAT 2 1 6 RTT18B REV 15 8-July-2015 52 WIRING DIAGRAM REV 15 8-July-2015 RTT18B 53 WIRING DIAGRAM KEY D B+ HORN B+ B+ 12V 48V LIGHTS KEY+ RTT18B REV 15 8-July-2015 B+ 48V B- 54 R EVISION LOG Rev Date Description Appr. 6 24-Oct-2013 Revised Beacon Pole Wiring PRB 7 15-Nov-2013 Removed Warranty Statement, Updated electrical component assembly for RT00-82-001-KA pre-charge resistor SEB 8 17-Dec-2013 Removed PM schedule from this document and established it as an appendix. SEB 9 06-Aug-2014 Corrected part numbers of front caster parts. SEB 10 29-Aug-2014 Added part numbers for front wheel bearing and seal. SEB 11 17-Oct-2014 Updated front hitch option and front hitch arm part number. PRB 12 21-Oct-2014 Updated front wheel, tire, and hub part numbers. PRB 13 26-Nov-2014 Added front wheel/tire assembled part number PRB 14 18-June-2015 Replaced seat assembly diagrams. Replaced axle service parts diagrams. DCM 15 8-July-2015 Corrected VMC part number. Added mico master cylinder assembly information. DCM REV 15 8-July-2015 RTT18B Appendix A1- RTT 2050 Compliant Preventive Maintenance Table of Contents Appendix A1 - RTT 2050 Compliant Preventive Maintenance Rev D, 25-Sep-2015 Description Page Servicing Procedures A1-2 Maintenance Schedule A1-4 Revision Log A1-5 A1-1 Appendix A1 - RTT 2050 Compliant Preventive Maintenance Servicing Procedures Periodic Maintenance RTT-12E Electric Tractor – 2000 Key-on Hour* PM Schedule 1.Disconnect battery. 2.Unbolt battery covers and steering column cover as well as the battery cable. 3.Inspect battery and battery compartment for corrosion, clean and recoat as necessary. 4.Remove both front side inspection plates and properly pressure lubricate both U-Joint bearing as well as the steering shaft flange bearing lubrication points with lithium grease. 5.Remove center console cover (access to motor, power electronics and hydraulic brake system). 6.Disconnect and remove RFI computer (if installed). 7.Safely jack tractor up and insert (3) safety stands spaced with (2) under frame (below battery). 8.Remove the (5) wheel hub bolts on each wheel and remove tire & wheel. 9.Remove the left fender assembly (as viewed from the drivers forward position). 10.Verify Steering column clamp u-bolts are torqued at 10 ft. lbs. 11.Verify that steering shaft split collar screws are torqued to 14 ft. lbs. 12.Verify the steering gear box bolts are torqued at 45 ft. lbs. 13.Remove the front steered wheel assembly. Measure the diameter of the (single) black solid rubber front tire(s). If worn 1/4” (10.5” diameter down to 10.25” diameter), replace. 14.Remove front steered axle and visually inspect both tapered wheel bearings; replace hub and bearings if bearing races are scored or bearings show signs of wear (rough spinning, etc). Properly repack old or new bearings with Mobile SHC 32 grease or equal. Re-assemble. 15.Remove two 1/2-20 UNC x 10 bolts securing the rear axle rubber suspension springs. 16.Block up axle torque arms; unbolt RH & LH pillow block bearings and remove cross shaft. Visually inspect plastic flange bearings in torque arms and replace if worn in appearance. Re-assemble the shaft and pillow blocks to the torque arms and chassis, in reverse order of disassembly and torque pillow block bolts to 105 ft. lbs. Reinstall rubber suspension bolts. 17.Remove RH & LH hub and brake drum assembly. Inspect parking brake cables for broken cable strands and replace as required. Inspect wheel cylinders for seepage, brake shoes for excess wear and axle seal for seepage. Replace as indicated. 18.Re-install front side inspection plates, steering column cover and operator facing steering cover plate. 19.Visually inspect hydraulic brake master cylinder and brake line connections for leaking (to verify seepage you may need to use a flashlight). Tighten or replace as indicated. Fill brake fluid reservoir to between the Min/Max lines with Dot 3 (brake fluid) and bleed if necessary. 20.Check parking brake application and release, verify acceptable (20 pounds max to apply and release). Adjust lever knob and lock, as necessary. A1-2 Rev D, 25-Sep-2015 Appendix A1- RTT 2050 Compliant Preventive Maintenance Servicing Procedures Periodic Maintenance—Cont. RTT-12E Electric Tractor – 2000 Key-on Hour* PM Schedule 21.Visually check the power controller wiring harness for deterioration due to routing or connection. Repair or replace as indicated. 22.Re-install center console cover. 23.Re-connect battery cable. 24.Visually inspect that the battery green watering light is blinking and that the single point watering hose connections are tight. Continue inspection of battery leads (including 18 ga. Red and black wires) and terminal connectors (including ORC thermistor) for solid connection, arcing or corrosion. Repair or replace as indicated. 25.Visually inspect battery discharge display (BDI) & hour meter for operation. Replace if required. 26.Jack tractor up, remove the (3) safety stands and safely lower to floor. 27.Drain the axle completely of fluid using the axle drain plug. Clean any particles from the magnetic drain plug and replace. 28.Remove the RH and LH axle shafts. Replace outboard axle bearings (2) and oil seals (4). Re-install the axle shafts to the axle housing. Re-install the RH and LH hub and brake assemblies removed earlier. 29.Fill the axle with 27oz/.8L of API GL-5 85W-140 gear oil or equivalent. NOTE: the axle must be filled slowly to allow time for the oil to disperse. Once axle has been filled with oil, reinstall fill plug, lower the front of the truck and remove the tire chocks. 30.Clean accelerator module of any dirt and debris, paying special attention to the groove on top of the actuator arm. Check accelerator operation to verify operation within specification (accelerate when depressed, re-gen braking when released). Notify manufacturer local service rep if deviation is experienced. 31.Physically verify floor mat safety switch by stepping on accelerator with foot on pad. Tractor should move. If inoperative, diagnose wiring or mat replacement as indicated. 32.Clean horn switch brushes and slip rings. Apply dielectric grease and reassemble. Verify horn and turn operation key to on; the following observations should be—headlight-on, taillight-on and with directional control switch in F or R, parking brake-on vehicle won’t move, parking brake-off normal operation. Check brake light operation by stepping on safety switch pad with directional control in F or R and step slightly on accelerator. Brake light dims to taillight when movement occurs. Repair or replace as necessary. 33.Check seat track for proper lubrication. Spray horizontal and vertical seat track with dry lubricant as needed. Note: 33 point PM inspection/adjustment/lubrication time allocation — 8.5 man hours plus additional time for any repair or replacement. * The 2000 hour interval should be performed every 2000 key-on hours or yearly, whichever comes first. Rev D, 25-Sep-2015 A1-3 Appendix A1 - RTT 2050 Compliant Preventive Maintenance Maintenance Schedule (hours listed are key-on hours) Inspect front steered wheel assembly including suspension springs X Inspect front wheel bearing and re-pack with grease X Inspect and grease steering shaft U-joints X Inspect plastic thrust bearing for wear and apply grease X Inspect front steered wheel axial load flange bearing for wear and apply grease X Oil front steered wheel suspension pivot with light oil applied through the lube hole X Inspect steering gear box X Inspect steering U-joint set screws, clamp screws, and shaft collars X Inspect steering column including tilt mechanism X Verify steering wheel horn button functional X Inspect battery cable plug - SBC350 X Inspect throttle assembly and clean of all debris including groove on actuator arm X Inspect accelerator pedal wear pad and replace if wear is excessive X Inspect suspension pillow blocks and verify smooth operation and apply grease X Inspect suspension flange bearings and replace if necessary X Inspect rear axle rubber springs X Inspect rear drive tires and replace if wear is excessive X Inspect parking brake cable assembly for damage or wear X Verify safety switch mat functional X Verify parking brake handle has smooth operation and adjust tension if necessary X Verify parking brake switch functioning X Verify direction rocker switch functioning X Verify speed rocker switch functioning X Verify on-off key switch functioning X Verify beacon functioning X Verify headlight functioning X Verify LED taillight functioning X Inspect master cylinder for leakage and boot wear X Verify brake pressure switch functioning X Verify brake relay functional X Inspect RH and LH brake shoes and replace if excessively worn X Inspect RH and LH brake wheel cylinders for leakage X Inspect seat cushions and replace if excessively worn X Inspect "E" hitch pin & spring. Replace hitch pin if excessively worn X Replace LH drive axle bearing and two oil seals. Bearing substitutions not acceptable. Bearing retainer collar must be installed with minimum 1 ton press. Apply grease between axle seals. X Replace RH drive axle bearing and two oil seals. Bearing substitutions not acceptable. Bearing retainer collar must be installed with minimum 1 ton press. Apply grease between axle seals. Drain and replace rear axle gear oil. Remove all particles from rear axle oil drain plug. Every 8000 hours Every 2000 hours* Every 1000 hours Every 500 hours Preventive Maintenance Item X X X Replace AC motor bearing Inspect fuses on fuse blocks for blown or loose X Inspect fuse on AC drive for loose X Inspect all high voltage cables for crimp integrity and tight hardware X Inspect precharge resistor for good connection to contactor X Clean and grease horn brush contacts and slip rings, re-test horn X Inspect brake pedal shaft set screws X * The 2000 hour interval should be performed every 2000 key-on hours or yearly, whichever comes first. A1-4 Rev D, 25-Sep-2015 Appendix A1- RTT 2050 Compliant Preventive Maintenance Revision Log Rev Date A 17-Dec-2013 PM schedule removed from RTT manuals and established as appendix. SEB B 13-Aug-2014 Added oiling of front wheel suspension to PM schedule. PRB C 20-Apr-2015 Changed axle oil viscosity and volume. SEB D 25-Sep-2015 Revised axle bearing replacement interval. PRB Rev D, 25-Sep-2015 Description Appr. A1-5 Appendix A1 - RTT 2050 Compliant Preventive Maintenance This page intentionally left blank. A1-6 Rev D, 25-Sep-2015