1
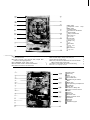
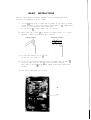
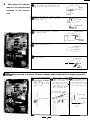
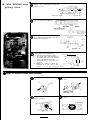
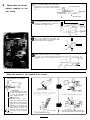
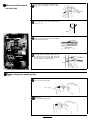
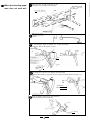
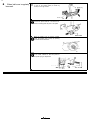
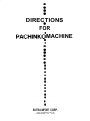
DIRECTIONS
FOR
PACHlNKd0 MACHINE
SUTRA IMPORT CORP.
3530 LAWSON BLVD.,
OCEANSIDE, N.Y. 11572.
Metal Frame
“Played-Out” I ndicator
Metal Frame
Lamp
Protection Band
Decoration for Ball Sheath
Jackpot Holder
Jack pot Holder Plate
Decoration A
Ball Holder
Inside Frame
Guage Rubber
Jackpot Tray
Lock
Name Plate
Plunger Cover
Handle
Decoration B
Finger Rest
--
Contents --When played-out indicator lamp is on, despite balls reserved
.... 1
in the reserved tank.
When balls reserved in the tank fall down, despite balls
.... 1
remained in the supply apparatus.
2
...............................
When “RENCHAN” keeps getting clown.
3
When the handle creaks or sounds uncomfortable. . . . . . . . . . . . . . . . . . . . .
3
When balls are not filled in the ball sheath. . . . . . . . . . . . . . . . . . . . . . . . . . . . . . . .
..........................
When shot balls stop at the top of the ball pick . . . . . . . . . . . . . . . . . . . . . . . . . . .
How to switch the pestle spring. . . . . . . . . . . . . . . . . . . . . . . . . . . . . . . . . . . . . . . . . . . . . . . .
When more prize balls than fixed flow out of the ball sheath.
(When the bluke does not bite well) . . . . . . . . . . . . . . . . . . . . . . . . . . . . . . . . . . . .
...............
The position of the handle rod for the best shooting
When shooting apparatus does not work well.
When balls are irregularly bounced.
..........................................
4
5
5
6
6
7
@ Outside Frame
@ Sophia Key
@Chuck
@ Reserve Ball Pipe
@ Reserve Ball Curve
@Scheduled Play-out Switch,
0 Shaft
(s> Middle Tank
@ Fluke preventing incompleteness
@I Lie Detector
@I Shutter Rod
@Tail Shoot of Safety Ball
@ Counter Connection Cornice
@Counter
@I Terminal
@ Upper Tank
8 Ball Collect Case
@ Damper Protection Cover
@
(80
@
@
Ball Sheath
Protection
Bell Pipe
Ball-Removing Pipe
BASIC
INSTRUCTIONS
There are many models of Pachinko Machines, but the under-mentioned basic
instructions
(1
are
applicable
) Put into @
of
balls
to
all
the
models.
Upper Tank as many balls as possible. By the action of weight
contained
in
Upper
Tank,
Shutter
placed
inside
of
@
Plunger
Cover
is lifted up so that ball may enter Plunger Room.
Put the balls in 8 Jackpot Holder. Now you can play.
(2) Always take care to keep @
horizontal
Lie Detector in vertical position. If it is kept in
position, the prize balls don’t come out.
vertical position
(3) To open Front Window, lift up
horizontal position
@ Lever.
To shut, just push window in.
(4) To take out all the balls contained Upper and Middle Tanks, lift down @
Lever, and balls come out from 0 Counter Connection Cornice.
Don’t forget to lift up @ Lever to the original position after having taken
out bal Is.
(5) Keep always balls clean and not rusty.
-A
-B
l
When played out indicator
lamps is on, despite balls
0
When both A parts are connected with each
other by sparkling, keep 2-3mm between those
(as shown), after connection point is filed off
connection
point
>
rust.
reserved in the reserve
tank.
(Leadifg
When
G
gets
apart,
put
G
back
to
rod)
original
position (as shown by arrow), with other
machines refered to.
(shutter
rod)
When G touches H, prevent G (scheduled
play-out lever) from touching H ( reserve tank )
for smoothly working.
When
obstacles
other
than
balls
get
into
H
(reserve tank), take them out.
Clean dirts off to have G
operate
smoothly.
r\
P
( schedu IeGd play
out lever)
-When balls reserved in the tank fall down, despite balls remained in the supply apparatus
0
the screw,
shaft, tighten
keeping the shaft in proper
length
so balls as
to be
supplied properly.
When
loosel y
screwed
balance weight (E) causes
change in the position of E
or E falls down, moove E
and tighten E after putting
s u p p l y a p p a r a t u s (D) f o r
reserve balls in the position
that it can properly work.
supply apparatus
IQ
When lever’s (H) touch of a
part of the middle tank (F)
causes unproper work to H,
make sure that the mooving
part of the lever (H) must
not ouch the middle tank (F)
balance
D for reserve balls iE weight
-
G
H
lever
transfer pipe
l
When “RENCHAN” keeps
0
getting down.
When the crank touches bounced ball adjuster,
bend the crank in the direction of arrow (as
seen from top
shown) or vice versa.
/&ggg/-~@$?@-/
/
P
‘i=
crank
=+F
i
-7when
being
touched
\
bend this part
bounced ball adjuster
When the ball sheath touches the base,
0 bend in the direction for adjustment.
ball sheath
bracket
I
when being touched
ease
When the RENCHAN cannot afford to lift up
0
lie detector
the lie detector while the damper gets down,
bend the rod for adjustment.
$
rod
RENCHAN
lift
When the ball sheath and the crank are delayed
in getting back to the original positions,
( 1 )
( 2 )
( 3 )
(4)
Clean dirt, if any, off balls by water
Give about 0.5mm play by bending up
the bracket when there is no play on 6
and C in the direction of the axle
Chanqe the parts for new if there is no
play on D
Compare the number of weight and
thickness of E with that of other
If it is less, increase the weight.
machines.
0 When the handle sounds uncomfortable.
0
Loosen the plus screw (A).
Tighten the screw (B) for fitting
the holder.
the holder
0
Tighten the donble nuts.
(refer to 3 on page 7)
Change the ball bearing for new
or calk it.
ng
(double nuts)
2
l
When balls are incom-
1)
When bails get stuck at bail-acusstoming part,
give 1mm space between the center of ballA
acusstoming part and the coupling pipe by
adjusting D, or take out dirt in the coupling
pipe.
pletely supplied in the
ball-accustoming
ball sheath.
B connection pipe
Adjustment of incompleteness preventer. When
0
0
middle tank
the incompleness preventer does not stop the
movement of RENCHAN while no balls are in
the middle tank. Adjust as shown.
Y---1
Adjustment of supplying apparatus.
When
balls are not supplied to the middle tank,
loosen E and shorten L for adjustment. When
balls fall down too much, lengthen L.
L
I&
E
/
J
When balls do not well flow out into the ball
sheath, twist the bracket of D for adjusting
the shaft to the proper position when the
connection pipe is not leveled with the ball
sheath.
)pJaft
A
B
coupling
pipe
C
<
connection balls sheath
pipe
When the shutter is not required to be closed.
When the shutter is not required to
be closed.
(leading
/I
plate)
:ch)
In case that no balls are left in
the uoper tank, when the shutter
is not to be closed with the
I
switch remained closed. _
- (shutter rod)
Nail B for conuenience
sake
Lift up the leading plate of the
switch. When no balls are left
in the upper tank, the scheduled
finished-lever in the upper tank
8
\,
0,
nail
makes both of the shutter rod
and the flange rod let down to
lead A to close the switch, but
the shutter won’t be lowered
down.
ifted
3
up, firstly,
Secondly, set a plier between the pestle
and the handle holder to lower the handle
0 When more prize balls
than fixed flow out of the
When the crank touches the ball adjuster at D,
with the crank being moved up and down in the
position that C (fluke) is off as shown, bend
the crank at the fulcrum to remove touching.
sheath.
A crank
B
ball adjuster
(when fluke does not bite
well).
.
Too little interval between the fluke and the
pin of the crank causes bad biting to the fluke.
Bend the pin upward for the proper interval
of 3mm to 4mm.
When the point of the sheath is touched.
when the point of the crank is pushed upward
to the maximum, there must be 1-2mm interval,
which dan be made by bending upward the
right part of the fulcrum of the crank.
When the ball pipe touches the crank at the
back due to the pipe positioned in the unproper way, reset the ball pipe upward by 2-3mm.
crank
remove touching
-The position of thehandle
position of the handle rod
for the best shooting.
When the handle remains at
the original position before
being pressed down,
for adjust-ment of (x),
move the ball transfer (B)
left or right for resetting. for
adjustment of (y), bend the
handle rod.
When the handle is pressed
0 down, change the handle rod
for proper length.
With the ball transfer pressed
lightly to the left by finger,
and the handle rod moved
back and forth, make lmm
interval for adjustment
ween the handle rod
the ball transfer B.
6
betand
0 When shot balls stop at
the ball pick.
When the top of the ball (B) touches the pipe,
put the top of it downward so it won’t touch
0
the pipe.
point
When both ends of the ball pick touches the
pipe, adjust them to go up and down without
touching the pipe.
When
the ball
sheath touches the plywood
surface, adjust the fulcrum of the ball sheath
0
not to touch the plywood.
E ball sheath
accustoming
ball
When the connection between F and B does not
work well, with balls stopped, swing the head
of nail (H) to the right first. Next, clean dirt
off the axles (B, A) for the light movement
of the ball pick (B) and the fluke (A).
F
pipe
-How to change the pestle spring.
0
How to remove it.
Turn it off to the left by plier.
pestle spring
How to set it.
0 Turn it on to the right by plier
5
G
control nail
When the lever is dirty, clean balls in the
passage to have the number of shooting fixed.
0 When the shooting apparatus does not work well.
when lifted up, ball
rolling
apparatus
comes off.
ball rolling apparatus
0
0
When balls get stuck,
change the ball rolling
apparatus.
balls cannot be shot without the handle to be flipped down
When
to the maximum, adjust the handle rod.
Loosen the wooden
screw (A) to have the ball trausfer (C) down.
level
-
pestle
-
/w
ball transfer B
Adjust
When a shot ball comes ahead of the pestle without the handle to be pressed down.
the handle rod in case that it is bent too much (as shown).
When the ball transfer (C) gets down too much, loosen the wooden screw A for lifting C up.
wood screw A
ball transfer C
IQ
When the handle comes off the ball transfer B
bend the pestle upward by hammering.
for
bending
l
When balls are irregularly
bounced.
0
When the handle is too tight or heavy, hammer
C parts of the handle holder (as shown by
arrows) for the light handle.
spring
handle ho
When the pestle spring comes out too much,
hammer the pestle holder B in the direction of
0
arrow for drawing back the point of the pestle.
When the double nuts are loosely screwed,
screw the double nuts D firmly by pushing
0
the handle to the handle rest.
When the pestle spring does not hit balls right
in the center, hammer or bend the pestle or
the pestle spring for adjustment.
e
pestle
MEMO
,
7
1
PRI NTED IN JAPAN