1
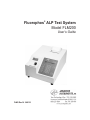
Fluorophos® ALP Test System
Model FLM200
User’s Guide
FLM5 Rev16 060110
Fluorophos® ALP Test System User’s Guide
Copyright
This user’s guide is copyrighted by Advanced Instruments, Inc. with all
rights reserved. Under copyright laws, this guide may not be reproduced
in any form, in whole or part, without the prior written consent of
Advanced Instruments.
© 2009 by Advanced Instruments, Inc., Norwood, MA 02062.
Advanced Instruments has reviewed this guide thoroughly. All material
contained within is believed reliable, but the accuracy and completeness
are not guaranteed or warranted, and are not intended to be representations or warranties concerning the product described.
Windows® is a registered trademark of Microsoft Corporation in the
United States and other countries. All other trademarks are the property
of Advanced Instruments.
Hot-Line® Service
If you have any questions regarding the proper operation of your instrument or would like to order replacement parts, please contact our HotLine® Service department by calling one of the following numbers:
800-225-4034 (toll-free within the USA and Canada; after
normal business hours, dial extension 2191)
+US 781-320-9000 (elsewhere)
781-320-0811 (fax)
ii
Table of Contents
Safe Use
vii
Reagents, Calibrators & Controls
xiii
Chapter 1 — Installation & Setup
1
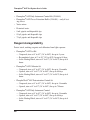
Supplies, Parts & Accessories
Foreword: Principles of Fluorescence
Step 1
Step 2
Step 3
Step 4
Step 5
Step 6
Step 7
Step 8
—
—
—
—
—
—
—
—
Find a location for the instrument
Unpack the instrument
Obtain additional items
Set up heating block
Check excitation filter
Power-up and run diagnostic test
Load printer paper
Set date and time
Chapter 2 — Instrument Operation
Hazardous material cautions
Function of major components
Function and components of the heating block
Using the 25-µL or 75-µL pipette
Using the 25-mL pipette
Instrument start-up
Calibration
Preparing reagents
Test procedure
Changing operating settings
xi
xv
1
2
5
5
6
6
7
8
11
11
11
13
14
15
15
16
17
17
17
iii
Fluorophos® ALP Test System User’s Guide
Chapter 3 — Fluorophos® ALP Milk
Pasteurization Assay
21
Chapter 4 — Instrument Maintenance
37
Chapter 5 — Troubleshooting & Service
43
Overview
Alkaline Phosphatase (ALP) background information
The Fluorophos® ALP reaction
Materials required
Reagent storage/stability
Reagent handling
Calibration
How to determine the need for different calibration curves
Reconstituting reagents
Daily instrument checks
Sample preparation
Determining the need for the high-turbidity test procedure
Calibrating and testing high-turbidity samples
Test procedure
Interpretation of results
Daily controls
Cleanup of spills
Reagent storage
Air filter replacement
Optical filter replacement
Optical filter care
Pipette maintenance
Fuse replacement
Lamp replacement
Service & maintenance cautions
Obtaining service
Troubleshooting checks
Internal diagnostics
Photomultiplier tube voltage adjustment
iv
21
21
24
25
26
27
27
30
30
31
32
33
34
34
35
37
37
39
39
39
40
40
40
41
43
45
46
46
47
Appendixes
Appendix A
Appendix B
Appendix C
Appendix D
Appendix E
Appendix F
Appendix G
Appendix H
Appendix I
Index
—
—
—
—
—
—
—
—
—
Additional Technical Information
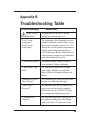
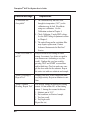
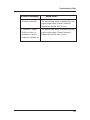
Troubleshooting Table
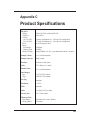
Product Specifications
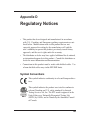
Regulatory Notices
Warranty & Warranty Duties
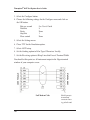
Supplemental RS-232 Information
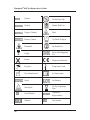
Symbol Definitions
Product Disposal and Recycling
Service Log
51
59
63
65
69
73
75
79
81
83
v
Fluorophos® ALP Test System User’s Guide
Notes:
vi
Safe Use
To reduce the risk of bodily injury, electric shock, fire, and
damage to your instrument, please read and observe the precautions in this User’s Guide.
• If the product is used in a manner not in accordance with the
equipment design, operating instructions or manufacturer's
recommendations, the operation of the product may be
impaired to the extent that a safety hazard is created.
• Do not attempt to perform electrical work if you are not
fully qualified. This manual is not a substitute for electrical
training.
Symbol Conventions
The exclamation point within an equilateral triangle is
intended to alert the user to the presence of important
operating and maintenance (servicing) instructions in the
literature accompanying this product.
The lightning flash with arrowhead symbol within an
equilateral triangle is intended to alert the user to the
presence of uninsulated dangerous voltage within the
product's enclosure that may be of sufficient magnitude to
constitute risk of electric shock to persons.
The static symbol within an equilateral triangle is intended to alert the user to the presence of internal components
that could be damaged by static electricity.
This static symbol is intended to alert the user to the presence of a specific component that could be damaged by
static electricity.
vii
Fluorophos® ALP Test System User’s Guide
This symbol indicates the presence of alternating current (AC).
This symbol indicates the presence of a fuse.
This symbol indicates the presence of protective earth ground.
This symbol indicates the power is ON.
This symbol indicates the power is OFF.
NOTE Additional symbol definitions are available in Appendix F.
General Cautions
• This product should be operated only with the type of power source
indicated on the product’s electrical ratings label. Refer to the
installation instructions included with the product.
• If the power cord provided is replaced for any reason or if an alternate cord is used, the cord must be approved for use in the local
country. The power cord must be approved for the product’s listed
operating voltage and be rated at least 20% greater than the ampere
ratings marked on the product’s electrical ratings label. The cord
end that connects to the product must have an IEC 60320 connector.
• Plug the product into an approved grounded electrical outlet.
• Do not disable the power cord’s grounding pin.
• If an extension cord or power strip is used, make sure that the cord
or strip is rated for the product, and that the total ampere ratings of
all products plugged into the extension cord or strip do not exceed
80% of the cord’s or strip’s rating limit.
viii
Safe Use
• Route power cords so that they will not be walked on, tripped on, or
pinched by items placed upon or against them. Pay particular attention to the plug, electrical outlet, and the point where the cord exits
the product.
• Do not pull on cords and cables. When unplugging cords or cables,
grasp the corresponding connector.
• Do not install or use this product in any area subject to extreme
short-term temperature variations, or locations that exceed the specified operating environment temperatures.
• Never use this product in a wet area.
• To avoid injury or fire hazard, do not operate this product in an
explosive atmosphere.
• Do not install or use the product on an unstable, non-level work surface.
• Do not operate this product with the covers removed or unsecured.
FCC Requirements
• WARNING: Changes or modifications to this unit not expressly
approved by Advanced Instruments could void the user’s authority to
operate the equipment.
• This equipment has been tested and found to comply with the limits
for a Class B digital device, pursuant to Part 15 of the FCC Rules.
These limits are designed to provide reasonable protection against
harmful interference in a residential installation. This equipment
generates, uses, and can radiate radio frequency energy and, if not
installed and used in accordance with the instructions, may cause
harmful interference to radio communications. However, there is no
guarantee that interference will not occur in a particular installation.
If this equipment does cause harmful interference to radio or television reception, which can be determined by turning the equipment
ix
Fluorophos® ALP Test System User’s Guide
off and on, the user is encouraged to try to correct the interference
by one or more of the following measures:
- Reorient or relocate the receiving antenna.
- Increase the separation between the equipment and receiver.
- Connect the equipment into an outlet on a circuit different from
that to which the receiver is connected.
- Consult the dealer or an experienced radio TV technician for
help.
x
Supplies, Parts &
Accessories
To order parts and accessories, contact your local Advanced
Instruments Distributor or the Advanced Instruments Customer
Service Department by using one of the following numbers.
• 800-225-4034 (toll-free in the USA and Canada)
• +US 781-320-9000 (elsewhere)
• 781-320-3669 (fax)
PART DESCRIPTION
PART NO.
Fluorophos Cuvettes (250)
FLA020
Pipette Tips 25-75 µL (100)
®
Printer Paper (5 rolls)
25-µL Pipette
75-µL Pipette
Plunger Wire for 75-µL Pipette
Cuvette Holder Cleaners (50 cleaners)
Heating Block Thermometer
20-Sample Heating Block
Service Manual
User’s Guide
Dual Excitation Filter (ACP, ALP) Assembly
Replacement Air Filter (box of 6)
FLA880
FLA835
FLA865
FLA885
FLA887
FLA840
FLA810
FLA802
FLM5SM
FLM5
FL2333
3D2340
xi
Fluorophos® ALP Test System User’s Guide
PART DESCRIPTION
PART NO.
Pipette Tips 2-mL (25)
ACM205
2 mL Pipette
xii
FLA888
Reagents, Calibrators &
Controls
To order calibrators and standards, contact your local Advanced
Instruments Distributor or the Advanced Instruments Customer
Service Department by using one of the following numbers.
• 800-225-4034 (U.S. territories and Canada)
• +US 781-320-9000 (international)
• 781-320-3669 (fax)
ALP Pasteurization Assay
PART DESCRIPTION
PART NO.
ALP Test Kit
FLA124
Cheese Extraction Buffer
225-Test ALP Reagent/Cuvettes Kit
ALP Calibrator Set
ALP PhosphaCheck® Control
ALP Daily Instrument Control
FLA005
FLA225
FLA250
FLA260
FLA280
xiii
Fluorophos® ALP Test System User’s Guide
Notes:
xiv
Foreword
Principles of Fluorescence
The technology of fluorescence has been used in analytical
assays for over 75 years. Molecules can be excited to higher
energy levels by the absorption of electromagnetic radiation
such as visible light. The excited molecular state is short-lived,
and certain molecules will emit light in the process of returning
to the lower energy level. The emitted light is usually lower in
energy than the excitation light. The emission of this lowerenergy light is called fluorescence. Light that is lower in energy is longer in wavelength. For example, light with a wavelength of 560 nm has less energy than light with a wavelength
of 439 nm.
Many fluorometric assays take advantage of the ability to measure the conversion of non-fluorescent molecules to highly fluorescent molecules, such as enzymatic assays. Inorganic
moleules can be measured with fluorescence by combining
them with other non-fluorescent molecules that will fluoresce
when attached to the inorganic ion.
One of the major advantages of fluorescence assays is the
improved sensitivity. Fluorescence assays can typically measure as little as 10-10 g/mL of analyte, compared to colorimetric
assays which measure 10-7 g/mL.
xv
Fluorophos® ALP Test System User’s Guide
Fluorometric Assays
The FLM200 Fluorometer is designed to perform two fluorometric
assays, the Alkaline Phosphotase (ALP) assay and the Acid Phosphotase
(ACP) assay. The Fluorophos® ALP Assay is a rapid test for verifying
proper pasteurization of dairy products by measuring the Alkaline
Phosphotase (ALP) activity. This User’s Guide provides information
specific to performing the Fluorophos® ALP assay.
The ThermaZyme® ACP assay and Fluorophos® ACP Juice
Pasteurization assay utilize materials, reagents, substrate buffers, and
Fluorometer setup that are different from the Fluorophos® ALP assay.
Information specific to these tests is not included in this User’s Guide.
To obtain more information about ThermaZyme® ACP assay or
Fluorophos® ACP Juice Pasteurization assay, please contact Advanced
Instruments, Inc.
xvi
1 Installation & Setup
In order to set up your instrument properly, it is important that
you read and follow the steps in this chapter. Please follow these
steps carefully and be sure to read Chapter 2 — Instrument
Operation before attempting to run tests on your instrument.
Step 1: Find a location for the instrument
When choosing a location for the fluorometer, be sure to meet
the following criteria.
• Adequate space. The dimensions of the instrument are
16.5 × 12.5 × 7 inches (42 × 32 × 18 cm). Be sure to keep
your workplace free of debris, especially near the left side of
the instrument where proper ventilation is needed. Your
instrument’s cuvette heating block also requires a small
amount of space (6.5 × 8.5 × 3.5 inches, 16.5 × 21.5 × 9.0
cm) Note that the heating block will perform optimally if
placed in a draft-free location.
• AC voltage selector. Your FLM200 is equipped with a voltage selector located on the rear of the instrument within the
fuse holder. The setting should match the table, below. If not,
seek qualified assistance to make the required change. A
change may require fuse replacement (see Chapter 4, Fuse
replacement).
Measured VAC
100-110
110-120
200-235
235-240
Position
100V
120V
230V
240V
1
Fluorophos® ALP Test System User’s Guide
• Electric outlet availability. Your instrument and cuvette heating block will need to operate within five feet of a properly
grounded, three-pronged electrical outlet capable of continuously supplying 1 ampere at 200-240V to 1.25 amperes at
100-120V. If the instrument and heating block are not grounded properly, their operation may be impaired and a safety hazard may exist. Therefore, be sure to test the outlet and record
the results before operating your instrument. For proper instrument operation, you should also choose an outlet that is not
subject to excessive electric interference or surges.
NOTE: If your laboratory has electrical fluctuations, we recommend using a line conditioner with your instrument.
Step 2: Unpack the instrument
To unpack the fluorometer, take the following steps.
a. Carefully unpack the fluorometer, accessories and supplies and
inspect them for shipping damage. Use the enclosed packing list to
verify that all items have been received.
b. Save the instrument’s shipping boxes and packaging material in case
future transport of the instrument becomes necessary.
c. If any item on the packing list appears to be missing from your shipment, please search carefully through and under all packing materials. If the item is not found, notify your receiving department immediately. Advanced Instruments can only be responsible for items
reported missing within 10 days of a shipment’s arrival.
d. If you receive any damaged items, save the cartons and packing
material those items came in for inspection by the insurer. The carrier, dealer, and Advanced Instruments must be notified within 24
hours in order for your warranty and insurance to apply. Have the
transportation company inspect items, fill out a “Report of
Concealed Damage,” and file your claim. Then, notify Advanced
Instruments immediately for repair or replacement.
2
Installation & Setup
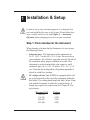
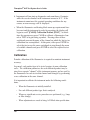
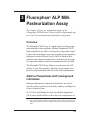
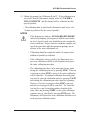
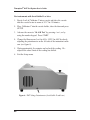
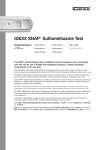
Figure 1-A: Model FLM200 Fluorophos® Test System and Supplies
Quantity
1
1
1
1
2 rolls
1
1
1 pack
1
1
1
Part No.
FLM200
FL0408
FL0425
FL2999
FLA020
FLA802
FLA810
FLM5-6
Description
The Fluorophos® Test System
Power Cord (as specified)
Paper Roll Holder
Printer Maintenance Kit with Instructions
Printer Paper (re-order package of 5 rolls as FLA835)
Black Body Calibration Tool
Fluorophos® Cuvettes
Cuvette Holder Cleaners (re-order pkg of 50 as
FLA840)
Heating Block (optional)
Heating Block Thermometer (optional)
Warranty Card
Table 1-A: Model FLM200 Packing List
3
Fluorophos® ALP Test System User’s Guide
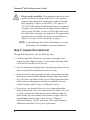
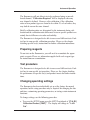
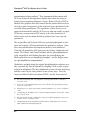
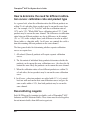
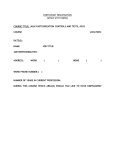
Figure 1-B: FLMA02 ALP Starter Test Kit
Quantity
1
1
1
1
1
1
1
1 pack
1 pack
1
Part No.
FLA865
FLA885
FLA888
FLA224
FLA250
FLA260
FLA280
ACM205
FLA880
FLM5
Description
25-µL Sample Pipette
75-µL Sample Pipette
2000-µL Sample Pipette
Fluorophos ALP 225-Test Reagent Set
Fluorophos ALP Calibrator Set
Fluorophos ALP Pasteurization Controls
Fluorophos ALP Daily Instrument Control
2-ml Pipette Tips (25)
25 - 75-µL Pipette Tips (100)
Fluorophos ALP Test System User’s Guide
Table 1-B: FLMA02 ALP Starter Test Kit Packing List
4
Installation & Setup
e. Fill out the postage-paid warranty card enclosed. Mark the appropriate boxes if you wish to receive additional information. You may
mail the card (postage required outside of the United States), or fax
it to 781-320-8181.
Step 3: Obtain additional items
Items needed, but not supplied by the manufacturer, include:
• A vortex mixer.
• Soft, lint-free wiping tissues.
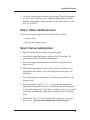
Step 4: Set up heating block
a. Plug the heating block cord into a grounded outlet.
b. Switch the heating block power switch to the ON position. The
power light on the front panel will illuminate.
c. Insert the heating block thermometer into the heating block thermometer well.
d. Allow the heating block to warm up for at least 30 minutes to set
temperature and stabilize. The ready light on the front panel will
illuminate.
e. Use the heating block thermometer to check the temperature of the
heating block.
f. If the temperature is not 38 ± 1°C, use the provided temperature
adjustment tool and the setscrew accessible through the front panel
to adjust the temperature. To do this, you will need to use very small
increments and allow the temperature to stabilize after each adjustment.
g. When stable at 38 ± 1°C, the heating block is properly set up and
ready to use. Turn off the heating block when not in use.
5
Fluorophos® ALP Test System User’s Guide
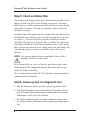
Step 5: Check excitation filter
Your instrument is shipped with a dual excitation filter assembly, which
houses two filters for ALP and ACP testing, respectively. Determine
which test(s) you will be running and check your filter to ensure that the
correct filter is in place. If testing dairy products, make sure that the
ALP filter is in place.
Facing the front of the instrument, the excitation filter assembly is located behind the cuvette holder, and is accessible through the cuvette door
(see Figure 3). The two ends of the dual filter assembly are marked
ACP and ALP, respectively. When the filter is installed, the visible end
of the filter will indicate which filter is currently in place. If the current
filter is not the one you need to use, simply remove the filter holder, flip
it around and replace it in such a way that the correct filter name is
showing.
NOTE: Use extreme caution whenever you handle a filter or filter
assembly. The filters scratch easily.
To clean your filter, use a piece of lint-free, non-abrasive tissue and a
small amount of 70% isopropanol solution. Be sure the filter is completely dry before re-installing.
This excitation filter assembly (FL2333) should be replaced annually to
maintain optimal performance.
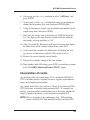
Step 6: Power-up and run diagnostic test
a. Plug the fluorometer power cord into a properly grounded outlet.
b. Switch the fluorometer power switch into the ON position. The display will report software and hardware identification and assistance
information, as well as the date and time.
c. The display will then begin a 15-minute countdown, during which
the cuvette chamber will stabilize at the required operating temperature.
6
Installation & Setup
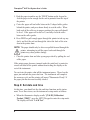
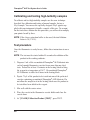
Figure 2: Loading Printer Paper
d. When the countdown ends, the instrument will run some brief diagnostic tests to ensure the instrument is functioning properly.
e. After the diagnostic tests are successfully completed, the fluorometer
will display "[CALIB] Calibration/Product [TEST]," and will be
ready for use.
Step 7: Load printer paper
A roll of printer paper and a paper roll holder are supplied with the
instrument. These must be installed in the printer as follows:
a. Unroll 6-8 inches (15-20 cm) of paper from the paper roll.
b. Fold both corners of the end of the paper to form a triangular point,
approximately 2-3 inches or 5-8 cm long. Crease the paper folds so
that the doubled part will not be much thicker than two thicknesses
of paper.
c. Insert the roller into the paper roll.
d. Open the printer door on the top right side of the instrument case.
e. Holding the roller in place with one hand, use the other hand to feed
the triangular pointed end of the paper from the bottom of the roll
into the opening between the back of the printer frame and the printer circuit board.
7
Fluorophos® ALP Test System User’s Guide
f. Push the paper in and/or use the "FEED" button on the keypad to
feed the paper in far enough for the end to protrude from the top of
the printer.
g. Center the paper roll and roller between the V-shaped roller guides
behind the printer, and press down firmly to seat the roller. When
both ends of the roller are in proper position, the paper roll should
be level. If the paper roll is not level, carefully reseat the roller
between the roller guides.
h. Press FEED or pull enough paper through the printer to take up any
slack, and feed the end out through the slot at the back of the window in the printer door.
NOTE: The paper should only be driven or pulled forward through the
printer; attempting to pull the paper backward through the
printer may cause printer damage.
i. Close the printer door and take up any paper slack by pulling the end
of the paper.
If the printer paper becomes jammed under the print head, a protective
circuit will shut off the printer without deactivating the display or the
rest of the instrument.
To reactivate the printer, shut off the instrument power. Then clear the
paper jam and turn the power back on. The instrument will complete
the warm-up cycle and the printer will report "Fluorometer Ready" if
the paper jam has been successfully cleared.
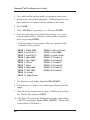
Step 8: Set date and time
At this time, you should set the date and time functions on the instrument. To set these items, use the instrument’s setup mode as follows:
a. When the fluorometer display scrolls “[CALIB] Calibration/
Product [TEST]", press the SETUP keypad to enter the setup mode.
The display will read "1:A/D Test".
8
Installation & Setup
b. Use the < or > keypad to cycle through setup menu options until you
see "2: Set Date/Time".
c. At "Set Date/Time", press START to display the current date and time.
d. Press CLEAR to clear the entire setting and display the present format ("mm/dd/yy" or "dd/mm/yy"), and use the < keypad to toggle
to the date format you require.
e. Use the > keypad to toggle to "24hr" format, "am", or "pm", as
required.
f. Enter the current date and time (including zeros) via the numeric
keypad, one digit at a time from left to right. For example,
September 9, 1999 would be entered 090999. Entering a two-digit
year will not affect instrument operation. Your instrument will automatically default to the correct four-digit date, and all printouts and
readouts will use the correct four-digit year.
g. Press ENTER to store the new setting (or STOP to restore the original setting). If an invalid setting is attempted, the instrument will
reject the setting and beep when ENTER is pressed.
9
Fluorophos® ALP Test System User’s Guide
Notes:
10
2 Instrument Operation
This chapter contains information on operating the fluorometer.
We have provided additional information for the Fluorophos®
ALP Milk Pasteurization Assay later in this user’s guide. You
should read both this chapter and the test chapter before running any tests on the fluorometer.
Hazardous material cautions
• WARNING: The specimens used in this product may be
hazardous to your health and to the health of others. Follow
national and local recognized safety standards and/or protocols for handling and disposing of such specimens.
• If a hazardous material is spilled on or inside the equipment,
the user is responsible for taking the appropriate decontamination steps, as outlined by the user’s national safety council
or equivalent agency for hazardous materials, and those
policies and procedures established within the user’s place
of business.
• To avoid injury or fire hazard, do not operate this product in
an explosive atmosphere.
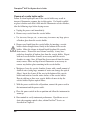
Function of major components
Operation of the instrument will be quicker and easier if you
become familiar with the locations and functions of the components, systems and controls described below before proceeding
further.
11
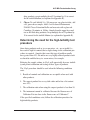
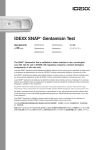
Fluorophos® ALP Test System User’s Guide
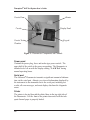
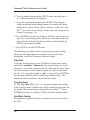
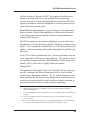
Cuvette Door
Cuvette
Printer
Display Panel
Cuvette Testing
Chamber
Keypad
Figure 3: Fluorometer Components and Controls
Power panel
Contains the power plug, fuses and rocker-type power switch. The
upper half of the switch is the power on position. The fluorometer is
intended to be left on with the display reading "2: A/D Test" during
normal operating hours.
Serial port
The Advanced® Fluorometer transmits a significant amount of information via the serial port. Almost every item of information displayed by
the instrument is also transmitted over the serial port, including test
results, all error messages, and most display data from the diagnostic
menu.
Printer
The printer is located beneath the slotted door in the top right side of
the fluorometer. Lift the front of the printer door and check that adequate thermal paper is properly loaded.
12
Instrument Operation
Display panel
The microprocessor communicates with the instrument operator by
means of alphanumeric messages printed on paper tape and displayed
on the illuminated display panel located at the top of the keypad.
Keypad
The keypad contains spill-proof pressure pads for operator input to the
instrument.
Cuvette door
The cuvette door, located to the left of the keypad, protects the cuvette
testing chamber.
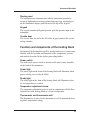
Function and components of the heating block
Operation of the heating block will be quicker and easier if you become
familiar with the locations and functions of the components, systems
and controls described below before proceeding further.
Power switch
The rocker-style power switch is located on the power entry assembly
on the back of the instrument.
Power light
The power light on the front of the heating block will illuminate when
power is being received by the block.
Ready light
The ready light on the front of the heating block will illuminate when
the set temperature is reached.
Temperature adjustment screw
The temperature adjustment screw is used in conjunction with the thermometer to set the heating block to a desired temperature.
Thermometer and thermometer well
The thermometer is placed in the thermometer well to monitor the heating block temperature setting.
13
Fluorophos® ALP Test System User’s Guide
µL or 75-µ
µL
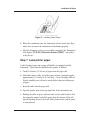
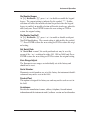
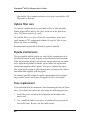
Using the 25-µ
pipette
The Advanced® positive displacement
pipettes are factory-set for precise fixedvolume delivery and shipped ready for
use. Calibration adjustment keys and
detailed instructions are provided with
each pipette. Operate the pipette as follows:
a. Depress the plunger fully.
b. Immerse the pipette tip about 1/4
inch or 6-7 mm into the liquid to be
pipetted.
Figure 4: Fluorometer Pipette
c. Release the plunger smoothly and
gently.
d. Remove the pipette tip from the liquid and wipe the outside (do not
wick out any fluid from the inside).
e. Immerse the pipette tip about 1/4 inch or 6-7 mm into the liquid in
the fluorometer cuvette and depress the pipette plunger fully several
times.
f. Depress the pipette plunger fully once more and, while depressed,
remove the pipette from the cuvette.
To eliminate sample-to-sample contamination between pipetting sessions,
remove and replace the disposable pipette tip after each sample.
Occasionally, the pipette plunger tip and wire assembly may require
replacement. Calibration and component replacement instructions are
supplied with each pipette.
14
Instrument Operation
Using the 2-mL pipette
The 2-mL pipette is a fixed-volume pipette, and is ready for use. It is
used for dispensing the ALP Test Reagent, the ALP Calibrators, and the
ALP Daily Instrument Control. Operate the pipette as follows:
a. Place a clean tip firmly onto the pipette, making sure that there is a
tight seal.
b. Depress the plunger completely before placing the clean tip into the
reagent to be dispensed.
c. Immerse the tip approximately 1/8” down into the reagent to be dispensed.
d. Allow the plunger to return to the release position. This must be
done slowly.
e. Remove the tip from the sample solution.
f. To dispense the collected reagent, hold the point of the tip against
the wall of the cuvette and depress the plunger slowly to the stop
position.
g. After the contents of the tip have been dispensed, move the tip away
from the wall of the cuvette before allowing the pipette plunger to
come to its release position.
h. Dispose of the used pipette tip. Never reuse the same pipette tip,
especially between different reagents.
Instrument start-up
To start up the test system, take the following steps:
a. Power up the fluorometer and heating block. Both are designed to
operate at 38°C and must be turned on and allowed to warm to operating temperature before use. Allow the heating block to warm for
30 minutes.
15
Fluorophos® ALP Test System User’s Guide
b. Instrument will run start-up diagnostics and count down 15 minutes
while the cuvette chamber in the instrument warms to 38°C. If the
instrument cannot meet the required operating conditions for any
reason, an error message will be displayed.
c. When the fluorometer and heating block warm-up requirements have
been met and the instrument is ready for operation, the display will
begin to scroll "[CALIB] Calibration/Product [TEST]", at which
time the operator may press CALIB to calibrate a fluorometer channel or TEST to begin testing a product. Pressing either of these
switchpads presents the name of the channel on which the last test or
calibration was accomplished. At this point, either press ENTER to
select that test or use the arrow switchpads to step through the menu
of available channels and press ENTER to select the required test or
calibration.
Calibration
Periodic calibration of the fluorometer is required to maintain instrument
accuracy.
In general, each product type to be tested requires its own calibration
curve. The calibration parameters for each calibrated product may be
stored in a separate "channel" of the instrument memory and are used by
the fluorometer for each test in that channel until changed by performing
a new calibration in the same channel.
It is important to calibrate the instrument under the following conditions:
• When the fluorometer is initially installed.
• For each different product type that is analyzed.
• Whenever significant service procedures are performed (e.g., lamp
or filter change).
• When adjustments are made to bring A-D Mode into specification.
16
Instrument Operation
The fluorometer will not allow tests to be performed using an un-calibrated channel; "Calibration Required" will be displayed when any
new channel is defined. However, after calibration, if the calibration
ratios of two product types are found to be within 5% of each other, they
may both be run on the same channel.
Briefly, calibration ratios are determined by the instrument during calibration and the calibration-ratio differences between specific products are
mainly due to differences in color and turbidity.
The fluorometer is designed to be able to run several different tests. Each
test has its own specific calibration procedure. Please see the chapter
detailing specific test(s) instructions for further calibration instructions.
Preparing reagents
To run tests on the fluorometer, you will need to reconstitute the appropriate reagents. Please see information supplied with each reagent type
for instructions on reconstitution.
Test procedure
The fluorometer is designed to be able to run several different tests. Each
test has its own specific test procedure. Please see the chapter detailing
the performance of specific test(s) and product inserts for further instructions.
Changing operating settings
The fluorometer has been individually set up at the factory for normal
operation, but the setup procedure may be required for changing the date
and time, customizing operating parameters, or testing certain instrument
functions.
To change settings, use the following procedure.
a. To access the SETUP menu, press the SETUP switchpad at "[CALIB]
Calibration/Product [TEST]". The display will change to "1:A/D
Test".
17
Fluorophos® ALP Test System User’s Guide
b. To select another function on the SETUP menu, repeatedly press >
or < until the desired item is displayed.
c. To activate a displayed function, press START. If the function
enables modifying an operating parameter, the display will change
to indicate the current setting, either as a numeric value or the symbol "*" next to the current setting. In most cases, the setting may be
changed by pressing < or >.
d. Press ENTER to save the new setting or STOP to cancel the new setting. The current setting will be printed for verification and the display will revert to the title of the item selected, indicating that the
SETUP menu is again available.
e. Press STOP to exit the SETUP menu.
The following menu choices allow you to change operating settings.
Please note that other options are available, but are used in troubleshooting, and will be discussed in the next chapter.
Date/Time
At the date and time display, press CLEAR to clear the entire setting
and display "mm/dd/yy hh:mm am" (the required format) or repeatedly press < to clear the setting one digit at a time from the right. Enter
the desired numbers via the numeric keypad, one digit at a time from
the left. Use > to toggle to "am" or "pm", as required. Press ENTER to
store the new setting (or STOP to restore the original setting). The
instrument will beep and reject any invalid date or time.
Print Avg F/min
At "[Y]< avg f/min *[N]", press < or > to print or suppress the printing
of the average increase in fluorescence which is displayed just before the
test results. The current setting is indicated by the symbol, "*". Press
ENTER to store the new setting or STOP to restore the original setting.
Sub Blank Testing
This option is designed for factory use and may not be used or reset in
the field.
18
Instrument Operation
Dis/Enable Beeper
At "[<] Dis/Enable [*]", press < or > to disable or enable the keypad
beeper. The current setting is indicated by the symbol, "*". Neither
selection will affect the invalid-selection beeper but when the keypad
beeper is enabled, an invalid selection will invoke two beeps, when disabled, only one. Press ENTER to store the new setting or STOP to
restore the original setting.
Dis/Enable Xon/Xoff
At "[<] Dis/Enable [*]", press < or > to enable or disable serial-port
Xon/Xoff handshaking. The current setting is indicated by the symbol,
"*". Press ENTER to store the new setting or STOP to restore the original setting.
Set Serial Rate
At "Serial Rate = xxxx", the serial-port baud rate may be reset by
means of the < or > switchpad to either 300, 1200 or 9600 baud. Press
ENTER to store the new setting or STOP to restore the original setting.
Zero Range Adjust
The fluorometer zero ranges are individually set at the factory and
should not be reset.
Serial Number
Fluorometer serial numbers are set at the factory for instrument identification and may not be reset in the field.
Product/Test
This option is designed for factory use and may not be used or reset in
the field.
Assistance
Provides the manufacturer's name, address, telephone, fax and internet
information and the instrument model, software version and serial number.
19
Fluorophos® ALP Test System User’s Guide
Notes:
20
3 Fluorophos® ALP Milk
Pasteurization Assay
This chapter will give you information specific to the
Fluorophos® ALP milk assay. Please read this chapter and chapters 1 and 2 on instrument operation before running tests.
Overview
The Fluorophos® ALP Assay is a rapid test for verifying proper
pasteurization of dairy products. Alkaline Phosphatase (ALP),
found naturally in raw milk, is destroyed at temperatures slightly above the temperatures necessary to destroy micro-organisms
pathogenic to man. Reduced levels of ALP in finished dairy
products ensure that the products have been heated to the proper temperature and have not been contaminated with raw milk.
The Fluorophos® ALP Assay allows you to measure the ALP
activity in your dairy products, allowing you to monitor completeness of pasteurization and detect raw milk contamination.
Alkaline Phosphatase (ALP) background
information
Numerous fluorometric analytical methods have been developed for analytes of interest to the dairy industry, and Shipe has
reviewed some of them1.
In 1935, Kay and Graham developed an alkaline phosphatase
(ALP) assay which could be used to detect the completeness of
(1)
Shipe, W.F. Fluorometric Methods: Applications and Limitations in Challenges to
Contemporary Dairy Analytical Techniques. Royal Society of Chemistry, London,
1984.
21
Fluorophos® ALP Test System User’s Guide
pasteurization in dairy products2. They demonstrated that natural milk
ALP was destroyed at temperatures slightly above those necessary to
destroy micro-organisms pathogenic to man. Reduced levels of ALP in
finished dairy products therefore ensured that the product had been heated to the required temperature or that it had not been contaminated with
raw milk during manufacture. The significance of this discovery was
appreciated immediately and the ALP test was soon universally accepted.
To this day, measurement of ALP activity is the only chemistry test
which can be used to confirm that dairy products have been correctly
pasteurized.
The original Kay and Graham ALP assay used phenylphosphate as substrate and required a 24-hour incubation for quantitative analysis. Since
then, many modifications and improvements have been introduced.
Currently, all quantitative ALP assays use one of three colorimetric substrates. The Scharer3 and Cornell4 methods still use phenylphosphate as
in the original Kay and Graham procedure; the Aschaffenburg and
Mullen procedure uses p-nitrophenyl phosphate5; and the Rutgers assay
uses phenolphthalein monophosphate6.
Quantitative methods using the original phenylphosphate substrate measure enzymatically liberated phenol by coupling it with a color reagent
to form an indophenol. The blue indophenol is removed from interfering
turbidity caused by the dairy product in one of two ways. First, the
American Public Health Association (APHA)7 and the Association of
(2)
(3)
(4)
(5)
(6)
(7)
22
Kay, H.D. and Graham, W.R., The phosphatase test for pasteurized milk. J. Dairy Res.
6:191-203 (1935).
Scharer, H., A rapid phosphomonoesterase test for control of dairy pasteurization. J. Dairy
Science 21:21-34 (1938).
Kosikowski, F.V., A simple universal dairy products phosphatase test. Science 110:480-481
(1949).
Aschaffenburg, R. and Mullen, J.E.C., A rapid and simple phosphatase test for milk. J. Dairy
Res. 16:58-67 (1949).
Kleyn, D.H. and Lin, S.H.C., Collaborative study of new alkaline phosphatase assay system
for milk. J.O.A.C. 51:802-807 (1968).
Standard Methods for the Examination of Dairy Products, 16th Edition, 1992. American
Public Health Association, Washington, DC.
ALP Milk Pasteurization Assay
Official Analytical Chemists (AOAC)8 have approved methods using
butanol extraction followed by spectrophotometric measurement.
Second, both AOAC and the International Dairy Federation (IDF) have
approved methods in which the indophenol is read after protein precipitation with barium and zinc salts8, 9.
Phenolphthalein monophosphate is used as substrate in the quantitative
Rutgers method. Liberated phenolphthalein is dialyzed into deionized
water during a three-hour incubation followed by spectrophotometric
reading of the dialysate8.
The IDF has approved a p-nitrophenyl phosphate assay in which the pnitrophenol is read after protein precipitation following a two-hour incubation 10. These quantitative methods have served the dairy industry well
and have aided in monitoring milk quality throughout the world for over
fifty years.
In late 1988, Advanced Instruments, Inc., presented preliminary data on
a new approach to ALP testing in dairy products11. The method is based
on a specially designed substrate called Fluorophos® which when acted
upon by ALP, is converted to a highly fluorescent product,
Fluoroyellow®.
The quantitative Fluorophos® assay is the first milk ALP test which permits the continuous and direct measurement of the released reaction
product from a fluorogenic substrate. The use of this fluorometric substrate eliminates the interferences and nonspecificity encountered in colorimetric assays and avoids the need for dialysis, butanol extraction, or
protein precipitation which are tedious and time consuming.
(8)
(9)
Official Methods of Analysis, 16th Edition, 1996. Association of Official Analytical
Chemists, Arlington, VA.
Detection of Phosphatase Activity, IDF Standard 63:1971. International Dairy Federation, Brussels,
Belgium.
(10) Detection of Phosphatase Activity, IDF Standard 82A:1987. International Dairy Federation,
Brussels, Belgium.
(11) Rocco, R.M. and Bargoot, F.G., An improved assay for alkaline phosphatase in fluid milk products.
Presented at the 102nd AOAC Annual Meeting, Palm Beach, FL, August 29, 1988.
23
Fluorophos® ALP Test System User’s Guide
The Fluorophos® method has been collaboratively studied12 and received
IMS/FDA, AOAC, SMEDP and IDF approval13 and ISO approval14.
The Fluorophos® method was correlated to Salmonella and Listeria inactivation by Eckner in 199215. The application of the Fluorophos® method
to the determination of both high and very low levels of ALP activity in
milk, cream and cheese was reported by Lechner and Regensburger in
199316, and the fluorometric method for cheese was approved by ISO in
200317. Introduction of this new approach to ALP testing will provide a
rapid, modern, and cost effective improvement in quality assurance testing in the dairy industry.
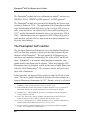
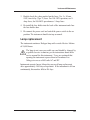
The Fluorophos® ALP reaction
The Advanced Instruments fluorometric assay for Alkaline Phosphatase
(ALP) in fluid dairy products is based on a specially designed enzyme
substrate called Fluorophos®. The high sensitivity of fluorometry permits direct and continuous monitoring of the action of ALP on the substrate. Fluorophos® is an aromatic ortho-phosphoric monoester compound which is non-fluorescent in solution. When acted upon by ALP,
Fluorophos® loses its phosphate radical and becomes a highly fluorescent
molecule called Fluoroyellow®. The reaction is kinetic and can be measured with a fluorometer.
In this procedure, an aliquot of dairy product is added to 2.0 mL of substrate. The rate of product formation is monitored for three minutes in a
compact fluorometer thermostated at 38°C. Enzyme activity is calculated
(12) Rocco, R.M., Fluorometric Determination of Alkaline Phosphatase in Fluid Dairy Products:
Collaborative Study, J. Assoc. Off. Anal. Chem. 73, Nov-Dec. 1990.
(13) Milk and Milk-Based Drinks, Determination of Alkaline Phosphatase Activity, Fluorometric
Method, IDF Standard 155:1992, International Dairy Federation, Brussels, Belgium
(14) ISO/DIS 11816.1 - Milk and Milk Based Drinks - Determination of Alkaline Phosphatase
Activity, Fluorimetric Method
(15) Eckner, K.F., Fluorometric Analysis of Alkaline Phosphatase Inactivation Correlated to
Salmonella and Listeria Inactivation, J. Food Protection 55:960-963 (1992).
(16) Lechner, E., and Regensburger, V., Alkaline Phosphatase Activity in Milk and Milk Products,
Translated from Deutsche Milchwirtschaft 44 (17) 815-819 (1993).
(17) ISO 11816-2/IDF 155-2 Milk and Milk Products - Determination of Alkaline Phosphatase
Activity - Part 2; Fluorometric Method for Cheese.
24
ALP Milk Pasteurization Assay
Figure 5: The Fluorophos® Reaction
in mU/L and displayed automatically at the end of the reading period.
Reaction rates are linear for up to thirty minutes and to 2.0% raw milk18.
The assay is complete in three minutes and utilizes a single stable substrate reagent. Detection limits down to 0.006% raw milk (approximately equivalent to 0.06 µg phenol in the APHA phenylphosphate "rapid"
method) are possible18.
Materials required
Contents of the Fluorophos® ALP Test Kit (FLA225):
• Fluorophos® ALP Substrate (2 bottles)
• Substrate Buffer (2 bottles)
• Glass Fluorometer Cuvettes
Materials required but not included in the Fluorophos® ALP Test Kit:
• Fluorophos® Test System with firmware version 2.0 or higher and
ALP excitation filter assembly in place
• Fluorophos® ALP Test Kit (FLA124) smaller bottle size (120 mL)
• Fluorophos® ALP Calibrator Set (FLA250)
• PhosphaCheck® ALP Pasteurization Control Set (FLA260)
(18) Rocco, R.M., Fluorometric Analysis of Alkaline Phosphatase in Fluid Dairy Products, J. Food
Protection 53:588-591(1990).
25
Fluorophos® ALP Test System User’s Guide
• Fluorophos® ALP Daily Instrument Control Kit (FLA280)
• Fluorophos® ALP Cheese Extraction Buffer (FLA005) -- only if testing cheese
• Vortex mixer
• Deionized water
• 2-mL pipette and disposable tips
• 25-µL pipette and disposable tips
• 75-µL pipette and disposable tips
Reagent storage/stability
Protect stock, working reagents and calibrators from light exposure.
• Fluorophos® ALP Test Kit
— Unopened, store at 2º to 8ºC (36º to 46ºF) for up to 2 years
— Reconstituted, store at 2º to 8ºC (36º to 46ºF) for up to 60 days
— In the Heating Block, store at 2º to 8ºC (36º to 46ºF) for up to 6
hours
• Fluorophos® ALP Calibrator Set
— Unopened, store at 2º to 8ºC (36º to 46ºF) for up to 18 months
— Opened, store at 2º to 8ºC (36º to 46ºF) for up to 60 days
— In the Heating Block, store at 2º to 8ºC (36º to 46ºF) for up to 6
hours
• PhosphaCheck® ALP Pasteurization Control Set
— Unopened, store at 2º to 8ºC (36º to 46ºF) for up to 18 months
— Opened, store at 2º to 8ºC (36º to 46ºF) for up to 72 hours
• Fluorophos® ALP Daily Instrument Control
— Unopened, store at 2º to 8ºC (36º to 46ºF) for up to 18 months
— Opened, store at 2º to 8ºC (36º to 46ºF) for up to 60 days
— In the Heating Block, store at 2º to 8ºC (36º to 46ºF) for up to 6
hours
26
ALP Milk Pasteurization Assay
• Fluorophos® ALP Cheese Extraction Buffer
— Unopened/Opened, store at 2º to 8ºC (36º to 46ºF) for up to 3
years
Reagent handling
The reagents used in the ALP Pasteurization Assay are irritating to skin,
harmful if swallowed, and pose danger of serious damage to health by
prolonged exposure if swallowed. Refer to the individual Material
Safety Data Sheets for complete hazard information.
NOTE: Do not freeze any of the above reagents. Make sure that all
bottles and vials are sealed tightly after use to prevent evaporation. Store all bottles and vials upright to prevent spills and
leakage.
Calibration
The FLA250 Fluorophos ALP Calibrator Set consists of three calibrators labeled A, B, and C. The calibrators are ready to use and designed
to be used directly from the bottle.
Calibrator set preparation
1. Mix gently by inversion prior to each use to assure optimal results.
2. Label two (2) cuvettes for each of the three (3) calibrators.
3. Dispense 2.0 mL of the appropriate calibrator into each clean,
labeled cuvette.
4. Place the cuvette in the 38 ± 1ºC heating block and allow to warm
for fifteen (15) minutes.
Calibrating with a product sample
Samples should be prepared as they are for regular testing.
1. Using a 75-µL pipette, add a 75-µL sample of the prepared product
to each of the pre-warmed calibrator cuvettes.
27
Fluorophos® ALP Test System User’s Guide
2. Cover with parafilm and mix gently by inversion or vortex mixer.
3. Return each cuvette to the heating block. Calibration must be completed within ten (10) minutes after the addition of the sample.
4. Press CALIB.
5. Select “ALP Dairy” by pressing < or >, then press ENTER.
6. Select the product type to be calibrated by pressing < or >, or by
using the numbered keys. When the desired product is displayed,
select it by pressing ENTER.
• If the channel has been previously calibrated, a printout of that
calibration will be provided.
"PROD
"PROD
"PROD
"PROD
"PROD
"PROD
"PROD
"PROD
"PROD
"PROD
"PROD
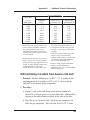
1 Whole Milk"
2 Low Fat 1%"
3 Low Fat 2%"
4 Skim Milk"
5 Choc Milk"
6 Cheese"
7 Butter"
8 Buttermilk"
9 UHT Milk"
10 Cream"
11 Light Cream"
"PROD
"PROD
"PROD
"PROD
"PROD
"PROD
"PROD
"PROD
"PROD
12
13
14
15
16
17
18
19
20
Heavy Cream"
Dry Milk"
Sour Cream"
Product A"
Product B"
Product C"
Product D"
Product E"
Product F"
7. The fluorometer will display “Insert A STD: [START]”.
8. Gently mix one (1) of the cuvettes containing Calibrator A and the
sample.
9. Open the cuvette chamber door and place Calibrator A in the chamber. Shut the door and press START.
10. After thirty (30) seconds, the fluorometer will make a final reading
(~200 FLU) and display “Insert A STD: [START]”. Repeat with a
second sample of Calibrator A.
28
ALP Milk Pasteurization Assay
11. Follow the prompts for Calibrators B and C. If the calibration was
successful, then the fluorometer display will read “CALIBRATION COMPLETE” and the channel will be calibrated for that
specific product.
• The calibration data is stored in the fluorometer until a new calibration is performed for the selected product.
NOTES
• If the fluorometer displays “STANDARDS REVERSED”
instead of prompting you to proceed with the next calibrator level, check to make sure that both cuvettes contain the
correct calibrator. Prepare two new calibrator samples and
repeat the procedure until the instrument prompts you to
advance to the next calibration level.
• Calibration should be completed within 10 minutes from
addition of product to calibrator.
• If the calibration is not accepted by the fluorometer, prepare new calibrators with the selected product and repeat
the entire calibration procedure.
• The calibration procedure can be interrupted at any point
during the calibration process by pressing STOP. If no test
is in progress when STOP is pressed, the entire calibration
will be cancelled. To continue calibration from that point,
you must re-enter the calibration mode by pressing CALIB
and starting the calibration procedure from the beginning.
However, if a test is in progress when STOP is pressed,
only the test in progress will be cancelled. The cancelled
test may be re-run by inserting another standard of the
same value and pressing START, or the entire calibration
sequence may be cancelled by pressing STOP again. The
fluorometer will discard the new calibration data and revert
to the previous calibration status.
29
Fluorophos® ALP Test System User’s Guide
How to determine the need for different calibration curves: calibration ratio and product type
As a general rule, when the calibration ratios for different products are
within 5% of each other, those products may be run on the same channel. For example, if a 2% "Low Fat" milk has a calibration ratio of
127.2 and a 3.2% "Whole Milk" has a calibration ratio of 133.3, both
products may be run on the same channel. The differences in calibration
ratios between different products are due to differences in fat content
(2% vs. 3.2% in the example above) and differences in color or added
flavor (white vs. chocolate milk). In all cases, use controls for verification when running different products on the same channel.
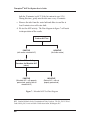
The four general rules for determining whether separate calibration
curves are required are:
1. All colored (flavored) products will require separate calibration
curves.
2. The fat content of individual dairy products determines whether the
products can be run on the same calibration curve: the closer the fat
content the more likely the products can be run on the same channel.
3. When the calibration ratios of two different products are within 5%
of each other, the two products may be run on the same calibration
curve.
4. In all cases: when two products are spiked with 0.1% (v/v) mixedherd raw milk and run on their own calibration curves and give the
same results within ± 10%, then both products may be run on the
same channel.
Reconstituting reagents
Each ALP Reagent Set contains two bottles each of Fluorophos® ALP
Substrate and ALP Substrate Buffer. These items must be used together;
do not intermix bottles from different reagent sets.
30
ALP Milk Pasteurization Assay
1. Allow one bottle of Fluorophos Substrate and one bottle of ALP
Substrate Buffer to come to room temperature.
2. To reconstitute, carefully decant the entire contents of the Substrate
Buffer into the Fluorophos Substrate bottle. Mix by gentle inversion
and allow to sit at room temperature for at least 30 minutes, or until
fully dissolved.
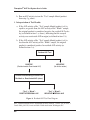
Daily instrument checks
1. Dispense 2.0 mL of the Daily Instrument Control into a clean, labeled
cuvette.
2. Place the cuvette in the 38 ± 1ºC heating block and allow to warm for
fifteen (15) minutes.
3. On the fluorometer, press SETUP. Select menu item A/D TEST by
pressing < or >.
4. With nothing in the cuvette chamber, press START. The display
should read 302 ± 4.
• If the value is outside of the specified range, clean the excitation
and emission filters and repeat the A/D Test.
5. Insert the pre-warmed Daily Instrument Control cuvette into the
cuvette chamber and close the door.
6. Once the display has stabilized, it should read 602 ± 15. Record this
value.
• If the value is outside of the specified range, the value can be corrected to 602 by slowly adjusting the potentiometer screw (R15
resistor) clockwise or counterclockwise, as necessary.
• If the instrument is adjusted to 602 or has experienced excessive
drift, it should be recalibrated with the Calibrator Set (P/N
FLA250).
7. Dispense 2.0 mL of the reconstituted substrate into a clean, labeled
cuvette.
31
Fluorophos® ALP Test System User’s Guide
8.
9.
Place the cuvette in the 38 ± 1ºC heating block and allow to warm
for fifteen (15) minutes.
After 15 minutes, insert the pre-warmed reconstituted substrate
cuvette into the cuvette chamber and close the door.
10. Once the display has stabilized, it should read < 1200. Record this
value.
• If the value is above 1200, do not use this substrate. Reconstitute
a new bottle of substrate and retest. Being open for more than 60
days, light, contamination, or not being refrigerated when not in
use could cause the A/D result to be above 1200. This can be
avoided by keeping the reconstituted substrate at 2-8ºC, protected
from light, and pouring off the amount that is going to be used
into a clean vessel for pipetting.
Sample preparation
The following sample preparation procedures have been used with the
Advanced® ALP Fluorophos® fluorometric method:
1.
2.
3.
4.
32
Whole milk, skim milk, low fat milk, chocolate milk, half and
half, and heavy cream: Mix the sample thoroughly before testing.
Buttermilk, sour cream, and creamed cottage cheese:
Homogenize in a mechanical blender before testing.
Concentrated and dry-milk products: Reconstitute the product
with laboratory grade water as necessary and test according to the
procedure for the original product.
Butter: To each labeled 16 × 100 mm screw cap glass test tube,
add a 0.5 gram butter sample taken from the center of the block.
Add 5.0 mL Advanced Instruments FLA005 Cheese Extraction
Buffer. Warm about 10 minutes in a 38°C water bath to allow the
butter to dissolve in the buffer. Remove the tube and gently mix by
inversion over parafilm (or use a vortex mixer). Test as for fluid
ALP Milk Pasteurization Assay
5.
dairy products except multiply the mU/L printout by 10 to correct
for the tenfold dilution (as explained in Appendix B).
Cheese: To each labeled 16 × 100 mm screw cap glass test tube, add
a 0.5 gram cheese sample. Add 5.0 mL Advanced Instruments
FLA005 Cheese Extraction Buffer and macerate with a glass rod.
Centrifuge 10 minutes at 1000xg. Sample from the upper layer and
test as for fluid dairy products except multiply the mU/L printout by
10 to correct for the tenfold dilution (as explained in Appendix B).
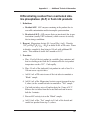
Determining the need for the high-turbidity test
procedure
Some dairy products such as ice cream mixes, etc., are so turbid (i.e.,
have such a high fat content) that a slight change in the calibration procedure is required. Samples that cause this type of problem usually
have greater than 10% fat and/or are very highly-colored products such
as chocolate and blueberry ice cream mixes, for example.
Reducing the sample volume to 25 µL will appreciably decrease turbidity and permit calibration and testing of these types of products.
The 25 µL procedure should be used when the following conditions
exist:
1. Results of controls and calibration are acceptable when used with
other products.
2. The suspect product has a very dark color and/or has a fat content
over 10%.
3. The calibration ratio when using the suspect product is less than 50.
4. The instrument cannot be calibrated because the fluorescence of
Calibrator B is too close to the fluorescence of Calibrator C.
If the specified conditions exist, follow the calibration procedure for
high-turbidity products.
33
Fluorophos® ALP Test System User’s Guide
Calibrating and testing high-turbidity samples
To calibrate and test high-turbidity samples use the same technique
described for calibration and testing of normal samples, but use a
25-µL sample. You can use the specially designed 25-µL pipette supplied with your instrument to handle a sample of this size. To account
for the times three dilution for this procedure, you will need to multiply
your printed result by three.
NOTE If the cheese extraction buffer is also used, the total dilution
factor is 30 (3 X 10).
Test procedure
Once the fluorometer is ready for use, follow these instructions to run a
test.
NOTE The test must be started within 20 seconds after addition of the
product to the working substrate.
1. Dispense 2 mL of the reconstituted Fluorophos® ALP Substrate into
each of enough fluorometer cuvettes for no more than one day's
tests. Preheat for at least 15 minutes in the heating block to bring
the reagent to a temperature of 38°C. Reconstituted Fluorophos®
ALP Substrate is stable for 6 hours in the heating block.
2. Pipette 75 µL of the product to be tested into one of the preheated
cuvettes containing reconstituted Fluorophos® ALP Substrate. Do
not allow the sample to sit in the heating block once the product to
be tested has been added to the reagent.
3. Mix well with the vortex mixer.
4. Place the cuvette in the fluorometer cuvette holder and close the
cuvette door.
5. At "[CALIB] Calibration/Product [TEST]", press TEST.
34
ALP Milk Pasteurization Assay
6. If necessary, use the < or > switchpad to select "ALP Dairy" and
press ENTER.
7. As necessary, use the < or > switchpad to change to an appropriate
channel for the product to be tested and press ENTER again.
8. Using the fluorometer keypad, type an identification number for the
sample being tested and press ENTER.
9. Make sure the cuvette door is shut and press START to begin the
test. The display will count down 60 seconds while the substrate
and sample are being stabilized at 38°C.
10. After 60 seconds the fluorometer will begin to measure and display
the fluorescence of the sample in fluorescence units (FLU).
11. At the end of three minutes, the fluorometer will display the average increase in fluorescence and the ALP activity in mU/L.
12. Remove the cuvette from the cuvette holder.
13. If desired, test another sample in the same manner.
14. When finished with ALP testing, press STOP a second time to return
to the "[CALIB] Calibration/Product [TEST]" display.
Interpretation of results
Any test that yields a test result under 350 is considered ALP NEGATIVE. No further action is required because a negative result indicates
proper and complete pasteurization.
Any sample that yields a test result over 350 mU/L is considered POSITIVE for bovine, reactivated and/or microbial ALP. If a sample tests
positive, you must perform confirmation tests to determine whether the
sample is positive for bovine, reactivated and/or microbial ALP.
NOTE Refer to Appendix A for confirmatory tests: Differentiating
bovine (residual) ALP from microbial and/or reactivated ALP.
35
Fluorophos® ALP Test System User’s Guide
Notes:
36
4 Instrument Maintenance
Daily controls
Use the Advanced Instruments Daily Instrument Control to monitor the day-to-day drift of the fluorometer, and to help determine when the instrument should be re-calibrated. If values fall
outside of the ranges indicated, then a fluorometer drift problem
can be quickly identified and corrected.
To order Daily Instrument Control, contact Advanced
Instruments or an authorized representative.
Cleanup of spills
If a liquid is spilled into the fluorometer or heating block, the
power cord should be unplugged immediately to avoid electrical
accidents. Small spills may generally be cleaned up and wiped
off with the aid of a mild non-abrasive detergent.
Do not immerse either the fluorometer or the electrical parts of
the heating block in water under any circumstance.
Cleanup of heating block spills:
If a liquid is spilled or glass is broken such that it falls into the
heating block wells, immediately unplug the power cord,
remove the thermometer and cuvettes from the heating block
and clean them separately. Use a test-tube brush to clean the
heating block wells. Take care not to scratch the anodized finish.
37
Fluorophos® ALP Test System User’s Guide
Cleanup of cuvette holder spills:
Failure to clean liquid spills out of the cuvette holder may result in
incorrect fluorometer response due to dirty optics. If a liquid is spilled
or glass is broken such that it falls into the fluorometer cuvette chamber,
take the following steps before drying occurs:
a. Unplug the power cord immediately.
b. Remove any cuvette from the cuvette holder.
c. Use tweezers, forceps, etc., as necessary, to remove any large pieces
of broken glass from the cuvette holder.
d. Remove any liquid from the cuvette holder by inserting a cuvette
holder cleaner straight down, firmly to the bottom of the cuvette
holder. Allow the cleaner to absorb liquid for about 20 seconds,
then remove. Discard the used cleaner carefully: it may have
picked up sharp bits of broken glass from the cuvette holder. Repeat
with new cuvette holder cleaners as necessary until the cuvette
chamber is empty. Once all liquid has been removed from the instrument, remove filters and tip or invert fluorometer as necessary to
remove any broken glass remaining in the cuvette holder.
e. Moisten a clean, dry cuvette chamber cleaner with a small amount of
distilled water (using large amounts of water can damage the optical
filters). Insert the cleaner all the way to the bottom of the cuvette
holder and twist to clean the entire surface of the cuvette holder.
Repeat with two or three new cuvette holder cleaners to dry the
cuvette holder. Replace optical filters.
f. With the power switch in the off position, connect the power cord to
the instrument and the power outlet.
g. Place the power switch in the on position and allow the instrument to
warm up.
h. Run controls to verify instrument performance. If problems are evident when running control values, obtain Hot-Line® Service as
described in Chapter 5.
38
Instrument Maintenance
Reagent storage
See information supplied with each reagent for storage instructions.
Air filter replacement
The air filter should be replaced monthly or whenever it
becomes clogged with dust so as to affect instrument performance. To change air filters, simply slide old filter out through
back panel and replace with new filter cartridge.
Optical filter replacement
The fluorometer has been equipped with ALP and ACP excitation filters and a dual filter holder assembly. The assembly may
be used by customers who run ALP tests, ACP tests, or both.
Because filters age and can easily be degraded by spills, scratches, etc.,
the excitation and emission filters should be replaced annually.
To replace filter assembly:
1. Shut off the fluorometer power switch and unplug the power cord
from the power outlet.
2. Carefully remove any cuvette from the cuvette holder. If there is
any evidence of broken glass or spills in the cuvette holder, follow
the cleanup procedure in this chapter.
3. Facing the front of the instrument, the excitation filter holder is
located behind the cuvette holder. Slide the excitation filter holder
straight up and out of the instrument. If the filter holder is too slippery to grip, use a piece of masking tape to improve your grip and
provide a pull tab.
4. Slide in the new filter holder. Note that the ends of the dual filter
assembly are marked ACP and ALP respectively. When the filter is
in place, the label on the end of the filter will indicate which filter is
currently in place. If the current filter is not ALP, simply remove the
39
Fluorophos® ALP Test System User’s Guide
filter holder, flip it around and replace it in such a way that the ALP
filter name is showing.
Optical filter care
Use extreme caution whenever you handle a filter or filter assembly.
Handle optical filters only by the edges and never on the optical surfaces. The filters scratch very easily.
To clean the filter, use a piece of lint-free, non-abrasive tissue and a
small amount of 70% isopropanol solution. Be sure the filter is completely dry before re-installing.
Excitation and emission filters should be replaced annually.
Pipette maintenance
The tips supplied with the pipette are stated by the manufacturer to be
chemically resistant to most reagents except chlorinated hydrocarbons.
If the pipette piston (plunger tip) becomes worn or otherwise un-usable
and a replacement piston is available, please follow the replacement
instructions supplied with the pipette. Always re-calibrate the pipette
after replacing the piston or other internal parts, referring to the calibration instructions supplied with the pipette.
To eliminate possible sample-to-sample contamination between pipetting sessions, remove and replace the pipette tip after each sample.
Fuse replacement
If you determine that the instrument is not functioning because of blown
fuses, you will need to replace the fuses using the following procedure.
1. Switch the power switch to the off position and disconnect the
power cord.
2. Use a small flat-bladed screwdriver or similar tool to pry open the
fuse holder door. Remove the fuse holder inside.
40
Instrument Maintenance
3. Double-check the values marked on the fuses. Use 5 × 20 mm,
250V, time delay (Type T) fuses. For 100-120V operation, use 2Amp fuses; for 200-240V operation use 1-Amp fuses.
4. Re-install the fuse holder into the back of the instrument and close
the fuse holder door.
5. Re-connect the power cord and switch the power switch to the on
position. The instrument should start up as normal.
Lamp replacement
The instrument contains a Halogen lamp with a rated effective lifetime
of 10,000 hours.
The lamp is not a user-accessible area and should be changed by
a qualified service technician, per the instructions found in the
service manual for this instrument. Users are cautioned that
opening this instrument exposes them to Hazardous Live
Voltages in excess of 600 volts AC and DC.
Instruments operated on an 8-hour day may need lamp replacement
after approximately 1200 days of operation. If the instrument is left on
continuously, this number falls to 416 days.
41
Fluorophos® ALP Test System User’s Guide
Notes:
42
5 Troubleshooting & Service
This chapter contains very basic information to help you solve
problems that might arise with your fluorometer. Please read all
instructions very carefully, and if a solution cannot be found in
this guide, contact Advanced Instruments for Hot-Line® Service.
Service & maintenance cautions
• Do not perform any service or maintenance yourself, except
as detailed in the User’s Guide.
• Unplug the power cord prior to opening or removing covers,
or else you may be exposed to electric shock, excessive
temperatures, or mechanical hazards. Voltages in excess of
600 VAC and VDC are present inside this product.
• Performing service or maintenance not detailed in the User’s
Guide, with or without a Service Manual, should only be
done by a qualified service technician.
• Never restrict airflow into or out of the product.
Occasionally, check the air vents for blockage.
• Wipe the exterior of the product with a soft, damp cloth as
needed. Using cleaning products other than those specified,
may discolor or damage the finish.
• If the product requires service for any of the following reasons, unplug the product from the electrical outlet and refer
service to a qualified service technician.
- The power cord, extension cord, power strip, or power
input module is damaged.
43
Fluorophos® ALP Test System User’s Guide
- Liquid has been spilled into the interior of the product.
- A foreign object has fallen into the product.
- The product has been dropped or damaged by a falling object.
- There are noticeable signs of overheating or a burning odor.
- The product does not operate normally when you follow the operating procedures.
- The main supply fuse(s) or any internal fuse(s) continually fail.
• A discharge of static electricity from contact with the human body or
other conductor may damage system boards or static sensitive devices. Never perform internal maintenance without
following recommended static protection procedures.
• The product is equipped with operator accessible fuses. If a fuse
blows, it may be due to a power surge or failure of a component.
Replace the fuse only once. If the fuse blows a second time, it is
probably caused by failure of a component part. If this occurs, refer
service to qualified service personnel. Always replace the fuse with
one of the same rating, voltage, and type. Never replace the fuse
with one of a higher current rating.
• When servicing the product, use only factory-specified parts.
• The product contains an integral lithium battery that is not user-serviceable.
WARNING:
44
When returning this product for service, or shipping this
product to a second location, remove all hazardous specimens and decontaminate the product before packaging
for shipment. If the product cannot be decontaminated,
consult with your shipping agent on appropriate packaging and marking.
Troubleshooting & Service
Obtaining service
Before contacting Advanced Instruments for Hot-Line® Service, be sure
to read through this user's guide for instructions on routine adjustments,
instrument care and troubleshooting. If this information does not solve
the problem, call the appropriate number below.
• 800-225-4034 (toll-free within the USA and Canada; after normal
business hours, dial extension 2191)
• +US 781-320-9000 (elsewhere)
• 781-320-0811 (fax)
When contacting our service personnel, please have the model and serial numbers from the label on the back of the instrument, and the symptoms of the problem ready. You should use a telephone as close to the
instrument as possible to facilitate making recommended diagnostic
checks. If you need to order parts or service, a purchase order from your
purchasing agent will be necessary.
After Hot-Line diagnosis, the service technician may assist you in making minor repairs over the phone, providing you with recommended
parts (or part numbers), or may have you ship the instrument for factory
repair.
If you need to return an instrument for repair or replacement:
• Notify our service department to obtain an RMA.
• Be sure to contact Advanced Instruments before shipping to avoid
any delays.
• Carefully pack and send the instrument, using its own speciallydesigned carton and packaging material. If you did not save the carton and packing materials, please request one from Advanced
Instruments or an authorized representative.
• Be sure to prepay for any shipment to the factory. Advanced
Instruments cannot accept collect shipments without prior approval.
Please insure the shipment or accept the damage risk.
45
Fluorophos® ALP Test System User’s Guide
• Do not tip, store, or ship the fluorometer without first removing any
liquid-containing cuvette from the cuvette chamber. Please use
cuvette chamber cleaners to remove any liquid that may be in the
cuvette chamber.
Troubleshooting checks
Check operational requirements. If you are experiencing difficulties
with the instrument, first carefully review the operational requirements
listed in the product specifications and the recommended setup and
operating procedures.
Check fuses. You will find the power switch and fuse holder beside
the power cord connector on the back panel of the instrument. Switch
the power switch to the off position and disconnect the power cord.
Use a small flat-bladed screwdriver or similar tool to pry open the fuse
holder door. Remove the fuse holder inside and visually check for a
blown fuse. If there is any doubt, test the fuses with a continuity checker or ohmmeter or simply replace them with new fuses.
Check error messages. The software of the instrument is designed in
such a way that any incomplete task will be associated with an error
message, many self-explanatory, that will help you discover the source
of the problem. You can find all error messages and descriptions of
what they mean in Appendix B.
Internal diagnostics
Your instrument has been equipped with a series of diagnostic tests to
allow you to isolate any problem. To access diagnostic checks, use the
following procedure.
a. To access the SETUP menu, press the SETUP switchpad at
"[CALIB] Calibration/Product [TEST]". The display will change
to "1: A/D Test".
46
Troubleshooting & Service
b. To select another test on the SETUP menu, repeatedly press > or <
until the desired item is displayed.
c. To activate a displayed test, press START.
d. Press STOP to exit the SETUP menu.
The following menu choices allow you to change operating settings.
Please note that other options are available, but are settings, and are discussed in Chapter 2, "Instrument Operation".
A/D Test
The A/D test is used to check the accuracy of the A/D conversion channel or to monitor the A/D channel for drift over time or temperature.
Serial Loop Test
This menu item is no longer supported.
Display/Print Test
Display/print test is a simple check of the display and printer. Press
START to run the test. On entry, a series of characters should scroll
across the display (and a single line of the same characters should print
out on the printer). The characters displayed have been chosen to illuminate every dot in the character matrix. This makes it possible to distinguish any dots that no longer work on the printer, as well as the display. Press STOP to end the test.
Keypad Test
The keypad test enables checking each switchpad on the keypad (except
STOP), as well as the lamps of each illuminated switchpad. Press
START to begin the test, then press each individual switchpad to be
tested. As each switchpad is pressed, its name should be displayed and
the lamp of each illuminated switchpad should light. Press STOP to end
the test.
Photomultiplier tube voltage adjustment
The voltage supplied to the photomultiplier tube (PMT) can be adjusted
to compensate for long-term changes in its output.
47
Fluorophos® ALP Test System User’s Guide
For instruments with Serial Suffix D or later:
1. Pipette 2 mL of Calibrator C into a cuvette and place the cuvette
into the cuvette heater to warm at 38º C for 15 minutes.
2. Place Calibrator C into the cuvette holder, close the door and press
SETUP.
3. Advance the menu to “10: A/D Test” by pressing < or >, or by
using the number keypad. Press START.
4. Change the fluorescence level to 602 ± 2 FLU for ALP by slowly
adjusting the potentiometer on the left side of the instrument enclosure (see figure 6).
5. Wait approximately five minutes and recheck the reading. Readjust to the above limits if the reading has shifted.
6. Exit the Setup menu.
Figure 6: PMT Voltage Potentiometer (Serial Suffix D and Later)
48
Troubleshooting & Service
NOTE Prior to calibrating or testing products, check the calibration
ratio of the A, B, and C calibrators (with no milk added) on an
empty channel. The calibration ratio should be 151 ± 7.
If the fluorescence cannot be set to the required value, the PMT
gain will have to be changed. Contact Advanced Instruments for
Hot-line® Service.
For instruments with Serial Suffix prior to D:
Instruments prior to Serial suffix D are not equipped with an
external accessible potentiometer. Adjusting the PMT voltage
requires removal of the enclosure and exposure to potentially
hazardous voltages. Contact Advanced Instruments for Hot-line®
Service.
49
Fluorophos® ALP Test System User’s Guide
Notes:
50
Appendix A
Additional Technical
Information
Calibration equations
"Calibration ratio" refers to a number used by the fluorometer for calculating
unknown test values and is derived as follows:
Calibration Ratio = [(CAL C-A) + 2 (CAL B-A)]/4
Assume 191 is the mean of the Calibrator A fluorescence readings, 317 the
mean of Calibrator B, and 448 the mean of Calibrator C. For these averages:
Calibration Ratio = [(257) + 2 (126)]/4 = 127.2
The fluorometer also uses the calibration ratio for linearity checks during calibration and will only accept calibration readings which are linear and within
specified ranges. The linearity of the calibrators may be manually checked as
follows:
Lin. CAL A (0 µmoles/L FY) = 191-191 = 0
Lin. CAL B (17.24 x 10⁻³ µmoles/L FY) = 317-191 = 126
Lin. CAL C (34.48 x 10⁻³ µmoles/L FY) = 448-191 = 257
In every case, the value of Calibrator C must be twice (± 10%) the value of
Calibrator B. If not, repeat calibration with fresh calibrators or a new lot of
calibrators.
Manual calculations for fluid dairy products
The Advanced® FLM200 Fluorometer printout reports the ALP activity of
the test sample (mU/L) as well as the average fluorescence increase (Avg
F/min). Alternatively, the ALP activity may be calculated, from the print-
51
Fluorophos® ALP Test System User’s Guide
out of the calibrator values and the average increase in fluorescence of the
sample, as follows:
1. Calibration: as the calibration process is accomplished, printouts similar to the following should result:
A STD = 198
A STD = 198
B STD = 345
B STD = 344
C STD = 475
C STD = 475
Avg A STD = 198
Avg B STD = 344
Avg C STD = 475
Calibration Ratio = 142.2
NOTE The values above are examples and for instructional purposes
only - Do not use for the calculation of unknown values.
2. Enzyme units: one unit of ALP is that amount of enzyme which catalyzes the transformation of one micromole of substrate per minute
per liter of sample. Because of the low levels of ALP in pasteurized
fluid dairy products, results are reported in milliunits per liter
(mU/L).
3. Calculation equation:
a. Calculate the µmoles FY/min/0.075 mL sample using the corrected fluorescence reading of the “B” calibrator (Calibration Ratio
used for automatic fluorometer calculations) which contains 3.448
× 10-5 µmoles of FY/2 mL:
Avg F/min/0.075 mL sample (3.448 × 10⁻⁵) = µmoles FY/min/0.075 mL
Avg F of corrected “B” Calibrator
b. Determine the µmoles of FY formed by one liter of sample:
52
Appendix A
— Additional Technical Information
Avg F/min/0.075 mL sample (3.448 × 10⁻⁵) (13333) = U/L
Avg F of corrected "B" Calibrator
c. Convert U/L into mU/L:
Avg Avg F/min/0.075 mL sample (3.448 × 10⁻⁵) (13333) (1000) = mU/L
Avg F of corrected "B" Calibrator
d. Simplified calculation:
Avg F of corrected “B” Calibrator = (Avg B STD - Avg A STD) = (344198) = 146
Avg F/min/0.075 mL sample (459.7) = mU/L
Avg F of corrected "B" Calibrator
Using the example above (1.) and the equations in (3.) above,
the following results were calculated:
Fluorescence of corrected"B" Calibrator = 146 Fluorescence Units
Avg F for Test Sample = 114.5 Fluorescence Units/min
114.5 (459.7) = 360.5 mU/L
146
53
Fluorophos® ALP Test System User’s Guide
Calculation for butter and cheese
The extraction of 0.5 g of butter or cheese into 5.0 mL of extraction
buffer results in a ten-fold dilution and requires the mU/L printout on
the fluorometer tape to be multiplied by 10.
mU/L (10) = mU/kg
Percent raw milk and ALP enzyme activity
U.S. Federal and IDF Standards require that cows milk intended for human
consumption contain less than 1.0 µg phenol/mL/15 min of ALP activity. This
value of 1.0 µg phenol/mL/15 min is equivalent to 500 mU/L of ALP enzyme
activity using the Fluorophos® test method.
It is important to remember that the cut-off values established by all regulatory
agencies are based on residual levels of ALP "activity" not on weighed-in values for the enzyme or on a percent of raw milk remaining in the finished product. Experience over the years has shown, however, that a 0.1% (v/v) dilution
of mixed-herd raw milk will give approximately 1 to 2 µg phenol/mL/15 min
or 500 mU/L of ALP activity.
The reason that the values obtained with a 0.1% (v/v) raw milk dilution are
approximate is that the original enzyme activity of the mixed-herd raw milk
sample will not always contain the same amount of enzyme sample to sample.
The total amount of enzyme in the mixed-herd sample will vary from season to
season, and, possibly, from breed to breed. For example, in order to obtain a
dilution of raw milk at 0.1% (v/v) which contains exactly 1 µg phenol/mL/15
min activity the original mixed-herd milk sample must have contained 1,000
µg phenol/mL/15 min activity. When 1,000 µg phenol/mL/15 min activity is
diluted to 0.1% (v/v) (× 10,000 dilution), the expected value will be 1.0 µg
phenol/mL/15 min activity. A slight variation in biological sampling of a
mixed-herd population could reduce the expected value for a 0.1% (v/v) dilution of this original mixed-herd raw milk to 0.9 µg/mL/15 min.
The table on the next page shows the results in which a sample of mixed-herd
raw milk was added to heat-treated milk from 0.003 to 0.4% and the samples
tested by various methods, including Fluorophos.
54
Appendix A
% Raw Milk
(v/v) in
Whole Milk1
0.003
0.006
0.012
0.025
0.050
0.100
0.200
0.400
100.002
Fluorophos
mU/L
15.6
31.2
62.5
125.0
250.0
500.0
1000.0
2000.0
500,000.0
1. Whole milk (3.2% fat) was heated to 95°C
for two minutes and found to contain less
than 10 mU/L of ALP activity by the
Fluorophos® ALP method. Fresh mixedherd raw milk was then added at the above
v/v concentrations.
2. Extrapolated from dilutions made as in note 1.
3. Above values are based on the assumption
that the mixed-herd raw milk which is used
to make the above dilutions contains exactly 5000,000 mU/L or 1000 µg phenol/mL/15 min ALP activity. This is not
— Additional Technical Information
ALP ACTIVITY3
AOAC 979.13
µg phenol/mL/15 min
0.03
0.06
0.12
0.25
0.50
<1.004
2.00
4.00
1000.00
IDF 82:1987
µg PNP/mL/2 hrs
0.312
0.625
1.25
2.50
5.00
10.005
20.00
40.00
10,000.00
always true in that the total ALP acti-vity
in mixed-herd raw milk before pasteurization will vary due to species and seasonal
variations.
4. Cutoff for acceptable milk is µ1 mg phenol/mL/15 min. Pasteurized Milk
Ordinance (PMO) Grade A, 1985 Revision,
U.S. Department of Health and Human
Services, FDA, Washington, D.C.
5. Cutoff according to Codex Alimentarius
Complete mission, World Health
Organization, July, 1989. Joint FAO/WHO
Standards Programme.
Differentiating microbial from bovine milk ALP
1. Principle: Alkaline Phosphatase (ALP EC 3.1.3.1) synthesized by
microorganisms is heat stable at 145ºF or 63°C, whereas bovine
milk ALP is inactivated at this temperature.
2. Procedure:
a. Pipette 1.0 mL of the milk being tested into the bottom of a
labeled 16 x 150 mm glass screw-cap culture tube, without allowing any of the milk to touch or adhere to the sides of the tube.
b. Place the screw cap on the tube, but do not seal completely (to
allow for gas expansion). Place the tube in a 63± 0.5°C water
55
Fluorophos® ALP Test System User’s Guide
bath for 30 minutes (or 66°C if the fat content is over 10%).
During this time, gently mix the tube once every 10 minutes.
c. Remove the tube from the water bath and allow to cool for at
least 5 minutes in a cold water bath.
d. Re-test for ALP activity. The flow diagram in figure 7 will assist
in interpretation of the results.
Perform ALP Test
POSITIVE
(milk and/or microbial ALP)
NEGATIVE
(No further action)
Perform Differentiating
Procedure for Microbial ALP
(above)
POSITIVE
(Microbial ALP: milk properly
pasteurized - positive due to
microbial ALP)
NEGATIVE
(Bovine ALP: milk not
properly pasteurized)
Figure 7: Microbial ALP Test Flow Diagram
REF: Standard Methods for the Examination of Dairy Products, 17th Ed. (Ed. H. Wehr, J.
Frank) 2004, p349, American Public Health Association, Washington, D.C.
56
Appendix A
— Additional Technical Information
Differentiating residual from reactivated alkaline phosphatase (ALP) in fluid milk products
1. Definitions:
a. Residual ALP: ALP enzyme remaining in the product due to
raw milk contamination and/or incomplete pasteurization.
b. Reactivated ALP: ALP enzyme that was inactivated due to pasteurization (usually UHT treatment), which recovers its activity
due to storage conditions.
2. Reagent: Magnesium Acetate (40.1 mg of Mg++/mL): Dissolve
35.4 g of Mg(C2H3O2)2 . 4H2O in about 50 mL of DI water. Warm
to dissolve completely, then bring to 100 mL with additional DI
water. This solution is stable for 6 months at 2-8°C.
3. Procedure:
a. Place 10 mL of the test product in a suitable glass container and
heat in a boiling water bath for 30 minutes after the test product
temperature reaches 95°C. Cool rapidly.
b. Place 5.0 mL of the (unheated) test product in each of two 16 x
100 mm screw-cap test tubes.
c. Add 0.1 mL of DI water to one of the test tubes to constitute a
“Blank” sample.
d. Add 0.1 mL of the Magnesium Acetate reagent (prepared in step
2, above) to the second test tube to constitute a “Test” sample.
e. Cap both test tubes, mix well and incubate for 1 hour at 34°C.
Remove the test tubes from the heated bath and cool in an ice
bath for 5 minutes.
f. Run an ALP activity test on the “Blank” sample.
g. Add 1.0 mL of the “Test” sample to 5.0 mL of the heated and
cooled test product from step 3.a, above.
57
Fluorophos® ALP Test System User’s Guide
h. Run an ALP activity test on the “Test”-sample diluted product
from step 3.g, above.
4. Interpretation of Test Results:
a. If the ALP activity of the “Test”-sample diluted product (x 6) is
equal to, or greater than, the ALP activity of the “Blank” sample,
the original product is considered negative for residual ALP activity (as defined in item 1.a, above), indicating that the assayed
activity was reactivated ALP in origin (as defined in item 1.b).
b. If the ALP activity of the “Test”-sample diluted product (x 6) is
less than the ALP activity of the “Blank” sample, the original
product is considered positive for residual ALP activity (as
defined in item 1.a).
Perform ALP Test
POSITIVE
(Residual and/or Reactivated ALP)
NEGATIVE
(No further action)
Perform Differentiating Procedure for
Residual vs. Reactivated ALP (above)
“Test” < “Blank”:
POSITIVE RESIDUAL ALP
“Test” > “Blank”:
NEGATIVE RESIDUAL ALP
Figure 8: Residual ALP Test Flow Diagram
REF: Standard Methods for the Examination of Dairy Products, 17th Ed. (Ed. H. Wehr, J.
Frank) 2004, p349-350, American Public Health Association, Washington, D.C.
58
Appendix B
Troubleshooting Table
Problem/Message
"Error: Cuvette
Door Open"
"Low Cuvette
Temperature"
"High Cuvette
Temperature"
"Calibration Required"
"Unacceptable Calib
Ratio"
"Standards Reversed,
Please Repeat"
"Error: Tubes
Reversed?"
"Calibration Not
Complete"
Explanation
Test procedure is cancelled. Close the
cuvette door and restart the test.
The temperature of the fluorometer cuvette
chamber (and/or the contents of the cuvette
in the cuvette chamber) is not at 38 ± 0.2°C.
Wait for the cuvette chamber temperature to
stabilize and the fluorometer display to
read, "Fluorometer Ready". Repeat the test
with reagents pre-warmed as recommended
in the instructions in the test kit.
The product channel chosen has not yet
been calibrated. Perform calibration.
The difference in fluorescence reading
between the calibrators is greater than
allowed. Repeat calibration with new calibrators.
The calibrators were tested in reverse order.
Prepare new calibrators and repeat.
The substrate blank and the standard were
tested in reversed order or the substrate
blank result was over 3000 FLU. Prepare
new samples and repeat the procedure.
The difference between the fluorescence of
the duplicate readings on each calibrator
must be less than ± 5 fluorescence units.
59
Fluorophos® ALP Test System User’s Guide
Problem/Message
"Calibration Not
Acceptable"
Explanation
1. The calibrators may not have been
brought to temperature (38°C), or the
calibrators may be bad. Recalibrate
using new calibrators. See the
Calibration section in Chapter 2.
2. Check Calibrator C under PMT voltage.
See the PMT Voltage Adjustment section
in Chapter 5.
"Value Less Than 10
mU/L"
"Error: Overranged,
Repeat Test"
"Error: Unstable
Reading, Repeat Test"
60
3. The optical lamp and/or excitation filter
may require replacement. Contact
Advanced Instruments for Hot-Line®
Service.
Fifty-seven out of 60 readings in either
minute 2 or minute 3 are below or equal to
zero fluorescence (indicating a very low
result). Confirm this very low result by
pressing TEST and START a second time
and/or third time. Check to make sure sample has been added to the substrate. Repeat
the entire test with new substrate and sample.
Display reads over 24,000 fluorescent units,
very high activity. Repeat on dilution to confirm.
The average change in fluorescence during
minute 2 is not within 20% of that during
minute 3. Among the reasons for this are:
1. Substrate not at 38°C.
2. Not a uniform, well-mixed sample.
3. Very low result.
4. Very high result.
Repeat the test.
Troubleshooting Table
Problem/Message
Readout is unstable
Calibrator C output
drifts over time, or
instrument requires
frequent readjustment
Explanation
The optical lamp and/or excitation filter may
require replacement. Contact Advanced
Instruments for Hot-Line® Service.
The optical lamp and/or excitation filter may
require replacement. Contact Advanced
Instruments for Hot-Line® Service.
61
Fluorophos® ALP Test System User’s Guide
Notes:
62
Appendix C
Product Specifications
Electrical
Voltage:
Frequency:
Current:
100-120 VAC:
200-240 VAC:
Fuses:
Power:
Fluorometer
Heating block
Memory backup:
Sample Volume:
Sample Capacity:
Readout:
Units:
Results Units:
Auto Ranges:
Low:
High:
Zeroing:
Resolution:
Gain:
Drift:
Cuvette Size:
Warm-up Time:
Fluorometer
Heating Block
100 to 120 VAC or 200 to 240 VAC
50 or 60 Hz
1.2 Amp. for fluorometer , 1/4-Amp. for heating block
0.7 Amp. for fluorometer , 1/8-Amp. for heating block
as listed on power label
150 Watts
30 Watts
Integral lithium cell; five years minimum in absence of power
See test kit instructions
Single sample
20-character dot matrix
FLU (fluorescence units)
See test kit instructions
0 to 999.9 FLU/minute
1000-9999 FLU/minute
automatic
± 1 FLU
automatic
Less than 3 FLU per hour
12 × 75 mm round
15 minutes for cuvette chamber
30 minutes
63
Fluorophos® ALP Test System User’s Guide
Optics:
90° optical bench with light source, fixed filter, detector
Filters:
Excitation
Emission:
440 ALP nm, narrow pass/405 ACP nm, narrow pass
530 nm, sharp cut-off
Lamp:
Storage
Temperature:
Communications:
Printer:
Operating Temp.
(ambient):
Room Humidity:
Test Time:
Dimensions
Height:
Width:
Depth:
Dimensions (Block)
Height:
Width:
Depth:
Weight
Net:
Shipping:
Certification:
64
quartz halogen
32 to 158°F or 0 to 70°C
RS-232C 9-pin DTE standard; baud selectable: 30, 1200, or
9600
built-in, 40-column, thermal
68 to 85°F or 20 to 29°C
5-80% (non-condensing)
3 minutes
inches
7.0
12.5
16.5
centimeters
18
32
42
pounds
25
35
kilograms
11
16
inches
3.5
6.5
8.5
centimeters
9.0
16.5
21.5
Appendix D
Regulatory Notices
• This product has been designed and manufactured in accordance
with U.S., Canadian, and European regulatory requirements as outlined below. Modifications made to this product that are not
expressly approved in writing by the manufacturer will void the
user’s authority to operate this product, previously issued factory
approvals, and the user’s rights under the warranty.
• The distributor or dealer may have applied additional local, national,
or international approvals to this product. Consult the distributor or
dealer for more information and documentation.
• Connections to this product must be made with shielded cables. Use
of non-shielded cables may violate RFI/EMI limits.
Symbol Conventions
This symbol indicates conformity to relevant European directives.
This symbol indicates the product was tested to conform to
relevant Canadian and U.S. safety standards by Intertek
Testing Services NA, Inc. The ETL mark is approved in the
United States as a Nationally Recognized Testing Lab
(NRTL) by OSHA, and in Canada by the Standards Council
of Canada.
65
Fluorophos® ALP Test System User’s Guide
Regulatory
approval type
U.S. Safety
Canadian Safety
EC Declaration of
Conformity - EMC
EC Declaration of:
Conformity Low Voltage
Description
This product has been listed by ETL testing laboratories
as being in compliance with the requirements of UL
61010-1 2nd edition, "Electrical Equipment for
Laboratory Use". The "US" in the lower right of the
ETL mark demonstrates this listing.
This product has been listed by ETL testing laboratories
as being in compliance with the requirements of CAN/
CSA C22.2 No.61010-1 2nd edition, "Safety Requirements for Electrical Equipment for Measurement,
Control and Laboratory Use”. The "C" in the lower left
of the ETL mark demonstrates this listing.
This product meets the intent of Directive 2004/108/EC
for Electromagnetic Compatibility. Compliance was
demonstrated using the following standards, as listed in
the Official Journal of the European Communities: Consult the Declaration of Conformance certificate shipped
with the product for the latest update.
· EN 61326-1:2006, Group 1, Class B, "Electrical Equipment for Measurement, Control, and Laboratory Use".
This product meets the intent of Directive 2006/95/EC,
the Low Voltage Directive. Compliance was demonstrated using the following standards as listed in the
Official Journal of the European Communities: Consult
the Declaration of Conformance certificate shipped with
the product (if required) for the latest update.
· IEC/EN 61010-1 2nd edition, "Safety Requirements for
Electrical Equipment for Measurement, Control and
Laboratory Use”.
· IEC/EN 61010-2-010 2nd edition, “Safety Requirements
for Electrical Equipment for Measurement, Control, and
Laboratory Use - Particular Requirements for Laboratory
Equipment for the Heating of Materials”.
66
Regulatory Notices
Regulatory
approval type
EC Declaration
of Conformity WEEE
FCC - Part 15,
Subpart B, Class B
Description
This product meets the intent of Directive 2002/96/EC
as amended by 2003/108/EC for Waste Electrical and
Electronic Equipment (WEEE). Consult the Declaration
of Conformance certificate shipped with the product (if
required) for the latest update.
This device complies with Part 15 of the FCC Rules.
Operation is subject to the following two conditions:
(1) this device may not cause harmful interference, and
(2) this device must accept any interference received, including interference that may cause undesired operation.
Canadian ICES-003 This Class B digital apparatus complies with Canadian
ICES-003.
Cet appareil numérique de la classe B est conforme à
la norme NMB-003 du Canada.
EC Declaration
of Conformity RoHS
CB Report
CB Certificate
This product meets the intent of Directive 2002/95/EC
for “Restriction of the Use of Certain Hazardous Substances in Electrical and Electronic Equipment” as an
exempt medical device per Article 2, Paragraph 1 and
per Annex 1, Category 9 of Directive 2002/96/EC.
A CB report and certificate have been issued for this
product. The standard used was IEC 61010-1, 2nd edition and 61010-2-010 2nd edition.
Fluorophos® Test System Approvals, as of June 2004
(Covering: Milk from cows, sheep and goats; Cheeses and Creams)
Regulatory Approvals
1. AOAC First Action - 1991
2. AOAC International 1995 15th Ed. Sec. 979.13 (AOAC
International Final Action) 1995
67
Fluorophos® ALP Test System User’s Guide
3. International Dairy Federation (IDF) - 1992
4. International Standards Organization (ISO) - ISO/DIS 11816 - 2:
2001
5. Interstate Milk Shippers (IMS) - 1993
6. FDA 8th Edition / 1995 Cheese
7. NCIMS - 2001 Method extension granted for cream products
8. Official Journal of the EU, named Reference Method, ISO 11816-1,
6 May 2007 (alternative methods must be validated against the
Fluorometric method)
9. Official Journal of the French Republic - 2004
Independent Laboratory Reviews
1. NIZO (Holland)
2. Bundesgesundheit Adm (Germany)
3. Weihenstephan (Germany)
4. SMR (Sweden)
5. Milk Marketing Board (England and Wales)
6. Food Standards Agency (UK)
7. Hannah Research Institute (Scotland)
8. University of Milan (Italy)
9. Instituto Nacional al Engenharia e Technologia - Lisbon (Portugal)
10.Universidad Autonoma de Bellaterra - Barcelona (Spain)
11.Nestle (Switzerland)
12. Black - Gilbert Chandler Institute (Australia)
13. University of Tennessee (U.S.A.)
14. University of Wisconsin (U.S.A.)
68
Appendix E
Warranty & Warranty Duties
By accepting and operating this instrument, the user and Advanced Instruments
agree to the following responsibilities
which constitute contractual warranties
and conditions between the seller and the
user for the maximum benefit and usefulness of the instrument.
ADVANCED INSTRUMENTS
WARRANTS THAT IT:
1. Has produced equipment equal to or
exceeding that of any competitive
product in the same price range in
standards of design, material and
workmanship.
69
Fluorophos® ALP Test System User’s Guide
2. Knows of no defects in design or
materials which may cause bodily
injury.
3. Will endeavor to advise the user of
changes or improvements in the
instrument as they are developed, so
that the user may take steps to
improve the safety and performance
of his equipment throughout its useful
life.
4. Will replace or repair equipment
according to the guarantee on the
attached warranty.
5. Will cooperate closely in common
defense of any accident involving this
equipment, or third-party suit against
the user or operating personnel, if
advised immediately by the user of
the occurrence of any accident.
THE USER WARRANTS THAT:
1. The instrument will be used reasonably.
2. The instrument will be regularly
maintained according to this manual,
including a log of all service, tests
and repairs performed on the equipment, and records will be kept of all
requests for repair made to Advanced
Instruments where such repairs were
beyond the ability of local service
personnel.
3. The instrument will not be altered
without written approval from
Advanced Instruments.
4. Advanced Instruments will be notified
immediately if any injury occurs in any
association with the instrument and
will be allowed prompt and thorough
70
examination of the instrument in question.
5. Advanced Instruments will be held
harmless in cases of injury arising
(see definitions below):
a. Beyond the useful life of the
equipment.
b. From unreasonable use.
c. When Advanced Instruments is
not immediately notified of said
injury.
d. From interpretation of results.
DEFINITIONS
1. "Useful life" is:
a. The same as the depreciation life in
the Internal Revenue Service guidelines, whether or not the user actually depreciates the instrument, but
not to exceed 10 years from date of
delivery to the user.
b. Only during the time the equipment
has been maintained on a regular
basis as prescribed by Advanced
Instruments. If the user is in an
area which has no local service,
Advanced Instruments may require
a local service person (understood
to mean the person actually performing the "hands-on" service of
the equipment) to attend and pass a
reasonable maintenance and repair
course.
c. Only during the time when the user
has not altered the equipment in
any way without written approval
from Advanced Instruments.
Appendix E
d. Only during the time when the user
has not loaned, leased or resold the
equipment to any third party.
2. "Reasonable use" is use:
a. According to the instructions supplied by Advanced Instruments
(assuming English-reading personnel or supervision). If neither the
supervisor nor the operator reads
English, the user agrees to obtain
accurate translations of the instrument labels, instructions, user's
guides and/or manuals provided.
— Warranty & Warranty Duties
named as a defendant in any form
of litigation.
c. Allowing Advanced Instruments
or its representatives, immediate,
full, and thorough examination of
Advanced Instruments equipment,
and all records pertaining to such
equipment.
b. Under direct, on-the-job supervision of the supervisor or other professional in charge.
c. In which there are no known
defects or uncorrected repairs.
d. Only for the purpose stated in the
instructions provided with the
instrument.
e. In which the equipment has been
maintained according to the
instructions provided.
3. "Immediate notification" is:
a. Recognition that time is of the
essence when any accident, malpractice or product liability arises
which involves Advanced
Instruments equipment.
b. Notification to Advanced
Instruments immediately (the same
day, if possible) in the event of
injury to any person in circumstances involving Advanced
Instruments equipment in which
Advanced Instruments might be
71
Fluorophos® ALP Test System User’s Guide
Notes:
72
Appendix F
Supplemental RS-232
Information
The DB-9 RS-232 port on your instrument conforms to the DTE EIA232 standard and can reliably communicate over shielded cable up to 10
meters in length, depending on the baud rate you use. Almost every
item of information displayed by your instrument is also transmitted
over the RS-232 port, including test results, all error messages, and
most display data from the diagnostic menu.
Data is transmitted asynchronously as 1 start bit, 8 data bits and 1 stop
bit, with no parity. Each message transmitted from the communication
port is terminated by the sequence, Carriage Return (0D Hex), Line
Feed (0A Hex). Note that your instrument is only capable of outputting
information. At this time, there is no protocol for talking to the instrument.
Sample RS-232 Setup
As a typical example of a communications program setup, the following
instructions will describe the process necessary for using your instrument in conjunction with Hyperterminal for Windows® 95 or later operating systems and a null modem cable, available from Advanced
Instruments, as shown in the diagram below. You can use this procedure
to be sure that your instrument and cable are operating correctly.
1. Create a Hyperterminal connection using the Hyperterminal program.
2. While working within that connection, choose the Properties selection from the File menu.
73
Fluorophos® ALP Test System User’s Guide
3. Select the Configure button.
4. Choose the following settings for the Configure menu and click on
the OK button.
Bits per second
Data bits
Parity
Stop bits
Flow control
5. Select the Settings menu.
See User’s Guide
8
None
1
None
6. Chose TTY for the Emulation option.
7. Select ASCII setup.
8. Set the Sending option to Echo Typed Characters Locally.
9. Set the Receiving option to Wrap Lines that Exceed Terminal Width.
You should at this point see all instrument output in the Hyperterminal
window of your computer screen.
Null Modem Cable
74
Shield connects
to metalized
connector housing at both ends.
Appendix G
Symbol Definitions
On-Off
Functional Arrow
Feed
Printer
Interrupt
Enter
Test
RS232
Start
Bar Code
Stop
Attention
Record Review
Caution Hot Surface
Setup
Dangerous Voltage
Calibration
Lifting Hazard
Cancel; Delete
Calibrator
75
Fluorophos® ALP Test System User’s Guide
76
Content
Do Not Open Top
Control
Handle With Care
Negative Control
Toxic
Positive Control
Use Blade To Open
Flammable
Do Not Re-Use
Fragile
For In Vitro Diagnostic
Use
Irritant
European Conformity
Keep Dry
Temperature Limit
Date Manufactured
See Instructions
Sterile
Lot Number
Non-Sterile
Use By; Expiration
Date
Serial Number
Authorized
Representative
Solution
Part Number
Appendix G
x
— Symbol Definitions
Sufficient for [x]
Tests
Latex-Free
Open Here
Diluent
Low Fluid Level
Keep Hands Clear
Manufacturer
See Instructions for
Temperature Guidelines
Potential Puncture
Hazard
Electronic Equipment Dispose of Properly
77
Fluorophos® ALP Test System User’s Guide
Notes:
78
Appendix H
Product Disposal and
Recycling
International concern about environmental pollution resulting from
improper disposal of products and materials at the end of their useful
life has resulted in an increase in legislation to control the methods and
procedures used to handle waste electrical and electronic equipment.
While the regulatory status in some regions of the world has progressed
to the point where formal legislation is already in effect, many other
regions are in the process of creating similar legislation or adopting that
already in existence in other areas. The result in the years ahead will be
more stringent control over disposal of products and recycling of their
components once they are withdrawn from use.
Since regulations governing the disposal of your instrument and accessories may vary depending upon your geographic location, the following
guidelines are provided to assist you in identifying the options available
to you once the decision has been made to replace or dispose of this
product:
• Contact the supplier who sold you the product. Whether this was
Advanced Instruments itself, or one of its authorized dealers, this
supplier should be knowledgeable about the national and local
regulations governing disposal and recycling of products in your
area. In some cases, this supplier may be legally obligated to
accept the product from you and arrange for proper disposal or
recycling with no further involvement on your part. Alternately,
the supplier can provide you with specific instructions for actions
that you can take to dispose of the product properly.
79
Fluorophos® ALP Test System User’s Guide
• Contact your local government agency responsible for waste collection and disposal. They can identify procedures and restrictions in effect to ensure proper disposal, and available locations
where products can be sent.
• Contact Advanced Instruments Hot-Line Service:
• 800 225-4034 (toll-free within the USA and Canada; after
normal business hours, dial extension 2191)
• +US 781-320-9000 (elsewhere)
• 781-320-0811 (fax)
Service personnel will provide you with contact information for
local disposal, or instructions for returning the product directly to
Advanced Instruments.
80
Appendix I
Service Log
Model:
FLM200
Serial Number:
Software Revision:
Date
Problem/Symptom
Action
81
Fluorophos® ALP Test System User’s Guide
Date
82
Problem/Symptom
Action
Index
A
A/D test
47
Air filter
39
Alkaline phosphatase
see ALP
ALP
21
ALP pasteurization assay
21
Calibration
27
Calibration curves
30
High turbidity procedure
34
Reagents, reconstituting
30
Reagents, storage
26
Sample preparation
32
Test
34
Assistance
19
C
Calculations
Butter and cheese
Fluid Dairy Products
Calibration
ALP Pasteurization
Equations
Frequency
Cuvette door
54
51
16
24
51
16
13
Daily Instrument Checks
Daily Instrument Control
Date, setting
Date/Time
31
37
8
18
D
Diagnostic checks
Dis/Enable Beeper
Dis/Enable Xon/Xoff
Display panel
Display/Print test
E
Excitation filter
F
Fuse replacement
H
Heating block
High-turbidity test
I
6, 46
19
19
13
47
6
40
5, 13
33
Installation
1
Keypad
Keypad test
13
47
Lamp replacement
41
Maintenance
37
K
L
M
83
Fluorophos® ALP Test System User’s Guide
O
Operator settings
Optical filters
Replacement
Care
17
Percent raw milk
Photomultiplier tube voltage
adjustment
Pipette
Maintenance
Power panel
Power requirements
Print avg f/min
Printer
Loading paper
Paper jams
Product specifications
Product/test
54
P
R
Reagents
Handling
Preparing
Reconstituting
Storage
Regulatory Notices
RS-232 Information
S
Serial loop test
Serial number
Serial port
Service
84
39
40
47
14
40
12
3
18
12
7
8
63
19
xiii
27
17
30
26, 39
65
73
47
19
12
45
Service log
Set serial rate
Space requirements
Specifications
Spills
Sub blank testing
Symbol definitions
81
19
1
63
37
18
75
Time, setting
Troubleshooting checks
Troubleshooting table
8
46
59
T
U
Unpacking
2
Ventilation requirements
1
V
W
Warranty duties
69
Zero range adjust
19
Z