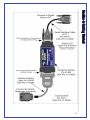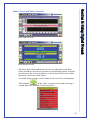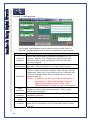
1
Polaris
Digital Wrench
Installation Guide
&
User Manual
System Version 3
© 2001-2011 Diagnostic Systems Associates Inc.
All rights reserved.
No part of this publication may be copied, photocopied, reproduced,
transmitted, transcribed, or reduced to any electronic medium or
machine-readable form without prior written consent of Polaris
Industries and Diagnostic Systems Associates Inc.
Internet Explorer is a registered trademark of Microsoft Corporation.
Acrobat Reader is a registered trademark of Adobe Systems.
Palm HotSync® Manager is a registered trademark of Palm Inc.
Table of Contents
About This Manual....................................................................................... 1
Introduction................................................................................................... 3
PC Minimum Requirements ....................................................................................... 4
Special Safety Information........................................................................... 5
Before Using Digital Wrench...................................................................... 5
General Safety Considerations .................................................................... 5
Safety Considerations for the Vehicle Interface Cable ............................... 6
Getting Started .............................................................................................. 7
What’s Included........................................................................................... 7
Installing Polaris Digital Wrench ................................................................ 8
Starting the Install Process.......................................................................................... 8
Possible Messages and Errors................................................................................... 12
Running the Software................................................................................ 13
Entering The Software Serial Number ...................................................... 13
Registering the Software ........................................................................... 14
Uninstalling Polaris Digital Wrench ......................................................... 15
Connecting the Vehicle Interface Cable.................................................... 16
Connecting to the PC ................................................................................................ 16
Serial Port Adapters (USB-Serial & Others) ............................................................ 16
Serial Port Problems with “low-power” Laptop Computers..................................... 17
Connecting to the Vehicle......................................................................................... 17
Using the SmartLink Interface Module..................................................... 18
Kit Contents: ............................................................................................................. 18
SmartLink Connections: ........................................................................................... 18
Care and Maintenance of the SmartLink Module:.................................................... 18
Using the SmartLink:................................................................................................ 20
Configuration and Utilities: ...................................................................................... 20
Digital Wrench Status Messages: ............................................................................. 21
Status LED:............................................................................................................... 21
Using Digital Wrench ................................................................................. 22
The Main Control Panel ............................................................................ 22
Communications Status Display ............................................................................... 23
The Main Control Panel Buttons............................................................... 24
Using the Keyboard to Run the Program .................................................. 25
Main Control Panel Keyboard Functions ................................................................. 25
Trouble Code Screen Keyboard Functions ............................................................... 25
Data Grid Screen Keyboard Functions ..................................................................... 26
Large Meter Screen Keyboard Functions ................................................................. 26
Data Chart Screen Keyboard Functions.................................................................... 27
Sensor Data Screen Keyboard Functions.................................................................. 27
Introduction to ASSERT and Satisfy ........................................................ 28
The ASSERT Process and ASK Form...................................................................... 30
Program Functions .................................................................................... 31
Vehicle Selection Screen .......................................................................................... 31
Customer Information Screen ................................................................................... 32
Trouble Codes........................................................................................................... 33
Data Display Grid ..................................................................................................... 37
Data Chart Screen ..................................................................................................... 41
Data Meter Screen..................................................................................................... 42
Dual Chart and Meter Screens .................................................................................. 43
Sensor Data Display.................................................................................................. 44
Data Trigger Setup Screen, (Snapshot)..................................................................... 45
Special Tests Menu ................................................................................................... 47
System Configuration ............................................................................................... 48
Vehicle Home Page................................................................................................... 49
Print........................................................................................................................... 50
Help System .............................................................................................................. 50
Exit Button ................................................................................................................ 50
Guided Diagnostics ................................................................................... 51
Introduction............................................................................................................... 51
Important Considerations.......................................................................................... 51
Common Buttons ...................................................................................................... 52
Guided Diagnostics Screen types.............................................................................. 52
Instruction Screen ..................................................................................................... 53
Measurement Screen................................................................................................. 54
Question Screen ........................................................................................................ 55
Data Screen ............................................................................................................... 56
Trouble Code Screen................................................................................................. 57
Conclusion Screen .................................................................................................... 58
Troubleshooting: ....................................................................................................... 59
Troubleshooting .......................................................................................... 60
Install Problems ......................................................................................... 60
Internet Explorer® and Acrobat Reader® Install Problems. ...................................... 60
Diagnostic System Install Problems ......................................................................... 60
Communication Problems ......................................................................... 61
Commstatus- No Cable or Power ............................................................................. 61
Commstatus- Always “Initializing Communications”.............................................. 62
Communications often lost and “Re-initializing”..................................................... 62
General Program Problems ....................................................................... 63
No Comm Ports Available on this Computer ........................................................... 63
The Selected Serial Port (x) is already in use ........................................................... 64
System Configuration Invalid ................................................................................... 64
About This Manual
This manual has been written to help you understand the all the functions
and capabilities of Polaris Digital Wrench in order to gain the maximum
benefit from the product.
The manual is divided into 5 parts:
• Introduction
− The Introduction provides an overview of the functions of Digital
Wrench and its uses.
• Special Safety Information
− The Special Safety Information section covers important issues
regarding operator safety while using Digital Wrench as well as
instructions to prevent damage to the equipment.
• Getting Started
− The Getting Started Section discusses installing and connecting
Digital Wrench.
• Using Digital Wrench
− The Using Digital Wrench Section covers all the functions of the
system in detail.
• Troubleshooting
− The Troubleshooting Section provides answers to common problems
that can occur while using Digital Wrench.
This manual covers most of Digital Wrench functions as of the date the
software was released.
For more detailed information, or assistance on specific vehicle tests and
functions, always check the Program Help.
Click This Button on the Main Screen to open the Help System
1
2
Introduction
Polaris Digital Wrench has been designed as a workshop service and
information tool for diagnosis and testing of Engine Control Systems
and related components.
There is a large amount of information available from this system
including:
• Diagnostic Trouble Codes
• Component-specific Wiring Diagrams
• Engine Sensor Data
• Fuel Injection System Control Parameters
• Engine Controller Identification Information
• Special Tests and Calibration Procedures
• Service Manual and other Documents
This software version provides testing capabilities on all Fuel Injected
Polaris Vehicles from model-year 1999 to the present. Version 3.0
also provides access to documentation and test procedures for
carbureted vehicles through the Vehicle Home Page and ASSERT
functions.
Additional vehicles and functions will be added to future versions of
the software. Always refer to the Help System for the latest software
function descriptions and vehicle coverage.
3
PC Minimum Requirements
♦
♦
♦
♦
Before installing Polaris Digital Wrench, please ensure that the PC
meets the following minimum requirements:
General Requirements:
• Windows 2000/XP/Vista/Windows 7 operating systems*
• Minimum Pentium 233 MHz, or equivalent Processor.
• Standard Serial Port, (RS-232) **
• CD ROM Drive
• SVGA Monitor and Video Card capable of 800 x 600 pixel
resolution.
• Polaris Digital Wrench requires 200 Megabytes of Hard
Disk Space. If Internet Explorer must be installed, an
additional of 75 Megabytes is required to complete the
install. If Adobe Acrobat Reader is required an additional
45 Megabytes of needed. So, in total it is possible that 320
Megabytes of Hard Disk space will be required.
• Additional Hard Disk space will be needed to install
Information System Documentation and Service Manuals.
The minimum amount of space is dependent on the
particular service manual installed.
Windows 95, 98, Windows ME, Windows NT
• Windows 95, 98, Windows ME and Windows NT are no
longer supported.
Windows 2000/XP/Vista/Windows 7
• Any computer capable of running Windows 2000, XP, Vista
or Windows 7 should be able to run Digital Wrench as long
as the minimum hardware requirements are met for the
version of Windows used.
NOTE for Windows 2000, XP, Vista and Windows 7
You must be logged into the system with "Administrator
Rights" to install the Diagnostic Software.
On Windows Vista and Windows 7 always install the software
using “Run as Administrator” to start the installer.
If you are unsure if you have Administrator Rights, please
verify this before proceeding with the install procedure.
**
4
THERE ARE VERY FEW USB TO SERIAL ADAPTERS
THAT WILL FUNCTION PROPERLY WITH THE
DIAGNOSTIC SOFTWARE. If you have a laptop PC without a
Serial Port, refer to the Digital Wrench Website for information
on which USB to Serial adapters will function with this software.
Special Safety Information
This section contains information on safety that must be followed to avoid
damage to Polaris Digital Wrench, or serious injury, or death to the
operator. Do not skip over this section! Read it carefully and thoroughly.
Before Using Digital Wrench
Thoroughly read and understand the operating
instructions before using Digital Wrench Application.
Always make sure the Interface Cable and Diagnostic
Connector terminals are clean and in good condition
before connecting the cable.
Verify that the vehicle battery is fully charged and in
good condition before attempting to use the Diagnostic
Software. Low battery voltage will cause
communication problems as well as produce invalid
test results.
General Safety Considerations
Note the following safety items related to motor vehicles and internal
combustion engines.
Always make sure an approved exhaust ventilation
system is being used and the work area is well
ventilated whenever working with a running engine.
Carbon monoxide is an odorless, colorless gas that is
extremely poisonous that can lead to serious injury or
death.
Always stay clear of moving parts on a running engine
and remove all loose clothing that can be caught in
rotating parts.
Always wear approved safety glasses.
Exercise extreme caution when working around acidfilled, wet cell batteries. These types of batteries
produce a highly explosive hydrogen gas that can
cause the battery to explode without warning.
5
Safety Considerations for the Vehicle Interface
Cable
Always make sure the cable is clear of any belts, pulleys,
or other moving parts of the vehicle being tested.
Don't allow the cable to come near to, or in contact with
hot engine components such as the exhaust manifold, or
engine block.
Never allow the cable to lie near or on any ignition system
components such as Ignition Coils or Spark Plug wires.
The Interface Cable is shielded from most types of
electrical interference, however, damage to the cable
and/or the PC will result if ignition voltages are
"discharged" into the cable itself.
Don't allow the cable to lie on the floor near or in puddles
of water. Water can leak into the circuitry through the
connector and damage the cable.
6
Getting Started
What’s Included
The Complete Polaris Digital Wrench Kit includes:
- The Vehicle Interface Cable
The Vehicle Interface Cable is used to connect the
computer to the vehicle being tested.
- Additional Diagnostic Adapters (Optional)
Some vehicles require additional adapters to connect the
Interface Cable to the Diagnostic Connector. Different
adapters are included with the software depending on
which Diagnostic Kit was ordered.
- The Polaris Digital Wrench CD
The Polaris Digital Wrench CD is used to install Digital
Wrench onto the computer. Always keep this CD in a
safe place in case the software needs to be reinstalled, or
moved to a different computer.
- The User Manual and Install Guide (this book)
- Your Polaris Digital Wrench Serial Number(s)
The Polaris Digital Wrench Serial Number is necessary
to install and register the software.
- The Vehicle Interface Cable
The Vehicle Interface Cable is used to connect the
computer to the vehicle being tested.
The Digital Wrench Update Kit includes:
- The Polaris Digital Wrench CD
- The User Manual and Install Guide (this book)
WARNING: Do not lose the Serial Number. It is the license
number for the software and without it, the software
cannot be re-installed or updated at a later time.
YOU WILL NEED THE SERIAL NUMBER TO INSTALL
FUTURE PROGRAM UPDATES
7
Installing Polaris Digital Wrench
The process of installing Polaris Digital Wrench may be slightly
different depending on the operating system version installed on your
PC. The following steps will take you through the normal installation
procedure. If message boxes appear that are not described in this
section, look in the section entitled ‘Possible Messages and Errors’ to
get a full description of each message or error.
IMPORTANT:
While installing you may be asked if you want to remove older
versions of Digital Wrench Software. Normally, removing an
older version is the best thing to do, but there may be
circumstances where it is needed for other product lines.
When in doubt, don’t remove the older version.
Windows NT/2000/XP:
You must be logged in as an Administrator or have
Administrator Rights to install Digital Wrench Software.
Attempting to install the software without Administrator
Rights will most likely result in errors when trying to run the
program.
Starting the Install Process
1. Insert the Polaris Digital Wrench CD into the CD ROM drive of
your PC. In most cases, the setup program will run
automatically. Once the CD has been inserted, wait a few
seconds for it to spin-up and start the setup program.
2. If the setup program does not start, then push the
Button
and select "Run". In the window that comes up, type
"D:\SetupLaunch.exe", but make sure to substitute the drive letter
for your CD-ROM drive in place of the "D," if “D” is not the
letter for your particular CD-ROM Drive.
8
3. Once the setup program has started, you will see a window like
this:
The CD contains installation programs for Internet Explorer 6
and Adobe Acrobat Reader 5.01, both of which are required for
Polaris Digital Wrench to work properly. You can install each of
these programs at any time by clicking on its corresponding
button. Many computers are already equipped with these
programs and do not need to be installed from this CD. If you
are not sure whether you need to install these programs, you can
refrain from installing them right now. The install program will
check, and let you know if either Internet Explorer or Acrobat
Reader needs to be installed.
Click on the button next to “Install EFI Diagnostic System
Software” to begin the main install process.
4. After a short time, the setup screen will appear:
Setup is now ready to begin. Click “Next” to continue.
9
5. This screen displays the Software License Agreement. After
reading and agreeing to its terms, Click “I accept…” and then
“Next.”
6. Now it’s time to choose the folder on your PC in which Polaris
Digital Wrench will be installed. In most cases, the default folder
is adequate. If you want to change this location, click “Browse”.
If the Diagnostic Software is already installed on your PC, this
window will not appear.
Click “Install” to continue.
10
7. The File Copy portion of the install has begun. This process may
take a few minutes. There is nothing you need to do during this
step.
8. After a short time, the Installer will complete and this screen will
appear. If this screen asks you to restart your computer, make
sure you restart your computer before using Polaris Digital
Wrench.
Click “Finish”. After a short time, this screen should disappear.
The initial Setup Launcher program seen in Step 3 may still be on
your screen. If it is, it is safe to close it now. Close the Setup
Launcher by clicking on the button next to “Exit This Program”
or by clicking on the “X” in the upper right-hand corner of the
window.
11
Possible Messages and Errors
During the Install Process there are several possible error or other
messages that may come up. These messages are displayed in a
window similar to the following:
Other messages may come up during the install process if the software
cannot be successfully installed or if any of the required Windows
components are missing.
If any error messages are displayed, read them carefully and follow
any instructions given.
Additional information on error messages is available in the
Troubleshooting section at the end of this manual and in the on-line
help system at:
http://polaris.diagsys.com/kb
12
Running the Software
Once the install process has been completed, there will be a new icon
on the Desktop.
Select this icon to run Digital Wrench or by selecting the
button, selecting "Programs" from the start menu and then navigating
to the program group where the program was installed, (normally this
would be "EFI Diagnostic System"), and then select the "EFI
Diagnostic System".
Entering The Software Serial Number
The first time you run the software you will be asked to enter the
Software Serial Number.
Enter the Software Serial Number from the Serial Number Sticker on
the CD Sleeve. When a valid serial number has been entered, the
number will turn Green.
Select OK to continue.
13
Registering the Software
When the EFI Diagnostic System is installed for the first time, you are
given a 30-day trial period where the software will run without being
registered. During this period, you are able to take advantage of the
full functionality of the software, but a "Reminder Screen" appears
each time you launch the application to inform you of the number of
days remaining in the trial. If you do not register the software before
the trial period ends, it will not function until the Registration/Feature
Code is entered.
After leaving the Reminder Screen, the Feature Configuration Screen
appears:
Write down the License ID and then go to the Internet Web Site shown
on this screen. If the PC you are using is connected to the Internet,
then you can simply select the "Click here. . ." link at the bottom of the
screen to get to the registration Web Site.
Enter the License ID and other information on the Web Site. Once you
have been provided a Registration Code, enter this code on the
Registration Screen and select the Add Button to complete the process.
Write down your License ID & Registration Code and keep it in a
safe place.
NOTE:
The current license agreement allows the software to
be registered on a maximum of 3 different PC's.
within the Same Dealership. Trying to register on
more than 3 PC's will result in an "Invalid License
ID" error.
14
Uninstalling Polaris Digital Wrench
Normally, there is no reason to uninstall the Diagnostic Software.
When new versions become available they can be installed without
having to uninstall the previous version.
In rare cases where the system has become corrupted it may be
necessary to remove the software and then reinstall. Follow the
instructions according to the version of software you are removing.
To uninstall Version 2.03 to 2.08 software :
1)
2)
3)
4)
Select the
button.
Select “Settings” and “Control Panel.”
Select “Add/Remove Programs.”
If you have more than one serial number installed, you may see
entries called “EFI Diagnostic System Option Pack.” For each of
these entries, click the “Add/Remove” button and follow the
instructions. If you do not see any such entries, proceed to step 5.
5) Locate "EFI Diagnostic System", select it with the mouse and then
press the "Add/Remove" button.
6) Follow the instructions given in the uninstaller.
Occasionally problems occur during the uninstall process. If there are
error messages displayed, once the uninstall process is complete, make
sure all files have been deleted from the EFI Diagnostic System Folder.
Normally this folder is located in
"C:\Program Files\EFI Diagnostic System"
To uninstall Version 1 software (versions 1.01 and 1.20):
1)
2)
3)
4)
Select the
button.
Select Settings and "Control Panel".
Select "Add/Remove Programs".
Locate "Polaris Diagnostic System," (if removing version 1.20), or
"MSE Diagnostic System," (if removing version 1.01) select it with
the mouse and then press the "Add/Remove" button.
Occasionally problems occur during the uninstall process. If there are
error messages displayed, once the uninstall process is complete,
make sure all files have been deleted from the Program Folder.
15
Connecting the Vehicle Interface Cable
The Interface Cable must be connected to the proper communications port
on the PC as well as the vehicle being tested.
The cable can be connected and disconnected at any time although it's
usually best to leave it connected to the PC at all times, (see note below).
Connecting to the PC
The PC end of the Interface Cable has a 9-pin D-SUB connector on it,
which must be connected to a serial communications port on the back
of the PC. If there is more than one serial port available, the cable
must be connected to the same serial port as the one selected in the
System Configuration Screen.
The Serial Port Connector on the back of the PC should look very
similar to the picture below.
Most serial ports have a 9-pin connector, although some use a 25-pin
type. If the serial connector on the PC has 25 pins then an adapter
must be used to convert the 25-pin connector to a 9-pin type before
the cable can be connected. 25 to 9 pin serial adapters are available at
nearly all computer stores.
Important:
It is very rare to find 25-pin serial connectors on modern
PC's. Do not mistake the 25-pin Parallel Printer Port (also
called "LPT") for a serial port. Connecting to the Parallel
Printer Port will not work.
The first time Digital Wrench is run, the communications port used to
communicate with the ECU through the Interface Cable will not have
been selected yet.
Note:
Direct Injection Watercraft and 1999-2000 Victory
Motorcycles utilize completely different Interface Cables
than the one normally used with Digital Wrench. Refer to
the Help System “Setup and Configuration” section for
detailed information on connecting to these vehicles.
Serial Port Adapters (USB-Serial & Others)
For PC’s and Laptops that do not have a built-in serial port, you will
need to use a serial port adapter in order to connect the vehicle
interface cable. While there are many USB to Serial and PCMCIA
Serial Port adapters that will function properly with the diagnostic
software, there is a much larger number of devices that will not
function properly or at all. Most low-priced adapters are not capable
16
of the data transfer rate (baud-rate) necessary to communicate with the
vehicle on-board computer.
Before purchasing an adapter, check on the Digital Wrench Support
Website, (available in the help menu under “Digital Wrench Home
Page”) for the latest list of adapters that have been tested & known to
work properly with the software.
Serial Port Problems with “low-power” Laptop Computers
Many new “low-power” or extended battery life laptop computers are
equipped with serial ports that do not perform well enough to
communicate with the vehicle on-board computer while running on
battery power. In addition, there are some laptops that still exhibit
communications problems even when connected to AC Power.
Often, these communication problems can be reduced or eliminated
by modifying the configuration of the serial port. Further information
and details on setting the serial port configuration are available on the
Digital Wrench Support Website (available in the help menu under
“Digital Wrench Home Page”).
Connecting to the Vehicle
The vehicle end of the Communications Interface Cable has a 4-pin
connector, which connects either directly to the vehicle or to an
additional interface adapter required for some vehicles.
Refer to the Help System for specific information on connecting the
interface cable to the vehicle. Specific information can be found
under the Setup and Configuration Section.
The location of the connector is different on each vehicle. Consult the
appropriate service manual for the location of the diagnostic
connector.
Connect the Interface Cable to the Vehicle Diagnostic Connector or
adapter, after making sure that the connector terminals are not
damaged or bent. Also, please refer to the Cautions Section for
important safety information related to the Interface Cable.
17
Using the SmartLink Interface Module
The Digital Wrench SmartLink Module is the next-generation
diagnostic interface for Polaris vehicles starting with Model Year
2006. Currently the SmartLink module must be used with vehicles use
the CAN (Controller Area Network) diagnostics.
Kit Contents:
The SmartLink kit consists of the SmartLink Module itself, the
Vehicle Interface Cable for vehicles that use the CAN diagnostic
connection, (new 8-pin diagnostic connector) and a standard serial
cable to connect to the Digital Wrench PC.
Item
DSA PN
SPX PN
SmartLink Kit (all three items below)
01-20002
PU-47471
SmartLink Module
01-10005
PU-47468
Vehicle Interface Harness (CAN Based Systems)
01-10004
PU-47469
SmartLink Serial Cable
01-10006
PU47470
SmartLink Connections:
Connect the Vehicle Interface Cable to the 15-pin connector on one
end of the SmartLink Module and the serial cable to the other end.
Make sure the screws at each end are tight to prevent damage to the
connectors. Refer to the diagram on the following page.
Connect the SmartLink Serial Cable to the same serial port used by
other diagnostic cables and connect the vehicle interface cable to the
vehicle diagnostic connector.
Care and Maintenance of the SmartLink Module:
Unlike previous interface cables, the SmartLink Module contains a
microprocessor, memory & other sensitive electronic components.
• DO NOT under any circumstances, open the module. Static
electric discharges will permanently destroy the device.
• Do not allow the SmartLink Module to become wet or operate
it in a wet environment.
• Always keep both the Vehicle Interface and Serial Cable screws
tight to prevent damage to the connectors.
• Do not attempt to lengthen the Interface Cable between the
SmartLink and the Vehicle or communication errors will result.
18
19
Using the SmartLink:
Starting with Model Year 2006 Vehicles, the SmartLink Module and
CAN Vehicle Interface Cable should be used whenever performing
diagnostics on the CAN Based Vehicles, (Sportsman & Ranger 500
EFI). For 2007 vehicles the SmartLink Module is used on all EFI
ATV, Ranger and CFI Snowmobiles. All other existing EFI vehicles
use the same diagnostic interface cable as they always have.
The diagnostic connector location varies for each vehicle. Always
refer to the Digital Wrench help system for details on finding the
connector.
The SmartLink Module is powered through the vehicle diagnostic
connector. When the module is first powered-up, the Status LED will
blink once indicating that it is ready. At all other times, the LED will
remain off although future applications may utilize the LED to
provide additional information on communications or special test
modes.
If the Status LED blinks rapidly or stays on steady, an error has been
detected in the SmartLink Module Software and the device must be
reprogrammed or repaired.
Configuration and Utilities:
Information on the current SmartLink Module software as well as
access to the reprogramming utility are located on the Digital Wrench
Configuration Screen. Select the “SmartLink Configuration” button
on the bottom of the Configuration Screen to access these functions.
Only reprogram the module if the LED is flashing, or when new
SmartLink software is released.
If after successfully reprogramming the SmartLink Module the LED
continues to blink rapidly or stays on continuously, the module is
damaged and must be replaced. Difficulty reprogramming the
SmartLink may also be caused by serial port communications
problems. Refer to the Digital Wrench Support Website for details on
solving SmartLink problems.
SmartLink Auto-update:
When a new Digital Wrench version is installed there is often a new
version of SmartLink software that goes with it. When the new
Digital Wrench version detects an older version of SmartLink
software a “SmartLink out of date” message will be displayed and the
SmartLink update screen will automatically load and update the
module.
This process will also happen if Digital Wrench detects that the
SmartLink module is not programmed correctly.
20
Digital Wrench Status Messages:
When Using the SmartLink Module, the following additional status
messages may be displayed in the Digital Wrench Status Display:
Message
Meaning
The SmartLink Cable is not connected to
the Serial Port selected on the Digital
No Connection
Wrench Configuration Screen.
To SmartLink
Or, one of the older diagnostic cables, (DI
Watercraft, Victory, etc.) is connected.
The SmartLink Module is Connected to
the Serial Port, but it is not powered-up.
No Power to
On some vehicles, the ignition key and
SmartLink
run/stop switches must be on before
power is available at the diagnostic
connector.
The SmartLink Module is connected to
Wrong
the Serial Port, but the selected vehicle
Diagnostic
requires one of the earlier diagnostic
Cable
cables.
Status LED:
LED State
One Flash at
Power-up and
then off.
Flashing
Rapidly
Always off
Always on
Meaning
Normal Operation
The Module is unprogrammed, or the
software is damaged. Reprogram the
device.
No power to the Module, (check the
vehicle interface cable and vehicle
harness). Or, a hardware failure has
occurred in the module.
The module failed to reprogram correctly
or a hardware failure has occurred. Cycle
power to the SmartLink, (disconnect from
the vehicle and reconnect). If the LED is
still always on then there is a fault in the
device.
21
Using Digital Wrench
The Main Control Panel
The heart of the software is the Main Control Panel. Nearly all
functions of the program can be accessed by selecting one of the
buttons with the mouse, or pressing one of the “Function keys” on the
keyboard.
For example, to view the Trouble Codes Screen, either select the
Trouble Codes Button, (the button on the far left side), or press the
“F1” key on the computer keyboard.
A list of all the buttons, their corresponding Function Keys and a
description of what each button does, is found in the chart in the Main
Control Panel Buttons Section later in this chapter.
The Communications Status window is also always visible in the lower
left corner of the Main Control Panel.
22
Communications Status Display
The Communications Status Display is located in the bottom left
portion of the Main Control Panel. All messages regarding
communications to the Vehicle Engine Control Module will be
displayed here. The following messages may be shown:
Note: Refer to the Troubleshooting Sections in this manual and
the Help System (Help Button) for more information on
Solving Communications Problems.
Status Display
Starting Up…
Initializing
Communications
Not Connected
No Cable or
Power
Connected
Wrong Vehicle
Selected
No Response
From ECU
Meaning
This message is briefly shown when the system is
first started and indicates that the software is
setting up the communications interface cable.
This message will be shown any time
communications to the ECU is being initiated.
This will happen when the cable is first connected
or whenever communications to the ECU has
been interrupted. Initializing communications
usually takes from 2 to 4 seconds.
This message will show briefly while the system
is starting up or when the ECU is not responding.
This message indicates that the interface cable is
not connected to the Diagnostic Connector, the
ignition is off, or there is no power to the
connector. This will also come up if the cable is
connected to a different port than the one selected
on the Configuration Screen.
This message indicates that communications to
the Engine Controller has been initiated and data
is available for display.
This message indicates that the software has
detected an unknown / unsupported Engine
Controller or that the ECU Identification indicates
that it is from a vehicle other than the one
selected on the Vehicle Selection Screen.
This message indicates that the cable is connected
to a vehicle, but there is no response to requests
for data.
This can be caused by damaged connections in
the cable, or vehicle. A defective Vehicle ECU
can also cause this message to come up.
23
The Main Control Panel Buttons
Button
24
Function
Key
What this button does
F1
Display Trouble Codes, Trouble Code
Information and Wiring Diagrams.
F2
Display Sensor Data and Parameters in a
grid, large meters, or chart format.
F3
Display data from the primary engine
system sensors.
F4
Set up data capturing functions based on
Trouble Codes Setting, or a specific sensor
value.
F5
Open the Special Tests Menu.
F6
Load the ASK Form or return to the current
location in the form if it is already loaded..
F7
Open the Vehicle Selection Screen
F8
Load or Return to the Customer Information
page of the ASK Form
F9
Load the Vehicle Home Page
F10
Open the Software Configuration Screen
F11
Open Digital Wrench Help.
F12
Exit Digital Wrench.
Using the Keyboard to Run the Program
The Diagnostic Software is designed to be run using a mouse, or other
pointing device attached to the PC, however many of the functions can
be accessed using the keyboard as well.
The following tables describe the keyboard functions on each screen.
Main Control Panel Keyboard Functions
The Function Keys on the keyboard will always function regardless of
where you are in the program. They can be used to quickly move
from one part to another. The only exception is when the Manual
Browser is the “active application” (i.e. the window in front). When
the Manual Browser is active, pressing the function keys may have
unexpected results depending on the type of document/manual being
viewed.
The “ESC” Key, (usually the key in the upper left portion of the
keyboard can always be used to close a screen and “back up” through
the application.
To perform this function
Read Trouble Codes.
View the Data Grid.
View the Sensor Data Screen.
Set up a Recording Trigger.
Open the Special Tests Menu.
Load the ASK Form
Load the Vehicle Selection Page
Load the Customer Information Page
Load the Vehicle Home Page
Open the Software Configuration Screen
Run the Help System.
Exit the System.
Press this Key
F1
F2
F3
F4
F5
F6
F7
F8
F9
F10
F11
F12
Trouble Code Screen Keyboard Functions
To perform this function
Clear Trouble Codes.
Close the Screen.
Press this Key
Del
Esc
25
Data Grid Screen Keyboard Functions
To perform this function
“Select” a Data Item.
Disable or enable updates of a Data Item.
Change to the Large Digital Meter Screen.
Change to the Data Chart Screen.
Mark a point on the Data Recorder, (press
the "Mark Button").
Stop Data Recording, (press the "Stop
Button").
Start Data Recording, (press the "Go
Button").
Close the Screen.
Press this Key
Up Arrow/Down
Arrow Keys
Spacebar
1
2
X
<
>
Esc
Large Meter Screen Keyboard Functions
To perform this function
Switch to the Data Chart Screen.
Move to the next Data Item in the list.
Move to the previous Data Item in the list.
Add a Second Meter.
Remove the Second Meter.
Move the Second Meter to the next item in
the list.
Move the Second Meter to the previous
item in the list.
Mark a point on the Data Recorder, (press
the "Mark Button").
Stop Data Recording, (press the "Stop
Button").
Start Data Recording, (press the "Go
Button").
Close the Screen.
26
Press this Key
Page-Down Key
Right Arrow
Key
Left Arrow Key
+
Alt and Right
Arrow Keys
together
Alt and Left
Arrow Keys
together
X
<
>
Esc
Data Chart Screen Keyboard Functions
To perform this function
Switch to the Large Meter Screen.
Move to the next Data Item in the list.
Move to the previous Data Item in the list.
Add a Second Chart.
Remove the Second Chart.
Move the Second Chart to the next item in
the list.
Move the Second Chart to the previous
item in the list.
Mark a point on the Data Recorder, (press
the "Mark Button").
Stop Data Recording, (press the "Stop
Button").
Start Data Recording, (press the "Go
Button").
Close the Screen.
Press this Key
Page-Up Key
Right Arrow
Key
Left Arrow Key
+
Alt and Right
Arrow Keys
together
Alt and Left
Arrow Keys
together
X
<
>
Esc
Sensor Data Screen Keyboard Functions
To perform this function
Mark a point on the Data Recorder, (press
the "Mark Button").
Stop Data Recording, (press the "Stop
Button").
Start Data Recording, (press the "Go
Button").
Close the Screen.
Press this Key
X
<
>
Esc
27
Introduction to ASSERT and Satisfy
Digital Wrench 3.0 was specifically designed to help technicians “fix it
fast and right the first time”. It uses the ASSERT and Satisfy
troubleshooting methodology to help diagnose both EFI and non-EFI
systems.
This powerful new version not only aids diagnosis, but also provides a
step by step process you can follow to ensure total customer
satisfaction. It does this by creating a unique work order for each
customer case that stores information about the customer complaint,
cause and correction.
So, what is ASSERT and Satisfy? Simply stated, it is a 7-step,
disciplined approach to problem solving and customer satisfaction.
Following this process correctly will help ensure better, faster
diagnosis and fewer come-backs. You can learn more about this
process by taking the ASSERT and Satisfy online training module on
the Know the Way Out website, but the outline is also presented below
for your reference:
ASSERT is an acronym that stands for:
• A = Ask - Collect customer data. You will need:
– Machine information: VIN, mileage, ownership history, etc.
– Maintenance history
– Detailed description of condition
• S = See - Verify condition and visually inspect.
– Perform walk around
– Look at machine for obvious causes
– Determine whether the condition can be verified safely and
without damaging the machine
– Verify the condition
– Identify any preventative maintenance that could have an
effect
– Identify outstanding service communications
• Safety Bulletins
• Service Bulletins or Team Tips that could have an
impact on condition
• S = Solve - Determine root cause
– Implement the 3i diagnostic process
• Illustrate – Create a diagram of the affected system
• Isolate – Test to isolate affected components
• Identify – Positively identify the root cause
– Why did this occur?
– What else might be affected?
– How can this be prevented in the future?
28
•
•
•
•
– Note: Systems are organized in ASSERT and Satisfy as
follows:
• Electrical – Includes any component that generates,
stores, distributes, controls or consumes electricity
• Drive – Includes any component used to support
internal combustion and distribute that power
• Chassis – Includes steering, suspension, braking,
cosmetic items, frame, track, skis, wheels and tires,
etc.
E = Explain - Plan and present your solution to the customer
– Determine the best, most cost-effective solution
– Describe your findings and recommendation
– Get the customer’s agreement on the repair
R = Repair - Complete the work
– Repair or replace affected components
– Perform appropriate service bulletin repair
– Complete necessary maintenance with customer approval
T = Test - Verify the effectiveness of the repair
– Confirm that the repair/maintenance was effective
– Sign off on work order
Satisfy = Follow up with the customer to ensure complete
satisfaction with your work.
Digital Wrench 3.0 supports the ASSERT and Satisfy process in two
ways:
1. The work order form, or “case”, includes many detailed questions
you can use to find clues to aid diagnostics. This form can also be
saved and printed.
2. On each vehicle home page for non-EFI vehicles, you will have
access to “Illustrations” (block diagrams) of key vehicle systems
and a list of tests you can use to “Isolate” root cause.
For experienced Digital Wrench users, please note the core
functionality remains the same. The additional new features are
designed to make the tool more user-friendly and applicable to more
models.
29
The ASSERT Process and ASK Form
The ASSERT Process and ASK form have been integrated into
Digital Wrench as part of the main screen shown when the software is
started. Once a vehicle has been selected, the ASK form is available
by selecting one of the buttons shown along the top of the screen.
Each of the ASSERT Steps is represented by a button (Ask, See,
Solve, Explain, Repair & Test) where the information relevant to that
portion of the process can be entered.
As the information is entered into the ASSERT pages, it is added to
the currently active Case File and stored on the vehicle hard disk.
These cases can be retrieved later by selecting the case file from the
“Select Existing Case” function shown on the start-up screen and
under the Quick Start Menu.
ASSERT Cases may also be printed out by selecting the “print”
button while one of the ASK form pages is displayed. A blank form
can be printed if desired by selecting a new vehicle and then selecting
the “print” button.
Filling in the ASK form pages and following the ASSERT process
can greatly increase both the speed and accuracy of diagnostics as
well as provide a record of the process to the customer.
30
Program Functions
Vehicle Selection Screen
• The Vehicle Selection Screen is used to select the vehicle being
tested.
• Select the Model Year, Product Line and Description by clicking
on the lists shown on the screen.
• If the system is configured with Start-up Help enabled, additional
icons will appear at the bottom of the screen where you can get
help on connecting to the selected Vehicle.
• Vehicles may also be selected by opening existing “cases”. Cases
are stored anytime vehicle and customer information is entered and
are kept on the hard disk.
31
Customer Information Screen
• The Customer Information Screen is used to enter general
information about the vehicle owner. The information is used on
the ASK form and is stored in the Case File on the hard disk.
• Entering customer and vehicle information is not required for the
system to operate properly, but adding the information will make
printed reports more useful.
• To enter information, simply select the box next to the Customer
Name, Address, Etc. and enter the required information.
32
Trouble Codes
The Trouble Codes Screen provides information on all diagnostic trouble
codes stored in the Engine Control Module. Each row in the list contains
several pieces of information on the particular trouble code.
• The following Trouble Code numbers may be shown on the Trouble
Codes Screen.
• The type of Trouble Code numbers shown will be different depending on
the vehicle/engine being tested.
Code
Number:
Blink Code:
Not Always
Displayed
Code:
Description
The Blink Code column shows the Trouble Code Number
that would be "blinked out" on the Malfunction Indicator
Lamp for this trouble code. If there is no number shown,
then the particular code does not have a Blink Code
Number.
The Code column indicates the trouble code number
associated with a particular fault. This is usually a two-digit
number.
A P-Code Number based on SAE standards may also be
shown. The "P" indicates that the trouble code is related to
a Powertrain component. P-Code numbers used here are
similar to the OBD II diagnostic standards used in the
automotive industry.
33
The following additional items may also be shown on the Trouble Codes
Screen.
• The information shown will depend on the Vehicle/Engine being tested.
• The "Description" and "Info" columns are always present.
Item:
Description
Description: The Description Column contains a brief description of
the nature of the fault code.
Status:
The Status Column will either show "Current" or
Not Always "Historic." "Current" indicates that the failure that caused
Displayed
the Trouble Code, is still present in the Engine
Controllers memory (also know as a Hard Fault). A
status of "Historic" indicates that the conditions that
caused the Trouble Code to be set are not currently
present in the system. Historic Codes are most often
caused by broken or loose connectors which cause
intermittent connection problems.
The Hours Column indicates when the Trouble Code set
Hours:
Not Always based on Engine Hours. Comparing this number to the
current Engine Hours gives an indication of how long
Displayed
ago the Trouble Code set.
The "#" Column indicates how many times the
#:
Not Always conditions necessary to set the Trouble Code have
occurred. A "1" in this column indicates that the code has
Displayed
set once and may also indicate that the conditions to set
the code are still present. A number greater than one
indicates that the conditions to set the code have come
and gone several times.
34
♦ Freeze Frame Trouble Code, (Not Always Displayed)
Usually, one of the Trouble Codes shown on the Victory Trouble
Code Screen will be highlighted with a Yellow Background. This
Trouble Code is what is known as the Freeze Frame Trouble Code.
The Freeze Frame Trouble Code is usually the first trouble code that
set if there are more than one code present and there will be additional
information available for this trouble code available under the Freeze
Frame Data Button.
♦ Freeze Frame Data, (Not Always Displayed)
The
Button on the bottom of the Trouble Codes Screen
can be used to view the Freeze Frame Data of the Freeze Frame
Trouble Code. The Freeze Frame Data are the values of the main
engine sensors at the moment the Freeze Frame Trouble Code was set.
Pressing the
Codes.
Button will return to display of Trouble
35
♦ Trouble Code Information Screen
Selecting the
button next to one of the trouble code descriptions
on the Trouble Codes Screen will bring up the Trouble Code
Information Screen.
The Trouble Code Information Screen contains more specific
information about the particular fault code along with possible causes.
There may also be a Wiring Diagram Button
present on
this screen. If this button is enabled, (i.e. not grayed-out) then there is
a wiring diagram available.
will be enabled when
The Guided Diagnostics Button
additional Guided Diagnostics Procedures are available for this
Trouble Code. Selecting the button will begin the diagnostic
procedure. Refer to the Guided Diagnostics Section in this manual or
the Software Help System for more information on Guided
Diagnostics.
♦ Clearing Trouble Codes
The Clear Trouble Codes Button
on the Trouble Codes
Screen can be used to erase any Historic Trouble Codes from the
Engine Controller Memory.
Only those trouble codes, which are marked as “Historic,” will be
erased. “Current” trouble codes cannot be erased from the controllers
memory, until the cause of the trouble code has been repaired.
36
Data Display Grid
The Data Display Grid Screen shows various sensor values as well as
the critical operating parameters of the engine control system. The
display is arranged in a grid format where all the information can be
seen at one time.
The grid shows the data item name, current value as well as the units
of measure, (i.e. volts, degrees, etc.) for each item.
The following control buttons are also available on the grid itself:
Button What this button does
The Green “Check” button indicates that the data item is
currently enabled and the data values will be updated. Clicking
on the green check button will disable updates of the particular
data value and will increase the update rate of the other items
on the grid. If you are only watching a few of the data items,
turning the other ones off will make the remaining items update
considerably faster.
The Red “X” button indicates that the data item is currently
disabled and the data values will not be updated. Clicking on
the red “X” button will re-enable updates of the particular data
value.
The Meter Button will switch the display from the data grid to
a large meter of the selected data item
The Chart Button will switch the display from the data grid to a
single chart of the selected data item
37
♦ Data Grid Configuration
One of the data items on the Display Grid is always highlighted with a
yellow bar. This is the "Currently Selected" item. The Yellow
Highlight can be moved by either clicking on another data item with
the Mouse or using the up/down arrow keys on the keyboard.
The buttons along the right side of the data grid provide control over
the position of data items and allow individual items to be added or
removed from the grid.
Different Data Grid configurations can also be saved and restored
using the Save & Load Buttons.
Refer to the Help System for a more detailed description of how to
modify the Data Grid Configuration.
Button What this button does
The Up Button moves the Selected Data Item (highlighted in
yellow) towards the top of the list.
The Down Button moves the Selected Data Item (highlighted
in yellow) towards the bottom of the list.
The Add Button opens up a menu of additional data items that
are available to be added to the Data Item Grid display. If the
display is already full, (14 items) one item must be removed
before adding a different one.
The Remove Button removes the currently selected data item
from the display. The remaining items will expand to fill the
space.
The Save Button opens a menu where the current list of
displayed items can be saved.
The Load Button displays the list of saved Data Grid Display
configurations. Select one of the saved configurations from the
list to restore the Data Grid layout to the way it was when the
configuration was saved.
38
♦ Data Recording Controls
The Data Recording Controls are located on the bottom of many of
the data display screens. These controls can be used to capture
important events in the engine controller data and review back
through the information to see the data over a specific period of time.
The following buttons and controls can be used to start and stop
recording as well as review the recorded information.
Button
What This Button Does
The Mark Button can be used to mark a certain point in the
recorded data where a significant event occurred, (such as a
misfire, or other fault). When this button is pressed, the
Trigger Point Marker will be displayed on the Record
Control to show the point in time when the button was
pressed. Once the Mark Button has been pressed, data will
continue to be recorded for a short time and will then stop to
allow the recorded event to be reviewed.
This button will only be enabled when data is being
recorded. Once it has been pressed, it cannot be pressed
again until the Go Button has been selected to restart the
recording process.
The Go Button can be used to restart the display and
recording of data after the Stop Button has been pressed.
When the Go Button is selected, all previously recorded data
is erased and the recording process begins again.
This button will only be enabled when the display of live
data has been stopped by selecting the Stop Button, or
shortly after a “Trigger Point” has occurred.
The Stop Button can be used to stop the display of live data
and allow the recorded information to be reviewed, (using
the Record Control).
This button will only be enabled after the Mark Button has
been pressed.
39
♦ The Record Slider Control
The Record Control can be used to move through recorded data once
the "Stop Button" has been pressed. The numbers at the bottom of the
“Slider” show the time in seconds since recording started. There are
several ways to move through and view the recorded data:
Button
What This Button Does
The Slider Bar shows the position of the currently displayed
data relative to the time when the first data was recorded.
The Slider Bar will move to the right as more data is
recorded and will stop moving when the Stop button has
been pressed.
Once the Stop Button has been pressed the Slider Bar can be
used to move around within the recorded data. Simply click
on the Slider Bar and while holding the mouse button down,
move to the left to view older data and to the right to view
newer data items.
The Previous Data Item Button is located on the far Left of
the Record Control. Once the Stop Button has been pressed,
this button can be used to move to the previous data item,
step-by-step each time the button is pressed.
The Next Data Item Button is located on the far Right of
the Record Control. Once the Stop Button has been pressed,
this button can be used to move to the next data item, stepby-step each time the button is pressed.
The Trigger Point Marker will be shown on the Record
Control when either the Mark Button has been pressed, or an
Automatic Trigger has occurred. This marker shows the
point in time when the Mark Button was pressed, or when
the Automatic Trigger happened.
40
Data Chart Screen
The Data Chart Screen displays a single data item in a chart format.
Time in seconds is shown horizontally on the chart and the data value
is shown vertically. The chart shows 10 seconds worth of information
and 30 seconds total can be stored in the Record/Playback controls.
The red “.” marks on the graph show the actual data points at the time
they were received from Engine Controller.
The following buttons and controls are available on this screen:
Button
What This Button Does...
The Next Data Item Button will change the chart
display to the next data item in the Data Grid List,
(moves to the next item down the list).
The Previous Data Item Button will change the chart
display to the previous data item in the Data Grid List,
(moves to the next item up the list).
The Plus Button can be used to add a second data chart
to the screen. When this button is pressed, a list of
available data items will be displayed in the center of
the screen. Select the data item for the second chart by
either clicking on the data item name, pressing the
number next to the item, or using the arrow keys on the
keyboard to move through the list.
Often there are more items on the list than are displayed
at one time. Use the arrow keys to move to the bottom
of the list to see any additional items.
The Meter Button will switch the display from the Data
Chart Screen to a single meter of the current data item.
41
Data Meter Screen
The Data Meter Screen displays a single data item as a large digital
meter.
The following buttons and controls are available on this screen:
Button
What This Button Does...
The Next Data Item Button will change the meter display
to the next data item in the Data Grid List, (moves to the
next item down the list).
The Previous Data Item Button will change the meter
display to the previous data item in the Data Grid List,
(moves to the next item up the list).
The Plus Button can be used to add a second meter to the
screen. When this button is pressed, a list of available
data items will be displayed in the center of the screen.
Select the data item for the second meter by either
clicking on the data item name, pressing the number next
to the item, or using the arrow keys on the keyboard to
move through the list.
Often there are more items on the list than are displayed
at one time. Use the arrow keys to move to the bottom of
the list to see any additional items.
The Chart Button will switch the display from the Meter
Screen to a single chart of the current data item.
42
Dual Chart and Meter Screens
Dual Chart Screen
Dual Meter Screen
The Dual Data Chart and Meter Screens are identical to the Data
Chart and Meter Screens except that two half-height charts or meters
are shown on the screen and there are Next Data and Previous Data
buttons for each one of the charts.
A second chart or meter can be added to the screen by selecting the
“Plus Button”
on the chart, or meter screen and selecting a
second data item from the list shown below.
43
Sensor Data Display
♦
♦
♦
♦
♦
♦
The Sensor Data Display Screen shows the values from the main
Engine Control System Sensors. The content of this screen depends
on the vehicle being tested.
Frontier Snowmobile
Throttle Position, Engine Speed, Engine Temperature and
Oxygen Sensor Volts are displayed as large digital meters.
Sportsman ATV
Intake Air Temperature Throttle Position, Engine Speed and
Engine Temperature are displayed.
Victory Motorcycles
Throttle Position, Engine Temperature, Barometric Pressure
and Air Temperature Sensors are displayed.
Direct Injected Watercraft
Throttle Position, Engine Temperature, Alternator Voltage and
Air Temperature Sensors are displayed.
MSX (4-Stroke) Watercraft
Battery Voltage, Throttle Position, Oxygen Sensor Voltage and
Engine Temperature Sensors are displayed.
Fusion / IQ / RMK
Throttle Position, Engine Temperature, Barometric Pressure
and Air Temperature Sensors are displayed.
The Data Recording Controls are also present on this screen. Refer to
the Data Recording Control section in this chapter for information on
how to use these functions.
44
Data Trigger Setup Screen, (Snapshot)
The Trigger Setup Screen allows the software to be set up to capture
certain events based on specific “trigger” criteria. Triggers can either
be the point where a Trouble Code is set, or where a specific data
value is greater than, less than, or equal to a particular value.
The “Clear Trigger Button”
can be used to clear out any
previously set up trigger points.
Select the “Exit Button” to close the Trigger Setup Screen without
setting a trigger.
Once a Trigger has been set up, you will be returned to the Data
Display Grid Screen. Now that a trigger has been set, there will be an
additional item on the screen in the lower left corner.
This Check Box tells you that triggering is “ON” and as soon as the
trigger conditions have been met, the data will be captured. If you
want to disable the triggering, simply click on the checked box with
the mouse, to turn triggering “OFF”.
45
♦ Trouble Code Triggering
1. Triggering on Trouble Codes is done by first selecting the
Button.
2. Next, select the trouble code you want to use as a Trigger, or
select “Any Trouble Code” to trigger when any trouble code
sets.
3. Finally, select the “Arm Trigger Button”
trigger and proceed to the Data Display Screen.
to set up the
♦ Data Item Triggering
1. Triggering on a data item is done by first selecting the
Button.
2. Next, Select the data item to trigger on from the list.
3. Enter the type of comparison, (Equal to, Greater Than, or Less
than).
4. Enter the Value to Compare to in the Value Box using the
keyboard.
5. Finally, select the “Arm Trigger Button “
trigger and proceed to the Data Display Screen.
46
to set up the
Special Tests Menu
Selecting the Special Tests Button
on the Main Menu will
bring up the Special Tests Menu for the currently selected vehicle.
The Special Tests Menu displays a list of any special tests, or
procedures available for the vehicle being tested.
The number of available tests shown on the menu will be different
depending on the Vehicle being tested.
Refer to the Digital Wrench Help System for more detailed
information on Special Tests & Functions for specific vehicles.
A test / procedure can be selected through a number of methods:
• Click on the number next to the test you want to run.
• Double-click on the text for the test.
• Pressing the number of the test on the keyboard.
• Use the arrow keys on the keyboard to move to the desired test and
then press the Enter key.
Click on the “X” in the upper right corner, or hit the “ESC” key on the
keyboard to close the Special Tests Menu without running any tests.
Note: The Feature Configuration/Registration selection shown at
the bottom of the Special Tests Menu is used to access the
Software Registration Screen.
Refer to the Software Help System for specific information
about Feature Configuration & Registration.
47
System Configuration
The System Configuration Screen can be used to set the Units of
Measure, Workshop Information and Communications Port setting.
Item
Units of
Measure
Workshop
Information
COM Port
Help
Balloons
Serial
Numbers
Start-up
Help
Content
48
What it Does
Select the desired units of measure using the “US” or
“Metric” buttons. The setting chosen here will be the
default for the system and will be used each time the
system is started.
Enter the Workshop Name and Address in the boxes
provided. This information is used on printed reports.
Select the communications port number where the Interface
Cable is connected to the computer. Click on the currently
displayed Comm port if you want to select a different one.
All the Communications Ports available for use will be
shown in this list.
NOTE: If the port you have the cable connected to is
not listed, it is likely that another software
application using this port. Refer to the
Troubleshooting Section for more information
Help balloons come up when the mouse pointer is left
sitting over one of the software buttons. They can be
turned on and off here.
Displays the Serial Number(s) for this license of the
diagnostic software.
Turns the Getting Started Prompt On or Off.
Controls weather the Vehicle Home Page content is loaded
from the PC hard disk (Local) or from the internet (Web)
instead.
Vehicle Home Page
The Vehicle Home Page is a new feature in version 3 and it replaces
the Manual Browser and Diagnostic Procedures screens used in
previous versions. All service documentation, diagrams and Guided
Diagnostic Procedures are available from this single location.
The screen is split into two components. A table of contents for the
selected vehicle is arranged in a “tree view” on the left side of the
screen. The right side of the screen is a display area that operates in
much the same way as a web browser.
Main topics are shown as a “book” icon in the tree view. DoubleClick on a topic (or on the + and – symbols) to expand and contract
the topic. Documents and other information are shown as a “page”
icon. Click on the document title to open the information in the
display page.
Vehicle Home Page Content (Local vs. Web):
There are two possible sources of the information shown on the
Vehicle Home Page . When Digital Wrench is first installed, the
documents displayed are those that are stored on the PC hard disk. If
the content source is changed to “Web” (on the Configuration
Screen), the information will be loaded from the Digital Wrench
Home Page on the Internet.
Web documents will always be the most current information and there
may be more information available. Loading the Vehicle Home Page
from the Internet requires that there be an Internet connection
available on the Digital Wrench PC and in most cases the Home Page
will take quite a bit longer to load.
49
Print
On certain screens, the Print Button will print out a report on the
default printer. When there is no information to print, selecting the
print button will have no effect.
All the reports will have the Customer Information and Workshop
Information included on the printout if it has been entered in on the
Customer/Vehicle and Configuration Screens. The Engine Controller
information will also be included on the report.
On this Screen
The Print Button Will....
Trouble Codes Screen
Print a list of the Trouble Codes currently
set in the engine controller.
Print a list of the data as it was when the
Print Button was selected.
Print the sensor data values as they were
when the Print Button was selected.
Print an image of the Data Chart as it was
when the Print Button was selected.
Print the data item in the meter as it was
when the Print Button was selected.
Print the current document shown in the
Information System Window. Use with
care, some documents are very long
and many, many pages will be printed
Data Display Grid
Screen
Sensor Data Screen
Data Chart Screen
Meter Screen
Vehicle Home Page
Help System
The Help Button will open the help system when selected. The Help
System contains the most complete and up to date information on
Digital Wrench. Although the information in the Help System is
similar to what is in this manual, always refer to the Help System first.
Exit Button
The Exit Button will close Digital Wrench and shut down
communications to the Vehicle.
50
Guided Diagnostics
Introduction
Guided Diagnostics provide step-by-step procedures for diagnosing
faults in the EFI or other systems.
The Guided Diagnostic Procedures take information normally
provided in a Flowchart or Trouble Tree format and presents each step
of the process as a single screen of information.
Each step of a diagnostic procedure provides Instructions on actions to
take, Measurements to be made, Questions to be answered, or will
display Diagnostic Conclusions.
Important Considerations
• Always read all instructions presented carefully and
completely. Failing to perform the instructions exactly as
written is guaranteed to produce incorrect diagnostic results.
• Don't skip steps unless you are absolutely sure that it won't
affect the outcome of the test.
• If you are going to go back through a procedure and restart testing
from an earlier point, always undo any instructions given when
you originally went through the steps. For example, if you are
backing up, through a step that instructs you to disconnect a
connector, reconnect it before backing up further. If you are unsure
about a diagnostic conclusion, it's usually best to reconnect
everything and restart the procedure from the beginning.
51
Common Buttons
The following buttons are located along the bottom right of a screen
of the Guided Diagnostics Screens:
Icon
Button Name
Image
What this button does
Displays a picture related to the
Instructions, or Measurement being
performed.
Wiring
Diagram
Displays a Wiring Diagram related to the
specific circuit being tested.
Backup
Backs up in the procedure to the previous
step. Note that the previous step may not
be the previous screen. Often, the Backup
Button will move back several screens.
Exit
Exit the Diagnostic Procedures.
Guided Diagnostics Screen types
There are several different types of screens used in the Guided
Diagnostic Procedures.
Screen Type
Purpose of this Screen
Instruction Screens are used to give you a
Instruction Screen message or to instruct you to perform some
operation.
Measurement screens lead you through a
Measurement Screen multimeter measurement and provide a list of
possible measurement results to select from.
Question Screens ask you a question and provide
Question Screen
a list of possible answers to select from.
Data Screens retrieve Data Items from the
Engine Controller and make decisions based on
Data Screen
the value of that data.
Trouble Code Screens retrieve Trouble Codes
Trouble Code Screen
from the Engine Controller for evaluation.
This screen displays the final diagnosis of the
Conclusion Screen
problem.
52
Instruction Screen
• Instruction Screens will look similar to the example above. They
will give you some piece of information, instruct you to do
something, or just serve as an introduction to the chart.
• After you have read the screen (and performed the task, if
necessary) click the Done/Continue Button to proceed to the next
step.
!!! Important !!!
•
Always follow any instructions given completely
and exactly.
•
Skipping a step or ignoring an instruction is
almost guaranteed to produce incorrect diagnostic
results.
53
Measurement Screen
• Measurement Screens aid in taking a measurement with a
multimeter. The measurement data is used in making the diagnosis.
After taking the Measurement, answer the Question about the
measurement.
• Always double check the connections and measurement before
providing the answer.
Screen Component
Measurement
Connection
Connection Picture
Question
Answer
54
Purpose
The measurement area displays information about
the measurement to be taken, such as the
recommended multimeter settings.
There may also be a short explanation of what is
being measured or why.
The connection area tells you where to hookup the
two leads of the multimeter. Pin numbers and wire
colors are often mentioned here.
The connection pictures (if available) give you a
real-life image of the involved wiring or the meter
connection to be made. If there is no Connection
Picture available, the button will be gray and nothing
will happen if you click on it.
The question area asks a question about the
measurement result. Note the measurement from the
multimeter and use it to choose the appropriate
answer in the answer area.
The answer area is the place for you to provide your
answer to the software. Click the number button
corresponding to the best answer to the question
asked, or double-click on the answer text itself.
Question Screen
• Question Screens are used to provide information to the Diagnostic
Procedures which cannot be obtained by direct measurements or
other means.
• There are two components to a Question Screen:
Screen Component
Question
Answer
Purpose
In the Question Area there may be
instructions given similar to the Instruction
Screen however there will always be a
Question asked.
The answer area is the place for you to
provide your answer to the software.
Click the number button corresponding to the
best answer to the question asked or doubleclick on the answer text itself.
Always read the Question carefully before
answering to make sure the correct answer is
provided.
55
Data Screen
• Data screens request data from the Engine Controller and use the
information returned to make a decision on which path to follow in
the Diagnostic Procedure. When the Continue Button is pressed,
the Data Value currently displayed is used to make the decision.
• The Interface Cable must be connected and the Ignition On before
you can proceed from this screen. If there are communication
problems, the Continue Button will be disabled and you won’t be
able to move on to the next step.
• There are some situations where a Data Screen will automatically
continue when a specific condition is met (such as, the Engine is
started). Most of the time however, the Continue Button should be
pressed to proceed.
Screen Component
Data Item
Instruction
Continue Button
56
Purpose
The Data Item Area will display the value of
a particular Sensor or other Data Item.
The Instruction Area will contain any
instructions or actions to be performed while
on this step.
Once all the actions have been performed,
select the Continue Button to proceed to the
next step.
The Continue Button is used to proceed to the
next step.
When the button is pressed, the current value
of the Data Item Area will be stored and used
in any decisions.
Trouble Code Screen
• The Trouble Codes Screen requests Trouble Code Information
from the Engine Controller and makes decisions based on what
Trouble Codes are set. The screen may or may not be visible.
• The Interface Cable must be connected and the Ignition On before
you can proceed from this screen. If there are communications
problems, the Continue Button will be disabled and you won’t be
able to move on to the next step.
• An invisible Trouble Code Screen will only take a short time to
evaluate the data it receives from the Engine Controller. If there is
a problem receiving this data, the Waiting for Communications
Screen will appear, (see the Troubleshooting section for more
information). The cause of the Communications Problem will have
to be resolved before the Diagnostic Procedure can continue.
• A visible Trouble Code Screen will give you instructions about
what, if anything, you need to do.
• The most common use for a visible Trouble Code Screen is a
Wiggle Test. The Wiggle Test is used to locate intermittent wiring
faults by continuously monitoring for Trouble Codes while the
wiring harness, connectors, sensors, etc. are "Wiggled", moved or
tapped. If no problems are detected, pressing the Continue button
will proceed to the next step in the procedure.
57
Conclusion Screen
• The Conclusion Screen will either display a Final Diagnosis and
suggested remedies to the problem or a list of potential problems
and additional test procedures to follow.
• Diagnostic Conclusion Screens can be printed by selecting the
Print Button on the Main Control Panel.
58
Troubleshooting:
♦ Waiting for Communications
• The Waiting for Communications Screen will appear if the Guided
Diagnostics System is attempting to retrieve information from the
Engine Controller and there is a Communications Problem. When
a few seconds have elapsed without a response from the Engine
Controller this screen will appear.
• To fix this problem make sure the software is communicating with
the Engine Controller. Most often the problem is that the Ignition
is OFF or the Interface Cable is not connected.
• If the Waiting for Communications Screen appears while the
Engine is Running at High Speed (greater than 1800 RPM), it may
be necessary to return to Idle to allow communications to be
reestablished.
• Also, in situations where you have used the Backup Button to
move back to previous steps in the procedure, it is very likely that
one or more connectors have been disconnected preventing
communications with the Controller. Whenever using the Backup
Button it is important to "undo" any instructions that were
performed as you backup through each of the previous steps.
• If the software is communicating with the engine controller and the
Waiting for Communications Screen still appears, try closing the
Screen and run the chart again.
59
Troubleshooting
Install Problems
Problems with installing the software can be caused by a variety of
things and the solutions depend on where the problem occurred.
• Errors during install are most often caused by a damaged or dirty
Install CD. Always handle the CD carefully and make sure there
are no fingerprints on it.
• Errors during install can also be caused by problems on the PC
Hard Disk. If problems with the Hard Disk are suspected, use
“Scandisk”, (a utility program that is part of Windows), or another
Hard Disk utility to check for and possibly repair any errors on the
disk.
Internet Explorer® and Acrobat Reader® Install Problems.
Problems that occur with installation of Microsoft Internet Explorer
6®, or Adobe Acrobat Reader® and solutions to those problems are
available at the Internet sites of Microsoft, (www.microsoft.com) or
Adobe Systems, (www.adobe.com).
Diagnostic System Install Problems
The following issues should be considered when problems occur
while installing the software.
• Always install Internet Explorer 6 ® and Acrobat Reader ® before
installing Digital Wrench Software. On older versions of
Windows, the install process will generate an error, if Internet
Explorer has not been installed.
• If the system needs to be rebooted during the install process, do not
select the “reboot later” option. Always reboot the PC before
continuing on to the next step. With older PC’s, this can be long
and time consuming process, but once it is done, updates to Digital
Wrench will go very quickly.
• On Windows NT, 2000 and XP Systems, always make sure that
the User Name you have logged in as has Administrator Rights.
Otherwise the install will fail.
60
Communication Problems
There are many possible causes of communications problems with the
vehicle. Often they are very simple to remedy.
Commstatus- No Cable or Power
This message is generated when Digital Wrench cannot detect the
presence of an Interface Cable at the communications port selected on
the Configuration Screen.
Problem
Solution
If you are sure you are connected to a
Some other software is using
particular Comm Port but you cannot
the Comm Port causing the
Diagnostic Software to default select this port on the Configuration
a different port than where the Screen then the most likely cause is some
other software using that port. This other
cable is connected.
software must be shut down before
running the Diagnostic Software.
Check the cable connection to the PC and
The Interface Cable is not
make sure Digital Wrench is configured to
connected to the PC, or to a
different communications port the same communications port.
than the one selected on the
Configuration Screen.
The Vehicle Ignition Key or
Make sure the Ignition Key and/or
Run/Kill Switch is off.
Run/Kill Switch is on.
A "Diagnostic Jumper", or fuse Make sure any special procedures or
has not been properly installed, jumpers necessary to test the particular
(Frontier ACS Bypass Fuse) vehicle have been properly installed.
Refer to the Help System for information
on these Special Procedures.
The Power, or Ground circuits Verify that the Battery Voltage and
Ground Circuits in the vehicle Diagnostic
in the Vehicle Diagnostic
Connector are damaged or the Connector are functioning and that the
connector terminals are not damaged. Try
cable is not receiving power
Digital Wrench on another vehicle to
from the vehicle.
verify its operation.
The PC Communications port
Verify the proper operation of the
has been damaged, or the
communications port using a PC
Operating System
diagnostic application.
configuration is not correct.
The interface cable has been
Replace the Interface Cable.
damaged.
Note: If there is an Icon like this
on the screen near the
system clock, then the Palm Pilot HotSync® Manager is
running and may be using the same port as the Diagnostic
Software. Close the Palm Pilot software and try again.
61
Commstatus- Always “Initializing Communications”
This message is generated when Digital Wrench has detected a "powered"
Interface Cable and is attempting to initialize communications with the
Engine Controller.
Problem
Solution
The Engine RPM is too high.
Bring the engine back to idle until
Communications cannot be
communications status is again
initialized if the engine is running
"Connected"
at high speed.
Turn the ignition key on, and make
The Vehicle Ignition Key is off, or sure any special procedures or
a "diagnostic jumper" has not been jumpers necessary to test the
properly installed.
particular vehicle have been
properly installed.
The communications circuit
Check the wiring and connections.
between the Diagnostic Connector Verify operation of the system on
and the Engine Controller is
another vehicle.
damaged.
The Engine Controller has been
Check the Engine Controller power
damaged, or is not receiving
circuits. Verify operation of the
power.
system with another Engine
Controller.
The Interface Cable has been
Replace the Interface Cable.
damaged.
Communications often lost and “Re-initializing”
There are many situations that can cause communications with the Engine
Controller to stop and have to be and re-initialized. As with other problems,
it is often useful to verify operation of the system on another vehicle to
determine if the cause is the vehicle being tested, or Digital Wrench itself.
Problem
Other programs running in the PC
are slowing the computer too
much or using too much memory.
Solution
Make sure all other applications
have been shut down before
running Digital Wrench.
Check all the wires and terminals
Damaged terminals, or wires in
between the Engine Controller and
the Vehicle Diagnostic connector, PC Communications Port to make
sure there are no loose or damaged
or Interface Cable.
connections.
The PC does not meet the
Make sure the PC meets the
minimum requirements for Digital minimum requirements.
Wrench.
62
General Program Problems
General Program Problems are those which prevent Digital Wrench
from operating properly or operating at all. Most problems that affect
the operation of Digital Wrench are caused within the PC being used,
or Operating System configuration problems.
Many times, if Digital Wrench will not run properly, rebooting the PC
may resolve the problem. In extreme cases, it may be necessary to
completely re-install the PC operating system and/or service packs as
well as Digital Wrench itself to restore any damaged or missing system
files.
No Comm Ports Available on this Computer
If the following messages appears when the program is run for the
first time:
This means that there are no available communications ports available
on the PC and the system will not be able to communicate to the
Interface Cable.
This situation can occur when other applications that use serial
communications ports are running and have taken all the available
ports on the PC. Make sure there is at least one free port that no other
applications are using and that the Interface Cable is connected to this
port.
Note: If there is an Icon like this
on the screen near the
system clock, then the Palm Pilot HotSync® Manager is
running and may be using the same port as the Diagnostic
Software. Close the Palm Pilot software and try again.
63
The Selected Serial Port (x) is already in use
When the following messages appears when the program is run:
This means that the Comm Port that Digital Wrench has been
configured to use, is no longer available.
This situation can occur when other applications that use serial
communications ports are installed after Digital Wrench has been
installed. Make sure there are no other applications running which are
using the same communications port as Digital Wrench.
Note: If there is an Icon like this
on the screen near the
system clock, then the Palm Pilot HotSync® Manager is
running and may be using the same port as the Diagnostic
Software. Close the Palm Pilot software and try again.
System Configuration Invalid
This error can occur when the install process was not completed
properly, or some other situation caused the program installation to
fail. Try uninstalling and re-installing the application again (see the
uninstall section on page 15). If this error continues to come up,
contact technical support.
64