1
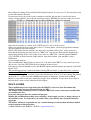
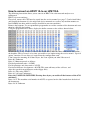
How to convert an HP8711A to an HP8712A.
The following instruction allows you to convert an HP8711A scalar network analyzer to a
fullfeatured
HP8712A vector analyzer.
First of all, remove the CPU board as stated into the service manual (see page 7-5 and related links),
and identify the bootrom (it’s the only flash device mounted on a socket, my machine mounts an
Intel 28F010, but other models could be installed in your own machine).
Remove the bootrom. Use an eprom/flash programmer to read the contents of the bootrom and store
them in a disk file for backup.
Using the programmer hex editor, display the buffer contents at the address shown below.
As you can see, every 32 bytes (2 rows in the editor above) there are some information that define
the machine. This is because every time you enable a new option using the service menu’s “Special
option” function, 32 new bytes are copied into the configuration stack.
I don’t know the meaning of all those bytes, but I can explain you what I discovered.
Bytes 0,1 Unknown
Bytes 2,3 Bootstrap mode as follows:
For final production units = 215DH.
For lab prototype and demo units = 215CH.
For fastest firmware development = 011CH (This turns off many of the self tests, and
skips the search for new firmware on the floppy disk).
Bytes 4-8 The string “HP87*”
Bytes 9-13 all zeros (unknown)
Bytes 14-17 OPTION SWITCHES. Zeroing these bytes you enable all the features of the 8712
machine!!!
Bytes 18-27 The machine serial number in ASCII, as reported on the label attached on the back of
the instrument.
Bytes 28-32 Unknown
Here follows the dump of my modified full featured bootrom. As you can see, I deleted all the stack
record other than the first one.
If you want to leave the stack records, remember to modify the one that is stored at the lower
address (in my machine, it was the one starting at address 1FF60H, but you may add a new record
at address 1FF40H too). Remember that records with higher address are ignored.
Note that my machine is a demo (code 215CH at bytes 2 and 3 of the record).
When you patched the bytes from offset 14 to 17 (zeroing them), you must program the bootrom,
and then reinstall it into the machine.
Put the CPU board into the machine, and after you reassembled all its parts, turn it on and see.
Note that the bootstrap procedure still says “HP8711A”, but after the bootstrap has finished, the
main popup window in the center of the screen will say “HP8712A” with the optional IBASIC
(1C2) and SRL & Fault Location (100) enabled. After that window, your machine is now a
fullfeatured
vector network analyzer.
These modifications should apply to releases B, C, D and E of the HP871x series, but I can’t state
this for sure, since the CPU board has been changed in that releases.
Note that on some old machines to use the IBASIC option you must update the contents of the PAL
named U137.
This modification doesn’t work on machines having FW revision 2.xx since they have a reduced
performance CPU board.
Many thanks to Lang Lee Van who checked the modification on his 8713C and worked. He pointed
out that the “C” version used the 28F020 flash memory as boot rom, instead of the 28F010.
Moreover, the stack records have doubled in length, since additional 32 bytes have been added to
hold the MAC address of the embedded LAN adapter.
DISCLAIMER
These modifications have been made after the HP8711x series has been discontinued by
Agilent (formerly known as Hewlett-Packard or HP)
The Author of this document wrote it to all those HP8711A owners who want to modify their
own machine for free.
Do not use this procedure for commercial purpose.
Making this modification to third party machines, do not apply any fees or money charges to
the machine owner. If you do that, you could violate your country laws about the firmware
copyright.
The author will never responsible for any eventual damages to the machine hardware linked
to the execution of this procedure.
© 2006-2010 Massimo PORZIO - IK1IZA – [email protected]