1
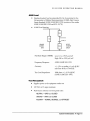
DNINEVADA
Operating Manual
231D/232D
OPERATING
To order this
use Part Number 9508-0173.
MANUAL
G
H
I
Corrections
Test Procedure Revisions
Updating Contact Information
11/97
10/00
11/02
Refunds & Credits
days ot purctlaS~
Return Procedure
Evc~tV
l,rcx:iudt re1:u:rrJled :tor .renmd,1mxl1tmulSt b<~ aoconlpaJOlec! bv a Kemrn ~r1atc~.At:lthC>~ltlOjl(~:.Mi\) number, to be obtained from our Order
modules are not covered under this warranty.
W8lrranty
Disclaimer
WARNING
Unauthorized user modificatioOlS or ~lppJlica1tionl bey-ond tile 1=mbJlished ~;pe(::ilicatlc>OlS .ffia'V result: ttl ie!ec:tt1ca! s.hoc:k hazards or improper operation. DNI
;;
231D/232D
1
OPERATING
MANUAL
SYSTEM FAMILIARIZATION
Safety Considerations •••••••••••••••••••••••••••••••••••••••••••••••••••••••••••••••••••••••••••••••• 1-1
General ••••••••••••••••••••••••••••••••••••••••••••••••••••••••••••••••••••••••••••••••••••••••••••••••• 1-1
Safety Symbols •••••••••••••••••••••••••••••••••••••••••••••••••••••••••••••••••••••••••••••••••••• 1-1
Introduction •••••••••••••••••••••••••••••••••••••••••••••••••••••••••••••••••••••••••••••••••••••••••••••••• 1-2
Specifications ••••••••••••••••••••••••••••••••••••••••••••••••••••••••••••••••••••••••••••••••••••••••••••• 1-4
Meter •••••••••••••••••••••••••••••••••••••••••••••••••••••••••••••••••••••••••••••••••••••••••••••••••••• 1-4
Current•••••••••••••••••••••••••••••••••••••••••••••••••••••••••••••••••••••••••••••••••••••••••••••••••• 1-4
Equipment Current ••••••••••••••••••••••••••••••••••••••••••••••••••••••••••••••••••••••••••••••• 1-4
Resistance ••••••••••••••••••••••••••••••••••••••••••••••••••••••••••••••••••••••••••••••••••••••••••• 1-4
Voltage ••••••••••••••••••••••••••••••••••••••••••••••••••••••••••••••••••••••••••••••••••••••••••••••••• 1-4
AAMI Load •••••••••••••••••••••••••••••••••••••••••••••••••••••••••••••••••••••••••••••••••••••••••••• 1-5
Test Receptacle ••••••••••••••••••••••••••••••••••••••••••••••••••••••••••••••••••••••••••••••••••• 1-5
Ground Fault Interrupter•••••••••••••••••••••••••••••••••••••••••••••••••••••••••••••••••••••• 1-6
Test Lead ..acks••••••••••••••••••••••••••••••••••••••••••••••••••••••••••••••••••••••••••••••••••• 1-6
ECG Leads Binding Posts •••••••••••••••••••••••••••••••••••••••••••••••••••••••••••••••••••• 1-6
Power Requirements•••••••••••••••••••••••••••••••••••••••••••••••••••••••••••••••••••••••••••• 1-6
Physical Characteristics•••••••••••••••••••••••••••••••••••••••••••••••••••••••••••••••••••••• 1-7
Temperature Range ••••••••••••••••••••••••••••••••••••••••••••••••••••••••••••••••••••••••••••• 1-7
Accessories •••••••••••••••••••••••••••••••••••••••••••••••••••••••••••••••••••••••••••••••••••••••••••••••• 1-7
Standard ••••••••••••••••••••••••••••••••••••••••••••••••••••••••••••••••••••••••••••••••••••••••••••••• 1-7
Optional •••••••••••••••••••••••••••••••••••••••••••••••••••••••••••••••••••••••••••••••••••••••••••••••• 1-7
2
INSTALLATION
Unpacking and Inspection•••••••••••••••••••••••••••••••••••••••••••••••••••••••••••••••••••••••••• 2-1
Claims•••••••••••••••••••••••••••••••••••••••••••••••••••••••••••••••••••••••••••••••••••••••••••••••••••••••••• 2-1
Warranty Repair •••••••••••••••••••••••••••••••••••••••••••••••••••••••••••••••••••••••••••••••••••••••••• 2-2
Preparing for Use •••••••••••••••••••••••••••••••••••••••••••••••••••••••••••••••••••••••••••••••••••••••• 2-2
3
OPERATING INSTRUCTIONS
Instrument Familiarity •••••••••••••••••••••••••••••••••••••••••••••••••••••••••••••••••••••••••••••••• 3-1
iii
231D/232D
OPERATING
MANUAL
Top Panel Controls, Displays, and Connectors
3·1
Rear Panel Connectors and Controls
3-4
Testing Procedures ••••••••••••••••••••••••••••••••••••••••••••••••••••••••••••••••••••••••••••••••••••• 3·5
Start·Up and Self·Test••••••••••••••••••••••••••••••••••••••••••••••••••••••••••••••••••••••••••3-6
System Voltage •••••••••••••••••••••••••••••••••••••••••••••••••••••••••••••••••••••••••••••••••••• 3·7
Grounded Power Systems ••••••••••••••••••••••••••••••••••••••••••••••••••••••••••••• 3·7
Isolated Power Systems ••••••••••••••••••••••••••••••••••••••••••••••••••••••••••••••• 3·7
Power Cord Resistance•••••••••••••••••••••••••••••••••••••••••••••••••••••••••••••••••••••••• 3·8
Case Leakage, Extemal Lead •••••••••••••••••••••••••••••••••••••••••••••••••••••••••••••• 3·9
Case Leakage, Ground Conductor••••••••••••••••••••••••••••••••••••••••••••••••••••• 3-1 0
Extemal Meter,
~mV
••••••••••••••••••••••••••••••••••••••••••••••••••••••••••••••••••••••• 3-11
Equipment Current ••••••••••••••••••••••••••••••••••••••••••••••••••••••••••••••••••••••••••••• 3-11
Extemal Meter, mOHMs ••••••••••••••••••••••••••••••••••••••••••••••••••••••••••••••••••••• 3-12
DC Only ••••••••••••••••••••••••••••••••••••••••••••••••••••••••••••••••••••••••••••••••••••••••••••••• 3-12
ECG Tests (232D only) ••••••••••••••••••••••••••••••••••••••••••••••••••••••••••••••••••••••• 3-13
Leakage to Ground (232D only)
3-13
Interlead Leakage (232D only)
3-14
Isolation Test (232D only) ••••••••••••••••••••••••••••••••••••••••••••••••••••••••••• 3-14
Performance Waveforms (232D only)
3-15
Power-Down ••••••••••••••••••••••••••••••••••••••••••••••••••••••••••••••••••••••••••••••••••••••• 3-15
4
PERFO'RMANCE TEST
Required Equipment••••••••••••••••••••••••••••••••••••••••••••••••••••••••••••••••••••••••••••••••••••4·1
Test Procedure••••••••••••••••••••••••••••••••••••••••••••••••••••••••••••••••••••••••••••••••••••••••••••4-2
iv
231D/232D
3
OPERATING
MANUAL
OPERATING INSTRUCTIONS
Figure 3-1. 232D Top and Rear Panel Locator
3-2
Figure 3-2. Power Cord Resistance and Case Leakage, Extemal Lead•••• 3-16
Figure 3-2. Case Leakage, Ground Conductor
3-16
Figure 3-4. External Meter Connections for IIA, mY, and mQ
3-17
Figure 3-5. ECG Lead Test Connections
3-17
v
2 3 1 D I 2 3 2 DO PER A TIN G
MANUAL
NOTE: This column is alphabetized.
ANSI American National Standards Institute
A ampere
AAMI Association for the
Advancement of Medical Instrumentation
BPM beats per minute
dB decibel
°C degrees Celsius (centigrade)
OF
Fahrenheit
DMM digital multimeter
EEPROM electrically erasable PROM
ECG electrocardiograph or electrocardiogram
EUT equipment under test
Hz hertz
in inch
k kilo- (103)
kHz kilohertz
kQ kilohm
LED
LCD
M
MHz
Mn
light-emitting diode
liquid crystal display
meg(a)- (106)
megahertz
megohm
-meter
f..1 micro- (10-6)
m
~
microampere
f..1V
microvolt
m milli- (10-3)
rnA milliampere
m V millivolt
n ohm
lb pound
PROM programmable read-only memory
s second
TRMS true root mean square
V volt
w watts
vi
231D/232D
OPERATING
MANUAL
vii
231D/232D
OPERATING
MANUAL
Read this chapter to acquaintyourse!f with the
specifications andftatures of DNI's 231D and 232D
S aft!Y AnalYzers.
General
This instrument and related documentation must be reviewed for
familiarization with safety markings and instructions before you operate
the instrument. Refer to the 231D/232D Operating Manual for
operating instructions.
Safety Symbols
I:\.
m
•
The symbol to the left is the Operating Manual symbol.
When you see this symbol on the instrument, refer to the
Operating Manual.
System Familiarization -
Page 1·1
231D/232D
OPERATING
MANUAL
The DNI Models 231D and 232D Safety Analyzers are precision voltage,
current, and resistance meters designed expressly for testing the electrical
safety level of both the patient environment and associated electrically
operated equipment.
Both electrical safety analyzers measure
D
grounding resistance of the equipment power cord;
D
leakage current from the equipment's chassis or ground wire;
D
equipment load current;
D
voltage gradient (mV) and intergrounding resistance (mOhms)
using the external meter function; and
D
power system AC voltages:
•
neutral to hot,
•
neutral to ground, and
•
hot to ground.
A test receptacle mounted on the top panel of both meters is used to simulate
a wide range of power system fault conditions to assist the operator in
assessing the equipment's level of safety. Push-button switches on the front
panel select
•
neutral (open and closed),
•
ground (open and closed), and
•
polarity (normal and reverse).
An internal ground fault circuit interrupter (GFCI) protects both the operator
and the equipment under test. If a hot line to ground fault condition
exceeding 10 milliamperes occurs, line voltage is immediately removed from
the test receptacle.
For conducting more extensive power system tests, both electrical safety
analyzers are compatible with the DNI Model 202A Isolated Power and
GFCI Test Module. Contact your DNI Nevada representative for details.
System Familiarization -
Page 1-2
231D/232D
OPERATING
MANUAL
The Model 232D additionally simplifies the electrical safety testing of more
sophisticated electrically operated equipment with up to 10 direct-patient
electrodes, such as a diagnostic 12-lead electrocardiograph or recorder. The
test receptacle wiring can be set to simulate a wide range of power system
faults (as listed earlier).
The Model 232D conducts these added tests:
o Leakage current tests referenced to power ground
•
on all patient electrodes;
•
on individual patient electrodes-RL, 'RA, LA, LL, and
the Vl-6 set; and
•
between specified patient electrode pairs:
right arm and left arm (RA-LA),
right arm and right leg (RA-RL), and
left arm and right leg (LA-RL).
o Isolation of all patient electrodes from ground with 120 VAC
applied by the analyzer. (The current-limited test voltage is
applied to the patient electrodes only when a front panel
push-button is depressed and held by the operator.)
o A wide range of ECG simulations and performance testing
waveforms.
System Familiarization - Page 1-3
231D/232D
OPERATING
MANUAL
Meter
•
Measurements displayed on a 3V2-digit LED display.
•
Overrange indicated by a flashing 1999.
•
The appropriate range selected automatically with the units of
measure shown on the mode switch.
•
During resistance measurements, a separate LED illuminates
when the current source has been activated.
Current
Refer to the AAMI Load section later in this chapter for measurement
accuracies.
Equipment Current
•
One range: 0.1 to 15.0 amps.
•
Accuracy: 5% of range.
Resistance
Refer to the AAMI Load section later in this chapter for measurement
accuracies.
Voltage
•
Three voltage ranges:
0.0 to 199.9 mV
oto 1999 mV
0.0 to 199.9 V
•
AAMI Load used for these measurements.
•
Millivolt (mV) ranges autoranging.
•
Voltage (V) ranges used for line voltage measurements of the test
receptacle powering the analyzer.
•
Millivolt (mV) ranges usable for external meter jack
measurements.
System Familiarization - Page 1-4
231D/232D
OPERATING
MANUAL
AAMILoad
•
Simulated patient load recommended by the Association for the
Advancement of Medical Instrumentation (AAMI), Safe Current
Limits Standard (ANSI/AAMI ES1-1993) (revision of the earlier
ANSI/AAMI ESl-1985 and SCL-12/78).
•
AAMI Load drawing:
10kQ
1kQ
0.015 JlF
OUTPUT
TO METER
CIRCUIT
LEAKAGE
CURRENT
INPUT
Full Scale Ranges (fRMS):
Low: 0.1 to 199.9 f.lA/mV
High: 200 to 1999 f.lA/mV
Frequency Response:
ANSI/AAMI ESl-1993
Accuracy:
+/- (50/0 or reading +1 f.lA) @ DC
and from 48 Hz to 100 kHz.
Test Load Impedance:
1000 ohms +/- 0.50/0 @ DC
(ANSI/AAMI ESl-1993)
Test Receptacle
•
Supplies power to the equipment under test
•
120 VAC at 15 amps maximum
•
Push-button switches on front panel select
NEUTRAL - OPEN and CLOSED
GROUND - OPEN and CLOSED
POLARITY - NORMAL, REVERSE, and OFF/RESET
System Familiarization - Page 1·5
231D/232D
OPERATING
MANUAL
Ground Fault Interrupter
•
Detects a TEST RECEPTACLE ground fault of >10 rnA ±10O/o.
•
Disconnects the hot and neutral lines to the TEST RECEPTACLE
when a fault is detected.
•
Resets by setting the POLARITY switch to the OFF/RESET (center)
position.
Test Lead Jacks
•
Four standard banana jacks.
•
Two for the METER input and two for the CURRENT SOURCE.
•
Arranged to allow a set of Kelvin cables to be connected to the
four terminals and left in for all tests without damaging the
analyzer.
•
The CURRENT SOURCE connected only internally for resistance
measurements, so that it will not interfere with leakage
measurements even though the cables are connected to the
CURRENT SOURCE jacks.
•
All protected against accidental application of line voltage.
ECG Leads Binding Posts
•
Ten universal binding posts.
•
Accept 3.2-mm or 4-mm pins or disposable snap
electrocardiograph electrodes.
Power Requirements
System Familiarization -
•
117 VAC at 15 amps 50 to 60 Hz
•
Detachable hospital-grade power cord (supplied)
•
Uses very little power by itself « 100 rnA)
•
15-amp rating for equipment under test plugged into the test
receptacle
Page 1-6
231D/232D
OPERATING
MANUAL
Physical Characteristics
Size
Weight
22.9-cm L x 22.9-cm W x 10.2-cm H
(9-in L x 9-in W x 4-in H)
2.07 kg (4.5 lb)
Temperature Range
Operating
15° to 35°C (59° to 95°F)
Storage
0° to 50°C (32° to 122°F)
Standard
DNI Part #
•
Soft vinyl carrying case
9530-0044
•
Power cord*
3010-0012
•
Kelvin cable test leads (2)
9501-0032
•
Ground pin adapter (2)
9503-0004
•
231D/232D Operating Manual
9508-0173
231D/232D Service Manual
9508-0271
Optional
•
System Familiarization - Page 1·7
231D/232D
OPERATING
MANUAL
This chapter contains informationfor inspecting the
instrumen; processing a claim) repackagingfor shipmen;
andpreparingfor use.
F
ollOW standard receiving practices upon receipt of the instrument. Check
the shipping carton for damage. If damage is found, stop unpacking the
instrument. Notify the carrier and ask for an agent to be present while the
instrument is unpacked. There are no special unpacking instructions, but be
careful not to damage the instrument when unpacking it. Inspect the
instrument for physical damage such as bent or broken parts, dents, or
scratches.
Our routine method of shipment is via common carrier, FOB origin. Upon
delivery, if physical damage is found, retain all packing materials in their
original condition and contact the carrier immediately to file a claim.
If the instrument is delivered in good physical condition but does not operate
within specifications, or if there are any other problems not caused by
shipping damage, please contact DNI Nevada or your local sales
representative.
Installation -
Page 2-1
231D/232D
OPERATING
MANUAL
The warranty statement for this product is at the front of this manual.
When shipping an instrument to DNI Nevada for repair, complete the
Service Return Form and attach to the instrument. Completing this form will
help to ensure timely repair of your instrument.
Use the original carton and packaging material for shipment. If they are not
available, we recommend the following guide for repackaging:
•
Use a double-walled carton of sufficient strength for the weight
being shipped.
•
Use heavy paper or cardboard to protect all instrument surfaces.
Use nonabrasive material around all projecting parts.
•
Use at least four inches of tightly packed, industrial-approved
shock-absorbent material around the instrument.
The Models 231D/232D are portable instruments designed for use on threewire 115V 50-60 Hz power.
No cables or wires other than those supplied need be used. No cables need to
be fabricated.
Installation -
Page 2-2
231D/232D
OPERATING
MANUAL
Use this chapter to learn about operating the
231D/ 232D Safety AnalYzers.
In this section you will [md the names and descriptions of the controls,
displays, and connectors on the top and rear panels of the 231D and 232D
Safety Analyzers. The numbers in the list refer to the locations illustrated in
3-1.
Top Panel Controls, Displays, and Connectors
1
2
Display - A 3V2-digit LED display that indicates the results of the
measurement being made. Decimal points are placed automatically.
The units of measure are shown on the MODE switch.
MODE Switch - Sets the type of measurement to be made.
Mode1232D onlY: The ECG position enables the LEADS selector switch.
3
DC ONLY Switch - Changes the measurement mode from AC+DC to
DC only.
4
CURRENT SOURCE ACTIVE Lamp - Lights up in resistance tests
indicating when the current source is connected properly.
5
POLARITY Switch - A three-position switch. Selects NORMAL or
REVERSE polarity of the hot and neutral lines to the TEST
RECEPTACLE. In the center position, shuts power OFF to the TEST
RECEPTACLE and RESETS the ground fault circuit.
6
GROUND OPEN Switch - Momentarily OPENs the ground connection
to the TEST RECEPTACLE.
Operating Instructions - Page 3·1
231D/232D
OPERATING
MANUAL
See Supplement
Figure 3-1.
Operating Instructions -
Page 3-2
232D Top and Rear Paneluca/or
231D/232D
OPERATING
MANUAL
7
NEUTRAL OPEN Switch - Momentarily OPENs the neutral line to the
TEST RECEPTACLE.
8
LEADS Selector Switch (1vfode1232D onlY) - Selects the ECG lead test to
be made. The MODE switch must be in the ECG position to activate
these tests.
9
ISO TEST (1vfode1232D onfy)- Connects the ECG isolation voltage to the
ECG LEADS.
10
ECG PERFORMANCE Switch (1vfode1232D onfy)- Selects the ECG
Performance Waveform to be applied to the ECG LEADS. The MODE
switch must be in the ECG position, and the LEADS switch must be in
the ECG PERFORMANCE SWITCH ENABLE position to enable this mode.
11
ECG PERFORMANCE Indicator Lamp (1vfode1232D onfy) - In the ECG
PERFORMANCE waveform mode, this lights up and the display blanks.
12
GROUND FAULT INTERRUPT Lamp - Lights up after a ground fault has
been detected.
13
TEST RECEPTACLE - Power receptacle for the equipment under test.
14
ECG LEADS Binding Posts (1vfode1232D onfy) - Accept all styles of
electrocardiograph connectors-disposable snaps, 3.2-mm pins, and
4.0-mm pins.
Operating Instructions -
Page 3-3
231D/232D
OPERATING
MANUAL
Rear Panel Connectors and Controls
15
POWER ON/OFF Switch - Turns on the power.
16
POWER CORD Plug - Power cord plugs in here.
17
FUSE Holder - 15-amp 3AG slow-blow fuse protects the instrument
and the equipment under test.
18
External Probe Connections
CURRENT SOURCE - The current source for measuring resistance is
internally connected to these jacks when the MODE switch is in the
mOHM measuring position.
EXTERNAL METER - The metering circuit is internally connected to
these jacks when the MODE switch is in any position requiring external
connections.
Operating Instructions -
Page 3·4
231D/232D
OPERATING
MANUAL
This section describes the types of electrical safety and EeG performance
tests that can be performed using the Models 231D/232D.
While these analyzers perform a wide range of tests on both general and
critical medical devices,
to the particular equipment under test (EUT)
service manual for the required checkout procedure and testing protocol.
Operating Instructions -
Page 3·5
231D/232D
OPERATING
MANUAL
Start-Up and Self-Test
Before using the analyzer to test any other equipment, we recommend that
you do the following self-test:
1. Plug the analyzer into the wall socket.
2. Turn the power ON.
3. Set the MODE switch to SELF TEST.
The display should read 1000 +/-20, and the CURRENT SOURCE ACTIVE
lamp should be illuminating. If this is not the case, the instrument is
not functioning properly, and it should be repaired before using.
The self-test is not intended to be a complete checkout of the instrument but
rather a quick method of determining if it is operational. To do a complete
performance check, see the Peiformance Test chapter for instructions.
Operating Instructions - Page 3·6
231D/232D
OPERATING
MANUAL
System Voltage
The system voltages from either a grounded or an isolated power outlet can
be easily measured without using external test leads.
Grounded Power Systems
See Supplement
For a grounded power oudet, the neutral conductor is referred to as the line
one (L1) and the hot conductor is referred to as the line two (L2). With a
properly wired 120-VAC grounded power oudet, the following values should
be read:
1. With the MODE switch in the L1-L2 position, the display reads the
hot to neutral or line voltage.
2. With the MODE switch in the L1-GND position, the display reads
the neutral to ground voltage which should be no more than
6 VAC or 50/0 of the previously measured line voltage.
3. With the MODE switch in the L2-GND position, the display reads
the hot to ground voltage which should be approximately equal to
the previously measured line voltage.
If the power outlet is wired backward (reverse polarity), line voltage
(L1-L2) reads the same. However, L1-GND and L2-GND readings are
reversed. If ground (GND) wire is open, both the L1-GND and L2-GND
read low and of equal value.
Isolated Power Systems
When testing balanced-line isolation power systems, the line voltage (L1-L2)
measurement remains the same as above. However, the L1-GND and L2-GND
measurements read low and of equal value.
Operating Instructions - Page 3-7
231D/232D
OPERATING
MANUAL
Power Cord Resistance
To test power cord resistance:
1. Set the MODE switch to POWER CORD RESISTANCE.
2. Set the TEST RECEPTACLE POLARITY switch to the OFF (center)
position.
3. Plug the equipment under test into the TEST RECEPTACLE located
on the top of the Model 232D.
4. Connect the dual banana plug end of a Kelvin cable to the two
red rear panel jacks.
5. Connect the alligator end of the Kelvin cable to a grounded point
on the case of the equipment under test.
The CURRENT SOURCE ACTIVE lamp lights up to indicate that the
connection is made. The display reads the resistance (in mOHMs)
from the case to the power receptacle of the equipment under
test.
This is a four-terminal resistance measurement. The Kelvin cable
connects one end of the current source and the positive input of the
measuring circuit through separate wires. Thus, the voltage drop in
the test leads does not affect the meter reading.
The same scheme is used inside the Model 232D at the receptacle
ground pin, so the resistance of the wiring in the instrument does not
affect the reading. The resistance of the test receptacle adds to the
reading «2 mn).
Operating Instructions -
Page 3·8
231D/232D
OPERATING
MANUAL
Case Leakage, External Lead
To make case leakage measurements:
1. Set the MODE switch to CASE LEAKAGE fJA, EXT LEAD.
2. Connect a Kelvin cable to the red rear panel jacks.
3. Connect the other end of the cable to the case of the equipment
under test.
4. Case leakage measurements can now be made for various line
conditions:
•
poweron
•
power off
•
normal polarity
•
reverse polarity
•
closed or open ground
•
closed or open neutral
5. If a ground fault is detected when the POLARITY switch is placed in
either the NORMAL or REVERSE position, the TEST RECEPTACLE is
automatically shut off again.
To reset it, return the POLARITY switch to OFF/RESET, then back on
again.
Operating Instructions - Page 3-9
231D/232D
OPERATING
MANUAL
Case Leakage, Ground Conductor
To measure case leakage through the ground wire:
1. Set the MODE switch to CASE LEAKAGE
~A,
GROUND CONDUCTOR.
2. Without using any test leads, leakage through the ground wire of
the power cord can be measured with the TEST RECEPTACLE,
GROUND switch OPEN. This test configuration facilitates the
measurement of leakage current for double-insulated devices
utilizing a three-conductor power plug.
3. If a ground fault is detected when the POLARITY switch is placed in
either the NORMAL or REVERSE position, the TEST RECEPTACLE is
automatically shut off again. To reset it, return the POLARITY
switch to OFF/RESET, then back on again.
Operating Instructions -
Page 3·10
231D/232D
OPERATING
MANUAL
Extemal Meter, J1AImV
To measure a current of up to 2000 J.!A or a voltage up to 2000 mV:
1. Set the MODE switch to EXT METER, IlAlmV.
2. Connect one Kelvin cable to the two red jacks and the other
Kelvin cable to the two black jacks. If you are using single test
leads, connect one single lead to the red EXTERNAL jack and the
other single lead to the black EXTERNAL jack.
3. A current of up to 2000 J.lA or a voltage up to 2000 mV can now
be measured between the cables. The AAMI Load is connected,
which may load down voltage measurements where the
impedance of the voltage source is high.
Equipment Current
To measure the operating current of the equipment under test:
1. Set the MODE switch to EQUIPMENT CURRENT.
2. Set TEST RECEPTACLE switch to NORMAL POLARITY.
Operating Instructions - Page 3-11
231D/232D
OPERATING
MANUAL
External Meter, mOHMs
To measure low value resistances:
1. Set the MODE switch to EXT METER, mOHM. In this mode, the
current source and measurement circuits are both connected to
the rear panel jacks.
2. Connect one Kelvin cable to the red jacks and the other Kelvin
cable to the black jacks.
3. Connect the resistance to be measured between the alligator clips.
Be sure the CURRENT SOURCE ACTIVE lamp lights up when the
connections are made.
This is a four-terminal technique used to accurately measure low value
resistances (i.e., less than 2 Q). This is also the only measurement
requiring two Kelvin cables.
DC Only
To filter out the AC portion of the measured signal and get a separate reading
of DC only (rather than AC +DC) for volts and current:
•
Operating Instructions -
Press the DC ONLY button.
Page 3-12
231D/232D
OPERATING
MANUAL
ECG Tests (2320 only)
For all ECG tests:
1. Set the MODE switch to ECG.
2. Connect
equipment under test to the TEST RECEPTACLE.
3. Connect the ECG leads to the ECG LEADS posts.
The leakage tests that follow can be made for:
•
normal/reverse polarity
•
closed/open ground
•
closed/open neutral
To measure the leakage of all leads to ground:
1. Set the LEADS selector switch to ALL.
2. The next five LEADS switch positions-RL, RA, LA, LL, and V1-6measure the leakage of individual leads to ground.
3. Patient lead leakage measurements can be made for:
•
power on/off
•
normal/reverse polarity
•
closed/open ground
•
closed/open neutral
Operating Instructions - Page 3·13
2310/232D
OPERATING
MANUAL
Interlead Leakage (232D only)
To measure leakage between the specified leads:
1. Set the LEADS, INTERLEAD selector switch to positions RA-LA,
RA-RL, and LA-RL.
2. Patient interlead leakage measurements can be made for:
•
normal/reverse polarity.
•
closed/open ground.
•
closed/open neutral.
•
power on/off.
Isolation Test (232D only)
To measure the leakage that would result if line voltage were to be applied to
the EeG terminals:
1. Set the LEADS selector switch to ISO TEST.
2. Press the ISO TEST button.
Operating Instructions -
Page 3·14
231D/232D
OPERATING
MANUAL
Performance Waveforms (2320 only)
To select a performance waveform to be applied to the ECG LEADS:
1. Set the LEADS selector switch to the ECG PERFORMANCE SWITCH
ENABLE position.
2. The ECG PERFORMANCE SWITCH ENABLE switch now selects any
of the waveforms listed below. All amplitudes are for Lead I.
•
•
SQUARE WAVE - 0.125 Hz (at 1 mV)
To check low-end -3db cutofffrequenfY of the
SQUAREWAVE-2Hz(atlmV)
To check amplitude accurary and damping of the
monitor.
monitor.
•
SINE WAVEs 10,40, 60, 100 Hz (at 1 mV)
To checkfrequenfY response ofmonitor and to check linefrequenry
rejection.
•
TRIANGLE WAVE 2 Hz (at 3 mV)
To check linearity ofmonitor.
•
ECG waves - 30, 60, 120, 180, 240 BPM (at 1 mV)
To check monitor EeG rate indicator and rate alarm limits.
Power-Down
After completing the tests:
1. Set the POLARITY switch to OFF.
2. Turn the 231D/232D POWER OFF.
3. Disconnect equipment under test from the TEST RECEPTACLE.
4. Unplug the 231D/232D.
We recommend that the instrument be stored in the storage case
provided.
Operating Instructions - Page 3·15
2 3 1 D I 2 3 2 DO PER A TIN G
MANUAL
EUT
TESTREC
MODEL 232
Figure 3-2.
Power Cord Resistance and Case L.eakage) ExternalLead
EUT
+CURRENT
TESTREC
+EXTERNAL
-EXTERNAL
-CURRENT
ECG POSTS
MODEL 232
Figure 3-3.
Operating Instructions - Page 3·16
Case L.eakage) Ground Conductor
231D/232D
+CURRENT
OPERATING
MANUAL
TEST REC
+EXTERNAL
ECG POSTS
MODEL 232
Figure 3-4. ExternalMeter Connectionsfor jJAJ
ml/; and mil
EUT
+CURRENT
TESTREC
+EXTERNAL
-EXTERNAL
-CURRENT
ECGPOSTS
MODEL 232
Figure 3-5. ECG Lead Test Connections
Operating Instructions -
Page 3-17
231D/232D
OPERATING
MANUAL
The performance test in this chapter checks the operation of
the 232D Safety Anafyzer. This performance check is
usualfypeiformed upon the initial receipt of the
instrument.
4V2 digits
•
Digital Multimeter (DMM) -
•
DC Current Source -
•
Sine Wave Generator -
•
10-12A 60-Hz Load -
•
15-A 60-Hz Current Meter -
1% accuracy
•
Power Receptacle Tester -
Woodhead Model 755P
or equivalent
•
Resistors -
1000
±10 IlA
60 Hz to 1 MHz
10mVto 1000mVRMS
portable electric heater
9.31 ill, 2 W, 1.0%
13.0 ill, 2 W, 1.0%
0.1 Q, 1/8 W, 0.10/0
Performance Test -
Page 4-1
231 D/232D
OPERATING
MANUAL
1. Connect the instrument to an appropriate power source and turn
it on.
2. Set MODE switch to SELF TEST.
The display should read 1000 ±20, and the CURRENT SOURCE
ACTIVE LED should illuminate.
3. Set the MODE switch to L1-L2. Monitor the line voltage.
The display should
the line voltage
V.
4. Press DC ONLY.
The display should
to .0 or .1.
5. Set the MODE switch to L1-GND.
The display should read <50/0 of the measured value
L1-L2.
6. Set the MODE switch to L2-GND.
The display should read -0/ +50/0 of the measured value of L1-L2.
7. Set the MODE switch to POWER CORD RESISTANCE.
The display should be flashing 1999.
8. Connect a Kelvin cable to the red EXT and red CUR jacks.
Connect the other end of the Kelvin cable to the GND pin of the
TEST RECEPTACLE.
The display should read <002
9. Set the MODE switch to CASE LEAKAGE JlA, EXT LEAD. Connect a
1000-f.lA DC current source between the TEST RECEPTACLE, GND
pin and the Kelvin cable.
The display should read 1000 ±20 flA.
10. Set the MODE switch to CASE LEAKAGE JlA, GROUND CONDUCTOR.
Connect a 1000-f.lA DC current source between the TEST
RECEPTACLE, GND pin and chassis ground (front panel screw). Set
the OPEN GROUND switch to OPEN.
The display should read 1000 ±20 f.lA.
Performance Test -
Page 4-2
231D/232D
OPERATING
MANUAL
11. Set the MODE switch to EXTERNAL METER, 1JAIrnV. Measure the
resistance between the EXT METER jacks.
The resistance should be between 995 and 1005 n.
12. Connect a 1000-mV, 60-Hz sine wave, decoupled through a 100JlF nonpolarized capacitor, to the EXT METER jacks. (Decouple the
red
jack; the black jack should be ground.)
The display should read 1000 ±20 mY. (The AAMI load will cause
a 2.4% error if the sine wave generator has a 50-n output
resistance and is terminated in 50 n.)
13. Switch the sine wave to 100 mY.
The meter should read 100.0 ±2.0 mV.
14. Switch to 10 mY.
The reading should be 10.0 ±2.0 mV.
15. Set the signal generator to 1000 mVat 1000 Hz.
The display should read 724 ±20 mV.
16. Set the signal generator to 1000 mV at 10kHz.
The display should read 105.0 ±4.0 mV.
17. Set the signal generator to 1000 mVat 100 kHz.
The display should read 14.4 ±4.0 mY.
18. Set the MODE switch to EXT METER, mOHM. Connect two Kelvin
cables to the EXT METER and CURRENT jacks.
The display should be flashing 1999.
19. Short the cables together. Move them around to get the minimum
reading on the display.
The meter should read <004.
20. Connect the 0.1-0 resistor to the cables.
The proper reading should be 0.1 ±.002 O.
Performance Test - Page 4-3
231 D/232DOPERATING
MANUAL
21. Set the MODE switch to ECG. Set the LEADS switch to ALL. Connect
a 1OOO-fJ,ADC current source between any ECG post and the
TEST RECEPTACLE, GND pin.
The display should read 1000 ±20.
Check all ECG posts.
22. Set the LEADS switch to RL. Connect the DC current source to the
RL binding post.
The display should read 1000 ±20.
Repeat for RA, LA, LL, and V1 binding posts.
23. Set the LEADS switch to the INTERLEAD position of RA-LA.
Connect the DC current source to the RA and LA binding posts.
The display should read 1000 ±20.
With the DC current source still connected to the RA and LA posts,
ensure that the display reads less than 5.0 fJ,A in the RA-RL and LARL switch positions.
Repeat this test with the DC current source connected to the other
two INTERLEAD selections of RA-RL and LA-RL. Ensure that the
readings are less than 5.0 JlA in the other two untested INTERLEAD
switch positions.
24.
Set LEADS switch to ISOLATION TEST. Press ISO TEST.
The display should read <2 IlA.
25. Connect any ECG post to ground with ISO TEST depressed.
The display should read 1000 ±100.
26. Set the LEADS switch to ECG PERFORMANCE TEST ENABLE.
The ECG PERFORMANCE Indicator Lamp should light up, and the
display should blank.
Performance Test -
Page 4-4
231D/232D
OPERATING
MANUAL
27. Connect the ECG LEADS Binding Posts to an electrocardiograph
and check all waveforms.
28. Connect a Power Receptacle Tester to the TEST RECEPTACLE and
check for proper operation of the OPEN NEUTRAL, OPEN GROUND,
and POLARITY switches.
29. Set the MODE switch to EQUIPMENT CURRENT. Connect the 10-A
60-Hz load to the TEST RECEPTACLE. Monitor the current with
the lS-A current meter. Set the POLARITY switch to NORMAL.
The display should match the current meter within 5%.
Remove the test load.
30. Connect the 13.0-kn resistor from HOT to GND
the TEST
RECEPTACLE. While not touching the resistor, set the POLARITY
switch to NORMAL. The GROUND FAULT INTERRUPT Lamp should
not be lighted.
Repeat with the 9.31-kn resistor, and the GROUND FAULT
INTERRUPT Lamp should light up.
Performance Test -
Page 4-5
Manual Supplement
Manual Title:
Part Number:
Print Date:
Revision/Date:
231D/232D Operating
2242845
Supplement Issue:
Issue Date:
Page Count:
1
10/06
1
I, 11/02
This supplement contains information necessary to ensure the
accuracy of the above manual.
© 2006 Fluke Corporation. All rights reserved. Printed in U.S.A.
231D/232D Operating
Manual Supplement
Change# 1
On page 3-2, Figure 3-1 change the following:
Under TEST RECEPTACLE:
From: L2 HOT
To:
L1 HOT
From: L1 NEUT
To:
L2 NEUT
Under MODE selection, SYSTEM VOLTAGE change the following:
From: L2-GND
L1-GND
To:
L1-GND
L2-GND
On page 3-7, under Grounded Power Systems replace the first sentence with the following:
For a grounded power outlet, the neutral conductor is referred to as the line two (L2)
and the hot conductor is referred to as the line one (L1).
Change steps 2 and 3 as follows:
10/06
2.
With the Mode switch in the L2-GND position…..
3.
With the Mode switch in the L1-GND position…..
1