1
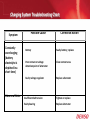
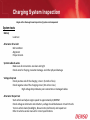
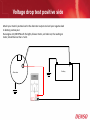
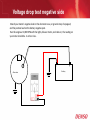
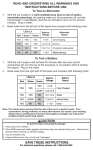
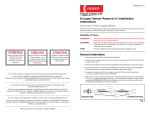
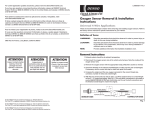
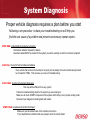
System Diagnosis
Proper vehicle diagnosis requires a plan before you start
Following a set procedure to base your troubleshooting on will help you
find the root cause of a problem and prevent unnecessary repeat repairs .
STEP ONE: Understand the Customer’s Concern
Information collection beyond the basics.
Questions asked MUST be related To the system you will be working on and the customer complaint
STEP TWO:
Check for Technical Service Bulletins
Every vehicle that comes into the shop for a repair (not necessary for routine maintenance) should
be checked for TSB’s , This can save you hours of troubleshooting.
STEP THREE:
Conduct a Systematic Diagnosis
This step will be different for every system
Follow the troubleshooting steps for the system you are working on.
Make sure to check EVERY component of the system and that they are in proper working order.
Document your diagnosis including tests and results.
STEP FOUR: Complete and Confirm the Repair
Make sure you have taken care of the customers concerns.
Try to duplicate the conditions that were present when the vehicle failed
Charging System Troubleshooting Chart
Symptom
Batteries not
charging
Possible Cause
Corrective Action
1. Insufficient belt tension, worn belt
1. Tighten or replace
2. Defective battery(s) or battery
connections
2. Check battery and battery
terminal connections
3. Blown fuse or fusible link
3. Check fuse and fusible link;
replace as needed
4. Check voltage drop
4. Defective wiring
5. Replace alternator
5. Faulty alternator
6. Reduce load by turning off all
unnecessary accessories
6. Excessive electrical load
Charging System Troubleshooting Chart
Symptom
Constantly
overcharging
(battery
electrolyte is
depleted in a
short time)
Abnormal Noise
Possible Cause
Corrective Action
Battery
Faulty battery; replace
Poor contact at voltage
detection point of alternator
Clean contact area
Faulty voltage regulator
Replace alternator
Insufficient belt tension
Tighten or replace
Faulty bearing
Replace alternator
Charging System Inspection
Begin with a thorough visual inspection of system and components
System tests:
Battery
Load test
Alternator drive belt
Belt condition
Alignment
Proper tension
System cables & wires
Make sure all connections are clean and tight
Check wires for fraying, insulation damage, and other physical damage
Voltage drop test
Check positive side of the charging circuit. (0.2volts of less)
Check negative side of the charging circuit. (0.2 volts or less)
High voltage drop indicates poor connections or damaged cables
Alternator Output test
Start vehicle and adjust engine speed to approximately 2,000RPM
Check voltage at alternator and at battery voltage should be between 13 and 15 volts
Turn on vehicle loads (headlights, blower motor, defrosters) and repeat test
Refer to vehicle service manual for correct specifications
Voltage drop test positive side
Attach your meter's positive lead to the alternator output stud and your negative lead
to battery positive post.
Run engine at 2,000 RPM with the lights, blower motor, and radio on, the reading on
meter, should be less than .2 volts
-
+
Battery
Alternator
0.2
Voltage drop test negative side
Attach your meter's negative lead on the alternator case, or ground strap if equipped,
and the positive lead on the battery negative post.
Run the engine at 2,000 RPM with the lights, blower motor, and radio on, the reading on
your meter should be .2 volts or less.
-
+
Battery
Alternator
0.2
WWW.DENSOAFTERMARKET.COM
VoltageDENSO
dropTech
test
negative
side
Hotline
800-366-1123