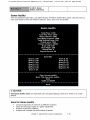
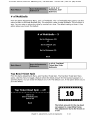
1
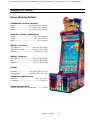
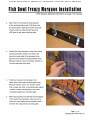
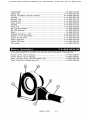
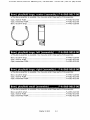
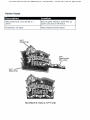
Click Here For Game Availability & Prices | BMIGaming.com | Global + 561.391.7200 | US / CA 800-746-2255 To Purchase This Item, Please Visit : BMIGaming.com | Call Global Sales : + 561.391.7200 | USA / CA : (800) 746-2255 Contents Chapter 1. Safety .................... 1-1 Live Well: Keep Safe .............................. 1-1 Key to Safety Terms ............................... 1-1 Safety Instructions for Fishbowl Frenzy ..... 1-1 Chapter 2. Setup ..................... 2-1 Game Machine Details ............................ 2-1 Quick Installation Guide .......................... 2-2 Detailed Assembly Instructions ............... 2-3 Unpack the Game Machine ..................... 2-3 Remove Shipping Insert & Screws ............ 2-4 Join the Cabinets ................................... 2-5 Check 10 connections between cabinets ... 2-6 Assemble & Install the Marquee ............... 2-7 Inspect Your Work ................................. 2-8 Gameplay ........................................... 2-10 Chapter 3. Adjustments, Audits & Diagnostics ............................ 3-1 Menu System ........................................ 3-1 Diagnostic Button Panel .......................... 3-1 Navigating Through Menus ...................... 3-1 Improve Earnings .................................. 3-2 How This Chapter Can Help ..................... 3-2 Tour of the Menu System ........................ 3-3 1.0.0.0, Main Menu ................................ 3-4 1.1.0.0, Coin Adjustments ...................... 3-5 1.1.1.0, Coin 1 ...................................... 3-6 1.1.2.0, Coin 2 ...................................... 3-6 1.1.4.0, Price Per Play ............................ 3-7 1.1.5.0, Swipe Card Mode ....................... 3-7 1.1.6.0, Reset Adjustables to Factory Defaults ...................................... 3-8 1.2.0.0, Coin Audits ............................... 3-9 1.3.0.0, Game Audits ........................... 3-10 1.3.1.0, Clear Current Audits ................. 3-11 1.4.0.0, Game Adjustments .................. 3-12 1.4.1.0, Attract Sounds ........................ 3-12 1.4.2.0, # of Multiballs ......................... 3-13 1.4.3.0, Top Bowl Ticket Spin ................ 3-13 1.4.4.0, Ticket Value ............................ 3-14 1.4.5.0, Ticket Amount Per Ticket .......... 3-15 1.4.6.0, Recall Owed Tickets/Credits ...... 3-15 1.4.7.0, Bowl/Drain Ticket Adjustments .. 3-16 1.4.8.0, Top Bowl Ticket Adjustments..... 3-17 1.4.8.1, Top Bowl 1 Tickets ................... 3-18 1.5.0.0, Diagnostics ............................. 3-19 1.5.1.0, Standard Switch Tests .............. 3-21 1.5.2.0, Bowl Opto Switch Tests ............ 3-22 1.5.3.0, Coin Meter Tests ...................... 3-23 1.5.4.0, Ticket Dispenser Tests .............. 3-24 1.5.5.0, Blower and Gantry Tests ........... 3-25 1.5.5.1, Gantry Controller Test .............. 3-26 1.5.6.0, Show FPS ............................... 3-26 1.5.7.0, Auto Drop Ball ......................... 3-27 1.6.0.0, Software Update ...................... 3-27 1.7.0.0, Sound Volume .......................... 3-28 1.8.0.0, System Information .................. 3-29 1.9.0.0, Set Date .................................. 3-29 Chapter 4. Troubleshooting .... 4-1 Power Fuses .......................................... 4-1 Block Diagram ....................................... 4-1 Restore Missing Game Features ............... 4-2 Test Playfield Opto Switches ................... 4-3 Test Gantry Opto Switches ...................... 4-4 Clean the LCD and Playfield .................... 4-5 Replace the Top Speakers ....................... 4-7 Marquee Lights Troubleshooting .............. 4-8 Motor & Solenoid Troubleshooting ............ 4-9 Opto Troubleshooting ............................ 4-10 Peripheral Troubleshooting: Inputs ......... 4-10 Peripheral Troubleshooting: Outputs ....... 4-11 System-Wide Troubleshooting ................ 4-12 Disaster Recovery: Flood ....................... 4-13 Disaster Recovery: Fire ......................... 4-14 Disaster Recovery: Lightning Strike / ESD / EMP ............................ 4-15 Chapter 5. Parts ..................... 5-1 Understanding the Parts Chapter ............. 5-1 List of Assemblies .................................. 5-1 Blower ................................................. 5-2 Bowl, playfield large, center .................... 5-3 Bowl, playfield large, left ........................ 5-3 Bowl, playfield large, right ...................... 5-3 Bowl, playfield small .............................. 5-3 Bowls, machined ................................... 5-4 Cabinet, CPU / pod ................................ 5-4 Cabinet, main LCD ................................. 5-5 Canopy................................................. 5-6 Chute, gantry ball .................................. 5-7 Conduit, gantry cable ............................. 5-7 CPU / I-O / PS / HD ............................... 5-8 Door, LCD cabinet top ............................ 5-8 Gantry ................................................. 5-8 Glass, chute .......................................... 5-9 Glass, front ........................................... 5-9 Kits, service .......................................... 5-9 LCD / playfield ..................................... 5-10 Loader ................................................ 5-10 Marquee .............................................. 5-10 Marquee, Flat ....................................... 5-11 Marquee, Mini ...................................... 5-11 Panel, control ....................................... 5-12 Playfield .............................................. 5-12 Power, line ........................................... 5-13 Shield ................................................ 5-13 Solenoid, ball server .............................5-14 Supply, 24-volt power ........................... 5-14 Switch, EOS away .................................5-14 Switch, EOS home ................................ 5-14 To Purchase This Item, Please Visit : BMIGaming.com | Call Global Sales : + 561.391.7200 | USA / CA : (800) 746-2255 To Purchase This Item, Please Visit : BMIGaming.com | Call Global Sales : + 561.391.7200 | USA / CA : (800) 746-2255 User’s Manual for Fishbowl Frenzy Machine ∆ WARNING: Mold and Mildew can endanger your health. Mold removal can be hazardous to your health and that of co-workers. Spores can invade the lungs and cause respiratory disease. Removal chemicals contain chlorine bleach, which is toxic. During removal, appropriate protective clothing and strong ventilation to the outdoors is necessary. A trained and properly equipped HazMat team should encapsulate and remove mold or mildew from the premises. ∆ WARNING: Restraining cables. You might need to angle the front glass beyond the extent of restraining cables. (The same applies to the LCD.) In that case, you must disconnect these cables. Take care to protect the fragile glass and LCD. Don’t let them free-fall out of the cabinet! The LCD might slam into the control panel and break. The front glass could snap or splinter. Before resting the glass and LCD on the CPU (pod) cabinet, remove the top panels. Otherwise, the glass or LCD might shatter against the player button. Shards of glass could fly in every direction. ∆ WARNING: LCD. Handle the liquid crystal display with care. Avoid serious injuries from shattered glass. ∆ WARNING: Transporting. Movers should watch out for one another, avoid injury and be respectful of heavy equipment. Glass and fragile components require special care. ∆ WARNING: Water. Never allow the game machine to come into contact with water, sewage or mud. If such contact occurs, drying the machine won’t render the machine safe again. Shut off the machine and service it. Repair or replace the electronics. Lube mechanical joints and moving parts. Disinfect surfaces to protect users from bacterial or mold exposure. Otherwise, death or injury by fire, shock, contamination or illness is likely. CAUTION: Auto Drop Ball serves balls randomly. While a technician may use this feature to diagnose blower and gantry problems, normal gameplay is impossible. Before restoring the game machine to service, disable this feature. CAUTION • Avert accidents and malfunctions! Your installation must be safe and mechanically stable. It must comply with building codes, ordinances and procedures in this manual. • For safety’s sake, turn off any malfunctioning game device. Have a qualified technician service the machine. Call your distributor and see if your warranty covers the service fee. Your warranty is in force for six months after your purchase. CAUTION: ESD / EMP. The term ESD stands for electrostatic discharge. The term EMP stands for electromagnetic pulse. ESD is a conducted threat to your equipment. EMP is a radiated threat. Yet wiring can inductively pick up an EMP, converting EMP into a conducted threat. Both natural and man-made sources can produce ESD or EMP. ESD and EMP effects vary from software disruption to hardware malfunctions, damage or destruction. Chapter 1. Safety 1-2 To Purchase This Item, Please Visit : BMIGaming.com | Call Global Sales : + 561.391.7200 | USA / CA : (800) 746-2255 User’s Manual for Fishbowl Frenzy Machine CAUTION: Marquee. Before transporting a game machine, remove the marquee. Otherwise, the marquee could break off. CAUTION: Liability. This equipment might be subject to damage from static discharges or power surges. Team Play assumes no liability for equipment damage. We recommend a surge protector. CAUTION: PC handling. The hard drive is sensitive to mechanical shocks. Gentle handling will reward you with long and reliable operation. Otherwise, a sharp rap to an operating hard drive can destroy it. CAUTION: Playfield surface. The playfield surface is a soft plastic. A mild cleaner is necessary. Use of abrasives will scratch this plastic surface. Abrasives can also pit the glass monitor screen. CAUTION • Reserved Rights. Team Play reserves the rights to this document. Reproduction requires prior permission from Team Play. • Intellectual property laws protect the game machine’s hardware, software and content. • Product specifications might change without notice. CAUTION: Shipping Screws. You must remove the shipping screws. Leaving them in might damage the LCD. CAUTION: Show FPS. Before putting the game into service, disable this feature. Otherwise, code will overwrite game graphics and spoil gameplay. CAUTION: Start Mode. When you start the game machine, don’t go straight into Diagnostic Mode. Instead, allow the machine to start in Game Mode so that the switches initialize properly. Then after a few moments, you may enter Diagnostic Mode. Otherwise, switches might start in the wrong position during a game, causing a malfunction. CAUTION: The menu, Reset Adjustables to Factory Defaults can reset both coin and game settings. Take care: There is no “undo” feature. CAUTION: The Coin Audits menu can reset both coin and game settings. Take care: There is no “undo” feature. Chapter 1. Safety 1-3 To Purchase This Item, Please Visit : BMIGaming.com | Call Global Sales : + 561.391.7200 | USA / CA : (800) 746-2255 User’s Manual for Fishbowl Frenzy Machine CAUTION: Flood water can contain minerals that could damage your equipment. CAUTION: The Game Audits menu can reset both coin and game settings. Take care: There is no “undo” feature. CAUTION: Ventilation. Allow at least two inches of clearance for ventilation between the back of the game machine and the building wall. Otherwise, the wall will obstruct ventilation fans at the top of the cabinet. The machine might overheat. CAUTION: When joining cabinets or installing panels, avoid pinching wires. CAUTION: You are responsible for proper installation, maintenance and operation. Team Play Inc. isn’t accountable for damage resulting from faulty assembly, maintenance or operation. ♦ NOTICE: Balls, installing from front. You can install balls from the front or back of the machine. To install from the front, open the speaker panel and drop the balls onto the playfield. ♦ NOTICE: Copyright 2014 by Team Play Inc. All rights reserved. Keep this manual available for use. ♦ NOTICE: Patent www.teamplayinc.net/legal.html ♦ NOTICE: Speaker Replacement. You must replace the top speakers in pairs. . ♦ NOTICE: Trademark. Fishbowl Frenzy is a trademark of Team Play Inc. All rights reserved. Chapter 1. Safety 1-4 To Purchase This Item, Please Visit : BMIGaming.com | Call Global Sales : + 561.391.7200 | USA / CA : (800) 746-2255 Chapter 2. Setup Game Machine Details DIMENSIONS (without marquee) Height .......................... 99 inches (2.52 meters) Depth ........................... 56 inches (1.42 meters) Width ........................... 40 inches (1.02 meters) MARQUEE (TOPPER) DIMENSIONS Height .................................. 33” (0.84 meters) Depth ................................... 16” (0.41 meters) Width ......................................... 39” (1 meter) WEIGHT (unpacked) LCD Cabinet ........................600 lbs.(272.16 kg) CPU Cabinet (Pod) ................ 150 lbs. (68.04 kg) Marquee.................................. 20 lbs. (9.07 kg) WEIGHT (shipping) LCD Cabinet .......................725 lbs. (328.85 kg) Pod .................................... 190 lbs. (86.18 kg) Marquee................................ 40 lbs. (18.14 kg) POWER Domestic...................... 120 VAC @ 60 Hz, 6.3 A International ................ 230 VAC @ 50 Hz, 3.5 A OPERATING TEMPERATURE Farenheit .................................. 32° F to 104° F Centigrade ................................... 0° C to 40° C OPERATING HUMIDITY Relative humidity, non-condensing ......... 5 - 95% Chapter 2. Setup 2-1 To Purchase This Item, Please Visit : BMIGaming.com | Call Global Sales : + 561.391.7200 | USA / CA : (800) 746-2255 To Purchase This Item, Please Visit : BMIGaming.com | Call Global Sales : + 561.391.7200 | USA / CA : (800) 746-2255 To Purchase This Item, Please Visit : BMIGaming.com | Call Global Sales : + 561.391.7200 | USA / CA : (800) 746-2255 Remove Shipping Insert & Screws You’ll Need These Tools • 7/16-inch socket • T15 tamper-proof Torx driver • 3/4-inch end wrench • T27 tamper-proof Torx driver • #2 Phillips screwdriver [ ] 1. This step requires a T15 tamper-proof Torx driver. From the side of the LCD cabinet, remove the speaker panel retaining screws. (One screw on each side of the cabinet.) [ ] 2. At the top of the LCD cabinet is a foam shipping insert. (Look under the cable support from the ball server assembly.) The foam prevents the ball-server trolley from crashing into the ends of the gantry. Remove the insert. [ ] 3. Load the balls (minimum: four). Drop the balls onto the top of the playfield. [ ] 4. Pivot the speaker panel away from of the cabinet. [ ] 5. The step requires a 7/16-inch socket. Remove the hex bolts from the upper corners of the viewing glass. [ ] 6. Pivot the front glass out of the cabinet by two feet. (Two hold-back cables restrict maximum travel to two feet.) ∆ WARNING Restraining cables. You might need to angle the front glass beyond the extent of restraining cables. (The same applies to the LCD.) In that case, you must disconnect these cables. Take care to protect the fragile glass and LCD. Don’t let them free-fall out of the cabinet! The LCD might slam into the control panel and break. The front glass could snap or splinter. Before resting the glass and LCD on the CPU (Pod) cabinet, remove the top panels. Otherwise, the glass or LCD might shatter against the player button. Shards of glass could fly in every direction. CAUTION Shipping Screws. You must remove the shipping screws. Leaving them in might damage the LCD. See Step 7. [ ] 7. This step requires a #2 Phillips screwdriver. Remove the two shipping screws from the LCD panel. Removal reduces the chance of LCD damage. [ ] 8. The step requires a 7/16-inch socket. Fasten the viewing glass to the cabinet frame. Use the two fasteners that you removed during disassembly. [ ] 9. Ease the speaker panel back into position. [ ] 10. This step requires a T15 tamper-proof Torx wrench. Fasten the speaker panel with the two screws that you removed during disassembly. Chapter 2. Setup 2-4 To Purchase This Item, Please Visit : BMIGaming.com | Call Global Sales : + 561.391.7200 | USA / CA : (800) 746-2255 To Purchase This Item, Please Visit : BMIGaming.com | Call Global Sales : + 561.391.7200 | USA / CA : (800) 746-2255 Chapter 2. Setup 2-6 To Purchase This Item, Please Visit : BMIGaming.com | Call Global Sales : + 561.391.7200 | USA / CA : (800) 746-2255 To Purchase This Item, Please Visit : BMIGaming.com | Call Global Sales : + 561.391.7200 | USA / CA : (800) 746-2255 To Purchase This Item, Please Visit : BMIGaming.com | Call Global Sales : + 561.391.7200 | USA / CA : (800) 746-2255 To Purchase This Item, Please Visit : BMIGaming.com | Call Global Sales : + 561.391.7200 | USA / CA : (800) 746-2255 To Purchase This Item, Please Visit : BMIGaming.com | Call Global Sales : + 561.391.7200 | USA / CA : (800) 746-2255 [ ] 11. Set the Sound Volume Menu as necessary. [ ] 12. Go to the Diagnostic Menu. [ ] 13. Select Bowl Opto Switch Tests. [ ] 14. Verify that all bowl trigger switches operate. See the procedure in Chapter 4. Maintenance, Troubleshooting & Wiring. [ ] 15. In the menu system, go to Blower and Gantry Tests. [ ] 16. Verify that the ball server trolley (drop mech) can drop a ball. [ ] 17. Check that the gantry trolley can travel all the way right and left. [ ] 18. By running the Switch Test, check proper game machine operation. [ ] 19. To verify normal gameplay, play a few games. CAUTION When joining cabinets or installing panels, avoid pinching wires. [ ] 20. This is a job for two or three people. Move the game machine into to its exact position. For proper ventilation, keep the LCD cabinet at least two inches away from the wall. [ ] 21. This step requires a 3/4-inch end wrench. Adjust the leg levelers on both cabinets as necessary. Leveling cabinets by adjusting leg levelers is a job for two people. [ ] 22. Find the coin door key, cashbox key and ticket door key. The keys are in a red bag. The bag ships in a cardboard box inside the CPU (Pod) Cabinet. [ ] 23. Store the keys in a safe place. Chapter 2. Setup 2-9 To Purchase This Item, Please Visit : BMIGaming.com | Call Global Sales : + 561.391.7200 | USA / CA : (800) 746-2255 Gameplay Fishbowl Frenzy is a colorful redemption game with several twists... • This is an oversized machine, standing nine feet tall. Yet every nook is full of action! • Animated fish appear to swim inside 3D fishbowls. The fishbowls actually protrude from the front of the machine. • Server. Using the machine's movable ball server or trolley, the player drops balls into the playfield. • Points. A player earns points by succeeding in landing a ball in one of the fishbowls. • Landing a ball in a bowl causes the system to dispense a number of tickets. • Button. The SERVE BALL button controls a unique ball server chute that rides on a trolley in an overhead gantry. • A skilled player can serve the ball in such a way that it falls into a particular fishbowl. • Multiball play is possible once per game. One of the bowls is the Multiball fishbowl. Below this bowl, you’ll notice the sparkling display MULTIBALL. A player earns the Multiball feature by landing a ball in the Multiball fishbowl. Multiball causes the gantry to serve three balls in quick succession. Because the trolley moves while serving, each ball falls in a different location. Any of these balls might drop into a fishbowl, triggering the game machine to vend tickets. During Multiball Mode, every fishbowl dunk adds to the score. Another aspect of Multiball is that it varies from game to game. The Multiball fishbowl doesn’t remain in a constant location. Any bowl can be a Multiball fishbowl. Between games, the game machine switches the location of the Multiball fishbowl. Yet in any game, the feature never changes bowls. CAUTION Start Mode. When you start the game machine, don’t go straight into Diagnostic Mode. Instead, allow the machine to start in Game Mode so that the switches initialize properly. Then after a few moments, you may enter Diagnostic Mode. Otherwise, switches might start in the wrong position during a game, causing a malfunction. CAUTION Ventilation. Allow at least two inches of clearance for ventilation between the back of the game machine and the building wall. Otherwise, the wall will obstruct ventilation fans at the top of the cabinet. The machine might overheat. Chapter 2. Setup 2-10 To Purchase This Item, Please Visit : BMIGaming.com | Call Global Sales : + 561.391.7200 | USA / CA : (800) 746-2255 To Purchase This Item, Please Visit : BMIGaming.com | Call Global Sales : + 561.391.7200 | USA / CA : (800) 746-2255 To Purchase This Item, Please Visit : BMIGaming.com | Call Global Sales : + 561.391.7200 | USA / CA : (800) 746-2255 To Purchase This Item, Please Visit : BMIGaming.com | Call Global Sales : + 561.391.7200 | USA / CA : (800) 746-2255 To Purchase This Item, Please Visit : BMIGaming.com | Call Global Sales : + 561.391.7200 | USA / CA : (800) 746-2255 To Purchase This Item, Please Visit : BMIGaming.com | Call Global Sales : + 561.391.7200 | USA / CA : (800) 746-2255 To Purchase This Item, Please Visit : BMIGaming.com | Call Global Sales : + 561.391.7200 | USA / CA : (800) 746-2255 To Purchase This Item, Please Visit : BMIGaming.com | Call Global Sales : + 561.391.7200 | USA / CA : (800) 746-2255 To Purchase This Item, Please Visit : BMIGaming.com | Call Global Sales : + 561.391.7200 | USA / CA : (800) 746-2255 To Purchase This Item, Please Visit : BMIGaming.com | Call Global Sales : + 561.391.7200 | USA / CA : (800) 746-2255 To Purchase This Item, Please Visit : BMIGaming.com | Call Global Sales : + 561.391.7200 | USA / CA : (800) 746-2255 To Purchase This Item, Please Visit : BMIGaming.com | Call Global Sales : + 561.391.7200 | USA / CA : (800) 746-2255 To Purchase This Item, Please Visit : BMIGaming.com | Call Global Sales : + 561.391.7200 | USA / CA : (800) 746-2255 To Purchase This Item, Please Visit : BMIGaming.com | Call Global Sales : + 561.391.7200 | USA / CA : (800) 746-2255 To Purchase This Item, Please Visit : BMIGaming.com | Call Global Sales : + 561.391.7200 | USA / CA : (800) 746-2255 To Purchase This Item, Please Visit : BMIGaming.com | Call Global Sales : + 561.391.7200 | USA / CA : (800) 746-2255 To Purchase This Item, Please Visit : BMIGaming.com | Call Global Sales : + 561.391.7200 | USA / CA : (800) 746-2255 To Purchase This Item, Please Visit : BMIGaming.com | Call Global Sales : + 561.391.7200 | USA / CA : (800) 746-2255 To Purchase This Item, Please Visit : BMIGaming.com | Call Global Sales : + 561.391.7200 | USA / CA : (800) 746-2255 To Purchase This Item, Please Visit : BMIGaming.com | Call Global Sales : + 561.391.7200 | USA / CA : (800) 746-2255 1.5.7.0, Button Light Test Pick this option to light the player button lamp. To turn off the lamp, press the button. Helps you to check the lamp and cables. 1.5.8.0, Coin 1 Lockout on/off Test, If you have a New Jersey lockout mechanism, this test activates the Coin 1 coil. If the mech is good, it refuses coins. 1.5.9.0, Coin 2 Lockout on/off Test If you have a New Jersey lockout mechanism, this test activates the Coin 1 coil. If the mech is good, it refuses coins. 1.5.A.0, Reboot Game Reboots the game. After several moments, game software reboots and restarts in Game Mode. 1.5.B.0, Shutdown Game Shuts down the game computer. The peripherals are still active. To start the machine up again, turn the main power off and on. 1.5.C.0, Show FPS: off Strictly for diagnostic use! Access the Show FPS Menu. During a game, you can display the monitor frame rate. (Also other game code.) The character mode display appears sideways and superimposes over game video. 1.5.D.0, Auto Drop Ball: off Strictly for diagnostic use! Access the Auto Drop Ball Menu. When active, this feature causes balls to drop randomly in Game Mode. Use Auto Drop Ball to test the blower, gantry, trolley and server mech. Then reset the feature for normal gameplay. CAUTION Show FPS. Before putting the game into service, disable this feature. Otherwise, code will overwrite game graphics and spoil gameplay. CAUTION Auto Drop Ball serves balls randomly. While a technician may use this feature to diagnose blower and gantry problems, normal gameplay is impossible. Before restoring the game machine to service, disable this feature. Chapter 3. Adjustments, Audits & Diagnostics 3-20 To Purchase This Item, Please Visit : BMIGaming.com | Call Global Sales : + 561.391.7200 | USA / CA : (800) 746-2255 To Purchase This Item, Please Visit : BMIGaming.com | Call Global Sales : + 561.391.7200 | USA / CA : (800) 746-2255 To Purchase This Item, Please Visit : BMIGaming.com | Call Global Sales : + 561.391.7200 | USA / CA : (800) 746-2255 To Purchase This Item, Please Visit : BMIGaming.com | Call Global Sales : + 561.391.7200 | USA / CA : (800) 746-2255 To Purchase This Item, Please Visit : BMIGaming.com | Call Global Sales : + 561.391.7200 | USA / CA : (800) 746-2255 To Purchase This Item, Please Visit : BMIGaming.com | Call Global Sales : + 561.391.7200 | USA / CA : (800) 746-2255 To Purchase This Item, Please Visit : BMIGaming.com | Call Global Sales : + 561.391.7200 | USA / CA : (800) 746-2255 To Purchase This Item, Please Visit : BMIGaming.com | Call Global Sales : + 561.391.7200 | USA / CA : (800) 746-2255 To Purchase This Item, Please Visit : BMIGaming.com | Call Global Sales : + 561.391.7200 | USA / CA : (800) 746-2255 To Purchase This Item, Please Visit : BMIGaming.com | Call Global Sales : + 561.391.7200 | USA / CA : (800) 746-2255 Adjustments, Audits & Diagnostics, Notes Chapter 3. Adjustments, Audits & Diagnostics 3-30 To Purchase This Item, Please Visit : BMIGaming.com | Call Global Sales : + 561.391.7200 | USA / CA : (800) 746-2255 To Purchase This Item, Please Visit : BMIGaming.com | Call Global Sales : + 561.391.7200 | USA / CA : (800) 746-2255 Restore Missing Game Features Particularly in new game machines, the cause of missing game features is often an open cable. Installers might have forgotten to connect just one cable between cabinets. There are 10 such inter-cabinet cables. You can easily find “free” connectors and mate them in the CPU (Pod) Cabinet. You’ll Need These Tools • T27 tamper-proof Torx driver Disassembly [ ] 1. Switch off power to the game machine. [ ] 2. This step requires a T27 tamper-proof Torx driver. Remove the two top panels from the CPU cabinet. Chapter 4. Maintenance, Troubleshooting & Wiring 4-2 To Purchase This Item, Please Visit : BMIGaming.com | Call Global Sales : + 561.391.7200 | USA / CA : (800) 746-2255 Reassembly [ ] 1. This step requires a T27 tamper-proof Torx driver. Fasten the two top panels onto the CPU cabinet. Test Playfield Opto Switches You’ll Need These Tools • T15 tamper-proof Torx driver ● 7/16 socket or hand driver Disassembly [ ] 3. Switch off power to the game machine. [ ] 4. Remove the top two screws from the LCD cabinet. These screws secure the top of the acrylic window (“glass”) to the cabinet. The bottom of the glass connects to the cabinet with a hinge. [ ] 5. Ease the speaker panel away from of the cabinet. [ ] 6. Ease the front glass out of the cabinet by two feet. (Two hold-back cables restrict maximum travel to two feet.) [ ] 7. Unscrew two fasteners from the top of the LCD. [ ] 8. Ease the LCD out of the cabinet until the LCD rests on the front glass. Now you can access the plastic playfield. [ ] 9. Switch on power to the game machine. Servicing the Optos [ ] 1. Enter the Diagnostic Menu System. [ ] 2. Go to the Bowl Opto Switch Tests. [ ] 3. Test opto switches of interest with your fingers: Placing fingers in any bowl should cause the switch to change state. When the state changes, a red bar displays in the bowl, indicating an open switch (normal). As the switch opens, the game machine will also play a sound. A missing bar or sound means that there is no state change. Then something must be wrong with the switch. For example, the opto receiver (transistor) might be dirty, or the LED might have failed. [ ] 4. Service optos as necessary. For example, replace suspect or bad boards and retest the fishbowl with the new opto. Chapter 4. Maintenance, Troubleshooting & Wiring 4-3 To Purchase This Item, Please Visit : BMIGaming.com | Call Global Sales : + 561.391.7200 | USA / CA : (800) 746-2255 ∆ WARNING RESTRAINING CABLES. You might need to angle the front glass beyond the extent of restraining cables. (The same applies to the LCD.) In that case, you must disconnect these cables. Take care to protect the fragile glass and LCD. Don’t let them free-fall out of the cabinet! The LCD might slam into the control panel and break. The front glass could snap or splinter. Before resting the glass and LCD on the CPU (pod) cabinet, remove the top panels. Otherwise, the glass or LCD might shatter against the player button. Shards of glass could fly in every direction. Reassembly [ ] 1. Ease the LCD back into position inside the cabinet. [ ] 2. Fasten the LCD with the two fasteners that you removed during disassembly. [ ] 3. Ease the front glass back position inside the cabinet. [ ] 4. Ease the speaker panel back into position. [ ] 5. Replace the top two screws on the LCD cabinet. Test Gantry Opto Switches You’ll Need These Tools • T15 tamper-proof Torx driver ● 7/16 socket or hand driver Disassembly [ ] 1. Switch off power to the game machine. [ ] 2. This step requires a T15 tamper-proof Torx driver. Remove the two speaker panel screws from the LCD cabinet. These screws secure the speaker panel’s acrylic window (“glass”) to the cabinet. The top of the glass connects to the cabinet with a hinge. [ ] 3. Ease the speaker panel away from of the cabinet. The gantry and trolley are behind this glass. [ ] 4. The step requires a 7/16-inch, ¼-20 socket, ratchet end wrench. Remove the top two screws from the LCD cabinet. These screws secure the top of the acrylic window (“glass”) to the cabinet. The bottom of the glass connects to the cabinet with a hinge. [ ] 5. Switch on power to the game machine. [ ] 6. Enter the Diagnostic Menu System. [ ] 7. Go to the Bowl Opto Switch Tests. Chapter 4. Maintenance, Troubleshooting & Wiring 4-4 To Purchase This Item, Please Visit : BMIGaming.com | Call Global Sales : + 561.391.7200 | USA / CA : (800) 746-2255 Testing Gantry Optos [ ] 1. Test opto switches of interest with your fingers: You can remove or add balls to the trolley (ball server). Or you can put your fingers in the trolley and cause optos to change states. When the state changes, a red bar displays at the top of the screen, indicating an open switch (normal). No change in state, or a missing bar means that something is wrong with the switch. For example, the opto receiver (transistor) might be dirty, or the LED might have failed. [ ] 2. Service optos as necessary. For example, replace suspect or bad boards and retest the trolley with the new opto. Reassembly [ ] 1. Ease the speaker panel toward the cabinet. [ ] 2. This step requires a T15 tamper-proof Torx driver. Fasten the speaker panel with the two screws that you removed during disassembly. Clean the LCD and Playfield You’ll Need These Tools [ ] 2.Microfiber towels • T15 tamper-proof Torx driver ● Cleaning solution (See Cleaning, below) ● 7/16 socket or hand driver Disassembly CAUTION Playfield surface. The playfield surface is a soft plastic. A mild cleaner is necessary. Use of abrasives will scratch this plastic surface. Abrasives can also pit the glass monitor screen. [ ] 1. Switch off power to the game machine. [ ] 2. This step requires a T15 tamper-proof Torx driver. Remove the top two screws from the LCD cabinet. Chapter 4. Maintenance, Troubleshooting & Wiring 4-5 To Purchase This Item, Please Visit : BMIGaming.com | Call Global Sales : + 561.391.7200 | USA / CA : (800) 746-2255 [ ] 3. Ease the speaker panel away from of the cabinet. [ ] 4. The step requires a 7/16-inch socket or hand driver. Remove the top two screws from the LCD cabinet. These screws secure the top of the viewing glass to the LCD cabinet frame. The bottom of the glass connects to the cabinet with a hinge. [ ] 5. Gradually let down the front glass and small bowls. (Two holdback cables restrict maximum travel to about two feet.) [ ] 6. Release the LCD panel from the playfield side rails. Cleaning [ ] 1. Moisten a microfiber towel with an appropriate cleaning solution such as SuzoHapp® Anti-Foam Plexi-Clean Cleaner & Polisher. (Other suggested products: Novus® #1 Plastic Cleaner from Marco Specialties. Endust® Screen Cleaner, available from Amazon.com. The microfiber towels are also available from Amazon.) [ ] 2. Rub the moist towel on the LCD screen, removing dirt as you go. To maintain towel moisture, add cleaner as necessary. [ ] 3. When the towel becomes too dirty or wears out, discard and replace it. Repeat the moistening instructions above. [ ] 4. After you finish the entire screen or playfield, examine your work for streaking. [ ] 5. If you find streaks, go over your work with a fresh and moist towel. [ ] 6. Repeat this procedure as necessary until you’ve satisfactorily cleaned the LCD or playfield. Reassembly [ ] 1. Reposition the LCD panel into the frame from the playfield side rails. [ ] 2. Ease the front glass and small bowls back into the cabinet. Take care not to catch the hold-back chains. [ ] 3. The step requires a 7/16-inch socket or hand driver. Fasten the top of the acrylic window (“glass”) to the cabinet. Use two screws that you removed during disassembly. [ ] 4. Ease the speaker panel back into position. [ ] 5. This step requires a T15 tamper-proof Torx driver. Fasten the speaker panel with the two screws that you removed during disassembly. [ ] 6. Switch the power back on. Chapter 4. Maintenance, Troubleshooting & Wiring 4-6 To Purchase This Item, Please Visit : BMIGaming.com | Call Global Sales : + 561.391.7200 | USA / CA : (800) 746-2255 Replace the Top Speakers You’ll Need These Tools • T15 tamper-proof Torx driver • 8/32 socket or hand driver The LCD cabinet speakers are on the back of the top, hinged panel. The hinge runs along the top of the cabinet. When free, the panel swings outward. On the back of the panel are four speakers. From the back of the panel, four nuts hold each speaker in place. ♦NOTICE Speaker Replacement. You must replace the top speakers in pairs. Disassembly [ ] 1. Switch off power to the game machine. [ ] 2. This step requires a T15 tamper-proof Torx driver. Remove the two speaker panel screws from the LCD cabinet. These screws secure the bottom of the hinged speaker panel. [ ] 3. Ease the speaker panel away from of the cabinet. [ ] 4. This step requires an 8/32 socket or hand driver. Remove the hex nuts that secure the speaker mounting brackets. [ ] 5. Remove the speaker cable from the cable clamps on the inside of the speaker panel. [ ] 6. Remove the speakers. Speaker Replacement [ ] 1. Place the new speakers against the speaker panel. [ ] 2. This step requires an 8/32 socket or hand driver. Secure the speakers using the speaker mounting brackets and hex nuts. Reassembly [ ] 1. Ease the speaker panel toward the cabinet. [ ] 2. This step requires a T15 tamper-proof Torx driver. Fasten the speaker panel with the two screws that you removed during disassembly. [ ] 3. Switch the power back on. [ ] 4. Retest speakers by listening to them during Attract Mode. Chapter 4. Maintenance, Troubleshooting & Wiring 4-7 To Purchase This Item, Please Visit : BMIGaming.com | Call Global Sales : + 561.391.7200 | USA / CA : (800) 746-2255 To Purchase This Item, Please Visit : BMIGaming.com | Call Global Sales : + 561.391.7200 | USA / CA : (800) 746-2255 To Purchase This Item, Please Visit : BMIGaming.com | Call Global Sales : + 561.391.7200 | USA / CA : (800) 746-2255 To Purchase This Item, Please Visit : BMIGaming.com | Call Global Sales : + 561.391.7200 | USA / CA : (800) 746-2255 To Purchase This Item, Please Visit : BMIGaming.com | Call Global Sales : + 561.391.7200 | USA / CA : (800) 746-2255 To Purchase This Item, Please Visit : BMIGaming.com | Call Global Sales : + 561.391.7200 | USA / CA : (800) 746-2255 To Purchase This Item, Please Visit : BMIGaming.com | Call Global Sales : + 561.391.7200 | USA / CA : (800) 746-2255 To Purchase This Item, Please Visit : BMIGaming.com | Call Global Sales : + 561.391.7200 | USA / CA : (800) 746-2255 To Purchase This Item, Please Visit : BMIGaming.com | Call Global Sales : + 561.391.7200 | USA / CA : (800) 746-2255 Maintenance, Troubleshooting & Wiring, Notes Chapter 4. Maintenance, Troubleshooting & Wiring 4-16 To Purchase This Item, Please Visit : BMIGaming.com | Call Global Sales : + 561.391.7200 | USA / CA : (800) 746-2255 To Purchase This Item, Please Visit : BMIGaming.com | Call Global Sales : + 561.391.7200 | USA / CA : (800) 746-2255 To Purchase This Item, Please Visit : BMIGaming.com | Call Global Sales : + 561.391.7200 | USA / CA : (800) 746-2255 To Purchase This Item, Please Visit : BMIGaming.com | Call Global Sales : + 561.391.7200 | USA / CA : (800) 746-2255 To Purchase This Item, Please Visit : BMIGaming.com | Call Global Sales : + 561.391.7200 | USA / CA : (800) 746-2255 To Purchase This Item, Please Visit : BMIGaming.com | Call Global Sales : + 561.391.7200 | USA / CA : (800) 746-2255 To Purchase This Item, Please Visit : BMIGaming.com | Call Global Sales : + 561.391.7200 | USA / CA : (800) 746-2255 To Purchase This Item, Please Visit : BMIGaming.com | Call Global Sales : + 561.391.7200 | USA / CA : (800) 746-2255 To Purchase This Item, Please Visit : BMIGaming.com | Call Global Sales : + 561.391.7200 | USA / CA : (800) 746-2255 To Purchase This Item, Please Visit : BMIGaming.com | Call Global Sales : + 561.391.7200 | USA / CA : (800) 746-2255 To Purchase This Item, Please Visit : BMIGaming.com | Call Global Sales : + 561.391.7200 | USA / CA : (800) 746-2255 To Purchase This Item, Please Visit : BMIGaming.com | Call Global Sales : + 561.391.7200 | USA / CA : (800) 746-2255 To Purchase This Item, Please Visit : BMIGaming.com | Call Global Sales : + 561.391.7200 | USA / CA : (800) 746-2255 To Purchase This Item, Please Visit : BMIGaming.com | Call Global Sales : + 561.391.7200 | USA / CA : (800) 746-2255 To Purchase This Item, Please Visit : BMIGaming.com | Call Global Sales : + 561.391.7200 | USA / CA : (800) 746-2255 To Purchase This Item, Please Visit : BMIGaming.com | Call Global Sales : + 561.391.7200 | USA / CA : (800) 746-2255 Parts, Notes Chapter 5. Parts 5-16 To Purchase This Item, Please Visit : BMIGaming.com | Call Global Sales : + 561.391.7200 | USA / CA : (800) 746-2255 To Purchase This Item, Please Visit : BMIGaming.com | Call Global Sales : + 561.391.7200 | USA / CA : (800) 746-2255 To Purchase This Item, Please Visit : BMIGaming.com | Call Global Sales : + 561.391.7200 | USA / CA : (800) 746-2255 To Purchase This Item, Please Visit : BMIGaming.com | Call Global Sales : + 561.391.7200 | USA / CA : (800) 746-2255 To Purchase This Item, Please Visit : BMIGaming.com | Call Global Sales : + 561.391.7200 | USA / CA : (800) 746-2255 To Purchase This Item, Please Visit : BMIGaming.com | Call Global Sales : + 561.391.7200 | USA / CA : (800) 746-2255 To Purchase This Item, Please Visit : BMIGaming.com | Call Global Sales : + 561.391.7200 | USA / CA : (800) 746-2255 To Purchase This Item, Please Visit : BMIGaming.com | Call Global Sales : + 561.391.7200 | USA / CA : (800) 746-2255 To Purchase This Item, Please Visit : BMIGaming.com | Call Global Sales : + 561.391.7200 | USA / CA : (800) 746-2255 To Purchase This Item, Please Visit : BMIGaming.com | Call Global Sales : + 561.391.7200 | USA / CA : (800) 746-2255 To Purchase This Item, Please Visit : BMIGaming.com | Call Global Sales : + 561.391.7200 | USA / CA : (800) 746-2255 To Purchase This Item, Please Visit : BMIGaming.com | Call Global Sales : + 561.391.7200 | USA / CA : (800) 746-2255 To Purchase This Item, Please Visit : BMIGaming.com | Call Global Sales : + 561.391.7200 | USA / CA : (800) 746-2255 To Purchase This Item, Please Visit : BMIGaming.com | Call Global Sales : + 561.391.7200 | USA / CA : (800) 746-2255 To Purchase This Item, Please Visit : BMIGaming.com | Call Global Sales : + 561.391.7200 | USA / CA : (800) 746-2255 To Purchase This Item, Please Visit : BMIGaming.com | Call Global Sales : + 561.391.7200 | USA / CA : (800) 746-2255 To Purchase This Item, Please Visit : BMIGaming.com | Call Global Sales : + 561.391.7200 | USA / CA : (800) 746-2255 To Purchase This Item, Please Visit : BMIGaming.com | Call Global Sales : + 561.391.7200 | USA / CA : (800) 746-2255 Fishbowl)Frenzy™)Combined)Ticket)Meter)Option) By# factory# default,# the# total# number# of# tickets# dispensed# (“Tickets# Won”)# is# recorded# by# the# Fishbowl#Frenzy™#game#software#and#can#be#viewed#at#the#“Game#Audits”#menu.##In#addition,# the#two#ticket#dispensers#have#builtGin#outputs#which#can#be#connected#to#two#physical#meters.# In#response#to#customer#interest,#following#is#an#optional#change#which#allows#a#single#physical## meter#(or#debit#card#system)#to#track#the#combined#total#number#of#tickets#dispensed#by#both# ticket#dispensers.##By#sending#a#combined#ticket#count#to#the#I/O#Board,#you#can#eliminate#the# need# to# access# the# software# menu# or# to# add# the# physical# ticket# meter# counts# together,# as# follows:# • Update# your# game# software# by# downloading# the# software# update# at# the# Technical# Support#page#for#Fishbowl#Frenzy#at#www.teamplayinc.com.# • After#updating#your#software,#move#the#CN4G2#Yellow/Green#wire#on#the#I/O#board#to# the#CN4G4#position.##This#changes#the#Coin#2/#Dollar#METER#2#to#a#Ticket#Meter.## • Push#the#connector#pin#for#Pin#2#out#of#the#CN4#housing#and#insert#it#back#into#Pin#4#of# the#CN4#housing.###This#will#change#METER#2#from#a#currency#meter#for#Coin#2/Bill#to#a# Totalizing#Ticket#Meter.# # # # # Copyright 2015 Team Play, Inc. Page 2 of 3 To Purchase This Item, Please Visit : BMIGaming.com | Call Global Sales : + 561.391.7200 | USA / CA : (800) 746-2255 # # # # • In#the#alternative#–#Add#a#new#wire#to#the#unused#Pin#4#of#the#CN4#housing,#and#run#the# new# wire# to# a# physical# meter# or# card# system# ticket# input.##This# will# leave# the# currency# meter#unchanged#and#add#the#new#ticket#meter#output.# # # # If#you#have#any#questions,#please#call#847G952G7533#or#email#[email protected].# Copyright 2015 Team Play, Inc. Page 3 of 3