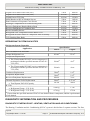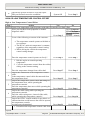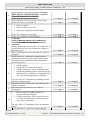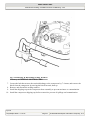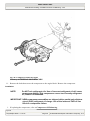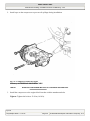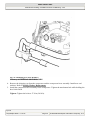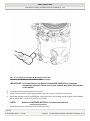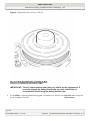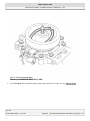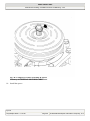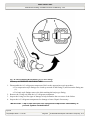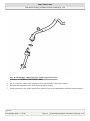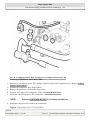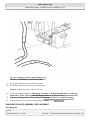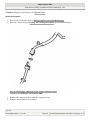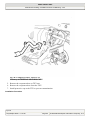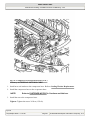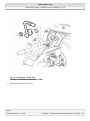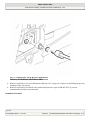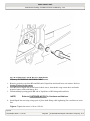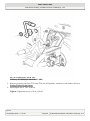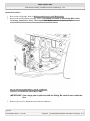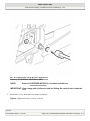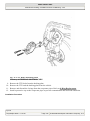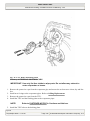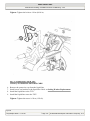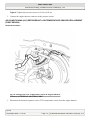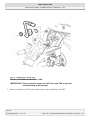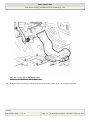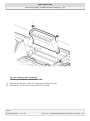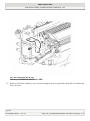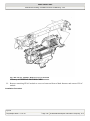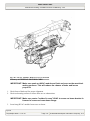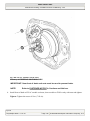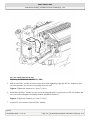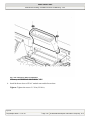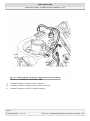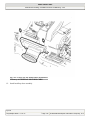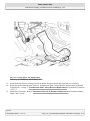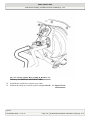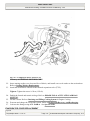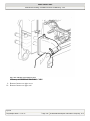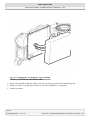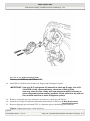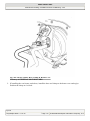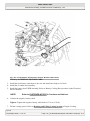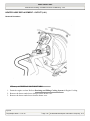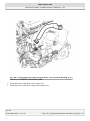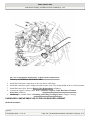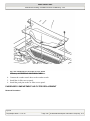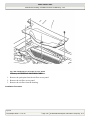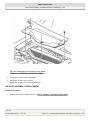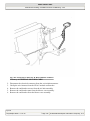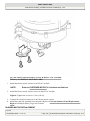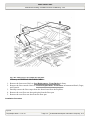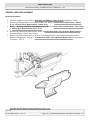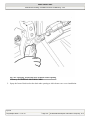
1
2003 Saturn Vue 2003 HVAC Heating, Ventilation and Air Conditioning - Vue 2003 HVAC Heating, Ventilation and Air Conditioning - Vue SPECIFICATIONS FASTENER TIGHTENING SPECIFICATIONS Fastener Tightening Specifications Application Air Inlet Assembly Screws Air Outlet Duct Screws Battery Box to Body Bolts Blower Motor Resistor Screws Blower Motor Screws Compressor Clutch Nut Compressor Hose Assembly to Battery Box Nut (L61) Compressor Hose Assembly to Compressor Bolt Compressor Hose Assembly to Condenser Nut Compressor Hose Assembly to TXV Nut (L61) Compressor to Engine Block Bolts Compressor Pressure Relief Valve Compressor Thermal Protection Switch Retainer Bolt CRFM Bracket Bolts Defrost Actuator to Evaporator Case Screws Defroster Duct to HVAC Module Nuts Discharge Line Nuts Evaporator Case Assembly to Blower Case Assembly Screws Evaporator Cover Screws Evaporator Outlet Hose to Air Cleaner Bracket Bolt (L66) Evaporator Outlet Hose to Compressor Hose Nut (L66) Evaporator Outlet Hose to Cowl Nut (L66) Evaporator Outlet Hose to TXV Nut (L66) Evaporator Pipe Cover Screw Floor Actuator to Evaporator Case Screws Front of Dash to HVAC Module Seal Nuts Heater Core Cover Screws Heater Core Pipe Cover Screw Heater Core Screws Heater Duct to Heater Core Cover Screws Hold Down Bracket and Bolt HVAC Module to Cross Car Beam Nuts and Bolts Intermediate Duct Fasteners Liquid Line to Receiver Dehydrator Nut Specifications Metric English 1 N.m 9 lb in 1 N.m 9 lb in 15 N.m 11 lb ft 1 N.m 9 lb in 1 N.m 9 lb in 19 N.m 14 lb ft 8 N.m 71 lb in 27 N.m 20 lb ft 16 N.m 12 lb ft 16 N.m 12 lb ft 22 N.m 16 lb ft 10 N.m 89 lb in 6 N.m 53 lb in 10 N.m 89 lb in 1 N.m 9 lb in 2.5 N.m 22 lb in 16 N.m 12 lb ft 1 N.m 9 lb in 1 N.m 9 lb in 7 N.m 62 lb in 16 N.m 12 lb ft 8 N.m 71 lb in 16 N.m 12 lb ft 1 N.m 9 lb in 1 N.m 9 lb in 8 N.m 70 lb in 1 N.m 9 lb in 1 N.m 9 lb in 1 N.m 9 lb in 2 N.m 18 lb in 6 N.m 53 lb in 8 N.m 70 lb in 2.5 N.m 22 lb in 16 N.m 12 lb ft Tycoon 15 декабря 2008 г. 11:01:19 11:01:05 Page 1 © 2005 Mitchell Repair Information Company, LLC. 2003 Saturn Vue 2003 HVAC Heating, Ventilation and Air Conditioning - Vue Liquid Line to Strut Tower Nut (L61) Liquid Line to Strut Tower Nut (L66) Liquid Line to TXV Nut Metal Bracket to HVAC Module Screws Panel Actuator to Evaporator Case Screws Passenger Compartment Air Filter Housing Nuts Receiver Dehydrator Bracket Bolt to Body Receiver Dehydrator to Condenser Nut Recirc Assembly Screws Refrigerant Low Temperature Sensor Bolt to TXV Refrigerant Pressure Sensor to Compressor Hose Assembly TXV Backing Plate Bolts 5 N.m 10 N.m 16 N.m 2 N.m 1 N.m 9 N.m 10 N.m 16 N.m 1 N.m 5 N.m 10 N.m 9 N.m 44 lb in 89 lb in 12 lb ft 18 lb in 9 lb in 80 lb in 89 lb in 12 lb ft 9 lb in 45 lb in 89 lb in 80 lb in REFRIGERANT SYSTEM CAPACITIES Refrigerant System Capacities Metric Specification English 103 ml1 3.5 oz1 120 ml2 4 oz2 120 ml2 4 oz2 30 ml2 1 oz2 Evaporator Replacement 30 ml2 1 oz2 Receiver/Dehydrator Replacement 60 ml3 2 oz3 Thermal Expansion Valve Replacement 20 ml2 207 ml 0.75 oz2 7.00 oz Application PAG Oil Saturn P/N 22695048 Abrupt Refrigerant Loss Compressor Replacement The Visteon model SC105V service compressor is precharged with the specified amount of PAG oil. 2.2L (L61) The Visteon model SC100V service compressor is precharged with the specified amount of PAG oil. 3.5L (L66) Condenser Replacement Total System PAG Oil Capacity R-134a Refrigerant Charge - 2.2L (L61) 0.68 kg 1.5 lb Refrigerant Charge - 3.5L (L66) 0.79 kg 1.75 lb 2 If more than the specified amount of PAG oil was drained from a component, add the equal amount of oil drained. DIAGNOSTIC INFORMATION AND PROCEDURES DIAGNOSTIC STARTING POINT - HEATING, VENTILATION AND AIR CONDITIONING The Heating, Ventilation and Air Conditioning (HVAC) system is divided into 2 separate sections. The first, Tycoon 15 декабря 2008 г. 11:01:06 Page 2 © 2005 Mitchell Repair Information Company, LLC. 2003 Saturn Vue 2003 HVAC Heating, Ventilation and Air Conditioning - Vue Heating, Ventilation and Air Conditioning, has all procedures that pertain to a HVAC component or function that is not specifically associated with the manual control system. The second, HVAC Systems Manual, has all procedures specific to the Manual control system. Begin the system diagnosis with the Diagnostic System Check - HVAC Systems - Manual in HVAC Systems - Manual. The Diagnostic System Check will provide the identification of the control module(s) which command the system. The use of the Diagnostic System Check will identify the correct procedure for diagnosing the system and where the procedure is located. Review the Description and Operation information to help you determine the correct symptom diagnostic procedure when a malfunction exists. Reviewing the Description and Operation information will also help you determine if the condition described by the customer is normal operation. The HVAC Description and Operation information is divided into: Air Delivery Description and Operation in HVAC Systems - Manual Air Temperature Description and Operation in HVAC Systems - Manual The Air Delivery Description and Operation contains the following topics: Air Speed Air Distribution The Air temperature Description and Operation contains the following topics: Heater Mode A/C Mode A/C Cycle LEAK TESTING Refrigerant Leak Testing Tools Required J 39400-A Halogen Leak Detector. See Special Tools. J 41447 R 134a A/C Tracer Dye-Box of 24. See Special Tools. J 42220 Universal 12V Leak Detection Lamp. See Special Tools. J 46297 A/C Dye Injector Kit. See Special Tools. J 46297-12 Replacement Dye Cartridges. See Special Tools. IMPORTANT: Saturn vehicles are now manufactured with fluorescent dye installed directly into the A/C system. The preferred method of leak testing is with the use of fluorescent dye. J 41447 is the only fluorescent dye Tycoon 15 декабря 2008 г. 11:01:06 Page 3 © 2005 Mitchell Repair Information Company, LLC. 2003 Saturn Vue 2003 HVAC Heating, Ventilation and Air Conditioning - Vue approved by Saturn. See Special Tools. The fluorescent dye mixes and flows with the PAG oil throughout the refrigerant system. Verifying some passive leaks may require using the J 39400-A , even though the A/C system contains fluorescent dye. See Special Tools. The only time that adding additional fluorescent dye is required is after flushing the A/C system. Fluorescent Leak Detector Fluorescent dye will assist in locating any leaks in the A/C system. IMPORTANT: PAG oil is water soluble. Condensation on the evaporator core or the refrigerant lines may wash the PAG oil and fluorescent dye away from the actual leak. Condensation may also carry dye through the HVAC module drain. Leaks in the A/C system will be indicated in a light green or yellow color when using the leak detection lamp. Use the leak detection lamp in the following areas: All fittings or connections that use seal washers or O-rings All of the A/C components The A/C compressor shaft seal The A/C hoses and pressure switches The HVAC module drain tube, if the evaporator core is suspected of leaking The service port sealing caps The sealing cap is the primary seal for the service ports. Follow the instructions supplied with the J 42220 . See Special Tools. To prevent false diagnosis in the future, thoroughly clean the residual dye from any area where leaks were found. Clean any refrigerant dye on components with brake and choke cleaner, Saturn P/N 21007432. If any refrigerant dye contacts an exterior paint surface, remove it by performing the following steps: Carefully wash affected surfaces according to the Saturn Owner's Handbook to remove any dirt and to ensure that paint is not scratched during dye removal. Mix water and isopropyl alcohol to obtain 50/50 mixture. Soak a soft 100 percent cotton cloth towel with the solution and wet down the affected areas to remove dye. After dye has been removed, wash affected areas and inspect to make sure that the dye has been removed. Fluorescent Dye Injection IMPORTANT: J 41447 is the only A/C leak detection dye approved by Saturn. See Special Tools. Tycoon 15 декабря 2008 г. 11:01:06 Page 4 © 2005 Mitchell Repair Information Company, LLC. 2003 Saturn Vue 2003 HVAC Heating, Ventilation and Air Conditioning - Vue Not all of the fluorescent dyes are compatible with PAG oil. Some types of dye decrease the oil viscosity or may chemically react with the oil. R-134a leak detection dye requires time to work. Depending upon the leak rate, a leak may not become visible for between 15 minutes and 7 days. IMPORTANT: Do NOT overcharge the A/C system with dye. This may cause reliability problems. Use only one 7.39 ml (0.25 oz) charge bottle of J 41447 . See Special Tools. With the A/C system charged, add J 41447 to the A/C system using J 46297 . Follow the instructions provided with J 46297 . See Special Tools. To prevent false diagnosis in the future, thoroughly clean the residual dye from any area where leaks were found. Clean any refrigerant dye on components with brake and choke cleaner, Saturn P/N 21007432. The dye injection package contains a notice sticker. Complete the leak detection information and place the sticker near the charge label. Halogen Leak Detector CAUTION: Do not operate the detector in a combustible atmosphere since its sensor operates at high temperatures or personal injury and/or damage to the equipment may result. Ensure that the vehicle has at least 0.41 kg (0.9 lb) of refrigerant in the A/C refrigeration system in order to perform a leak test. Refer to Refrigerant Recovery and Recharging for recharging the A/C system. IMPORTANT: Halogen leak detectors are sensitive to the following items: Windshield washing solutions Many solvents and cleaners Some adhesives used in the vehicle Clean and dry all surfaces in order to prevent a false warning. Liquids will damage the detector. IMPORTANT: Follow a continuous path in order to ensure that you will not miss any possible leaks. Test all areas of the system for leaks. Follow the instructions supplied with the J 39400-A . See Special Tools. HVAC PRELIMINARY CHECKS Most A/C system problems can be detected by a thorough visual and physical inspection of the system. IMPORTANT: The importance of this inspection cannot be stressed enough because proper heating and cooling depends upon adequate front air flow. Tycoon 15 декабря 2008 г. 11:01:06 Page 5 © 2005 Mitchell Repair Information Company, LLC. 2003 Saturn Vue 2003 HVAC Heating, Ventilation and Air Conditioning - Vue 1. Inspect air deflector, A/C condenser splash shield, condenser to radiator seal, and rear hood seal for missing or damaged parts. 2. Inspect outer surfaces of radiator and condenser cores, to be sure air flow is not blocked by dirt, leaves, or other foreign material. 3. Inspect for kinks in hoses and lines. Also inspect for refrigerant leaks using a blacklight or an electronic leak detector. 4. Inspect for worn/loose drive belt or malfunctioning belt tensioner. 5. Inspect blower motor operation at all speeds. 6. With blower on high, inspect for equal distribution of air from all outlets. 7. Inspect operation of mode control knob and distribution of air from designated outlets. 8. Press recirc button with blower on high. A noticeable increase in air flow and sound should occur. Indicator should light. 9. Start engine and run until it is up to operating temperature. 10. Inspect operation of temperature control knob and air outlet temperature from hot to cold. Tycoon 15 декабря 2008 г. 11:01:06 Page 6 © 2005 Mitchell Repair Information Company, LLC. 2003 Saturn Vue 2003 HVAC Heating, Ventilation and Air Conditioning - Vue Fig. 1: Identifying Air Conditioning Compressor Pulley Courtesy of GENERAL MOTORS CORP. 11. Press A/C button. Indicator should light. Inspect compressor for clutch engagement, slippage, or noise. 12. Inspect electric cooling fan operation and speed as determined by system temperature and pressure. 13. Turn OFF A/C. Compressor clutch should disengage. 14. If any problem is found in any of the previous steps, go to the complaint condition cause charts. HVAC VEHICLE SET-UP Identifying Refrigerant Purity Tycoon 15 декабря 2008 г. 11:01:06 Page 7 © 2005 Mitchell Repair Information Company, LLC. 2003 Saturn Vue 2003 HVAC Heating, Ventilation and Air Conditioning - Vue Fig. 2: RI-2002DS Refrigerant Identifier Courtesy of GENERAL MOTORS CORP. Tycoon 15 декабря 2008 г. 11:01:06 Page 8 © 2005 Mitchell Repair Information Company, LLC. 2003 Saturn Vue 2003 HVAC Heating, Ventilation and Air Conditioning - Vue NOTE: The purity of the system refrigerant should be confirmed before any other diagnostics are begun. The RI-2002DS refrigerant identifier has the ability to identify R-12, R134a, R-22, potentially dangerous hydrocarbons, and non-condensable gases (NCG) such as air. If the A/C system contains anything less than 98 percent pure refrigerant, the refrigerant is considered contaminated and the temperature/pressure charts will not be valid. Contaminated refrigerant should not be recovered as it will contaminate the recovery machine and refrigerant supply tank. Air is not considered a contaminate as it can be purged. 1. Turn ON refrigerant identifier and let it reach operating temperature (3-5 minutes). 2. When display reads "HOSE," and with the vehicle turned OFF, attach the hose to the low side (suction) port and open service valves. 3. Press ENTER button. 4. The display will read GAS as a sample of refrigerant is taken and analyzed. 5. When analysis is complete, display will show, by percentage, the make-up of gases. If refrigerant is less than 98 percent pure, the temperature/pressure charts will not be accurate for system diagnosis. If refrigerant is pure but contains air, system should be recovered and recharged with virgin refrigerant before proceeding. Installing Manifold Gage Set Tycoon 15 декабря 2008 г. 11:01:06 Page 9 © 2005 Mitchell Repair Information Company, LLC. 2003 Saturn Vue 2003 HVAC Heating, Ventilation and Air Conditioning - Vue Fig. 3: Manifold Gage Set Courtesy of GENERAL MOTORS CORP. If an A/C system problem still exists after you have completed the preliminary inspects, more diagnostic tests must follow. These include manifold gage set readings. Follow the steps listed below for installing a manifold gage set. CAUTION: Always wear goggles and wrap a clean cloth around fittings, valves, and connections when performing work that involves opening the refrigerant system. IMPORTANT: Inspect to make sure gages read zero before installing manifold gage set. 1. Close both hand valves of manifold gage set. 2. Connect low pressure (blue) gage hose to suction service port located on the suction pipe. Pull valve Tycoon 15 декабря 2008 г. 11:01:06 Page 10 © 2005 Mitchell Repair Information Company, LLC. 2003 Saturn Vue 2003 HVAC Heating, Ventilation and Air Conditioning - Vue assembly collar up, place valve assembly over service port and release collar. 3. Open service valve. 4. Connect high pressure (red) gage hose to discharge service port located on the liquid line. Pull valve assembly collar up, place valve assembly over service port and release collar. 5. Open service valve. Performance Test - Service Stall IMPORTANT: If ambient air temperature is lower than 0° C (32° F), A/C compressor will not be enabled. IMPORTANT: This test must be performed in a service stall environment that protects the vehicle from wind that could cause incorrect pressure/temperature readings. 1. Open hood and leave open during entire test. 2. Install a manifold gage set to high and low side service ports. 3. Disconnect vehicle thermal expansion valve (TXV) temperature sensor electrical connector and connect a temperature sensor that is exposed to ambient air. 4. Start engine and warm to operating temperature. Use scan tool to verify coolant temperature is being thermostatically controlled approx. 88°C (190°F). 5. Install thermometer into right center outlet. 6. Open both front doors and windows to stabilize interior air temperature with outside ambient temperature. 7. Press re-circulation button so that indicator light is lit. 8. Set temperature knob to full cold position. 9. Set mode knob to I/P outlet position. 10. Set blower to third speed. 11. Press A/C button. 12. Using Tech 2, command fan to HIGH speed. 13. Using accelerator pedal, increase engine speed to 2,000 RPM and hold. 14. Continue running until system pressures and outlet temperature stabilizes. Usually 4 to 8 minutes. 15. Record A/C system pressures and outlet temperature every minute for five minutes. 16. Exit out of the scan tool test and return engine to idle. 17. Release Tech 2 control of engine cooling fans. 18. Compare recorded values to system performance charts then continue down diagnostic flow chart. 19. When test is complete, re-connect the electrical connector for the vehicle TXV temperature sensor. AIR CONDITIONING (A/C) SYSTEM PERFORMANCE TEST System Condition Charts - Definition and Usage Degrees* Suction* 21°C (70°F) Discharge* 765-1130 kPa (111-164 131-186 kPa (19-27 psi) psi) Outlet* 1-8°C (33-46°F) Tycoon 15 декабря 2008 г. 11:01:06 Page 11 © 2005 Mitchell Repair Information Company, LLC. 2003 Saturn Vue 2003 HVAC Heating, Ventilation and Air Conditioning - Vue 27°C (80°F) 33°C (90°F) 38°C (100°F) 43°C (110°F) 896-1193 kPa (130-173 psi) 1151-1462 kPa (167-212 131-186 kPa (19-27 psi) psi) 1456-1751 kPa (211-254 144-193 kPa (21-28 psi) psi) 1599-1938 kPa (232-281 144-193 kPa (21-28 psi) psi) 131-186 kPa (19-27 psi) 1-9°C (33-49°F) 2-9°C (34-49°F) 3-10°C (37-51°F) 3-10°C (37-51°F) IMPORTANT: Statements contain additional information to help you confirm your diagnosis and lead you to a corrective action. When ALL pressure and temperature readings fall within the ranges of a given chart, use that chart to repair the vehicle. Key: Statements are used to interpret the pressure and temperature readings compared to normal system performance. If testing above or below ambient temperatures listed, rely on key statements to diagnose system.Then: Statements contain additional information to help you confirm your diagnosis and lead you to a corrective action. When all pressure and temperature readings fall within the ranges of a given chart, use that chart to repair the vehicle.*Degrees - If the ambient air temperature is*Suction - and the low side gage should read*Discharge - and the high side gage should read*Outlet - and the right center air temperature should be Normal System Performance Service Stall Degrees* Suction* 21°C (70°F) 131-186 kPa (19-27 psi) 27°C (80°F) 131-186 kPa (19-27 psi) 33°C (90°F) 131-186 kPa (19-27 psi) 38°C (100°F) 144-193 kPa (21-28 psi) 43°C (110°F) 144-193 kPa (21-28 psi) Discharge* 765-1130 kPa (111-164 psi) 896-1193 kPa (130-173 psi) 1151-1462 kPa (167-212 psi) 1456-1751 kPa (211-254 psi) 1599-1938 kPa (232-281 psi) Outlet* 1-8°C (33-46°F) 1-9°C (33-49°F) 2-9°C (34-49°F) 3-10°C (37-51°F) 3-10°C (37-51°F) *Degrees - If the ambient air temperature is *Suction - and the low side gage should read *Discharge - and the high side gage should read *Outlet - and the right center air temperature should be IMPORTANT: To ensure accurate pressure and temperature readings make sure the vehicle is properly set up to run the performance test. Refer to vehicle set up section in this manual. ALL TEST PARAMETERS MUST BE FOLLOWED TO OBTAIN ACCURATE READINGS. IMPORTANT: Use a refrigerant identifier to verify refrigerant purity. Non-condensable gases or refrigerant substitutes will affect system pressure/temperature readings. Tycoon 15 декабря 2008 г. 11:01:06 Page 12 © 2005 Mitchell Repair Information Company, LLC. 2003 Saturn Vue 2003 HVAC Heating, Ventilation and Air Conditioning - Vue Normal System Performance Service Stall High Humidity Degrees* Suction* Discharge* 807-1124 kPa (117-163 21°C (70°F) 138-193 kPa (20-28 psi) psi) 1075-1358 kPa (156-197 27°C (80°F) 138-193 kPa (20-28 psi) psi) 1489-1793 kPa (216-260 33°C (90°F) 144-193 kPa (21-28 psi) psi) 1627-1994 kPa (236-289 38°C (100°F) 144-193 kPa (21-28 psi) psi) 1917-2303 kPa (278-334 43°C (110°F) 144-200 kPa (21-29 psi) psi) *Degrees - If the ambient air temperature is *Suction - and the low side gage should read *Discharge - and the high side gage should read *Outlet - and the right center air temperature should be 2-9°C (36-48°F) 2-10°C (36-50°F) 5-12°C (40-53°F) 6-13°C (43-55°F) 6-14°C (43-56°F) High humidity conditions affect the system performance by increased heat load on the system. This extra heat load will increase the discharge pressure and the outlet temperature. High humidity is defined as a relative humidity higher than 70 percent at 21°C (70°F), 60 percent at 27°C (80°F), 50 percent at 32°C (90°F), 40 percent at 38°C (100°F), and 20 percent at 43°C (110°F). This chart illustrates the effect the high humidity has on the Saturn VUE air conditioning system. Use this chart to determine the normal system performance under high humidity conditions. General System Condition - Low Refrigerant Charge Degrees* Suction* Discharge* 21-43°C (70-110°F) Normal to High Low Key: Poor Cooling at Higher Ambients. Then: The system is operating with a low charge. Outlet* Outlet* Slightly Cool to Warm Leak test all the components and connections. If the refrigerant charge level is unknown, reclaim, evacuate and recharge the system with 0.68 kg (1.5 lb) of R-134a. Run another performance test. *Degrees - If the ambient air temperature is *Suction - and the low side gage should read *Discharge - and the high side gage should read *Outlet - and the right center air temperature should be General System Condition Refrigerant/Oil Overcharge Degrees* Suction* Discharge* 21-43°C (70-110°F) Normal to Slightly High High Outlet* Cool to Warm Key: The high pressures cause the pressure sensor to cycle the compressor on and off at high ambient air temperatures Then: The System may be operating in an overcharged condition. Tycoon 15 декабря 2008 г. 11:01:06 Page 13 © 2005 Mitchell Repair Information Company, LLC. 2003 Saturn Vue 2003 HVAC Heating, Ventilation and Air Conditioning - Vue An overcharged condition will generate a poor and/or intermittent cooling complaint at higher ambient air temperatures. Intermittent complaints are caused by the pressure sensor cycling the compressor OFF and ON. Reclaim the system using an approved recovery system. Evacuate and recharge the system with 0.68 kg (1.5 lb) of R-134a. Run another performance test. An oil overcharge can occur if a compressor or other refrigerant system change is made without proper oil balancing. Review the vehicle service history for compressor service. *Degrees - If the ambient air temperature is *Suction - and the low side gage should read *Discharge - and the high side gage should read *Outlet - and the right center air temperature should be Specific System Condition - Compressor No-Pump Degrees* Suction* Discharge* 483-689 kPa (70-100 483-689 kPa (70-100 21-43°C (70-110°F) psi) psi) Outlet* 21-43°C (70-110°F) IMPORTANT: Ensure that the manifold gage set valves are closed. Key: No change in the suction and the discharge pressures with the compressor engaged. The gage pressures will be almost equal.Then: Verify compressor clutch engagement. Run the engine at 2,000 RPM and cycle the compressor ON and OFF two or three times. If the pressure remains static, engage the compressor and snap the engine throttle two or three times. If the pressure still remains static, replace the compressor. After the repair, return to the diagnostic flow chart. *Degrees - If the ambient air temperature is*Suction - and the low side gage should read*Discharge and the high side gage should read*Outlet - and the right center air temperature should be Specific System Condition - Compressor at Minimum Displacement Degrees* Suction* Discharge* 730-1007 kPa (106-146 21°C (70°F) 165-207 kPa (24-30 psi) psi) 834-1110 kPa (121-161 27°C (80°F) 172-213 kPa (25-31 psi) psi) 930-1207 kPa (135-175 33°C (90°F) 199-241 kPa (29-35 psi) psi) 1145-1421 kPa (166-206 38°C (100°F) 220-275 kPa (32-40 psi) psi) 43°C (110°F) 220-275 kPa (32-40 psi) 1158-1434 kPa (168-208 Outlet* 2-8°C (35-47°F) 3-9°C (37-49°F) 5-9°C (42-49°F) 7-12°C (45-54°F) 7-12°C (45-54°F) Tycoon 15 декабря 2008 г. 11:01:06 Page 14 © 2005 Mitchell Repair Information Company, LLC. 2003 Saturn Vue 2003 HVAC Heating, Ventilation and Air Conditioning - Vue psi) Key: Increased suction pressure for a relatively low discharge pressure. High outlet temperatures. Then: The compressor may be at minimum displacement. This condition will be most noticeable at high ambients. Confirm the charge level before replacing the compressor. After the repair, return to the diagnostic flow chart. Specific System Condition - Compressor at Maximum Displacement Degrees* Suction* Discharge* 21-43°C (70-110°F) Low to Normal High Key: Outlet* Cold Lower than normal suction pressure and outlet temperature at lower ambients. Higher than normal discharge pressures. Then: The compressor may be at maximum displacement. This condition will be most noticeable at low ambients. This condition could create a compressor cycling complaint due to the Evaporator Low Ambient Protection (ELAP) cycling the compressor to prevent evaporator freeze. On L61 equipped vehicles, this cycling condition may not be duplicated in the service stall testing. Replace the compressor. After the repair, return to the diagnostic flow chart. *Degrees - If the ambient air temperature is *Suction - and the low side gage should read *Discharge - and the high side gage should read *Outlet - and the right center air temperature should be Specific System Condition - TXV Open Degrees* Suction* Discharge* 21-43°C (70-110°F) Normal to Slightly High Normal to Slightly High Outlet* Cool to Warm Key: Higher than normal suction pressure. Higher than normal outlet temperature. Hissing or gurgling noise may be observed near the TXV. Tycoon 15 декабря 2008 г. 11:01:06 Page 15 © 2005 Mitchell Repair Information Company, LLC. 2003 Saturn Vue 2003 HVAC Heating, Ventilation and Air Conditioning - Vue Then: The thermal expansion valve (TXV) may be open. Replace the TXV. After the repair, return to the diagnostic flow chart. *Degrees - If the ambient air temperature is *Suction - and the low side gage should read *Discharge - and the high side gage should read *Outlet - and the right center air temperature should be Specific System Condition - TXV Restricted or Closed Degrees* Suction* Discharge* 21-43°C (70-110°F) Low Low Key: Outlet* Cool to Warm Near vacuum for suction pressure. Low discharge pressure. Right center air outlet near ambient. Then: The thermal expansion valve (TXV) may be restricted or closed. Replace the TXV. After the repair, return to the diagnostic flow chart. *Degrees - If the ambient air temperature is *Suction - and the low side gage should read *Discharge - and the high side gage should read *Outlet - and the right center air temperature should be General System Condition - High or Low Side Restrictions Degrees* Suction* Discharge* 21-43°C (70-110°F) Low Low Outlet* Cool to Warm Key: Temperature drop across restriction in line or component. Frost may be observed near the restriction. Then: Confirm the condition by a thorough physical and visual inspection of all lines and components. The temperature will be much colder on the down stream side of the restriction. Also look for possible frost. Tycoon 15 декабря 2008 г. 11:01:06 Page 16 © 2005 Mitchell Repair Information Company, LLC. 2003 Saturn Vue 2003 HVAC Heating, Ventilation and Air Conditioning - Vue Replace the restricted part. After the repair, return to the diagnostic flow chart. *Degrees - If the ambient air temperature is *Suction - and the low side gage should read *Discharge - and the high side gage should read *Outlet - and the right center air temperature should be HEATING PERFORMANCE DIAGNOSTIC Heating Performance Diagnostic Step Action DEFINITION: Heating system performance. Were you sent here from Symptoms or another diagnostic table? 1 2 1. 2. 3. 4. 5. Go to Step 2 Go to Symptoms HVAC Systems Manual in HVAC Systems - Manual Go to Step 3 Go to Step 9 Go to Step 7 Go to Step 4 Allow the engine to idle. Select the FLOOR mode. Select the minimum blower speed. Select the warmest temperature setting. Feel the temperature of the inlet and outlet heater hoses at the heater core. Does the inlet heater hose feel warmer than the outlet heater hose? 4 No 1. Start the engine. 2. Allow the engine to idle. Does the engine reach a normal operating temperature? 3 Yes 1. Install a thermometer into the center I/P PANEL air outlet. 2. Secure a thermometer to the heater core outlet hose. 3. Select the PANEL mode. 4. Select the maximum blower speed. 5. Select the warmest temperature setting. 6. Record the temperature at the following locations: The center I/P PANEL air outlet The heater core outlet hose 7. Compare the recorded temperatures. Tycoon 15 декабря 2008 г. 11:01:06 Page 17 © 2005 Mitchell Repair Information Company, LLC. 2003 Saturn Vue 2003 HVAC Heating, Ventilation and Air Conditioning - Vue Are the two temperature readings about equal? 5 8 9 10 Go to Step 10 - Go to Step 10 - Go to Step 8 Go to Step 10 Go to Step 10 - Go to Step 10 - System OK Go to Step 2 1. Inspect the temperature door operation. Refer to Diagnostic System Check - HVAC Systems - Manual in HVAC Systems Manual. 2. Perform any necessary repairs. Are the repairs complete? 7 Go to Step 6 1. Inspect and repair the following areas of the vehicle for cold air leaks: The cowl The recirculation door The HVAC module case 2. Perform the necessary repairs. Are the repairs complete? 6 Go to Step 5 1. 2. 3. 4. 5. 6. 7. Turn OFF the engine. Backflush the heater core. Start the engine. Select the FLOOR mode. Select the minimum blower speed. Select the warmest temperature setting. Feel the temperature of the inlet and outlet heater hoses at the heater core. Does the inlet heater hose feel warmer than the outlet heater hose? Replace the heater core. Refer to Heater Core Replacement. Is the repair complete? Repair the low engine temperature concern. Refer to Engine Fails To Reach Normal Operating Temperature in Engine Cooling. Is the repair complete? Operate the system in order to verify the repair. Did you find and correct the condition? DEFROSTING INSUFFICIENT Defrosting Insufficient Step Action Yes DEFINITION: Time required to defrost the windshield is longer than usual. 1 Were you sent here from Symptoms or another diagnostic table? No Go to Symptoms HVAC Systems Manual in HVAC Tycoon 15 декабря 2008 г. 11:01:06 Page 18 © 2005 Mitchell Repair Information Company, LLC. 2003 Saturn Vue 2003 HVAC Heating, Ventilation and Air Conditioning - Vue 2 3 4 5 6 7 8 9 10 11 12 13 14 Go to Step 2 Systems - Manual Go to Step 3 Go to Step 11 Go to Step 4 Go to Step 9 Go to Step 12 Go to Step 6 Go to Step 5 Go to Step 14 Go to Step 8 Go to Step 7 Go to Step 15 - Go to Step 10 Go to Step 13 1. Start the engine. 2. Select the DEFROST mode. 3. Select the maximum blower speed. Does sufficient air flow from the defroster outlets? Measure the engine operating temperature. Does engine reach normal operating temperature? 1. Select the minimum blower speed. 2. Select the warmest temperature setting. 3. Feel the temperature of the inlet and outlet hoses at the heater core. Does the inlet heater hose feel warmer than the outlet heater hose? Is the vehicle equipped with air conditioning? Test the operation of the A/C compressor clutch. Does the A/C compressor clutch engage? Repair the A/C compressor clutch. Refer to HVAC Compressor Clutch Does Not Engage in HVAC Systems - Manual. Is the repair complete? Perform the A/C system performance test. Refer to Air Conditioning (A/C) System Performance Test. Is the A/C system operating within the specifications? Repair the low engine temperature concern. Refer to Engine Fails To Reach Normal Operating Temperature in Engine Cooling. Is the repair complete? Inspect for correct operation of the recirculation door. Is the recirculation door operating correctly? Repair the air delivery concern. Refer to Air Delivery Improper in HVAC Systems - Manual. Is the repair complete? Repair the heating concern. Refer to Heating Performance Diagnostic. Is the repair complete? Repair the A/C performance concern. Refer to Air Conditioning (A/C) System Performance Test. Is the repair complete? Repair the recirculation door concern. Refer to Air Recirculation Malfunction in HVAC Systems Manual. Is the repair complete? Go to Step 15 Go to Step 15 Go to Step 14 Go to Step 15 - Go to Step 15 - Go to Step 15 - Go to Step 15 - Tycoon 15 декабря 2008 г. 11:01:06 Page 19 © 2005 Mitchell Repair Information Company, LLC. 2003 Saturn Vue 2003 HVAC Heating, Ventilation and Air Conditioning - Vue 15 Operate the system in order to verify the repair. Did you find and correct the condition? System OK Go to Step 2 HIGH OR LOW TEMPERATURE CONTROL EFFORT High or Low Temperature Control Effort Step Action Yes No DEFINITION: The temperature control operates with either too much or too little effort. Were you sent here from Symptoms or another Go to Symptoms diagnostic table? HVAC Systems 1 Manual in HVAC Go to Step 2 Systems - Manual Is one of the following a concern of the customer: 2 The temperature control operates with little or no resistance. The HVAC outlet air temperature is constant, regardless of the temperature control setting. While driving the vehicle the temperature control setting changes. Does the temperature control operate too freely? 3 4 5 6 7 Go to Step 3 Go to Step 7 Go to Step 17 Go to Step 4 Go to Step 15 Go to Step 5 Go to Step 22 Go to Step 6 Go to Step 19 Go to Step 16 Go to Step 21 Go to Step 8 1. Idle the engine at normal operating temperature. 2. Cycle the temperature control from the coldest setting to the warmest setting. Does the temperature change from cold to hot? Inspect the connections of the temperature control cable. Is the temperature control cable disconnected from the temperature door? Inspect the temperature control cable and linkage at the temperature door, while operating the temperature controls. Does the temperature door move while operating the temperature controls? Inspect the cable casing while operating the temperature controls. Does the cable casing move, instead of the cable, while operating the temperature controls? Inspect the HVAC control module for any debris or obstructions that would increase the effort to operate the temperature controls. Are there any obstructions? 1. Disconnect the temperature control cable from Tycoon 15 декабря 2008 г. 11:01:06 Page 20 © 2005 Mitchell Repair Information Company, LLC. 2003 Saturn Vue 2003 HVAC Heating, Ventilation and Air Conditioning - Vue 8 the temperature door. 2. Operate the HVAC control module with the temperature control cable disconnected. Does the HVAC control module bind now? With the temperature control cable disconnected: 9 13 14 15 16 17 Go to Step 10 Go to Step 17 Go to Step 11 Go to Step 18 Go to Step 12 Go to Step 18 Go to Step 13 Go to Step 17 Go to Step 14 Go to Step 22 - Go to Step 22 - Go to Step 22 - 1. Extend the cable in both directions. 2. Inspect the cable for binding. Does the temperature control cable bind? 12 Go to Step 20 1. Disconnect the temperature control cable from the HVAC control assembly. 2. Operate the HVAC control module with the cable disconnected. Does the HVAC control module bind now? With the temperature control cable disconnected at both ends: 11 Go to Step 9 1. Manually operate the temperature door. 2. Inspect the door for binding. Does the temperature door bind with the cable disconnected? 10 Go to Step 10 1. Inspect the temperature control cable for kinks or bends from incorrect routing. 2. Repair the cable or routing as necessary. Does the temperature cable still bind? Operate the HVAC control module with the temperature control cable disconnected. Does the HVAC control module bind now? Assemble the temperature control system. Is the action complete? Connect the temperature control cable to the temperature door linkage install the cable retainers. Is the action complete? Repair the lack of heating or lack of cooling condition. Refer to Engine Fails To Reach Normal Operating Temperature . Is the action complete? Replace the HVAC control module. Refer to HVAC Control Module Replacement in HVAC Systems Manual. Tycoon 15 декабря 2008 г. 11:01:06 Page 21 © 2005 Mitchell Repair Information Company, LLC. 2003 Saturn Vue 2003 HVAC Heating, Ventilation and Air Conditioning - Vue 18 19 20 21 22 Is the repair complete? Replace the temperature control cable. Refer to Temperature Control Cable Replacement in HVAC Systems - Manual. Is the repair complete? Secure the temperature control cable casing. Is the action complete? Repair the binding door. Is the repair complete? Remove the debris. Is the action complete? Operate the system in order to verify the repair. Did you find and correct the condition? Go to Step 22 - Go to Step 22 - Go to Step 22 - Go to Step 22 - Go to Step 22 - System OK Go to Step 2 Yes No Go to Step 2 Go to Symptoms HVAC Systems Manual in HVAC Systems - Manual Go to Step 8 Go to Step 3 Go to Step 4 Go to Step 11 Go to Step 6 Go to Step 5 Go to Step 9 Go to Step 11 NOISE DIAGNOSIS - BLOWER MOTOR Noise Diagnosis - Blower Motor Step Action DEFINITION: Noise originating from the blower motor. Were you sent here from Symptoms or another diagnostic table? 1 2 3 4 5 6 Inspect the air inlet grille for debris. Is debris present? 1. 2. 3. 4. Sit inside the vehicle. Close the vehicle doors and windows. Turn ON the ignition, with the engine OFF. Cycle the blower motor through all of the speeds and modes in order to determine where and when the noise occurs. Is a noise evident during the blower operation? Inspect for excessive vibration at each blower motor speed by feeling the blower case. Is excess vibration present? Listen to the blower motor at each speed. Is the blower motor making a squeaking or chirping noise? 1. Remove the blower motor. Refer to Blower Motor Replacement. 2. Inspect the blower motor impeller for deposits of foreign material. 3. Inspect the blower motor for deposits of foreign material. Tycoon 15 декабря 2008 г. 11:01:06 Page 22 © 2005 Mitchell Repair Information Company, LLC. 2003 Saturn Vue 2003 HVAC Heating, Ventilation and Air Conditioning - Vue Did you find any foreign material on the blower motor or blower motor impeller? Inspect the blower motor for the following conditions: 7 8 9 10 11 Go to Step 8 Go to Step 7 Go to Step 9 Go to Step 10 Go to Step 10 - Go to Step 11 - Go to Step 11 - System OK Go to Step 2 Cracked blades A loose impeller retainer Improper impeller alignment Did you find any of these conditions? Remove the foreign material. Is the action complete? Replace the blower motor. Refer to Blower Motor Replacement. Is the repair complete? Install the blower motor. Refer to Blower Motor Replacement. Is the action complete? Operate the system in order to verify the repair. Did you find and correct the condition? NOISE DIAGNOSIS - AIR CONDITIONING (A/C) SYSTEM Noise Diagnosis - Air Conditioning (A/C) System Step Action Yes No DEFINITION: Noise originating from the A/C compressor, drive belt or the A/C lines. Were you sent here from Symptoms or another Go to Symptoms diagnostic table? HVAC Systems 1 Manual in HVAC Go to Step 2 Systems - Manual A/C system noises can be generally categorized into 3 areas: Screeching, Squealing, Chirping noises Moaning noises Vibration/Rattle noises 2 1. Start the engine. 2. Ensure that the A/C is ON. 3 Is a screeching, squealing noise heard when the A/C is engaged? With the engine OFF, inspect the drive belt for excessive wear. Is the drive belt excessively worn? Go to Step 3 Go to Step 9 Go to Step 18 Go to Step 4 Tycoon 15 декабря 2008 г. 11:01:06 Page 23 © 2005 Mitchell Repair Information Company, LLC. 2003 Saturn Vue 2003 HVAC Heating, Ventilation and Air Conditioning - Vue 4 5 6 7 Inspect the drive belt tension. Refer to ENGINE DRIVE BELT AND TENSIONER TROUBLESHOOTING CHART . Is the drive belt tension correct? Inspect the drive belt for excessive oil coverage. Is the drive belt covered with oil? Go to Step 5 Go to Step 19 Go to Step 17 Go to Step 6 Go to Step 24 Go to Step 23 Go to Step 7 Go to Step 8 Go to Step 15 Go to Step 10 Go to Step 10 Go to Step 12 Go to Step 20 Go to Step 11 Go to Step 22 Go to Step 13 Go to Step 13 Go to Step 14 Go to Step 15 Go to Step 25 Go to Step 21 Go to Step 25 1. Start the engine. 2. Ensure that the A/C is ON. 3. Inspect the compressor and the clutch. Is the A/C compressor locked up? Is the A/C compressor clutch slipping? CAUTION: Refer to MOVING PARTS & HOT SURFACES CAUTION in Cautions and Notices. 8 9 10 11 12 13 14 Using a stethoscope, listen to the A/C compressor for any abnormal noises.Is the compressor causing an abnormal noise? Does a moaning noise exist when the A/C clutch is engaged? Listen to the A/C compressor components and mounting for noise concerns using a stethoscope. Are any of these components loose, damaged or excessively worn? 1. Idle the engine. 2. Engage the A/C compressor clutch. 3. Using a stethoscope, move around the entire refrigerant plumbing system. Listening for any abnormal noises caused by a component of the A/C system touching another component. Are any of the A/C components grounding out and causing a vibration noise? Does a vibration or rattle noise exist when the A/C clutch is engaged? Does the noise stop when the A/C clutch is disengaged? 1. Idle the engine in PARK with the A/C compressor clutch engaged. 2. Using a stethoscope, move around the entire A/C system testing for any abnormal noises caused by a component. Do any of the A/C components cause an abnormal noise? Verify that the A/C system is properly charged. Tycoon 15 декабря 2008 г. 11:01:07 Page 24 © 2005 Mitchell Repair Information Company, LLC. 2003 Saturn Vue 2003 HVAC Heating, Ventilation and Air Conditioning - Vue 15 16 17 18 19 20 21 22 23 24 25 26 Refer to Refrigerant System Capacities. Is the A/C system properly charged? Recharge the A/C system to specification. Refer to Refrigerant Recovery and Recharging. Is the abnormal compressor noise still present? Repair the oil leak. Refer to OIL LEAK DIAGNOSIS . Is the repair complete? Replace the drive belt. Refer to ENGINE DRIVE BELT AND TENSIONER REPLACEMENT . Is the repair complete? Replace the drive belt tensioner. Refer to ENGINE DRIVE BELT AND TENSIONER REPLACEMENT . Is the repair complete? Repair or replace the A/C compressor mounting component. Is the repair complete? Repair or replace the component which is causing the moaning concern as needed. Is the repair complete? Correctly route or insulate the A/C component. Is the repair complete? Replace the A/C compressor clutch. Refer to Compressor Clutch Coil Replacement. Is the repair complete? Replace the A/C compressor. Refer to Compressor Replacement. Is the repair complete? The concern may be caused by an engine related component. Refer to Vibration Analysis - Engine in Vibration Diagnosis and Correction. Did you find and correct the condition? Operate the system in order to verify the repair. Did you find and correct the condition? Go to Step 26 Go to Step 16 Go to Step 24 Go to Step 26 Go to Step 26 - Go to Step 26 - Go to Step 26 - Go to Step 26 - Go to Step 26 - Go to Step 26 - Go to Step 26 - Go to Step 26 - Go to Step 26 - System OK Go to Step 2 Yes No Go to Step 2 Go to Symptoms HVAC Systems Manual in HVAC Systems - Manual NOISE DIAGNOSIS - HVAC MODULE Noise Diagnosis - HVAC Module Step Action DEFINITION: Noise originating from the HVAC module. Were you sent here from Symptoms or another diagnostic table? 1 1. Start the engine. 2. Cycle through all of the following: Tycoon 15 декабря 2008 г. 11:01:07 Page 25 © 2005 Mitchell Repair Information Company, LLC. 2003 Saturn Vue 2003 HVAC Heating, Ventilation and Air Conditioning - Vue Blower motor speeds HVAC modes Temperature control settings 3. Determine the type of noise: Scrape, pop Tick/click, chirp or groaning Air rush/whistle 2 3 4 5 6 Is a scrape or pop noise evident when selecting modes or temperature settings? Is a tick/click, chirping, groaning or scraping noise present, but decreases as blower motor speed is decreased? Is an air rush/whistle noise evident in all modes but not all temperature settings? Is an air rush/whistle noise evident only in defrost or floor mode? 8 9 10 11 12 Go to Step 3 Go to Step 6 Go to Step 4 Go to Step 6 Go to Step 5 Go to Step 6 Go to Step 6 Go to Step 7 - Go to Step 10 Go to Step 8 Go to Step 11 Go to Step 9 Go to Step 11 - Go to Step 11 - Go to Step 12 - System OK Go to Step 2 1. Remove the instrument panel center trim bezel. Refer to Trim Bezel Replacement Center in Instrument Panel, Gages and Console. 2. Remove the center air outlet duct. Is the action complete? 7 Go to Step 6 1. Inspect the air flow doors for proper operation. 2. Inspect the ducts for obstructions or foreign materials. Were any of these conditions found? Inspect the mode and temperature doors and seals for warping or cracking. Are the doors in normal condition? Replace the appropriate door and/or seals. Is the repair complete? Remove any obstructions or foreign material found. Is the action complete? 1. Install the center air outlet duct. 2. Install the I/P center trim bezel. Refer to Trim Bezel Replacement - Center in Instrument Panel, Gages and Console. Is the action complete? Operate the system to verify the repair. Did you find and correct the condition? Tycoon 15 декабря 2008 г. 11:01:07 Page 26 © 2005 Mitchell Repair Information Company, LLC. 2003 Saturn Vue 2003 HVAC Heating, Ventilation and Air Conditioning - Vue ODOR DIAGNOSIS Odor Diagnosis Step Action Yes DEFINITION: Odor originating or noticed through the HVAC system. 1 2 3 4 5 6 7 8 9 Go to Step 2 Go to Symptoms HVAC Systems Manual in HVAC Systems - Manual Go to Step 3 Go to Step 8 Go to Step 4 Go to Step 5 Were you sent here from Symptoms or another diagnostic table? 1. 2. 3. 4. 5. 6. 7. 8. No Sit inside the vehicle. Close all of the doors and windows. Start the engine. Allow the engine idle at normal operating temperature. Select the maximum blower speed. Select the PANEL air outlet mode. Select the coldest temperature setting. Cycle through all of the blower speeds, modes and temperatures to define what type of odor is present. Musty smell Coolant smell Oil smell Does the odor have a musty smell? Inspect the HVAC filter and the air inlet grille for debris. Is debris present? Remove any debris. Is the action complete? Inspect for wet carpeting. Is the carpet wet? Inspect for the following conditions: Go to Step 15 - Go to Step 6 Go to Step 14 Go to Step 7 Go to Step 14 1. Water leaks around the windshield 2. Blockage of the HVAC module drain 3. Leaks around the door seals Is a leak present? Repair the leak as necessary. Is the repair complete? Does the odor have a coolant smell? Inspect the cooling system for leaks. Refer to Loss of Coolant in Engine Cooling. Go to Step 15 Go to Step 9 Go to Step 12 Tycoon 15 декабря 2008 г. 11:01:07 Page 27 © 2005 Mitchell Repair Information Company, LLC. 2003 Saturn Vue 2003 HVAC Heating, Ventilation and Air Conditioning - Vue Is a leak present? Inspect for coolant leaking inside the vehicle or for a film build-up on the windshield. Is the condition present? Replace the heater core. Refer to Heater Core Replacement. Is the repair complete? Does the odor have an oily smell? 10 11 12 Go to Step 10 Go to Step 12 Go to Step 11 Go to Step 15 - Go to Step 15 Go to Step 13 1. Inspect the engine compartment for any leaks. Refer to the following procedures: OIL LEAK DIAGNOSIS Fluid Leak Diagnosis in Automatic Transaxle AF33-5 SYMPTOM DIAGNOSIS in Automatic Transaxle VT25-E 2. Repair any oil leaks. 13 Is the repair complete? A musty odor can be caused by mold or mildew build-up on the evaporator or the heater core or inside of the HVAC module. Refer to Odor Correction. Is the action complete? Operate the system in order to verify the repair. Did you find and correct the condition? 14 15 Go to Step 15 - Go to Step 15 Go to Step 15 System OK Go to Step 2 REPAIR INSTRUCTIONS ODOR CORRECTION Eliminating Air Conditioning Odor Odors may be emitted from the air conditioning system primarily at start up in hot, humid climates. The following conditions may cause the odor: Debris is present in the HVAC module. Microbial growth on the evaporator core When the blower motor fan is turned on, the microbial growth may release an unpleasant musty odor into the passenger compartment. To remove odors of this type, the microbial growth must be eliminated. Perform the following procedure: Deodorize the evaporator core using Deodorizing Aerosol Kit. Perform the following steps in order to deodorize the A/C system: 1. Ensure that the plenum which draws outside air into the HVAC module is clear of debris. Tycoon 15 декабря 2008 г. 11:01:07 Page 28 © 2005 Mitchell Repair Information Company, LLC. 2003 Saturn Vue 2003 HVAC Heating, Ventilation and Air Conditioning - Vue 2. Disable the A/C compressor clutch operation by disconnecting the clutch coil electrical connector. 3. Dry the evaporator core by performing the following steps: 1. Start the engine. 2. Select the warmest temperature setting. 3. Select the recirculation mode. 4. Run the blower motor on high for 10 minutes. 4. Locate an area in the HVAC module case between the blower motor and the evaporator core downstream of the blower motor. 5. Drill a 3.175 mm (0.125 in) hole where the hole will not interfere with or damage the following components: The blower motor The evaporator core Any other operating part the of system 6. Wear safety goggles and latex gloves in order to perform the following actions: 1. Select the maximum blower speed. 2. Insert the deodorizer extension tube into the hole to the mark on the extension tube. 3. Use short spray bursts and vary the direction of spray for a 2-3 minute period of time. 7. Shut the engine OFF. Allow the vehicle to sit for 3-5 minutes. 8. Seal the 3.175 mm (0.125 in) hole with body sealer or RTV gasket compound. 9. Start the engine. 10. Operate the blower motor on high for 15-20 minutes to dry. 11. Reconnect the A/C compressor clutch coil electrical connector. 12. Verify proper clutch operation. REFRIGERANT RECOVERY AND RECHARGING Tools Required J 43600 ACR 2000 Air Conditioning Service Center. See Special Tools. CAUTION: Avoid breathing the A/C Refrigerant 134a (R-134a) and the lubricant vapor or the mist. Exposure may irritate the eyes, nose, and throat. Work in a well ventilated area. In order to remove R-134a from the A/C system, use service equipment that is certified to meet the requirements of SAE J 2210 (R-134a recycling equipment). If an accidental system discharge occurs, ventilate the work area before continuing service. Additional health and safety information may be obtained from the refrigerant and lubricant manufacturers. CAUTION: For personal protection, goggles and gloves should be worn and a clean cloth wrapped around fittings, valves, and connections when doing work that includes opening the refrigerant system. If R-134a comes in contact with any part of the body severe frostbite and personal injury can result. The exposed area should be flushed Tycoon 15 декабря 2008 г. 11:01:07 Page 29 © 2005 Mitchell Repair Information Company, LLC. 2003 Saturn Vue 2003 HVAC Heating, Ventilation and Air Conditioning - Vue immediately with cold water and prompt medical help should be obtained. NOTE: R-134a is the only approved refrigerant for use in this vehicle. The use of any other refrigerant may result in poor system performance or component failure. NOTE: To avoid system damage use only R-134a dedicated tools when servicing the A/C system. NOTE: Use only Polyalkylene Glycol Synthetic Refrigerant Oil (PAG) for internal circulation through the R-134a A/C system and only 525 viscosity mineral oil on fitting threads and O-rings. If lubricants other than those specified are used, compressor failure and/or fitting seizure may result. NOTE: R-12 refrigerant and R-134a refrigerant must never be mixed, even in the smallest of amounts, as they are incompatible with each other. If the refrigerants are mixed, compressor failure is likely to occur. Refer to the manufacturer instructions included with the service equipment before servicing. The J 43600 is a complete air conditioning service center for R-134a. See Special Tools. The ACR 2000 recovers, recycles, evacuates and recharges A/C refrigerant quickly, accurately and automatically. The unit has a display screen that contains the function controls and displays prompts that will lead the technician through the recover, recycle, evacuate and recharge operations. R-134a is recovered into and charged out of an internal storage vessel. The ACR 2000 automatically replenishes this vessel from an external source tank in order to maintain a constant 5.45-6.82 kg (12-15 lbs) of A/C refrigerant. The ACR 2000 has a built in A/C refrigerant identifier that will test for contamination, prior to recovery and will notify the technician if there are foreign gases present in the A/C system. If foreign gases are present, the ACR 2000 will not recover the refrigerant from the A/C system. The ACR 2000 also features automatic air purge, single pass recycling and an automatic oil drain. Refer to the J 43600 ACR 2000 manual for operation and setup instruction. See Special Tools. Always recharge the A/C System with the proper amount of R-134a. Refer to Refrigerant System Capacities for the correct amount. A/C Refrigerant System Oil Charge Replenishing If oil was removed from the A/C system during the recovery process or due to component replacement, the oil must be replenished. Oil can be added to the system by pouring the correct amount into the replaced component or into an open refrigerant line. For the proper quantities of oil to add to the A/C refrigerant system, refer to Refrigerant System Capacities. COMPRESSOR OIL BALANCING Draining Procedure Tycoon 15 декабря 2008 г. 11:01:07 Page 30 © 2005 Mitchell Repair Information Company, LLC. 2003 Saturn Vue 2003 HVAC Heating, Ventilation and Air Conditioning - Vue IMPORTANT: Drain and measure as much of the refrigerant oil as possible from the removed compressor. 1. Drain the oil from both the suction and discharge ports of the removed compressor into a clean, graduated container. Rotate the compressor shaft to assist in draining the compressor. Fig. 4: Draining A/C Refrigerant Oil From Compressor Courtesy of GENERAL MOTORS CORP. Tycoon 15 декабря 2008 г. 11:01:07 Page 31 © 2005 Mitchell Repair Information Company, LLC. 2003 Saturn Vue 2003 HVAC Heating, Ventilation and Air Conditioning - Vue 2. Measure and record the amount of oil drained from the removed compressor. This measurement will be used during installation of the replacement compressor. IMPORTANT: During the oil removal procedure, the condition of the oil should be evaluated. Compressor oil never breaks down unless something is wrong with the compressor or air conditioning (A/C) system. If one or more of the following conditions exist, replace the compressor and receiver dehydrator. 3. Inspect the polyalkylene glycol (PAG) oil for the following conditions: The color of the oil is dark brown or black. There is a presence of foreign substances, metal fillings, etc. in the oil. If the receiver-dehydrator is not replaced, damage to A/C compressor will occur. 4. Properly discard the used refrigerant oil. Balancing Procedure IMPORTANT: The refrigerant oil in the A/C system must be balanced during compressor replacement. 1. The replacement compressor is shipped with 120 ml (4.0 oz) of refrigerant oil. Tycoon 15 декабря 2008 г. 11:01:07 Page 32 © 2005 Mitchell Repair Information Company, LLC. 2003 Saturn Vue 2003 HVAC Heating, Ventilation and Air Conditioning - Vue Fig. 5: Draining A/C Refrigerant Oil From Compressor Courtesy of GENERAL MOTORS CORP. 2. Compare the amount of refrigerant oil recorded during compressor removal to the amount of refrigerant oil shipped in the replacement compressor. If the amount of refrigerant oil drained and recorded from the removed compressor is: Less than 120 ml (4.0 oz), leave the 120 ml (4.0 oz) in the replacement compressor. More than 120 ml (4.0 oz), add to the compressor the difference between the 120 ml (4.0 oz) and the amount drained. COMPRESSOR REPLACEMENT Tycoon 15 декабря 2008 г. 11:01:07 Page 33 © 2005 Mitchell Repair Information Company, LLC. 2003 Saturn Vue 2003 HVAC Heating, Ventilation and Air Conditioning - Vue Tools Required J 39400-A Halogen Leak Detector. See Special Tools. Removal 1. Recover the refrigerant. Refer to Refrigerant Recovery and Recharging. 2. Remove the drive belt. Refer to ENGINE DRIVE BELT AND TENSIONER REPLACEMENT . 3. Raise and support the vehicle. Refer to Lifting and Jacking the Vehicle in General Information. Fig. 6: Electrical Connector & Compressor Courtesy of GENERAL MOTORS CORP. 4. Disconnect the engine harness from the compressor. Tycoon 15 декабря 2008 г. 11:01:07 Page 34 © 2005 Mitchell Repair Information Company, LLC. 2003 Saturn Vue 2003 HVAC Heating, Ventilation and Air Conditioning - Vue Fig. 7: Disconnecting Oxygen Sensor From Engine Harness Courtesy of GENERAL MOTORS CORP. 5. On L81 vehicles, disconnect the oxygen sensor from the engine harness. Tycoon 15 декабря 2008 г. 11:01:07 Page 35 © 2005 Mitchell Repair Information Company, LLC. 2003 Saturn Vue 2003 HVAC Heating, Ventilation and Air Conditioning - Vue Fig. 8: Front Oxygen Sensor & Front Exhaust Manifold Courtesy of GENERAL MOTORS CORP. 6. On L81 vehicles, remove the oxygen sensor from the exhaust. Tycoon 15 декабря 2008 г. 11:01:07 Page 36 © 2005 Mitchell Repair Information Company, LLC. 2003 Saturn Vue 2003 HVAC Heating, Ventilation and Air Conditioning - Vue Fig. 9: Removing & Discarding Sealing Washers Courtesy of GENERAL MOTORS CORP. 7. Loosen the bolt that secures the suction/discharge to the compressor by 7-8 turns, and remove the block from the compressor by moving the block forward, then up. 8. Remove and discard the sealing washers. 9. Install the shipping cap on the compressor hose assembly to prevent moisture or contamination. 10. Install the compressor shipping cap before removal to prevent oil spillage and contamination. Tycoon 15 декабря 2008 г. 11:01:07 Page 37 © 2005 Mitchell Repair Information Company, LLC. 2003 Saturn Vue 2003 HVAC Heating, Ventilation and Air Conditioning - Vue Fig. 10: Compressor Bolts & Engine Courtesy of GENERAL MOTORS CORP. 11. Remove the bolts that secure the compressor to the engine block. Remove the compressor. Installation NOTE: Do NOT mix refrigerant oils. Use of incorrect refrigerant oil will cause compressor failure. This compressor uses a low viscosity refrigerant oil, Saturn P/N 22695048. IMPORTANT: NEW compressor assemblies are shipped with a partial poly-alkylene glycol (PAG) refrigerant oil charge. Use of the incorrect PAG oil can result in compressor failure. 1. If replacing the compressor, refer to Compressor Oil Balancing. Tycoon 15 декабря 2008 г. 11:01:07 Page 38 © 2005 Mitchell Repair Information Company, LLC. 2003 Saturn Vue 2003 HVAC Heating, Ventilation and Air Conditioning - Vue 2. Install caps on the compressor to prevent oil spillage during installation. Fig. 11: Compressor Bolts & Engine Courtesy of GENERAL MOTORS CORP. NOTE: Refer to FASTENER NOTICE in Cautions and Notices. 3. Install the compressor to the engine block bracket with the attachment bolts. Tighten: Tighten the bolts to 22 N.m (16 lb ft). Tycoon 15 декабря 2008 г. 11:01:07 Page 39 © 2005 Mitchell Repair Information Company, LLC. 2003 Saturn Vue 2003 HVAC Heating, Ventilation and Air Conditioning - Vue Fig. 12: Installing New Seal Washers Courtesy of GENERAL MOTORS CORP. 4. Remove the shipping cap from the compressor and the compressor hose assembly. Install new seal washers. Refer to Sealing Washer Replacement. 5. Install the compressor hose assembly to the compressor. Tighten the attachment bolt while holding the hose block flush. Tighten: Tighten the bolts to 27 N.m (20 lb ft). Tycoon 15 декабря 2008 г. 11:01:07 Page 40 © 2005 Mitchell Repair Information Company, LLC. 2003 Saturn Vue 2003 HVAC Heating, Ventilation and Air Conditioning - Vue Fig. 13: Front Oxygen Sensor & Front Exhaust Manifold Courtesy of GENERAL MOTORS CORP. 6. On L81 vehicles, install the oxygen sensor to the exhaust pipe. Tighten: Tighten the bolts to 45 N.m (33 lb ft). Tycoon 15 декабря 2008 г. 11:01:07 Page 41 © 2005 Mitchell Repair Information Company, LLC. 2003 Saturn Vue 2003 HVAC Heating, Ventilation and Air Conditioning - Vue Fig. 14: Connecting Oxygen Sensor To Engine Wire Harness Courtesy of GENERAL MOTORS CORP. 7. On L81 vehicles, connect the oxygen sensor to the engine wire harness. Tycoon 15 декабря 2008 г. 11:01:07 Page 42 © 2005 Mitchell Repair Information Company, LLC. 2003 Saturn Vue 2003 HVAC Heating, Ventilation and Air Conditioning - Vue Fig. 15: Electrical Connector & Compressor Courtesy of GENERAL MOTORS CORP. 8. 9. 10. 11. 12. Connect the engine wire harness to the compressor. Install the drive belt. Refer to ENGINE DRIVE BELT AND TENSIONER REPLACEMENT . Lower vehicle. Evacuate and charge the refrigerant system. Refer to Refrigerant Recovery and Recharging. Use J 39400-A to leak test the fittings. See Special Tools. COMPRESSOR CLUTCH COIL REPLACEMENT Tools Required J 25031-A Puller, Three Jaw. See Special Tools. SA9149AC-8 Snap Ring Pliers. See Special Tools. Tycoon 15 декабря 2008 г. 11:01:07 Page 43 © 2005 Mitchell Repair Information Company, LLC. 2003 Saturn Vue 2003 HVAC Heating, Ventilation and Air Conditioning - Vue J 45504 Clutch Pulley Installer. See Special Tools. J 45267 Clutch Holding Tool. See Special Tools. Removal Procedure 1. Remove the compressor. Refer to Compressor Replacement. Fig. 16: Clutch Nut, Disk & Hub Assembly Courtesy of GENERAL MOTORS CORP. 2. Use J 45267 to hold the disk and hub assembly. See Special Tools. Remove the clutch nut and the disk and hub assembly. Tycoon 15 декабря 2008 г. 11:01:07 Page 44 © 2005 Mitchell Repair Information Company, LLC. 2003 Saturn Vue 2003 HVAC Heating, Ventilation and Air Conditioning - Vue Fig. 17: Compressor Clutch Assembly & Spacer Courtesy of GENERAL MOTORS CORP. 3. Remove the spacer. Tycoon 15 декабря 2008 г. 11:01:07 Page 45 © 2005 Mitchell Repair Information Company, LLC. 2003 Saturn Vue 2003 HVAC Heating, Ventilation and Air Conditioning - Vue Fig. 18: Pulley Snap Ring Courtesy of GENERAL MOTORS CORP. 4. Use SA9149AC-8 to remove the pulley snap ring. See Special Tools. Tycoon 15 декабря 2008 г. 11:01:07 Page 46 © 2005 Mitchell Repair Information Company, LLC. 2003 Saturn Vue 2003 HVAC Heating, Ventilation and Air Conditioning - Vue Fig. 19: A/C Clutch Pulley Courtesy of GENERAL MOTORS CORP. 5. Use J 25031-A to remove the A/C clutch pulley. See Special Tools. Tycoon 15 декабря 2008 г. 11:01:07 Page 47 © 2005 Mitchell Repair Information Company, LLC. 2003 Saturn Vue 2003 HVAC Heating, Ventilation and Air Conditioning - Vue Fig. 20: Thermal Switch Bolt & Hold-Down Bracket Courtesy of GENERAL MOTORS CORP. 6. Remove the thermal switch bolt and the hold-down bracket. IMPORTANT: It may be necessary to pry the switch lightly with a small screwdriver. 7. Lift out the thermal switch while lightly twisting and pulling up on the sensor. Tycoon 15 декабря 2008 г. 11:01:07 Page 48 © 2005 Mitchell Repair Information Company, LLC. 2003 Saturn Vue 2003 HVAC Heating, Ventilation and Air Conditioning - Vue Fig. 21: Field Coil Snap Ring Courtesy of GENERAL MOTORS CORP. 8. Use SA9149AC-8 to remove the field coil snap ring. See Special Tools. Tycoon 15 декабря 2008 г. 11:01:07 Page 49 © 2005 Mitchell Repair Information Company, LLC. 2003 Saturn Vue 2003 HVAC Heating, Ventilation and Air Conditioning - Vue Fig. 22: A/C Clutch Field Coil Courtesy of GENERAL MOTORS CORP. 9. Remove the A/C clutch field coil. Installation Procedure 1. Clean the mounting surfaces on the A/C clutch field coil and pulley. Tycoon 15 декабря 2008 г. 11:01:07 Page 50 © 2005 Mitchell Repair Information Company, LLC. 2003 Saturn Vue 2003 HVAC Heating, Ventilation and Air Conditioning - Vue Fig. 23: A/C Clutch Field Coil Courtesy of GENERAL MOTORS CORP. 2. Install the A/C clutch field coil. Tycoon 15 декабря 2008 г. 11:01:07 Page 51 © 2005 Mitchell Repair Information Company, LLC. 2003 Saturn Vue 2003 HVAC Heating, Ventilation and Air Conditioning - Vue Fig. 24: Field Coil Snap Ring Courtesy of GENERAL MOTORS CORP. 3. Use SA9149AC-8 to install the field coil snap ring with the bevel side out. See Special Tools. Tycoon 15 декабря 2008 г. 11:01:07 Page 52 © 2005 Mitchell Repair Information Company, LLC. 2003 Saturn Vue 2003 HVAC Heating, Ventilation and Air Conditioning - Vue Fig. 25: Thermal Switch Bolt & Hold-Down Bracket Courtesy of GENERAL MOTORS CORP. IMPORTANT: It is important to use Saturn Sealant P/N 22681632 as a thermal conductive material. Failure to use this sealant may affect the function of the switch. 4. Clean the thermal switch pocket if necessary. 5. Apply thermal switch sealant, approximately the size of a pea, into the switch pocket. 6. Install the thermal switch by pushing the switch into place and wetting out the sealant, while holding the switch in place. Wipe away any excess sealant. NOTE: Refer to FASTENER NOTICE in Cautions and Notices. 7. Install the thermal switch hold-down bracket and bolt. Tycoon 15 декабря 2008 г. 11:01:08 Page 53 © 2005 Mitchell Repair Information Company, LLC. 2003 Saturn Vue 2003 HVAC Heating, Ventilation and Air Conditioning - Vue Tighten: Tighten the bolt to 6 N.m (53 lb in). Fig. 26: Clutch Bearing/Pulley Assembly & Hub Courtesy of GENERAL MOTORS CORP. IMPORTANT: The A/C clutch bearing and pulley is a slip fit on the compressor. If correctly aligned the pulley should slip on easily. If difficulty is encountered, install using the pulley installer tool. 8. Use J 45504 to align the clutch bearing/pulley assembly over the hub. See Special Tools. Gently tap on the assembly to install. Tycoon 15 декабря 2008 г. 11:01:08 Page 54 © 2005 Mitchell Repair Information Company, LLC. 2003 Saturn Vue 2003 HVAC Heating, Ventilation and Air Conditioning - Vue Fig. 27: Field Coil Snap Ring Courtesy of GENERAL MOTORS CORP. 9. Use SA9149AC-8 to install the pulley snap ring with the bevel side out. See Special Tools. Tycoon 15 декабря 2008 г. 11:01:08 Page 55 © 2005 Mitchell Repair Information Company, LLC. 2003 Saturn Vue 2003 HVAC Heating, Ventilation and Air Conditioning - Vue Fig. 28: Compressor Clutch Assembly & Spacer Courtesy of GENERAL MOTORS CORP. 10. Install the spacer. Tycoon 15 декабря 2008 г. 11:01:08 Page 56 © 2005 Mitchell Repair Information Company, LLC. 2003 Saturn Vue 2003 HVAC Heating, Ventilation and Air Conditioning - Vue Fig. 29: Clutch Nut, Disk & Hub Assembly Courtesy of GENERAL MOTORS CORP. IMPORTANT: Align the block tooth on the disk and hub assembly with the groove in the shaft. 11. Install the drive plate and nut. Use the old nut to evaluate the clearances. Tycoon 15 декабря 2008 г. 11:01:08 Page 57 © 2005 Mitchell Repair Information Company, LLC. 2003 Saturn Vue 2003 HVAC Heating, Ventilation and Air Conditioning - Vue Fig. 30: Measuring Clearance Between Pulley & Drive Plate Using Feeler Gauge Courtesy of GENERAL MOTORS CORP. 12. Using a feeler gauge, verify that the clearance is 0.35-0.75 mm (0.014-0.030 in). 13. If necessary, adjust the clearance by adding or removing clutch hub spacers. Tycoon 15 декабря 2008 г. 11:01:08 Page 58 © 2005 Mitchell Repair Information Company, LLC. 2003 Saturn Vue 2003 HVAC Heating, Ventilation and Air Conditioning - Vue Fig. 31: Clutch Nut, Disk & Hub Assembly Courtesy of GENERAL MOTORS CORP. 14. Once the correct air gap is obtained, install a new clutch nut. Use J 45267 to hold the disk and hub assembly while tightening. See Special Tools. Tighten: Tighten the nut to 19 N.m (14 lb ft). 15. Install the compressor. Refer to Compressor Replacement. 16. Evacuate and charge the refrigerant system. Refer to Refrigerant Recovery and Recharging. 17. Use J 39400-A to leak test the fittings. See Special Tools. COMPRESSOR PRESSURE RELIEF VALVE REPLACEMENT Tools Required Tycoon 15 декабря 2008 г. 11:01:08 Page 59 © 2005 Mitchell Repair Information Company, LLC. 2003 Saturn Vue 2003 HVAC Heating, Ventilation and Air Conditioning - Vue J 39400-A Halogen Leak Detector. See Special Tools. Removal Procedure 1. Recover the refrigerant. Refer to Refrigerant Recovery and Recharging. 2. Raise and support the vehicle. Refer to Lifting and Jacking the Vehicle in General Information. Fig. 32: Removing Pressure Relief Valve From Compressor Hose Courtesy of GENERAL MOTORS CORP. 3. Remove pressure relief valve from compressor hose. Installation Procedure Tycoon 15 декабря 2008 г. 11:01:08 Page 60 © 2005 Mitchell Repair Information Company, LLC. 2003 Saturn Vue 2003 HVAC Heating, Ventilation and Air Conditioning - Vue Fig. 33: Installing Pressure Relief Valve To Compressor Hose Courtesy of GENERAL MOTORS CORP. IMPORTANT: Use R-12 refrigerant oil (mineral) to lubricate O-rings. Use of R-134a (PAG) oil will cause premature corrosion of fitting joints. 1. Lubricate the pressure relief valve O-ring with new R-12 mineral compressor oil. Refer to O-Ring Replacement. NOTE: Refer to FASTENER NOTICE in Cautions and Notices. 2. Install the pressure relief valve to the compressor hose. Tighten: Tighten the pressure relief valve to 10 N.m (89 in ft). 3. Lower the vehicle. Tycoon 15 декабря 2008 г. 11:01:08 Page 61 © 2005 Mitchell Repair Information Company, LLC. 2003 Saturn Vue 2003 HVAC Heating, Ventilation and Air Conditioning - Vue 4. Evacuate and charge the A/C system. Refer to Refrigerant Recovery and Recharging. 5. Test the affected A/C joint for leaks using J 39400-A . See Special Tools. SEALING WASHER REPLACEMENT Removal Procedure Fig. 34: Identifying Good And Bad Sealing Washer Positions Courtesy of GENERAL MOTORS CORP. 1. Remove the seal washer from the A/C refrigerant component. IMPORTANT: Cap or tape the open A/C refrigerant components immediately to prevent system contamination. 2. Inspect the seal washer for signs of damage to help determine the root cause of the failure. Tycoon 15 декабря 2008 г. 11:01:08 Page 62 © 2005 Mitchell Repair Information Company, LLC. 2003 Saturn Vue 2003 HVAC Heating, Ventilation and Air Conditioning - Vue 3. Inspect the A/C refrigerant components for damage or burrs. Repair if necessary. IMPORTANT: DO NOT reuse sealing washer. 4. Discard the sealing washer. Installation Procedure IMPORTANT: Flat washer type seals do not require lubrication. 1. Inspect the new seal washer for any signs of cracks, cuts, or damage. Do not use a damaged seal washer. 2. Remove the cap or tape from the A/C refrigerant components. Tycoon 15 декабря 2008 г. 11:01:08 Page 63 © 2005 Mitchell Repair Information Company, LLC. 2003 Saturn Vue 2003 HVAC Heating, Ventilation and Air Conditioning - Vue Fig. 35: Identifying Good And Bad Sealing Washer Positions Courtesy of GENERAL MOTORS CORP. 3. Using a lint-free clean, dry cloth, clean the sealing surfaces of the A/C refrigerant components. 4. Carefully install the new seal washer onto the A/C refrigerant component. The washer must completely bottom against the surface of the fitting. IMPORTANT: After tightening the A/C components, there should be a slight sealing washer gap of approximately 1.2 mm (3/64 in) between the A/C line and the A/C component. 5. Assemble the remaining A/C refrigerant components. Refer to the appropriate repair procedure. O-RING REPLACEMENT Removal Procedure Tycoon 15 декабря 2008 г. 11:01:08 Page 64 © 2005 Mitchell Repair Information Company, LLC. 2003 Saturn Vue 2003 HVAC Heating, Ventilation and Air Conditioning - Vue Fig. 36: Disassembling/Reassembling A/C Line Fittings Courtesy of GENERAL MOTORS CORP. 1. Disassemble the A/C refrigerant components. Refer to the appropriate repair procedure For compression style fittings use a back up wrench on the fitting (2) and loosen the fitting nut (1). For banjo style fittings remove the bolt retaining the banjo type fitting. 2. Remove the O-ring seal from the A/C refrigerant component. 3. Inspect the O-ring seal for signs of damage to help determine the root cause of the failure. 4. Inspect the A/C refrigerant components for damage or burrs. Repair if necessary. IMPORTANT: Cap or tape the open A/C refrigerant components immediately to prevent system contamination. Tycoon 15 декабря 2008 г. 11:01:08 Page 65 © 2005 Mitchell Repair Information Company, LLC. 2003 Saturn Vue 2003 HVAC Heating, Ventilation and Air Conditioning - Vue 5. Cap or tape the A/C refrigerant components. 6. Discard the O-ring seal. Installation Procedure 1. Inspect the new O-ring seal for any sign or cracks, cuts, or damage. Replace if necessary. 2. Remove the cap or tape from the A/C refrigerant components. 3. Using a lint-free clean, dry cloth, carefully clean the sealing surfaces of the A/C refrigerant components. IMPORTANT: DO NOT allow any of the mineral base 525 viscosity refrigerant oil on the new O-ring seal to enter the refrigerant system. 4. Lightly coat the new O-ring seal with mineral base 525 viscosity refrigerant oil. IMPORTANT: DO NOT reuse O-ring seals. 5. Carefully slide the new O-ring seal onto the A/C refrigerant component. Tycoon 15 декабря 2008 г. 11:01:08 Page 66 © 2005 Mitchell Repair Information Company, LLC. 2003 Saturn Vue 2003 HVAC Heating, Ventilation and Air Conditioning - Vue Fig. 37: Identifying Proper Seating Of A/C Refrigerant O-Ring Courtesy of GENERAL MOTORS CORP. 6. The O-ring seal must be fully seated. Tycoon 15 декабря 2008 г. 11:01:08 Page 67 © 2005 Mitchell Repair Information Company, LLC. 2003 Saturn Vue 2003 HVAC Heating, Ventilation and Air Conditioning - Vue Fig. 38: Disassembling/Reassembling A/C Line Fittings Courtesy of GENERAL MOTORS CORP. 7. Assemble the A/C components. Refer to the appropriate repair procedure. For compression style fittings use a back up wrench on the fitting (2) and tighten the fitting nut (1) to specification. For banjo style fittings install the bolt retaining the banjo type fitting and tighten to specification. COMPRESSOR HOSE ASSEMBLY REPLACEMENT (L61) Tools Required Tycoon 15 декабря 2008 г. 11:01:08 Page 68 © 2005 Mitchell Repair Information Company, LLC. 2003 Saturn Vue 2003 HVAC Heating, Ventilation and Air Conditioning - Vue J 39400-A Halogen Leak Detector. See Special Tools. Removal Procedure 1. Recover the refrigerant. Refer to Refrigerant Recovery and Recharging. 2. Remove the left headlamp. Refer to Headlamp Assembly or Headlamp Bulb and/or Cornering, Sidemarker, Park, Turn Signal Bulb Replacement in Lighting Systems. Fig. 39: Compressor Hose, Nut & Battery Box Courtesy of GENERAL MOTORS CORP. 3. Remove the compressor hose nut from the battery box. 4. Remove the compressor hose from the battery box. Tycoon 15 декабря 2008 г. 11:01:08 Page 69 © 2005 Mitchell Repair Information Company, LLC. 2003 Saturn Vue 2003 HVAC Heating, Ventilation and Air Conditioning - Vue Fig. 40: Removing Compressor Hose From Evaporative Hose Courtesy of GENERAL MOTORS CORP. 5. On L81 vehicles, remove the compressor hose nut from the suction hose jumper. 6. Separate the compressor hose from the suction hose jumper. 7. Install a protective cap to the suction hose jumper to prevent contamination and desiccant saturation. Tycoon 15 декабря 2008 г. 11:01:08 Page 70 © 2005 Mitchell Repair Information Company, LLC. 2003 Saturn Vue 2003 HVAC Heating, Ventilation and Air Conditioning - Vue Fig. 41: Compressor Hose, Nut & TXV Courtesy of GENERAL MOTORS CORP. 8. On L61 vehicles, remove the compressor hose nut from the TXV. 9. Remove the compressor hose from the TXV. 10. Install a protective cap to the TXV to prevent contamination and desiccant saturation. Tycoon 15 декабря 2008 г. 11:01:08 Page 71 © 2005 Mitchell Repair Information Company, LLC. 2003 Saturn Vue 2003 HVAC Heating, Ventilation and Air Conditioning - Vue Fig. 42: Compressor Hose, Nut, Condenser & Protective Cap Courtesy of GENERAL MOTORS CORP. 11. 12. 13. 14. Remove the compressor hose nut from the condenser. Remove the compressor hose from the condenser. Install a protective cap to condenser to prevent contamination and desiccant saturation. Raise and support the vehicle. Refer to Lifting and Jacking the Vehicle in General Information. Tycoon 15 декабря 2008 г. 11:01:08 Page 72 © 2005 Mitchell Repair Information Company, LLC. 2003 Saturn Vue 2003 HVAC Heating, Ventilation and Air Conditioning - Vue Fig. 43: Compressor Hose, Bolt, Compressor, O-Rings & Protective Cap Courtesy of GENERAL MOTORS CORP. 15. 16. 17. 18. 19. 20. Remove the compressor hose bolt from the compressor. Remove the compressor hose from the compressor. Remove and discard the O-rings from the compressor. Refer to O-Ring Replacement. Install a protective cap to the compressor to prevent contamination and desiccant saturation. Remove the compressor hose from the vehicle. Remove and discard the sealing washers from the TXV and the condenser ends of the compressor hose. Refer to Sealing Washer Replacement. Installation Procedure Tycoon 15 декабря 2008 г. 11:01:08 Page 73 © 2005 Mitchell Repair Information Company, LLC. 2003 Saturn Vue 2003 HVAC Heating, Ventilation and Air Conditioning - Vue Fig. 44: Compressor Hose, Bolt, Compressor, O-Rings & Protective Cap Courtesy of GENERAL MOTORS CORP. 1. Install new seal washers to the TXV and the condenser ends of the compressor hose. Refer to Sealing Washer Replacement. 2. Position the compressor hose in the vehicle. 3. Remove the protective cap from the compressor. 4. Install new O-rings to the compressor. Refer to O-Ring Replacement. 5. Install the compressor hose to the compressor. NOTE: Refer to FASTENER NOTICE in Cautions and Notices. 6. Install the compressor hose bolt to the compressor. Tighten: Tighten the bolt to 27 N.m (20 lb ft). Tycoon 15 декабря 2008 г. 11:01:08 Page 74 © 2005 Mitchell Repair Information Company, LLC. 2003 Saturn Vue 2003 HVAC Heating, Ventilation and Air Conditioning - Vue 7. Lower vehicle. Fig. 45: Installing Compressor Hose To Evaporator Hose Courtesy of GENERAL MOTORS CORP. 8. On L81 vehicles, remove the protective cap from the suction hose jumper. 9. Connect the compressor hose to the suction hose jumper. 10. Install the compressor hose nut to the suction hose jumper. Tighten: Tighten the nut to 16 N.m (12 lb ft). Tycoon 15 декабря 2008 г. 11:01:08 Page 75 © 2005 Mitchell Repair Information Company, LLC. 2003 Saturn Vue 2003 HVAC Heating, Ventilation and Air Conditioning - Vue Fig. 46: Compressor Hose, Nut & TXV Courtesy of GENERAL MOTORS CORP. 11. Remove the protective cap from the TXV. 12. Install the compressor hose to the TXV. 13. Install the compressor hose nut to the TXV. Tighten: Tighten the nut to 16 N.m (12 lb ft). Tycoon 15 декабря 2008 г. 11:01:08 Page 76 © 2005 Mitchell Repair Information Company, LLC. 2003 Saturn Vue 2003 HVAC Heating, Ventilation and Air Conditioning - Vue Fig. 47: Compressor Hose, Nut, Condenser & Protective Cap Courtesy of GENERAL MOTORS CORP. 14. Remove the protective cap from the condenser. 15. Install the compressor hose to the condenser. 16. Install the compressor hose nut to the condenser. Tighten: Tighten the nut to 16 N.m (12 lb ft). Tycoon 15 декабря 2008 г. 11:01:08 Page 77 © 2005 Mitchell Repair Information Company, LLC. 2003 Saturn Vue 2003 HVAC Heating, Ventilation and Air Conditioning - Vue Fig. 48: Compressor Hose, Nut & Battery Box Courtesy of GENERAL MOTORS CORP. 17. Install the compressor hose to the battery box. 18. Install the compressor hose nut to the battery box. Tighten: Tighten the nut to 8 N.m (71 lb in). 19. Install left headlamp. Refer to Headlamp Assembly or Headlamp Bulb and/or Cornering, Sidemarker, Park, Turn Signal Bulb Replacement in Lighting Systems. 20. Evacuate and charge the A/C system. Refer to Refrigerant Recovery and Recharging. 21. Test the affected A/C joints for leaks using J 39400-A . See Special Tools. EVAPORATOR HOSE ASSEMBLY REPLACEMENT Tools Required Tycoon 15 декабря 2008 г. 11:01:08 Page 78 © 2005 Mitchell Repair Information Company, LLC. 2003 Saturn Vue 2003 HVAC Heating, Ventilation and Air Conditioning - Vue J 39400-A Halogen Leak Detector. See Special Tools. Removal Procedure 1. Recover the refrigerant. Refer to Refrigerant Recovery and Recharging. 2. Raise the vehicle. Refer to Lifting and Jacking the Vehicle in General Information. Fig. 49: Removing Compressor Hose From Evaporator Hose Courtesy of GENERAL MOTORS CORP. 3. Remove the compressor hose from the evaporator hose. 4. Remove and discard the seal washer. Tycoon 15 декабря 2008 г. 11:01:08 Page 79 © 2005 Mitchell Repair Information Company, LLC. 2003 Saturn Vue 2003 HVAC Heating, Ventilation and Air Conditioning - Vue Fig. 50: Compressor Hose, Nut & TXV Courtesy of GENERAL MOTORS CORP. 5. Remove the evaporator hose to TXV nut. 6. Remove the evaporator hose from the TXV. 7. Install protective cap to the TXV to prevent contamination. Installation Procedure Tycoon 15 декабря 2008 г. 11:01:08 Page 80 © 2005 Mitchell Repair Information Company, LLC. 2003 Saturn Vue 2003 HVAC Heating, Ventilation and Air Conditioning - Vue Fig. 51: Compressor & Evaporator Hoses (2.2L) Courtesy of GENERAL MOTORS CORP. 1. Install new seal washer to the compressor hose. Refer to Sealing Washer Replacement. 2. Install the compressor hose to the evaporator hose. NOTE: Refer to FASTENER NOTICE in Cautions and Notices. 3. Install the nut to the compressor hose. Tighten: Tighten the nut to 20 N.m (15 lb ft). Tycoon 15 декабря 2008 г. 11:01:08 Page 81 © 2005 Mitchell Repair Information Company, LLC. 2003 Saturn Vue 2003 HVAC Heating, Ventilation and Air Conditioning - Vue Fig. 52: Compressor Hose, Nut & TXV Courtesy of GENERAL MOTORS CORP. 4. Remove cap from TXV and install a new seal washer to the evaporator hose. Refer to Sealing Washer Replacement. 5. Install the evaporator hose to the TXV. 6. Install the evaporator hose to TXV nut. Tighten: Tighten the nut to 16 N.m (12 lb ft). 7. Evacuate and charge the refrigerant system. Refer to Refrigerant Recovery and Recharging. 8. Leak test the fittings using the J 39400-A . See Special Tools. LIQUID LINE REPLACEMENT Tools Required Tycoon 15 декабря 2008 г. 11:01:08 Page 82 © 2005 Mitchell Repair Information Company, LLC. 2003 Saturn Vue 2003 HVAC Heating, Ventilation and Air Conditioning - Vue J 39400-A Halogen Leak Detector. See Special Tools. Removal Procedure 1. Recover the refrigerant. Refer to Refrigerant Recovery and Recharging. 2. Remove left headlamp. Refer to Headlamp Assembly or Headlamp Bulb and/or Cornering, Sidemarker, Park, Turn Signal Bulb Replacement in Lighting Systems. Fig. 53: Heater Outlet Hose Clamp & Surge Tank Courtesy of GENERAL MOTORS CORP. 3. Remove surge tank to upper motor rail fasteners. Tycoon 15 декабря 2008 г. 11:01:08 Page 83 © 2005 Mitchell Repair Information Company, LLC. 2003 Saturn Vue 2003 HVAC Heating, Ventilation and Air Conditioning - Vue Fig. 54: Unclipping EPS Harness From Liquid Line Courtesy of GENERAL MOTORS CORP. 4. Unclip EPS harness from liquid line. 5. Unclip PTU vent from liquid line. Tycoon 15 декабря 2008 г. 11:01:09 Page 84 © 2005 Mitchell Repair Information Company, LLC. 2003 Saturn Vue 2003 HVAC Heating, Ventilation and Air Conditioning - Vue Fig. 55: Liquid Line, Strut Tower & Nut Courtesy of GENERAL MOTORS CORP. 6. Remove nut from P-clip at shock tower cap stud. Tycoon 15 декабря 2008 г. 11:01:09 Page 85 © 2005 Mitchell Repair Information Company, LLC. 2003 Saturn Vue 2003 HVAC Heating, Ventilation and Air Conditioning - Vue Fig. 56: Liquid Line, Nut & TXV Courtesy of GENERAL MOTORS CORP. 7. Remove liquid line to TXV nut. Tycoon 15 декабря 2008 г. 11:01:09 Page 86 © 2005 Mitchell Repair Information Company, LLC. 2003 Saturn Vue 2003 HVAC Heating, Ventilation and Air Conditioning - Vue Fig. 57: Liquid Line, Nut & Receiver Dehydrator Courtesy of GENERAL MOTORS CORP. 8. Remove liquid line to receiver/dehydrator (RD) nut. Use a large pair of pliers to hold fitting to prevent twisting of line if necessary. 9. Remove liquid line at left shock tower and install protective caps to RD and TXV to prevent contamination and desiccant saturation. Installation Procedure Tycoon 15 декабря 2008 г. 11:01:09 Page 87 © 2005 Mitchell Repair Information Company, LLC. 2003 Saturn Vue 2003 HVAC Heating, Ventilation and Air Conditioning - Vue Fig. 58: Liquid Line, Nut & Receiver Dehydrator Courtesy of GENERAL MOTORS CORP. 1. Remove protective cap from RD and RD end of liquid line and install new seal washer. Refer to Sealing Washer Replacement. 2. Feed RD end of liquid line down front of shock tower, beneath the surge return hose and under negative battery cable and battery box. 3. From headlamp opening guide RD end of liquid line to RD fitting and install nut. NOTE: Refer to FASTENER NOTICE in Cautions and Notices. 4. Install liquid line nut using a large pair of pliers hold fitting while tightening. Be careful not to twist line. Tighten: Tighten the nut to 16 N.m (12 lb ft). Tycoon 15 декабря 2008 г. 11:01:09 Page 88 © 2005 Mitchell Repair Information Company, LLC. 2003 Saturn Vue 2003 HVAC Heating, Ventilation and Air Conditioning - Vue Fig. 59: Liquid Line, Nut & TXV Courtesy of GENERAL MOTORS CORP. 5. Remove protective cap from TXV and TXV end of liquid line, install new seal washers. Refer to Sealing Washer Replacement. 6. Install liquid line to TXV with nut. Tighten: Tighten the nut to 16 N.m (12 lb ft). Tycoon 15 декабря 2008 г. 11:01:09 Page 89 © 2005 Mitchell Repair Information Company, LLC. 2003 Saturn Vue 2003 HVAC Heating, Ventilation and Air Conditioning - Vue Fig. 60: Liquid Line, Strut Tower & Nut Courtesy of GENERAL MOTORS CORP. 7. Install liquid line P-clip and nut to the shock tower cap stud. Tighten: Tighten the nut to 8 N.m (71 lb in). Tycoon 15 декабря 2008 г. 11:01:09 Page 90 © 2005 Mitchell Repair Information Company, LLC. 2003 Saturn Vue 2003 HVAC Heating, Ventilation and Air Conditioning - Vue Fig. 61: Clipping EPS Harness To Liquid Line Courtesy of GENERAL MOTORS CORP. 8. Clip EPS harness to liquid line. 9. Clip PTU vent hose to liquid line. Tycoon 15 декабря 2008 г. 11:01:09 Page 91 © 2005 Mitchell Repair Information Company, LLC. 2003 Saturn Vue 2003 HVAC Heating, Ventilation and Air Conditioning - Vue Fig. 62: Heater Outlet Hose Clamp & Surge Tank Courtesy of GENERAL MOTORS CORP. 10. Install surge tank and bolts. Tighten: Tighten the bolt to 6 N.m (53 lb in). 11. Install left headlamp. Refer to Headlamp Assembly or Headlamp Bulb and/or Cornering, Sidemarker, Park, Turn Signal Bulb Replacement in Lighting Systems. 12. Evacuate and charge the refrigerant system. Refer to Refrigerant Recovery and Recharging. 13. Leak test the fittings using the J 39400-A . See Special Tools. SERVICE PORT VALVE CORE REPLACEMENT Tools Required Tycoon 15 декабря 2008 г. 11:01:09 Page 92 © 2005 Mitchell Repair Information Company, LLC. 2003 Saturn Vue 2003 HVAC Heating, Ventilation and Air Conditioning - Vue J 39400-A Halogen Leak Detector. See Special Tools. J 46246 Valve Core Removal Tool. See Special Tools. Removal Procedure 1. Recover the refrigerant. Refer to Refrigerant Recovery and Recharging. Fig. 63: Equivalent & Valve Core Courtesy of GENERAL MOTORS CORP. 2. Use J 46246 or equivalent to remove the valve core. See Special Tools. Installation Procedure Tycoon 15 декабря 2008 г. 11:01:09 Page 93 © 2005 Mitchell Repair Information Company, LLC. 2003 Saturn Vue 2003 HVAC Heating, Ventilation and Air Conditioning - Vue Fig. 64: Equivalent & Valve Core Courtesy of GENERAL MOTORS CORP. 1. Use J 46246 or equivalent to install and tighten the valve core. See Special Tools. 2. Evacuate and charge the A/C system. Refer to Refrigerant Recovery and Recharging. IMPORTANT: To prevent loss of refrigerant charge, tighten the cap. Replace the cap if the seal is missing or damaged. 3. Test the affected A/C fittings for leaks using J 39400-A . See Special Tools. RECEIVER DEHYDRATOR REPLACEMENT Tools Required J 39400-A Halogen Leak Detector. See Special Tools. Tycoon 15 декабря 2008 г. 11:01:09 Page 94 © 2005 Mitchell Repair Information Company, LLC. 2003 Saturn Vue 2003 HVAC Heating, Ventilation and Air Conditioning - Vue Removal Procedure 1. Recover the refrigerant. Refer to Refrigerant Recovery and Recharging. 2. Remove the left headlamp assembly. Refer to Headlamp Assembly or Headlamp Bulb and/or Cornering, Sidemarker, Park, Turn Signal Bulb Replacement in Lighting Systems. Fig. 65: Receiver Dehydrator, Nut & Condenser Courtesy of GENERAL MOTORS CORP. IMPORTANT: Use a large pair of pliers to hold the fitting. Be careful not to twist the line. 3. Remove the receiver dehydrator nut from the condenser. Tycoon 15 декабря 2008 г. 11:01:09 Page 95 © 2005 Mitchell Repair Information Company, LLC. 2003 Saturn Vue 2003 HVAC Heating, Ventilation and Air Conditioning - Vue Fig. 66: Liquid Line, Nut & Receiver Dehydrator Courtesy of GENERAL MOTORS CORP. IMPORTANT: Use a large pair of pliers to hold the fitting. Be careful not to twist the line. 4. Remove the receiver dehydrator nut from the liquid line. Tycoon 15 декабря 2008 г. 11:01:09 Page 96 © 2005 Mitchell Repair Information Company, LLC. 2003 Saturn Vue 2003 HVAC Heating, Ventilation and Air Conditioning - Vue Fig. 67: Receiver Dehydrator, Nut & Condenser Courtesy of GENERAL MOTORS CORP. 5. Remove the receiver dehydrator bracket bolt from the vehicle. Tycoon 15 декабря 2008 г. 11:01:09 Page 97 © 2005 Mitchell Repair Information Company, LLC. 2003 Saturn Vue 2003 HVAC Heating, Ventilation and Air Conditioning - Vue Fig. 68: Receiver Dehydrator, Protective Caps & Liquid Line Courtesy of GENERAL MOTORS CORP. 6. Remove the receiver dehydrator from the vehicle. 7. Install protective caps to the condenser, the liquid line, and the receiver dehydrator to prevent contamination and desiccant saturation. Installation Procedure Tycoon 15 декабря 2008 г. 11:01:09 Page 98 © 2005 Mitchell Repair Information Company, LLC. 2003 Saturn Vue 2003 HVAC Heating, Ventilation and Air Conditioning - Vue Fig. 69: Receiver Dehydrator, Protective Caps & Liquid Line Courtesy of GENERAL MOTORS CORP. 1. Remove the protective caps from the condenser, the liquid line, and the receiver dehydrator. 2. Add the specified amount of PAG oil to the receiver dehydrator. Refer to Refrigerant System Capacities. 3. Install new seal washers to the receiver dehydrator. Refer to Sealing Washer Replacement. 4. Install the receiver dehydrator to the vehicle. Tycoon 15 декабря 2008 г. 11:01:09 Page 99 © 2005 Mitchell Repair Information Company, LLC. 2003 Saturn Vue 2003 HVAC Heating, Ventilation and Air Conditioning - Vue Fig. 70: Liquid Line, Nut & Receiver Dehydrator Courtesy of GENERAL MOTORS CORP. NOTE: Refer to FASTENER NOTICE in Cautions and Notices. IMPORTANT: Use a large pair of pliers to hold the fitting. Be careful not to twist the line. 5. Install the receiver dehydrator nut to the liquid line. Tighten: Tighten the nut to 16 N.m (12 lb ft). Tycoon 15 декабря 2008 г. 11:01:09 Page 100 © 2005 Mitchell Repair Information Company, LLC. 2003 Saturn Vue 2003 HVAC Heating, Ventilation and Air Conditioning - Vue Fig. 71: Receiver Dehydrator, Nut & Condenser Courtesy of GENERAL MOTORS CORP. IMPORTANT: Use a large pair of pliers to hold the fitting. Be careful not to twist the line. 6. Install the receiver dehydrator nut to the condenser. Tighten: Tighten the nut to 16 N.m (12 lb ft). 7. Position the receiver dehydrator in the vehicle. 8. Install the receiver dehydrator nut to the vehicle. Tighten: Tighten the bolt to 10 N.m (89 lb in). 9. Install left head lamp. Refer to Headlamp Assembly or Headlamp Bulb and/or Cornering, Tycoon 15 декабря 2008 г. 11:01:09 Page 101 © 2005 Mitchell Repair Information Company, LLC. 2003 Saturn Vue 2003 HVAC Heating, Ventilation and Air Conditioning - Vue Sidemarker, Park, Turn Signal Bulb Replacement in Lighting Systems. 10. Evacuate and charge the A/C system. Refer to Refrigerant Recovery and Recharging. 11. Test the affected A/C joints for leaks using J 39400-A . See Special Tools. THERMAL EXPANSION VALVE REPLACEMENT (FIRST DESIGN) Tools Required J 39400-A Halogen Leak Detector. See Special Tools. Removal Procedure 1. Recover the refrigerant. Refer to Refrigerant Recovery and Recharging. Fig. 72: Compressor Hose, Nut & TXV Courtesy of GENERAL MOTORS CORP. Tycoon 15 декабря 2008 г. 11:01:09 Page 102 © 2005 Mitchell Repair Information Company, LLC. 2003 Saturn Vue 2003 HVAC Heating, Ventilation and Air Conditioning - Vue IMPORTANT: When removing the thermal expansion valve (TXV), keep dirt and foreign material from getting on or into the O-ring sealing surfaces. Clean tools and a clean work area are important for proper service. The TXV seal area should be cleaned before any repairs are performed. The parts must be kept clean at all times and any parts to be assembled should be cleaned with a non-petroleum based solvent and dried with air. Use only lint free cloths to wipe parts. Do not allow solvent to enter evaporator or hoses. 2. Remove the evaporator outlet hose nut from the TXV. 3. Remove the evaporator outlet hose from the TXV. 4. Install a protective cap to the evaporator outlet hose to prevent contamination and desiccant saturation. Fig. 73: Liquid Line, Nut & TXV Courtesy of GENERAL MOTORS CORP. Tycoon 15 декабря 2008 г. 11:01:09 Page 103 © 2005 Mitchell Repair Information Company, LLC. 2003 Saturn Vue 2003 HVAC Heating, Ventilation and Air Conditioning - Vue 5. Remove the liquid line nut from the TXV. 6. Remove the liquid line from the TXV. 7. Install a protective cap to the liquid line to prevent contamination and desiccant saturation. Fig. 74: Refrigerant Low Temperature Sensor & Engine Harness Courtesy of GENERAL MOTORS CORP. 8. Disconnect the refrigerant low temperature sensor from the engine harness. Tycoon 15 декабря 2008 г. 11:01:09 Page 104 © 2005 Mitchell Repair Information Company, LLC. 2003 Saturn Vue 2003 HVAC Heating, Ventilation and Air Conditioning - Vue Fig. 75: TXV, Bolts & Backing Plate Courtesy of GENERAL MOTORS CORP. 9. 10. 11. 12. Remove the TXV bolts from the backing plate. Remove the TXV and the backing plate from the vehicle. Remove and discard the O-rings from the evaporator pipes. Refer to O-Ring Replacement. Install a protective cap to the evaporator pipes to prevent contamination and desiccant saturation. Installation Procedure Tycoon 15 декабря 2008 г. 11:01:09 Page 105 © 2005 Mitchell Repair Information Company, LLC. 2003 Saturn Vue 2003 HVAC Heating, Ventilation and Air Conditioning - Vue Fig. 76: TXV, Bolts & Backing Plate Courtesy of GENERAL MOTORS CORP. IMPORTANT: Use only lint free cloths to wipe parts. Do not allow any solvent to enter evaporator or hoses. 1. Remove the protective caps from the evaporator pipe and ensure the seal areas are clean, dry and lint free. 2. Install new O-rings to the evaporator pipes. Refer to O-Ring Replacement. 3. Remove the protective caps from the TXV. 4. Install the TXV and the backing plate to the evaporator pipes. NOTE: Refer to FASTENER NOTICE in Cautions and Notices. 5. Install the TXV bolts to the backing plate. Tycoon 15 декабря 2008 г. 11:01:09 Page 106 © 2005 Mitchell Repair Information Company, LLC. 2003 Saturn Vue 2003 HVAC Heating, Ventilation and Air Conditioning - Vue Tighten: Tighten the bolts to 9 N.m (80 lb in). Fig. 77: Liquid Line, Nut & TXV Courtesy of GENERAL MOTORS CORP. 6. 7. 8. 9. Remove the protective cap from the liquid line. Install a new seal washer to the liquid line. Refer to Sealing Washer Replacement. Install the liquid line to the TXV. Install the liquid line nut to the TXV. Tighten: Tighten the nut to 16 N.m (12 lb ft). Tycoon 15 декабря 2008 г. 11:01:09 Page 107 © 2005 Mitchell Repair Information Company, LLC. 2003 Saturn Vue 2003 HVAC Heating, Ventilation and Air Conditioning - Vue Fig. 78: Compressor Hose, Nut & TXV Courtesy of GENERAL MOTORS CORP. 10. 11. 12. 13. Remove the protective cap from the evaporator outlet hose. Install a new seal washer to the evaporator outlet hose. Refer to Sealing Washer Replacement. Install the evaporator outlet hose to the TXV. Install the evaporator outlet hose nut to the TXV. Tighten: Tighten the nut to 16 N.m (12 lb ft). Tycoon 15 декабря 2008 г. 11:01:09 Page 108 © 2005 Mitchell Repair Information Company, LLC. 2003 Saturn Vue 2003 HVAC Heating, Ventilation and Air Conditioning - Vue Fig. 79: Refrigerant Low Temperature Sensor & Engine Harness Courtesy of GENERAL MOTORS CORP. 14. Connect the refrigerant low temperature sensor to the engine harness. 15. Evacuate and charge the A/C system. Refer to Refrigerant Recovery and Recharging. 16. Test the affected A/C joints for leaks using J 39400-A . See Special Tools. AIR CONDITIONING (A/C) REFRIGERANT PRESSURE SENSOR REPLACEMENT Removal Procedure Tycoon 15 декабря 2008 г. 11:01:09 Page 109 © 2005 Mitchell Repair Information Company, LLC. 2003 Saturn Vue 2003 HVAC Heating, Ventilation and Air Conditioning - Vue Fig. 80: Compressor Hose, Bolt, Compressor, O-Rings & Protective Cap Courtesy of GENERAL MOTORS CORP. 1. Disconnect pressure sensor electrical connector. 2. With open end wrench remove pressure sensor. Installation Procedure IMPORTANT: Use R-12 refrigerant oil (mineral) to lubricate O-rings. Use of R-134a (PAG) oil will cause premature corrosion of fitting joints. 1. Lubricate pressure sensor O-ring with mineral oil. Refer to O-Ring Replacement. NOTE: Refer to FASTENER NOTICE in Cautions and Notices. 2. Hand start pressure sensor onto the pressure port taking care not to pinch the O-ring and tighten. Tycoon 15 декабря 2008 г. 11:01:09 Page 110 © 2005 Mitchell Repair Information Company, LLC. 2003 Saturn Vue 2003 HVAC Heating, Ventilation and Air Conditioning - Vue Tighten: Tighten the pressure sensor to 10 N.m (89 lb in). 3. Connect the engine harness connector to the pressure sensor. AIR CONDITIONING (A/C) REFRIGERANT LOW TEMPERATURE SENSOR REPLACEMENT (FIRST DESIGN) Removal Procedure Fig. 81: Refrigerant Low Temperature Sensor & Engine Harness Courtesy of GENERAL MOTORS CORP. 1. Disconnect the thermal expansion valve (TXV) temperature sensor from the engine harness. Tycoon 15 декабря 2008 г. 11:01:09 Page 111 © 2005 Mitchell Repair Information Company, LLC. 2003 Saturn Vue 2003 HVAC Heating, Ventilation and Air Conditioning - Vue Fig. 82: Temperature Sensor & TXV Courtesy of GENERAL MOTORS CORP. 2. Remove the temperature sensor from the TXV. Installation Procedure Tycoon 15 декабря 2008 г. 11:01:09 Page 112 © 2005 Mitchell Repair Information Company, LLC. 2003 Saturn Vue 2003 HVAC Heating, Ventilation and Air Conditioning - Vue Fig. 83: Temperature Sensor & TXV Courtesy of GENERAL MOTORS CORP. IMPORTANT: The TXV cavity for temperature sensor must be packed with thermal grease to ensure functionality. 1. Fill the temperature sensor housing in the TXV with the thermal grease included with the service kit. 2. Install the temperature sensor and wipe away the excess grease. NOTE: Refer to FASTENER NOTICE in Cautions and Notices. 3. Install the temperature sensor bolt. Tighten: Tighten the bolt to 5 N.m (44 lb in). Tycoon 15 декабря 2008 г. 11:01:10 Page 113 © 2005 Mitchell Repair Information Company, LLC. 2003 Saturn Vue 2003 HVAC Heating, Ventilation and Air Conditioning - Vue Fig. 84: Refrigerant Low Temperature Sensor & Engine Harness Courtesy of GENERAL MOTORS CORP. 4. Connect the temperature sensor to the engine harness. CONDENSER REPLACEMENT Tools Required J 39400-A Halogen Leak Detector. See Special Tools. Removal Procedure 1. Recover the refrigerant. Refer to Refrigerant Recovery and Recharging. 2. Remove the front fascia. Refer to Fascia Replacement - Front Bumper in Bumpers. Tycoon 15 декабря 2008 г. 11:01:10 Page 114 © 2005 Mitchell Repair Information Company, LLC. 2003 Saturn Vue 2003 HVAC Heating, Ventilation and Air Conditioning - Vue Fig. 85: Battery Box Air Duct Courtesy of GENERAL MOTORS CORP. 3. Remove battery box air duct. Tycoon 15 декабря 2008 г. 11:01:10 Page 115 © 2005 Mitchell Repair Information Company, LLC. 2003 Saturn Vue 2003 HVAC Heating, Ventilation and Air Conditioning - Vue Fig. 86: View Of CRFM Closeout/Splash Panel To Condenser Courtesy of GENERAL MOTORS CORP. 4. Remove condenser radiator fan module (CRFM) closeout panel. Tycoon 15 декабря 2008 г. 11:01:10 Page 116 © 2005 Mitchell Repair Information Company, LLC. 2003 Saturn Vue 2003 HVAC Heating, Ventilation and Air Conditioning - Vue Fig. 87: Receiver Dehydrator, Protective Caps & Liquid Line Courtesy of GENERAL MOTORS CORP. 5. Remove receiver/dehydrator (RD) line from condenser. 6. Install protective cap to RD line to prevent contamination and desiccant saturation. Tycoon 15 декабря 2008 г. 11:01:10 Page 117 © 2005 Mitchell Repair Information Company, LLC. 2003 Saturn Vue 2003 HVAC Heating, Ventilation and Air Conditioning - Vue Fig. 88: Compressor Hose, Nut, Condenser & Protective Cap Courtesy of GENERAL MOTORS CORP. 7. Remove compressor hose from condenser. 8. Install protective cap to the compressor hose to prevent contamination and desiccant saturation. Tycoon 15 декабря 2008 г. 11:01:10 Page 118 © 2005 Mitchell Repair Information Company, LLC. 2003 Saturn Vue 2003 HVAC Heating, Ventilation and Air Conditioning - Vue Fig. 89: View Of CRFM Mounting Brackets To The Radiator Support Courtesy of GENERAL MOTORS CORP. 9. Remove upper CRFM bracket and mount assembly. 10. Lift condenser while holding upper retention tabs forward and remove condenser. Installation Procedure Tycoon 15 декабря 2008 г. 11:01:10 Page 119 © 2005 Mitchell Repair Information Company, LLC. 2003 Saturn Vue 2003 HVAC Heating, Ventilation and Air Conditioning - Vue Fig. 90: Condenser & Radiator Courtesy of GENERAL MOTORS CORP. Tycoon 15 декабря 2008 г. 11:01:10 Page 120 © 2005 Mitchell Repair Information Company, LLC. 2003 Saturn Vue 2003 HVAC Heating, Ventilation and Air Conditioning - Vue 1. Check radiator to condenser seal for proper position. 2. Install condenser by guiding lower and upper tabs into retention clips on radiator and pressing down to snap into place. Fig. 91: View Of CRFM Mounting Brackets To The Radiator Support Courtesy of GENERAL MOTORS CORP. 3. Install upper CRFM bracket and mount assemblies. NOTE: Refer to FASTENER NOTICE in Cautions and Notices. 4. Install upper CRFM bracket bolts. Tighten: Tighten the bolts to 10 N.m (89 lb in). Tycoon 15 декабря 2008 г. 11:01:10 Page 121 © 2005 Mitchell Repair Information Company, LLC. 2003 Saturn Vue 2003 HVAC Heating, Ventilation and Air Conditioning - Vue Fig. 92: Compressor Hose, Nut, Condenser & Protective Cap Courtesy of GENERAL MOTORS CORP. 5. Remove protective cap from the compressor hose and install a new sealing washer. Refer to Sealing Washer Replacement. 6. Install compressor hose to condenser with the nut. Tighten: Tighten the nut to 16 N.m (12 lb ft). Tycoon 15 декабря 2008 г. 11:01:10 Page 122 © 2005 Mitchell Repair Information Company, LLC. 2003 Saturn Vue 2003 HVAC Heating, Ventilation and Air Conditioning - Vue Fig. 93: Receiver Dehydrator, Condenser & Seal Washer Courtesy of GENERAL MOTORS CORP. 7. Install new seal washer. Refer to Sealing Washer Replacement. 8. Install the RD line to the condenser with the nut. Tighten: Tighten the nut to 16 N.m (12 lb ft). Tycoon 15 декабря 2008 г. 11:01:10 Page 123 © 2005 Mitchell Repair Information Company, LLC. 2003 Saturn Vue 2003 HVAC Heating, Ventilation and Air Conditioning - Vue Fig. 94: View Of CRFM Closeout/Splash Panel To Condenser Courtesy of GENERAL MOTORS CORP. 9. Install CRFM closeout panel. Tycoon 15 декабря 2008 г. 11:01:10 Page 124 © 2005 Mitchell Repair Information Company, LLC. 2003 Saturn Vue 2003 HVAC Heating, Ventilation and Air Conditioning - Vue Fig. 95: Battery Box Air Duct Courtesy of GENERAL MOTORS CORP. 10. 11. 12. 13. Install battery box air duct. Install front fascia. Refer to Fascia Replacement - Front Bumper in Bumpers. Evacuate and charge the refrigerant system. Refer to Refrigerant Recovery and Recharging. Leak test the fittings using the J 39400-A . See Special Tools. HVAC MODULE ASSEMBLY REPLACEMENT Tools Required J 39400-A Halogen Leak Detector. See Special Tools. SA9111E Hose Clamp Pliers. See Special Tools. Removal Procedure Tycoon 15 декабря 2008 г. 11:01:10 Page 125 © 2005 Mitchell Repair Information Company, LLC. 2003 Saturn Vue 2003 HVAC Heating, Ventilation and Air Conditioning - Vue 1. Disable the frontal and curtain air bags. Refer to DISABLING & ACTIVATING AIR BAG SYSTEM . 2. Recover the refrigerant. Refer to Refrigerant Recovery and Recharging. 3. Drain engine coolant. Refer to Draining and Filling Cooling System in Engine Cooling. Fig. 96: Compressor Hose, Nut & TXV Courtesy of GENERAL MOTORS CORP. 4. Remove suction line at TXV and install protective cap to suction line. Tycoon 15 декабря 2008 г. 11:01:10 Page 126 © 2005 Mitchell Repair Information Company, LLC. 2003 Saturn Vue 2003 HVAC Heating, Ventilation and Air Conditioning - Vue Fig. 97: Liquid Line, Nut & TXV Courtesy of GENERAL MOTORS CORP. IMPORTANT: Place protective cover over A/C lines and TXV to prevent contamination of A/C system. 5. Remove liquid line at TXV and install protective cap to liquid line and TXV. Tycoon 15 декабря 2008 г. 11:01:10 Page 127 © 2005 Mitchell Repair Information Company, LLC. 2003 Saturn Vue 2003 HVAC Heating, Ventilation and Air Conditioning - Vue Fig. 98: Refrigerant Low Temperature Sensor & Engine Harness Courtesy of GENERAL MOTORS CORP. 6. Disconnect TXV temperature sensor connector. Tycoon 15 декабря 2008 г. 11:01:10 Page 128 © 2005 Mitchell Repair Information Company, LLC. 2003 Saturn Vue 2003 HVAC Heating, Ventilation and Air Conditioning - Vue Fig. 99: Heater Outlet, Hose Clamp & Heater Core Courtesy of GENERAL MOTORS CORP. 7. Reposition the heater inlet hose at the heater core using SA9111E . See Special Tools. 8. Remove heater hose at heater core outlet. Tycoon 15 декабря 2008 г. 11:01:10 Page 129 © 2005 Mitchell Repair Information Company, LLC. 2003 Saturn Vue 2003 HVAC Heating, Ventilation and Air Conditioning - Vue Fig. 100: Heater Inlet, Hose Clamp & Heater Core Courtesy of GENERAL MOTORS CORP. 9. 10. 11. 12. Reposition the heater outlet hose at the heater core using SA9111E . See Special Tools. Remove heater hose at heater core inlet. Plug heater core pipes with clean towels to prevent spillage when removing module. Remove the instrument panel (I/P) retainer. Refer to Instrument Panel (I/P) Retainer Replacement in Instrument Panel, Gages, and Console. 13. Remove the shift control bracket. Refer to Transmission Shift Control Bracket Replacement in Manual Transmission - Getrag 5, or Transmission Shift Control Bracket Replacement in Automatic Transaxle - AF33-5. Tycoon 15 декабря 2008 г. 11:01:10 Page 130 © 2005 Mitchell Repair Information Company, LLC. 2003 Saturn Vue 2003 HVAC Heating, Ventilation and Air Conditioning - Vue Fig. 101: Center Floor Air Outlet Duct Courtesy of GENERAL MOTORS CORP. 14. Remove front rear duct by sliding forward on heater duct then up at rear and then rearward. Tycoon 15 декабря 2008 г. 11:01:10 Page 131 © 2005 Mitchell Repair Information Company, LLC. 2003 Saturn Vue 2003 HVAC Heating, Ventilation and Air Conditioning - Vue Fig. 102: Center I/P Air Outlet Duct & Retainers Courtesy of GENERAL MOTORS CORP. 15. Remove auxiliary duct assembly. Tycoon 15 декабря 2008 г. 11:01:10 Page 132 © 2005 Mitchell Repair Information Company, LLC. 2003 Saturn Vue 2003 HVAC Heating, Ventilation and Air Conditioning - Vue Fig. 103: Blower Motor Electrical Connector & I/P Wire Harness Courtesy of GENERAL MOTORS CORP. 16. Disconnect I/P harness at blower motor connector. 17. Disconnect I/P harness at blower motor resistor connector. 18. Disconnect I/P harness at HVAC module connector. Tycoon 15 декабря 2008 г. 11:01:10 Page 133 © 2005 Mitchell Repair Information Company, LLC. 2003 Saturn Vue 2003 HVAC Heating, Ventilation and Air Conditioning - Vue Fig. 104: Defroster Duct & Retainer Courtesy of GENERAL MOTORS CORP. 19. Remove defroster duct to HVAC module nuts and defroster duct. 20. Disconnect I/P wire harness clips from HVAC module. Tycoon 15 декабря 2008 г. 11:01:10 Page 134 © 2005 Mitchell Repair Information Company, LLC. 2003 Saturn Vue 2003 HVAC Heating, Ventilation and Air Conditioning - Vue Fig. 105: Metal Bracket & Nut Courtesy of GENERAL MOTORS CORP. 21. Remove left HVAC module to cross car beam stamped metal L-type bracket from HVAC module and cross car beam. Tycoon 15 декабря 2008 г. 11:01:10 Page 135 © 2005 Mitchell Repair Information Company, LLC. 2003 Saturn Vue 2003 HVAC Heating, Ventilation and Air Conditioning - Vue Fig. 106: HVAC Module, Bolts & Cross Car Beam Courtesy of GENERAL MOTORS CORP. 22. Remove remaining HVAC module to cross car beam and front of dash fasteners and remove HVAC module. Installation Procedure Tycoon 15 декабря 2008 г. 11:01:10 Page 136 © 2005 Mitchell Repair Information Company, LLC. 2003 Saturn Vue 2003 HVAC Heating, Ventilation and Air Conditioning - Vue Fig. 107: HVAC Module, Bolts & Cross Car Beam Courtesy of GENERAL MOTORS CORP. IMPORTANT: Make sure seals on HVAC module are flush and even as the meet their mating surfaces. This will reduce the chance of leaks and insure proper fit. 1. Check front of dash seal for proper alignment. 2. Check seal mating surfaces to insure there are no obstructions. IMPORTANT: Make sure center "molded in case" HVAC to cross car beam bracket is forward of cross car beam down flange. 3. Loose hang HVAC module from cross car beam. Tycoon 15 декабря 2008 г. 11:01:10 Page 137 © 2005 Mitchell Repair Information Company, LLC. 2003 Saturn Vue 2003 HVAC Heating, Ventilation and Air Conditioning - Vue Fig. 108: HVAC Module Seal & Nuts Courtesy of GENERAL MOTORS CORP. IMPORTANT: New front of dash seal nuts must be used to prevent leaks. NOTE: Refer to FASTENER NOTICE in Cautions and Notices. 4. Install front of dash to HVAC module seal nuts, draw module to FOD evenly with nuts and tighten. Tighten: Tighten the nuts to 8 N.m (71 lb in). Tycoon 15 декабря 2008 г. 11:01:10 Page 138 © 2005 Mitchell Repair Information Company, LLC. 2003 Saturn Vue 2003 HVAC Heating, Ventilation and Air Conditioning - Vue Fig. 109: Metal Bracket & Nut Courtesy of GENERAL MOTORS CORP. 5. Push up on HVAC module at blower motor area while tightening right side HVAC module to cross car beam fasteners (to seat screen assembly/fresh air seal). Tighten: Tighten the fasteners to 8 N.m (71 lb in). 6. Install the left HVAC module to cross car beam stamped metal L-type bracket to HVAC module and cross car beam and tighten remaining module attachment fasteners. Tighten: Tighten the fasteners to 8 N.m (71 lb in). 7. Connect I/P wire harness clips to HVAC module. Tycoon 15 декабря 2008 г. 11:01:10 Page 139 © 2005 Mitchell Repair Information Company, LLC. 2003 Saturn Vue 2003 HVAC Heating, Ventilation and Air Conditioning - Vue Fig. 110: Defroster Duct & Retainer Courtesy of GENERAL MOTORS CORP. 8. Install defroster duct to HVAC module nuts and defroster duct. Tighten: Tighten the nuts to 2.5 N.m (22 lb in). Tycoon 15 декабря 2008 г. 11:01:10 Page 140 © 2005 Mitchell Repair Information Company, LLC. 2003 Saturn Vue 2003 HVAC Heating, Ventilation and Air Conditioning - Vue Fig. 111: Blower Motor Electrical Connector & I/P Wire Harness Courtesy of GENERAL MOTORS CORP. 9. Connect I/P harness to blower motor connector. 10. Connect I/P harness to blower motor resistor connector. 11. Connect I/P harness to HVAC module connector. Tycoon 15 декабря 2008 г. 11:01:11 Page 141 © 2005 Mitchell Repair Information Company, LLC. 2003 Saturn Vue 2003 HVAC Heating, Ventilation and Air Conditioning - Vue Fig. 112: Center I/P Air Outlet Duct & Retainers Courtesy of GENERAL MOTORS CORP. 12. Install auxiliary duct assembly. Tycoon 15 декабря 2008 г. 11:01:11 Page 142 © 2005 Mitchell Repair Information Company, LLC. 2003 Saturn Vue 2003 HVAC Heating, Ventilation and Air Conditioning - Vue Fig. 113: Center Floor Air Outlet Duct Courtesy of GENERAL MOTORS CORP. 13. Install front rear duct by sliding forward on heater duct then down and rearward over rear duct. 14. Install the shift control bracket. Refer to Transmission Shift Control Bracket Replacement in Manual Transmission - Getrag 5, Transmission Shift Control Bracket Replacement in Automatic Transaxle - AF33-5. 15. Install the I/P retainer. Refer to Instrument Panel (I/P) Retainer Replacement in Instrument Panel, Gages, and Console. Tycoon 15 декабря 2008 г. 11:01:11 Page 143 © 2005 Mitchell Repair Information Company, LLC. 2003 Saturn Vue 2003 HVAC Heating, Ventilation and Air Conditioning - Vue Fig. 114: Heater Inlet, Hose Clamp & Heater Core Courtesy of GENERAL MOTORS CORP. 16. Install heater inlet hose to heater core inlet. 17. Position the clamp at 9 o'clock using SA9111E . See Special Tools. Tycoon 15 декабря 2008 г. 11:01:11 Page 144 © 2005 Mitchell Repair Information Company, LLC. 2003 Saturn Vue 2003 HVAC Heating, Ventilation and Air Conditioning - Vue Fig. 115: Heater Outlet, Hose Clamp & Heater Core Courtesy of GENERAL MOTORS CORP. 18. Install heater outlet hose to heater core outlet. 19. Position the clamp at 9 o'clock position using SA9111E . See Special Tools. Tycoon 15 декабря 2008 г. 11:01:11 Page 145 © 2005 Mitchell Repair Information Company, LLC. 2003 Saturn Vue 2003 HVAC Heating, Ventilation and Air Conditioning - Vue Fig. 116: Liquid Line, Nut & TXV Courtesy of GENERAL MOTORS CORP. 20. Insure mating surfaces are clean and free of debris, and install a new seal washer to the liquid line. Refer to Sealing Washer Replacement. 21. Install the liquid line and nut to the thermal expansion valve (TXV). Tighten: Tighten the nut to 16 N.m (12 lb ft). Tycoon 15 декабря 2008 г. 11:01:11 Page 146 © 2005 Mitchell Repair Information Company, LLC. 2003 Saturn Vue 2003 HVAC Heating, Ventilation and Air Conditioning - Vue Fig. 117: Compressor Hose, Nut & TXV Courtesy of GENERAL MOTORS CORP. 22. Insure mating surfaces are clean and free of debris, and install a new seal washer to the suction hose. Refer to Sealing Washer Replacement. 23. Install the suction hose and nut to the thermal expansion valve (TXV). Tighten: Tighten the nut to 16 N.m (12 lb ft). 24. Enable the frontal and curtain air bags. Refer to DISABLING & ACTIVATING AIR BAG SYSTEM . 25. Fill the coolant. Refer to Draining and Filling Cooling System in Engine Cooling. 26. Evacuate and charge the refrigerant system. Refer to Refrigerant Recovery and Recharging. 27. Leak test the fittings using the J 39400-A . See Special Tools. EVAPORATOR CORE REPLACEMENT Tycoon 15 декабря 2008 г. 11:01:11 Page 147 © 2005 Mitchell Repair Information Company, LLC. 2003 Saturn Vue 2003 HVAC Heating, Ventilation and Air Conditioning - Vue Tools Required J 39400-A Halogen Leak Detector. See Special Tools. Removal Procedure 1. Remove HVAC module. Refer to HVAC Module Assembly Replacement. Fig. 118: TXV, Bolts & Backing Plate Courtesy of GENERAL MOTORS CORP. 2. Remove TXV to backing plate attachment bolts and remove TXV and backing plate. 3. Remove O-rings from evaporator pipes and caps to prevent system contamination. 4. Remove HVAC module front of dash seal. Tycoon 15 декабря 2008 г. 11:01:11 Page 148 © 2005 Mitchell Repair Information Company, LLC. 2003 Saturn Vue 2003 HVAC Heating, Ventilation and Air Conditioning - Vue Fig. 119: Heater Duct, Screws & Heater Core Cover Courtesy of GENERAL MOTORS CORP. 5. Remove heater duct. Tycoon 15 декабря 2008 г. 11:01:11 Page 149 © 2005 Mitchell Repair Information Company, LLC. 2003 Saturn Vue 2003 HVAC Heating, Ventilation and Air Conditioning - Vue Fig. 120: Panel, Defrost & Floor Mode Actuators Courtesy of GENERAL MOTORS CORP. 6. Disconnect HVAC module harness from all three mode actuators. 7. Remove panel, defrost and floor mode actuators. If blower case assembly is being replaced, mode actuators do not need to be removed. Tycoon 15 декабря 2008 г. 11:01:11 Page 150 © 2005 Mitchell Repair Information Company, LLC. 2003 Saturn Vue 2003 HVAC Heating, Ventilation and Air Conditioning - Vue Fig. 121: Heater Core Cover, Screws & Evaporator Case Assembly Courtesy of GENERAL MOTORS CORP. 8. Remove heater core cover. Tycoon 15 декабря 2008 г. 11:01:11 Page 151 © 2005 Mitchell Repair Information Company, LLC. 2003 Saturn Vue 2003 HVAC Heating, Ventilation and Air Conditioning - Vue Fig. 122: Heater Core Pipe Cover Courtesy of GENERAL MOTORS CORP. 9. Remove heater core pipe cover. 10. Remove heater core pipe seal. Tycoon 15 декабря 2008 г. 11:01:11 Page 152 © 2005 Mitchell Repair Information Company, LLC. 2003 Saturn Vue 2003 HVAC Heating, Ventilation and Air Conditioning - Vue Fig. 123: Heater Core & End Tanks Courtesy of GENERAL MOTORS CORP. 11. Grasp heater core at end tanks and remove. Spraying perimeter of heater core seal with a soap and water mixture will ease removal. Tycoon 15 декабря 2008 г. 11:01:11 Page 153 © 2005 Mitchell Repair Information Company, LLC. 2003 Saturn Vue 2003 HVAC Heating, Ventilation and Air Conditioning - Vue Fig. 124: Evaporator Case Assembly, Screws & Blower Case Assembly Courtesy of GENERAL MOTORS CORP. 12. Remove evaporator cover assembly. Tycoon 15 декабря 2008 г. 11:01:11 Page 154 © 2005 Mitchell Repair Information Company, LLC. 2003 Saturn Vue 2003 HVAC Heating, Ventilation and Air Conditioning - Vue Fig. 125: Evaporator Pipe Cover, Screw & Blower Case Assembly Courtesy of GENERAL MOTORS CORP. 13. Remove evaporator pipe retainer. Tycoon 15 декабря 2008 г. 11:01:11 Page 155 © 2005 Mitchell Repair Information Company, LLC. 2003 Saturn Vue 2003 HVAC Heating, Ventilation and Air Conditioning - Vue Fig. 126: Evaporator Core & Blower Case Assembly Courtesy of GENERAL MOTORS CORP. 14. Remove evaporator. Spraying perimeter of evaporator core seal with a soap and water mixture will ease removal. Installation Procedure Tycoon 15 декабря 2008 г. 11:01:11 Page 156 © 2005 Mitchell Repair Information Company, LLC. 2003 Saturn Vue 2003 HVAC Heating, Ventilation and Air Conditioning - Vue Fig. 127: Evaporator Core & Blower Case Assembly Courtesy of GENERAL MOTORS CORP. 1. Inspect seal around evaporator. Make sure seal is in correct position and retained properly. 2. Spray seal with a soap and water mixture to ease the installation of evaporator. 3. Install evaporator. Tycoon 15 декабря 2008 г. 11:01:11 Page 157 © 2005 Mitchell Repair Information Company, LLC. 2003 Saturn Vue 2003 HVAC Heating, Ventilation and Air Conditioning - Vue Fig. 128: Evaporator Case Assembly, Screws & Blower Case Assembly Courtesy of GENERAL MOTORS CORP. 4. Install evaporator cover assembly. NOTE: Refer to FASTENER NOTICE in Cautions and Notices. 5. Install evaporator cover assembly screws. Tighten: Tighten the screws to 1 N.m (9 lb in). Tycoon 15 декабря 2008 г. 11:01:11 Page 158 © 2005 Mitchell Repair Information Company, LLC. 2003 Saturn Vue 2003 HVAC Heating, Ventilation and Air Conditioning - Vue Fig. 129: Evaporator Pipe Cover, Screw & Blower Case Assembly Courtesy of GENERAL MOTORS CORP. 6. Install evaporator pipe retainer. 7. Install evaporator pipe retainer screws. Tighten: Tighten the screws to 1 N.m (9 lb in). Tycoon 15 декабря 2008 г. 11:01:11 Page 159 © 2005 Mitchell Repair Information Company, LLC. 2003 Saturn Vue 2003 HVAC Heating, Ventilation and Air Conditioning - Vue Fig. 130: Heater Core & Pipe Seal Courtesy of GENERAL MOTORS CORP. 8. Install heater core. Spraying perimeter of heater core seal with a soap and water mixture will ease installation. 9. Install heater core pipe seal. Tycoon 15 декабря 2008 г. 11:01:11 Page 160 © 2005 Mitchell Repair Information Company, LLC. 2003 Saturn Vue 2003 HVAC Heating, Ventilation and Air Conditioning - Vue Fig. 131: Heater Core Pipe Cover Courtesy of GENERAL MOTORS CORP. 10. Install heater core pipe cover. 11. Install heater core pipe cover screws. Tighten: Tighten the screws to 1 N.m (9 lb in). Tycoon 15 декабря 2008 г. 11:01:11 Page 161 © 2005 Mitchell Repair Information Company, LLC. 2003 Saturn Vue 2003 HVAC Heating, Ventilation and Air Conditioning - Vue Fig. 132: Heater Core Cover, Screws & Evaporator Case Assembly Courtesy of GENERAL MOTORS CORP. 12. Install heater core cover. 13. Install heater core cover screws. Tighten: Tighten the screws to 1 N.m (9 lb in). Tycoon 15 декабря 2008 г. 11:01:11 Page 162 © 2005 Mitchell Repair Information Company, LLC. 2003 Saturn Vue 2003 HVAC Heating, Ventilation and Air Conditioning - Vue Fig. 133: Panel, Defrost & Floor Mode Actuators Courtesy of GENERAL MOTORS CORP. 14. Install panel, defrost and floor mode actuators. 15. Install actuator screws. Tighten: Tighten the screws to 1 N.m (9 lb in). Tycoon 15 декабря 2008 г. 11:01:11 Page 163 © 2005 Mitchell Repair Information Company, LLC. 2003 Saturn Vue 2003 HVAC Heating, Ventilation and Air Conditioning - Vue Fig. 134: Heater Duct, Screws & Heater Core Cover Courtesy of GENERAL MOTORS CORP. 16. Install heater duct. 17. Install heater duct screws. Tighten: Tighten the screws to 1 N.m (9 lb in). Tycoon 15 декабря 2008 г. 11:01:11 Page 164 © 2005 Mitchell Repair Information Company, LLC. 2003 Saturn Vue 2003 HVAC Heating, Ventilation and Air Conditioning - Vue Fig. 135: TXV, Bolts & Backing Plate Courtesy of GENERAL MOTORS CORP. 18. Install HVAC module front of dash seal. Inspect and if damaged, replace. IMPORTANT: Use only R-12 refrigerant oil (mineral) to lubricate O-rings. Use of R134a PAG oil will cause premature corrosion of fitting joints. Use only clean lint free cloths with non-petroleum based solvents to clean refrigerant system sealing surfaces. Allow solvent to dry with air. Do not allow solvents to enter refrigerant system. 19. Remove evaporator pipe caps and insure seal areas are clean, dry and lint free. 20. Install new O-rings to evaporator lubricating with mineral oil. Refer to O-Ring Replacement. 21. Remove shipping caps and install TXV to evaporator pipes with backing plate and bolts. Tighten: Tighten the bolts to 9 N.m (80 lb in). Tycoon 15 декабря 2008 г. 11:01:11 Page 165 © 2005 Mitchell Repair Information Company, LLC. 2003 Saturn Vue 2003 HVAC Heating, Ventilation and Air Conditioning - Vue 22. Install the HVAC module. Refer to HVAC Module Assembly Replacement. HEATER HOSE REPLACEMENT - INLET (L61) Removal Procedure Fig. 136: Heater Inlet, Hose Clamp & Heater Core Courtesy of GENERAL MOTORS CORP. 1. Drain the coolant. Refer to Draining and Filling Cooling System in Engine Cooling. 2. Remove the heater inlet hose clamp from the heater core. 3. Remove the heater inlet hose from the heater core. Tycoon 15 декабря 2008 г. 11:01:11 Page 166 © 2005 Mitchell Repair Information Company, LLC. 2003 Saturn Vue 2003 HVAC Heating, Ventilation and Air Conditioning - Vue Fig. 137: Heater Inlet & Hose Clamp Courtesy of GENERAL MOTORS CORP. 4. Remove the heater inlet hose clamp from the engine. 5. Remove the heater inlet hose from the engine. Installation Procedure Tycoon 15 декабря 2008 г. 11:01:12 Page 167 © 2005 Mitchell Repair Information Company, LLC. 2003 Saturn Vue 2003 HVAC Heating, Ventilation and Air Conditioning - Vue Fig. 138: Heater Inlet & Hose Clamp Courtesy of GENERAL MOTORS CORP. 1. Install the heater inlet hose to the engine. 2. Install the heater inlet hose clamp to the engine. Tycoon 15 декабря 2008 г. 11:01:12 Page 168 © 2005 Mitchell Repair Information Company, LLC. 2003 Saturn Vue 2003 HVAC Heating, Ventilation and Air Conditioning - Vue Fig. 139: Heater Inlet, Hose Clamp & Heater Core Courtesy of GENERAL MOTORS CORP. 3. Install the heater inlet hose to the heater core. 4. Install the heater inlet hose clamp to the heater core. 5. Fill the cooling system. Refer to Draining and Filling Cooling System in Engine Cooling. HEATER HOSE REPLACEMENT - INLET (L81) Removal Procedure 1. Disconnect the negative battery cable. 2. Drain the coolant. Refer to Draining and Filling Cooling System in Engine Cooling. 3. Remove the battery box/UHFB assembly. Refer to Battery Cooling Box procedure in the Electrical Service Manual. Tycoon 15 декабря 2008 г. 11:01:12 Page 169 © 2005 Mitchell Repair Information Company, LLC. 2003 Saturn Vue 2003 HVAC Heating, Ventilation and Air Conditioning - Vue Fig. 140: Front Heater Outlet Hose & Rear Heater Outlet Hose Courtesy of GENERAL MOTORS CORP. 4. Separate the front heater outlet hose from the rear heater outlet hose by moving the clamp at the splice forward then separating the hoses. Tycoon 15 декабря 2008 г. 11:01:12 Page 170 © 2005 Mitchell Repair Information Company, LLC. 2003 Saturn Vue 2003 HVAC Heating, Ventilation and Air Conditioning - Vue Fig. 141: Heater Outlet, Hose Clamp & Heater Core Courtesy of GENERAL MOTORS CORP. 5. If removing the rear heater outlet hose, remove the clamp and hose from the heater core outlet pipe. Tycoon 15 декабря 2008 г. 11:01:12 Page 171 © 2005 Mitchell Repair Information Company, LLC. 2003 Saturn Vue 2003 HVAC Heating, Ventilation and Air Conditioning - Vue Fig. 142: Removing Clamp & Hose From Engine Port Courtesy of GENERAL MOTORS CORP. 6. If removing the front heater outlet hose, remove the clamp and hose from the engine port. Installation Procedure Tycoon 15 декабря 2008 г. 11:01:12 Page 172 © 2005 Mitchell Repair Information Company, LLC. 2003 Saturn Vue 2003 HVAC Heating, Ventilation and Air Conditioning - Vue Fig. 143: Installing Clamp & Hose To Engine Port Courtesy of GENERAL MOTORS CORP. 1. If installing the front heater outlet hose, install the hose and clamp to the engine port. Position the clamp at 3 o'clock. Tycoon 15 декабря 2008 г. 11:01:12 Page 173 © 2005 Mitchell Repair Information Company, LLC. 2003 Saturn Vue 2003 HVAC Heating, Ventilation and Air Conditioning - Vue Fig. 144: Heater Outlet, Hose Clamp & Heater Core Courtesy of GENERAL MOTORS CORP. 2. If installing the rear heater outlet hose, install the hose and clamp to the heater core outlet pipe. Position the clamp at 9 o'clock. Tycoon 15 декабря 2008 г. 11:01:12 Page 174 © 2005 Mitchell Repair Information Company, LLC. 2003 Saturn Vue 2003 HVAC Heating, Ventilation and Air Conditioning - Vue Fig. 145: Front Heater Outlet Hose & Rear Heater Outlet Hose Courtesy of GENERAL MOTORS CORP. 3. Install the front heater outlet hose to the rear and install the clamp at 2 o'clock. 4. Install the air outlet duct assembly. 5. Install the battery box/UHFB assembly. Refer to Battery Cooling Box procedure in the Electrical Service manual. NOTE: Refer to FASTENER NOTICE in Cautions and Notices. 6. Connect the negative battery cable. Tighten: Tighten the negative battery cable bolt to 17 N.m (13 lb ft). 7. Fill the cooling system. Refer to Draining and Filling Cooling System in Engine Cooling. Tycoon 15 декабря 2008 г. 11:01:12 Page 175 © 2005 Mitchell Repair Information Company, LLC. 2003 Saturn Vue 2003 HVAC Heating, Ventilation and Air Conditioning - Vue HEATER HOSE REPLACEMENT - OUTLET (L61) Removal Procedure Fig. 146: Heater Outlet, Hose Clamp & Heater Core Courtesy of GENERAL MOTORS CORP. 1. Drain the engine coolant. Refer to Draining and Filling Cooling System in Engine Cooling. 2. Remove the heater outlet hose clamp from the heater core. 3. Remove the heater outlet hose from the heater core. Tycoon 15 декабря 2008 г. 11:01:12 Page 176 © 2005 Mitchell Repair Information Company, LLC. 2003 Saturn Vue 2003 HVAC Heating, Ventilation and Air Conditioning - Vue Fig. 147: Connecting Heater Inlet & Outlet Hoses To Thermostat Housing (2.2L) Courtesy of GENERAL MOTORS CORP. 4. Remove the heater outlet hose clamp from the engine. 5. Remove the heater outlet hose from the engine. Installation Procedure Tycoon 15 декабря 2008 г. 11:01:12 Page 177 © 2005 Mitchell Repair Information Company, LLC. 2003 Saturn Vue 2003 HVAC Heating, Ventilation and Air Conditioning - Vue Fig. 148: Connecting Heater Inlet & Outlet Hoses To Thermostat Housing (2.2L) Courtesy of GENERAL MOTORS CORP. 1. Install the heater outlet hose to the engine port. 2. Install the heater outlet hose clamp to the engine port. Tycoon 15 декабря 2008 г. 11:01:12 Page 178 © 2005 Mitchell Repair Information Company, LLC. 2003 Saturn Vue 2003 HVAC Heating, Ventilation and Air Conditioning - Vue Fig. 149: Heater Outlet, Hose Clamp & Heater Core Courtesy of GENERAL MOTORS CORP. 3. Install the heater outlet hose to the heater core. 4. Install the heater outlet hose clamp to the heater core. 5. Fill the engine coolant. Refer to Draining and Filling Cooling System in Engine Cooling. HEATER HOSE REPLACEMENT - OUTLET (L81) Removal Procedure Tycoon 15 декабря 2008 г. 11:01:12 Page 179 © 2005 Mitchell Repair Information Company, LLC. 2003 Saturn Vue 2003 HVAC Heating, Ventilation and Air Conditioning - Vue Fig. 150: Front Heater Outlet Hose & Rear Heater Outlet Hose Courtesy of GENERAL MOTORS CORP. 1. Disconnect the negative battery cable. Refer to Battery Negative Cable Disconnect/Connect Procedure in Battery. 2. Drain the engine coolant. Refer to Draining and Filling Cooling System in Engine Cooling. 3. Remove the battery box. Refer to Battery Box Replacement in Battery. 4. Move the outlet hose splice clamp forward away from splice. 5. Separate the front heater outlet hose from the rear heater outlet hose. Tycoon 15 декабря 2008 г. 11:01:12 Page 180 © 2005 Mitchell Repair Information Company, LLC. 2003 Saturn Vue 2003 HVAC Heating, Ventilation and Air Conditioning - Vue Fig. 151: Heater Outlet, Hose Clamp & Heater Core Courtesy of GENERAL MOTORS CORP. 6. Remove the rear heater outlet hose clamp from the heater core outlet pipe. 7. Remove the heater outlet hose from the heater core outlet pipe. Tycoon 15 декабря 2008 г. 11:01:12 Page 181 © 2005 Mitchell Repair Information Company, LLC. 2003 Saturn Vue 2003 HVAC Heating, Ventilation and Air Conditioning - Vue Fig. 152: Removing Front Heater Outlet Hose Clamp From Engine Port Courtesy of GENERAL MOTORS CORP. 8. Remove the front heater outlet hose clamp from the engine port. 9. Remove the front heater outlet hose clamp from the engine port. Installation Procedure Tycoon 15 декабря 2008 г. 11:01:12 Page 182 © 2005 Mitchell Repair Information Company, LLC. 2003 Saturn Vue 2003 HVAC Heating, Ventilation and Air Conditioning - Vue Fig. 153: Installing Front Heater Outlet Hose Clamp To Engine Port Courtesy of GENERAL MOTORS CORP. 1. Install the heater outlet hose to the engine port. 2. Install the heater outlet hose clamp to the engine port. The clamp should at the 3 o'clock position. Tycoon 15 декабря 2008 г. 11:01:12 Page 183 © 2005 Mitchell Repair Information Company, LLC. 2003 Saturn Vue 2003 HVAC Heating, Ventilation and Air Conditioning - Vue Fig. 154: Heater Outlet, Hose Clamp & Heater Core Courtesy of GENERAL MOTORS CORP. 3. Install the heater outlet hose to the heater outlet pipe. 4. Install the heater outlet hose clamp to the heater outlet pipe. The clamp should at the 9 o'clock position. Tycoon 15 декабря 2008 г. 11:01:12 Page 184 © 2005 Mitchell Repair Information Company, LLC. 2003 Saturn Vue 2003 HVAC Heating, Ventilation and Air Conditioning - Vue Fig. 155: Front Heater Outlet Hose To Rear Heater Outlet Hose Courtesy of GENERAL MOTORS CORP. 5. 6. 7. 8. Install the front heater outlet hose to the rear heater outlet hose. Install the outlet hose splice clamp rearward to splice joint. The clamp should at the 9 o'clock position. Install the battery box. Refer to Battery Box Replacement in Battery. Connect the negative battery cable. Refer to Battery Negative Cable Disconnect/Connect Procedure in Battery. 9. Fill the engine coolant. Refer to Draining and Filling Cooling System in Engine Cooling. PASSENGER COMPARTMENT AIR FILTER HOUSING REPLACEMENT Removal Procedure Tycoon 15 декабря 2008 г. 11:01:12 Page 185 © 2005 Mitchell Repair Information Company, LLC. 2003 Saturn Vue 2003 HVAC Heating, Ventilation and Air Conditioning - Vue Fig. 156: Push Pins & Air Filter Access Panel Courtesy of GENERAL MOTORS CORP. 1. Remove the push pins from the air filter access panel. 2. Lift the air filter access panel and disconnect the washer nozzle hose from the washer nozzle. 3. Remove the air filter access panel. Tycoon 15 декабря 2008 г. 11:01:12 Page 186 © 2005 Mitchell Repair Information Company, LLC. 2003 Saturn Vue 2003 HVAC Heating, Ventilation and Air Conditioning - Vue Fig. 157: Filter Housing & Nuts Courtesy of GENERAL MOTORS CORP. 4. Remove the filter housing nuts from the body. 5. Remove the filter housing from the body. Installation Procedure Tycoon 15 декабря 2008 г. 11:01:12 Page 187 © 2005 Mitchell Repair Information Company, LLC. 2003 Saturn Vue 2003 HVAC Heating, Ventilation and Air Conditioning - Vue Fig. 158: Filter Housing & Nuts Courtesy of GENERAL MOTORS CORP. 1. Inspect the foam seal. If the seal is damaged, replace the seal using Kent Industries adhesive back foam tape P/N 46485 or equivalent. 2. Install the filter housing to the body. NOTE: Refer to FASTENER NOTICE in Cautions and Notices. IMPORTANT: New seal nuts must be used when installing passenger compartment air filter housing to prevent leaks. 3. Install the new seal nuts to the filter housing. Tighten: Tighten the nuts to 9 N.m (80 lb in). Tycoon 15 декабря 2008 г. 11:01:12 Page 188 © 2005 Mitchell Repair Information Company, LLC. 2003 Saturn Vue 2003 HVAC Heating, Ventilation and Air Conditioning - Vue Fig. 159: Push Pins & Air Filter Access Panel Courtesy of GENERAL MOTORS CORP. 4. Connect the washer nozzle hose to the washer nozzle. 5. Install the air filter access panel. 6. Install the push pins to the air filter access panel. PASSENGER COMPARTMENT AIR FILTER REPLACEMENT Removal Procedure Tycoon 15 декабря 2008 г. 11:01:12 Page 189 © 2005 Mitchell Repair Information Company, LLC. 2003 Saturn Vue 2003 HVAC Heating, Ventilation and Air Conditioning - Vue Fig. 160: Push Pins & Air Filter Access Panel Courtesy of GENERAL MOTORS CORP. 1. Remove the push pins from the air filter access panel. 2. Remove the air filter access panel. 3. Remove the air filter from the housing. Installation Procedure Tycoon 15 декабря 2008 г. 11:01:12 Page 190 © 2005 Mitchell Repair Information Company, LLC. 2003 Saturn Vue 2003 HVAC Heating, Ventilation and Air Conditioning - Vue Fig. 161: Push Pins & Air Filter Access Panel Courtesy of GENERAL MOTORS CORP. 1. Install the air filter into the housing. 2. Install the air filter access panel. 3. Install the air filter access panel push pins. AIR INLET ASSEMBLY REPLACEMENT Removal Procedure 1. Remove the HVAC module. Refer to HVAC Module Assembly Replacement. Tycoon 15 декабря 2008 г. 11:01:12 Page 191 © 2005 Mitchell Repair Information Company, LLC. 2003 Saturn Vue 2003 HVAC Heating, Ventilation and Air Conditioning - Vue Fig. 162: Electrical Connector & Recirculation Actuator Courtesy of GENERAL MOTORS CORP. 2. 3. 4. 5. 6. Disconnect the electrical connector from the recirculation actuator. Unclip the wire harness from the HVAC module end bracket. Remove the end bracket screws from the air inlet assembly. Remove the end bracket nuts from the blower case assembly. Remove the end bracket from the blower case assembly. Tycoon 15 декабря 2008 г. 11:01:12 Page 192 © 2005 Mitchell Repair Information Company, LLC. 2003 Saturn Vue 2003 HVAC Heating, Ventilation and Air Conditioning - Vue Fig. 163: Air Inlet Assembly Courtesy of GENERAL MOTORS CORP. 7. 8. 9. 10. Remove the recirculation actuator screws. Remove the recirculation actuator. Remove the air inlet assembly screws. Remove the air inlet assembly. Installation Procedure 1. Install the air inlet assembly. NOTE: Refer to FASTENER NOTICE in Cautions and Notices. 2. Install the air inlet assembly screws. Tycoon 15 декабря 2008 г. 11:01:13 Page 193 © 2005 Mitchell Repair Information Company, LLC. 2003 Saturn Vue 2003 HVAC Heating, Ventilation and Air Conditioning - Vue Tighten: Tighten the screws to 1 N.m (9 lb in). Fig. 164: Air Inlet Assembly Courtesy of GENERAL MOTORS CORP. 3. Install the recirculation actuator. 4. Install the recirculation actuator screws. Tighten: Tighten the screws to 1 N.m (9 lb in). Tycoon 15 декабря 2008 г. 11:01:13 Page 194 © 2005 Mitchell Repair Information Company, LLC. 2003 Saturn Vue 2003 HVAC Heating, Ventilation and Air Conditioning - Vue Fig. 165: Electrical Connector & Recirculation Actuator Courtesy of GENERAL MOTORS CORP. 5. Route the HVAC module harness through the end bracket bottom hole and install the bracket. 6. Install the end bracket screws. Tighten: Tighten the screws to 2 N.m (18 lb in). 7. Install the end bracket nuts. Tighten: Tighten the nuts to 2 N.m (18 lb in). 8. Clip the wire harness to the end bracket. 9. Install the electrical connector to the recirculation actuator. 10. Install the HVAC module. Refer to HVAC Module Assembly Replacement. Tycoon 15 декабря 2008 г. 11:01:13 Page 195 © 2005 Mitchell Repair Information Company, LLC. 2003 Saturn Vue 2003 HVAC Heating, Ventilation and Air Conditioning - Vue BLOWER MOTOR RESISTOR REPLACEMENT Removal Procedure Fig. 166: Electrical Connector & Blower Motor Resistor Courtesy of GENERAL MOTORS CORP. 1. Remove the right side insulator/closeout panel. Refer to Closeout/Insulator Panel Replacement Right in Instrument Panel, Gages and Console. 2. Disconnect the electrical connector from the blower motor resistor. Tycoon 15 декабря 2008 г. 11:01:13 Page 196 © 2005 Mitchell Repair Information Company, LLC. 2003 Saturn Vue 2003 HVAC Heating, Ventilation and Air Conditioning - Vue Fig. 167: Blower Motor Resistor, Screws & Blower Case Assembly Courtesy of GENERAL MOTORS CORP. 3. Remove the blower motor resistor screws from the HVAC module. 4. Remove the blower motor resistor from the HVAC module. Installation Procedure Tycoon 15 декабря 2008 г. 11:01:13 Page 197 © 2005 Mitchell Repair Information Company, LLC. 2003 Saturn Vue 2003 HVAC Heating, Ventilation and Air Conditioning - Vue Fig. 168: Blower Motor Resistor, Screws & Blower Case Assembly Courtesy of GENERAL MOTORS CORP. 1. Install the blower motor resistor to the HVAC module. NOTE: Refer to FASTENER NOTICE in Cautions and Notices. 2. Install the blower motor resistor screws to the HVAC module. Tighten: Tighten the screws to 1 N.m (9 lb in). 3. Connect the electrical connector to the blower motor resistor. 4. Install the right side insulator/closeout panel. Refer to Closeout/Insulator Panel Replacement Right in Instrument Panel, Gages and Console. BLOWER MOTOR REPLACEMENT Tycoon 15 декабря 2008 г. 11:01:13 Page 198 © 2005 Mitchell Repair Information Company, LLC. 2003 Saturn Vue 2003 HVAC Heating, Ventilation and Air Conditioning - Vue Removal Procedure Fig. 169: Electrical Connector & Blower Motor Courtesy of GENERAL MOTORS CORP. 1. Remove the passenger side insulator/closeout panel. Refer to Closeout/Insulator Panel Replacement - Right in Instrument Panel, Gages and Console. 2. Disconnect the electrical connector from the blower motor. Tycoon 15 декабря 2008 г. 11:01:13 Page 199 © 2005 Mitchell Repair Information Company, LLC. 2003 Saturn Vue 2003 HVAC Heating, Ventilation and Air Conditioning - Vue Fig. 170: Blower Motor Screws & Blower Case Assembly Courtesy of GENERAL MOTORS CORP. 3. Remove the blower motor screws from the HVAC module. 4. Remove the blower motor from the HVAC module. Installation Procedure Tycoon 15 декабря 2008 г. 11:01:13 Page 200 © 2005 Mitchell Repair Information Company, LLC. 2003 Saturn Vue 2003 HVAC Heating, Ventilation and Air Conditioning - Vue Fig. 171: Blower Motor Screws & Blower Case Assembly Courtesy of GENERAL MOTORS CORP. 1. Install the blower motor to the HVAC module. NOTE: Refer to FASTENER NOTICE in Cautions and Notices. 2. Install the blower motor screws to the HVAC module. Tighten: Tighten the screws to 1 N.m (9 lb in). Tycoon 15 декабря 2008 г. 11:01:13 Page 201 © 2005 Mitchell Repair Information Company, LLC. 2003 Saturn Vue 2003 HVAC Heating, Ventilation and Air Conditioning - Vue Fig. 172: Electrical Connector & Blower Motor Courtesy of GENERAL MOTORS CORP. 3. Connect the electrical connector to the blower motor. 4. Install the passenger side insulator/closeout panel. Refer to Closeout/Insulator Panel Replacement Right in Instrument Panel, Gages and Console. BLOWER MOTOR IMPELLER REPLACEMENT Removal Procedure Tycoon 15 декабря 2008 г. 11:01:13 Page 202 © 2005 Mitchell Repair Information Company, LLC. 2003 Saturn Vue 2003 HVAC Heating, Ventilation and Air Conditioning - Vue Fig. 173: Electrical Connector & Blower Motor Courtesy of GENERAL MOTORS CORP. 1. Disconnect the electrical connector from the blower motor. Tycoon 15 декабря 2008 г. 11:01:13 Page 203 © 2005 Mitchell Repair Information Company, LLC. 2003 Saturn Vue 2003 HVAC Heating, Ventilation and Air Conditioning - Vue Fig. 174: Blower Motor Screws & Blower Case Assembly Courtesy of GENERAL MOTORS CORP. 2. 3. 4. 5. Remove the blower motor screws from the HVAC module. Remove the blower motor from the HVAC module. Remove the blower motor fan retention clip from the blower motor. Remove the blower motor fan from the blower motor. Installation Procedure Tycoon 15 декабря 2008 г. 11:01:13 Page 204 © 2005 Mitchell Repair Information Company, LLC. 2003 Saturn Vue 2003 HVAC Heating, Ventilation and Air Conditioning - Vue Fig. 175: Blower Motor Screws & Blower Case Assembly Courtesy of GENERAL MOTORS CORP. 1. Install the blower motor fan to the blower motor. 2. Install the blower motor fan retention clip to the blower motor. 3. Install the blower motor to the HVAC module. NOTE: Refer to FASTENER NOTICE in Cautions and Notices. 4. Install the blower motor screws to the HVAC module. Tighten: Tighten to screws to 1 N.m (9 lb in) Tycoon 15 декабря 2008 г. 11:01:13 Page 205 © 2005 Mitchell Repair Information Company, LLC. 2003 Saturn Vue 2003 HVAC Heating, Ventilation and Air Conditioning - Vue Fig. 176: Electrical Connector & Blower Motor Courtesy of GENERAL MOTORS CORP. 5. Connect the electrical connector to the blower motor. AIR OUTLET REPLACEMENT - INSTRUMENT PANEL Removal Procedure 1. Remove the instrument panel (I/P) upper trim panel. Refer to Trim Panel Replacement - Instrument Panel (I/P) Upper in Instrument Panel, Gages, and Console. Tycoon 15 декабря 2008 г. 11:01:13 Page 206 © 2005 Mitchell Repair Information Company, LLC. 2003 Saturn Vue 2003 HVAC Heating, Ventilation and Air Conditioning - Vue Fig. 177: Outlet Bezel Courtesy of GENERAL MOTORS CORP. 2. Depress the locking tabs on the outlet. 3. Carefully slide the outlet out of the I/P trim and the surrounding outlet bezel. Installation Procedure Tycoon 15 декабря 2008 г. 11:01:13 Page 207 © 2005 Mitchell Repair Information Company, LLC. 2003 Saturn Vue 2003 HVAC Heating, Ventilation and Air Conditioning - Vue Fig. 178: Outlet Bezel Courtesy of GENERAL MOTORS CORP. 1. Install the outlet to the I/P trim panel. The outlet will snap into place. 2. Install the I/P upper trim panel. Refer to Trim Panel Replacement - Instrument Panel (I/P) Upper in Instrument Panel, Gages, and Console. AIR OUTLET REPLACEMENT - FLOOR Removal Procedure Tycoon 15 декабря 2008 г. 11:01:13 Page 208 © 2005 Mitchell Repair Information Company, LLC. 2003 Saturn Vue 2003 HVAC Heating, Ventilation and Air Conditioning - Vue Fig. 179: Center Floor Air Outlet Duct Courtesy of GENERAL MOTORS CORP. 1. Remove the shift control bracket. Refer to Transmission Shift Control Bracket Replacement in Manual Transmission - Getrag 5, Transmission Shift Control Bracket Replacement in Automatic Transaxle - AF33-5. 2. Slide the floor air duct forward on heater duct enough to clear the rear floor air duct and then up and rearward to remove. Installation Procedure Tycoon 15 декабря 2008 г. 11:01:13 Page 209 © 2005 Mitchell Repair Information Company, LLC. 2003 Saturn Vue 2003 HVAC Heating, Ventilation and Air Conditioning - Vue Fig. 180: Center Floor Air Outlet Duct Courtesy of GENERAL MOTORS CORP. 1. Slide the floor air duct forward on heater duct enough to clear rear floor air duct and then down and rearward to install. 2. Install the shift control bracket. Refer to Transmission Shift Control Bracket Replacement in Manual Transmission - Getrag 5, Transmission Shift Control Bracket Replacement in Automatic Transaxle - AF33-5. AIR OUTLET REPLACEMENT - REAR FLOOR Removal Procedure Tycoon 15 декабря 2008 г. 11:01:13 Page 210 © 2005 Mitchell Repair Information Company, LLC. 2003 Saturn Vue 2003 HVAC Heating, Ventilation and Air Conditioning - Vue Fig. 181: Rear Floor Air Outlet & Push Pins Courtesy of GENERAL MOTORS CORP. 1. Remove the front seats. Refer to Seat Replacement - Front Bucket in Seats. 2. Remove the floor console. Refer to Console Replacement - Front Floor in Instrument Panel, Gages, and Console. 3. Partially remove the floor carpet from the front footwells to the B-pillars. 4. Remove the rear floor rear duct push pins from the floor pan. 5. Remove the rear floor rear duct from the floor pan. Installation Procedure Tycoon 15 декабря 2008 г. 11:01:13 Page 211 © 2005 Mitchell Repair Information Company, LLC. 2003 Saturn Vue 2003 HVAC Heating, Ventilation and Air Conditioning - Vue Fig. 182: Rear Floor Air Outlet & Push Pins Courtesy of GENERAL MOTORS CORP. 1. 2. 3. 4. Install the rear floor rear duct to the floor pan. Install rear floor rear duct push pins to the floor pan. Install the floor carpet to the B-pillars and the front footwells. Install the floor console. Refer to Console Replacement - Front Floor in Instrument Panel, Gages, and Console. 5. Install the front seats. Refer to Seat Replacement - Front Bucket in Seats. DEFROSTER DUCT REPLACEMENT - WINDSHIELD Removal Procedure Tycoon 15 декабря 2008 г. 11:01:13 Page 212 © 2005 Mitchell Repair Information Company, LLC. 2003 Saturn Vue 2003 HVAC Heating, Ventilation and Air Conditioning - Vue Fig. 183: Defroster Duct & Retainer Courtesy of GENERAL MOTORS CORP. 1. Remove the instrument panel upper trim panel. Refer to Trim Panel Replacement - Instrument Panel (I/P) Upper in Instrument Panel, Gages, and Console. 2. Remove the windshield defrost duct nuts from the HVAC module. 3. Remove the windshield defrost duct from the HVAC module. Installation Procedure Tycoon 15 декабря 2008 г. 11:01:13 Page 213 © 2005 Mitchell Repair Information Company, LLC. 2003 Saturn Vue 2003 HVAC Heating, Ventilation and Air Conditioning - Vue Fig. 184: Defroster Duct & Retainer Courtesy of GENERAL MOTORS CORP. 1. Inspect the windshield defrost duct seals. If damaged, replace using Kent Industries adhesive back foam tape P/N 46485 or equivalent. 2. Install the windshield defrost duct to the HVAC module. NOTE: Refer to FASTENER NOTICE in Cautions and Notices. 3. Install the windshield defrost duct nuts to the HVAC module. Tighten: Tighten the nuts to 2.5 N.m (22 lb in). 4. Install the instrument panel upper trim panel. Refer to Trim Panel Replacement - Instrument Panel (I/P) Upper in Instrument Panel, Gages, and Console. Tycoon 15 декабря 2008 г. 11:01:13 Page 214 © 2005 Mitchell Repair Information Company, LLC. 2003 Saturn Vue 2003 HVAC Heating, Ventilation and Air Conditioning - Vue HEATER CORE REPLACEMENT Removal Procedure 1. Drain the engine coolant. Refer to Draining and Filling Cooling System in Engine Cooling. 2. Remove the heater outlet hose from the heater core. Refer to Heater Hose Replacement - Outlet (L61) or Heater Hose Replacement - Outlet (L81). 3. Remove the heater inlet hose from the heater core. Refer to Heater Hose Replacement - Inlet (L61) or Heater Hose Replacement - Inlet (L81). 4. Remove the instrument panel retainer. Refer to Instrument Panel (I/P) Retainer Replacement in Instrument Panel, Gages, and Console. 5. Remove the shift control bracket. Refer to Transmission Shift Control Bracket Replacement in Manual Transmission - Getrag 5, Transmission Shift Control Bracket Replacement in Automatic Transaxle - AF33-5. Fig. 185: Heater Duct, Screws & Heater Core Cover Tycoon 15 декабря 2008 г. 11:01:13 Page 215 © 2005 Mitchell Repair Information Company, LLC. 2003 Saturn Vue 2003 HVAC Heating, Ventilation and Air Conditioning - Vue Courtesy of GENERAL MOTORS CORP. 6. Remove the heater duct screws. 7. Remove the heater duct. Fig. 186: Heater Core Cover, Screws & Evaporator Case Assembly Courtesy of GENERAL MOTORS CORP. 8. Remove the heater core cover screws. 9. Remove the heater core cover. Tycoon 15 декабря 2008 г. 11:01:13 Page 216 © 2005 Mitchell Repair Information Company, LLC. 2003 Saturn Vue 2003 HVAC Heating, Ventilation and Air Conditioning - Vue Fig. 187: Heater Core Pipe Cover Courtesy of GENERAL MOTORS CORP. 10. Remove the heater core pipe cover screw. 11. Remove the heater core pipe cover. 12. Remove the heater core pipe foam seal. Tycoon 15 декабря 2008 г. 11:01:13 Page 217 © 2005 Mitchell Repair Information Company, LLC. 2003 Saturn Vue 2003 HVAC Heating, Ventilation and Air Conditioning - Vue Fig. 188: Heater Core & End Tanks Courtesy of GENERAL MOTORS CORP. 13. Grasp the heater core at end tanks and remove heater core. Spray the perimeter of the heater core seal and the heater core pipes at the front of dash with a soap and water mixture to ease removal. Installation Procedure Tycoon 15 декабря 2008 г. 11:01:14 Page 218 © 2005 Mitchell Repair Information Company, LLC. 2003 Saturn Vue 2003 HVAC Heating, Ventilation and Air Conditioning - Vue Fig. 189: Heater Core & Pipe Seal Courtesy of GENERAL MOTORS CORP. 1. Install the heater core. Spray the perimeter of the heater core seal and the heater core pipes at the front of dash with a soap and water mixture to ease installation. Tycoon 15 декабря 2008 г. 11:01:14 Page 219 © 2005 Mitchell Repair Information Company, LLC. 2003 Saturn Vue 2003 HVAC Heating, Ventilation and Air Conditioning - Vue Fig. 190: Heater Core Pipe Cover Courtesy of GENERAL MOTORS CORP. 2. Install the heater core pipe seal. 3. Install the heater core pipe cover. NOTE: Refer to FASTENER NOTICE in Cautions and Notices. 4. Install the heater core pipe cover screw. Tighten: Tighten the screw to 1 N.m (9 lb in). Tycoon 15 декабря 2008 г. 11:01:14 Page 220 © 2005 Mitchell Repair Information Company, LLC. 2003 Saturn Vue 2003 HVAC Heating, Ventilation and Air Conditioning - Vue Fig. 191: Spraying Front Dash Seal At Drain Tube Opening Courtesy of GENERAL MOTORS CORP. 5. Spray the front of dash seal at the drain tube opening to aid in heater core cover installation. Tycoon 15 декабря 2008 г. 11:01:14 Page 221 © 2005 Mitchell Repair Information Company, LLC. 2003 Saturn Vue 2003 HVAC Heating, Ventilation and Air Conditioning - Vue Fig. 192: Heater Core Cover, Screws & Evaporator Case Assembly Courtesy of GENERAL MOTORS CORP. 6. Install the heater core cover. 7. Install the heater core cover screws. Tighten: Tighten the screw to 1 N.m (9 lb in). Tycoon 15 декабря 2008 г. 11:01:14 Page 222 © 2005 Mitchell Repair Information Company, LLC. 2003 Saturn Vue 2003 HVAC Heating, Ventilation and Air Conditioning - Vue Fig. 193: Heater Duct, Screws & Heater Core Cover Courtesy of GENERAL MOTORS CORP. 8. Install the heater duct. 9. Install the heater duct screws. Tighten: Tighten the screw to 1 N.m (9 lb in). 10. Install the instrument panel retainer. Refer to Instrument Panel (I/P) Retainer Replacement in Instrument Panel, Gages, and Console. 11. Install the shift control bracket. Refer to Transmission Shift Control Bracket Replacement in Manual Transmission - Getrag 5, Transmission Shift Control Bracket Replacement in Automatic Transaxle - AF33-5. 12. Install the heater inlet hose to the heater core. Refer to Heater Hose Replacement - Inlet (L61) or Heater Hose Replacement - Inlet (L81). 13. Install the heater outlet hose to the heater core. Refer to Heater Hose Replacement - Outlet (L61) or Tycoon 15 декабря 2008 г. 11:01:14 Page 223 © 2005 Mitchell Repair Information Company, LLC. 2003 Saturn Vue 2003 HVAC Heating, Ventilation and Air Conditioning - Vue Heater Hose Replacement - Outlet (L81). 14. Replace the engine coolant. Refer to Draining and Filling Cooling System in Engine Cooling. AIR OUTLET DUCT REPLACEMENT - AUXILIARY Removal Procedure 1. Remove the instrument panel retainer. Refer to Instrument Panel (I/P) Retainer Replacement in Instrument Panel, Gages and Console. Fig. 194: Center I/P Air Outlet Duct & Retainers Courtesy of GENERAL MOTORS CORP. 2. Remove the auxiliary duct push pins from the cross car beam. 3. Remove the auxiliary duct from the cross car beam. Tycoon 15 декабря 2008 г. 11:01:14 Page 224 © 2005 Mitchell Repair Information Company, LLC. 2003 Saturn Vue 2003 HVAC Heating, Ventilation and Air Conditioning - Vue Installation Procedure 1. Inspect the seals and replace if damaged using Kent Industries adhesive backed foam tape P/N 46485 or equivalent. Fig. 195: Center I/P Air Outlet Duct & Retainers Courtesy of GENERAL MOTORS CORP. 2. Install the auxiliary duct to the cross car beam. 3. Install the auxiliary duct push pins to the cross car beam. 4. Install the instrument panel retainer. Refer to Instrument Panel (I/P) Retainer Replacement in Instrument Panel, Gages and Console. SPECIAL TOOLS AND EQUIPMENT SPECIAL TOOLS Tycoon 15 декабря 2008 г. 11:01:14 Page 225 © 2005 Mitchell Repair Information Company, LLC. 2003 Saturn Vue 2003 HVAC Heating, Ventilation and Air Conditioning - Vue Special Tools Illustration Tool Number/Description J 25031-A Three Jaw Puller J 39400-A Halogen Leak Detector J 41447 R-134A A/C Tracer Dye-Box of 24 J 42220 Universal 12V Leak Detection Lamp J 43600 ACR 2000 Air Conditioning Service Center Tycoon 15 декабря 2008 г. 11:01:14 Page 226 © 2005 Mitchell Repair Information Company, LLC. 2003 Saturn Vue 2003 HVAC Heating, Ventilation and Air Conditioning - Vue J 44020 Terminal Repair Kit J 45267 Clutch Holding Tool J 45504 Clutch Pulley Installer Tycoon 15 декабря 2008 г. 11:01:14 Page 227 © 2005 Mitchell Repair Information Company, LLC. 2003 Saturn Vue 2003 HVAC Heating, Ventilation and Air Conditioning - Vue J 46246 Valve Core Tool J 46297 A/C Dye Injector Kit J 46297-12 Replacement Dye Cartridges SA 9111E Hose Clamp Pliers SA 9149AC-8 Snap Ring Pliers Tycoon 15 декабря 2008 г. 11:01:14 Page 228 © 2005 Mitchell Repair Information Company, LLC.