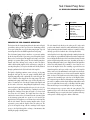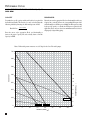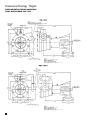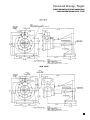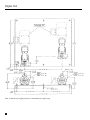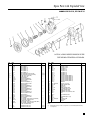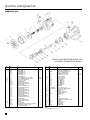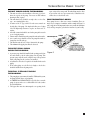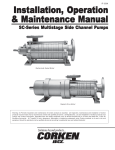
1
Corken, a tradition of excellence
As a unit of IDEX Corporation, Corken Inc. is a leader in
specialized niche markets. To maintain our leadership in your
industry requires continual Innovation, Diversity and Excellence.
With over 50 years global experience in liquefied gas handling,
Corken offers innovative solutions to the rapidly changing
pumping needs of the Polyurethane industry. Corken’s exceptional
reputation is built upon decades of maintaining the highest quality
and customer service standards.
Through intimate contact within your industry, Corken is
committed to application of new product technology and
streamlining product selection.
This specialized information packet is designed as a comprehensive
guide to applying Corken products in your industry.
Corken Meets the Challenges
of Blowing Agent Handling
HIGH PUMPING PRESSURE
Corken’s SC-Series multistage pump delivers higher differential pressures for current
and future high vapor pressure product.
LOW NPSH
Corken products exceed expectations where NPSH is as low as 1 foot.
TEMPERATURE VARIATIONS
Corken products perform year around regardless of seasonal temperature variations.
MAINTENANCE PROBLEMS
Corken’s unique design minimizes maintenance. Reduced operating speed and free
floating impellers (no metal to metal contact) provide years of trouble free performance.
ENTRAINED GASES / VAPOR LOCK
Corken pumps perform with up to 50% entrained gas content eliminating lost time
venting and re-priming.
SEALING INTEGRITY
Whether your application calls for mechanical sealing or sealless designs, Corken
provides the widest range of options.
COMPREHENSIVE PUMP SELECTION
At Corken, we understand the value of time and commit ourselves to streamlining the
process from pump selection through successful startup.
COMMITMENT AND SUPPORT
Corken products are backed by the strongest service commitment in your industry. We
are pleased to provide you with our growing list of satisfied customers successfully
handling the widest range of Fluorocarbons, Hydrocarbons, CO2 and other similar
liquefied gases.
A Comprehensive Guide to Blowing Agent Pumping
GUIDE TO PUMP SELECTION . . . . . . . . . . . . . . . . . . . . . . . . . . . . . . . . . . . . . . . . . . . . . . . . . . . . . . . 7
Corken offers a wide range of products. This table identifies the pumping principle
best suited to your flow and pressure requirements.
SIDE-CHANNEL PUMP SERIES . . . . . . . . . . . . . . . . . . . . . . . . . . . . . . . . . . . . . . . . . . . . . . . . . . . . . . 8
Where high-differential pressures or problematic suction conditions are encountered
the Side Channel pump provides a new dimension in liquid transfer.
Principle of Operation . . . . . . . . . . . . . . . . . . . . . . . . . . . . . . . . . . . . . . . . . . . . . . . . . . . . . . . . . . . . . . . . . . . . . . . . . . . . . . . . . . 9
Performance Curves . . . . . . . . . . . . . . . . . . . . . . . . . . . . . . . . . . . . . . . . . . . . . . . . . . . . . . . . . . . . . . . . . . . . . . . . . . . . . . . . . . . 10
Material Specifications. . . . . . . . . . . . . . . . . . . . . . . . . . . . . . . . . . . . . . . . . . . . . . . . . . . . . . . . . . . . . . . . . . . . . . . . . . . . . . . . . 18
Dimensional Drawings . . . . . . . . . . . . . . . . . . . . . . . . . . . . . . . . . . . . . . . . . . . . . . . . . . . . . . . . . . . . . . . . . . . . . . . . . . . . . . . . . 19
Spare Parts with Exploded View. . . . . . . . . . . . . . . . . . . . . . . . . . . . . . . . . . . . . . . . . . . . . . . . . . . . . . . . . . . . . . . . . . . . . . . . . . 21
CORO-FLO TURBINE SERIES. . . . . . . . . . . . . . . . . . . . . . . . . . . . . . . . . . . . . . . . . . . . . . . . . . . . . . . 23
For low-capacity, medium-head pumping, the Coro-Flo Turbine is the pump of choice.
Performance Curves . . . . . . . . . . . . . . . . . . . . . . . . . . . . . . . . . . . . . . . . . . . . . . . . . . . . . . . . . . . . . . . . . . . . . . . . . . . . . . . . . . . 24
Material Specifications. . . . . . . . . . . . . . . . . . . . . . . . . . . . . . . . . . . . . . . . . . . . . . . . . . . . . . . . . . . . . . . . . . . . . . . . . . . . . . . . . 26
Dimensional Drawings . . . . . . . . . . . . . . . . . . . . . . . . . . . . . . . . . . . . . . . . . . . . . . . . . . . . . . . . . . . . . . . . . . . . . . . . . . . . . . . . . 27
Duplex Unit . . . . . . . . . . . . . . . . . . . . . . . . . . . . . . . . . . . . . . . . . . . . . . . . . . . . . . . . . . . . . . . . . . . . . . . . . . . . . . . . . . . . . . . . . 30
Spare Parts with Exploded View. . . . . . . . . . . . . . . . . . . . . . . . . . . . . . . . . . . . . . . . . . . . . . . . . . . . . . . . . . . . . . . . . . . . . . . . . . 31
Technical Service Manual (Coro Flo) . . . . . . . . . . . . . . . . . . . . . . . . . . . . . . . . . . . . . . . . . . . . . . . . . . . . . . . . . . . . . . . . . . . . . . 33
Technical Service Manual (Seal Replacement) . . . . . . . . . . . . . . . . . . . . . . . . . . . . . . . . . . . . . . . . . . . . . . . . . . . . . . . . . . . . . . . 41
BULK TRANSFER OF BLOWING AGENTS . . . . . . . . . . . . . . . . . . . . . . . . . . . . . . . . . . . . . . . . . . . . 45
LIQUID LIST. . . . . . . . . . . . . . . . . . . . . . . . . . . . . . . . . . . . . . . . . . . . . . . . . . . . . . . . . . . . . . . . . . . . . 46
BLANK APPLICATION DATA SHEET. . . . . . . . . . . . . . . . . . . . . . . . . . . . . . . . . . . . . . . . . . . . . . . . . 47
SYSTEM PIPING RECOMMENDATIONS . . . . . . . . . . . . . . . . . . . . . . . . . . . . . . . . . . . . . . . . . . . . . . 49
BY PASS VALVE / CORKEN MODEL B-166 . . . . . . . . . . . . . . . . . . . . . . . . . . . . . . . . . . . . . . . . . . . . 58
WARRANTY INFORMATION . . . . . . . . . . . . . . . . . . . . . . . . . . . . . . . . . . . . . . . . . . . . . . . . . . . . . . . 60
CONVERSION FACTORS. . . . . . . . . . . . . . . . . . . . . . . . . . . . . . . . . . . . . . . . . . . . . . . . . . . . . . . . . . . 62
Guide to Pump Selection
FLOW VS. PRESSURE
FOR HIGHER FLOW
RATES, PLEASE
REFER TO CORKEN'S
CORO-VANE PUMP
ON PAGE 45.
500
450
1155
1040
924
400
350
809
300
693
250
578
HEAD (FEET)
PRESSURE DIFFERENTIAL (PSID)*
SC20
SC30
462
200
SC10
SC40
175
404
150
347
125
289
100
231
CORO-FLO
FOR MORE INFORMATION
ON THE SIDE CHANNEL
PUMP SERIES (SC10-SC40)
REFER TO PAGE 8.
REFER TO
PAGE 23.
75
173
50
116
25
58
0
5
10
15
20
25
30
35
40
45
50
55
60
CAPACITY (GPM)
Please Note: Performance data is for reference only. Product limitations are listed in Specifications. Above pressure differential
values are based on water (1.0 sg). Higher differential pressures may be attainable dependent upon the specific
gravity of the liquid being handled. Consult factory for further details.
7
Side Channel Pump Series
SC SERIES SIDE CHANNEL PUMPS
SPECIFICATIONS
MODEL
10
20
Number of Stages
The latest generation of Blowing Agents create unique pumping
challenges. Increasingly, differential pressures are rising and NPSH
requirements are more demanding. Corken’s SC series is designed
specifically to overcome these obstacles and provide flexibility to
meet future demands.
In winter months when peak differential pressures are encountered
Corken’s SC series eliminates the need to push existing technology
beyond its design capability. Demands that are extreme for many
pump designs fall into the heart of the SC series, simply put the right
pump for your changing needs.
40
Inlet Flange
Inches (MM)
1-1/2 (40)
2-1/2 (65)
2-1/2 (65)
3 (80)
Outlet Flange
Inches (MM)
3/4 (20)
1-1/4 (32)
1-1/4 (32)
1-1/2 (40)
1450
1150/1750
1450
1150/1750
1450
1150/1750
1450
1150/1750
Maximum Working
Pressure PSIG (Bar)
580 (40)
580 (40)
580 (40)
580 (40)
Differential Pressure*
Range PSI (Bar)
13 (.9)
-375 (26)
13 (.9)
-565 (39)
7 (.5)
-440 (30)
13 (.9)
-429 (29.5)
Min. Temp. °F (°C)
-40° (-40°)
-40° (-40°)
-40° (-40°)
-40° (-40°)
Max. Temp. °F (°C)
428° (220°)
428° (220°)
428° (220°)
428° (220°)
NPSH Range FT (M)
1.0 (.3)
13 (4)
1.3 (.4)
3.3 (1)
1.0 (.3)
6.6 (2)
1.0 (.3)
8.2 (2.5)
1050 (230)
1050 (230)
1050 (230)
1050 (230)
Maximum Proportion
of Gas Allowable
50%
50%
50%
50%
DIN Flange Option
Yes
Yes
Yes
Yes
ANSI Flange Option
CF**
Yes
Yes
Yes
RPM-50 Hz
RPM-60 Hz
Maximum Viscosity
SSU (CST)
Casing Material Option
Ductile Iron, Cast Iron, Stainless Steel
Impeller Material Option
O-Ring Material Option
8
30
1 to 8
Bronze, Steel, Stainless Steel
Neoprene, Viton®, Teflon®, Ethylene-Propylene
Double Seal Option
Yes
Yes
Yes
Magnetic Drive Option
Yes
Yes
Yes
Yes
High Temp. Option
Yes
Yes
Yes
Yes
Internal Relief Option
No
No
No
No
* Above differential pressures are based on a 1.2 specific gravity.
** Consult Factory
Yes
Side Channel Pump Series
SC SERIES SIDE CHANNEL PUMPS
F
G
H
C
D
E
Item
Liquid-Vapor
Mixture
B
A
Vapor
A
B
C
D
E
F
G
H
Description
Discharge Stage Casing
Suction Stage Casing
Impeller
Equalization Holes
Inlet Port
Outlet Port
Mini-Channel
Secondary Discharge Port
Liquid
PRINCIPLE OF SIDE-CHANNEL OPERATION
The design of the side-channel pump allows for the transfer of liquidgas mixtures with up to 50% vapor; therefore eliminating possible
air or vapor locking that can occur in other pump designs. A special
suction impeller lowers the NPSH requirement for the pump.
The side channel leads directly to the outlet port (F). At the outlet
port, the main channel ends and a smaller minichannel (G) begins.
At the point where the mini-channel ends, there is a small secondary
discharge port (H) level with the base of the impeller blades.
The side-channel pump design is similar to a regenerative turbine
in that the impeller makes regenerative passes through the liquid.
However, the actual design of the impeller and casing as well as the
principles of operation differ greatly. The side-channel pump has a
channel only in the discharge stage casing (A) and a flat surface
which is flush with the impeller on the suction stage casing (B). A
star-shaped impeller (C) is keyed to the shaft and is axially balanced
through equalization holes (D) in the hub of the impeller.
As the liquid is forced to the periphery through centrifugal action due
to its density, the vapor within the liquid stream tends to remain at the
base of the impeller blades since it has a much lower density. The main
portion of liquid and possibly some vapor, depending on the mix, is
discharged through the outlet port. A small portion of the liquid flow
follows the mini-channel and eventually is forced into the area
between the impeller blades. The remaining vapor which was not
drawn through the outlet port resides at the base of the impeller
blades. At the end of the minichannel, as the liquid is forced into the
area between the blades, the area between and around the impeller
blade is reduced. The liquid between the blades displaces and thus
compresses the remaining vapor at the base of the impeller blades.
The compressed vapor is then forced through the secondary discharge
port where it combines with the liquid discharged through the outlet
port as it is pulled into the next stage or discharged from the pump.
Thus entrained vapor is moved through each stage of the pump.
The liquid or liquid/vapor mixture enters each stage of the pump
through the inlet port (E). Once the pump is initially filled with
liquid, the pump will provide a siphoning effect at the inlet port. The
effect is similar to what happens in water ring pumps. The water
remaining in the pump casing forms a type of water ring with a free
surface. A venturi effect is created by the rotation of the impeller and
the free surface of the water, thus pulling the liquid into the casing.
After the liquid is pulled through the inlet port, it is forced to the
outer periphery of the impeller blade by centrifugal action. It is
through this centrifugal action that the liquid is accelerated and
forced into the side channel. The liquid then flows along the
semicircular contour of the side channel from the outermost point
to the innermost point until once again it is accelerated by the
impeller blade. The liquid moves several times between the impeller
and the side channel. Thus the rotating impeller makes several
regenerative passes until the liquid reaches the outlet port. The
speed of the impeller along with the centrifugal action impart
energy to the liquid through the exchange of momentum, thus
allowing the pump to build pressure.
Each subsequent stage operates under the same principle. The
number of stages can be varied to meet the required discharge head.
When multiple stages are required, the relative positions of the stage
outlet ports are radially staggered to balance shaft loads.
9
Performance Curves
SC10 SERIES
1150 RPM
400
18
17
300
H (ft)
16
15
200
14
13
100
12
11
0
1.0
2.0
3.0
4.0
5.0
6.0
7.0
8.0
Q (U.S. gpm)
2.50
18
2.00
17
P (Hp)
16
1.50
**Note:
Multiply
Power by
Specific
Gravity
15
14
1.00
13
0.50
12
11
0.00
1.0
2.0
3.0
4.0
5.0
6.0
7.0
8.0
Q (U.S. gpm)
NPSH (ft)
5.0
4.0
3.0
2.0
1.0
0.0
1.0
2.0
3.0
4.0
5.0
Q (U.S. gpm)
Note: Consult factory for viscosities above 30 SSU
10
6.0
7.0
8.0
Performance Curves
SC10 SERIES
1750 RPM
700
18
600
17
500
16
H (ft)
400
15
14
300
13
200
12
100
11
0
6.5
7.5
8.5
9.5
10.5
11.5
12.5
13.5
Q (U.S. gpm)
7
6
5
18
17
**Note:
Multiply
Power by
Specific
Gravity
16
P (Hp)
4
15
3
14
13
2
12
1
11
0
6.50
7.50
8.50
9.50
10.50
11.50
12.50
13.50
NPSH (ft)
Q (U.S. gpm)
14
12
10
8
6
4
2
0
6.50
7.50
8.50
9.50
10.50
11.50
12.50
13.50
Q (U.S. gpm)
Note: Consult factory for viscosities above 30 SSU
11
Performance Curves
SC20 SERIES
1150 RPM
600
28
27
500
26
H (ft)
400
25
300
24
23
200
22
100
21
0
4.0
5.0
6.0
7.0
8.0
9.0
10.0
11.0
12.0
13.0
14.0
15.0
16.0
Q (U.S. gpm)
6
28
5
27
26
**Note:
Multiply
Power by
Specific
Gravity
P (Hp)
4
25
3
24
23
2
22
1
21
0
4.0
5.0
6.0
7.0
8.0
9.0
10.0
11.0
12.0
13.0
14.0
15.0
16.0
Q (U.S. gpm)
NPSH (ft)
2.0
1.5
1.0
0.5
0
4.0
5.0
6.0
7.0
8.0
9.0
Note: Consult factory for viscosities above 30 SSU
12
10.0
11.0
Q (U.S. gpm)
12.0
13.0
14.0
15.0
16.0
Performance Curves
SC20 SERIES
1750 RPM
1100
1000
28
H (ft)
900
800
27
700
26
600
25
500
24
400
23
300
22
200
100
21
0
13
14
15
16
17
18
19
20
21
22
23
24
25
26
27
Q (U.S. gpm)
18
16
28
14
27
12
26
**Note:
Multiply
Power by
Specific
Gravity
P (Hp)
10
25
8
24
6
23
4
22
2
21
0
13
14
15
16
17
18
19
20
21
22
23
24
25
26
27
22
23
24
25
26
27
NPSH (ft)
Q (U.S. gpm)
5
4
3
2
1
0
13
14
15
16
17
18
19
20
21
Q (U.S. gpm)
Note: Consult factory for viscosities above 30 SSU
13
Performance Curves
SC30 SERIES
1150 RPM
H (ft)
450
400
38
350
37
300
36
250
35
200
34
150
33
100
32
50
31
0
13.0
14.0
15.0
16.0
17.0
18.0
20.0
21.0
22.0
23.0
24.0
25.0
26.0
Q (U.S. gpm)
6
38
5
P (Hp)
4
37
**Note:
Multiply
Power by
Specific
Gravity
36
35
3
34
2
1
33
32
31
0
13.0
14.0
15.0
16.0
17.0
18.0
20.0
21.0
22.0
23.0
24.0
25.0
26.0
21.0
22.0
23.0
24.0
25.0
26.0
Q (U.S. gpm)
NPSH (ft)
4.0
3.0
2.0
1.0
0
13.0
14.0
15.0
16.0
17.0
18.0
20.0
Q (U.S. gpm)
Note: Consult factory for viscosities above 30 SSU
14
Performance Curves
SC30 SERIES
1750 RPM
900
800
700
600
H (ft)
500
400
300
200
100
0
24.5
38
37
36
35
34
33
32
31
25.5
26.5
27.5
28.5
29.5
30.5
31.5
32.5
33.5
34.5
35.5
36.5
37.5
38.5
39.5
40.5
Q (U.S. gpm)
20
18
38
16
37
14
36
**Note:
Multiply
Power by
Specific
Gravity
P (Hp)
12
35
10
8
6
4
2
0
24.5
34
33
32
31
25.5
26.5
27.5
28.5
29.5
30.5
31.5
32.5
33.5
34.5
35.5
36.5
37.5
38.5
39.5
40.5
34.5
35.5
36.5
37.5
38.5
39.5
40.5
NPSH (ft)
Q (U.S. gpm)
10
8
6
4
2
0
24.5
25.5
26.5
27.5
28.5
29.5
30.5
31.5
32.5
33.5
Q (U.S. gpm)
Note: Consult factory for viscosities above 30 SSU
15
Performance Curves
SC40 SERIES
1150 RPM
400
48
350
47
300
46
H (ft)
250
45
200
44
150
43
100
42
50
41
0
28.5
29.5
30.5
31.5
32.5
33.5
34.5
35.5
36.5
37.5
38.5
39.5
40.5
41.5
42.5
Q (U.S. gpm)
P (Hp)
9
8
48
7
47
6
46
5
45
4
44
3
43
2
42
**Note:
Multiply
Power by
Specific
Gravity
41
1
0
28.5
29.5
30.5
31.5
32.5
33.5
34.5
35.5
36.5
37.5
38.5
39.5
40.5
41.5
42.5
NPSH (ft)
Q (U.S. gpm)
2.5
2.0
1.5
1.0
0.5
0.0
28.5
29.5
30.5
31.5
32.5
33.5
34.5
35.5
36.5
Q (U.S. gpm)
Note: Consult factory for viscosities above 30 SSU
16
37.5
38.5
39.5
40.5
41.5
42.5
Performance Curves
SC40 SERIES
1750 RPM
900
800
48
700
47
600
46
H (ft)
500
400
300
45
44
43
200
42
100
41
0
46.5
48.5
50.5
52.5
54.5
56.5
58.5
60.5
62.5
64.5
66.5
Q (U.S. gpm)
30
P (Hp)
28
26
24
22
48
47
20
18
16
46
14
12
10
44
**Note:
Multiply
Power by
Specific
Gravity
45
43
8
42
6
4
41
2
0
46.5
48.5
50.5
52.5
54.5
56.5
58.5
60.5
62.5
64.5
66.5
60.5
62.5
64.5
66.5
NPSH (ft)
Q (U.S. gpm)
10
8
6
4
2
0
46.5
48.5
50.5
52.5
54.5
56.5
58.5
Q (U.S. gpm)
Note: Consult factory for viscosities above 30 SSU
17
Material Specifications
PART DESCRIPTION
Suction Casing
Discharge Casing
Suction Impeller Casing
Suction Stage Casing
Discharge Stage Casing
Foot
Shaft
Impeller
Suction Impeller
Bearing Bracket
Seal Casing
Stage Casing Gasket
Bushing (Stage Casing)
Bushing (Stage Casing - K style)
Bushing (Suction Impeller Casing)
Bearing
18
STANDARD MATERIAL
OPTIONAL MATERIAL
Cast Iron ASTM A48
Ductile Iron ASTM A536
Stainless Steel ASTM A351
Cast Iron
Stainless Steel ASTM A276
Bronze
Cast Iron
Stainless Steel
Teflon
Carbon Graphite
Carbon Graphite Press Fitted into
a steel Ring
Carbon Graphite Press Fitted into
a Steel Ring with Shaft Sleeve
Deep Groove Ball Bearings
316 Stainless Steel
Steel ASTM A743
Stainless Steel ASTM A351
Bronze
Dimensional Drawings / Weights
A INLET
(MATE WITH
300-LB. ANSI FLANGES)
B OUTLET
(MATE WITH 300-LB.
ANSI FLANGES)
P
D
F
L
U
J
E
H
C
S
M
N
V
G
1.7" (43.2 mm)
(SC10 SERIES ONLY)
1.9" (48.3mm)
SERIES
SC10
SC20/SC30
SC40
SC50
SC60
A*
INLET
1-1/2
40
2-1/2
65
3
80
4
100
4
100
B*
OUTLET
3/4
20
1-1/4
32
1-1/2
40
2
50
2-1/2
65
C
F
H
J
G
N
V
E
L
D
S
U
0.39
10
0.51
13
0.59
15
0.71
18
0.79
20
6.73
171
7.91
210
7.68
195
9.33
237
10.31
262
3.94
100
4.41
112
5.20
132
6.30
160
7.09
180
3.94
100
5.20
132
5.51
140
6.50
165
7.09
180
5.51
140
6.69
170
7.68
195
8.46
215
9.65
245
4.13
105
5.31
135
6.10
155
6.69
170
7.68
195
4.45
113
5.28
134
5.59
142
6.26
159
6.77
172
0.55
14
0.75
19
0.94
24
1.10
28
1.26
32
0.55
25
1.57
40
1.77
45
1.97
50
2.56
65
5.91
150
7.28
185
7.87
200
9.25
235
9.25
235
.51
13
.55
14
.59
15
.59
15
.59
15
.20
5
.24
6
.31
8
.39
10
.39
10
1 STAGE
2 STAGES
3 STAGES
P
M
P
M
P
M
7.68
8.03 9.02 9.37 10.35 14.65
195
204
229
238
263
372
SC20/SC30 8.39
8.94 9.96 10.51 11.54 12.09
213
227
253
267
293
307
SC40
10.55 10.20 12.72 12.36 14.88 14.53
268
259
323
314
378
369
SC50
12.01 12.32 14.96 15.28 17.91 18.23
305
313
380
388
455
463
SC60
13.31 13.90 16.85 17.44 20.39 20.98
338
353
428
443
518
533
SERIES
SC10
NOTE: PUMP TURNS COUNTERCLOCKWISE WHEN VIEWED FROM
THE DRIVE END.
SC10 SERIES WILL BE EQUIPPED WITH
WELD NECK COMPANION FLANGES ON
INLET AND OUTLET.
4 STAGES
P
M
11.69 12.05
297
306
13.11 13.66
333
347
17.05 16.69
433
424
20.87 21.18
530
538
23.94 24.53
608
623
5 STAGES
P
M
13.03 13.39
331
340
14.69 15.24
373
387
19.21 18.86
488
479
23.82 24.13
605
613
27.48 28.07
698
713
6 STAGES
P
M
14.37 14.72
365
374
16.26 16.81
413
427
21.38 21.02
543
534
26.77 27.09
680
688
31.02 31.61
788
803
7 STAGES
P
M
15.71 16.06
399
408
17.83 18.39
453
467
23.54 23.19
598
589
29.72 30.04
755
763
34.57 35.16
878
893
8 STAGES
P
M
17.05 17.40
433
442
19.41 19.96
493
507
26.89 25.35
653
644
32.68 32.99
830
838
38.11 38.70
968
983
* INLET AND OUTLET FLANGES ARE PER DIN SPEC (PN40 DIN 2501).
FLANGES CAN BE DRILLED PER ANSI FOR 300-LB. FLANGES, EXCEPT FOR SC10 SERIES.
DIMENSIONS SHOWN IN GREY AREA ARE MILLIMETERS; OTHERS ARE INCHES.
19
20
Spare Parts with Exploded View
1
4
5 6
7
8
9
8
10
11
16
17
19
18
2
3
4
5
6
7
8
9
10
11
12
13
14
15
16
17
18
19
20
21
22
23
24
41
15
8
12 13 14
31
26
40
27 38 39
29
2 37
Single Balanced Seal
39 40
DESCRIPTION
SUCTION CASING PLUG
(SC10 - 1/8”; SC60 - 3/8”; SC20-SC50 - 1/4”)
TIE BOLT HEX NUT
TIE BOLT WASHER
SUCTION CASING
SUCTION IMPELLER HEX NUT
SUCTION IMPELLER LOCK WASHER
SUCTION IMPELLER
CASING GASKET
SUCTION IMPELLER CASING
BUSHING AND SLEEVE
SUCTION IMPELLER CASING
FIRST SUCTION STAGE CASING
IMPELLER
STAGE CASING BUSHING
DISCHARGE STAGE CASING
SUCTION STAGE CASING
SUCTION IMPELLER WOODRUFF KEY
STAGE IMPELLER WOODRUFF KEY
SHAFT
SHAFT DRIVE KEY
DISCHARGE CASING
TIE BOLT
DISCHARGE CASING O-RING
(USED WITH COOLING OPTION)
FOOT O-RING
(USED WITH COOLING OPTION)
DISCHARGE CASING PLUG
(NOT AVAILABLE ON SC60)
(1/4” STRAIGHT CONNECTION)
41
32 33 34 35 36
30
28
42
8
24
25
22
23
20
Double Balanced Seal
1
13 14 8
A
17
ITEM
12
21
23
46 45 44
8
42
39
ITEM
25
26
27
28
29
30
31
32
33
34
35
36
37
38
39
40
41
42
43
44
45
46
(A) Illustration Above
Contains Single
Unbalanced Seal.
Optional Seals are
Displayed Below.
Double Unbalanced Seal
40
46 45 44
43
38 39
40
DESCRIPTION
FOOT
STUD BOLT
TIE BOLT WASHER
(OPTIONAL ON SOME UNITS)
DISCHARGE CASING DRAIN PLUG
SEAL HOUSING HEX NUT
BEARING BRACKET SCREW
BEARING BRACKET
BEARING SPACER SLEEVE WITH
THROWER O-RING
ROLLER BALL BEARING
BEARING RETAINER RING
BEARING COVER PLATE
SCREW
SEAL LOCATOR RING
UNBALANCED MECHANICAL SEAL
WITH SEAT O-RING
SEAL HOUSING GASKET
SEAL HOUSING
SEAL LOCATOR AND SLEEVE
WITH SLEEVE O-RING
BALANCED MECHANICAL SEAL
WITH SEAT O-RING
SEAL LOCATOR RING
(DOUBLE UNBALANCED SEAL)
INNER UNBALANCED MECHANICAL SEAL
WITH SEAT O-RING (DOUBLE SEALS ONLY)
SEAL COLLAR WITH O-RING
(DOUBLE SEALS ONLY)
SEAL COLLAR GASKET
(DOUBLE SEALS ONLY)
21
22
Coro-Flo Turbine Pumps
Corken’s Coro-Flo product has a successful history in liquefied gas
service. For low capacity, medium head pressure requirements CoroFlo is the pump of choice. Extremely quiet and free of vibration and
pulsation, the Coro-Flo Pump provides extended trouble free service.
Where higher head pressures are required, an economical solution is
to incorporate two Coro-Flo pumps in a Duplex series pump set. In
this case both pumps may operate in winter months when higher
differential pressures are required and only one pump is used under
normal operating conditions.
The Coro-Flo pump has been designed for simplicity and service.
The cover can be removed and the impeller and seal serviced without
disturbing the piping. The balanced mechanical seal is furnished
with its own sleeve, providing extremely reliable service. The newly
offered DS/DL model seen below is designed to accept standard
NEMA C flanged motors assuring proper alignment to further
simplify installation and extend seal and bearing life.
SPECIFICATIONS
MODEL
9
10
12
13
14
Inlet
1-1/4" NPT
1-1/4" NPT
1-1/2" NPT
1-1/2" NPT
1-1/2" NPT
Outlet
1" NPT
1" NPT
1" NPT
1" NPT
1" NPT
2880
3450
2880
3450
2880
3450
2880
3450
2880
3450
135 (9.3)
150 (10.3)
150 (10.3)
150 (10.3)
150 (10.3)
150 (10.3)
150 (10.3)
150 (10.3)
RPM-50 Hz
RPM-60 Hz
Max. Differential Press.
50 Hz PSI (Bar)
135 (9.3)
60 Hz PSI (Bar)
150 (10.3)
F Model
Mounting Options
Direct Driven (101)
Yes
Yes
Yes
Yes
Yes
Direct Mounted Frame
(DS/DL)
Yes
Yes
Yes
Yes
Yes
Double Seal Option
Yes
Yes
Yes
Yes
Yes
Flange Option
1-1/2" x 1" - 300#
Yes
Yes
Yes
Yes
Yes
Impeller Material Opt.
Bronze (standard), Ductile Iron, Stainless Steel
O-ring Material Opt.:
Buna N (standard), Neoprene®, Teflon®, Viton®, Ethylene-Propylene
Seal Seat Material
Cast Iron (standard), Ni-Resist, Stainless Steel, Tungsten Carbide, Ceramic
Temperature
(min/max)
-25/225 °F
-32/107 °C
-25/225 °F
-32/107 °C
-25/225 °F
-32/107 °C
-25/225 °F
-32/107 °C
-25/225 °F
-32/107 °C
Above differential pressures are based on a 1.2 specific gravity.
DS/DL Model
23
Performance Curves
CHARACTERISTIC CURVES FOR MODELS 10, 12, 14
3450 RPM
CAPACITY
HORSEPOWER
Determine the specific gravity and the total head in feet required for
the fluid being handled. The head in feet can be calculated from the
following formula by knowing the differential pressure in PSI:
Enter the curves at the appropriate Head, read horizontally to the heavy
Capacity line, vertically down to the corresponding Horsepower line
and horizontally to read Horsepower. Multiply the Horsepower reading
by the specific gravity to calculate the Horsepower required for the
application. These curves are based on a minimum static head of 4 feet
and properly designed inlet piping.
(2.31) x (PSI)
Head In Feet = (Specific Gravity)
Enter the curves at the appropriate Head, read horizontally to
intersect the proper Capacity line and vertically down to find the
Capacity in GPM.
Note: Differential pressure must not exceed 150 psi for the Coro Flo model pumps.
700
600
16
400
14
12
300
10
8
200
6
100
MODEL 14
4
2
MODEL 10
0
MODEL 12
0
0
5
10
15
20
CAPACITY, GPM (
24
25
)
30
35
HORSEPOWER (
)
HEAD, FEET
500
Performance Curves
CHARACTERISTIC CURVES FOR MODELS 9, 13, 15
3450 RPM
CAPACITY
HORSEPOWER
Determine the specific gravity and the total head in feet required for
the fluid being handled. The head in feet can be calculated from the
following formula by knowing the differential pressure in PSI:
Enter the curves at the appropriate Head, read horizontally to the
Capacity line, vertically down to the Horsepower line and
horizontally to read Horsepower. Multiply the Horsepower reading
by the specific gravity to calculate the Horsepower required for the
application. These curves are based on a minimum static head of 4
feet and properly designed inlet piping.
(2.31) x (PSI)
Head In Feet = (Specific Gravity)
Enter the curves at the appropriate Head, read horizontally to
intersect the proper Capacity line and vertically down to find the
Capacity in GPM.
Note: Differential pressure must not exceed 150 psi for the Coro Flo model pumps.
700
600
16
400
14
12
)
300
10
8
200
6
100
HORSEPOWER (
HEAD, FEET
500
4
MODEL 13
2
MODEL 9
0
MODEL 15
0
0
5
10
15
20
CAPACITY, GPM (
25
30
35
)
25
Performance Curves
MATERIAL SPECIFICATIONS
F-MODEL
STANDARD
OPTIONAL
PART
SIZE
MATERIAL
SIZE
MATERIAL
CASE, COVER
ALL
DUCTILE IRON ASTM A536
IMPELLER
ALL
BRONZE
ALL
DUCTILE IRON 416
IMPELLER KEY
ALL
STEEL
ALL
STAINLESS STEEL
ALL
304 STAINLESS
STEEL NI-RESIST
CAST IRON CERAMIC
TUNGSTEN CARBIDE
NONE
STAINLESS STEEL
SEAL SEAT
ALL
CAST IRON
SEAL ROTOR
ALL
CARBON
NONE
SEAL METAL PARTS
ALL
STEEL
SEAL SLEEVE
ALL
ALUMINUM
NONE
SEAL FOLLOWER
ALL
ALUMINUM
ALL
416 STAINLESS STEEL
SEAL HOUSING
ALL
STEEL, CADMIUM PLATED
ALL
416 STAINLESS STEEL
SHAFT
F-MODELS
“STRESS PROOF” STEEL
F-MODELS
FRAME
F-MODELS
GRAY IRON ASTM A48, CLASS 30
BEARING CAP
F-MODELS
ALUMINUM
NONE
BUNA-N
PTFE, VITON*, NEOPRENE*,
ETHYLENE-PROPYLENE
ALL
416 STAINLESS STEEL
416 STAINLESS STEEL
NONE
O-RINGS
ALL
ALL
RETAINER RINGS
F-MODELS
STEEL
NONE
BEARINGS
ALL
BALL
NONE
*Viton and Neoprene are registered trademarks of Dupont
DS/DL MODEL
STANDARD
OPTIONAL
PART
SIZE
MATERIAL
SIZE
MATERIAL
CASE, COVER
IMPELLER
ALL
ALL
DUCTILE IRON ASTM A536
BRONZE
ALL
NONE
DUCTILE IRON 416
STAINLESS STEEL
IMPELLER KEY
ALL
STEEL
ALL
STAINLESS STEEL
ALL
304 STAINLESS
STEEL NI-RESIST
CAST IRON CERAMIC
TUNGSTEN CARBIDE
SEAL SEAT
ALL
CAST IRON
SEAL ROTOR
ALL
CARBON
NONE
SEAL METAL PARTS
ALL
STEEL
SEAL SLEEVE
ALL
ALUMINUM
SEAL FOLLOWER
ALL
ALUMINUM
ALL
416 STAINLESS STEEL
SEAL HOUSING
ALL
STEEL, CADMIUM PLATED
ALL
416 STAINLESS STEEL
SHAFT
F-MODELS
“STRESS PROOF” STEEL
F-MODELS
416 STAINLESS STEEL
ALL
PTFE, VITON*, NEOPRENE*,
ETHYLENE-PROPYLENE
O-RINGS
ALL
BUNA-N
BEARINGS
ALL
BALL
NONE
ALL
416 STAINLESS STEEL
NONE
*Viton and Neoprene are registered trademarks of Dupont
26
Dimensional Drawings / Weights
FRAME-MOUNTED
OUTLINE DIMENSIONS
27
Dimensional Drawings / Weights
DIRECT-MOUNTED OUTLINE DIMENSIONS
SMALL MOTOR FRAME 56C-145TC
28
Dimensional Drawings / Weights
DIRECT-MOUNTED OUTLINE DIMENSIONS
LARGE MOTOR FRAME 182TC-215TC
29
Duplex Unit
Note: Consult factory for piping and valve recommendations for a duplex setup.
30
Spare Parts with Exploded View
PARTS DETAILS CORO-FLO PUMPS
MODELS F9 TO F15, FF9 TO FF15
CAUTION: ALWAYS RELIEVE PRESSURE IN THE
UNIT BEFORE ATTEMPTING ANY REPAIRS.
REF.
NO.
1.
2.
(a) 3.
(a)
(a) 4.
(a)
5.
6.
7.
PART
NO.
7001-031NC100A
1001-09
1001-0
1001-2
1001-3
1001-4
1001-5
1014
1014-1
2-246
2-247E
1003-09
1003-091
1003-092
1003-0
1003-01
1003-02
1003-2
1003-21
1003-22
1003-3
1003-31
1003-32
1003-4
1003-41
1003-42
1003-5
1003-51
1003-52
113CX
1004-1X
1004-11X
1004-2X
1004-21X
8.
1013
1013-1
PART NAME
HEX HEAD CAP SCREW
COVER (MODEL 9)
COVER (MODEL 10)
COVER (MODEL 12)
COVER (MODEL 13)
COVER (MODEL 14)
COVER (MODEL 15)
CASE CLEARANCE SHIM (.002” RED)
CASE CLEARANCE SHIM (.003” GREEN)
O-RING (CASE) (EXCEPT TFE)
O-RING (CASE) (TFE)
IMPELLER BRASS
IMPELLER IRON (MODEL 9)
IMPELLER STAINLESS STEEL
IMPELLER BRASS
IMPELLER IRON (MODEL 10)
IMPELLER STAINLESS STEEL
IMPELLER BRASS
IMPELLER IRON (MODEL 12)
IMPELLER STAINLESS STEEL
IMPELLER BRASS
IMPELLER IRON (MODEL 13)
IMPELLER STAINLESS STEEL
IMPELLER BRASS
IMPELLER IRON (MODEL 14)
IMPELLER STAINLESS STEEL
IMPELLER BRASS
IMPELLER IRON (MODEL 15)
IMPELLER STAINLESS STEEL
SEAL ASSEMBLY
SEAL HOUSING, STEEL (EXCEPT TFE O-RINGS)
SEAL HOUSING, STAINLESS STEEL
(EXCEPT TFE O-RINGS)
SEAL HOUSING, STEEL (FOR TFE O-RINGS ONLY)
SEAL HOUSING, STAINLESS STEEL
(FOR TFE O-RINGS ONLY)
HOUSING ADJ. SHIM (.010)
HOUSING ADJ. SHIM (.020)
QTY.
8
1
1
1
1
1
1
As Req.
As Req.
1
1
REF.
NO.
PART
NO.
PART NAME
(a) 9.
10.
11.
12.
2-224
3442
3444
1002-09
1002-0
1002-2
1002-3
1002-4
1002-5
4206-09
4206-0
4206-2
4206-3
4206-4
4206-5
1914-1
7012-006SF025E
5002-281
1238
1006
5102-118
2758
5000-281
2497
2497-1
1234
1234-1
3226
2759
1010-2
7002-037NC087A
2158
2159
O-RING (HOUSING)
PIPE PLUG 1/4” NPT
PIPE PLUG 3/4” NPT
CASE (MODEL 9)
CASE (MODEL 10)
CASE (MODEL 12)
CASE (MODEL 13)
CASE (MODEL 14)
CASE (MODEL 15)
CASE ANSI FLANGED (MODEL 9)
CASE ANSI FLANGED (MODEL 10)
CASE ANSI FLANGED (MODEL 12)
CASE ANSI FLANGED (MODEL 13)
CASE ANSI FLANGED (MODEL 14)
CASE ANSI FLANGED (MODEL 15)
NAMEPLATE
PHILLIP HD. 6-32 X 1/4”
BEARING RETAINER RING
BEARING CAP
GREASE SEAL
BEARING RETAINER RING
BALL BEARING (Was 55605)
BEARING RETAINER RING
#5 WOODRUFF KEY STEEL
#5 WOODRUFF KEY STAINLESS STEEL
SHAFT
SHAFT STAINLESS STEEL
KEY
BALL BEARING (Was 77506)
FRAME
SOC HEAD SCREW
GREASE ZERK
LUBRICAP
1
1
13.
14.
15.
16.
17.
18.
19.
20.
21.
1
1
1
22.
1
23.
24.
25.
26.
27.
28.
1
1
1
1
1
As Req.
As Req.
QTY.
1
1
1
1
1
1
1
1
1
1
1
1
1
1
1
1
2
1
1
1
1
1
1
1
1
1
1
1
1
1
4
2
2
NOTE:
(a)
Included with Seal Assy 113-CX. See Page F202. For Seal and O-Ring Material Coding
See Page A500.
31
Spare Parts with Exploded View
PARTS DETAILS CORO-FLO PUMPS
MODELS DS & DL
CAUTION: ALWAYS RELIEVE PRESSURE IN THE
UNIT BEFORE ATTEMPTING ANY REPAIRS.
REF.
NO.
1.
2.
(a) 3.
(a)
(a) 4.
(a)
5.
(a) 6.
7.
8.
PART
NO.
7001-031NC100A
1001-09
1001-0
1001-2
1001-3
1001-4
1001-5
1014
1014-1
2-246
2-247E
1003-09
1003-091
1003-092
1003-0
1003-01
1003-02
1003-2
1003-21
1003-22
1003-3
1003-31
1003-32
1003-4
1003-41
1003-42
1003-5
1003-51
1003-52
1009
113CX
1004-1X
1004-11X
PART NAME
HEX HEAD CAP SCREW
COVER (MODEL 9)
COVER (MODEL 10)
COVER (MODEL 12)
COVER (MODEL 13)
COVER (MODEL 14)
COVER (MODEL 15)
CASE CLEARANCE SHIM (.002” RED)
CASE CLEARANCE SHIM (.003” GREEN)
O-RING (CASE) (EXCEPT TFE)
O-RING (CASE) (TFE)
IMPELLER BRASS
IMPELLER IRON (MODEL 9)
IMPELLER STAINLESS STEEL
IMPELLER BRASS
IMPELLER IRON (MODEL 10)
IMPELLER STAINLESS STEEL
IMPELLER BRASS
IMPELLER IRON (MODEL 12)
IMPELLER STAINLESS STEEL
IMPELLER BRASS
IMPELLER IRON (MODEL 13)
IMPELLER STAINLESS STEEL
IMPELLER BRASS
IMPELLER IRON (MODEL 14)
IMPELLER STAINLESS STEEL
IMPELLER BRASS
IMPELLER IRON (MODEL 15)
IMPELLER STAINLESS STEEL
SEAL PIN
SEAL ASSEMBLY
SEAL HOUSING, STEEL (EXCEPT TFE O-RINGS)
SEAL HOUSING, STAINLESS STEEL
(EXCEPT TFE O-RINGS)
QTY.
8
1
1
1
1
1
1
As Req.
As Req.
1
1
1
1
1
1
1
1
1
1
1
1
REF.
NO.
PART
NO.
1004-2X
1004-21X
9.
1013
1013-1
(a)10. 2-224
11. 3442
12. 3444
13. 1002-09
1002-0
1002-2
1002-3
1002-4
1002-5
14. 1914-1
15. 7012-006SF025E
16. 7001-037NC100A
17. 2158
17a. 2159
18. 4298
4308
19. 5000-281
20. 4378
21. 3226
22. 4303
23. 2497
2497-1
24. 2758
25. 5102-118
26. 1006
27. 1238
28. 5002-281
PART NAME
SEAL HOUSING, STEEL
(FOR TFE O-RINGS ONLY)
SEAL HOUSING, STAINLESS STEEL
(FOR TFE O-RINGS ONLY)
HOUSING ADJ. SHIM (.010)
HOUSING ADJ. SHIM (.020)
O-RING (HOUSING)
PIPE PLUG 1/4” NPT
PIPE PLUG 3/4” NPT
CASE (MODEL 9)
CASE (MODEL 10)
CASE (MODEL 12)
CASE (MODEL 13)
CASE (MODEL 14)
CASE (MODEL 15)
NAMEPLATE
PHILLIP HD. 6-32 X 1/4”
PUMP HEX. HD. MOUNTING BOLTS
GREASE ZERK 1/8” NPT
LUBRICAP
MOUNTING FRAME - DL
MOUNTING FRAME - DS
RETAINER RING
BEARING
KEY
SHAFT
#5 WOODRUFF KEY STEEL
#5 WOODRUFF KEY STAINLESS STEEL
BEARING
RETAINER RING
GREASE SEAL
BEARING CAP
RETAINER RING
NOTE:
(a)
32
Included with Seal Assy 113-CX.
QTY.
1
1
As Req.
As Req.
1
1
1
1
1
1
1
1
1
2
4
2
2
1
1
1
1
1
1
1
1
1
1
1
1
Technical Service Manual
CORO-FLO® SERIES
DS/DL MODEL
Warning: (1) Periodic inspection and maintenance of Corken products is essential. (2) Inspection, maintenance and installation of Corken products must be made only by
experienced, trained and qualified personnel. (3) Maintenance, use and installation of Corken products must comply with Corken instructions, applicable laws and safety
standards (such as NFPA Pamphlet 58 for LP-Gas and ANSI K61. 1-1972 for Anhydrous Ammonia). (4) Transfer of toxic, dangerous, flammable or explosive substances
using Corken products is at user’s risk and equipment should be operated only by qualified personnel according to applicable laws and safety standards.
33
34
Technical Service Manual / Coro-Flo®
TABLE OF CONTENTS
PRINCIPLES OF THE CORKEN CORO-FLO® PUMP . . . . . . . . . . . . . . . . . . . . . . . . . . . . . . . . . . . . . 36
EXCLUSIVE FEATURES OF YOUR CORKEN CORO-FLO® PUMP . . . . . . . . . . . . . . . . . . . . . . . . . . 36
INSTALLATION OF YOUR CORKEN CORO-FLO® PUMP . . . . . . . . . . . . . . . . . . . . . . . . . . . . . . . . . 36
Inlet Piping Should Include the Following . . . . . . . . . . . . . . . . . . . . . . . . . . . . . . . . . . . . . . . . . . . . . . . . . . . . . . . . . . . . . . . . . . 37
Outlet Piping Should Include the Following . . . . . . . . . . . . . . . . . . . . . . . . . . . . . . . . . . . . . . . . . . . . . . . . . . . . . . . . . . . . . . . . . 37
By-Pass System Must Include the Following . . . . . . . . . . . . . . . . . . . . . . . . . . . . . . . . . . . . . . . . . . . . . . . . . . . . . . . . . . . . . . . . 37
Pump Foundation F-Models . . . . . . . . . . . . . . . . . . . . . . . . . . . . . . . . . . . . . . . . . . . . . . . . . . . . . . . . . . . . . . . . . . . . . . . . . . . . . 37
Level Base . . . . . . . . . . . . . . . . . . . . . . . . . . . . . . . . . . . . . . . . . . . . . . . . . . . . . . . . . . . . . . . . . . . . . . . . . . . . . . . . . . . . . . . . . . 38
Coupling Alignment F-Models . . . . . . . . . . . . . . . . . . . . . . . . . . . . . . . . . . . . . . . . . . . . . . . . . . . . . . . . . . . . . . . . . . . . . . . . . . . 38
Back-Up Wrench . . . . . . . . . . . . . . . . . . . . . . . . . . . . . . . . . . . . . . . . . . . . . . . . . . . . . . . . . . . . . . . . . . . . . . . . . . . . . . . . . . . . . 38
Driver Installation . . . . . . . . . . . . . . . . . . . . . . . . . . . . . . . . . . . . . . . . . . . . . . . . . . . . . . . . . . . . . . . . . . . . . . . . . . . . . . . . . . . . 38
COMMON INSTALLATION . . . . . . . . . . . . . . . . . . . . . . . . . . . . . . . . . . . . . . . . . . . . . . . . . . . . . . . . . 39
OPERATION OF YOUR CORO-FLO® PUMP . . . . . . . . . . . . . . . . . . . . . . . . . . . . . . . . . . . . . . . . . . . . 40
CARE OF YOUR CORO-FLO® PUMP. . . . . . . . . . . . . . . . . . . . . . . . . . . . . . . . . . . . . . . . . . . . . . . . . . 40
REPAIR SERVICE ON YOUR CORO-FLO® PUMP. . . . . . . . . . . . . . . . . . . . . . . . . . . . . . . . . . . . . . . . 40
35
Technical Service Manual / Coro-Flo®
PRINCIPLES OF THE CORKEN CORO-FLO® PUMP
The CORKEN Coro-Flo Pump is a special type of pump known as
a turbine or regenerative pump. The liquid flows into the inlet nozzle
and into the passageway on each side of an impeller (the rotating
element) and is recirculated constantly between the vanes or teeth of
the impeller and this passageway as the impeller rotates. The fluid
makes a complete revolution in the pump case and is diverted out the
outlet nozzle. The horsepower required to drive the pump increases
as the differential pressure increases, but the capacity decreases at
the same time. (Differential pressure is the difference between the
pressure at the inlet of the pump and at the outlet of the pump.)
The impeller is the only moving part and has no contact with the
casing. Consequently, practically no wear occurs to the impeller,
even when pumping volatile liquids such as LP-gas or ammonia
which have no lubricating qualities.
EXCLUSIVE FEATURES OF YOUR CORKEN
CORO-FLO® PUMP
The pumping of volatile liquids is one of the most difficult of all
pumping jobs. Unlike other pumping operations, more attention
must be given to the design, manufacture installation and operation
of the pump.
In addition to being a pump type especially suited for handling
volatile liquids, your CORO-FLO PUMP has a number of features
which help to make it more easily operated and maintained.
The CORO-FLO PUMPS of this series are manufactured with their
own frame for connection to a separate driver by means of a flexible
coupling. The frame pumps are available in the F- and DS/DLmodels with the following pump sizes: 9, 10, 12, 13, 14 and 15.
UNDERWRITERS' LABORATORIES, INC. have tested and
inspected the CORO-FLO PUMPS of this series and have listed them
for use in the handling of LP-gas and ammonia fluids. The nameplate
on the pump shows the UL label.
DUCTILE IRON, the metal with the strength of steel, has been
used in the manufacture of this pump for parts under pressure
of the liquid.
THE IMPELLER floats on a shaft and may be replaced easily
without disturbing the piping or driver by simply removing the cover.
No special tools are needed.
THE MECHANICAL SEAL ASSEMBLY may be replaced easily by
removing the cover and the impeller, and without disturbing the
piping or driver. No special tools are needed.
THE PUMP NOZZLES MAY BE ROTATED into four different
positions, 90 degrees apart, if desired.
36
A BYPASS CONNECTION, 3/4" pipe thread, has been located on
the outlet nozzle to make the piping of the pump more simple.
PRESSURE GAUGE CONNECTIONS, 1/4" pipe thread, have been
located on the outlet nozzle.
INSTALLATION OF YOUR CORKEN
CORO-FLO® PUMP
THE INSTALLATION OF A CORO-FLO PUMP is a simple matter.
However, in order for the pump to deliver the performance you
expect, the principles discussed in this book must be followed
exactly. The piping details are furnished to illustrate methods proved
by hundreds of installations. Your own needs may require some slight
variations, but they must be slight, and no compromise made.
For more detailed piping arrangements, request Engineering Data
book Z400. For a discussion of pumping from underground tanks see
Corken Engineering Bulletin #6.
IF IT IS DESIRABLE TO ROTATE THE NOZZLES of the pump to
a new position, remove the four cap screws connecting the pump case
to the frame. Be careful to do this without moving the case away from
the frame; otherwise, the mechanical seal may be damaged.
NO PUMP CAN DISCHARGE MORE LIQUID THAN IT
RECEIVES, so the location and the inlet piping must be given
careful attention. If the inlet piping is inadequate to supply the
demand of the pump, you may expect trouble!
THE PUMP MUST BE LOCATED AS NEAR THE STORAGE
TANK as possible. The complete inlet line, including the vertical line
from the tank must not exceed 12 feet in length. The bottom of the
tank must be at least two feet above the pump inlet nozzle, and four
feet should be considered standard.
Technical Service Manual / Coro-Flo®
THE INLET SHOULD INCLUDE THE FOLLOWING:
1. The tank excess flow valve should have a flow rate of 1-1/2 to 2
times the capacity of the pump. Do not use an EVF without
knowing its flow capacity.
2. The tank shutoff valve should be an angle valve or a free flow
type – not a standard globe valve.
3. A strainer of the "Y" type, with 1/16" mesh screen, must be on
the inlet line of the pump. For simpler inlet lines use a Corken
1836-X1 Right Angle Strainer to replace an elbow and "Y"
strainer.
4. A flexible connection should be used on the pump inlet or outlet
to care for piping strains.
5. Unions must be installed near the pump inlet and outlet nozzles.
6. An eccentric swage should be used at the pump inlet nozzle to
change line size (flat side up.)
7. The inlet line must be level or slope downward to the pump.
8. The minimum inlet piping sizes must be observed.
vapor section of the storage tank. The tank fitting must be either
an excess flow valve or a vapor return valve; it should never be
a filler valve or a back check valve.
PUMP FOUNDATION F-MODELS
Every pump deserves a firm, neat concrete foundation. There are
many ways to construct a foundation, and the example in Figure 3 is
only a suggestion. The important features are to make the foundation
level, and deep enough to get below the frost line for your locality.
THE OUTLET PIPING SHOULD
INCLUDE THE FOLLOWING:
1. A pressure gauge should be installed in the opening provided on
the outlet nozzle or in the outlet piping near the pump. This
pressure gauge will tell you the complete story of the operation
inside your pump. Be sure you have one installed.
2. A hydrostatic relief valve is required to be installed in the outlet
piping.
3. If the outlet piping exceeds 50 feet in length, a check valve
should be installed near the pump outlet.
Figure 3
THE BYPASS SYSTEM MUST INCLUDE
THE FOLLOWING:
1. The pump bypass system must be installed. Without this system,
the pump has little chance of performing.
2. A CORKEN B166 BYPASS VALVE (a special valve to vent the
pump of vapors and to act as a differential relief valve) makes
the ideal installation.
3. The bypass line must rise uninterrupted to an opening in the
37
Technical Service Manual / Coro Flo®
LEVEL BASE
DRIVER INSTALLATION
After the concrete has set, check the pump base for level. Drive metal
shims under the base near the anchor bolts as below. Tighten anchor
bolts and recheck the base for level.
THE WIRING OF YOUR ELECTRIC MOTOR is extremely
important and must be done by a competent electrical contractor.
Figure 4
COUPLING ALIGNMENT F-MODELS
The coupling alignment must be near perfect to give quiet, long-life
service to the pump and driver. The pump and driver shafts are
carefully aligned at the factory but always should be checked after
the pump is installed and before the initial operation.
Lay a straight edge across coupling halves, top, and side; both
positions must line up to be correct.
If misalignment exists, adjust the shims between the pump base and
the foundation until exact alignment is accomplished.
Figure 5
BACK-UP WRENCH
To keep from breaking the pump nozzle or springing the pump out
of alignment, always use a back-up wrench as shown in Figure 6.
Use the proper wrench size, and be sure the pipe threads are clean
and well doped with the proper thread seal for the service. Avoid
using excessive dope, for it may enter the pump and damage the
mechanical seal.
Figure 6
38
Improper motor wiring will cause you to experience expensive motor
difficulties from low voltage. If you suspect you have low voltage,
call your power company. Connecting your motor for the voltage you
have available is important too. Be sure your motor is connected to
the proper voltage. Connecting to improper voltage will completely
destroy your motor.
In explosion-proof motor applications in humid climates, the normal
breathing and alternating temperatures of the motor (warm during
operation and cold when stopped) will often cause moist air to be
drawn into the motor housing. This moist air will condense and may
eventually add enough free water to the inside of the motor to cause
it to fail. To prevent this, make a practice of running the motor and
pump at least once a week on a bright, dry day for an hour or so
(pump through the bypass system). During this time, the motor will
heat up and vaporize the condensed moisture. No motor
manufacturer will guarantee his explosion-proof or totally enclosed
motor against damage from moisture.
ENGINE DRIVERS pose a special consideration. The
manufacturer's instructions must be followed. When the COROFLO PUMP is equipped with an engine from the factory, the engine
speed should normally not exceed 3600 rpm. Excessive engine speed
will overload the engine and cause early failure. The engine loses 3%
of its power for every 1000 feet above sea level, so if your installation
is at a higher altitude than normal, consult the factory.
Technical Service Manual / Coro-Flo®
COMMON INSTALLATION
23
VAPOR LINE FROM METER
VAPOR ELIMINATOR OR
METER BACK PRESSURE VALVE
24A
24
21
22
25
20
18
19
1
2A 2
3
17
13A
13
12
4’ - 0”
RECOMMENDED
DISTANCE
18
11
15 14
10
26
11
4
5
6
8
9
5A
7
9A
16
Item
No.
IF DISCHARGE LINE
IS OVER 50 FEET
LONG, INSTALL A
CHECK VALVE
BETWEEN VALVE 15
AND TEE 16.
1
2
2A
3
4
5
5A
6
7
8
9
9A
10
11
12
13
13A
14
15
16
17
18
19
20
21
22
23
24
24A
25
26
Description
Size of Fitting in Inches
Model
C10
F9, F10
Model
C12, C13
F12, F13
Model
C14
F14
1-1/4
1-1/4
--1-1/4
1-1/4
1-1/4
--1-1/4
1-1/4
1-1/4
1-1/4
--1
1
1
1 x 3/4
--1 x 1/2
1/2
1
3/4
3/4
3/4
3/4
--3/4
3/4
3/4
--3/4
1/4
2
--2 x 1-1/2
1-1/2
1-1/2
1-1/4
1-1/2 x 1-1/4
1-1/2
1-1/2
1-1/2
1-1/2
--1
1
1
1 x 3/4
--1 x 1/2
1/2
1
3/4
3/4
3/4
3/4
--3/4
3/4
3/4
--3/4
1/4
2
2
--2
2
2
--2
2
2
--2 x 1-1/2
1
1
1
--1
1 x 1/2
1/2
1
1
1
1
1
1 x 3/4
3/4
1
--1 x 3/4
3/4
1/4
Excess Flow Valve
Nipple
Swage Nipple
Shutoff Valve
Tee
Double Check Filler Valve
Bushing
Strainer with 1/16 Mesh Screen
Flexible Hose Connection with Male Hose Connection
Union
Nipple
Swage Nipple
Union
Tee
Shutoff Valve
Swage Nipple
Nipple
Bushing
Hydrostatic Relief
Ell
Corken Bypass Valve B-166
Ell
Union
Tee
Swage Nipple
Vapor Return Valve
Angle Valve
Nipple
Swage Nipple
Excess Flow Valve
Pressure Gauge with 1/4” x 2” Nipple and 1/4” 90° Ell
39
Technical Service Manual / Coro Flo®
OPERATION OF YOUR CORO-FLO® PUMP
REPAIR SERVICE ON YOUR CORO-FLO® PUMP
The following steps should be performed for the initial pumping
operation:
After a long service life, repairs are limited to replacing the impeller
or mechanical seal.
1.
2.
3.
4.
The only wearing part influencing the pumping action is the impeller,
so we suggest the pump be given an "efficiency" test before any
attempt is made to repair it. The trouble may lie in the piping system
rather than in the pump. If the pump will still produce as much
differential pressure when circulating through the bypass system as
it did when new, you may be sure your problem is elsewhere. If the
pump does not produce as much pressure as it did originally, remove
the cover and inspect the impeller. If visual inspection indicates the
impeller is in good condition, remove the thin shim gasket and
replace the cover. Many times this procedure will adjust for slight
Impeller wear. If the Impeller is badly damaged, it must be replaced.
Close the shutoff valve on the end of the delivery hose.
Open the storage tank bottom shutoff valve.
Open the storage tank shutoff valve of the bypass system.
Check the motor for the proper voltage. (See instructions under
driver installation.)
5. Start the pump and circulate liquid through the bypass system.
6. Adjust the B166 bypass valve by turning the adjusting screw out
until the pump pressure gauge shows nearly the same pressure it
did before you started the pump. Screw the adjusting screw in
until the pressure gauge indicates the pump is starting to lose
discharge pressure (you will know this by the rapid fluctuating
of the pointer); then back the adjusting screw out a turn or two
until the pressure gauge again indicates a steady pressure. Lock
the lock nut, and permit the pump to circulate liquid for a half
hour or more. If the motor overload protection device stops the
motor during this period, this indicates the bypass system valve
is set too high and should be readjusted by turning the adjusting
screw out until the motor will run for this period.
CARE OF YOUR CORO-FLO® PUMP
The only maintenance necessary on this pump is to lubricate the
bearings about once every six months. The Bearings have been
lubricated at the factory for the initial operation.
LUBRICATION FOR MODELS F9, F10, F12, F13, F14, F15,
DS/DL 9, 10, 12, 13, 14, AND 15
There are two bearings on the pump frame of these models that
require lubrication. In addition, if the pump is driven by a motor there
may be two bearings on the motor to lubricate at the same time you
lubricate the pump bearings. If the driver is an engine, follow the
engine manufacturer's instructions.
LUBRICATING BALL BEARING IS SIMPLE. Use only Ball
Bearing Grease – nothing else will do. Remove the plug or fitting
over the bearing, add a small amount of grease, and run the pump
and driver for several minutes with the plug removed. The bearings
will pump out the excess grease. Replace the plug.
40
REPLACING THE IMPELLER is a matter of removing the cover
and removing the old impeller from the shaft. If the old impeller is
tight on the shaft, threaded bolt holes are provided in the impeller to
use for pulling. The new impeller must be a good slip fit on the shaft;
it should "float" on the shaft, so it may be necessary to sand the shaft
lightly to get the proper fit.
REPLACING THE MECHANICAL SEAL is a simple matter, and
replacement parts are immediately available. Clear instructions are
furnished with the replacement seal assembly for its installation.
Technical Service Manual
SEAL REPLACEMENT
Warning: (1) Periodic inspection and maintenance of Corken products is essential. (2) Inspection, maintenance and installation of Corken products must be made only by
experienced, trained and qualified personnel. (3) Maintenance, use and installation of Corken products must comply with Corken instructions, applicable laws and safety
standards (such as NFPA Pamphlet 58 for LP-Gas and ANSI K61. 1-1972 for Anhydrous Ammonia). (4) Transfer of toxic, dangerous, flammable or explosive substances
using Corken products is at user’s risk and equipment should be operated only by qualified personnel according to applicable laws and safety standards.
41
Technical Service Manual / Seal Replacement
CAUTION
Bleed all pressure from the pump and piping before starting to install your seal assembly.
CLEANLINESS
Even the smallest amount of dirt on your new seal can cause early failure. Keep all parts, tools and your hands clean while installing the
seal. Never touch the smooth lapped faces of the carbon rotor or seal seat. For LP-gas, anhydrous ammonia and similar liquids, you are
trying to seal a fluid that is 5 to 10 times thinner than water! Your new seal needs every chance it can get, so keep it clean.
1. Remove the cover cap screws and
remove the cover from the case. If the
cover is stuck, use two cover screws in
the threaded holes to loosen it.
3. Remove the impeller key (No. 14; Figure
1) with side cutters or by tapping with a
punch, forcing the key up and out of its
slot. Take care not to damage the shaft.
2. Remove the impeller. It should slide
freely, but if it is stuck use two cover cap
screws in the threaded holes provided
and pry off carefully. Care must be taken
not to warp the impeller or damage the
case o-ring groove.
4. Remove the three seal clamp ring screws
(No. 1) and remove the seal clamp ring
(No. 2). Using a screw driver, press
against the seal sleeve (No. 5) and
remove the seal drive pin (No. 15).
42
5. Remove the pump nameplate. Through
the exposed holes in the case, engage a
screw driver in the grooves on the seal
housing (No. 12) and pry the housing
and seal sleeve from the pump chamber.
Be sure to keep all of the shims (No. 13)
with the housing so they will not be bent
or lost.
6. Carefully tap the old seal seat (No. 10)
out of the seal housing. Do not damage
the interior of the housing.
Technical Service Manual / Seal Replacement
around the keyway. Replace all the
shims (No. 13) on the seal housing (No.
12) and apply a light coat of oil to the
outside surfaces. Reinstall the seal
housing (No. 12) into the pump case.
7. Clean the seal housing (No. 12) and
apply a light coat of oil on the inside
surfaces. Remove the new seal seat (No.
10) from its package and oil the seal seat
o-ring (No. 11). Wipe the smooth lapped
face clean, being very careful not to
scratch it or leave any fingerprints on it.
Insert the seal seat with the notch
pointing down and in line with the
locator pin in the back of the seal
housing (No. 12). Place the small round
piece of cardboard found in the seal
package (being sure it is very clean) on
the seal seat face. Use a hammer handle
with cardboard disc to push the seal seat
(No. 10) into place. Check to make sure
the locator pin is in the seal seat notch.
10. Align the notches in the seal sleeve
(No. 5) and the follower ring (No. 3)
with the small hole in the shaft. With
a screw driver push the seal sleeve (No.
5) and the follower ring (No. 3) back in
order to drop a new drive pin (No. 15)
into the hole in the shaft. Install the
clamp ring (No. 2).
11. Install the new impeller key (No. 14) by
using pliers to squeeze the key in to the
keyway slot. A small piece of cardboard
should be used as a pad between the
pliers and the shaft. The impeller must
slide on the shaft very freely. If it is
tight, carefully remove any burrs from
the keyway or key with a small file. Be
certain to clean all filings off of the
impeller before reinstalling.
9. Carefully unwrap the remainder of your
seal assembly, which includes the new
retainer shell (No. 6), carbon rotor ( No.
9) and seal sleeve assembly (No. 5).
Carefully wipe the carbon rotor clean
with a soft cloth, being sure that it is not
scratched. Apply a tin coat of oil to the
carbon face and the o-ring behind the
carbon. Slide the entire assembly in
place on the shaft. Oil and insert the
follower o-ring (No. 4) and the follower
ring (No. 3). Make certain the follower
ring is pointing out.
12. Replace the cover o-ring or any shims
which may have been damaged during
removal. To obtain proper clearance,
remove shims one at a time until binding
is noted, then reinstall one shim.
8. Using a knife, remove the old seal
housing o-ring groove and install a new
o-ring after applying a thin coat of oil.
Clean the shaft and remove any burrs
13. Replace the cover and nameplate and
check to see if the pump will spin freely.
If at all possible, pressurize the pump
case with vapor first. After the pump has
been pressurized with vapor, then allow
liquid to slowly enter the pump.
43
Technical Service Manual / Seal Replacement
NOTE: These numbers are for general reference only and should not be used when
ordering parts. Consult your Service Manual, Section F, for the correct part numbers for
your pump model.
44
Ref.
No.
Part Name
1
2
3
4
5
6
7
8
9
10
11
12
13
14
15
16
Clamp Ring Screws
Seal Clamp Ring
Follower Ring
Follower O-ring
Seal Sleeve Assembly
Retainer
Disc
Rotor O-ring
Rotor
Seal Seat
Seat O-ring
Seal Housing
Housing Adjustment Shim
Impeller Key
Drive Pin
Seal Housing O-ring
Bulk Transfer of Foam Blowing Agents
HIGHER FLOWS / BULK TRANSFER NEEDS
Although our niche focus is specific to low flow / high head applications, Corken’s dynamic product offering covers a broad range of
hydraulic conditions. Corken’s Rotary Vane Pump product as well as high flow Side Channel product is specifically designed for high
volume bulk transfer of liquefied gases and thin, non-lubricating liquids. We invite you to visit our web sight at www.corken.com, which
provides more information on our entire product offering.
500
1155
450
1040
400
924
350
809
300
693
250
578
HEAD (FEET)
PRESSURE DIFFERENTIAL (PSID)*
FLOW VS. PRESSURE
SIDE CHANNEL
462
200
SSV
175
404
150
347
125
289
100
231
173
75
CORO - FLO
CORO - VANE
50
116
25
58
0
20
40
60
80
100
120
140
160
180
200
400
CAPACITY (GPM)
45
Common Blowing Agent Liquid List
FLUOROCARBONS
HCFC 141b
HCFC 142b
HCFC 22
HFC 245 FA
HFC 134 A
HFC 152 A
HYDROCARBONS
Isopentane
Cyclopentane
Pentane
Butane
Isobutane
CO2
46
Application Data Sheet
Company Name and Location
Submitted by
Date
Phone Number
FAX Number
PUMP
Liquid
Specific Gravity
Discharge Pressure
Inlet Temperature
Differential Pressure
Viscosity
Flow Rate
NPSHA
Power Available
PSIG
°F
PSIG
GPM, M3/hr, LPM
Phase
Hz
Voltage
APPLICATION SUMMARY
NOTES
End Use
End User
47
48
System Recommendations
PIPING
49
System Recommendations
PIPING
THE APPLICATION OF PUMPS TO LIQUEFIED GAS TRANSFER
Of the many hundreds of pump manufacturers in the United States,
only a handful recommend their equipment for transferring liquefied
gases. There are various reasons for this, but the basic problem has
to do with the nature of a liquefied gas. The specific peculiarity of
a liquefied gas is that a liquefied gas is normally stored at its boiling
point ... exactly at its boiling point! This means that any reduction in
pressure, regardless of how slight, or any increase in temperature, no
matter how small, causes the liquid to start to boil. If either of these
things happen in the inlet piping coming to the pump, the pump
performance is severely affected. Pump capacity can be drastically
reduced, the pump can be subjected to severe wear and the
mechanical seal and the pump may run completely dry, causing
dangerous wear and leakage.
Although we cannot change the nature of the liquefied gas, there are
many things we can and must do to design an acceptable liquefied
gas pumping system.
Many of these design hints are incorporated in the accompanying
illustrations. You will note that each drawing is over-simplified and
illustrates just one principle. Normal fittings, strainers, unions, flex
lines, valves, etc. have been ignored so that just that portion of the
piping which applies to the problem is shown. Do not pipe a plant
from these incomplete illustrations! You should also note that all of
these rules can be violated to a degree and still have a workable
pumping system. You may see several places where your plant is at
variance from some of these. However, you should be aware that
every violation is reducing your pumping efficiency and increasing
your pump maintenance cost. The principles apply to all makes and
styles of liquefied gas pumps ... rotary positive displacement,
regenerative turbine or even centrifugal types.
This booklet is used in Corken Training Schools. Corken cooperates
with gas marketers, trade associations and other groups to conduct
complete training schools for persons involved in the transfer of
liquefied gases. These presentations include product information,
safety, plant design and equipment service / maintenance. Other
information is available in various sections of your Corken Catalog.
Warning: (1) Periodic inspection and maintenance of Corken products is essential. (2) Inspection, maintenance and installation of Corken products must be made only by
experienced, trained and qualified personnel. (3) Maintenance, use and installation of Corken products must comply with Corken instructions, applicable laws and safety
standards (such as NFPA Pamphlet 58 for LP-Gas and ANSI K61. 1-1972 for Anhydrous Ammonia). (4) Transfer of toxic, dangerous, flammable or explosive substances
using Corken products is at user’s risk and equipment should be operated only by qualified personnel according to applicable laws and safety standards.
50
System Recommendations
PIPING
1
No!
2
Yes!
Use inlet line larger than pump
suction nozzle. Same size as
nozzle OK on short runs.
Don't use restricted inlet line!
Pressure drop caused by restriction in suction line will cause vaporization and cavitation.
3
No!
4
Yes!
10D
D
Don't locate restrictive fittings
or elbows close to pump inlet.
Best rule is 10 pipe diameters
straight pipe upstream from
pump! (not always possible)
Turbulence caused by flow interference close to the pump accentuates incipiant cavitation.
5
No!
6
Yes!
Eccentric Reducer.
Concentric Reducer.
An eccentric reducer should always be used when reducing into any pump inlet where vapor might be encountered in the pumpage. The flat
upper portion of the reducer prevents an accumulation of vapor that could interfere with pumping action.
51
System Recommendations
PIPING
7
8
Yes!
Don't place pump far from tank!
Locate pump close to tank!
Directly under is best.
When possible, it is best to allow the pump to be fed by gravity flow to give stable, trouble-free operation.
9
10
No!
Yes!
Don't slope liquid line up toward pump!
Slight slope down toward pump is best.
Perfectly level is OK.
Vaporization in the pump inlet line can displace liquid in the pump so that pump may start up in a dry condtition. A slope back toward the tank of
only an inch or two in a 10 foot run will allow vapor to gravitate back into the tank and be replaced with liquid.
11
No!
Don't allow bypass
line to have low spot.
52
12
Yes!
Keep return line level
or go up toward tank!
Low spots in bypass line can collect liquid which prevents normal vapor passage for priming purposes just like the P trap in the drain of a kitchen sink.
This is not a problem for bypass lines where vapor elimination is not required.
System Recommendations
PIPING
13
7
14
Yes!
No!
Try not to locate
pump above
level of liquid
feeding pump.
Product must
be able to flow
by gravity into
pump.
Always locate pump below tank level
... the lower the better!
Since liquefied gases boil when drawn into a pump by its own suction, the pump must be fed by gravity flow to give stable, trouble-free operation.
15
16
No!
No!
Feeding small pump from tee off of large
supply line. Come out the bottom of pipe
line, not top or side!
When feeding small pump from large main
line, don't tee off the side. Tee out the bottom.
Low capacity flow through large lines often does not sweep out vapor. Flow occurs like liquid in a flume. Drawings 15 and 16 would allow vapor slugs
to be drawn into the small pump causing erratic performance. Drawing 17 shows the best chance for stable feed into a small pump from a large line.
17
18
Yes!
Ma
in L
ine
When feeding small
pump from large main
line, don't tee off the side.
Tee out the bottom!
Some tanks have vapor
connections in the bottom.
These have stand pipes
inside. A bottom vapor
connection can be used
instead of a top opening
with any of the drawings in
this booklet.
Vapor
Liquid
53
System Recommendations
PIPING
19
20
No!
Yes!
Back Check Vavle
Excess Flow Check Valve
Necessary for proper vapor eliminatiion
when using priming type bypass valves.
Positive closure of back check valve prevents
proper vapor return for pump priming.
21
22
Bad...
Better...
No underground liquefied gas pumping
system is good. Where tank must be buried,
use one size smaller dip tube pipe, shallow
tank, keep suction line short and use only
Corken B166 bypass valve.
Tank too deep. Line too long. Suction
pipe too large. Plan on higher pump
maintenance and repair costs on all
underground pumping systems.
Where pumping from underground storage must be done, consult Engineer Data Page Z402.
23
24
Long Discharge Line
No!
Large quantity of liquid in long lines allows continuing vaporization over
long periods of time during which the pump will be full of vapor and will
run dry during start-up attemps.
54
Back Check Vavle
Yes!
Use soft-seat back check valve near pump in long discharge lines
to prevent vaporization from coming back through pump when pump
is not in operation.
System Recommendations
PIPING
25
26
Good...
OK...
Multiple pumps fed
from same main line.
Pumps operating
in parallel.
27
28
Best...
Bad...
Pump No. 1 is starved because
of venturi action at tee. This would
be acceptable for installations
where both pumps would never
operate at the same time.
Parallel piping of
liquefied gas pumps.
Inquire about Corken's Duplex-Series Pump Set.
29
No!
Don't pipe bypass line back
into suction piping! Heat
Buildup in recirculated
products causes flashing of
liquid to vapor with
immediate cavitation and ultimate dry-running. This is why the
bypass relief valves which are built into many positive displacement
pumps should not be used for normal bypass action when handling
liquefied gases. The internal valve should be considered to be a
back-up safety relief in addition to a back-up safety relief in addition
to a back-up safety relief in addition to a back-to-tank bypass valve
and should be set to relieve at a pressure 10 to 20 psi higher than
the working bypass. Some built-in bypass valves have the capability
of being piped back-to-tank so check with the pump manufacturer.
30
Yes!
Always pipe bypass back
to tank! Make sure bypass
line is large enough to
handle full pump flow
without excessive pressure
build-up. Note that bypass
line must be capable of bypassing full pump capacity without
excessive pressure build-up. High pressure rise can cause
bypass valve to chatter and vibrate.
55
System Recommendations
PIPING
No!
31
32
To Vaporizer
To Vaporizer
Back check must be located to allow back-flow
into tank from vaporizer.
Back check must be located to allow back-flow into
tank from vaporizer.
Better...
33
34
Back check valve protects pump but allows back flow through bypass
valve into storage tank. Use back check without spring loaded valve to
allow normal vapor elimination.
Corken B166 Bypass Valve Functions.
Delivery line
shut-off or
pressure build
up is so high
that valve
opens and
relieves
capacity back
into supply
tank.
No circulation
- all pump
capacity going
to delivery.
OUTLET
OUTLET
A
B
Valve A is a fixed pressure bypass like
the Fisher 98H which limits the feed
pressure into the vaporizer to a
specific value regardless of system vapor pressure. A differential difference in
pressure between the pump discharge and the tank. Differential valve B must
be set to the maximum acceptable differential of the pump while fixed pressure
valve A is set for the vaporizer pressure requirement.
36
Liquid from
supply tank
seeking its
level in pump
and bypass
piping.
OUTLET
INLET
INLET
INLET
FIG. 1 Relieving Operation
OPEN
FIG. 2 Pumping Operation
CLOSED
FIG. 3 Priming Operation
OPEN
For pump capacities under 100 GPM, use a bypass valve with built-in
vapor elimination where possible. Like Corken's B166 or T166 valves.
56
Best
Where A is a constant
pressure bypass
control valve and B is
Corken B166 bypass
and vapor elimination
valve.
To Vaporizer
35
No!
Some bypass valves, like the Corken B177, require tank pressure
sensing lines. Check instructions for your valve.
57
Bypass Valve
THE CORKEN B166 VALVE
INSTALLATION OF B166 VALVE
Your new CORKEN B166 Valve (Figure 1) is a patented, dual
purpose automatic priming and differential bypass valve especially
designed for high pressure volatile liquid service, but it is suitable
also as a bypass valve for handling stable liquids. The B166 Valve
was developed for use with the CORKEN Coro-Flo turbine
regenerative pumps to keep the pump primed at all times and to act
as a differential bypass when needed. The B166 is also ideal for
centrifugal and other pumps.
Proper installation of the CORKEN B166 Valve will ensure
optimum performance of the pump as well as the valve. Install your
B166 Valve on the discharge side of the pump, either vertically or
horizontally. All CORKEN Coro-Flo turbine pumps have a 3/4" NPT
opening in the discharge nozzle for piping this valve. For other
pumps a tee in the discharge line must be provided. The discharge
piping from the valve must go to the vapor section of the supply tank
into an excess flow valve, not a back check valve. The typical
installation is shown in Figure 2. The recommended valve discharge
pipe line sizes are given in the table below. For distances of 50 feet
or more, the next larger pipe size should be used.
Adjusting
Screw
Locknut
Recommended Valve Discharge Line Sizes
Bonnet
Spring Seal
O-ring
Flow Rate
GPM
B166 Valve Size
3/4"
1"
Up to 20
Up to 40
3/4"
1"
3/4"
1"
Relief Spring
Socket Head
Screw
ADJUSTMENT OF
CORKEN B166 VALVE
O-ring
The proper setting of the valve must be made at the time of
installation. Start the pump and circulate liquid through the valve
back to the tank. Turn the valve adjusting screw out
(counterclockwise) to decrease the pressure and in (clockwise) to
increase the pump discharge pressure.
Ball Spring
Ball
Body
Valve
Figure 1
Adjust the valve to open at the maximum pump pressure required to
fill all containers.
Tighten the lock nut and permit the pump to circulate liquid through
the valve. On stationary applications, if the motor overload
protection device stops the motor, readjust the valve by turning the
screw out another turn or two.
Once a satisfactory pressure adjustment has been made, attach the
"tamper-proof" seal furnished with your valve to prevent
unauthorized valve adjustment. On installations where the pump has
an internal safety relief valve, the B166 bypass valve should be set
at a pressure slightly lower than the pump internal safety relief valve.
Discharge Line
NOTE:
On LP-gas installations, a maximum differential pressure of 125 psi
is allowed by Underwriters' Laboratories, Inc. meeting the
requirements of NFPA Pamphlet No. 58.
Figure 2
58
Bypass Valve
THE CORKEN T166 VALVE
INSTALLATION OF T166 VALVE
Your new CORKEN T166 Valve (Figure 3) has been especially designed
for use with delivery truck pumps to control the pump discharge pressure
and to bypass excess liquid back to the truck tank. It is also quite
satisfactory for service with any positive displacement pump within its
capacity range and has been used in many stationary installations.
Proper installation of the CORKEN T166 Valve will ensure optimum
performance of the pump as well as the valve. Install your T166
Valve on the discharge side of the pump, either vertically or
horizontally. The discharge piping from the valve should go to the
vapor section of the truck tank into a filler type valve or a back check
valve. A typical truck installation is shown in Figure 4. When the
valve is being used for vapor venting on stationary applications
using pumps with internal safety relief valves, the piping should be
the same as that used for the CORKEN B166. The recommended
valve discharge pipe line sizes are given in the table below. For
distances of 50 feet or more, the next larger pipe size should be used.
Adjusting Screw
Locknut
Recommended Valve Discharge Line Sizes
Bonnet
Spring Seal
Flow Rate
GPM
T166 Valve Size
1-1/4"
1-1/2"
O-ring
Up to 40
1-1/2"
1-1/2"
Relief Spring
ADJUSTMENT OF
CORKEN T166 VALVE
Socket Head
Screw
O-ring
Valve
The proper setting of the valve must be made at the time of
installation. Start the pump and circulate liquid through the valve
back to the tank. Turn the valve adjusting screw out
(counterclockwise) to decrease the pressure and in (clockwise) to
increase the pump discharge pressure.
Adjust the valve to open at the maximum pump pressure required to
fill all containers. This is typically around 100 psi differential.
Figure 3
Body
Tighten the lock nut and permit the pump to circulate liquid through
the valve. On stationary applications, if the motor overload
protection device stops the motor, readjust the valve by turning the
screw out another turn or two.
Once a satisfactory pressure adjustment has been made, attach the
"tamper-proof" seal furnished with your valve to prevent
unauthorized valve adjustment. On installations where the pump has
an internal safety relief valve, the T166 bypass valve should be set
at a pressure slightly lower than the pump internal safety relief valve.
NOTE:
On LP-gas installations, a maximum differential pressure of 125 psi
is allowed by Underwriters' Laboratories, Inc. meeting the
requirements of NFPA Pamphlet No. 58.
Figure 4
59
Warranty Information
WARNING
Install, use and maintain this equipment according to CORKEN, INC. instructions and all applicable federal, state, local laws and codes,
and NFPA Pamphlet 58 for LP-Gas or ANSI K61.1-1989 for Anhydrous Ammonia. Periodic inspection and maintenance is essential.
CORKEN ONE YEAR LIMITED WARRANTY
CORKEN, INC. warrants that its products will be free from defects in material and workmanship for a period of 12 months following date
of purchase from CORKEN.
CORKEN products which fail within the warranty period due to defects in material or workmanship will be repaired or replaced, at
CORKEN's option, when returned, freight prepaid, to CORKEN, INC., 3805 N.W. 36th Street, Oklahoma City, Oklahoma 73112.
Parts subject to wear or abuse, such as mechanical seals, blades, piston rings, and packing, and other parts showing signs of abuse are not
covered by this limited warranty. Also, equipment, parts and accessories not manufactured by CORKEN but furnished with CORKEN
products are not covered by this limited warranty and the purchaser must look to the original manufacturer's warranty, if any. This limited
warranty is void if the CORKEN product has been altered or repaired without the consent of CORKEN.
All implied warranties, including any implied warranty of merchantability or fitness for a particular purpose, are expressly negated to the
extent permitted by law and shall in no event extend beyond the expressed warranty period.
CORKEN DISCLAIMS ANY LIABILITY FOR CONSEQUENTIAL DAMAGES DUE TO BREACH OF ANY WRITTEN OR IMPLIED
WARRANTY ON CORKEN PRODUCTS. Transfer of toxic, dangerous, flammable or explosive substances using CORKEN PRODUCTS
is at the user's risk. Such substances should be handled by experienced, trained personnel in compliance with governmental and industrial
safety standards.
WRITING THE FACTORY
For your convenience, the valve size and serial code are given on the valve nameplate. This serial code tells the month and year your valve
was built. Space is provided below for you to keep a written record of this information. Always include the valve size and serial code when
ordering parts.
Valve Model
Valve Size
Serial Code
Date Purchased
Date Installed
Purchased From
Installed By
60
Warranty Information
ONE YEAR LIMITED WARRANTY
CANCELLATION CHARGES
CORKEN, INC. warrants that its products will be free from defects in material and
workmanship for a period of 12 months following date of purchase from CORKEN.
There will be a minimum cancellation charge of 15% of the net price for any order
which is canceled after having been accepted and officially acknowledged by
CORKEN. In the event there is material involved that is manufactured by others,
and is being purchased by CORKEN for the sole purpose of becoming part of this
canceled order, the cancellation charges assessed CORKEN by these other
manufacturers shall be borne by the Purchaser.
CORKEN products which fail within the warranty period due to defects in material
or workmanship will be repaired or replaced at CORKEN's option, when returned,
freight prepaid to CORKEN, INC., 3805 N.W. 36th St., Oklahoma City, Oklahoma
73112.
Parts subject to wear or abuse, such as mechanical seals, blades, piston rings, valves
and packing, and other parts showing signs of abuse, neglect or failure to be properly
maintained are not covered by this limited warranty. Also, equipment, parts and
accessories not manufactured by CORKEN but furnished with CORKEN products
are not covered by this limited warranty and the purchaser must look to the original
manufacturer's warranty, if any. This limited warranty is void if the CORKEN
product has been altered or repaired without the consent of CORKEN.
All implied warranties, including any implied warranty of merchantability or fitness
for a particular purpose, are expressly negated to the extent permitted by law and
shall in no event extend beyond the expressed warrantee period.
CORKEN DISCLAIMS ANY LIABILITY FOR CONSEQUENTIAL DAMAGES
DUE TO BREACH OF ANY WRITTEN OR IMPLIED WARRANTY ON
CORKEN PRODUCTS. Transfer of toxic, dangerous, flammable or explosive
substances using CORKEN PRODUCTS is at the user's risk. Such substances
should be handled by experienced, trained personnel in compliance with
governmental and industrial safety standards
PRICES
All prices are f.o.b. factory at Oklahoma City U.S.A. Prices quoted are for
acceptance within 30 days, but in the meantime may be changed upon proper notice.
Prices of equipment for future delivery will be those in effect at time of shipment.
TERMS
Standard terms for all sales are net payment within thirty (30) days from the date of
invoice unless it is the judgment of CORKEN that the financial condition of the
purchaser warrants other terms. In the event the Purchaser fails to make payment
in accordance with the conditions specified, the Purchaser shall pay interest on the
amount due at the rate of 1.5% per month.
DESIGN
It is CORKEN's intention to continually improve the design and performance of its
products as new ideas, new practices and new materials become available.
Therefore, all published designs, specifications and prices are subject to minor
modifications at the time of manufacture to coincide with this policy, without prior
notice to the Purchaser. If the equipment purchased is to be used in an existing
installation to match previously purchased equipment, material will be furnished to
be interchangeable as near as may be feasible, but CORKEN reserves the right to
substitute materials and designs.
SHIPMENTS
The prices shown include standard crating or packaging for normal rail or
commercial truck shipments within the borders of the continental United States,
Canada and Mexico. Consult Factory for Export Crating charges. All promises of
shipment are estimates contingent upon strikes, fires, elements beyond our control
or manufacturing difficulties, including the scheduled shipping dates of materials
from our suppliers.
If shipment has already been made before notice of cancellation, the Purchaser will
be charged all the freight costs involved in the handling of the order, including the
charges necessary to get the equipment back to the respective warehouses of
CORKEN and its suppliers, in addition to the cancellation charge described above.
RETURNED MATERIAL
Material may be returned to the factory ONLY if there is prior written authorization
from CORKEN and accompanied by a Corken CSC number and the freight is paid
by the shipper.
Material that is authorized for return will be inspected when received, and if it is of
current design, unused, and in first-class resalable condition, credit will be allowed
on the basis of the original invoice value less restocking charges. Returned material
that is found to be worn, or in damaged condition, will not be accepted. The
customer will be notified of this, and return shipping instructions, or permission to
scrap such items will be requested. If no instructions are received within sixty (60)
days after such notice, the material will be scrapped. Outside purchased materials
and equipment may be returned for credit ONLY by CORKEN's prior written
authorization, and must be in new and undamaged resalable condition, and of
current design. Such returned materials are subject to a MINIMUM restocking
charge of 25%.
LITERATURE
CORKEN will furnish, upon request and without charge to the Purchaser, six copies
of paper prints of standard drawings, performance curves, and other current
literature covering the pump or compressor and/or such other descriptive material
that good judgment would consider necessary. Any additional material and/or
special drawings will be charged for at appropriate rates determined by CORKEN.
See Corken Optional Services in price pages for details.
FACTORY INSPECTION AND TESTS
Each article of CORKEN's manufacture passes a standard factory inspection and
operating test prior to shipment. Special factory inspections, tests and/or certified
test reports are all subject to a factory charge available upon request.
LIABILITY FROM USE OF PRODUCT
CORKEN has no control over the ultimate use of its products and specifically
disclaims any liability damage, loss or fines which may arise from the use thereof.
The user and purchaser shall hold CORKEN harmless from such damage, loss or
fines. The user and purchaser shall determine the suitability of CORKEN products
for the use intended and issue adequate safety instructions therefor.
Compliance with the Occupational Safety and Health Act and similar laws and
regulations shall be the responsibility of the user of the product and not the
responsibility of CORKEN.
61
Conversion Factors
English Measures - unless otherwise designated, are those used in the United States, an the units of weight and mass are avoirdupois units.
Gallon - designates to the U.S. gallon. To convert into the Imperial gallon, multiply the U.S. gallon by 0.83267. Likewise, the word ton
designates a short ton, 2,000 pounds.
62
MULTIPLY
BY
TO OBTAIN
Bar
Bar
33.456
29.530
Feet H2O @ 39°F
In. Hg @ 32°F
Bar
1.0197
kg/cm
Bar
British Thermal Units
British Thermal Units
14.504
0.2520
777.6
Pounds/in
Kilogram - calories
Foot - lbs.
British Thermal Units
British Thermal Units
British Thermal Units
Centimeters
Centimeters
Centimeters
Centipoise
Centipoise
Centistokes
Centistokes
Feet
Feet
Feet
Feet
Feet
Feet
Feet
Feet of water
Feet of water
Feet of water
Feet of water
Feet of water
Gallons
Gallons
Gallons
Gallons
Gallons
Gallons
Gallons
Gallons
Gallons - Imperial
Gallons - U.S.
Gallons / min.
3.927 x 10
107.5
4
2.928 x 10
0.3937
0.01
10
0.001
0.01
0.01
0.01
30.48
0.166667
-4
3.0480 x 10
304.8
12
0.3048
1/3
0.0295
0.8826
304.8
62.43
0.4335
3785
0.1337
231
-3
3.785 x 10
-3
4.951 x 10
3.785
8
4
1.20095
0.83267
-3
2.228 x 10
2
2
4
Horsepower - hrs.
Kilogram - meters
Kilowatt - hrs.
Inches
Meters
Millimeters
Pascal - second
Poises
Sq. cm / sec.
Stokes
Centimeters
Fathoms
Kilometers
Millimeters
Inches
Meters
Yards
Atmoshperes
Inches of mercury
Kgs. / sq. meter
Lbs. / sq. ft.
Lbs. / sq. inch
Cubic centimeters
Cubic feet
Cubic inches
Cubic meters
Cubic yards
Liters
Pints (liq.)
Quarts (liq.)
U.S. gallons
Imperial gallons
Cubic feet / sec.
P.O. Box 12338, Oklahoma City, OK 73157
3805 N.W. 36th St., Oklahoma City, OK 73112
Phone (405) 946-5576 • Fax (405) 948-7343
E-mail [email protected]
Web address www.corken.com
CP358
Printed in U.S.A.
June 2000