1
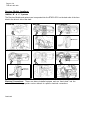
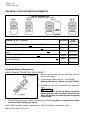
Page 1 of 6
SUBJECT:
REMOTE KEYLESS ENTRY (2005 MODELS)
No:
TSB−05−42A−003
DATE:
January, 2005
MODEL:
All 2005 models
CIRCULATE TO:
[ ] GENERAL MANAGER
[X] PARTS MANAGER
[X] TECHNICIAN
[X] SERVICE ADVISOR
[X] SERVICE MANAGER
[ ] WARRANTY PROCESSOR
[ ] SALES MANAGER
Refer to TSB−98−42A−008 for RKE service information for 1993−99 models.
Refer to TSB−00−42A−008 for RKE service information for 2000 models.
Refer to TSB−00−42A−010 for RKE service information for 2001 models.
Refer to TSB−02−42A−002 for RKE service information for 2002 models.
Refer to TSB−03−42A−002 for RKE service information for 2003 models.
Refer to TSB−04−42A−001REV for RKE service information for 2004 models.
Refer to the appropriate page in this bulletin for remote keyless entry (RKE) service information:
BULLETIN CONTENTS
Refer to Page
OMRON “B” & “C” RKE System Identification & Operation
RKE Answerback Operation & Customization
Receiver Module Locations
OMRON “B” & “C” RKE System Details (Eclipse/Eclipse Spyder,
Endeavor, Galant, Lancer/Lancer Evolution, Montero, Outlander)
2
3
4
5
6
6
RKE Parts Information
Transmitter Battery Replacement
PURPOSE
The RKE system must be properly identified in order to service the system or program the transmitter.
This bulletin contains basic service information for RKE systems on 2005 models.
Using the following chart, identify the system before attempting repairs. System operation, component
location, and transmitter programming are different for each system. For detailed information on troubleshooting factory−installed RKE systems, refer to Group 42 in the appropriate service manual.
OMRON “B”
System
OMRON “C”
Eclipse & Eclipse Spyder
X
Endeavor
X
Galant
X
Lancer & Lancer Evolution
X
Montero
Outlander
X
X
Continued
FILE UNDER:
Group 42A Body in the Dealer Service Information Binder
(2820)
Page 2 of 6
TSB−05−42A−003
OMRON “B” & “C” RKE Systems
(Factory−installed − See Group 42 in service manual)
B" = 2005 Montero
C" = 2005 Eclipse/Eclipse Spyder, Endeavor, Galant, Lancer/Lancer Evolution, & Outlander
OMRON Systems
System Type
Receiver Location
Answerback Feature Variations
OMRON “B”
Integral with ETACS−ECU
2 modes
OMRON “C”
Integral with ETACS−ECU
3 modes
Normal System Operation:
The keyless entry system will operate with the doors open or closed, but will not operate when the
ignition key is in the ignition switch lock cylinder. Pressing the UNLOCK button on the remote transmitter once unlocks the driver’s door. Pressing the UNLOCK button twice unlocks all doors (and liftgate).
When any or all of the doors (and liftgate) are unlocked, and the dome light switch is in the DOOR
position, the dome light will illuminate for 15 seconds. The turn signal/hazard lights will flash once.
Pressing the LOCK button on the remote transmitter locks all doors and the liftgate or trunk. When the
any or all of the doors (and liftgate) are unlocked, and the dome light switch is in the DOOR position,
the dome light as well as the turn signal/hazard lights will flash twice. With the answerback feature in
the default mode, the horn will also sound once.
The answerback features can be customized. Refer to the Answerback Operation and Modification
section of this bulletin or Group 42 in the service manual for more information about the RKE answerback features.
Pressing the TRUNK button on the remote transmitter (if equipped) twice within five seconds will unlock the trunk lid. The trunk lid must be closed manually after it has been unlocked.
If the UNLOCK button is pressed while all doors (and liftgate) are closed and no door is opened within
30 seconds, all doors (and liftgate) will automatically re−lock.
On vehicles with factory−installed security alarm systems, the remote transmitter will have a PANIC
button. Locking/unlocking the doors will arm/disarm the alarm system. Pressing the PANIC button will
activate the alarm system, flashing the headlights and intermittently sounding the horn for about 3
minutes. Pressing any button on the remote transmitter will deactivate and silence the PANIC alarm.
Continued
Page 3 of 6
TSB−05−42A−003
RKE Answerback Operation and Customization:
The keyless entry system answerback/confirmation functions from the turn signal/hazard lights and
horn can each be turned on and off as desired using the following procedures. All procedures must be
done with the key OFF and removed from the ignition switch. For best results, these customization
procedures should be done while sitting in the driver’s seat so the confirmation tone/chime sounds
from the ETACS can be heard clearly.
NOTE: All doors must be closed for the answerback feature to function properly.
ENABLING/DISABLING THE HAZARD/TURN SIGNAL ANSWERBACK FUNCTION
The answerback function from the hazard/turn signals when the doors are locked and unlocked can
be turned on and off separately. A tone will sound once when the function is turned on and twice
when the function is turned off. Before proceeding with the following procedures, make sure the key
is removed from the ignition switch.
1. Press and hold the UNLOCK button for 4 to 10 seconds, then press and hold the LOCK
button during this time.
2. To turn the function on or off when the doors are locked, immediately release the LOCK
button and then release the UNLOCK button. A tone will sound once when the function is
turned on and twice when the function is turned off.
3. To turn the function on or off when the doors are unlocked, immediately release the UNLOCK
button and then release the LOCK button. A tone will sound once when the function is turned
on and twice when the function is turned off.
NOTE: For Endeavor and Galant GTS vehicles with the multi−center display, the multi−center display
can be used to change the answerback functions provided by the turn hazard/turn signal lights. For
details, refer to the vehicles owner’s manual.
ENABLING/DISABLING THE HORN ANSWERBACK FUNCTION
The following steps will set the horn answerback function to one of two different modes. These steps
must be done with the key removed from the ignition switch.
1. Press and hold the LOCK button for 4 to 10 seconds, then press the UNLOCK button during
this time.
2. Immediately release the LOCK or UNLOCK button then release the UNLOCK or LOCK button.
A chime/tone will sound to indicate the current mode. Repeating Steps 1 & 2 will change
to the next mode, so continue repeating Steps 1 & 2 until you reach the desired mode.
One tone/chime:
The horn will sound if the doors are locked with the keyless entry system.
Two tones/chimes
The horn will not sound, even if the doors are locked or unlocked with
the keyless entry system.
Three tones/chimes:
(For Eclipse/Eclipse Spyder, Endeavor, Galant, Lancer/Lancer Evolution, & Outlander ONLY):
The horn will sound if the doors are already locked and the keyless
entry system is used again. In this mode, the horn will only sound when
the keyless entry LOCK button is pressed again to confirm that the
doors are already locked.
NOTE: For Endeavor and Galant GTS vehicles with the multi−center display, the multi−center display
can be used to change the answerback functions provided by the horn. For details, refer to the
vehicles owner’s manual.
Continued
Page 4 of 6
TSB−05−42A−003
Receiver Module Locations:
OMRON “B” & “C” Systems
The Receiver Module and antenna are incorporated into the ETACS−ECU on the back side of the fuse
block in the driver’s side of the dash.
ECLIPSE
LANCER & EVOLUTION
GALANT
MONTERO
OUTLANDER
ENDEAVOR
Electrical Connections: These are factory−installed systems and are “hard−wired” into the
vehicle. Refer to the appropriate service manual for specific electrical connections.
Continued
Page 5 of 6
TSB−05−42A−003
OMRON “B” & “C” SYSTEM DETAILS:
(Factory−installed − See Group 42 in service manual)
OMRON “B” RKE System
(2005 Montero)
OMRON “C” RKE System
(2005 Eclipse/Eclipse Spyder, Endeavor, Galant, Lancer/Lancer Evolution, & Outlander)
The RKE functions and receiver module are integral with the ETACS−ECU.
OMRON “B & C” RKE System Transmitter Programming:
1. You can program up to 4 transmitters. You must program all transmitters at the same time.
2. Insert the key into the ignition lock on the steering column. Do not turn it on.
3. With the ignition key off, connect the MUT−II or MUT−III scan tool into the data link connector (or
ground pin No.1 of the data link connector if a scan tool is not available).
4. Within 10 seconds of plugging in the MUT−II or
MUT−III (or grounding pin No.1 of the data link
connector), press the Hazard switch 6 times. The
door locks will cycle indicating you are in the
programming mode.
5. Press either the LOCK or UNLOCK button on the first transmitter slowly three times within 10 seconds.
The power door locks should cycle after the first transmitter is programmed.
6. Press either the LOCK or UNLOCK button on the second transmitter slowly three times within 10 seconds. The door locks should cycle after the second transmitter is programmed. The same procedure
applies to the third and fourth transmitters.
7. Disconnect the scan tool (or remove the ground connection from data link connector pin No.1) then
remove the ignition key. Verify that all transmitters operate properly.
Continued
Page 6 of 6
TSB−05−42A−003
2005 MODEL YEAR RKE PARTS INFORMATION
OMRON TRANSMITTERS
Fig. A
Identified by ‘OMRON’ mark on back
Fig. B
Fig. C
Fig. D
PANIC
(on back)
OMRON “B” & “C” Systems
Illustration
Part
Number
Transmitter (Montero; 3−button with theft alarm/PANIC)
Fig. B
MR587977
Transmitter (Galant & Eclipse Spyder; 3−button, no theft alarm/PANIC)
Fig. D
MR587980
Transmitter (Eclipse Spyder, & Galant; 3−button on front with PANIC on
back)
Fig. C
MR587981
Transmitter (Eclipse, Endeavor; 3−button, with PANIC)
Fig. B
MR587982
Transmitter (Eclipse, Lancer/Lancer Evolution & Outlander; 2−button, no
theft alarm/PANIC)
Fig. A
MR587983
Screw
MR207501
Transmitter Battery Replacement
OMRON TRANSMITTER BATTERY REPLACEMENT
1. Remove the set screw, open the transmitter case and
remove the battery.
2. Insert the new battery with the ‘+’ side DOWN.
Replacement battery: Lithium, coin type CR2032
3. Inserting the claw first, reassemble the transmitter
case.
CAUTION
Be careful not to deform the battery electrodes
when replacing, ensure that water and dirt do not
enter, and that you do not directly touch the printed
circuit board.
4. Verify that the keyless entry system operates properly. It is not necessary to reprogram the remote
transmitter after changing the battery.
NOTE: RKE transmitter battery replacement is NOT considered a warrantable repair.
Mitsubishi Motors North America, Inc.