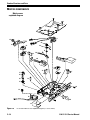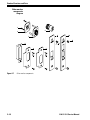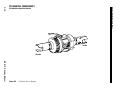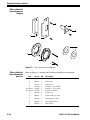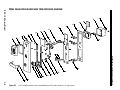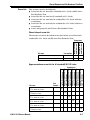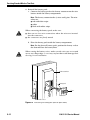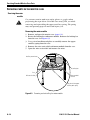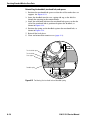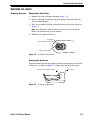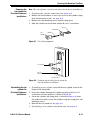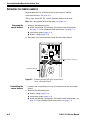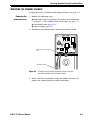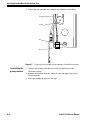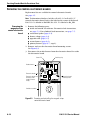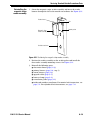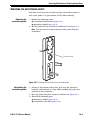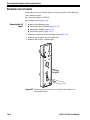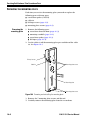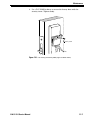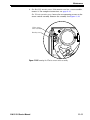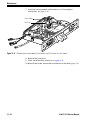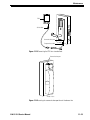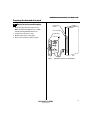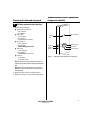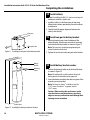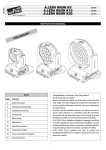
1
SERVICE MANUAL
SERVICE MANUAL
CREDITS/COPYRIGHT
©2001–2002
Best Lock Corporation dba Best Access Systems. All rights
reserved. Printed in the United States of America.
Information in this document is subject to change without notice and does not
represent a commitment on the part of Best Access Systems. The software described in
this document are furnished under a license agreement or nondisclosure agreement.
This publication is intended to be an accurate description and set of instructions
pertaining to its subject matter. However, as with any publication of this complexity,
errors or omissions are possible. Please call your BEST distributor or Best Access
Systems at (317) 849-2250 if you see any errors or have any questions. No part of this
manual and/or databases may be reproduced or transmitted in any form or by any
means, electronic or mechanical, including photocopying, recording, or information
storage and retrieval systems, for any purpose, without the express written permission
of Best Access Systems.
This document is distributed as is, without warranty of any kind, either express or
implied, respecting the contents of this book, including but not limited to implied
warranties for the publication’s quality, performance, merchantability, or fitness for any
particular purpose. Neither Best Access Systems, nor its dealers or distributors shall be
liable to the user or any other person or entity with respect to any liability, loss, or
damage caused or alleged to be caused directly or indirectly by this publication.
The Best Access Systems logo and B.A.S.I.S. are registered trademarks of Best Lock
Corporation.
The Life Safety Code is a registered trademark of the National Fire Protection
Association.
Von Duprin is a registered trademark of Von Duprin, Inc.
Lubriplate is a registered trademark of Fiske Brothers Refining Company.
Written and designed by Best Access Systems and Avalon Group, Inc., Indianapolis,
Indiana.
T63300 Rev A 1821749 ER-7991-6 July 2002
CONTENTS
FIGURES
XI
GETTING STARTED 1–1
Introduction
1–1
B.A.S.I.S. G product overview 1–2
System overview 1–2
Mortise lock overview 1–4
Cylindrical lock overview 1–4
Certifications and standards 1–5
B.A.S.I.S. G Locks 1–5
Mortise locks 1–5
Cylindrical locks 1–5
Exit hardware trim 1–5
Documentation package
1–6
Technical support 1–8
Support services 1–8
Telephone technical support
1–8
STANDARD FUNCTIONS AND PARTS
2–1
Function descriptions 2–2
Mortise functions 2–2
Cylindrical function 2–4
Trim components 2–5
Magnetic stripe reader and trim 2–5
Smart card reader and trim 2–8
Dual validation reader and trim 2–11
B.A.S.I.S. G Service Manual
iii
Contents
Mortise components
2–14
Cylindrical components 2–19
Cylindrical chassis 2–19
Other cylindrical lock components
2–21
EXIT HARDWARE TRIM FUNCTIONS AND PARTS 3–1
Function descriptions
3–2
Trim components 3–3
Magnetic stripe reader and trim 3–3
Smart card reader and trim 3–6
Dual validation reader and trim 3–9
Cylinders and related components 3–12
Mortise cylinder and related components 3–12
Rim cylinder and related components 3–13
Levers
3–14
SHARED STANDARD AND EXIT HARDWARE TRIM PARTS 4–1
Reader conversion 4–2
Converting to a magnetic stripe reader 4–2
Converting to a smart card reader 4–2
Converting to a dual validation reader 4–2
Tasks to perform for converting 4–2
Field replacement kits 4–4
Reader kits 4–4
Control electronics kits 4–5
Battery kits 4–5
Lens cover kit 4–6
Cable and harness kits for standard B.A.S.I.S. Locks 4–6
Screw kits 4–7
Shared internal screw kits 4–7
Upper escutcheon screw kits for all standard B.A.S.I.S. Locks 4–7
Lower escutcheon screw kits for standard B.A.S.I.S. Locks with brass
escutcheons 4–8
Lower escutcheon screw kits for standard B.A.S.I.S. Locks with zinc
escutcheons 4–8
Battery door screw kits for standard B.A.S.I.S. Locks 4–9
Screw and spring kits for EX Series Exit Hardware Trim 4–9
Internal part kits for EX Series Exit Hardware Trim 4–10
Sensor module kits for standard B.A.S.I.S. Locks 4–10
Other system components
iv
4–11
B.A.S.I.S. G Service Manual
Contents
SERVICING STANDARD MORTISE TRIM PARTS
5–1
Servicing the levers 5–2
Removing the levers 5–2
Reinstalling the levers 5–2
Servicing the inside and outside escutcheons 5–3
Removing the inside and outside escutcheons 5–3
Reinstalling the inside and outside escutcheons 5–6
Servicing the mounting plates 5–14
Removing the mounting plates 5–14
Reinstalling the mounting plates 5–14
Servicing the core 5–15
Removing the core 5–15
Reinstalling the core 5–15
Servicing the mortise case faceplate 5–16
Removing the mortise case faceplate 5–16
Reinstalling the mortise case faceplate 5–16
Servicing the cylinder 5–17
Removing the cylinder 5–17
Reinstalling the cylinder 5–17
SERVICING STANDARD MORTISE CASE PARTS
6–1
Servicing the mortise case 6–2
Removing and opening the mortise case 6–2
Closing and reinstalling the mortise case 6–2
Changing the hand and bevel 6–3
Changing hand and bevel quick reference 6–3
Changing the hand only 6–5
Changing the bevel only 6–5
Changing the hand and bevel 6–5
Tasks for changing the hand and bevel 6–6
Turning over the hubs 6–6
Turning over the cylinder clamp plate 6–7
Turning over the auxiliary bolt 6–8
Turning over the latchbolt 6–9
Function conversion 6–10
Removing key override 6–10
Adding key override 6–11
Adding a deadbolt 6–12
Removing a deadbolt 6–12
Servicing parts in the mortise case 6–14
Servicing the motor module 6–14
Removing the motor module 6–14
Reinstalling the motor module 6–15
B.A.S.I.S. G Service Manual
v
Contents
Servicing the sensor module 6–16
Removing the sensor module 6–16
Reinstalling the sensor module 6–16
Servicing the deadbolt, turn knob hub, and spacer 6–17
Removing the deadbolt, turn knob hub, and spacer 6–17
Reinstalling the deadbolt, turn knob hub, and spacer 6–18
Servicing the cylinder clamp plate 6–19
Removing the cylinder clamp plate 6–19
Reinstalling the cylinder clamp plate 6–19
SERVICING CYLINDRICAL PARTS
7–1
Servicing the core and throw member 7–2
Removing the core and throw member 7–2
Reinstalling the core and throw member 7–2
Servicing the levers 7–3
Removing the levers 7–3
Removing the keyed lever 7–3
Removing the plain lever 7–3
Reinstalling the levers 7–4
Servicing the inside and outside escutcheons 7–5
Removing the inside and outside escutcheons 7–5
Reinstalling the inside and outside escutcheons 7–8
Servicing the rose liners 7–15
Removing the rose liners 7–15
Reinstalling the rose liners 7–16
Servicing the cylindrical chassis 7–18
Removing the cylindrical chassis 7–18
Reinstalling the cylindrical chassis 7–18
SERVICING EXIT HARDWARE TRIM PARTS
8–1
Servicing the battery cover 8–2
Removing the battery cover 8–2
Reinstalling the battery cover 8–3
Servicing the battery pack 8–4
Removing the battery pack 8–4
Reinstalling the battery pack 8–5
Servicing the battery bracket 8–6
Removing the battery bracket 8–6
Reinstalling the battery bracket 8–7
Servicing the exit hardware 8–8
Removing the exit hardware 8–8
Reinstalling the exit hardware 8–8
Servicing the core 8–9
Removing the core 8–9
Reinstalling the core 8–9
vi
B.A.S.I.S. G Service Manual
Contents
Servicing the cylinder 8–10
Removing the mortise cylinder 8–10
Reinstalling the mortise cylinder 8–10
Removing the rim cylinder for Precision Hardware installations 8–11
Reinstalling the rim cylinder for Precision Hardware installations 8–11
Removing the rim cylinder for Von Duprin installations 8–12
Reinstalling the rim cylinder for Von Duprin installations 8–12
Servicing the B.A.S.I.S. escutcheon 8–13
Removing the escutcheon 8–13
Reinstalling the escutcheon 8–14
SERVICING STANDARD OUTSIDE ESCUTCHEON PARTS
9–1
Servicing the escutcheon gasket 9–2
Removing the escutcheon gasket 9–2
Reinstalling the escutcheon gasket 9–2
Servicing the lens covers 9–3
Removing the lens covers 9–3
Reinstalling the lens covers 9–3
Servicing the harness clamp 9–4
Removing the harness clamp 9–4
Reinstalling the harness clamp 9–4
Servicing the upgrade cable 9–5
Removing the upgrade cable 9–5
Reinstalling the upgrade cable 9–5
Servicing the sensor harness 9–6
Removing the sensor harness 9–6
Reinstalling the sensor harness 9–6
Servicing the primary harness 9–7
Removing the primary harness 9–7
Reinstalling the primary harness 9–8
Servicing the control electronics boards 9–10
Removing the magnetic stripe control electronics board 9–10
Reinstalling the magnetic stripe control electronics board 9–11
Removing the smart card control electronics board 9–12
Reinstalling the smart card control electronics board 9–13
Removing the dual validation control electronics board 9–15
Reinstalling the dual validation control electronics board 9–15
Servicing the reader assemblies 9–17
Removing the magnetic stripe reader assembly 9–17
Reinstalling the magnetic stripe reader assembly 9–19
Removing the smart card reader assembly 9–20
Reinstalling the smart card reader assembly 9–22
Removing the dual validation reader assembly 9–23
Reinstalling the dual validation reader assembly 9–25
B.A.S.I.S. G Service Manual
vii
Contents
SERVICING EXIT HARDWARE TRIM ESCUTCHEON PARTS
10–1
Servicing the mounting standoffs 10–2
Removing the mounting standoffs 10–2
Reinstalling the mounting standoffs 10–2
Servicing the escutcheon gasket 10–3
Removing the escutcheon gasket 10–3
Reinstalling the escutcheon gasket 10–3
Servicing the lift finger 10–4
Removing the lift finger 10–4
Reinstalling the lift finger 10–5
Servicing the mounting plate 10–6
Removing the mounting plate 10–6
Reinstalling the mounting plate 10–7
Servicing the lever return springs 10–8
Removing the lever return springs 10–8
Reinstalling the lever return springs 10–8
Servicing the lens covers 10–9
Removing the lens covers 10–9
Reinstalling the lens covers 10–9
Servicing the primary harness 10–9
Removing the primary harness 10–10
Reinstalling the primary harness 10–10
Servicing the control electronics boards 10–10
Removing the magnetic stripe control electronics board 10–10
Reinstalling the magnetic stripe control electronics board 10–11
Removing the smart card control electronics board 10–11
Reinstalling the smart card control electronics board 10–11
Removing the dual validation control electronics board 10–11
Reinstalling the dual validation control electronics board 10–12
Servicing the reader assemblies 10–12
Removing the magnetic stripe reader assembly 10–12
Reinstalling the magnetic stripe reader assembly 10–12
Removing the smart card reader assembly 10–13
Reinstalling the smart card reader assembly 10–13
Removing the dual validation reader assembly 10–13
Reinstalling the dual validation reader assembly 10–13
Servicing the motor assembly 10–14
Removing the motor assembly 10–14
Reinstalling the motor assembly 10–15
Servicing the locking plate 10–18
Removing the locking plate 10–18
Reinstalling the locking plate 10–19
viii
B.A.S.I.S. G Service Manual
Contents
Servicing the yoke 10–20
Removing the yoke 10–20
Reinstalling the yoke 10–21
Servicing the beam and beam roller 10–22
Removing the beam and beam roller 10–22
Reinstalling the beam and beam roller 10–23
Servicing the lever assembly 10–24
Removing the lever assembly 10–24
Reinstalling the lever assembly 10–25
Servicing the shear pin 10–26
Removing the shear pin 10–26
Reinstalling the shear pin 10–27
Changing the handing
MAINTENANCE
10–28
11–1
Replacing the backup battery 11–2
Removing the backup battery 11–2
Reinstalling the backup battery 11–3
Replacing or upgrading the battery pack 11–4
Removing the battery pack for a standard lock 11–4
Reinstalling the battery pack for a standard lock 11–6
Removing the battery pack for exit hardware trim 11–8
Reinstalling the battery pack for exit hardware trim 11–9
Adding key override sensing to Standard B.A.S.I.S. Mortise Locks
11–10
Performing diagnostics using a PDA 11–13
Diagnostics overview 11–13
Viewing diagnostics information 11–14
Changing a lock’s online mode 11–18
Unlocking a door temporarily 11–19
Resetting the use count 11–19
Clearing the diagnostics code 11–20
TROUBLESHOOTING
12–1
Visual and audible response quick reference
12–2
Enabling communications without a card or password
12–3
Opening a standard B.A.S.I.S. Lock with dead batteries
12–6
Responding to problems
12–7
LOCK HISTORY EVENT TYPES
A–1
INSTALLATION INSTRUCTIONS
B–1
INDEX
B.A.S.I.S. G Service Manual
C–1
ix
Contents
x
B.A.S.I.S. G Service Manual
FIGURES
GETTING STARTED
System overview diagram
1–3
Mortise lock overview diagram
1–4
Cylindrical lock overview diagram
1–4
STANDARD FUNCTIONS AND PARTS
Understanding mortise function drawings
2–2
Understanding the cylindrical function drawing
Cylindrical chassis diagram
2–4
2–18
Other cylindrical lock components
2–20
EXIT HARDWARE TRIM FUNCTIONS AND PARTS
Mortise cylinder and related components diagram
Rim cylinder and related components diagram
Levers diagram
3–12
3–13
3–14
SHARED STANDARD AND EXIT HARDWARE TRIM PARTS
Other system components diagram
4–11
SERVICING STANDARD MORTISE TRIM PARTS
Removing and reinstalling the levers
5–2
Removing the battery door (four-cell door shown)
5–3
Removing the battery pack (four-cell pack shown)
5–4
Removing the inside escutcheon
5–4
Disconnecting the motor connector and sensor connector
Removing the bushings and trim hole inserts
B.A.S.I.S. G Service Manual
5–5
5–6
xi
Figures
Locating the backup battery tab
5–7
Reinstalling the trim hole inserts and bushings
5–8
Feeding the wire harness connectors through the harness hole
Making the motor connection and sensor connections
Securing the escutcheons
5–9
5–10
5–11
Reinstalling the battery pack (four-cell pack shown)
5–12
Reinstalling the battery door (four-cell door shown)
5–13
Removing and reinstalling the mounting plates
Removing and reinstalling the core
5–14
5–15
Removing and reinstalling the mortise case faceplate
Removing and reinstalling the cylinder
5–16
5–17
SERVICING STANDARD MORTISE CASE PARTS
Removing and reinstalling the mortise case
6–2
Explanation of the hand and bevel of the door
Motor module and locking bar in place
Turning over the auxiliary bolt
6–3
6–7
6–8
Latchbolt with anti-friction latch lever in position
Removing and reinstalling the motor module
6–9
6–14
Positioning the turn knob hub and deadbolt spring
6–18
Removing and reinstalling the cylinder clamp plate
6–19
SERVICING CYLINDRICAL PARTS
Removing the core and throw member
7–2
Reinstalling the core and throw member
Removing the keyed lever
Removing the plain lever
Reinstalling the levers
7–2
7–3
7–3
7–4
Removing the battery door (four-cell door shown)
7–5
Removing the battery pack (four-cell pack shown)
7–6
Removing the escutcheon
7–6
Disconnecting the motor connector
7–7
Removing the bushings, trim hole inserts, and hub washers
Locating the backup battery tab
7–7
7–8
Reinstalling the bushings, trim hole inserts, and hub washers
Feeding the wire harness connectors through the harness hole
Connecting the motor connector
Securing the escutcheons
xii
7–9
7–10
7–11
7–12
Reinstalling the battery pack (four-cell pack shown)
7–13
Reinstalling the battery door (four-cell door shown)
7–14
B.A.S.I.S. G Service Manual
Figures
Removing the inside rose liner
7–15
Removing the outside rose liner
7–15
Reinstalling the outside rose liner
Reinstalling the inside rose liner
7–16
7–17
SERVICING EXIT HARDWARE TRIM PARTS
Removing and reinstalling the battery cover on the battery bracket
Removing and reinstalling the battery pack
8–4
Removing and reinstalling the battery bracket on the door
8–6
Removing and reinstalling the com port in the battery bracket
Removing and reinstalling the core
Mortise cylinder components
Rim cylinder components
8–2
8–6
8–9
8–10
8–11
Removing and reinstalling the rim cylinder for Precision Hardware installations
8–11
Removing and reinstalling the rim cylinder for Von Duprin installations
Removing and reinstalling the escutcheon
8–12
8–13
SERVICING STANDARD OUTSIDE ESCUTCHEON PARTS
Removing and reinstalling the escutcheon gasket
9–2
Removing and reinstalling the lens covers (smart card reader shown)
9–3
Removing and reinstalling the harness clamp (smart card reader shown)
9–4
Removing and reinstalling the upgrade cable (smart card reader shown)
9–5
Removing and reinstalling the sensor harness (smart card reader shown)
9–6
Removing and reinstalling the primary harness from the
electronics board (smart card reader shown) 9–7
Disconnecting the sounder and com port from the outside escutcheon
Connecting the sounder and com port to the outside escutcheon
9–8
9–9
Removing and reinstalling the magnetic stripe control electronics board
Removing and reinstalling the smart card control electronics board
9–10
9–12
Disconnecting the flex cable from the smart card control electronics board
9–13
Connecting the flex cable to the smart card control electronics board
Removing and reinstalling the dual validation control electronics board
9–14
9–15
Removing and reinstalling the screws for the magnetic stripe reader assembly
9–17
Removing the magnetic stripe reader assembly from the outside escutcheon
9–18
Positioning the magnetic stripe reader assembly
9–19
Removing and reinstalling the screws for the smart card reader assembly
9–20
Removing the smart card reader assembly from the outside escutcheon
9–21
B.A.S.I.S. G Service Manual
xiii
Figures
Positioning the smart card reader assembly
9–22
Removing and reinstalling the screws for the dual validation reader assembly
9–23
Removing the dual validation reader assembly from the outside escutcheon
9–24
Positioning the dual validation reader assembly
9–25
SERVICING EXIT HARDWARE TRIM ESCUTCHEON PARTS
Removing and reinstalling the mounting standoffs
10–2
Removing and reinstalling the escutcheon gasket
10–3
Removing and reinstalling the lift finger (Precision Hardware rim configuration
shown) 10–4
Removing and reinstalling the mounting plate
10–6
Removing and reinstalling the lever return springs
Removing the motor assembly
10–14
Rotating the motor assembly gear
Routing the motor harness
10–8
10–15
10–16
Reinstalling the motor assembly
10–17
Removing and reinstalling the locking plate
Reinstalling the locking plate
10–18
10–19
Removing and reinstalling the yoke
10–20
Removing and reinstalling the c-clip
10–22
Removing and reinstalling the beam and beam roller
Removing and reinstalling the lever assembly
Removing and reinstalling the shear pin
Changing the handing
10–23
10–24
10–26
10–29
MAINTENANCE
Removing the backup battery (escutcheon for standard mortise lock shown)
11–2
Reinstalling the backup battery (escutcheon for standard mortise lock shown)
11–3
Removing the battery door (four-cell door shown)
11–4
Removing the battery pack (four-cell pack shown)
11–5
Reinstalling the battery pack (eight-cell pack shown)
11–6
Reinstalling the battery door (eight-cell door shown)
11–7
Removing and reinstalling the battery cover on the battery bracket
Removing and reinstalling the battery pack
11–8
Connecting the sensor harness to the electronics board
Removing the V Series sensor switch assembly
xiv
11–8
11–10
11–11
B.A.S.I.S. G Service Manual
Figures
B.A.S.I.S. Transport Diagnostics window and Diagnostics Codes window
11–13
Connecting the PDA to a standard lock
11–15
Locating the communication port for exit hardware trim
Starting B.A.S.I.S. Transport
11–15
11–16
Disconnecting the programming cable from the lock
11–17
TROUBLESHOOTING
Enabling communications with the password override button (escutcheon for
standard mortise lock shown) 12–4
Connecting the programming cable to the lock
B.A.S.I.S. G Service Manual
12–6
xv
Figures
xvi
B.A.S.I.S. G Service Manual
1
GETTING STARTED
INTRODUCTION
The B.A.S.I.S. G Service Manual contains essential
information to help you maintain your B.A.S.I.S. G
Locks and EX Series Exit Hardware Trim.
Throughout this manual, the term standard
B.A.S.I.S. G Locks is used to refer to 35HG Mortise
Locks and 93KG–95KG Cylindrical Locks.
The term EX Series Exit Hardware Trim refers to EXG
Exit Hardware Trim. B.A.S.I.S. EX Series Exit
Hardware Trim is available for use with the following
types of exit devices manufactured by Precision
Hardware (1000 Series and 2000 Series) and Von
Duprin (98/99 Series):
■
■
■
■
rim
mortise
surface vertical rod
concealed vertical rod.
Standard B.A.S.I.S. G Locks and EX Series Exit
Hardware Trim are available with the following types
of readers:
■
■
■
B.A.S.I.S. G Service Manual
magnetic stripe card readers
smart card readers
dual validation (magnetic stripe card/keypad)
readers.
1–1
Getting Started
B.A.S.I.S. G PRODUCT OVERVIEW
System
overview
Figure 1.1 shows the components of the B.A.S.I.S. G system. The table
below defines each of the components in the system.
Components
Definition
Magnetic stripe card Device that reads, encodes, and erases information on a
encoder
magnetic stripe card.
1–2
Smart card encoder
(not shown)
Device that reads, encodes, and erases information on a smart
card.
Magnetic stripe
electronic lock
A battery-powered, self-contained, programmable lock that
uses standard magnetic stripe cards and controls access to a
door.
Smart card
electronic lock
(not shown)
A battery-powered, self-contained, programmable lock that
uses smart cards and controls access to a door.
Dual validation
electronic lock
(not shown)
A battery-powered, self-contained, programmable lock that
uses standard magnetic stripe cards and PINs, and controls
access to a door.
Exit hardware trim
(not shown)
B.A.S.I.S. escutcheon assembly (including B.A.S.I.S. reader and
control electronics) and external battery compartment used
with mortise, rim, concealed vertical rod, and surface vertical
rod exit hardware (panic) devices.
PDA running
B.A.S.I.S. Transport
software
Device that lets you transfer reader configurations from
B.A.S.I.S. 2002 System Administration to the locks, transfer
history records from B.A.S.I.S. Locks and EX Series Exit
Hardware Trim to System Administration, and view
diagnostics information for B.A.S.I.S. Locks and EX Series Exit
Hardware Trim.
B.A.S.I.S. 2002
software
Software that lets you define programming settings and the
user database for groups of locks, as well as individual locks.
The software lets you view and print information about locks
at any time.
Access card
A card containing identification information. A card is given to
a user and is similar to a key, letting the user gain access to a
controlled area.
Programming cable
A cable for connecting B.A.S.I.S. Locks and Exit Hardware
Trim to the serial cable.
Serial cable
A cable for connecting the programming cable to the PDA.
B.A.S.I.S. G Service Manual
Getting Started
Personal computer running
B.A.S.I.S. 2002 software
Personal digital assistant
(PDA) running B.A.S.I.S.
Transport software
Access card
Serial cable
Mortise
magnetic stripe
electronic lock
Programming cable
Figure 1.1
Magnetic stripe
card encoder
Not shown:
– Cylindrical magnetic stripe
electronic lock
– Mortise and cylindrical smart
card electronic locks
– Mortise and cylindrical dual
validation electronic locks
– Exit hardware trim
– Smart card encoder
System overview diagram
B.A.S.I.S. G Service Manual
1–3
Getting Started
Mortise lock
overview
The diagram below shows an exploded view of the components of the
B.A.S.I.S. G Mortise Lock, indicating their orientation to the door.
Inside trim
Outside trim
Figure 1.2
Mortise lock overview diagram
Cylindrical lock
overview
The diagram below shows an exploded view of the components of the
B.A.S.I.S. G Cylindrical Lock, indicating their orientation to the door.
Inside trim
Outside trim
Figure 1.3
1–4
Cylindrical lock overview diagram
B.A.S.I.S. G Service Manual
Getting Started
CERTIFICATIONS AND STANDARDS
B.A.S.I.S. G Locks
■
The B.A.S.I.S. 9KG and 35HG Locks comply with FCC and Canadian
EMC requirements.
Mortise locks
■
The strike fits the standard door frame cutout as specified in
ANSI A115.1.
The 35H locks meet or exceed ANSI A156.13, Series 1000,
Grade 1 Operational, and Grade 2 Security standards.
The 35H locks are certified in the Builders Hardware Manufacturers
Association Directory.
The #14 and #15 lever handles conform to California Administrative
Code Title 19 and Title 24.
■
■
■
Cylindrical locks
■
■
■
■
Exit hardware trim
The 9K locks comply with ANSI A156.2, Series 4000 Grade 1
standards.
The chassis conforms to ANSI A115.2.
The strike fits the standard door frame cutout as specified in
ANSI A115.2.
The #14 and #15 lever handles conform to California Administrative
Code Title 19 and Title 24.
■
The B.A.S.I.S. EX Series Exit Hardware Trim complies with FCC and
Canadian EMC requirements.
■
The B.A.S.I.S. EX Series Exit Hardware Trim meets
ANSI/BHMA A156.3 for panic devices.
B.A.S.I.S. G Service Manual
1–5
Getting Started
DOCUMENTATION PACKAGE
The following documentation is available to help you with the
installation, start-up, and maintenance of your B.A.S.I.S. G Locks and EX
Series Exit Hardware Trim.
The installation and upgrade instructions also can be ordered
separately:
Document Title
Doc. No.
Installation Instructions for B.A.S.I.S. Cylindrical Locks
(with brass escutcheons)
T61835
Installation Instructions for B.A.S.I.S. Mortise Locks
(with brass escutcheons)
T61836
Installation Instructions for B.A.S.I.S. Cylindrical Locks
(with zinc escutcheons)
T63301
Installation Instructions for B.A.S.I.S. Mortise Locks
(with zinc escutcheons)
T63302
Installation Instructions for B.A.S.I.S. EX Series Exit
Hardware Trim
T61828
Instructions for Upgrading B.A.S.I.S. Locks with Zinc
Escutcheons to Brass Escutcheons
T61854
Instructions for Upgrading V Series Locks to
B.A.S.I.S. Locks
T61837
The templates and specifications required for lock and exit hardware
trim installations also can be ordered separately:
Document Title
Doc. No.
G01 Template; Installation Specifications for 93KG &
93KBV Cylindrical Locks with Small Strike
T63305
G02 Template; Installation Specifications for 93KG &
93KBV Cylindrical Locks with Large Strike
T63310
G03 Template; Installation Specifications for 35HG &
35HBV Mortise Locks
T63306
G04 Template; Hole Pattern Chart for 35HG & 35HBV
Mortise Locks
T63311
G05 Template; Installation Template for 93KG & 93KBV T63303
Cylindrical Locks
1–6
G06 Template; Installation Template for 35HG &
35HBV Mortise Locks
T63304
G07 Installation Template for EXG & EXBV Exit
Hardware Trim for Use with Von Duprin 98/99 Series
Devices
T61824
G08 Installation Template for EXG & EXBV Exit
Hardware Trim for Use with Precision Hardware
1000/2000 Series Devices
T61825
B.A.S.I.S. G Service Manual
Getting Started
Document Title
Doc. No.
G09 Installation Specification for EXG & EXBV Exit
Hardware Trim for Use with Von Duprin 98/99 Series
Devices
T61826
G10 Installation Specification for EXG & EXBV Exit
Hardware Trim for Use with Precision Hardware
1000/2000 Series Devices
T61827
The service manuals referred to in this manual can also be ordered
separately:
Document Title
Doc. No.
H Series Service Manual
T61964
9K Series Service Manual
T56082
8K Series Service Manual
T56081
B.A.S.I.S. V Service Manual
T61805
The BEST document for the B.A.S.I.S. software can also be ordered
separately:
Document Title
Doc. No.
B.A.S.I.S. G Getting Started Guide
T63308
B.A.S.I.S. Transport User’s Guide
T63307
B.A.S.I.S. G Service Manual
1–7
Getting Started
TECHNICAL SUPPORT
Support
services
Telephone
technical
support
When you have a problem with a B.A.S.I.S. G Lock or EX Series Exit
Hardware Trim, your first resource for help is the B.A.S.I.S. G Service
Manual. If you cannot find a satisfactory answer, contact your local
BEST representative.
A factory-trained Certified Product Specialist (CPS) is available in your
area whenever you need help. Before you call, however, please make
sure that the product is in your immediate vicinity, and that you are
prepared to give the following information:
■
■
what happened and what you were doing when the problem arose
what you have done so far to correct the problem.
Best Access Systems Representatives provide telephone technical
support for all B.A.S.I.S. G products. You may locate the representative
nearest you by calling (317) 849-2250 Monday through Friday, between
7:00 a.m. and 4:00 p.m. eastern standard time; or visit the web page
www.BestAccess.com.
1–8
B.A.S.I.S. G Service Manual
2
STANDARD FUNCTIONS AND
PARTS
The following pages contain function descriptions
for all standard B.A.S.I.S. G Locks. This chapter also
includes exploded diagrams that show all fieldserviceable mechanical parts, diagrams of trim and
other miscellaneous parts, as well as trim and reader
conversion information.
B.A.S.I.S. G Service Manual
2–1
Standard Functions and Parts
FUNCTION DESCRIPTIONS
This section includes function descriptions grouped by the following
function types:
■ mortise
■ cylindrical.
Mortise functions
The following lists describe how the latchbolt, deadbolt, outside lever,
and inside lever operate for each standard B.A.S.I.S. mortise function.
Deadbolt
Outside key
Latchbolt
Turn knob
Auxiliary dead latch
Outside
Figure 2.1
Understanding mortise function drawings
EV–Latchbolt with key override
Latchbolt operated by:
■ outside key
■ outside lever—unless locked
by internal motor drive
mechanism
■ inside lever
Outside lever locked by:
■ internal motor drive
mechanism operated by time–
activated electronic signal or
by valid card/PIN
Outside lever unlocked by:
■ internal motor drive
mechanism operated by time–
activated electronic signal or
by valid card/PIN
Inside lever is always unlocked
2–2
Inside
FV–Deadbolt with key override
Latchbolt operated by:
■ outside key
■ outside lever—unless locked
by internal motor drive
mechanism
■ inside lever
Latchbolt deadlocked by
auxiliary latch
Deadbolt operated by:
■ outside key
■ inside turn–knob
■ outside lever when lever is
unlocked by internal motor
drive mechanism (retracts
only)
■ inside lever (retracts only)
Outside lever locked and
unlocked by:
■ internal motor drive
mechanism operated by time–
activated electronic signal or
by valid card/PIN (if deadbolt
is thrown, deadbolt override
privilege is required)
Inside lever is always unlocked
B.A.S.I.S. G Service Manual
Standard Functions and Parts
LV–Deadbolt without key override
Latchbolt operated by:
■ outside lever—unless locked
by internal motor drive
mechanism
■ inside lever (deadlocked by
auxiliary latch)
Latchbolt deadlocked by
auxiliary latch
Deadbolt operated by:
■ inside turn–knob
■ outside lever when lever is
unlocked by internal motor
drive mechanism (retracts
only)
■ inside lever (retracts only)
Outside lever locked and
unlocked by:
■ internal motor drive
mechanism operated by time–
activated electronic signal or
by valid card/PIN (if deadbolt
is thrown, deadbolt override
privilege is required)
Inside lever is always unlocked
B.A.S.I.S. G Service Manual
NV–Latchbolt without key override
Latchbolt operated by:
■ outside lever—unless locked
by internal motor drive
mechanism
■ inside lever
Outside lever locked by:
■ internal motor drive
mechanism operated by time–
activated electronic signal or
by valid card/PIN
Outside lever unlocked by:
■ internal motor drive
mechanism operated by time–
activated electronic signal or
by valid card/PIN
Inside lever is always unlocked
2–3
Standard Functions and Parts
Cylindrical function
The following list describes how the latchbolt, outside lever, and inside
lever operate for the standard B.A.S.I.S. cylindrical function.
Latchbolt
Outside key
Outside
Figure 2.2
Inside
Understanding the cylindrical function drawing
DV–Latchbolt with key override
Latchbolt operated by:
■ outside key
■ outside lever—unless locked
by internal motor drive
mechanism
■ inside lever
Outside lever locked by:
■ internal motor drive
mechanism operated by time–
activated electronic signal or
by valid card/PIN
Outside lever unlocked by:
■ internal motor drive
mechanism operated by time–
activated electronic signal or
by valid card/PIN
Inside lever is always unlocked
2–4
B.A.S.I.S. G Service Manual
B.A.S.I.S. G Service Manual
TRIM COMPONENTS
MAGNETIC STRIPE READER AND TRIM EXPLODED DIAGRAM
21
19
15
2
3
5
4
6
8
11
9 10
12
17
23
24
18
13 14
22
20
7
1
2–5
Figure 2.3
Magnetic stripe reader and trim exploded diagram (mortise shown)
Standard Functions and Parts
16
Standard Functions and Parts
Magnetic stripe
reader and trim
parts list
2–6
Refer to Figure 2.3 and the table below to find the part that you need.
Item
Part No.
1
A35455
Qty. Part
1
#15 outside lever assemblya (mortise locks) or
not shown B55168
1
#15 keyed lever handleb (cylindrical locks)
2
See magnetic stripe
reader kits
(page 4–4)
1
Magnetic stripe reader
3
B60321
1
Reader gasket
4
D62506
1
35HG brass outside escutcheon with key
(EV and FV functions) or
not shown D62508
1
35HG brass outside escutcheon for use with
non-BEST cores (EV and FV functions) or
not shown D62505
1
35HG brass outside escutcheon without key
(LV and NV functions) or
not shown D62507
1
9KG brass outside escutcheon assembly
(DV function) or
not shown C60445
1
35HG zinc outside escutcheon with key
(EV and FV functions) or
not shown C60406
1
35HG zinc outside escutcheon for use with
non-BEST cores (EV and FV functions) or
not shown C60446
1
35HG zinc outside escutcheon without key (LV
and NV functions) or
not shown C60449
1
9KG zinc outside escutcheon assembly
(DV function)
5
See lens cover kit
(page 4–6)
2
Lens cover
6
See screw kits
(page 4–7)
4
Reader assembly mounting screw
7
See primary harness
kit (page 4–6)
1
Tape for mounting the sounder
8
See magnetic stripe
control electronics
kit (page 4–5)
1
Magnetic stripe control electronics board
assembly (with backup battery)
9
See backup battery
kit (page 4–5)
1
Backup battery
10
See upgrade cable
kit (page 4–6)
1
Upgrade cablec
11
See sensor harness
kit (page 4–6)
1
Sensor harness
12
See primary harness
kit (page 4–6)
1
Primary harness
13
See screw kits
(page 4–7)
2
Electronics board mounting screw
14
B63294
1
Harness clamp
15
A60725
1
Outside escutcheon gasket
16
1818846
2
Bushing
B.A.S.I.S. G Service Manual
Standard Functions and Parts
Item
Part No.
17
B61439
2
Trim hole insert
18
B60726
1
Battery pack or
not shown B62101
1
Eight-cell battery packd
C80894
1
35HG brass inside escutcheon with turn knobe
(FV and LV functions) or
not shown D62104
1
35HG brass inside escutcheon without turn
knob for (EV and NV functions) or
not shown D62102
1
9KG brass inside escutcheon
(DV function) or
not shown B60768
1
35HG zinc inside escutcheon with turn knobe
(FV and LV functions) or
not shown B60778
1
35HG zinc inside escutcheon without turn
knob for (EV and NV functions) or
not shown B60749
1
9KG zinc inside escutcheon
(DV function)
19
Qty. Part
20
See screw kits
(page 4–7)
1
Lower escutcheon screw
21
See screw kits
(page 4–7)
1
Upper escutcheon screw
22
A35454
1
#15 inside lever assemblya (mortise locks) or
not shown B55169
1
#15 plain lever handleb (cylindrical locks)
B62128
1
Battery door for brass escutcheons or
not shown C61410
1
Battery door for zinc escutcheons or
not shown B62101
1
Eight-cell battery door for brass escutcheonsd or
not shown C62100
1
Eight-cell battery door for zinc escutcheons
See screw kits
(page 4–7)
1
Battery door screw (TORX with post head) or
not shown See screw kits
(page 4–7)
1
Battery door screw (McGard head)
23
24
a.
b.
c.
d.
See the H Series Service Manual for other lever styles.
See the 9K Series Service Manual for other lever styles.
The upgrade cable is for future use.
If you need to upgrade to the eight-cell battery pack and door, see the Eight-Cell Battery
Upgrade kit on page 4–5.
e. This item includes the battery door.
B.A.S.I.S. G Service Manual
2–7
21
19
15
2
3
5
4
6
8
11
9 10
12
17
23
Standard Functions and Parts
2–8
SMART CARD READER AND TRIM EXPLODED DIAGRAM
24
18
13 14
22
20
B.A.S.I.S. G Service Manual
16
7
1
Figure 2.4
Smart card reader and trim exploded diagram (mortise shown)
Standard Functions and Parts
Smart card reader
and trim parts list
Refer to Figure 2.4 and the table below to find the part that you need.
Item
Part No.
1
A35455
Qty. Part
1
#15 outside lever assemblya (mortise locks) or
not shown B55168
1
#15 keyed lever handleb (cylindrical locks)
2
See smart card
reader kit (page 4–4)
1
Smart card reader
3
B60321
1
Reader gasket
4
D62506
1
35HG brass outside escutcheon with key
(EV and FV functions) or
not shown D62508
1
35HG brass outside escutcheon for use with
non-BEST cores (EV and FV functions) or
not shown D62505
1
35HG brass outside escutcheon without key
(LV and NV functions) or
not shown D62507
1
9KG brass outside escutcheon assembly
(DV function) or
not shown C60445
1
35HG zinc outside escutcheon with key
(EV and FV functions) or
not shown C60406
1
35HG zinc outside escutcheon for use with
non-BEST cores (EV and FV functions) or
not shown C60446
1
35HG zinc outside escutcheon without key (LV
and NV functions) or
not shown C60449
1
9KG zinc outside escutcheon assembly
(DV function)
B.A.S.I.S. G Service Manual
5
See lens cover kit
(page 4–6)
2
Lens cover
6
See screw kits
(page 4–7)
4
Reader assembly mounting screw
7
See primary harness
kit (page 4–6)
1
Tape for mounting the sounder
8
See smart card
control electronics
kit (page 4–5)
1
Smart card control electronics board assembly
(with backup battery)
9
See backup battery
kit (page 4–5)
1
Backup battery
10
See upgrade cable kit
(page 4–6)
1
Upgrade cablec
11
See sensor harness
kit (page 4–6)
1
Sensor harness
12
See primary harness
kit (page 4–6)
1
Primary harness
13
See screw kits
(page 4–7)
2
Electronics board mounting screw
14
B63294
1
Harness clamp
15
A60725
1
Outside escutcheon gasket
16
1818846
2
Bushing
2–9
Standard Functions and Parts
Item
Part No.
17
B61439
2
Trim hole insert
18
B60726
1
Battery pack or
not shown B62101
1
Eight-cell battery packd
C80894
1
35HG brass inside escutcheon with turn knobe
(FV and LV functions) or
not shown D62104
1
35HG brass inside escutcheon without turn
knob for (EV and NV functions) or
not shown D62102
1
9KG brass inside escutcheon
(DV function) or
not shown B60768
1
35HG zinc inside escutcheon with turn knobe
(FV and LV functions) or
not shown B60778
1
35HG zinc inside escutcheon without turn
knob for (EV and NV functions) or
not shown B60749
1
9KG zinc inside escutcheon
(DV function)
19
Qty. Part
20
See screw kits
(page 4–7)
1
Lower escutcheon screw
21
See screw kits
(page 4–7)
1
Upper escutcheon screw
22
A35454
1
#15 inside lever assemblya (mortise locks) or
not shown B55169
1
#15 plain lever handleb (cylindrical locks)
B62128
1
Battery door for brass escutcheons or
not shown C61410
1
Battery door for zinc escutcheons or
not shown B62101
1
Eight-cell battery door for brass escutcheonsd or
not shown C62100
1
Eight-cell battery door for zinc escutcheons
See screw kits
(page 4–7)
1
Battery door screw (TORX with post head) or
not shown See screw kits
(page 4–7)
1
Battery door screw (McGard head)
23
24
a.
b.
c.
d.
See the H Series Service Manual for other lever styles.
See the 9K Series Service Manual for other lever styles.
The upgrade cable is for future use.
If you need to upgrade to the eight-cell battery pack and door, see the Eight-Cell Battery
Upgrade kit on page 4–5.
e. This item includes the battery door.
2–10
B.A.S.I.S. G Service Manual
B.A.S.I.S. G Service Manual
DUAL VALIDATION READER AND TRIM EXPLODED DIAGRAM
21
19
15
2
3
5
4
6
8
11
9 10
12
17
23
24
18
13 14
22
20
7
1
2–11
Figure 2.5
Dual validation reader and trim exploded diagram (mortise shown)
Standard Functions and Parts
16
Standard Functions and Parts
Dual validation
reader and trim
parts list
2–12
Refer to Figure 2.5 and the table below to find the part that you need.
Item
Part No.
1
A35455
Qty. Part
1
#15 outside lever assemblya (mortise locks) or
not shown B55168
1
#15 keyed lever handleb (cylindrical locks)
2
See dual validation
reader kits
(page 4–4)
1
Dual validation reader
3
A60725
1
Reader gasket
4
D62506
1
35HG brass outside escutcheon with key
(EV and FV functions) or
not shown D62508
1
35HG brass outside escutcheon for use with
non-BEST cores (EV and FV functions) or
not shown D62505
1
35HG brass outside escutcheon without key (LV
and NV functions) or
not shown D62507
1
9KG brass outside escutcheon assembly
(DV function) or
not shown C60445
1
35HG zinc outside escutcheon with key
(EV and FV functions) or
not shown C60406
1
35HG zinc outside escutcheon for use with
non-BEST cores (EV and FV functions) or
not shown C60446
1
35HG zinc outside escutcheon without key (LV
and NV functions) or
not shown C60449
1
9KG zinc outside escutcheon assembly
(DV function)
5
See lens cover kit
(page 4–6)
2
Lens cover
6
See screw kits
(page 4–7)
4
Reader assembly mounting screw
7
See primary
harness kit
(page 4–6)
1
Tape for mounting the sounder
8
See dual validation
control electronics
kit (page 4–5)
1
Dual validation control electronics board
assembly (with backup battery)
9
See backup battery
kit (page 4–5)
1
Backup battery
10
See upgrade cable
kit (page 4–6)
1
Upgrade cablec
11
See sensor harness
kit (page 4–6)
1
Sensor harness
12
See primary
harness kit
(page 4–6)
1
Primary harness
13
See screw kits
(page 4–7)
2
Electronics board mounting screw
14
B63294
1
Harness clamp
B.A.S.I.S. G Service Manual
Standard Functions and Parts
Item
Part No.
15
A60725
1
Outside escutcheon gasket
16
1818846
2
Bushing
17
B61439
2
Trim hole insert
18
B60726
1
Battery pack or
not shown B62101
1
Eight-cell battery packd
C80894
1
35HG brass inside escutcheon with turn knobe
(FV and LV functions) or
not shown D62104
1
35HG brass inside escutcheon without turn
knob for (EV and NV functions) or
not shown D62102
1
9KG brass inside escutcheon
(DV function) or
not shown B60768
1
35HG zinc inside escutcheon with turn knobe
(FV and LV functions) or
not shown B60778
1
35HG zinc inside escutcheon without turn knob
for (EV and NV functions) or
not shown B60749
1
9KG zinc inside escutcheon
(DV function)
19
Qty. Part
20
See screw kits
(page 4–7)
1
Lower escutcheon screw
21
See screw kits
(page 4–7)
1
Upper escutcheon screw
22
A35454
1
#15 inside lever assemblya (mortise locks) or
not shown B55169
1
#15 plain lever handleb (cylindrical locks)
B62128
1
Battery door for brass escutcheons or
not shown C61410
1
Battery door for zinc escutcheons or
not shown B62101
1
Eight-cell battery door for brass escutcheonsd or
not shown C62100
1
Eight-cell battery door for zinc escutcheons
See screw kits
(page 4–7)
1
Battery door screw (TORX with post head) or
not shown See screw kits
(page 4–7)
1
Battery door screw (McGard head)
23
24
a.
b.
c.
d.
See the H Series Service Manual for other lever styles.
See the 9K Series Service Manual for other lever styles.
The upgrade cable is for future use.
If you need to upgrade to the eight-cell battery pack and door, see the Eight-Cell Battery
Upgrade kit on page 4–5.
e. This item includes the battery door.
B.A.S.I.S. G Service Manual
2–13
Standard Functions and Parts
MORTISE COMPONENTS
Mortise case
exploded diagram
1
2
3
25
29
24
28
23
27
22
21
26
20
4
5
19
17
7
6
16
16
18
15
8
9
10
14
13
11
12
Figure 2.6
2–14
FV function mortise case exploded diagram (LH case shown)
B.A.S.I.S. G Service Manual
Standard Functions and Parts
Mortise case parts
list
Refer to Figure 2.6 and the table below to find the part you need.
Item
Part No. Qty. Description
1
A34087
5
Case cover mounting screws
2
B60481
1
Case cover
3
1833885 1
Sensor module with deadbolt and key override kit (FV
function)
not shown 1838747 1
Sensor module with deadbolt kit (LV function)
not shown 1833927 1
Sensor module with key override kit (EV function)
B.A.S.I.S. G Service Manual
4
B35035
1
Deadbolt (FV and LV functions)
5
C34011
1
Turn knob hub (FV and LV functions)
6
B34032
1
Turn knob hub spacer (FV and LV functions)
7
A35257
1
Cylinder clamp plate (EV and FV functions)
8
B61302
1
Case assembly
9
C34053
1
Armored front
10
A34450
1
Case mounting screw
11
B34092
1
Auxiliary bolt
12
A60346
1
Mortise case spacer
13
B60493
1
Motor module
14
A34236
1
Wire strain relief
15
A34065
1
Lower auxiliary spring
16
B34020
2
Auxiliary return levers
17
A34066
1
Upper auxiliary spring
18
A34048
1
Stop pin
19
A35004
1
Latch lever
20
B35019
1
Latchbolt
21
B60467
1
Locking bar
22
B34043
1
Inside hub
23
B34003
1
Outside hub
24
B35490
1
Long hub lever
25
A34081
1
Hub lever spring
26
A35002
1
Deadlocking lever
27
A34315
1
Retaining ring
28
A61210
1
Auxiliary bolt spring
29
A34018
1
Deadlocking spring
2–15
Standard Functions and Parts
Other mortise
components
diagram
1
4
2
10
9
3
11
11
5
6
8
Figure 2.7
2–16
7
8
Other mortise components
B.A.S.I.S. G Service Manual
Standard Functions and Parts
Other mortise
components
parts list
Refer to Figure 2.7 and the table below to find the part you need.
Item
Part no. Qty. Description
1
A18991
2
Mounting plate screw
2
B35030
1
Inside mounting plate
3
B35247
1
Outside mounting plate
4
B61231
1
Cylinder for 1 3/4″–2″ thick doors for brass escutcheons
(EV or FV functions)
not shown B61232
1
Cylinder for 2 1/4″–2 1/2″ thick doors for brass escutcheons
(EV or FV functions)
not shown B61233
1
Cylinder for 2 3/4″–3″ thick doors for brass escutcheons
(EV or FV functions)
not shown B61307
1
Cylinder for 1 3/4″–2″ thick doors for zinc escutcheons
(EV or FV functions)
not shown B61308
1
Cylinder for 2 1/4″–2 1/2″ thick doors for zinc escutcheons
(EV or FV functions)
not shown B61309
1
Cylinder for 2 3/4″–3″ thick doors for zinc escutcheons
(EV or FV functions)
5
B34380
1
Strike box
6
C29517
1
Strike plate for LH/RHRB or
7
C29516
1
Strike plate for RH/LHRB
8
A18724
not shown A34450
2
2
Standard strike screw
Security strike screw
9
B34515
1
Faceplate for EV and NV functions
10
D34095
1
Faceplate for FV and LV functions (deadbolt)
11
A18722
not shown A34454
2
2
Standard faceplate screw or
Security faceplate screw
B.A.S.I.S. G Service Manual
2–17
Standard Functions and Parts
2–18
CYLINDRICAL COMPONENTS
CYLINDRICAL CHASSIS DIAGRAM
Inside
Outside
B.A.S.I.S. G Service Manual
Figure 2.8
Cylindrical chassis diagram
Standard Functions and Parts
Cylindrical chassis
parts list
Refer to Figure 2.8 and the table below to find the part you need.
Chassis type
Part no.
Standard chassis
D60464
Chassis for non-BEST cores
D60332
Free motion chassis
D56025
B.A.S.I.S. G Service Manual
2–19
Standard Functions and Parts
Other cylindrical
lock components
diagram
3
4
5
1
2
9
6
7
8
Figure 2.9
Other cylindrical
lock components
parts list
Refer to Figure 2.9 and the table below to find the part you need.
Item
Part no.
Qty.
Description
1
B34380
1
Strike box
2
B25641
1
Strike plate
3
A18724
2
Strike screw
C54680
C51682
C54684
1
1
1
Latch for 2 3/4″ backset
Latch for 3 3/4″ backset
Latch for 5″ backset
5
A25359
2
Latch screw
6
B55603
1
Small outside rose liner
7
C55556
1
Small inside rose liner
8
B55557
2
Through-bolt screw
9
A80775
2
Hub washer
4
not shown
not shown
2–20
Other cylindrical lock components
B.A.S.I.S. G Service Manual
3
EXIT HARDWARE TRIM
FUNCTIONS AND PARTS
The following pages contain function descriptions
for B.A.S.I.S. G EX Series Exit Hardware Trim. This
chapter also includes exploded diagrams showing all
field-serviceable exit hardware trim parts.
B.A.S.I.S. G Service Manual
3–1
Exit Hardware Trim Functions and Parts
FUNCTION DESCRIPTIONS
The following lists describe how the latchbolt, outside lever, and inside
trim operate for each EX Series Exit Hardware Trim function.
EV–With key override
Latchbolt operated by:
■ outside key
■ outside lever—unless locked
by internal motor drive
mechanism
■ inside lever
Outside lever locked by:
■ internal motor drive
mechanism operated by time–
activated electronic signal or
by valid card/PIN
Outside lever unlocked by:
■ internal motor drive
mechanism operated by time–
activated electronic signal or
by valid card/PIN
Inside trim is always unlocked
3–2
NV–Without key override
Latchbolt operated by:
■ outside lever—unless locked
by internal motor drive
mechanism
■ inside lever
Outside lever locked by:
■ internal motor drive
mechanism operated by time–
activated electronic signal or
by valid card/PIN
Outside lever unlocked by:
■ internal motor drive
mechanism operated by time–
activated electronic signal or
by valid card/PIN
Inside trim is always unlocked
B.A.S.I.S. G Service Manual
B.A.S.I.S. G Service Manual
TRIM COMPONENTS
MAGNETIC STRIPE READER AND TRIM EXPLODED DIAGRAM
31
28
32
29
27
26
24
23
1
3
5
6
7 11
16
14
18
30
17
25
20
8
3–3
2
Figure 3.1
9 10
12
13
15
19
4
Magnetic stripe reader and trim exploded diagram (Precision Hardware–rim type shown)
Exit Hardware Trim Functions and Parts
21 22
Exit Hardware Trim Functions and Parts
Magnetic stripe
reader and trim
parts list
3–4
Refer to Figure 3.1 and the table below to find the part that you need.
Item
Part No.
Qty. Part
1
See magnetic stripe
reader kits
(page 4–4)
1
Magnetic stripe reader
2
See levers (page 3–14)
1
Lever assembly (#15 lever shown)
3
B60321
1
Reader gasket
4
See shear pin kit
(page 4–10)
1
Shear pin
5
C64565
1
Escutcheon with key (EV function)
not shown C64550
1
Escutcheon without key (NV function)
6
See lens cover kit
(page 4–6)
2
Lens cover with retaining ring
7
See screw kits
(page 4–7)
4
Reader assembly mounting screw
8
B64557
1
Beam
9
A64571
1
Beam roller
10
A64609
1
C-clip
11
A64610
2
Lever return spring
12
C64552
1
Yoke
13
See screw kits
(page 4–7)
4
Shoulder screw
14
See magnetic stripe
control electronics kit
(page 4–5)
1
Magnetic stripe control electronics board
assembly (with backup battery)
15
B64562
1
Locking plate
16
See backup battery kit
(page 4–5)
1
Backup battery
17
See primary harness
kit (page 4–10)
1
Tape for mounting the sounder
18
See screw kits
(page 4–7)
2
Electronics board mounting screw
19
See motor assembly
kit (page 4–10)
1
Motor assembly (with socket head screw and
spacer)
20
C64558
1
Lift finger for Precision Hardware rim and rod
installations
not shown C64633
1
Lift finger for Von Duprin rim and rod
installations
not shown C64576
1
Lift finger (left hand) for Precision Hardware
mortise installations
not shown C64568
1
Lift finger (right hand) for Precision Hardware
mortise installations
not shown C64566
1
Lift finger for Von Duprin mortise installations
B.A.S.I.S. G Service Manual
Exit Hardware Trim Functions and Parts
Item
Part No.
21
A64607
1
Washer
22
See screw kits
(page 4–7)
1
Lift finger screw
23
See primary harness
kit (page 4–10)
1
Primary harness
24
D64551
1
Mounting plate for Precision Hardware
installations
not shown D64634
1
Mounting plate for Von Duprin installations
B.A.S.I.S. G Service Manual
Qty. Part
25
See screw kits
(page 4–7)
5
Mounting plate screw
26
See screw kits
(page 4–7)
6
Mounting standoff
27
C64564
1
Escutcheon gasket
28
C64560
1
Battery bracket
29
B60726
1
Battery pack
30
See screw kits
(page 4–7)
2
Battery bracket screw
31
C64559
1
Battery cover
32
See screw kits
(page 4–7)
1
Battery cover screw (TORX with post head)
3–5
31
28
32
29
27
26
24
23
1
3
5
6
7 11
16
14
18
30
17
21 22
B.A.S.I.S. G Service Manual
25
20
8
2
Figure 3.2
9 10
12
13
15
19
4
Smart card reader and trim exploded diagram (Precision Hardware–rim type shown)
Exit Hardware Trim Functions and Parts
3–6
SMART CARD READER AND TRIM EXPLODED DIAGRAM
Exit Hardware Trim Functions and Parts
Smart card reader
and trim parts list
Refer to Figure 3.2 and the table below to find the part that you need.
Item
Part No.
Qty. Part
1
See smart card reader
kit (page 4–4)
1
Smart card reader
2
See levers (page 3–14)
1
Lever assembly (#15 lever shown)
3
B60321
1
Reader gasket
4
See shear pin kit
(page 4–10)
1
Shear pin
5
C64565
1
Escutcheon with key (EV function)
not shown C64550
1
Escutcheon without key (NV function)
6
See lens cover kit
(page 4–6)
2
Lens cover with retaining ring
7
See screw kits
(page 4–7)
4
Reader assembly mounting screw
8
B64557
1
Beam
9
A64571
1
Beam roller
10
A64609
1
C-clip
11
A64610
2
Lever return spring
12
C64552
1
Yoke
13
See screw kits
(page 4–7)
4
Shoulder screw
14
See smart card control
electronics kit
(page 4–5)
1
Smart card control electronics board assembly
(with backup battery)
15
B64562
1
Locking plate
16
See backup battery kit
(page 4–5)
1
Backup battery
17
See primary harness
kit (page 4–10)
1
Tape for mounting the sounder
18
See screw kits
(page 4–7)
2
Electronics board mounting screw
19
See motor assembly
kit (page 4–10)
1
Motor assembly (with socket head screw and
spacer)
20
C64558
1
Lift finger for Precision Hardware rim and rod
installations
not shown C64633
1
Lift finger for Von Duprin rim and rod
installations
not shown C64576
1
Lift finger (left hand) for Precision Hardware
mortise installations
not shown C64568
1
Lift finger (right hand) for Precision Hardware
mortise installations
not shown C64566
1
Lift finger for Von Duprin mortise installations
B.A.S.I.S. G Service Manual
3–7
Exit Hardware Trim Functions and Parts
3–8
Item
Part No.
Qty. Part
21
A64607
1
Washer
22
See screw kits
(page 4–7)
1
Lift finger screw
23
See primary harness
kit (page 4–10)
1
Primary harness
24
D64551
1
Mounting plate for Precision Hardware
installations
not shown D64634
1
Mounting plate for Von Duprin installations
25
See screw kits
(page 4–7)
5
Mounting plate screw
26
See screw kits
(page 4–7)
6
Mounting standoff
27
C64564
1
Escutcheon gasket
28
C64560
1
Battery bracket
29
B60726
1
Battery pack
30
See screw kits
(page 4–7)
2
Battery bracket screw
31
C64559
1
Battery cover
32
See screw kits
(page 4–7)
1
Battery cover screw (TORX with post head)
B.A.S.I.S. G Service Manual
B.A.S.I.S. G Service Manual
DUAL VALIDATION READER AND TRIM EXPLODED DIAGRAM
31
28
32
29
27
26
24
1
3
5
7 11
6
16
14
23
18
30
17
21 22
20
8
2
3–9
Figure 3.3
9 10
12
13
15
19
4
Dual validation reader and trim exploded diagram (Precision Hardware–rim type shown)
Exit Hardware Trim Functions and Parts
25
Exit Hardware Trim Functions and Parts
Dual validation
reader and trim
parts list
3–10
Refer to Figure 3.3 and the table below to find the part that you need.
Item
Part No.
Qty. Part
1
See dual validation
reader kits
(page 4–4)
1
Dual validation reader
2
See levers (page 3–14)
1
Lever assembly (#15 lever shown)
3
A60725
1
Reader gasket
4
See shear pin kit
(page 4–10)
1
Shear pin
5
C64565
1
Escutcheon with key (EV function)
not shown C64550
1
Escutcheon without key (NV function)
6
See lens cover kit
(page 4–6)
2
Lens cover with retaining ring
7
See screw kits
(page 4–7)
4
Reader assembly mounting screw
8
B64557
1
Beam
9
A64571
1
Beam roller
10
A64609
1
C-clip
11
A64610
2
Lever return spring
12
C64552
1
Yoke
13
See screw kits
(page 4–7)
4
Shoulder screw
14
See dual validation
control electronics kit
(page 4–5)
1
Dual validation control electronics board
assembly (with backup battery)
15
B64562
1
Locking plate
16
See backup battery kit
(page 4–5)
1
Backup battery
17
See primary harness
kit (page 4–10)
1
Tape for mounting the sounder
18
See screw kits
(page 4–7)
2
Electronics board mounting screw
19
See motor assembly
kit (page 4–10)
1
Motor assembly (with socket head screw and
spacer)
20
C64558
1
Lift finger for Precision Hardware rim and rod
installations
not shown C64633
1
Lift finger for Von Duprin rim and rod
installations
not shown C64576
1
Lift finger (left hand) for Precision Hardware
mortise installations
not shown C64568
1
Lift finger (right hand) for Precision Hardware
mortise installations
not shown C64566
1
Lift finger for Von Duprin mortise installations
B.A.S.I.S. G Service Manual
Exit Hardware Trim Functions and Parts
Item
Part No.
21
A64607
1
Washer
22
See screw kits
(page 4–7)
1
Lift finger screw
23
See primary harness
kit (page 4–10)
1
Primary harness
24
D64551
1
Mounting plate for Precision Hardware
installations
not shown D64634
1
Mounting plate for Von Duprin installations
B.A.S.I.S. G Service Manual
Qty. Part
25
See screw kits
(page 4–7)
5
Mounting plate screw
26
See screw kits
(page 4–7)
6
Mounting standoff
27
C64564
1
Escutcheon gasket
28
C64560
1
Battery bracket
29
B60726
1
Battery pack
30
See screw kits
(page 4–7)
2
Battery bracket screw
31
C64559
1
Battery cover
32
See screw kits
(page 4–7)
1
Battery cover screw (TORX with post head)
3–11
Exit Hardware Trim Functions and Parts
CYLINDERS AND RELATED COMPONENTS
Mortise cylinder
and related
components
diagram
2
1
Figure 3.4
Mortise cylinder
and related
components parts
list
3–12
Mortise cylinder and related components diagram
Refer to Figure 3.4 and the table below to find the part you need.
Item
Part no.
Qty. Description
1
B35173
1
7-pin cylinder assembly
2
A06280
1
Cylinder ring
B.A.S.I.S. G Service Manual
Exit Hardware Trim Functions and Parts
Rim cylinder and
related components
diagram
3
2
1
Figure 3.5
Rim cylinder and
related components
parts list
Rim cylinder and related components diagram
Refer to Figure 3.5 and the table below to find the part you need.
Item
Part no.
Qty. Description
1
B00689
1
7-pin cylinder assembly
2
C13910
1
Clamp plate
3
A14533
2
Mounting screws
not shown
A64635
1
Mounting sleevea
a. For Von Duprin rim and rod applications only.
B.A.S.I.S. G Service Manual
3–13
Exit Hardware Trim Functions and Parts
LEVERS
Levers diagram
1
Figure 3.6
Levers parts list
3–14
2
Levers diagram
Refer to Figure 3.6 and the table below to find the part you need.
Item
Part no.
Qty. Description
1
B64572
1
#14 round lever
2
B64577
1
#15 contoured lever
B.A.S.I.S. G Service Manual
4
SHARED STANDARD AND EXIT
HARDWARE TRIM PARTS
This chapter includes reader conversion information
for standard B.A.S.I.S. G Locks and EX Series Exit
Hardware Trim.It also includes parts lists for shared
kits and system components.
B.A.S.I.S. G Service Manual
4–1
Shared Standard and Exit Hardware Trim Parts
READER CONVERSION
The reader conversion information provided in this section applies to
both standard B.A.S.I.S. Locks and EX Series Exit Hardware Trim. To
determine whether a lock has B.A.S.I.S. G or B.A.S.I.S. V electronics, see
page 9–10.
Converting to a
magnetic stripe
reader
To change the reader for a standard B.A.S.I.S. Lock or EX Series Exit
Hardware Trim to a magnetic stripe reader, order:
■
■
Converting to a
smart card reader
B.A.S.I.S. Magnetic Stripe Reader Kit:
■ Magnetic Stripe Reader (Track 1) Kit (1837869) or
■ Magnetic Stripe Reader (Track 2) Kit (1833445) or
■ Magnetic Stripe Reader (Track 3) Kit (1837900)
B.A.S.I.S. G Magnetic Stripe Control Electronics Kit (1833529).
To change the reader for a standard B.A.S.I.S. Lock or EX Series Exit
Hardware Trim to a smart card reader, order:
■
■
B.A.S.I.S. Smart Card Reader Kit (1833560)
B.A.S.I.S. G Smart Card Control Electronics Kit (1833644).
Converting to a dual
validation reader
Since the reader gasket is extremely difficult to remove from the
escutcheon in the field, BEST does not recommend conversion to or
from a dual validation reader by replacing the reader. Contact your
BEST Representative to obtain a complete outside escutcheon
assembly.
Tasks to perform for
converting
Perform these tasks:
1. For standard locks, remove the inside and outside escutcheons
from the door. For mortise lock instructions, see page 5–3. For
cylindrical lock instructions, see page 7–5.
For exit hardware trim, remove the B.A.S.I.S. escutcheon from the
door. See page 8–13.
4–2
B.A.S.I.S. G Service Manual
Shared Standard and Exit Hardware Trim Parts
2. Replace the reader:
■
■
To replace the magnetic stripe reader, see page 9–17 (for
standard B.A.S.I.S. Locks) or page 10–12 (for EX Series Exit
Hardware Trim).
To replace the smart card reader, see page 9–20 (for standard
B.A.S.I.S. Locks) or page 10–13 (for EX Series Exit Hardware
Trim).
3. Replace the control electronics board:
To replace the magnetic stripe control electronics board,
see page 9–10 (for standard B.A.S.I.S. Locks) or page 10–10 (for
EX Series Exit Hardware Trim).
■ To replace the smart card control electronics board,
see page 9–12 (for standard B.A.S.I.S. Locks) or page 10–11 (for
EX Series Exit Hardware Trim).
4. For standard locks, reinstall the inside and outside escutcheons on
the door. For mortise lock instructions, see page 5–6. For cylindrical
lock instructions, see page 7–8.
■
For exit hardware trim, reinstall the escutcheon on the door. See
page 8–14.
B.A.S.I.S. G Service Manual
4–3
Shared Standard and Exit Hardware Trim Parts
FIELD REPLACEMENT KITS
Unless otherwise noted, each kit contains a quantity of one for each
component indicated.
Reader kits
The reader kits described in the table below are used for both standard
B.A.S.I.S. Locks and EX Series Exit Hardware Trim. To determine the
read head track position for magnetic stripe readers, see page 9–17. To
determine the read head track position for dual validation readers, see
page 9–15.
Smart Card Reader Kit
1833560
Dual Validation Reader (Track 1) Kit 1837984
Dual Validation Reader (Track 2) Kit 1838024
Dual Validation Reader (Track 3) Kit 1838066
■
■
■
■
■
Temporary operator card
Magnetic Stripe Reader (Track 3) Kit 1837900
■
Lift finger screw
Magnetic Stripe Reader (Track 2) Kit 1833445
■
Moutning plate screw
Part number
†
5
■
■
†
5
■
■
†
5
■
■
†
5
■
■
†
5
■
■
†
5
■
■
†
5
■
■
Escutcheon gaskets
Kit name
Magnetic Stripe Reader (Track 1) Kit 1837869
Magnetic stripe
reader assembly (track 1)
Magnetic stripe
reader assembly (track 2)
Magnetic stripe
reader assembly (track 3)
Smart card
reader assembly
Dual validation
reader assembly (track 1)
Dual validation
reader assembly (track 2)
Dual validation
reader assembly (track 3)
Components
†. Kit includes one escutcheon gasket for standard B.A.S.I.S. Locks and one escutcheon gasket for EX Series Exit Hardware Trim.
4–4
B.A.S.I.S. G Service Manual
Shared Standard and Exit Hardware Trim Parts
Control electronics
kits
The control electronics kits described in the table below are used for
both standard B.A.S.I.S. Locks and EX Series Exit Hardware Trim. To
determine whether a lock has B.A.S.I.S. G or B.A.S.I.S. V electronics, see
page 9–10.
■
Escutcheon gaskets
1838223
Lift finger screw
B.A.S.I.S. G Dual Validation
Control Electronics Kit
■
Moutning plate screw
1833644
Temporary operator card
B.A.S.I.S. G Smart Card
Control Electronics Kit
■
Pull-tab for backup battery
1833529
Backup battery
B.A.S.I.S. G Magnetic Stripe
Control Electronics Kit
Dual validation
control electronics board
Part number
Smart card
control electronics board
Kit name
Magnetic stripe
control electronics board
Components
■
■
■
5
■
†
■
■
■
5
■
†
■
■
■
5
■
†
†. Kit includes one escutcheon gasket for standard B.A.S.I.S. Locks and one escutcheon gasket for EX
Series Exit Hardware Trim.
Battery kits
The Backup Battery Kit is used for both standard B.A.S.I.S. Locks and
EX Series Exit Hardware Trim. The Eight-cell Battery Upgrade Kit is
used only for standard B.A.S.I.S. Locks with brass escutcheons.
1833843
Eight-cell Battery Upgrade Kit (for
standard B.A.S.I.S. Locks with brass
escutcheons)
1838705
■
†
5
Eight-cell
battery pack
Eight-cell
battery door
Backup Battery Kit
Lift finger screw
Part number
Escutcheon
gaskets
Mounting plate
screw
Kit name
Backup battery
Components
■
■
■
†. Kit includes one escutcheon gasket for standard B.A.S.I.S. Locks and one escutcheon gasket for
EX Series Exit Hardware Trim.
B.A.S.I.S. G Service Manual
4–5
Shared Standard and Exit Hardware Trim Parts
Lens cover kit
The Lens Cover Kit described in the table below is used for both
standard B.A.S.I.S. Locks and EX Series Exit Hardware Trim.
1838580
†
4
Lift finger screw
Lens Cover Kit
Mounting plate screw
Part number
Lens cover with
retaining ring
Kit name
Escutcheon gaskets
Component
10
2
†. Kit includes one escutcheon gasket for standard B.A.S.I.S. Locks and one escutcheon gasket for
EX Series Exit Hardware Trim.
Cable and harness
kits for standard
B.A.S.I.S. Locks
The cable and harness kits described in the table below are used only
for standard B.A.S.I.S. Locks. For the Primary Harness Kit for EX Series
Exit Hardware Trim, see page 4–10.
4–6
Conversion Harness Kit
1833760
Upgrade Cable Kit
1833801
Escutcheon gasket
1833728
■
Upgrade cable
Sensor Harness Kit
■
Conversion harness
1833686
Sensor harness
Part number
Primary Harness Kit
Tape for mounting the sounder
Kit name
Primary harness
Components
■
■
■
■
■
■
■
B.A.S.I.S. G Service Manual
Shared Standard and Exit Hardware Trim Parts
Screw kits
This section contains the following:
■ Screw kits that are shared by standard B.A.S.I.S. Locks and EX Series
Exit Hardware Trim
■ Screw kits that are used for all standard B.A.S.I.S. Locks
■ Screw kits that are used only for standard B.A.S.I.S. Locks with zinc
escutcheons
■ Screw kits that are used only for standard B.A.S.I.S. Locks with brass
escutcheons
■ Screw and spring kits for EX Series Exit Hardware Trim.
Shared internal screw kits
The internal screw kits described in the table below are used for both
standard B.A.S.I.S. Locks and EX Series Exit Hardware Trim.
Part number
Reader Assembly Mounting Screw Kit
1838621
Electronics Board Mounting Screw Kit
1839300
Electronics board
mounting screw
Kit name
Reader assembly
mounting screw
Components
25
25
Upper escutcheon screw kits for all standard B.A.S.I.S. Locks
Kit name
Part
number
Upper Escutcheon Screw for
1 3/4″ Thick Doors Kit
1846978
Upper Escutcheon Screw for
2″ Thick Doors Kit
1847018
Upper Escutcheon Screw for
2 1/4″ Thick Doors Kit
1847050
Upper Escutcheon Screw for
2 1/2″ Thick Doors Kit
1847091
Upper Escutcheon Screw for
2 3/4″ Thick Doors Kit
1847133
Upper Escutcheon Screw for
3″ Thick Doors Kit
1847175
B.A.S.I.S. G Service Manual
Upper escutcheon screw
for 1 3/4″ thick doors
Upper escutcheon screw
for 2″ thick doors
Upper escutcheon screw
for 2 1/4″ thick doors
Upper escutcheon screw
for 2 1/2″ thick doors
Upper escutcheon screw
for 2 3/4″ thick doors
Upper escutcheon screw
for 3″ thick doors
Components
25
25
25
25
25
25
4–7
Shared Standard and Exit Hardware Trim Parts
Lower escutcheon screw kits for standard B.A.S.I.S. Locks with brass
escutcheons
Kit name
Part
number
Lower Escutcheon Screw for
1 3/4″ Thick Doors Kit
1877702
Lower Escutcheon Screw for
2″Thick Doors Kit
1877744
Lower Escutcheon Screw for
2 1/4″ Thick Doors Kit
1876557
Lower Escutcheon Screw for
2 1/2″ Thick Doors Kit
1876599
Lower Escutcheon Screw for
2 3/4″ Thick Doors Kit
1876630
Lower Escutcheon Screw for
3″ Thick Doors Kit
1876672
Lower escutcheon screw
for 1 3/4″ thick doors
Lower escutcheon screw
for 2″ thick doors
Lower escutcheon screw
for 2 1/4″ thick doors
Lower escutcheon screw
for 2 1/2″ thick doors
Lower escutcheon screw
for 2 3/4″ thick doors
Lower escutcheon screw
for 3″ thick doors
Components
10
10
10
10
10
10
Lower escutcheon screw kits for standard B.A.S.I.S. Locks with zinc
escutcheons
Kit name
4–8
Part
number
Lower Escutcheon Screw for
1 3/4″ Thick Doors Kit
1838663
Lower Escutcheon Screw for
2″Thick Doors Kit
1839342
Lower Escutcheon Screw for
2 1/4″ Thick Doors Kit
1839384
Lower Escutcheon Screw for
2 1/2″ Thick Doors Kit
1838380
Lower Escutcheon Screw for
2 3/4″ Thick Doors Kit
1846894
Lower Escutcheon Screw for
3″ Thick Doors Kit
1846936
Lower escutcheon screw
for 1 3/4″ thick doors
Lower escutcheon screw
for 2″ thick doors
Lower escutcheon screw
for 2 1/4″ thick doors
Lower escutcheon screw
for 2 1/2″ thick doors
Lower escutcheon screw
for 2 3/4″ thick doors
Lower escutcheon screw
for 3″ thick doors
Components
25
25
25
25
25
25
B.A.S.I.S. G Service Manual
Shared Standard and Exit Hardware Trim Parts
Battery door screw kits for standard B.A.S.I.S. Locks
The battery door screw kits described in the table below are used only
for standard B.A.S.I.S. Locks. For the battery cover and battery bracket
screw kits for EX Series Exit Hardware Trim, see the table at the bottom
of this page.
Part number
McGard Battery Door Screw Kit
1839489
TORX Battery Door Screw Kit
1839447
TORX battery
door screw
Kit name
McGard battery
door screw
Components
10
25
Screw and spring kits for EX Series Exit Hardware Trim
Mounting Standoff Kit
1877587
Mounting Plate Screw Kit
1879170
Lever Return Spring Kit
1877545
Shoulder Screw (for Yoke) Kit
1879338
Lift Finger Screw Kit
1879411
Motor Mounting Screw Kit
1879370
B.A.S.I.S. G Service Manual
Motor stop spacer
1879097
Motor mounting screw
Battery Bracket Screw for Doors
2″ Thick or Greater Kit
Lift finger screw
1879055
Shoulder screw (for yoke)
Battery Bracket Screw Kit for Doors
Less than 2″ Thick Kit
Lever return spring
10
Mounting plate screw
1879139
Mounting standoff
TORX Battery Cover Screw Kit
1 3/4″ battery bracket screw
Part
number
1 1/4″ battery bracket screw
Kit name
TORX battery cover screw
Components
10
10
10
10
10
10
10
10
10
4–9
Shared Standard and Exit Hardware Trim Parts
Internal part kits
for EX Series
Exit Hardware Trim
Shear Pin Kit
1879013
■
■
■
■
■
4
Sensor module kits
for standard
B.A.S.I.S. Locks
5
■
■
5
■
■
5
■
■
Sensor Module with Deadbolt & Key Override Kit 1833885
Sensor Module with Key Override Kit
1833927
Sensor Module with Deadbolt Kit
1838747
Sensor module with
deadbolt
Sensor module with
key override
Part number
Sensor module with
deadbolt & key override
Components
Kit name
4–10
Escutcheon gasket
1878973
Lift finger screw
Motor Assembly Kit
Mounting plate screw
■
Shoulder screw
■
Shear pin
1878931
Spacer
Tape for mounting the sounder
Primary Harness Kit
Socket head screw
Part
number
Motor assembly
Kit name
Primary harness
Components
■
■
■
B.A.S.I.S. G Service Manual
Shared Standard and Exit Hardware Trim Parts
OTHER SYSTEM COMPONENTS
The components described in this section are used with both standard
B.A.S.I.S. Locks and EX Series Exit Hardware Trim.
Other system
components
diagram
1
2
3
Figure 4.1
Other system
components parts
list
Other system components diagram
Refer to Figure 4.1 and the table below to find the part you need.
Item
Part no.
Qty.
Description
1
1825277
1
Magnetic stripe card encoder with power supply
1825235
1
Smart card encoder
2
1820876
2
Programming cable
3
VPA-PVC†
1
PVC cards (box of 500)
not shown
VPA-POLYa
1
Polyester cards (box of 500)
not shown
VPA-CUSTa 1
not shown
Photo identification/custom cards
†. Contact your BEST Representative for more details.
B.A.S.I.S. G Service Manual
4–11
Shared Standard and Exit Hardware Trim Parts
4–12
B.A.S.I.S. G Service Manual
5
SERVICING STANDARD
MORTISE TRIM PARTS
This chapter contains instructions for servicing
standard B.A.S.I.S. G mortise trim parts.
■
■
■
To remove all of the trim parts from the door,
perform all of the steps for removing parts in
each section of this chapter. Begin with the levers
(page 5–2).
To reinstall all of the trim parts onto the door,
perform all of the steps for reinstalling parts in
each section of this chapter. Begin with the
cylinder (page 5–17).
To service an individual part, see the section for
that part. The instructions refer to other sections
as necessary.
If you need to service…
See…
Levers
page 5–2
Inside and outside escutcheons
page 5–3
Mounting plates
page 5–14
Core
page 5–15
Mortise case faceplate
page 5–16
Cylinder
page 5–17
Note: When servicing parts, always test that the lock
works properly when you’re finished.
B.A.S.I.S. G Service Manual
5–1
Servicing Standard Mortise Trim Parts
SERVICING THE LEVERS
Removing the levers
1. Remove the set screw cap and use a 1/8″ Allen wrench to remove
the set screw from the inside lever.
2. Remove the inside lever, then the outside lever and spindle
assembly from the door.
Location of set screw
Outside of door
Figure 5.1
Reinstalling the
levers
Spindles
Inside of door
Removing and reinstalling the levers
1. Unscrew the inside spindle one full turn to allow the spindles to
turn freely.
2. With the handle pointing toward the door hinges, insert the outside
lever and spindles assembly into the lock from the outside of the
door.
3. Slide the inside lever onto the inside spindle and secure it with the
set screw.
4. If you removed the escutcheons from the door, make sure that the
core is positioned properly in the outside escutcheon (EV and FV
only), the escutcheons are aligned properly on the door, and tighten
the escutcheon mounting screws.
Note: For a description of lock functions, see page 2–2.
5. Turn the levers to check that they operate smoothly.
5–2
B.A.S.I.S. G Service Manual
Servicing Standard Mortise Trim Parts
SERVICING THE INSIDE AND OUTSIDE ESCUTCHEONS
Removing the inside
and outside
escutcheons
1. Remove the levers. See page 5–2.
2. Remove the battery door:
a. Use a T15 TORX bit driver to remove the security screw from
the battery door.
b. Open the battery door and remove it from the escutcheon.
Security screw
Tabs
Figure 5.2
B.A.S.I.S. G Service Manual
Removing the battery door (four-cell door shown)
5–3
Servicing Standard Mortise Trim Parts
3. Remove the battery pack:
a. Remove the battery pack from the battery compartment.
b. Disconnect the battery pack from the battery connector on the
wire harness.
Inside escutcheon
Battery pack
Inside of door
Figure 5.3
Removing the battery pack (four-cell pack shown)
4. Remove the escutcheons:
a. From the inside of the door, remove the upper and lower
escutcheon screws.
Inside escutcheon
Upper escutcheon screw
Lower escutcheon screw
Inside of door
Figure 5.4
5–4
Removing the inside escutcheon
B.A.S.I.S. G Service Manual
Servicing Standard Mortise Trim Parts
b. Remove the inside escutcheon from the door.
c. From the inside of the door, disconnect the motor connector,
the key override sensor connector (optional for EV and FV
functions), and the deadbolt sensor connector (FV and LV
functions).
Note: For a description of lock functions, see page 2–2.
Deadbolt sensor connector
Key override sensor connector
Motor connection
Figure 5.5
B.A.S.I.S. G Service Manual
Inside of door
Disconnecting the motor connector and sensor connector
5–5
Servicing Standard Mortise Trim Parts
d. Remove the bushings and trim hole inserts (for locks with brass
escutcheons) from each side of the door.
Trim hole inserts
Bushings
Figure 5.6
Removing the bushings and trim hole inserts
e. Remove the outside escutcheon from the door, feeding the
motor connector and sensor connectors out the harness hole.
Caution
Reinstalling the
inside and outside
escutcheons
When removing the outside escutcheon, make sure that the harnesses
are not rubbed across any sharp edges or over any surface that could
damage their sleeving or wire insulation.
1. Activate the backup battery:
If you are reinstalling the outside escutcheon, go to Step 2.
If you are installing a new outside escutcheon, perform these
steps:
a. Locate the backup battery tab on the inside of the outside
escutcheon.
b. Pull down on the tab and remove it from the outside escutcheon
to turn on the backup battery.
For the lock to operate properly, you must remove the backup battery
tab.
Caution
Do not connect the battery pack before you have removed the backup
battery tab. Doing so may cause the lock to malfunction.
Caution
5–6
B.A.S.I.S. G Service Manual
Servicing Standard Mortise Trim Parts
Outside escutcheon
Battery backup tab
Figure 5.7
B.A.S.I.S. G Service Manual
Locating the backup battery tab
5–7
Servicing Standard Mortise Trim Parts
2. Install the trim hole inserts and bushings:
a. For locks with brass escutcheons, insert the two trim hole
inserts into the upper trim hole on each side of the door.
b. Insert the two bushings into the harness hole on each side of the
door.
Trim hole inserts
Bushings
Figure 5.8
5–8
Reinstalling the trim hole inserts and bushings
B.A.S.I.S. G Service Manual
Servicing Standard Mortise Trim Parts
3. Feed the wire harness connectors through the harness hole:
a. From the outside of the door, feed the upgrade cable connector
through the harness hole.
b. From the outside of the door, feed the motor connector, battery
connector, and sensor connectors through the harness hole.
Note: NV function locks do not have a sensor harness.
Caution
When routing the connectors, make sure the harnesses are not routed
across any sharp edges or over any surface that could damage their
sleeving or wire insulation.
Harness hole
Sensor connectors
Battery connector
Motor connector
Upgrade connector
Outside escutcheon
Outside of door
Figure 5.9
Feeding the wire harness connectors through the harness hole
4. Rest the outside escutcheon on the door by inserting the trim studs
into the trim holes.
Note: You can temporarily install the outside lever to hold the
outside escutcheon in place. See Reinstalling the levers
(page 5–2).
B.A.S.I.S. G Service Manual
5–9
Servicing Standard Mortise Trim Parts
5. Make motor and sensor connections:
a. From the inside of the door, make the motor connection, the key
override sensor connection (optional for EV and FV functions),
and the deadbolt sensor connection (FV and LV functions).
Note 1: It is physically possible to connect the key override
sensor connector from the mortise case to the battery connector
from the wire harness. To avoid this mistake, connect only the
connectors with matching wire colors.
Note 2: The upgrade cable is used for upgrading the lock without
removing the lock from the door. This cable does not connect to
a mating lock connector.
Note 3: For a description of lock functions, see page 2–2.
Caution
When making the motor connection and sensor connections, make
sure:
■ there are no loose wire connections where the wires are inserted
into the connectors
■ the connectors are firmly mated.
The following table describes the motor and sensor connections.
No. of No. of
wires pins
Wire connection
Colors
Motor
Yellow
Gray
2
2
Key override sensor
Gray
2
3
Deadbolt sensor
Blue
2
3
Upgrade cable – not connected
Deadbolt sensor connection
Key override sensor connection
Motor connection
Inside of door
Figure 5.10 Making the motor connection and sensor connections
5–10
B.A.S.I.S. G Service Manual
Servicing Standard Mortise Trim Parts
6. Secure the escutcheons:
a. Position the inside and outside escutcheons on the door.
b. Making sure that the escutcheons do not pinch the wires, secure
the escutcheons to the door. Do not tighten the screws
completely. Use the combination mounting screw in the upper
trim hole and the standard mounting screw in the lower trim
hole.
Inside escutcheon
Combination mounting screw
Standard mounting screw
Inside of door
Figure 5.11 Securing the escutcheons
7. Reinstall the levers, and tighten the escutcheon mounting screws.
See page 5–2.
B.A.S.I.S. G Service Manual
5–11
Servicing Standard Mortise Trim Parts
8. Reinstall the battery pack:
a. Connect the battery pack to the battery connector on the wire
harness inside the battery compartment.
Note: The battery connection has 3 wires and 3 pins. The wire
colors are:
■ red with white stripe
■ white
■ black with white stripe.
Caution
When connecting the battery pack, make sure:
■ there are no loose wire connections where the wires are inserted
into the connectors
■ the connectors are firmly mated.
b. Place the battery pack inside the battery compartment.
Note: For the four-cell battery pack, position the battery so that
the foam will face the battery door.
Caution
When routing the battery wires, make sure the wires are not routed
across any sharp edges or over any surface that could damage their
sleeving or wire insulation.
Inside escutcheon
Battery pack
Foam
Inside of door
Figure 5.12 Reinstalling the battery pack (four-cell pack shown)
5–12
B.A.S.I.S. G Service Manual
Servicing Standard Mortise Trim Parts
9. Reinstall the battery door:
a. Making sure that the battery door does not pinch any wires,
insert the tabs of the battery door into its mating slots and swing
the door closed.
b. Use a T15 TORX bit driver to secure the battery door with the
security screw. Tighten firmly.
Security screw
Tabs
Inside of door
Figure 5.13 Reinstalling the battery door (four-cell door shown)
B.A.S.I.S. G Service Manual
5–13
Servicing Standard Mortise Trim Parts
SERVICING THE MOUNTING PLATES
Removing the
mounting plates
1. Remove the following parts:
■ levers (page 5–2)
■ inside and outside escutcheons (page 5–3).
2. Remove the two mounting plate screws from the inside of the door.
Save the screws.
3. Remove the outside and inside mounting plates.
Outside
mounting
plate
Inside mounting plate
Outside of door
Figure 5.14 Removing and reinstalling the mounting plates
Reinstalling the
mounting plates
1. Insert the outside mounting plate through the door and mortise
case.
2. Position the inside mounting plate opposite the outside mounting
plate and screw them securely in place.
Do not overtighten the mounting plate screws. Overtightening may
compress the mortise cavity and bind the locking mechanism.
Caution
3. Reinstall the following parts:
■ inside and outside escutcheons (page 5–6)
■ levers (page 5–2).
5–14
B.A.S.I.S. G Service Manual
Servicing Standard Mortise Trim Parts
SERVICING THE CORE
Perform these steps for EV and FV function locks only.
Note: For a description of lock functions, see page 2–2.
Removing the core
1. Insert the control key into the core and rotate the key 15 degrees to
the right.
2. Remove the core from the cylinder.
Cylinder
Core
Control key
Inside of door
Figure 5.15 Removing and reinstalling the core
Reinstalling
the core
1. Insert the control key into the core and rotate the key 15 degrees to
the right.
2. With the control key in the core, insert the core into the cylinder.
3. Rotate the control key 15 degrees to the left and withdraw the key.
The control key can be used to remove cores and to access doors.
Provide adequate security for the control key.
Caution
4. Reinstall the following parts:
■ escutcheons (page 5–6)
■ levers (page 5–2).
B.A.S.I.S. G Service Manual
5–15
Servicing Standard Mortise Trim Parts
SERVICING THE MORTISE CASE FACEPLATE
Removing the
mortise case
faceplate
Unscrew the two faceplate screws and remove the mortise case
faceplate from the lock. Save the screws.
Mortise case faceplate
Faceplate mounting screws
Outside of door
Figure 5.16 Removing and reinstalling the mortise case faceplate
Reinstalling the
mortise case
faceplate
5–16
1. Secure the mortise case faceplate to the mortise case with the
faceplate mounting screws.
2. Check the lock for proper operation.
B.A.S.I.S. G Service Manual
Servicing Standard Mortise Trim Parts
SERVICING THE CYLINDER
Perform these steps for EV and FV function locks only.
Note: For a description of lock functions, see page 2–2.
Removing the
cylinder
1. Remove the following parts:
■ levers (page 5–2)
■ inside and outside escutcheons (page 5–3)
■ core (page 5–15)
■ mortise case faceplate (page 5–16).
2. Loosen the cylinder set screw, found on the inside of the mortise
case.
3. Use a cylinder wrench (ED211) to turn the cylinder
counterclockwise until you can remove it.
Cylinder
Cylinder set screw
(inside mortise case)
Outside of door
Figure 5.17 Removing and reinstalling the cylinder
Reinstalling the
cylinder
1. Use a cylinder wrench to thread the cylinder into the mortise case
so that the groove around the cylinder head is even with the door
surface.
Note: Do not tighten the cylinder set screw until you reinstall the
outside escutcheon.
A malfunction can occur if the cylinder is threaded in too far.
Caution
2. Reinstall the following parts:
■ core (page 5–15)
■ inside and outside escutcheons (page 5–6)
■ mortise case faceplate (page 5–16)
■ levers (page 5–2).
B.A.S.I.S. G Service Manual
5–17
Servicing Standard Mortise Trim Parts
5–18
B.A.S.I.S. G Service Manual
6
SERVICING STANDARD
MORTISE CASE PARTS
This chapter contains instructions for servicing
standard B.A.S.I.S. G mortise case parts.
If you need to…
See…
Remove the mortise case from the door and
open the case
page 6–2
Change the hand or bevel
page 6–3
Perform function conversion
page 6–10
Service parts inside the mortise case
page 6–14
Note: When replacing parts, always test that the lock
works properly when you’re finished.
B.A.S.I.S. G Service Manual
6–1
Servicing Standard Mortise Case Parts
SERVICING THE MORTISE CASE
Removing and
opening the mortise
case
1. Remove the inside and outside trim from the door. Instructions
begin on page 5–1.
2. From the edge of the door, remove the two case mounting screws.
3. Remove the case from the door.
Mortise cavity
Mortise case
Bevel adjusting
screw
Case
mounting
screws
Location of bevel
adjusting screw
Figure 6.1
Sensor & motor
wire hole and
wires
Inside of door
Removing and reinstalling the mortise case
4. Set the case on a flat surface.
5. Remove the case cover screw from the mortise case spacer. Remove
the case spacer.
6. Remove the remaining four case cover screws. Carefully remove the
case cover. Many parts are spring loaded and may shift.
Closing and
reinstalling the
mortise case
1. Route the motor and sensor wires through the openings in the case.
2. Place the case cover on the case and install the four case cover
screws.
3. Install the mortise case spacer and the case cover screw.
4. Insert the mortise case into the mortise cavity, while feeding the
sensor and motor wires into the mortise cavity and out the sensor &
motor wire hole to the inside of the door.
Note: If the armored front of the mortise case is not flush with the
door edge, remove the case and loosen the screws at the top and
bottom of the case. Adjust the bevel of the armored front of the
mortise case to match the bevel of the door. Tighten the screws and
insert the mortise case back into the mortise cavity.
5. Secure the mortise case with the case mounting screws.
6. Reinstall the inside and outside trim on the door. Instructions begin
on page 5–1.
6–2
B.A.S.I.S. G Service Manual
Servicing Standard Mortise Case Parts
CHANGING THE HAND AND BEVEL
This section describes how to change the hand and/or bevel of the lock.
The section includes a quick reference, outlines of the tasks required to
change the hand and/or bevel, and detailed instructions for each task.
Each outline references the detailed instructions for each task found in
Tasks for changing the hand and bevel, which begins on page 6–6.
Changing
hand and bevel
quick reference
Review the diagram below to understand the hand and bevel of the
door.
Left hand (LH)
Outside
Right hand (RH)
Outside
Left hand reverse bevel (LHRB)
Figure 6.2
B.A.S.I.S. G Service Manual
Right hand reverse bevel (RHRB)
Explanation of the hand and bevel of the door
6–3
Servicing Standard Mortise Case Parts
The following diagram and table show which components need to be
turned over when changing the hand and bevel. See the section that
follows for instructions.
Latchbolt
Outside hub
Cylinder clamp plate
Auxiliary bolt
Inside hub
Figure 6.3
Overview of changing the hand and bevel (FV function, LH case shown)
■
■
■
B represents the latchbolt and auxiliary bolt
H represents the hubs
C represents the cylinder clamp plate assembly.
LH
LH
B/H/C
RH
LHRB B
RHRB H/C
6–4
RH
LHRB
RHRB
B/H/C
B
H/C
H/C
B
H/C
B
B/H/C
B/H/C
B.A.S.I.S. G Service Manual
Servicing Standard Mortise Case Parts
The following table shows how the bolts, hubs, and cylinder clamp
plate should be oriented for the hand and bevel options. The
orientation indicated assumes that the case is on a flat surface, the case
cover has been removed, and the part is in the case.
Bolts
Outside hub Inside hub
Clamp plate
bevel up
top
bottom
screw up
top
screw down
bottom
screw up
top
screw down
LH
bevel down bottom
RH
LHRB bevel down top
bottom
RHRB bevel up
Changing the
hand only
Refer to the detailed instructions for each task that follows.
1. Remove and open the mortise case (page 6–2).
2. Perform the steps in Turning over the hubs (page 6–6).
3. If the lock has key override, perform the steps in Turning over the
cylinder clamp plate (page 6–7).
4. Perform the steps in Turning over the auxiliary bolt (page 6–8).
5. Perform the steps in Turning over the latchbolt (page 6–9).
6. Close and reinstall the mortise case (page 6–2).
Changing the
bevel only
Refer to the detailed instructions for each task that follows.
1. Remove and open the mortise case (page 6–2).
2. Perform the steps in Turning over the auxiliary bolt (page 6–8).
3. Perform the steps in Turning over the latchbolt (page 6–9).
4. Close and reinstall the mortise case (page 6–2).
Changing the
hand and bevel
Refer to the detailed instructions for each task that follows.
1. Remove and open the mortise case (page 6–2).
2. Perform the steps in Turning over the hubs (page 6–6).
3. If the lock has key override, perform the steps in Turning over the
cylinder clamp plate (page 6–7).
4. Close and reinstall the mortise case (page 6–2).
B.A.S.I.S. G Service Manual
6–5
Servicing Standard Mortise Case Parts
Tasks for changing
the hand and bevel
Turning over the hubs
1. Rotate the locking bar and motor module. See Figure 6.4 and
Figure 6.5. Remove the locking bar from the case.
2. Remove the top hub from the case, maintaining the hub’s
orientation.
3. Push the hub lever toward the side of the case and remove the
bottom hub from the case. Maintain the hub’s orientation.
4. Turn over the hubs.
5. Push the hub lever toward the side of the case and slide the now
bottom hub under the auxiliary levers.
6. Insert the now top hub onto the bottom hub.
Note: The inside hub is silver-colored. It is always on the side of the
case that faces the inside of the door. The outside hub is goldcolored. It is always on the side of the case that faces the outside of
the door.
Outside hub
Cylinder clamp plate
Inside hub
Hub lever
Auxiliary levers
Locking bar
Motor module
Figure 6.4
6–6
Turning over the hubs and cylinder clamp plate (FV function, LH case shown)
B.A.S.I.S. G Service Manual
Servicing Standard Mortise Case Parts
7. Insert the motor module’s actuator into the opening in the locking
bar. See Figure 6.5. Rotate the components into place. The motor
module locks into place in the case. The locking bar fits into the slot
on the outside hub. The two feet on the bottom of the locking bar
fit into the bottom of the case.
Outside hub
Locking bar
Motor module’s
actuator
Figure 6.5
Motor module and locking bar in place
Turning over the cylinder clamp plate
Turn over the cylinder clamp plate and insert it in the case.
See Figure 6.4.
Note: The screw must be on the same side of the case as the cylinder.
B.A.S.I.S. G Service Manual
6–7
Servicing Standard Mortise Case Parts
Turning over the auxiliary bolt
1. Remove the auxiliary bolt spring and the deadlocking spring.
See Figure 6.6.
2. Remove the auxiliary bolt from the case and turn it over.
3. Insert the auxiliary bolt into the case. The beveled portion of the
bolt should be pushed through the front of the case and the feet
should be resting in the slot.
U-shaped latchbolt
rod support
Hollow post on the
deadlocking lever
Deadlocking spring
Solid post on the
deadlocking lever
Auxiliary bolt
spring
Auxiliary
bolt
Hub
Figure 6.6
Turning over the auxiliary bolt
4. Place the auxiliary bolt spring, bent shank up, onto the hollow post
on the deadlocking lever. Then place the deadlocking spring, bent
shank down, on top of the auxiliary bolt spring. The center of both
spring coils should rest around the hollow post.
5. Position the long, straight shank of the auxiliary bolt spring so it
rests between the solid post on the deadlocking lever and the hubs.
Position the short, straight shank of the deadlocking spring against
the U-shaped latchbolt rod support.
6. While holding the springs on the post, grasp the bent shanks of both
springs and fit them into the top groove on the auxiliary bolt. The
spring tension should push the bolt toward the front of the case.
6–8
B.A.S.I.S. G Service Manual
Servicing Standard Mortise Case Parts
Turning over the latchbolt
1. Remove the latch lever. See Figure 6.8
2. Slide the brass grommet on the latchbolt away from the U-shaped
latchbolt rod support. Grasp the latchbolt by the square-shaped tail
and pull the latchbolt up and out of the case.
3. Turn over the latchbolt and rotate the anti-friction latch lever into
position. See Figure 6.7. Place the latchbolt in the case.
Anti-friction latch lever
Latchbolt
Figure 6.7
Latchbolt with anti-friction latch lever in position
4. Slide the brass grommet on the latchbolt away from the U-shaped
latchbolt rod support. Rest the latchbolt rod into the U-shaped
support. Release the grommet. It should snap into place.
Note 1: If you can pull the square-shaped tail out of the rod support,
the latchbolt is not placed properly. Reposition the latchbolt.
Note 2: The bevel of the latchbolt must match the bevel of the
auxiliary bolt.
5. Reinstall the latch lever, as shown in Figure 6.8.
Latch lever
Square-shaped tail
U-shaped latchbolt
rod support
Brass grommet
Figure 6.8
Turning over the latchbolt (FV function, LH case shown)
B.A.S.I.S. G Service Manual
6–9
Servicing Standard Mortise Case Parts
FUNCTION CONVERSION
The following table describes the B.A.S.I.S. mortise functions.
Function Deadbolt
FV
✓
LV
✓
EV
Key override
✓
✓
NV
Removing key
override
To remove key override from a B.A.S.I.S. Mortise Lock, you can convert
an FV function lock to an LV function lock or an EV function lock to an
NV function lock.
Note: For a description of lock functions, see page 2–2.
Order the outside escutcheon, part number D62506 for brass or
C60446 for zinc, and perform the tasks below.
1. Remove all of the trim parts from the door, by performing all of the
steps for removing parts in each section of Chapter 5. Begin with
the levers (page 5–2).
2. Remove the cylinder clamp plate:
a. Remove and open the mortise case (page 6–2).
b. Remove the clamp plate from the mortise case (page 6–19).
c. Close and reinstall the mortise case (page 6–2).
3. Remove all of the parts from the old outside escutcheon, by
performing all of the steps for removing parts in each section of
Chapter 9. Begin with the escutcheon gasket (page 9–2).
4. Install all of the parts from the old outside escutcheon into the new
outside escutcheon, by performing all of the steps for reinstalling
parts in each section of Chapter 9. Begin with the reader assembly:
■ magnetic stripe card reader assembly (page 9–19)
■ smart card reader assembly (page 9–13)
■ dual validation reader assembly (page 9–25).
5. Reinstall all of the trim parts onto the door, except for the cylinder
and core, by performing all of the steps for reinstalling parts in each
section of Chapter 5. Begin with the faceplate (page 5–16).
6–10
B.A.S.I.S. G Service Manual
Servicing Standard Mortise Case Parts
Adding key override
To add key override, you can convert an LV function lock to an
FV function lock or an NV function lock to an EV function lock.
Note: For a description of lock functions, see page 2–2.
Order these parts/kits and perform the tasks below:
■
■
■
■
■
■
brass outside escutcheon, part number D62506 (or D62508 for use
with non-BEST cores) or zinc outside escutcheon, part number
C60445 (or C60406 for use with non-BEST cores).
core, contact your BEST Representative for details
cylinder, part number B61341 for 1 3/4″–2″ thick doors.
See page 2–17 for cylinder part numbers for thicker doors.
sensor harness kit, part number 1833728 (NV to EV) or 1833760 for
the conversion harness
sensor module kit, part number 1833885 (LV to FV)
or 1833927 (NV to EV)
clamp plate, part number A35257.
1. Remove all of the trim parts from the door, by performing all of the
steps for removing parts in each section of Chapter 5. Begin with
the levers (page 5–2).
2. Remove and open the mortise case (page 6–2).
3. For LV to FV conversions, remove the sensor module (page 6–16).
4. Install the following parts in the mortise case:
■ sensor module (page 6–16)
■ clamp plate (page 6–19).
5. Remove all of the parts from the old outside escutcheon, by
performing all of the steps for removing parts in each section of
Chapter 9. Begin with the escutcheon gasket (page 9–2).
6. Install all of the parts from the old outside escutcheon into the new
outside escutcheon, by performing all of the steps for reinstalling
parts in each section of Chapter 9. Begin with the reader assembly:
■ magnetic stripe card reader assembly (page 9–19)
■ smart card reader assembly (page 9–22)
■ dual validation reader assembly (page 9–25).
7. Close and reinstall the mortise case (page 6–2).
8. Reinstall all of the trim parts onto the door, including the cylinder
and core, by performing all of the steps for reinstalling parts in each
section of Chapter 5. Begin with the cylinder (page 5–17).
B.A.S.I.S. G Service Manual
6–11
Servicing Standard Mortise Case Parts
Adding a deadbolt
To add a deadbolt, you can convert an EV function lock to an
FV function lock or an NV function lock to an LV function lock.
Note: For a description of lock functions, see page 2–2.
Order these parts/kits and perform the tasks below:
■
■
■
■
■
■
inside escutcheon, part number B60768
faceplate, part number D34095
sensor harness kit, part number 1833728 (NV to LV)
sensor module kit, part number 1833885 (EV to FV)
1838747 (NV to LV)
deadbolt, part number B35035
turn knob hub assembly (includes hub and spacer), part
number A35000.
1. Remove all of the trim parts from the door, by performing all of the
steps for removing parts in each section of Chapter 5. Begin with
the levers (page 5–2).
2. Remove and open the mortise case (page 6–2).
3. Install the following parts in the mortise case:
■ sensor module (page 6–16)
■ deadbolt (page 6–18)
■ turn knob hub assembly (page 6–18).
4. For NV to LV conversions, install the sensor harness kit in the
outside escutcheon.
5. Close and reinstall the mortise case (page 6–2).
6. Reinstall all of the trim parts onto the door, including the new inside
escutcheon and faceplate, by performing all of the steps for
reinstalling parts in each section of Chapter 5. Begin with the
cylinder (page 5–17).
Removing a
deadbolt
To remove a deadbolt, you can convert an FV function lock to a
EV function lock or an LV function lock to an NV function lock.
Note: For a description of lock functions, see page 2–2.
Order these parts/kits and perform the tasks below:
■
■
■
inside escutcheon, part number B60778
sensor module, part number B60794 (FV to EV)
faceplate, part number B34515.
1. Remove all of the trim parts from the door, by performing all of the
steps for removing parts in each section of Chapter 5. Begin with
the levers (page 5–2).
2. Remove and open the mortise case (page 6–2).
6–12
B.A.S.I.S. G Service Manual
Servicing Standard Mortise Case Parts
3. Remove the following parts in the mortise case:
■ sensor module (page 6–16)
■ deadbolt (page 6–18)
■ turn knob hub assembly (page 6–18).
4. For FV to EV conversions, install the new sensor module in the
mortise case.
5. For LV to NV conversions, remove the sensor harness from the
outside escutcheon (page 9–6).
6. Close and reinstall the mortise case (page 6–2).
7. Reinstall all of the trim parts onto the door, including the new inside
escutcheon and faceplate, by performing all of the steps for
reinstalling parts in each section of Chapter 5. Begin with the
cylinder (page 5–17).
B.A.S.I.S. G Service Manual
6–13
Servicing Standard Mortise Case Parts
SERVICING PARTS IN THE MORTISE CASE
Servicing the motor
module
Caution
Use extreme caution and wear safety glasses or goggles when
performing the steps below. Point the case away from you while
removing and reinstalling the upper auxiliary spring. The spring
may unexpectedly pop out and could injure you.
Removing the motor module
1. Remove and open the mortise case (page 6–2).
2. Rotate the locking bar and motor module. Remove the locking bar
from the case. See Figure 6.9.
3. Use a pair of needle-nosed pliers to carefully remove the upper
auxiliary spring from the case.
4. Remove the wire strain relief and motor module from the case.
5. Open the wire strain relief and remove the wires.
Auxiliary return lever
Locking bar
Post
Motor module’s
actuator
Wire strain relief
Top shank of the upper
auxiliary bolt spring
Figure 6.9
6–14
Removing and reinstalling the motor module
B.A.S.I.S. G Service Manual
Servicing Standard Mortise Case Parts
Reinstalling the motor module
1. Insert the motor module’s actuator into the opening in the locking
bar. Rotate the components into place. The motor module locks
into place in the case. The locking bar fits into the slot on the
outside hub. The two feet on the bottom of the locking bar fit into
the bottom of the case.
2. Place the strain relief on the notch in the case.
3. Route the motor module’s wires behind the post, above the lower
auxiliary spring, and out through the strain relief.
Note: Make sure the wires are not pulled so tightly that there is strain
on the connection to the motor, and the wires are not pulled so
loosely that they will interfere with the operation of the auxiliary
springs.
4. Clamp the wires in the strain relief. Slide the strain relief into
position on the case. It should lock into place.
5. Install the upper auxiliary spring on the post so the short shank rests
against the auxiliary return lever.
6. While holding the coil of the upper auxiliary spring on the post, use
a pair of needle-nosed pliers to pull the top shank of the spring
around to rest against the inside of the case. The shank should be
parallel to the top of the case.
Note: Make sure that the upper auxiliary spring does not separate
and ride onto the top of the post.
7. Close and reinstall the mortise case (page 6–2).
B.A.S.I.S. G Service Manual
6–15
Servicing Standard Mortise Case Parts
Servicing the sensor
module
Replacement kits are available for the sensor module. See page 4–10.
Removing the sensor module
1. Remove and open the mortise case (page 6–2).
2. Remove the latch lever.
3. Remove the sensor module.
Sensor module
Sensor module
cables
Latch lever
Figure 6.10
Removing and reinstalling the sensor module (FV function, LH case shown)
Reinstalling the sensor module
1. Position the sensor module in the case and route the cables as
shown in Figure 6.10.
2. Reinstall the latch lever.
3. Close and reinstall the mortise case (page 6–2).
6–16
B.A.S.I.S. G Service Manual
Servicing Standard Mortise Case Parts
Servicing the
deadbolt, turn knob
hub, and spacer
Removing the deadbolt, turn knob hub, and spacer
1. Remove and open the mortise case (page 6–2).
2. Remove the latch lever. See Figure 6.10.
3. Pull the deadbolt spring away from the turn knob hub and remove
the turn knob hub from the case. See Figure 6.11.
4. Grasp the deadbolt by the post and remove the deadbolt from the
case.
5. Remove the turn knob hub spacer from the case.
Deadbolt post
Deadbolt
Turn knob hub
Turn knob hub spacer
Figure 6.11
Removing the deadbolt, turn knob hub, and spacer (FV function, LH case shown)
B.A.S.I.S. G Service Manual
6–17
Servicing Standard Mortise Case Parts
Reinstalling the deadbolt, turn knob hub, and spacer
1. Position the turn knob hub spacer so that the tail fits under the case
support. See Figure 6.12.
2. Insert the deadbolt into the case, spring side up, so the bolt fits
though the opening in the armored front.
3. Insert the turn knob hub into the turn knob hub spacer so that the
tail of the turn knob hub is positioned against the deadbolt, as
shown in Figure 6.12.
4. Position the spring on the deadbolt against the turn knob hub, as
shown in Figure 6.12.
5. Reinstall the latch lever.
6. Close and reinstall the mortise case (page 6–2).
Turn knob hub spacer
Turn knob hub
Case support
Deadbolt spring
Figure 6.12 Positioning the turn knob hub and deadbolt spring
6–18
B.A.S.I.S. G Service Manual
Servicing Standard Mortise Case Parts
Servicing the
cylinder clamp plate
Removing the cylinder clamp plate
1. Remove and open the mortise case (page 6–2).
2. Remove the cylinder clamp plate from the case.
Cylinder clamp plate
Figure 6.13 Removing and reinstalling the cylinder clamp plate
Reinstalling the cylinder clamp plate
1. Insert the cylinder clamp plate into the case so the screw is on the
same side of the case as the concealed cylinder.
2. Close and reinstall the mortise case (page 6–2).
B.A.S.I.S. G Service Manual
6–19
Servicing Standard Mortise Case Parts
6–20
B.A.S.I.S. G Service Manual
7
SERVICING CYLINDRICAL PARTS
This chapter contains instructions for replacing
B.A.S.I.S. G cylindrical parts.
■
■
■
To remove all of the trim parts from the door,
perform all of the steps for removing parts in
each section of this chapter. Begin with the core
and throw member (page 7–2).
To reinstall all of the trim parts onto the door,
perform all of the steps for reinstalling parts in
each section of this chapter. Begin with the rose
liners (page 7–16).
To service an individual part, see the section for
that part. The instructions refer to other sections
as necessary.
If you need to service…
See…
Core and throw member
page 7–2
Levers
page 7–3
Inside and outside escutcheons
page 7–5
Rose liners
page 7–15
Cylindrical chassis
page 7–18
Note: When replacing parts, always test that the lock
works properly when you’re finished.
B.A.S.I.S. G Service Manual
7–1
Servicing Cylindrical Parts
SERVICING THE CORE AND THROW MEMBER
Note: To service a core and throw member from a manufacturer
other than BEST with a 9KG Lock, see the Installation Instructions for
9K Non-interchangeable Cores & Throw Members (T56093).
Removing the core
and throw member
1. Insert the control key into the core and rotate the key 15 degrees to
the right.
2. Remove the core and throw member from the lever.
Core
Blocking plate
Throw member
Figure 7.1
Reinstalling
the core and
throw member
Removing the core and throw member
1. Install the blocking plate onto the throw member.
You must use the blocking plate to prevent unauthorized access.
Caution
2. Insert the control key into the core and rotate the key 15 degrees to
the right.
3. Insert the throw member into the core.
4. Insert the core and throw member into the lever with the control
key.
5. Rotate the control key 15 degrees to the left and withdraw the key.
The control key can be used to remove cores and to access doors.
Provide adequate security for the control key.
Caution
Throw member
Core
Control key
Figure 7.2
7–2
Reinstalling the core and throw member
B.A.S.I.S. G Service Manual
Servicing Cylindrical Parts
SERVICING THE LEVERS
Removing the levers
Removing the keyed lever
1. Remove the core and throw member (page 7–2).
2. Insert a flat blade screwdriver into the figure-8 core hole and into
the lever/knob keeper.
3. Press the screwdriver blade in the direction of the arrow shown in
Figure 7.3.
Note: You will not be able to remove the lever if the screwdriver
blade is inserted too far past the keeper.
4. Slide the lever off of the sleeve.
Lever keeper
Insert screwdriver blade here.
Figure-8 core hole
Figure 7.3
Removing the keyed lever
Removing the plain lever
Insert the protrusion on the spanner wrench into the hole on the shaft
of the lever, as shown in Figure 7.4. Slide the lever off of the sleeve.
Protrusion on the spanner wrench
Figure 7.4
B.A.S.I.S. G Service Manual
Lever shaft
Removing the plain lever
7–3
Servicing Cylindrical Parts
Reinstalling the
levers
1. With the handle pointing toward the door hinges, position a lever
on the outside sleeve and push firmly on the lever until it is seated.
Repeat, placing the other lever on the inside sleeve.
2. Tighten the escutcheon mounting screws.
3. Turn the levers to check that they operate smoothly.
4. Reinstall the core and throw member (page 7–2).
Outside of door
Figure 7.5
7–4
Reinstalling the levers
B.A.S.I.S. G Service Manual
Servicing Cylindrical Parts
SERVICING THE INSIDE AND OUTSIDE ESCUTCHEONS
Removing the inside
and outside
escutcheons
1. Remove the following parts:
■ core and throw member (page 7–2)
■ levers (page 7–3).
2. Remove the battery door.
a. Use a T15 TORX bit driver to remove the security screw from
the battery door.
b. Open the access door and remove it from the escutcheon.
Security screw
Tabs
Figure 7.6
B.A.S.I.S. G Service Manual
Removing the battery door (four-cell door shown)
7–5
Servicing Cylindrical Parts
3. Remove the battery pack.
a. Remove the battery pack from the battery compartment.
b. Disconnect the battery pack from the battery connector on the
wire harness.
Inside escutcheon
Battery pack
Figure 7.7
Removing the battery pack (four-cell pack shown)
4. Remove the escutcheons.
a. Remove the combination mounting screw and standard
mounting screw from the inside escutcheon.
Inside escutcheon
Combination mounting screw
Standard escutcheon screw
Figure 7.8
7–6
Removing the escutcheon
B.A.S.I.S. G Service Manual
Servicing Cylindrical Parts
b. Remove the inside escutcheon from the door.
c. From the inside of the door, disconnect the motor connector on
the chassis from its mating connector on the wire harness.
Motor connector
Inside of door
Figure 7.9
Disconnecting the motor connector
d. Remove the bushings, trim hole inserts, and hub washers from
each side of the door.
Note: Trim hole inserts and hub washers are used only for locks
with brass escutcheons.
Trim hole inserts
Bushings
Hub washers
Figure 7.10 Removing the bushings, trim hole inserts, and hub washers
B.A.S.I.S. G Service Manual
7–7
Servicing Cylindrical Parts
e. Remove the outside escutcheon from the door, feeding the
motor connector out the harness hole.
Caution
Reinstalling the
inside and outside
escutcheons
When removing the outside escutcheon, make sure that the harnesses
are not rubbed across any sharp edges or over any surface that could
damage their sleeving or wire insulation.
1. Activate the backup battery:
If you are reinstalling the outside escutcheon, go to Step 2.
If you are installing a new outside escutcheon, perform these
steps:
a. Locate the backup battery tab on the inside of the outside
escutcheon.
b. Pull down on the tab and remove it from the outside escutcheon
to turn on the backup battery.
For the lock to operate properly, you must remove the backup battery
tab.
Caution
Do not connect the battery pack before you have removed the backup
battery tab. Doing so may cause the lock to malfunction.
Caution
Outside escutcheon
Battery backup tab
Figure 7.11 Locating the backup battery tab
7–8
B.A.S.I.S. G Service Manual
Servicing Cylindrical Parts
2. Install the trim hole inserts, bushings, and hub washers:
a. Insert the two trim hole inserts into the upper trim hole on each
side of the door.
b. For locks with brass escutcheons, insert the two bushings into
the harness hole on each side of the door.
c. For locks with brass escutcheons, on each side of the door, slide
a hub washer over the chassis sleeve so it rests on the hub.
Trim hole inserts
Bushings
Hub washers
Figure 7.12 Reinstalling the bushings, trim hole inserts, and hub washers
B.A.S.I.S. G Service Manual
7–9
Servicing Cylindrical Parts
3. Feed the wire harness connectors through the harness hole:
a. From the outside of the door, feed the upgrade cable connector
through the harness hole.
b. From the outside of the door, feed the motor connector and
battery connector through the harness hole.
Caution
When routing the connectors, make sure the wire harness is not
routed across any sharp edges or over any surface that could damage
its sleeving or wire insulation.
Battery connector
Motor connector
Upgrade connector
Harness hole
Outside escutcheon
Outside of door
Figure 7.13 Feeding the wire harness connectors through the harness hole
c. Temporarily rest the outside escutcheon on the door by
inserting the trim studs into the trim holes.
Note: You can temporarily install the outside lever to hold the
outside escutcheon in place. See Reinstalling the levers
(page 7–4).
7–10
B.A.S.I.S. G Service Manual
Servicing Cylindrical Parts
4. Connect the motor connector:
a. From the inside of the door, connect the motor connector from
the chassis to its mating connector on the wire harness.
Wire connection Colors
Motor
Yellow
Gray
No. of No. of
wires pins
2
2
Note: The upgrade cable is used for upgrading the lock without
removing the lock from the door. This cable does not connect to
a mating lock connector.
Caution
When connecting the motor connector, make sure:
■ there are no loose wire connections where the wires are inserted
into the connectors
■ the connectors are firmly mated.
Upgrade cable – not connected
Motor connector
Inside of door
Figure 7.14 Connecting the motor connector
B.A.S.I.S. G Service Manual
7–11
Servicing Cylindrical Parts
5. Secure the escutcheons:
a. Position the inside and outside escutcheons on the door.
b. Making sure that the escutcheons do not pinch the wires, secure
the escutcheons to the door—but do not tighten. Use the
combination mounting screw at the upper trim hole and the
standard mounting screw at the lower trim hole.
Inside escutcheon
Combination mounting screw
Standard mounting screw
Figure 7.15 Securing the escutcheons
7–12
B.A.S.I.S. G Service Manual
Servicing Cylindrical Parts
6. Reinstall the battery pack:
a. Connect the battery pack to the battery connector on the wire
harness inside the battery compartment.
Note: The battery connection has 3 wires and 3 pins. The wire
colors are:
red with white stripe
■ white
■ black with white stripe.
When connecting the battery pack, make sure:
■
■
Caution
■
there are no loose wire connections where the wires are inserted
into the connectors
the connectors are firmly mated.
b. Place the battery pack inside the battery compartment.
Note: For the four-cell battery pack, position the battery so that
the foam will face the battery door.
Caution
When routing the battery wires, make sure the wires are not routed
across any sharp edges or over any surface that could damage their
sleeving or wire insulation.
Inside escutcheon
Battery pack
Foam
Figure 7.16 Reinstalling the battery pack (four-cell pack shown)
B.A.S.I.S. G Service Manual
7–13
Servicing Cylindrical Parts
7. Reinstall the battery door:
a. Making sure that the battery door does not pinch any wires,
insert the tabs of the battery door into its mating slots and swing
the door closed.
b. Use a T15 TORX bit driver to secure the battery door with the
security screw. Tighten firmly.
Security screw
Tabs
Figure 7.17 Reinstalling the battery door (four-cell door shown)
8. Reinstall the following parts:
■ levers (page 7–4)
■ core and throw member (page 7–2).
7–14
B.A.S.I.S. G Service Manual
Servicing Cylindrical Parts
SERVICING THE ROSE LINERS
Removing the rose
liners
1. Remove the following parts:
■ core and throw member (page 7–2)
■ levers (page 7–3)
■ escutcheons (page 7–5).
2. Remove the through-bolts from the top and bottom holes in the rose
liner.
3. Slide the inside rose liner off of the door.
E
Motor wire
Through-bolt
Rose liner
Inside of door
Figure 7.18 Removing the inside rose liner
4. Slide the chassis assembly out of the door.
5. Retract the rose locking pin, and rotate the outside rose liner until it
is free from the hub.
6. Remove the rose and liner assembly from the sleeve.
Hub
Sleeve
Outside rose liner
Rose locking pin
Figure 7.19 Removing the outside rose liner
B.A.S.I.S. G Service Manual
7–15
Servicing Cylindrical Parts
Reinstalling the
rose liners
1. Retract the rose locking pin, and rotate the outside rose liner
clockwise until the proper door thickness groove on the
through-bolt stud lines up with the hub face.
This illustration
shows the chassis
adjusted for a 2
1/4″ thick door.
2 1/4″
2″
1
Outside rose liner
Through-bolt stud
Hub face
Rose locking pin
Figure 7.20 Reinstalling the outside rose liner
2. Release the rose locking pin. It should lock into the rose liner.
Note: Make sure that the locking pin fully locks into the rose liner.
3. From the outside of the door, insert the lock chassis into the 2 1/8″
chassis hole, routing the motor wire through the notch.
Make sure that the latch tube prongs engage the chassis frame and
that the latch tailpiece engages the retractor.
Caution
4. Place the inside rose liner on the chassis, aligning the holes in the
rose liner with the holes prepared in the door.
Make sure that there is clearance for the motor wire between the rose
liner and the door.
Caution
5. Install the through-bolts through the rose liner and door in the top
and bottom holes.
7–16
B.A.S.I.S. G Service Manual
Servicing Cylindrical Parts
6. Tighten the rose liner on the door with the through-bolts.
E
Motor wire
Through-bolt
Rose liner
Inside of door
Figure 7.21 Reinstalling the inside rose liner
7. Reinstall the following parts:
■ escutcheons (page 7–8)
■ levers (page 7–4)
■ core and throw member (page 7–2).
B.A.S.I.S. G Service Manual
7–17
Servicing Cylindrical Parts
SERVICING THE CYLINDRICAL CHASSIS
Because of the complex nature of servicing the individual components
of the cylindrical chassis, BEST recommends that you order a new
cylindrical chassis. Contact your BEST representative.
Use the following part numbers when ordering a new cylindrical
chassis.
Chassis type
Part no.
Chassis
D60464
Chassis for use with non-BEST cores
D60332
Free motion chassis
D56025
Removing the
cylindrical chassis
1. Remove the following parts:
■ core and throw member (page 7–2)
■ levers (page 7–3)
■ escutcheons (page 7–5)
■ rose liners (page 7–15).
Reinstalling the
cylindrical chassis
2. Reinstall the following parts:
■ rose liners (page 7–16)
■ escutcheons (page 7–8)
■ levers (page 7–4)
■ core and throw member (page 7–2).
7–18
B.A.S.I.S. G Service Manual
8
SERVICING EXIT HARDWARE
TRIM PARTS
This chapter contains instructions for servicing
EX Series Exit Hardware Trim parts.
■
■
■
To remove all of the trim parts from the door,
perform all of the steps for removing parts in
each section of this chapter. Begin with the
battery cover (page 8–2).
To reinstall all of the trim parts onto the door,
perform all of the steps for reinstalling parts in
each section of this chapter. Begin with the
B.A.S.I.S. escutcheon (page 8–14).
To service an individual part, see the section for
that part. The instructions refer to other sections
as necessary.
If you need to service…
See…
Battery cover
page 8–2
Battery pack
page 8–4
Battery bracket
page 8–6
Exit hardware
page 8–8
Core (for EV function only)
page 8–9
Cylinder (for EV function only)
page 8–10
Escutcheon
page 8–13
Note: When servicing parts, always test that the lock
works properly when you’re finished.
B.A.S.I.S. G Service Manual
8–1
Servicing Exit Hardware Trim Parts
SERVICING THE BATTERY COVER
Removing the
battery cover
1. Use a T15 TORX driver to remove the security screws from the
battery cover.
2. Remove the battery cover from the battery bracket.
Location of
knockout
Security
screws
Location of
knockout
Inside of door
Figure 8.1
8–2
Removing and reinstalling the battery cover on the battery bracket
B.A.S.I.S. G Service Manual
Servicing Exit Hardware Trim Parts
Reinstalling the
battery cover
1. If installing a new battery cover with a surface rod exit device,
remove the knockouts for the rod from the battery cover. See
Figure 8.1.
2. Making sure that the battery cover does not pinch any wires, place
the cover over the bracket.
3. Use a T15 TORX bit driver to secure the battery compartment cover
with the security screws. Tighten firmly. See Figure 8.1.
B.A.S.I.S. G Service Manual
8–3
Servicing Exit Hardware Trim Parts
SERVICING THE BATTERY PACK
Removing the
battery pack
1. Remove the battery cover. See page 8–2.
2. Remove the battery pack from the holder inside the battery bracket.
Note: You might need to cut a cable tie if one was used to dress the
wire harness inside the battery bracket.
3. Disconnect the battery pack from the battery connector on the wire
harness.
Battery pack
Battery holder
(inside bracket)
Inside of door
Figure 8.2
8–4
Removing and reinstalling the battery pack
B.A.S.I.S. G Service Manual
Servicing Exit Hardware Trim Parts
Reinstalling the
battery pack
Note: Replacement battery packs are shipped with foam attached, but
foam is not needed for EX Series Exit Hardware Trim. Remove and
discard the foam before installing the battery pack.
1. Connect the battery pack to the battery connector on the wire
harness shown in Figure 8.2.
Note: The battery connector has 3 wires and 3 pins. The wire colors
are:
■ red with white stripe
■ white
■ black with white stripe.
Caution
When connecting the battery pack, make sure there are no loose wire
connections where the wires are inserted into the connectors and the
connectors are firmly mated.
2. Place the battery pack in the holder inside the battery bracket and
dress the wire harness inside the bracket.
Make sure you do not damage the sleeving on the battery pack.
Doing so may cause the batteries to be drained.
Caution
3. If reinstalling with a surface rod device, dress the wire harness
inside the bracket to the left of the rod so that the harness will not
interfere with the movement of the rods.
We recommend that you loosely coil the harness and use a cable tie
to secure the coil. To avoid damaging the harness, do not put any
sharp bends in it or flex it close to the connectors.
Failure to dress the wire harness away from the rod could damage
the wire harness, causing the lock’s electronics to not work properly.
Caution
4. Reinstall the battery cover. See page 8–3.
B.A.S.I.S. G Service Manual
8–5
Servicing Exit Hardware Trim Parts
SERVICING THE BATTERY BRACKET
Removing the
battery bracket
1. Remove the following parts:
■ battery cover (page 8–2)
■ battery pack (page 8–4).
2. Remove the two battery bracket mounting screws. See Figure 8.3.
3. Loosen the nut securing the com port to the bracket and slide the
com port out of the bracket. See Figure 8.4.
Battery bracket
Mounting screws
Inside of door
Figure 8.3
Removing and reinstalling the battery bracket on the door
Com port
Nut
Battery bracket
Figure 8.4
8–6
Removing and reinstalling the com port in the battery bracket
B.A.S.I.S. G Service Manual
Servicing Exit Hardware Trim Parts
Reinstalling the
battery bracket
1. Routing the wire harness into the bottom of the battery bracket,
slide the com port into its mounting slot inside the battery bracket
as shown in Figure 8.4.
Note: The com port is used when programming the control
electronics for the lock.
2. Tighten the nut to secure the com port to the bracket.
3. Position the battery bracket on the inside of the door as shown in
Figure 8.3.
Note: If reinstalling with a surface rod exit device, the battery
bracket is mounted over the upper rod.
4. Secure the battery bracket to the door using the two mounting
screws.
Note: Doors less than 2″ in thickness use 1 1/4″ screws. Doors 2″ or
greater use 1 3/4″ screws.
Caution
When routing the wire harness, make sure the wires are not routed
across any sharp edges or over any surface that could damage their
sleeving or wire insulation.
5. Reinstall the following parts:
■ battery pack (page 8–5)
■ battery cover (page 8–3).
B.A.S.I.S. G Service Manual
8–7
Servicing Exit Hardware Trim Parts
SERVICING THE EXIT HARDWARE
Removing the exit
hardware
1. Remove the following parts:
■ battery cover (page 8–2)
■ battery pack (page 8–4)
■ battery bracket (page 8–6).
2. Remove the exit hardware (lock stile case, case cover, touch bar
assembly, and related hardware); follow the instructions provided
by the exit hardware manufacturer.
Note: The B.A.S.I.S. escutcheon is secured on the outside of the door
by the screws used to mount the lock stile case on the inside of the
door.
Reinstalling the exit
hardware
1. Reinstall the exit hardware (lock stile case, case cover, touch bar
assembly, and related hardware); follow the instructions provided
by the exit hardware manufacturer.
Note: Make any adjustments to the exit hardware necessary for
compatibility with lever function outside trim.
When securing the B.A.S.I.S. escutcheon, make sure that it does not
pinch the wire harness.
Caution
2. Reinstall the following parts:
■ battery bracket (page 8–7)
■ battery pack (page 8–5)
■ battery cover (page 8–3).
8–8
B.A.S.I.S. G Service Manual
Servicing Exit Hardware Trim Parts
SERVICING THE CORE
Perform these steps for EV function locks only.
Note: For a description of lock functions, see page 3–2.
Removing the core
1. Insert the control key into the core and rotate the key 15 degrees to
the right.
2. Remove the core from the cylinder.
Cylinder
Core
Control key
Outside of door
Figure 8.5
Reinstalling
the core
Removing and reinstalling the core
1. Insert the control key into the core and rotate the key 15 degrees to
the right.
2. With the control key in the core, insert the core into the cylinder as
shown in Figure 8.5.
3. Rotate the control key 15 degrees to the left and withdraw the key.
The control key can be used to remove cores and to access doors.
Provide adequate security for the control key.
Caution
B.A.S.I.S. G Service Manual
8–9
Servicing Exit Hardware Trim Parts
SERVICING THE CYLINDER
Perform these steps for EV function locks only.
Note: For a description of lock functions, see page 3–2.
Removing the
mortise cylinder
1. Remove the core. See page 8–9.
2. Insert a cylinder wrench (ED211) into the cylinder and unscrew the
cylinder from the mortise case.
3. Slide the cylinder and cylinder ring (if present) out of the door and
escutcheon.
View of the back of
the cylinder
Cam in 12 o’clock
position
Mortise cylinder
Location of throw pins
Figure 8.6
Reinstalling the
mortise cylinder
Mortise cylinder components
1. For doors less than 2″ in thickness, place the cylinder ring provided
on the cylinder.
2. Rotate the cylinder cam to the 12 o’clock position, as shown in
Figure 8.6.
3. Using a cylinder wrench (ED211), insert the cylinder through the
cylinder opening in the B.A.S.I.S. escutcheon and screw the cylinder
into the mortise case. Make sure that the cylinder is oriented as
shown in Figure 8.6.
Do not screw the cylinder in too tightly. Doing so may cause you or
someone else to be locked out.
Caution
4. Reinstall the core. See page 8–9.
8–10
B.A.S.I.S. G Service Manual
Servicing Exit Hardware Trim Parts
Removing the
rim cylinder for
Precision Hardware
installations
Note: The rim cylinder is used in rim and rod exit device installations.
1. If replacing the cylinder, remove the core (page 8–9).
2. Remove the exit hardware as necessary to access the cylinder clamp
plate and mounting screws. See page 8–8.
3. Remove the two mounting screws and the clamp plate.
4. Slide the cylinder out of the door and the B.A.S.I.S. escutcheon.
Screws
Clamp plate
Rim
cylinder
Figure 8.7
Spindle
Rim cylinder components
Rim cylinder
B.A.S.I.S.
escutcheon
Outside of door
Figure 8.8
Reinstalling the rim
cylinder for
Precision Hardware
installations
Removing and reinstalling the rim cylinder for
Precision Hardware installations
1. If installing a new cylinder, break off the new spindle to match the
length of the old spindle.
2. Insert the cylinder through the cylinder opening in the B.A.S.I.S.
escutcheon and into the door as shown in Figure 8.8.
3. Orient the cylinder and clamp plate as shown in Figure 8.8. From
the inside of the door, secure the cylinder using the clamp plate and
mounting screws.
4. Reinstall the exit hardware. See page 8–8.
5. If installing a new cylinder, reinstall the core. See page 8–9.
B.A.S.I.S. G Service Manual
8–11
Servicing Exit Hardware Trim Parts
Removing the
rim cylinder for
Von Duprin
installations
Note: The rim cylinder is used in rim and rod exit device installations.
1. If replacing the cylinder, remove the core. See page 8–9.
2. Remove the following parts:
■ exit hardware as necessary to remove the B.A.S.I.S. escutcheon
(page 8–8)
■ B.A.S.I.S. escutcheon (page 8–13).
3. From the back of the escutcheon, remove the two mounting screws
and the cylinder clamp plate.
4. Lift the mounting sleeve off the cylinder.
5. Slide the cylinder out of the escutcheon.
Screws
Spindle
Rim
cylinder
Clamp
plate
Break off the
screws here.
Mounting
sleeve
Orient the
curve toward
the cylinder.
B.A.S.I.S.
escutcheon
Figure 8.9
Reinstalling the
rim cylinder for
Von Duprin
installations
8–12
Removing and reinstalling the rim cylinder for Von Duprin installations
1. If installing a new cylinder, break off the spindle on the new
cylinder to match the length of the old spindle.
2. From the front of the B.A.S.I.S. escutcheon, insert the cylinder into
the cylinder opening.
3. Holding the cylinder in position in the escutcheon, insert the
cylinder mounting sleeve through the back of the escutcheon, over
the cylinder.
4. Orient the cylinder and clamp plate as shown in Figure 8.9. From
the back of the escutcheon, secure the cylinder and mounting
sleeve using the clamp plate and mounting screws.
5. Reinstall the following parts:
■ B.A.S.I.S. escutcheon (page 8–14)
■ exit hardware (page 8–8).
6. If installing a new cylinder, reinstall the core. See page 8–9.
B.A.S.I.S. G Service Manual
Servicing Exit Hardware Trim Parts
SERVICING THE B.A.S.I.S. ESCUTCHEON
Removing the
escutcheon
1. Remove the following parts:
■ battery cover (page 8–3)
■ battery pack (page 8–4)
■ battery bracket (page 8–6)
■ exit hardware (page 8–8)
■ core (for EV function locks) (page 8–9)
■ cylinder (for EV function locks) (page 8–11 for a Precision
Hardware rim or rod exit device installation, or page 8–10 for a
mortise exit device installation).
Note: If removing the escutcheon for a Von Duprin EV function rim
or rod exit device installation, you cannot remove the cylinder from
the escutcheon until you have removed the escutcheon from the
door. See page 8–12.
2. Remove the escutcheon from the door, feeding the battery
connector and com port out the harness hole.
Battery connector
Com port
Harness hole
B.A.S.I.S. escutcheon
Outside of door
Figure 8.10 Removing and reinstalling the escutcheon
B.A.S.I.S. G Service Manual
8–13
Servicing Exit Hardware Trim Parts
Reinstalling the
escutcheon
1. If installing an escutcheon for a Von Duprin EV function rim or
rod exit device, reinstall the cylinder in the escutcheon. See
page 8–12.
2. If installing a new B.A.S.I.S. escutcheon, activate the backup
battery:
a. Locate the backup battery tab on the inside of the B.A.S.I.S.
escutcheon.
b. Pull down on the tab and remove it from the B.A.S.I.S.
escutcheon to turn on the backup battery.
For the lock to operate properly, you must remove the backup battery
tab.
Caution
Do not connect the battery pack before you have removed the backup
battery tab. Doing so may cause the lock to malfunction.
Caution
3. From the outside of the door, feed the com port and battery
connector through the harness hole as shown in Figure 8.10.
Caution
When routing the connectors, make sure the harnesses are not routed
across any sharp edges or over any surface that could damage their
sleeving or wire insulation.
4. Rest the B.A.S.I.S. escutcheon on the door by inserting the trim
studs into the mounting holes.
5. Reinstall the following parts:
■ cylinder (for EV function locks) (page 8–11 for a Precision
Hardware rim or rod exit device installation, or page 8–10 for a
mortise exit device installation)
■ core (for EV function locks) (page 8–9)
■ exit hardware (page 8–8)
■ battery bracket (page 8–7)
■ battery pack (page 8–5)
■ battery cover (page 8–3).
8–14
B.A.S.I.S. G Service Manual
9
SERVICING STANDARD
OUTSIDE ESCUTCHEON PARTS
This chapter contains instructions for servicing
outside escutcheon parts for a standard B.A.S.I.S. G
Lock. For instructions on servicing EX Series Exit
Hardware Trim parts, see page 10–1.
■
■
■
To remove all of the parts from the outside
escutcheon, perform all of the steps for removing
parts in each section of this chapter. Begin with
the escutcheon gasket (page 9–2).
To reinstall all of the parts in the outside
escutcheon, perform all of the steps for
reinstalling parts in each section of this chapter.
Begin with the reader assembly (page 9–17).
To service an individual part, see the section for
that part. The instructions refer to other sections
as necessary.
If you need to service…
See…
Escutcheon gasket
page 9–2
Lens covers
page 9–3
Harness clamp
page 9–4
Upgrade cable
page 9–5
Sensor harness or conversion harness
page 9–6
Primary harness
page 9–7
Control electronics board
page 9–10
Reader assembly
page 9–17
Note: When servicing components, always test that
the lock works properly when you’re finished.
B.A.S.I.S. G Service Manual
9–1
Servicing Standard Outside Escutcheon Parts
SERVICING THE ESCUTCHEON GASKET
Before you handle the control electronics board or any component
Caution
Removing the
escutcheon gasket
on the control electronics board, make sure that you are properly
grounded using an electrostatic discharge (ESD) protection kit.
Touching the control electronics board without proper grounding can
damage sensitive electronic components—even if you don’t notice
any static discharge.
1. Remove the inside and outside escutcheons from the door. For
mortise lock instructions, see page 5–3. For cylindrical lock
instructions, see page 7–5.
2. Remove the escutcheon gasket from the escutcheon and discard the
gasket.
Gasket
Upper post
Outside escutcheon
Figure 9.1
Reinstalling the
escutcheon gasket
9–2
Removing and reinstalling the escutcheon gasket
1. Peel away the protective backing from the edge of the escutcheon
gasket and slide the gasket onto the upper escutcheon post. Press
the gasket into place on the edge of the escutcheon so the
electronics board is covered.
2. Reinstall the inside and outside escutcheons on the door. For
mortise lock instructions, see page 5–6. For cylindrical lock
instructions, see page 7–8.
B.A.S.I.S. G Service Manual
Servicing Standard Outside Escutcheon Parts
SERVICING THE LENS COVERS
A replacement kit is available for the lens covers. See page 4–6.
Removing the lens
covers
1. Remove the following parts:
■ inside and outside escutcheons. For mortise lock instructions, see
page 5–3. For cylindrical lock instructions, see page 7–5.
■ escutcheon gasket (page 9–2).
2. Pry the lens covers off the top of the outside escutcheon.
Location of the lens cover
Retaining ring
Figure 9.2
Reinstalling the lens
covers
Location of the lens cover
Retaining ring
Removing and reinstalling the lens covers (smart card reader shown)
1. Insert the lens covers into the holes in the top of the outside
escutcheon.
2. On the inside of the escutcheon, slide the retaining rings up and
around the ends of the lens covers.
3. Reinstall the following parts:
■ escutcheon gasket
■ inside and outside escutcheons. For mortise lock instructions, see
page 5–6. For cylindrical lock instructions, see page 7–8.
B.A.S.I.S. G Service Manual
9–3
Servicing Standard Outside Escutcheon Parts
SERVICING THE HARNESS CLAMP
Removing the
harness clamp
1. Remove the following parts:
■ inside and outside escutcheons. For mortise lock instructions,
see page 5–3. For cylindrical lock instructions, see page 7–5.
■ escutcheon gasket (page 9–2).
2. Loosen the electronics board mounting screw that holds the harness
clamp and remove the clamp.
Electronics board
mounting screw
Upgrade cable
(J1)
Harness clamp
Sensor harness
Primary harness
Outside escutcheon
Figure 9.3
Reinstalling the
harness clamp
Removing and reinstalling the harness clamp
(smart card reader shown)
1. Slide the harness clamp under the loosened electronics board
mounting screw.
2. Position the primary harness, sensor harness (EV, FV, and LV
function mortise locks), and upgrade cable under the clamp, as
shown in Figure 9.3.
Note: For a description of lock functions, see page 2–2.
3. Tighten the screw.
4. Reinstall the following parts:
■ escutcheon gasket (page 9–2)
■ inside and outside escutcheons. For mortise lock instructions, see
page 5–6. For cylindrical lock instructions, see page 7–8.
9–4
B.A.S.I.S. G Service Manual
Servicing Standard Outside Escutcheon Parts
SERVICING THE UPGRADE CABLE
A replacement kit is available for the upgrade cable. See page 4–6.
Note: The upgrade cable is for future use.
Removing the
upgrade cable
1. Remove the following parts:
■ inside and outside escutcheons. For mortise lock instructions,
see page 5–3. For cylindrical lock instructions, see page 7–5.
■ escutcheon gasket (page 9–2)
■ harness clamp (page 9–4).
2. Disconnect the upgrade cable from the electronics board.
Upgrade cable connector
Outside escutcheon
Figure 9.4
Reinstalling the
upgrade cable
Removing and reinstalling the upgrade cable
(smart card reader shown)
1. Connect the upgrade cable to the J1 connector on the electronics
board.
2. Reinstall the following parts:
■ harness clamp (page 9–4)
■ escutcheon gasket (page 9–2)
■ inside and outside escutcheons. For mortise lock instructions, see
page 5–6. For cylindrical lock instructions, see page 7–8.
B.A.S.I.S. G Service Manual
9–5
Servicing Standard Outside Escutcheon Parts
SERVICING THE SENSOR HARNESS
Replacement kits are available for the sensor harness and the
conversion harness. See page 4–6.
These steps are for EV, FV, and LV function mortise locks only.
Note: For a description of lock functions, see page 2–2.
Removing the
sensor harness
1. Remove the following parts:
■ inside and outside escutcheons. For mortise lock instructions,
see page 5–3. For cylindrical lock instructions, see page 7–5.
■ escutcheon gasket (page 9–2)
■ harness clamp (page 9–4).
2. Disconnect the sensor harness from the electronics board.
Sensor harness connector
(J4)
Outside escutcheon
Figure 9.5
Reinstalling the
sensor harness
9–6
Removing and reinstalling the sensor harness
(smart card reader shown)
1. Connect the sensor harness to the J4 connector on the electronics
board.
2. Reinstall the following parts:
■ harness clamp (page 9–4)
■ escutcheon gasket (page 9–2)
■ inside and outside escutcheons. For mortise lock instructions, see
page 5–6. For cylindrical lock instructions, see page 7–8.
B.A.S.I.S. G Service Manual
Servicing Standard Outside Escutcheon Parts
SERVICING THE PRIMARY HARNESS
A replacement kit is available for the primary harness. See page 4–6.
Removing the
primary harness
1. Remove the following parts:
■ inside and outside escutcheons. For mortise lock instructions,
see page 5–3. For cylindrical lock instructions, see page 7–5.
■ escutcheon gasket (page 9–2)
■ harness clamp (page 9–4).
2. Disconnect the primary harness from the electronics board.
Primary harness connector
(J3)
Outside escutcheon
Figure 9.6
Removing and reinstalling the primary harness from the
electronics board (smart card reader shown)
3. Insert a flat blade screwdriver under the sounder and turn it to
remove the sounder from the outside escutcheon.
B.A.S.I.S. G Service Manual
9–7
Servicing Standard Outside Escutcheon Parts
4. Loosen the nut and slide the com port out from the escutcheon.
Outside escutcheon
Sounder
Nut
Com port
Figure 9.7
Reinstalling the
primary harness
9–8
Disconnecting the sounder and com port from the outside escutcheon
1. Connect the primary wire harness to the J3 connector on the
electronics board.
2. Remove the backing from the adhesive tape and apply the tape to
the escutcheon.
3. Press the sounder in place on the tape.
B.A.S.I.S. G Service Manual
Servicing Standard Outside Escutcheon Parts
4. Slide the com port into place in the escutcheon and tighten the nut.
See Figure 9.8.
Sounder
Close-up of the bottom
edge of the escutcheon
showing the com port
in position
Nut
Spacer
Com port
Figure 9.8
Connecting the sounder and com port to the outside escutcheon
5. Reinstall the following parts:
■ harness clamp (page 9–4)
■ escutcheon gasket (page 9–2)
■ inside and outside escutcheons. For mortise lock instructions, see
page 5–6. For cylindrical lock instructions, see page 7–8.
B.A.S.I.S. G Service Manual
9–9
Servicing Standard Outside Escutcheon Parts
SERVICING THE CONTROL ELECTRONICS BOARDS
Replacement kits are available for control electronics boards.
See page 4–5.
Note: To determine whether a lock has a B.A.S.I.S. G or B.A.S.I.S. V
control electronics board, look at the label on the center of the board.
B.A.S.I.S. G is labeled as BAGLKS. B.A.S.I.S. V is labeled as BA_LKS.
Removing the
magnetic stripe
control electronics
board
1. Remove the following parts:
■ inside and outside escutcheons. For mortise lock instructions,
see page 5–3. For cylindrical lock instructions, see page 7–5.
■ escutcheon gasket (page 9–2)
■ harness clamp (page 9–4)
■ upgrade cable (page 9–5)
■ sensor harness (page 9–6)
■ primary harness (page 9–7, step 2).
2. Remove and save the electronics board mounting screws.
See Figure 9.9.
3. Disconnect the reader harness from the electronics board. Set aside
the electronics board.
Green LED
Retaining ring
Reader harness
Electronics board
Electronics board
mounting screw
(used for harness
clamp)
Electronics board
mounting screw
Outside escutcheon
Figure 9.9
9–10
Removing and reinstalling the magnetic stripe
control electronics board
B.A.S.I.S. G Service Manual
Servicing Standard Outside Escutcheon Parts
Reinstalling the
magnetic stripe
control electronics
board
1. If you are installing a new control electronics board, pull down on
the backup battery tab and remove it from the outside escutcheon
to turn on the backup battery.
For the lock to operate properly, you must remove the backup battery
tab.
Caution
Do not connect the battery pack before you have removed the backup
battery tab. Doing so may cause the lock to malfunction.
Caution
2. Firmly connect the reader harness to the connector on the
upper-left corner of the electronics board. The connector should
snap into place. See Figure 9.9.
3. Route the reader harness so it fits to the side of the green LED.
4. Position the electronics board in the escutcheon so the LEDs fit into
the retaining rings.
5. Install the two electronics board mounting screws, but do not
tighten the screw for the harness clamp.
6. Reinstall the following parts:
■ primary harness (page 9–8, step 1)
■ sensor harness (page 9–6)
■ upgrade cable (page 9–5)
■ harness clamp (and tighten the electronics board mounting
screw) (page 9–4)
■ escutcheon gasket (page 9–2)
■ inside and outside escutcheons. For mortise lock instructions, see
page 5–6. For cylindrical lock instructions, see page 7–8.
B.A.S.I.S. G Service Manual
9–11
Servicing Standard Outside Escutcheon Parts
Removing the
smart card control
electronics board
1. Remove the following parts:
■ inside and outside escutcheons. For mortise lock instructions,
see page 5–3. For cylindrical lock instructions, see page 7–5.
■ escutcheon gasket (page 9–2)
■ harness clamp (page 9–4)
■ upgrade cable (page 9–5)
■ sensor harness (page 9–6)
■ primary harness (step 2, page 9–7).
2. Remove and save the electronics board mounting screws.
See Figure 9.10.
Retaining ring
Retaining ring
Electronics board
Electronics board
mounting screw
Electronics board
mounting screw
(used for harness
clamp)
Outside escutcheon
Figure 9.10 Removing and reinstalling the smart card control electronics board
3. Flip up the control electronics board.
9–12
B.A.S.I.S. G Service Manual
Servicing Standard Outside Escutcheon Parts
4. Slide open the flex cable connector and disconnect the flex cable.
Set aside the electronics board. See Figure 9.11.
Flex cable connector
Back of electronics board
Flex cable
Figure 9.11 Disconnecting the flex cable from the smart card control electronics
board
Reinstalling the
smart card control
electronics board
1. If you are installing a new control electronics board, pull down on
the backup battery tab and remove it from the outside escutcheon
to turn on the backup battery.
For the lock to operate properly, you must remove the backup battery
tab.
Caution
Do not connect the battery pack before you have removed the backup
battery tab. Doing so may cause the lock to malfunction.
Caution
2. Insert the flex cable into the connector on the back of the
electronics board. See Figure 9.12.
3. Slide closed the flex cable connector.
B.A.S.I.S. G Service Manual
9–13
Servicing Standard Outside Escutcheon Parts
4. Flip down the electronics board and position it in the escutcheon so
the LEDs fit into the retaining rings.
.
Black part of the connector
Retaining ring
Figure 9.12 Connecting the flex cable to the smart card control electronics board
5. Install the two electronics board mounting screws, but do not
tighten the screw for the harness clamp.
6. Reinstall the following parts:
■ primary harness (page 9–8, step 1)
■ sensor harness (page 9–6)
■ upgrade cable (page 9–5)
■ harness clamp (and tighten the electronics board mounting
screw) (page 9–4)
■ escutcheon gasket (page 9–2)
■ inside and outside escutcheons. For mortise lock instructions, see
page 5–6. For cylindrical lock instructions, see page 7–8.
9–14
B.A.S.I.S. G Service Manual
Servicing Standard Outside Escutcheon Parts
Removing the dual
validation control
electronics board
1. Remove the following parts:
■ inside and outside escutcheons. For mortise lock instructions,
see page 5–3. For cylindrical lock instructions, see page 7–5.
■ escutcheon gasket (page 9–2)
■ harness clamp (page 9–4)
■ upgrade cable (page 9–5)
■ sensor harness (page 9–6)
■ primary harness (page 9–7, step 2).
2. Remove and save the electronics board mounting screws.
See Figure 9.13.
3. Disconnect the reader cable from the electronics board. Set aside
the electronics board.
Reader cable
(J1)
Retaining ring
Electronics board
Electronics board
mounting screw
(used for harness
clamp)
Electronics board
mounting screw
Outside escutcheon
Figure 9.13 Removing and reinstalling the dual validation control electronics board
Reinstalling the
dual validation
control electronics
board
1. If you are installing a new control electronics board, pull down on
the backup battery tab and remove it from the outside escutcheon
to turn on the backup battery.
For the lock to operate properly, you must remove the backup battery
tab.
Caution
Do not connect the battery pack before you have removed the backup
battery tab. Doing so may cause the lock to malfunction.
Caution
B.A.S.I.S. G Service Manual
9–15
Servicing Standard Outside Escutcheon Parts
2. Firmly connect the reader harness to the connector on the
upper-left corner of the electronics board. The connector should
snap into place. See Figure 9.13.
3. Route the reader cable so it fits in between the top of the
electronics board and the escutcheon.
4. Position the electronics board in the escutcheon so the LEDs fit into
the retaining rings.
5. Install the two electronics board mounting screws, but do not
tighten the screw for the harness clamp.
6. Reinstall the following parts:
■ primary harness (page 9–8, step 1)
■ sensor harness (page 9–6)
■ upgrade cable (page 9–5)
■ harness clamp (and tighten the electronics board mounting
screw) (page 9–4)
■ escutcheon gasket (page 9–2)
■ inside and outside escutcheons. For mortise lock instructions, see
page 5–6. For cylindrical lock instructions, see page 7–8.
■ inside and outside escutcheons. For mortise lock instructions,
see page 5–3. For cylindrical lock instructions, see page 7–5.
■ inside and outside escutcheons. For mortise lock instructions, see
page 5–6. For cylindrical lock instructions, see page 7–8.
9–16
B.A.S.I.S. G Service Manual
Servicing Standard Outside Escutcheon Parts
SERVICING THE READER ASSEMBLIES
Replacement kits are available for the reader assemblies. See page 4–4.
Removing the
magnetic stripe
reader assembly
1. Remove the following parts:
■ inside and outside escutcheons. For mortise lock instructions,
see page 5–3. For cylindrical lock instructions, see page 7–5.
■ escutcheon gasket (page 9–2)
■ harness clamp (page 9–4)
■ upgrade cable (page 9–5)
■ sensor harness (page 9–6)
■ primary harness (step 2, page 9–7)
■ electronics board (page 9–12).
2. Remove and save the four reader assembly mounting screws.
See Figure 9.14.
Reader assembly
mounting screw
Figure 9.14 Removing and reinstalling the screws for the magnetic stripe reader
assembly
B.A.S.I.S. G Service Manual
9–17
Servicing Standard Outside Escutcheon Parts
3. Remove the magnetic stripe reader assembly from the outside
escutcheon, sliding the reader harness through the slot in the
escutcheon. See Figure 9.15.
Note: To determine the read head track position for ordering a
magnetic stripe reader replacement kit, look at the back of the
reader for the label that states, “This reader was factory set to read
magstripe track no. 1 2.” The track number is circled. If there is no
label, the track number is 3.
Reader harness
Magnetic stripe
reader assembly
Outside escutcheon
Figure 9.15 Removing the magnetic stripe reader assembly from the outside
escutcheon
9–18
B.A.S.I.S. G Service Manual
Servicing Standard Outside Escutcheon Parts
Reinstalling the
magnetic stripe
reader assembly
1. Orient the magnetic stripe reader assembly and insert the reader
harness through the slot in the outside escutcheon. See Figure 9.16.
,
Reader harness
Magnetic stripe
reader assembly
Slot
Reader gasket
Outside escutcheon
Figure 9.16 Positioning the magnetic stripe reader assembly
2. Position the reader assembly on the reader gasket and install the
four reader assembly mounting screws. See Figure 9.14.
3. Reinstall the following parts:
■ electronics board (page 9–13)
■ primary harness (page 9–8, step 1)
■ sensor harness (page 9–6)
■ upgrade cable (page 9–5)
■ harness clamp (page 9–4)
■ escutcheon gasket (page 9–2)
■ inside and outside escutcheons. For mortise lock instructions, see
page 5–6. For cylindrical lock instructions, see page 7–8.
B.A.S.I.S. G Service Manual
9–19
Servicing Standard Outside Escutcheon Parts
Removing the smart
card reader
assembly
1. Remove the following parts:
■ inside and outside escutcheons. For mortise lock instructions,
see page 5–3. For cylindrical lock instructions, see page 7–5.
■ escutcheon gasket (page 9–2)
■ harness clamp (page 9–4)
■ upgrade cable (page 9–5)
■ sensor harness (page 9–6)
■ primary harness (step 2, page 9–7)
■ electronics board (page 9–12).
2. Remove and save the four reader assembly mounting screws.
See Figure 9.17.
Reader assembly
mounting screw
Figure 9.17 Removing and reinstalling the screws for the smart card
reader assembly
9–20
B.A.S.I.S. G Service Manual
Servicing Standard Outside Escutcheon Parts
3. Remove the smart card reader assembly from the outside
escutcheon, sliding the flex cable through the slot in the
escutcheon. See Figure 9.18.
Flex cable
Smart card
reader assembly
Outside escutcheon
Figure 9.18 Removing the smart card reader assembly from the outside escutcheon
B.A.S.I.S. G Service Manual
9–21
Servicing Standard Outside Escutcheon Parts
Reinstalling the
smart card reader
assembly
1. Orient the reader assembly and insert the flex cable through the slot
in the outside escutcheon. See Figure 9.19.
Slot
Flex cable
Reader gasket
Smart card
reader assembly
Outside escutcheon
Figure 9.19 Positioning the smart card reader assembly
2. Position the smart card reader assembly on the reader gasket and
install the four reader assembly mounting screws. See Figure 9.17.
3. Reinstall the following parts:
■ electronics board (page 9–13)
■ primary harness (step 1, page 9–8)
■ sensor harness (page 9–6)
■ upgrade cable (page 9–5)
■ harness clamp (page 9–4)
■ escutcheon gasket (page 9–2)
■ inside and outside escutcheons. For mortise lock instructions, see
page 5–6. For cylindrical lock instructions, see page 7–8.
9–22
B.A.S.I.S. G Service Manual
Servicing Standard Outside Escutcheon Parts
Removing the dual
validation reader
assembly
1. Remove the following parts:
■ inside and outside escutcheons. For mortise lock instructions,
see page 5–3. For cylindrical lock instructions, see page 7–5.
■ escutcheon gasket (page 9–2)
■ harness clamp (page 9–4)
■ upgrade cable (page 9–5)
■ sensor harness (page 9–6)
■ primary harness (step 2, page 9–7)
■ electronics board (page 9–15).
2. Remove and save the four reader assembly mounting screws.
See Figure 9.20.
Reader assembly
mounting screw
Figure 9.20 Removing and reinstalling the screws for the dual validation reader
assembly
B.A.S.I.S. G Service Manual
9–23
Servicing Standard Outside Escutcheon Parts
3. Remove the dual validation reader assembly from the outside
escutcheon, sliding the reader cable through the slot in the
escutcheon. See Figure 9.21.
Note: To determine the read head track position for ordering a dual
validation reader replacement kit, look at the back of the reader for
the label that states, “This reader was factory set to read dual
validation track no. 1 2.” The track number is circled. If there is no
label, the track number is 3.
Reader cable
Dual validation
reader assembly
Outside escutcheon
Figure 9.21 Removing the dual validation reader assembly from the outside
escutcheon
9–24
B.A.S.I.S. G Service Manual
Servicing Standard Outside Escutcheon Parts
Reinstalling the
dual validation
reader assembly
1. Orient the dual validation reader assembly and insert the reader
cable through the slot in the outside escutcheon. See Figure 9.22.
,
Reader cable
Slot
Dual validation
reader assembly
Reader gasket
Outside escutcheon
Figure 9.22 Positioning the dual validation reader assembly
2. Position the reader assembly on the reader gasket and install the
four reader assembly mounting screws. See Figure 9.20.
3. Reinstall the following parts:
■ electronics board (page 9–15)
■ primary harness (page 9–8, step 1)
■ sensor harness (page 9–6)
■ upgrade cable (page 9–5)
■ harness clamp (page 9–4)
■ escutcheon gasket (page 9–2)
■ inside and outside escutcheons. For mortise lock instructions, see
page 5–6. For cylindrical lock instructions, see page 7–8.
■ inside and outside escutcheons. For mortise lock instructions,
see page 5–3. For cylindrical lock instructions, see page 7–5.
■ inside and outside escutcheons. For mortise lock instructions, see
page 5–6. For cylindrical lock instructions, see page 7–8.
B.A.S.I.S. G Service Manual
9–25
Servicing Standard Outside Escutcheon Parts
9–26
B.A.S.I.S. G Service Manual
10
SERVICING EXIT HARDWARE
TRIM ESCUTCHEON PARTS
This chapter contains instructions for servicing
EX Series Exit Hardware Trim escutcheon parts for
B.A.S.I.S. G EX Series Exit Hardware Trim. For
instructions for servicing standard B.A.S.I.S. outside
escutcheon parts, see page 9–1.
■
■
■
■
B.A.S.I.S. G Service Manual
To remove all of the parts from the B.A.S.I.S.
escutcheon, perform all of the steps for removing
parts in each section of this chapter. Begin with
the mounting standoffs (page 10–2).
To reinstall all of the parts in the B.A.S.I.S.
escutcheon, perform all of the steps for
reinstalling parts in each section of this chapter.
Begin with the shear pin (page 10–27).
To change the handing for the B.A.S.I.S.
escutcheon, see page 10–28.
To service an individual part, see the section for
that part. The instructions refer to other sections
as necessary.
If you need to service…
See…
Mounting standoffs
page 10–2
Escutcheon gasket
page 10–3
Lift finger
page 10–4
Mounting plate
page 10–6
Lever return springs
page 10–8
Lens covers
page 10–9
Primary harness
page 10–9
10–1
Servicing Exit Hardware Trim Escutcheon Parts
If you need to service…
See…
Control electronics board
page 10–10
Reader assembly
page 10–12
Motor assembly
page 10–14
Locking plate
page 10–18
Yoke
page 10–20
Beam and beam roller
page 10–22
Lever assembly
page 10–24
Shear pin
page 10–26
Note: When servicing components, always test that the lock works
properly when you’re finished.
SERVICING THE MOUNTING STANDOFFS
Removing the
mounting standoffs
1. Remove the escutcheon from the door. See page 8–13.
2. Unscrew the 6 mounting plate standoffs from the mounting plate.
Mounting standoffs
Mounting plate
Mounting standoffs
Figure 10.1 Removing and reinstalling the mounting standoffs
Reinstalling the
mounting standoffs
10–2
1. Screw the 6 mounting standoffs onto the mounting plate.
2. Reinstall the escutcheon on the door. See page 8–14.
B.A.S.I.S. G Service Manual
Servicing Exit Hardware Trim Escutcheon Parts
SERVICING THE ESCUTCHEON GASKET
Each time you service the escutcheon gasket you need to replace it
with a new gasket. Use part number C64564 when ordering.
Removing the
escutcheon gasket
1. Remove the followings parts:
■ escutcheon from the door (page 8–13)
■ mounting standoffs (page 10–2).
2. Peel the gasket off the escutcheon and discard. See Figure 10.2.
Note: You may need to scrape remnants of the gasket from the
escutcheon.
Escutcheon gasket
Figure 10.2 Removing and reinstalling the escutcheon gasket
Reinstalling the
escutcheon gasket
1. Starting at the bottom of the gasket, peel away the protective
backing a small amount at a time while unrolling the gasket into
position on the escutcheon.
2. Press the gasket into place on the escutcheon. See Figure 10.2.
3. Reinstall the following parts:
■ mounting standoffs (page 10–2)
■ escutcheon on the door (page 8–14).
B.A.S.I.S. G Service Manual
10–3
Servicing Exit Hardware Trim Escutcheon Parts
SERVICING THE LIFT FINGER
Each time you service the lift finger you need to replace the following
parts with new parts:
■ escutcheon gasket (C64564)
■ lift finger screw (page 4–9).
Removing the lift
finger
1. Remove the following parts:
■ escutcheon from the door (page 8–13)
■ mounting standoffs (page 10–2)
■ escutcheon gasket (page 10–3).
2. Note the orientation of the lift finger. See Figure 10.3.
3. Remove the lift finger screw and discard.
4. Remove the washer, and lift finger.
Screw
Lift finger
Figure 10.3 Removing and reinstalling the lift finger (Precision Hardware rim
configuration shown)
10–4
B.A.S.I.S. G Service Manual
Servicing Exit Hardware Trim Escutcheon Parts
Reinstalling the lift
finger
1. Position the lift finger on the escutcheon in the orientation noted in
step 2 on page 10–4.
2. Position the washer on the lift finger screw. Tightly secure the lift
finger with the lift finger screw (25–30 lbs. torque). See Figure 10.3.
3. Reinstall the following parts:
■ escutcheon gasket (page 10–3)
■ mounting standoffs (page 10–2)
■ escutcheon on the door (page 8–14).
B.A.S.I.S. G Service Manual
10–5
Servicing Exit Hardware Trim Escutcheon Parts
SERVICING THE MOUNTING PLATE
Each time you service the mounting plate you need to replace the
following parts with new parts:
■ escutcheon gasket (C64564)
■ cable tie
■ lift finger screw (page 4–9)
■ mounting plate screws (page 4–9).
Removing the
mounting plate
1. Remove the following parts:
■ escutcheon from the door (page 8–13)
■ mounting standoffs (page 10–2)
■ escutcheon gasket (page 10–3)
■ lift finger (page 10–4).
2. Cut the cable tie off the mounting plate post and discard the cable
tie. See Figure 10.4.
Primary harness
Mounting plate screws
Cable tie
Mounting plate
Mounting plate screws
Figure 10.4 Removing and reinstalling the mounting plate
3. Remove the 5 mounting plate screws and discard.
4. Carefully remove the mounting plate from the escutcheon.
10–6
B.A.S.I.S. G Service Manual
Servicing Exit Hardware Trim Escutcheon Parts
Be careful not to drop the lever return springs on the control
electronics board. They can easily damage the electronics.
Caution
Reinstalling the
mounting plate
1. With the posts on the mounting plate inserted in the lever return
springs, slide the mounting plate into the escutcheon. See Figure
Figure 10.5.
Make sure that the locking plate fits into the slot in the mounting
plate. See Figure 10.4.
2. Install the 5 new mounting plate screws.
3. Route the primary harness against the mounting plate post and
secure the harness to the post with a cable tie. See Figure 10.4.
4. Reinstall the following parts:
■ lift finger (page 10–5)
■ escutcheon gasket (page 10–3)
■ mounting standoffs (page 10–2)
■ escutcheon on the door (page 8–14).
B.A.S.I.S. G Service Manual
10–7
Servicing Exit Hardware Trim Escutcheon Parts
SERVICING THE LEVER RETURN SPRINGS
Each time you service the lever return springs you need to replace the
following parts with new parts:
■ escutcheon gasket (C64564)
■ cable tie
■ lift finger screw (page 4–9)
■ mounting plate screws (page 4–9).
Removing the lever
return springs
1. Remove the following parts:
■ escutcheon from the door (page 8–13)
■ mounting standoffs (page 10–2)
■ escutcheon gasket (page 10–3)
■ lift finger (page 10–4)
■ mounting plate (page 10–6).
2. Remove the lever return springs from the yoke. See Figure 10.5.
Lever return springs
Yoke
Figure 10.5 Removing and reinstalling the lever return springs
Reinstalling the
lever return springs
10–8
1. Install the lever return springs onto the yoke posts. See Figure 10.5.
2. Reinstall the following parts:
■ mounting plate (page 10–7)
■ lift finger (page 10–5)
■ escutcheon gasket (page 10–3)
■ mounting standoffs (page 10–2)
■ escutcheon on the door (page 8–14).
B.A.S.I.S. G Service Manual
Servicing Exit Hardware Trim Escutcheon Parts
SERVICING THE LENS COVERS
A replacement kit is available for the lens covers. See page 4–6.
Each time you service the lens covers you need to replace the following
parts with new parts:
■ escutcheon gasket (C64564)
■ cable tie
■ lift finger screw (page 4–9)
■ mounting plate screws (page 4–9).
Removing the lens
covers
Reinstalling the lens
covers
1. Remove the following parts:
■ escutcheon from the door (page 8–13)
■ mounting standoffs (page 10–2)
■ escutcheon gasket (page 10–3)
■ lift finger (page 10–4)
■ mounting plate (page 10–6)
2. Perform step 2 on page 9–3.
1. Perform steps 1 and 2 on page 9–3.
2. Reinstall the following parts:
■ mounting plate (page 10–7)
■ escutcheon gasket (page 10–3)
■ lift finger (page 10–5)
■ mounting standoffs (page 10–2)
■ escutcheon on the door (page 8–14).
SERVICING THE PRIMARY HARNESS
A replacement kit is available for the primary harness. See page 4–10.
Each time you service the primary harness you need to replace the
following parts with new parts:
■ escutcheon gasket (C64564)
■ cable tie
■ lift finger screw (page 4–9)
■ mounting plate screws (page 4–9)
■ tape for mounting the sounder.
Before you handle the control electronics board or any component
Caution
on the control electronics board, make sure that you are properly
grounded using an electrostatic discharge (ESD) protection kit.
Touching the control electronics board without proper grounding can
damage sensitive electronic components—even if you don’t notice
any static discharge.
B.A.S.I.S. G Service Manual
10–9
Servicing Exit Hardware Trim Escutcheon Parts
Removing the
primary harness
1. Remove the following parts:
■ escutcheon from the door (page 8–13)
■ mounting standoffs (page 10–2)
■ escutcheon gasket (page 10–3)
■ lift finger (page 10–4)
■ mounting plate (page 10–6).
2. Perform steps 2 through 4 starting on page 9–7.
Reinstalling the
primary harness
1. Perform steps 1 through 3 starting on page 9–8.
2. Reinstall the following parts:
■ mounting plate (page 10–7)
■ lift finger (page 10–5)
■ escutcheon gasket (page 10–3)
■ mounting standoffs (page 10–2)
■ escutcheon on the door (page 8–14).
SERVICING THE CONTROL ELECTRONICS BOARDS
Replacement kits are available for control electronics boards.
See page 4–5.
Each time you service the control electronics board you need to replace
the following parts with new parts:
■ escutcheon gasket (C64564)
■ cable tie
■ lift finger screw (page 4–9)
■ mounting plate screws (page 4–9).
Note: To determine whether a lock has a B.A.S.I.S. G or B.A.S.I.S. V
control electronics board, look at the label on the center of the board.
B.A.S.I.S. G is labeled as BAGLKS. B.A.S.I.S. V is labeled as BA_LKS.
Removing the
magnetic stripe
control electronics
board
10–10
1. Remove the following parts:
■ escutcheon from the door (page 8–13)
■ mounting standoffs (page 10–2)
■ escutcheon gasket (page 10–3)
■ lift finger (page 10–4)
■ mounting plate (page 10–6)
■ primary harness (page 10–10).
2. Perform steps 2 and 3 on page 9–10.
B.A.S.I.S. G Service Manual
Servicing Exit Hardware Trim Escutcheon Parts
Reinstalling the
magnetic stripe
control electronics
board
1. Perform steps 1 through 5 on page 9–11.
2. Reinstall the following parts:
■ primary harness (page 10–10)
■ mounting plate (page 10–7)
■ lift finger (page 10–5)
■ escutcheon gasket (page 10–3)
■ mounting standoffs (page 10–2)
■ escutcheon on the door (page 8–14).
Removing the
smart card control
electronics board
1. Remove the following parts:
■ escutcheon from the door (page 8–13)
■ mounting standoffs (page 10–2)
■ escutcheon gasket (page 10–3)
■ lift finger (page 10–4)
■ mounting plate (page 10–6)
■ primary harness (page 10–10).
2. Perform steps 2 through 4 starting on page 9–12.
Reinstalling the
smart card control
electronics board
1. Perform steps 1 through 5 starting on page 9–13.
2. Reinstall the following parts:
■ primary harness (page 10–10)
■ mounting plate (page 10–7)
■ lift finger (page 10–5)
■ escutcheon gasket (page 10–3)
■ mounting standoffs (page 10–2)
■ escutcheon on the door (page 8–14).
Removing the dual
validation control
electronics board
1. Remove the following parts:
■ escutcheon from the door (page 8–13)
■ mounting standoffs (page 10–2)
■ escutcheon gasket (page 10–3)
■ lift finger (page 10–4)
■ mounting plate (page 10–6)
■ primary harness (page 10–10).
2. Perform steps 2 and 3 on page 9–15.
B.A.S.I.S. G Service Manual
10–11
Servicing Exit Hardware Trim Escutcheon Parts
Reinstalling the
dual validation
control electronics
board
1. Perform steps 1 through 5 starting on page 9–15.
2. Reinstall the following parts:
■ primary harness (page 10–10)
■ mounting plate (page 10–7)
■ lift finger (page 10–5)
■ escutcheon gasket (page 10–3)
■ mounting standoffs (page 10–2)
■ escutcheon on the door (page 8–14).
SERVICING THE READER ASSEMBLIES
Replacement kits are available for the reader assemblies. See page 4–4.
Each time you service the reader assembly you need to replace the following
parts with new parts:
■ escutcheon gasket (C64564)
■ cable tie
■ lift finger screw (page 4–9)
■ mounting plate screws (page 4–9).
Removing the
magnetic stripe
reader assembly
1. Remove the following parts:
■ escutcheon from the door (page 8–13)
■ mounting standoffs (page 10–2)
■ escutcheon gasket (page 10–3)
■ lift finger (page 10–4)
■ mounting plate (page 10–6)
■ primary harness (page 10–10)
■ electronics board (page 10–10).
2. Perform steps 2 and 3 starting on page 9–17.
Reinstalling the
magnetic stripe
reader assembly
1. Perform steps 1 and 2 on page 9–19.
2. Reinstall the following parts:
■ electronics board (page 10–11)
■ primary harness (page 10–10)
■ mounting plate (page 10–7)
■ lift finger (page 10–5)
■ escutcheon gasket (page 10–3)
■ mounting standoffs (page 10–2)
■ escutcheon on the door (page 8–14).
10–12
B.A.S.I.S. G Service Manual
Servicing Exit Hardware Trim Escutcheon Parts
Removing the smart
card reader
assembly
Reinstalling the
smart card reader
assembly
Removing the dual
validation reader
assembly
Reinstalling the
dual validation
reader assembly
1. Remove the following parts:
■ escutcheon from the door (page 8–13)
■ mounting standoffs (page 10–2)
■ escutcheon gasket (page 10–3)
■ lift finger (page 10–4)
■ mounting plate (page 10–6)
■ primary harness (page 10–10)
■ electronics board (page 10–11).
2. Perform steps 2 and 3 starting on page 9–20.
1. Perform steps 1 and 2 on page 9–22.
2. Reinstall the following parts:
■ electronics board (page 10–11)
■ primary harness (page 10–10)
■ mounting plate (page 10–7)
■ lift finger (page 10–5)
■ escutcheon gasket (page 10–3)
■ mounting standoffs (page 10–2)
■ escutcheon on the door (page 8–14).
1. Remove the following parts:
■ escutcheon from the door (page 8–13)
■ mounting standoffs (page 10–2)
■ escutcheon gasket (page 10–3)
■ lift finger (page 10–4)
■ mounting plate (page 10–6)
■ primary harness (page 10–10)
■ electronics board (page 10–11).
2. Perform steps 2 and 3 starting on page 9–23.
1. Perform steps 1 and 2 on page 9–25.
2. Reinstall the following parts:
■ electronics board (page 10–12)
■ primary harness (page 10–10)
■ mounting plate (page 10–7)
■ lift finger (page 10–5)
■ escutcheon gasket (page 10–3)
■ mounting standoffs (page 10–2)
■ escutcheon on the door (page 8–14).
B.A.S.I.S. G Service Manual
10–13
Servicing Exit Hardware Trim Escutcheon Parts
SERVICING THE MOTOR ASSEMBLY
Replacement kits are available for motor assemblies. See page 4–10.
Each time you service the motor assembly you need to replace the
following parts with new parts:
■ escutcheon gasket (C64564)
■ cable tie
■ lift finger screw (page 4–9)
■ mounting plate screws (page 4–9)
■ tape for mounting the sounder.
Removing the motor
assembly
1. Remove the following components:
■ escutcheon from the door (page 8–13)
■ mounting standoffs (page 10–2)
■ escutcheon gasket (page 10–3)
■ lift finger (page 10–4)
■ mounting plate (page 10–6)
■ lever return springs (page 10–8).
2. Disconnect the motor connector from the primary harness. See
Figure 10.6.
Motor connector
Sounder
Motor assembly
Socket head screw
Figure 10.6 Removing the motor assembly
10–14
B.A.S.I.S. G Service Manual
Servicing Exit Hardware Trim Escutcheon Parts
3. Using a screwdriver, pry the sounder off the escutcheon.
4. Using a 3/32″ hex driver, remove the socket head screw and spacer.
Remove the motor assembly from the escutcheon.
Reinstalling the
motor assembly
1. Rotate the gear on the motor assembly until the locking lever is as
close to the screw hole as possible, as shown in Figure 10.7.
Note: If the locking lever does not move freely as you turn the gear,
gently move the locking lever into position.
Locking lever
Pivot pin
Gear
Socket head screw hole
Figure 10.7 Rotating the motor assembly gear
2. Position the motor assembly in the escutcheon as shown in
Figure 10.8. Make sure that:
■ the locking lever is inserted through the locking plate.
■ the motor assembly pivot pin is seated in the recess in the
escutcheon
B.A.S.I.S. G Service Manual
10–15
Servicing Exit Hardware Trim Escutcheon Parts
.
Motor harness
Motor assembly
Pivot pin
Locking lever
Socket head screw
Locking plate
Figure 10.8 Routing the motor harness
3. Place the spacer on the socket he4ad screw. Using a 3/32″ hex
driver, reinstall the socket head screw.
4. Route the motor harness into the groove in the escutcheon, as
shown in Figure 10.8.
5. Reinstall the sounder onto the escutcheon. See Figure 10.9.
10–16
B.A.S.I.S. G Service Manual
Servicing Exit Hardware Trim Escutcheon Parts
6. Connect the motor harness to the primary harness.
Motor connector
Sounder
Figure 10.9 Reinstalling the motor assembly
7. Reinstall the following components:
■ lever return springs (page 10–8)
■ mounting plate (page 10–7)
■ lift finger (page 10–5)
■ escutcheon gasket (page 10–3)
■ mounting standoffs (page 10–2)
■ escutcheon on the door (page 8–14).
B.A.S.I.S. G Service Manual
10–17
Servicing Exit Hardware Trim Escutcheon Parts
SERVICING THE LOCKING PLATE
Each time you service the locking plate you need to replace the
following parts with new parts:
■ escutcheon gasket (C64564)
■ cable tie
■ lift finger screw (page 4–9)
■ mounting plate screws (page 4–9).
Removing the
locking plate
1. Remove the following parts:
■ escutcheon from the door (page 8–13)
■ mounting standoffs (page 10–2)
■ escutcheon gasket (page 10–3)
■ lift finger (page 10–4)
■ mounting plate (page 10–6)
■ lever return springs (page 10–8)
■ motor assembly (page 10–14).
2. Slide the locking plate out of the escutcheon. See Figure 10.10.
Locking lever
Locking plate
Figure 10.10 Removing and reinstalling the locking plate
10–18
B.A.S.I.S. G Service Manual
Servicing Exit Hardware Trim Escutcheon Parts
Reinstalling the
locking plate
1. Slide the locking plate into position as shown in Figure 10.11. Make
sure that the locking lever of the motor assembly is inserted through
the locking plate.
Locking plate
Locking lever
Figure 10.11 Reinstalling the locking plate
2. Reinstall the following parts:
■ motor assembly (page 10–15)
■ lever return springs (page 10–8)
■ mounting plate (page 10–7)
■ lift finger (page 10–5)
■ escutcheon gasket (page 10–3)
■ mounting standoffs (page 10–2)
■ escutcheon on the door (page 8–14).
B.A.S.I.S. G Service Manual
10–19
Servicing Exit Hardware Trim Escutcheon Parts
SERVICING THE YOKE
Each time you service the yoke you need to replace the following parts
with new parts:
■ escutcheon gasket (C64564)
■ cable tie
■ lift finger screw (page 4–9)
■ mounting plate screws (page 4–9)
■ 4 shoulder screws (page 4–10).
Removing the yoke
1. Remove the following parts:
■ escutcheon from the door (page 8–13)
■ mounting standoffs (page 10–2)
■ escutcheon gasket (page 10–3)
■ lift finger (page 10–4)
■ mounting plate (page 10–6)
■ lever return springs (page 10–8).
2. Unscrew the 4 shoulder screws and discard. See Figure 10.12.
3. Remove the yoke from the escutcheon.
Shoulder screws
Yoke
Shoulder screws
Figure 10.12 Removing and reinstalling the yoke
10–20
B.A.S.I.S. G Service Manual
Servicing Exit Hardware Trim Escutcheon Parts
Reinstalling the
yoke
1. Position the yoke in the escutcheon with the threaded nut down.
2. Apply Lubriplate® GR-132 grease or an equivalent quality petroleum
around the slots on the face of the yoke.
3. Tightly secure the yoke to the escutcheon using the 4 new shoulder
screws (20–25 lbs. torque). See Figure 10.12.
4. Reinstall the following parts:
■ lever return springs (page 10–8)
■ mounting plate (page 10–7)
■ lift finger (page 10–5)
■ escutcheon gasket (page 10–3)
■ mounting standoffs (page 10–2)
■ escutcheon on the door (page 8–14).
B.A.S.I.S. G Service Manual
10–21
Servicing Exit Hardware Trim Escutcheon Parts
SERVICING THE BEAM AND BEAM ROLLER
Each time you service the beam or beam roller you need to replace the
following parts with new parts:
■ escutcheon gasket (C64564)
■ cable tie
■ lift finger screw (page 4–9)
■ mounting plate screws (page 4–9)
■ 4 shoulder screws (page 4–10).
Removing the beam
and beam roller
1. Remove the following parts:
■ escutcheon from the door (page 8–13)
■ mounting standoffs (page 10–2)
■ escutcheon gasket (page 10–3)
■ lift finger (page 10–4)
■ mounting plate (page 10–6)
■ lever return springs (page 10–8)
■ yoke (page 10–20).
2. Remove the c-clip from the lever spindle. See Figure 10.13.
C-clip
Lever spindle
Figure 10.13 Removing and reinstalling the c-clip
10–22
B.A.S.I.S. G Service Manual
Servicing Exit Hardware Trim Escutcheon Parts
3. Remove the beam and beam roller from the lever spindle. See
Figure 10.14.
Slot in beam
Locking plate
Lever spindle
Beam
Beam roller
Figure 10.14 Removing and reinstalling the beam and beam roller
Reinstalling the
beam and
beam roller
1. Place the beam on the lever spindle so that the slot in the beam
aligns with the locking plate. See Figure 10.14.
2. Reinstall the c-clip onto the lever spindle. The orientation of the clip
does not matter. See Figure 10.13.
3. Place the beam roller on the beam.
4. Reinstall the following parts:
■ yoke (page 10–21)
■ lever return springs (page 10–8)
■ mounting plate (page 10–7)
■ lift finger (page 10–5)
■ escutcheon gasket (page 10–3)
■ mounting standoffs (page 10–2)
■ escutcheon on the door (page 8–14).
B.A.S.I.S. G Service Manual
10–23
Servicing Exit Hardware Trim Escutcheon Parts
SERVICING THE LEVER ASSEMBLY
Each time you service the lever assembly you need to replace the
following parts with new parts:
■ escutcheon gasket (C64564)
■ cable tie
■ lift finger screw (page 4–9)
■ mounting plate screws (page 4–9)
■ 4 shoulder screws (page 4–10).
Removing the lever
assembly
1. Remove the following parts:
■ escutcheon from the door (page 8–13)
■ mounting standoffs (page 10–2)
■ escutcheon gasket (page 10–3)
■ lift finger (page 10–4)
■ mounting plate (page 10–6)
■ lever return spring (page 10–8)
■ yoke (page 10–20)
■ beam and beam roller (page 10–22).
2. Remove the lever from the front of the escutcheon. See
Figure 10.15.
Lever
Figure 10.15 Removing and reinstalling the lever assembly
10–24
B.A.S.I.S. G Service Manual
Servicing Exit Hardware Trim Escutcheon Parts
Reinstalling the
lever assembly
1. Make sure that the shear pin is positioned on the lever so that the
head faces the opposite direction of the lever handle. See
Figure 10.16.
2. Insert the lever through the escutcheon, positioning the lever so its
handle will point toward the door hinges. See Figure 10.15.
3. Reinstall the following parts:
■ beam and beam roller (page 10–23)
■ yoke (page 10–21)
■ lever return spring (page 10–8)
■ mounting plate (page 10–7)
■ lift finger (page 10–5)
■ escutcheon gasket (page 10–3)
■ mounting standoffs (page 10–2)
■ escutcheon (page 8–14).
B.A.S.I.S. G Service Manual
10–25
Servicing Exit Hardware Trim Escutcheon Parts
SERVICING THE SHEAR PIN
Replacements kits are available for shear pins. See page 4–10.
Each time you service the shear pin you need to replace the following
parts with new parts:
■ escutcheon gasket (C64564)
■ cable tie
■ lift finger screw (page 4–9)
■ mounting plate screws (page 4–9)
■ 4 shoulder screws (page 4–10).
Removing the shear
pin
1. Remove the following parts:
■ escutcheon from the door (page 8–13)
■ mounting standoffs (page 10–2)
■ escutcheon gasket (page 10–3)
■ lift finger (page 10–4)
■ mounting plate (page 10–6)
■ lever return spring (page 10–8)
■ yoke (page 10–20)
■ beam and beam roller (page 10–22)
■ lever assembly (page 10–24).
2. Remove the shear pin from the lever. See page 10–26.
Shear pin
Figure 10.16 Removing and reinstalling the shear pin
10–26
B.A.S.I.S. G Service Manual
Servicing Exit Hardware Trim Escutcheon Parts
Reinstalling the
shear pin
1. Insert the shear pin into the lever, making sure that the shear pin is
positioned in the lever so that the head faces the opposite direction
of the lever handle. See Figure 10.16.
2. Reinstall the following parts:
■ lever assembly (page 10–25)
■ beam and beam roller (page 10–23)
■ yoke (page 10–21)
■ lever return spring (page 10–8)
■ mounting plate (page 10–7)
■ lift finger (page 10–5)
■ escutcheon gasket (page 10–3)
■ mounting standoffs (page 10–2)
■ escutcheon in the door (page 8–14).
B.A.S.I.S. G Service Manual
10–27
Servicing Exit Hardware Trim Escutcheon Parts
CHANGING THE HANDING
Each time you change the handing you need to replace the following
parts with new parts:
■ escutcheon gasket (C64564)
■ cable tie
■ lift finger screw (page 4–9)
■ mounting plate screws (page 4–9)
■ 4 shoulder screws (page 4–10).
Note: When changing the handing for Precision Hardware mortise
applications, you must replace the lift finger with the correct lift finger
for the desired handing. To order the left-hand lift finger, use part
number C64576. To order the right-hand lift finger, use part number
C64568.
1. Remove the following parts:
■ escutcheon from the door (page 8–13)
■ mounting standoffs (page 10–2)
■ escutcheon gasket (page 10–3)
■ lift finger (page 10–4)
■ mounting plate (page 10–6)
■ lever return springs page 10–8)
■ yoke (page 10–20)
■ beam and beam roller (page 10–22)
■ lever assembly (page 10–24).
10–28
B.A.S.I.S. G Service Manual
Servicing Exit Hardware Trim Escutcheon Parts
2. Make sure that the shear pin is positioned in the lever so that the
head faces the opposite direction of the lever handle. Then insert
the lever through the escutcheon, positioning the lever so its handle
will point toward the door hinges. See Figure 10.17.
Shear pin head
Lever
Figure 10.17 Changing the handing
3. Reinstall the following parts:
■ beam and beam roller (page 10–23)
■ yoke (page 10–21)
■ lever return springs (page 10–8)
■ mounting plate (page 10–7)
■ lift finger (page 10–5)
■ escutcheon gasket (page 10–3)
■ mounting standoffs (page 10–2)
■ escutcheon on the door (page 8–14).
B.A.S.I.S. G Service Manual
10–29
Servicing Exit Hardware Trim Escutcheon Parts
10–30
B.A.S.I.S. G Service Manual
11
MAINTENANCE
This chapter includes instructions for performing
basic maintenance for standard B.A.S.I.S. Locks and
for EX Series Exit Hardware Trim.
If you need to…
See…
Replace the backup battery
page 11–2
Replace or upgrade the battery pack
page 11–4
Add key override sensing to standard B.A.S.I.S.
Mortise Locks and B.A.S.I.S. Locks with V Series
mortise cases
page 11–10
Perform diagnostics using a PDA
page 11–13
Note: When servicing components, always test that
the lock works properly when you’re finished.
B.A.S.I.S. G Service Manual
11–1
Maintenance
REPLACING THE BACKUP BATTERY
Removing the
backup battery
A replacement kit is available for the backup battery. See page 4–5.
1. For standard locks, remove the inside and outside escutcheons
from the door. For mortise lock instructions, see page 5–3. For
cylindrical lock instructions, see page 7–5.
For exit hardware trim, remove the B.A.S.I.S. escutcheon from the
door. See page 8–13.
2. For standard locks, remove the gasket from the outside escutcheon
to expose the control electronics board and discard the gasket.
For exit hardware trim, remove the following parts from the
escutcheon to expose the control electronics board:
mounting standoffs (page 10–2)
■ escutcheon gasket (page 10–3)
■ lift finger (page 10–4)
■ mounting plate (page 10–6).
3. Remove the backup battery from the battery socket.
■
Battery clip
Lift the battery here.
Outside escutcheon
Figure 11.1 Removing the backup battery (escutcheon for standard mortise lock
shown)
11–2
B.A.S.I.S. G Service Manual
Maintenance
Reinstalling the
backup battery
1. Slide the backup battery under the clip and into position in the
battery socket.
Battery clip
Battery socket
Backup battery
Slide the backup battery
under the clip.
Outside escutcheon
Figure 11.2 Reinstalling the backup battery (escutcheon for standard mortise lock
shown)
2. For standard locks, peel away the protective backing from the edge
of the escutcheon gasket and slide the gasket onto the upper
escutcheon post. Press the gasket into place so the electronics
board is covered.
For exit hardware trim, reinstall the following parts in the
escutcheon:
mounting plate (page 10–7)
■ lift finger (page 10–5)
■ escutcheon gasket (page 10–3)
■ mounting standoffs (page 10–2).
3. For standard locks, reinstall the inside and outside escutcheons on
the door. For mortise lock instructions, see page 5–6. For cylindrical
lock instructions, see page 7–8.
■
For exit hardware trim, reinstall the escutcheon on the door. See
page 8–14.
B.A.S.I.S. G Service Manual
11–3
Maintenance
REPLACING OR UPGRADING THE BATTERY PACK
To replace the four-cell battery pack for a standard B.A.S.I.S. Lock or for
EX Series Exit Hardware Trim, obtain part number B60726.
An eight-cell battery pack also is available for use with standard
B.A.S.I.S. Locks. To replace the eight-cell battery pack in a standard
lock, obtain part number B62101. An upgrade kit is available to upgrade
a standard lock with a four-cell battery pack (and brass escutcheons) to
an eight-cell battery pack. See page 4–5.
Removing the
battery pack for a
standard lock
1. Use a T15 TORX bit driver to remove the security screw from the
battery door. See Figure 11.3.
2. Open the battery door and remove it from the escutcheon.
3. Remove the battery pack from the battery compartment.
Security screw
Tabs
Figure 11.3 Removing the battery door (four-cell door shown)
4. Disconnect the battery pack from the battery connector on the wire
harness. See Figure 11.4.
11–4
B.A.S.I.S. G Service Manual
Maintenance
Inside escutcheon
Battery pack
Figure 11.4 Removing the battery pack (four-cell pack shown)
B.A.S.I.S. G Service Manual
11–5
Maintenance
Reinstalling the
battery pack for a
standard lock
1. Connect the battery pack to the battery connector on the wire
harness inside the battery compartment. See Figure 11.5.
Note: The battery connection has 3 wires and 3 pins. The wire colors
are:
■ red with white stripe
■ white
■ black with white stripe.
Caution
When connecting the battery pack, make sure:
■ there are no loose wire connections where the wires are inserted
into the connectors
■ the connectors are firmly mated.
Inside escutcheon
Battery pack
Figure 11.5 Reinstalling the battery pack (eight-cell pack shown)
2. Place the battery pack inside the battery compartment.
Note: For the four-cell battery pack, position the battery so that the
foam will face the battery door.
Caution
When routing the battery wires, make sure the wires are not routed
across any sharp edges or over any surface that could damage their
sleeving or wire insulation.
3. Making sure that the battery door does not pinch any wires, insert
the tabs of the battery door into its mating slots and swing the door
closed.
11–6
B.A.S.I.S. G Service Manual
Maintenance
4. Use a T15 TORX bit driver to secure the battery door with the
security screw. Tighten firmly.
Security screw
Tabs
Figure 11.6 Reinstalling the battery door (eight-cell door shown)
B.A.S.I.S. G Service Manual
11–7
Maintenance
Removing the
battery pack for
exit hardware trim
1. Use a T15 TORX driver to remove the security screws from the
battery cover. See Figure 11.7.
2. Remove the battery cover from the battery bracket.
Security
screws
Inside of door
Figure 11.7 Removing and reinstalling the battery cover on the battery bracket
3. Remove the battery pack from the holder inside the battery bracket.
See Figure 11.8.
Note: You might need to cut a cable tie if one was used to dress the
wire harness inside the battery bracket.
4. Disconnect the battery pack from the battery connector on the wire
harness.
Battery connector
Battery pack
Battery holder
(inside bracket)
Figure 11.8 Removing and reinstalling the battery pack
11–8
B.A.S.I.S. G Service Manual
Maintenance
Reinstalling the
battery pack for
exit hardware trim
Note: Replacement battery packs are shipped with foam attached, but
foam is not needed for EX Series Exit Hardware Trim. Remove and
discard the foam before installing the battery pack.
1. Connect the battery pack to the battery connector on the wire
harness as shown in Figure 11.8.
Note: The battery connector has 3 wires and 3 pins. The wire colors
are:
■ red with white stripe
■ white
■ black with white stripe.
Caution
When connecting the battery pack, make sure there are no loose wire
connections where the wires are inserted into the connectors and the
connectors are firmly mated.
2. Place the battery pack in the holder inside the battery bracket and
dress the wire harness inside the bracket.
Make sure you do not damage the sleeving on the battery pack.
Doing so may cause the batteries to be drained.
Caution
3. If reinstalling with a surface rod device, dress the wire harness
inside the bracket to the left of the rod so that the harness will not
interfere with the movement of the rods.
We recommend that you loosely coil the harness and use a cable tie
to secure the coil. To avoid damaging the harness, do not put any
sharp bends in it or flex it close to the connectors.
Failure to dress the wire harness away from the rod could damage
the wire harness, causing the lock’s electronics to not work properly.
Caution
4. Making sure that the battery cover does not pinch any wires, place
the cover over the bracket.
5. Use a T15 TORX bit driver to secure the battery compartment cover
with the security screws. Tighten firmly. See Figure 11.7.
B.A.S.I.S. G Service Manual
11–9
Maintenance
ADDING KEY OVERRIDE SENSING TO STANDARD B.A.S.I.S. MORTISE LOCKS
You can add key override sensing to a FV or EV function B.A.S.I.S.
Mortise Lock that was:
■
■
ordered without the key override sensing option, or
upgraded from a V Series Mortise lock.
Note: For a description of lock functions, see page 2–2.
Order the following parts and perform the tasks below:
■
■
■
sensor harness kit, part number 1833728
sensor module with deadbolt and key override kit (FV function), part
number 1833885, or
sensor module with key override kit (EV function), part
number 1833927.
1. Remove the inside and outside trim from the door (page 5–3).
2. If the lock has a sensor harness, remove it. See Figure 11.9. For
complete instructions, see page 9–6.
3. Connect the new sensor harness. For complete instructions, see
page 9–6.
Electronics board
Sensor harness
Outside escutcheon
Figure 11.9 Connecting the sensor harness to the electronics board
4. Remove and open the mortise case. For complete instructions,
see page 6–2.
5. Remove the latch lever. See Figure 11.11.
11–10
B.A.S.I.S. G Service Manual
Maintenance
6. For B.A.S.I.S. mortise cases, if the mortise case has a sensor module,
remove it. For complete instructions, see page 6–16.
For V Series mortise cases, loosen the two mounting screws on the
sensor switch assembly. Remove the assembly. See Figure 11.10.
V Series sensor
switch assembly
Mounting screw
Figure 11.10 Removing the V Series sensor switch assembly
B.A.S.I.S. G Service Manual
11–11
Maintenance
7. Install the sensor module in the mortise case. For complete
instructions, see page 6–16.
Sensor module
Latch lever
Figure 11.11 Positioning the sensor module in the mortise case (FV function, LH case shown)
8. Reinstall the latch lever.
9. Close and reinstall the mortise case (page 6–2).
10. Reinstall the inside and outside escutcheons on the door (page 5–6).
11–12
B.A.S.I.S. G Service Manual
Maintenance
PERFORMING DIAGNOSTICS USING A PDA
Diagnostics
overview
You can use B.A.S.I.S. Transport to view diagnostics information for a
lock. Figure 11.12 shows an example of the diagnostics information
provided. The table below describes each of the fields in the
Diagnostics window.
Figure 11.12 B.A.S.I.S. Transport Diagnostics window and Diagnostics Codes
window
This field
Shows
Firmware ID
ID indicating the type of firmware in the lock. Technical
support personnel may ask you to provide this information.
The B.A.S.I.S. G firmware ID is BAGLKS. The B.A.S.I.S. V
firmware ID is BA_LKS.
Version
Version number of the lock’s firmware. Technical support
personnel may ask you to provide this information.
Diagnostics Code
Hexadecimal number indicating firmware conditions, such as
firmware resets, that have occurred at the lock since the
diagnostics code was last cleared. The code 0x00 means no
conditions have occurred.
To view the meaning of the code, tap the more button (...). The
Diagnostics Codes window shows each active diagnostics code
and its meaning. See Figure 11.12. Tap the close button (X) to
close this window.
Technical support personnel may ask you to provide this
information.
To clear the diagnostics code, see page 11–20.
B.A.S.I.S. G Service Manual
11–13
Maintenance
This field
Shows
Online Mode
Whether the lock is under timezone control (Automatic) or set
to a specific mode, such as Locked or Unlocked.
For more information, see Changing a lock’s online mode on
page 11–18.
Use Count
Number of times access was granted since the use count was
last reset. To reset the use count, see page 11–19.
Main Battery
Current power level of the lock’s battery pack.
No shading in the status bar indicates an Alarm condition. The
batteries are dead and must be replaced.
If the shading falls within the Warning range, the power level is
10% or lower. You should replace the batteries soon.
If the shading falls within the Good range, the power level is
between 10% and 100%.
Backup Battery
Viewing diagnostics
information
Current power level of the lock’s coin cell battery, used to back
up the lock’s memory if the main battery pack dies or is
disconnected. If the backup battery is Bad, you should replace
it. See page 11–2.
1. Connect the PDA to a lock.
a. Connect the serial cable to the PDA.
b. Connect the serial cable to the programming cable.
c. Connect the programming cable to the lock’s communication
port. The connector snaps into place.
Note 1: For standard locks, the communication port is located in
the bottom of the outside escutcheon. See Figure 11.13.
Note 2: For exit hardware trim, the communication port is
located in the top of the battery bracket. See Figure 11.14. You
must remove the battery cover to access the communication
port. See page 11–2.
11–14
B.A.S.I.S. G Service Manual
Maintenance
PDA
Serial cable
Communication port
Programming cable
Figure 11.13 Connecting the PDA to a standard lock
Communication port
Inside of door
Figure 11.14 Locating the communication port for exit hardware trim
B.A.S.I.S. G Service Manual
11–15
Maintenance
2. Start B.A.S.I.S. Transport.
On the PDA, tap Start, then Programs, then BAS, then Transport.
The Main window appears, as shown in Figure 11.15.
Figure 11.15 Starting B.A.S.I.S. Transport
3. From the B.A.S.I.S. Transport Main window on the PDA, tap View,
then Diagnostics.
The Diagnostics window appears, with the fields blank.
4. Tap Diagnostics, then Connect.
The Login window appears.
5. Enter the lock’s password in the Enter Password field.
For instructions to use the PDA’s virtual keyboard, see the
documentation provided with the PDA.
Note: The password for a lock is the password programmed for the
reader configuration’s access control panel. You must enter the
password exactly as it was entered in the Password field on the
Offline Lock form in the Access Panels folder. Capitalization must be
the same.
6. Tap OK.
A message appears stating, “Attempting login... Please swipe a
card...”.
7. Use the temporary operator card to activate the lock.
The diagnostics information appears on the PDA, as shown in
Figure 11.12 on page 11–13.
11–16
B.A.S.I.S. G Service Manual
Maintenance
Note: To perform other activities while connected to the lock, see:
Changing a lock’s online mode on page 11–18
■ Unlocking a door temporarily on page 11–19
■ Resetting the use count on page 11–19
■ Clearing the diagnostics code on page 11–20.
8. When you have finished using diagnostics features, tap Diagnostics,
then Disconnect.
■
The PDA closes communications with the lock.
9. To return to the Main window, tap View, then Main.
10. To disconnect the PDA from the lock, press the button on the
programming cable connector and unplug the programming cable
from the lock’s communication port. See Figure 11.16.
Button on the
programming cable
Figure 11.16 Disconnecting the programming cable from the lock
B.A.S.I.S. G Service Manual
11–17
Maintenance
Changing a lock’s
online mode
When a B.A.S.I.S. G Lock’s mode of operation is determined by its
programming, the diagnostics information for the lock indicates that
the lock’s “online mode” is Automatic. In effect, the lock is under
timezone control. For information about defining timezones for a lock,
see the B.A.S.I.S. 2002 System Administration User Guide.
You can use the PDA to select a specific online mode of operation for a
lock and override timezone control. The selected mode remains in
effect until you restore the lock to timezone control by setting the
online mode to Automatic.
For example, during an emergency you might set a lock’s online mode
to Unlocked so that emergency personnel can access the room. When
the emergency is over, you can set the lock’s online mode to Automatic
to restore timezone control.
The following online modes are available:
■
■
■
■
■
■
■
Automatic. The lock is under timezone control.
Card. Any valid card in the lock’s database can access the lock.
Card and PIN. Any valid card and PIN combination programmed in
the lock’s database can access the lock.
Card or PIN. Any valid card or PIN programmed in the lock’s
database can be used to access the lock.
Facility Code. Any card or PIN with a valid facility code can access
the lock.
Locked. The door is locked. All cards and PINs are denied access.
Unlocked. The door is unlocked.
To change a lock’s online mode, perform these steps:
1. If you are already viewing diagnostics information for the lock,
go to step 2.
If you are not viewing diagnostics information for the lock,
perform step 1 through step 7 on page 11–14.
2. From the B.A.S.I.S. Transport Diagnostics window on the PDA, tap
Diagnostics, then Set Online Mode, then the mode that you want.
See Figure 11.12.
A confirmation message appears.
3. Select OK.
4. When you have finished using diagnostics features, perform step 8
through step 10 on page 11–17.
11–18
B.A.S.I.S. G Service Manual
Maintenance
Unlocking a door
temporarily
You can use the PDA to unlock a door for the default duration
programmed for a lock. This feature is useful when you need to access
the inside of the door to replace the lock’s batteries or perform other
maintenance for the lock.
To unlock a door temporarily, perform these steps:
1. If you are already viewing diagnostics information for the lock,
go to step 2.
If you are not viewing diagnostics information for the lock,
perform step 1 through step 7 on page 11–14.
2. From the B.A.S.I.S. Transport Diagnostics window on the PDA
(Figure 11.12 on page 11–13), tap Diagnostics, then Unlock Once.
A confirmation message appears asking, “Unlock once?”
3. Select OK.
The lock unlocks for the default duration programmed for the lock,
letting you open the door.
4. When you have finished using diagnostics features, perform step 8
through step 10 on page 11–17.
Resetting the use
count
Every B.A.S.I.S. Lock keeps a count of times access is granted to a card
or PIN since the use count was last reset. You can use this count to
track how often a lock is used during a selected time frame.
To reset the use count for a lock, perform these steps:
1. If you are already viewing diagnostics information for the lock,
go to step 2.
If you are not viewing diagnostics information for the lock,
perform step 1 through step 7 on page 11–14.
2. From the B.A.S.I.S. Transport Diagnostics window on the PDA
(Figure 11.12 on page 11–13), tap Diagnostics, then Reset, then Use
Count.
A confirmation message appears asking, “Reset use count?”
3. Select OK.
The lock’s use count is reset to 0.
4. When you have finished using diagnostics features, perform step 8
through step 10 on page 11–17.
B.A.S.I.S. G Service Manual
11–19
Maintenance
Clearing the
diagnostics code
The lock’s diagnostics code indicates firmware conditions, such as
firmware resets, that have occurred at the lock since the diagnostics
code was last cleared. For more information, see page 11–13.
To clear a lock’s diagnostics code, perform these steps:
1. If you are already viewing diagnostics information for the lock,
go to step 2.
If you are not viewing diagnostics information for the lock,
perform step 1 through step 7 on page 11–14.
2. From the B.A.S.I.S. Transport Diagnostics window on the PDA
(Figure 11.12 on page 11–13), tap Diagnostics, then Reset, then
Diagnostics Code.
A confirmation message appears asking, “Reset diagnostics code?”
3. Select OK.
The diagnostics code is reset to 0x0000.
4. When you have finished using diagnostics features, perform step 8
through step 10 on page 11–17.
11–20
B.A.S.I.S. G Service Manual
12
TROUBLESHOOTING
This chapter contains instructions for
troubleshooting problems for standard B.A.S.I.S.
Locks and EX Series Exit Hardware Trim.
If you need to…
See…
Understand the visual and audible responses
page 12–2
Enable communications without a card or PIN
page 12–3
Open a standard B.A.S.I.S. Lock with dead
batteries
page 12–6
Respond to common problems
page 12–7
Note: When servicing components, always test that
the lock works properly when you’re finished.
B.A.S.I.S. G Service Manual
12–1
Troubleshooting
VISUAL AND AUDIBLE RESPONSE QUICK REFERENCE
The table below summarizes the visual and audible responses for
standard B.A.S.I.S. Locks and for EX Series Exit Hardware Trim. See
page 12–7 for complete troubleshooting details.
Green LED
Red LED
Sounder
2 flashes
–––
–––
Prompt to enter the new PIN during PIN
programming mode, or prompt to use a second card
and/or PIN during two card and/or PIN control.
3 flashes
–––
–––
Access is granted.
3 slow flashes
–––
–––
Passage mode is granted.
3 slow flashes
–––
Stays on
–––
–––
3 flashes
–––
Stays on
3 flashes
3 flashes
3 short tones Battery is very low (alarm).
4 flashes
4 flashes
4 short tones Lock performed an internal reset.
–––
–––
3 long tones Lock timed out and is waiting for an action.
–––
–––
3 short tones Bad data was presented to the reader.
12–2
Meaning
3 long tones Battery is low (warning).
–––
Door is in communication mode.
3 short tones Access is denied.
–––
PIN programming mode is active, or the lock is busy
after communication mode has ended.
B.A.S.I.S. G Service Manual
Troubleshooting
ENABLING COMMUNICATIONS WITHOUT A CARD OR PASSWORD
If the card or password is lost or unavailable, you can enable
communications by pressing the password override button on the
control electronics board, which is located on the inside of the outside
escutcheon. This procedure will not affect the user database, history, or
lock configuration.
Before you handle the control electronics board or any component
Caution
on the control electronics board, make sure that you are properly
grounded using an electrostatic discharge (ESD) protection kit.
Touching the control electronics board without proper grounding can
damage sensitive electronic components—even if you don’t notice
any static discharge.
1. For standard locks, remove the inside and outside escutcheons
from the door. For mortise lock instructions, see page 5–3. For
cylindrical lock instructions, see page 7–5.
For exit hardware trim, remove the B.A.S.I.S. escutcheon from the
door. See page 8–13.
2. For standard locks, peel back the lower edge of the gasket from the
outside escutcheon to expose the lower portion of the control
electronics board.
For exit hardware trim, remove the following parts from the
escutcheon to expose the control electronics board:
mounting standoffs (page 10–2)
■ escutcheon gasket (page 10–3)
■ lift finger (page 10–4)
■ mounting plate (page 10–6).
3. Connect the PDA to the lock:
a. Connect the serial cable to the PDA.
b. Connect the serial cable to the programming cable.
c. Connect the programming cable to the lock’s communication
port. The connector snaps into place.
■
Note 1: For standard locks, the communication port is located in
the bottom of the outside escutcheon.
Note 2: When the B.A.S.I.S. escutcheon for exit hardware trim has
been removed from the door, the communication port is located
on the end of the primary harness.
B.A.S.I.S. G Service Manual
12–3
Troubleshooting
4. Start B.A.S.I.S. Transport:
a. On the PDA, tap Start, then Programs, then BAS, then Transport.
b. From the B.A.S.I.S. Transport Main window on the PDA, tap
View, then Transport.
The Transport window shows the Panel/Reader Tree.
Note: When transferring history records from the door, you do
not need to highlight a reader in the tree.
5. Using B.A.S.I.S. Transport, select the communications activity you
want to perform.
6. When you see the login window, press the password override
button on the electronics board.
Electronics board
Password override
button
Outside escutcheon
Figure 12.1 Enabling communications with the password override button
(escutcheon for standard mortise lock shown)
7. When you have finished performing communications activities,
disconnect the PDA from the lock. Press the button on the
programming cable connector and unplug the programming cable
from the lock’s communication port.
12–4
B.A.S.I.S. G Service Manual
Troubleshooting
8. For standard locks, press the escutcheon gasket into place so the
electronics board is covered.
For exit hardware trim, reinstall the following parts in the
escutcheon:
mounting plate (page 10–7)
■ lift finger (page 10–5)
■ escutcheon gasket (page 10–3)
■ mounting standoffs (page 10–2).
9. For standard locks, reinstall the inside and outside escutcheons on
the door. For mortise lock instructions, see page 5–6. For cylindrical
lock instructions, see page 7–8.
■
For exit hardware trim, reinstall the escutcheon on the door. See
page 8–14.
B.A.S.I.S. G Service Manual
12–5
Troubleshooting
OPENING A STANDARD B.A.S.I.S. LOCK WITH DEAD BATTERIES
If you were not able to replace the batteries before they died in a
standard B.A.S.I.S. Lock and you cannot unlock the lock, you can
provide temporary power to the lock and use a valid card or PIN to
unlock it. Then, you can access the lock’s battery compartment to
replace the battery pack.
1. To provide temporary power to the lock, connect the programming
cable, with an external battery pack connected, to the lock’s
communication port. Although the serial cable and PDA do not need
to be connected to the programming cable, it will not cause a
problem if they are connected.
Communication port
Programming cable
Battery pack
Figure 12.2 Connecting the programming cable to the lock
2. To unlock the lock, use a valid operating card for the lock.
3. Replace the lock’s battery pack. See page 11–4.
4. Disconnect the programming cable from the lock.
12–6
B.A.S.I.S. G Service Manual
Troubleshooting
RESPONDING TO PROBLEMS
The table below summarizes the possible causes for certain problems
based on visible and audible signals (LEDs, sounder, and whether access
is granted or denied). The causes of failure are listed in the order of
likelihood. (The most likely cause is first, and so forth.)
Another helpful tool to use when troubleshooting a standard B.A.S.I.S.
Lock or EX Series Exit Hardware Trim is the lock’s history of events.
Appendix A lists the types of events recorded in the history and their
meaning. For information about retrieving and viewing history records,
see the B.A.S.I.S. Transport User’s Guide (T63307).
See page 12–2 for a visual and audible response quick reference.
LEDs
Sounder Access Possible causes include…
Green
flashes
–––
Granted Condition is normal for a valid
card or PIN.
–––
3 short
tones
Denied
Red
flashes
3 short
tones
Denied
B.A.S.I.S. G Service Manual
You should…
a. Card was used, but not
removed soon enough.
a. Try using the card again.
b. Variable card format error
occurred.
b. Check the variable card format.
a. Card number is invalid.
a. Check the access privileges.
b. Timezone is invalid.
b. Check the access privileges.
c. For a standard mortise lock,
card does not have the
deadbolt override privilege.
c. Either program the deadbolt override
privilege for the card, or instruct the user
that his or her card cannot access the lock
when the deadbolt is thrown.
d. Card is damaged.
d. Re-encode the operating card. It may be
possible to re-encode a damaged card. If not,
issue a new operating card.
e. Facility code is invalid.
e. Program the correct facility code.
f. Card has expired.
f. Re-program the lock or re-encode the card
with a valid expiration date.
g. Door may be in a lock down
mode.
g. Check to see if a door lock mode is active by
using the PDA to review the door mode. If
desired, set the online mode to Automatic.
See page 11–18.
12–7
Troubleshooting
LEDs
Sounder Access Possible causes include…
You should…
–––
–––
a. Card reader needs cleaning.
a. Clean the card reader head using a cleaning
card for magnetic stripe card readers.
b. Primary wire harness is
damaged or disconnected.
b. Check the primary wire harness. If it’s
damaged, replace the wire harness. For
standard locks, see page 9–7. For exit
hardware trim, see page 10–9.
c. Foreign object is inserted in
the card reader.
c. Remove the object or replace the reader.
d. Battery pack is faulty.
d. Check the battery pack. Replace it, if
necessary. See page 11–4.
Denied
e. Firmware has locked up due to e. Contact your local BEST Representative.
incorrect sequence when
connecting the battery pack.
f. Primary wire harness is
disconnected from the motor
or is damaged.
f. Check the primary wire harness.
For standard locks, see page 9–7. For exit
hardware trim, see page 10–9.
g. Smart card reader is not
properly aligned in the bezel
on the inside of the reader.
(Smart card present switch is
stuck.)
g. Pop the smart card reader into place in the
bezel.For standard locks, see page 9–22. For
exit hardware trim, see page 10–13.
h. For smart card readers,
conformal coating has been
applied to the flex cable
connector.
h. Remove the flex cable from the connector
and apply electrical contact cleaner onto the
connector. Reinstall the flex cable.
For standard locks, see page 9–22. For exit
hardware trim, see page 10–13.
i. Firmware is out-of-date or
faulty.
i. Update the firmware. Contact your local
BEST Representative.
j. Control electronics board is
malfunctioning.
j. Replace the control electronics board.
For standard locks, see page 9–10. For exit
hardware trim, see page 10–10.
k. Control electronics board
k. Replace the control electronics board.
failed for an unknown reason.
For standard locks, see page 9–10. For exit
hardware trim, see page 10–10.
Note: If the above condition
exists, the key override may be
used to access the door. If the
door has no key override, call
your local BEST representative.
Green
flashes
12–8
–––
Denied
l. Reader has failed.
l. Replace the reader. For standard locks, see
page 9–17. For exit hardware trim, see
page 10–12.
a. For a standard mortise lock,
self-aligning trim is
overtightened.
a. Loosen the escutcheon mounting screws.
See page 5–3.
B.A.S.I.S. G Service Manual
Troubleshooting
LEDs
Sounder Access Possible causes include…
You should…
b. For a standard mortise lock,
mounting plates are
overtightened.
b. Loosen the mounting plates. See page 5–14.
c. For a standard cylindrical
lock, chassis type is set to
“mortise”.
c. Change the programming setting for chassis
type to cylindrical.
d. For a standard cylindrical
d. If you can hear the chassis cycling, replace
lock, the spindle may be faulty.
the chassis. Contact your local BEST
Representative for assistance.
e. For exit hardware trim, the
locking plate is not properly
positioned.
e. Reposition the locking plate.
See page 10–18.
f. The trim or latchbolt is not
properly aligned.
f. Realign the trim or latchbolt.
Green
flashes
3 long
tones
Granted Battery is low (warning).
after
delay
Change the battery pack. See page 11–4.
Red &
green
flashes
3 short
tones
Denied
Battery is very low (alarm).
Change the battery pack. See page 11–4.
Green
stays on
–––
Denied
Communication card was used.
Wait 1 minute for the communications mode to
automatically expire, or use any card again to
turn off communications.
Red
flashes
–––
Denied
a. Sounder is damaged.
a. Replace the reader.
For standard locks, see page 9–17. For exit
hardware trim, see page 10–12.
b. Control electronics board is
malfunctioning.
b. Replace the control electronics board.
For standard locks, see page 9–10. For exit
hardware trim, see page 10–10.
c. Primary harness connection is
damaged or loose.
c. Check the primary harness and replace the
harness, if necessary. For standard locks, see
page 9–7. For exit hardware trim, see
page 10–9.
–––
–––
Granted a. LEDs are damaged.
B.A.S.I.S. G Service Manual
a. Replace the reader.
For standard locks, see page 9–17. For exit
hardware trim, see page 10–12.
b. Control electronics board is
malfunctioning.
b. Replace the control electronics board.
For standard locks, see page 9–10. For exit
hardware trim, see page 10–10.
c. Smart card flex cable is
broken.
c. Replace the smart card reader.
For standard locks, see page 9–20. For exit
hardware trim, see page 10–13.
12–9
Troubleshooting
LEDs
Sounder Access Possible causes include…
You should…
Green or
Red
flashes
–––
Denied
Smart card flex cable is hitting
against the LED.
Install protective tape on the flex cable.
For standard locks, see page 9–20. For exit
hardware trim, see page 10–13.
–––
Red &
green
flashes
repeating
Denied
Door failed a diagnostic self-test.
Replace the control electronics.
For standard locks, see page 9–10. For exit
hardware trim, see page 10–10.
The table below summarizes the possible causes for certain problems.
The causes of failure are listed in the order of likelihood. (The most
likely cause is first, and so forth.)
You notice…
Possible causes include…
Door is always unlocked.
a. Use the PDA to check the online mode. If
a. Door may be in a unlocked
desired, change the online mode.
mode or passage mode. Setting
See page 11–18.
the door mode to “Unlocked”
means that anyone can access
the door in this condition.
For exit hardware trim,
the lever is dangling.
You should…
b. Door may be in a door unlock
timezone.
b. Use the PDA to check whether the online
mode is “Automatic” (timezone control). See
page 11–18. Use B.A.S.I.S. to check the
reader configuration for the door.
a. Shear pin has been broken.
a. Replace the shear pin. See page 10–26.
b. Lever is not properly installed. b. Reinstall the lever. See page 10–24.
Cannot plug the PDA
connector into the door’s
communications port.
Cannot swipe a card.
12–10
a. Foreign object is jammed into
the communications port.
a. Remove the object from the communications
port.
b. Communications port is
damaged.
b. Replace the primary wire harness. For
standard locks, see page 9–7. For exit
hardware trim, see page 10–9.
c. Programming cable is
damaged.
c. Replace the programming cable.
See page 9–5.
Foreign object is jammed in the
card reader.
Push the object down through the card reader if
possible. Unless the object is preventing the
card from being swiped, there is no reason to
remove the trim.
If the object will not push through the card
reader, remove the trim and remove the foreign
object, and/or replace the reader.
For standard locks, see page 9–17. For exit
hardware trim, see page 10–12.
Note: Use a valid card to verify that the card
reader head is not damaged.
B.A.S.I.S. G Service Manual
Troubleshooting
a. Communications cable(s) is
When communicating
(are) not connected properly.
between a PC or PDA, or
PDA and lock or exit
b. The primary wire harness is
hardware trim you see a
damaged or disconnected.
message that
communications has failed.
a. Check all cable connections.
b. Check the primary wire harness. If it’s
damaged, replace the wire harness.
For standard locks, see page 9–10. For exit
hardware trim, see page 10–10.
c. Communications cable or port c. Try communicating with another device or
is faulty or damaged.
PC. If communications works, the
communication cable and serial cables are
not the problem. If communications does
not work, replace the cable(s).
B.A.S.I.S. G Service Manual
12–11
Troubleshooting
12–12
B.A.S.I.S. G Service Manual
A
LOCK HISTORY EVENT TYPES
The following table describes in alphabetical order
each history event that can be recorded at a B.A.S.I.S.
Lock.
B.A.S.I.S. G Service Manual
A–1
Lock History Event Types
Lock history event types
Event
Description
ACCESS GRANTED
The lock granted access to the indicated card or PIN.
ACCESS GRANTED ON
FACILITY CODE
The lock granted access to the indicated card during a
Facility Code Only mode.
DENIED INVALID
TOKEN (BADGE)
The lock denied access to the indicated card and/or PIN
because the card and/or PIN was not valid.
DENIED INVALID
ISSUE CODE
The lock denied access to the indicated card because
the card’s issue number was not valid.
DENIED LOW BATTERY The lock denied access to the indicated card or PIN
because the lock’s battery was very low.
DENIED INVALID CARD The lock denied access to the card because the format
was not valid.
FORMAT
A–2
DENIED COUNT
EXCEEDED
The lock denied access to the indicated card or PIN
because the number of invalid cards or PINs presented
to the lock exceeded the programmed threshold.
DENIED INVALID
FACILITY CODE
The lock denied access to the card because the card’s
facility code was incorrect.
DENIED INACTIVE
TOKEN
The lock denied access to the indicated card or PIN
because the card or PIN is not active in the database.
DENIED USE LIMIT
EXCEEDED
The lock denied access to the indicated card because
the card exceeded the programmed use limit.
DENIED INVALID
ACCESS LEVEL
The lock denied access to the indicated card because
the card was not assigned the access level necessary to
unlock the lock.
DENIED TIMEOUT
EXCEEDED-NO
SECOND CARD
The lock denied access to the indicated card during two
card control mode because the second card was not
presented within the allocated time period.
DENIED INVALID PIN
The lock denied access to the indicated PIN because
the PIN was not valid.
MODE FACILITY CODE
The lock’s mode changed to facility code only.
MODE CARD ONLY
The lock’s mode changed to card only.
MODE FIRST CARD
UNLOCKED
The lock’s mode changed to first card unlocked.
MODE UNLOCKED
The lock’s mode changed to unlocked.
MODE LOCKED
The lock’s mode changed to locked.
MODE CARD OR PIN
The lock’s mode changed to card or PIN.
MODE CARD AND PIN
The lock’s mode changed to card and PIN.
B.A.S.I.S. G Service Manual
Lock History Event Types
Event
Description
READER RESET
The lock’s reader was reset.
KEY OVERRIDE
The lock was unlocked using the key override.
TRANSFER, PDA
TO LOCK
Using B.A.S.I.S. Transport, settings were transferred
from the PDA to the lock.
TRANSFER, HISTORY
Using B.A.S.I.S. Transport, the lock’s history records
were retrieved from the lock to the PDA.
TRANSFER,
DIAGNOSTICS
Using B.A.S.I.S. Transport, the lock’s diagnostics information was retrieved from the lock to the PDA.
B.A.S.I.S. G Service Manual
A–3
Lock History Event Types
A–4
B.A.S.I.S. G Service Manual
B
INSTALLATION INSTRUCTIONS
The following pages contain the Installation
Instructions for B.A.S.I.S. Mortise Locks (with brass
escutcheons), the Installation Instructions for
B.A.S.I.S. Cylindrical Locks (with brass
escutcheons), and the Installation Instructions for
B.A.S.I.S. EX Series Exit Hardware Trim.
B.A.S.I.S. G Service Manual
B–1
Installation Instructions
B–2
B.A.S.I.S. G Service Manual
Installation Instructions for
B.A.S.I.S. Mortise Locks
Planning the installation
Contents
These installation instructions describe how to install your
B.A.S.I.S.® G (35HG) or B.A.S.I.S. V (35HBV) Mortise Lock.
The following topics are covered.†
Planning the installation ................................................ 1
Preparing the door and door jamb ................................ 2
Installing the lock ............................................................ 5
Completing the installation..........................................11
Site survey
Use the following survey to record information about the
installation site.
Lock information
Lock function:
❑ EV–Latch with key override
❑ With key override sensing‡
❑ FV–Deadbolt with key override
❑ With key override sensing‡
❑ LV–Deadbolt without key override
❑ NV–Latch without key override
Door information
Door handing and bevel:
❑ Left hand (LH)
❑ Left hand, reverse bevel (LHRB)
❑ Right hand (RH)
❑ Right hand, reverse bevel (RHRB)
inches (1 3/4″ to 3″ )
Door thickness:
Environment information
Ambient temperature:
❑ Is within specifications. See the tables below.
This product meets the following Locked Door Outdoor
test requirements for ANSI/BHMA 156.25:
Side of door
Inside
Outside
Range
+66°F to +74°F (+19°C to +23°C)
–31°F to +151°F (–35°C to +66°C)
† The Best Access Systems logo and B.A.S.I.S. are
registered trademarks of Best Lock Corporation.
‡ Key override sensing is optional for 35HG and
standard for 35HBV.
This product meets the following Full Indoor test
requirements for ANSI/BHMA 156.25:
Side of door
Inside and outside
Range
+32°F to +120°F (0°C to +42°C)
Components checklist
Use the following checklist to make sure that you have the
items necessary to install your B.A.S.I.S. Mortise Lock.
Components provided in the box:
❑ Mortise case assembly
❑ Mortise case faceplate
❑ Inside escutcheon assembly
❑ Battery compartment door
❑ Battery pack
❑ Outside escutcheon assembly
❑ Inside and outside mounting plates
❑ Inside lever
❑ Outside lever & spindle assembly
❑ Cylinder assembly (for EV and FV functions only)
❑ Screw package
❑ Plastic bushing package
❑ Trim hole insert package
❑ Escutcheon screw package
❑ Strike
❑ Strike box
❑ Bar code ID sticker (for your records)
❑ Temporary operator card
❑ Installation template and instructions
Other components:
❑ Core (for EV and FV functions only)
❑ Control key (for EV and FV functions only)
Special tools checklist
Use the following checklist to make sure that you have the
special tools necessary to install your B.A.S.I.S. Mortise Lock.
❑ T15 TORX® bit driver††
❑ ED211 cylinder wrench (for EV and FV functions only)
†† TORX is a registered trademark of the Camcar
Division of Textron.
BEST ACCESS SYSTEMS
Indianapolis, Indiana
1
Installation Instructions for B.A.S.I.S. Mortise Locks
Preparing the door and door jamb
1
Vert. centerline
of lock
Vert. centerline
of strike
Horz. centerline
of strike
Vert. centerline
of door’s edge
1
Horz. centerline
of lock
Door jamb
Figure 1
Horz. centerline
of lever
(38″ from floor
recommended)
Door
2
Marking the centerlines
3
4
Installation template
Vertical centerline
of lock
Horizontal centerline
of lock
Horizontal centerline
of lever
Figure 2
2
Mark centerlines
Note: If the door is a fabricated hollow metal door,
determine whether it is properly reinforced to support
the lock. If door reinforcement is not adequate, consult
the door manufacturer for information on proper
reinforcement. For dimensions for preparing metal
doors, see the G03 Template—Installation
Specifications for 35HG and 35HBV Mortise Locks.
On the door, measure and mark the height of the
centerline of the lever from the floor (38″
recommended). On both sides of the door, on the
door’s edge, and on the door jamb, mark the
horizontal centerline of the lock 1 1/2″ above the
centerline of the lever.
Note: If the door is a LH or RH door, mark the inside of
the door. If the door is a LHRB or RHRB door, mark the
outside of the door.
On the door’s edge and door jamb, mark the vertical
centerline of the lock.
Measure and mark the backset (2 3/4″ standard) from
the vertical centerline on the door’s edge. On both
sides of the door, mark the vertical centerline of the
lock.
On the door jamb, mark the horizontal centerline of
the strike 3/8″ above the horizontal centerline of the
lock.
2
Position template and mark drill points
1 Cut the G06 Template—Installation Template for 35HG
and 35HBV Mortise Locks along the dashed lines and
align the horizontal and vertical arrows with the
marked centerlines on the door.
2 Tape the template to the door.
3 Center punch the necessary drill points. Refer to the
instructions on the template.
Positioning the template
BEST ACCESS SYSTEMS
Indianapolis, Indiana
Installation Instructions for B.A.S.I.S. Mortise Locks
Preparing the door and door jamb
3
Mortise for lock case and faceplate
Lock faceplate
mortise
1 Mortise the edge of the door for the lock case.
Note: The mortise cavity depth of 4 5/8″ includes
clearance for wiring behind the mortise case.
2 Insert the lock in the mortise cavity.
3 Mark the outline of the lock faceplate.
4 Remove the lock. Mortise to fit the faceplate.
Lock case mortise
Lock faceplate
Lock case
Door
Figure 3
BEST ACCESS SYSTEMS
Indianapolis, Indiana
Mortising for the lock case and faceplate
3
Installation Instructions for B.A.S.I.S. Mortise Locks
Preparing the door and door jamb
4
Harness hole
.125
Upper trim
hole
Cylinder hole
Turn knob
hole
Through-bolt
holes
Sensor & motor
wire hole
Lever hole
Lower trim
hole
Inside of RH door
Outside of RHRB door
Figure 4a Drilling the RH and RHRB holes
.125
Harness hole
Upper trim
hole
Turn knob
hole
Through-bolt
holes
Cylinder hole
Lever hole
Drill holes
Caution: Check for the correct lock function, hand,
and bevel before drilling.
Drill the holes listed below:
■ upper and lower trim holes
— 5/8″ diameter
— through door
■ harness hole
— 3/4″ diameter
— through door
— location based on handing
■ cylinder hole
— 1 3/8″ diameter
— from outside into mortise cavity
— EV and FV functions only
■ turn knob hole
— 5/8″ diameter
— from inside into mortise cavity
— FV and NV functions only
■ upper and lower through-bolt holes
— 3/8″ diameter
— through door
■ lever hole
— 7/8″ diameter
— through door
■ sensor & motor wire hole
— 3/4″ diameter
— from inside into mortise cavity, approximately
1″ deep
Note 1: To locate the center of a hole on the opposite
side of the door, drill a pilot hole completely through the
door.
Note 2: For holes through the door, it is best to drill
halfway from each side of the door to prevent the door
from splintering.
Lower trim
hole
Outside of LHRB door
Inside of LH door
Sensor &
motor wire
hole
Figure 4b Drilling the LH and LHRB holes
4
BEST ACCESS SYSTEMS
Indianapolis, Indiana
Installation Instructions for B.A.S.I.S. Mortise Locks
Preparing the door and door jamb
5
Mortise for strike box and strike plate
1 On the door jamb, locate the horizontal centerline of
the strike (3/8″ above the centerline of the lock), as
well as the vertical centerline of the strike.
2 Mortise the door jamb to fit the strike box and strike
plate.
3 Drill the holes for the screws used to install the strike
box and strike plate.
Door jamb
Figure 5
6
Mortising the door jamb for the strike box and
strike plate
Mortise cavity
Install mortise case
1 Remove the faceplate from the mortise case.
2 Drill the holes for the case mounting screws.
3 Insert the mortise case into the mortise cavity, while
feeding the sensor and motor wires into the mortise
cavity and out the sensor & motor wire hole to the
inside of the door.
Note: If the armored front of the mortise case is not flush
with the door edge, remove the case and loosen the
screws at the top and bottom of the case. Adjust the
bevel of the armored front of the mortise case to match
the bevel of the door. Tighten the screws and insert the
mortise case back into the mortise cavity.
4 Secure the mortise case with the case mounting
screws.
Mortise case
Bevel adjusting
screw
Case
mounting
screws
Location of bevel
adjusting screw
Figure 6
BEST ACCESS SYSTEMS
Indianapolis, Indiana
Sensor & motor
wire hole and wires
Inside of door
Installing the mortise case
5
Installation Instructions for B.A.S.I.S. Mortise Locks
Installing the lock
7
Install mounting plates
1 Insert the outside mounting plate through the door
and mortise case.
2 Position the inside mounting plate opposite the
outside mounting plate and screw them securely in
place.
Caution: Do not overtighten the mounting plate
screws. Overtightening may compress the mortise
cavity and bind the locking mechanism.
Outside
mounting
plate
Inside
mounting
plate
Outside of door
Figure 7
Installing the mounting plates
8
Install cylinder (EV and FV only)
Use a cylinder wrench (ED211) to thread the concealed
cylinder into the mortise case so that the groove
around the cylinder head is even with the door surface.
Note: Do not tighten the cylinder set screw until you
perform task 12 on page 8.
Caution: A malfunction can occur if the cylinder is
threaded in too far.
Concealed
cylinder
Outside of door
Figure 8
6
Installing the cylinder
BEST ACCESS SYSTEMS
Indianapolis, Indiana
Installation Instructions for B.A.S.I.S. Mortise Locks
Installing the lock
9
Install core (EV and FV only)
1 Insert the control key into the core and rotate the key
15 degrees to the right.
2 With the control key in the core, insert the core into
the cylinder.
3 Rotate the control key 15 degrees to the left and
withdraw the key.
Caution: The control key can be used to remove
cores and to access doors. Provide adequate
security for the control key.
10
Cylinder
Core
Control key
Remove backup battery tab
Caution 1: For the lock to operate properly, you
must remove the backup battery tab.
Caution 2: Do not connect the battery pack before
you have removed the backup battery tab. Doing
so may cause the lock to malfunction.
1 Locate the backup battery tab on the inside of the
outside escutcheon.
2 Pull down on the tab and remove it from the outside
escutcheon to turn on the backup battery.
Outside of door
Figure 9
BEST ACCESS SYSTEMS
Indianapolis, Indiana
Installing the core
7
Installation Instructions for B.A.S.I.S. Mortise Locks
Installing the lock
Trim hole inserts
11
Install trim hole inserts and bushings
Bushings
1 Insert the two trim hole inserts into the upper trim
hole on each side of the door, as shown in Figure 11.
2 Insert the two bushings into the harness hole on each
side of the door, as shown in Figure 11.
12
Figure 11 Installing the trim hole inserts and bushings
Harness
hole
Sensor
connectors
Battery
connector
Motor
connector
Upgrade
connector
Cylinder set
screw (inside
mortise case)
Outside
escutcheon
Route wire harnesses and position
outside escutcheon
1 From the outside of the door, feed the upgrade
connector through the harness hole.
2 From the outside of the door, feed the motor
connector, battery connector, and sensor connectors
through the harness hole.
Note: NV function locks do not have a sensor harness.
Caution: When routing the connectors, make sure
the harnesses are not routed across any sharp
edges or over any surface that could damage their
sleeving or wire insulation.
3 For EV and FV function locks, perform these steps:
a Firmly press the outside escutcheon in position on
the door. The core should be flush with the outer
surface of the escutcheon.
a If necessary, adjust the cylinder depth plus or
minus one turn so that the core is flush with the
outer surface of the escutcheon.
b Secure the cylinder in the mortise case with the
cylinder set screw.
4 Rest the outside escutcheon on the door by inserting
the trim studs into the trim holes.
Note: You can temporarily install the outside lever to
hold the outside escutcheon in place. See task 16 on
page 12.
Outside of door
Figure 12 Feeding the wire harness connectors through
the harness hole
8
BEST ACCESS SYSTEMS
Indianapolis, Indiana
Installation Instructions for B.A.S.I.S. Mortise Locks
Installing the lock
13
Make motor and sensor connections
From the inside of the door, make the motor
connection, the key override sensor connection (EV
and FV functions)†, and the deadbolt sensor
connection (FV and LV functions).
Note 1: It is physically possible to connect the key
override sensor connector from the mortise case to the
battery connector from the wire harness. To avoid this
mistake, connect only the connectors with matching wire
colors.
Note 2: The upgrade cable is used for reprogramming
the lock’s firmware without removing the lock from the
door. This cable does not connect to a mating lock
connector.
Caution: When making the motor connection and
sensor connections, make sure:
■ there are no loose wire connections where the
wires are inserted into the connectors
■ the connectors are firmly mated.
No. of No. of
wires pins
Wire connection
Colors
Motor
Yellow
Gray
2
2
Key override sensor
Gray
2
3
Deadbolt sensor
Blue
2
3
Upgrade cable
Deadbolt sensor
connection
Key override
sensor connection
Motor
connection
Inside of door
Figure 13 Making the motor connection and
sensor connections
† Key override sensing is optional for 35HG and
standard for 35HBV.
BEST ACCESS SYSTEMS
Indianapolis, Indiana
9
Installation Instructions for B.A.S.I.S. Mortise Locks
Installing the lock
14
Inside escutcheon
Combination
mounting screw
Secure escutcheons
1 Position the inside and outside escutcheons on the
door.
2 Making sure that the escutcheons do not pinch
the wires, secure the escutcheons to the door. Do not
tighten the screws completely. Use the combination
mounting screw in the upper trim hole and the
standard mounting screw in the lower trim hole.
Standard
mounting screw
Inside of door
Figure 14 Securing the escutcheons
10
BEST ACCESS SYSTEMS
Indianapolis, Indiana
Installation Instructions for B.A.S.I.S. Mortise Locks
Installing the lock
15
Install battery pack
1 Connect the battery pack to the battery connector on
the wire harness inside the battery compartment.
Note: The battery connection has 3 wires and 3 pins. The
wire colors are:
■ red with white stripe
■ white
■ black with white stripe.
Caution: When connecting the battery pack, make
sure:
■ there are no loose wire connections where the
wires are inserted into the connectors
■ the connectors are firmly mated.
2 Place the battery pack inside the battery compartment
so that the foam will face the battery compartment
door.
Caution: When routing the battery wires, make
sure the wires are not routed across any sharp
edges or over any surface that could damage their
sleeving or wire insulation.
Inside escutcheon
Battery pack
Inside of door
Figure 15 Connecting the battery pack
BEST ACCESS SYSTEMS
Indianapolis, Indiana
11
Installation Instructions for B.A.S.I.S. Mortise Locks
Completing the installation
16
Location
of set
screw
Outside of door
Spindles
Figure 16 Installing the levers
12
Inside of door
Install inside and outside levers
1 Unscrew the inside spindle one full turn to allow the
spindles to turn freely.
2 With the handle pointing toward the door hinges,
insert the outside lever and spindles assembly into the
lock from the outside of the door.
3 Slide the inside lever onto the inside spindle and
secure it with the set screw.
4 Making sure that the core is positioned properly in the
outside escutcheon (EV and FV only) and the
escutcheons are aligned properly on the door, tighten
the escutcheon mounting screws.
Note: If a core is not available, you can use the cylinder
wrench (ED211) to help you align the core opening in the
escutcheon.
5 Turn the levers to check that they operate smoothly.
BEST ACCESS SYSTEMS
Indianapolis, Indiana
Installation Instructions for B.A.S.I.S. Mortise Locks
Completing the installation
17
Install battery compartment door
1 Making sure that the battery compartment door
does not pinch any wires, insert the tabs of the
battery compartment door into its mating slots and
swing the door closed.
2 Use a T15 TORX bit driver to secure the battery
compartment door with the security screw. Tighten
firmly.
Security
screw
Tabs
Figure 17 Installing the battery compartment door
18
Install mortise case faceplate
1 Secure the mortise case faceplate to the mortise case
with the faceplate mounting screws.
2 Check the lock for proper operation.
Mortise
case
faceplate
Outside of door
Faceplate
mounting
screws
Figure 18 Installing the mortise case faceplate
BEST ACCESS SYSTEMS
Indianapolis, Indiana
13
Installation Instructions for B.A.S.I.S. Mortise Locks
Completing the installation
19
Strike box
Strike plate
Install strike box and strike plate
1 Insert the strike box into the mortise in the door jamb.
Place the strike plate over the strike box and secure the
strike with the screws provided.
2 Check the position of the auxiliary bolt against the
strike plate.
Caution: The auxiliary bolt must make contact
with the strike plate. The auxiliary bolt deadlocks
the latchbolt and prevents someone from forcing
the latch open when the door is closed. If the
incorrect strike is installed, a lock-in can occur.
Note: The recommended gap between the door and
jamb is 1/8″ .
Door jamb
Figure 19a Installing the strike box and strike plate
Strike plate
Auxiliary bolt
Figure 19b Positioning the strike
14
BEST ACCESS SYSTEMS
Indianapolis, Indiana
Installation Instructions for B.A.S.I.S. Mortise Locks
Completing the installation
20
Test lock
To test the lock for proper operation before the lock is
programmed, use the temporary operator card that came
with the lock. This card is for temporary use only. After
permanent cards have been programmed for the lock, the
temporary card should be deleted.
1 Use the temporary operator card to activate the lock.
When the lock detects the presence of a card for the
first time, the lock performs a series of diagnostic selftests. If no problem is detected, the lock responds with
4 red LED flashes, simultaneous with 4 green LED
flashes and 4 short tones.
If a problem is detected, the lock’s red LED and
green LED simultaneously flash in a repeating pattern
(and no tones sound). The lock’s control electronics
board must be replaced. For instructions, see the
B.A.S.I.S. G Service Manual (T63300) or the B.A.S.I.S. V
Service Manual (T61805).
Note: If the lock has a proximity card reader, it may have
already been activated by the presence of an object near
the card reader.
2 Use the temporary operator card to access the lock.
The green light flashes and the locking mechanism
unlocks.
3 Turn the lever and open the door.
If the mechanism doesn’t unlock, refer to the
following table. For additional troubleshooting
instructions, see the B.A.S.I.S. G Service Manual or the
B.A.S.I.S. V Service Manual.
LEDs
Sounder
Single
red flash
—
Use the card at a moderate speed.
Red
flashes
3 short
tones
Use the temporary operator card
provided with the lock.
Green
flashes
—
Check the motor connection.
—
—
Check the battery connection.
For all EV and FV function locks
Insert and turn the key to unlatch the door.
For all FV and LV function locks
From the inside of the door, turn the turn knob and
make sure that the deadbolt operates properly.
You should
BEST ACCESS SYSTEMS
Indianapolis, Indiana
15
Installation Instructions for B.A.S.I.S. Mortise Locks
© 2002 Best Lock Corporation dba Best Access Systems.
T61836/Rev – 1854161 ER-7991-12 February 2002
16
BEST ACCESS SYSTEMS
Indianapolis, Indiana
Installation Instructions for
B.A.S.I.S. Cylindrical Locks
Planning the installation
Contents
Components checklist
These installation instructions describe how to install your
B.A.S.I.S.® G (93KG–95KG) or B.A.S.I.S. V (93KBV–95KBV)
Cylindrical Lock. The following topics are covered.†
Use the following checklist to make sure that you have the
items necessary to install your B.A.S.I.S. Cylindrical Lock.
Components provided in the box:
❑ Chassis with outside lever and outside rose liner
assembly
❑ Inside escutcheon assembly
❑ Battery compartment door
❑ Battery pack
❑ Inside rose liner
❑ Outside escutcheon assembly
❑ Inside lever
❑ Throw member package
❑ Latch
❑ Hub washers
❑ Trim hole insert package
❑ Plastic bushing package
❑ Escutcheon screw package
❑ Strike package
❑ Bar code ID sticker (for your records)
❑ Temporary operator card
❑ Installation template and instructions
Other components:
❑ Core
❑ Control key
Planning the installation ................................................ 1
Preparing the door and door jamb ................................ 2
Installing the lock ............................................................ 6
Completing the installation..........................................10
Site survey
Use the following survey to record information about the
installation site. You need this information to determine
how to prepare the door for the lock.
Door information
Door handing and bevel:
❑ Left hand (LH)
❑ Left hand, reverse bevel (LHRB)
❑ Right hand (RH)
❑ Right hand, reverse bevel (RHRB)
inches (1 3/4″ to 2 1/4″ )
Door thickness:
Environment information
Ambient temperature:
❑ Is within specifications. See the tables below.
This product meets the following Locked Door Outdoor
test requirements for ANSI/BHMA 156.25:
Side of door
Inside
Outside
Range
+66°F to +74°F (+19°C to +23°C)
–31°F to +151°F (–35°C to +66°C)
This product meets the following Full Indoor test
requirements for ANSI/BHMA 156.25:
Side of door
Inside and outside
Range
+32°F to +120°F (0°C to +42°C)
Special tools checklist
Use the following checklist to make sure that you have the
special tools necessary to install your B.A.S.I.S. Cylindrical
Lock.
❑ KD303 Drill jig
❑ T15 TORX® bit driver‡
❑ KD325 Strike plate locating pin
❑ KD315 Faceplate marking chisel
† The Best Access Systems logo and B.A.S.I.S. are
registered trademarks of Best Lock Corporation.
‡ TORX is a registered trademark of the Camcar
Division of Textron.
BEST ACCESS SYSTEMS
Indianapolis, Indiana
1
Installation Instructions for B.A.S.I.S. Cylindrical Locks
Preparing the door and door jamb
1
Installation template
Horizontal centerline
of lever
1
2
Figure 1
Positioning the template
3
4
Position template and mark drill points
Note: If the door is a fabricated hollow metal door,
determine whether it is properly reinforced to support
the lock. If door reinforcement is not adequate, consult
the door manufacturer for information on proper
reinforcement. For dimensions for preparing metal
doors, see the G01 and G02 Templates—Installation
Specifications for 93KG and 93KBV Cylindrical Locks.
Note: If the door is a LH or RH door, mark the inside of
the door. If the door is a LHRB or RHRB door, mark the
outside of the door.
For uncut doors and frames
Measure and mark the horizontal centerline of the
lever (the centerline for the chassis hole) on the door
and door jamb. Mark the vertical centerline of the door
edge.
Note: The recommended height from the floor to the
centerline of the lock is 38″ .
Fold the G05 Template—Installation Template for 93KG
and 93KBV Cylindrical Locks on the dashed line and
carefully place it in position on the high side of the
door bevel.
Note: For steel frame applications, align the template’s
horizontal centerline for the latch with the horizontal
centerline of the frame’s strike preparation.
Tape the template to the door.
Center punch the necessary drill points. Refer to the
instructions on the template.
For doors with standard cylindrical preparation
1 Fold the G05 Template—Installation Template for 93KG
and 93KBV Cylindrical Locks on the dashed line.
Looking through the hole from the opposite side of
the door, align the template so that you see the
template outline of the 2 1/8″ diameter chassis hole.
2 Tape the template to the door.
3 Center punch the necessary drill points. Refer to the
instructions on the template.
2
BEST ACCESS SYSTEMS
Indianapolis, Indiana
Installation Instructions for B.A.S.I.S. Cylindrical Locks
Preparing the door and door jamb
2
Components checklist
Drill holes and mortise for latch face.
1 Drill the holes listed below:
■ upper and lower trim holes
— 5/8″ diameter
— through door
■ harness hole
— 3/4″ diameter
— through door
— location based on handing
■ motor wire hole
— 7/16″ diameter
— through door
— before drilling chassis hole
■ chassis hole
— 2 1/8″ diameter
— through door
— after drilling motor wire hole
■ latch hole
— 1″ diameter
— meets chassis hole
Upper trim hole
Harness
hole
Motor wire hole
Latch hole
Chassis hole
Latch face
mortise
Lower trim hole
Inside of door
Figure 2
Drilling holes and mortising for the latch face
Note 1: To locate the center of a hole on the opposite
side of the door, drill a pilot hole completely through the
door.
Note 2: For holes through the door, it is best to drill
halfway from each side of the door to prevent the door
from splintering.
2 Mortise the edge of the door to fit the latch face.
3 Drill the holes for the screws used to install the latch.
BEST ACCESS SYSTEMS
Indianapolis, Indiana
3
Installation Instructions for B.A.S.I.S. Cylindrical Locks
Preparing the door and door jamb
3
Install latch
1 Install the latch in the door.
Note: The latch tube prongs should be centered and
should project into the chassis hole.
2 Check that the door swings freely.
Chassis hole
Location of latch
tube prongs
Latch
Inside of door
Figure 3
Installing the latch in the door
4
Drill upper through-bolt hole.
Latch
tube
prongs
Use drill jig to drill through-bolt holes
1 Press the drill jig (KD303) onto the door, engaging it
with the latch tube prongs (see the close-up in
Figure 4). Make sure the front edge of the jig is parallel
with the door edge.
2 Drill the through-bolt holes (5/16″ diameter) halfway
into the door.
3 Turn over the drill jig and repeat steps 1 and 2 from the
opposite side of the door.
Note: Replace the drill jig after 10 door preparations.
Drill lower through-bolt hole.
Inside of door
Figure 4
4
Installing the drill jig and drilling the
through-bolt holes
BEST ACCESS SYSTEMS
Indianapolis, Indiana
Installation Instructions for B.A.S.I.S. Cylindrical Locks
Preparing the door and door jamb
5
Install strike box and strike plate
1 In alignment with the center of the latchbolt, mortise
the door jamb to fit the strike box and strike plate.
2 Drill the holes for the screws used to install the strike
box and strike plate.
3 Insert the strike box and secure the strike with the two
screws provided.
4 Check the position of the deadlocking plunger against
the strike plate.
Caution: The deadlocking plunger of the latchbolt
must make contact with the strike plate, as shown
in Figure 5b. The plunger deadlocks the latchbolt
and prevents someone from forcing the latch
open when the door is closed.
Strike box
Strike plate
Door jamb
Figure 5a Installing the strike box and strike plate
Deadlocking
plunger
Strike plate
Door jamb
Figure 5b Aligning the deadlocking plunger with the
strike plate
BEST ACCESS SYSTEMS
Indianapolis, Indiana
5
Installation Instructions for B.A.S.I.S. Cylindrical Locks
Installing the lock
6
1 Insert the control key into the core and rotate the key
15 degrees to the right.
2 Insert a flat blade screwdriver into the figure-8 core
hole and into the lever.
3 Press the screwdriver blade in the direction of the
arrow in Figure 6.
Note: You cannot remove the lever if the screwdriver
blade is inserted too far past the keeper.
4 Slide the lever off of the sleeve.
Lever keeper
Insert screwdriver
blade here.
Figure-8
core hole
Figure 6
Removing the outside lever
7
2 1/4″ groove
2″
1 3/4″
Remove outside lever
Adjust for door thickness
1 Determine the door’s thickness.
2 Pull the rose locking pin and rotate the outside rose
liner until the proper groove on the through-bolt stud
lines up with the hub face.
Throughbolt stud
Hub face
Note 1: Make sure that the locking pin fully locks into
the rose liner.
Note 2: The lockset fits doors 1 3/4″ to 2 1/4″ thick.
Outside
rose liner
Figure 7
6
Rose locking
pin
Adjusting the rose liner for the door thickness
BEST ACCESS SYSTEMS
Indianapolis, Indiana
Installation Instructions for B.A.S.I.S. Cylindrical Locks
Installing the lock
8
Install lock chassis and engage
retractor in latch
Retractor
Latch tube
prong
Latch
tailpiece
From the outside of the door, insert the lock chassis
into the 2 1/8″ chassis hole, routing the motor wire
through the notch.
Caution: Make sure that the latch tube prongs
engage the chassis frame and that the latch
tailpiece engages the retractor.
Latch tube
prong
Chassis frame
Notch
Chassis
Inside of door
Figure 8
9
Installing the lock chassis and engaging the
retractor in the latch
Install through-bolts and inside rose
liner
1 Place the inside rose liner on the chassis, aligning the
holes in the rose liner with the holes prepared in the
door.
Caution: Make sure that there is clearance for the
motor wire between the rose liner and the door.
2 Install the through-bolts through the rose liner and
door in the top and bottom holes.
3 Tighten the rose liner on the door with the
through-bolts.
Motor wire
Through-bolt
Rose liner
Figure 9
BEST ACCESS SYSTEMS
Indianapolis, Indiana
Inside of door
Installing the through-bolts and rose liner
7
Installation Instructions for B.A.S.I.S. Cylindrical Locks
Installing the lock
Trim hole inserts
10
Bushings
Remove backup battery tab
Caution 1: For the lock to operate properly, you
must remove the backup battery tab.
Caution 2: Do not connect the battery pack before
you have removed the backup battery tab. Doing
so may cause the lock to malfunction.
1 Locate the backup battery tab on the inside of the
outside escutcheon.
2 Pull down on the tab and remove it from the outside
escutcheon to turn on the backup battery.
11
Install trim hole inserts, bushings, and
hub washers
1 Insert the two trim hole inserts into the upper trim
hole on each side of the door, as shown in Figure 11.
2 Insert the two bushings into the harness hole on each
side of the door, as shown in Figure 11.
3 On each side of the door, slide a hub washer over the
chassis sleeve so it rests on the hub.
Hub
Hub washers
Figure 11 Installing the trim hole inserts, bushings, and
hub washers
12
Battery connector
Motor connector
Upgrade
connector
Harness hole
Outside escutcheon
Route wire harness and position
outside escutcheon
1 From the outside of the door, feed the upgrade
connector, and then the motor connector and battery
connector, through the harness hole.
Caution: When routing the connectors, make sure
the wire harness is not routed across any sharp
edges or over any surface that could damage its
sleeving or wire insulation.
2 Temporarily rest the outside escutcheon on the door
by inserting the trim studs into the trim holes.
Note: You can temporarily install the outside lever to
hold the outside escutcheon in place. See task 16 on
page 10.
Outside of door
Figure 12 Feeding the wire harness connectors through
the harness hole
8
BEST ACCESS SYSTEMS
Indianapolis, Indiana
Installation Instructions for B.A.S.I.S. Cylindrical Locks
Installing the lock
13
Make motor connection
From the inside of the door, connect the motor
connector from the chassis to its mating connector on
the wire harness.
Note 1: The upgrade cable is used for reprogramming
the lock’s firmware without removing the lock from the
door.
This cable does not connect to a mating lock connector.
Upgrade cable
Note 2: The motor connection has 2 wires and 2 pins.
The wire colors are yellow and gray.
Caution: When making the motor connection,
make sure:
■ there are no loose wire connections where the
wires are inserted into the connectors
■ the connectors are firmly mated.
Motor connection
Inside of door
Figure 13 Making the motor connection
14
Secure escutcheons
1 Position the inside and outside escutcheons on the
door.
2 Making sure that the escutcheons do not pinch
the wires, secure the escutcheons to the door—but
do not tighten. Use the combination mounting screw
at the upper trim hole and the standard mounting
screw at the lower trim hole.
Inside escutcheon
Combination
mounting screw
Standard
mounting screw
Inside of door
Figure 14 Securing the escutcheons
BEST ACCESS SYSTEMS
Indianapolis, Indiana
9
Installation Instructions for B.A.S.I.S. Cylindrical Locks
Completing the installation
15
Inside escutcheon
Battery pack
Figure 15 Connecting the battery pack
Install battery pack
1 Connect the battery pack to the battery connector on
the wire harness inside the battery compartment.
Note: The battery connection has 3 wires and 3 pins. The
wire colors are:
■ red with white stripe
■ white
■ black with white stripe.
Caution: When connecting the battery pack, make
sure:
■ there are no loose wire connections where the
wires are inserted into the connectors
■ the connectors are firmly mated.
2 Place the battery pack inside the battery compartment
so that the foam will face the battery compartment
door.
Caution: When routing the battery wires, make
sure the wires are not routed across any sharp
edges or over any surface that could damage their
sleeving or wire insulation.
16
Install inside and outside levers
Note: To use a core and throw member from a
manufacturer other than BEST with a B.A.S.I.S. Lock, see
the Installation Instructions for 9K Noninterchangeable Cores & Throw Members (T56093).
Skip task 16 and task 17.
For the inside and outside levers
1 With the handle pointing toward the door hinges,
position a lever on the outside sleeve and push firmly
on the lever until it is seated. Repeat, placing the other
lever on the inside sleeve.
2 Tighten the escutcheon mounting screws.
3 Turn the levers to check that they operate smoothly.
Outside of door
Figure 16 Installing the levers
10
BEST ACCESS SYSTEMS
Indianapolis, Indiana
Installation Instructions for B.A.S.I.S. Cylindrical Locks
Completing the installation
17
Install core and throw member
Core
1 Install the blocking plate onto the throw member.
Caution: You must use the blocking plate to
prevent unauthorized access.
2 Insert the control key into the core and rotate the key
15 degrees to the right.
3 Insert the throw member into the core.
4 Insert the core and throw member into the lever with
the control key.
5 Rotate the control key 15 degrees to the left and
withdraw the key.
Caution: The control key can be used to remove
cores and to access doors. Provide adequate
security for the control key.
Blocking
plate
Throw
member
Figure 17a Installing the blocking plate and throw member
Throw
member
Core
Control
key
Figure 17b Installing the core
18
Install battery compartment door
1 Making sure that the battery compartment door
does not pinch any wires, insert the tabs of the
battery compartment door into its mating slots and
swing the door closed.
2 Use a T15 TORX bit driver to secure the battery
compartment door with the security screw. Tighten
firmly.
Security
screw
Tabs
Figure 18 Installing the battery compartment door
BEST ACCESS SYSTEMS
Indianapolis, Indiana
11
Installation Instructions for B.A.S.I.S. Cylindrical Locks
Completing the installation
19
Test lock
To test the lock for proper operation before the lock is
programmed, use the temporary operator card that came
with the lock. This card is for temporary use only. After
permanent cards have been programmed for the lock, the
temporary card should be deleted.
1 Use the temporary operator card to activate the lock.
When the lock detect the presence of a card for the
first time, it performs a series of diagnostic self-tests. If
no problem is detected, the lock responds with 4 red
LED flashes, simultaneous with 4 green LED flashes
and 4 short tones.
If a problem is detected, the lock’s red LED and
green LED simultaneously flash in a repeating pattern
(and no tones sound). The lock’s control electronics
board must be replaced. For instructions, see the
B.A.S.I.S. G Service Manual (T63300) or the B.A.S.I.S. V
Service Manual (T61805).
Note: If the lock has a proximity card reader, it may have
already been activated by the presence of an object near
the card reader.
2 Use the temporary operator card to access the lock.
The green light flashes and the locking mechanism
unlocks.
3 Turn the lever and open the door.
4 With the door closed, insert and turn the key to
unlatch the door.
If the mechanism doesn’t unlock, refer to the
following table. For additional troubleshooting
instructions, see the B.A.S.I.S. G Service Manual or the
B.A.S.I.S. V Service Manual.
LEDs
Sounder
Single
red flash
—
Use the card at a moderate speed.
Red
flashes
3 short
tones
Use the temporary operator card
provided with the lock.
Green
flashes
—
Check the motor connection.
—
—
Check the battery connection.
12
You should
© 2002 Best Lock Corporation dba Best Access Systems.
T61835/Rev – 1854203 ER-7991-12 February 2002
BEST ACCESS SYSTEMS
Indianapolis, Indiana
Installation Instructions for
B.A.S.I.S. EX Series Exit Hardware Trim
Planning the installation
Contents
Components checklist
These installation instructions describe how to install your
B.A.S.I.S.® G EX Series (EXG) or B.A.S.I.S. V EX Series (EXBV)
Exit Hardware Trim.† B.A.S.I.S. EX Series Exit Hardware
Trim is available for use with the following types of exit
devices manufactured by Precision Hardware (1000 Series
and 2000 Series) and Von Duprin® (98/99 Series):‡
■ rim
■ surface vertical rod
■ mortise
■ concealed vertical rod.
These instructions cover the following topics:
Use the following checklist to make sure that you have the
items necessary to install your B.A.S.I.S. Exit Hardware Trim.
Components provided in the box:
❑ B.A.S.I.S. escutcheon and lever assembly
❑ Battery bracket
❑ Battery cover
❑ Battery pack
❑ Battery screw package
❑ Cylinder assembly and related components (for EV
function only)
❑ Cylinder mounting sleeve (for Von Duprin EV functions
only)
❑ Bar code ID sticker (for your records)
❑ Temporary operator card
❑ Installation template and instructions
Other components (for EV function only):
❑ 7-pin core
❑ Control key
Planning the installation ................................................ 1
Preparing the door .......................................................... 2
Installing the exit hardware and trim ............................ 6
Completing the installation .......................................... 10
Site survey
Use the following survey to record information about the
installation site.
Lock information
Exit hardware type:
❑ Rim
❑ Mortise
❑ Surface vertical rod
❑ Concealed vertical rod
Lock function:
❑ EV–With key override
❑ NV–Without key override
Door information
Door handing and bevel:
❑ Left-hand reverse bevel (LHRB)
❑ Right-hand reverse bevel (RHRB)
Door type:
❑ Wood
❑ Metal
Door thickness:
inches (1 3/4″ to 2 1/4″)
Special tools checklist
Use the following checklist to make sure that you have the
special tools necessary to install your B.A.S.I.S. Exit Hardware
Trim.
❑ T15 TORX® bit driver††
❑ ED211 cylinder wrench (for EV function only)
† The Best Access Systems logo and B.A.S.I.S. are
registered trademarks of Best Lock Corporation.
‡ Von Duprin is a registered trademark of
Von Duprin, Inc.
†† TORX is a registered trademark of the Camcar
Division of Textron.
BEST ACCESS SYSTEMS
Indianapolis, Indiana
1
Installation Instructions for B.A.S.I.S. EX Series Exit Hardware Trim
Preparing the door
1
2
Mark centerlines
Note 1: If retrofitting the B.A.S.I.S. trim to an existing exit
hardware installation, skip this task. Instead, remove the
exit hardware from the door.
Note 2: If the door is a fabricated hollow metal door,
determine whether it is properly reinforced to support
the lock. If door reinforcement is not adequate, consult
the door manufacturer for information on proper
reinforcement. For dimensions for preparing metal
doors, see the G10 Template—Installation
Specifications for EXG & EXBV Exit Hardware Trim
for use with Precision Hardware 1000/2000 Series
Locks or G09 Template—Installation Specifications
for EXG & EXBV Exit Hardware Trim for use with
Von Duprin 98/99 Series Locks.
1 On the door, measure and mark the height of the
centerline of the lock from the finished floor as
specified by the exit hardware manufacturer.
On both sides of the door, on the door’s edge, and on
the door frame (if required for strike installation), mark
the horizontal centerline of the lock.
2 On both sides of the door, on the door’s edge, and on
the door frame (if required for strike installation), mark
the vertical centerline of the lock stile case as specified
by the exit hardware manufacturer.
Note: The vertical centerline for the B.A.S.I.S. trim on the
outside of the door should correspond exactly to the
vertical centerline for the lock stile case on the inside of
the door. When measuring from the edge of the door,
take into account the door bevel (if any).
2
1
2
3
4
Position exit hardware template(s) and
mark drill points
Note: If retrofitting the B.A.S.I.S. trim to an existing exit
hardware installation, skip this task.
Position the Precision Hardware or Von Duprin exit
hardware template on the inside of the door; follow
the instructions provided by the exit hardware
manufacturer.
Tape the template to the door.
Center punch the necessary drill points. Refer to the
instructions on the template and to the hole schedule
provided by the exit hardware manufacturer.
If necessary, repeat step 1 through step 3 to prepare
the door frame or door stop for strike installation.
BEST ACCESS SYSTEMS
Indianapolis, Indiana
Installation Instructions for B.A.S.I.S. EX Series Exit Hardware Trim
Preparing the door
3
Position trim template and mark drill
points
1 For new installations
a Cut the G08 Template—Installation Template for
EXG & EXBV Exit Hardware Trim for Use with Precision
Hardware 1000/2000 Series Locks or G07
Template—Installation Template for EXG & EXBV Exit
Hardware Trim for Use with Von Duprin 98/99 Series
Locks along the dashed lines.
b Align the horizontal and vertical arrows marked on
the template with the centerlines marked on the
door. See Figure 1.
For retrofit installations
Align the mounting holes for the escutcheon and
lock stile case marked on the template with the
mounting holes in the door. See Figure 1.
Note: The B.A.S.I.S. outside escutcheon is mounted
using the four lock stile case mounting holes
(‘A’ holes); these holes must be 7/16″ in diameter and
drilled completely through the door.
2 Tape the template to the door.
3 Center punch the necessary drill points. Refer to the
instructions on the template.
4
Vertical centerline
of lock
Trim template
Horizontal centerline
of lock
Outside of door
Figure 1
Positioning the B.A.S.I.S. trim template
Mortise for mortise case and faceplate
(mortise exit devices only)
Note: If retrofitting the B.A.S.I.S. trim to an existing exit
hardware installation, skip this task.
Mortise the edge of the door for the mortise case and
faceplate; follow the instructions provided by the exit
hardware manufacturer.
BEST ACCESS SYSTEMS
Indianapolis, Indiana
3
Installation Instructions for B.A.S.I.S. EX Series Exit Hardware Trim
Preparing the door
5
Outside of LHRB door
Figure 2
Drilling the trim holes for use with
Precision Hardware exit hardware
Outside of LHRB door
Figure 3
4
Outside of RHRB door
Drill holes and mortise door surface
Caution: Check for the correct lock function, hand,
and bevel before drilling.
1 Drill the trim holes listed below; follow the instructions
on the trim template. See Figure 2 or Figure 3, and
Figure 4.
■ battery bracket hole
— 7/16″ diameter
— through door
■ battery bracket/harness hole
— 7/8″ diameter
— through door
■ escutcheon mounting holes
— 7/16″ diameter
— through door
■ optional cylinder hole
— 1 3/8″diameter for use with Precision Hardware
exit devices;
2″diameter for use with Von Duprin exit devices
— for rim and vertical rod exit devices, through
door; for mortise exit devices, from outside into
mortise cavity
— drill for EV function only
■ lift finger slot
— for Precision Hardware exit devices,
1 1/8″diameter slot
— for Von Duprin exit devices, 3/4″diameter slot
— through door
Note 1: To locate the center of a hole on the opposite
side of the door, drill a pilot hole through the door.
Note 2: For holes through the door, drill halfway from
each side of the door to keep the door from splintering.
2 For new installations, drill the exit hardware holes
and mortise the inside surface of the door according to
the instructions provided by the exit hardware
manufacturer.
Note: The B.A.S.I.S. outside escutcheon is mounted using
the four lock stile case mounting holes, labeled ‘A’ on the
exit hardware template.
Outside of RHRB door
Drilling the trim holes for use with
Von Duprin exit hardware
BEST ACCESS SYSTEMS
Indianapolis, Indiana
Installation Instructions for B.A.S.I.S. EX Series Exit Hardware Trim
Preparing the door
Battery bracket hole
Battery bracket/harness hole
Escutcheon mounting holes
Cylinder hole
(for EV function locks only)
Lift finger slot
Outside of LHRB door
Figure 4
Escutcheon mounting holes
Trim hole guide—Precision Hardware door preparation shown
BEST ACCESS SYSTEMS
Indianapolis, Indiana
5
Installation Instructions for B.A.S.I.S. EX Series Exit Hardware Trim
Installing the exit hardware and trim
6
Install mortise case
(mortise exit devices only)
Install the mortise case in the door; follow the
instructions provided by the exit hardware
manufacturer.
7
Screws
Spindle
Clamp
plate
Rim
cylinder
Break off the
screws here.
Mounting
sleeve
B.A.S.I.S.
escutcheon
Figure 5
Installing the cylinder for Von Duprin
rim and rod exit devices
Orient the
curve toward
the cylinder.
Install cylinder (Von Duprin EV
function rim and rod exit devices only)
1 To determine the correct spindle length, try the
cylinder in the door while holding the B.A.S.I.S.
escutcheon and lock stile case in place.
Then break off the spindle at the groove where it will
engage correctly with the latching mechanism.
Break off the mounting screws as shown in Figure 5.
2 From the front of the escutcheon, insert the cylinder
into the cylinder opening.
3 Holding the cylinder in position in the escutcheon,
insert the cylinder mounting sleeve through the back
of the escutcheon, over the cylinder.
4 Orient the cylinder and clamp plate as shown in
Figure 5. From the back of the escutcheon, secure the
cylinder and mounting sleeve using the clamp plate
and mounting screws.
8
Remove backup battery tab
Caution 1: For the lock to operate properly, you
must remove the backup battery tab.
Caution 2: Do not connect the battery pack before
you have removed the backup battery tab. Doing
so may cause the lock to malfunction.
1 Locate the backup battery tab on the inside of the
B.A.S.I.S. escutcheon.
2 Pull down on the tab and remove it from the B.A.S.I.S.
escutcheon to turn on the backup battery.
6
BEST ACCESS SYSTEMS
Indianapolis, Indiana
Installation Instructions for B.A.S.I.S. EX Series Exit Hardware Trim
Installing the exit hardware and trim
9
Route wire harnesses and position
B.A.S.I.S. escutcheon
1 From the outside of the door, feed the com port and
battery connector through the battery bracket/
harness hole as shown in Figure 6.
Caution 1: When routing the connectors, make
sure the harnesses are not routed across any
sharp edges or over any surface that could
damage their sleeving or wire insulation.
Caution 2: Do not put too much strain on the wire
harness either by pulling too hard on it or by
dangling the escutcheon from it.
2 Rest the B.A.S.I.S. escutcheon on the door by inserting
the trim studs into the mounting holes.
Battery
connector
Com port
Battery
bracket/
harness
hole
B.A.S.I.S.
escutcheon
Outside of door
Figure 6
BEST ACCESS SYSTEMS
Indianapolis, Indiana
Feeding the wire harness connectors through
the battery bracket/harness hole
7
Installation Instructions for B.A.S.I.S. EX Series Exit Hardware Trim
Installing the exit hardware and trim
10
Rim
cylinder
B.A.S.I.S.
escutcheon
Outside of door
Figure 7
Installing the cylinder
Screws
Clamp plate
Spindle
Orient the curve
toward the cylinder.
Rim
cylinder
Figure 8
Install cylinder (EV function only)
For Precision hardware rim and rod exit device
installations
1 To determine the correct spindle length, try the cylinder
in the door while holding the B.A.S.I.S. escutcheon and
lock stile case in place.
Then break off the spindle at the groove where it will
engage correctly with the latching mechanism.
Break off the mounting screws at the groove where they
will secure the clamp plate to the cylinder.
2 Insert the cylinder through the cylinder opening in the
B.A.S.I.S. escutcheon and into the door as shown in
Figure 7.
3 Orient the cylinder and clamp plate as shown in
Figure 8. From the inside of the door, secure the cylinder
using the clamp plate and mounting screws.
For all mortise exit device installations
1 For doors less than 2″ in thickness, place the cylinder
ring provided on the cylinder.
2 Rotate the cylinder cam to the 12 o’clock position, as
shown in Figure 9.
3 Using a cylinder wrench (ED211), insert the cylinder
through the cylinder opening in the B.A.S.I.S.
escutcheon and screw the cylinder into the mortise
case. Make sure that the figure-8 hole is in the 12 o’clock
position.
Caution: Do not screw the cylinder in too tightly.
Doing so may cause you or someone else to be
locked out.
Rim cylinder components
View of the back
of the cylinder
Cam in 12 o’clock
position
Mortise cylinder
Figure 9
8
Mortise cylinder components
BEST ACCESS SYSTEMS
Indianapolis, Indiana
Installation Instructions for B.A.S.I.S. EX Series Exit Hardware Trim
Installing the exit hardware and trim
11
Install exit hardware and
secure B.A.S.I.S. escutcheon
Install the exit hardware (lock stile case, case cover,
touch bar assembly and mounting bracket, latches and
rods [if applicable], and related hardware); follow the
instructions provided by the exit hardware
manufacturer.
Note: Make any adjustments to the exit hardware
necessary for compatibility with lever function outside
trim.
The B.A.S.I.S. escutcheon is secured on the outside of
the door by the screws used to mount the lock stile
case on the inside of the door.
Caution: When securing the escutcheon, make
sure that it does not pinch the wire harness.
12
Cylinder
Install core (EV function only)
1 Insert the control key into the core and rotate the key
15 degrees to the right.
2 With the control key in the core, insert the core into
the cylinder as shown in Figure 10.
3 Rotate the control key 15 degrees to the left and
withdraw the key.
Caution: The control key can be used to remove
cores and to access doors. Provide adequate
security for the control key.
Core
Control key
Outside of door
Figure 10 Installing the core
13
Install mortise case faceplate
(mortise exit devices only)
1 Secure the mortise case faceplate to the mortise case;
follow the instructions provided by the exit hardware
manufacturer.
2 Check the lock for proper operation.
BEST ACCESS SYSTEMS
Indianapolis, Indiana
9
Installation Instructions for B.A.S.I.S. EX Series Exit Hardware Trim
Completing the installation
14
Install strike(s)
Note: If retrofitting the B.A.S.I.S. trim to an existing exit
hardware installation, skip this task.
1 Install the strike(s) in the door frame or door stop;
follow the instructions provided by the exit hardware
manufacturer.
2 Check the lock for proper alignment between the
strike(s) and latch(es).
Com port
Nut
15
Install com port in battery bracket
1 Routing the wire harness into the bottom of the
battery bracket, slide the com port into its mounting
slot inside the battery bracket as shown in Figure 11.
Note: The com port is used when programming the
control electronics for the lock.
Battery bracket
Figure 11 Installing the com port in the battery bracket
Battery
bracket
2 Tighten the nut to secure the com port to the bracket.
16
Mounting
screws
Install battery bracket on door
1 Position the battery bracket on the inside of the door
as shown in Figure 12.
Note: If installing with a surface rod exit device, the
battery bracket is mounted over the upper rod.
2 Secure the battery bracket to the door using two of the
mounting screws provided.
Note: For doors less than 2″ in thickness, use the
1 1/4″ screws. For doors 2″ or greater, use the
1 3/4″ screws.
Caution: When routing the wire harness, make
sure the wires are not routed across any sharp
edges or over any surface that could damage their
sleeving or wire insulation.
Inside of door
Figure 12 Installing the battery bracket on the door
10
BEST ACCESS SYSTEMS
Indianapolis, Indiana
Installation Instructions for B.A.S.I.S. EX Series Exit Hardware Trim
Completing the installation
17
Install battery pack in bracket
1 Connect the battery pack to the battery connector on
the wire harness as shown in Figure 13.
Note: The battery connection has 3 wires and 3 pins.
The wire colors are:
■ red with white stripe
■ white
■ black with white stripe.
Caution: When connecting the battery pack,
make sure:
■ there are no loose wire connections where the
wires are inserted into the connectors
■ the connectors are firmly mated.
Battery pack
Battery holder
(inside bracket)
2 Place the battery pack in the holder inside the battery
bracket and dress the wire harness inside the bracket.
Caution: Make sure you do not damage the
sleeving on the battery pack. Doing so may cause
the batteries to drain.
3 If installing with a surface rod device, dress the
wire harness inside the bracket to the left of the rod so
that the harness will not interfere with the movement
of the rods.
We recommend that you loosely coil the harness and
use a cable tie to secure the coil. To avoid damaging
the harness, do not put any sharp bends in it or flex it
close to the connectors.
Caution: Failure to dress the wire harness away
from the rod could damage the wire harness,
causing the lock’s electronics to not work
properly.
18
Inside of door
Figure 13 Connecting the battery pack
Location of
knockout
Security
screws
Location of
knockout
Install battery cover on bracket
1 If installing with a surface rod exit device, remove
the knockouts for the rod from the battery cover. See
Figure 14.
2 Making sure that the battery cover does not pinch any
wires, place the cover over the bracket.
3 Use a T15 TORX bit driver to secure the battery
compartment cover with the security screws. Tighten
firmly. See Figure 14.
Figure 14 Installing the battery cover on the bracket
BEST ACCESS SYSTEMS
Indianapolis, Indiana
11
Installation Instructions for B.A.S.I.S. EX Series Exit Hardware Trim
Completing the installation
19
Test lock
To test the lock for proper operation before the lock is
programmed, use the temporary operator card that came
with the lock. This card is for temporary use only. After
permanent cards have been programmed for the lock, the
temporary card should be deleted.
1 Use the temporary operator card to activate the lock.
When the lock detects the presence of a card for the
first time, the lock performs a series of diagnostic selftests. If no problem is detected, the lock responds with
4 red LED flashes, simultaneous with 4 green LED
flashes and 4 short tones.
If a problem is detected, the lock’s red LED and
green LED simultaneously flash in a repeating pattern
(and no tones sound). The lock’s control electronics
board must be replaced. For instructions, see the
B.A.S.I.S. G Service Manual (T63300) or the B.A.S.I.S. V
Service Manual (T61805).
Note: If the lock has a proximity card reader, it may have
already been activated by the presence of an object near
the card reader.
2 Use the temporary operator card to access the lock.
The green light flashes and the locking mechanism
unlocks.
3 Turn the lever and open the door.
If the mechanism doesn’t unlock, refer to the
following table. For additional troubleshooting
instructions, see the B.A.S.I.S. G Service Manual or the
B.A.S.I.S. V Service Manual.
LEDs
Sounder
Single
red flash
—
Use the card at a moderate speed.
Red
flashes
3 short
tones
Use the temporary operator card
provided with the lock.
—
—
Important: When the trim and exit hardware
installation is complete, perform all testing specified
by the exit hardware manufacturer.
You should
Check the battery connection.
For EV function locks
Insert and turn the key to unlatch the door.
© 2001–2002 Best Lock Corporation dba Best Access Systems.
T61828/Rev A 1844200 ER-7991-12 July 2002
12
BEST ACCESS SYSTEMS
Indianapolis, Indiana
C
INDEX
A
adding key override sensing 11–10
armored front
part drawings for 2–14
part numbers for 2–15
audible responses 12–2
auxiliary bolt
part drawings for 2–14
part numbers for 2–15
removing and turning over 6–8
auxiliary bolt spring
part drawings for 2–14
part numbers for 2–15
auxiliary return levers
part drawings for 2–14
part numbers for 2–15
B
B.A.S.I.S. Transport 11–13
backup battery for EX trim
part drawings for 3–3
part numbers for 4–5
removing and reinstalling 11–2
backup battery for standard B.A.S.I.S. Locks
part drawings for 2–5
part numbers for 4–5
removing and reinstalling 11–2
battery bracket
part drawings for 3–3
part numbers for 3–5
removing and reinstalling 8–6
battery bracket screws
part drawings for 3–3
part numbers for 4–9
B.A.S.I.S. G Service Manual
battery cover
part drawings for 3–3
part numbers for 3–5
removing and reinstalling 8–2
battery cover screws
part drawings for 3–3
part numbers for 4–9
battery door
part drawings for 2–5
part numbers for 2–7
battery door screw
part drawings for 2–5
part numbers for 4–9
battery pack for EX trim
part drawings for 3–3
part numbers for 3–5
removing and reinstalling 8–4
battery pack for standard B.A.S.I.S. Locks
part drawings for 2–5
part numbers for 2–7
removing and reinstalling 5–3
upgrading 11–4
beam
part drawings for 3–3
part numbers for 3–4
removing and reinstalling 10–22
beam roller
part drawings for 3–3
part numbers for 3–4
removing and reinstalling 10–22
bevel, changing 6–5
bushings
part drawings for 2–5
part numbers for 2–6
C-1
Index
C
card 4–11
case assembly
part drawings for 2–14
part numbers for 2–15
case cover
part drawings for 2–14
part numbers for 2–15
case cover mounting screws
part drawings for 2–14
part numbers for 2–15
case mounting screws
part drawings for 2–14
part numbers for 2–15
c-clip
part drawings for 3–3
part numbers for 3–4
certifications and standards 1–5
changing lock’s online mode 11–18
changing mortise lock’s hand and
bevel 6–3
clearing lock’s diagnostics code
11–20
control electronics boards for EX
trim
part drawings for 3–3
part numbers for 4–5
removing and reinstalling
10–10
control electronics boards for
standard B.A.S.I.S. Locks
part drawings for 2–5, 2–11
part numbers for 4–5
removing and reinstalling 9–10
conversion harness
part numbers for 4–6
core for EX trim
removing and reinstalling 8–9
core for standard B.A.S.I.S. Locks
removing and reinstalling
5–15, 7–2
cylinder clamp plate
part drawings for 2–14
part numbers for 2–15
removing and reinstalling 6–19
removing and turning over 6–7
cylinder, mortise for EX trim
part numbers and drawings for
3–12
removing and reinstalling 8–10
cylinder, mortise for standard
B.A.S.I.S. Locks
part drawings for 2–16
part numbers for 2–17
removing and reinstalling 5–17
C-2
cylinder, rim for EX trim
part numbers and drawings for
3–13
removing and reinstalling 8–11
cylindrical chassis
part drawings for 2–18
part numbers for 2–19
removing and reinstalling 7–18
D
deadbolt
part drawings for 2–14
part numbers for 2–15
removing and reinstalling 6–17
deadlocking lever
part drawings for 2–14
part numbers for 2–15
deadlocking spring
part drawings for 2–14
part numbers for 2–15
documentation package 1–6
dual validation reader for EX trim
part drawings for 3–9
part numbers for 4–4
dual validation reader for standard
B.A.S.I.S. Locks
part drawings for 2–11
part numbers for 4–4
dual validation reader trim for EX
trim
part drawings for 3–9
part numbers for 3–10
dual validation reader trim for
standard B.A.S.I.S. Locks
part drawings for 2–11
part numbers for 2–12
DV function cylindrical lock
function description 2–4
E
electronics board mounting screw
for EX trim
part drawings for 3–3
part numbers for 4–7
electronics board mounting screw
for standard B.A.S.I.S.
Locks
part drawings for 2–5
part numbers for 4–7
enabling communications without a
card or password 12–3
escutcheon for EX trim
part drawings for 3–3
part numbers for 3–4
removing and reinstalling 8–13
escutcheon gasket for EX trim
part drawings for 3–3
part numbers for 3–5
removing and reinstalling 10–3
escutcheon gasket for standard
B.A.S.I.S. Locks
part drawings for 2–5
part numbers for 2–6
removing and reinstalling 9–2
escutcheons for standard B.A.S.I.S.
Locks
part drawings for 2–5
part numbers for 2–6
removing and reinstalling 5–3,
7–5
EV function for EX trim
function description 3–2
EV function mortise lock
function conversion 6–10
function description 2–2
exit hardware
removing and reinstalling 8–8
F
faceplate
part drawings for 2–16
part numbers for 2–17
removing and reinstalling 5–16
faceplate screw 2–16
function conversion 6–10
function descriptions for EX trim
3–2
function descriptions for standard
B.A.S.I.S. Locks 2–2, 2–4
FV function for EX trim
function description 3–2
FV function mortise lock
function conversion 6–10
function description 2–2
H
hand, changing for EX trim 10–28
hand, changing for standard
B.A.S.I.S. Locks 6–5
harness clamp
part drawings for 2–5
part numbers for 2–6
removing and reinstalling 9–4
history event types A–1
hub lever spring
part drawings for 2–14
part numbers for 2–15
hubs
part drawings for 2–14
part numbers for 2–15
B.A.S.I.S. G Service Manual
Index
L
latch 2–20
latch lever
part drawings for 2–14
part numbers for 2–15
latch screw 2–20
latchbolt
part drawings for 2–14
part numbers for 2–15
removing and turning over 6–9
lens covers for EX trim
part drawings for 3–3
part numbers for 4–6
removing and reinstalling 10–9
lens covers for standard B.A.S.I.S.
Locks
part drawings for 2–5
part numbers for 4–6
removing and reinstalling 9–3
lever return springs
part drawings for 3–3
part numbers for 4–9
removing and reinstalling 10–8
levers for EX trim
part drawings for 3–3, 3–14
part numbers for 3–14
removing and reinstalling
10–24
levers for standard B.A.S.I.S. Locks
part drawings for 2–5
part numbers for 2–6
removing and reinstalling 5–2,
7–3
lift finger
part drawings for 3–3
part numbers for 3–4
removing and reinstalling 10–4
lift finger screw
part drawings for 3–3
part numbers for 4–9
lock history event types A–1
locking bar
part drawings for 2–14
part numbers for 2–15
locking plate
part drawings for 3–3, 3–6
part numbers for 3–4
removing and reinstalling
10–18
long hub lever
part drawings for 2–14
part numbers for 2–15
lower auxiliary spring
part drawings for 2–14
part numbers for 2–15
B.A.S.I.S. G Service Manual
lower escutcheon screws
part drawings for 2–5
part numbers for 4–8
LV function mortise lock
function conversion 6–10
function description 2–3
M
magnetic stripe card reader for EX
trim
part drawings for 3–3
part numbers for 4–4
magnetic stripe card reader for
standard B.A.S.I.S. Locks
part drawings for 2–5
part numbers for 4–4
magnetic stripe card reader trim for
EX trim
part drawings for 3–3
part numbers for 3–4
magnetic stripe card reader trim for
standard B.A.S.I.S. Locks
part drawings for 2–5
part numbers for 2–6
mortise case
part drawings for 2–14
part numbers for 2–15
removing and reinstalling 6–2
mortise case spacer
part drawings for 2–14
part numbers for 2–15
motor assembly
part drawings for 3–3
part numbers for 4–10
removing and reinstalling
10–14
motor module
part drawings for 2–14
part numbers for 2–15
removing and reinstalling 6–14
mounting plate for EX trim
part drawings for 3–3
part numbers for 3–5
removing and reinstalling 10–6
mounting plate screws for EX trim
part drawings for 3–3
part numbers for 4–9
mounting plate screws for standard
B.A.S.I.S. Locks
part drawings for 2–16
part numbers for 2–17
mounting plates for standard
B.A.S.I.S. Locks
part drawings for 2–16
part numbers for 2–17
removing and reinstalling 5–14
mounting standoffs
part drawings for 3–3
part numbers for 4–9
removing and reinstalling 10–2
N
NV function mortise lock
function conversion 6–10
function description 2–3
O
opening a lock with dead batteries
12–6
overview
B.A.S.I.S system 1–2
B.A.S.I.S. locks 1–4
P
part drawings for EX trim
dual validation reader trim 3–9
magnetic stripe card reader
trim 3–3
smart card reader trim 3–6
part drawings for standard B.A.S.I.S.
Locks
cylindrical chassis 2–18
dual validation reader trim
2–11
magnetic stripe card reader
trim 2–5
mortise case 2–14
other cylindrical lock components 2–20
other mortise lock components
2–16
smart card reader trim 2–8
part numbers for EX trim
dual validation reader trim
3–10
magnetic stripe card reader
trim 3–4
smart card reader trim 3–7
part numbers for standard B.A.S.I.S.
Locks
cylindrical chassis 2–19
dual validation reader trim
2–12
magnetic stripe card reader
trim 2–6
mortise case 2–15
other cylindrical lock
components 2–20
other mortise lock components
2–16
smart card reader trim 2–9
C-3
Index
PDA 11–13
primary harness for EX trim
part drawings for 3–3
part numbers for 4–10
removing and reinstalling 10–9
to 10–10
primary harness for standard
B.A.S.I.S. Locks
part drawings for 2–5
part numbers for 4–6
removing and reinstalling 9–7
programming cable 4–11
R
reader assemblies for EX trim
removing and reinstalling
10–12
reader assemblies for standard
B.A.S.I.S. Locks
removing and reinstalling 9–17
reader assembly mounting screws
for EX trim
part drawings for 3–3
part numbers for 4–7
reader assembly mounting screws
for standard B.A.S.I.S.
Locks
part drawings for 2–5
part numbers for 4–7
reader gasket for EX trim
part drawings for 3–3
part numbers for 3–4
reader gasket for standard B.A.S.I.S.
Locks
part drawings for 2–5
part numbers for 2–6
removing and reinstalling EX trim
parts
backup battery 11–2
battery bracket 8–6
battery cover 8–2
battery pack 8–4
beam and beam roller 10–22
control electronics boards
10–10
core 8–9
cylinder, mortise 8–10
cylinder, rim 8–11
escutcheon 8–13
escutcheon gasket 10–3
exit hardware 8–8
lens covers 10–9
lever return springs 10–8
levers 10–24
lift finger 10–4
C-4
locking plate 10–18
motor assembly 10–14
mounting plate 10–6
mounting standoffs 10–2
primary harness 10–9 to 10–10
reader assemblies 10–12
shear pin 10–26
yoke 10–20
removing and reinstalling standard
B.A.S.I.S. parts
backup battery 11–2
battery pack 5–3
control electronics boards
9–10
core 5–15, 7–2
cylinder 5–17
cylinder clamp plate 6–19
cylindrical chassis 7–18
deadbolt 6–17
escutcheon gasket 9–2
escutcheons 5–3, 7–5
faceplate 5–16
harness clamp 9–4
lens covers 9–3
levers 5–2, 7–3
mortise case 6–2
motor module 6–14
mounting plates 5–14
primary harness 9–7
reader assemblies 9–17
rose liners 7–15
sensor harness 9–6
sensor module 6–16
throw member 7–2
turn knob hub 6–17
turn knob spacer 6–17
upgrade cable 9–5
replacement kits
batteries 4–5
cable and harness 4–6
control electronics boards 4–5
lens cover 4–6
readers 4–4
screws 4–7
sensor modules 4–10
replacing the battery pack 11–4
resetting lock’s use count 11–19
retaining ring
part drawings for 2–14
part numbers for 2–15
rose liners
part numbers and drawings for
2–20
removing and reinstalling 7–15
S
sensor harness
part drawings for 2–5, 3–3
part numbers for 4–6
removing and reinstalling 9–6
sensor module
part drawings for 2–14
part numbers for 2–15, 4–10
removing and reinstalling 6–16
shear pin
part drawings for 3–3
part numbers for 4–10
removing and reinstalling
10–26
shoulder screws
part drawings for 3–6
part numbers for 4–9
smart card reader for EX trim
part numbers for 4–4
smart card reader for standard
B.A.S.I.S. Locks 4–4
smart card reader trim for EX trim
part drawing for 3–6
part numbers for 3–7
smart card reader trim for standard
B.A.S.I.S. Locks
part drawing for 2–8
part numbers for 2–9
stop pin
part drawings for 2–14
part numbers for 2–15
strain relief
part drawings for 2–14
part numbers for 2–15
strike box
Cylindrical Locks 2–20
Mortise Locks 2–16
strike plate
Cylindrical Locks 2–20
Mortise Locks 2–16
strike screw
Cylindrical Locks 2–20
Mortise Locks 2–16
support, technical 1–8
T
tape for mounting the sounder for
EX trim
part drawings for 3–3
part numbers for 4–6
tape for mounting the sounder for
standard B.A.S.I.S. Locks
part drawings for 2–5
part numbers for 4–6
B.A.S.I.S. G Service Manual
Index
technical documentation package
1–6
technical support 1–8
through-bolt screw 2–20
throw member 7–2
trim hole inserts
part drawings for 2–5
part numbers for 2–7
troubleshooting 12–7
turn knob hub
part drawings for 2–14
part numbers for 2–15
removing and reinstalling 6–17
turn knob hub spacer
part drawings for 2–14
part numbers for 2–15
removing and reinstalling 6–17
U
unlocking door temporarily 11–19
upgrade cable
part drawings for 2–5
part numbers for 4–6
removing and reinstalling 9–5
upgrading the battery pack 11–4
upper auxiliary spring
part drawings for 2–14
part numbers for 2–15
upper escutcheon screws for EX
trim
part drawings for 3–3
part numbers for 4–7
upper escutcheon screws for
standard B.A.S.I.S. Locks
part drawings for 2–5
part numbers for 4–7
V
viewing diagnostics information
11–14
visual responses 12–2
W
washer
part drawings for 3–6
part numbers for 3–5
Y
yoke
part drawings for 3–6
part numbers for 3–4
removing and reinstalling
10–20
B.A.S.I.S. G Service Manual
C-5
Index
C-6
B.A.S.I.S. G Service Manual