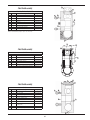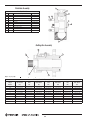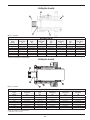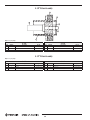
1
MODELS MA-240L, MA-240L-HD, MA-240M, MA-240M-HD, MA-240K, SC-300L, SC-300, RO-358L AND RO-358 QUINTUPLEX PUMPS INSTALLATION AND SERVICE MANUAL NOTE! To the installer: Please make sure you provide this manual to the owner of the equipment or to the responsible party who maintains the system. Part # AP-03-101 | © 2014 Pentair Ltd. | 09/24/14 Engineering Data MA-240L............................................................ 3 MA-240L-HD...................................................... 4 MA-240M........................................................... 5 MA-240M-HD..................................................... 6 MA-240K........................................................... 7 SC-300L............................................................ 8 SC-300.............................................................. 9 RO-358L.......................................................... 10 RO-358............................................................ 11 Stuffing Box, Packing and Plunger Assemblies........ 21 General............................................................ 21 Spring Loaded Packing.................................21–22 J-Style Stuffing Box & Plunger Assembly (Styles 838 and 858)........................................ 22 Inserting the Plunger......................................... 22 Installing the Gland........................................... 22 Installing the Stuffing Box.................................. 22 Connecting the Plunger...................................... 23 Packing Lubrication........................................... 23 Plungers........................................................... 23 Dimensional Data............................................12–13 Disc Valve Systems and Abrasion Resistant Valve Construction................................................ 23 General............................................................ 23 Setting the Valve Seat........................................ 23 Installing O-Rings, Abrasion Resistant Spring and Cage.......................................................... 23 Installing Disc, Spring, Disc Valves and Stem....... 24 Pulling the Valve Seat........................................ 24 Salvage of Worn Seats........................................ 24 Trouble Location and Remedy...........................25–27 Installation, Operation, Lubrication, Maintenance and Storage Instructions........................................ 14 Safety.............................................................. 14 Storage............................................................ 14 Pump Location and Piping Design....................... 14 Suction Piping.............................................14–15 Acceleration Head............................................. 15 Discharge Piping............................................... 15 Bypass Piping................................................... 15 Lubrication....................................................... 16 V-Belt Drive...................................................... 16 Direction of Rotation.......................................... 16 Automatic (Safety) Shutdowns............................ 16 Suggested Piping System for Plunger Pumps....... 17 Parts Lists......................................................28–34 Warranty.............................................................. 36 Crankshaft Assembly............................................. 18 General............................................................ 18 Tapered Roller Bearings..................................... 18 Cup Installation................................................. 18 Center Bearings................................................. 18 Installing Crankshaft............................................. 18 Shim Adjustment of Tapered Roller Bearings........ 18 Installation of Crankshaft Oil Seal....................... 18 Lube Oil Pump Assembly................................... 19 Disassembly...................................................... 19 Connecting Rod, Crosshead, Extension Rod, Crosshead Pin and Wiper Box Assembly/Disassembly............... 19 General............................................................ 19 Installing Wrist Pin Bushings.............................. 20 Pinning the Crosshead....................................... 20 Order of Assembly............................................. 20 Precision Crankpin (Crankthrow) Bearings.......20–21 Oil Scoop......................................................... 21 Wiper Box Assembly.............................................. 21 General............................................................ 21 “Poly Pak” Seal................................................ 21 Mechanical Oil Seal........................................... 21 Inserting the Extension Rod................................ 21 2 MA-240L ENGINEERING DATA MA-240L ENGINEERING DATA Power End Liquid End (Continued) Model Quintuplex Pump MA-240L Maximum Input hp at Speed 240 at 450 rpm Rated Continuous Plunger Load 8,937 lbs. Stroke 4-1/4" Maximum Rated Continuous Speed 450 rpm Normal Continuous Speed Range 150 to 420 rpm Minimum Speed 100 rpm Oil Capacity Plunger Type Rokide® Stainless Steel: Chromium Oxide-Coated 316 S.ST. Stuffing Boxes, Field-Removable and Replaceable: Aluminum Bronze Stainless Steel, Hardened Carbon Steel B148-C955 17-4 PH 1020 54 U.S. Quarts Packing Types Available: Gland-loaded, Nonadjustable Spring-loaded, V-Ring Spring-loaded or Gland Adjusted, Braided Teflon® & Kevlar® Style 838 Style 120X Style 140/141/ 8921K Viscosity, S.S.U. at 210ºF 70 to 84 Seals, Stuffing Boxes, Valve Covers, Cylinder Heads Buna-N Power End Oiling System Pressure Lubrication System Studs, Material, ASTM A193 Grade B7, Cadmium Plated Power Frame, One Piece Cast Iron Crosshead, Full Cylindrical Cast Iron Available Valve Types: Optional, Hardened and Lapped 17-4 PH S.ST. Crosshead, Diameter x Length 5-3/4" x 6-3/16" Valve Spring Material Inconel® Crankshaft Ductile Iron Valve Seat, Liquid Passage Areas 6.26 sq. in. Crankshaft Diameters: At Drive Extension At Tapered Roller Bearings At Center Bearings At Crankpin Bearings, Diameter x Length 3.875/3.874" 4" 9-3/8" 4" x 3" Average Liquid Velocity, 3-1/2" Plungers at 450 rpm: Suction Manifold Discharge Manifold 4.42 fps 18.1 fps Crosshead (Wrist) Pin, Case-Hardened and Ground AISI 8620 Wrist Pin Bushing, SAE 660, Diameter x Width 2" x 3" Main Bearings, Tapered Roller Timken® Crankpin Bearings, Precision Automotive Steel Backed, Babbitt-Lined Extension (Pony) Rod: Diameter Material 2" 17-4 PH S.ST. Connecting Rod, Automotive Type Ductile Iron Average Crosshead Speed: At 450 rpm At 150 rpm 300 fpm 100 fpm Minimum Life Expectancy, Main Bearings, L10 75,000+hr General Liquid End Plunger Size Range, Diameter 2-3/8" thru 3-1/2" Maximum Continuous Working Pressure 2,020 psi Hydrostatic Test: Discharge Suction 3,375 psi 425 psi Discharge Connection Size 3" ANSI 900# Suction Connection Size 6" ANSI 150# Maximum Working Pressure Suction Manifold 2,220 psi Available Liquid End Materials, ASTM: Nickel Aluminum Bronze Carbon Steel Block Stainless Steel B148-C955 Various Grades Various Grades 3 Overall Dimensions: Length Width Height 52-1/2" 56-3/4" 22-1/8" Approximate Weights: With Aluminum Bronze Liquid End With Forged Steel Liquid End 3,240 lbs. 3,600 lbs. MA-240L-HD ENGINEERING DATA MA-240L-HD ENGINEERING DATA Power End Liquid End (Continued) Model Quintuplex Pump MA-240L-HD Maximum Input HP at Speed 275 at 450 rpm Rated Continuous Plunger Load 10,300 lbs. Stroke 4-1/4" Maximum Rated Continuous Speed 450 rpm Normal Continuous Speed Range 150 to 420 rpm Minimum Speed 100 rpm Oil Capacity 54 U.S. Quarts Viscosity, S.S.U. at 210ºF 70 to 84 Power End Oiling System Pressure Lubrication System Power Frame, One Piece Cast Iron Crosshead, Full Cylindrical Plunger Type Rokide® Stainless Steel: Chromium Oxide-Coated 316 S.ST. Stuffing Boxes, Field-Removable and Replaceable: Aluminum Bronze Stainless Steel, Hardened Carbon Steel B148-C955 17-4 PH 1020 Packing Types Available: Gland-loaded, Nonadjustable Spring-loaded, V-Ring Spring-loaded or Gland Adjusted, Braided Teflon® & Kevlar® Style 838 Style 120X Style 140/141/8921K Seals, Stuffing Boxes, Valve Covers, Cylinder Heads Buna-N Studs, Material, ASTM A193 Grade B7, Cadmium Plated Cast Iron Available Valve Types: Optional, Hardened and Lapped 17-4 PH S.ST. Crosshead, Diameter x Length 5-3/4" x 6-3/16" Crankshaft Nitrided Forged Steel Valve Spring Material Inconel® Valve Seat, Liquid Passage Areas 6.26 sq. in. Average Liquid Velocity, 3-1/2" Plungers at 450 rpm: Suction Manifold Discharge Manifold 4.42 fps 18.1 fps Crankshaft Diameters: At Drive Extension At Tapered Roller Bearings At Center Bearings At Crankpin Bearings, Diameter x Length 3.875/3.874" 4" 9-3/8" 4" x 3" Crosshead (Wrist) Pin, Case-Hardened and Ground AISI 8620 Wrist Pin Bushing, SAE 660, Diameter x Width 2" x 3" Main Bearings, Tapered Roller Timken® Crankpin Bearings, Precision Automotive Steel Backed, Babbitt-Lined Extension (Pony) Rod: Diameter Material 2" 17-4 PH S.ST. Connecting Rod, Automotive Type Ductile Iron Average Crosshead Speed: At 450 rpm At 150 rpm 300 fpm 100 fpm Minimum Life Expectancy, Main Bearings, L10 60,000+hr General Overall Dimensions: Length Width Height 52-1/2" 56-3/4" 22-1/8" Approximate Weights: With Aluminum Bronze Liquid End With Forged Steel Liquid End 3,240 lbs. 3,600 lbs. Liquid End Plunger Size Range, Diameter 2-3/8" Thru 3-1/2" Maximum Continuous Working Pressure 2,326 psi Hydrostatic Test: Discharge Suction 3,375 psi 425 psi Discharge Connection Size 3" ANSI 900# Suction Connection Size 6" ANSI 150# Maximum Working Pressure Suction Manifold 2,326 psi Available Liquid End Materials, ASTM: Nickel Aluminum Bronze Carbon Steel Block Stainless Steel B148-C955 Various Grades Various Grades 4 MA-240M ENGINEERING DATA MA-240M ENGINEERING DATA Power End Liquid End (Continued) Model Quintuplex Pump MA-240M Plunger Type Rokide® Stainless Steel: Chromium Oxide-Coated Maximum Input HP at Speed 240 at 450 rpm 316 S.ST. Rated Continuous Plunger Load 8,937 lbs. Stuffing Boxes, Field-Removable and Replaceable: Aluminum Bronze Carbon Steel Stroke 4-1/4" B148-C955 1020 Maximum Rated Continuous Speed 450 rpm Packing Types Available: Gland-loaded, Nonadjustable Spring-loaded, V-Ring Spring-loaded or Gland Adjusted, Braided Teflon® & Kevlar® Normal Continuous Speed Range 150 to 420 rpm Style 838 Style 120X Style 140/141/8921K Minimum Speed 100 rpm Oil Capacity 54 U.S. Quarts Viscosity, S.S.U. at 210ºF 70 to 84 Seals, Stuffing Boxes, Valve Covers, Cylinder Heads Buna-N Power End Oiling System Pressure Lubrication System Studs, Material, ASTM A193 Grade B7, Cadmium Plated Power Frame, One Piece Cast Iron Available Valve Types: Optional, Hardened and Lapped 17-4 PH S.ST. Crosshead, Full Cylindrical Cast Iron Valve Spring Material Inconel® Crosshead, Diameter x Length 5-3/4" x 6-3/16" Valve Seat, Liquid Passage Areas 2.35 sq. in. Crankshaft Ductile Iron Crankshaft Diameters: At Drive Extension At Tapered Roller Bearings At Center Bearings At Crankpin Bearings, Diameter x Length 3.875/3.874" 4" 9-3/8" 4" x 3" Average Liquid Velocity, 2-1/4" Plungers at 450 rpm: Suction Manifold Discharge Manifold 4.19 fps 16.7 fps Crosshead (Wrist) Pin, Case-Hardened and Ground AISI 8620 Wrist Pin Bushing, SAE 660, Diameter x Width 2" x 3" Main Bearings, Tapered Roller Timken® Crankpin Bearings, Precision Automotive Steel Backed, Babbitt-Lined Extension (Pony) Rod: Diameter Material 2" 17-4 PH S.ST. Connecting Rod, Automotive Type Ductile Iron Average Crosshead Speed: At 450 rpm At 150 rpm 300 fpm 100 fpm Minimum Life Expectancy, Main Bearings, L10 75,000+hr General Liquid End Plunger Size Range, Diameter 1-3/4" Thru 2-1/4" Maximum Continuous Working Pressure 3,600 psi Hydrostatic Test: Discharge Suction 5,625 psi 425 psi Discharge Connection Size 2" ANSI 150# Suction Connection Size 4" ANSI 1500# Maximum Working Pressure Suction Manifold 3,705 psi Available Liquid End Materials, ASTM: Nickel Aluminum Bronze Carbon Steel Block Stainless Steel B148-C955 Various Grades Various Grades 5 Overall Dimensions: Length Width Height 50-1/2" 56-3/4" 22-1/8" Approximate Weights: With Aluminum Bronze Liquid End 3,580 lbs. MA-240M-HD ENGINEERING DATA MA-240M-HD ENGINEERING DATA Power End Liquid End (Continued) Model Quintuplex Pump MA-240M-HD Maximum Input HP at Speed 270 at 450 rpm Available Liquid End Materials, ASTM: Nickel Aluminum Bronze Carbon Steel Stainless Steel B148-C955 Various Grades Various Grades Rated Continuous Plunger Load 10,300 lbs. Stroke 4-1/4" Plunger Type Rokide® Stainless Steel: Chromium Oxide-Coated Maximum Rated Continuous Speed 450 rpm 316 S.ST. Normal Continuous Speed Range 150 to 420 rpm Stuffing Boxes, Field-Removable and Replaceable: Aluminum Bronze Carbon Steel Minimum Speed 100 rpm B148-C955 1020 Oil Capacity 54 U.S. Quarts Viscosity, S.S.U. at 210ºF 70 to 84 Pressure Lubrication System Packing Types Available: Gland-loaded, Nonadjustable Spring-loaded, V-Ring Spring-loaded or Gland Adjusted, Braided Teflon® & Kevlar® Style 838 Style 120X Style 140/141/8921K Power End Oiling System Power Frame, One Piece Cast Iron Seals, Stuffing Boxes, Valve Covers, Cylinder Heads Buna-N Crosshead, Full Cylindrical Cast Iron Crosshead, Diameter x Length 5-3/4" x 6-3/16" Studs, Material, ASTM A193 Grade B7, Cadmium Plated Crankshaft Forged, Heat Treated and Nitrided Alloy Steel Available Valve Types: Optional, Hardened and Lapped 17-4 PH S.ST. Valve Spring Material Inconel® Valve Seat, Liquid Passage Areas 2.35 sq. in. Average Liquid Velocity, 2-1/4" Plungers at 450 rpm: Suction Manifold Discharge Manifold 4.19 fps 16.7 fps Crankshaft Diameters: At Drive Extension At Tapered Roller Bearings At Center Bearings At Crankpin Bearings, Diameter x Length 3.875/3.874" 4" 9-3/8" 4" x 3" Crosshead (Wrist) Pin, Case-Hardened and Ground AISI 8620 Wrist Pin Bushing, SAE 660, Diameter x Width 2" x 3" Main Bearings, Tapered Roller Timken® Crankpin Bearings, Precision Automotive Steel Backed, Babbitt-Lined Extension (Pony) Rod: Diameter Material 2" 17-4 PH S.ST. Connecting Rod, Automotive Type Ductile Iron Average Crosshead Speed: At 450 rpm At 150 rpm 300 fpm 100 fpm Minimum Life Expectancy, Main Bearings, L10 60,000+hr General Overall Dimensions: Length Width Height 50-1/2" 56-3/4" 22-1/8" Approximate Weights: With Aluminum Bronze Liquid End 3,580 lbs. Liquid End Plunger Size Range, Diameter 1-7/8" Thru 2-1/4" Maximum Continuous Working Pressure 3,600 psi Hydrostatic Test: Discharge Suction 5,625 psi 425 psi Discharge Connection Size 2" ANSI 150# Suction Connection Size 4" ANSI 1500# Maximum Working Pressure Suction Manifold 3,705 psi 6 MA-240K ENGINEERING DATA MA-240K ENGINEERING DATA Power End Liquid End (Continued) Model Quintuplex Pump MA-240K Maximum Input HP at Speed 240 at 450 rpm Stuffing Boxes, Field-Removable and Replaceable: Aluminum Bronze Stainless Steel, Hardened B148-C955 316 S.ST. Rated Continuous Plunger Load 8,937 lbs. Stroke 4-1/4" Packing Types Available: Gland-loaded, Nonadjustable Spring-loaded, V-Ring Spring-loaded or Gland Adjusted, Braided Teflon® & Kevlar® Maximum Rated Continuous Speed 450 rpm Style 838 Style 120X Style 140/141/8921K Normal Continuous Speed Range 150 to 420 rpm Minimum Speed 100 rpm Seals, Stuffing Boxes, Valve Covers, Cylinder Heads Buna-N Oil Capacity 54 U.S. Quarts Studs, Material, ASTM A193 Grade B7, Cadmium Plated Viscosity, S.S.U. at 210ºF 70 to 84 Power End Oiling System Pressure Lubrication System Available Valve Types: Optional, Hardened and Lapped 17-4 PH S.ST. Power Frame, One Piece Cast Iron Valve Spring Material Inconel® Crosshead, Full Cylindrical Cast Iron Valve Seat, Liquid Passage Areas 6.54 sq. in. Average Liquid Velocity, 4-1/2" Plungers at 450 rpm: Suction Manifold Discharge Manifold Crosshead, Diameter x Length 5-3/4" x 6-3/16" Crankshaft Ductile Iron 4.2 fps 18.4 fps Crankshaft Diameters: At Drive Extension At Tapered Roller Bearings At Center Bearings At Crankpin Bearings, Diameter x Length 3.875/3.874" 4" 9-3/8" 4" x 3" Overall Dimensions: Length Width Height 55-3/8" 56-3/4" 26" Crosshead (Wrist) Pin, Case-Hardened and Ground AISI 8620 Wrist Pin Bushing, SAE 660, Diameter x Width 2" x 3" Main Bearings, Tapered Roller Timken® Approximate Weights: With Aluminum Bronze Liquid End With Stainless Steel Liquid End 3,640 lbs. 3,900 lbs. Crankpin Bearings, Precision Automotive Steel Backed, Babbitt-Lined Extension (Pony) Rod: Diameter Material 2" 17-4 PH S.ST. Connecting Rod, Automotive Type Ductile Iron Average Crosshead Speed: At 450 rpm At 150 rpm 300 fpm 100 fpm Minimum Life Expectancy, Main Bearings, L10 100,000+hr General Liquid End Plunger Size Range, Diameter 3-1/2" Thru 4-1/2" Maximum Continuous Working Pressure 929 psi Hydrostatic Test: Discharge Suction 2,250 psi 425 psi Discharge Connection Size 4" ANSI 600# FF Suction Connection Size 8" ANSI 150# FF Maximum Working Pressure Suction Manifold 1,480 psi Available Liquid End Materials, ASTM: Nickel Aluminum Bronze Stainless Steel B148-C955 Various Grades Plunger Type Rokide® Stainless Steel: Chromium Oxide-Coated 316 S.ST. 7 SC-300L ENGINEERING DATA SC-300L ENGINEERING DATA Power End Liquid End (Continued) Model Quintuplex Pump SC-300L Maximum Input HP at Speed 400 at 400 rpm Rated Continuous Plunger Load 16,780 lbs. Stroke 4-1/4" Maximum Rated Continuous Speed 400 rpm Normal Continuous Speed Range 150 to 380 rpm Minimum Speed 100 rpm Oil Capacity 54 U.S. Quarts Viscosity, S.S.U. at 210ºF 70 to 84 Power End Oiling System Pressure Lubrication System Power Frame, One Piece Cast Iron Crosshead, Full Cylindrical Cast Iron Crosshead, Diameter x Length 5-3/4" x 6-3/16" Crankshaft Nitrided Forged Steel Crankshaft Diameters: At Drive Extension At Tapered Roller Bearings At Center Bearings At Crankpin Bearings, Diameter x Length 3.875/3.874" 4" 9-3/8" 4" x 3" Crosshead (Wrist) Pin, Case-Hardened and Ground AISI 8620 Wrist Pin Bushing, SAE 660, Diameter x Width 2" x 3" Main Bearings, Tapered Roller Timken® Crankpin Bearings, Precision Automotive Steel Backed, Babbitt-Lined Extension (Pony) Rod: Diameter Material 2" 17-4 PH S.ST. Connecting Rod, Automotive Type Ductile Iron Average Crosshead Speed: At 400 rpm At 150 rpm 267 fpm 100 fpm Plunger Type Rokide® Stainless Steel: Chromium Oxide-Coated 316 S.ST. Stuffing Boxes, Field-Removable and Replaceable: Carbon Steel 1020 Packing Types Available: Gland-loaded, Nonadjustable Spring-loaded, V-Ring Spring-loaded or Gland Adjusted, Braided Teflon® & Kevlar® Style 838 Style 120X Style 140/141/8921K Seals, Stuffing Boxes, Valve Covers, Cylinder Heads Buna-N Studs, Material, ASTM A193 Grade B7, Cadmium Plated Available Valve Types: Abrasion Resistant 17-4 PH S.ST. Valve Spring Material Inconel® Average Liquid Velocity, 4-1/2" Plungers at 400 rpm: Suction Manifold Discharge Manifold 3.7 fps 15 fps General Overall Dimensions: Length Width Height 55-3/8" 56-3/4" 22" Approximate Weights: With Forged Steel Liquid End 3,900 lbs. Liquid End Plunger Size Range, Diameter 3-5/8" Thru 4-1/2" Maximum Continuous Working Pressure 1,626 psi Hydrostatic Test: Discharge Suction 3,330 psi 425 psi Discharge Connection Size 4" ANSI 900# Suction Connection Size 8" ANSI 150# Maximum Working Pressure Suction Manifold 2,020 psi Available Liquid End Materials, ASTM Steel A516 Grade 70 Piston Type Rubber Liners Hardened Steel 8 SC-300 ENGINEERING DATA SC-300 ENGINEERING DATA Power End Liquid End (Continued) Model Quintuplex Pump SC-300 Plunger Type Rokide® Stainless Steel: Chromium Oxide-Coated Maximum Input HP at Speed 400 at 450 rpm 316 S.ST. Rated Intermittent Plunger Load 14,908 lbs. Stuffing Boxes, Field-Removable and Replaceable: Aluminum Bronze Carbon Steel Stroke 4-1/4" B148-C955 1020 Maximum Rated Intermittent Speed 450 rpm Packing Types Available: Gland-loaded, Nonadjustable Spring-loaded, V-Ring Spring-loaded or Gland Adjusted, Braided Teflon® & Kevlar® Normal Intermittent Speed Range 150 to 420 rpm Style 838 Style 120X Style 140/8921K Minimum Speed 100 rpm Oil Capacity 54 U.S. Quarts Viscosity, S.S.U. at 210ºF 70 to 84 Seals, Stuffing Boxes, Valve Covers, Cylinder Heads Buna-N Power End Oiling System Pressure Lubrication System Studs, Material, ASTM A193 Grade B7, Cadmium Plated Power Frame, One Piece Cast Iron Available Valve Types: Optional, Hardened and Lapped 17-4 PH S.ST. Crosshead, Full Cylindrical Cast Iron Valve Spring Material Inconel® Crosshead, Diameter x Length 5-3/4" x 6-3/16" Valve Seat, Liquid Passage Areas 3.92 sq. in. Crankshaft Nitrided Forged Steel Average Liquid Velocity, 3-1/2" Plungers at 450 rpm: Suction Manifold Discharge Manifold 4.42 fps 18.1 fps Crankshaft Diameters: At Drive Extension At Tapered Roller Bearings At Center Bearings At Crankpin Bearings, Diameter x Length 3.875/3.874" 4" 9-3/8" 4" x 3" Crosshead (Wrist) Pin, Case-Hardened and Ground AISI 8620 Wrist Pin Bushing, SAE 660, Diameter x Width 2" x 3" Main Bearings, Tapered Roller Timken® Crankpin Bearings, Precision Automotive Babbitt-Lined Extension (Pony) Rod: Diameter Material 2" 17-4 PH S.ST. Connecting Rod, Automotive Type Ductile Iron Average Crosshead Speed: At 450 rpm At 150 rpm 300 fpm 100 fpm Minimum Life Expectancy, Main Bearings, L10 75,000+hr General Liquid End Plunger Size Range, Diameter 2-3/8" Thru 3-1/2" Maximum Continuous Working Pressure 3,365 psi Hydrostatic Test: Discharge Suction 5,558 psi 425 psi Discharge Connection Size 3" ANSI 1500# Suction Connection Size 6" ANSI 150# Maximum Working Pressure Suction Manifold 3,705 psi Available Liquid End Materials, ASTM: Carbon Steel A516 Grade 70 9 Overall Dimensions: Length Width Height 50-1/2" 56-3/4" 22-1/8" Approximate Weights: With Aluminum Bronze Liquid End 3,580 lbs. RO-358L ENGINEERING DATA RO-358L ENGINEERING DATA Power End Liquid End (Continued) Model Quintuplex Pump RO-358L Maximum Input HP at Speed 260 at 450 rpm Rated Continuous Plunger Load 9,688 lbs. Stroke 4-1/4" Maximum Rated Continuous Speed 450 rpm Normal Continuous Speed Range 150 to 420 rpm Minimum Speed 100 rpm Oil Capacity 54 U.S. Quarts Viscosity, S.S.U.at 210ºF 70 to 84 Power End Oiling System Pressure Lubrication System Power Frame, One Piece Cast Iron Crosshead, Full Cylindrical Cast Iron Crosshead, Diameter x Length 5-3/4" x 6-3/16" Crankshaft Ductile Iron Crankshaft Diameters: At Drive Extension At Tapered Roller Bearings At Center Bearings At Crankpin Bearings, Diameter x Length 3.875/3.874" 4" 9-3/8" 4" x 3" Crosshead (Wrist) Pin, Case-Hardened and Ground AISI 8620 Wrist Pin Bushing, SAE 660, Diameter x Width 2" x 3" Main Bearings, Tapered Roller Timken® Crankpin Bearings, Precision Automotive Steel Backed, Babbitt-Lined Extension (Pony) Rod: Diameter Material 2" 17-4 PH S.ST. Connecting Rod, Automotive Type Ductile Iron Average Crosshead Speed: At 450 rpm At 150 rpm 300 fpm 100 fpm Minimum Life Expectancy, Main Bearings, L10 100,000+hr Plunger Type Rokide® Stainless Steel: Chromium Oxide-Coated 316 S.ST. Stuffing Boxes, Field-Removable and Replaceable: Aluminum Bronze Stainless Steel, Hardened B148-C955 316 S.ST. Packing Types Available: Spring-loaded, V-Ring Spring-loaded or Gland Adjusted, Braided Teflon® & Kevlar® Style 120X Style 140/141/8921K Seals, Stuffing Boxes, Valve Covers, Cylinder Heads Buna-N Studs, Material, ASTM A193 Grade B7, Cadmium Plated Available Valve Types: Optional, Hardened and Lapped 17-4 PH S.ST. Valve Spring Material Inconel® Valve Seat, Liquid Passage Areas 6.54 sq. in. Average Liquid Velocity, 4-1/2" Plungers at 450 rpm: Suction Manifold Discharge Manifold 4.2 fps 18.4 fps General Overall Dimensions: Length Width Height 55-3/8" 56-3/4" 26" Approximate Weights: With Aluminum Bronze Liquid End With Stainless Steel Liquid End 3,640 lbs. 3,900 lbs. Liquid End Plunger Size Range, Diameter 3-5/8" Thru 4-1/2" Maximum Continuous Working Pressure 939 psi Hydrostatic Test: Discharge Suction 2,250 psi 425 psi Discharge Connection Size 4" ANSI 600# FF Suction Connection Size 8" ANSI 150# FF Maximum Working Pressure Suction Manifold 1,480 psi Available Liquid End Materials, ASTM: Nickel Aluminum Bronze Stainless Steel B148-C955 Various Grades 10 RO-358 ENGINEERING DATA RO-358 ENGINEERING DATA Power End Liquid End (Continued) Model Quintuplex Pump RO-358 Maximum Input HP at Speed 260 at 450 rpm Rated Continuous Plunger Load 9,688 lbs. Stroke 4-1/4" Maximum Rated Continuous Speed 450 rpm Normal Continuous Speed Range 150 to 420 rpm Minimum Speed 100 rpm Oil Capacity 54 U.S. Quarts Viscosity, S.S.U. at 210ºF 70 to 84 Power End Oiling System Pressure Lubrication System Power Frame, One Piece Cast Iron Crosshead, Full Cylindrical Cast Iron Crosshead, Diameter x Length 5-3/4" x 6-3/16" Crankshaft Ductile Iron Crankshaft Diameters: At Drive Extension At Tapered Roller Bearings At Center Bearings At Crankpin Bearings, Diameter x Length 3.875/3.874" 4" 9-3/8" 4" x 3" Crosshead (Wrist) Pin, Case-Hardened and Ground AISI 8620 Wrist Pin Bushing, SAE 660, Diameter x Width 2" x 3" Main Bearings, Tapered Roller Timken® Crankpin Bearings, Precision Automotive Steel Backed, Babbitt-Lined Extension (Pony) Rod: Diameter Material 2" 17-4 PH S.ST. Connecting Rod, Automotive Type Ductile Iron Average Crosshead Speed: At 450 rpm At 150 rpm 300 fpm 100 fpm Minimum Life Expectancy, Main Bearings, L10 100,000+hr Plunger Type Rokide® Stainless Steel: Chromium Oxide-Coated 316 S.ST. Stuffing Boxes, Field-Removable and Replaceable: Aluminum Bronze B148-C955 Packing Types Available: Gland-loaded, Nonadjustable Spring-loaded, V-Ring Spring-loaded or Gland Adjusted, Braided Teflon® & Kevlar® Style 838 Style 120X Style 140/141/8921K Seals, Stuffing Boxes, Valve Covers, Cylinder Heads Buna-N Studs, Material, ASTM A193 Grade B7, Cadmium Plated Available Valve Types: Optional, Hardened and Lapped 17-4 PH S.ST. Valve Spring Material Inconel® Valve Seat, Liquid Passage Areas 6.26 sq. in. Average Liquid Velocity, 3-1/2" Plungers at 450 rpm: Suction Manifold Discharge Manifold 4.42 fps 18.1 fps General Liquid End Plunger Size Range, Diameter 2-3/8" Thru 3-1/2" Maximum Continuous Working Pressure 2,187 psi Hydrostatic Test: Discharge Suction 3,375 psi 425 psi Discharge Connection Size 3" ANSI 900# Suction Connection Size 6" ANSI 150# Maximum Working Pressure Suction Manifold 2,220 psi Available Liquid End Materials, ASTM: Nickel Aluminum Bronze Stainless Steel B148-C955 Various Types 11 Overall Dimensions: Length Width Height 52-1/2" 56-3/4" 22-1/8" Approximate Weights: With Aluminum Bronze Liquid End With Stainless Steel Liquid End 3,240 lbs. 3,600 lbs. CROSS-SECTION DIMENSIONAL DATA TABLE Ref. No. MA-240L MA-240L-HD MA-240M MA-240M-HD MA-240K SC-300L SC-300 RO-358L RO-358 A1 A2 A3 A4 B1 B2 B3 B4 B5 B6 (B) Discharge Connections (B) Suction Connections C1 C2 C3 C4 C5 C6 (C) Discharge Connections (C) Suction Connections D1 D2 D3 D4 D5 D6 (D) Discharge Connections (D) Suction Connections 8-7/8 27-9/16 56-3/4 29-3/16 52-5/16 38-1/4 22-1/8 10 10-3/8 5-1/2 3" ANSI 8-7/8 27-9/16 56-3/4 29-3/16 52-5/16 38-1/4 22-1/8 10 10-3/8 5-1/2 3" ANSI 900# FF 6" ANSI 150# FF – – – – – – 8-7/8 27-9/16 56-3/4 29-3/16 51-3/4 37-1/2 22-1/8 10 8-7/8 6-3/8 2" ANSI 1500# FF 4" ANSI 150# FF 51-1/16 38-1/4 22-1/8 10 9-1/4 4-5/8 2" ANSI 1500# RF 4" ANSI 150# RF – – – – – – 8-7/8 27-9/16 56-3/4 29-3/16 51-3/4 37-1/2 22-1/8 10 8-7/8 6-3/8 2" ANSI 1500# FF 4" ANSI 150# FF 51-1/16 38-1/4 22-1/8 10 9-1/4 4-5/8 2" ANSI 1500# RF 4" ANSI 150# RF – – – – – – 8-7/8 27-9/16 56-3/4 29-3/16 – – 22 10 13-1/2 3-1/8 4" ANSI 600# RJT 8" ANSI 150# FF – – – – – – 8-7/8 27-9/16 56-3/4 29-3/16 – – – – – – 8-7/8 27-5/8 56-3/4 29-3/16 – – – – – – – – 8-7/8 27-9/16 56-3/4 29-3/16 55-3/8 39-1/4 22-1/8 10 13-1/2 3-1/8 4" ANSI 600# FF 8" ANSI 150# FF – – – – – – 8-7/8 27-9/16 56-3/4 29-3/16 52-5/16 38-1/4 22-1/8 10 10-3/8 5-1/2 3" ANSI 900# FF 6" ANSI 150# FF – – – – – – – – – – – – 900# FF 6" ANSI 150# FF – 37-3/4 22-1/8 10 10-1/2 4-7/8 3" ANSI 600# SPECIAL 6" SUCT. – – – – – – – – – – 50-3/8 37-3/4 22-1/8 10 10-1/2 4-7/8 3" ANSI 600# SPECIAL 6" SUCT. – – – – 25 10 14-5/8 2-7/8 4" ANSI 600# FF SPECIAL 8" SUCT. 12 – – 56-3/8 39-1/4 25-1/8 10 20 – 4" ANSI 900# RF 8" ANSI 150# RF – – – – – – 52 38 21-1/4 10 11 – 3" ANSI 1500# RF 6" ANSI 150# RF 51-1/4 38 21-1/4 10 11 – – 3" NPT – – 6" NPT – – – – – – – – – 50-3/8 37-3/4 22-1/8 10 10-1/2 4-7/8 3" ANSI 600# SPECIAL 6" SUCT. DIMENSIONAL DRAWINGS OIL PRESSURE SET VALVE A1 LUBE OIL FILTER OIL PRESSURE GAUGE A3 REQ’D TO REMOVE OIL FILTER A2 5 35 CRANKSHAFT 15 PUMP 30 5 A4 1-1/2 5 2-1/8 TYP. 5 FOUNDATION PLAN Cast Fluid End DISCHARGE CONNECTIONS B1 B2 B3 B5 B4 B6 CRADLE DRAIN Block Fluid End SUCTION CONNECTION C1 C2 NOTE REQUIRED DIRECTION OF ROTATION DISCHARGE CONNECTION C3 PUMP C5 C4 C6 SUCTION CONNECTION CRADLE DRAIN Block Fluid End D1 NOTE REQUIRED DIRECTION OF ROTATION D2 4 D3 DISCHARGE CONNECTION D5 D4 D6 CRADLE DRAIN SUCTION CONNECTION 13 PUMP 2-1/2 INSTALLATION, OPERATION, LUBRICATION, MAINTENANCE AND STORAGE INSTRUCTIONS The supply tank(s) should be large to allow dissolved air and other gases to escape from the liquid and allow suspended solids to settle out before entering pump. A system employing dams and settling chambers is desirable. SAFETY CAUTION: All pumps should be installed level. For mobile applications the maximum angle of intermittent operation pumps (SC pumps) should be no more than 5 degrees in any one direction. Pumps are not designed to withstand piping weight, vibration, and the effects of thermal piping expansion/ contraction. Piping loads may be considerable and the weight of all valving, dampeners, filters, and associated forces, moments, and couples must be completely isolated. Use flexible hoses and rigid piping supports to isolate the pump and its driver from these effects. Electrical power or engine must be shut off completely before attempting service on the pump or its drive. Air surrounding the unit to be free of toxic, flammable, or explosive gases. A properly sized and set relief valve installed in the pump discharge system (ahead of any block valves) is necessary to protect personnel and to avoid dangerous overpressure. The relief valve set pressure should be not more than 25% above the design operating pressure and should discharge to tank or to the atmosphere (toward the ground), and must not be directed back to the pump suction system. SUCTION PIPING No part of the piping system deserves more careful planning than the suction piping system. Suction piping must be short, direct and oversize. Use one pipe size larger than the pump suction connection. 1 to 3 feet per second suction velocity is acceptable. WARNING: Improper use of this equipment could result in loss of life. CALIFORNIA PROPOSITION 65 WARNING: Reference the following table to size a direct suction line from a tank to a pump. WARNING: This product and related accessories contain chemicals known to the State of California to cause cancer, birth defects or other reproductive harm. STORAGE 4" – 6" Suction Piping 6" – 8" 8" – 10" MA-240M MA-240L MA-240K MA-240M-HD MA-240L-HD SC-300L SC-300 RO-358L Use no elbows, tees, or restricted port valves in this line. Do not install orifice plates or positive displacement type fluid meters in the suction line which act as flow restrictors. Avoid the use of suction filters. Consider filtering the liquid as it enters the supply tank rather than as it leaves it. The use of an eccentric reducer with the flat side up located at the pump suction connection is recommended. The suction line should slightly rise upward toward the pump to ensure air cannot collect in the line. Pumps are shipped dry from the factory. If a pump has been in storage in a humid environment for more than 6 months the crankcase cover should be removed and carefully examined for rust or water collected in the power end. Flush out any evidence of rust or damage that exists, using a light clean oil. Pumps to be placed in extended storage should be cleaned, repaired as needed, and completely filled to the top with clean oil to prevent rusting. Rotate pump monthly 4-1/2 revolutions. Plug all openings to prevent air entry and oil leakage. The absolute pressure in a suction line may be less than atmospheric pressure and air may be sucked into the line unless all flanges and connections are airtight and watertight. If you can see water leaking out of a suction line when the pump is still, that may mean air is being sucked in when the pump is running. Fluid ends must be completely drained of water and suction and discharge ports blanked off. Store pump in a clean, dry location. PUMP LOCATION AND PIPING DESIGN Suction piping should be buried beneath the frost line, or insulated to avoid freezing in the winter. If the suction line has a block valve at the supply tank, a suitable relief valve is suggested to relieve the suction piping from any possible dangerous overpressure from the discharge piping system. Locate pump and driver in a clean, well drained, ventilated, and brightly illuminated area, with adequate working spaces around the pump to provide ample access to fluid end, power end, and associated drive elements. 14 Suction piping is often large, heavy (especially when filled with liquid), and tends to vibrate. Proper solid supports are recommended. A suction hose located near the pump will isolate these effects, protecting the pump from the forces and moments that piping weight creates. a full size relief line. To minimize vibration (whether hydraulic or mechanical), discharge lines should be kept short, direct, well supported and solidly anchored. New suction piping systems should be flushed free of pipe scale, welding slag, and dirt before starting the pump. Hydrostatic testing to detect air leaks is advisable. Proper choice of suction hose construction is essential to avoid collapse of the hose liner. A reciprocating pump, especially after maintenance of the valves or plungers, starts with one or more fluid chambers full of air. Pumps operating on propane, butane, or other volatile liquids start with vapor in the fluid chamber(s). Install a dry type compound gauge in the suction line near the pumps which should fluctuate evenly. If violently pulsating, this gauge indicates that the pump is not fully primed, or that one or more valves are inoperative. Positive displacement pumps do not automatically purge themselves of air and gas after shutdown. For example, a quintuplex plunger pump will, after servicing, expel the air in four of the five pump chambers. Thus, the pressure from four of the “active” cylinders will keep shut the discharge valve of the “inactive”, or “air bound,” cylinder. Then, the air or gas in this cylinder will be compressed and expanded by its reciprocating plunger and never leave the chamber. Similar effects occur in duplex and triplex pumps. BYPASS PIPING ACCELERATION HEAD A characteristic of all reciprocating pumps is the imperative need to consider the effects of acceleration head. Acceleration head may be considered to be the loss of available hydraulic head (energy) in the piping system occurring because the demand by the pump cylinders for liquid is not smooth and even. Because the pump’s demand for liquid is cyclical, the velocity of the liquid in the entire suction system is not truly constant but varies in response to the combined demand of the reciprocating plungers. The loss of available hydraulic head is proportional to the speed (RPM) of the crankshaft, the average liquid velocity in the piping, the length of the suction piping, the number of pumping chambers and the compressibility of the liquid. To overcome these difficulties, adequate provision for expelling the gas in the “air bound” cylinders must be present. Common practice is to totally relieve the pump of all discharge pressure during the start-up, after servicing. Consider the operational advantage of a full-sized bypass line (return to tank) which substantially removes discharge pressure from all cylinders during the start. This requires a block valve on the discharge side and a full opening bypass valve on the other side. The bypass (to tank) can be combined with the relief valve discharge line. This line must be full-sized, well supported, and sloped downward to avoid freezing in cold weather. For a given pump, acceleration head effects may be reduced by the use of the shortest possible suction line sized to reduce liquid velocity to a very low speed. The ability of a reciprocating pump to be self-priming depends on the ratio of the swept (displaced) volume in the cylinder to the unswept (clearance) volume at the end of the stroke. This depends on the design of the fluid end and on the plunger size selected. Each pump should be fed by its own separate individual piping system, free from the effects of other pump cyclical demands for liquid. DISCHARGE PIPING Choice of the largest size plunger for a particular fluid end improves this compression ratio and so leads to self priming, or easy priming. Choice of the minimum size plunger sometimes leads to difficulties, especially with pumps that require frequent servicing, or which handle volatile liquids, or which contain substantial amounts of dissolved air or gas. A properly designed discharge piping system usually prevents the need for a pulsation dampener. A good discharge piping system includes a properly sized, correctly set relief valve, a full opening discharge gate or ball valve and a pressure gauge with gauge dampener or snubber. An automatic bypass and purging system for these applications may be merited. Locate the relief valve and pressure gauge ahead of any block valve so that the pressure in the pump is always reflected at the relief valve. The relieving capacity of the relief valve must exceed the capacity of the pump to avoid excessive pressure while relieving. Use 15 LUBRICATION Myers Aplex Series pumps utilize S.A.E. 40 wt. nondetergent oil in the crankcase. This oil requires only a nonfoaming additive and should possess good water separation (antiemulsion) characteristics. In temperate climates, oil viscosity selected should fall between 70 and 84 seconds Saybolt viscosimeter at 210º F. In arctic service, low pour point oils are needed. Approx. Center Distance (Span), inches Deflection, inches 16 1/4 22 3/8 28 7/16 32 1/2 40 5/8 48 3/4 60 15/16 Belts must be matched in pitch length. If one or two belts are slack, when the others are correctly tensioned, investigate for possible reasons. Correct any misalignment or lack of matching so each belt will transmit its load share. After the first 500 hours of operation in a new pump, drain the oil. Refill with clean, fresh oil. Change the oil every 1,500 hours or sooner if it becomes contaminated with water or dirt. Fill to the center of the sight gage. Recheck after starting, adding oil to center of gauge while running. Sheaves must be balanced to prevent abnormal vibration. Balancing weights must not be removed. Type “QD” sheaves must be evenly tightened on their tapered hubs to avoid rim wobble and severe lateral vibration. V-belts which snap and jerk will produce abnormal vibration and loads on both pump and motor or engine. V-BELT DRIVE A properly designed, well-aligned V-belt will provide years of reliable, economical service if properly tensioned and kept dry, free of oil and ventilated. Run the pump several minutes at full load with belt guard removed, observing for uneven motion on the belt slack side, especially. Alignment is critical for long life. If the shaft axes are not truly parallel, or if the sheave grooves are not positioned in good alignment, some belts will carry most of the load, resulting in their disproportionate load share and may actually twist or turn over in the groove. Use a straight edge across the rim of the sheaves to detect and correct for misalignment. When an old V-belt drive becomes unserviceable, replace all belts, not just the broken or cracked belts. Do not operate belts on sheaves having worn, rusted, greasy or broken grooves. Shut off power to driver before servicing drive or pump. After about one week of operation, new V-belts will have stretched somewhat. The motor must be moved on its slide base to re-establish proper belt tensioning. WARNING: Do not operate without appropriate guards in place. Insufficient tension results in slippage, burning, squealing (especially during starting) and shortened belt life. Overtightening imposes excessive loads on pump and motor bearings and can cause early shaft fatigue failure. DIRECTION OF ROTATION Before placing pump in operation, check that crankshaft rotation agrees with the arrows cast on top of the power frame by briefly jogging the electric motor. Crankshaft rotation must be clockwise as viewed from the right side of pump. Use the following table in adjusting V-belt tension: Belt Cross-Section Tension at Mid-Span New Belts Used Belts “B” 5 – 6 lb. 3-1/4 – 5 lb. “C” 9-3/4 – 13 lb. 6-1/2 – 9-3/4 lb. “3V” 4 – 10 lb. 3 – 7-1/2 lb. “5V” 17 – 30 lb. 13 – 23 lb. If pump is gear driven, remember that the pinion shaft turns opposite the crankshaft, if using a singlereduction geared drive or in the same direction as the crankshaft when using a planetary gear. AUTOMATIC (SAFETY) SHUTDOWNS Applying the above forces with a small spring scale, adjust motor position to provide the following deflection at mid-span: Carefully check all electric shutdown devices present, such as crankcase oil level, discharge pressure, vibration, lubricator oil level, motor thermostat, etc. 16 17 PRESSURE GAUGE AND BLOCK VALVE HORIZONTAL PLUNGER PUMP WITH DUAL SUCTION AND DUAL DISCHARGE CONNECTIONS (DRIVER AND FOUNDATIONS NOT SHOWN) DISCHARGE LINE (SEE NOTE 7) SUCTION PULSATION DAMPENER (IF USED) DISCHARGE PULSATION DAMPENER (IF USED) FLEXIBLE HOSE OR EXPANSION JOINT (SEE NOTE 7) FULL-OPENING DISCHARGE LINE VALVE FLEXIBLE HOSE OR EXPANSION JOINT (SEE NOTE 7) SEE NOTE 4 VORTEX SPLITTER AND SUPPORT SUCTION (INLET) LINE. SEPARATE LINE REQUIRED FOR EACH PUMP IF MULTIPLE PUMPING UNITS ARE USED. SIZE OF LINE DEPENDS ON ACCELERATION HEAD FACTOR BUT MUST AT LEAST EQUAL PUMP SUCTION CONNECTION SIZE. (MINIMUM) CENTERLINE OF PUMP SUCTION (INLET) (SEE NOTE 1) ECCENTRIC REDUCER WITH FLAT SIDE UP PRESSURE GAUGE AND BLOCK VALVE SWING CHECK VALVE WITH FULL-OPENING SEAT FULL-OPENING RELIEF VALVE OR BURST-DISC VALVE OPENS FULLY WHEN SET PRESSURE IS REACHED PRESSURE RELIEF VALVE AND COLD WEATHER DRAIN (SEE NOTE 9) LOW POINT DRAIN VALVE (SEE NOTE 2) FULL-OPENING SUCTION (INLET) LINE VALVE BYPASS LINE MANHOLE LIQUID SUPPLY TANK 7) TO REMOVE PIPING STRAIN AND VIBRATION, A FLEXIBLE HOSE, EXPANSION JOINT, OR SWIVEL JOINT PAIR SHOULD BE POSITIONED TO MINIMIZE EFFECTS OF PIPING THERMAL EXPANSION, CONTRACTION AND PIPING WEIGHT. 10) ALL SYSTEM CONPONENTS MUST HAVE ADEQUATE PRESSURE RATINGS FOR OPERATING, STARTING, AND UPSET CONDITIONS IN ORDER TO REDUCE POTENTIAL HAZARDS, PARTICULAR ATTENTION IS RECOMMENDED FOR THE SURGE CONDITION THAT WILL RESULT DOWNSTREAM OF THE RELIEF VALVE WHEN NORMAL DISCHARGE IS BLOCKED. 9) TO PROTECT SUCTION SYSTEM AGAINST HAZARD OF DISCHARGE PRESSURE ENTRY (AS WHEN PUMP IS IDLE) A SMALL RELIEF VALVE IS OFTEN CONNECTED HERE. 8) SUCTION AND DISCHARGE PIPING MUST BE SUPPORTED AND ANCHORED. FEED LINE (SEE NOTE 6) MINIMUM LIQUID LEVEL COMPLETELY SUBMERGED BAFFLE PLATE SEPARATING INCOMING FROM OUTGOING LIQUID SUCTION BELL. DESIGNED FOR LOW LIQUID ENTRY VELOCITY (MAY INCLUDE FOOT VALVE IF DESIRABLE) SUGGESTED PIPING SYSTEM FOR PLUNGER PUMPS NEEDLE OR HARD-TRIMMED CHOKE BYPASS VALVE OPEN TO EXPEL AIR IN PUMP PRIOR TO LOADING (SEE NOTE 5) 6) FEED LINE AND BYPASS LINE SHOULD FEED LIQUID INTO TANK BELOW MINIMUM LIQUID LEVEL. 5) IF DESIRED, A TWO-WAY MOTOR-OPERATED BYPASS VALVE MAY BE USED RATHER THAN A MANUAL TYPE. IT SHOULD BE DESIGNED TO OPEN AUTOMATICALLY WHILE STARTING OR STOPPING. 4) LOCATE CHARGING PUMP AT POINT SHOWN IF A CHARGING PUMP IS NECESSARY (AS FOR VOLATILE FLUIDS, FOR EXAMPLE). 3) DO NOT LOCATE PIPING OR OTHER EQUIPMENT IN FRONT OF OR ABOVE PUMP LIQUID END, PREVENTING SERVICING. 2) SLOPE BYPASS SO LOW POINT DRAIN WILL FULLY EMPTY RELIEF AND CHOKE VALVES AND ALL LIQUID IN BYPASS CIRCUIT. NOTES 1) CENTERLINE OF PUMP SUCTION (INLET) TO BE SLIGHTLY HIGHER THAN CENTERLINE OF SUCTION (INLET) VALVE, SO ANY AIR IN SUCTION SYSTEM PROMPTLY REACHES THE PUMP AND IS EXPELLED. CRANKSHAFT ASSEMBLY CENTER BEARINGS The two center bearings are pressed into the power frame bore, one from the right and one from the left. The drilled indentation on the bearing must be aligned with drilled and tapped hole in the back of the power frame. After the bearing is pressed into place, this indentation must approximately line up to allow use of the locking set screw. Press into place until the flange on the bearing faces out on the counter bore in the power frame. This ensures the bearing is not cocked. After the bearings are in place, lock them with the set screw. GENERAL Myers Aplex Series crankshaft suspension uses two single-row tapered bearings, which are shim adjusted to provide the correct running clearance. Thorough cleaning of all components prior to assembly is essential. Power frame, shaft, bearings and retainer must be scrubbed with clean solvent before starting. Remove any oil, dirt, rust and foreign matter which might prevent the correct fit up. INSTALLING CRANKSHAFT Crankshaft journals are critical. Remove all burrs, rust spots, and nicks, paying special attention to the ground areas on which bearings and oil seals operate. SHIM ADJUSTMENT OF TAPERED ROLLER BEARINGS Connecting rods and crossheads may be installed either before or after installing the crankshaft in these pumps. To provide for crankshaft thermal expansion, sufficient shims must be installed to provide .005" to .015" lateral end play, when shaft is cold. Shims must be placed only under the drive side bearing carrier. The lube oil housing has a gasket under it. TAPERED ROLLER BEARINGS Shaft and frame tolerances provide a tight fit on the shaft and in the carrier. The best way to install the cone assembly (consists of the inner race, cage and rollers) on the shaft is to heat the cone assembly in an electric oven for 30 minutes at 300 to 400ºF. (do not heat bearings with an acetylene torch as this will ruin the bearings!) Using clean, insulated gloves, remove the hot cone assembly from the oven, promptly dropping it on to the shaft. A feeler gauge and a 1" micrometer caliper are required. Install a trail shim set on one side of the pump. Tighten the flange bolts on this side only. CAUTION: Lubricate the frame bores and the O-ring seals located in each carrier to prevent damage during entry. Oil the bearings. Draw up the carrier, evenly tightening its cap screws. Rotate the crankshaft slowly by hand, seating all rollers into running position. The cone assembly must contact the seat thrust face and the large end of the rollers must be down. Do not hammer on the bearing. The soft steel cage is easily distorted, ruining its function as a roller separator and guide against skewing. If the cone does not contact its thrust face properly, it must be pressed into place using a specially machined sleeve (which does not touch the soft steel cage). A hydraulic press is recommended if this difficulty arises. Measure the gap existing between the frame face and carrier flange. The correct thickness of the shim set to be installed equals the measure gap plus about .010". After installing above shim set, a dial indicator may be used against the end of the shaft to confirm the shim selection. Bump the shaft in one direction and zero the dial indicator. Bump the shaft the opposite way. If shimming is correct, the shaft will move laterally from .005" to .010". CUP INSTALLATION The recommended tightening torque for bearing retainer 5/8"-11UNC cap screws is 118 to 145 ft. lb. Tapered roller bearing cup (outer race) is a press-fit in the bearing carrier, using a hydraulic press. Cup must be pressed into a clean carrier until the race solidly abuts its shoulder. INSTALLATION OF CRANKSHAFT OIL SEAL The tool or plate used for this must contact only the outer end face – not on the taper. Insert oil seal over the end of crankshaft and position it into the oil seal bore in the bearing carrier. Using a rubber mallet, tap it into the bore until the face of the seal is flush with the bearing carrier. 18 LUBE OIL PUMP ASSEMBLY excessive heat on the crankshaft which tends to distort its geometry. Lube oil pump and filter assemblies are employed in certain Myers Aplex Series pumps. This assembly is installed after the shaft and its tapered bearings have been correctly set. Providing filtered oil under pressure (35 to 75 psi) to all crosshead pin bushings and crankpin bearings, this special gear pump is driven by a bolted-on drive shaft. Driver is made with a female drive square which drives the male square end of the lube oil pump shaft. Cups (outer races) of tapered roller bearings may be extracted from bearing carrier using a bearing puller tool of the automotive type. Do not attempt to use heat on a bearing carrier as this will result in severe distortion. Replace the bearing carrier if broken or out-of-round. CONNECTING ROD, CROSSHEAD, EXTENSION ROD, CROSSHEAD PIN AND WIPER BOX ASSEMBLY/ DISASSEMBLY: The driver shaft is piloted by the main bearing inner race cone and is secured to the crankshaft by four socket head cap screws. Stake their heads using a center punch to upset the adjoining metal. The lube oil pump (Tuthill) is a gear type pump possessing a self-reversing sector which automatically switches suction and discharge connections in the event that the pump is caused to rotate opposite the correct direction. The lube oil pump is readily removed for inspection, repair, or replacement without disturbing any other pump component. GENERAL This pump employs full circle (piston type) crossheads and hardened stainless steel extension rods, which are field replaceable. The lube oil pump shaft is journaled in a bronze bushing fitted into the bearing carrier. If this bushing becomes worn, it must be promptly replaced. A worn bronze bushing will cause this pump to frequently lose its prime, and also may cause excessive wear in the pump rotor teeth. Extension rods are provided with wrenching flats to permit tightening of the tapered thread into the crosshead, establishing accurate alignment while affording easy field installation. Before beginning the assembly all parts must be scrupulously cleaned, removing all oil, dirt, rust, and foreign matter which prevent proper fitting, or which might tend to score the rubbing surfaces. Clean and examine the power frame bores for scoring and abnormal wear, especially wear of the lower crosshead guide way. Hone smooth, if rough. DISASSEMBLY After removing the connecting rod cap and cap bolts (note identifying marks on each cap so each may be later correctly reassembled onto its own rod) remove a bearing carrier from the frame. Two jack out tapped holes are provided in the flange of the carrier for this purpose. Support the shaft during removal to avoid damage. Measure the bores of the frame using inside micrometers to determine abnormal frame wear if any. Crosshead O.D.: 5.742/5.740 New Frame Bores: 5.749/5.742 The crankshaft may now be extracted, once all connecting rods are moved clear. Examine the crankpin surfaces for wear or corrosive pitting. The correct diameters of these journals are: Frame bores that have become worn more than .015" must be sleeved with a cast iron liner to re-establish correct geometry and alignment. Contact Myers Aplex Series concerning the repair of badly worn frame bores. Crankpin Diameter............................4.0000/3.9990" Smooth any rough corners and edges on the crosshead skirts, using fine emery cloth. Examine and clean the female tapered threads and wrist pin holes. If worn more than .010" undersize, crankshaft should be replaced, or an attempt to salvage it may be made at a shop well equipped to grind the crankpins which must be fully round, chrome plated, and finish ground to the above sizes. Crankshaft tapered roller bearings should be carefully examined for pitting, scoring or corrosion, and replaced as required. The cone and roller assembly is most easily removed by first cutting away the cage. Then heat the cone (inner race) with the shaft held vertically so cone will drop off due to its own weight. Avoid 19 INSTALLING WRIST PIN BUSHINGS ORDER OF ASSEMBLY The wrist pin bushing is precision machined bearing bronze which is press fitted into the eye of the connecting rod. The connecting rod/crosshead assembly is installed after the assembly of the crankshaft. In these models, the rod and crosshead will pass through the wiper box wall bore. With the frame in the horizontal position, load the rods through the cradle. Bushing O.D.: 2.256/2.255 Connecting Rod Eye: 2.251/2.254 Carefully align the bushing with its hole, and after applying oil to bushing O.D. use a hydraulic press to force it home. When a bronze bushing is pressed into place, the I.D. (bore) of the bushing is reduced somewhat, owing to the extent of press fit. Therefore, a clean, new wrist pin should be inserted into the bushing bore to establish that running clearance has been obtained. The running clearance between the wrist pin and installed bushing is: PRECISION CRANKPIN (CRANKTHROW) BEARINGS Myers Aplex Series pump crankpin bearings require no shimming to establish correct running clearance. Precise machining of the connecting rod, caps and crankpin journals is necessary to achieve this convenience. New Crankpin O.D.: 4.000/3.999 New Connecting Rod Bore: 4.232/4.233 New Pin O.D.: 2.0238/2.0233 Installed Bushing Bore: 2.0251/2.0261 Crankpins that are worn out-of-round, tapered, or badly scored should either be discarded or perhaps salvaged by grinding undersize, hard chrome-plated, and finish ground to above diameter. Oil Clearance.........................................0013/.0028" Replacement bushings are furnished prebored by Myers Aplex Series which usually eliminates the need to ream the installed bushing bore. However, due to slight variations in finishes and tolerances it sometimes happens that more than predicted contraction of the I.D. occurs. This occurrence results in a slight interference which may be eliminated by lightly honing the bore of the bronze. (not by reducing the pin size!) Bore of bushing must be round and free of taper. Connecting rod/cap bore must be perfectly round and within above sizes and free of taper. Discard if elliptical or tapered as the result of abnormal heating. Each cap and rod is match-marked for correct identification. Take care that each cap is reinstalled properly with its companion rod. Bearing halves are identical and are prevented from rotating by tongues that fit into slots in the cap. Check that all oil holes are clean and fully open. All surfaces must be perfectly clean and lightly oiled prior to assembly. Remove any burrs or sharp corners which prevent the perfect fitting of these precision bearings. Using a torque wrench, tighten cap bolts as follows: PINNING THE CROSSHEAD A pressfit is employed between the crosshead pin and crosshead to secure the pin against any motion. A hydraulic press is employed to force the pin through the bosses of the crosshead. Thread Size: 1/2" – 13UNC Tightening Torque: 60-75 Ft. Lbs. A mishap during insertion can occur causing the ruin of the pin or the crosshead, if during application of pressure: Specified torque, applied to clean, well oiled threads and bearing faces, will create tensile stresses in the cap bolts from 90,000 to 110,000 psi, approx. and will provide correct initial tension. Myers Aplex Series pumps use high strength cap bolts suitable for these initial loadings, maintained by hardened spring lockwashers. (a) Pin is not aligned absolutely square with the crosshead. (b) Crosshead is not supported on v-blocks so it can roll while under load. (c) Connecting rod is not fully supported so pin cannot enter the bushing without damage to it. This will damage the bushing. After all rods and caps are secured, slowly turn the crankshaft to be sure no bearing is in a bind. Examine the location of each connecting rod (eye end) within its crosshead. Rods must not touch any crosshead boss or skirt. (d) Failure to oil pin O.D. and crosshead bores, to prevent galling. Use clean motor oil. After installing the pin, carefully check the crosshead O.D. to see if it is out-of-round. If so, use a rubber mallet to restore the crosshead O.D. into its original roundness. 20 OIL SCOOP crosshead female threads. Firmly tighten, apply torque to the wrenching flats only. Never damage the extension rod ground surfaces! These pumps also employ oil scoops which are cast integrally with the power frame and are machined to lightly contact the crankshaft cheek. No adjustment is required. Then fasten the wiper box to the power frame by tightening the cap screws. Oil leakage between frame face and wiper box is prevented by use of an O-ring. WIPER BOX ASSEMBLY STUFFING BOX, PACKING AND PLUNGER ASSEMBLIES GENERAL Extension rod wiper boxes serve two important functions: retention of crankcase oil in the power end and exclusion of dirt and water. GENERAL Myers Aplex Series pumps all feature field removable and replaceable stuffing boxes with plungers separable from the extension rods. Myers Aplex Series has developed a unique sealing set which operates on a hardened and ground stainless steel extension rod (often called “pony” rod) and a baffle disc, affording protection against leaking plunger packing. The seals require no adjustment, only correct and careful assembly. If desired, the boxes, plungers, and packing units may be installed (or removed) as a unit assembly, permitting service outside the pump. All boxes are retained by studs and nuts, and are centered in the frame bore, ensuring correct alignment. “POLY PAK” SEAL The plungers may also be removed separately (without box removal) to facilitate repacking. With this option, the necessary space required to remove plunger, it is first necessary to remove the extension rod. This seal keeps oil from leaking out of the power frame. Developed by the Parker Seal Group, this patented rod seal employs a soft nitrile rubber O-ring to energize a special hard polyurethane Molythane® shell by forcing the inner lip against the rod and the outer lip against the housing bore. SPRING LOADED PACKING Note that the gland is screwed tightly onto the box and contacts its face. The spring is providing all of the initial compression and adjustment. No adjustment is provided by the gland. The Poly Pak seal is inserted into its counter bore with its lips directed toward the oil in the crankcase. MECHANICAL OIL SEAL Since the force exerted by the spring is contingent on the space provided for it, the correct lengths of all rings are essential for good tensioning. The oil seal is to keep contamination out of the power frame. With the box positioned in a hydraulic press, install the backup seal against the Poly Pak seal, with the lips of both seals facing downward. Spring: The mechanical seal contains a garter spring. Check to see that this spring is still properly located and in its position. The mechanical seal has a metal case which serves to force the “Poly Pak” seal into its cavity, energizing its lips. Apply oil lightly to the bore of the box before pressing each seal into its counterbore. An Inconel® spring, which closely fits the bore of the stuffing box, is used in this assembly. This spring is compressed in a vise to the operating length required plus 0.25" and tied with waxed nylon spot tie cord. The cord is looped over the ends of the spring through the coils and tied to maintain the length mentioned above. Each spring is assembled into the stuffing box. Note that the spring does not contact the plunger. INSERTING THE EXTENSION ROD Spring-Guide Ring: Plungers are heavy and the importance of a well-fitted guide ring that carries this weight is often overlooked. Discard any guide ring that becomes worn or scored, as it will then not serve its purpose. It should fit snugly in the box. Apply oil generously to this ring. Insert the extension rod through the wiper seals with the tapered thread and entering first. Care should be used in moving the extension rod through the seals with wrenching flats entering first. The sharp corners on the wrenching flats may damage the seal lips. With extension rod inserted through the wiper box seals, thread the tapered threads into the tapered 21 Lantern rings are provided with O.D. and I.D. reliefs and two (or more) oil holes to allow lubricant to reach the plunger. After the last unit of Styles 838 and 858 packing is in place, generously oil the lips of all seal rings to ease plunger entry. Spring Loaded Packing: Three rings of chevron or compression packing are installed next. For compression packing, install them with the skive intersections 180º apart to discourage leaking. Gland Ring: INSERTING THE PLUNGER This ring also fits the plunger and helps support the plunger weight. Discard it if bore is worn, rough or outof-round. Lightly oil the ring before insertion. Apply oil liberally to plunger O.D. and lightly tap it through the packing. When introducing the plunger through the stuffing boxes, also apply oil liberally to the O.D. of each extension rod to allow easy passage through the wiper box seals. J-STYLE STUFFING BOX & PLUNGER ASSEMBLY (STYLES 838 & 858) INSTALLING THE GLAND Styles 838 and 858 packing are installed with all packing lips facing toward the fluid pressure. Note that two units of Styles 838 and 858 packing are positioned ahead of the lantern ring, and one unit is positioned behind it. The lubricant entering the lantern ring is forced toward the pressure. Considerable downward pressure on the gland is required to compress the spring, to move the packing into location, and to start the threads of the box. Once the gland threads are started, screw it down completely until it mates up tightly against the face of the box, for spring loaded packing. For J-Style or Gland adjusted packing, tighten the gland until it is seated firmly against the packing. Throat Bushing: Plungers are heavy and the importance of a well fitted throat bushing that carries this weight is often overlooked. Discard any throat bushing that becomes worn or scored, as it will not then serve its purpose. It should fit snugly in the bottom of the box. Apply oil generously to this ring. INSTALLING THE STUFFING BOX The stuffing boxes derive their alignment from the bores of the power frame and the faces of the fluid end. These surfaces must be free of rust, scale, and dirt before assembly is begun. Wash all contacting surfaces with clean solvent and dry with a clean shop towel. Styles 838 and 858 Packing: Styles 838 and 858 are a non-adjustable type packing which depends solely on hydraulic pressure to energize the sealing lips. (Gland-tightening forces do not energize the lips.) Tightening and hydraulic end thrust loads are transmitted entirely through the center support portions of each ring. A nitrile rubber seal is used to seal between the face of the fluid end (must be flat, clean and smooth) and the face of the box. Replace if damaged. The flattened portions of the rings are large enough to withstand overtightening. Do not attempt to adjust this type packing. It should be kept thoroughly tightened at all times. All stuffing boxes are retained by four large studs and nuts which extend through the power end, serving to clamp the box and the power frame tightly against the fluid end face. These four stud nuts must be evenly tightened. Using a socket, socket extension, and torque wrench, tighten clean, well-oiled threads and nut faces. Lightly oil each ring and the box bore and then lightly tap in each ring separately with the rings facing correctly. This is most easily done before installing the plunger. Stud Threads 1" – 8UN at 350–400 Ft. Lb. 22 CONNECTING THE PLUNGER Myers Aplex Series can supply solid ceramic plungers on order. This plunger is very fragile, vulnerable to thermal and mechanical shock, and must be handled with the greatest care. Use only a rubber mallet to insert it into the packing. Other plunger types are available upon request. Install the metal baffle plate on the extension rod and roll the pump slowly until the extension rod male threads just touch the mating plunger female threads. Applying a pipe wrench to plunger knurled area, thoroughly tighten the connection. Do not use a “cheater” when connecting plunger to extension rod. DISC VALVE SYSTEMS AND ABRASION RESISTANT VALVE CONSTRUCTION PACKING LUBRICATION Packing life for aramid fiber packing may be improved in some applications by regular, systematic lubrication. An optional force feed lubricator assembly is often recommended especially for pumps on continuous duty. This provides regular, controlled supply of lubricant lowering friction and heat. GENERAL Myers Aplex Series has developed a unique system permitting quick, easy and safe methods of installing and removing tapered seat valves. Additionally, the regular application of the correct lubricant aids dissolving of salt and gyp tending to build up on the plungers in produced water applications. For this service, Rock Drill Lubricant is a popular and effective packing lubricant. The system allows servicing without distortion of the seat, with minimum effort and no damage to fluid end tapers or seat. SETTING THE VALVE SEAT Plungers in CO2, ethane, or other very cold liquid services may use brake fluid. This fluid does not congeal into a solid which cannot enter the packing. Consider the use of an air-sealed cradle into which dry (instrument) air may be directed, excluding the moisture which causes plunger icing especially in very humid conditions. Effective pressure-sealing between tapered (male) seat and tapered (female) fluid end deck is possible only if the tapers are absolutely clean and dry just prior to installation. Examine the cleaned fluid end deck tapers and remove all deposits of gyp, salt, or other incrustation. Using emery cloth, lightly rub out any minor imperfections found in the deck taper. Packing lubricant for pumps on light hydrocarbons, hot water, lean oil, naphtha, or gasoline often requires experimentation. The puller stem and puller head are provided with tapered (locking) threads, screw them together. Screw the valve seat onto the puller head by hand until it stops against the puller shoulder. Do not tighten. A good start is to use steam cylinder oil. Castor oil is sometimes successful as a packing lubrication for liquid propane and butane services, at ambient temperature. Lower the seat and puller assembly into the fluid end, squarely setting the seat into the deck. Then pound the top of the stem until a sharp metallic sound is heard. In pumps placed in arctic service, a special low pour point oil is indicated. Packing lubrication is not permitted on some services, such as amine, food stuffs, etc., and other packing styles and materials may be required. Unscrew the head and stem from the seat. INSTALLING O-RINGS, ABRASION RESISTANT SPRING AND CAGE PLUNGERS Install nitrile O-ring over the threaded section of the seat and position it at the bottom of the threads. Install the polyurethane insert into the valve. The insert may be heated in hot water to make it flexible enough to stretch over the valve. Position the valve into the seat. Install the valve spring. Apply anti-seizing lubricant to the threads of the valve cage and screw the cage on to the threaded valve seat with cage setting tool. Myers Aplex Series offers its own unique product: the Myers Aplex Series Rokide® plunger. This premier quality plunger consists of a chromium-oxide deposition on a solid stainless steel body. Avoid striking the coated surface (black) during installation. Apply light forces only on the ends of the plunger. Do not hammer or pry. All threads on plungers must be clean and oiled before assembly. Apply oil to the threads and the rubbing surface. 23 INSTALLING DISC, SPRING, DISC VALVES AND STEM Position the disc and Inconel® spring on the seat, aligning the hole in the disc with the stem threads in the seat center. The stem, spring retainer, and locknut are shipped already assembled and tightened. Stem Threads 1/2"-13UNC Tightening Torque 65-75 ft. lb. Use an anti-seizing lubricant in these threads. This is very necessary when seats and stems of Type 316 stainless steel are selected to prevent galling. PULLING THE VALVE SEAT First drain the fluid end entirely. For abrasion resistant valves, use the cage wrench to unscrew the cage from the seat. For disc valves unscrew the stem from the seat. Remove the cage, spring and valve from the fluid end. Attach the puller head to the puller stem and tighten their tapered threads. Lower the stem and head into the fluid end and engage the threads of the head onto the seat threads. Rotate the head clockwise and thread it fully onto the seat but do not tighten. Slide the bridge over the stem. Clean and oil the stem threads. Oil the face of the wing nut. Thread wing nut down onto the stem, seating it on the bridge top firmly. Extract the seat from the pump by striking the wing nut with a heavy hammer. Stand clear of the pump when applying heavy tonnage, as the entire assembly will jump violently upward when the pulling energy is suddenly released! The Myers Aplex Series puller/setting tool and gauge tool are custom designed and built for each specific Myers Aplex Series pump model. The same puller head is used on both suction and discharge seats. The bridge is made to fit each model, and its proper use will not damage the valve cover gasket machined counterbore on the top of the fluid end. SALVAGE OF WORN SEATS Rough valve seat faces may often be renewed by lapping or grinding, if not deeply fluid-cut. Perfect flatness is required. A surface grind, followed by lapping on a lapping plate, provides excellent smoothness and the flatness needed for good sealing and smooth running. Metal valve discs may sometimes be salvaged by grinding or lapping, if not deeply cut or cracked. 24 TROUBLE LOCATION AND REMEDY Trouble Pump fails to deliver required capacity. Suction and/or discharge piping vibrates or pounds. Pump vibrates or pounds. Possible Cause Remedy Speed incorrect. Belts slipping. Change drive ratio or tighten belts (if loose). Correct motor speed. Air leaking into pump. Seal with compounds. Liquid cylinder valves, seats or plungers worn. Reface or lap valves and seats; replace packing or plungers. Insufficient NPSHA. Increase suction pressure. Pump not filling. Prime pump. Makeup in suction tank less than displacement of pump. Increase makeup flow. Reduce pump speed. Vortex in supply tank. Increased liquid level in supply tank. Install vortex breaker. One or more cylinders not pumping. Prime all cylinders. Allow pump to operate at low pressure through bypass valve to eliminate vapor. Suction lift too great. Decrease lift. Raise tank level. Broken valve springs. Replace. Stuck foot valve. Clean. Pump valve stuck open. Remove debris beneath valve. Clogged suction strainer. Clean or remove. Relief, bypass, pressure valves leaking. Repair. Piping too small and/or too long. Increase size and decrease length. Use booster pump. Use suction and/ or discharge pulsation dampeners. Worn valves or seats. Replace or reface. Piping inadequately supported. Improve support at proper locations. Gas in liquid. Submerge return, supply or makeup lines in suction supply tank. If operating under a suction lift, check joints for air leaks. Pump valve stuck open. Remove debris beneath valve. Pump not filling. Increase suction pressure. One or more cylinders not pumping. Prime all cylinders. Allow pump to operate a low pressure through bypass valve to eliminate vapor. Excessive pump speed. Reduce. Check drive ratio. Worn valves or seats. Replace or reface. Broken valve spring. Replace. Loose plunger. Tighten. Loose or worn bearings. Adjust or replace. Worn crossheads or guides. Replace. Loose crosshead pin. Loose connecting rod cap bolts. Adjust or replace. Pump running backward. Correct rotation. 25 TROUBLE LOCATION AND REMEDY Trouble Consistent knock. Possible Cause Remedy Water in power end, crankcase. Drain. Refill with clean oil. Worn or noisy gear. Replace. Worn or loose main bearing, crank pin Adjust or replace. bearing, wrist pin bushing, plunger, Add oil to proper level. valve seat, low oil level. Note: High speed power pumps are not quiet. Checking is necessary only when the sound is erratic. Packing failure (excessive). Wear of liquid end parts. Liquid end cylinder failure. Improper installation. Install per instructions. Improper or inadequate lubrication. Lubricate per instructions. Improper packing selection. Change to correct packing. Scored plungers. Replace. Worn or oversized stuffing box bushings. Repair or replace. Check bore and outside diameter of bushings frequently. (Many times plungers are replaced and bushings ignored.) Plunger misalignment. Realign. Plungers must operate concentrically in stuffing box. Abrasive or corrosive action of liquid. Check valves and seats frequently at start-up to determine schedule for replacing, etc. Eliminate sand, abrasive, air entering pump. Incorrect material. Install correct materials. Air entering suction system. Eliminate air. Note: Pitting often leads to hairline cracks which ends in cylinder failure. Wear of power end parts (excessive). Poor lubrication. Replace oil as recommended in instructions. Keep oil clean and at correct temperature. Be sure oil is reaching all bearings. Overloading. Modify pump or system to eliminate overload. Liquid in power end. Drain power end. Eliminate cause or source of liquid entering power end. Relubricate. 26 TROUBLE LOCATION AND REMEDY Trouble Excessive heat in power end. (Above 180ºF.) Possible Cause Remedy Pump operating backward. Correct rotation. Insufficient oil in power end. Fill to proper level. Excessive oil in power end. Drain to proper level. Incorrect oil viscosity. Fill with correct oil. Overloading. Reduce load. Tight main bearings. Correct clearance. Drive misaligned. Realign. Belts too tight. Reduce tension. Discharge valve of a cylinder(s) stuck open. Fix valve(s). Insufficient cooling. Provide adequate cooling for oil or reduce ambient temperature. Pump speed too low. Increase speed. 27 Power Frame Assembly; Connecting Rod, Crosshead & Wiper Box Assembly 15 14 14 3 3 2 2 10 16 16 13 13 10 1 1 9 18 9 17 17 12 12 4 4 15 18 21 21 20 20 19 19 5 5 6 6 7 11 11 8 87 MA-240L, MA-240L-HD, MA-240M, MA-240M-HD, MA-240K, SC-300L, SC-300, RO-358L, RO-358 Item Quantity 1 2 3 4 5 6 7 8 9 10 11 1 1 16 16 1 1 1 1 4 1 1 23 23 24 22 24 22 Description Power Frame Crankcase Cover 1/2" NC Hex Head Cap Screw x 3/4" Long 1/2" Lockwasher, Spring Gasket, Crankcase Cover 1/2" Pipe Plug, Hex Head Oil Level Sight Gauge Nipple, Pipe; Std. 1/4" NPT x 4-1/2" 1/2" Pipe Plug, Socket Head 1-1/4" NPTM Crankcase Breather 1/4" Pipe Plug, Square Head MA-240L, MA-240L-HD, MA-240M, MA-240M-HD, MA-240K, SC-300L, SC-300, RO-358L, RO-358 Eng. No. Item Quantity 7204-0343-00E 7204-0392-00B 100-012034-273 154-012087-244 7204-0393-00B 170-012002-237 7602-3014-00A 157-014412-235 170-012003-237 7602-3001-00A 170-014002-405 12 13 14 15 16 17 18 19 20 21 22 23 24 5 5 10 10 5 5 5 5 5 10 5 5 5 Description Connecting Rod subassembly, which includes: Wrist Pin Bushing Connecting Rod Bolts 1/2" Spring Lockwasher Crankpin Bearing Pair Wrist Pin Crosshead Extension Rod Wiper Box 5/8" x 1-1/2" Long, Hex Head Cap Screw Poly Pak Ring Oil Seal O-Ring Eng. No. 7204-0311-00D 7204-0310-01B 7204-0312-00A 154-012087-244 7204-0073-10K 7204-0005-00A 7204-0309-00C 7204-0065-10B 7204-0306-00C 100-058112-273 145-200234-999 145-200300-999 001500421 Crankshaft Assembly 4-1/4" Stroke; Right-Hand and Left-Hand Drive; Right-Hand Shown 15 11 17 13 14 15 13 26 9 17 12 4 1 10 16 5 23 25 12 3 4 5 6 7 8 9 10 11 2 2 1 2 12 12 2 1 1 12 13 1 1 2 Description 7 Crankshaft Assembly (includes items 1 & 2) Crankshaft Drive Key Crankshaft Kit (includes items 1, 2, 3, & 4) Bearing Cone, Tapered Roller Bearing Cup Bearing Carrier, Drive Side O-Ring, Nitrile Rubber 5/8" NC Hex Head Cap Screw 1-3/4" Long 5/8" Lockwasher, Spring Medium Shim Set Oil Seal, Drive Side Bearing Carrier, Lube Oil Pump Side Assembly includes Shaft Bushing Gasket Bearing Retainer & Lube Oil Pump Driver Assembly 20 8 22 24 23 MA-240L, MA-240M, MA-240K, RO-358L, RO-358 Eng. No. Item Quantity PE105K 7204-0344-00E 146-100700-236 PE105KB 203-168000-999 202-458000-999 7204-0018-00C 110-000271-201 100-058134-273 154-058108-244 7502-0293-00A 145-393538-999 7204-0324-00E 7204-0320-00A 7204-0323-00A 7204-0322-01B 14 15 16 17 18 19 20 21 22 23 24 25 26 27 28 4 1 1 1 1 1 1 8 1 2 1 1 2 2 2 11 1 22 19 27 18 19 5 1 1 3 4 28 MA-240L, MA-240M, MA-240K, RO-358L, RO-358 6 1 2 10 20 2 14 24 Quantity 8 21 21 Item 9 7 3 16 6 18 28 Description 1/2" NC x 1" Lg. Socket Hd. Cap Screw, Nylok Switchgage, Murphy Lube Oil Pump 3/8" x 1/8" Hex Pipe Bushing, Hex, Iron 1" x 15" Oil Filter 1-1/4" Oil Filter Plug Frame Plug, Drive Side Screw, Cap; Hex Head, 5/16"-18UNC x 7/8" Long O-Ring, Nitrile Rubber 3/8" Pipe Plug, Socket Hd. O-Ring, Nitrile Rubber Check Valve, Brass Center Bearing 1/2" NC Flat Head Hex Soc. Cap Screw 1/2" NC Locking Nut Eng. No. 272-012100-999 7509-0008-00A 7204-0325-00K 161-038018-451 7602-3005-00A 7204-0314-00A 7204-0315-00A 100-516078-273 110-000210-201 170-038003-237 110-000023-201 7509-0012-00A 7204-0396-00C 188-012300-271 151-012013-405 Crankshaft Assembly 4-1/4" Stroke; Right-Hand and Left-Hand Drive; Right-Hand Shown 6 13 15 11 17 15 11 17 26 13 6 26 8 9 9 8 7 5 7 2 105 2 10 16 16 21 23 21 14 24 14 24 23 25 25 28 12 19 Quantity 1 2 1 1 3 4 5 6 7 8 9 10 11 2 2 1 2 12 12 2 1 1 12 13 1 1 Description Crankshaft Assembly (includes items 1 & 2) Crankshaft Drive Key Crankshaft Kit (includes items 1, 2, 3, & 4) Bearing Cone, Tapered Roller Bearing Cup Bearing Carrier, Drive Side O-Ring, Nitrile Rubber 5/8" NC Hex Head Cap Screw 1-3/4" Long 5/8" Lockwasher, Spring Medium Shim Set Oil Seal, Drive Side Bearing Carrier, Lube Oil Pump Side Assembly includes Shaft Bushing Gasket Bearing Retainer & Lube Oil Pump Driver Assembly 27 20 18 19 MA-240L-HD, MA-240M-HD, SC-300L, SC-300 Item 27 28 12 3 43 22 4 1 1 22 20 18 MA-240L-HD, MA-240M-HD, SC-300L, SC-300 Eng. No. Item Quantity PE271K 7204-1042-00E 146-100700-236 PE271KB 203-168000-999 202-458000-999 7204-0018-00C 110-000271-201 100-058134-273 154-058108-244 7502-0293-00A 145-393538-999 7204-0324-00E 7204-0320-00A 7204-0323-00A 7204-0322-01B 14 15 16 17 18 19 20 21 22 23 24 25 26 27 28 4 1 1 1 1 1 1 8 1 2 1 1 2 2 2 Description 1/2" NC x 1" Lg. Socket Hd. Cap Screw, Nylok Switchgage, Murphy Lube Oil Pump 3/8" x 1/8" Hex Pipe Bushing, Hex, Iron 1" x 15" Oil Filter 1-1/4" Oil Filter Plug Frame Plug, Drive Side 5/16" NC x 5/8" Lg. Hex Hd. Cap Screw O-Ring, Nitrile Rubber 3/8" Pipe Plug, Socket Hd. O-Ring, Nitrile Rubber Check Valve, Brass Center Bearing 1/2" NC Flat Head Hex Soc. Cap Screw 1/2" NC Locking Nut Eng. No. 272-012100-999 7509-0008-00A 7204-0325-00K 161-038018-451 7602-3005-00A 7204-0314-00A 7204-0315-00A 100-516078-273 110-000210-201 170-038003-237 110-000023-201 7509-0012-00A 7204-0396-00C 188-012300-271 151-012013-405 Lube Assembly 4-1/4" Stroke; Right-Hand and Left-Hand Drive; Right-Hand Shown 29 31 29 31 34 34 35 35 33 33 32 32 MA-240L, MA-240L-HD, MA-240M, MA-240M-HD, MA-240K SC-300L, SC-300, RO-358L, RO-358 Item Quantity 29 30 31 32 1 1 1 2 Description Piston, Relief Valve Adjusting Screw, Relief Valve Spring, Relief Valve Washer 30 30 MA-240L, MA-240L-HD, MA-240M, MA-240M-HD, MA-240K SC-300L, SC-300, RO-358L, RO-358 Eng. No. Item Quantity 7204-0318-00A 7204-0317-00A 7204-0319-00A 204-013009-206 33 34 35 1 1 1 29 Description 1/8" Pipe Plug, Socket Hd. 7/8" x 14 Thread Jam Nut, Hex Cap, Relief Valve Eng. No. 05022A021 130-078014-243 7204-0316-00A Fluid End Assembly (Nickel Aluminum Bronze) MA-240L, MA-240L-HD, RO-358 Item Quantity 1 5 Valve Cover Screw Description 7204-0345-00B Eng. No. 2 5 Valve Cover 7204-0403-00B 3 5 O-Ring 4 6 1/4" Hex Hd. Pipe Plug, S.ST. 170-014002-405 5 1 Liquid End, Al. Brz. 7204-0402-00E 6 20 1" x 4-7/8" Stuffing Box Studs 7507-2791-00A 7 20 1"-8 Thrd. Heavy Hex Nut 127-100008-243 8 16 7/8" x 4-1/4" Stud, Discharge Flange (Not Shown) 7507-2736-00A 9 16 7/8"-9 Thrd. Heavy Hex Nut (Not Shown) 133-078009-243 10 16 3/4" x 3-1/2" Stud, Suction Flanged (Not Shown) 7507-2735-00A 11 16 3/4"-10 Thrd. Heavy Hex Nut (Not Shown) 133-034010-243 12 2 1-1/2" x 12-3/8" Stud, Liquid End to Power End (Not Shown) 7204-0404-00A 13 2 1-1/2"-6 Thrd Heavy Hex Nut (Not Shown) 133-112006-243 14 2 1/2" Hex Hd. Pipe Plug (Not Shown) 170-012002-237 001500131 Fluid End Assembly (Nickel Aluminum Bronze) MA-240M, MA-240M-HD Item Quantity 1 5 Valve Cover Description Eng. No. 2 5 Valve Cover Gasket 7202-0041-00A 3 6 1/4" Hex Hd. Pipe Plug, S.ST. 170-014002-405 4 1 Liquid End, Al. Brz. 7204-0391-00E 5 20 1" x 4-7/8" Stuffing Box Studs 7507-2791-00A 6 20 1"-8 Thrd. Heavy Hex Nut 133-100008-243 7 16 7/8" x 4-1/4" Stud, Discharge Flange (Not Shown) 7507-2736-00A 8 16 7/8"-9 Thrd. Heavy Hex Nut (Not Shown) 133-078009-243 7202-0058-00B 9 16 5/8" x 3-1/2" Stud, Suction Flanged (Not Shown) 7507-2732-00A 10 16 5/8"-11 Thrd. Heavy Hex Nut (Not Shown) 133-058011-243 11 2 1-1/2" x 11-5/8" Stud, Liquid End to Power End (Not Shown) 7204-0399-00A 12 2 1-1/2"-6 Thrd Heavy Hex Nut (Not Shown) 133-112006-243 13 2 1/2" Hex Hd. Pipe Plug (Not Shown) 170-012002-405 Fluid End Assembly (Nickel Aluminum Bronze) MA-240K, RO-358L Item Quantity 1 5 Valve Cover Screw Description Eng. No. 2 5 Valve Cover 7204-0602-00B 3 5 O-Ring 110-000246-201 4 6 1/4" Hex Hd. Pipe Plug, S.ST. 170-014002-405 5 1 Liquid End, Al. Brz. 7204-0586-00E 6 20 1" x 4-7/8" Stuffing Box Studs 7507-2791-00A 7 20 1"-8 Thrd. Heavy Allen Nut 321-100008-454 8 16 7/8" x 4-1/4" Stud, Discharge Flange (Not Shown) 7507-2736-00A 9 16 7/8"-9 Thrd. Heavy Hex Nut (Not Shown) 133-078009-243 10 16 3/4" x 3-1/2" Stud, Suction Flanged (Not Shown) 7507-2735-00A 11 16 3/4"-10 Thrd. Heavy Hex Nut (Not Shown) 133-034010-243 12 2 1-1/2" x 12-3/8" Stud, Liquid End to Power End (Not Shown) 7204-0608-00B 13 2 1-1/2"-6 Thrd Heavy Hex Nut (Not Shown) 133-112006-243 14 3 1/2" Hex Hd. Pipe Plug (Not Shown) 170-012002-405 7204-0601-00B 30 1 Fluid End Assembly 2 MA-240L, MA-240L-HD, RO-358 Item Quantity Description 1 5 Valve Cover Screw 7204-0345-00B 2 5 Valve Cover 7204-0403-10B 3 5 O-Ring, Nitrile Rubber 4* 1 1/2" Hex Hd. Pipe Plug, S.ST. 5 1 Liquid End Consult Factory 6 20 1" x 4-7/8" Stuffing Box Stud 7507-2791-00A 7 20 1"-8 NC Nut, Heavy Hex 133-100008-243 8 2 Stud, Power Frame to Fluid End 7204-0903-00A 9 2 1-1/2"-6 NC Nut, Heavy Hex (Not Shown) 133-112006-243 3 Eng. No. 7 6 001500131 8 170-012002-237 5 *Note: For item number 4, RO pumps use part no. 170-012002-405 4 5 2 4 Fluid End Assembly 3 3 SC-300L Item Quantity 1 1 Fluid End Description Eng. No. 2 20 1-1/4" NC Hex Head Cap Screw x 5" long 100-114500-273 3 10 Valve & Cylinder Head Cover 7204-1030-00A 4 10 Valve & Cylinder Cover Seal 7204-1031-00A 5 10 Retainer Bar 7204-1034-00A 6 2 1-1/4" Eye Bolt (Not Shown) 7509-0020-12A 7 2 Power Frame to Liquid End Studs (Not Shown) 7204-1035-00A Consult Factory 5 4 1 7 2 1 Fluid End Assembly 6 SC-300 Item Quantity Description 1 5 Valve Cover Eng. No. 2 5 Valve Cover Gasket 7201-0081-10A 3 5 1/4" Hex Hd. Pipe Plug, S.ST. 170-014002-405 4 1 Liquid End Consult Factory 5 20 1" x 4-7/8" Stuffing Box Studs 7507-2791-00A 6 20 1" x 3-3/4" Stud, Cover 7507-2793-00A 7 40 1"-8 Thrd. Heavy Hex Nut 133-100008-243 8 2 1-1/2" x 11-5/8" Stud, Liquid End to Power End (Not Shown) 7204-0903-00A 9 2 1-1/2"-6 Thrd Heavy Hex Nut (Not Shown) 133-112006-243 10 2 3/4" Hex Hd. Pipe Plug (Not Shown) 170-034002-237 7 7201-0087-10B 5 4 3 10 31 Fluid End Assembly 1 2 RO-358L, MA-240K Item Quantity 1 5 Valve Cover Screw Description 7204-0601-00B Eng. No. 2 5 Valve Cover 7204-0602-00B 3 5 O-Ring, Nitrile Rubber 110-000246-201 4 1 1/4" Hex Hd. Pipe Plug, S.ST. 170-014002-405 5 1 Liquid End 6 20 1" x 4-7/8" Stuffing Box Stud 7507-2791-00A 7 20 1"-8 NC Nut, Heavy Hex 133-100008-243 8 1 1/2" Hex Hd. Pipe Plug 170-012002-237 9 2 Stud, Power Frame to Fluid End 7204-0608-00B 10 2 1-1/2"-6 NC Nut, Heavy Hex (Not Shown) 133-112006-243 3 7 6 9 Consult Factory 8 5 4 Stuffing Box Assembly 5 3 2 1 4 Qty. 5 ea. per pump MA-240L, MA-240L-HD, SC-300, RO-358 Plunger Diameter Plunger, Chrome-Oxide (#1) Baffle (#2) Stuffing Box Seal, Nitrile Rubber (#3) Stuffing Box, *Steel (#4) Stuffing Box, Alum. Bronze (#4) Gland Nut Steel (#5) Gland Nut Alum. Bronze (#5) 3-1/2" 7204-0535-28B 7204-0016-00A 7204-0054-00A 7204-0385-00B 7204-0012-10B 7204-0377-00B 7204-0052-00B 3-3/8" 7204-0535-27B 7204-0016-00A 7204-0054-00A 7204-0385-00B 7204-0012-10B 7204-0377-00B 7204-0052-00B 3-1/4" 7204-0535-26B 7204-0016-00A 7204-0054-00A 7204-0385-00B 7204-0012-10B 7204-0377-00B 7204-0052-00B 3-1/8" 7204-0535-25B 7204-0016-00A 7204-0054-00A 7204-0384-00B 7204-0011-10A 7204-0376-00B 7204-0051-00B 3" 7204-0535-24B 7204-0016-00A 7204-0054-00A 7204-0384-00B 7204-0011-10A 7204-0376-00B 7204-0051-00B 2-7/8" 7204-0535-23B 7204-0016-00A 7204-0054-00A 7204-0384-00B 7204-0011-10A 7204-0376-00B 7204-0051-00B 2-3/4" 7204-0535-22B 7204-0016-00A 7204-0054-00A 7204-0384-00B 7204-0011-10A 7204-0376-00B 7204-0051-00B 2-5/8" 7204-0535-21B 7204-0016-00A 7204-0054-00A 7204-0384-00B 7204-0011-10A 7204-0376-00B 7204-0051-00B 2-1/2" 7204-0535-20B 7204-0016-00A 7204-0054-00A 7204-0383-00B 7204-0010-10C 7204-0375-00B 7204-0049-00B 2-3/8" 7204-0535-19B 7204-0016-00A 7204-0054-00A 7204-0383-00B 7204-0010-10C 7204-0375-00B 7204-0049-00B *GLAND NUT WRENCH 7204-0464-00B 32 Stuffing Box Assembly 5 3 2 1 4 Qty. 5 ea. per pump MA-240M, MA-240M-HD Plunger Diameter Plunger, Chrome-Oxide (#1) Baffle (#2) Stuffing Box Seal, Nitrile Rubber (#3) Stuffing Box, *Steel (#4) Stuffing Box, *Alum. Bronze (#4) Gland *Steel (#5) Gland *Alum. Bronze (#5) 2-1/4" 2-1/8" 7204-0535-18B 7204-0016-00A 7204-0054-00A 7204-0383-00B 7204-0010-10C 7204-0375-00B 7204-0049-00B 7204-0535-17B 7204-0016-00A 7204-0054-00A 7204-0383-00B 7204-0010-10C 7204-0375-00B 7204-0049-00B 2" 7204-0535-16B 7204-0016-00A 7204-0053-00A 7204-0340-00C 7204-0009-10C 7204-0342-00B 7204-0048-00B 1-7/8" 7204-0535-15B 7204-0016-00A 7204-0053-00A 7204-0340-00C 7204-0009-10C 7204-0342-00B 7204-0048-00B 1-3/4" 7204-0535-14B 7204-0016-00A 7204-0053-00A 7204-0340-00C 7204-0009-10C 7204-0342-00B 7204-0048-00B 1-5/8" 7204-0535-13B 7204-0016-00A 7204-0053-00A 7204-0339-00C 7204-0008-10B 7204-0341-00B 7204-0047-00B 1-1/2" 7204-0535-12B 7204-0016-00A 7204-0053-00A 7204-0339-00C 7204-0008-10B 7204-0341-00B 7204-0047-00B *GLAND NUT WRENCH 7204-0464-00B Stuffing Box Assembly 2 1 3 4 5 Qty. 5 ea. per pump MA-240K, RO-358L Plunger Diameter Plunger, Chrome-Oxide (#1) Baffle (#2) Stuffing Box Seal, Nitrile Rubber (#3) Stuffing Box, *Alum. Bronze (#4) Gland Nut Alum. Bronze (#5) 4-1/2" 7204-0535-36B 7204-0016-00A 204-049046-206 7204-0590-00C 7204-0595-00B 4-3/8" 7204-0535-35B 7204-0016-00A 204-049046-206 7204-0590-00C 7204-0595-00B 4-1/4" 7204-0535-34B 7204-0016-00A 204-049046-206 7204-0590-00C 7204-0595-00B 4-1/8" 7204-0535-33B 7204-0016-00A 204-049046-206 7204-0590-00C 7204-0595-00B 4" 7204-0535-32B 7204-0016-00A 204-049046-206 7204-0588-00C 7204-0592-00B 3-7/8" 7204-0535-31B 7204-0016-00A 204-049046-206 7204-0588-00C 7204-0592-00B 3-3/4" 7204-0535-30B 7204-0016-00A 204-049046-206 7204-0588-00C 7204-0592-00B 3-5/8" 7204-0535-29B 7204-0016-00A 204-049046-206 7204-0588-00C 7204-0592-00B GLAND NUT WRENCH 7204-0464-00B * 2205 Duplex SST available 33 4-1/4" Piston Assembly 4 5 2 3 6 1 Qty. 5 ea. per pump SC-300L Item Quantity 1 1 2 3 Description SC-300L Eng. No. Item Quantity Piston Liner 7204-1265-00B 4 1 Piston Liner Flange Description 7204-1054-00B Eng. No. 1 Piston Rod 7204-1056-00B 5 1 Gasket, Liner 316-049042-508 1 Piston Cup Assembly, 4-1/4" 7204-1290-00A 6 1 Nut, Piston Rod, Self Locking 151-100008-273 4-1/2" Piston Assembly Qty. 5 ea. per pump SC-300L Item Quantity 1 1 2 3 Description SC-300L Eng. No. Item Quantity Piston Liner 7204-1176-00B 4 1 Piston Liner Flange 7204-1054-00B 1 Piston Rod 7204-1056-00B 5 1 Gasket, Liner 204-049046-206 1 Piston Cup Assembly, 4-1/2" 7201-0731-00A 6 1 Nut, Piston Rod, Self Locking 151-100008-273 34 Description Eng. No. THIS PAGE INTENTIONALLY LEFT BLANK STANDARD LIMITED WARRANTY CENTRIFUGAL & RECIPROCATING PUMPS Pentair Myers® warrants its products against defects in material and workmanship for a period of 12 months from the date of shipment from Pentair Myers or 18 months from the manufacturing date, whichever occurs first – provided that such products are used in compliance with the requirements of the Pentair Myers catalog and technical manuals. During the warranty period and subject to the conditions set forth, Pentair Myers, at its discretion, will repair or replace to the original user, the parts that prove defective in materials and workmanship. Pentair Myers reserves the right to change or improve its products or any portions thereof without being obligated to provide such a change or improvement for prior sold and/or shipped units. Seals, piston cups, packing, plungers, liners and valves used for handling clear, fresh, nonaerated water at a temperature not exceeding 120ºF are warranted for ninety days from date of shipment. All other applications are subject to a thirty day warranty. Accessories such as motors, engines and auxiliary equipment are warranted by the respective manufacturer and are excluded in this standard warranty. Under no circumstance will Pentair Myers be responsible for the cost of field labor, travel expenses, rented equipment, removal/reinstallation costs or freight expenses to and from the factory or an authorized Pentair Myers service facility. This limited warranty will not apply: (a) to defects or malfunctions resulting from failure to properly install, operate or maintain the unit in accordance with the printed instructions provided; (b) to failures resulting from abuse, accident or negligence; (c) to normal maintenance services and parts used in connection with such service; (d) to units that are not installed in accordance with applicable local codes, ordinances and good trade practices; (e) if the unit is moved from its original installation location; (f) if unit is used for purposes other than for what it is designed and manufactured; (g) to any unit that has been repaired or altered by anyone other than Pentair Myers or an authorized Pentair Myers service provider; (h) to any unit that has been repaired using non factory specified/OEM parts. Warranty Exclusions: PENTAIR MYERS MAKES NO EXPRESS OR IMPLIED WARRANTIES THAT EXTEND BEYOND THE DESCRIPTION ON THE FACE HEREOF. PENTAIR MYERS SPECIFICALLY DISCLAIMS THE IMPLIED WARRANTIES OF MERCHANTABILITY AND FITNESS FOR ANY PARTICULAR PURPOSE. Liability Limitation: IN NO EVENT SHALL PENTAIR MYERS BE LIABLE OR RESPONSIBLE FOR CONSEQUENTIAL, INCIDENTAL OR SPECIAL DAMAGES RESULTING FROM OR RELATED IN ANY MANNER TO ANY PENTAIR MYERS PRODUCT OR PARTS THEREOF. PERSONAL INJURY AND/OR PROPERTY DAMAGE MAY RESULT FROM IMPROPER INSTALLATION. PENTAIR MYERS DISCLAIMS ALL LIABILITY, INCLUDING LIABILITY UNDER THIS WARRANTY, FOR IMPROPER INSTALLATION. PENTAIR MYERS RECOMMENDS INSTALLATION BY PROFESSIONALS. Some states do not permit some or all of the above warranty limitations or the exclusion or limitation of incidental or consequential damages and therefore such limitations may not apply to you. No warranties or representations at any time made by any representatives of Pentair Myers shall vary or expand the provision hereof. 1101 MYERS PARKWAY ASHLAND, OHIO, USA 44805 419-289-1144 WWW.FEMYERS.COM Warranty Rev. 12/13