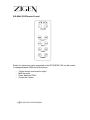
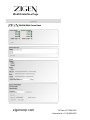
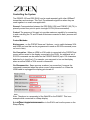
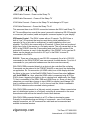
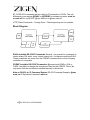
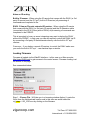
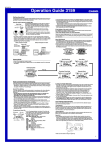
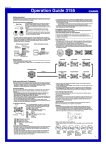
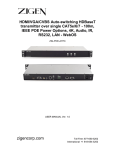
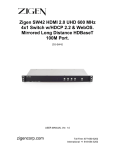
1
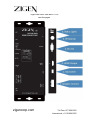
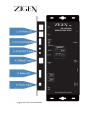
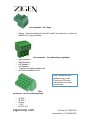
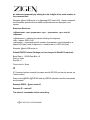
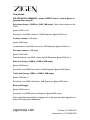
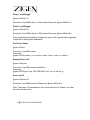
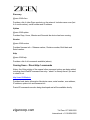
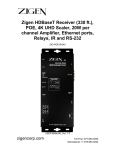
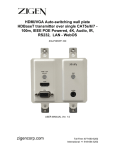
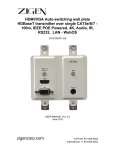
Zigen HDBaseT Receiver (330 ft.),
POE, 4K UHD Scaler, 20W per
channel Amplifier, Ethernet ports,
Relays, IR and RS-232
ZIG-POE-RXAV
USER MANUAL Ver. 2.0
June 2015
zigencorp.com
Toll Free: 877-650-5252
International: +1 818-654-5252
Table of Contents
Copyright and Trademark
Introduction
Package Contents
Features
Specifications
Panel Description – Right Side
Panel Description – Left Side
Captive Screw Connections
Connection and Installation
Initial Connections
Remote Control
WebOS Interface
IP/RS-232 Command Syntax
Commands
Controlling the System
Firmware Updating
Warranty
2 ZIG-POE-RXAV USER MANUAL
3
4
4
4
5
7
10
12
14
15
16
17
19
21
24
27
30
Copyright and Trademarks:
All rights reserved by ZIGEN, INC. No part of this document may be reproduced
in any form or by any means without written permission from the product
manufacturer. Changes are periodically made to the information in this
document. They will be incorporated in subsequent editions. The product
manufacturer may make improvements and /or changes in the product described
in this document at any time.
All the registered trademarks referred to this manual are belonging to their
respective companies.
Before You Begin
Follow all instructions marked on the device during using.
Do not attempt to maintain the device by yourself, any faults, please contact your
vendor.
▪Provide proper ventilation and air circulation and do not use near water.
▪It is better to keep it in a dry environment.
▪The system should be installed indoor only.
▪Only use the power cord supplied with the device.
▪Do not use liquid or aerosol cleaners to clean the device.
▪Always unplug the power to the device before cleaning.
▪Unplug the power cord during lightning or after a prolonged period of nonuse to avoid damage to the equipment.
zigencorp.com
Toll Free: 877-650-5252
International: +1 818-654-5252
Introduction
HDBaseT 328’/100M Receiver (RX) perfect for classrooms, boardrooms, huddle
rooms and more – POE, 4K UHD and 4K UHD scaler, built-in amplifier that strips
from HDMI, 2 Ethernet ports, 2 relays, WebOS. Also includes IR and RS232.
Package Contents
•
•
•
•
•
•
•
1 x ZIG-POE-RXAV
1 x 24V/2.5A DC Power Supply
IEC USA AC Cord 3’
5 x Male Captive Screw Connectors (2 pin: power, 3 pin: Relays x 2 (NCG-NO), 4 pin: speakers, 5 pin: IR)
Remote Control
1 x User Manual
1 IR Receiver 3.5mm
Features
•
•
•
•
•
•
•
•
•
•
•
•
48V IEEE POE
WebOS Control
2 Ethernet LAN ports
Built-in Class-D Amp 20 watts per channel stereo
Built-in 4K UHD Scaler
Supports HDMI 1.2, 1.3 and 1.4 with 48-bit deep color
Supports digital video formats up to 4K UHD (2160P60 @4:2:0 pixel
format)
Supports uncompressed PCM 2- Ch., 5.1, 7.1, Dolby Digital, DTS, Dolby
TrueHD, DTS HD-Master Audio and more.
Bi-directional IR 3V to 12V
Bi-directional RS-232
2 Relays for Contact Closure
RS-232 Command Set for 3rd Party control
4 ZIG-POE-RXAV USER MANUAL
Specifications
Ports
Inputs
HDBaseT – RJ-45
Outputs
HDMI x 1
L/R Audio (stereo) – via 4 pin female locking connector (Phoenix), 20W per
channel Class D
Control/Access
IR in/out – 3.5mm stereo
IR in/out – female locking connector (Phoenix)
Power – female 2-pin locking connector - 24V (internal step up transformer to get
48V IEEE POE source)
2 Ethernet 10/100 BaseT – RJ-45
2 Relay/Contact Closures – 2-pin locking connectors (Phoenix)
Distance between TX and RX
Full HDBaseT - 328’ or 100M @ 2160P60 4:2:0 8-bit
Copy Protection Compliance
HDCP – Yes – 1.4 (includes functionality to overcome the problem when displays
don’t implement clock stretching)
Video Bandwidth
10.2 Gbps
Video Timings
480i, 480p, 720p, 1080i, 1080p, 1920x1200, 2K and 4K. 4K/2K, 30Hz 24bpp.
4K/2K, 60Hz, 24bpp with 4:2:0 pixel format
zigencorp.com
Toll Free: 877-650-5252
International: +1 818-654-5252
Audio
Stereo, 20W per channel RMS, Class D Amplifier 8 ohms recommended
4K UHD Scaler
Scales 1080P24/30 (generally a movie) incoming signal up to 2160P24/30
Wall Mountable
Yes
Power Consumption
Depends on POE requirements. Without POE ~ 5W. With POE > 5W up to
around 13W -> ~18W
Dimensions
5.9 x 2.9 x .95 inches
150 x 74 x 24 millimeters
Weight
.67 pounds
303 grams
Certifications/Compliance
FCC, HDBaseT, CE, RoHS, HDCP, HDMI
Works With
Any properly implemented HDBaseT transmitter. Works especially well with
Zigen ZIG-PS-61 presentation switch and ZIG-POEWP-100 wall plate
transmitter.
6 ZIG-POE-RXAV USER MANUAL
Right Side Panel. See items 1-6 on
next few pages
zigencorp.com
Toll Free: 877-650-5252
International: +1 818-654-5252
Panel Description
Right Side Panel
1. Speaker connection – 4 pin female locking connector. Connect directly to
speaker wires and then to speakers. Output is 20 watts per channel –
plenty or sound for classroom, bedroom, conference room or huddle room.
2. Dip Switch –
Dip Switch Settings:
Default/Factory – All Up or OFF
Up = Off
Down = On
DIP 1: EDID
OFF: EDID default mode (use EDID from connected TV)
ON: Custom EDID - not implemented yet. Once implemented will override
switches 2 and 3.
DIP2: Force 3D Off
OFF: EDID copied from HDMI output
ON: EDID copied but force output to NO 3D
DIP3: Force 2 Channel Audio
OFF: EDID copied normal with multichannel audio
ON: EDID forced 2 channel stereo
DIP4: Audio Routing
OFF: Speaker output (amp turned on)
ON: HDMI output to TV (amp turned off)
3. HDMI Output – Connect HDMI cable here for output to the display or
projector.
4. RS-232 – Connect to standard 9 pin serial port and on to your projector,
TV, 3rd party controller, etc for RS-232 device control
8 ZIG-POE-RXAV USER MANUAL
5. IR Receiver – built in IR receiver sensor – if possible place in line of site to
remote control.
Note: You may also use the IR receiver that is included with the RXAV if you
cannot get line of sight access to the built-in IR “eye”. Simply connect the IR
receiver to the RXAV 3.5mm IR IN jack and route the eye to a place with line
of sight access to the remote. If you use this procedure make sure to cover
the built-in eye with black tape so conflicts are eliminated.
6. Status Indicator Lights:
a. Power – Solid green – indicated power is present
b. Mode – Should be flashing green – data is flowing
c. Link – Should be solid when TX and RX are connected
d. HDCP – Solid Green – when HDCP is detected/present
zigencorp.com
Toll Free: 877-650-5252
International: +1 818-654-5252
Left Side Panel. See items 1-6 on next few pages
10 ZIG-POE-RXAV USER MANUAL
Left Side Panel
1. 2 LAN Connections/Full Duplex Ethernet ports. 10/100 BaseT. Use for
programming the ZIG-POE-RXAV and ZIG-POEWP-100 or for 3rd party
controller, or connection to your ISP or router.
2. IR connection terminal – 5-pin locking (Phoenix style) connector.
a. IR OUT +
b. IR OUT –
c. Ground
d. + 12V
e. IR IN 3-12V
3. IR connection via 3.5mm
a. IR OUT – Use mono plug tip & ring (P+ and P-)
b. IR IN – Use stereo plug tip, ring & sleeve (Signal, 5V & Ground)
Note: Includes dual voltage IR that installers can use to power up any 3rd party
IR receiver such as Xantec, KX|AV or Niles. Traditional extenders support 5V OR
12V IR signals. Zigen extenders support from 3V up to 12v. This is a great
feature when using it with 3rd party controllers that output different voltages (ex.
Control4 uses 3V).
Connect IR inputs to receive IR signals for routing back to the transmitter via
HDBaseT and the on to the source device you want to control. Connect IR
outputs to your display or projector to control is from a source on transmitter.
(See sample diagram below)
4. HDBaseT Input – plug HDBaseT (RJ45) input signal from HDBaseT
transmitter. Maximum cable length is 100 meters (328’)
5. Relays – 2 3-pin phoenix style connectors (captive screw) – NC (normally
closed), G (ground) and NO (normally open. Use to insert in circuit of
device you want to trigger – examples include masking screens, screen
control, lighting features, etc.
6. Power connector – 2-pin phoenix style (captive screw) – connect to
24VDC power block supplied with the unit.
zigencorp.com
Toll Free: 877-650-5252
International: +1 818-654-5252
Captive Screw Connectors – pin outs are also located on
the top of the unit
2-pin connector – for power
•
•
Power – connect black wire to negative terminal (-)
Power – connect white wire to positive terminal (+)
12 ZIG-POE-RXAV USER MANUAL
3-pin connecter – for relays
•
•
•
•
•
•
•
Relays – there are settings for both NO and NC for each relay – control via
WebOS or 3rd party controller.
4-pin connecter – for connecting to speakers
Right Speaker +
Right Speaker –
Left Speaker +
Left Speaker –
14 gauge and higher speaker wire
pin outs are labeled on unit.
Note: connections also
labeled on top of unit.
Consult you IR device
manufacturer for proper
connections.
5-Pin
connecter – for IR connecting block
•
•
•
•
•
IR OUT +
IR OUT –
Ground
+ 12V
IR IN 3-12V
zigencorp.com
Toll Free: 877-650-5252
International: +1 818-654-5252
14 ZIG-POE-RXAV USER MANUAL
General – In the example above we are showing using an HDBaseT transmitter
(ZIG-POEWP-100) connected to the HDBaseT receiver (ZIG-POE-RXAV) – as
mentioned previously you also get an amplified audio output for direct connection
to speakers, LAN ports for almost anything you choose and for controlling/setting
up the devices, relays, a 4K scaler and IR and RS232 control and functionality.
1. Connect sources to POEWP – HDMI and VGA w/Audio
2. Connect RXAV to Display via HDMI
3. Connect Ethernet cable between HDBaseT transmitter (ZIG-POEWP-100)
and RXAV (HDBaseT) Ports – this will also provide power on the ZIGPOEWP-100
4. Connect LAN switch/router to LAN 1 port – this is the switch or router that
issues IP address (DHCP server)
5. Connect your PC or MAC to the same switch/router. The DHCP server will
issue IP addresses to both devices separately.
6. Turn on the Source, TV and RXAV
7. Locate the serial number sticker on each RXAV and make note of it. The
web address for the given unit is http://rxav-xxxx/ where the xxxx are the
last 4 digits of the serial number. Ex. If the serial number is
154320000015, then the web address is http://rxav-0015/. This is
necessary to distinguish multiple units from colliding in the network before
their names are changed by the customer. The ZIG-POEWP-100 operates
similarly...i.e. http://poewp-xxxx/.
8. You can also locate the devices with Bonjour. If you do need to connect
directly from a PC or Mac to the LAN 1 or 2 port in the RXAV without a
router (LAN) you can expect up to 5 minutes for the address to be
resolved.
9. Once connected the user interfaces will be available for you to evaluate,
change, enter commands, etc.
zigencorp.com
Toll Free: 877-650-5252
International: +1 818-654-5252
ZIG-RXAV-POE Remote Control
Perfect for classrooms when connected to the ZIG-POEWP-100 use the remote
to change between HDMI and VGA sources.
•
•
•
•
Trigger devices connected to relays
Mute the audio
Power down the RXAV
Control the Volume
16 ZIG-POE-RXAV USER MANUAL
WebOS Interface Page
Status
Device
Name/Notes
Control/Defaults
Firmware/Reset/
Info
zigencorp.com
Toll Free: 877-650-5252
International: +1 818-654-5252
WebOS
Status
Local HDBaseT (RXAV in this case)
•
•
•
•
Link – Green when there is an HDBaseT connection
HDMI - Green when HDMI is present
Mode: Solid green when HDCP is present, flashing green when no HDCP
detected.
Cable Length of CAT cable being reported by HDBaseT chip – this is not
always 100% accurate, especially with shorter cables.
Remote HDBaseT (POEWP in this case)
•
•
•
•
Link – Green when there is an HDBaseT connection
HDMI - Green when HDMI is present
Mode: Solid green when HDCP is present, flashing green when no HDCP
detected.
Cable Length of CAT cable being reported by HDBaseT chip – this is not
always 100% accurate, especially with shorter cables.
Device Name & Notes
•
•
Device Name – default out of the box is RXAV.XXXX (last 4 digits of the
serial number). You should change it if you are using more than 1 device
(Change Name below) to whatever you want – ex. CR100RX – for
conference room number 100 receiver.
Notes – free form field for entering installer notes.
Control/Defaults
•
•
•
•
•
•
•
Relay 1 – checking box changes the state of the relay. NC-G-NO
Relay 2 – checking box changes the state of the relay. NC-G-NO
Audio Mute – Mutes the audio from the built-in amplifier.
Volume Control – Control volume
Bass – Control the bass of the audio
Treble – Control the treble of the audio
RS232 Baud Rate – use to match the speed of your 3rd party control
18system.
ZIG-POE-RXAV USER MANUAL
Firmware/Reset/Info
•
•
•
•
•
Serial Number – serial number of RXAV
Firmware – Current firmware revision
Hardware – for internal use
IP Address – IP address of the unit assigned by your DHCP Server
Hostname – this is what you want to call the unit – syntax example
CR100RX_k123. This is also the name you type into your browser to
access the WebOS.
•
•
Factory Reset – will erase user entered date like installer notes.
Choose File/Upload Firmware – when necessary, this is where you select
a new firmware file and upload firmware.
Reset POEWP – will reset the ZIG-POEWP-100 remotely.
Install Update – when necessary is for installing new software updates to
the unit.
•
•
Command Syntax
RS-232 & IP Commands – note the same commands are available via RS232 and IP
RS-232
Command Structure for ZIG-POE-RXAV & POEWP-100 RS-232
<@hostname> <space> <command> <space> <parameter> <end of
command>
<@hostname > indicates the specific target RXAV device, followed by <space>
space or tab
<command> defines the current operation
<parameter> is the variable or the value passed to the device
<end of command> newline char \n, ASCII 0xA [hex]
Example single command: @rxav mute on
Example 2 commands: @rxav mute on\n@rxav rel1 on\n
Notes: You may add command strings up to 128 characters. You should delimit
commands with the \n (new line) command. If you are using a terminal program
set default to CR + LF (add carriage return and line feed to each entry).
Additionally, if there are multiple POEWP or RXAV in the system that can
zigencorp.com
Toll Free: 877-650-5252
International: +1 818-654-5252
be addressed separately by adding the last 4 digits of the serial number to
the command line.
Example: @rxav-0048 mute on or @poewp-0078 insel VGA – these commands
would address specific devices when multiple devices are deployed in the
system.
Response Structure:
<@hostname> <sp> <parameter> <sp>... <parameter> <sp> <end of
response>
<@hostname> = indicates the device initiating the response
<sp> = space, ASCII 0x20
<parameter> = command-specific number of parameters, each followed by a
space 0x20 [hex] <end of response> = newline char \n, ASCII 0xA [hex]
Example: @rxav-0048 mute on
Default RS232 Protocol Settings (can be changed in WebOS if required):
Baud Rate = 115200 Data Bits = 8
Parity = None
Stop Bit = 1
Flow control = None
IP
IP Command syntax is exactly the same as with RS-232 and can be access via
Telnet session.
Remove the @RXAV/@POEWP and any RS232 delimiters and the commands
are the same.
Example RS232 - @rxav mute off
Example IP – mute off
The above 2 commands do the same thing.
20 ZIG-POE-RXAV USER MANUAL
Commands
ZIG-POE-RXAV COMMANDS – shown in RS232 format – remove @rxav or
@poewp when using IP:
Set volume [range -136dB to +10dB, 1dB steps] - Sets a fixed volume on the
RXAV.
@rxav-0048 vol -25
Set device ‘rxav-0048’ volume to -25dB Response: @rxav-0048 vol x
Increase volume in 1dB steps
@rxav-0048 volup
Increase device ‘rxav-0048’ volume by 1dB Response: @rxav-0048 vol x
Decrease volume in 1dB steps
@rxav-0048 voldn
Decrease device ‘rxav-0048’ volume by 1dB Response: @rxav-0048 vol x
Bass level [range -10dB to +10dB in 2dB steps]
@rxav-0048 bass 6
Set device ‘rxav-0048’ bass level to +6dB Response: @rxav-0048 bass x
Treble level [range -10dB to +10dB in 2dB steps]
@rxav-0048 treb -2
Set device ‘rxav-0048’ treb level to -2dB Response: @rxav-0048 treb x
Mute on/off/toggle
@rxav-0048 mute on
Set device ‘rxav-0048’ mute on Response: @rxav-0048 mute x
Note: toggle has been added to change mute to the opposite state regardless of
where it is setting when addressed.
zigencorp.com
Toll Free: 877-650-5252
International: +1 818-654-5252
Relay 1 on/off/toggle
@rxav-0048 rel1 on
Set device ‘rxav-0048’ relay 1 to ON position Response: @rxav-0048 rel1 x
Relay 2 on/off/toggle
@rxav-0048 rel2 on
Set device ‘rxav-0048’ relay 2 to ON position Response: @rxav-0048 rel2 x
Note: toggle has been added to change the relay to the opposite state regardless
of where it is setting when addressed.
Get Device Status
@rxav-0048 st
Get device ‘rxav-0048’ status
Response:
@rxav-0048 st power x, vol x, bass x, treb x, mute x, relay1 x, relay2 x
Display Device Info
@rxav-0048 man
Get device ‘rxav-0048’ device information
Response:
@rxav-0048 Zigen Corp, ZIG-POE-RXAV, fw1 ver xx, fw2 ver yy
Power on/off
@rxav-0048 pwr off
Set device ‘rxav-0048’ power off Response: @rxav-0048 pwr x
Note: The power off command now only shuts down the AV stream – all other
functions remain active.
22 ZIG-POE-RXAV USER MANUAL
Discovery
@rxav-0048 disco
Provides a list of other Zigen products on the network. Includes name-xxxx (last
4 of serial number), serial number and IP address.
Uptime
@rxav-0048 uptime
Provides Days, Hours, Minutes and Seconds the device has been running.
Version
@rxav-0048 version
Provides firmware info – Release number, Revision number, Build date and
Serial number.
Help
@rxav-0048 help
Provides a list of all commands available (above).
Coming Soon – Direct http:// commands
Notes: As of this printing of the manual other command options are being added
including direct WebOS command line entry. “admin” is already there if you want
to check it out.
http://rxav-0048/admin
Provides back status information like device name, serial number, mac address,
IP address, uptime info and firmware info.
Pronto/IR commands are also being developed and will be available shortly.
zigencorp.com
Toll Free: 877-650-5252
International: +1 818-654-5252
Controlling the System
The POEWP-100 and POE-RXAV can be used separately with other HDBaseT
transmitters and receivers. This Tech Tip addresses signal flow when they are
used together in a small room application.
General: Communication between the POE-RXAV (RX) and POEWP-100 (TX) is
primarily routed from point to point via single CAT5e (6a recommended).
Control: The purpose of this pair is to provide maximum capability for connecting
to and controlling the TX and RX and all devices connected to them (sources and
displays.
Control Methods:
Button press - on the POEWP there are 2 buttons - one to switch between VGA
and HDMI and one that can be programmed to send an RS-232 command (more
on how to later).
On-Connection - When an HDMI or VGA cable is connected to the POEWP that
source will be routed to the display connected to the RXAV. An additional set of
RS-232 commands can be added via the POEWP WebOS (up to 128 characters
delimited by \n (next line)). For example, you may want to turn on the display
when an active HDMI or VGA source is connected.
On-Disconnection - Same process as above (on-connection), however the
command is executed when the active source is disconnected. ex. When the
HDMI cable is unplugged the display gets turned off.
Note: The above is a screenshot of the WebOS for the POWEP. This is an
example while connected to a Sharp display:
24Press
ZIG-POE-RXAV
USER
MANUAL
Button
– toggle the
mute
condition in the RXAV and turn the power on the
Sharp display.
HDMI Cable Connect – Power on the Sharp TV
HDMI Cable Disconnect – Power off the Sharp TV
VGA Cable Connect – Power on the Sharp TV and change to PC input
VGA Cable Disconnect – Power the Sharp TV off
This assumes there is an RS-232 connection between the RXAV and Sharp TV.
All TVs are different so consult the owner’s manual to determine RS-232 straight
or crossover (null modem) cable and specific command syntax for your display.
IR/Remote Control - The RXAV comes with an IR remote. The RXAV has a
built-in "eye" (IR receiver) that may be used during initial installation or in
operation is line of site can be maintained. In many installations this is not
possible. The RXAV also comes with an IR receiver (3.5mm) that can be placed
within line of site of the remote or a 3rd party remote. The only caveat here is the
MCU in the POEWP does the IR processing and must be in the system if the
extended IR receiver is used. As an alternative, if the POEWP is not used an IR
flasher can be placed over the built-in IR "eye" in the RXAV to issue IR
commands to the RXAV.
RS-232 - There are a few ways to use RS-232 commands (for a list of RS-232
commands for the RXAV/POEWP see user manual for either device. For a list of
commands for your particular hardware see the device service manual):
With RXAV DB9 connected directly to a device to be controlled like a display.
Commands can be entered in the POEWP WebOS on any input line depending
on application. Ex. On-connection (of HDMI cable) turn on the display and dim
the lights in the room. In the WebOS HDMI Cable Connect line enter: \n@rxav
rel1 on\nPOWR1 \n - thus, when the HDMI cable is connected relay #1 in the
RXAV closes, triggering the lights to dim to viewing level, additionally, the Sharp
TV that is connected to the RXAV DB9 and HDMI turns on. Since you have 128
characters you could also change to input HDMI (on display) and change VOL
level to reference level (in RXAV). \n is to force a next line, which is needed in
RS-232 to indicate a new command is being entered.
With RXAV DB9 connected to a 3rd party control processor. When connected as
part of a distributed system to a 3rd party controller all commands in the users
manuals are valid and can be issued to control both devices.
With RXAV DB9 connected directly to a PC or Mac via terminal program.
Primarily for troubleshooting and testing of commands - use of null modem vs.
straight connection, etc. All commands are valid and can be executed and
echoed via terminal session.
zigencorp.com
Toll Free: 877-650-5252
International: +1 818-654-5252
IP - All RS-232 commands are also valid via IP connection to RXAV. The only
difference is you remove @RXAV or @POEWP so instead only enter: mute on
or mute off vs. via RS-232: @rxav mute on or @rxav mute off
HTTP Direct Commands – Coming Soon – Check zigencorp.com for updates.
Block Diagram
RXAV Available RS-232/IP Commands: Several - see manual for commands to
control relays, EQ audio, mute, volume control, etc. for features inside the RXAV.
These commands can come from the POEWP command lines or from 3rd party
controllers or computers.
POEWP Available RS-232/IP Commands: @poewp insel HDMI or VGA or
CVBS - the ability to change the source input used on the POEWP. This is the
only action that can be directly controlled remotely in this device.
Note on RS-232 vs. IP Command Syntax: RS-232 Command Example: @rxav
mute on IP Equivalent Command: mute on
26 ZIG-POE-RXAV USER MANUAL
Notes on IR routing:
Built-in IR sensor - When using the IR remote that comes with the RXAV (or 3rd
party IR remote) and the IR "eye" (built-in IR Receiver) all processing of
commands are completed in the
RXAV. 3.5mm or Phoenix extended IR receiver - When using the IR remote
that comes with the RXAV (or 3rd party IR remote) and the IR extension cable
(connected to the IR IN 3.5mm jack on RXAV) all processing of commands are
completed in the POEWP.
This is important to know, as some integrators may want to deploy the RXAV
without the POEWP - in that case you can still remotely control the RXAV via IR
by connecting a 3rd party IR flasher/sender directly over the built-in IR "eye"
receiver.
Cover eye – if you deploy a remote IR receiver to control the RXAV make sure
you cover the built-in IR “eye” – use electrical tape or similar.
Loading Firmware
Firmware is loaded via the WebOS interface – in this case on a Mac we enter
http://rxav-0048/.local to gain access to the control screen. Firmware loading is at
the bottom of the page.
See screenshots below:
Step 1 – Choose File – Will take you to a browsing window (below). Locate the
file(s) from the list/download location and in this case we would select the
zig_rxav-v1.03_1030.mcu by clicking on the filename.
zigencorp.com
Toll Free: 877-650-5252
International: +1 818-654-5252
Step 2 – Upload Firmware – This will begin the process of uploading the
firmware into the RXAV. Should be less than 2 minutes and a status bar will
show when the task is complete. Additionally see screenshot below showing file
is uploaded.
Step 3 – Install Update – This will begin the process of installing the updates to
the RXAV or POEWP.
For .mcu files the indication that the install is complete is that the unit will reset
itself and operate normally.
For .xbin files you must cycle power once the progress bar indicates the load is
complete.
As of this printing of the paper manual current firmware revisions are:
POEWP-100 – ver. 1.06
POE-RXAV – ver. 1.03
Release notes from latest version:
1. IR commands via IR JACK IN using an IR extender will be processed
by RXAV in addition to the direct IR lens receiver. This feature assumes
POEWP is connected on the other side of the HDBaseT connection.
2. RXAV and POEWP factory reset -button clears all values and resets
defaults where applicable
3. RXAV default volume is now -10dB
4. RXAV volume up/down uses increments/decrements of 1dB
28 ZIG-POE-RXAV USER MANUAL
5. RXAV remote control button operation enhancements
6. POEWP supports composite video now (CVBS). The CVBS signal is input
via the GREEN channel in the VGA cable. The default selection is always
VGA and the POEWP web-page has a channel selection button for CVBS
now.
7. POEWP supports many more analog modes such as 1920x1200x60.
8. Added Toggle command to mute, rel1 and rel2 commands
9. Added several new commands now listed in this manual – help, discover,
etc.
zigencorp.com
Toll Free: 877-650-5252
International: +1 818-654-5252
Warranty Information
LIMITED WARRANTY – with the exceptions noted in the next paragraph, ZIGEN
warrants the original purchaser that the equipment it manufactures or sells will be
free from defects in materials and workmanship for a period of one year from the
date of purchase. The proof of sale is required in order to claim warranty. Should
this product, in ZIGEN’s opinion, prove defective within this warranty period,
ZIGEN, at its option, will repair or replace this product without charge. Customers
outside of US are responsible for shipping charges to and from ZIGEN. Any
defective parts replaced become the property of ZIGEN. This warranty does not
apply to those products which have been damaged due to accident, unauthorized
alterations, improper repair, modifications, inadequate maintenance and care, or
use in any manner for which the product was not originally intended for. Items
integrated into ZIGEN products that are made by other manufacturers, notably
computer hard drives and liquid crystal display panels, are limited to the term of
the warranty offered by the respective manufacturers. Such specific warranties
are available upon request to ZIGEN.
ZIGEN makes no other representation of warranty as to fitness for the purpose or
merchantability or otherwise in respect of any of the products sold. The liability of
ZIGEN with respect to any defective products will be limited to the repair or
replacement of such products. In no event shall ZIGEN be responsible or liable
for any damage arising from the use of such defective products whether such
damages be direct, indirect, consequential or otherwise, and whether such
damages are incurred by the reseller, end-user or any third party. The
information in this manual has been carefully checked and is believed to be
accurate. However, ZIGEN assumes no responsibility for any inaccuracies that
may be contained in this manual, even if advised of the possibility of such
damages. The technical information contained herein regarding the features and
specifications is subject to change without notice.
30 ZIG-POE-RXAV USER MANUAL