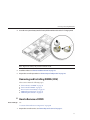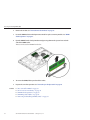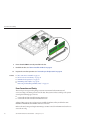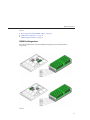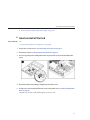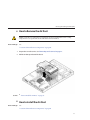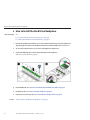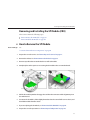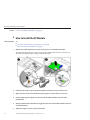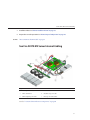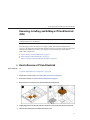
1
Sun Fire X2270 M2 Server Service Manual
Part No: 821–1345
January, 2012, –12
Copyright © 2010, 2012, Oracle and/or its affiliates. All rights reserved.
This software and related documentation are provided under a license agreement containing restrictions on use and disclosure and are protected by intellectual
property laws. Except as expressly permitted in your license agreement or allowed by law, you may not use, copy, reproduce, translate, broadcast, modify, license,
transmit, distribute, exhibit, perform, publish or display any part, in any form, or by any means. Reverse engineering, disassembly, or decompilation of this software,
unless required by law for interoperability, is prohibited.
The information contained herein is subject to change without notice and is not warranted to be error-free. If you find any errors, please report them to us in writing.
If this is software or related documentation that is delivered to the U.S. Government or anyone licensing it on behalf of the U.S. Government, the following notice is
applicable:
U.S. GOVERNMENT RIGHTS. Programs, software, databases, and related documentation and technical data delivered to U.S. Government customers are
"commercial computer software" or "commercial technical data" pursuant to the applicable Federal Acquisition Regulation and agency-specific supplemental
regulations. As such, the use, duplication, disclosure, modification, and adaptation shall be subject to the restrictions and license terms set forth in the applicable
Government contract, and, to the extent applicable by the terms of the Government contract, the additional rights set forth in FAR 52.227-19, Commercial
Computer Software License (December 2007). Oracle America, Inc., 500 Oracle Parkway, Redwood City, CA 94065.
This software or hardware is developed for general use in a variety of information management applications. It is not developed or intended for use in any inherently
dangerous applications, including applications that may create a risk of personal injury. If you use this software or hardware in dangerous applications, then you shall
be responsible to take all appropriate fail-safe, backup, redundancy, and other measures to ensure its safe use. Oracle Corporation and its affiliates disclaim any
liability for any damages caused by use of this software or hardware in dangerous applications.
Oracle and Java are registered trademarks of Oracle and/or its affiliates. Other names may be trademarks of their respective owners.
Intel and Intel Xeon are trademarks or registered trademarks of Intel Corporation. All SPARC trademarks are used under license and are trademarks or registered
trademarks of SPARC International, Inc. AMD, Opteron, the AMD logo, and the AMD Opteron logo are trademarks or registered trademarks of Advanced Micro
Devices. UNIX is a registered trademark of The Open Group.
This software or hardware and documentation may provide access to or information on content, products, and services from third parties. Oracle Corporation and
its affiliates are not responsible for and expressly disclaim all warranties of any kind with respect to third-party content, products, and services. Oracle Corporation
and its affiliates will not be responsible for any loss, costs, or damages incurred due to your access to or use of third-party content, products, or services.
Ce logiciel et la documentation qui l’accompagne sont protégés par les lois sur la propriété intellectuelle. Ils sont concédés sous licence et soumis à des restrictions
d’utilisation et de divulgation. Sauf disposition de votre contrat de licence ou de la loi, vous ne pouvez pas copier, reproduire, traduire, diffuser, modifier, breveter,
transmettre, distribuer, exposer, exécuter, publier ou afficher le logiciel, même partiellement, sous quelque forme et par quelque procédé que ce soit. Par ailleurs, il est
interdit de procéder à toute ingénierie inverse du logiciel, de le désassembler ou de le décompiler, excepté à des fins d’interopérabilité avec des logiciels tiers ou tel que
prescrit par la loi.
Les informations fournies dans ce document sont susceptibles de modification sans préavis. Par ailleurs, Oracle Corporation ne garantit pas qu’elles soient exemptes
d’erreurs et vous invite, le cas échéant, à lui en faire part par écrit.
Si ce logiciel, ou la documentation qui l’accompagne, est concédé sous licence au Gouvernement des Etats-Unis, ou à toute entité qui délivre la licence de ce logiciel
ou l’utilise pour le compte du Gouvernement des Etats-Unis, la notice suivante s’applique:
U.S. GOVERNMENT RIGHTS. Programs, software, databases, and related documentation and technical data delivered to U.S. Government customers are
"commercial computer software" or "commercial technical data" pursuant to the applicable Federal Acquisition Regulation and agency-specific supplemental
regulations. As such, the use, duplication, disclosure, modification, and adaptation shall be subject to the restrictions and license terms set forth in the applicable
Government contract, and, to the extent applicable by the terms of the Government contract, the additional rights set forth in FAR 52.227-19, Commercial
Computer Software License (December 2007). Oracle America, Inc., 500 Oracle Parkway, Redwood City, CA 94065.
Ce logiciel ou matériel a été développé pour un usage général dans le cadre d’applications de gestion des informations. Ce logiciel ou matériel n’est pas conçu ni n’est
destiné à être utilisé dans des applications à risque, notamment dans des applications pouvant causer des dommages corporels. Si vous utilisez ce logiciel ou matériel
dans le cadre d’applications dangereuses, il est de votre responsabilité de prendre toutes les mesures de secours, de sauvegarde, de redondance et autres mesures
nécessaires à son utilisation dans des conditions optimales de sécurité. Oracle Corporation et ses affiliés déclinent toute responsabilité quant aux dommages causés
par l’utilisation de ce logiciel ou matériel pour ce type d’applications.
Oracle et Java sont des marques déposées d’Oracle Corporation et/ou de ses affiliés. Tout autre nom mentionné peut correspondre à des marques appartenant à
d’autres propriétaires qu’Oracle.
Intel et Intel Xeon sont des marques ou des marques déposées d’Intel Corporation. Toutes les marques SPARC sont utilisées sous licence et sont des marques ou des
marques déposées de SPARC International, Inc. AMD, Opteron, le logo AMD et le logo AMD Opteron sont des marques ou des marques déposées d’Advanced Micro
Devices. UNIX est une marque déposée d’The Open Group.
Ce logiciel ou matériel et la documentation qui l’accompagne peuvent fournir des informations ou des liens donnant accès à des contenus, des produits et des services
émanant de tiers. Oracle Corporation et ses affiliés déclinent toute responsabilité ou garantie expresse quant aux contenus, produits ou services émanant de tiers. En
aucun cas, Oracle Corporation et ses affiliés ne sauraient être tenus pour responsables des pertes subies, des coûts occasionnés ou des dommages causés par l’accès à
des contenus, produits ou services tiers, ou à leur utilisation.
121001@25097
Contents
Preface ......................................................................................................................................................5
Related Books ..................................................................................................................................5
About This Documentation (PDF and HTML) ..........................................................................7
Documentation Comments ...........................................................................................................7
Download Server System Tools and Drivers ...............................................................................7
Documents History ........................................................................................................................8
Sun Fire X2270 M2 Server Service Manual Organization .................................................................9
Sun Fire X2270 M2 Server Overview ................................................................................................ 11
Components and Features .......................................................................................................... 11
Front and Rear External Features and Components ............................................................... 15
Maintaining the Sun Fire X2270 M2 Server ..................................................................................... 17
Preparing for Service and Operation ......................................................................................... 17
Powering On and Powering Off the Server ............................................................................... 27
Component Replacement Procedures and Topic .................................................................... 29
Sun Fire X2270 M2 Server Service Procedures and Information .................................................. 77
Using the Tools and Drivers CD ................................................................................................ 77
How to Backup Motherboard FRUID Information ................................................................. 78
LED Locations and Meanings .................................................................................................... 78
BIOS Booting and Setup Considerations .................................................................................. 82
Service Procedures ....................................................................................................................... 88
Ordering Components ................................................................................................................ 93
Sun Fire X2270 M2 Server Specifications ......................................................................................... 95
Physical Specifications ................................................................................................................. 95
Power Specifications .................................................................................................................... 95
Environmental Specifications .................................................................................................... 96
Acoustic Noise Specifications ..................................................................................................... 96
Index ......................................................................................................................................................97
3
4
Preface
This preface describes related documentation, available documentation formats, and the
process for submitting feedback to Oracle. It also includes a document change history.
■
■
■
■
■
“Related Books” on page 5
“About This Documentation (PDF and HTML)” on page 7
“Documentation Comments” on page 7
“Download Server System Tools and Drivers” on page 7
“Documents History” on page 8
Related Books
The following is a list of documents related to Oracle's Sun Fire X2270 M2 server. These and
additional support documents are available on the library page at:
http://www.oracle.com/pls/topic/lookup?ctx=sfx2270m2&id=homepage.
Document Group
Document
Description
Sun Fire X2270 M2
Server-Specific
Documentation
Sun Fire X2270 M2 Server Product
Documentation
Integrated HTML version of all starred
(*) documents, including Search and
Index.
Sun Fire X2270 M2 Server Getting
Started Guide
Pictorial setup quick reference.
Sun Fire X2270 M2 Server Installation
Guide*
How to install, rack, and configure the
server up to initial power-on.
Sun Fire X2270 M2 Server Product
Notes*
Important late-breaking information
about the server.
Sun Installation Assistant 2.3 through
2.4 User's Guide for x64 Servers*
An Oracle tool used to perform an
assisted installation of a supported
Windows or Linux OS, upgrade firmware
(regardless of OS), and other tasks.
Sun Fire X2270 M2 Server Installation
Guide for Oracle Solaris Operating
Systems*
How to install the Oracle Solaris OS on
your server.
5
Related Books
Document Group
Document
Description
Sun Fire X2270 M2 Server Installation
Guide for Oracle VM*
How to install Oracle VM on your server.
Sun Fire X2270 M2 Server Installation
Guide for Linux Operating Systems*
How to install a supported Linux OS on
your server.
Sun Fire X2270 M2 Server Installation
Guide for Windows Operating Systems*
How to install supported versions of
Microsoft Windows on your server.
Sun Fire X2270 M2 Server Installation
Guide for ESX Software*
How to install supported versions of the
ESX OS on your server.
Integrated Lights Out Manager
Supplement for the Sun Fire X2270 M2
Server*
Version-specific supplemental
information for your server's Integrated
Lights Out Manager.
Sun Fire X2270 M2 Server Diagnostics
Guide*
How to diagnose problems with your
server.
Sun Fire X2270 M2 Server Service
Manual*
How to service and maintain your server.
Sun Fire X2270 M2 Server Safety and
Compliance Guide
Safety and compliance information
about your server.
Sun x64 Server Disk Management
Overview
Information about managing your server
storage.
x64 Servers Applications Sun x64 Server Utilities Reference
and Utilities Reference
Manual
Documentation
How to use the available utilities included
with your server.
Oracle Integrated
Controller Disk
Management
Integrated Lights Out
Manager (ILOM) 3.0
Documentation
6
Oracle Integrated Lights Out Manager
Information about new ILOM features.
(ILOM) 3.0 Feature Updates and Release
Notes
Oracle Integrated Lights Out Manager
(ILOM) 3.0 Getting Started Guide
Overview of ILOM 3.0.
Oracle Integrated Lights Out Manager
(ILOM) 3.0 Concepts Guide
Conceptual information about ILOM
3.0.
Oracle Integrated Lights Out Manager
(ILOM) 3.0 Web Interface Procedures
Guide
How to use ILOM through the web
interface.
Oracle Integrated Lights Out Manager
(ILOM) 3.0 CLI Procedures Guide
How to use ILOM through commands.
Sun Fire X2270 M2 Server Service Manual • January, 2012, –12
Documentation Comments
Document Group
Document
Description
Oracle Integrated Lights Out Manager
How to use SNMP and IPMI commands.
(ILOM) 3.0 SNMP and IPMI Procedures
Guide
Oracle Integrated Lights Out Manager
(ILOM) 3.0 Management Protocols
Reference Guide
Information about management
protocols.
About This Documentation (PDF and HTML)
This documentation set is available in both portable document format (PDF) and HTML. The
information is presented in topic-based format (similar to online help) and therefore does not
include chapters, appendices, or section numbering.
Documentation Comments
Oracle is interested in improving product documentation and welcomes your comments and
suggestions. You can submit comments by going to this link:
http://www.oraclesurveys.com/se.ashx?s=25113745587BE578
▼
Download Server System Tools and Drivers
Patches and the Tools and Drivers CD/DVD ISO image file for your server are now available by
from My Oracle Support (MOS). Use this procedure to access server-specific downloads on
MOS.
1
Go to http://support.oracle.com.
2
Sign in to My Oracle Support.
3
At the top of the page, click the Patches and Updates tab.
The Patches and Updates screen appears.
4
In the Search screen, click Product or Family (Advanced Search).
The screen appears with search fields.
5
In the Product field, select the product from the drop-down list.
Alternatively, type a full or partial product name (for example, Sun Fire X2270 M2) until a
match appears.
7
Documents History
6
In the Release field, select the release from the drop-down list.
Expand the folders to see the component offerings.
7
Click Search.
A list of updates (patches) appears.
8
To select a patch, click the check boxes next to the patch name (you can select more than one
patch).
A popup action panel appears. The panel contains several action options.
9
To download the update, click Download in the popup panel.
The download begins automatically.
Documents History
8
■
May 2010, initial publication
■
June 2010, collection refresh, revisions to –11
■
March 2011, Product Notes document updated for document errata and SW v1.1.0 and SW
v1.2.0 releases. Windows Operating System Installation Guide revised for document errata.
Oracle Solaris Operating System Installation Guide revised for document errata. Service
Manual revised for document errata.
■
September 2011, Product Notes and OS Installation Guides updated for SW v1.3.0 release.
Sun Fire X2270 M2 Server Service Manual • January, 2012, –12
Sun Fire X2270 M2 Server Service Manual
Organization
This Sun Fire X2270 M2 Server Service Manual provides information and procedures for
maintaining your server. The following table describes how this content is organized.
Section
Link
General server feature and component
overview information
“ Sun Fire X2270 M2 Server Overview” on page 11
Safety information and component
removal and installation tasks
“Maintaining the Sun Fire X2270 M2 Server” on page 17
Service procedures and information
“Sun Fire X2270 M2 Server Service Procedures and Information” on
page 77
System specifications
“Sun Fire X2270 M2 Server Specifications” on page 95
9
10
Sun Fire X2270 M2 Server Overview
This section provides an overview of the internal components and the front and rear panel
features of the Sun Fire X2270 M2 server.
■
■
“Components and Features” on page 11
“Front and Rear External Features and Components ” on page 15
Components and Features
■
■
■
■
“Components List” on page 11
“Supported Operating Systems and the Preinstalled Oracle Solaris OS Option” on page 13
“System Management” on page 14
“Tools and Drivers CD Software” on page 14
Components List
Component and Feature
Processors
■
■
■
■
Up to two six-core Intel Xeon
processors (three model
options)
Speeds: 2.40 GHz to 3.06 GHz
12 MB level 2 cache per CPU
CPU socket, LGA1366
■
Intel Xeon E5620 (2.40 GHz,
12 MB cache, 5.86 GT/s QPI,
DDR3-1066, Turbo On, HT
On, 80 W)
■
Intel Xeon X5649 (2.53 GHz,
12 MB cache, 5.86 GT/s QPI,
DDR3-1333, Turbo On, HT
On, 80 W)
■
Intel Xeon X5675 (3.06 GHz,
12 MB cache, 6.4 GT/s QPI,
DDR3-1333, Turbo On, HT
On, 95 W)
11
Components List
Component and Feature
Memory
■
■
Disk and Storage
■
■
■
Up to 96 GB of DDR3-1066
Up to 96 GB of DDR3–1333
SATA hard drive (HD)
SATA solid-state drive (SSD)
Embedded RAID support
■
Twelve DDR3-1333 capable
DIMM slots (6 DIMM per
CPU) that support up to 96 GB
maximum using 8 GB 1066
MHz DIMMs.
■
Each DIMM socket can
support a 8 GB 1333 MHz, or 8
GB 1066 MHz registered
DIMM module.
■
Supports four 3.5” 2 TB 7.2K
RPM SATA disk drives.
Supports four 2.5” 32 GB SSD
drives.
Up to 8 TB with 3.5" SATA
drives
Up to 128 GB with 2.5" SSD
drives
Embedded controller Supports
RAID 0,1,5 & 10 on Windows
Only
■
■
■
■
Power Supply
600W PSU, 80% high-efficiency
Network I/O
■
■
PCI I/O
Two 10/100/1000BASE-T
GigabitEthernet ports
One 10/100BASE-T Network
Management (NET MGT)
Ethernet port
PCI Express Generation 2
■
■
External I/O
Serial/RJ-45 and USB 2.0
■
■
12
Sun Fire X2270 M2 Server Service Manual • January, 2012, –12
One PCI Express 2.0 slot
50 W max, x16 slot
electrical/mechanical, x16 90
degree angle PCIe riser
One RJ-45 serial port
Five USB 2.0 ports (2 front, 2
rear, and 1 internal)
Supported Operating Systems and the Preinstalled Oracle Solaris OS Option
Component and Feature
System Management
Service processor (SP) module
Power
One 600 W power supply with
cooling fan
Cooling
Three 5k RPM internal
variable-speed blowers
■
Contains an IPMI
2.1-compliant service
processor with Integrated
Lights Out Manager (ILOM)
■
Contains an onboard AST2100
2D/3D graphics controller with
an HD15 connector
Forced-air cooling to motherboard
and components.
Next: “Supported Operating Systems and the Preinstalled Oracle Solaris OS Option” on
page 13
Supported Operating Systems and the Preinstalled
Oracle Solaris OS Option
This section describes the operating system options supported for the Sun Fire X2270 M2
Server. You can order your server with the supported version Oracle Solaris 10 operating
system (OS) preinstalled. This option assists you in quickly bringing up the sever to an
operational state. If you ordered this option, do not need to install the OS, because it is
factory-installed on hard drive (HD) 0. When you boot the OS for the first time, use the
menu-driven configuration utility to set up the OS with your site-specific parameters. For
instructions on configuring the preinstalled OS, refer to the Sun Fire X2270 M2 Server
Installation Guide.
You can also install one of the supported versions of the Solaris OS, Oracle VM, Linux,
Windows, or VMware ESX.
Supported Operating Systems
Preinstalled
Operating
Systems
Oracle Solaris 10 OS
13
System Management
Supported Operating Systems
Supported
Operating
Systems
■
Solaris 10 Operating System 10/09
■
Oracle Enterprise Linux (OEL) 5.4, 64–bit
■
Oracle VM 2.2
■
Linux
■
■
■
Windows
■
■
■
Red Hat Enterprise Linux 5.4 64-bit Advanced Server
SUSE Linux Enterprise Server (SLES) 10, SP3 64–bit
Windows Server 2008 SP2 32-bit (Standard, Enterprise, and Datacenter)
Windows Server 2008 R2, (Standard, Enterprise, and Datacenter)
VMware
■
■
VMWare ESX UI 4.0
VMWare ESXi UI 4.0
For and updated list of supported operating systems, see http://wikis.sun.com/
display/SystemsComm/Sun+Fire+X2270+M2+Server#tab:Operating-Systems.
Next:“System Management” on page 14
System Management
System management on the Sun Fire X2270 M2 Server is performed using an IPMI
2.1-compatible SP. The SP contains the Oracle ILOM application. ILOM provides management
capabilities in a browser interface and a command- line interface in both full-power and
standby power modes. For more information about ILOM management, refer to theIntegrated
Lights Out Manager 3.0 User’s Guide and the Integrated Lights Out Manager (ILOM) Supplement
for Sun Fire X2270 M2 Server.
Next:“Tools and Drivers CD Software” on page 14
Tools and Drivers CD Software
The Sun Fire X2270 M2 Server Tools and Drivers CD, which is available both online and
separately in the optional Sun Fire X2270 M2 Server Media and Documentation Kit, contains
drivers for OS installation and Intel NIC and Intel RAID/AHCI. The CD also contains
BIOS/BMC flash utilities, diagnostics software, and Windows Remote Installation Service (RIS)
files.
For more information about using the Tools and Drivers CD software, see “Using the Tools and
Drivers CD” on page 77.
14
Sun Fire X2270 M2 Server Service Manual • January, 2012, –12
Front Panel Features and Components
Next:“Front and Rear External Features and Components ” on page 15
Front and Rear External Features and Components
This section shows the locations of external features and components of both the front and rear
of the Sun Fire X2270 M2 Server.
■
■
“Front Panel Features and Components” on page 15
“Rear Panel Features and Components” on page 16
Front Panel Features and Components
Legend
1
White Locate LED/button
2
Amber Service Action Required LED
3
Green Power Status LED
4
Power button
5
USB 2.0 ports (2)
6
Server serial number
7
Optional removable SATA HD/SSD 1
8
Optional removable SATA HD/SSD 2
9
Optional removable SATA HD/SSD 3
10
Optional removable SATA HD/SSD 4
11
Disk Ready-to-Remove LED
(non-operational)
12
Disk Service Action Required LED (non-operational)
13
Green Disk OK read and write activity LED
15
Rear Panel Features and Components
See also:
■
■
“Locations of Internal Server Components” on page 30
“Front Panel System Status LEDs” on page 78
Next:“Rear Panel Features and Components” on page 16
Rear Panel Features and Components
Legend
1
AC power connector
2
White Locate LED
3
Amber Service Action Required LED
4
Green Power Status LED
5
Serial Management (SER MGT) port (RJ-45) 6
GigabitEthernet port (NET-0)
7
GigabitEthernet port (NET-1)
USB 2.0 ports (2)
9
Network Management (NET MGT)
10
Ethernet port (available only in systems with
an SP module)
11
PCIe slot (Gen 2, x16)
8
HD-15 video connector (available only in systems
with an SP module)
See also:
■
■
■
16
“Locations of Internal Server Components” on page 30
“Rear Panel System Status LEDs” on page 80
“Front Panel Features and Components” on page 15
Sun Fire X2270 M2 Server Service Manual • January, 2012, –12
Maintaining the Sun Fire X2270 M2 Server
This section contains information that describes how to add, replace, and configure
components in the Sun Fire X2270 M2 Server after it has been set up:
■
■
■
“Preparing for Service and Operation” on page 17
“Powering On and Powering Off the Server” on page 27
“Component Replacement Procedures and Topic” on page 29
Preparing for Service and Operation
This section contains important topics and tasks that describe how to safely and properly
prepare your server for both service and operation.
Note – System cooling might be affected by dust and contaminant buildup. Open and check the
server approximately every six months or more often in dustier operating environments. Check
system heatsinks, fans, and air openings. If necessary, clean systems by brushing or blowing
contaminants from the system or by carefully vacuuming contaminants from the system. Do
not use liquid cleaners on or in the server.
■
■
■
■
■
■
■
■
■
■
■
“Important Safety Information” on page 17
“Antistatic Procedures and Precautions” on page 18
“How to Use an Antistatic Mat” on page 19
“CRU and FRU List” on page 19
“Tools and Supplies Needed” on page 20
“How to Prepare for Service” on page 21
“How to Remove the Server from the Rack” on page 22
“How to Install the Server Into the Rack” on page 23
“How to Remove the Server Cover” on page 25
“How to Install the Server Cover” on page 26
“How to Prepare for Operation” on page 26
Important Safety Information
This section describes important safety information to know before removing or installing
parts in your Sun Fire server.
17
Antistatic Procedures and Precautions
Caution – Hazardous voltage present. Never attempt to run the server with the covers removed.
You must disconnect the power supply before servicing any of the components documented in
this section.
Caution – Equipment damage possible. The covers must be in place for proper air flow.
For your protection, observe the following safety precautions when setting up your equipment:
■
Follow all Oracle cautions, warnings, and instructions marked on the equipment and
described in Important Safety Information for Sun Hardware Systems.
■
Follow all cautions, warnings, and instructions marked on the equipment and described in
the Sun Fire X2270 M2 Server Safety and Compliance Guide.
■
Ensure that the voltage and frequency of your power source match the voltage and
frequency inscribed on the equipment's electrical rating label.
■
Follow the electrostatic discharge safety practices as described in this document.
Next:“Antistatic Procedures and Precautions” on page 18
Antistatic Procedures and Precautions
Electrostatic discharge (ESD) can damage your processor, hard drives, expansion boards, and
other components. ESD sensitive devices, such as the motherboards, PCI cards, hard drives,
and memory modules, require special handling. Always observe the following precautions
before you install a system component
Caution – Component damage. Circuit boards and hard drives contain electronic components
that are extremely sensitive to static electricity. Ordinary amounts of static electricity from
clothing or the work environment can destroy the components located on these devices. Do not
touch the components without antistatic precautions, especially along the connector edges.
■
Do not remove a component from its protective packaging until you are ready to install it.
■
Wear a wrist strap and attach it to the system chassis ground or to any metal part of the
system before handling components or working in the interior compartment of the
workstation.
■
Use an antistatic mat (see “How to Use an Antistatic Mat” on page 19).
Wear an antistatic wrist strap and use an antistatic mat when handling components such as
hard drive assemblies, circuit boards, or PCI cards. When servicing or removing server
18
Sun Fire X2270 M2 Server Service Manual • January, 2012, –12
CRU and FRU List
components, attach an antistatic strap to your wrist and then to a bare metal area on the chassis.
Following this practice equalizes the electrical potentials between you and the server.
▼
1
2
See Also
How to Use an Antistatic Mat
Prepare an antistatic surface to set parts on during the removal, installation, or replacement
process.
Place static-sensitive components such as the printed circuit boards, memory modules, and
CPUs on the antistatic mat. The following items can be used as an antistatic mat:
■
Antistatic bag used to wrap an Oracle replacement part
■
Oracle antistatic mat, part number 250-1088
■
A disposable antistatic mat (shipped with some replacement parts or optional system
components)
Attach an antistatic wrist strap.
When servicing or removing server components, attach an antistatic strap to your wrist and
then to a bare metal area on the chassis.
■
■
“Important Safety Information” on page 17
“Antistatic Procedures and Precautions” on page 18
CRU and FRU List
The following is a list of customer-replaceable units (CRUs) and field-replaceable units (FRUs)
for the Sun Fire X2270 M2 Server. CRU and FRU designations refer to serviceability. For
reasons of safety and complexity, a component designated as a FRU must be serviced by an
Oracle Service Technician. A component designated as a CRU has safety and complexity levels
deemed to be sufficiently within the scope of a non-service personnel. However, if you feel that
servicing a component designated as a CRU exceeds your service capabilities, please contact
Oracle Service.
Note – Components designated as a FRU must be serviced by an Oracle Service Technician.
Component
Designation
Motherboard
FRU
CPU
FRU
Heatsink
FRU
19
Tools and Supplies Needed
Component
Designation
HD backplane
FRU
Front I/O board
FRU
DIMM
CRU
Power Supply 600 W
CRU
Hard drive
CRU
Solid-state drive
CRU
Slide rail kit
CRU
Tool-less slide rail kit
CRU
Cable management arm
CRU
Service processor module
CRU
SATA cable
CRU
Blower assembly
CRU
Battery (CR2032)
CRU
Front I/O cable kit
CRU
Riser card, PCIe x16 slot
CRU
Next:“Tools and Supplies Needed” on page 20
Tools and Supplies Needed
You need the following tools and supplies to perform Sun Fire X2270 M2 Server maintenance
procedures:
■
■
■
■
■
■
#2 Phillips screwdriver (6 inches)
Small flat-blade screwdriver
Antistatic wrist strap
Portable light source
Antistatic brush, canned air, or a vacuum cleaner (to remove dust and debris)
Alcohol pads (for CPU replacement by service personnel only)
Next:“How to Prepare for Service” on page 21
20
Sun Fire X2270 M2 Server Service Manual • January, 2012, –12
Tools and Supplies Needed
▼
1
How to Prepare for Service
Review the Sun Fire X2270 M2 Server Sun Fire X2270 M2 Server Product Notes.
The Product Notes contain update information about issues related to hardware and software.
2
Review the safety information. See “Important Safety Information”on page 17.
3
Review ESD procedures. See “Antistatic Procedures and Precautions”on page 18.
4
Power off the server. See “How to Power Off the Server”on page 28.
5
Disconnect the AC power cords from the rear of the server.
6
Power off all of the peripherals connected to the server.
7
Label and disconnect all cables attached to the rear of the server.
8
Remove the server from the rack. See “How to Remove the Server from the Rack”on page 22.
Note – For some procedures it is not necessary to remove the server from the rack. To determine
whether to remove the server, review the procedure before proceeding.
9
Place the server in a location with ample space and light.
10
Remove the server cover. See “How to Remove the Server Cover”on page 25.
11
Use a vacuum, compressed air, or an antistatic brush to clean the interior of the server so
component surfaces and server air vents are free of dust.
Caution – Potential for component damage. Do not use liquid or aerosol spray cleaners to clean
the server. Liquid has the potential for causing shorts in electrical systems.
21
Tools and Supplies Needed
▼
How to Remove the Server from the Rack
Caution – Potential for physical harm to personnel or component and facility damage. The
weight of the server and uneven weight distribution within the rack can cause physical harm to
personnel and damage to components and the facility. Always use a mechanical lift or more
than one person to remove the server from the rack. Always use your rack's anti-tip bar, keep
the weight distribution to the lower end of the rack, and do not extend more than one server at a
time.
1
Power off the server.
2
Disconnect all cables from the rear of the server.
If necessary, label the cables first.
3
Extend the anti-tip bar at the bottom of the server.
The anti-tip bar prevents the rack from tipping over and causing physical harm to personnel
and damage to components and the facility.
4
Squeeze and hold the green slide-rail lock tabs that are located on each side of the front of the
server.
5
Pull the server away from the rack until both slide rails lock with an click.
Caution – Include additional personnel from this step forward.
6
Locate the slide lock release tabs.
The release tabs are located on each side of the server near the center of the mounting brackets.
7
Prepare to remove the server from the rack. Position at least one person on each side of the rack
holding the server.
8
Pull the slide lock release tabs forward and then pull the server slightly away from the rack, just
far enough to disengage the slide locks.
This action releases the server from the rack allowing it to slide freely.
Caution – Do not leave the server unattended.
9
22
Slide the server away from the rack until the mounting brackets on the side of the server clear
the rails.
Sun Fire X2270 M2 Server Service Manual • January, 2012, –12
Tools and Supplies Needed
10
Set the server on a flat stable surface.
11
If necessary, push the extended rails into the rack.
See Also
Next Steps
▼
“How to Install the Server Into the Rack” on page 23
“How to Remove the Server Cover” on page 25
How to Install the Server Into the Rack
Use this procedure to install the server chassis, with mounting brackets, into the slide rail
assemblies that are mounted to the rack.
Caution – This procedure requires a minimum of two people because of the weight of the server.
Attempting this procedure alone could result in equipment damage or personal injury.
Caution – Always load equipment into a rack from the bottom up so that it does not become
top-heavy and tip over. Deploy your rack’s anti-tilt bar to prevent the rack from tipping during
equipment installation.
1
Ensure that the slide rails and the slide rail assemblies are fully collapsed into the rack.
Push the slide rails into the slide rail assemblies and then collapse the assemblies.
23
Tools and Supplies Needed
2
Raise the server so the rear ends of the mounting brackets are aligned with the slide rail
assemblies mounted in the equipment rack.
3
Insert the mounting brackets into the slide rails, then push the server into the rack until the
mounting brackets encounter the slide rail stops (approximately 12 inches, or 30 cm).
4
Simultaneously push and hold the slide rail release buttons on each mounting bracket while
you push the server into the rack. Continue pushing until the slide rail locks on the front of the
mounting brackets engage the slide rail assemblies.
You will hear a click.
Caution – Verify that the server is securely mounted in the rack and that the slide rails locks are
engaged with the mounting brackets before continuing.
24
Sun Fire X2270 M2 Server Service Manual • January, 2012, –12
Tools and Supplies Needed
Next Steps
See Also
▼
“How to Prepare for Operation” on page 26
“Rear Panel Features and Components” on page 16
How to Remove the Server Cover
1
Prepare the server for service. See “How to Prepare for Service”on page 21.
2
Loosen the captive screw that secures the cover to the chassis.
If necessary, use a screwdriver to loosen the screw.
3
Pull the cover slightly toward the rear of the server until it stops (approximately .5 inch).
4
Lift the cover and remove it.
See Also
“Component Replacement Procedures and Topic” on page 29
25
Tools and Supplies Needed
▼
How to Install the Server Cover
1
Orient the cover over the server so the lip edge of the cover is at the front of the server and the
captive retaining screw is at the rear.
2
Set the cover on top of the server and position it so approximately .5 inch of the cover extends
over the rear of the server.
3
Use the indent on the top cover to push the cover toward the front of the server until the captive
screw is in position.
4
To secure the cover, tighten the captive screw.
Next Steps
“How to Install the Server Into the Rack” on page 23
▼
How to Prepare for Operation
1
Ensure that all new components are installed as described in the component replacement
instructions (see “Component Replacement Procedures and Topic”on page 29).
2
Ensure that all existing components are properly seated and connected.
3
Ensure that all internal cabling is connected and secured within the server and that the cabling
is not obstructing the air flow.
4
Inspect the interior of the server and remove any tools and loose or foreign debris.
5
Use a vacuum, compressed air, or an antistatic brush to clean the interior of the server so
component surfaces and server air vents are free of dust.
Caution – Potential for component damage. Do not use liquid or aerosol spray cleaners to clean
the server. Liquid has the potential for causing shorts in electrical systems.
26
6
Install the system’s cover. See “How to Install the Server Cover”on page 26.
7
Install the server in the rack. See “How to Install the Server Into the Rack”on page 23.
8
Connect all external cables to the system.
9
To apply AC power, connect the AC power cords to the server.
When the AC power is applied, the server enters standby mode.
Sun Fire X2270 M2 Server Service Manual • January, 2012, –12
Power Modes
10
See Also
Power on the server. See “How to Power On the Server”on page 28.
“Sun Fire X2270 M2 Server Service Procedures and Information” on page 77
Powering On and Powering Off the Server
This section contains information about the server power modes and procedures for powering
on and off the server.
■
■
■
“Power Modes” on page 27
“How to Power Off the Server” on page 28
“How to Power On the Server” on page 28
Power Modes
The Sun Fire X2270 M2 Server has two power modes, full-power mode and standby-power
mode.
In full-power mode, power is supplied to all the server components (for example, CPU, hard
drives, fans). Full-power mode is the normal operational mode for the server. When the server
is in full-power mode, the server boots and the operating system (OS) functions. Full-power
mode is achieved by pressing the power button on the front of the server when the server is in
standby power mode. When the server is in full-power mode, the Power On LED is on
continuously (does not blink).
Standby-power mode is the non-operating mode. That is, the server is in a low-power or
powered-down state and is not capable of booting and starting the OS. In standby–power mode,
minimum power is supplied only to the components that are required for lights-out
management (LOM), such as the service processor (SP). Standby-power mode is achieved by
connecting the server to an AC supply using the AC power cords. To sustain standby-power
mode, do not press the front panel power button. You can also achieve standby-power mode by
powering off the server from full-power mode using one of the methods described in the
section, “How to Power Off the Server” on page 28. When the server is in standby power mode
the Power OK LED on the front panel blinks.
See also:
■
■
“How to Power Off the Server” on page 28
“How to Power On the Server” on page 28
27
Power Modes
▼
How to Power Off the Server
1
To gracefully power off the server from main power mode to standby power mode, use the
operating system-specific shutdown procedure for the OS running on your server.
All operating systems have a shutdown procedure. This shutdown procedure provides a
graceful shutdown of the OS, and it should be your first choice for powering off the server.
2
To gracefully power off the server from main power mode to standby power mode using the
Power switch, use a stylus or other nonconducting pointed object to quickly press and release
the Power button on the front panel.
Caution – Potential data loss. Pressing and releasing the Power button causes Advanced
Configuration and Power Interface (ACPI) enabled operating systems to perform an orderly
shutdown of the operating system. Servers not running ACPI-enabled operating systems
perform an emergency shut down to standby power mode.
When the main power is off and the server is in standby power mode, the Power/OK LED on
the front panel blinks, indicating that standby power is still available.
Caution – In standby power mode, power is still directed to some components. To completely
power off the server, you must disconnect the AC power cords from the rear panel of the server.
3
To perform an emergency shutdown of the server power, press and hold the Power button for
four seconds to force the main power off and enter standby power mode.
Caution – Potential Data Loss. Pressing and holding the Power button for four seconds performs
an immediate shutdown of the server. The system does not prompt for confirmation, nor are
you allowed to save and exit open applications.
See Also
▼
1
28
“How to Power On the Server” on page 28
How to Power On the Server
Verify that the server’s power supply is connected to an AC power source and that the server is in
“Power Modes”on page 27.
In standby power mode, the Power/OK LED on the front panel blinks, indicating that the
service processor is working and the system is ready to be fully powered on to full-power mode
(see“Power Modes” on page 27).
Sun Fire X2270 M2 Server Service Manual • January, 2012, –12
Component Replacement Procedures and Topic
2
Press and release the recessed power button on the server front panel.
Note – If necessary, use a stylus or other nonconducting pointed object to depress the power on
button.
The server performs power-on self tests (POST) and boots to the OS.
See Also
“How to Power Off the Server” on page 28
Component Replacement Procedures and Topic
The procedures in this section are separated into customer-replaceable units (CRUs) and field
replaceable units (FRUs). For more information about CRUs and FRUs, see “CRU and FRU
List” on page 19.
Component Designations
Procedures and Topics
Component locations
“Locations of Internal Server Components” on page 30
Customer-Replaceable Units
(CRUs)
System battery
“Replacing the System Battery (CRU)” on page 31
DIMMs
“Removing and Installing DIMMs (CRU)” on page 33
PCIe card
“Removing and Installing a PCIe Card (CRU)” on page 40
PCIe riser
“Removing and Installing the PCIe Riser (CRU)” on page 42
Power supply
“Removing and Installing a Power Supply (CRU)” on page 45
Hard drive filler and hard drive
assembly
“Removing and Installing a Hard Drive Filler and Hard Drive Assembly
(CRU)” on page 48
Air duct
“Removing and Installing the Air Duct (CRU)” on page 52
Blower module
“Replacing a Blower Module (CRU)” on page 54
SP module
“Removing and Installing the SP Module (CRU)” on page 59
Internal cabling
“Sun Fire X2270 M2 Server Internal Cabling” on page 61
Cable harness
“Replacing the SATA Cable Harness (CRU)” on page 62
I/O cable
“Replacing the Front I/O Cable (CRU)” on page 63
Field-Replaceable Units (FRUs)
29
Locations of Internal Server Components
Component Designations
Procedures and Topics
Hard drive backplane assembly
“Replacing the Hard Drive Backplane Assembly (FRU)” on page 56
Front I/O board
“Replacing the Front I/O Board (FRU)” on page 64
CPU and heatsink assembly
“Removing, Installing, and Adding a CPU and Heatsink (FRU)” on
page 67
Motherboard
“Replacing the Motherboard (FRU)” on page 73
Locations of Internal Server Components
Legend
30
1
DIMM slots (6) for CPU 1
2
CPU 1
3
PCIe riser and card
4
Unsupported component
5
SP board
6
CPU 0
7
DIMM slots (6) for CPU 0
8
Power supply
9
Air duct
10
System battery (located under the air duct)
Sun Fire X2270 M2 Server Service Manual • January, 2012, –12
Replacing the System Battery (CRU)
Legend
11
Blower modules (3)
12
HD/SSD backplane
13
Removable SATA HD/SSD 3
14
Removable SATA HD/SSD 2
15
Removable SATA HD/SSD 1
16
Removable SATA HD/SSD 0
17
I/O board
See also:
■
“CRU and FRU List” on page 19
Replacing the System Battery (CRU)
The system battery is a CR2032 calculator–type battery.
Replace the system battery if you know it is weak, if after any period of AC power loss the BIOS
loses its CMOS settings, or if the time-of-day clock loses time.
Caution – Loss of data. Removing the battery causes the server to revert to the factory default
BIOS settings.
Caution – Do not attempt to open or service batteries. The battery contains lithium and can
explode if mishandled or improperly disposed.
■
▼
Before You Begin
“How to Replace the System Battery” on page 31
How to Replace the System Battery
See:
“Locations of Internal Server Components” on page 30
1
Prepare the server for service. See “How to Prepare for Service”on page 21.
2
Remove the air duct. See “How to Remove the Air Duct”on page 53.
3
Remove the system battery by pulling and quickly releasing the battery retaining clip.
This action causes the battery to pop out of its socket.
31
Replacing the System Battery (CRU)
Note – Use a tool to gently pry the battery from the socket while pulling the retaining clip.
Caution – Do not dispose of the battery with regular waste. Discard used batteries according to
the manufacturer’s instructions or in accordance with your facility or local waste-disposal
agency.
32
Sun Fire X2270 M2 Server Service Manual • January, 2012, –12
Removing and Installing DIMMs (CRU)
4
Insert the new system battery into the battery holder with the side labeled“+”facing upward.
Note – Replace the battery only with the identical model.
5
Install the air duct. See “How to Install the Air Duct”on page 53.
6
Prepare the server for operation. See “How to Prepare for Operation”on page 26.
Removing and Installing DIMMs (CRU)
This section contains the following topics:
■
■
■
■
■
▼
Before You Begin
“How to Remove a DIMM” on page 33
“How to Install a DIMM” on page 35
“Error Correction and Parity” on page 36
“DIMM Slot Designations” on page 37
“DIMM Population Rules” on page 38
How to Remove a DIMM
See:
“Locations of Internal Server Components” on page 30
1
Prepare the server for service. See “How to Prepare for Service”on page 21.
33
Removing and Installing DIMMs (CRU)
2
Remove the air duct. See “How to Remove the Air Duct”on page 53.
3
Locate the DIMM socket in which you want to install or replace a memory module. See “DIMM
Slot Designations”on page 37.
4
Eject the DIMM from the slot by simultaneously pressing down on the ejector levers at both
ends of the DIMM socket.
This action releases the DIMM from the slot.
5
To remove the DIMM, lift it up and out of the socket.
6
Prepare the server for operation. See “How to Prepare for Operation”on page 26.
See Also
■
■
■
■
■
34
“How to Install a DIMM” on page 35
“Error Correction and Parity” on page 36
“DIMM Slot Designations” on page 37
“DIMM Population Rules” on page 38
“Removing and Installing DIMMs (CRU)” on page 33
Sun Fire X2270 M2 Server Service Manual • January, 2012, –12
Removing and Installing DIMMs (CRU)
▼
How to Install a DIMM
Tip – As an ESD precaution, do not remove the DIMM from its packaging until you are ready to
install it.
Before You Begin
See:
■
■
■
“Locations of Internal Server Components” on page 30
“DIMM Population Rules” on page 38
“DIMM Slot Designations” on page 37
1
Prepare the server for service. See “How to Prepare for Service”on page 21.
2
Remove the air duct. See “How to Remove the Air Duct”on page 53.
3
Locate the DIMM socket in which you want to install or replace a memory module. For slot
designations, see “DIMM Slot Designations”on page 37.
4
Ensure that the DIMM socket ejector levers are open (rotated fully outward).
5
Align the notch in the DIMM’s edge connector with the socket alignment key.
6
Ensure that the DIMM's edge connector is positioned correctly within the slot.
7
To install the DIMM, simultaneously press downward on both top edges of the DIMM until the
ejector levers rise to their vertical position and lock into place.
This action produces a click as the levers lock the DIMM in the slot.
Note – Insert the DIMMs evenly, straight down along the DIMM slot until locked into place.
35
Error Correction and Parity
8
Ensure that the DIMM is correctly installed in the slot.
9
Install the air duct. See “How to Install the Air Duct”on page 53.
10
See Also
Prepare the server for operation. See “How to Prepare for Operation”on page 26.
■
■
■
■
■
“How to Remove a DIMM” on page 33
“Error Correction and Parity” on page 36
“DIMM Slot Designations” on page 37
“DIMM Population Rules” on page 38
“Removing and Installing DIMMs (CRU)” on page 33
Error Correction and Parity
The server’s processor provides parity protection on its internal cache memories and
error-correcting code (ECC) protection of the data. The system can detect and log to the system
event log the following types of errors:
■
■
Correctable and uncorrectable memory ECC errors
Correctable and uncorrectable CPU internal errors
Advanced ECC corrects up to 4 bits in error on nibble boundaries, if they are all in the same
DRAM. If a DRAM fails, the DIMM continues to function.
Refer to the Oracle Integrated Lights Out Manager 3.0 User’s Guide for information about how to
access the error log.
36
Sun Fire X2270 M2 Server Service Manual • January, 2012, –12
DIMM Slot Designations
See also:
■
■
■
“Removing and Installing DIMMs (CRU)” on page 33
“DIMM Slot Designations” on page 37
“DIMM Population Rules” on page 38
DIMM Slot Designations
The following illustrations show the DIMM slot designations for CPU 0 and CPU 1
respectively.
See also:
37
DIMM Population Rules
■
■
■
“Removing and Installing DIMMs (CRU)” on page 33
“Error Correction and Parity” on page 36
“DIMM Population Rules” on page 38
DIMM Population Rules
When installing, removing, or replacing DIMMs, adhere to the following population rules.
Physical slot population All DIMMs must be DDR3.
rules
DIMMs are available in two speeds: 1066 MHz and 1333 MHz
Registered DIMMs (RDIMMs) must be ECC only.
Do not populate any DIMM slot next to an empty CPU socket. Each CPU contains a
separate memory controller.
Populate the DIMM slots for each memory channel that are the farthest from the
CPU first.
Blue DIMM slots are always populated first. For example, populate D5/D3/D1 first,
then populate D4/D2/D0.
Performance
Considerations
The best performance is assured by preserving symmetry; for example: adding two of
the same kind of DIMMs, one per memory channel, and ensuring that both CPUs
have the same size of DIMMs populated in the same manner.
DIMMs with different speeds can be installed in different slots within the same
channel; however, the speed of the slowest DIMM is applied to all the DIMMs (faster
DIMMs operate at the slowest supported frequency).
DIMM speed rules are as follows:
2 x DIMM per channel = 1066 MHz
■
2 x DIMM per channel = 1333 MHz
■
1 x DIMM per channel = 1333 MHz (if using 1333 MHz DIMMs)
■
1 x DIMM per channel = 1066 MHz (if using 1066 MHz DIMMs)
■
These are the acceptable DIMM configurations.
38
DIMM SLOT Location
DIMM
CPU
Qty
Qty
CPU 0
1
1
D5
1
2
2
1
CPU 1
configuration not allowed
D5, D3
Sun Fire X2270 M2 Server Service Manual • January, 2012, –12
DIMM Population Rules
DIMM SLOT Location
DIMM
CPU
Qty
Qty
CPU 0
CPU 1
2
2
D5
D5
3
1
D5, D3, D1
3
2
D5, D3
4
1
D5, D3, D1, D4
4
2
D5, D3
5
1
D5, D3, D1, D4, D2
5
2
D5, D3, D1
6
1
D5, D3, D1, D4, D2, D0
6
2
D5, D3, D1
7
1
7
2
8
1
8
2
9
1
9
2
10
1
10
2
11
1
11
2
12
1
12
2
D5
D5, D3
D5, D3
D5, D3, D1
configuration not allowed
D5, D3, D1, D4
D5, D3, D1
configuration not allowed
D5, D3, D1, D4
D5, D3, D1, D4
configuration not allowed
D5, D3, D1, D4, D2
D5, D3, D1, D4
configuration not allowed
D5, D3, D1, D4, D2
D5, D3, D1, D4, D2
configuration not allowed
D5, D3, D1, D4, D2, D0
D5, D3, D1, D4, D2
configuration not allowed
D5, D3, D1, D4, D2, D0
D5, D3, D1, D4, D2, D0
See also:
■
■
■
“Removing and Installing DIMMs (CRU)” on page 33
“Error Correction and Parity” on page 36
“DIMM Slot Designations” on page 37
39
Removing and Installing a PCIe Card (CRU)
Removing and Installing a PCIe Card (CRU)
This section contains the following topics:
■
■
▼
Before You Begin
“How to Remove a PCIe Card” on page 40
“How to Install a PCIe Card” on page 41
How to Remove a PCIe Card
See:
“Locations of Internal Server Components” on page 30
1
Prepare the server for service. See “How to Prepare for Service”on page 21.
2
Remove the air duct. See “How to Remove the Air Duct”on page 53.
3
Disconnect any cables connected to the PCIe card.
4
To unlock the PCIe card, open the locking latch on the server rear panel.
5
To remove the PCIe card from the server, slide the card out of the server rear panel and
disconnect the card from the PCIe riser.
6
Remove any card-specific cabling from the server.
7
Install the air duct. See “How to Install the Air Duct”on page 53.
8
Prepare the server for operation. See “How to Prepare for Operation”on page 26.
See Also
40
■
“How to Install a PCIe Card” on page 41
Sun Fire X2270 M2 Server Service Manual • January, 2012, –12
Removing and Installing a PCIe Card (CRU)
■
▼
Before You Begin
“Removing and Installing a PCIe Card (CRU)” on page 40
How to Install a PCIe Card
See:
“Locations of Internal Server Components” on page 30.
1
Prepare the server for service. See “How to Prepare for Service”on page 21.
2
Remove the air duct. See “How to Remove the Air Duct”on page 53.
3
If necessary, pull open the locking latch on the rear panel of the server to unlock the PCIe filler
panel.
4
Remove the filler panel by lifting it straight up and out of the server.
5
If a PCIe riser is not already installed in the server, install a PCIe riser. See “How to Install the PCIe
Riser”on page 42.
The PCIe riser is a low-profile, half-length x16 connector card.
41
Removing and Installing the PCIe Riser (CRU)
6
Slide the new PCIe card into the PCIe slot on the rear panel of the server and connect the card to
the PCIe riser.
7
To lock the PCIe card, push to close the locking latch on the rear panel of the server.
8
Attach any required internal cabling to the card.
9
Install the air duct. See “How to Install the Air Duct”on page 53.
10
See Also
Prepare the server for operation. See “How to Prepare for Operation”on page 26.
■
■
“How to Remove a PCIe Card” on page 40
“Removing and Installing a PCIe Card (CRU)” on page 40
Removing and Installing the PCIe Riser (CRU)
The PCIe riser installed in the server is a low-profile, half-length x16 connector card, supporting
up to 35–watt cards.
■
■
▼
Before You Begin
“How to Install the PCIe Riser” on page 42
“How to Remove the PCIe Riser” on page 44
How to Install the PCIe Riser
See:
“Locations of Internal Server Components” on page 30.
1
42
Prepare the server for service. See “How to Prepare for Service”on page 21.
Sun Fire X2270 M2 Server Service Manual • January, 2012, –12
Removing and Installing the PCIe Riser (CRU)
2
Remove the air duct. See “How to Remove the Air Duct”on page 53.
3
Align the riser card in the PCIe slot on the motherboard.
4
To install the riser card, gently push the card downward into the slot.
5
If you are installing a PCIe card, see “How to Install a PCIe Card”on page 41.
6
Install the air duct. See “How to Install the Air Duct”on page 53.
7
Prepare the server for operation. See “How to Prepare for Operation”on page 26.
See Also
■
■
“How to Remove the PCIe Riser” on page 44
“Removing and Installing a PCIe Card (CRU)” on page 40
43
Removing and Installing the PCIe Riser (CRU)
▼
Before You Begin
How to Remove the PCIe Riser
See:
“Locations of Internal Server Components” on page 30.
1
Prepare the server for service. See “How to Prepare for Service”on page 21.
2
Remove the air duct. See “How to Remove the Air Duct”on page 53.
3
If a PCIe card is connected to the PCIe riser, remove the PCIe card. See “How to Remove a PCIe
Card”on page 40.
4
Pull the PCIe riser upward to disengage the riser card from the connector on the motherboard.
5
Install the air duct. See “How to Install the Air Duct”on page 53.
6
Prepare the server for operation. See “How to Prepare for Operation”on page 26.
See Also
■
■
44
“How to Install the PCIe Riser” on page 42
“Removing and Installing a PCIe Card (CRU)” on page 40
Sun Fire X2270 M2 Server Service Manual • January, 2012, –12
Removing and Installing a Power Supply (CRU)
Removing and Installing a Power Supply (CRU)
This section contains the following topics:
■
■
▼
Before You Begin
“How to Remove the Power Supply” on page 45
“How to Install the Power Supply” on page 47
How to Remove the Power Supply
See:
■
■
“Sun Fire X2270 M2 Server Internal Cabling” on page 61
“Locations of Internal Server Components” on page 30
1
Prepare the server for service. See “How to Prepare for Service”on page 21.
2
Remove the air duct. See “How to Remove the Air Duct”on page 53.
45
Removing and Installing a Power Supply (CRU)
3
Reference the following illustration for this procedure.
Note the numbered panels.
4
Disconnect the three power supply cables from the motherboard (1).
5
Disconnect the power supply cable from the hard drive backplane and push the cable through
the cutout in the chassis divider (2).
6
Loosen the captive screw that secures the power supply to the chassis (3).
7
Lift the power supply out of the chassis (4).
Next Steps
46
“How to Install the Power Supply” on page 47
Sun Fire X2270 M2 Server Service Manual • January, 2012, –12
Removing and Installing a Power Supply (CRU)
▼
Before You Begin
How to Install the Power Supply
See:
■
■
■
1
“How to Remove the Power Supply” on page 45.
“Sun Fire X2270 M2 Server Internal Cabling” on page 61.
“Locations of Internal Server Components” on page 30
Reference the following illustration for this procedure.
Note the numbered panels.
2
Insert the power supply into the chassis with the cable bundle toward the front of the server (1).
3
To secure the power supply to the chassis, fully tighten the captive screw (2).
47
Removing and Installing a Hard Drive Filler and Hard Drive Assembly (CRU)
4
Route the HD/SSD power cable through the opening in the chassis divider (3).
5
Connect three of the power supply cables to the motherboard (4).
6
Connect the power supply cable to the hard disk backplane.
7
Install the air duct. See “How to Install the Air Duct”on page 53.
8
Prepare the server for operation. See “How to Prepare for Operation”on page 26.
Removing and Installing a Hard Drive Filler and Hard
Drive Assembly (CRU)
This section contains the following topics:
■
■
■
■
▼
“How to Remove a Hard Drive Filler” on page 48
“How to Install a Hard Drive Filler” on page 49
“How To Remove a Removable Hard Drive Assembly” on page 50
“How to Install a Removable Hard Drive Assembly” on page 51
How to Remove a Hard Drive Filler
Caution – Thermal over-temperature potential. Do not operate the server without all drive slots
populated with either a drive of a filler.
If your server contains a filler panel, remove the filler panel before installing a hard drive.
48
Sun Fire X2270 M2 Server Service Manual • January, 2012, –12
Removing and Installing a Hard Drive Filler and Hard Drive Assembly (CRU)
1
For the drive slot in which you want to install a removable hard drive, rotate the release lever on
the front of the filler to disengage the hook and extend the handle.
2
Use the handle to pull the filler out of the slot.
Next Steps
See Also
“How to Install a Removable Hard Drive Assembly” on page 51
■
■
■
▼
“How to Install a Hard Drive Filler” on page 49
“How To Remove a Removable Hard Drive Assembly” on page 50
“How to Install a Removable Hard Drive Assembly” on page 51
How to Install a Hard Drive Filler
Caution – Thermal over-temperature potential. Do not operate the server without all drive slots
populated with either a drive or a filler.
If your server contains a filler panel, remove the filler panel before installing a hard drive.
1
Prepare the server for service. See “How to Prepare for Service”on page 21.
2
Rotate the release lever on the front of the filler to disengage the hook and extend the handle.
49
Removing and Installing a Hard Drive Filler and Hard Drive Assembly (CRU)
3
Slide the filler into the vacant slot until the front of the filler is flush with the front of the server.
4
Close the latch and rotate the release lever to lock the latch.
See Also
■
■
■
▼
“How to Remove a Hard Drive Filler” on page 48
“How To Remove a Removable Hard Drive Assembly” on page 50
“How to Install a Removable Hard Drive Assembly” on page 51
How To Remove a Removable Hard Drive Assembly
Caution – Thermal over-temperature potential. Do not operate the server without all drive slots
populated with either a drive or a filler panel.
1
Power off the server. See “How to Power Off the Server”on page 28.
Note – If you are using an integrated-mirroring (IM) configuration, you do not need to power off
the server before removing a hard drive.
2
On the drive you want to remove, push the release button to open the latch and extend the latch
to its fully-open position.
Note – The latch is not an ejector. Do not bend it too far to the right. Doing so may damage the
latch.
50
Sun Fire X2270 M2 Server Service Manual • January, 2012, –12
Removing and Installing a Hard Drive Filler and Hard Drive Assembly (CRU)
3
To remove the drive, us the handle to pull the drive out of the drive slot.
4
If you are replacing the drive, go to “How to Install a Removable Hard Drive Assembly”on
page 51.
5
If you are not replacing the drive, install a filler panel. See “How to Install a Hard Drive Filler”on
page 49.
6
Power on the server. See “How to Power On the Server”on page 28.
See Also
■
■
■
▼
Before You Begin
“How to Remove a Hard Drive Filler” on page 48
“How to Install a Hard Drive Filler” on page 49
“How to Install a Removable Hard Drive Assembly” on page 51
How to Install a Removable Hard Drive Assembly
See:
“How to Remove a Hard Drive Filler” on page 48.
1
Power off the server. See “How to Power Off the Server”on page 28.
51
Removing and Installing the Air Duct (CRU)
2
Ensure that the latch on the hard drive assembly is in the fully open position.
To open the latch, press the latch release button on the front of the assembly.
3
Slide the drive into the drive slot until it is fully seated and flush with the front of the server.
4
Close the latch.
5
Power on the server. See “How to Power On the Server”on page 28.
See Also
■
■
■
“How to Remove a Hard Drive Filler” on page 48
“How to Install a Hard Drive Filler” on page 49
“How To Remove a Removable Hard Drive Assembly” on page 50
Removing and Installing the Air Duct (CRU)
This section contains the following topics:
■
■
52
“How to Remove the Air Duct” on page 53
“How to Install the Air Duct” on page 53
Sun Fire X2270 M2 Server Service Manual • January, 2012, –12
Removing and Installing the Air Duct (CRU)
▼
How to Remove the Air Duct
Caution – Thermal over-temperature potential. The air duct is an important server-cooling
component. Do not operate the server without the air duct installed .
Before You Begin
See:
“Locations of Internal Server Components” on page 30.
1
Prepare the server for service. See “How to Prepare for Service”on page 21.
2
Pull the air duct up and out of the chassis.
See Also
▼
Before You Begin
■
“How to Install the Air Duct” on page 53
How to Install the Air Duct
See:
“Locations of Internal Server Components” on page 30
53
Replacing a Blower Module (CRU)
1
Position the air duct in the chassis, aligning the baffle with the indents and opening in the
chassis divider.
2
Carefully lower the air duct in place.
3
Prepare the server for operation. See “How to Prepare for Operation”on page 26.
See Also
■
“How to Remove the Air Duct” on page 53
Replacing a Blower Module (CRU)
The following procedures describe how to replace a blower module. The X2270 server contains
three blower modules.
■
■
▼
Before You Begin
How to Remove a Blower Module
See:
■
■
54
“How to Remove a Blower Module” on page 54
“How to Install a Blower Module” on page 55
“Sun Fire X2270 M2 Server Internal Cabling” on page 61
“Locations of Internal Server Components” on page 30
Sun Fire X2270 M2 Server Service Manual • January, 2012, –12
Replacing a Blower Module (CRU)
1
Prepare the server for service. See “How to Prepare for Service”on page 21.
2
Remove the air duct. See “How to Remove the Air Duct”on page 53.
3
Unplug the blower’s power connector from the motherboard.
4
Pull the blower upward while pushing the connector cable through the cutout in the chassis
divider and taking care not to catch the connector on the metal, to remove the blower from the
chassis.
Caution – Thermal over-temperature potential. Do not operate the server without all airflow
components installed.
See Also
▼
Before You Begin
■
“How to Install a Blower Module” on page 55
How to Install a Blower Module
See:
■
■
“Locations of Internal Server Components” on page 30
“Sun Fire X2270 M2 Server Internal Cabling” on page 61
55
Replacing the Hard Drive Backplane Assembly (FRU)
1
Position the blower module so that it fits over the guideposts and the duct opening fits into the
cutouts in the chassis divider.
2
Gently push the blower module down while directing the connector cable through the cutout in
the chassis divider, until the blower is seated on the guideposts.
Note – Ensure that the connector cable has been directed through the connector opening in the
chassis divider and not through the blower exhaust opening.
3
Connect the blower power connector to the blower power connector on the motherboard.
4
Prepare the server for operation. See “How to Prepare for Operation”on page 26.
See Also
■
■
“How to Remove a Blower Module” on page 54
“Replacing a Blower Module (CRU)” on page 54
Replacing the Hard Drive Backplane Assembly (FRU)
Note – The hard drive backplane assembly is a field-replaceable unit. It must be replaced by a
certified Oracle Service Technician.
This section contains the following topics:
■
■
56
“How to Remove the Hard Drive Backplane” on page 57
“How to Install the Hard Drive Backplane” on page 58
Sun Fire X2270 M2 Server Service Manual • January, 2012, –12
Replacing the Hard Drive Backplane Assembly (FRU)
▼
Before You Begin
How to Remove the Hard Drive Backplane
See:
■
■
“Locations of Internal Server Components” on page 30
“Sun Fire X2270 M2 Server Internal Cabling” on page 61
1
Prepare the server for service. See “How to Prepare for Service”on page 21.
2
Remove all hard drives. See “How To Remove a Removable Hard Drive Assembly”on page 50.
This ensures that HD/SSDs are detached from the backplane assembly.
3
Remove the air duct. See “How to Remove the Air Duct”on page 53.
4
Disconnect the HD/SSD power cable connector and the four SATA cable connectors from the
backplane assembly.
5
Remove the eight screws fastening the backplane assembly to the server chassis.
6
Carefully lift the backplane assembly from the server chassis.
Next Steps
“How to Install the Hard Drive Backplane” on page 58
57
Replacing the Hard Drive Backplane Assembly (FRU)
▼
Before You Begin
How to Install the Hard Drive Backplane
See:
■
■
“Locations of Internal Server Components” on page 30
“Sun Fire X2270 M2 Server Internal Cabling” on page 61
1
Position the backplane board in the server chassis with the SATA connectors facing upward and
align the eight screw holes in the backplane with the threaded standoffs in the server chassis.
2
To secure the backplane to the server chassis, fully tighten the eight screws.
3
Connect the HD/SSD power cable and four SATA cables to the backplane.
Take care to route the cables properly.
4
Install all HD/SSDs. See “How to Install a Removable Hard Drive Assembly”on page 51.
5
Install the air duct. See “How to Install the Air Duct”on page 53.
6
Prepare the server for operation. See “How to Prepare for Operation”on page 26.
See Also
58
“How to Remove the Hard Drive Backplane” on page 57
Sun Fire X2270 M2 Server Service Manual • January, 2012, –12
Removing and Installing the SP Module (CRU)
Removing and Installing the SP Module (CRU)
This section contains the following topics:
■
■
▼
Before You Begin
“How to Remove the SP Module” on page 59
“How to Install the SP Module” on page 60
How to Remove the SP Module
See:
“Locations of Internal Server Components” on page 30
1
Prepare the server for service. See “How to Prepare for Service”on page 21.
2
Remove the air duct. See “How to Remove the Air Duct”on page 53.
3
Remove any cables that are attached to the rear of the SP module.
4
Completely loosen the captive screw securing the SP module to the server motherboard.
5
Pull the SP module upward to disengage the card from the connector and the alignment pin on
the motherboard.
6
To remove the SP module, slide it slightly forward to clear the rear wall of the server chassis, and
then lift the module from the chassis.
7
If you are replacing the SP module, see “How to Install the SP Module”on page 60.
8
Prepare the server for operation. See “How to Prepare for Operation”on page 26.
59
Removing and Installing the SP Module (CRU)
See Also
▼
Before You Begin
■
How to Install the SP Module
See:
■
■
1
“How to Install the SP Module” on page 60
“Locations of Internal Server Components” on page 30
“How to Remove the SP Module” on page 59
Slide the SP module alignment pin over the screw post before installing the SP module.
The SP module alignment pin is designed to help align the SP module with the card connector.
The SP module alignment pin is shipped with the SP module.
60
2
Position the SP module so the card’s RJ-45 and HD15 connectors face the rear of the server.
3
Align connectors on the SP board with the openings in the rear panel of the server chassis.
4
Use the alignment pin to align the connector on the SP module with the connector on the
motherboard.
5
Gently push down on the SP module to engage the connector on the module with the connector
on the motherboard.
6
Tighten the captive screw to secure the SP module.
Sun Fire X2270 M2 Server Service Manual • January, 2012, –12
Sun Fire X2270 M2 Server Internal Cabling
7
Install the air duct. See “How to Install the Air Duct”on page 53.
8
Prepare the server for operation. See “How to Prepare for Operation”on page 26.
See Also
“How to Remove the SP Module” on page 59
Sun Fire X2270 M2 Server Internal Cabling
Legend
1
Blower power cables (3)
2
Front I/O cable
3
SATA cable harness
4
Motherboard power cable
5
SATA backplane power cable
6
Blower power cable (main)
See also: “Locations of Internal Server Components” on page 30
61
Replacing the SATA Cable Harness (CRU)
Replacing the SATA Cable Harness (CRU)
This section contains the following topics:
■
■
▼
Before You Begin
“How to Remove the SATA Cable Harness” on page 62
“How to Install the SATA Cable Harness” on page 62
How to Remove the SATA Cable Harness
See:
“Sun Fire X2270 M2 Server Internal Cabling” on page 61.
1
Prepare the server for service. See “How to Prepare for Service”on page 21.
2
Remove the air duct. See .“How to Remove the Air Duct”on page 53.
3
Disconnect the four SATA cables from the backplane.
4
Disconnect the four SATA cables from the motherboard connections.
5
Release the SATA cable harness from its tie-down points.
6
Carefully pull the SATA cable through the cutout in the chassis divider and lift it from the chassis.
Next Steps
▼
Before You Begin
“How to Install the SATA Cable Harness” on page 62
How to Install the SATA Cable Harness
See:
“Sun Fire X2270 M2 Server Internal Cabling” on page 61.
62
1
Match the color-coded SATA cables with their associated motherboard connections and connect
the SATA cable connectors to the motherboard.
2
Carefully route the SATA cable through the cutout in the chassis divider.
3
Match the color-coded SATA cables with their associated backplane connection and connect the
SATA cable connectors to the backplane.
4
Secure the SATA cable to the tie-down points.
5
Check the routing of all cables for obstructions.
Sun Fire X2270 M2 Server Service Manual • January, 2012, –12
Replacing the Front I/O Cable (CRU)
6
Install the air duct. See “How to Install the Air Duct”on page 53.
7
Prepare the server for operation. See “How to Prepare for Operation”on page 26.
See Also
“How to Remove the SATA Cable Harness” on page 62
Replacing the Front I/O Cable (CRU)
This section contains the following topics:
■
■
▼
Before You Begin
“How to Remove the Front I/O Cable” on page 63
“How to Install the Front I/O Cable” on page 63
How to Remove the Front I/O Cable
See:
“Sun Fire X2270 M2 Server Internal Cabling” on page 61.
1
Prepare the server for service. See “How to Prepare for Service”on page 21.
2
Remove the air duct. See “How to Remove the Air Duct”on page 53.
3
Disconnect the I/O cable from the I/O board.
4
Disconnect the two I/O cable connections from the motherboard.
5
Carefully pull the I/O cable through the cutout in the chassis divider and lift it from the chassis.
Next Steps
▼
Before You Begin
“How to Install the Front I/O Cable” on page 63
How to Install the Front I/O Cable
See:
■
■
“Sun Fire X2270 M2 Server Internal Cabling” on page 61
“How to Remove the Front I/O Cable” on page 63
1
Connect the two I/O cable connections to the motherboard.
2
Carefully route the I/O cable through the cutout in the chassis divider and over the top of the HD
partition.
63
Replacing the Front I/O Board (FRU)
3
Reconnect the I/O cable to the I/O board.
4
Check the routing of all cables for obstructions.
5
Prepare the server for operation.
See Also
“How to Remove the Front I/O Cable” on page 63
Replacing the Front I/O Board (FRU)
Note – The front I/O board is a field-replaceable unit. It must be replaced by a certified Oracle
Service Technician.
This section contains the following topics:
■
■
▼
Before You Begin
“How to Remove the I/O Board” on page 64
“How to Install the I/O Board” on page 66
How to Remove the I/O Board
See:
“Locations of Internal Server Components” on page 30
64
1
Prepare the server for service. See “How to Prepare for Service”on page 21.
2
Remove the air duct. See “How to Remove the Air Duct”on page 53.
Sun Fire X2270 M2 Server Service Manual • January, 2012, –12
Replacing the Front I/O Board (FRU)
3
Remove the three screws securing the I/O board to the hard drive (HD) cage.
4
To remove the I/O board, lift the board high enough to clear the standoffs and then slide the
board toward the rear of the server until the connectors are clear.
5
Remove the cable connected to the I/O board.
Next Steps
“How to Install the I/O Board” on page 66
65
Replacing the Front I/O Board (FRU)
▼
Before You Begin
How to Install the I/O Board
See:
“Locations of Internal Server Components” on page 30
1
Position the I/O board on top of the HD cage with the connectors facing upward.
2
Connect the I/O cable to the connector I/O board.
3
Lower the board onto the server and slide the two connectors on the front of the board under
the front edge of the server.
4
Align the screw holes in the board with the threaded standoffs.
5
To secure the board to the server, fully tighten the three screws.
6
Install the air duct. See “How to Install the Air Duct”on page 53.
7
Prepare the server for operation. See “How to Prepare for Operation”on page 26.
See Also
66
“How to Remove the I/O Board” on page 64
Sun Fire X2270 M2 Server Service Manual • January, 2012, –12
Removing, Installing, and Adding a CPU and Heatsink (FRU)
Removing, Installing, and Adding a CPU and Heatsink
(FRU)
Note – The CPU and heatsink assembly is a field-replaceable unit. It must be replaced by a
certified Oracle Service Technician.
The following procedure describes how to replace a CPU. The Sun Fire X2270 M2 Server
supports both single-CPU and dual-CPU configurations. The procedures in this section include
removal and installation procedures, as well as a procedure for adding a second CPU to a
single-CPU configuration.
■
■
■
▼
Before You Begin
“How to Remove a CPU and Heatsink” on page 67
“How to Install a CPU and Heatsink” on page 68
“How to Add a New CPU and Heatsink Assembly” on page 70
How to Remove a CPU and Heatsink
See:
“Locations of Internal Server Components” on page 30
1
Prepare the server for service. See “How to Prepare for Service”on page 21.
2
Remove the air duct. See “How to Remove the Air Duct”on page 53.
3
Remove the four screws that secure the heatsink to the motherboard.
4
Slightly wiggle the heatsink right and left to break the seal created by the thermal compound.
5
Lift the heatsink away from the CPU and out of the server.
67
Removing, Installing, and Adding a CPU and Heatsink (FRU)
6
Place the heatsink upside down on a flat surface to prevent the thermal compound from
contaminating other components or the work space.
7
To open the socket release lever, push the lever down and move it slightly away from the CPU.
This action releases the lever from the retaining clip.
8
Lift the lever to its fully-opened position.
9
Lift the CPU cover to its fully-opened position.
10
Remove the CPU, leaving the release lever in the open position.
Note – Ensure that no thermal compound that might be left from the heatsink comes into
contact with the CPU socket or underside of the CPU chip.
Next Steps
▼
Before You Begin
“How to Install a CPU and Heatsink” on page 68
How to Install a CPU and Heatsink
See:
■
■
1
68
“Locations of Internal Server Components” on page 30
“How to Remove a CPU and Heatsink” on page 67
Ensure that the socket release lever and the CPU cover are in their fully-open position.
Sun Fire X2270 M2 Server Service Manual • January, 2012, –12
Removing, Installing, and Adding a CPU and Heatsink (FRU)
2
Unpack the new CPU.
Caution – ESD component damage. The CPU is highly sensitive to static electricity. Observe ESD
precautions before handling the CPU. See “Antistatic Procedures and Precautions” on page 18.
3
Align the small triangle on the upper-left corner of the CPU with the alignment triangle on the
socket.
In addition, ensure that the alignment post on the socket engages the semicircular cutout on the
CPU.
4
Set the CPU in the socket.
Caution – Component and motherboard damage. Do not force the CPU into the socket. The
CPU does not need to be pushed downward. When the CPU is correctly aligned, you should be
able to easily place the CPU in the socket and it should have minimal movement within the
socket. Forcing a misaligned CPU into the socket can permanently damage the component and
the motherboard.
5
When the CPU is seated in the socket, close the CPU cover.
6
To secure the CPU in the socket, lower the socket release lever down until it snaps into place
under the retaining clip.
7
If you are installing a new heatsink, remove the protective plastic from the base of the heatsink
to expose the pre-applied thermal compound and go to Step 10.
69
Removing, Installing, and Adding a CPU and Heatsink (FRU)
8
If you are not installing a new heatsink, use the alcohol pads to remove any residual thermal
compound from the bottom of the heatsink.
9
Apply thermal compound to the top of the CPU.
For best application, use the entire contents of the pre-filled syringe and apply the compound in
a star (asterisk) pattern.
10
Carefully position the heatsink over the CPU, aligning it with the mounting posts.
After the heatsink contacts the CPU, minimize the movement .
Caution – If the heatsink is moved too much during its installation, the layer of thermal
compound might become uneven, leading to component damage.
11
To secure the heatsink to the motherboard, alternately tighten the four screws.
Alternately turn each screw one full turn until all the screws are tightened fully.
12
Install the air duct. See “How to Install the Air Duct”on page 53.
13
Prepare the server for operation. See “How to Prepare for Operation”on page 26.
▼
How to Add a New CPU and Heatsink Assembly
Use this procedure if you are adding a CPU to your server.
Before You Begin
See:
“Locations of Internal Server Components” on page 30
70
1
Prepare the server for service. See “How to Prepare for Service”on page 21.
2
Remove the air duct. See “How to Remove the Air Duct”on page 53.
Sun Fire X2270 M2 Server Service Manual • January, 2012, –12
Removing, Installing, and Adding a CPU and Heatsink (FRU)
3
To unlock the CPU cover, gently push downward on the CPU retaining lever and move it slightly
away from the CPU.
This action releases the lever from the retaining clip.
4
Lift the lever to its fully open and upright position.
5
Lift the CPU cover to its fully open position.
6
Remove the new CPU from its packaging.
Caution – ESD component damage. The CPU is highly sensitive to static electricity. Observe ESD
precautions before handling the CPU. See “Antistatic Procedures and Precautions” on page 18.
7
Align the small triangle on the upper-left corner of the CPU with the alignment triangle on the
motherboard.
In addition, the alignment post on the socket must engage the semicircular cutout on the CPU.
8
Set the CPU in the socket.
71
Removing, Installing, and Adding a CPU and Heatsink (FRU)
Caution – Component and motherboard damage. Do not force the CPU into the socket. The
CPU does not require any force and does not need to be pushed downward. When the CPU is
correctly aligned, you should be able to easily place the CPU in the socket and it should have
minimal movement within the socket. Forcing a misaligned CPU into the socket can
permanently damage the component and the motherboard.
9
When the CPU is seated in the socket, close the CPU cover.
10
To secure the CPU in the socket, rotate the socket retaining lever down until it snaps into place
under the retaining clip.
11
Remove the protective plastic from the base of the heatsink to expose the pre-applied thermal
compound.
The plastic cover protects the compound on the bottom of the heatsink. Do not contaminate
components or the work space with the thermal compound.
12
Carefully position the heatsink over the CPU, aligning it with the threaded standoffs.
After the heatsink contacts the CPU, take care to minimize the movement .
Caution – If the heatsink is moved too much during its installation, the layer of thermal
compound might become uneven, leading to component damage.
13
Lower the heatsink onto the CPU.
14
To secure the heatsink, alternately tighten the four screws.
Alternately turn each screw one full turn until all the screws are tightened fully.
72
15
Install the air duct. See “How to Install the Air Duct”on page 53.
16
Prepare the server for operation.
Sun Fire X2270 M2 Server Service Manual • January, 2012, –12
Replacing the Motherboard (FRU)
Replacing the Motherboard (FRU)
Note – The hard drive backplane assembly is a field-replaceable unit. It must be replaced by a
certified Oracle Service Technician.
■
■
▼
Before You Begin
“How to Remove the Motherboard” on page 73
“How to Install the Motherboard” on page 74
How to Remove the Motherboard
See:
“Locations of Internal Server Components” on page 30
1
Backup motherboard (MB) FRUID information, see “How to Backup Motherboard FRUID
Information”on page 78.
2
Prepare for service. See “How to Prepare for Service”on page 21.
3
Remove the air duct. See “How to Remove the Air Duct”on page 53.
4
Remove the SP module. See “How to Remove the SP Module”on page 59.
5
Remove any PCIe cards. See “How to Remove a PCIe Card”on page 40.
6
Remove the PCIe riser assembly. See “How to Remove the PCIe Riser”on page 44.
7
Remove the DIMMs. See “How to Remove a DIMM”on page 33.
8
Disconnect all cables attached to the motherboard and keep them clear of the motherboard.
See “Sun Fire X2270 M2 Server Internal Cabling”on page 61.
If necessary label the cables.
9
Remove the CPU and heatsink assemblies. See “How to Remove a CPU and Heatsink”on
page 67.
73
Replacing the Motherboard (FRU)
10
Remove and retain the eight screws that secure the motherboard to the chassis.
11
Lift the motherboard out of the chassis.
Next Steps
▼
Before You Begin
“How to Install the Motherboard” on page 74
How to Install the Motherboard
See:
“How to Remove the Motherboard” on page 73.
74
1
Position the new motherboard so that the ports on the motherboard face the rear of the server.
2
Align the motherboard in the chassis so that the screw holes align with the threaded standoffs
on the chassis.
Sun Fire X2270 M2 Server Service Manual • January, 2012, –12
Replacing the Motherboard (FRU)
3
To secure the motherboard, fully tighten the eight screws.
4
Install the CPU and heatsink. See “How to Install a CPU and Heatsink”on page 68.
5
Connect the cables to the motherboard. See “Sun Fire X2270 M2 Server Internal Cabling”on
page 61.
6
Install the DIMMs. See “How to Install a DIMM”on page 35.
7
Install the PCIe riser. See “How to Install the PCIe Riser”on page 42.
8
Install the PCIe card. See “How to Install a PCIe Card”on page 41.
9
Install the SP module. See “How to Install the SP Module”on page 60.
10
Install the air duct. See “How to Install the Air Duct”on page 53.
11
Prepare the server for operation. See “How to Prepare for Operation”on page 26.
12
Enter the standby-power mode. See “Power Modes”on page 27.
75
Replacing the Motherboard (FRU)
13
To restore FRUID information, enter Service mode and type the following command:
copypsnc BACKUP1 PRIMARY
The MAC address stored in BACKUP1 is incorrect, because it is the address for the old MB.
14
To obtain the MAC address of the new motherboard, log in to the ILOM CLI and enter the
following command:
show /SYS/MB/NET0
The MAC address appears in the list.
15
Make note of the MAC address.
16
In Service mode, type the following command:
setpsnc -m new-mac_address
where, new-mac_address is the MAC address of the new motherboard.
76
17
Backup the MB FRUID information. See “How to Backup Motherboard FRUID Information”on
page 78.
18
Prepare the server for operation. See “How to Prepare for Operation”on page 26.
Sun Fire X2270 M2 Server Service Manual • January, 2012, –12
Sun Fire X2270 M2 Server Service Procedures
and Information
This section contains the following information about the BIOS Setup utility and management
procedures:
■
■
■
■
■
■
“Using the Tools and Drivers CD” on page 77
“How to Backup Motherboard FRUID Information” on page 78
“LED Locations and Meanings” on page 78
“BIOS Booting and Setup Considerations” on page 82
“Service Procedures” on page 88
“Ordering Components” on page 93
Using the Tools and Drivers CD
The Tools and Drivers CD contains several software applications and utilities for use with your
Sun Fire X2270 M2 Server. The Tools and Drivers CD is available online as an ISO image, which
you can download and mount as a virtual CD or use to burn a physical CD. Use the following
table to locate the documents that contain a description and explanation of the applications and
utilities that are on the Sun Fire X2270 M2 Server Tools and Drivers CD.
Application
Document or Section in This Document
Drivers and installation scripts for supported
operating systems
■
■
■
■
Sun Fire X2270 M2 Server Installation Guide for
Linux Operating Systems
Sun Fire X2270 M2 Server Installation Guide for
Oracle Solaris Operating System
Sun Fire X2270 M2 Server Installation Guide for
Oracle VM
Sun Fire X2270 M2 Server Installation Guide for
Windows Operating System
BIOS and SP firmware
Integrated Lights Out Manager Supplement for Sun
Fire X2270 M2 Server
Diagnostics software
Oracle x86 Server Diagnostics Guide
Windows RIS/WDS files
Sun Fire X2270 M2 Server Installation Guide for
Windows Operating System
77
LED Locations and Meanings
▼
How to Use the Tools and Drivers CD
1
Download the Tools and Drivers CD ISO image from the server download page.
2
Use the ISO image to burn a CD or mount the ISO image as a virtual CD.
3
Boot the server from the CD or browse the contents of the CD.
▼
How to Backup Motherboard FRUID Information
Note – This information is for Oracle Service personnel only.
The Sun Fire X2270 M2 Server supports TLI and stores the TLI records in the motherboard
(MB) FRUID container, called PRIMARY and in a file on the service processor (SP) filesystem,
called BACKUP1. After adding or replacing a component in your server, you can initiate a
backup the latest TLI record information in the MB FRUID PRIMARY container to BACKUP1
on the SP filesystem using this procedure.
1
Enter Service mode.
2
To backup the PRIMARY container to the SP filesystem, enter the following command:
copypsnc PRIMARY BACKUP1
Next Steps
“How to Remove the Motherboard” on page 73
LED Locations and Meanings
This section contains the following topics:
■
■
■
“Front Panel System Status LEDs” on page 78
“Hard Drive LEDs” on page 79
“Rear Panel System Status LEDs” on page 80
Front Panel System Status LEDs
The Sun Fire X2270 M2 Server has three system status LEDs on both the front and rear panels of
the server. The LEDs are the Power LED, the Service Action Required LED, and the Locate LED.
78
Sun Fire X2270 M2 Server Service Manual • January, 2012, –12
Hard Drive LEDs
LED Name
Color
Activity
1
Server Locate LED
White
Use to identify a server in a rack. Activate locally by pressing the
Locate button or activate remotely using the ILOM.
■
Off: Normal
■
On: Blinking
2
Server Service Action
Required LED
Amber
The SP monitors the health of the system and activates the Service
Action Required LED.
■
Off: Normal operation
■
Slow blink: A new (unacknowledged) event that requires a service
action has been detected.
■
Steady on: An event has been acknowledged, but the problem still
requires attention.
The following conditions cause the SP to activate the Service Action
Required LED:
■
Voltage outside thresholds.
■
Temperature above thresholds.
■
Fan speed below thresholds (or not present).
■
24 correctable errors have occurred in a 24 hour period.
■
One correctable error has occurred.
3
Power OK LED
Green
Use to discern the power state of the server.
Steady On: Full-power mode on and OK.
■
Blinking: Standby power is on, but main power is off
■
Quick blink: in POST, diagnostics running
■
Off: No power. AC cords not attached.
■
For more on power modes, see “Power Modes” on page 27.
4
Power Button
Hard Drive LEDs
For each hard disk (HD) there are three LEDs.
79
Rear Panel System Status LEDs
Name
Color
Activity
Comment
1 Hot-swap Blue
LED
■
Not supported
2 Fault
LED
■
Amber
3 Activity Green
LED
■
■
■
■
Off: Normal operation
Steady on: The system
indicates that the disk is
ready to be removed.
Not supported
Off: Normal operation
Steady on: The system has
detected a fault with the
HD.
Blink: Disk activity,
standby
Off: Power is off or no disk
activity
Rear Panel System Status LEDs
The rear panel LEDs:
80
Sun Fire X2270 M2 Server Service Manual • January, 2012, –12
Rear Panel System Status LEDs
Name
Color
Activity
NET MGT 10/100
Ethernet LED
Green and
Amber
See Table 1
2,3,4 GigabitEthernet LED Green and
Amber
See Table 2
5
Server Locate LED
Use to identify a server in a rack. Activate locally by pressing the
Locate button or activate remotely using the ILOM.
■
Off: Normal
■
On: Blinking
6
Server Service Action Amber
Required LED
1
White
The SP monitors the health of the system and activates the
Service Action Required LED.
■
Off: Normal operation.
■
Slow blink: A new (unacknowledged) event that requires a
service action has been detected.
■
Steady on: An event has been acknowledged, but the
problem still requires attention.
The following conditions cause the SP to activate the Service
Action Required LED:
■
Voltage outside thresholds
■
Temperature above thresholds
■
Fan speed below thresholds (or not present)
■
24 correctable errors have occurred in a 24 hour period.
■
One correctable error has occurred.
7
TABLE 1
Power OK LED
Green
Use to discern the power state of the server.
■
Steady On: Full-power mode on and OK.
■
Blinking: Standby power is on, but main power is off
■
Quick blink: in POST, diagnostics running
■
Off: No power. AC cords not attached.
10/100 Ethernet LED Activity Table
LED Name
Color
Activity
10/100 Ethernet
(right side)
Green
On: Link established at 100 Megabits.
Amber
On: Link established at 10 Megabits. Amber LED indicates that
the link established is not at full capacity for that port.
Green
On: Link Activity.
10/100 Ethernet
(left side)
81
BIOS Booting and Setup Considerations
TABLE 2
10/100/1000 Base-T Ethernet Activity Table
LED Name
Color
Activity
10/1000/1000 Base-T Ethernet LED (left side)
Green
On: Link established at 1 Gigabit.
Amber
On: Link established at 100
Megabits. Amber LED indicates
that the link established is not at full
capacity for that port.
Amber
Off: Link established at 10
Megabits. Amber LED indicates
that the link established is not at full
capacity for that port.
Green
On: Link activity.
10/1000/1000 Base-T Ethernet LED (right side)
BIOS Booting and Setup Considerations
See the following sections for information when booting the BIOS and other setup
considerations:
■
■
■
■
■
■
“About the BIOS” on page 82
“BIOS-Supported POST Hot Keys” on page 83
“Default BIOS Power-On Self Test (POST) Events” on page 83
“BIOS POST F1 and F2 Errors” on page 84
“BIOS POST Memory Testing Sequence” on page 87
“About Hardware Prefetchers” on page 88
About the BIOS
The Basic Input/Output System (BIOS) has a setup utility stored in the BIOS memory. The
setup utility reports system information and can be used to configure the BIOS settings. The
configurable data is provided with context-sensitive help and is stored in the system’s
battery-backed CMOS RAM. If the configuration stored in the CMOS RAM is invalid, the BIOS
settings return to their default optimal values.
There are seven menus in the BIOS Setup utility, which appear in this order: Main, Advanced,
PCI, Boot, Security, Chipset, and Exit. To navigate the menus or options listed on the menu, use
the arrow keys. The options or fields that you can configure on a menu appear in color. For
instructions on how to navigate and change settings in the BIOS Setup utility, refer to the online
instructions provided on the menu.
82
Sun Fire X2270 M2 Server Service Manual • January, 2012, –12
Default BIOS Power-On Self Test (POST) Events
BIOS-Supported POST Hot Keys
Key or Key Sequence
Function
Availability
F2
Enter BIOS Setup utility
During POST
ESC
Toggle the logo screen to POST screen
While Log screen appears
ESC
Bypass memory test
During memory count
F1
Continue from nonfatal BIOS error
During POST when prompt message is
shown
F8
Show the boot menu
During POST
F12
Boot from Network
PXE boot
F2
Enter Setup utility when fatal error
During POST when prompt message is
shown
Ctrl + Home
BIOS recovery
Press when power on
Default BIOS Power-On Self Test (POST) Events
At system startup, the BIOS performs a power-on self test that checks the hardware on your
server to ensure that all components are present and functioning properly. identifies the events
that can occur during BIOS POST, as well as specifies whether these event can prevent the host
from powering-on.
Event
Cause
Boot continues on
host?
User password violation
Attempt to enter password fails three times
No
Setup password violation
Attempt to enter password fails three times
No
Correctable ECC
Correctable error correction code (ECC) error detected
Does not apply
Uncorrectable ECC
Uncorrectable ECC error detected
Does not apply
No system memory
No physical memory detected in the system
No
No usable system memory
All installed memory has experienced an unrecoverable failure
No
Hard disk controller failure
No disk controller found
Yes
Keyboard failure
Keyboard cannot be initialized
Yes
Boot media failure
No removable boot media is found
Yes
No video device
No video controller is found
No
83
BIOS POST F1 and F2 Errors
Event
Cause
Boot continues on
host?
Firmware (BIOS) ROM corruption
BIOS checksum fails and the boot block is not corrupted
No
System restart
System boot initiated
Yes
Initiated by hard reset
Boot process started by hard reset
Yes
Memory initialization
Memory sizing is occurring
Does not apply
System firmware progress
Primary processor initialization
Primary CPU initialization
Does not apply
System firmware progress
Initiated by warm reset
Boot process started by warm reset
Does not apply
Embedded controller management
Management controller initialization
Does not apply
Secondary processor(s) initialization
Secondary CPU initialization asserted
Does not apply
System firmware progress
Video initialization
When BIOS initializes keyboard
Does not apply
Keyboard controller initialization
When BIOS initializes keyboard
Does not apply
Option ROM initialization
BIOS initializes Option ROMs
Does not apply
System firmware progress
Option ROM space exhausted
BIOS cannot copy an option to the memory
Yes
User initiated system set up
End user initiated access to BIOS Setup utility
Does not apply
System firmware progress
User initiated boot to OS
System boot initiated
Does not apply
System firmware progress
No bootable media
Nothing to boot from
No
PXE server not found
Boot error - PXE server not found
No
F12 key was pressed but BIOS fails to boot from PXE server
ACPI Power state
Soft-off power applied
Does not apply
BIOS POST F1 and F2 Errors
Each power-on-self-test (POST) diagnostic is a low-level test designed to pinpoint faults in a
specific hardware component. If a POST diagnostic discloses an F1 or F2 error, it typically
reports the following information about the error:
84
Sun Fire X2270 M2 Server Service Manual • January, 2012, –12
BIOS POST F1 and F2 Errors
■
■
Type of error detected
When or where the error occurred
The following table lists some of the F1 and F2 error messages that could appear during the
POST diagnostics and instructions for how to possibly resolve the error reported.
BIOS POST Error Message
Error Type
Resolution
Uncorrectable Error Detected on Last Boot:IOH(0) Protocol
Error (Please Check SP Log for more Details)
IOH error
■
Uncorrectable Error Detected on Last Boot:IOH(0) QPI [x]
Error (Please Check SP Log for more Details)
IOH error
■
Press F1 to continue.
Check the SP event log in ILOM for more details.
■
Press F1 to continue.
■
Check the fault management function and the SP
event log in ILOM for more details.
■
Press F1 to continue.
■
Check the fault management function and the SP
event log in ILOM for more details.
Uncorrectable Error Detected on Last Boot:IOH(0) ESI Error IOH error
(Please Check SP Log for more Details)
■
Press F1 to continue.
■
Check the fault management function and the SP
event log in ILOM for more details.
Uncorrectable Error Detected on Last Boot:IOH(0) Thermal
Error (Please Check SP Log for more Details)
IOH error
■
Press F1 to continue.
■
Check the fault management function and the SP
event log in ILOM for more details.
Uncorrectable Error Detected on Last Boot:IOH(0) DMA
Error (Please Check SP Log for more Details)
IOH error
■
■
Press F1 to continue.
Check the SP event log for more details.
Uncorrectable Error Detected on Last Boot:IOH(0)
Miscellaneous Error (Please Check SP Log for more Details)
IOH error
■
Press F1 to continue.
■
Check the fault management function and the SP
event log in ILOM for more details.
Uncorrectable Error Detected on Last Boot:IOH(0) VT-d
Error (Please Check SP Log for more Details)
IOH error
■
■
Press F1 to continue.
Check the SP event log in ILOM for more details.
BMC Not Responding
ILOM error
■
Press F1 to continue.
Note – Where QPI [ x] equals 0 for QPI Link 0 or 1 for QPI
Link 1.
Uncorrectable Error Detected on Last Boot:IOH(0) PCIe [x]
Error (Please Check SP Log for more Details)
IOH error
Note – Where PCIe [ x] port number can range from 1 to 10
depending on the PCI root port on IOH.
Note – This error message might appear if an
internal error occurs during the SP/BIOS
communication. This error might require you to
restart the SP.
85
BIOS POST F1 and F2 Errors
BIOS POST Error Message
Error Type
Resolution
■
IDE/ATAPI
error
■
Press F1 to continue.
■
Check the SP event log in ILOM for more details.
■
■
■
Primary Master Hard Disk Error
Primary Slave Hard Disk Error
Secondary Master Hard Disk Error
Secondary Slave Hard Disk Error
Timer Error
Note – These error messages appear when the
BIOS is attempting to configure IDE/ATAPI
devices in POST.
8254 timer
error
■
Press F1 to continue.
■
Check the SP event log in ILOM for more details.
Note – This type of error typically indicates an
error while programming the count register of
channel 2 of the 8254 timer. This could indicate a
problem with system hardware.
RAM R/W test failed
Memory test
failure
■
Press F1 to continue.
■
Check the SP event log in ILOM for more details.
Note – This type of error typically indicates that
the RAM read/write (R/W) test failed.
KBC BAT Test failed
Display memory test failed
CMOS Battery Low
Keyboard
controller basic
assurance test
error
■
Press F1 to continue.
■
Check the SP event log in ILOM for more details.
Video display
error
■
CMOS battery
error
■
Note – Keyboard controller BAT test failed. This
error might indicate a problem with keyboard
controller initialization.
■
■
■
■
■
CMOS Checksum Bad
CMOS Date/Time Not Set
CMOS error
■
■
86
Sun Fire X2270 M2 Server Service Manual • January, 2012, –12
Press F1 to continue.
Check the SP event log in ILOM for more details.
Press F2 to enter BIOS Setup utility to load
system defaults.
Check the SP event log in ILOM for more details.
If necessary, replace CMOS battery.
Press F2 to enter BIOS Setup utility to load
system defaults.
Check the SP event log in ILOM for more details.
BIOS POST Memory Testing Sequence
BIOS POST Error Message
Error Type
Resolution
Password check failed
Password
check error
■
Press F1 to continue.
■
Check the SP event log in ILOM for more details.
Note – This type of error indicates a password
entered does not match the password specified in
the BIOS Setup utility. This condition might
occur for both Supervisor and User password
verification.
Keyboard/Interface Error
Keyboard
controller error
■
Press F1 to continue.
■
Check the SP event log in ILOM for more details.
Note – This type of error indicates a Keyboard
Controller failure. This error might indicate a
problem with the system hardware.
S.M.A.R.T. error on the drive
S.M.A.R.T.
device error
■
Press F1 to continue.
■
Check the SP event log in ILOM for more details.
Note – S.M.A.R.T. failure messages might
indicate to replace the storage device.
BIOS POST Memory Testing Sequence
The BIOS POST memory testing sequence is performed as follows:
1. The first megabyte of DRAM is tested by the BIOS before the BIOS code is shadowed (that
is, copied from ROM to DRAM).
2. After executing out of DRAM, the BIOS performs a simple memory test (where a write/read
of every location with the pattern 55aa55aa is performed).
Note – The simple memory test is performed only if Quick Boot is not enabled from the Boot
Settings Configuration screen. Enabling Quick Boot causes the BIOS to skip the memory
test.
3. The BIOS polls the memory controllers for both correctable and non-correctable memory
errors and logs those errors into the SP.
4. The message BMC Responding appears at the end of the POST.
87
About Hardware Prefetchers
About Hardware Prefetchers
Hardware prefetchers work well in workloads that traverse array and other regular data
structures. The hardware prefetcher option is disabled by default and should be disabled when
running applications that perform aggressive software prefetching or for workloads with
limited cache. For example, memory-intensive applications with high bus utilization could see a
performance degradation if hardware prefetching is enabled.
Service Procedures
This section contains the following service procedure topics:
■
■
■
▼
“How to Clear the CMOS” on page 88
“Updating BIOS and SP Firmware” on page 89
“Recovering the SP and BIOS Firmware” on page 91
How to Clear the CMOS
Use this procedure to clear the server’s CMOS settings in the case of a system hang.
For example, if the server hangs because of incorrect settings and will not boot, use this
procedure to invalidate the settings and reboot with the default settings.
1
Prepare the server for service. See “How to Prepare for Service”on page 21.
2
Remove the AC power cord from the rear of the server.
3
Remove the server cover. See “How to Remove the Server Cover”on page 25.
4
Remove the battery for 30 seconds, then reinsert it.
Use the procedure for replacing the system battery. See “Replacing the System Battery (CRU)”
on page 31.
88
5
Install the server cover. See “How to Install the Server Cover”on page 26.
6
Prepare the server for operation. See “How to Prepare for Operation”on page 26.
7
Reinsert the AC power cord.
Sun Fire X2270 M2 Server Service Manual • January, 2012, –12
Updating BIOS and SP Firmware
Updating BIOS and SP Firmware
Note – If you want to use the Sun Installation Assistant to update the BIOS and SP firmware,
refer to “System BIOS and ILOM Upgrade” in the Sun Installation Assistant for Windows and
Linux User’s Guide.
You can update the BIOS and SP firmware from the Tools and Drivers CD using one of the
following methods:
■
■
“How to Update BIOS and ILOM SP Firmware Using the CLI” on page 89
“How to Update the BIOS and SP Firmware Using the Web Interface” on page 90
▼
How to Update BIOS and ILOM SP Firmware Using the
CLI
1
Set up a TFTP server to host the SP image.
Instructions for setting up the TFTP server can be found in the system administration guides
for the appropriate Solaris or Linux version:
■
Solaris 10 manual at:
http://docs.sun.com/app/docs/prod/solaris.10#hic
■
Red Hat Enterprise Linux 5 documentation at:
http://www.redhat.com/docs/manuals/enterprise/#RHEL5
■
SUSE Linux Enterprise Server 9 manual at:
http://www.novell.com/documentation/suse.html
2
Copy the SP image from the /firmware/webgui_cli/version/SP_file file on the Tools and
Drivers CD to your TFTP server /tftpboot directory.
where version is the version of the Tools and Drivers CD that you are using and SP_file is the
name of the SP image.
For example: /firmware/webgui_cli/1.0.0/X2270M2-3.0.9.20.pkg
3
Ensure that the OS on the platform is shut down.
4
Log in to the Sun Fire X2270 ILOM CLI with Administrator privileges.
5
Type the following command to download the new ILOM SP firmware image:
-> load -source tftp:URL
89
Updating BIOS and SP Firmware
For example:
-> load -source tftp://ipaddress/X2270M2-xxx_xxxx.pkg
6
Type y to load the specified file.
7
Type y to preserve your ILOM configuration settings. If not, the settings will be overwritten by
the firmware default.
8
Type n to upgrade BIOS after ILOM is upgraded.
The BIOS and ILOM SP firmware update begins.
Note – During the upgrade process, the login prompt appears. Do not attempt to log in until the
update is finished.
Caution – Possible firmware corruption. The update is not finished until the SP reboot is
complete. Do not press the Power button until the SP is booted and the server is in
standby-power mode.
▼
How to Update the BIOS and SP Firmware Using the
Web Interface
You can update BIOS and ILOM SP firmware using the ILOM web interface. Refer to the Sun
Integrated Lights Out Manager 3.0 User’s Guide for more information about setting up and using
the ILOM software.
1
Start the ILOM SP web interface by typing the IP address of the SP into a browser.
2
Copy the file /firmware/webgui_cli/version/SP_file from the webgui_cli directory located
on the Tools and Drivers CD to the remote system that is running the ILOM web interface.
where version is the version of the Tools and Drivers CD you are using and SP_file is the name
of the SP image.
For example: /firmware/webgui_cli/1.0.0/X2270M2-3.0.9.20.pkg
90
3
Ensure that the OS on the platform is shut down.
4
Log in to the SP ILOM web interface with Administrator privileges.
5
Select Maintenance --> Firmware Upgrade tabs.
The Firmware Upgrade page appears.
Sun Fire X2270 M2 Server Service Manual • January, 2012, –12
Recovering the SP and BIOS Firmware
6
Click Enter Upgrade Mode.
A dialog box appears asking you to confirm to enter Upgrade mode.
7
Click OK to enter Upgrade mode or Cancel to exit the process.
ILOM stops its normal operation and prepares for a flash upgrade.
8
Enter the path to the new ILOM flash image file in the Select Image File to Upload field or click
Browse to locate and select the firmware update file.
Use files with .pkg extensions.
9
Click Upload to upload the file, or click Cancel to exit the process.
The selected file is uploaded and verified as the correct image update for your SP.
This process takes about one minute with a fast network connection.
10
When the Verify Firmware Image page appears, click OK.
11
Select Preserve Configuration to keep your ILOM settings. If not, the settings are overwritten by
the firmware defaults.
12
Click Start Upgrade or click Cancel to exit the process.
When you click Start Upgrade, a progress screen indicates that the firmware image is being
updated. When the update progress reaches 100%, the firmware update is complete.
When the update is complete, the system automatically reboots.
13
After the SP finishes rebooting, use your browser to reconnect to ILOM.
Recovering the SP and BIOS Firmware
If your server has corrupted SP or BIOS firmware, you can use one of the following methods to
recover the firmware:
■
■
“How to Recover the SP and BIOS Firmware Using a CD/DVD Drive” on page 92
“How to Recover the SP and BIOS Firmware Using a USB Flash Drive” on page 92
Note – You should only use the following procedures for system recovery, as these procedures
will not preserve BIOS settings and ILOM configurations.
91
Recovering the SP and BIOS Firmware
▼
How to Recover the SP and BIOS Firmware Using a
CD/DVD Drive
1
Insert the Tools and Drivers CD into the CD/DVD drive.
2
Reboot the server.
3
When the Tools and Drivers CD menu appears, select menu option 3, Exit to DOS.
4
From the DOS prompt, navigate to the directory on the Tools and Drivers CD that contains the
recovery program.
For example:
-> cd firmware/BIOS
5
From the DOS prompt, type the following command to run the recovery program:
-> run flash.bat
6
When the Recovery menu is appears, select menu option 1.
For example:
1) Flash System BIOS firmware - Clear BIOS CMOS and load defaults.
Note – When you select option 1, the default ILOM and BIOS settings are loaded. Therefore, you
might need to reset some of the ILOM and BIOS settings.
92
7
When the recovery program is completed, disconnect the AC power connection from the server
for 30 seconds, then reconnect the AC power.
▼
How to Recover the SP and BIOS Firmware Using a USB
Flash Drive
1
Create a bootable MS-DOS USB flash drive.
You can create a bootable USB flash drive using a freeware application such as BootFlashDOS
1.0.
2
Using a system that contains both a CD/DVD drive and a USB port, insert the Tools and Drivers
CD into the CD/DVD drive and the bootable USB flash drive into an available USB port.
3
Copy the contents of the /firmware/USBFlash/SPREcovery/* directory from the Tools and
Drivers CD to a bootable MS-DOS USB flash drive.
Sun Fire X2270 M2 Server Service Manual • January, 2012, –12
Ordering Components
4
Insert the USB flash drive containing the contents of the Tools and Drivers CD into an available
USB port on the Sun Fire X2270 M2 Server.
5
Power on (or reboot) the Sun Fire X2270 M2 Server.
The BIOS screen appears.
6
In the BIOS screen, press F8 to specify a temporary boot device.
The Select Boot Device menu appears.
7
In the Boot Device menu, select the USB flash drive as the first boot device, then press Enter.
8
Save the changes and exit the system BIOS.
The system automatically boots to the USB flash drive.
9
Navigate to the directory on the USB flash drive that contains the contents of the Tools and
Drivers CD.
10
In the terminal window, type the following command to run the recovery program:
-> run recovery.bat
11
When the recovery program is completed, disconnect the AC power connection from the server
for 30 seconds, then reconnect the AC power.
Because the default ILOM and BIOS settings are automatically loaded when the SP and BIOS
firmware is flashed, you might need to reset some of the ILOM and BIOS settings.
Ordering Components
You can order additional components and replacement parts for the Sun Fire X2270 M2 Server.
Contact your local Oracle sales representative for more information. For the most up-to-date
component information, refer to the components list on the following web site:
http://sunsolve.sun.com/handbook_pub/validateUser.do?target=Systems/index
93
94
Sun Fire X2270 M2 Server Specifications
The section contains the following topics:
■
■
■
■
“Physical Specifications” on page 95
“Power Specifications” on page 95
“Environmental Specifications” on page 96
“Acoustic Noise Specifications” on page 96
Physical Specifications
Specification
Standard
Metric
Height
1.7 inches
43 mm
Width
17.2 inches
436 mm
Depth
25.6 inches
650 mm
Weight
27.28 lbs (minimum configuration option)
12.4 kg
29.04 lbs (maximum configuration option)
13.2 kg
Power Specifications
Maximum continuous power is 600 watts.
Parameter
Minimum
Rated
Maximum
Voltage
90 Vrms
100–127/200-240 Vrms
264 Vrms
Frequency
47 Hz
50/60 Hz
63 Hz
Current Type
Values
Maximum input current
8.6 Amps max. at 100 VAC; 4.3 Amps max. @ 200 VAC, full load
95
Environmental Specifications
Current Type
Values
Maximum inrush current
60 Amps
Environmental Specifications
Specification
State
British
Metric
Temperature
Operating (sea level)
41° F to 100° F
5° C to 35° C
Non-operating
-40° F to 158° F
-40° C to 70° C
Operating
10% to 93% RH
non-condensing, 80.6° F
max wet bulb
10%to 93% RH
non-condensing, 38° C
max wet bulb
Non-operating
93% RH, non-condensing, 93% RH, non-condensing,
100.4° F max wet bulb
43° C max wet bulb
Operating
0.12 G x-y, 0.17 G z;5-500
Hz sine
Non-operating
0.3 G x-y, 0.6 G z;5–500 Hz
sine
Operating
3.5 G; 11 msec. half-sine
Humidity
Vibration
Shock
Maximum operating
temperature derating
Altitude
Operating
-1.8° F for every 985 ft. in
altitude
-1° C for every 300 m in
altitude
0 to 10,000 feet
0 to 3,048 m
Acoustic Noise Specifications
96
23° C Idle
23° C Operating
LwAd
7.0 B
7.5 B
LpAm
60 dba
70 dba
Sun Fire X2270 M2 Server Service Manual • January, 2012, –12
Index
A
C
acoustic specifications, server, 96
adding a CPU to the server, 70–72
air duct
installing, 53–54
internal location, 30
removing, 53
antistatic mat, using, 19
antistatic procedures and precautions, 18
cable locations, internal, 61
CD/DVD drive, recovering SP and BIOS firmware, 92
CLI (command-line interface), updating BIOS and
ILOM firmware, 89–90
CMOS
battery (type CR2032), 31
clearing, 88
components
internal, 30
list of internal, 11
ordering, 93
replacement list, 29
cooling, specifications, 13
cover, server
installing, 26
removing, 25
CPU, supported versions, 11
CPU and heatsink assembly
adding, 70–72
installing, 68–70
internal location, 30
removing, 67–68
customer-replaceable units (CRU), list, 19
B
backplane, hard drive, internal location, 30
battery
internal location, 30
replacing (type CR2032), 31
BIOS
firmware, updating
CLI, 89–90
Web interface, 90–91
hot keys, 83
overview, 82
POST
errors, 84
memory testing sequence, 87
self test, 83
blower modules
installing, 55–56
internal location, 30
removing, 54–55
D
DIMM
error correction and parity, 36
installing, 35–36
internal location, 30
97
Index
DIMM (Continued)
population rules and configurations, 38
removing, 33–34
slot designation, 37
hard drive filler (Continued)
removing, 48–49
hot keys, BIOS, 83
I
E
environmental specifications, server, 96
error-correcting code (ECC), 36
errors, POST, 84
Ethernet LEDs
10/100, 81–82
10/100/1000, 82
F
firmware
recovering
CD/DVD drive, 92
USB drive, 92–93
updating
CLI, 89–90
Web interface, 90–91
front panel
features and components, 15
LEDs, 78
FRUID information, backing up, 78
full-power mode, 27
H
hard drive
installing, 51–52
internal location, 30
LEDs, 79
removing, 50–51
supported list, 12
hard drive backplane
installing, 58
removing, 57
hard drive filler
installing, 49–50
98
I/O board
installing, 66
internal location, 30
removing, 64–65
I/O cable
installing, 63–64
removing, 63
ILOM
firmware, updating
CLI, 89–90
Web interface, 90–91
system management, 14
important safety information, 17
installing
air duct, 53–54
blower module, 55–56
CPU and heatsink assembly, 68–70
DIMM, 35–36
hard drive, 51–52
hard drive backplane, 58
hard drive filler, 49–50
I/O board, 66
I/O cable, 63–64
motherboard, 74–76
PCIe card, 41–42
PCIe riser card, 42–43
power supply, 47–48
SATA cable harness, 62–63
server cover, 26
server in the rack, 23–25
SP module, 60–61
Integrate Lights Out Manager, See ILOM
Integrated Lights Out Manager, See ILOM
internal cable, locations, 61
internal components, list, 11
Sun Fire X2270 M2 Server Service Manual • January, 2012, –12
Index
L
LEDs
10/100/1000 Ethernet, 82
10/100 Ethernet, 81–82
front panel system status, 78
hard drive, 79
rear panel, 80
M
maintaining the server, 17–76
memory
POST testing sequence, 87
supported list, 12
motherboard
backing up FRUID information, 78
installing, 74–76
removing, 73–74
O
operating
server preparation, 26–27
temperature, server, 96
operating systems, supported versions, 13
ordering components, 93
overview, BIOS, 82
P
PCIe card
installing, 41–42
internal location, 30
removing, 40–41
PCIe riser card
installing, 42–43
removing, 44
PCIe slot specification, 12
physical specifications, server, 95
population rules and configurations, DIMM, 38
POST
errors, 84
POST (Continued)
memory testing sequence, 87
power modes, 27
power-on self test, See POST
power-on self test (POST), 83
power specifications, server, 95
power supply
installing, 47–48
internal location, 30
removing, 45–46
specification, 12
powering off, 28
powering on, 28–29
preparing for service and operation, 17
R
rack
installing the server, 23–25
removing the server, 22–23
rear panel
features and components, 16
LEDs, 80
recovering SP and BIOS firmware
CD/DVD drive, 92
USB drive, 92–93
removing
air duct, 53
blower module, 54–55
CPU and heatsink assembly, 67–68
DIMM, 33–34
hard drive, 50–51
hard drive backplane, 57
hard drive filler, 48–49
I/O board, 64–65
I/O cable, 63
motherboard, 73–74
PCIe card, 40–41
PCIe riser card, 44
power supply, 45–46
SATA cable harness, 62
server cover, 25
server from the rack, 22–23
SP module, 59–60
99
Index
S
W
safety information, 17
SATA cable harness
installing, 62–63
removing, 62
self test, BIOS, 83
server, specifications, 95–96
service processor, See SP module
servicing the server, preparation, 21–22
shutdown, 28
slot designations, DIMM, 37
SP and BIOS firmware, recovering
CD/DVD drive, 92
USB drive, 92–93
SP module
installing, 60–61
internal location, 30
removing, 59–60
specifications, 13
system management, 14
specifications, server, 95–96
standby-power mode, 27
startup, 28–29
system management, 14
Web interface, updating firmware, 90–91
T
tools, list of required, 20
Tools and Drivers CD
overview, 14
using, 77
U
updating firmware
CLI, 89–90
Web interface, 90–91
USB drive, recovering SP and BIOS firmware, 92–93
100
Sun Fire X2270 M2 Server Service Manual • January, 2012, –12