1
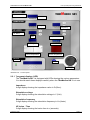
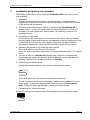
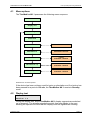
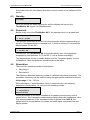
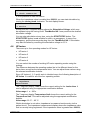
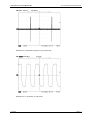
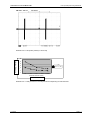
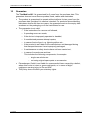
Instructions for Use
TherMedico NK 1
REF 503719
Table of Contents
1
General............................................................................................................................................... 1-1
1.1
Intended Use............................................................................................................................... 1-1
1.2
Classification ............................................................................................................................... 1-1
1.3
Safety Precautions ...................................................................................................................... 1-1
2 Description ......................................................................................................................................... 2-1
2.1
Used Symbols ............................................................................................................................. 2-1
2.1.1
Front of the device ............................................................................................................... 2-1
2.1.2
Label .................................................................................................................................... 2-1
2.1.3
Mains supply ........................................................................................................................ 2-3
2.2
Control panel............................................................................................................................... 2-3
2.2.1
7-segment displays (LED) ................................................................................................... 2-4
2.2.2
Text display (VFD) ............................................................................................................... 2-5
2.2.3
Needle display ..................................................................................................................... 2-5
2.2.3
Buttons................................................................................................................................. 2-5
2.2.4
Turning knob ........................................................................................................................ 2-6
2.3
Signaller ...................................................................................................................................... 2-6
3 Installation and putting into operation ................................................................................................ 3-1
4 Operating............................................................................................................................................ 4-1
4.1
Menu options............................................................................................................................... 4-2
4.2
Display test.................................................................................................................................. 4-2
4.3
Standby ....................................................................................................................................... 4-3
4.4
Probe test.................................................................................................................................... 4-3
4.5
Stimulation .................................................................................................................................. 4-3
4.6
HF-lesion..................................................................................................................................... 4-4
4.6.1
Automatic HF-lesion ............................................................................................................ 4-5
4.6.2
Manual HF-lesion................................................................................................................. 4-5
4.7
HF-lesion pulsed ......................................................................................................................... 4-6
4.7.1
Automatic HF-lesion pulsed................................................................................................. 4-6
4.7.2
Manual HF-lesion pulsed ..................................................................................................... 4-6
4.8
Temperature displays ................................................................................................................. 4-7
5 Troubleshooting.................................................................................................................................. 5-1
6 Settings .............................................................................................................................................. 6-1
7 Technical data .................................................................................................................................... 7-1
8 Maintenance and safety-related checks............................................................................................. 8-1
9 Sterilisation, cleaning and care .......................................................................................................... 9-1
10
Guarantee..................................................................................................................................... 10-1
11
Disposal ........................................................................................................................................ 11-1
12
Scope of delivery .......................................................................................................................... 12-1
13
Accessories .................................................................................................................................. 13-1
14
Addresses..................................................................................................................................... 14-1
14.1
Manufacturer’s address......................................................................................................... 14-1
14.2
Dealer’s address.................................................................................................................... 14-1
List of Illustrations
Fig. 1:
Fig. 2:
Fig. 3:
Fig. 4:
Fig. 5:
Fig. 6:
Fig. 7:
Control Panel
Menu Options
Stimulation impulse (on 500 Ω real)
Stimulation impulses 2 Hz (on 500 Ω real)
HF impulse (on 100 Ω real)
HF impulse pulsed (on 100 Ω real)
Total performance and half performance depending on load resistance
2-3
4-2
7-2
7-3
7-3
7-4
7-4
Instructions for Use TherMedico NK 1
1
Fout! Opmaakprofiel niet gedefinieerd.
General
These instructions describe the areas of application and the mode of operation of
the TherMedico NK 1. Please refer to the service manual for information about
the TherMedico NK 1 maintenance and repairs.
1.1
Intended Use
The TherMedico NK 1 is used in the field of human pain therapy and works by
means of temperature-controlled nerve lesion using high-frequency energy, as
well as high-frequency therapy without nerve lesion. Using electrodes and
needles, the device is designed for
•
percutaneous coagulation of soft tissue using radio frequency,
•
percutaneous application of pulsed radio frequency.
Both methods are used in the area of pain therapy for the reduction or the
elimination of pain.
1.2
Classification
In line with the guideline for medical products 93/42/EWG Appendix IX and in
accordance with rule 9, the TherMedico NK 1 is classed as a category IIb
product.
1.3
Safety Precautions
You must follow the instructions for use when using the TherMedico NK 1.
The device may only be operated by qualified medical persons who are
specifically trained to do so.
Adaptors or extension leads may not be used, as this could result in increased
emissions or render the TherMedico NK 1 more susceptible to interference.
Damaged leads or plugs must be replaced immediately.
If the device is damaged it must be returned to the manufacturer immediately for
checking.
Before cleaning or servicing the device, the power plug and any other connecting
cables must be pulled.
The device may only be serviced or checked by skilled persons with training in
the use of the device. Checks and maintenance must be carried out following the
service manual, using tests with valid calibration.
Do not operate in proximity of flammable anaesthetic agents or gases. Danger of
explosion!
Keep the device far from containers with a liquid content. Liquids must be
prevented from getting into the device. If liquid has penetrated the TherMedico
NK 1 despite precautions, the device must be dried and technical tests carried
out before it is used again.
Always replace a fuse with one of the same type that has the same parameters.
Before connecting the device to the power supply, ensure that the mains voltage
and frequency corresponds to the one displayed on the device label.
September 2005
Seite 1-1
Instructions for Use TherMedico NK 1
Fout! Opmaakprofiel niet gedefinieerd.
The operator is fully responsible to take these safety precautions.
1.4 Safety Notes
All the items that are listed under accessories may be used in conjunction with
the TherMedico NK 1.
Using the TherMedico NK 1 close to (e.g. 1m) a therapy device using short
waves or microwaves may cause the base values of the TherMedico NK 1 to
fluctuate.
In order to prevent unwanted burning, the following points should be observed:
•
The surface area of the neutral electrode must have total contact with the
patient’s body and be fixed securely and as close to the area of operation as
possible.
•
The patient’s body must not touch any metal items that are earthed or have
significant earthing potential, e.g. operating table brackets etc. The use of
antistatic cloth is recommended for this purpose.
•
Skin-to-skin contact, for example between the patient’s arms and body,
should be avoided. For this purpose, dry gauze may be placed between
potential contact areas.
•
When the TherMedico NK 1 is used simultaneously with other physiological
monitoring equipment, all the monitoring electrodes should be fixed to the
patient’s body as far away as possible from the active or neutral electrode.
We do not recommend the use of needle electrodes for monitoring. We do
recommend the use of monitoring systems, which are equipped to limit high
frequency currents.
•
The electrode leads should not touch either the patient or any of the other
leads. Electrodes that are not being used temporarily should be put away and
not touch the patient.
•
The output power should be set at the lowest possible level suited to the
intended use.
•
If the output value is apparently too low, or if, during standard procedures, the
TherMedico NK 1 displays intermittent functional deficiency, this may be due
to either faulty contact between the neutral electrode and the patient’s body or
faulty contacts in the leads. Check the position of the neutral electrode and
the check the leads before increasing the output power.
•
Patients with pacemakers or other active implants could be at risk in so far as
the pacemaker could be affected or damaged. In case of doubt, please seek
professional advice.
•
When the TherMedico NK 1 is switched on, its interferences may affect other
electronic equipment working. Portable or mobile high frequency
communication equipment can interfere with electric medical instruments.
Please read the notes about putting the system into operation as well as the
accompanying manufacturer’s notes.
•
The operator must check the accessories regularly, paying particular attention
to potential damage of the insulation of the electrode leads.
September 2005
Seite 1-2
Instructions for Use TherMedico NK 1
Fout! Opmaakprofiel niet gedefinieerd.
•
Failure of the TherMedico NK 1 may result in an undesirable increase of the
output power.
•
The START/STOP button is not suitable for emergency use. In case of an
emergency, pull the thermo-probe plug from the TherMedico NK1.
September 2005
Seite 1-3
Instructions for Use TherMedico NK 1
2
Description
2.1
Used Symbols
Fout! Opmaakprofiel niet gedefinieerd.
2.1.1 Front of the device
Connection thermo-probe
Connection neutral electrode
Neutral electrode is insulated against earth for high frequency.
Attention, read accompanying literature.
2.1.2 Label
September 2005
Page 2-1
Instructions for Use TherMedico NK 1
SN
REF
Fout! Opmaakprofiel niet gedefinieerd.
Device serial number
Article or order number
Device output power
Short term use 5 min
Attention, read accompanying literature.
The device may not be disposed of in the normal way.
The device was put in circulation after 13.08.2005.
Application part type BF
A
Non-ionising electromagnetic radiation
Year of construction of device
JJJJ
September 2005
Year of manufacture
Page 2-2
Instructions for Use TherMedico NK 1
| 0197
Fout! Opmaakprofiel niet gedefinieerd.
This product conforms to the guideline for medical products (93/42/EWG).
2.1.3 Mains supply
Before opening the device, pull power plug!
Mains fuse
2.2
Control panel
The displays and buttons on the control panel are in order of use:
•
Impedance
•
Stimulation
•
HF-lesion
•
Mode
The following illustration shows the control panel (without activated 7-segment displays
or text displays):
September 2005
Page 2-3
Instructions for Use TherMedico NK 1
Fout! Opmaakprofiel niet gedefinieerd.
impedance
impedance
voltage
frequency
HF lesion
time
HF voltage
lesion temperature
temperature limit
HF current
lesion temperature
MODE
stop
intensity
Illustration No. 1: Control panel
2.2.1 7-segment displays (LED)
The TherMedico NK 1 is equipped with LEDs showing the various parameters.
You should watch these displays carefully when the TherMedico NK 1 is in use.
Impedance
4-digit display showing the impedance value in Ω (Ohm).
Stimulation voltage
3-digit display showing the stimulation voltage in V (Volt).
Stimulation frequency
3-digit display showing the stimulation frequency in Hz (Hertz).
HF-lesion - Time
3-digit display showing the lesion time in s (seconds).
September 2005
Page 2-4
Instructions for Use TherMedico NK 1
Fout! Opmaakprofiel niet gedefinieerd.
HF-lesion – Temperature limit
3-digit display showing the different temperature limits in °C (degrees Celsius).
HF-lesion - Voltage
3-digit display showing the HF voltage in V (Volt).
HF-lesion - Current
3-digit display showing the HF current in mA (Milli-ampère).
HF-lesion - Temperature
2-digit display showing the current temperature in °C (degrees Celsius).
When working with the TherMedico NK 1, the operator must continuously
compare the temperatures shown on the needle display with the lesion
temperature on the 7-segment display. If there is a significant difference
between the temperatures, the device is not working properly.
2.2.2 Text display (VFD)
The text display shows the various operating modes and it also conveys
important information to the operator, for instance cases of faulty operation or
functional interference. The operator should observe the text display carefully
when working with the TherMedico NK 1.
2.2.3 Needle display
The needle display shows the dynamics of temperature measured in the
thermo-probe. The temperature test circuit directly controls the needle display.
The needle display should be observed carefully when the TherMedico NK 1 is
in operation.
When working with the TherMedico NK 1, the operator must continuously
compare the temperatures on the needle display with the lesion
temperature on the 7-segment display. If there is a significant difference
between the temperatures, the device is not working properly.
The needle display is always illuminated.
2.2.3 Buttons
START/STOP button
You can stop stimulation and HF-lesion by pushing the START/STOP button
and you can also start manual lesion with it.
The START/STOP button is not suitable for emergency use. In case of an
emergency, pull the thermo-probe plug from the TherMedico NK 1.
September 2005
Page 2-5
Instructions for Use TherMedico NK 1
Fout! Opmaakprofiel niet gedefinieerd.
Mode buttons
The two mode buttons allow you to select the desired operating mode of the
TherMedico NK 1.
Modification buttons
The modification buttons are used to change the parameters on their left.
Some operating modes, however, do not allow the changing of the displayed
parameter. If a modification button is pressed for longer than a second, the
display will change more quickly.
The modification buttons are:
•
Stimulation frequency
•
HF-lesion time
•
HF-lesion temperature limit
2.2.4 Turning knob
You can change certain parameters using the turning knob:
2.3
•
Stimulation intensity (operating mode stimulation)
•
Manual temperature limit (operating mode HF-lesion)
•
HF-voltage (operating mode HF-lesion pulsed)
Signaller
The TherMedico NK 1 is equipped with an integrated signaller. This signaller
emits system-specific audio signals.
September 2005
Page 2-6
Instructions for Use TherMedico NK 1
3
Fout! Opmaakprofiel niet gedefinieerd.
Installation and putting into operation
The following describes how to install the TherMedico NK 1 and how to put it
into operation:
1. Installation
The device should be positioned on an even surface. To enable heat to
dissipate as required, you must ensure that the aeration holes on the bottom
of the device are not blocked.
2. To avoid mutual interference, please do not place the TherMedico NK 1
directly next to, on top of or underneath any other equipment. If this is not
possible, you must watch each device when it is operating, to ensure it is
working normally.
3. Connection to the mains
The socket for the mains lead is on the back of the device. Having checked
that the mains voltage and frequency corresponds to the one displayed on the
device label, plug the device into a safety socket that has been installed
according to regulations, using the mains lead that came with the device.
4. Switching the device on by using the mains switch
The mains switch is on the back of the device.
When the device has been switched on, the green indicator lamp „I / 0“ should
be on.
5. The device will run a display test (please refer to section on display test).
The display test allows you to check that the displays and the signaller are
working. Following this, the device will be on Standby.
6. Connecting the thermo-probe
Connect the thermo-probe to the connector showing this symbol:
The markings on the plug and the socket must be lined up.
To pull the thermo-probe out of the socket, make sure you only pull it by the
plug casing, to open the automatic lock of the connector. Do not pull the
lead! Pulling the lead may damage or break the thermo-probe.
7. Connecting the neutral electrode
Connect the plug of the neutral electrode lead into the socket with this symbol:
September 2005
Page 3-1
Instructions for Use TherMedico NK 1
Fout! Opmaakprofiel niet gedefinieerd.
8. Thermo-probe test
Before using the device, you should run a thermo-probe test. For this
purpose, the device must be in the thermo-probe test operating mode and the
temperature in the probe tip increased (please refer to the probe test section).
9. The device is now ready for use and you can select the desired operating
mode.
Attention
The length of the needle and the thermo-probe must correspond to work
safely and effectively!
September 2005
Page 3-2
Instructions for Use TherMedico NK 1
4
Fout! Opmaakprofiel niet gedefinieerd.
Operating
The TherMedico NK 1 has several operating modes. These may be selected
using the mode buttons or the device activates or deactivates them automatically.
The operating modes are as follows:
•
Display test
•
Standby
•
Probe test
•
Stimulation 1
•
Stimulation 2
•
HF-lesion 1
•
(HF-lesion 2)
•
(HF-lesion 3)
•
(HF-lesion 4)
•
HF-lesion pulsed
The number of operating modes for HF-lesion may be changed using the
settings.
The following operating modes can only be accessed using special combinations
of buttons:
•
Basic settings
o Language
o Temperature threshold
o RF lesion check time
o RF lesion number
•
Advanced settings and adjustment functions
o Serial data transfer
o Calling up factory settings
o Adjustment functions
September 2005
Page 4-1
Instructions for Use TherMedico NK 1
4.1
Fout! Opmaakprofiel niet gedefinieerd.
Menu options
The TherMedico NK 1 possesses the following menu sequence:
Power On
Display Test
Standby
Probe Test
Stimulation 1
Stimulation manual
Stimulation 2
Stimulation manual
HF-lesion 1
Lesion
automatic / manual
(HF-lesion 2 – 4)
Lesion
automatic / manual
HF-lesion pulsed
Lesion
automatic / manual
Illustration No. 22: Menu options
If the device has been not been used for lesion or stimulation and if no button has
been pressed for a period of 20 min, the TherMedico NK 1 reverts to Standby
mode.
4.2
Display test
TherMedico NK 1
Version 1.0
During the display test, all the TherMedico NK 1 display segments are switched
on in sequence. The signaller signals the switch from one display to the next,
allowing the operator to check that the displays and the signaller are working.
September 2005
Page 4-2
Instructions for Use TherMedico NK 1
Fout! Opmaakprofiel niet gedefinieerd.
At the same time the text display shows the current version of the software of the
device.
4.3
Standby
Standby
Once the device has been switched on and the display test has run the
TherMedico NK 1 goes into Standby mode.
4.4
Probe test
Before every use of the TherMedico NK 1, the operator must run a probe test!
Probe test
-> Test probe
The operator must heat up the tip of the thermo-probe without compromising its
sterility. If the temperature is increased by 3 °C within a period of 5 seconds, the
display shows „Probe OK“.
Probe test
-> Probe OK
Furthermore, the TherMedico NK 1 runs a plausibility test. If the registered
temperature is not between 10 °C and 40 °C, this is shown accordingly.
The temperatures shown on needle display and the 7-segment display „Lesion
temperature“ (room temperature) should be about the same.
4.5
Stimulation
There are two operating modes for stimulation:
•
Stimulation 1
•
Stimulation 2
The difference between these two modes is a different stimulation frequency. The
stimulation frequency can be modified using the appropriate modification buttons.
Value range: 2 Hz – 100 Hz
Since stimulation 1 and stimulation 2 work in identical ways, the following
description of stimulation 1 is valid for both operating modes:
Stimulation 1
-> Impedance
measurement
Whilst stimulation is not active, impedance is measured continuously via the
patient circuit. The impedance measurement display shows the impedance value
that is being measured. If the impedance value is greater than 3000 Ω, the
patient circuit is recognized as not closed, an audio signal sounds and the text
display shows:
September 2005
Page 4-3
Instructions for Use TherMedico NK 1
Fout! Opmaakprofiel niet gedefinieerd.
Stimulation 1
-> Check connection
It is not possible to start stimulation.
When the impedance value is smaller than 3000 Ω, you can start stimulation by
turning the turning knob clockwise. The text display shows:
Stimulation 1
-> Active
At this point the 7-segment display shows the Stimulation Voltage, which may
be adjusted using the turning knob. TherMedico NK 1 now produces the desired
stimulation voltage.
You can stop stimulation at any time, using the START/STOP button. The
START/STOP button is not suitable for use in an emergency. In case of an
emergency, pull the thermo-probe plug from the TherMedico NK 1. Stimulation
may also be halted by re-setting the stimulation voltage to 0,0 V.
4.6
HF-lesion
There are up to four operating modes for HF-lesion:
•
HF-lesion 1
•
HF-lesion 2
•
HF-lesion 3
•
HF-lesion 4
You can select the number of existing HF-lesion operating modes using the
settings.
The difference between the operating modes lies in the different times for the
lesion timer as well as the temperature limits. You can adjust these values using
the relevant modification buttons.
Since HF-lesions 1, 2, 3 and 4 work in identical ways, the following description of
HF-lesion 1 is valid for all of the four operating modes:
HF-lesion 1
-> Impedance
measurement
The 7-segment display Time shows the current setting for the Lesion time. It
can be adjusted using the appropriate modification buttons.
Value range: 1 s – 300 s
The 7-segment display Temperature limit shows the current setting for the
Temperature limit. This can be adjusted using the appropriate modification
buttons.
Value range: 20 °C – 95 °C
Whilst stimulation is not active, impedance is measured continuously via the
patient circuit. The impedance measurement display shows the impedance value
that is currently being registered. If the impedance value is greater than 3000 Ω,
September 2005
Page 4-4
Instructions for Use TherMedico NK 1
Fout! Opmaakprofiel niet gedefinieerd.
the patient circuit is recognized as not closed, an audio signal sounds and the
text display shows:
HF-lesion 1
-> Check connection
It is not possible to start HF-lesion.
There are two ways to start HF-lesion (impedance smaller than 3000 Ω):
•
Automatic (START/STOP button)
•
Manual (turning knob)
4.6.1 Automatic HF-lesion
HF-lesion 1
-> Active
Push the START/STOP button to activate automatic HF-lesion. The
temperature limit that has been set and is indicated on the 7-segment display
must be reached and then maintained and this determines and regulates the HFperformance. Both the 7-segment display lesion temperature and the needle
display show the temperature that is currently being registered.
The lesion timer operates once the set temperature level has been reached or
when the two HF-lesion time buttons are pressed at once. You can adjust the
temperature level using the menu option Settings. HF-lesion finishes
automatically when the timer stops.
Push the START/STOP button to halt the lesion process at any point. The
START/STOP button is not suitable for use in an emergency. In case of an
emergency, pull the thermo-probe plug from the TherMedico NK 1.
4.6.2 Manual HF-lesion
HF-lesion 1
-> Active manual
You can start manual HF-lesion by turning the turning knob clockwise. The 7segment display now shows the temperature limit, which can be manually
adjusted using the turning knob. A dot on the 7-segment display marks this value.
The temperature limit that has been set and is indicated on the 7-segment
display must be reached and then maintained and this determines and regulates
the HF-performance.
Both the 7-segment display lesion temperature and the needle display show the
temperature that is being registered. HF-voltage and HF-current on the 7segment display show the set HF-voltage and HF-current.
The lesion operates once the set temperature level has been reached or when
the two HF-lesion time buttons are pressed at once. HF-lesion finishes
automatically when the timer stops. You can adjust the temperature level using
the menu option Settings.
September 2005
Page 4-5
Instructions for Use TherMedico NK 1
Fout! Opmaakprofiel niet gedefinieerd.
Push the START/STOP button to halt the lesion process at any point. The
START/STOP button is not suitable for use in an emergency. In case of an
emergency, pull the thermo-probe plug from the TherMedico NK 1.
4.7
HF-lesion pulsed
When the operating mode is in HF-lesion pulsed, the HF signal is emitted pulsed.
The temperature limit is fixed at 42 °C.
HF-lesion pulsed
-> Impedance
measurement
The 7-segment display Time shows the current setting for the Lesion time. It
can be adjusted using the appropriate modification buttons.
Value range: 1 s – 300 s
Whilst stimulation is not active, impedance is measured continuously via the
patient circuit. The impedance measurement display shows the impedance value
that is being measured. If the impedance value is greater than 3000 Ω, the
patient circuit is recognized as not closed, an audio signal sounds and the text
display shows:
HF-lesion pulsed
-> Check connection
It is not possible to start HF-lesion.
There are two ways to start HF-lesion pulsed (impedance smaller than 3000 Ω):
•
Automatic (START/STOP button)
•
Manual (turning knob)
4.7.1 Automatic HF-lesion pulsed
HF-lesion pulsed
-> Active
Push the START/STOP button to start automatic HF-lesion. HF-performance is
determined and regulated by reaching and maintaining a temperature
(temperature limit) of 42 °C.
The lesion timer starts immediately. Automatic HF-lesion finishes automatically
when the timer stops.
Push the START/STOP button to halt the lesion process at any point. The
START/STOP button is not suitable for use in an emergency. In case of an
emergency, pull the thermo-probe plug from the TherMedico NK 1.
4.7.2 Manual HF-lesion pulsed
HF-lesion pulsed
-> Active manual
For this operating mode the required HF voltage is set directly, not the
desired temperature.
September 2005
Page 4-6
Instructions for Use TherMedico NK 1
Fout! Opmaakprofiel niet gedefinieerd.
Start manual HF-lesion pulsed by turning the turning knob clockwise. The 7segment display now shows the HF-voltage, which can be adjusted using the
turning knob. A dot on the 7-segment display marks this value.
The 7-segment display temperature limit is switched off because this operating
mode does not use a temperature limit. The operator is responsible for regulating
the temperature.
Both the 7-segment display lesion temperature and the needle display show the
temperature that is being registered. HF-current on the 7-segment display shows
the HF-current that is being measured.
The lesion starts immediately. Manual HF-lesion finishes automatically when the
timer stops.
Push the START/STOP button to halt the lesion process at any point. The
START/STOP button is not suitable for use in an emergency. In case of an
emergency, pull the thermo-probe plug from the TherMedico NK 1.
4.8
Temperature displays
The TherMedico NK 1 has two temperature displays for the temperature that is
being measured:
•
Needle display lesion temperature
•
7-segment display lesion temperature
The control unit (micro controller) of the TherMedico NK 1 controls the 7segment display. The temperature shown on the needle display, on the other
hand, is derived directly from the temperature measurement control. This makes
a plausibility test using both displays possible. Different values on the displays
indicate a malfunctioning. You should immediately stop any running HF-lesion. If
the TherMedico NK 1 does not respond to any button being pushed, you can
pull either the thermo-probe plug or the neutral electrode plug from the device
(emergency stop).
September 2005
Page 4-7
Instructions for Use TherMedico NK 1
5
Fout! Opmaakprofiel niet gedefinieerd.
Troubleshooting
Faults may occur when the TherMedico NK 1 is running. They are shown on the
text display or an audio signal is given.
You may come across the following faults:
Fault
message
„No probe “
Description
Possible cause,
solution
Probe is not connected or probe lead is damaged.
Check thermo-probe
and connect or
replace.
Consequence: Running stimulation or HF-lesion is
suddenly cut off. Stimulation or lesion cannot be restarted
whilst the problem persists. Device switches to operating
mode „Probe test“.
„Check
Circuit thermo-probe – neutral electrode not closed.
connection “
Consequence: Stimulation or lesion cannot be started
whilst the problem persists.
Check circuit, check
plug and socket
connection, check
neutral electrode lead.
Check contact neutral
electrode and patient.
Audio signal Display module disconnected.
and no
Consequence: Stimulation or lesion cannot be started
displays
whilst the problem persists.
The device must be
repaired.
„E 10“
In stimulation mode:
Faulty generation of stimulation pulse.
The device must be
repaired.
Consequence: Stimulation or lesion cannot be started
whilst the problem persists.
July 2005
„E 20“
In probe-test mode:
Measured temperature is not room temperature range of
10 – 40 °C.
„E 30“
In lesion mode:
Once the desired set temperature is reached, the control
value for HF is controlled. If it does not change within a
certain set (check time) time span, lesion is stopped and
this fault message appears.
„E 31“
In lesion mode:
After starting lesion, the temperature is controlled for a
certain set (check time) time span. If it does not change,
lesion is stopped and this fault message appears.
„E 32“
In lesion mode:
After starting lesion, the temperature is controlled for a
certain set (check time) time span. If it does not increase
by at least +5 °C, lesion is stopped and this fault
message appears.
Faulty thermo-probe,
replace.
Possibly no contact
between thermo-probe
and tissue. Check
combination needle,
thermo-probe length.
Otherwise, the device
must be repaired.
Page 5-1
Instructions for Use TherMedico NK 1
6
Fout! Opmaakprofiel niet gedefinieerd.
Settings
The TherMedico NK 1 has several possible basic settings. They are
programmed according to the client’s requirements at the time of delivery. The
available setting options and the selected settings are described or documented
in the service manual.
July 2005
Page 6-1
Instructions for Use TherMedico NK 1
7
July 2005
Fout! Opmaakprofiel niet gedefinieerd.
Technical data
1
General
1.1
Nominal voltage
230 VAC
1.2
Nominal current
300 mA
1.3
Operating frequency
50 / 60 Hz
1.4
Mains fuses
2 x T 500 mA H 250 V (IEC 127)
1.5
Protection class
I
1.6
Application part
Type BF (1 active and 1 neutral electrode)
1.7
Mode of operation
Short term operation 5 min
1.8
Dimensions
350 x 380 x 170 mm (W x H x D)
1.9
Weight
ca. 8 kg (without accessories)
2
Impedance measurement
2.1
Range (digital display)
0 - 3000 Ω (precision ± 20 %)
2.2
Frequency
54 kHz ± 0,5 kHz sinus
2.3
Internal test resistance
500 Ω ± 25 Ω
3
Stimulation
3.1
General
Voltage adjustable by units of 0,1 V
3.2
Number of programmes
2
3.3
Voltage range
0 – 3,0 V (± 10 %)
3.4
Frequency range
2 – 100 Hz (± 1 %)
3.5
Wave form
Bi-phase rectangle, 1 msec. negative, 1 msec. positive
4
Temperature measurement
4.1
Thermo element
Type K
4.2
Measurement range
0 - 100 °C (± 2 °C)
5
HF-lesion
5.1
General
Desired temperature adjustable by units of 1 °C
automatic performance regulation
1 application circuit, floating
5.2
Number of programmes
max. 4
5.3
Modes of operation
automatic / manual
5.4
Output power
0 – 25 W on 100 Ω
5.5
Frequency
Modulation type
485 kHz ± 0,5 kHz
amplitude-modulated, modulation grade maximum
100%
5.6
Max. lesion time
300 s
5.7
Max. lesion temperature
95 °C
5.8
Timer
1 – 300 s (± 1 %)
Page 7-1
Instructions for Use TherMedico NK 1
Fout! Opmaakprofiel niet gedefinieerd.
6
HF-lesion pulsed
6.1
General
Desired temperature adjustable by units of 1 °C
automatic performance regulation
1 application circuit, floating
6.2
Number of programmes
1
6.3
Modes of operation
automatic
manual (set HF voltage)
6.4
Output power
0 – 1 W on 100 Ω (equivalent to 25 W pulsed)
6.5
Pulse frequency
2 Hz
6.6
Pulse impulse breadth
20 msec.
6.7
Max. lesion temperature pulsed
42 °C
Output signals
Illustration No.1: Stimulation impulse (on 500 Ω real)
July 2005
Page 7-2
Instructions for Use TherMedico NK 1
Fout! Opmaakprofiel niet gedefinieerd.
Illustration No.2: Stimulation impulses 2 Hz (on 500 Ω real)
Illustration No.5: HF impulse (on 100 Ω real)
July 2005
Page 7-3
Instructions for Use TherMedico NK 1
Fout! Opmaakprofiel niet gedefinieerd.
Illustration No.6: HF impulse pulsed (on 100 Ω real)
output performance
Ausgangsleistung (W)
30
25
20
P = f (R L)
15
1/2 P = f (R L)
10
5
0
100
200
500
1000
2000
Lastw iderstand R L (O hm )
resistance load
Illustration No.7: Total performance and half performance depending on load resistance
July 2005
Page 7-4
Instructions for Use TherMedico NK 1
8
Fout! Opmaakprofiel niet gedefinieerd.
Maintenance and safety-related checks
Every 12months, staff must run safety checks on the TherMedico NK 1 and all
its accessories.
Please refer to the service manual for a detailed description of all the required
checks.
July 2005
Page 8-1
Instructions for Use TherMedico NK 1
9
July 2005
Fout! Opmaakprofiel niet gedefinieerd.
Sterilisation, cleaning and care
•
You should clean the TherMedico NK 1 regularly. You will need a soft, lintfree cloth and a little mild detergent or isopropanol. Do not use any abrasive
cleaning materials. When cleaning, do make sure that the inside of the device
does not get wet. Flammable cleaning agents must have fully evaporated
before the device is used again.
•
The needles are sterile when they are delivered and are intended for single
use only.
•
The thermo-probes are not sterile when delivered and must be sterilized
before each use. Please refer to the instructions accompanying the thermoprobe that is used.
•
The neutral electrodes are not sterile intended for single use only.
Page 9-1
Instructions for Use TherMedico NK 1
10
Fout! Opmaakprofiel niet gedefinieerd.
Guarantee
The TherMedico NK 1 is guaranteed for 2 years from the purchase date. This
guarantee does not cover thermo-probes, leads, cables and electrodes.
•
The product is guaranteed to operate without defects for two years from the
purchase date, provided it is used as intended. For products whose labelling
indicates a shorter life than two years, the guarantee ends on the expiry date
as shown on the packaging or on the instructions for use.
•
The guarantee is not valid:
o if the instructions for use are not followed,
o if operating errors are made,
o if the device is improperly operated or handled,
o if unauthorized persons attempt repairs,
o in cases of acts-of-god, e.g. lightning strikes etc.,
o if the product is sent back to the manufacturer and damaged during
that transport because it was improperly packaged,
o if maintenance or safety checks have not been carried out,
o in cases of normal wear and tear.
This includes the following components, for example:
– single use articles etc.
– not using original spare parts or accessories.
July 2005
•
Pierenkemper GmbH is not liable for consequential harm caused by a defect,
where this is due to intent or gross negligence, or in cases of slight
negligence causing injury to life and limb.
•
This policy does not affect your statutory rights.
Page 10-1
Instructions for Use TherMedico NK 1
11
Fout! Opmaakprofiel niet gedefinieerd.
Disposal
The manufacturer is obliged to take back the TherMedico NK 1 and to dispose
of it properly.
July 2005
Page 11-1
Instructions for Use TherMedico NK 1
12
Fout! Opmaakprofiel niet gedefinieerd.
Scope of delivery
The TherMedico NK 1 comes with:
Number REF
July 2005
Description
1
503710
TherMedico NK 1
1
106850
Neutral electrode cable
1
450810-0043
Mains cable
1
503719
Instructions for use
1
451710-0002
Service manual
Page 12-1
Instructions for Use TherMedico NK 1
13
Fout! Opmaakprofiel niet gedefinieerd.
Accessories
The TherMedico NK 1 may be used in conjunction with the following
accessories:
July 2005
REF
Description
Type
Manufacturer
500882
Thermo-probe 50 mm
M/405-TC05
RDG
500883
Thermo-probe 100 mm
M/406-TC10
RDG
500884
Thermo-probe 150 mm
M/407-TC15
RDG
500887
Needle 50 mm 22 G 5 mm tip
Thermo lesion needle
Pierenkemper
500888
Needle 100 mm 22 G 5 mm tip
Thermo lesion needle
Pierenkemper
503713
Needle 100 mm 22 G 10 mm tip
Thermo lesion needle
Pierenkemper
500890
Needle 100 mm 22 G 15 mm tip
Thermo lesion needle
Pierenkemper
500889
Needle 150 mm 20 G 5 mm tip
Thermo lesion needle
Pierenkemper
503714
Needle 150 mm 20 G 10 mm tip
Thermo lesion needle
Pierenkemper
500991
Neutral electrode
Mono plate
Erbe
Page 13-1
Instructions for Use TherMedico NK 1
14
Fout! Opmaakprofiel niet gedefinieerd.
Addresses
14.1 Manufacturer’s address
Pierenkemper GmbH
Hörnsheimer Eck 19
D-35578 Wetzlar
Tel.: +49 (0) 6443-67923-0
Fax: +49 (0) 6443-67923-33
Internet:
Email:
http://www.pieren-tech.de
[email protected]
| 0197
451600-0231
14.2 Dealer’s address
schwa-medico GmbH
Abteilung für Spezialsysteme (Department for Special Systems)
Am Geiersberg 6
D-35630 Ehringshausen
Internet:
http://www.schwa-medico.com
Email:
[email protected]
[email protected]
July 2005
Page 14-1