1
[Year]
PSE
Service Manual[Document
– HSC Hot title]
Spot
PSE d.o.o.
[Author
name]
1/1/2014
PSE
d.o.o.
[Date]
Internet for Guests
1 / 29
1
Internet for Guests
1.1
Your Registration Number:
1.2
Disclaimer
Copyright © 2003-2013 PSE Group
All rights reserved.
The information provided in this brochure contains merely general descriptions or
characteristics of performance which in case of actual use do not always apply as described
or which may change as a result of further development of the product. An obligation to
provide the respective characteristics shall only exist if expressly agreed in the terms of
contract. Availability and technical specifications are subject to change without notice.
Windows® is a registered trademark of Microsoft Corporation in the United States and other
countries.
Linux® is the registered trademark of Linus Torvalds in the U.S. and other countries.
Java® is registered trademarks of Oracle and/or its affiliates
All other company, brand, product and service names are trademarks or registered
trademarks of their respective holders.
PSE makes no warranty, express or implied, in fact or in law, including, but not limited to
any implied warranties of merchantability or fitness for a particular purpose. Warranty
information and services for non-PSE products can be found on the manufacturer's website
or is provided with the equipment. In no event shall PSE and/or its respective suppliers be
liable for any special, indirect or consequential damages arising from the use of PSE
products.
1.3
Notes
PSE HSC Hot Spot
Service Manual
2 / 29
2
General Information
2.1
About the Product
Thank you for choosing 'Internet for Guests'. The system enables you to provide guests with
an Internet connection using 'Surftickets' within the 'Surf-LAN' (dedicated network for your
guests). To administer the system with the so-called 'WebAdmin', you'll only need a web
browser (e.g. Internet Explorer, Firefox, Safari, etc.) installed on one of the computers in the
'Office-LAN' (your office network).
In addition, the system has a range of other benefits:
real Plug and Play (no amendments to or software installation on the end-device)
simple creation of freely definable 'Surftickets'
billing based on volume and/or time
multi-language capability
integrated security features (Firewall, Web Filter, etc.)
many useful modules (e.g. Online Update, 'PMS' Connector)
and much more ...
Have a good time.
2.2
Implementation
The 'Office-LAN' is protected by an integrated firewall. This ensures that
your office network is completely separate from your guests.
Using a convenient bandwidth management, you can allocate only a part
of your Internet bandwidth to your guests and still guarantee a trouble-free
Internet connection for your office operations.
You will need to comply with any national legal regulations and to
configure the system appropriately.
The system is best placed in a server, or system, room. Protect the device
from dust and the effects of heat.
PSE HSC Hot Spot
Service Manual
3 / 29
2.2.1
Requirements
To be able to use 'Internet for Guests' you'll need to have:
broadband Internet access (e.g. DSL, Cable)
network infrastructure (e.g. CAT5, WLAN, Powerline)
DSL/cable router
web browser to administer 'Surftickets'
If the system is installed behind a firewall, as well as the standard port such as HTTP, DNS,
etc. you will need to permit additional connections to the following ports:
Value
Description
53 TCP/UDP
Domain Name Service (DNS)
123 TCP/UDP
Time Server (NTP)
873 TCP/UDP
Online Update
1194 TCP/UDP
Central Services VPN
5555 TCP
Remote Control
2.2.2
System Default
The system has the following network settings for 'Office-LAN' by default:
Value
System Default
Note
IP Address
192.168.1.1
IP address of the system within the 'Office-LAN'
Subnet Mask
255.255.255.0
subnet mask of the 'Office-LAN'
Default Gateway
192.168.1.254
default gateway (usually DSL router, cable router,
etc.)
Time Server
(NTP)
ntp.frozentux.org
NTP / Time Server for time synchronization (e.g.
ntp.frozentux.org)
Primary DNS
Server
192.168.2.1
server for DNS requests (e.g. settings like other
devices within the 'Office-LAN' / provider DNS)
Secondary DNS
Server
server for DNS requests (e.g. settings like other
devices within the 'Office-LAN' / provider DNS)
The 'Surf-LAN' DHCP range is configurable from 172.30.0.0/17 to
172.30.0.0/22. In the 'Surf-LAN', the system can be addressed by using
172.30.3.254.
The 'Surf-LAN' has to occupy a different IP/subnet area than the 'OfficeLAN'.
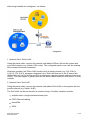
2.2.3
Integration
The hardware contains two network cards and can be connected to the company network PSE HSC Hot Spot
Service Manual
4 / 29
after being installed and configured - as follows:
Integration
1. Network Card: 'Office-LAN'
Using the patch cable, connect the network card labeled 'Office-LAN' on the system with
your office network (e.g. Switch, DSL router). The configured system now uses the existing
office network's Internet connection.
Wherever possible, the 'Office-LAN' should not be a classic network (e.g. 192.168.0.x,
10.0.0.0, 172.16.0.0), because computers in the 'Surf-LAN' that are in the IP area of the
'Office-LAN' will not find a Plug and Play environment (change network settings of device to
DHCP). This can happen if guests have set the same classic network in their home or office
network.
2. Network Card: 'Surf-LAN'
Using the patch cable, connect the network card labeled 'Surf-LAN' on the system with the
guest's network (e.g. Switch, WAP).
The 'Surf-LAN' can be structured in a number of ways. Possible variations include:
as direct start, a single wireless access point
CAT5 Ethernet cabling
HomePNA
VDSL
PSE HSC Hot Spot
Service Manual
5 / 29
etc. or in combination
Make sure that the 'Office-LAN' and 'Surf-LAN' network connections are
not mixed up - this can severely damage the office network.
In contrast to a wireless access point, a WLAN router allows all device
behind the router to become active with just a single 'Surfticket'. This can
be by-passed by switching to a so-called 'bridging mode'.
PSE HSC Hot Spot
Service Manual
6 / 29
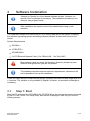
3
Software Installation
'Internet for Guests' is a Linux-based software solution. However, no
special Linux knowledge is necessary. The installation procedure is run
using its own program setup.
After installation the system can be fully administered using a web
interface.
The installation needs to be carried out on a PC solely reserved for the system. Installing
the software (operating system and billing software) deletes all other data found on the
device.
System Requirements
500 MHz +
10 GB HDD +
256 MB RAM +
2 x PCI Ethernet Network Card (1 for 'Office-LAN', 1 for 'Surf-LAN')
Most network cards are ready for licensing. However, please test your
network card type before you sell the product.
The hardware requirements are minimum requirements, otherwise it will
not be possible to set up the installation.
Follow the steps below to install the the system. Normally this does not take longer than 5 to
10 minutes. The installer is only available in English. However, no specialist knowledge is
necessary.
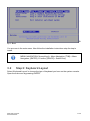
3.1
Step 1: Boot
Start the PC and place the CD-ROM in the CD-ROM drive. As soon as the system is booted
by the CD, the 'Frozen Tux Setup Utility' boot screen is displayed. Wait until you see the
following screen:
PSE HSC Hot Spot
Service Manual
7 / 29
St
ep 1: Boot
You are now in the main menu. Now follow the installation instructions step for step to
install.
MENU NAVIGATION: [Arrow Keys] = Menu Navigation; [TAB] = Menu
Navigation; [ENTER] = Confirm; [SPACE] = Select Entry
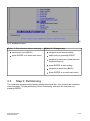
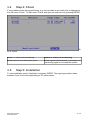
3.2
Step 2: Keyboard Layout
Select 'Keyboard Layout' to choose the type of keyboard you have on the system console.
Open the sub-menu by pressing ENTER.
PSE HSC Hot Spot
Service Manual
8 / 29
St
ep 2: Keyboard Layout
Option 1: Quit submenu without changing
Option 2: Change entry
select menu item [BACK]
navigate to the favored setting
press ENTER to re-enter main menu
select entry by pressing SPACE
navigate to menu item [Load selected
Keyboard Layout]
press ENTER to save setting
navigate to menu item [BACK]
press ENTER to re-enter main menu
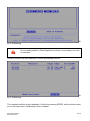
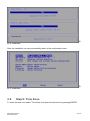
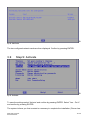
3.3
Step 3: Partitioning
The installation program automatically partitions the hard disk - this needs to be confirmed
when prompted. To start partitioning, select 'Partitioning' and open the sub-menu by
pressing ENTER.
PSE HSC Hot Spot
Service Manual
9 / 29
St
ep 3: Partitioning
Do not reedit partitions ('Reedit partitions') unless it is necesarry, but click
on continue.
Partition defaults are then displayed. Confirm by pressing ENTER.
St
ep 3: Partitioning
The complete partition is then displayed. Confirm by pressing ENTER, which will also return
you to the main menu. Partitioning is then complete.
PSE HSC Hot Spot
Service Manual
10 / 29
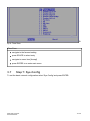
3.4
Step 4: Check
If any problems arise during partitioning (e.g. the hard disk is too small), this is displayed in
the sub-menu 'Check'. To start select 'Check' and open the sub-menu by pressing ENTER.
St
ep 4: Check
Option 1: there is no red warning
Option 2: there is a red warning
press ENTER to re-enter main menu
check system requirements; if necessary run
partitioning again or re-install the system
3.5
Step 5: Installation
To start installation select 'Installation' and press ENTER. The copying procedure takes
between 2 and 10 minutes depending on PC performance.
PSE HSC Hot Spot
Service Manual
11 / 29
St
ep 5: Installation
After the installation you are automatically taken to the configuration menu.
St
ep 5: Installation
3.6
Step 6: Time Zone
To enter the time zone select 'Time Zone' and open the sub-menu by pressing ENTER.
PSE HSC Hot Spot
Service Manual
12 / 29
St
ep 6: Time Zone
Time Zone
navigate to the favored setting
press SPACE to select entry
navigate to menu item [Accept]
press ENTER to re-enter main menu
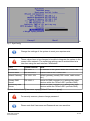
3.7
Step 7: Sys-Config
To set the basic network configuration select 'Sys-Config' and press ENTER.
PSE HSC Hot Spot
Service Manual
13 / 29
St
ep 7: Sys-Config
Change the settings of the system to meet your requirements.
These values have to be changed to be able to integrate the system in the
current office network. The remaining settings can be administered at a
later time using the web interface 'WebAdmin'.
Value
System Default
Note
IP Address
192.168.1.1
IP address of the system within the 'Office-LAN'
Subnet Mask
255.255.255.0
subnet mask of the 'Office-LAN'
Default Gateway
192.168.1.254
default gateway (usually DSL router, cable router,
etc.)
Primary DNS
Server
192.168.2.1
server for DNS requests (e.g. settings like other
devices within the 'Office-LAN' / provider DNS)
Secondary DNS
Server
server for DNS requests (e.g. settings like other
devices within the 'Office-LAN' / provider DNS)
System Administrator [Username: sysop] [Default Password: sysop]
For security reasons, please change password.
Please note that Username and Password are case sensitive.
PSE HSC Hot Spot
Service Manual
14 / 29
Change Settings
navigate to the favored setting
press ENTER to make entry changeable
press ENTER to save setting
navigate to menu item [Accept]
press ENTER to re-enter main menu
3.8
Step 8: Net-Auto
In the menu item 'Net-Auto', the two network cards are automatically identified and
configured. Select 'Net-Auto' and open the sub-menu by pressing ENTER.
St
ep 8: Net-Auto
Make sure that the two identified network cards are selected - indicated by
a preceding + sign. If you press SPACE by accident, you might mistakenly
deselect an entry.
The two network cards are displayed and marked with a + sign. Confirm by pressing
ENTER.
PSE HSC Hot Spot
Service Manual
15 / 29
St
ep 8: Net-Auto
The two configured network cards are then displayed. Confirm by pressing ENTER.
3.9
Step 9: Activate
St
ep 9: Activate
To save the settings select 'Activate' and confirm by pressing ENTER. Select 'Yes – Do it!'
and confirm by pressing ENTER.
The system informs you that a restart is necessary to complete the installation ('Server has
PSE HSC Hot Spot
Service Manual
16 / 29
to be restarted, otherwise changes have no effect.'). Confirm the prompt by pressing
ENTER - this then takes you back to the main menu.
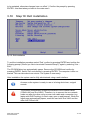
3.10
Step 10: Exit installation
St
ep 10: Exit installation
To exit the installation procedure select 'End', confirm by pressing ENTER and confirm the
following prompt ('Would you like to terminate FrozentuxSetup?') again by selecting 'Yes –
Exit!'.
The CD-ROM drive tray automatically opens. Remove the CD-ROM and confirm by
pressing ENTER. Select 'Exit' and confirm by pressing ENTER. The computer is then restarted. This can take about one minute. The system is now ready.
After installation the system can be fully administered using a web interface.
As soon as the system is ready to use or is being shut down, a signal
sounds
The system automatically accepts the attribute of the network cards
('Office-LAN' and 'Surf-LAN'). Therefore, try to connect the two network
cards one after the other using a cross-over cable and a computer (e.g.
laptop with DHCP setting). In each case, open a web browser. When the
logon page automatically opens, mark this card with 'Surf-LAN' and the
other with 'Office-LAN'.
PSE HSC Hot Spot
Service Manual
17 / 29
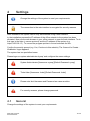
4
Settings
Change the settings of the system to meet your requirements.
The connection to the web interface is encrypted for security reasons.
After installation the system can be fully administered using a web interface.
In the installation process the IP address of the office network to the system has been
allocated. Now use the web browser in your office network to open the web interface. To do
this type in the https (= secure protocol) and the IP address of the system (e.g.
https://192.168.1.1). To access the program quicker in future bookmark the link.
Confirm the security prompt (e.g. Yes, Continue to this website). The 'Internet for Guests WebAdmin' logon appears.
The system has two predefined users.
Please logon as system administrator 'sysop' and configure the menu settings.
System Administrator [Username: sysop] [Default Password: sysop]
Ticket User [Username: ticket] [Default Password: ticket]
Please note that Username and Password are case sensitive.
For security reasons, please change password.
4.1
General
Change the settings of the system to meet your requirements.
PSE HSC Hot Spot
Service Manual
18 / 29
The settings should be made by your IT partner as part of the installation
process. To make changes, please follow the instructions of your system
administrator.
Value
Description
Company Name
Name of your company/organisation.
Company Address
Address of your company/organisation.
Company Website
Website of your company/organisation.
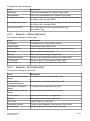
4.1.1
System
Value
Description
Operation Mode
'Normal': pay mode; ticket-based Internet
access; guests have to buy a 'Surfticket'.
System Default
Normal
'Freelogon': free Internet access for all
guests; logon page appears with the button:
Access the Internet for free.
'Autologon': the same as 'Freelogon', but
guests log on directly in the Internet.
Currency
Abbreviation of the currency (e.g. EUR, USD).
Time Zone
Select your time zone.
Keyboard
Keyboard layout for the system console.
Seamless
Roaming
If activated allows a valid online user to roam
seamless between interfaces on the same end
device (e.g. switching from wired to wireless).
Remember me
If a user gets logged off due to inactivity, he will
activated
get logged on again automatically as soon as he is
active again. This feature is not working if user
logs off manually (e.g. logoff button).
Remember
Username
Automatically saves the last logged in username at deactivated
ticket logon. This way the user only has to enter
his password at the next ticket logon.
4.2
EUR
activated
Network
Change the settings of the system to meet your requirements.
The settings should be made by your IT partner as part of the installation
process. To make changes, please follow the instructions of your system
administrator.
4.2.1
Network - General
PSE HSC Hot Spot
Service Manual
19 / 29
Edit general network settings.
Value
Description
Hostname
Enter a new hostname for customer logon page.
Domainname
Enter a new domainname for customer logon page.
Primary DNS Server
Server for DNS requests (e.g. settings like other devices within
the 'Office-LAN' / provider DNS).
Secondary DNS Server
Server for DNS requests (e.g. settings like other devices within
the 'Office-LAN' / provider DNS).
Time Server (NTP)
NTP / Time Server for time synchronization (e.g.
ntp.frozentux.org).
4.2.2
Network - Office-LAN (eth1)
Edit network settings for 'Office-LAN'.
Value
Description
IP Address
IP Address of the 'Office-LAN' interface.
Subnet Mask
Subnet Mask of the 'Office-LAN'.
Default Gateway
Default Gateway (usually DSL router, cable router, etc.).
MTU Size
Edit MTU size for 'Office-LAN'.
Routes
Click to get to the routing configuration.
WebAdmin Access
Activate to get 'WebAdmin' access from 'Office-LAN'.
FTP Access
Activate to get FTP access from 'Office-LAN'.
SSH Access
Activate to get SSH access from 'Office-LAN'.
4.2.3
Network - Surf-LAN (eth0)
Edit network settings for 'Surf-LAN'.
Value
Description
IP Address (Unprotected
Mode)
IP Address of the unprotected 'Surf-LAN'.
Subnet Mask
(Unprotected Mode)
Subnet Mask of the unprotected 'Surf-LAN'.
IP Address (Protected
Mode)
IP Address of the protected 'Surf-LAN'.
Subnet Mask (Protected
Mode)
Subnet Mask of the protected 'Surf-LAN'.
DHCP Server
Click to get to the DHCP configuration.
Routes
Click to get to the routing configuration.
MTU Size
Edit MTU size for 'Surf-LAN'.
WebAdmin Access
Activate to get 'WebAdmin' access from 'Office-LAN'.
SSH Access
Activate to get SSH access from 'Office-LAN'.
PSE HSC Hot Spot
Service Manual
20 / 29
4.2.4
Network - Management-LAN (eth2)
Edit network settings for 'Management-LAN'.
Value
Description
IP Address
IP Address of the 'Management-LAN' interface.
Subnet Mask
Subnet Mask of the 'Management-LAN'.
Routes
Click to get to the routing configuration.
MTU Size
Edit MTU size for 'Management-LAN'.
WebAdmin Access
Activate to get 'WebAdmin' access from 'Office-LAN'.
FTP Access
Activate to get FTP access from 'Office-LAN'.
SSH Access
Activate to get SSH access from 'Office-LAN'.
4.2.5
Network - Surf-LAN Certificate
If default Hostname or Domainname is changed you need to upload your own SSL
certificate. Therefore you can generate your own CSR and key file using the CSR
generator.
Value
Description
Status
Shows the validation status of the SSL certificate (green =
valid).
Certificate File
Select certificate file for upload.
Certificate Key File
Select certificate key file for upload.
Certificate Authority File
Select certificate authority file for upload (if required by SSL
certificate).
4.2.6
Bandwidth Management
Edit total bandwidth settings for 'Surf-LAN' or completely deactivate the bandwidth
management.
Value
Description
System Default
Status
Shows the service status.
Service running
Total Download
Bandwidth
Maximum bandwidth in Kbit/s available to all
simultaneous surfers (guests).
2048
Total Upload
Bandwidth
Maximum bandwidth in Kbit/s available to all
simultaneous surfers (guests).
2048
Fixed Bandwidth
Activate to use a specific part of total bandwidth as Deactivated
fixed bandwidth.
Fixed Download
Bandwidth
Reserve a part of the total bandwidth as fixed
download bandwidth.
Deactivated
Shared Download Shows the remaining download bandwidth which
Bandwidth
will be shared among normal users.
Deactivated
Fixed Upload
Bandwidth
Deactivated
PSE HSC Hot Spot
Service Manual
Reserve a part of the total bandwidth as fixed
upload bandwidth.
21 / 29
Value
Description
System Default
Shared Upload
Bandwidth
Shows the remaining upload bandwidth which will
be shared among normal users.
Deactivated
4.2.7
SMTP Server
Define an SMTP server to forward emails.
Value
Description
Status
Shows the service status.
Sender
Enter the email address of the sender.
Server
Enter SMTP server of your provider.
Port
Enter port of the SMTP server (default:25).
TLS
Enable data encryption using transport layer security (if
supported by remote SMTP server).
SSL
Enable data encryption using secure socket layer (if supported
by remote SMTP server).
SMTP Authentication
If SMTP authentication is required, enter username/password
to authenticate on remote SMTP server.
Testmail
Send a testmail to check if SMTP configuration works.
4.2.8
SMTP Proxy
Most ISPs (Internet Service Providers) not allow sending eMails from a non-customer
account. Most of your customers can receive (POP-Server) their eMails but not send them
(SMTP-Server) because they are connected with your ISP. Enter your SMTP Relayhost to
enable customers to send eMails via your ISP.
Please contact your system administrator for further information.
Value
Description
System Default
Status
Shows the service status.
Service not
running
Mode
SMTP Proxy: eMails are sent via the
system's SMTP Proxy.
SMTP Proxy
Disable SMTP: users are not allowed to send
eMails.
Direct SMTP: eMails are sent directly.
SMTP Relayhost
E.g. email.aon.at
SMTP
Authentication
If your ISP requires SMTP Authentication, please
activate checkbox and enter Username/Password.
4.2.9
Public IP
Public IP configuration.
PSE HSC Hot Spot
Service Manual
22 / 29
Requires minimum one public ip range and special routing configurations
from ISP.
'Office-LAN' Proxy ARP allows you to share the same public IP subnet on
the 'Office-LAN' and 'Surf-LAN' interface.
Value
Description
System Default
Status
Shows the service status.
Deactivated
Name
Name and/or description of public ip address pool.
Start IP Address
Public IP Address range start (e.g.: 192.0.2.1 hint: omit network address!).
End IP Address
Public IP Address range end (e.g.: 192.0.2.5).
Subnet based
Subnet based is recommended. If unchecked
clients will get host route to gateway.
Subnet Mask
Subnet mask of IP Address pool (e.g.:
255.255.255.248).
Default Gateway
Default Gateway IP Address (e.g.: 192.0.2.6).
Activate
Set this public ip range active.
4.3
Ticket
Change the settings of the system to meet your requirements.
The settings should be made by your IT partner as part of the installation
process. To make changes, please follow the instructions of your system
administrator.
Value
Description
System Default
Prefix
Displays the username on the 'Surfticket' together
with the automated ticket numbering (e.g. ticket1,
ticket2).
ticket
Password Length
Defines the length of passwords for 'Surftickets'.
5
Expiration Period
Defines the days a user can consume the time
credit (e.g. 365 days).
365
Max Idle Time
Time span in minutes after an inactive session
20
(e.g. no network traffic) is automatically logged off.
eMail Statistics to
eMail addresses (separated by a comma) to which
statistics are to be sent monthly (common CSV file
format).
Session Limit
Defines the download volume in megabyte a user
can consume per session (e.g. 50 MB).
PSE HSC Hot Spot
Service Manual
200
23 / 29
Ticket Limit
Defines the download volume in megabyte a user
can consume for the entire ticket (e.g. 100 MB).
Max Download
Bandwidth
Defines the default maximum download bandwidth 200
for 'Surftickets'.
Max Upload
Bandwidth
Defines the default maximum upload bandwidth for 200
'Surftickets'.
4.3.1
200
Mandatory Fields
Choose or define fields that ar mandatory when creating a 'Surfticket' within WebAdmin
interface.
4.3.2
Data Collector
The Data Collector allows to define additional user input fields (email, name, mobile number
etc.) the user has to fill out at login. The Data Collector templates can then be assigned to
ticket templates.
Value
Description
New
Click to create a new data collector template.
Save
Click to save all created data collector templates.
Name
Enter a proper name for the data collector template.
Single Device Template
(Max Devices = 1)
Disabled: Disables the data collector template if used with
a single device ticket template.
First Login: The user has to enter the additional data only
at first login.
Every Login: The user has to enter the additional data at
every login.
Multi Device Template
(Max Devices > 1)
Disabled: Disables the data collector template if used with
a multi device ticket template.
First Login on any device: The user has to enter the
additional data only at first login on ANY device.
First Login on each device: The user has to enter the
additional data at first login on EACH device.
Every Login: The user has to enter the additional data at
every login.
User Input 1-9
4.3.3
Select additional data you want the user to enter at login.
VAT
Value
Description
System Default
TOTAL Name
Name of total sum on the 'Surfticket'.
TOTAL
PSE HSC Hot Spot
Service Manual
24 / 29
Value
Description
System Default
VAT Description
VAT description on the 'Surfticket' (e.g. Price
includes VAT).
Amount received.
Price includes
VAT
Defines if the ticket price includes VAT.
Active
VAT Name
Name of VAT on the 'Surfticket'.
VAT
VAT Rate
VAT rate on the 'Surfticket'.
20
NET Name
Name of net sum on the 'Surfticket'.
NET
Value
Description
System Default
Invoice active
Defines if an invoice number should be displayed
on the 'Surfticket'.
Inactive
Invoice
Description
Name of invoice on the 'Surfticket'.
Invoice
Invoice Prefix
Displays the invoice number on the 'Surfticket'
together with the automated invoice numbering
(e.g. INV1, INV2).
INV
Invoice number
value
Displays the invoice number on the 'Surfticket'
together with the invoice prefix (e.g. INV1, INV2);
you can set the counter at any time (e.g. 100).
4.3.4
4.3.5
Invoice
Logo
The logo will appear on top of the 'Surfticket'.
4.3.6
Ticket Template
Define the 'Surfticket' printout design individually for all languages.
4.4
WebAdmin
Change the settings of the system to meet your requirements.
The settings should be made by your IT partner as part of the installation
process. To make changes, please follow the instructions of your system
administrator.
Value
Description
Logon Session expires
Time span in minutes after an inactive session (e.g. no network
traffic) is automatically logged off.
Date Format
Choose your desired format.
CSV Separator
Defines which character is used as CSV separator.
PSE HSC Hot Spot
Service Manual
25 / 29
Records per page
Defines how many records will be displayed per page when
using search functions.
Ticket Format
Defines print format for 'WebAdmin' generated Tickets.
Network Check
Checks your DNS settings and displays an error if the used
DNS server is not reachable or has the same IP Address as
the used default gateway.
Default Language
If no cookie is set and the browser language is not supported,
this language will be preselected at the 'WebAdmin' logon
page.
Number Format
Choose your desired format.
Modify 'hosts' File
If your system is Windows-based, you can map the IP Address
to the 'WebAdmin' to a special host name by downloading and
executing this file. So you can avoid the security alert when
accessing the 'WebAdmin'.
Print Note
Print predefined notes on tickets.
4.5
License
Ensure that your system has the latest enhancements. If your Online Update Subscription
has expired, we would strongly recommend extending it.
It includes:
Security Updates
Minor and Major Releases
Web Filter Lists for Advanced Web Filter
Latest Security Certificate for 'Surf-LAN' (https)
The settings should be made by your IT partner as part of the installation
process. To make changes, please follow the instructions of your system
administrator.
Value
Description
Status
Shows if your system is licensed.
Online Update
Subscription
System can receive Online Updates until the date specified.
Registration Date.
Current Version.
Registration MAC
License is bound on this network card (MAC Address).
Registration Number.
Registration Password.
User Limit
PSE HSC Hot Spot
Service Manual
Maximum concurrent users who can connect to the Internet
within the 'Surf-LAN'.
26 / 29
License Key.
Modules
4.5.1
Shows available modules and their license status.
Registration
To license your system select a registerable network card (MAC address) and enter your
Registration Number and Registration Password as shown on your certificate.
Also the Company Name, Location and Administrator Email Address is required for system
notifications.
PSE HSC Hot Spot
Service Manual
27 / 29
5
Good to Know
5.1
Automated Backup
activate and change password for user 'backup' ('WebAdmin')
download 'Internet_for_Guests_Backup-setup.zip'
follow the installation guide
5.2
Change IP Address on System Console
attach monitor and keyboard to the system
logon as administrator 'sysop'
enter new IP address in menu 'Sys-Config'
run automatic netcard detection 'Net-Auto'
activate changes with service 'Activate'
restart system
5.3
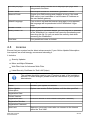
Reset Password for Administrator 'sysop'
For security reasons, this operation is only possible on system console.
attach monitor and keyboard to the system
you see the system console login
enter string: resetsysop
press ENTER two times
the values had been reset to system default
5.4
Reset IP address and Password for Administrator
'sysop'
PSE HSC Hot Spot
Service Manual
28 / 29
For security reasons, this operation is only possible on system console.
attach monitor and keyboard to the system
you see the system console login
enter string: resetfactory
press ENTER two times
PSE HSC Hot Spot
Service Manual
29 / 29