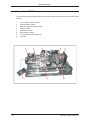
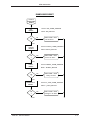
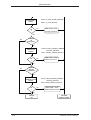
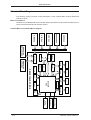
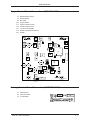
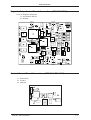
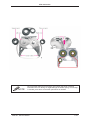
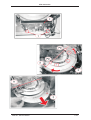
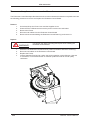
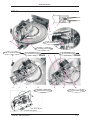
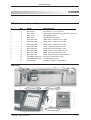
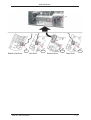
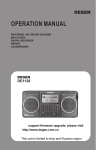
1
CTS electronics
SERVICE MANUAL
CPS120
Card issuance system
CPS120 - Service Manual
I
CTS electronics
PUBLISHED BY:
CTS electronics
Corso Vercelli, 332 - 10015 IVREA - ITALY
Tel. (0125) 235611 - Telefax (0125) 235623
http://www.ctsgroup.it
Copyright
No part of this publications may be reproduced or transmitted in any form or any means, electronic or
mechanical, including photocopying and recording, or by any information storage or retrieval system
without the prior written permission of CTS Electronics.
Disclaimers
The information in this document is subject to change without notice.
CTS Electronics makes NO warranty of any kind with regard to this material, either express or implied,
expect as provided herein, including without limitation, thereof, warranties as to marketability,
merchantability, fitness for a particular purpose of use or non-infringement. CTS Electronics shall not be
liable for any direct , incidental, or consequential damages of any nature, or losses or expenses resulting
from the use of this material.
Edition: 24 april 2007
Codice: MAN 1217
Previous issue
Subjects covered in the new issue
New pages
introduced or amended
03 August 2006
Topper Cartridge Capacity
Chapter 7 - Spare parts list
1-5
16 January 2007
Contact Control Board Connections
Chapter 7 - Spare parts list
4-8
7-14
30 January 2007
Chapter 7 - Spare parts list
7-5; 7-16
19 February 2007
Chapter 6 -
All
07 March 2007
Chapter 7 - Spare parts list
7-8; 7-9
30 March 2007
Chapter 3 - Console Operation Description
3-17
II
CPS120 - Service Manual
CTS electronics
FOREWORD
NOTE:
The machine must be used solely for the purposes for which it was designed. Any intervention
modifying its original operating configuration must be authorized and certified beforehand by
the manufacturer.
CTS electronics is not liable for any damages caused by the use of non-original spare parts.
CPS120 - Service Manual
III
CTS electronics
SYMBOLS
This handbook uses the following conventions:
The note contains important information for the user.
NOTE!
!
IV
WARNING!
Improperly using controls, making adjustments, or performing
procedures not specified in this User Guide may be dangerous.
CPS120 - Service Manual
CTS electronics
DECLARATION CE of CONFORMITY
The Manufacturer:
C.T.S. electronics S.p.A.
Corso Vercelli, 332
10015 Ivrea (To) Italy
Declares under its sole responsability that the product:
Equipment category:
Information Technology Equipment
Product type:
Card issuance system
Commercial name:
CPS120
Fulfils the essential requirements of Electromagnetic Compatibility and of Electrical Safety as prescribed by the
Directives:
89/336/EEC dated 3 th May 1989 with subsequent amendments (Directive 92/31/EEC dated 28 th April 1992 and Directive
nd
93/68/EEC dated 22 July 1993);
th
nd
73/23/EEC dated 19 February 1973 with subsequent amendments (Directive 93/68/EEC dated 22
July 1993);
since designed and manufactured in compliance with the following European Harmonised Standards:
EN 55022:
(Limits and method of measurements of radio interference characteristics of Information
Technology Equipment)
EN 61000-3-2: (Electromagnetic Compatibility – Part 3: Limit – Section 2: Limits for harmonic current
emission (equipment input current £ 16 A per phase))
EN 61000-3-3: (Electromagnetic Compatibility – Part 3: Limit – Section 3: Limitation of voltage fluctuations
and flicker in low-voltage supply system for equipment with rated current £ 16 A)
EN 55024:
(Limits and method of measurements of Immunity characteristics of Information Technology
Equipment)
EN 60950-1:
(Safety of Information Technology Equipment, including electrical business equipment)
Compliance with the above mentioned essential requirements is shown by affixing the CE marking on the
product.
U.S.A.
U.S. FEDERAL COMMUNICATIONS COMMISSION RADIO FREQUENCY INTERFERENCE STATEMENT
INFORMATION TO THE USER
This equipment has been tested and found to comply with the limits for a Class A digital device, pursuant to Part 15 of the FCC Rules.
These limits are designed to provide reasonable protection against harmful interference when the equipment is operated in a
commercial enviroment. This equipment generates, uses, and can radiate radio frequency energy and, if not installed and used in
accordance with the instruction manual, may cause harmful interference to radio communications. Operation of this equipment in a
residential area is likely to cause harmful interference in which case the user will be required to correct the interference at his own
expense.
Change or modification not expressly approved by the party responsible for compliance could void the user’s aulhority to operate the
equipment. Connecting of peripherals required the use of grounded shielded signal cables.
CANADA
EMI REQUIREMENTS FOR CANADIAN MARKET
This digital apparatus does not exceed the class A limits for radio noise emissions from digital apparatus as set out in the
interference-causing equipment standard entitled “Digital Apparatus”, ICES-003 of the industry of Canada.
SPECIFICATIONS EMI POUR LE MARCHÉ CANADIEN
Cet appareil numérique respecte les limites de bruits radioélectriques applicables aux appareils numériques de Classe A prescrites dans
la norme sur le matériel prouilleur: “Appareils Numériques”, NMB-003 édictée par le Ministre des Communications.
CPS120 - Service Manual
V
CTS electronics
Information to the users
SUPPLIED BY PARTNERS
The
symbol, affixed on the equipment, means that the refuse of this equipment must be collected
separately.
Therefore the user shall deliver the related refuse to one of the special centres predisposed by the local
administrations for the separate refuse collection.
In alternative the user shall give the equipment back to the retailer in exchange for a new equivalent
equipment.
The separate collection of the refuse and the related operations for the treatment, recycling and waste
disposal, promote the manufacturing of new equipment using recycled materials thus limiting the
damages to the environment and the negative effects to the health due to an inadequate waste
management.
The unauthorized waste disposing of the product will be submitted to the administrative penalties in
conformity to the article 50 and subsequent articles of the D.lgs number 22/1997.
According to the article 13, D.Lgs dated 25 July 2005 n 151 Enforcing of the directives : 2002/95/CE,
2002/96/CE e 2003/108/CE)”, related to reduce the use of dangerous substances in electric and
electronic equipment and to the refuse disposal.
For more information visit www.ctsgroup.it
VI
CPS120 - Service Manual
CTS electronics
1
Chapter
SYSTEM DESCRIPTION
The CPS120 Card Personalization System operates as a standalone
card embosser. This chapter provides a system description of the
CPS120 embosser.
Audience . . . . . . . . . . . . . . . . . . . . . . . . . . . 1-3
Repair Ability . . . . . . . . . . . . . . . .
Serial Numbers . . . . . . . . . . . . . . .
Use of this Document . . . . . . . . . . .
Product Specifications . . . . . . . . . . .
Magnetic Stripe Encoding Specifications. .
Standard Financial Emboss Line Locations
Standard Emboss Character Height . . . .
Standard Emboss Character Spacing . . .
CPS120 - Service Manual
.
.
.
.
.
.
.
.
.
.
.
.
.
.
.
.
.
.
.
.
.
.
.
.
.
.
.
.
.
.
.
.
.
.
.
.
.
.
.
.
.
.
.
.
.
.
.
.
.
.
.
.
.
.
.
.
.
.
.
.
.
.
.
.
.
.
.
.
.
.
.
.
1-3
1-3
1-4
1-5
1-6
1-6
1-7
1-7
1-1
CTS electronics
1-2
CPS120 - Service Manual
CTS electronics
Audience
This document is intended for use by authorized representatives of CTS Group Corporation who
are responsible for the maintenance, service, and repair of the CTS CPS120 Card
Personalization System, which is also referred to in this document as the CPS120.
Repair Ability
The authorized CTS representative must possess the following ability:
· Ability to set up the CPS120 communication parameters.
· Ability to check CPS120 configuration against purchase order agreement and, if necessary
change configuration.
· Ability to run and interpret software diagnostics.
· Ability to remove and replace all FRUs (Field Replaceable Units).
· Ability to diagnose mechanical and electrical failures and correctly adjust all mechanical
components including software adjustments.
Serial Numbers
Information in this document applies to all CPS120 Card Personalization Systems beginning with
Serial number xxxxxxx and higher.
CPS120 - Service Manual
1-3
CTS electronics
Use of this Document
This document contains the following chapters to assist the service representative in the
maintenance, service, and repair of the CPS120:
Chapter 1: System Description
Provides general information about this document and service data for the CPS120.
Chapter 2: Installation
Provides information for site preparation, unpacking, inspection, setup, configuration, and initial
checkout of a CPS120.
Chapter 3: Preventive Maintenance
Provides a preventive maintenance schedule with procedures and tool requirements for periodic
maintenance of the CPS120.
Chapter 4: Theory of Operation
Provides basic electrical theory for the CPS120.
Chapter 5: Troubleshooting
Provides a Troubleshooting guide to determine which FRU needs to be replaced or what
adjustment needs to be performed for proper operation of the CPS120.
Chapter 6: Adjustments
Provides detailed procedures for mechanical, electrical, and software adjustments.
Chapter 7: Removal and Replacement
Provides removal and replacement procedures for field replaceable items in the CPS120.
1-4
CPS120 - Service Manual
CTS electronics
Product Specifications
Electrical
100-240V AC at 3,2A, 50/60Hz (Single phase, 3 wire grounded receptable only)
Environmental
Noise level:
Relative Humidity:
Maximum heat dissipation:
Less than 60dB
20% to 80% non-condensing
1,195 BTU/Hour
Operating temperature range:
ESD Susceptibility:
60°F to 90°F (15°C to 32°C)
The CPS120 can withstand an ESD discharge of
15KV, 150pF storage and 330 ohm series
resistance in test simulating a human discharge
to the machine's outer surfaces (EN61000-4-2)
Communications
RS-232 service port
RS-232 host port
LAN port
USB port
Smart Card Contact port
Smart Card Contactless port
Card Capacities
Input Hopper Capacity
Reject Hopper Capacity
Output Hopper Capacity
Topper Cartridge Capacity
100 cards (automatic card feed)
Up to 30 cards
Up to 50 cards
700 cards
Physical Specifications
Width:
Depth:
Height:
Weight:
17.7 inches (450 mm)
25.9 inches (650 mm)
11.6 inches (295 mm)
86 pounds (39 Kg)
Card Specifications
Dimensions:
Finish:
Color:
Bow
Material:
IC (Smart Card):
Magnetic stripe:
CPS120 - Service Manual
Length: 3.375 inches (85.7 mm)
Height: 2.125 inches (54.0 mm)
Thickness: 0.030 ± 0.003 inches (0.762 mm ±0.08mm)
Any gloss or matte finish
Any color
0.06 inches maximum from flat (1.5mm)
PVC
Optional
Low Coercivity: 300 Oe
High Coercivity: 4000 Oe
1-5
CTS electronics
Magnetic Stripe Encoding Specifications
The following table gives encoding specifications for magnetic stripe encoding used on the CPS120.
Track
Number
Start Bit
(inches)
Position*
(millimeters)
Skew
Angle
Track
(Max Top
in inches)
Location**
(Min Bottom
in inches)
BPI
Track1 (IATA)***
0.293 ±0.020
7.44 ±0.51
0° ±20'
0.223
0.333
210 ±8%
Track2 (ABA)***
0.293 ±0.020
7.44 ±0.51
0° ±20'
0.353
0.463
75 ±5%
Track3 (TTS)***
0.293 ±0.040
7.44 ±1.02
0° ±20'
0.493
0.603
210 ±8%
NTT-J2
0.236 ±0.020
6.00 ±0.51
0° ±10'
0.236
0.472
210 ±8%
*
Start Bit Position is referenced from the right edge of the card as viewed from the magnetic stripe
side.
** Track Location is referenced from the top edge of the card.
*** Track 1 (IATA) = 76 maximum data characters.
*** Track 2 (ABA) = 37 maximum data characters.
*** Track 3 (TTS) = 104 maximum data characters.
NOTE!
Maximum data characters do not include start, end sentinels, and LCR
characters.
All magnetic stripe specifications are per ISO 7811-2, 7811-4, and 7811-5.
Standard Financial Emboss Line Locations
L1 = 7CPI
L2 = 10CPI
L3 = 10CPI
L4 = 10CPI
L5 = 10CPI
NOTE!
1-6
V = 0.843 ±0.005 inches (21.412 ±0.127 mm) OCR
V = 0.646 ±0.005 inches (16.408 ±0.127 mm) 1st AN
V = 0.488 ±0.005 inches (12.395 ±0.127 mm) 2nd AN
V = 0.332 ±0.005 inches (8.432 ±0.127 mm) 3rd AN
V = 0.175 ±0.005 inches (4.445 ±0.127mm) 4th AN
All lines have a left margin of 0.401 ±0.010 inch (10.185 ±0.254mm).
V is the distance from the bottom of the card to the center of the character.
CPS120 - Service Manual
CTS electronics
Standard Emboss Character Height
OCR Farrington 7B
7 Characters per inch
0.016 to 0.019 inches (0.40 to 0.48 mm)
AN
Indent Characters
Indent Punctuation
10 Characters per inch
0.015 to 0.018 inches (0.38 to 0.46 mm)
0.001 to 0.005 inches (0.0254 to 0.127 mm)
0.001 to 0.007 inches (0.0254 to 0.177 mm)
Standard Emboss Character Spacing
OCR Ferrington 7B
AN
7 Characters per inch
10 Characters per inch
Indent Characters
Indent Punctuation
±0.006 inches (±0.152 mm)
±0.006 inches (±0.152 mm)
CPS120 - Service Manual
0.143 ±0.006 inches (3.632 ±0.152 mm)
0.100 ±0.006 inches (2.540 ±0.152 mm)
1-7
CTS electronics
1-8
CPS120 - Service Manual
CTS electronics
2
Chapter
PREVENTIVE
MAINTENANCE
The CPS120 Card Personalization System operates as a standalone
card embosser. This chapter provides instructions for performing
preventive maintenance on the CPS120.
Preventive Maintenance . . . . . . . . . . . . . . . . . . . 2-3
Tools and Material . . . . . . . . . . . . . . . . . . . . . . 2-4
Preventive Maintenance Procedures.
Cleaning the CPS120 . . . . . . . .
Cleaning the O-Rings . . . . . . . .
Cleaning the Sensors . . . . . . . .
Cleaning the Magnetic Stripe Head .
CPS120 - Service Manual
.
.
.
.
.
.
.
.
.
.
.
.
.
.
.
.
.
.
.
.
.
.
.
.
.
.
.
.
.
.
.
.
.
.
.
.
.
.
.
.
.
.
.
.
.
.
.
.
.
.
.
.
.
.
.
.
.
.
.
.
2-4
2-5
2-5
2-6
2-7
2-1
CTS electronics
2-2
CPS120 - Service Manual
CTS electronics
Preventive Maintenance
The following table lists the periodic cleaning and adjustment verification requirements for the
CPS120. A complete procedure for each item in the table is given in this chapter.
Preventive Maintenance (PM) should be performed at 12-month intervals and after any of the
following activities:
· Any adjustement to a FRU or sub-assembly.
· Any replacement to a FRU or sub-assembly.
· Any unscheduled maintenance is performed.
Task
FRU/Module
Procedure
Cleaning the CPS120
CPS120
Vacuum out the entire inside of the CPS120 and
clean the outside of the cabinet with desk cleaner
Clean The CPS120
O-Rings/Drive Rollers
CPS120
Clean O-Rings and rubber drive rollers with
rubber rejuvenator
Clean the CPS120 Sensors
CPS120
Clean sensors with compressed air
Clean Magnetic Stripe Head
Magnetic Stripe Clean head using Encoding Cleaning Card
Verify Adjustment and Operation Card Transport
of the CPS120
Verify Start Sentinel and Track
Locations for Magnetic Stripe
Magnetic Stripe Run a Magnetic Stripe Test Card and verify start
sentinel and track locations
Verify Even and Uniform Topping Topper
CPS120 - Service Manual
Verify horizontal margin, character height and
vertical line location on customer setups
Run customer cards and verify cards are top
coated evenly and uniformly
2-3
CTS electronics
Tools and Material
The following tools and supplies are required to perform preventive maintenance as specified in
the PM schedule:
·
·
·
·
·
·
·
·
Can of compressed air
Desk cleaner
Encoder cleaning card
Lint-free cloth
Magnetic stripe sight gauge
Rubber rejuvenator
Vacuum cleaner
Vernier calipers
Preventive Maintenance Procedures
The following procedures are performed to complete the requirements of the PM schedule:
·
·
·
·
·
·
·
2-4
Cleaning the CPS120
Cleaning the O-Rings/Drive Rollers
Cleaning the Sensors
Clean of the Magnetic Stripe Head
Verifying Embossing Line Locations and Margins
Verifying Start Sentinel and Track Locations for Magnetic Stripe
Verifying Even and Uniform Topper coating
CPS120 - Service Manual
CTS electronics
Cleaning the CPS120
1.
Unlock and lift up the Front Cover and the Supplies Cover.
2.
Power OFF the CPS120 and remove the power cord
· Vacuum out the inside of the CPS120.
· Clean the outside of the cabinet with either a damp lint -free cloth or desk cleaner
Cleaning the O-Rings
1.
2.
3.
Unlock and lift up the Front and Supplies Covers.
Power OFF The CPS120 and remove the power cord.
Clean the following O-Rings or drive rollers with rubber rejuvenator:
· Magnetic Stripe Encoder roller (1)
· Single Card Input drive rollers (2)
· Single Card Input drive belt (3)
NOTE!
Inspect all O-Rings and drive rollers for cracks or cuts. Replace if necessary.
CPS120 - Service Manual
2-5
CTS electronics
Cleaning the Sensors
1.
Unlock and lift up the Front and Supplies Covers.
2.
3.
Power OFF the CPS120 and remove the power cord.
Use a can of compressed air to clean the following sensors
·
·
·
·
·
·
·
·
·
2-6
Single Card Input Sensor
X-Home sensor
Y-Home sensor
Reject Full sensor
Input Hopper Empty sensor
Input Hopper Nearly Empty sensor
Magnetic Stripe Synchronism sensor
Emboss Synchronism sensor
Indent Ribbon Motion sensor
CPS120 - Service Manual
CTS electronics
Cleaning the Magnetic Stripe Head
1.
Unlock and lift up the Front and Supplies Covers.
2.
3.
Power OFF the CPS120 and remove the power cord.
Clean the following areas:
· Vacuum card dust from around the magnetic stripe head. Remove remaining dust with a
damp cloth.
4.
· Clean roller with a cloth lightly moistened with rubber rejuvenator.
· Move an Encoder Cleaning Card back and forth over the magnetic stripe head.
Plug in the power cord and power ON the CPS120.
CPS120 - Service Manual
2-7
CTS electronics
2-8
CPS120 - Service Manual
CTS electronics
Chapter
3
THEORY OF OPERATION
The CPS120 Card Personalization System operates as a standalone
card embosser. This chapter provides general theory of operation for the
CPS120.
CPS120 Overview . . . . . . . . . . . . . . . . . . . . . . 3-3
Component Identification . . . . . . . . . . . . . . . . . . . 3-3
Inside View of the CPS120 . . . . . . . . . . . . . . . . . . 3-4
Rear View of the CPS120 . . . . . . . . . . . . . . . . . . 3-5
Sequence of Reset . . . . . . . . . . . . . . . . . . . . . . 3-6
Sequence of operation . . . . . . . . . . . . . . . . . . . 3-11
Electrical Block Diagrams . . . . . . . . . . . . . . . . . . 3-12
Main Control Board . . . . . . . . . . . . . . . . . . . . . 3-12
CPS120 Main Control Board Block Diagram . . . . . . . . 3-12
Microprocessor . . . . . . . . . . . . . . . . . . . . . . . 3-13
Cpld . . . . . . . . . . . . . . . . . . . . . . . . . . . . 3-13
Flash . . . . . . . . . . . . . . . . . . . . . . . . . . . . 3-13
Sdram . . . . . . . . . . . . . . . . . . . . . . . . . . . . 3-13
Eeprom . . . . . . . . . . . . . . . . . . . . . . . . . . . 3-13
485 Lines . . . . . . . . . . . . . . . . . . . . . . . . . . 3-13
24 Volt Power Supply . . . . . . . . . . . . . . . . . . . . 3-14
5 Volt Regulator . . . . . . . . . . . . . . . . . . . . . . . 3-14
3.3 Volt Regulator . . . . . . . . . . . . . . . . . . . . . . 3-14
CPS120 - Service Manual
3-1
CTS electronics
RS232 Tranceiver. . . . . . . . . . . . . . . . . . . . . . 3-14
LAN Tranceiver . . . . . . . . . . . . . . . . . . . . . . . 3-14
USB Tranceiver . . . . . . . . . . . . . . . . . . . . . . . 3-14
Input / Output / Reject Control Board . . . . . . . . . . . 3-15
Magnetic Stripe Control Board . . . . . . . . . . . . . . . 3-15
Topper Control Board . . . . . . . . . . . . . . . . . . . . 3-15
Embosser Control Board . . . . . . . . . . . . . . . . . . 3-16
Consolle Control Board . . . . . . . . . . . . . . . . . . . 3-16
Console Operation Description . . . . . . . . . . . . . . . 3-17
3-2
CPS120 - Service Manual
CTS electronics
CPS120 Overview
The CPS120 is a full featured single-pass card personalization system. The CPS120 embosses,
indents, encodes and tops financial cards. Depending on the options ordered, the CPS120 is
also capable of front indent printing and smart card personalization.
Component Identification
The follow bulleted list identifies the major components of the CPS120. See Figure for their
location.
1.
2.
3.
4.
Output hopper door
Single card access entry
Keyhole
Keypad
5.
6.
7.
Display
Front cover
Power switch
7
6
3
4
5
2
1
CPS120 - Service Manual
3-3
CTS electronics
Inside View of the CPS120
The following bulleted list identifies the major modules inside of the CPS120. See Figure for their
location.
1.
2.
3.
4.
Input / output / Reject module
Card transport module
Magnetic stripe encoding module
Topper module
5.
6.
7.
8.
Embosser module
Rear indent cartridge
Front indent cartridge (optional)
Consolle
1
8
3-4
3
4
5
2
7
6
CPS120 - Service Manual
CTS electronics
Rear View of the CPS120
The following bulleted list identifies the components on the rear of the CPS120. See Figure for
their location.
1.
Comunication ports
2.
3.
4.
·
·
·
·
·
·
Host
Service
LAN (option)
USB (option)
Smart card contact USB (option)
Smart card contactless USB (option)
Power receptable
Power fuse
Power ON/OFF
4
2
3
1
CPS120 - Service Manual
3-5
CTS electronics
Sequence of Reset
PROCESS RESET
CONSOLLE
RESET
OK
?
No
Yes
TOPPER
RESET
OK
?
No
Yes
FEEDER
RESET
OK
?
No
Yes
ENCODER
RESET
OK
?
No
Yes
EMBOSSER
RESET
OK
?
No
Yes
MOVE TO CLAMP
POSITION
3-6
RETURN
ERROR CODE
CPS120 - Service Manual
CTS electronics
TOPPER RESET
Routine
TOPPER
RESET
FIRST
ON?
Yes
ERR CODE = 0x77.
Device Need Reset SW
No
TOPPER
MECHANICAL
RESET
OK
?
Sensor: TOPPER_HOME_SENSOR
Motor: TOPPER_MOTOR
No
ERR CODE = 0x4A.
Topper moving is Lock
Yes
Sensor: TOPPER_RIBBON MOTION
SENSOR
Motor: RIBBON_MOTOR
RIBBON
RESET
OK
?
No
ERR CODE = 0x4B
Topper Ribbon Ending
or Broken
Yes
TOPPER
TEMP.
OK?
No
ERR CODE = 0x41/42.
Topper Temperature
Low / High
Yes
RETURN
OK
CPS120 - Service Manual
RETURN
ERROR CODE
3-7
CTS electronics
FEEDER RESET
Routine
FEEDER
RESET
Sensor: UP_SELECTION_TRAT_SENSOR,
DOWN_SELECTION_TRAY_SENSOR
HOPPER
RESET
Motor: SELECTION_TRAY_MOTOR
OK
?
No
ERR CODE = 0x30.
Feeder Group in
mechanical Error
Yes
Sensor: _FEEDER_HOME_SENSOR
FEEDER
RESET
OK
?
Motor: FEEDER_MOTOR
No
Yes
ERR CODE = 0x30.
Feeder Group in
mechanical Error
OR
WARN. CODE 0x17
Card can be Feed
Sensors:REJECT_FULL_SENSOR,
EJECT_FULL_SENSOR
CHECK
SENSORS
Motor: NONE
OK
?
No
WARNING CODE
= 0x33/34.
Reject/Eject Stack Full
Yes
RETURN
OK
3-8
RETURN
ERROR CODE
CPS120 - Service Manual
CTS electronics
EMBOSSER RESET
Routine
EMBOSSER
RESET
Sensor: DIE_HOME_SENSOR
DIE
RESET
OK
?
Motor: DIE_MOTOR
No
ERR CODE = 0x51.
Die On Error
Yes
Sensor: PUNCH_HOME_SENSOR
PUNCH
RESET
OK
?
Motor: PUNCH_MOTOR
No
ERR CODE = 0x51.
Punch On Error
Yes
Sensor: WHEEL_HOME_SENSOR
DAISY
RESET
OK
?
Motor: WHEEL_MOTOR
No
ERR CODE = 0x52.
Daisy On Error
Yes
Sensor:Y_AXIS_HOME_SENSOR
CARRIAGE Y
RESET
OK
?
Motor: Y_AXIS_MOTOR
No
ERR CODE = 0x54.
Carriage Y On Error
Yes
CPS120 - Service Manual
3-9
CTS electronics
Sensor: X_AXIS_HOME_SENSOR
CARRIAGE X
RESET
Motor: X_AXIS_MOTOR
No
OK
?
ERR CODE = 0x53.
Carriage X On Error
Yes
No
RIBBON
UP
PRESENT?
Yes
Sensor: FRONT_INDENT_RIBBON
MOTOR_SENSOR
RIBBON UP
RESET
Motor: FRONT_INDENT_MOTOR
No
OK
?
ERR CODE = 0x59.
Indent UP On Error
Yes
No
RIBBON
DOWN
PRESENT?
Yes
Sensor: REAR_INDENT_RIBBON
MOTOR_SENSOR
RIBBON DOWN
RESET
Motor: REAR_INDENT_MOTOR
No
OK
?
ERR CODE = 0x5A.
Indent DOWN On Error
Yes
RETUR
OK
3-10
RETURN
ERROR CODE
CPS120 - Service Manual
CTS electronics
Sequence of operation
1.
After the CPS120 initializes on power up, cards can be produced:
a. Once the system detects that a block of data has been received, acknowledges the
data and signals the topper platen heater to turn on.
2.
The CPS120 senses cards in the Input Hopper by checking the Input Hopper Empty
sensor:
a. The card is feed and the pick mechanism picks a card.
3.
The card is tranported to the Encoder Module:
a. Depending on the Magnetic Stripe setup, the card make as many as one or two
passes (one for LO-CO, two for HI-CO) to read and write to the card's magnetic
stripe tracks.
b. If the magnetic stripe can not be written to or read from, the card is transported to
the reject tray.
4.
The card transport mechanism moves the card to the Embossing Wheel:
a. The Embossing Wheel senses the home position (Wheel Home sensor) the first
time a character is requested to print. The Embossing Wheel will move either
clockwise or counter clockwise depending on how quickly the Embossing character
can be moved to be embossed on the card.
b. The card will move in four directions as the punch and dies emboss characters on
the card.
c. The die cam home sensor and the punch cam home sensor detect when both cams
are in their home position, both the die and the punch cams work simultaneously to
emboss characters on a card.
5.
After a card is embossed, it is transported to the Topper Module where the bottom half
of the card is topped:
a. The topper platen sensor detects that the platen is in its home position and up to
temperature and ready to top cards.
b. The topping foil is advanced and the platen is moved to the ready position.
c. As a card is moved in to the topper module, a topper motor is activated to apply
platen pressure and heat to the topping foil. This topping foil adheres to the raised
embossed characters on the card.
6.
After a card is topped, the completed card is transported to the eject tray for delivery to
the operator.
CPS120 - Service Manual
3-11
CTS electronics
Electrical Block Diagrams
The following section provides a brief description of the CPS120 Main Control Board and
module's boards.
Main Control Board
The Main Control Board hold communication data to all modules and provides the electronics to
control Interlock Solenoid and Interlock Sensor.
HOST
LAN
USB
MAX232
PHY
TRANCEIVER
CONTACT CHIP
CARD SOLENOID
INTERLOCK
SOLENOID
TRANCEIVER
OSC. 25 MHz
CPU
MCF5272
SERVICE
2 MAX232
EXTERNAL
UART
PAL
INTERLOCK
SENSOR
3-12
CPS-CONS
CPS-FEEDER
OSC.
3,072 MHz
CPS-ENC
485 LINE
CPS-TOP
EEPROM
RAM 16 Mb
32 BIT
OSC. 66 MHz
OSC. 48 MHz
FLASH 2Mb
16 BIT
RESET
CIRCUIT
DEBUG
BDM
CPU
MAIN CONTROL BOARD
CONTACT
CHIP CARD
POWER SUPPLY
5V E 3,3V
CONTACTLESS
CHIP CARD
CPS-EMB
CPS120 Main Control Board Block Diagram
CPS120 - Service Manual
CTS electronics
Microprocessor
The microprocessor is the controlling element of CPS120 system, the connectivity (two serial
port, LAN and Usb) and the comunication with other module of CPS120 through 485 lines.
It is a Motorola COLDFIRE MCF5272 a 32 bit microprocessor clocked at 66MHz.
The processor power is supplied by filtered 3.3 volt supply;
The microprocessor support the address bus A0-A23 and it generate eight chip select
(CS0-CS7) that are used as follow:
·
·
·
·
·
·
·
·
CS0 for flash memory;
CS1 for cpld;
CS2 for future expansion;
CS3 for external uart;
CS4 unused;
CS5 unused;
CS6 unused;
CS7 for SDRAM;
Additionally the microprocessor have two serial port, the SDRAM controller, the MAC controller
of LAN and the controller of USB 1.1.
A BDM/JTAG connector allows a host development system, the ability to control the processor,
debug the hardware and programming the Flash memory.
Cpld
This component (M4A3 32-32) perform the enable of all module of CPS120, the control of data
buffer, the I/O of EEPROM memory and the administration of signal TX/RX of 485 lines for the
comunication of all modules.
Flash
The Flash memory chip (AMD29LV160) is 2 MB with 16-bit wide (1M X 16) and contain the
firmware code that control and operates the CPS120 system.
The Flash is selected by chip select 0 (-CS0) and address and data signal are buffered.
By using the BDM/JTAG connector of the microprocessor is possible programming the firmware
in flash memory;
Sdram
There are two memory SDRAM (MT48LC4M16A2) each by 8 MByte (4M X 16) arranged to
provide 16MByte in a 32-bit wide data bus configuration (8M X 32) of main memory for the
microprocessor.
These devices are controlled directly by the microprocessor by chip select 7 (-CS7).
Eeprom
The EEPROM (Elettrically Erasable Programmable Read Only Memory) can be written to and
changed many times and it is used for data storage.
This device organized as 128 byte (64 X 16) is accessed through a serial data input and output.
Configuration, offset setting and history of machine are stored in this chip.
485 Lines
The board Cps-Master communicate with the other module of CPS120 with this channel.
This is a line of two differential wire controlled by the chip SN75176.
It used the microprocessor Comm port2 and communicate at 19200 baud.
CPS120 - Service Manual
3-13
CTS electronics
24 Volt Power Supply
The power supplies 24V DC supplies all driver of stepper motors, DC motors, solenoids, the
resistor of topping and the magnetic stripe driver circuit.
5 Volt Regulator
A switching regulator is utilized to create the 5.0-volt supply (about 3A) from the 24 Volts.
The 5 volts (Vcc) is used to supply all board of module of CPS120 and the board of contacless
(option).
3.3 Volt Regulator
A linear regulator (LD1117DT33C) is utilized to create 3.3-volts regulated supply from 5.0 volts.
The 3.3 volts (+3.3V) is supplied to all IC's via a discrete plane within the printed circuit board.
RS232 Tranceiver
The CPS120 service port support a 2-driver and 2-receiver RS232 tranceiver configuration; the
RS232 trainceiver input and output are tied directly to the microprocessor Comm port1.
The CPS120 host port support the modem control signal; the trainceiver input and output are tied
to an external Uart (TL16C550) controlled by the microprocessor.
LAN Tranceiver
The MCF5272 integrated fast Ethernet media access controller (MAC) performs the full set of
IEEE 802.3/Ethernet CSMA/CD media access control.
The microprocessor interface an external 100/10 BaseT Ethernet tranceiver (LXT971L) and the
isolation trasformer (HALO TG110);
The tranceiver requires a 25 MHz oscillator.
In default configuration mode the LAN is auto negotiation of 10 or 100 baseT full duplex
operation.
There are three LED that indicated the status of the Ethernet tranceiver and the meaning of each
LED is software configurable .
Default settings meaning:
· LED2 display:
1. If link is not connected the LED2 is off;
2. If link is connected the LED2 is on;
3. If link is connected and there is activity on the lines the LED2 blinking;
· LED3 display the state of link (if the link is connected LED3 is on).
· LED4 display the state of receiver.
USB Tranceiver
The integrated USB controller on COLDFIRE MCF5272 support device mode data
communication between itself and a USB host device, typically a PC.
It is fully compatible with the Universal Bus Specification 1.1 and support full-speed 12 Mbps USB
device and low-speed 1.5 Mbps devices;
The controller required a 48 MHz oscillator and data/communication is internally synchronized;
The USB trainceiver (PDIUSB11APW) is an external component to be USB 1.1 compliant
controlled by microprocessor.
3-14
CPS120 - Service Manual
CTS electronics
Input / Output / Reject Control Board
The microprocessor Motorola MC68HC908GT8 is the module controlling element of CPS120
system;
It is a 8 bit microprocessor at 8 MHz internal bus frequency; it communicate with the master board
through 485 lines at 19200 baud.
Features of the microprocessor include the following:
· 8 K-byte user program FLASH memory
· 512 byte of on-chip RAM
· internal oscillator
The Input / Output / Reject Board provides the electronics to control:
· Feeder Motors (Feeder Step motor, Selection Tray DC motor and Single Card Input DC motor)
· Feeder sensors (Feeder Home sensor, Single Card Input sensor, Nearly Empty Hopper
sensor, Empty Hopper sensor, Selection Tray sensors, Eject Tray Door open sensor, Reject
Tray Full sensor).
Magnetic Stripe Control Board
The microprocessor Motorola MC68HC908AB32 is the module controlling element of CPS120
system;
It is a 8 bit microprocessor at 8 MHz internal bus frequency; it communicate with the master board
through 485 lines at 19200 baud.
Features of the microprocessor include the following:
· 32 K-byte user program FLASH memory
· 512 byte of on-chip EEPROM for user data storage
· 1 K-byte of on-chip RAM
The microprocessor support two CPLD that manage the contemporaneous writing of three
tracks (one and zero bit) sincronized by encoder of 210 BPI, and in reading mode the sincronized
of count of tracks for the jitter control.
The Magnetic Stripe Board provides the electronics to control the Magnetic Head and
synchronism sensor.
Topper Control Board
The microprocessor Motorola MC68HC908GT8 is the module controlling element of CPS120
system;
It is a 8 bit microprocessor at 8 MHz internal bus frequency; it communicate with the master board
through 485 lines at 19200 baud.
Features of the microprocessor include the following:
· 8 K-byte user program FLASH memory
· 512 byte of on-chip RAM
· internal oscillator
The Topper Board provides the electronics to control:
· Heater
· Topper motors (Topper DC Motor and Ribbon DC Motor)
· Topper Sensors (Topper Temperature sensor, Topper Home sensor and Ribbon Motion
sensor).
CPS120 - Service Manual
3-15
CTS electronics
Embosser Control Board
The microprocessor Motorola MC68HC908AB32 is the module controlling element of CPS120
system;
It is a 8 bit microprocessor at 8 MHz internal bus frequency; it communicate with the master board
through 485 lines at 19200 baud.
Features of the microprocessor include the following:
· 32 K-byte user program FLASH memory
· 512 byte of on-chip EEPROM for user data storage
· 1 K-byte of on-chip RAM
The microprocessor support a CPLD that manage the enable, rotations and the phases of four
motor step: the full step of punch and die and the half step of wheel and the X axis.
The Embosser Board provides the electronics to control :
· Embosser Motors (Wheel Step motor, Punch Step motor, Die Step motor, Rear Indent Ribbon
DC motor, Rear Indent solenoid, Front Indent Ribbon DC motor and Front Indent solenoid)
· Axis motors (X Axis Step motor and Y Axis Step motor)
· Embosser sensors (Wheel Home sensor, Punch Home sensor, Die Home sensor, Rear Indent
Ribbon Motion sensor and Front Indent Ribbon Motion sensor)
· Axis sensors (X Axis Home sensor, Y Axis Home sensor and Synchronism sensor)
Consolle Control Board
The microprocessor Motorola MC68HC908GT8 is the module controlling element of CPS120
system;
It is a 8 bit microprocessor at 8 MHz internal bus frequency; it communicate with the master board
through 485 lines at 19200 baud.
Features of the microprocessor include the following:
· 8 K-byte user program FLASH memory
· 512 byte of on-chip RAM
· internal oscillator
The Consolle Board incorporates a 2X24 LCD display. Five indipendently controlled LED's
provide visual status and control functions. A 12 digit keypad allows user input from the front
panel.
3-16
CPS120 - Service Manual
CTS electronics
Console Operation Description
Console display gives informations on the machine across two lines structured in the following way:
machine name and release
CPS120 4.1
- on line online/offline
locked keypad
locked
cards = 156
printed cards
Keypad unlocking
The first operation to perform to have access to the console is unlocking the keyboard.
For this purpose the user is required to digit a key (the message “Please enter pin:” will be displayed),
followed by a correct sequence of 4 digits (the keypad pin), and followed by an Enter.
The factory initial pin is set to 3450.
At every reset, the keypad will be locked again and will need to be unlocked.
After the keypad has been unlocked, every key is associated with a specific operation to be performed on
the peripheral.
Every operation will require the user confirmation before being executed, to avoid accidental errors in key
pressing.
Key 1 – Set IP address and address mask
Both operations can be skipped pressing the key [2], and executed by pressing key [1].
At the end of the operations, a chance of resetting the machine is offered to the user.
Key 2 – Get IP address and address mask
The current IP address, followed by the current address mask, are shown to the user.
Key 3 – DES3 encryption
The current encryption mode (YES=DES3 enabled, NO=DES3 disabled) is shown, and a chance to
change it is given to the user.
Press key [1] to enable DES3, key [2] to disable it, key [9] to exit to the main display.
Key 4 – Unlock cover
If the user confirms his choice (pressing the key [1]) the printer cover is unlocked even without turning
around its key.
After a timeout of about 15 seconds, the cover is locked again.
If the cover is yet locked, the printer goes Off Line. After closing the cover, the printer will reset itself.
Key 5 - not used
Key 6 - not used
CPS120 - Service Manual
3-17
CTS electronics
Key 7 – Start Eject Loop
Cards are taken from the feeder and ejected, one after the other, until a key is pressed to stop the loop.
Key 8 – Start Reject Loop
Cards are taken from the feeder and rejected, one after the other, until a key is pressed to stop the loop.
Key 9 – Make Demo card
The task is divided in three subtasks: encoding the magnetic stripe, embossing the card, and moving to
Chip Contact. Each of these subtasks can be enabled or disabled.
If encoding the stripe is enabled, the user is asked what is the required coercitivity (high or low).
if embossing the card is requested, a further topping step can be enabled or disabled.
After having embossed the card, and eventually moved it to Chip Contact, a further option can be printing
the indent on the rear face: in that case the user must specify if the indent must be OCRB or Slanted.
Key DEL – Enable Diagnostic Mode
The channel is asked (RS232 or LAN).
Once entered Diagnostic Mode, the only way to go back to Normal mode is switch off and again on the
printer, or use the correct command sent from PC.
Key 0 – Read Topping Temperature
The topping temperature is shown on the display.
Key ENTER – reset
Pressing this key, a warm reset is performed.
An alternate way to reset the peripheral is obtained by turning around the cover key.
3-18
CPS120 - Service Manual
CTS electronics
Chapter
4
TROUBLESHOOTING
The CPS120 Card Personalization System operates as a standalone
card embosser. This chapter of the manual provides information and
procedures to isolate a fault to the part, and/or component level. It
includes symptoms, fault isolation procedures, use of diagnostic tools
and error codes.
Troubleshooting Tips . . . . . . . . . . . . . . . . . . . . . 4-3
If a Card is Loose in the CPS120 . . . . . . . . . . . . . . 4-3
If the Card is Jammed in the Input Hopper. . . . . . . . . . 4-3
If the Card is Jammed in the Embosser Module . . . . . . . 4-3
If the Card is Jammed in the Topper Module. . . . . . . . . 4-3
If the Card is Jammed in the Smart Card Module . . . . . . 4-3
CPS120 Interconnect Diagrams . . . . . . . . . . . . . . . 4-4
Main Control Board Connections (CPS-MASTER 10758) . . 4-5
Input/Output/Reject Control Board Connections
(CPS-CT 10761) . . . . . . . . . . . . . . . . . . . . . . . 4-6
Topper Control Board Connections (CPS-CT 10762) . . . . 4-7
Topper Control Board Connections (CPS-CT 14029)
(Optional - only for Single Feeder module installed) . . . . . 4-8
Magnetic Stripe Control Board Connections (CPS-BM 10763)4-9
Contact Control Board Connections (CPS-SC-USB 14025) . 4-9
Embosser Control Board Connections (CPS-EBM 10759) . 4-10
Consolle Control Board (CPS-DISPLAY 10764) . . . . . . 4-11
AC Wiring Diagram . . . . . . . . . . . . . . . . . . . . . 4-11
CPS120 - Service Manual
4-1
CTS electronics
4-2
CPS120 - Service Manual
CTS electronics
Troubleshooting Tips
When correcting errors, it is a good idea to perform the following:
·
·
·
·
·
·
·
Always power OFF the CPS120.
Load the Input Hopper if the card stock is low.
Clear any rejected cards from the Reject Tray.
Replace the Topper Ribbon if it is getting low.
Replace the Indent Ribbon if it is getting low.
Make sure the Front Cover and the Supplies Cover are closed and locked.
Output Hopper door is fully closed.
Use these tips to correct the following problems:
If a Card is Loose in the CPS120
· Check the inside of the CPS120 for cards that may have fallen from the Card Transport
module.
· Remove the cards and attempt to resume printing.
If the Card is Jammed in the Input Hopper
· Remove any jammed cards from the Input Hopper module by pulling cards from the back of
the Input Hopper through the card throat.
· Attempt to resume printing.
If the Card is Jammed in the Embosser Module
· Remove any Jammed cards from the Embosser module.
· Attempt to resume printing.
If the Card is Jammed in the Topper Module
· Remove any Jammed Cards from the Topper module.
· Attempt to resume printing.
If the Card is Jammed in the Smart Card Module
· Remove any jammed cards from the Smart Card Module.
· Attempt to resume printing.
!
WARNING!
CPS120 - Service Manual
When removing jammed card from the CPS120, care must be taken
not to damage components.
4-3
CTS electronics
CPS120 Interconnect Diagrams
The following diagrams show the CPS120 system cable connections.
24V
POWER SUPPLY
Interlock
Sensor
Punch Home
Sensor
Interlock
Solenoid
Smart Card
Contact
Solenoid
Smart Card
Contatless
Power Supply
CONTROL BOARD
Die Home
Sensor
Wheel Home
Sensor
X-Axis Home
Sensor
Y-Axis Home
Sensor
Rear Indent Ribbon
Motion Sensor
Front Indent Ribbon
Motion Sensor
Emboss
Synchronism Sensor
Topper Home
Sensor
Topper Ribbon
Motion Sensor
Heater Temperature
Sensor
EMBOSSER
MAIN
CONSOLLE
CONTROL
TOPPER
CONTROL BOARD
BOARD
CONTROL BOARD
Write/Read
Synchronism Sensor
MAGNETIC STRIPE
CONTROL BOARD
INPUT/OUTPUT/REJECT
CONTROL BOARD
4-4
Encoder
Sensor
Track 1 ISO
Read Head
Track 2 ISO
Read Head
Track 3 ISO/JIS
Read Head
Input Hopper
Empty Sensor
Input Hopper
Nearly Empty Sensor
Reject Tray Full
Sensor
Output Tray Full
Sensor
Feeder Home
Sensor
Selection Tray
Sensors
Single Card Input
Sensor
Punch Step
Motor
Die Step
Motor
Wheel Step
Motor
X-Axis Step
Motor
Y-Axis Step
Motor
Rear Indent
Ribbon DC Motor
Front Indent
Ribbon DC Motor
Rear Indent
Solenoid
Front Indent
Solenoid
Topper
DC Motor
Topper Ribbon
DC Motor
Heater
Track 1 ISO
Write Head
Track 2 ISO
Write Head
Track 3 ISO/JIS
Write Head
Selection Tray
DC Motor
Single Card Input
DC Motor
Feeder
Step Motor
CPS120 - Service Manual
CTS electronics
Main Control Board Connections (CPS-MASTER 10758)
J7 Service Port
J8
J9
J10
J11
J12
J13
Host Port
Embosser Communication Port
Encoder Communication Port
Input/Output/Reject Communication Port
Topper Communication Port
Consolle Communication Port
J18
J19
J20
J22
J24
J26
USB Port
+24 V Power Supply
Smart Card Contactless Power Supply
Interlock Sensor
Interlock Solenoid
Smart Card Contact Solenoid
SCREW2
SCREW3
J19
J24
J22
J13
J12
J10
J9
J20
J11
J26
SCREW1
J18
CPS120 - Service Manual
J7
J8
SCREW4
J16
4-5
CTS electronics
Input/Output/Reject Control Board Connections (CPS-CT 10761)
J1 Near Empty Hopper Sensor
J2
J3
J4
J5
J6
J7
J8
J9
J10
J11
J12
J13
Empty Hopper Sensor
Eject Tray Door Open Sensor
Single Card Entry Motor
Single Card Entry Sensor
Eject Tray Full Sensor (Emitter)
Selection Tray Sensor (UP)
Selection Tray Sensor (Down)
Feeder Motor
Selection Tray Full Sensor
Reject Tray Full Sensor
Communication Port
+24 V Power Supply
J1
J2
J3
SCREW3
SCREW4
J4
J11
J5
J10
J6
J9
J13
J7
J8
SCREW1
J12
4-6
SCREW2
CPS120 - Service Manual
CTS electronics
Topper Control Board Connections (CPS-CT 10762)
J2 Ribbon Motion Senor
J4
J5
J10
J11
J12
J13
Ribbon Motor
Not used
Topper Motor
Topper Home Sensor
Communication Port
+24 V Power Supply
J14 Heater Temperature Sensor
J15 Heater
J15
J14
J2
SCREW3
SCREW4
J4
J11
J5
J10
J13
SCREW1
J12
SCREW2
Carriage Control Board Connection (CPSINTX 10760)
J1 Photosensor
J2 Interconnection
J3 Y-Axis Motor
FOT1
1
J3
1
J2
1
CPS120 - Service Manual
J1
10
4-7
CTS electronics
Topper Control Board Connections (CPS-CT 14029)
(Optional - only for Single Feeder module installed)
J2
J4
J5
J7
J8
J9
Ribbon Motion Senor
Ribbon Motor
Not used
Card entry photosensor
Card presence photosensor
Feeder module motor
J10
J11
J12
J13
J14
J15
Topper Motor
Topper Home Sensor
Communication Port
+24 V Power Supply
Heater Temperature Sensor
Heater
J15
J14
J2
SCREW3
SCREW4
J4
J11
J5
J10
J9
J7
J13
J8
SCREW1
J12
4-8
SCREW2
CPS120 - Service Manual
CTS electronics
Magnetic Stripe Control Board Connections (CPS-BM 10763)
J1-J2-J3 Magnetic head group
J7 Synchronism Sensor
J11 Encoder
SCREW4
SCREW3
J11
J7
J1
J2
J3
SCREW2
SCREW1
Contact Control Board Connections (CPS-SC-USB 14025)
J1 Photosensor
J2 Contact
J5 USB port
J2
L1
LED1
1
X1
X2
LED2
U3
C19
T1
U4
15
43
29
PT1
J1
1
T-P1
U1
1
+
+
1
C21
U6
C44
U5
J5
CPS120 - Service Manual
4-9
CTS electronics
Embosser Control Board Connections (CPS-EBM 10759)
J1 Die Motor
J2
J3
J5
J6
J7
J8
J9
J10
J12
J13
J14
J15
J16
Punch Motor
Wheel Motor
X-Axis Motor
Interconnection
Front Indent Motor
Front Indent Solenoid
Rear Indent Motor
Rear Indent Solenoid
Die Home Sensor
Punch Home Sensor
Wheel Home Sensor
Front Indent Ribbon Motion Sensor
Rear Indent Ribbon Motion Sensor
J21 Synchronism Sensor
J22 Communication Port
SCREW4
J8
J7
J17
SCREW5
J12 J14 J15
SCREW3
J1
J3
J2
J22
J5
J16
SCREW1
J9
4-10
J10 J13 J21
SCREW2
J6
CPS120 - Service Manual
CTS electronics
Consolle Control Board (CPS-DISPLAY 10764)
SCREW 5
SCREW 4
SCREW 10
SCREW 9
SCREW 7
SCREW 8
SCREW 6
SCREW 3
SCREW 1
SCREW 2
AC Wiring Diagram
• Main ON/OFF
Switch
Cable Assy.
+ +
_ +
Switching
Power Supply
Chassis Ground
FUSE
CPS120
BOARDS
CPS120 - Service Manual
4-11
CTS electronics
4-12
CPS120 - Service Manual
CTS electronics
5
Chapter
ADJUSTMENTS
The CPS120 Card Personalization System operates as a standalone
card embosser. This chapter provides information for adjusting the
CPS120.
Introduction . . . . . . . . . . . . . . . . . . . . . . . . . . 5-3
Mechanical Adjustments . . . . . . . . . . . . . . . . . . . 5-3
CARRIAGE - Pliers carriage adjustment . . . . . . . . . . . 5-4
CARRIAGE - Carriage high adjustment . . . . . . . . . .
CARRIAGE - X-Axis Transport Drive Belt Adjustment . . .
HOPPER - Adjusting for Card Thickness . . . . . . . . .
INPUT/ OUTPUT/REJECT - Metal Plate high adjustment .
.
.
.
.
5-5
5-6
5-6
5-7
ENCODER - Encoder adjustment . . . . . . . . . . . . . . 5-8
Orizzontal position . . . . . . . . . . . . . . . . . . . . . . 5-8
ENCODER - Adjustment card gap way . . . . . . . . . . . 5-9
Vertical position. . . . . . . . . . . . . . . . . . . . . . . . 5-9
TOPPER . . . . . . . . . . . . . . . . . . . . . . . . . . 5-10
ENCODER - Hunting control by the encoder . . . . . . . . 5-11
EMBOSSER - Embosser adjustment . . . . . . . . . . . . 5-11
Initial punch/die adjustment . . . . . . . . . . . . . . . . . 5-11
Daisy wheel rotation reset position adjustment . . . . . . . 5-11
Character projecting adjustment . . . . . . . . . . . . . . 5-11
Card bow adjustment . . . . . . . . . . . . . . . . . . . . 5-11
Embossing parallelism adjustment . . . . . . . . . . . . . 5-11
INDENT - Indent adjustment . . . . . . . . . . . . . . . . 5-13
Lower indent - Tape position adjustment . . . . . . . . . . 5-13
Upper indent - Tape position adjustment . . . . . . . . . . 5-13
CONTACT - Chip contact station adjustment (option) . . . 5-15
CPS120 - Service Manual
5-1
CTS electronics
5-2
CPS120 - Service Manual
CTS electronics
Introduction
This chapter presents mechanical and software adjustment procedures for the CPS120.
These procedures are not part of preventive maintenance and are only performed as unscheduled
maintenance requirements identified during fault isolation.
Mechanical Adjustments
The following pages describe the mechanical adjustments for the CPS120. The software offset
adjustments appear after the mechanical adjustments.
CPS120 - Service Manual
5-3
CTS electronics
CARRIAGE - Pliers carriage adjustment
Verify that bridge 1, pulled by the spring 6, is leading on the point P1. Verify that the pin 2 is leading on the
levers A pulled by the hook 3. If these conditions are correct, verify that the distance from the theets 5 to
the plier support 6 is from 0,2 mm up to 0,3 mm. If the distance is different, bend the levers A. Then insert a
card between the theets 5 and the plier support 6 and verify that the card stay in position if pulling it whit a
certain force. If the card slip out the plier easy, adjust by the nut 4. (Fig. 1 - Fig.2)
Fig.1
Fig.2
5-4
CPS120 - Service Manual
CTS electronics
CARRIAGE - Carriage high adjustment
Put the carriage to the end of stroke, in this position move the carriage to the working points (1 and 2) and
verify that the height with respect to the base is 127 mm. Differently operate on the respective dowels
shown in figure.
1 - Transport position
2 - Work position
CPS120 - Service Manual
5-5
CTS electronics
CARRIAGE - X-Axis Transport Drive Belt Adjustment
· Connect the dynamometer (5Kg max) to the X-Transport Drive Belt backstand (1)
· Pull the dynamometer and observe the X-Transport Drive Belt backstand; when this start to move
check the face of the dynamometer. The correct adjustment is around 3Kg.
· If the adjustment does not correspond to the required, one intervention on the nut (2) will be
necessary.
· Rotating the nut (2) clockwise increase the adjustment.
1
2
HOPPER - Adjusting for Card Thickness
The card thickness adjustment is set for the standard card
thickness at the factory. You can adjust the gauge on the
entrance input hopper gate for cards of other thicknesses.
The card thickness knob has to be adjusted anytime the
cards in the input hopper are too thick for the card to move
into the entrance of the input hopper gate.
Perform the following steps to adjust the input hopper gate.
· Unlock the supplies cover and lift it up (see
Opening the Front and Supplies Covers)
· Insert one blank card into the input hopper.
· Slide the card in the gate and out as you rotate
the knob until the card moves inside the gate
smoothly.
NOTE!
5-6
Move the knob clockwise to widen
the gate opening or
counterclockwise to narrow the
gate opening.
CPS120 - Service Manual
CTS electronics
INPUT/ OUTPUT/REJECT - Metal Plate high adjustment
The adjustment of the little moving plate is done operating only on one side of the INPUT/
OUTPUT/REJECT module (right side), in fact the height of the plate on the left side of the module
depends on the presence of the cam that grants the correct height.
Right side
· Loosen the fixing dowel 3;
· Put the moving plate 1 at the same height of the upper
side of the internal metal plate 2
· Keep this adjustment and fix it tightening the fixing
dowel 3.
CPS120 - Service Manual
5-7
CTS electronics
ENCODER - Encoder adjustment
It is possible to adjust both the horizontal position of the magnetic head and the input height of the cards
into the encoder module in order to allow the correct position of the writing with respect to the magnetic
stripe.
Orizzontal position
· Work on the dowel 1 to move away or bring nearer
the magnetic head group.
Clockwise rotation - move backward
Anticlockwise rotation - move forward
To verify the position of the writing is correct, place the encoder group again into the machine and perform
a writing, then check the values of the magnetic stripe with the following table:
The following table gives encoding specifications for magnetic stripe encoding used on the CPS120.
Track
Number
Start Bit
(inches)
Position*
(millimeters)
Skew
Angle
Track
(Max Top
in inches)
Location**
(Min Bottom
in inches)
BPI
Track1 (IATA)***
0.293 ±0.020
7.44 ±0.51
0° ±20'
0.223
0.333
210 ±8%
Track2 (ABA)***
0.293 ±0.020
7.44 ±0.51
0° ±20'
0.353
0.463
75 ±5%
Track3 (TTS)***
0.293 ±0.040
7.44 ±1.02
0° ±20'
0.493
0.603
210 ±8%
NTT-J2
0.236 ±0.020
6.00 ±0.51
0° ±10'
0.236
0.472
210 ±8%
*
Start Bit Position is referenced from the right edge of the card as viewed from the magnetic stripe
side.
** Track Location is referenced from the top edge of the card.
*** Track 1 (IATA) = 76 maximum data characters.
*** Track 2 (ABA) = 37 maximum data characters.
*** Track 3 (TTS) = 104 maximum data characters.
5-8
CPS120 - Service Manual
CTS electronics
Vertical position
· Act on the nut 2 to lower or lift up the magnetic
head group.
Clockwise rotation - move up
Anticlockwise rotation - move down
To verify the correct position of the encoder group it is
necessary checking the input of the card during a
standard operating phase.
The adjustment is reached when there are no
hindrances to the passage of the card with respect to
encoder group and the writing is successful.
ENCODER - Adjustment card gap way
Adjust the blocking nut 1 in order to verify a force of 150 ± 50gr., to move the card position between the
wheel feed and the Encoder group.
By turning the blocking nut on clokwise, it’s increase the card gap way.
150 ±
CPS120 - Service Manual
50 gr.
5-9
CTS electronics
TOPPER
The topper group can be adjusted to allow inserting, positioning and fixing the cartridge correctly.
· Operate on the nut to obtain the distance of 10 mm between the end of the threaded pivot and the
front face of the metal plate.;
· Repeat this operation for each of the three spacing pivots;
· Insert the cartridge onto the topper group and
close the stopper (2);
· Verify that the cartridge is blocked;
· Differently work on the nut (1) to move away or
nearer the fixing slot;
5-10
CPS120 - Service Manual
CTS electronics
ENCODER - Hunting control by the encoder
Check on the diagnostic graph. Test on the two direction and adjust the belt tension (see page 6-6 X-Axis
Transport Drive Belt Adjustment) eventually increase the card gap way (see page 6-9 Adjustment card
gap way).
EMBOSSER - Embosser adjustment
Initial punch/die adjustment
Lower part - Adjust the screw control 1A in order to get the head of the screw on the same line with the
lateral arms profile 2A - Fig.1.
Upper part - Adjust the screw control 1 in order to get the quote of 2.7÷3mm between the screw head and
the internal bush - Fig. 1.
Daisy wheel rotation reset position adjustment
Run a complete reset and verify that the punch/die internal cone has to be true in comparison with the
character projecting cone -Fig.3, if not act on the reset steps (see wheel offset).
Character projecting adjustment
After download the steps table for punch/die control, run a card to get a standard embossing on it and
measure if the character projection is in according with ISO standard.
Act on the two regulation screw 1 and turn always the same distance on lower part and upper part till
obtain the projection needed. Tight the upper and lower grub screw - Fig.1
Card bow adjustment
The Card support metal plate 3 drive the lower indent tape, and mainly it control the card bow just
embossed.
If the card embossed show a bow with the two side towards down (f), need to move up the Card support
metal plate 3 by loosing the three screw V1 and the grub screw G and screw clockwise the cam 4, till get
the proper adjustment. Then tight the grub screw G and the screws V1 (Fig.2).
If the card embossed show a bow with the two side towards up (e), need to move down the Card support
metal plate 3 by loosing the three screw V1 and the grub screw G and screw anticlockwise the cam 4, till
get the proper adjustment. Then tight the grub screw G and the screw V1 (Fig.2).
Move the Card support metal plate even of few 0,1mm, can make a considerable changes, so adjust it
with care.
The Card support metal plate 5 is present only if the Upper Indent group is available, if it's so, adjust by the
screws V2, in order to hold a embossed card thickness plus 0.3÷0.5mm.
Embossing parallelism adjustment
Run a card by embossing with three 8 characters on the two card opposite position and verify the
parallelism between the two 8 characters of the same line (Q1 and Q2) - Fig.4, the difference between the
two quote do not change over 0.1mm. If not, act on the screws V3 - Fig.5 on the carriage upper group.
The upper metal plate is available only if the upper indent group is installed and need to be adjusted on
parallel at the lower metal plate. Check the free movement of the card between the two metal plate.
CPS120 - Service Manual
5-11
CTS electronics
2
2
Upper group
1
1
2.7÷3mm
2A
1A
2A
Fig.1
1A
Lower group
5
V2
Character
3
G
V1
4
Fig. 3
Fig. 2
Character
Fig.5
Q1
8
8
8
Q2
Fig. 4
5-12
CPS120 - Service Manual
CTS electronics
INDENT - Indent adjustment
Lower indent - Tape position adjustment
The tape on reset position must be like shown in the Fig.1, if not act on the column by the screw A. The
tape on work position must be like shown on Fig.2, and it's in the middle of character, if not act on the
position of the solenoid 1 by the screw B. Check after run a card with indent the matching of the characters
on the tape.
Upper indent - Tape position adjustment
The adjustment is like the Lower indent on the Upper indent group.
1÷2 mm
Tape on work position
Tape on rest position
Tape on work position
Tape on rest position
Daisy whell
Character
Metal plate
Fig. 1
Fig. 2
1
B
A
A
CPS120 - Service Manual
5-13
CTS electronics
Metal plate
Character
Daisy wheel
Tape on rest position
Fig. 3
Tape on work position
Fig. 4
Tape on work position
Tape on rest position
1÷2 mm
A
B
B
1
5-14
CPS120 - Service Manual
CTS electronics
CONTACT - Chip contact station adjustment (option)
Run a card on chip card reading position and verify that the contacts of the station are touching on the card
contacts. The adjustment on X axe is done by change the motor steps, beside the adjustment on Y axe is
done by adjusting the shaft 1 by the nut 2.
2
1
CPS120 - Service Manual
5-15
CTS electronics
5-16
CPS120 - Service Manual
CTS electronics
Chapter
6
REMOVAL AND
REPLACEMENT
The CPS120 Card Personalization System operates as a standalone
card embosser.
This chapter provides instruction for removal and replacement of
assemblies and parts.
Introduction . . . . . . . . . . . . . . . . . . . . . . . . . . 6-3
Servicing Guidelines . . . . . . . . . . . . . . . . . . . 6-3
FEEDER MODULE ASSEMBLY . . . . . . . . . . . . . . . 6-4
Remove and replace input/output/reject module
(multi feeder) . . . . . . . . . . . . . . . . . . . . . . . 6-4
Remove and replace single card input drive o-ring . . . . 6-6
Remove and replace feeder drive belt . . . . . . . . . . 6-7
Remove and replace single card input drive motor . . . . 6-8
Remove and replace feeder motor . . . . . . . . . . . 6-10
Remove and replace selection tray motor . . . . . . . . 6-11
Remove and replace Input/Output/Reject module
sensors . . . . . . . . . . . . . . . . . . . . . . . . . 6-12
Remove and replace input/output module
(Single feeder) . . . . . . . . . . . . . . . . . . . . . 6-15
Remove and replace single card input drive motor . . . 6-16
Remove and replace card input drive o-ring . . . . . . 6-18
Remove and replace Input/Output module photosensors6-20
ENCODER ASSEMBLY. . . . . . . . . . . . . . . . . . . 6-21
Remove and replace encoder module . . . . . . . . . 6-21
CPS120 - Service Manual
6-1
CTS electronics
Remove and replace encoder sensor . . . . . . . . . . 6-23
TOPPER ASSEMBLY . . . . . . . . . . . . . . . . . . . . 6-24
Remove and replace topper module . . . . . . . . . . 6-24
Remove and replace topper motor . . . . . . . . . . . 6-26
Remove and replace topper home sensor . . . . . . . 6-27
Remove and replace ribbon motor drive belt . . . . . . 6-28
Remove and replace ribbon motor . . . . . . . . . . . 6-29
Remove and replace ribbon motion sensor . . . . . . . 6-30
Remove and replace topper platen . . . . . . . . . . . 6-31
Replacing the topping ribbon . . . . . . . . . . . . . . 6-32
EMBOSSER ASSEMBLY . . . . . . . . . . . . . . . . . . 6-34
Remove and replace embosser module. . . . . . . . . 6-34
Remove and replace embosser sensor . . . . . . . . . 6-36
Remove and replace punch/die cam belts . . . . . . . 6-38
Remove and replace X-transport motor . . . . . . . . . 6-58
Remove and replace Y-transport drive belt . . . . . . . 6-59
Remove and replace Y-transport motor . . . . . . . . . 6-60
Remove and replace card transport sensor . . . . . . . 6-61
Remove and replace power supply . . . . . . . . . . . 6-63
Remove and replace fuse . . . . . . . . . . . . . . . . 6-64
Remove and replace Input/Output/Reject module control
board. . . . . . . . . . . . . . . . . . . . . . . . . . . 6-65
Remove and replace encoder control board .
Remove and replace topper control board . .
Remove and replace embosser control board
Remove and replace Main control board . . .
6-2
.
.
.
.
.
.
.
.
.
.
.
.
.
.
.
.
.
.
.
.
6-66
6-67
6-68
6-69
CPS120 - Service Manual
CTS electronics
Introduction
This section gives procedures for the removal and replacement of the CPS120 Card Personalization
System Field Replaceable Units (FRUs) and sub-assemblies.
NOTE!
Some FRU replacements may require self-tapping screws to be used.
Servicing Guidelines
Use the following guidelines when servicing the CPS120:
· Observe warning and caution labels affixed to various areas of the equipment.
· Use only the recommended tools as specified to perform service.
· Replacement of certain assemblies and parts requires follow-up adjustments. Make sure these
adjustments are performed after replacement.
· Always perform preventive maintenance as described in Chapter 3, Preventive Maintenance, of
this manual after replacement procedures.
· Verify the CPS120 functions after replacement by performing and/or observing a limited customer
production run.
· DO NOT defeat the safety interlock.
CPS120 - Service Manual
6-3
CTS electronics
FEEDER MODULE ASSEMBLY
E' possibile installare su CPS 120 due differenti moduli feeder, In opzione al modulo base (multi
feeder) è possibile installare
Remove and replace input/output/reject module (multi feeder)
The Input/Output/Reject Module is a main assembly used for stacking cards (or a single card), as an
output receptacle for completed cards and as an reject receptacle for rejected cards. Use the following
procedure to remove and replace the Input/Output/Reject Module.
Remove
1.
2.
Unlock and lift up the Front Cover and the Supplies Cover.
Power OFF the CPS120 and remove the power cord from the wall outlet.
3.
4.
5.
6.
Remove the Frame.
Manually move the Card Transport carriage to the center of the CPS120.
Remove all loose cards from the CPS120 Input/Output/Reject Hoppers.
Disconnect the following cables from the Feeder control board:
· Power supply (J13)
· Communication cable (J12)
7.
Remove five screws and lift the module from the CPS120
Replace
1.
2.
3.
· Power supply (J13)
· Communication cable (J12)
After connecting the inline cables, attach the five screws (1) on the module.
Make sure to do not pinch the wires under the module.
!
WARNING!
4.
5.
6-4
Place the new module in position.
Reconnect the following cables to the Input/Output/Reject Module control board
Replace the Frame.
Insert a Standard Test Card to confirm the proper operation of the CPS120. If the test is
successful, run a limited number of customer produced cards for a final quality
verification.
CPS120 - Service Manual
CTS electronics
CPS120 - Service Manual
6-5
CTS electronics
Remove and replace single card input drive o-ring
The Single Card Input Drive O-Ring provides movement to transport a single card to the picked area. Use
the following procedure to remove and replace the Single Card Input Drive Belt.
Remove
1.
2.
3.
4.
Unlock and lift up the Front Cover.
Power OFF the CPS120 and remove the power cord from the wall outlet.
Remove one seeger (1) holding the Input Guide Card Transport Drive Roller and
partially remove the Input Guide Card Transport (2) .
Slip the Input Drive O-Ring (3) off the Input drive motor pulley and remove the O-Ring
from the assembly.
Replace
1.
2.
3.
6-6
Place the new Input drive O-Ring in position.
Replace the Input Guide Card Transport in position and hold it in place with one seeger.
Insert a Standard Test Card to confirm the proper operation of the CPS120. If the test is
successful, run a limited number of customer produced cards for a final quality
verification.
CPS120 - Service Manual
CTS electronics
Remove and replace feeder drive belt
The feeder drive belt provide the motion to feed one card from the input hopper.
Use the following procedure to remove and replace the feeder drive belt.
Remove
1.
2.
Unlock and lift up the Front Cover and the Supplies Cover.
Power OFF the CPS120 and remove the power cord from the wall outlet.
3.
4.
Remove the Frame.
Remove manually the two plastic washers (1) from the two gears and remove the
Feeder Drive Belt (2)
Replace
1.
2.
3.
Place the new Feeder Drive Belt in position and replace the two plastic washer (1).
Replace the Frame.
Insert a Standard Test Card to confirm the proper operation of the CPS120. If the test is
successful, run a limited number of customer produced cards for a final quality
verification.
CPS120 - Service Manual
6-7
CTS electronics
Remove and replace single card input drive motor
The input motor provide traction for moving a single card into the picked area. Use the following procedure
to remove and replace the input motor.
Remove
1.
2.
3.
4.
5.
6.
7.
8.
9.
Unlock and lift up the Front Cover and the Supplies Cover
Power OFF the CPS120 and remove the power cord from the wall outlet.
Remove the Frame .
Remove the Input/Output/Reject module from the CPS120 (see Remove and Replace
the Input/Output/Reject module)
Remove two nuts (1) holding the Input Motor group.
Slip the input drive o-ring (5) off the Input drive motor pulley and remove the Input
Motor group.
Loose one grub screw (4) holding the drive motor pulley and remove it.
Remove two screws (2) holding the input motor to its support.
Disconnect the input motor cable (J4) from the Input/Output/Reject Control Board.
Replace
1.
2.
3.
4.
5.
Place a new motor into the support and hold in place with two screws (2).
Place the drive motor pulley onto the shaft motor and hold in place with one grub screw.
Place the input drive o-ring in position.
Place the motor group in positon and hold in place with two nuts.
Reconnect the input motor cable (J4) on the Input/Output/Reject Control Board.
6.
Replace the Input/Output/Reject module on the CPS120 (see Remove and Replace the
Input/Output/Reject module).
Make sure to do not pinch the wires under the module.
!
WARNING!
7.
8.
6-8
Replace the Frame.
Insert a Standard Test Card to confirm the proper operation of the CPS120. If the test is
successful, run a limited number of customer produced cards for a final quality
verification.
CPS120 - Service Manual
CTS electronics
CPS120 - Service Manual
6-9
CTS electronics
Remove and replace feeder motor
The Feeder motor provide traction for feed a card from the input hopper. Use the following procedure to
remove and replace the Feeder motor.
Remove
1.
2.
3.
4.
5.
6.
Unlock and lift up the Front Cover and the Supplies Cover.
Power OFF the CPS120 and remove the power cord from the wall outlet.
Remove the Frame.
Remove the Input/Output/Reject Module from CPS120 (see Remove and Replace the
Input/Output/Reject Module)
Remove two nuts (1) holding the Feeder Motor (4) and remove it.
Loose one grub screw (2) holding the drive motor pulley (3) and remove it.
Replace
1.
2.
3.
4.
5.
6-10
Place the drive motor pulley in the shaft motor and hold in place with one grub screw.
Place a new motor and the Feeder Motor Belt in position and attach with two nuts.
Make sure belt tension is sufficient to ensure that no slippage will occur.
Replace the Input/Output/Reject Module on the CPS120 (see Remove and Replace the
Input/Output/Reject Module).
Replace the Frame.
Insert a Standard Test Card to confirm the proper operation of the CPS120. If the test is
successful, run a limited number of customer produced cards for a final quality
verification.
CPS120 - Service Manual
CTS electronics
Remove and replace selection tray motor
The Selection Tray motor provide traction for select the Reject Tray or the Eject Tray. Use the following
procedure to remove and replace the Selection Tray motor.
Remove
1.
2.
3.
4.
5.
6.
7.
8.
Unlock and lift up the Front Cover and the Supplies Cover.
Power OFF the CPS120 and remove the power cord from the wall outlet.
Remove the Frame.
Remove the Input/Output/Reject Module from CPS120 (see Remove and Replace the
Input/Output/Reject Module)
Remove two screws holding the Selection Tray Sensors (1 up, 2 down) and remove
the Sensors.
Loose one grub screw (3) holding the motor cam and remove it.
Disconnect the selection tray motor cable (J10) from the Input/Output/Reject Module
Control Board and remove cable ties.
Remove two screws (4) holding the Selection Tray Motor and remove it.
Replace
1.
2.
3.
4.
5.
6.
7.
Place a new motor in position and attach with two screws.
Place the motor Cam in the shaft motor and hold in place with one grub screw.
Place the Selection Tray Sensors and hold in place with two screws.
Reconnect the selection tray motor cable (J10) on the Feeder Control Board and
replace cable ties.
Replace the Input/Output/Reject Module on the CPS120 (see Remove and Replace the
Input/Output/Reject Module)
Replace the Frame.
Insert a Standard Test Card to confirm the proper operation of the CPS120. If the test is
successful, run a limited number of customer produced cards for a final quality
verification.
CPS120 - Service Manual
6-11
CTS electronics
Remove and replace Input/Output/Reject module sensors
The sensors that control the Input/Ouput/Reject movement are:
·
·
·
·
·
·
·
·
Single Card Input sensor (1)
Selection Tray sensors (2-3)
Reject Tray Full sensor (4)
Empty Hopper sensor (5)
Nearly Empty Hopper sensor (6)
Feeder Home sensor (7)
Eject Tray Door Open sensor (8)
Use the following procedure to remove and replace the sensors.
Remove
1.
2.
3.
4.
Unlock and lift up the Front Cover and the Supplies Cover (see Opening the Covers)
Power OFF the CPS120 and remove the power cord from the wall outlet.
Remove the Frame (see Remove and Replace the Frame)
Remove the Input/Output/Reject Module from CPS120 (see Remove and Replace the
Input/Output/Reject Module)
Single card input sensor
1.
Disconnect the Single Card Input sensor cable (J5) from Input/Output/Reject Module
control board .
2.
Remove one screw and remove the Single Card Input sensor (1).
Selection tray sensor (UP)
1.
Disconnect the Up Selection Tray sensor cable (J7) from Input/Output/Reject Module
control board .
2.
Remove one screw and remove the Up Selection Tray sensor (2).
Selection tray sensor (DOWN)
1.
Disconnect the Down Selection Tray sensor cable (J8) from Input/Output/Reject Module
control board.
2.
Remove one screw and remove the Down Selection Tray sensor (3).
Reject tray full sensor
1.
Disconnect the Reject Tray Full sensor cable (J11) from Input/Output/Reject Module
control board .
2.
Remove one screw and remove the Reject Tray Full sensor (4).
Empty hopper sensor
1.
Disconnect the Empty Hopper sensor cable (J2) from Input/Output/Reject Module
control board.
2.
Remove one screw and remove the Empty Hopper sensor (5).
6-12
CPS120 - Service Manual
CTS electronics
Nearly empty hopper sensor
1.
Disconnect the Nearly Empty Hopper sensor cable (J1) from Input/Output/Reject
Module control board .
2.
Remove one screw and remove the Nearly Empty Hopper sensor (6).
Feeder home sensor
1.
Disconnect the Feeder Home sensor cable (J16) from Input/Output/Reject Module
control board.
2.
Remove one screw and remove the Feeder home sensor (7).
Eject tray door open sensor
1.
Disconnect the Eject Tray Door Open sensor cable (J3) from Input/Output/Reject
Module control board .
2.
Remove one screw and remove the Eject Tray Door Open sensor (8).
CPS120 - Service Manual
6-13
CTS electronics
Replace
Single card input sensor
1.
Place the new Single Card Input sensor (1) in place and attach with one screw
2.
Reconnect the Single Card Input sensor cable (J5) on the Input/Output/Reject Module
control board.
Selection tray sensor (UP)
1.
Place the new Up Selection Tray sensor (2) in place and attach with one screw
2.
Reconnect the Up Selection Tray sensor cable (J7) on the Input/Output/Reject Module
control board.
Selection tray sensor (DOWN)
1.
Place the new Down Selection Tray sensor (3) in place and attach with one screw
2.
Reconnect the Down Selection Tray sensor cable (J8) on the Input/Output/Reject
Module control board.
Reject tray full sensor
1.
Place the new Reject Tray Full sensor (4) in place and attach with one screw
2.
Reconnect the Reject Tray Full sensor cable (J11) on the Input/Output/Reject Module
control board.
3.
Replace the Input/Output/Reject Module on the CPS120 (see Remove and Replace the
Input/Output/Reject Module)
4.
Replace the Frame (see Remove and Replace the Frame)
5.
Run a Standard Test Card to confirm proper operation of the CPS120. If successful, run
a limited number of customer produced cards for a final quality verification.
Empty hopper sensor
1.
Place the new Empty Hopper sensor (5) in place and attach with one screw
2.
Reconnect the Empty Hopper sensor cable (J2) on the Input/Output/Reject Module
control board.
Nearly empty hopper sensor
1.
Place the new Nearly Empty Hopper sensor (6) in place and attach with one screw
2.
Reconnect the Nearly Empty Hopper sensor cable (J1) on the Input/Output/Reject
Module control board.
Feeder home sensor
1.
Place the new Feeder Home sensor (7) in place and attach with one screw
2.
Reconnect the Feeder Home sensor cable (J16) on the Input/Output/Reject Module
control board.
Eject tray door open sensor
1.
Place the new Eject Tray Door Open sensor (8) in place and attach with one screw
2.
Reconnect the Eject Tray Door Open sensor cable (J3) on the Input/Output/Reject
Module control board.
6-14
CPS120 - Service Manual
CTS electronics
Remove and replace input/output module (Single feeder)
The Input/Output Module is a main assembly used for stacking single card, as an output receptacle for
completed card. Use the following procedure to remove and replace the Input/Output Module (Single card).
Remove
1.
2.
3.
4.
5.
Unlock and lift up the Front Cover and the Supplies Cover.
Power OFF the CPS120 and remove the power cord from the wall outlet.
Remove the Frame.
Manually move the Card Transport carriage to the center of the CPS120.
Disconnect the following cables from the Topper (code. 14029) control board:
· Motor connection (J9)
· Photosensors cable (J7-J8)
6.
Remove two screws and lift the module from the CPS120.
Replace
1.
2.
Place the new module in position.
Reconnect the following cables from the Topper (code. 14029) control board:
· Motor connection (J9)
· Photosensors cable (J7-J8)
3.
!
After connecting the inline cables, attach the five screws (1) on the module.
Make sure to do not pinch the wires under the module.
WARNING!
4.
Replace the Frame.
5.
Insert a Standard Test Card to confirm the proper operation of the CPS120. If the test is
successful, run a limited number of customer produced cards for a final quality verification.
CPS120 - Service Manual
6-15
CTS electronics
Remove and replace single card input drive motor
The input motor provide traction for moving a single card into the picked area. Use the following procedure
to remove and replace the input motor.
Remove
1.
2.
3.
4.
5.
Unlock and lift up the Front Cover and the Supplies Cover
Power OFF the CPS120 and remove the power cord from the wall outlet.
Remove the Frame .
Remove the input/output module (See Remove and replace input/output module (Single
feeder))
Loose grub screw (1) holding the drive motor pulley and remove it.
6.
7.
Remove two screws (2) holding the input motor to its support.
Disconnect the input motor cable (J9) from the Topper (code. 14029) Control Board.
Replace
1.
2.
3.
4.
Make sure to do not pinch the wires under the module.
!
WARNING!
7.
8.
6-16
Place a new motor in positon and hold in place with two screws (2).
Place the drive motor pulley onto the shaft motor and hold in place with a grub screw (1).
Reconnect the input motor cable (J9) on the Topper (code. 14029) Control Board.
Replace the Input/Output module on the CPS120 (See Remove and replace input/output
module (Single feeder)).
Replace the Frame.
Insert a Standard Test Card to confirm the proper operation of the CPS120. If the test is
successful, run a limited number of customer produced cards for a final quality
verification.
CPS120 - Service Manual
CTS electronics
CPS120 - Service Manual
6-17
CTS electronics
Remove and replace card input drive o-ring
The Card Input Drive O-Ring provides movement to transport a card to the picked area. Use the following
procedure to remove and replace the Card Input Drive O-Ring.
Remove
1.
2.
3.
4.
5.
Unlock and lift up the Front Cover and the Supplies Cover
Power OFF the CPS120 and remove the power cord from the wall outlet.
Remove the Frame.
Disconnect the input motor cable (J9) from the Topper (code. 14029) Control Board.
Remove the input/output module (Remove and replace input/output module (Single
feeder)).
6.
7.
8.
9.
Loose grub screw (1) holding the drive motor pulley and remove it.
Slip the Input Drive O-Ring (2) off the Input drive motor pulley.
Remove the seeger (3) and slide out the shaft (4).
Extract the the Card Input Drive O-Ring (2).
Replace
1.
2.
3.
4.
5.
Make sure to do not pinch the wires under the module.
!
WARNING!
6.
7.
6-18
Place the new Input drive O-Ring (2) in position.
Replace the shaft (4)and fix with the seeger (3).
Place the drive motor pulley onto the shaft motor and hold in place with a grub screw (1).
Reconnect the input motor cable (J9) on the Topper (code. 14029) Control Board.
Replace the Input/Output module on the CPS120 (See Remove and replace input/output
module (Single feeder)).
Replace the Frame.
Insert a Standard Test Card to confirm the proper operation of the CPS120. If the test is
successful, run a limited number of customer produced cards for a final quality
verification.
CPS120 - Service Manual
CTS electronics
CPS120 - Service Manual
6-19
CTS electronics
Remove and replace Input/Output module photosensors
The photosensors that control the Input/Ouput/ movement are:
· Card entry photosensor (J7)
· Card presence photosensor (J8)
Remove
Card entry photosensor (J7)
1.
Disconnect the Card entry photosensor cable (J7) from Topper Module (code. 14029)
control board.
2.
Remove one screw and remove the Card entry photosensor (1).
Card presence photosensor (J8)
1.
Disconnect the Card presence photosensor cable (J8) from Topper Module (code. 14029)
control board.
2.
Remove two screw and remove the Card presence photosensor (2)
Replace
Replace
Card entry photosensor (J7)
1.
Place the new Card entry photosensor (1) in place and attach with one screw
2.
Reconnect the Card entry photosensor cable (J7) on the Topper Module (code. 14029)
control board.
Card presence photosensor (J8)
1.
Place the new Card presence photosensor (2) in place and attach with screws
2.
Reconnect the Card presence photosensor cable (J8) on the Topper Module (code. 14029)
control board.
6-20
CPS120 - Service Manual
CTS electronics
ENCODER ASSEMBLY
Remove and replace encoder module
The Encoder Module head reads and writes data on the magnetic stripes on a card.
Use the following procedure to remove and replace the Encoder Module.
Remove
1.
Unlock and lift up the Front Cover and the Supplies Cover .
2.
3.
4.
5.
Power OFF the CPS120 and remove the power cord from the wall outlet.
Remove the Frame.
Unscrew the screw (1) and extract the metal plate protection boad (2);
Remove four screws and partially remove the Encoder from the base to
to the cable connectors.
Disconnect the following cables from the Encoder control board:
6.
gain access
· Power supply (J4)
· Communication cable (J5)
7.
Lift the Encoder from the CPS120
Replace
1.
2.
Partially place the new Encoder in position.
Reconnect the following cables on the Encoder control board
· Power supply (J4)
· Communication cable (J5)
3.
4.
5.
6.
After connecting the inline cables, place the new Encoder in position and attach with
four screws.
Replace the metal plate protection boad (2) and screw the fixing screw (1)
Replace the Frame.
Insert a Standard Test Card to confirm the proper operation of the CPS120. If the test is
successful, run a limited number of customer produced cards for a final quality
verification.
CPS120 - Service Manual
6-21
CTS electronics
6-22
CPS120 - Service Manual
CTS electronics
Remove and replace encoder sensor
The Encoder sensor provide the synchronism to write the magnetic stripe on the cards.
Use the following procedure to remove and replace the sensors.
Remove
1.
2.
Unlock and lift up the Front Cover and the Supplies Cover.
Power OFF the CPS120 and remove the power cord from the wall outlet.
3.
4.
Remove the Frame.
Remove the Encoder Module from CPS120 (see Remove and Replace the Encoder
Module).
Disconnect the Synchronism sensor cable (J7) from the Encoder Control board.
Remove screw (1) and extract the metal plate holding the synchronism sensor (2)
remove it.
5.
6.
Replace
1.
2.
3.
4.
5.
Place the new Synchronism sensor on the metal plate (2), in position with emitter
pointing down and attach with screw (1).
Reconnect the Synchronism sensor cable (J7) on the Encoder board.
Replace the Encoder on the CPS120 (see Remove and Replace the Encoder)
Replace the Frame.
Insert a Standard Test Card to confirm the proper operation of the CPS120. If the test is
successful, run a limited number of customer produced cards for a final quality
verification.
CPS120 - Service Manual
6-23
CTS electronics
TOPPER ASSEMBLY
Remove and replace topper module
The Topper Module places a colored layer on the top of embossed characters on a plastic card. Heat is
used to affix this layer to the plastic card.
Use the following procedure to remove and replace the Topper Module.
Remove
1.
2.
3.
Unlock and lift up the Front Cover and the Supplies Cover.
Power OFF the CPS120 and remove the power cord from the wall outlet.
Remove the Frame.
The Topper Platen May Be Very Hot.
!
WARNING!
4.
5.
Remove four screws (1) and partially remove the Topper from the base to gain access
to the cable connectors.
Disconnect the following cables from the Topper control board:
· Power supply (J13)
· Communication cable (J12)
6.
Lift the Topper Module from the CPS120
Replace
1.
2.
Place the new Topper Module in position and attach with four screws.
Reconnect the following cables to the Topper control board
· Power supply (J13)
· Communication cable (J12)
3.
4.
6-24
Replace the Frame.
Insert a Standard Test Card to confirm the proper operation of the CPS120. If the test is
successful, run a limited number of customer produced cards for a final quality
verification.
CPS120 - Service Manual
CTS electronics
CPS120 - Service Manual
6-25
CTS electronics
Remove and replace topper motor
The Topper motor provides traction for moving the platen to the card. Use the following procedure to
remove and replace the Topper motor.
Remove
1.
2.
3.
Unlock and lift up the Front Cover and the Supplies Cover.
Power OFF the CPS120 and remove the power cord from the wall outlet.
Remove the Frame.
The Topper Platen May Be Very Hot.
!
WARNING!
4.
5.
6.
7.
8.
Remove the Topper from CPS120 (see Removing the Topper Assembly)
Remove one pin (1) holding the Topper Motor gear (2)
Remove the Topper motor gear.
Disconnect the Topper motor cable (J10) from the Topper Control Board and remove
cable ties.
Remove three screws (3) holding the Topper Motor and remove it.
Replace
1.
2.
3.
4.
5.
6.
6-26
Place a new Topper motor in position and attach with three screws.
Place the Topper motor gear onto the shaft motor and hold in place with one pin.
Reconnect the Topper motor cable (J10) on the Topper Control Board and replace
cable ties.
Replace the Topper Assembly on the CPS120 (see Replacing the Topper Assembly)
Replace the Frame.
Insert a Standard Test Card to confirm the proper operation of the CPS120. If the test is
successful, run a limited number of customer produced cards for a final quality
verification.
CPS120 - Service Manual
CTS electronics
Remove and replace topper home sensor
The Topper Home sensor detects when the platen has reached its home position.Use the following
procedure to remove and replace the Topper Home sensor.
Remove
1.
2.
3.
Unlock and lift up the Front Cover and the Supplies Cover.
Power OFF the CPS120 and remove the power cord from the wall outlet.
Remove the Frame.
The Topper Platen May Be Very Hot.
!
WARNING!
4.
5.
Remove one screw (1) holding the Topper Home sensor and remove it.
Disconnect the Topper Home sensor cable (J11) from the Topper Control Board.
Replace
1.
2.
3.
4.
Place the new Topper home sensor in position and attach with one screw.
Reconnect the Topper Home sensor cable (J11) on the Topper Control Board.
Replace the Frame.
Insert a Standard Test Card to confirm the proper operation of the CPS120. If the test is
successful, run a limited number of customer produced cards for a final quality
verification.
CPS120 - Service Manual
6-27
CTS electronics
Remove and replace ribbon motor drive belt
The Ribbon Motor Belt provides movement to advance the topping ribbon in the Topping cartridge. Use
the following procedure to remove and replace the Ribbon Motor Belt.
Remove
1.
2.
3.
Unlock and lift up the Front Cover and the Supplies Cover.
Power OFF the CPS120 and remove the power cord from the wall outlet.
Remove the Frame.
The Topper Platen May Be Very Hot.
!
WARNING!
4.
5.
6.
Remove two screws (1) holding the Ribbon Motor and partially remove the Ribbon
Motor (4) .
Remove one seeger (2) and partially remove the Ribbon Motion shaft (5).
Slip the Ribbon Motor Belt (3) off the Ribbon drive shaft pulley and remove the belt from
the assembly.
Replace
1.
2.
1.
3.
4.
6-28
Place the new Ribbon Motor belt in position.
Replace the Ribbon drive shaft in position and hold in place with one seeger.
Replace the Ribbon Motor in position and attach with two screws. Make sure belt
tension is sufficient to ensure that no slippage will occur.
Replace the Frame.
Insert a Standard Test Card to confirm the proper operation of the CPS120. If the test is
successful, run a limited number of customer produced cards for a final quality
verification.
CPS120 - Service Manual
CTS electronics
Remove and replace ribbon motor
The Ribbon Motor is a DC motor used to advance the topping ribbon in the Topping cartridge. Use the
following procedure to remove and replace the Ribbon Motor.
Remove
1.
2.
3.
Unlock and lift up the Front Cover.
Power OFF the CPS120 and remove the power cord from the wall outlet.
Remove the Frame.
The Topper Platen May Be Very Hot.
!
WARNING!
4.
5.
Remove two screws (1) holding the Ribbon Motor and slip the Ribbon Motor Belt (3) off
the Ribbon drive shaft pulley, then remove the Ribbon Motor (2) .
Disconnect the Ribbon Motor cable (J4) from the Topper Control board.
Replace
1.
2.
3.
4.
5.
Place the Ribbon Motor belt in position
Place the new Ribbon Motor in position and attach with two screws. Make sure belt
tension is sufficient to ensure that no slippage will occur.
Reconnect the Ribbon Motor cable (J4) on the Topper Control board.
Replace the Frame.
Insert a Standard Test Card to confirm the proper operation of the CPS120. If the test is
successful, run a limited number of customer produced cards for a final quality
verification.
CPS120 - Service Manual
6-29
CTS electronics
Remove and replace ribbon motion sensor
The Ribbon Motion sensor detects physical motion of a slotted wheel insuring that the topper ribbon has
advanced.Use the following procedure to remove and replace the Ribbon Motion sensor.
Remove
1.
2.
3.
Unlock and lift up the Front Cover and the Supplies Cover.
Power OFF the CPS120 and remove the power cord from the wall outlet.
Remove the Frame.
The Topper Platen May Be Very Hot.
!
WARNING!
4.
5.
6.
Remove two screws (1) holding the Ribbon Motion sensor group and remove it.
Remove one screw (2) holding the Ribbon Motion sensor (3) and remove it.
Disconnect the Ribbon Motion sensor cable (J2) from the Topper Control Board.
Replace
1.
2.
3.
4.
5.
6-30
Place a new sensor in position and hold in place with one screw.
Place the Ribbon Motion sensor group in position and attach with two screws.
Reconnect the Ribbon Motion sensor cable (J2) on the Topper Control Board.
Replace the Frame.
Insert a Standard Test Card to confirm the proper operation of the CPS120. If the test is
successful, run a limited number of customer produced cards for a final quality
verification.
CPS120 - Service Manual
CTS electronics
Remove and replace topper platen
The Topper Platen places a colored layer on the top of embossed characters on a plastic card. Use the
following procedure to remove and replace the Topper Platen.
Remove
1.
2.
3.
Unlock and lift up the Front Cover.
Power OFF the CPS120 and remove the power cord from the wall outlet.
Remove the Frame.
The Topper Platen May Be Very Hot.
!
WARNING!
4.
5.
6.
Remove one screw (1) and remove the Topper Platen holding plate (2).
Disconnect the Heater cable (J15) and the Topper Temperature sensor cable (J14)
from the Topper Control board.
Remove the Topper Platen (3).
Replace
1.
2.
3.
4.
5.
Place the new Topper Platen in position
Place the Topper Platen holding plate in position and attach with one screw.
Reconnect the Heater Cable (J15) and the Topper Temperature sensor cable (J14) on
the Topper Control board.
Replace the Frame.
Insert a Standard Test Card to confirm the proper operation of the CPS120. If the test is
successful, run a limited number of customer produced cards for a final quality
verification.
CPS120 - Service Manual
6-31
CTS electronics
Replacing the topping ribbon
Perform the following steps to replace the topping ribbon.
!
WARNING!
1.
2.
3.
4.
5.
6.
7.
8.
9.
10.
6-32
Use proper anti-static grounding techniques when handling the
Topper Control Board.
Unlock and lift up the supplies cover.
Unlock the topper cartridge by turning lever counterclockwise and pulling the
cartridge out of the module.
Remove the end tape from the supply spool and then unlock and remove the spool by
pulling it out.
Unlock and remove the tape-up spool by pulling it out.
Replace the topping ribbon by winding the new tape around the cartridge.
Insert the supply spool in the left core.
Thread the topper ribbon from the supply spool around the ribbon motion guide and
insert the take-up spool on the right core.
Wind the ribbon by turning the take-up spool counterclockwise until it is tight.
Place the topper cartridge inside the topper module and press it firmly in place. Lock
lever by turning it clockwise
Close the supplies cover.
CPS120 - Service Manual
CTS electronics
NOTE!
Do not pull the ribbon from the supply spool when the spool is already
inserted in the core. Doing so might damage the holder spring. If more tape
is needed, press lever 3A and then pull ribbon as needed.
CPS120 - Service Manual
6-33
CTS electronics
EMBOSSER ASSEMBLY
Remove and replace embosser module
The Embosser Module is comprised of two rotating metal disks of punches and dies, provides a means to
make embossed characters on plastic card. Use the following procedure to remove and replace the
Embosser Module.
Remove
1.
2.
3.
4.
Unlock and lift up the Front Cover and the Supplies Cover.
Power OFF the CPS120 and remove the power cord from the wall outlet.
Remove the Frame.
Remove the Rear and Front Indent Cartridges (if available).
5.
7.
8.
9.
Disconnect all cables from the Embosser control board (B).
Uncrew two screws (A) and remove the control board support.
Remove two screws (C).
Remove two screws (D) by pushing fowar and remove the embosser module.
Replace
1.
2.
3.
·
·
·
·
Interconnection Flat cable (J6)
Power supply (J13)
Communication cable (J12)
X-axis motor cable (J5)
After connecting the inline cables, attach the three screws (2) on the module.
Make sure to do not pinch the wires under the module.
!
WARNING!
4.
5.
6-34
Place the new module in position.
Reconnect the following cables to the Embosser control board
Replace the Frame.
Insert a Standard Test Card to confirm the proper operation of the CPS120. If the test is
successful, run a limited number of customer produced cards for a final quality
verification.
CPS120 - Service Manual
CTS electronics
Front side
CPS120 - Service Manual
Rear side
6-35
CTS electronics
Remove and replace embosser sensor
The sensors that control the Embosser movement are:
· Punch and Die Home sensors
· Wheel Home sensor
· Synchronism sensor.
Use the following procedure to remove and replace the sensors.
Remove
1.
2.
3.
4.
Unlock and lift up the Front Cover and the Supplies Cover (see Opening the Covers)
Power OFF the CPS120 and remove the power cord from the wall outlet.
Remove the Frame (see Remove and Replace the Frame)
Remove the Embosser Module from CPS120 (see Remove and Replace the Embosser
Module)
Punch or die home sensors
1.
Disconnect the Punch or Die Home sensor cable (J13 Punch, J12 Die) from the
Embosser control board .
2.
Remove Cable Tie
3.
4.
5.
6.
Remove four screws (1) holding the Front Indent module to remove Die sensor.
Partially Remove the Indent Module
Remove one screw (3) holding the Punch or Die Home sensor (4) and remove it.
To remove the Punch sensor follow the same procedure of Die sensor but on the Rear
Indent module.
Wheel home sensor
1.
Disconnect the Wheel Home sensor cable (J14) from the Embosser Control Board.
2.
Remove Cable Tie.
3.
Remove one screw (5) and remove the Wheel Home sensor (6).
Synchronism sensor
1.
Disconnect the Synchronism sensor cable (J21) from the Embosser Control board.
2.
Remove Cable Tie.
3.
Remove two screws (7) and remove the Synchronism sensor (8).
Replace
Punch or die home sensor
1.
Place the new Punch or Die Home sensor in place and attach with one screw.
2.
Reconnect the Punch or Die Home sensor cable (J13 Punch, J12 Die) on the Embosser
control board.
3.
Replace Cable Tie.
4.
Place the Front/Rear Indent module in position and hold in place with four screws.
6-36
CPS120 - Service Manual
CTS electronics
Wheel home sensor
1.
Place the new Wheel Home sensor in place and attach with one screw.
2.
Reconnect the Wheel Home sensor cable (J14) on the Embosser Control board.
3.
Replace Cable Tie.
Synchronism sensor
1.
Place the new Synchronism sensor in place and attach with two screws.
2.
Reconnect the Synchronism sensor cable (J21) on the Embosser Control board.
3.
Replace Cable Tie.
1.
2.
3.
Replace the Embosser Module on the CPS120 (see Remove and Replace the
Embosser Module).
Replace the Frame (see Remove and Replace the Frame)
Run a Standard Test Card to confirm proper operation of the CPS120. If successful, run
a limited number of customer produced cards for a final quality verification.
Follow-up Adjustments
The following adjustments must be performed after replacing the Wheel sensor :
· Wheel Offset.
3
8
4
1
7
6
5
1
CPS120 - Service Manual
6-37
CTS electronics
Remove and replace punch/die cam belts
The Punch/Die Cam belts transfers motion from the Punch/Die Cam Motors to the cams, which in turn
applies pressure to the embossing punch/die on the characters wheel.
Use the following procedure to remove and replace the Punch/Die cam belts.
Remove
1.
2.
3.
4.
5.
6.
Unlock and lift up the Front Cover and the Supplies Cover.
Power OFF the CPS120 and remove the power cord from the wall outlet.
Remove the Frame.
Remove the Embosser Module (see Remove and Replace the Embosser Module)
Remove the Rear/Front indent cartridge (if available).
Disconnect the Indent cable from the Embosser Control board:
· Indent Ribbon Motion sensor (J15 Front, J16 Rear)
· Indent Ribbon Motor (J7 Front, J9 Rear)
· Indent Solenoid (J8 Front, J10 Rear)
7.
8.
9.
10.
11.
12.
Remove four screws (1) and remove the Front Indent Module.
Disconnect the Punch/Die motor cables from the Punch/Die motors.
Remove nine screws (2) and remove the Punch/Die motors module.
Uncrew the two screws (3) and open the module.
Remove the Die Cam belt (4).
The procedure to remove the Punch Cam belt are the same of the Die Cam Belt on the
Rear Indent Module.
Replace
1.
Place the new Punch/Die Belt (4) in position around the idler pulley.
2.
Partially place the Punch/Die motor support in position and place the Punch/Die Cam
belt around the cam motor.
Attach the Punch/Die motor support with two screws (3).
Replace the Punch/Die motors module and attach with ninw screws (2).
Replace the Indent Module in position and attach with four screws (1).
Reconnect the Indent cables on the Embosser Control board:
3.
4.
4.
5.
· Indent Ribbon Motion sensor (J15 Front, J16 Rear)
· Indent Ribbon Motor (J7 Front, J9 Rear)
· Indent Solenoid (J8 Front, J10 Rear)
6.
7.
8.
9.
6-38
Replace the Embosser on the CPS120 (see Remove and Replace the Embosser)
Replace the Rear/Front indent cartridge (if available).
Replace the Frame.
Insert a Standard Test Card to confirm the proper operation of the CPS120. If the test is
successful, run a limited number of customer produced cards for a final quality
verification.
CPS120 - Service Manual
CTS electronics
CPS120 - Service Manual
6-39
CTS electronics
Remove and replace punch/die cam motors
The Punch/Die Cam Motor applies pressure to the Embossing Punch/Die on the character wheel to form
a character on plastic cards.
Use the following procedure to remove and replace the Punch/Die Cam motors.
Remove
1.
2.
3.
4.
5.
6.
7.
Unlock and lift up the Front Cover and the Supplies Cover.
Power OFF the CPS120 and remove the power cord from the wall outlet.
Remove the Frame
Remove the Embosser Module from CPS120 (see Remove and Replace the Embosser
Module)
Remove the Punch/Die Cables from the motors.
Remove four screws (1) and remove the Punch/Die motors (2).
Loose one grub screw holding the drive motor pulley and remove it.
Replace
1.
2.
3.
4.
5.
6.
6-40
Place the drive motor pulley in the shaft motor and hold in place with one grub screw.
Place a new motor and the Punch/Die Motor Belts in position and attach with four
screws.
Replace the Punch/Die cables on the motor.
Replace the Embosser Module on the CPS120 (see Remove and Replace the
Embosser Module).
Replace the Frame
Insert a Standard Test Card to confirm the proper operation of the CPS120. If the test is
successful, run a limited number of customer produced cards for a final quality
verification.
CPS120 - Service Manual
CTS electronics
2
1
1
1
1
2
CPS120 - Service Manual
6-41
CTS electronics
Remove and replace wheel motor
The Wheel Motor is a stepper motor used for select a caracter to emboss.
Use the following procedure to remove and replace the Wheel motor.
Remove
1.
Unlock and lift up the Front Cover and the Supplies Cover.
2.
3.
4.
Power OFF the CPS120 and remove the power cord from the wall outlet.
Remove the Frame.
Remove the Embosser Module from CPS120 (see Remove and Replace the Embosser
Module)
Remove the Wheel Cable from the motor.
Remove four screws (1) and remove the Wheel motor (2).
Loose one grub screw holding the drive motor pulley and remove it.
5.
6.
7.
Replace
1.
2.
Place the drive motor pulley in the shaft motor and hold in place with one grub screw.
Place a new motor in position and attach with four screws, but do not fully tighten.
3.
4.
5.
Press the motor pulley against the wheel gear, then completely tighten the screws.
Replace the Wheel cable on the motor.
Replace the Embosser Module on the CPS120 (see Remove and Replace the
Embosser Module).
Replace the Frame.
Insert a Standard Test Card to confirm the proper operation of the CPS120. If the test is
successful, run a limited number of customer produced cards for a final quality
verification.
6.
7.
1
1
2
6-42
CPS120 - Service Manual
CTS electronics
Remove and replace front/rear indent solenoids
The Front/Rear Indent Solenoids are used to place the Front/Rear Indent Ribbon under the Punch/Die
characters.
Use the following procedure to remove and replace the Front/Rear Indent Solenoids.
Remove
1.
2.
3.
4.
5.
6.
7.
Unlock and lift up the Front Cover and the Supplies Cover.
Power OFF the CPS120 and remove the power cord from the wall outlet.
Remove the Frame.
Remove the Embosser Module from CPS120 (see Remove and Replace the Embosser
Module)
Disconnect the Indent cable (J8 Front, J10 Rear) from the Embosser control board.
Remove the Cable Tie.
Remove two nuts (1) and remove the Front/Rear Indent Solenoids (2).
Replace
1.
2.
3.
4.
5.
Place a new Solenoid in position and attach with two nuts, but do not fully tighten.
Reconnect the Indent solenoid cable (J8 Front, J10 Rear) on the Embosser control
board.
Replace the Embosser Module on the CPS120 (see Remove and Replace the
Embosser Module).
Replace the Frame.
Insert a Standard Test Card to confirm the proper operation of the CPS120. If the test is
successful, run a limited number of customer produced cards for a final quality
verification.
Follow-up Adjustments
This remove and replace procedure affects the following adjustments which must be performed
after this procedure.
· Indent adjustment
CPS120 - Service Manual
6-43
CTS electronics
2
2
6-44
1
1
CPS120 - Service Manual
CTS electronics
Remove and replace front/rear indent motor
The Front and Rear Indent Motors are a DC motors used to advance the Front (if is available) and Rear
Indent ribbon in the Indent cartridge. Use the following procedure to remove and replace the Front and Rear
Indent Motors. The procedure is the same for both Front and Rear Motors.
Remove
1.
2.
3.
4.
5.
6.
7.
8.
9.
Unlock and lift up the Front Cover and the Supplies Cover.
Power OFF the CPS120 and remove the power cord from the wall outlet.
Remove the Frame.
Remove the Embosser Module from CPS120 (see Remove and Replace the Embosser
Module)
Remove the Indent cartridge.
Disconnect the Indent Motor cable (J7 Front Indent, J9 Rear Indent) from the
Embosser control board.
Remove cable ties
Remove one grub screw (1) holding the Ribbon Traction Gear (3) and remove it.
Remove two screws (2) and remove the Indent Motor (4).
Replace
1.
Place the new Indent motor in position and attach with two screws.
2.
3.
Place the Ribbon traction gear on the shaft motor and hold in place with one grub screw.
Reconnect the Indent motor cable (J7 Front Indent, J9 Rear Indent) on the
Embosser control board.
Replace cable ties and the Indent cartridge.
Replace the Embosser Module on the CPS120 (see Remove and Replace the
Embosser Module).
Replace the Frame.
Insert a Standard Test Card to confirm the proper operation of the CPS120. If the test is
successful, run a limited number of customer produced cards for a final quality
verification.
4.
5.
6.
7.
CPS120 - Service Manual
6-45
CTS electronics
2
1
4
3
6-46
CPS120 - Service Manual
CTS electronics
Remove and replace front/rear indent ribbon motion sensor
The Front/Rear Indent Ribbon Motion Sensors detects physical motion of a slotted wheel insuring that the
Front/Rear Indent ribbons has advanced. Use the following procedure to remove and replace the
Front/Rear Indent Ribbon motion sensors. The procedure to remove and replace the Front and Rear
Indent Ribbon Motion Sensors is the same for both Front and Rear Indent Ribbon Motion Sensors.
Remove
1.
2.
3.
4.
5.
6.
7.
8.
9.
10.
Unlock and lift up the Front Cover and the Supplies Cover.
Power OFF the CPS120 and remove the power cord from the wall outlet.
Remove the Frame.
Remove the Embosser Module from CPS120 (see Remove and Replace the Embosser
Module)
Remove the Rear/Front Indent cartridges (if available)
Disconnect the Indent Ribbon Motion Sensor cable (J15 Front Indent, J16 Rear
Indent) from the Embosser control board.
Remove cable ties
Remove two screws (1) holding the Cartridge Support (2).
Partially remove the Cartridge Support to have access at the Indent Ribbon Motion
sensor (3).
Remove one screw (4) holding the Indent Ribbon Motion sensor and remove it.
Replace
1.
2.
3.
4.
5.
6.
7.
Place the new Indent Ribbon Motion sensor in position and attach with one screw.
Place the cartridge in position and hold in place with two screws.
Reconnect the Indent Ribbon Motion cable (J15 Front Indent, J16 Rear Indent) on the
Embosser control board.
Replace cable ties and Rear/Front Indent cartridge (if available).
Replace the Embosser Module on the CPS120 (see Remove and Replace the
Embosser Module).
Replace the Frame.
Insert a Standard Test Card to confirm the proper operation of the CPS120. If the test is
successful, run a limited number of customer produced cards for a final quality
verification.
2
3
4
1
1
CPS120 - Service Manual
6-47
CTS electronics
Remove and replace
The Embosser Module is comprised of two rotating metal disks of punches and dies, every metal disk is
subdivided in two parts for an easy extraction from the module.
Use the following procedure to remove and replace a single part of metal disk of the Embosser Module.
Remove
1.
2.
3.
4.
5.
6.
7.
Unlock and lift up the Front Cover and the Supplies Cover.
Power OFF the CPS120 and remove the power cord from the wall outlet.
Remove the Frame.
Uncrew the two screws (1) and remove the main control board with support (2).
Manually rotate the metal disks on the free zone, until you can see two pins that indicate
a central line (A).
Uncrew the three fixing screws that fix the part to be remove.
Remove only one half at a time to maintain the correct module adjustment.
Before extracting another part of a metal disck replace the first one.
!
WARNING!
Replace
1.
2.
3.
4.
5.
6-48
Place the half of metal disk (3) in the correct position.
Insert (without impediment) and fix three fixing screws.
Replace the main control board with support (2) and fix two screws (1).
Replace the Frame.
Insert a Standard Test Card to confirm the proper operation of the CPS120. If the test is
successful, run a limited number of customer produced cards for a final quality
verification.
CPS120 - Service Manual
CTS electronics
CPS120 - Service Manual
6-49
CTS electronics
Replace the indent ribbon
To change the indent ribbon, perform the following steps:
!
WARNING!
1.
2.
3.
4.
5.
6.
7.
8.
The topper platen may be very hot.
Unlock the Supplies Cover and lift it (see opening the Front and Supplies Covers).
Unlock the indent cartridge by pushing the two levers and pulling the cartridge out of the
embosser module.
Unlock the cartridge lever and open the cartridge.
Remove the empty ribbon core from the supplies spool and the full ribbon core from the
take-up spool.
Place the new ribbon core on the supply spool as shown below.
Wrap the indent ribbon around the ribbon motion guide and ribbon guide rollers.
Place the empty core on the take-up spool.
Tape the edge of the ribbon, dull side out, to the empty core as shown below, and lock
the lever.
Take-up spool
Supply spool
Tape the edge
of the ribbon,
dull side out,
to the core.
Shiny side
Dull side
9.
6-50
Insert the cartridge into the printer and close the supplies cover.
CPS120 - Service Manual
CTS electronics
CHIP CARD ASSEMBLY (option)
Remove and replace smart card module
The Smart Card Module consists of a mechanism for write and read Contact and Contactless smart card.
Use the following procedure to remove and replace the Smart Card Module.
Remove
1.
Unlock and lift up the Front Cover and the Supplies Cover.
2.
3.
4.
Power OFF the CPS120 and remove the power cord from the wall outlet.
Remove the Frame.
Disconnect the following cable from the Main Control board:
· Smart Card Contact Solenoid (J26)
· Smart Card Contactless Power Supply (J20)
5.
6.
Remove two screws (1) and remove the Smart Card Module from the CPS120.
Lift the Smart Card Module from the CPS120.
Replace
1.
2.
Place the new Smart Card Module in position and attach with two screws.
Reconnect the Following Cable on the Main Control Board:
· Smart Card Contact Solenoid (J26)
· Smart Card Contactless Power Supply (J20)
!
WARNING!
Make sure wires are not pinched. Make sure wires will not interfere
with any mechanical movement inside the CPS120.
3.
4.
Replace the Frame.
Insert a Standard Test Card to confirm the
proper operation of the CPS120. If the test is
successful, run a limited number of customer
produced cards for a final quality verification.
1
Follow-up Adjustments
This remove and replace procedure affects the following
adjustments which must be performed after this procedure.
Smart Card Offset
CPS120 - Service Manual
1
6-51
CTS electronics
Remove and replace smart card contact sensor
The Smart Card Contact sensor control that the contact is on the card.
Use the following procedure to remove and replace the sensor.
Remove
1.
Unlock and lift up the Front Cover and the Supplies Cover.
2.
3.
4.
Power OFF the CPS120 and remove the power cord from the wall outlet.
Remove the Frame.
Remove the Smart Card Module from CPS120 (see Remove and Replace the Smart
Card Module)
Disconnect the Smart Card Contact sensor cable from the Smart Card Contact Control
board (1).
Remove one screw (2) holding the Smart Card Contact sensor (3) and remove it.
5.
6.
Replace
1.
Place the new Smart Card Contact sensor in position and attach with one screw.
2.
Reconnect the Smart Card Contact sensor cable on the Smart Card Contact control
board.
Replace the Smart Card Module on the CPS120 (see Remove and Replace the Smart
Card Module).
Replace the Frame.
Insert a Standard Test Card to confirm the proper operation of the CPS120. If the test is
successful, run a limited number of customer produced cards for a final quality
verification.
3.
4.
5.
1
3
2
6-52
CPS120 - Service Manual
CTS electronics
Remove and replace smart card contact solenoid
The Smart Card Contact Solenoid is used to place the Contact on the card.
Use the following procedure to remove and replace the Smart Card Contact Solenoid.
Remove
1.
Unlock and lift up the Front Cover and the Supplies Cover.
2.
3.
4.
Power OFF the CPS120 and remove the power cord from the wall outlet.
Remove the Frame.
Remove the Smart Card Module from CPS120 (see Remove and Replace the Smart
Card Module)
Remove two screws (1) and remove the Smart Card Contact Solenoid (2).
5.
Replace
1.
2.
Place a new Solenoid in position and attach with two screws.
Replace the Smart Card Module on the CPS120 (see Remove and Replace the Smart
Card Module).
3.
4.
Replace the Frame.
Insert a Standard Test Card to confirm the proper operation of the CPS120. If the test is
successful, run a limited number of customer produced cards for a final quality
verification.
1
2
CPS120 - Service Manual
6-53
CTS electronics
CARRIAGE ASSEMBLY
Remove and replace card transport module
The Card Transport consists of a mechanism for moving a card through different stages of production to
produce a final card.
Use the following procedure to remove and replace the Card Transport Module.
Remove
1.
2.
3.
4.
5.
6.
Unlock and lift up the Front Cover and the Supplies Cover.
Power OFF the CPS120 and remove the power cord from the wall outlet.
Remove the Frame.
Remove eight screws (1) and partially remove the Card Transport from the base to gain
access to the cable connectors.
Disconnect the X-axis cable from the X-axis motor and the Card Transport Flex Cable
from the Axis Interconnection.
Lift the Card Transport Module from the CPS120
Replace
1.
2.
3.
4.
5.
6-54
Partially place the new Card Transport Module in position.
Reconnect the X-axis cable on the X-axis motor and the Card Transport Flex Cable on
the Axis Interconnection.
After connecting the inline connectors, place the new Card Transport Module in position
and attach with eight screws (1).
Replace the Frame.
Insert a Standard Test Card to confirm the proper operation of the CPS120. If the test is
successful, run a limited number of customer produced cards for a final quality
verification.
CPS120 - Service Manual
CTS electronics
CPS120 - Service Manual
6-55
CTS electronics
Remove and replace X-transport drive belt
The X-Transport Drive belt drives the transport mechanism for moving cards through the CPS120.Use
the following procedure to remove and replace the X-Transport Drive belt.
Remove
1.
2.
3.
4.
Unlock and lift up the Front Cover and the Supplies Cover.
Power OFF the CPS120 and remove the power cord from the wall outlet.
Remove the Frame.
Remove the Card Transport Module from CPS120 (see Remove and Replace the Card
Transport Module)
5.
6.
7.
Remove one nut (1) holding the X-Transport Drive belt backstand (2).
Remove two screws (3) holding the backstand pulley.
Remove two nuts (4) and one stirrup holding the X-Transport drive belt (5) on the Card
Transport.
Remove the X-Transport drive belt.
8.
Replace
1.
2.
3.
4.
5.
6.
Place the new X-Transport drive belt in position as shown in Figure B and hold in the
Card Transport Module with one stirrup and two nuts.
Place the X-Transport drive belt around the backstand gear; place the backstand gear
in place and attach with two screws.
Replace the X-Transport drive belt backstand in position and hold with one nut.
Replace the Card Transport Module CPS120 (see Remove and Replace the Card
Transport Module).
Replace the Frame.
Insert a Standard Test Card to confirm the proper operation of the CPS120. If the test is
successful, run a limited number of customer produced cards for a final quality
verification.
Follow-up Adjustment
This remove and replace procedure affects the following adjustments which must be performed
after this procedure.
· X-Transport drive belt backstand regulation.
6-56
CPS120 - Service Manual
CTS electronics
1
2
4
CPS120 - Service Manual
5
3
6-57
CTS electronics
Remove and replace X-transport motor
The X-Transport motor provides traction for moving cards through the CPS120.
Use the following procedure to remove and replace the X-Transport motor.
Remove
1.
Unlock and lift up the Front Cover and the Supplies Cover.
2.
3.
4.
Power OFF the CPS120 and remove the power cord from the wall outlet.
Remove the Frame.
Remove the Card Transport Module from CPS120 (see Remove and Replace the Card
Transport Module).
Remove two screws (1) holding the X-Transport motor (2).
Slip the X-Transport Drive Belt (3) off the X-Transport drive motor pulley and remove
X-Transport motor.
Loose one grub screw holding the X-Transport drive motor pulley and remove it.
5.
6.
7.
Replace
1.
2.
3.
4.
5.
6-58
Place the Drive motor pulley on the shaft motor and hold in place with one grub
screw.
Place the X-Transport drive belt and the new X-Transport motor in position and attach
with two screws.
Replace the Card Transport Module on the CPS120 (see Remove and Replace the
Card Transport Module).
Replace the Frame.
Insert a Standard Test Card to confirm the proper operation of the CPS120. If the test is
successful, run a limited number of customer produced cards for a final quality
verification.
CPS120 - Service Manual
CTS electronics
Remove and replace Y-transport drive belt
The Y-Transport Drive belt drives the transport mechanism for moving cards through the CPS120. Use
the following procedure to remove and replace the Y-Transport Drive belt.
Remove
1.
2.
3.
4.
5.
Unlock and lift up the Front Cover and the Supplies Cover.
Power OFF the CPS120 and remove the power cord from the wall outlet.
Remove the Frame.
Remove four screws (1) and remove the up side of the Card transport.
Remove two screws (4) and one stirrup holding the Y-Transport drive belt (2) and
remove it.
Replace
1.
Place the new Y-Transport drive belt in position and hold in the up side of the Card
Transport with one stirrup and two nuts.
2.
Partially place the Up side of the Card Transport in position, place the belt around the
drives belt (3). Attach with four screws the Up side of the Card Transport.
Replace the Frame.
Insert a Standard Test Card to confirm the proper operation of the CPS120. If the test is
successful, run a limited number of customer produced cards for a final quality
verification.
3.
4.
CPS120 - Service Manual
6-59
CTS electronics
Remove and replace Y-transport motor
The Y-Transport Motor drives the transport mechanism for moving cards through the CPS120.Use the following
procedure to remove and replace the Y-Transport Drive belt.
Remove
1.
2.
3.
4.
5.
6.
7.
Unlock and lift up the Front Cover and the Supplies Cover.
Power OFF the CPS120 and remove the power cord from the wall outlet.
Remove the Frame.
Remove four screws (1) and remove the up side of the Card transport.
Disconnect the cable from the Y-Transport motor.
Remove two nuts (3) and remove the Y-Transport motor (4).
Loose one grub screw and remove the Y-Transport drive motor pulley (5).
Replace
1.
2.
3.
4.
5.
6-60
Replace the Y-Transport drive motor pulley (5) on the shaft motor and hold in place with
one grub screw.
Place the new Y-Transport drive motor (4) in position and attach with two nuts.
Partially place the Up side of the Card Transport in position, place the belt around the
drives belt (2). Make sure belt tension is sufficient to ensure that no slippage will
occur.Attach with four screws the Up side of the Card Transport.
Replace the Frame.
Insert a Standard Test Card to confirm the proper operation of the CPS120. If the test is
successful, run a limited number of customer produced cards for a final quality
verification.
CPS120 - Service Manual
CTS electronics
Remove and replace card transport sensor
The sensors that control the Card Transport movement are:
· X Home sensor
· Y Home sensor
Use the following procedure to remove and replace the sensors.
Remove
1.
2.
3.
4.
Unlock and lift up the Front Cover and the Supplies Cover (see Opening the Covers)
Power OFF the CPS120 and remove the power cord from the wall outlet.
Remove the Frame (see Remove and Replace the Frame)
Remove the Card Transport Module from CPS120 (see Removing the Card Transport
Module)
X Home sensor
1.
Remove the seeger (1)
2.
Remove three screws (2)and extract the support metal plate.
3.
Disconnect the X Home sensor cable from Axis Interconnection control board .
4.
Remove the X home sensor (3).
Y Home sensor
1.
Disconnect all cables from Axis Interconnection control board.
2.
Remove two screws (4) and remove the Axis interconnection control board (5).
Replace
X Home sensor
1.
Place the new X Home sensor (3) in place and attach with one screw on the support
metal plate.
2.
Fix the metal plate with three screws (2)
3.
Reconnect the X Home sensor cable on the Axis interconnection control board.
4.
Place the seeger (1).
Y Home sensor
1.
Place the new Axis interconnection control board (5) in place and attach with two
screws (4).
2.
Reconnect all cables on the Axis interconnection control board.
1.
2.
3.
Replace the Card transport Module on the CPS120 (see Remove and Replace the Card
Transport Module).
Replace the Frame (see Remove and Replace the Frame)
Run a Standard Test Card to confirm proper operation of the CPS120. If successful, run
a limited number of customer produced cards for a final quality verification.
Follow-up Adjustments
These remove and replace procedures affect the following adjustments which must be
performed after these procedures.
· X Offset
· Y Offset
CPS120 - Service Manual
6-61
CTS electronics
X Home sensor
Y Home sensor
6-62
CPS120 - Service Manual
CTS electronics
Remove and replace power supply
The Power Supply delivers DC power to the stepper and DC motors and powers the Main Control Board.
Use the following procedure to remove and replace the Power Supply.
Remove
1.
2.
3.
4.
5.
6.
7.
Unlock and lift up the Covers.
Power OFF the CPS120 and remove the power cord from the wall outlet.
Remove the Frame.
Remove two screws (1) and partially remove the Power Supply.
Remove the protection plate and remove six red wires from the +V side of the Power
Supply.
Remove six black wires from the -V side of the Power Supply and three AC line wires
from the AC Input side of the Power Supply.
Remove the Power Supply.
Replace
1.
2.
3.
4.
5.
6.
Attach six red wires to the +V side of the new Power Supply.
Attach six black wires to the -V side of the new Power Supply.
Attach three AC line wires to the AC input side of the new Power supply.
Place the protection plate.
Place the new Power Supply in position and attach with two screws.
Replace the Frame.
7.
8.
Plug in the power cord and power ON the CPS120.
Insert a Standard Test Card to confirm the proper operation of the CPS120. If the test is
successful, run a limited number of customer produced cards for a final quality
verification.
SP-200-24
DC OUTPUT
+V
CPS120 - Service Manual
AC INPUT
-V
N
L
6-63
CTS electronics
Remove and replace fuse
The Fuse protects the electronic components inside the CPS120. Use the following procedure to remove
and replace the Fuse.
Remove
1.
2.
Power OFF the CPS120 and remove the power cord from the wall outlet.
Use a flat blade screwdriver to pry out the Fuse Holder as shown.
Replace
6-64
1.
2.
Place the new fuse in the Fuse Holder and press the Fuse Holder back in place.
Plug in the power cord and power ON the CPS120.
3.
Insert a Standard Test Card to confirm the proper operation of the CPS120. If the test is
successful, run a limited number of customer produced cards for a final quality
verification.
CPS120 - Service Manual
CTS electronics
Remove and replace Input/Output/Reject module control board
The Input/Output/Reject Control Board provides the electronics to control the Input/Output/Reject
module.
Use the following procedure to remove and replace the Input/Output/Reject Control Board.
Remove
1.
2.
3.
4.
!
Unlock and lift up the Front Cover and the Supplies Cover.
Power OFF the CPS120 and remove the power cord from the wall outlet.
Remove the Frame.
Remove the Input/Output/Reject Module from CPS120 (see Remove and Replace the
Input/Output/Reject Module)
WARNING!
5.
6.
Use proper anti-static grounding techniques when handling the
Input/Output/Reject Control Board.
Disconnect all cables from the Input/Output/Reject Control Board (1).
Remove four screws and remove the Input/Output/Reject Module Control Board.
Replace
!
WARNING!
1.
2.
3.
4.
5.
Use proper anti-static grounding techniques when handling the
Input/Output/Reject Control Board.
Place the new Input/Output/Reject Module Control
Board in position and hold in place with four screws.
Reconnect all cables on the Input/Output/Reject
Control Board.
Replace the Input/Output/Reject Module on the
CPS120 (see Remove and Replace the
Input/Output/Reject Module)
Replace the Frame.
Insert a Standard Test Card to confirm the proper
operation of the CPS120. If the test is successful,
run a limited number of customer produced cards
for a final quality verification.
CPS120 - Service Manual
6-65
CTS electronics
Remove and replace encoder control board
The Encoder Control Board provide the electronic to write and read the magnetic stripe on the cards.Use
the following procedure to remove and replace the Encoder Control Board.
Remove
1.
2.
3.
4.
!
Unlock and lift up the Front Cover and the Supplies Cover.
Power OFF the CPS120 and remove the power cord from the wall outlet.
Remove the Frame.
Remove the Encoder Module from CPS120 (see Remove and Replace the Encoder
Module)
WARNING!
5.
6.
Use proper anti-static grounding techniques when handling the
Encoder Control Board.
Disconnect all cables from the Encoder Control board
Remove four screws holding the Encoder Control Board (1) and remove it.
Replace
!
1.
2.
3.
4.
5.
6-66
WARNING!
Use proper anti-static grounding techniques when handling the
Encoder Control Board.
Place the new Encoder Control Board in
position and attach with four screws.
Reconnect all cables on the Encoder control
board.
Replace the Encoder Module in the CPS120
(see Remove and Replace the Encoder
Module)
Replace the Frame.
Insert a Standard Test Card to confirm the
proper
operation of the CPS120. If the
test is successful, run a limited number of
customer produced cards for a final
quality verification.
CPS120 - Service Manual
CTS electronics
Remove and replace topper control board
The Topper Control Board provides the electronic to places a colored layer of embosser characters on a
plastic card.
Use the following procedure to remove and replace the Topper Control Board.
Remove
1.
2.
3.
4.
!
Unlock and lift up the Front Cover and the Supplies Cover.
Power OFF the CPS120 and remove the power cord from the wall outlet.
Remove the Frame.
Remove the Topper Assembly from CPS120 (see Removing the Topper Assembly)
WARNING!
5.
6.
Use proper anti-static grounding techniques when handling the
Topper Control Board.
Disconnect all cables from the Topper Control board
Remove four screws holding the Topper Control Board (1) and remove it.
Replace
!
1.
2.
3.
4.
5.
WARNING!
Use proper anti-static grounding techniques when handling the
Topper Control Board.
Place the new Topper Control Board
in position and attach with four
screws.
Reconnect all cables on the Topper
control board.
Replace the Topper Assembly on the
CPS120 (see Replacing the Topper
Assembly).
Replace the Frame.
Insert a Standard Test Card to confirm
the proper operation of the CPS120.
If the test is successful, run a
limited number of customer produced
cards for a final quality verification.
CPS120 - Service Manual
6-67
CTS electronics
Remove and replace embosser control board
The Embosser Control Board provides the electronic to make embossed characters on a plastic card.Use
the following procedure to remove and replace the Embosser Control Board.
Remove
1.
2.
3.
4.
5.
Unlock and lift up the Front Cover and the Supplies Cover.
Power OFF the CPS120 and remove the power cord from the wall outlet.
Remove the Frame.
Disconnect all cables from the Embosser Control board
Remove three screws holding the Embosser Control Board (1) and remove it.
Replace
!
WARNING!
1.
2.
3.
4.
Use proper anti-static grounding techniques when handling the
Embosser Control Board.
Place the new Embosser Control Board in position and attach with three screws (1).
Reconnect all cables on the Embosser control board.
Replace the Frame.
Insert a Standard Test Card to confirm the proper operation of the CPS120. If the test
is successful, run a limited number of customer produced cards for a final quality
verification.
2
1
6-68
CPS120 - Service Manual
CTS electronics
Remove and replace Main control board
The Main Control Board is the main processorboard of the CPS120.
Use the following procedure to remove and replace the Main Control Board.
Remove
!
WARNING!
1.
2.
3.
!
Unlock and lift up the Front Cover and the Supplies Cover.
Power OFF the CPS120 and remove the power cord from the wall outlet.
Remove the Frame.
WARNING!
4.
5.
Before replacing the Main Control Board, backup all stored setting
using the CPS120 Diagnostic Install Utility. This program will give
you step by step instructions for backing up the Main Control Board.
Use proper anti-static grounding techniques when handling the Main
Control Board.
Disconnect all cables from the Main Control Board (1).
Remove four screws (2) and four studs (3) and remove the Main Control Board.
Replace
!
1.
2.
3.
4.
5.
WARNING!
Use proper anti-static grounding techniques when handling the Main
Control Board.
Place the new Main Control Board in
position and hold in place with four
screws and four studs.
Reconnect all cables on the Main
Control Board.
Reload the saved configurations
into the CPS120
Replace the Frame
Insert a Standard Test Card to confirm
the proper operation of the CPS120.
If the test is successful, run a limited
number of customer produced cards
for a final quality verification.
2
1
2
CPS120 - Service Manual
3
3
6-69
CTS electronics
6-70
CPS120 - Service Manual
CTS electronics
Chapter
7
SPARE PARTS LIST
INPUT / OUTPUT / REJECT MODULE
TAB. Nr 1 Input - Leafing . . . . . .
ENCODER . . . . . . . . . . . . . . .
TAB. Nr 2 Encoder . . . . . . . . .
.
.
.
.
.
.
.
.
.
.
.
.
.
.
.
.
.
.
.
.
.
.
.
.
.
.
.
.
.
.
.
.
.
.
.
.
.
.
.
.
.
.
.
.
7-2
7-2
7-5
7-5
TOPPER . . . . . . . . . . . . . . . . . . . . . . . . . . . 7-6
TAB. Nr 3 Topper . . . . . . . . . . . . . . . . . . . . . 7-6
EMBOSSER . . . . . . . . . . . . . . . . . . . . . . . . . 7-8
TAB. Nr 4 Embosser . . . . . . . . . . . . . . . . . . . 7-8
INDENT . . . . . . . . . . . . . . . . . . . . . . . . . . . 7-10
TAB. Nr 5 Indent . . . . . . . . . . . . . . . . . . . . . 7-10
CARRIAGE . . . . . . . . . . . . . . . . . . . . . . . . . 7-12
TAB. Nr 6 Carriage . . . . . . . . . . .
CONTACT STATION SMART CARD . . . .
TAB. Nr 7 Contact . . . . . . . . . . . .
COVER . . . . . . . . . . . . . . . . . . .
TAB. Nr 8 Cover - Cable connection . .
OPTIONS . . . . . . . . . . . . . . . . . .
INPUT / OUTPUT MODULE (Single feeder)
TAB. Nr 9 Single feeder . . . . . . . . .
.
.
.
.
.
.
.
.
.
.
.
.
.
.
.
.
.
.
.
.
.
.
.
.
.
.
.
.
.
.
.
.
.
.
.
.
.
.
.
.
.
.
.
.
.
.
.
.
.
.
.
.
.
.
.
.
.
.
.
.
.
.
.
.
7-12
7-14
7-14
7-15
7-15
7-18
7-18
7-18
Legend
Z (XXX board name)
CPS120 - Service Manual
Connect to
7-1
CTS electronics
INPUT / OUTPUT / REJECT MODULE
TAB. Nr 1
Input - Leafing
Q
RIF
CODE
DESCRIPTION
4
1
1
1
1
1
1
1
1
1
1
1
1
4
1
1
1
1
2
3
4
5
6
7
8
9
10
11
12
13
14
15
16
17
R34-01015
R34-01136
R34-01150
R34-01207
R34-01267
R34-01246
R34-022098
R34-022099
R34-022100
R34-022101
R34-10714
R34-10751
R34-10794
R34-CAB-0716
R34-CAB-0740
R34-CAB-0804
R34-CAB-0806
Bearings 6x10x3 9balls
Belt Tooth 480MXL Z60 L025
Belt Tooth 1200MXL Z150
O-ring CB86 3030 2-109 Silicon
O-ring CB85 D=7.60 SEC=2.62
O-ring (2-028).070x4-19/32 83A
Tooth Leafer Group
Input Cam Group
Lever Bridge Group
Knob Group
Reduc Motor Group 24v+Fimo+Cable 400mm
Reduc Motor Group L149.12.43 MODU2 L280
Step Motor Group T17 0.33A+Cable
Cable 3way+Photo TLP802= L=250 P2
Cable 3way+Photo TLP802 L285 P2
Cable 2way+ST03xPhoto ricev
Cable+photo medium ST17 P2 L350
2
1
1
1
18
19
R34-CAB-0866
R34-10710
R34-CAB-0803
R34-10761
Cable 3way + Photo TLP822 L350 P2
ST03-03 Emitt(E2)
Cable 2way x Photo Em L400mm
CPS-CT Input-Output Board
20
7-2
CPS120 - Service Manual
CTS electronics
TABLE 1
10
Z J4 Feeder board
12
6
7
3
Z J5 Feeder board
1
15
1
1
20
14
2
Z J7 Feeder board
8
9
14
13
4
5
16R
Z J17 Feeder board
Z J8 Feeder board
Z J9 Feeder board
11
Z J10 Feeder board
19 E
Z J6 Feeder board
CPS120 - Service Manual
7-3
CTS electronics
Z J2 Feeder board
14
1
18
18
Z J3 Feeder board
Z J11 Feeder board
14
Z J1 Feeder board
17
Z J16 Feeder board
7-4
CPS120 - Service Manual
CTS electronics
ENCODER
TAB. Nr 2
Encoder
Q
RIF
CODE
DESCRIPTION
1
1
1
1
R34-10790
Magnetic Head Group R/W 3T+Support
2
3
R34-10795
R34-CAB-0716
4
R34-10763
Encoder Heds-5500-A12 + Cable
Cable-photo TLP802L=250
(Writing Synchronism photo)
CPS-BM Encoder board
1
TABLE 2
2
3
Z J7 Encoder board
Z J11 Encoder board
1
Z J1 - J2 - J3 Encoder board
4
CPS120 - Service Manual
7-5
CTS electronics
TOPPER
TAB. Nr 3
Topper
Q
RIF
CODE
DESCRIPTION
1
2
1
1
1
1
1
1
R34-20828
Topping cartridge group
2
3
4
5
6
7
R34-01326
R34-01360
R34-01136
R34-10791
R34-10887
R34-10786
Traction Spring
Traction Spring
Belt Tooth 480MXL Z60 L025
Reduction Motor Group 24V + Fimo1+Cable
Gr. M-rid*L149.12.90*MODU2 L280
Heater Group
2
1
8
9
R34-CAB-0715
R34-10762
Cable 3way+photo TLP802 L150 P2
CPS-CT *Topping* Board
TABLE 3
1
7-6
CPS120 - Service Manual
CTS electronics
Z J14 - J15 Topper board
7
4
6
Z J4 Topper board
2
8
Z J11 Topper board
5
Z J10 Topper board
8
Z J2 Topper board
3
9
CPS120 - Service Manual
7-7
CTS electronics
EMBOSSER
TAB. Nr 4
Embosser
Q
RIF
CODE
DESCRIPTION
1
2
1
1
1
1
1
2
2
2
1
1
2
3
4
5
6
7
8
9
10
11
R34-01028
R34-01094
R34-022221
R34-022223
R34-022261
R34-022262
R34-022263
R34-022265
R34-022266
R34-022267
R34-10896
1
12
R34-10897
1
13
R34-10797
2
14
R34-CAB-0716
Bearing 120x150x16
Belt Tooth XL Z=40 L025
Wheel Tooth Z=192
Daisy wheel Upper "A"
Daisy wheel Upper "B"
Daisy wheel Lower "B"
Daisy wheel Lower "A"
Cam Shaft Group
Punch Arm Group
Punch Group
GR MOT STEP CAMM Super L300
(Upper Punch Motor)
GR MOT STEP CAMM Infer L150
(Lower Punch Motor)
MOTSTEP-05 Group+Cabmot-017
(Daisy Motor)
Cable 3way+Photo TLP822 L=250 P2
(Upper/lower Punch Zeroing Photo)
1
15
R34-CAB-0740
1
16
R34-CAB-0755
1
17
R34-10759
7-8
Cable 3way+Photo TLP802 L=285 P2
(Daisy wheel Zeroing Photo)
Cable+Photo High ST07*p.2*L=380
(Synchronism Photo)
CPS-EMB Board
5
6
4
7
CPS120 - Service Manual
CTS electronics
TABLE 4
1
17
10
Z J3 Embosser board
13
15
Z J21 Embosser board
16
9
2
Z J14 Embosser board
Z J1 Embosser board
11
UPPER
8
3
14
Z J12 Embosser board
CPS120 - Service Manual
2
9
Z J2 Embosser board
12
LOWER
8
14
Z J13 Embosser board
7-9
CTS electronics
INDENT
TAB. Nr 5
Indent
Q
RIF
2
2
1
1
2
2
1
2
3
4
5
6
CODE
DESCRIPTION
R34-10793
R34-022282
R34-10890
R34-10891
R34-10788
R34-CAB-0866
Gr Cartridge indent
Leaf spring
Gr. motrid 24V+V+fimo+cavo L300+isolan "front"
Gr. motrid 24V+V+fimo+cavo L300 "rear"
Gr e-magnet 7.31 24V 66ohm L300
Cable 3way+photo TLP822 L=350 P2 (Photo encoder)
TABLE 5
1
7-10
CPS120 - Service Manual
CTS electronics
5
6
Z J15 Embosser board
Z J8 Embosser board
3
Z J7 Embosser board
2
FRONT
Z J9 Embosser board
4
Z J16 Embosser board
6
2
5
Z J10 Embosser board
REAR
CPS120 - Service Manual
7-11
CTS electronics
CARRIAGE
TAB. Nr 6
Carriage
Q
RIF
CODE
DESCRIPTION
1
1
2
1
1
1
1
1
1
1
1
1
1
2
3
4
5
6
7
8
9
10
11
12
R34-01093
R34-01092
R34-022371
R34-022382
R34-022383
R34-022384
R34-022385
R34-10760
R34-10794
R34-10798
R34-CAB-0715
R34-CAB-0813
Belt Tooth MXL Z591 L025
Belt Tooth MXL Z85 L025
Shaft guide
Plier Group Axis Y Card Movement
Plier Group Axis X Card Movementer
Transport Card support group
Release Command group
CPSINTX board
Step Motor T17 0.33A+Cable group
Gr Motstep-13+Cabmot-016
Cable 3way+Photo TLP802 L=150 P2
FCC 10wayx890mm P 2.54mm
TABLE 6
6
7-12
CPS120 - Service Manual
CTS electronics
3
1
7
10
12
Z J5 Embosser board
From J2 Carriage board to Z J6 Embosser board
4
5
11
Z J1 Carriage board
CPS120 - Service Manual
2
8
9
Z J3 Carriage board
7-13
CTS electronics
CONTACT STATION SMART CARD
TAB. Nr 7
Contact
Q
RIF
1
1
1
1
1
2
3
4
CODE
DESCRIPTION
R34-10792
R34-CAB-0716
R34-10578
R34-14025
Contact station group
Cable 3way+photo TLP822 L250 P2
Gr E-mag T.31 24V 66ohm L160
CPS-SC-USB Board
TABLE 7
4
Z J1 Contact control board
2
1
Z J2 Contact control board
3
Z J26 Main board
7-14
CPS120 - Service Manual
CTS electronics
COVER
TAB. Nr 8
Cover - Cable connection
Q
RIF
1
1
1
1
1
3
1
2
3
4
5
6
1
2
2
1
1
1
1
1
1
7
8
9
10
11
12
13
14
15
CODE
DESCRIPTION
R34-00812
R34-10892
R34-10764
R34-10758
R34-CAB-0797
R34-CAB-0798
Lock box5 sx. 16 onc Fast Loc
Gr E-mag E5499 24V 60ohm (Thermal protection)
CPS-Display Board
CPS-Master "Full Option"
Cable 5way 1:1 Molex P2.5L=1200
Cable 5way 1:1 Molex P2.5L=650
R34-CAB-0799
R34-CAB-0800
R34-CAB-0801
R34-CAB-0802
R34-CAB-0805
R34-CAB-0910
R34-INPUL18551108
R34-PRESAPANN--01
R34-TR-0085
Cable 5way 1:1 Molex P2.5L=350
Cable Power 2way Modu2 L=450
Cable Power 2way Modu2 L=300
Cable Power 4+2way Modu2 L=150
Cable 2way Power Switch L=300
Cable Tond 4V+Photo LTP802 L800 P2
8 Switch 4A 250V Green Light
1 Socket Male+P-Fuse
Ali SW O-F 200W 8.4A SP-200-24
TAB. Nr 8
1
12 Z J22 Main board
2 Z J24 Main board
3 (J3)
Z J13 Main board
CPS120 - Service Manual
7-15
CTS electronics
8
Z Power supply
Z J3 Consolle
5 (J13)
6 (J12)
4
6 (J11)
Z J12 Feeder
Z J12 Topper
7 (J9)
Z J22 Embosser
13
6 (J10)
14
Z J5 Encoder
11
Z Power supply
Z J3 Consolle
Z J12 Topper
Z J22 Embosser
Z J5 Encoder
Z J12 Feeder
7-16
CPS120 - Service Manual
CTS electronics
15
9
J4
CPS120 - Service Manual
8
J13
10
9
J13
J18
7-17
CTS electronics
OPTIONS
INPUT / OUTPUT MODULE (Single feeder)
TAB. Nr 8
Cover - Cable connection
Q
RIF
CODE
DESCRIPTION
1
1
1
1
1
2
3
4
R34-01246
R34-01207
R34-01267
R34-01351
O-Ring (2-028) 070x4 19/32
O-Ring CB86 30302-109 silicon
O-Ring CB85 D=6.02 S=2.62 Silicon
Spring
1
1
1
1
1
1
5
6
7
8
9
10
R34-01321
R34-10893
R34-CAB-0755
R34-CAB-0994
R34-014029
R34-022081
Traction spring
GR M-RID*L149.12.43 Modu2 L400
Photosensor + Cable ST07 High P.2 L=380
Photoxensor + Cable ST17 Medium P.2 L=400
CPS-CT Topping + Single feeder board
Input/output contrast roller
Z J9 Topper board
014029
6
3
2
1
7
10
4
Z J8 Topper board
014029
8
Z J7 Topper board
014029
5
5
9
7-18
CPS120 - Service Manual