1
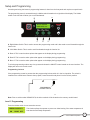
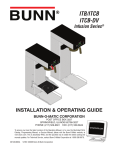
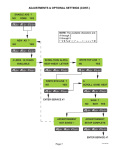
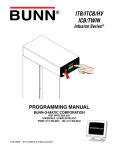
Unit 2 Setup
Unit Objectives
Given a realistic scenario depicting a new site install, the learner will be able to install and setup the brewer
for retail turnover without error.
Given an installed machine, all the necessary tools and safety equipment, the learner will be able to set the machine up for initial operation.
The learner will be able to power on the machine.
The learner will be able to access and scroll through the programming options.
The learner will be able to perform the calibrations.
Setup and Programming
Accessing and using the brewer’s programming features is done from the front panel and requires no special tools.
The programming menu is accessed through a hidden switch located on the right side of the display. The hidden
switch on the left side will allow you to scroll backwards.
A
B
ENABLE
ON / OFF
BREW
®
READY TO BREW
WATER TEMP: 200°
BREW
A
BREW
B
C
D
FULL
HALF
BREW
C
E
A. Right Hidden Switch: This is used to access the programming mode and is also used to scroll forward through the
function list.
B. Left Hidden Switch: This is used to scroll backwards through the function list.
C. Brew A: This is used to select options that appear on the display during programming.
D. Brew B: This is used to select options that appear on the display during programming.
E. Brew C: This is used to select options that appear on the display during programming.
To exit the programming mode at any time, press and release the ON/OFF button located on the user interface. The
display will return to the main screen.
Programming Lockout
MEMORY
LOCK
UNLOCK
If the programming cannot be access then the programming lockout switch is in the Lock position. The switch is
located on the control board. Remove the top panel, locate the switch and place it into the Unlock position.
PROGRAMMING
LOCKOUT SWITCH
P3048
Note: Prior to serial number ICB00007479, the lockout switch will be located on the memory module board.
Level 1 Programming
Press the hidden switch for one second to access.
BREW LOCKOUT ?
ON
DONE OFF
This function allows the operator to prevent or allow brewing if the water temperature is
less than the Set Ready temperature.
7
Bunn-O-Matic Corporation
Level 2 Programming
Press and hold the hidden switch for 5 seconds
Set Language?
NO
YES
UNITS
Metric
DONE
ENG
REVIEW RECIPES ?
NO
YES
ASSIGN RECIPE ?
NO
YES
SET NEW RECIPE ?
NO
YES
MASTER TEMP 205O
(-)
DONE
(+)
READY DEGREE 5O
(-)
DONE
(+)
ENABLE ADS ?
NO
DONE
YES
ENABLE SANITATION
NO
DONE
YES
This function allows the operator to select the language used for the display.
This function allows the operator to select if numeric settings are displayed in English or
Metric units.
This function allows the operator to view the brew settings for the carious coffee recipes
stored into the brewer. It also allows the operator to modify any of the brew settings for a
particular recipe stored in the brewer.
This function allows the operator to assign a recipe to (or disable) each of the 3 brew
switches (A, B, C). Any saved recipes listed under “Review Recipes” can be assigned to
a brew switch. Only one recipe per brew switch is allowed.
This function allows the operator to set Brew Volumes, Bypass %, Pulse Brew/Preinfusion Times and Drip Out Times for each coffee name stored in the grinder’s memory.
This function allows the operator to adjust the brew water temperature in the tank. This
also sets the hot water faucet dispense temperature.
This function allows the operator to set the minimum temperature allowable to start a
brew cycle. The range can be from 2° to 20° F below the set temperature. The water
must be at the Ready temperature or higher for the display to indicate Ready To Brew. If
brew lockout is enabled, the brewing process won’t start below this Ready temperature.
This function allows the operator to choose whether or not to display an advertising message. An ad can be saved to the brewer by either writing the ad using the programming
commands, or by entering the ad into the brewer using an Ad Card. This message will
be displayed when the brewer is not in use.
This function allows the operator to enable the sanitation function and set the time before a cleaning alert will be displayed.
ENABL ENERGYSAVR
NO
DONE YES
This function allows the operator to enable the Energy Savings mode function and set
the idle time. Once the set idle time has expired, the operator can choose to have the
heaters either turn off, or reduce the tank holding temp to 140° F (60° C).
ENABLE FRESH TIMER
DONE
YES
NO
This function allows the operator to enable the Freshness Alert and set the expiration
time. The expiration time is the amount of time the product is allowed to sit in the server/
dispenser before a fresh batch is brewed.
8
ITCB Training Manual
XX
REFILL
(-)
DONE
XXX
(+)
SPRAY OZ/M: XX.X
(-)
DONE
(+)
DILUTE OZ/M: XX.X
(-)
DONE
(+)
CALIBRATE FLOW?
NO
YES
BREW COUNTERS?
NO
YES
SET RECIPES TEMPS
NO
YES
ENTER SERVICE #
NO
YES
SERVICE TOOLS
NO
YES
FACTORY DEFAULTS
NO
This function allows the operator to view or enter the actual flow rate coming out of each
sprayhead. This is Not used to control the actual flow rate, but to tell the internal processor how fast the water is flowing.
This function allows the operator to view or to enter the actual flow rate coming out of
the dilution nozzle. This is not used to control the actual flow rate, but to tell the internal
processor how fast the water is flowing.
This function allows the operator to test and enter the actual flow rate of the
sprayhead(s) and the bypass/dilution for each side of the brewer by dispensing each
separately for one minute. The volumes are then entered into the brewer.
This function allows the operator to track the total number of brew cycles completed, as
well as the number of batches brewed using each of the brew buttons. There are (up to)
three resettable counters, and one life counter that is not resettable.
This function allows the operator to set separate temperatures for each selected recipe.
YES
ENTER ASSET #
NO
This function allows the operator to adjust the sensitivity of the refill circuit. This is
mainly a troubleshooting feature. Water in different geographical locations can have
different conductivities. By adjusting the sensitivity of the refill circuit, this will allow the
brewer to operate under various water conditions.
YES
This function allows the operator to enter the machine’s asset number. This can be useful for tracking the usage or service of an individual machine within a group.
This function allows the operator to enter in the telephone number to call if service is
needed. The service number will be displayed anytime there is a fault message displayed.
(For Authorized Service Personel Only)
This function allows the testing of individual components and the ability to check
switches for proper function. This function also tests the funnel sensor coil’s frequency
(diagnostic tool for troubleshooting purposes only).
Refer to Service Manual for in depth procedures.
This function allows the operator to erase all of the previously entered recipes and ad
messages. Factory-set default values will replace All previous settings.
9
Bunn-O-Matic Corporation
Uploading a Recipe Using a Recipe Card
The recipe card includes all the information needed to set up that particular tea/coffee name. The information from
the recipe card is loaded into the brewer’s memory by holding the chip area up to the brewer’s sensing coil. This
information can include all the recipe settings for that particular name. These can all be loaded in seconds.
Note: Instructions to program the brewer are printed on the recipe card, along with the tea or coffee name that is being programmed.
Procedure to program the coffee name:
Step 1: Remove the funnel.
Step 2: Position the recipe card vertically, so that the top end of the chip is beneath the sensing coil (located on the
under side of the front panel).
Step 3: After a short pause the display will read “Card Contains Recipe For” then will change to “Recipe Name”
(SHOW-QUIT-SAVE). All brewing parameters for that recipe are now transferred from the card to the brewer.
Step 4: To show (view) this information, press and release SHOW. The display will scroll through all of the brew settings for that recipe. This display will then return to “Card Contains Recipe For” then will change to “Recipe Name”
(SHOW-QUIT-SAVE).
Step 5: If all brew settings are correct, press SAVE. The display will read “Recipe Name Setup Complete”. All brew
settings for that name are now stored in the Brewer’s memory.
Step 6: If the brewing information is not correct, or it is desired to exit the setup before the settings are loaded into
the brewer’s memory, press QUIT. The display will read “Recipe Name Not Saved”. The display will then return to the
main screen.
Note: This just saves the recipe in the brewer’s memory. To use for brewing, you must still assign the recipe
to a brew button.
Calibrating the Sprayhead Flow Rate
CALIBRATE FLOW?
Step 1: Place a measuring container with a minimum capacity of 60 ounces beneath
the funnel of the brewer. Water can also be dispensed into the server and then into
the measuring container.
Step 2: Press and hold the right hidden switch to enter level 2 programming. Continue
to press the right hidden switch until the display reads “Calibrate Flow?”.
Step 3: Press YES to advance to the “Spray Head Cal?” function screen.
Step 4: Press YES. The display will read “Container Ready?” If the container is under the
funnel, press YES. The display will read “Calibrate Spray…Press Brew to Start”.
Step 5: Press and release the BREW switch (on the side to be calibrated for Dual Brewers).
The display will read “Calibrate Spray…60 Sec to Finish”. The 60 second timer on the
display will count down to zero. When the counter reaches zero, the display will change to OZ,
along with the existing ounces per minute.
Step 6: Measure the amount of water in the container and using the (-) or (+), adjust the amount
on the display to match the amount in the container. Then press DONE.
Step 7: The display should now read “New Spray Flow” along with the correct flow rate of the
sprayhead in ounces per minute. After 5 seconds, the display will return to the “Calibrate Flow?”
screen.
NO
YES
BREW
COUNTERS
SPRAYHEAD CAL
NO
YES
CONTAINER READY?
QUIT
YES
CALIBRATE SPRAY
QUIT
START
CALIBRATE SPRAY
60 SEC TO FINISH
SPRAYHD OZ XX.X
(-)
DONE
(+)
NEW SPRAY FLOW
XX.X OZM
5 sec
CALIBRATE FLOW?
NO
10
ITCB Training Manual
YES
Calibrating the Dilution Flow Rate
CALIBRATE FLOW?
Step 1: Place the measuring container with a minimum capacity of 130 ounces beneath the
dilution nozzle on the brewer. Water can also be dispensed into the server and then into the
measuring container.
Step 2: Press and hold the right hidden switch to enter level 2 programming. Continue
to press the right hidden switch until the display reads “Calibrate Flow?”.
Step 3: Press and release YES to advance to the “Sprayhead Cal?” function screen.
Step 4: Press and release NO to advance to the “Dilution Calibration” screen.
Step 5: Press YES. The display will read “Container Ready?” If the container is under
the nozzle, press YES. The display should read “Calibrate Dilute .. Press Brew
to Start”.
Step 6: Press and release the BREW switch. The display will read “Calibrate Dilute....
60 Sec to Finish”. The 60 second timer on the display will count down to zero. When the
counter reaches zero, the display will change to “Dilute OZ/M” along with the existing
ounces per minute.
Step 7: Measure the amount of water in the container and using the (-) or (+), adjust the
amount on the display to match the amount in the container. Then press DONE.
Step 8: The display should now read “New Dilute Flow” along with the correct flow rate
of the bypass in ounces per minute. After about 5 seconds, the display will return to the
“Calibrate Flow?” screen.
NO
YES
BREW
COUNTERS
SPRAYHEAD CAL
NO
YES
DILUTION CAL?
QUIT
YES
CONTAINER READY?
QUIT
YES
CALIBRATE DILUTE
QUIT
START
CALIBRATE DILUTE
60 SEC TO FINISH
DILUTE OZ XX.X
(-)
DONE
(+)
NEW DILUTE FLOW
XX.X OZM
Master Tank Temp
5 sec
The Master tank temperature is the maximum temperature for the tank. The Set Recipe Temps
allows the operator to set temperature for all recipes and will override the Master temp.
CALIBRATE FLOW?
NO
YES
Explanation:
Setting recipe temps will override the Master Temp. The tank will hold at the lowest temperature between the three
selected recipes stored in the brew buttons. For instance, let’s say Brew A’s recipe tem¬perature is set at 205°, Brew
B’s recipe temperature is set at 205°, and Brew C’s recipe temperature is set at 200°. The tank will hold at 200°. If
Brew A or Brew B is pressed, the tank will heat to the 205° temperature. The brew button must be pressed again in
order for a brew to start. After the completion of that brew, the tank will return to the 200° holding temperature. It may
take awhile for the tank to return to the lower temperature.
Factory Default Values
Brew Lockout
Disabled
Set Language
English
Units
English
Master Temp
205º
Ready Degree
5º
Enable Ads
Disabled
Enable Sanitation Disabled
Enable EnergySavrDisabled
Enable Fresh timerDisabled
Refill 155
Spray Oz. 24.0
Dilution Oz.
71.0
Set Recipe Temps Coffee: 200º/Tea: 205º
11
Bunn-O-Matic Corporation