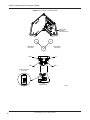
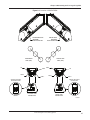
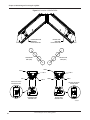
1
3-Pod and
Split Vision SLR™ Lightbars
Installation, Maintenance,
and Service Manual
2562678A
REV. A 212
Printed in U.S.A.
Solaris is a registered trademark of Federal Signal Corp.
Vision SLR is a trademark of Federal Signal Corp.
Torx is a registered trademarks of Accument Intellectual Properties, LLC
Plexis is a registered tradenark of Gaymar Industries, Inc.
Opticom is a trademark of Global Traffic Technologies, LLC
Contents
CHAPTER 1 Safety Messages for Installers and Operators.................................................5
Safety Messages to Installers of Warning Light Equipment......................................................................5
Safety Message to Operators of Warning Light Equipment......................................................................8
CHAPTER 2 An Overview of the 3-Pod and Split Vision Lightbars.....................................9
LED Lights and Colors..............................................................................................................................9
LED Flash Rates and Positions..................................................................................................................9
Control Options.........................................................................................................................................9
Dimensions..............................................................................................................................................10
Light Specifications.................................................................................................................................10
CHAPTER 3 Preparing for the Lightbar Installation............................................................ 11
Unpacking the Lightbar........................................................................................................................... 11
Determining the Mounting Location and Wire Routings........................................................................ 11
CHAPTER 4 Wiring the Lightbar in the Vehicle...................................................................13
Connecting Power to the Lightbar ..........................................................................................................13
Wiring the Control Cable for the Standard VSLR Lightbar....................................................................14
Wiring the Controls for White Light and Rear Light Cutoff ..................................................................15
CHAPTER 5 Programming Flash Patterns...........................................................................16
Programming Primary Mode...................................................................................................................16
Programming Secondary Mode...............................................................................................................17
CHAPTER 6 Maintaining and Servicing the Lightbar..........................................................21
Cleaning the Lightbar Domes..................................................................................................................21
Replacing a Dome....................................................................................................................................22
Replacing a Pod.......................................................................................................................................23
Replacing a Lightbar Controller..............................................................................................................25
Troubleshooting the Lightbar..................................................................................................................29
Getting Technical Support and Service...................................................................................................29
Ordering Replacement Parts....................................................................................................................30
Returning a Product to Federal Signal.....................................................................................................30
Contents
Contents
Table 4.1 Functions of 2-conductor power cable and 6-conductor control cable.......................................15
Table 5.1 Legends for VSLR flash patterns................................................................................................17
Table 5.2 3-Pod VSLR Flash Patterns.........................................................................................................18
Table 5.3 6-Pod VSLR Flash Patterns.........................................................................................................19
Table 5.4 8-Pod VSLR Flash Patterns.........................................................................................................20
Table 6.1 Troubleshooting tips....................................................................................................................29
Table 6.2 Replacement parts.......................................................................................................................30
Figures
Figure 6.1 Dome removal and replacement................................................................................................22
Figure 6.2 Pods rotated for removal............................................................................................................24
Figure 6.3 Location of VSLR3 PCBA........................................................................................................26
Figure 6.4 Location of VSLR3 PCBA........................................................................................................27
Figure 6.5 Location of VSLR8 PCBA........................................................................................................28
4
3-Pod and Split Vision SLR Lightbars
CHAPTER 1
Safety Messages for Installers and Operators
For your safety, read and understand this manual thoroughly before installing, operating, and servicing
the Vision SLR™ lightbar. The safety messages presented in this chapter and throughout the manual are
reminders to exercise extreme care at all times. In addition, read and understand the safety instructions to
installers (doc. no. 256A692), and keep it close at hand for reference.
To download copies of this manual, go to www.fedsig.com or call the Federal Signal Service Department
at 1-800-433-9132, 7 a.m. to 5 p.m., Monday through Friday (CT).
Safety Messages to Installers of Warning Light Equipment
People’s lives depend on your proper installation and servicing of Federal Signal products. It is important
to read and follow all instructions shipped with this product. In addition, listed below are some other
important safety instructions and precautions you should follow:
Before Installation
Qualifications
• To properly install or service this equipment, you must have a good understanding of automotive
mechanical and electrical procedures and systems along with proficiency in the installation and service
of safety warning equipment. Always refer to the vehicle service manuals when performing equipment
installations on a vehicle.
Light Hazards
• To be an effective warning device, this product produces bright light that can be hazardous to your
eyesight when viewed at a close range. Do not stare directly into this lighting product at a close range
or permanent damage to your eyesight may occur.
• Do not install the light system in an area that would block, impair, or blind the driver’s vision. Ensure
that the light system is mounted in a position that is outside of the driver’s field of vision, so the driver
can safely operate the vehicle.
• Federal Signal power supplies and lightheads are designed to work together as a system. Combining
lightheads and a power supply from different manufacturers may reduce the warning effectiveness of
the lighting system and may damage the components. You should verify or test your combination to
ensure the system works together and meets federal, state, and local standards or guidelines.
3-Pod and Split Vision SLR Lightbars
5
Chapter 1: Safety Messages for Installers and Operators
Electrical Hazards
• A light system is a high current system. In order for the system to function properly, a separate
negative (–) connection and positive (+) connection must be made. All negative connections should
be connected to the negative battery terminal and a suitable fuse should be installed on the positive
battery terminal connection as close to the battery as possible. Ensure that all wires and fuses are rated
correctly to handle the device and system amperage requirements.
• Never attempt to install aftermarket equipment that connects to the vehicle wiring without reviewing a
vehicle wiring diagram available from the vehicle manufacturer. Ensure that your installation will not
affect vehicle operation or mandated safety functions or circuits. Always check the vehicle for proper
operation after installation.
• The lighting system components, especially light bulbs, strobe tubes, LEDs, and the outer housing, get
hot during operation. Be sure to disconnect power to the system and allow the system to cool down
before handling any components of the system.
• Do not mount a radio antenna within 18 inches (45.7 cm) of the lighting system. Placing the antenna
too close to the lighting system could cause the lighting system to malfunction or be damaged by
strong radio fields. Mounting the antenna too close to the lighting system may also cause the radio
noise emitted from the lighting system to interfere with the reception of the radio transmitter and
reduce radio reception.
• Do not attempt to wash any unsealed electrical device while it is connected to its power source.
During Installation and Service
• A light system is a high current system. Disconnect ALL power to the lightbar before any maintenance
is performed. Failure to do so may result in property damage, serious injury, or death.
• DO NOT get metal shavings inside the product. Metal shavings in the product can cause the system to
fail. If drilling must be done near the unit, place an ESD-approved cover over the unit. Inspect the unit
after mounting to be sure there are no shavings present in or near the unit.
• To avoid a battery explosion, always disconnect the negative battery cable first and reconnect it last.
Avoid causing a spark when connecting near or to the battery. The gases produced by a battery can
caused a battery explosion that could result in vehicle damage and serious injury.
• DO NOT connect this system to the vehicle battery until ALL other electrical connections are made,
mounting of all components is complete, and you have verified that no shorts exist. If the wiring is
shorted to the vehicle body or frame, high current conductors can cause hazardous sparks resulting in
electrical fires or flying molten metal.
• DO NOT install equipment or route wiring (or the plug-in cord) in the deployment path of an airbag.
• If a vehicle seat is temporarily removed, verify with the vehicle manufacturer if the seat needs to be
recalibrated for proper airbag deployment.
• Before mounting any components, check the manual to be sure that the component you are installing
is suitable for use in that area of the vehicle. Many components are not suitable for use in the engine
compartment or other extreme environmental exposure areas.
6
3-Pod and Split Vision SLR Lightbars
Chapter 1: Safety Messages for Installers and Operators
• When drilling into a vehicle structure, be sure that both sides of the surface are clear of anything
that could be damaged. Remove all burrs from drilled holes. To prevent electrical shorts, grommet
all drilled holes through which wiring passes. Also, ensure that the mounting screws do not cause
electrical or mechanical damage to the vehicle.
• Refer to the manual packed with the lighting system for proper electrical connections, additional
precautions, and information.
• To avoid denting the roof of the vehicle, place the lightbar mounting feet as close to the outer edge of
the roof as possible.
• Roof damage can occur if the hook adjustment bolts are over-tightened. On Arjent lightbars tighten the
hook-adjustment bolts 10 ft-lb to 11 ft-lb. On all other lightbars tighten the adjustment bolts 6 ft-lb to
7 ft-lb. Install keeper plates.
• Locate the light system controls so the VEHICLE and CONTROLS can be operated safely under all
driving conditions.
After Installation or Service
• After installation, test the light system to ensure that it is operating properly.
• To ensure proper operation, test all vehicle functions, including horn operation, vehicle safety
functions, and vehicle light systems. Ensure that the installation has not affected the vehicle operation
or changed any vehicle safety function or circuit.
• Scratched or dull reflectors, mirrors, or domes will reduce the effectiveness of the lighting system.
Avoid heavy pressure and use of caustic or petroleum based products when cleaning the lighting
system. Replace any optical components that may have been scratched or crazed during system
installation.
• Do not attempt to activate or de-activate the light system control while driving in a hazardous
situation.
• You should frequently inspect the light system to ensure that it is operating properly and that it is
securely attached to the vehicle.
• After installation and testing are complete, provide a copy of these instructions to instructional staff
and all operating personnel.
• File these instructions in a safe place and refer to them when maintaining and/or re installing the product.
Failure to follow these precautions may result in property damage, serious injury, or death.
3-Pod and Split Vision SLR Lightbars
7
Chapter 1: Safety Messages for Installers and Operators
Safety Message to Operators of Warning Light Equipment
People’s lives depend on your safe use of our products. Listed below are some important safety
instructions and precautions you should follow:
• Do not attempt to activate or de-activate the light system control while driving in a hazardous
situation.
• Although your warning system is operating properly, it may not be completely effective. People may
not see or heed your warning signal. You must recognize this fact and continue driving cautiously.
• Also, situations may occur which obstruct your warning signal when natural and man-made objects are
between your vehicle and others, such as raising your hood or trunk lid. If these situations occur, be
especially careful.
• All effective sirens and horns produce loud sounds that may cause, in certain situations, permanent
hearing loss. You and your passengers should consider taking appropriate safety precautions, such as
wearing hearing protection.
• In order to be an effective warning device, this product produces bright light that can be hazardous to
your eyesight when viewed at a close range. Do not stare directly into this lighting product at a close
range or permanent damage to your eyesight may occur.
• It is important that you fully understand how to safely operate this warning system before use.
• You should only operate your vehicle and its light/sound system in accordance with your department’s
Standard Operating Procedures.
• If a selected function does not perform properly or if any of the lamps remain illuminated when the
control is off, disconnect the power connector from the control unit and contact the nearest service
center.
• At the start of your shift, you should ensure that the entire warning light system and the siren system is
securely attached and operating properly.
• Ensure that the mounting surface is flat.
Failure to follow these precautions may result in property damage, serious injury, or death.
8
3-Pod and Split Vision SLR Lightbars
CHAPTER 2
An Overview of the 3-Pod and Split Vision Lightbars
The 3-Pod and Split Vision SLR are rotating LED lightbars, employing fixed LED boards and
rotating Solaris® S2 reflectors. V-shaped construction lets the Vision SLR warning system maximize
light warning efficiency at crucial intersection angles. The individual domes are shaped to eliminate
critical dome angles, which reflect rather than transmit light in other lightbars, significantly improving
light transmission (brightness). Vision SLR continues and improves its predecessor’s revolutionary
aerodynamic styling to provide superior vehicle fuel efficiency and top speed.
LED Lights and Colors
The LED pods are positioned to provide 360-degree coverage. The warning system’s LED pods are
available in multicolor. Exclusive to Federal Signal, Spectralux technology provides for entirely new
color combinations. One pod can have more than one color, for example, rotating red, then switching to
blue, and then to white when the takedown function is activated. Single color pods are also available.
All pods are Smart Pods and are pre-programmed to provide a wide selection of warning light patterns.
Pattern selection can be performed during or after installation.
LED Flash Rates and Positions
Quiet, smooth, precise, and efficient positioning stepper motors control the Solaris S2 reflectors and
have a longer life than conventional DC motors. The motors provides a variety of flash rate options and
oscillation angles. In addition, each reflector allows two LEDs to shine upward for the aerial location of
the vehicle. The lightbar is protected against reverse damage. The Vision SLR lightbar may be installed in
any vehicle with a 12 Vdc NEGATIVE-ground electrical system.
Control Options
The lightbar is completely wired at the factory and does not require any additional internal wiring. All the
conductors necessary to control the functions of the lightbar are contained in the 2-conductor power cable
and 6-conductor control cable.
Other advanced features of the Vision SLR lightbar include:
• A high degree of reliability through the use of advanced microprocessors and other integrated
circuits.
• Modular construction with easily replaceable pods and domes to greatly reduce spare parts inventory.
• High output, long-life LEDs with no bulbs to change.
3-Pod and Split Vision SLR Lightbars
9
Chapter 2: An Overview of the 3-Pod and Split Vision SLR Lightbars
Dimensions
Model
Length
Height
Depth
Weight*
VSLR3
22.4 in (56.9 cm)
4.6 in (11.7 cm)
17.8 in (45.2 cm)
21.6 lb (9.8 kg)
VSLR6 (each half)
21.1 in (53.6 cm)
4.6 in (11.7 cm)
21.7 in (55.1 cm)
18.9 lb (8.6 kg)
VSLR8 (each half)
26.8 in (68.1 cm)
4.6 in (11.7 cm)
26.5 in (67.3 cm)
23.8 lb (10.8 kg)
*Less mounting feet
Light Specifications
Lighting Option
LED (all heads)
Current Draw
2.2 A per pod
Lamp Technology
High-brightness LED
Reflector Style
Offset, compound curve, polished reflector
Maximum Amperage*
18 A (VSLR8), 14 A (VSLR6), 7 A (VSLR3)
Operating Temperature
40 ºF to 149 ºF (–40 ºC to 65 ºC)
*Steady Burn Mode
10
3-Pod and Split Vision SLR Lightbars
CHAPTER 3
Preparing for the Lightbar Installation
Taking the preparatory steps in this chapter before mounting and wiring the lightbar to a vehicle will help
ensure that your installation is fast, easy, and error free.
Unpacking the Lightbar
HEAVY OBJECT—Use lifting aids and proper lifting techniques when
removing or replacing this product. Failure to follow this warning may cause
personal injury.
Carefully unpack the lightbar assembly and any other products included in the shipment. Inspect them
for damage that may have occurred during shipping. If a product has been damaged, do not install or
operate it. Immediately file a claim with the carrier describing the damage. Carefully check all envelopes,
shipping labels, and tags before removing or destroying them. If you are missing any parts, contact
Customer Support at 1-800-264-3578, 7 a.m. to 5 p.m., Monday through Friday (CT).
Determining the Mounting Location and Wire Routings
To prepare for installing the lightbar:
1. Ensure that the battery voltage is the same as the voltage rating of the lightbar.
2. Verify that the lightbar and mounting hardware fit the vehicle.
3. Determine where to mount the lightbar on the vehicle.
LOCATING OPERATOR CONTROLS—The controls for the light system must be
located so that the VEHICLE and CONTROLS can be operated safely under all
driving conditions.
AIRBAG DEPLOYMENT—Do not install equipment or route wiring in the
deployment path of an airbag. Failure to observe this warning will reduce the
effectiveness of the airbag or potentially dislodge the equipment, causing
serious injury or death.
4. Decide where to route wiring around airbag areas.
5. Decide where to route the power and ground wires from the lightbar.
3-Pod and Split Vision SLR Lightbars
11
Chapter 1: Preparing for the Lightbar Installation
SEAT REMOVAL PRECAUTION—If a vehicle seat is temporarily removed, verify
with the vehicle manufacturer if the seat needs to be recalibrated for proper
airbag deployment. Failure to follow this warning cause serious injury or death.
6. To make wiring easier, remove the seats, spare tire, and pull down the headliner where needed.
7. Separate all electronic equipment wiring from two-way radio equipment wiring.
INSTALLATION PRECAUTIONS—The warning system and/or two-way radio
system may operate improperly if a two-way radio antenna installed on or within
18 inches of the lightbar. Before permanently installing the lightbar or a twoway radio antenna, test the warning system and two-way radio system. DO NOT
install a two-way radio antenna on the lightbar. Some installations may require
the relocation of the two-way radio antenna to a trunk or fender location. DO
NOT drill holes in the lightbar or install auxiliary devices on the lightbar or the
warning system may fail.
8. To avoid interference, keep two-way radio antennas a minimum of 18 in (45.7 cm) away from
warning equipment.
9. Whenever possible, run full wire lengths. DO NOT splice the wires.
10. Do not coil excess wire. Leave a drain loop for servicing.
11. After drilling holes for wires, deburr them, smooth sharp edges, and insert grommets to protect the
wires from chafing.
12. When you frame-ground the equipment, use the manufacturer-supplied ground locations in the
vehicle.
IMPORTANT: After the installation, frequently inspect the lightbar and mounting feet to ensure that all
fasteners and brackets are tight.
12
3-Pod and Split Vision SLR Lightbars
CHAPTER 4
Wiring the Lightbar in the Vehicle
Before wiring the lightbar in the vehicle, ensure that the lightbar has been installed on the vehicle roof
in accordance with the instructions included with the mounting kit. Installation of options such as an
Opticom® require additional wiring to the warning light system and vehicle battery not covered in this
manual. Review the electrical requirements of the lightbar and use an installer-supplied switch or relay
rated at 30 A for the connection between the red power lead of the lightbar and the fused power source.
If additional wire length is needed, splice wire of the same gauge or heavier to the leads.
NOTE: The lightbar is not internally fused.
Connecting Power to the Lightbar
BATTERY EXPLOSION—To avoid a battery explosion, always disconnect
the negative cable first and reconnect it last. Avoid causing a spark when
connecting near or to the battery. The gases produced by a battery can cause an
electrical explosion that could result in vehicle damage and serious injury.
To connect the power and ground wires from the lightbar:
1. Route the power and control cable into the vehicle and under the dash, near the eventual location of
the installer-supplied control head. Apply sealant to all drilled holes.
2. For the lightbar to operate properly, the control cable must be properly terminated inside the installersupplied control head. The current capacities of the switch for the control head should be at least 15
amperes. See Tables 4.1 on page 15 for the wire colors and functions.
PROPER GROUNDING—The lightbar WILL NOT light up or flash if it is
improperly grounded. Be sure that the lightbar is connected to a good vehicle
ground. Failure to observe this warning can lead to equipment failure and may
result in serious injury or death.
3. Connect the black 14 AWG ground lead to a good battery or chassis ground.
SPARK HAZARD—If wires are shorted to the vehicle frame or each other, high
current conductors can cause hazardous sparks resulting in electrical fires and
molten metal. Verify that no short circuits exist before connecting to the positive
(+) battery terminal.
3-Pod and Split Vision SLR Lightbars
13
Chapter 4: Wiring the Lightbar in the Vehicle
CURRENT CAPABILITY—To provide safe operation of the lightbar, the power
control switch and wiring must be capable of handling the rated current of the
fuse at the source.
HIGH CURRENT ARCING—Do not connect this system to the vehicle battery
until ALL other electrical connections are completed, the mounting of all
components is complete, and you have verified that no shorts exist. Highcurrent shorts can cause hazardous sparks or burning wire resulting in an
electrical fire.
FUSE ELECTRICAL SOURCES—Always fuse the current/voltage sources with a
fuse connected near the power source. Be sure that the fuse is properly rated to
protect the electrical load, the wiring, and the connectors in the circuit. Failure
to follow this notice could result in vehicle or equipment damage.
4. Connect the red 14 AWG power lead from the lightbar to an installer-supplied switch or relay rated
at 30 A.
5. Connect the other side of the fuse/circuit breaker to the +12 Vdc supply. The lightbar is not internally
fused.
Wiring the Control Cable for the Standard VSLR Lightbar
All of the lightbar controls are integrated in the VSLR control board. Lightbars are manufactured with a
2-conductor power cable and a 6-conductor control cable. See Table 4.1 on page 15 for the functions of
the control wires. You can activate any of the lightbar functions by applying +12 Vdc or GND (–) to the
wire that controls the function.
For information on the option to enable the lightbar to cut off certain lights, see “Wiring the Controls for
White Light and Rear Light Cutoff” on page 15.
14
3-Pod and Split Vision SLR Lightbars
Chapter 4: Wiring the Lightbar in the Vehicle
Table 4.1 Functions of 2-conductor power cable and 6-conductor control cable
Wire Color
Function
Black
GND (–): Connects to a good battery/chassis ground.
Red
Gray
White
Blue
Orange
Yellow
Brown
PRIMARY MODE: +12 Vdc activates the lightbar in Primary Mode.
FLOOD: Applying +12 Vdc will turn any rotating white heads into a flood light if
the lightbar is powered up in Primary or Secondary Mode.
REAR LIGHT CUTOFF: Applying +12 Vdc will turn off any light from flashing to
the rear of the bar.
SECONDARY MODE: Applying +12 Vdc changes the pattern of the lightbar
to the pattern selected for Secondary Mode. The function is only active if the
lightbar is flashing in Primary Mode.
PROGRAM: Touching GND (–) for 1 second advances the flash pattern to the next
pattern in the library and stores it in memory. For a description of the flash patterns,
see the tables on pages 18 through 20. Holding the orange Program wire to GND
for 5 seconds reprograms the lightbar to Flash Pattern 1.
WHITE LIGHT CUTOFF: White lights flash with the rest of the lightbar when
+12 Vdc is applied to the yellow wire. White warning lights are cut off when
disconnected or power is removed.
ALLEY LIGHT: Applying +12 Vdc will turn a single white pod into an alley light if
the lightbar is powered up in Primary or Secondary Mode.
Wiring the Controls for White Light and Rear Light Cutoff
The standard lightbar is configured from the factory with options that turn off white lights to the front and
turn off light to the rear of the lightbar. The options are controlled by applying and removing power to the
control wire of the function in the lightbar cable.
White Light Cutoff
The option to cut off the standard white warning lights in the lightbar is programmed at the factory.
The option is controlled by the yellow wire in the lightbar control cable. When +12 Vdc is applied
to the wire, the white lights flash in the same flash pattern as the rest of the lightbar. When +12 Vdc
is removed from the wire, the white lights turn off. For white light to flash in the lightbar, +12 Vdc
must be present on the yellow lead.
Rear Light Cutoff
The lightbar is equipped to shut off the rear of the lightbar while the rest of the lightbar continues
to flash. The option is controlled by the white wire in the lightbar control cable. When +12 Vdc is
applied to the wire, the rear light is shut off. When +12 Vdc is removed from the wire, the lights turn
back on. If rear-light cutoff is not needed, fold and insulate the wire.
3-Pod and Split Vision SLR Lightbars
15
CHAPTER 5
Programming Flash Patterns
Although the standard VSLR lightar is shipped with preselected flash patterns for Primary and Secondary
Mode, you can select new patterns from the lightbar's internal library of flash patterns. A pattern displayed
in Primary Mode is typically more active than the pattern displayed in Secondary Mode. It indicates the
primary purpose of the vehicle; for example, the vehicle is on its way to the scene of an emergency or is
towing a vehicle. A pattern displayed in Secondary Mode is a more relaxed pattern, indicating that the
vehicle is returning from the scene.
The default pattern in Primary Mode is Pattern 1. The default pattern in Secondary Mode is Pattern 2.
Tables 5.2, 5.3, and 5.4 beginning on page 18 list the flash patterns in the lightbar pattern library for the
3-Pod V-Bar and 6-Pod and 8-Pod Split V-Bars.
We recommended that you select flash patterns for both Primary and Secondary Mode during the
installation of the lightbar.
NOTE: To return to Flash Pattern 1 while programming Primary or Secondary Mode, apply GND (–) to
the orange wire for 5 seconds.
Programming Primary Mode
For flash patterns in the lightbar library, refer to the table for your model of lightbar. See the tables on
pages 18 through 20.
LIGHT HAZARD—To be an effective warning device, this product produces
bright light that can be hazardous to your eyesight when viewed at a close
range. Do not stare directly into this lighting product at a close range or
permanent damage to your eyesight may occur.
1. Apply +12 Vdc to the red Primary Mode wire in the lightbar cable.
2. Apply GND (–) to the orange wire in the lightbar cable for one second to display the next pattern in
the library.
3. Remove the orange wire for a few seconds and observe the pattern.
4. To select the pattern, allow it to run for at least 15 seconds to save it in memory.
16
3-Pod and Split Vision SLR Lightbars
Chapter 5: Programming Flash Patterns
Programming Secondary Mode
For flash patterns in the lightbar library, refer to the table for your model of lightbar.
LIGHT HAZARD—To be an effective warning device, this product produces
bright light that can be hazardous to your eyesight when viewed at a close
range. Do not stare directly into this lighting product at a close range or
permanent damage to your eyesight may occur.
1. Apply +12 Vdc to both the red Primary and the blue Secondary Mode wires to turn on the lightbar in
Secondary Mode.
2. Apply GND (–) to the orange wire in the lightbar cable for one second to display the next pattern in
the library.
3. Remove the orange wire for a few seconds and observe the pattern.
4. To select a pattern, allow it to run for at least 15 seconds to save it in memory.
Table 5.1 Legends for VSLR flash patterns
NOTE: See Tables 5.2 (page 18),
5.3 (page 19), and 5.4 (page 20)
Key
Definition
90
90 FPM rotation
75
120
OSC F
OSC R
OSL L
OSC FL
OSC FR
OSC LF
OSC RF
75 FPM rotation
120 FPM rotation
Oscillation to front
Oscillation to right
Oscillation to left
Oscillation to front left
Oscillation to front right
Oscillation to left front
Oscillation to right front
3-Pod and Split Vision SLR Lightbars
17
Chapter 5: Programming Flash Patterns
Table 5.2 3-Pod VSLR Flash Patterns
2
1
3
Pattern
Pod 1
Pod 2
Pod 3
2
90
75
90
1
3
4
5
120
75
OSC F
90
OSC F
75
75
90
6
OSC FL
8
OSC FL
10
75
7
9
OSC F
11
OSC FL
13
90
12
14
15
75
OSC F
OSC F
75
120
75
90
90
90
OSC F
OSC FR
75
OSC FR
90
75
75
OSC F
*
120
90
120
OSC F
OSC F
75
VSLR3 programming assumes Pod 2 is multicolor with
a clear dome.
Pods 1 and 3 are red LEDs.
Programming remains the same regardless of colors
in these pods.
* White rotations must be red to the rear.
18
*
*
OSC FR
OSC F
*
75
90
90
*
3-Pod and Split Vision SLR Lightbars
*
*
*
*
*
*
Chapter 5: Programming Flash Patterns
Table 5.3 6-Pod VSLR Flash Patterns
3
4
2
5
1
6
Pattern
Pod 1
Pod 2
Pod 3
Pod 4
Pod 5
Pod 6
2
75
90
75
75
90
75
1
120
3
OSC L
5
OSC L
4
90
75
OSC F
OSC F
90
OSC F
OSC F
75
75
75
90
OSC LF
OSC FL
8
75
OSC L
9
10
11
12
13
14
15
75
75
OSC F
90
OSC L
90
OSC F
OSC L
OSC L
75
90
OSC F
75
75
75
90
90
90
75
6
7
90
120
OSC F
90
90
90
75
OSC L
90
75
90
120
75
OSC R
90
OSC R
90
90
OSC F
OSC FR
OSC RF
75
OSC R
75
90
75
75
75
OSC F
90
OSC R
75
120
90
OSC R
90
OSC F
OSC R
OSC F
75
75
90
90
90
95
OSC R
75
*
*
* & **
*
* & **
**
*
*
*
*
*
**
VSLR6-NFPA programming assumes Pods 2 and 5 are multicolor with clear domes.
Pods 1, 3, 4, and 6 are red LEDs with red domes.
Programming remains the same regardless of colors in these pods
* White rotations must be red to the rear.
** Not NFPA compliant,
3-Pod and Split Vision SLR Lightbars
19
Chapter 5: Programming Flash Patterns
Table 5.4 8-Pod VSLR Flash Patterns
4
5
3
6
2
7
1
Pattern
1
2
3
4
5
8
Pod 1
Pod 2
Pod 3
Pod 4
Pod 5
Pod 6
Pod 7
Pod 8
90
75
90
75
75
90
75
90
90
120
75
OSC L
90
OSC L
90
90
75
OSC F
OSC F
90
OSC F
OSC F
75
75
75
90
OSC L
OSC LF
OSC FL
8
75
75
OSC L
9
10
11
12
13
14
15
75
75
75
90
90
75
90
90
75
75
OSC F
90
OSC L
90
75
90
OSC F
OSC L
OSC L
90
75
90
75
6
7
90
120
OSC F
90
OSC F
75
75
90
90
90
75
OSC L
90
75
90
OSC F
75
75
90
75
OSC R
90
OSC R
90
OSC FR
75
OSC R
OSC F
75
90
OSC R
75
120
90
OSC R
90
OSC F
OSC R
OSC F
VSLR8 programming assumes Pods 3 and 6 are multicolor with clear domes.
Pods 1, 2, 4, 5, 7, and 8 are red LEDs.
Programming remains the same regardless of colors in these pods.
* White rotations must be red to the rear.
** Not NFPA compliant.
20
3-Pod and Split Vision SLR Lightbars
120
90
90
*
75
* & **
90
90
OSC RF
OSC R
75
75
75
75
90
90
90
90
OSC R
75
75
75
75
90
90
75
90
90
*
*
* & **
**
*
*
*
*
**
CHAPTER 6
Maintaining and Servicing the Lightbar
This chapter describe how to maintain and service the Vision SLR lightbar. Establishing a regular
maintenance and inspection schedule extends the life of the lightbar and ensures safety. For service,
support, or replacement parts, contact the Federal Signal Service Department at 1-800-433-9132, 7 a.m.
to 5 p.m, Monday through Friday (CT). See Table 6.1 on page 29 for troubleshooting tips and Table 6.2
on page 30 for replacement parts.
SHOCK HAZARD—A lighting system is a high-current system. Disconnect ALL
power to the lightbar before any maintenance is performed. Failure to do so may
result in property damage, serious injury, or death.
BURN HAZARD—After prolonged operation, the lightbar gets hot and can cause
burns. Do not touch the lightbar while or shortly after it has been operating.
Always allow it to cool before handling it.
Cleaning the Lightbar Domes
CRAZING/CLEANING SOLUTIONS—The use of other materials such as strong
detergents, solvents, petroleum products, etc. can cause crazing (cracking)
of the plastic domes. If crazing of domes does occur, reliability of light for
emergency purposes may be reduced until domes are replaced. Failure to follow
this warning can damage the domes, reducing the effectiveness of the lighting
system, and may result in injury or death.
CRAZING/CHEMICALS—Crazed, cracked or faded domes reduce the light output
and the effectiveness of the lighting system. Domes or reflectors showing this
type of aging must be replaced. Failure to follow this warning may result in
injury or death.
To clean the lightbar domes:
1. Rinse the domes with lukewarm water to loosen dirt and debris.
2. Use a mild detergent, lukewarm water, and a soft cloth to gently clean the domes. To avoid damaging
the finish, do not use heavy pressure or caustic, abrasive, or petroleum-based cleaners.
3. Rinse and dry the domes with a soft cloth to prevent water spotting.
4. To remove fine scratches and haze, use a soft cloth and a high quality automotive paste cleaner/wax
3-Pod and Split Vision SLR Lightbars
21
Chapter 6: Maintaining and Servicing the Lightbar
that is non-abrasive or a plastic polish like Plexus®.
Replacing a Dome
The lightbar domes filter the LED lights and protect the LED and circuitry. If a dome is damaged, it must
be replaced.
Tool required:
T25 Torx driver
Removing a Dome
To remove a lightbar dome:
1.
Disconnect all power to the lightbar at the battery.
2. See Figure 6.1. Use a T25 Torx driver to remove the #10-32 Torx shoulder screw.
3. Carefully lift the dome from the back and rotate it to a vertical position to avoid damaging the
pod hook and pod base gasket.
4. Inspect the gasket on the base of the pod to insure it is not torn, brittle, or damaged. Replace it,
if necessary.
Figure 6.1 Dome removal and replacement
#10-32 TORX SHOULDER SCREW
SEE DETAIL
SEE DETAIL
CENTERED
DOME
HOOK IN POD BASE
POD BASE GASKET
DOME
HOOK IN DOME
HOOK IN DOME
CENTERED IN
OPENING IN POD
POD BASE
POD BASE
22
3-Pod and Split Vision SLR Lightbars
290A6603
Chapter 5: Maintaining and Servicing the Lightbar
Installing a Dome
To install a dome:
DO NOT FORCE THE DOME DOWNWARD—If there is resistance to the
dome dropping into position on the base, do not force it downward. To
avoid damaging the dome, ensure that the dome hook is properly centered
with the mating recess in the pod base so that it drops down from the
vertical position.
1. See Figure 6.1 on page 22. Hold the dome at an angle and insert the pod hook into the mating
recess in the pod base. Ensure the dome hook is properly centered with the mating recess in the
pod base. The dome drops from the vertical position when the dome hook is properly aligned.
DO NOT OVERTIGHTEN SCREW—Do avoid damaging the pod, do not
overtighten the #10-32 screw securing it to the pod base.
2. Insert the #10-32 Torx shoulder screw into the hole through the tip of the dome and into the
pod base. To prevent cross-threading, back the screw counterclockwise until you hear the click
of the threads engaging, then tighten the screw.
3. Reconnect power to the lightbar.
Replacing a Pod
Each lightbar pod contains the LED light and printed circuit board. The pod is replaceable in one piece.
Tool required:
T25 Torx driver
Removing a Pod
To remove a pod:
1. Disconnect all power to the lightbar at the battery.
2. See Figure 6.2 on page 24. Use a T25 Torx driver to loosen the #10-32 Torx shoulder screw by
1/4 inch, just enough for the tip of the screw to clear the top plate.
3. Rotate the pod to the stopping point (counterclockwise for driver-side pods, clockwise for
passenger-side pods).
4. Lift the pod from the lightbar and unplug the electrical connector from the pod. If removing
more than one pod, note which connector goes to which pod. See the figures on pages 26
through 28 for the controller connectors for the pods.
5. Inspect the gasket on the base of the pod to insure it is not torn, brittle, or damaged. Replace it
if necessary.
3-Pod and Split Vision SLR Lightbars
23
Chapter 6: Maintaining and Servicing the Lightbar
Figure 6.2 Pods rotated for removal
#10-32 x 1/4" TORX
SHOULDER SCREW
1
8
2
7
3
6
5
4
ROTATE CLOCKWISE
TO THE STOPPING POINT
INDICATED BY POD 5
ROTATE COUNTERCLOCKWISE
TO THE STOPPING POINT
INDICATED BY POD 1
Installing a Pod
To install a pod:
1. Reconnect the electrical connector to the pod.
2. Place the pod atop in the correct location in the lightbar and rotate it counterclockwise for
driver-side pods or clockwise for passenger-side pods.
3. Insert the #10-32 Torx shoulder screw into the hole through the tip of the dome and into the
pod base. To prevent cross-threading, back the screw counterclockwise until you hear the click
of the threads engaging, then tighten the screw.
4. Reconnect power to the lightbar.
24
3-Pod and Split Vision SLR Lightbars
Chapter 5: Maintaining and Servicing the Lightbar
Replacing a Lightbar Controller
The lightbar controller controls the flash patterns and auxiliary light functions. If a lightbar problem
cannot be traced to a pod, a wiring connection, or the vehicle battery, the problem may lie with the
controller. To order a replacement controller for your model of lightbar see "Replacing a Lightbar
Controller" on page 25.
STATIC SENSITIVE DEVICE—This unit's circuitry can be damaged by an
electrostatic discharge (ESD). Follow anti-static procedures while installing
this unit.
Tool required:
T25 Torx driver
Removing the Controller
For the location of the controller, see the figures on pages 26 through 28 for your model of lightbar.
To remove a controller:
1.
Disconnect all power to the lightbar at the battery.
2. Remove the pods on both sides of the controller as described in “Removing a Pod” on page 23.
3. Note the locations of the connectors on the controller, then unplug all the cables from the
controller.
4. Carefully pop the controller from the snap top fasteners. Slide the controller out through a pod
opening.
Installing the Controller
To install a controller:
1. Orient the controller with the connectors down and the pod connections towards the front
of the lightbar. Slide the controller through the pod opening and snap it onto the snap top
fasteners.
2. Reconnect the cables to the controller.
3. Reinstall the pods as described in “Installing a Pod” on page 24.
4.
Reconnect power to the lightbar.
3-Pod and Split Vision SLR Lightbars
25
Chapter 6: Maintaining and Servicing the Lightbar
Figure 6.3 Location of VSLR3 PCBA
DRIVER SIDE
(BOTTOM)
PCBA INSTALLED
3
1
PASSENGER
SIDE (TOP)
DRIVER SIDE
SIDE (TOP)
2
POD 3
NA
POD 2
POD 1
SWITCH SETTINGS
FOR 3-POD
1 2
ON
26
VSLR3
BOTTOM VIEW
3-Pod and Split Vision SLR Lightbars
290A6892
Chapter 5: Maintaining and Servicing the Lightbar
Figure 6.4 Location of VSLR3 PCBA
PASSENGER SIDE
(BOTTOM)
PCBA INSTALLED
DRIVER SIDE
(BOTTOM)
PCBA INSTALLED
6
1
5
2
PASSENGER
SIDE (TOP)
DRIVER SIDE
SIDE (TOP)
4
NA
3
POD 4
POD 6
POD 5
POD 3
NA
POD 2
POD 1
SWITCH SETTINGS
PASSENGER SIDE
SWITCH SETTINGS
DRIVER SIDE
1 2
1 2
VSLR6
DRIVER SIDE
BOTTOM VIEW
ON
VSLR6
PASSNGER SIDE
BOTTOM VIEW
290A6894
3-Pod and Split Vision SLR Lightbars
27
ON
Chapter 6: Maintaining and Servicing the Lightbar
Figure 6.5 Location of VSLR8 PCBA
DRIVER SIDE
(BOTTOM)
PCBA INSTALLED
PASSENGER SIDE
(BOTTOM)
PCBA INSTALLED
8
PASSENGER
SIDE (TOP)
1
7
2
6
DRIVER SIDE
SIDE (TOP)
3
5
4
POD 4
POD 8
POD 1
POD 5
POD 7
POD 6
POD 3
POD 2
SWITCH SETTINGS
PASSENGER SIDE
SWITCH SETTINGS
DRIVER SIDE
1 2
1 2
VSLR8
DRIVER SIDE
BOTTOM VIEW
ON
VSLR8
PASSNGER SIDE
BOTTOM VIEW
ON
290A6891
28
3-Pod and Split Vision SLR Lightbars
Chapter 5: Maintaining and Servicing the Lightbar
Troubleshooting the Lightbar
This section provides troubleshooting assistance for common problems. If you have any questions left
unanswered, call the Federal Signal Service Department at 1-800-433-9132, 7 a.m. to 5 p.m., Monday
through Friday (CT).
Table 6.1 Troubleshooting tips
Problem
The lightbar does
not light.
Corrective Action
✓ Check that the red power line (+BAT) and the black ground power line (–GND)
from the lightbar are properly connected to a good, fully charged 12 Vdc battery.
✓ Check the fuse.
✓ Ensure that the ground connection from the lightbar controller to the aluminum
extrusion is good.
A pod does not
light.
✓ Check the connections from the lightbar cable to the pod.
Only one takedown light turns
on.
✓ Check that the connections from the lightbar controller to the pods are in the
proper locations.
Getting Technical Support and Service
Federal Signal Corporation will service your equipment or provide technical assistance with any problems
that cannot be handled locally. Any product returned to Federal Signal for service, inspection, or repair
must be accompanied by a Return Material Authorization number. The RMA number can be obtained
from your local distributor or Federal Signal. Please provide a brief explanation of the service requested
or the nature of the malfunction. Contact your local dealer/distributor for replacement parts availability or
contact the Federal Signal Service Department (7 a.m. to 5 p.m., Monday through Friday, CT) at:
Service Department
Federal Signal Corporation
2645 Federal Signal Drive
University Park, IL 60484-3167
800-433-9132
800-343-9706 (fax)
www.fedsig.com
3-Pod and Split Vision SLR Lightbars
29
Chapter 6: Maintaining and Servicing the Lightbar
Ordering Replacement Parts
To order replacement parts, please contact your local dealer/distributor or:
Customer Support
Federal Signal Corporation
Phone: 1-800-264-3578
(7 a.m. to 5 p.m., Monday through Friday, Central Time)
Table 6.2 Replacement parts
Description
Part Number
Pod Assembly
Contact Service
PCB Assembly, Controller
Dome, Clear
Dome, Amber
Dome, Blue
Dome, Red
Seal, Pod
Gasket, Pod Base
Contact Service
8652106
8652106-02
8652106-03
8652106-04
8652107
8652108
Returning a Product to Federal Signal
Before returning a product to Federal Signal, call 800-264-3578, 800-433-9132, or 800-824-0254 to
obtain a Returned Merchandise Authorization number (RMA number). To expedite the process, please be
prepared with the following information:
• Your Federal Signal customer or account number.
• The purchase order number under which the items were purchased.
• The shipping method.
• The model or part number of the product being returned.
• The quantity of products being returned.
• Drop ship information as needed.
• Any estimate required.
When you receive your RMA Number:
• Write the RMA number on the outside of the box of returned items.
• Reference the RMA number on your paperwork inside of the box.
• Write the RMA number down, so that you can easily check on status of the returned equipment.
Send all material with the issued RMA Number to:
30
3-Pod and Split Vision SLR Lightbars
Chapter 5: Maintaining and Servicing the Lightbar
Federal Signal Corporation
Public Safety Systems
2645 Federal Signal Drive
University Park, IL 60484-3167
Attn: Service Department
RMA: #__________
www.fedsig.com
Tel.: (800) 264-3578 • Fax: (800) 682-8022
3-Pod and Split Vision SLR Lightbars
31
2645 Federal Signal Drive, University Park, IL 60484-3167
Tel.: (800) 264-3578 • Fax: (800) 682-8022
www.fedsig.com
© 2012 Federal Signal Corporation