1
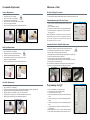
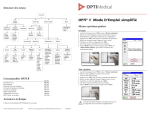
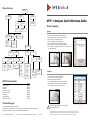
Menu Structure
Ready Menu
Data Manager
QC Manager
Run QC
Diagnostic Reports
- Patient
- Auto QC
- Control
- Calibration
OPTI® R Analyzer Quick Reference Guide
- Patient Results
- Patient Entry
Setup QC
- Auto QC
- Controls
Measurement
Reports/Statitstics
Measurement
Patient Sampling
- Auto QC
- Controls
Syringe
1.
2.
3.
4.
5.
6.
7.
8.
Configuration
- Patient
- Auto QC
- Control
- Calibration
- Errors
System Manager
Time and Date
Diagnostics
Sensors
Consumable
Status
Control
- Versions
- Temperature
- LEDs
- Barometric
Pressure
- Pack Level
- Cassette
- QC Meas.
- Gas Level
- Fan
- Valve Test
- FSet
OPTI R Consumables
Setup
Tests
- Barcode
- Printer
- Optics
- Flow
- Pump
- Display
- Touch
- RS232
- Ethernet
E-Ca50 Cassettes
Fluid Pack
Gas Bottle
Peristaltic Pump Kit
Calibrator Cassette
Printer Paper Syringe Adaptors
OPTI Check, Tri-level
Utilities
Utilities
- Patient Entry
- Meas. Param.
- Calc. Param.
- Normal
Ranges
- Correlation
- Units
- Security
- Printer
- Hardware
- Language
Press <Run Sample> at the ready display.
Insert new syringe adaptor into the cassette port.
Mix and place sample syringe on syringe adaptor.
Press <OK> to start sample aspiration.
Remove sample syringe when prompted.
Press <OK> after the syringe has been removed.
Read results at the completion of the measurement.
Press <Home> to return to the ready screen or <Patient Info>
to enter patient data.
- Calibrator
- Master Cal.
- Power Control
(Powerdown,
Shutdown)
Component
Installation
- Fluid Pack
- Cassette
- Gas Bottle
Ref/No.
BP7601
BP7092
BP7001
BP7118
BP7535
HP0070
BP7600
HC7008
Capillary
1.
2.
3.
4.
5.
6.
7.
Press <Run Sample> at the ready display.
Insert capillary tip into the cassette port.
Press <OK> to start sample aspiration.
Remove capillary when prompted.
Press <OK> after the capillary has been removed.
Read results at the completion of the measurement.
Press <Home> to return to the ready screen.
Technical Support
To contact technical support for assistance:
Inside the USA: 1-800-490-6784 or 770-510-4444 or e-mail [email protected]
Outside the USA: Please contact your local OPTI Medical Distributor
© 2007 OPTI Medical Systems, Inc.
OPTI is a registered trademark of OPTI Medical Systems, Inc.
AT7036-I
!
Refer to the operators manual or service manual
for detailed instructions.
CAUTION: Handle and dispose of all biological samples in accordance with your facility’s policies.
Obtain appropriate medical attention in the event of any exposure to biological samples since samples
may transmit infectious diseases. Use the products only as directed in the operators manual.
Consumable Replacement
Maintenance Tasks
Cassette Replacement
(Weekly) Cleaning the Analyzer
1.
2.
3.
4.
5.
6.
7.
1. Clean the analyzer’s surface using a mild detergent and a soft cloth.
2. Clean the SMC with an ammonia based cleaner or alcohol with a lint free cloth.
Open cover and remove expired cassette.
Properly dispose of used cassette.
Press <New Cassette> on the display.
Swipe the (2) two cassette barcodes.
Open pouch, wipe cassette and insert it into the SMC.
Close cover to begin calibration.
Refer to the provided insert sheet for additional instructions.
(3 months) Running the Calibrator Cassette
1. Select <Utilities> and then select the utilities tab at the top of
the screen.
2. Press <Calibrator> to begin.
3. Follow the on screen directions to run the calibrator cassette.
4. After the calibration is complete press <Home> to return to
the ready screen.
NOTE: OPTI Medical recommends the calibrator measurement
be performed between sensor cassette replacements. Removing
the sensor cassette before it has expired will result in the premature expiration of the sensor cassette.
(6 months) Peristaltic Pump Kit Replacement
Fluid Pack Replacement
1.
2.
3.
4.
5.
Remove expired pack and replace protective cap.
Press <Install Pack> on the display.
Remove the protective cap from the new pack.
Insert new pack into fluid pack receptacle.
After calibration run any two levels of OPTI check control
material to complete installation.
6. Refer to the provided insert sheet for additional instructions.
Gas Bottle Replacement
1.
2.
3.
4.
5.
6.
7.
Remove expired gas bottle by turning counter clockwise.
Press <Install Gas> on the display.
Swipe the gas bottle barcode located on the provided insert sheet and remove gas bottle cap.
Insert gas bottle into the instrument and turn clockwise to tighten.
When prompted “New Gas Bottle,” reply “Yes” if bottle is new.
If the gas bottle is used reply “No” and enter the number of weeks in use.
Refer to the provided insert sheet for additional instructions.
1. Open the printer cover.
2. Remove the pump by grasping the sides and pulling straight up.
3. Carefully remove pump seals with tweezers or hemostats.
4. Properly dispose of expired pump and pump seals.
5. Rotate the pump shaft until the flat edge aligns with the new pump roller.
6. Firmly press the pump down onto the shaft.
7. Next press down on the pump roller to finalize installation.
8. Open the SMC and remove the I/O port seals with hemostats or tweezers.
9. Properly dispose of the expired seals.
10. Insert the new seals with the round side up and press firmly into place.
11. Refer to the provided insert sheet for additional instructions.
Programming Auto QC
1.
2.
3.
4.
5.
6.
7.
8.
9.
Press <QC Manager> to enter the QC menu.
Select <Auto QC> under the setup heading.
At the first time row press <Edit>.
Enter the scheduled time for this QC measurement and press
<OK>.
Now select the levels to be run by checking the appropriate
level(s).
Continue by moving to the next row and following the above
steps.
To perform auto QC on Saturday or Sunday check the corresponding box.
When complete press <Save> to save the changes to memory.
Press <Home> when finished to return to the ready screen.