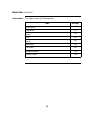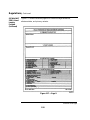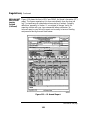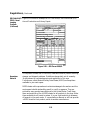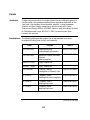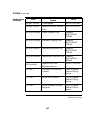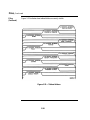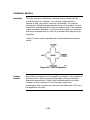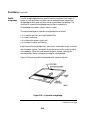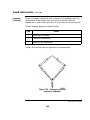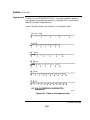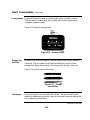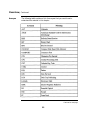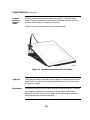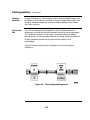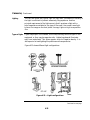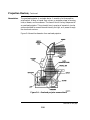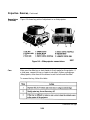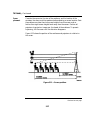
1
NONRESIDENT
TRAINING
COURSE
Illustrator Draftsman
Volume 1—Equipment
NAVEDTRA 14332
DISTRIBUTION STATEMENT A: Approved for public release; distribution is unlimited.
Sailor’s Creed
“I am a United States Sailor.
I will support and defend the
Constitution of the United States of
America and I will obey the orders
of those appointed over me.
I represent the fighting spirit of the
Navy and those who have gone
before me to defend freedom and
democracy around the world.
I proudly serve my country’s Navy
combat team with honor, courage
and commitment.
I am committed to excellence and
the fair treatment of all.”
DISTRIBUTION STATEMENT A: Approved for public release; distribution is unlimited.
PREFACE
By enrolling in this self-study course, you have demonstrated a desire to improve yourself and the Navy.
Remember, however, this self-study course is only one part of the total Navy training program. Practical
experience, schools, selected reading, and your desire to succeed are also necessary to successfully round
out a fully meaningful training program.
COURSE OVERVIEW: In completing this nonresident training course, you will demonstrate a
knowledge of the subject matter by correctly answering questions on the following subjects: general shop
administration and supervision, commonly available equipment, frequently required operator adjustments
and general equipment maintenance.
THE COURSE: This self-study course is organized into subject matter areas, each containing learning
objectives to help you determine what you should learn along with text and illustrations to help you
understand the information. The subject matter reflects day-to-day requirements and experiences of
personnel in the rating or skill area. It also reflects guidance provided by Enlisted Community Managers
(ECMs) and other senior personnel, technical references, instructions, etc., and the occupational
standards, which are listed in the Manual of Navy Enlisted Manpower Personnel Classifications and
Occupational Standards, NAVPERS 18068, found on line at https://buperscd.technology.navy.mil/
bup_updt/upd_CD/BUPERS/enlistedManOpen.htm.
THE QUESTIONS: The questions that appear in this course are designed to help you understand the
material in the text.
VALUE: In completing this course, you will improve your military and professional knowledge.
Importantly, it can also help you study for the Navy-wide advancement in rate examination. If you are
studying and discover a reference in the text to another publication for further information, look it up.
1997 Edition Prepared by
DMCS(SW) Sandra M. Bryan
Reviewed for accuracy by DMC(SW/AW) Leslie A. Crooke
November 2002
No technical changes were made to the content.
Minor changes made to assignments.
Published by
NAVAL EDUCATION AND TRAINING
PROFESSIONAL DEVELOPMENT
AND TECHNOLOGY CENTER
NAVSUP Logistics Tracking Number
0504-LP-101-8532
i
CONTENTS
Chapters
1. Shop Organization and Administration . . . . . . . . . . . . . . . . . . . . . . . . 1-1
2. Basic Equipment . . . . . . . . . . . . . . . . . . . . . . . . . . . . . . . . . . . . . . . . . 2-1
3. Computer Equipment . . . . . . . . . . . . . . . . . . . . . . . . . . . . . . . . . . . . . 3-1
4. Reproduction Equipment . . . . . . . . . . . . . . . . . . . . . . . . . . . . . . . . . . . 4-1
5. Audiovisual Equipment . . . . . . . . . . . . . . . . . . . . . . . . . . . . . . . . . . . . 5-1
Appendices
I. Glossary . . . . . . . . . . . . . . . . . . . . . . . . . . . . . . . . . . . . . . . . . . . . . . . . .AI-1
II. References Used to Develop The NRTC. . . . . . . . . . . . . . . . . . . . . .AII-1
Index
INDEX . . . . . . . . . . . . . . . . . . . . . . . . . . . . . . . . . . . . . . . . . . . . . . . ..INDEX-1
ii
ILLUSTRATOR DRAFTSMAN (DM) TRAINING SERIES
The following volumes in the DM Training Series are available:
DM, Vol. 1,
NAVEDTRA
14332
Equipment. This is an overview of general shop administration, available
equipment, required operator adjustments, and equipment maintenance.
Knowing the capabilities and limitations of the equipment before
creating artwork is essential.
DM, Vol. 2,
NAVEDTRA
14065
Standard Drafting Practices And Theory. Industry standards for
technical drawing, geometric construction, general drafting practices,
parallel projections, perspective, and composition are foundational
material on which all executionable practices rely.
DM, Vol. 3,
NAVEDTRA
14333
Executionable Practices. These chapters cover the theory of color,
photography, computer-generated art, figure drawing, cartooning,
animation, mediums, lettering, and airbrush. These are the practices a
successful DM must master.
DM, Vol. 4,
NAVEDTRA
14334
Presentations Graphics. Pre-press copy preparation, television graphics,
displays, exhibits, and audiovisual presentations are end products and
will influence the how and why DMs do business.
NOTE
For additional information on Professional Development you may go to
the following web site: https://www.cnet.navy.mil.
For information and enrollment in NRTCs and to view the Catalog of
Nonresident Training Courses, NAVEDTRA 12061, go to the following
web site: https//www.advancement.cnet.navy.mil.
iii
INSTRUCTIONS FOR TAKING THE COURSE
assignments. To submit your
answers via the Internet, go to:
ASSIGNMENTS
The text pages that you are to study are listed at
the beginning of each assignment. Study these
pages carefully before attempting to answer the
questions. Pay close attention to tables and
illustrations and read the learning objectives.
The learning objectives state what you should be
able to do after studying the material. Answering
the questions correctly helps you accomplish the
objectives.
https://courses.cnet.navy.mil
Grading by Mail: When you submit answer
sheets by mail, send all of your assignments at
one time. Do NOT submit individual answer
sheets for grading. Mail all of your assignments
in an envelope, which you either provide
yourself or obtain from your nearest Educational
Services Officer (ESO). Submit answer sheets
to:
SELECTING YOUR ANSWERS
Read each question carefully, then select the
BEST answer. You may refer freely to the text.
The answers must be the result of your own
work and decisions. You are prohibited from
referring to or copying the answers of others and
from giving answers to anyone else taking the
course.
COMMANDING OFFICER
NETPDTC N331
6490 SAUFLEY FIELD ROAD
PENSACOLA FL 32559-5000
Answer Sheets: All courses include one
“scannable” answer sheet for each assignment.
These answer sheets are preprinted with your
SSN, name, assignment number, and course
number. Explanations for completing the answer
sheets are on the answer sheet.
SUBMITTING YOUR ASSIGNMENTS
To have your assignments graded, you must be
enrolled in the course with the Nonresident
Training Course Administration Branch at the
Naval Education and Training Professional
Development
and
Technology
Center
(NETPDTC). Following enrollment, there are
two ways of having your assignments graded:
(1) use the Internet to submit your assignments
as you complete them, or (2) send all the
assignments at one time by mail to NETPDTC.
Grading on the Internet:
Internet grading are:
•
•
assignment
Do not use answer sheet reproductions: Use
only the original answer sheets that we
provide—reproductions will not work with our
scanning equipment and cannot be processed.
Follow the instructions for marking your
answers on the answer sheet. Be sure that blocks
1, 2, and 3 are filled in correctly. This
information is necessary for your course to be
properly processed and for you to receive credit
for your work.
Advantages to
COMPLETION TIME
you may submit your answers as soon as
you complete an assignment, and
you get your results faster; usually by the
next working day (approximately 24 hours).
Courses must be completed within 12 months
from the date of enrollment. This includes time
required to resubmit failed assignments.
In addition to receiving grade results for each
assignment, you will receive course completion
confirmation once you have completed all the
iv
PASS/FAIL ASSIGNMENT PROCEDURES
For subject matter questions:
If your overall course score is 3.2 or higher, you
will pass the course and will not be required to
resubmit assignments. Once your assignments
have been graded you will receive course
completion confirmation.
E-mail:
Phone:
[email protected]
Comm: (850) 452-1001, Ext. 2167
DSN: 922-1001, Ext. 2167
FAX: (850) 452-1370
(Do not fax answer sheets.)
Address: COMMANDING OFFICER
NETPDTC N313
6490 SAUFLEY FIELD ROAD
PENSACOLA FL 32509-5237
If you receive less than a 3.2 on any assignment
and your overall course score is below 3.2, you
will be given the opportunity to resubmit failed
assignments. You may resubmit failed
assignments only once. Internet students will
receive notification when they have failed an
assignment--they may then resubmit failed
assignments on the web site. Internet students
may view and print results for failed
assignments from the web site. Students who
submit by mail will receive a failing result letter
and a new answer sheet for resubmission of each
failed assignment.
For enrollment, shipping,
completion letter questions
grading,
or
E-mail:
Phone:
[email protected]
Toll Free: 877-264-8583
Comm: (850) 452-1511/1181/1859
DSN: 922-1511/1181/1859
FAX: (850) 452-1370
(Do not fax answer sheets.)
Address: COMMANDING OFFICER
NETPDTC N331
6490 SAUFLEY FIELD ROAD
PENSACOLA FL 32559-5000
COMPLETION CONFIRMATION
After successfully completing this course, you
will receive a letter of completion.
NAVAL RESERVE RETIREMENT CREDIT
ERRATA
If you are a member of the Naval Reserve, you
may earn retirement points for successfully
completing this course, if authorized under
current directives governing retirement of Naval
Reserve personnel. For Naval Reserve
retirement, this course is evaluated at 8 points.
(Refer to Administrative Procedures for Naval
Reservists on Inactive Duty, BUPERSINST
1001.39, for more information about retirement
points.)
Errata are used to correct minor errors or delete
obsolete information in a course. Errata may
also be used to provide instructions to the
student. If a course has an errata, it will be
included as the first page(s) after the front cover.
Errata for all courses can be accessed and
viewed/downloaded at:
https://www.advancement.cnet.navy.mil
STUDENT FEEDBACK QUESTIONS
We value your suggestions, questions, and
criticisms on our courses. If you would like to
communicate with us regarding this course, we
encourage you, if possible, to use e-mail. If you
write or fax, please use a copy of the Student
Comment form that follows this page.
v
CHAPTER 1
SHOP ORGANIZATION AND ADMINISTRATION
Overview
Introduction
As an Illustrator Draftsman, your responsibilities do not begin and end with the
start and completion of a drawing assignment. You may, regardless of pay
grade, have administrative and organizational responsibilities integral to the
efficient management of your shop. This chapter provides a basic background
to help you understand your administrative obligations.
Objectives
The material in this chapter enables you to do the following:
Identify command limitations on copy reproduction and the importance of a
production log.
Understand the significance of accurately completing Joint Committee of
Printing (JCP) inventories.
Recognize copyrighted material and avoid copyright infringement.
Compile information required to submit an audiovisual report.
Identify the procedures for releasing, handling, and protecting classified
material.
Recognize material suitable for inclusion in a picture morgue and
procedures for classifying additions and deletions.
Continued on next page
1-1
Overview,
Acronyms
Continued
The following table contains a list of acronyms you must know to understand
the material in this chapter:
Meaning
Acronym
AV
Audiovisual
BIB
Bibliography
DD
Department of Defense Form
FSC
Federal Supply Class
GSA
Government Supply Agency
ISA
Interservice Support Agreement
JCP
Joint Committee of Printing
JIRSG
Joint Interservice Regional Support Group
MLSR
Missing, Lost, Stolen, or Recovered
MOA
Memorandum of Agreement
MOU
Memorandum of Understanding
MSDS
Material Safety Data Sheets
NAVSUP
Navy Supply Form
OF
Optional Form
OPTAR
Operational Target
PAR
Personnel Advancement Requirements
PMRP
Precious Metal Recovery Program
SF
Standard Form
SSIC
Standard Subject Identification Code
VI
Visual Information
Continued on next page
1-2
Overview,
In this chapter
Continued
This chapter covers the following topics:
Topic
See Page
Shop Layout
1-4
Regulations
1-6
Forms
1-32
Files
1-35
Supply
1-39
Supervision
143
Job Orders
1-50
Customer Service
1-53
Quality Control
1-54
1-3
Shop Layout
Introduction
DMs fill billets in drafting or graphic shops on ships and shore locations.
The mission of the command and the shop varies from billet to billet. Some
shops stand alone and produce products from beginning to end. Other shops
interface with a Photo Lab or Printshop to complete the products. It is
important for you to understand the commitments and agreements of the shop
to administer, manage, and supervise the shop efficiently.
Local
commitments
Local commitments are interfaces with other shops, such as a Photo Lab or a
Printshop. Maintain a good rapport with these support shops. Provide them
with creditable service and your shop will receive the same.
External
commitments
In addition to and external to the command, Navy drafting shops have
obligations and responsibilities defined by instruction and practice. Know the
commitments of the shop to provide support to units external to your
command. These commitments exist in the form of Interservice Support
Agreements (ISA), Joint Interservice Regional Support Group (JIRSG),
Memorandums of Understanding (MOU), and Memorandums of Agreement
(MOA). Agreements between units typically define reoccurring services and
the basis for financial reimbursement. Although you need not know the
intricacies involved in establishing agreements between units, you must know
if your shop has such commitments, the extent of the obligation, and the
format for finding. These factors can determine how your shop orders
supplies and schedules work loads.
Figure 1-1 shows external agreements and their purposes.
Figure 1-1. —External Agreements.
Continued on next page
1-4
Shop Layout,
Physical
environment
Continued
Ideally, drafting shops are divided into the following three distinct areas:
• a reproduction area,
• a storage area, and
• a work area.
The chances are that your shop was set up before you arrived. Review your
shop spaces with an eye for an improved work environment.
ANALYZE: Analyze your shop spaces periodically to determine if you are
using space and equipment efficiently. Make a scale drawing of your shop
spaces and cutouts of the equipment to arrange and rearrange for maximum
productivity.
SPACE: Remove unwanted, obsolete, or defective equipment from the shop
and dispose of it properly to free up every inch of space. Locate the
reproduction and storage areas away from the work area to eliminate
distractions. Workers should not have to walk around each other to reach
supplies and reproduction machinery.
NOISE: Minimize the noise in the work area.
TEMPERATURE: Keep the temperatures in all areas comfortable– not too
hot and not too cold. Temperatures in the storage area may sour supplies if
overly warm and humid.
LIGHT: Lighting of the proper intensity is critical. All workers should have
a sufficient amount of direct light or they will require additional lighting.
Direct sunlight is rarely available as a steady light source.
COMFORT: Consider every factor that will impact the comfort of the
worker and the security of the equipment and supplies, including the effects
of the pitch and roll of the ship.
CLEANLINESS: Keep everything clean and in a maximum state of
readiness. Clean spaces regularly; clean equipment often. Dirty spaces and
equipment produce dirty work.
SAFETY: Plan for a safe environment.
1-5
Regulations
Introduction
Regulations govern every facet of military life, including the jobs we do and
how we do them. They provide guidance and direction. They ensure
uniformity and discipline. However, the word regulations seems always to
have a derogatory connotation, but regulations actually work for you. When
you know and operate within the guidelines of published regulations, you,
your shop, and the people that work for you are well taken care of.
Local policy
Local commands may have an established policy regarding the function and
use of the Graphics shop. Some do not. If a guidance policy does not exist
for your shop, it would be wise for you to create one. If one exists, review it
annually and update it as necessary.
A command policy or instruction minimizes the opportunity to abuse shop
personnel, equipment, and supplies. It establishes procedures, establishes a
chain of command for requesting services, and sets criteria for priority work.
When you have to create a command policy or instruction, use existing
guidance already promulgated in Navy and Department of Defense
instructions.
Governing
directives
Although the instructions in this section were current at the time of this
writing, they are subject to periodic review. Gather these instructions as
reference material and be sure to collect the most recent edition. This
training manual will not cover them in detail.
Continued on next page
1-6
Regulations,
Governing
directives
(Continued)
Continued
The following table contains a list of instructions you must know well to
manage a Navy Graphics shop effectively:
Name
Instruction
BUPERSINST 1610.10
Navy Performance Evaluation (EVAL) and
Counseling System
DODINST 4000.19
Interservice, Interdepartmental, and Interagency
support
JCP No. 26
Government Printing and Binding Regulations
NAVPUBINST
5600.44
Reprographics Management Program
NAVPUBINST
5600.42 NAVSO P-35
Department of the Navy, Publications and
Printing Regulations
NAVPUBINST
5603.10
Preparation and Submission of JCP Forms 1, 5,
and 6; Procedures for
NAVPUBINST P-2002
Navy Stocklist of Publications and Forms
NAVSEAINST 4570.3
Precious Metal Recovery Program (PMRP)
OPNAVNOTE 5290
Alteration of Official DOD Imagery
OPNAVINST 5290.1
Naval Imaging program (NAVIMP) Policy and
Responsibilities
OPNAVINST 5510.1
Department of the Navy, Information and
Personnel Security Program Regulation
SECNAVINST 5213.10 Department of the Navy, Forms Management
program
Continued on next page
1-7
Regulations,
Governing
directives
(Continued)
BUPERSINST
1610.10, Navy
Performance
Evaluation
(EVAL) and
Counseling
System
Continued
Name
Instruction
SECNAVINST 5215.1
Department of the Navy, Directives Issuance
System
SECNAVINST 5216.5
Navy Correspondence Manual
SECNAVINST 5210.11
Department of the Navy, Standard Subject
Identification Codes
SECNAVINST 5500.4
Department of the Navy, Reporting of Missing,
Lost, Stolen, or Recovered Government Property
SECNAVINST 5870.6
Copyright in Works of Authorship Prepared by
Department of the Navy Personnel
SECNAVINST 5870.5
Permission to Copy Materials Subject to
Copyright
SECNAVINST 5600.20
Graphic Design Standards
SECNAVINST 5603.2
Printed Matter for Official Ceremonies
SECNAVINST 5290.1
Naval Imaging Program
The Navy Performance Evaluation (EVAL) and Counseling System provides
guidance for writing performance evaluations and counseling personnel. It
identifies line items and appropriate entries for every category of an
evaluation. This is an invaluable reference for writing your input to your
evaluation or those of subordinates under your jurisdiction.
Continued on next page
1-8
Regulations,
Continued
DODINST
4000.19,
Interservice,
Interdepartmental, and
Interagency
Support
This instruction specifically defines the support provided throughout the
Department of Defense complex between services, agencies, and commands.
It also outlines reimbursable services and formalizes agreements by
Memorandums of Agreement (MOA), Memorandums of Understanding
(MOU), and Interservice Support Agreements (ISA).
JCP No. 26,
Government
Printing and
Binding
Regulations, S.
Pub. 101-9
This publication outlines shop entitlement, funding and allowance lists,
biannual inspections, annual reporting obligations, and the consequences of
inaccurate reporting or the failure to report. It contains definitions,
equipment condition codes, and a list of JCP forms.
NAVPUBINST
5600.44,
Reprographics
Management
Program
The NAVPUBINST 5600.44, Reprographics Management Program, is a
fleet-wide standard. It defines procedures and terminology, delineates copy
procedures, duplicating, and reprographic functions and entitlement. It
specifically addresses both sea and shore command limitations. The primary
concern of this instruction is the economical use of copying and reprographic
facilities.
Continued on next page
1-9
Regulations,
Continued
NAVPUBINST
5600.44,
Reprographics
Management
Program
(Continued)
The Copier Production Log is generally used for copying items in small
quantity. Keep this log near the copy machine and complete it every time a
copy is made. It gives an accurate account of the amount of paper used and
who is using it. It also highlights abuses in copier use. This is a valuable
tool for justifying expenditures in stock and toner.
Figure 1-2 shows a Copier Production Log and appropriate log entries.
Figure 1-2. -Copier Production Log.
Continued on next page
1-10
Regulations,
NAVPUBINST
5600.44,
Reprographics
Management
Program
(Continued)
Continued
The Economical Copying Limit displays the copier limitations and refers the
customers to another machine if their job exceeds the copier capabilities.
Display this sign along with the Copier Production Log prominently near the
copier.
Figure 1-3 shows the Economical Copying Limit, which is protection for the
copier from excessive wear due to exceeding the manufacturer rated capacity.
Figure 1-3.—Economical Copying Limit.
Continued on next page
1-11
Regulations,
Continued
NAVPUBINST Figure 1-4 shows an example of a Duplicating Production Log.
5600.44,
Reprographics
Management
Program
(Continued)
Figure 1-4. —Duplicating Production Log.
Continued on next page
1-12
Regulations,
NAVPUBINST
5600.44,
Reprographics
Management
Program
(Continued)
Continued
The Reproduction Production Log specifies job number, ordering activity,
size, number of originals, copies each, total copies, and adjusted totals. This
information is a valuable source in figuring overall costs in man-hours and
supplies.
Figure 1-5 depicts the Reproduction Production Log, which is an enclosure to
the instruction.
Figure 1-5. —Reproduction Production Log.
Continued on next page
1-13
Regulations,
Continued
NAVPUBINST This regulation provides detailed guidance to all ships and stations that
5600.42
produce a newspaper or a newsletter for the crew. It reiterates policy found
NAVSO P-35
in the Reprographics Management Program and the Joint Committee on
Department of
Printing (JCP), No. 26. There is a list of references and authorized Navy
the Navy,
printing plants in the back of the regulation.
Publications
and Printing
Regulations
NAVPUBINST
5603.10,
Preparation
and Submission
of JCP Forms
1, 5, and 6:
Procedures for
This is an instruction on completing the JCP Forms 1, 5, and 6. These are
annual reporting requirements that, if inaccurate or incorrectly filled in, may
cost your shop in terms of billets and funding.
Figure 1-6 shows Forms 1, 2, 5, and 6. Forms 1 and 5 are the most
important forms for your shop if the shop does any reproduction.
Figure 1-6. —JCP forms.
Continued on next page
1-14
Regulations,
Continued
NAVPUBINST
P-2002, Navy
Stocklist of
Publications
and Forms
The Navy Stocklist of Publications and Forms lists standard Navy forms,
signs, and labels available through the government supply system. It
provides ordering information such as the stock number, unit of issue, and a
brief description. Use this publication to order standard stock items instead
of producing them in your shop. If an originator requests standard stock
items or items with a stock number, refer them to supply with the appropriate
information for ordering the item through supply. It is against Navy
regulations to create or print, in quantity, items available through the system.
NAVSEAINST
4570.3,
Precious Metals
Recovery
Program
(PMRP)
This instruction introduces a precious metal/metal recovery program that is
becoming increasingly important in the work space. Some of the products
we use as DMs contain particles of precious metals or substances that are
recoverable. Photographic films, pastes, and paints are but a few of the
products that contain or produce effluent, containing recoverable particulate
which could represent a savings or credit to the Navy.
OPNAVNOTE
5290,
Alteration of
Official DOD
Imagery
This Department of Defense Directive provides guidance and establishes
policy and responsibility on the alteration of DoD imagery. It defines
acceptable alterations using photographic techniques, video imagery,
cropping, editting, enlarging, animation, digital simulation, graphics, special
effects, digital conversion or compression, and post-production enhancement.
Continued on next page
1-15
Regulations,
OPNAVINST
5290.1, Naval
Imaging
Program
(NAVIMP)
Policy and
Responsibilities
Continued
The purpose of the OPNAVINST 5290.1, Naval Imaging program
(NAVIMP) Policy and Responsibilities, is to establish a centralized visual
imagery activity to supply the regional fleet with audiovisual products. This
centralized shop would function more economically than a cluster of
independent shops and assume accountability and responsibility for all
audiovisual and visual information products.
Approved VI activities have a five-digit authorization number for finding and
billeting. This number, called a DVIAN number, identifies major commands
and individual activities of the VI community.
This instruction requires each shop to submit a visual information report
annually. The visual information (VI) report accounts and justifies funding
and billet assignments.
Study this instruction in its entirety. Definitions of production guidelines and
report requirements must be thoroughly understood before you submit the
myriad of forms associated with it.
Continued on next page
1-16
Regulations,
Continued
OPNAVINST
Figure 1-7 shows a customer request to initial production for an audiovisual
5290.1, Naval product.
Imaging
Program
(NAVIMP)
Policy and
Responsibilities
(Continued)
Figure 1-7. —VI Production Request.
Continued on next page
1-17
Regulations,
OPNAVINST
5290.1, Naval
Imaging
Program
(NAVIMP)
Policy and
Responsibilities
(Continued)
Continued
Figure 1-8 shows the extensive amount of research and consideration given to
a customer request for a visual information product before approval or
disapproval.
Figure 1-8. —Validation.
Continued on next page
1-18
Regulations,
OPNAVINST
5510.1,
Department of
the Navy,
Information
and Personnel
Security
Program
Regulation
Continued
The OPNAVINST 5510.1 is the Navy security manual. What you need to
know about protecting sensitive information is in this instruction. It
establishes security measures for handling and marking, as well as protection
and safeguards in transmitting and storing classified information.
Standardized fleet-wide procedures ensure optimum continued and consistent
protection of information vital to national security.
The following table contains a list of the most important chapters that you, as
a DM, must know:
Title
Chapter
Chapter 8
Declassification, Downgrading, and Upgrading
Chapter 9
Marking
Chapter 10
Accounting and Controls
Chapter 11
Printing, Reproduction, and Photographing
Chapter 13
Safeguarding
Chapter 14
Storage
Chapter 16
Hand Carrying
Chapter 17
Destruction
Continued on next page
1-19
Regulations,
Continued
SECNAVINST
5213.10,
Department of
the Navy,
Forms
Management
Program
The Forms Management Program encourages interagency, interservice, and
interdepartmental use of forms. Its intent is to reduce duplication of forms
and to minimize the creation of new forms.
SECNAVINST
5215.1,
Department of
the Navy,
Directives
Issuance
System
Besides standardizing and economizing form use, the Directives Issuance
System, SECNAVINST 5215.1, ensures the currency of local forms by
requiring periodic reviews. A command review procedure reduces form
duplication and obsolescence. Procedures for preparing and maintaining
local forms are specific. Before reproducing a local form, check to make
sure the local coordinator, usually located in the administrative offices,
approves the form for continued reproduction. The originators of the
reproduction request are responsible for making sure local forms have
approval, but not many do. The designation for approved local forms or
instructions is in the lower left-hand comer of the page.
SECNAVINST
5216.5, Navy
Correspondence Manual
The Navy Correspondence Manual defines the standard format for internal
memos and memorandums and letters that will leave the command. It
dissects a letter explaining the purpose and impact of each section.
Communicating intelligently in writing is a prerequisite to any successful
career. An excellent correspondence course is available through the
Educational Services Office.
Continued on next page
1-20
Regulations,
SECNAVINST
5210.11,
Department of
the Navy,
Standard
Subject
Identification
Codes (SSIC)
Continued
The SSIC is a standardized filing procedure that creates a filing system where
files are easily expandable and retrievable. All administrative
correspondence is based on this system, which consists of five sections and
thirteen major subject groups. Primarily numeric, further cross-referencing
and subdivision yield a highly flexible filing system. When you withdraw a
file from the system, use a Chargeout Record to indicate where a file
belongs. Chargeout Records information is covered in the “Forms” segment
of this chapter.
Figure 1-9 shows the five sections and thirteen major subject codes of the
Figure 1-9.—SSIC.
SECNAVINST
5500.4,
Department of
the Navy,
Reporting of
Missing, Lost,
Stolen, or
Recovered
(MLSR)
Government
Property
This instruction prescribes policy and procedures for reporting controlled or
pilferable equipment, precious metals/metal recovery, and gear on minor
plant property cards that is missing, lost, stolen, or recovered. Annual sight
inventories of custody card items will highlight discrepancies in shop
equipment. An enclosure lists MLSR definitions and terminology. Larger
shops or shops highly trafficked may hold a custody card inventory more
often than once a year.
Continued on next page
1-21
Regulations,
SECNAVINST
5500.4,
Department of
the Navy,
Reporting of
Missing, Lost,
Stolen, or
Recovered
(MLSR)
Government
Property
(Continued)
Continued
Figure 1-10 is an example of the front side of a DD Form 200. Report
inventory discrepancies immediately on a Financial Liability Investigation of
Property Loss, DD Form 200, NSN 0102-LF-011-9100.
Figure 1-10. —DD Form 200.
Continued on next page
1-22
Regulations,
Continued
SECNAVINST
5500.4,
Department of
the Navy,
Reporting of
Missing, Lost,
Stolen, or
Recovered
(MLSR)
Government
Property
(Continued)
Figure 1-11 is an example of the back side of the form. Maintain submitted
forms in the shop file until the missing equipment is removed from inventory.
Figure 1-11. —DD Form 200 (back).
Continued on next page
1-23
Regulations,
Continued
SECNAVINST
5870.6,
Copyright in
Works of
Authorship
Prepared by
Department of
the Navy
Personnel
Copyright in Works of Authorship Prepared by Department of the Navy
Personnel, SECNAVINST 5870.6, clearly states that work prepared by an
officer or employee of the United States Government while in an official
capacity is not eligible for copyright. The definition of official capacity or
official duties is defined by this instruction as are some exceptions which
would allow a copyright.
SECNAVINST
5870.5,
Permission to
Copy Materials
Subject to
Copyright
The purpose of SECNAVINST 5870.5, Permission to Copy Material Subject
to Copyright, is to prescribe the procedures for obtaining permission from
copyright owners to use their copyrighted material. The instruction describes
copyright infringement, copyright markings, and details the guidelines one
should follow to request permission to use information free of charge or at
cost. It also ascribes responsibilities for infringement to the user activity and
lists a point of contact for clarification and administrative claims.
Figure 1-12 illustrates common copyright markings.
Figure 1-12. —Copyright markings.
Continued on next page
1-24
Regulations,
SECNAVINST
5600.20,
Graphic Design
Standards
Continued
The purpose of SECNAVINST 5600.20, Graphic Design Standards, is to
standardize formats, typography, and emblem identifiers throughout the Navy
in the interest of economy. Identifiers are symbols that represent the
department and activity seals, the Navy emblem, and the logotype.
Figure 1-13 illustrates acceptable identifiers.
Figure 1-13. —Identifiers.
This instruction also specifies the allowable typography and leading between
words and lines. Although generally uniform, regardless of whether the
finished product is an envelope, a letterhead, or a certificate, it does vary.
This instruction offers a selection of standardized sizes and formats for
certificates and addresses the issue of color ink and color ink selection.
Figure 1-14 shows standard vertical formats. The asymmetric format is
using a full-color department seal. This seal is also available in a horizontal
format through the supply system.
Figure 1-14. —Vertical formats.
Continued on next page
1-25
Regulations,
Continued
SECNAVINST Figure 1-15 shows standard horizontal formats.
5600.20,
Graphic Design
Standards
(Continued)
Figure 1-15. —Horizontal formats.
SECNAVINST
5603.2, Printed
Matter for
Official
Ceremonies
Printed Matter for Official Ceremonies is a valuable reference instruction that
defines ceremonial printed material at public expense approved as official and
necessary. Ceremonial material is invitations for retirement ceremonies,
luncheons, dinners, receptions, and Dining-In ceremonies.
SECNAVINST
5290.1, Naval
Imaging
Program
The SECNAV instruction is almost identical to the OPNAV instruction. The
major difference between these two instructions is the detailed explanation of
the procedures for filling out the reports.
Continued on next page
1-26
Regulations,
SECNAVINST
5290.1, Naval
Imaging
Program
(Continued)
Continued
Figure 1-16 illustrates the front of a three-page form used to track the visual
information product throughout its creation.
Figure 1-16. —DD Form 1995-2, page 1 of 3.
Continued on next page
1-27
Regulations,
SECNAVINST
5290.1, Naval
Imaging
Program
(Continued)
Continued
Figure 1-17 shows the second page which identifies target audiences,
milestone dates, and primary contacts.
Figure 1-17. —Page 2.
Continued on next page
1-28
Regulations,
SECNAVINST
5290.1, Naval
Imaging
Program
(Continued)
Continued
Figure 1-18 shows the location of the master material and the overall cost of
production on the last of the three-part form.
Figure 1-18. —DD Form 1995/2.
Continued on next page
1-29
Regulations,
SECNAVINST
5290.1, Naval
Imaging
Program
(Continued)
Continued
Figure 1-19 shows the front of DD Form 2054/1, the Visual Information (VT)
report. The figures reported on this form come directly from the shop job
log. The importance of a detailed and accurate log is evident. Category
definitions, especially in Section III, are subject to change. Verify the
reporting criteria with your type commander before submission. An
incorrect report or your failure to report can be costly in terms of funding
and personnel during the next fiscal review.
Figure 1-19. —VI Annual Report.
Continued on next page
1-30
Regulations,
Continued
SECNAVINST Figure 1-20 shows an example of DD Form 2054/2, the Audiovisual (AV)
5290.1, Naval
Annual Production and Library Report.
Imaging
Program
(Continued)
Figure 1-20. —DD Form 2054/2.
Hazardous
Material
In the present climate and in the future, hazardous material presents handling,
storage, and disposal problems. Guidelines change daily out of necessity.
So stay abreast of new developments and regulations in this area.
Furthermore, collect Material Safety Data Sheets (MSDS) and keep them
available in your work space.
MSDS sheets outline procedures to minimize damage to the workers and the
environment should mishandling result in a spill or exposure. They are
printed for every product manufactured in the United States. Track them
down and maintain a file of MSDS sheets for all products in the shop. Make
them available for all hands to review. It is your right and duty to be aware
of hazards in the work center. If a manufacturer does not or will not provide
a MSDS sheet for their product, switch to another manufacturer.
1-31
Forms
Introduction
Standard forms exist within the supply system that are sufficiently generic to
use Navy-wide. Using these preexisting forms eliminates duplication at the
local level. Use standard forms whenever possible. It saves manpower,
supplies, and time. Newly created forms should comply with Forms
Analysis and Design, 058-LP-502-0000. Obtain a copy of the Navy Stocklist
of Publications and Forms, NAVSUP P-2002, to locate current form
numbers and revisions.
Standard forms The following table provides a partial list of standardized forms used
throughout the Navy that you will use frequently:
Purpose
Form
Source
DD Form 1149
Requisitioning and
Invoice/Shipping Document
0102-LF-007-2300
DD Form 1348
Requisition System Document
(Manual)
ordering supplies
0102-LF-001-3491
NAVSUP 1250/1
Supply Requisition
NAVSUP 1250/2
Supply Requisition
DD Form 200
Financial Liability
Investigation of Property Loss
0102-LF-011-9100
OF Form 23
Chargeout Record
checking files in/out, long form
7540-00-823-8130
OF Form 24
Chargeout Record
checking files in/out
7540-00-823-8131
OF Form 25
Chargeout Record
checking files in/out
7540-00-823-8132
Continued on next page
1-32
Forms,
Continued
Standard forms
(Continued)
Form
Purpose
Source
OPNAV 5213/18
Forms Register
0107-LF-052-1390
OPNAV 5213/19
Request for New or Revised
Forms
0107-LF-052-1397
NAVPUB 5600/26
Copier Production Log
Appendix
NAVPUBINST
5600.44
NAVPUB 5600/29
Economical Copying Limit
Appendix
NAVPUBINST
5600.44
NAVPUB 5600/27
Duplicating Production Log
Appendix
NAVPUBINST
5600.44
NAVPUB 5600/28
Reproduction Production Log
Appendix
NAVPUBINST
5600.44
DD Form 844
Requisition for Local
Duplicating Service
0102-LF-010-2700
JCP No. 1
Semi-amual Printing Plant
Inventory
Local or regional
Defense Printing
Service
JCP No. 5
Annual Plant Inventory
Local or regional
Defense Printing
Service
JCP No. 6
Annual Inventory of Stored
Equipment
Local or regional
Defense Printing
Service
Continued on next page
1-33
Forms,
Continued
Standard forms
(Continued)
Form
Purpose
Source
DD 2054/1
Visual Information (VI)
Annual Activity Report
CNO (OP-09BG)
DD 2054/2
Audiovisual (AV) Production
and Library Report
CNO (OP-09BG)
OPNAV 5290/1
Request for Audiovisual
Services
0107-LF-031-5081
OPNAV 5290/3
Navy Visual Information
Activity
Authorization/Request
CNO (OP-09BG)
DD 1995-1
Visual Information Production
Request, Evacuation and
Approval
0102-LF-019-9511
DD 1995-2
Visual Information (VI)
Production Report
0102-LF-019-9506
OPNAV 3150/16
Audiovisual Activity Job
Order
0107-LF-031-5080
1-34
Files
Introduction
The way a shop files data, correspondence, original drawings, tracings,
negatives, and large- or roll-size drawings is unique to each shop. Often it is
dictated by the available storage containers and space. The effectiveness of a
filing system is simply material retrievability.
Responsibility
The leading petty officer in the shop should designate one person to be
responsible for maintaining the files. This person is to check material in and
out, trace outstanding files, and replace returned files. All workers in the
shop, however, should familiarize themselves with the system and be able to
maintain it.
Containers
Navy shops have the following similar filing containers:
• file drawers for data and correspondence,
• flat files for original drawings, tracings, and negatives, and
• container files for large- or roll-size drawings.
These filing containers may or may not have safeguards for protecting
classified material.
Continued on next page
1-35
Files,
Continued
Filing systems
The following table represents the two basic filing systems found in most
shops and their advantages/disadvantages:
Advantages
System
Standard Subject
Identification Codes
(SSIC) numbers
• broad coverage
• Navy-wide use
• easily expandable
• easily retrievable
• number identifies
Disadvantages
• initial setup takes
•
time
more complicated
subject
Sequential serial
numbers
• eliminates shifting
files
• easily expandable
• numbers do not
identify subject
• requires extensive
cross-referencing
Picture morgue Every shop has a picture morgue. Your shop may call it a clip art file, or
scrap file. This is reference material and picture ideas collected for use in
whole or in part for future illustrations and layout formats.
Contents
Any image on any subject is appropriate for a picture morgue. Magazines,
newspapers, brochures, books, and catalogues are all excellent sources for
scavenging ideas. The intent here is to use the images as a catalyst to inspire
your own original ideas, not to copy another’s work blatantly.
Clipping
Once you find artwork to clip for your file, identify the pictures by
annotating the date, publisher, caption or description, and copyright
information. Do this on the reverse of the image or on a firmly attached
separate paper. Carefully pry out all the staples and remove the tape from
the image area. Fold large pictures with the picture side out to minimize
damage created by creasing.
Continued on next page
1-36
Files,
Filing
Continued
Store clipped art in letter-sized folders. Folders with tabs are convenient for
labeling. File tie folders in the shop using the established filing system or
begin a system specific to the picture morgue.
Figure 1-21 shows general subject divisions for a picture morgue.
Figure 1-21. —Subject divisions.
Continued on next page
1-37
Files,
Continued
Filing
(Continued)
Figure 1-22 indicates how tabbed folders are easily visible.
Figure 1-22. —Tabbed folders.
1-38
Supply
Introduction
At some time in your career, you will be responsible for maintaining and
ordering supplies. Plentiful supplies ensure that all workers have what they
need to perform a task and that your shop remains versatile and fully capable.
Waste
Monitor your shop for waste and abuses in supply use. Curb the tendency to
loan or give supplies away. Correct abuses, minimize waste, and use limited
shelf-life items before the expiration date. The amount of wasted supplies
should not exceed 2 percent of the total supplies used on a job.
Estimating
supplies
Inventory the supplies on hand regularly. Information from the job log on
completed job requests, current job requests, and upcoming special projects
combined with prospective deployments and exercises will show trends in
quantity. Common sense gleaned from past experience will guide your
decisions to order the quantities required to maintain adequate supply levels.
Purchasing new When purchasing new equipment, project the future requirements of your
equipment
shop and what technology offers to fill those needs. Consider the equipment
life expectancy and service contracts offered by the manufacturer. Increased
quality, ease of performance, and increased production should be the effects
of modernization.
Purchasing
consumables
Limitations in purchasing consumables are often related to storage space.
Some supplies are temperature and/or time sensitive. Use the first in/first out
system of storing. Clearly mark the contents and receipt date on the package
before storing it away.
Continued on next page
1-39
Supply,
Sources
Continued
There are four basic sources for supply purchases. These sources and the
type of supplies you can expect from them are shown in the following table:
Type
Source
Supplies
Servmart
Local warehouse
• basic consumables
• brushes
• ink
• pens
Government Supply
Agency (GSA)
Navy Supply Group 99
(9905) Federal Supply
class
• basic consumables
• papers
• paints
• basic equipment
• Office furniture
Navy Stocklist of
Publications and
Forms, NAVPUBINST
P-2002
• signs
• forms
• preprinted
GSA contracted items
• consumables
• equipment
• furniture
• service contracts
any civilian business
• any product
Open purchase
stationary and
invitations
available
Imprest Funds
any civilian business
• any product
available
• $500 emergency
• $1000 if authorized
by a supply corps
officer
Continued on next page
1-40
Supply,
Continued
Requisitioning
Local commands prefer specific required forms for requisitioning supplies.
Ships, in particular, have unusual and complicated supply channels. Visit
your local supply office and learn what form your command uses. Setup and
maintain a supply requisitioning log similar to a supply Operational Target
(OPTAR) to track the supplies you order.
Figure 1-23 is a standard supply NAVSUP Form 1250 and 1250-1.
Figure 1-23. —Supply requisitions.
Continued on next page
1-41
Supply,
Continued
Requistioning
(Continued)
Figure 1-24 is another standard DD Form 1348 and its color-coded receipt
copies.
Figure 1-24. —DD Form 1348.
1-42
Supervision
Introduction
There are six basic steps to supervision. Some steps occur automatically and
others will require conscious application. The results of a well run,
effectively supervised shop are a contagious professional work ethic among
crew members and a high caliber end product.
Planning
Planning is the first step in supervision. It is also a part of all other steps.
Planning applies to every aspect of the shop, not just tasking. Let the crew
know long- and short-range plans that concern the shop. Solicit their input
for setting shop goals. Without a plan, there is nowhere to go.
Figure 1-25 demonstrates how planning affects all aspects of supervision.
Figure 1-25. —Six basic steps in supervision.
Continued on next page
1-43
Supervision,
Planning
(Continued)
Continued
Some things to consider when formulating plans to accomplish a task are
shown in the following table:
Continued on next page
1-44
Supervision,
Organizing
Continued
Understanding from whom one receives orders and over who one has control
is imperative to the organization and management of an efficiently run shop.
Each worker must understand the chain of command in the shop and the shop
position in the command. The chain of command must be definite, clear-cut,
and short.
Figure 1-26 illustrates a direct and uncomplicated chain of command.
Figure 1-26. —An
uncomplicated chain of
command.
Organizing also involves dividing work into manageable tasks and arranging
these tasks in logical order. Workers assigned to the task must have a clear
definition of their duties and responsibilities. When assigning workers to a
job, consider how many people the job requires, worker skill levels, and the
job time line. Some jobs necessitate dividing the labor force into an
assembly line vice independent workers,
Continued on next page
1-45
Supervision,
Organizing
(Continued)
Continued
Some of the advantages and disadvantages of a divided work force is shown
in the following table:
Work force
Assembly line
Advantages
• rapid production
• developed expertise
Disadvantages
• limited overall
development
• unable to see big
•
Independent worker
• pride in
accomplishment
• development of skills
• sees big picture
picture
boredom
• skilled workers
•
sometimes do menial
tasks
requires broader skills
Coordinating
All phases of leadership and management require coordinating. It starts at
the planning stage when deciding who is the right person for the job, whether
the material to do the job is onboard, and if the work environment is ready to
support the job. Coordinating outside shop support, equipment readiness,
and timely completion ensures that deadlines are met and no one shop is
scrambling because another shop fell behind.
Supervising
Supervising is more than coordinating work flow and staying abreast of new
technologies. It involves communicating both up and down the chain of
command, thoughtful and timely decisions, and consistency and fairness. Be
supportive without interfering or stifling creativity. Regularly monitor
inexperienced personnel, but monitor experienced personnel far less.
Provide feedback and motivate your crew. Fulfill administrative obligations
accurately and in a timely manner.
Continued on next page
1-46
Supervision,
Supervising
(Continued)
Continued
FEEDBACK: All people want feedback on job performance and for different
reasons. Provide feedback in the forms of criticism or praise. Feedback in
either form should be honest and constructive. There is a major difference.
Praise a worker in public, criticize him in private. Feedback may be
intangible as in verbal exchanges or physical gestures and touch or tangible
as in counseling sheets, evaluations, and awards.
The following table lists some tangible forms of feedback:
Further Information
Form
Counseling sheets
• Local policy and instruction
Liberty
• Local policy and instruction
More challenging assignments
• Local policy and instruction
Evaluations
•
Awards
• Local policy and instructions on,
• commendatory
•
Navy Performance Evaluation
(EVAL) and Counseling System,
BUPERSINST 1610.10
correspondence
• Sailor of the
Month/Quarter/Year
• commendatory mast
Navy and Marine Corps Awards
Manual, OPNAVINST 1650.1
MOTIVATION: Take time to know each worker and what motivates each
one. Motivate people differently. Be creative in seeking ways to motivate
your crew members. Foster team spirit within the shop, division, and
command. Motivate positively. Negative motivation produces negative
results and promotes undesirable behaviors.
Continued on next page
1-47
Supervision,
Supervising
(Continued)
Continued
ACCURACY: The administrative forms you complete and submit are only
as good as the accuracy of the information on them. Inaccurate figures
misrepresent situations and lead to misunderstandings that may cost the shop
funding and billet structure. So be accurate.
TIMELINESS: Complete tasks, both administrative and shop, on time.
Submitting input late is like not submitting input at all. Seniors and
subordinates appreciate and respond to timely consideration. When you are
unable to complete an item quickly, conduct regular follow-ups and provide
updates to individuals concerned.
Training
If you are a supervisor, you are the frost and primary link to rating
knowledge. You have a responsibility to train subordinates and educate
seniors about your rate. You are the most experienced person onboard at
your level of expertise in your field. Make reference material available and
explore new technologies and products. If you are not the supervisor, your
obligation is to attend training, study all reference materials, and learn new
skills actively.
The following are a few recommendations for an effective training program:
• Assemble all reference materials
• current bibliography (BIB)
• Personnel Advancement Requirements (PARS)
• directives and instructions
• rate training manual
• manufacturer’s instruction manuals
• civilian references
• Establish a set time
• without interruptions and as part of regular work routine
• same day and time weekly
• 1 hour minimum
• Review all material 3 months before exam
• review to understand
• quiz or test regularly
Continued on next page
1-48
Supervision,
Training
(Continued)
Continued
The following are additional Navy training manuals you may want to study:
•
Blueprint Reading and Sketching, NAVEDTRA 12014
•
Lithographer’s Mate 3 & 2, NAVEDTRA 10451
•
Photographer’s Mate Basic, NAVEDTRA 12700
•
Photographer’s Mate Advanced, NAVEDTRA 12701
•
Navy Customer Service Manual, NAVEDTRA 12972
•
Navy Correspondence Manual, NAVEDTRA 13091
Check with your Educational Services Office concerning the availability of
the BIBs and PARs electronically.
Accountability
Regardless of your position in the chain of command, take responsibility for
your actions. Take charge of your professional and personal behavior.
Invest in how the shop is run. Be responsible for applying what you learn to
what you do. Inform your seniors on all matters impacting the shop and seek
assistance if needed. Do your job to the best of your ability.
1-49
Job Orders
Introduction
Job orders are requests for a product that requires the expenditure of funds
and man-hours. Job orders accompany the job to completion. They are a
record of the classification of the job, the originating department, the code or
activity, the originator, and a phone number. The job order shows who did
the job, how long it took, and how much supplies were used. Job orders
should also indicate who picked the job up and when. Retain job orders for 1
year or until a new fiscal year begins before discarding.
Format
Your job request may be the standard Navy job request, or it maybe a local
form. Local forms need to present a complete picture of information to the
worker. Supervisors must make sure there is enough information on the job
order for the worker to do the job without having to do additional
calculations or finding more information.
Local forms
Base the information for the construction of a local job order form on the
reporting criteria for the VI annual report. This will simplify report
requirements by building in readily quantifiable figures. Add to this
information the date when the job entered the shop and the date due. There
should be a section where the shop LPO can make specific comments to the
worker or assign a priority and an area for a pick-up signature and date.
Specific guidance for designing job order request forms is in SECNAVINST
5290.1.
Job order log
Enter incoming job orders into a job order log book. Give them a sequential
number and write down information including a brief description of the job in
the log. This is an invaluable aid in tracking the progress of a job throughout
the shop. Later, this information will gauge predictability in the history and
trends in work load and supply use. You will have a ready reference for job
status, man-hours spent on a job, and a record of who picked up the job and
when. Maintain this book accurately and diligently.
Continued on next page
1-50
Job Orders,
Standard job
order form
Continued
Figure 1-27 is the front of a standard job order form.
Figure 1-27. —Job order.
Continued on next page
1-51
Job Orders,
Standard job
order form
(Continued)
Continued
Figure 1-28 shows the amount and type of information on the job order that
will also be in the job log and eventually translated to the VI report.
Figure 1-28. —Audiovisual Activity Job Order (back).
1-52
Customer Service
Introduction
The Navy Illustrator Draftsman is a customer service oriented rate. We
provide a product to a customer. Your customer maybe the fleet, a
coworker or peer, your seniors, and even a subordinate. The customer
perceives your attitude and responsiveness as part of the product. You spoil
a beautifully executed product by treating a customer poorly. Poor treatment
is what a customer remembers. If you are not able to assist your customers,
refer them to someone who can. Don’t let a customer walk away from you
dissatisfied.
Figure 1-29 shows worker responsibilities to extend professional customer
service.
Figure 1-29. —Service obligations.
Customer
treatment
Be courteous and responsive to the requests of customers. Listen carefully to
what they want. If they are asking the impossible, tell them so and offer
alternatives and solutions. Project a positive attitude and do not ridicule
customers for their ignorance. You are the expert; guide them
professionally. Most customers are not aware of the talents that a DM has or
the capabilities of the shop.
1-53
Quality Control
Introduction
All work done in your shop reflects upon the shop, its workers, and its
leadership; whether you or a coworker did the work is immaterial. It does
not matter if you are the supervisor or the worker; the reputation of the shop
is your reputation. The work produced by the shop must be professional in
appearance and meet professional standards. A shop should have someone to
review completed jobs to ensure that they are, in fact, completed as the
customer requested and that they meet prescribed standards of execution and
presentation.
Quality control
inspectors
Individuals with a keen eye for detail and a thorough knowledge of drafting
standards and practices should review completed jobs before the originators
are called to pick them up. LPOs may assign these individuals and should
rotate the assignment occasionally to cross train other workers.
What to look
for
Before a product is reviewed for quality, the inspector must have a copy of
the original to mark corrections on. When a copy is unavailable, then cover
the original with an overlay to protect it. Do not markup an original
drawing. The inspector is looking to see if the artwork satisfies the
customer’s request. The inspectors have a set of standards or guidelines for
format, size, lettering, and standard drafting practices. If the job requires
support from other shops, they check to see if those shops will have problems
handling the job.
1-54
Summary
Review
This chapter briefly covered shop layout and the importance of the physical
environment in the shop. There is a list of regulations and forms that have a
direct influence on the operation of the shop and your professional
knowledge. Files and supply are site specific. Good supervision requires
constant application and refinement. Job orders, customer service, and
quality control are as important to a shop as good supervision. Run your
shop as if it needed to show a profit or as if it were your shop in the civilian
sector. Remember, your reputation depends on a quality end product and
prompt, courteous customer service.
Comments
Thoroughly understand regulations, those that apply to how a shop is run and
those that apply to you and your workers as Navy personnel. A solid
foundation in Graphic Design Standards, copyright regulations, and printing
regulations is imperative. Stay abreast of new instructions in the field of
computer generated graphics and electronic imagery manipulation, hazardous
waste, and precious metals. Practice the core values of honesty, integrity,
and courage in every transaction with every person. Go home at the end of
the day confident that you have done your very best work and that you have
treated all persons well and fairly.
1-55
CHAPTER 2
BASIC EQUIPMENT
Overview
Introduction
The environment of the Navy Drafting shop directly reflects the vitality of the
shop and the abilities of the personnel assigned to it. It sets the mood for
creativity and productivity. Cleanliness, availability of supplies, and
equipment readiness are important to the environment of the shop and affects
the way a customer perceives the professional knowledge and capabilities of
personnel.
Objectives
The material in this chapter enables you to do the following:
• Identify the angles created by the use of the 30/60- and 90-degree triangles
both alone and in combination.
• Differentiate between standard cased instruments and special-purpose
instruments.
• Identify the steps in cleaning a technical pen with a reservoir.
• Select the appropriate lead hardness for a detailed technical drawing.
Continued on next page
2-1
Overview,
In this chapter
Continued
This chapter covers the following topics:
Topic
See Page
Furniture
2-3
Cased Instruments
2-20
Special Cased Instruments
2-28
Pens
2-34
Drawing Aids
2-39
Scales
2-50
Brushes
2-59
Pencils
2-64
Basic Consumables
2-67
2-2
Furniture
Introduction
The name Illustrator Draftsman conjures up a visual image of a particular
type of table and drawing instruments. However, a drafting table and a set of
cased instruments are not all a DM has to work with. Along with the use of
furniture and equipment is the responsibility of maintenance.
General care
Tables, straightedges, and other equipment that is common to drafting shops
should be kept clean of debris and clutter. Periodically, clean them with mild
detergent and rinse them well. Use a thinner or mineral spirits to remove
adhesives and wax. Keep tables and straightedges free of nicks and
lacerations. Carefully adjust tables and chairs for comfort in sitting or
standing at work.
Drafting tables
Drafting tables come in a variety of shapes and sizes. Most tables have a
height and a tilt adjustment. The trend is toward modular systems with an
adjoining worktable. Do not cut against the drafting table. Make it a
practice to cover the drafting tabletop and change the cover when it becomes
soiled or unserviceable.
Figure 2-1 shows a large drafting table.
Figure 2-1. —A large drafting table with a roller-type
drafting machine.
Continued on next page
2-3
Furniture,
Drafting tables
(Continued)
Continued
Figure 2-2 shows many types of drafting tables.
Figure 2-2. —Drafting tables.
Continued on next page
2-4
Furniture, Continued
Worktables
Worktables are large, flat tables used to spread out additional reference
material or equipment. Cutting may be done on this table provided you
cover it with cardboard or vinyl. Besides protecting the tabletop, the
covering prevents the blade from snapping or slipping across the table.
Figure 2-3 shows a typical worktable.
Figure 2-3. —A work table.
Light tables
Light tables may be small and portable, or as large as a drafting table.
Illuminated from underneath, they allow a worker to see through paper and
trace an image. They are invaluable for aligning transparencies or in color
separation work. Never cut against a light table as this will scar the glass
surface. Furthermore, do not lean against or on top of a glass tabletop.
Figure 2-4 shows a portable light table.
Figure 2-4. —A light table.
Continued on next page
2-5
Furniture, Continued
Tabourets
Tabourets are small, portable work stations that contain some storage in the
bottom and a small drawer. They are useful when a job requires a temporary
work station at a remote location away from the shop.
Figure 2-5 shows a two drawer tabouret.
Figure 2-5.
—A tabouret.
Table coverings A table covering protects the table from damage and wear. It smooths over
existing damage to the drawing surface and changes easily when it becomes
soiled or unserviceable.
The following table shows four table coverings and their advantages:
Advantage
Material
Cellulose acetate
paper
• resin coated
• short-term protection
• maybe gridded
vinyl
• long lasting
• self sealing
• most popular
• available as translucent for light tables
Mylar
• long lasting
• dimensionally stable
Cork
• permanent
• use on badly scarred tabletops
Continued on next page
2-6
Furniture,
Continued
Table coverings Apply new table coverings periodically and according to the following
(Continued)
procedures:
Cellulose acetate paper
Action
Step
1
Roll out and cut paper to fit table.
2
Wet paper and place on table.
3
Tape around table edges.
4
Paper will expand when wet and shrink when dry to fit tabletop.
CAUTION: This type of covering may snap smaller drafting tables or tables
not reinforced with internal rods.
Vinyl and Mylar
Action
Step
1
Roll out and cut vinyl/Mylar slightly larger than tabletop.
2
Allow vinyl/Mylar to lie flat for 24 hours before applying.
3
Lay vinyl/Mylar on table and trim to size.
4
Tape to table across the top of board only.
Continued on next page
2-7
Furniture, Continued
Table coverings
(Continued)
Cork
Action
Step
1
Roll out and cut cork slightly larger than tabletop.
2
Apply glue to tabletop and cork back.
3
Allow glue to dry.
4
Placing paper over the glued back of the cork, gently roll cork up.
5
Position cork roll carefully over one end of the table and unroll
over tabletop.
6
Gradually slide paper out from under cork while applying pressure.
7
Trim to size.
8
Cover tabletop with additional cover of cellulose acetate paper,
vinyl, or Mylar.
Chairs
There are many types and styles of chairs in the supply system through
Government Supply Agency (GSA) contract. You will spend a great deal of
time in this chair at the drafting table so make sure it is comfortable. It
should be adjustable in height and tilt. Whether it has arms or rollers is a
personal preference.
Lighting
Natural lighting is the best type for drawing; however, it is not always
available. Overhead lighting is usually the fluorescent type and not bright
enough for drafting work. You need additional lighting attached to the
tabletop to alleviate shadows and glare. These desk lights are available in
many styles including a ring light around a magnifier for closeup work.
Attach a desk light for a right-handed draftsman to the upper left corner of
the table. For a left-handed DM, attach the desk light to the upper right
comer of the table. Minimize shadows cast by the hand for they distract and
distort visual perception.
Continued on next page
2-8
Furniture, Continued
Waxers
Waxers are machines that heat an adhesive wax substance to a liquid form
and apply it in a thin layer. The two types of waxers are hand waxers and
tabletop waxers. A hand waxer waxes a 2-inch-wide strip and a tabletop
waxer waxes a full sheet of paper.
To use a hand waxer, follow this table:
Action
Step
1
Look at sight glass on the side of waxer.
2
Lift top cap to replace wax brick if low on wax.
3
Plug in waxer.
4
Wait 20 minutes or until wax flows easily from the roller.
CAUTION: Never overturn waxer once the wax is heated.
Figure 2-6 shows a hand-held waxer.
Figure 2-6. —A hand waxer.
Continued on next page
2-9
Furniture,
Waxers
(Continues)
Continued
To use a tabletop waxer, follow this table:
Step
Action
1
Make sure the machine is a minimum of one-third capacity full of
wax.
2
Turn on the machine to medium setting.
3
Allow 30 minutes to heat wax evenly.
4
Run the material through waxer.
5
Run the material through waxer a second time and at a right angle
to the first pass.
6
If wax does not appear as a light frost on the back of the material,
adjust temperature setting.
7
Allow 20 minutes for waxer to heat wax evenly with new
temperature.
8
Waxed material is repositionable until burnished into place.
Figure 2-7 shows a tabletop waxer.
Figure 2-7. —A tabletop waxer.
Continued on next page
2-10
Furniture, Continued
Mat cutters
Another piece of equipment often found in drafting shops is a mat cutter.
The two basic types of mat cutters are hand-held mat cutters and carriage
units. Hand-cut mats require great skill and a steady hand. Carriage units
ensure uniformity, speed, and accuracy. Carriage units cut oval, round,
rectangular, square, and fancy cut mats. They may be large and mounted on
a wall or they may be small tabletop units. Both types of mat cutters require
a plentiful supply of fresh blades.
Figure 2-8 shows a mat being cut by hand.
Figure 2-8. —Hand cutting a mat.
Figure 2-9 shows a tabletop carriage unit.
Figure 2-9. —A carriagetype mat cutter.
Continued on next page
2-11
Furniture,
Paper cutters
Continued
The most abused tool in the shop is the paper cutter. Because of this abuse,
do not trust the scale at the top of the cutter for accuracy. When you use the
cutter, do not force it to cut more material than it can easily handle. Cut
only paper or light cardstock. Paper cutters come in a variety of sizes with
the most common measuring 36 inches in blade length.
To use a paper cutter, follow this table:
Action
Step
1
Measure and mark the piece to be cut.
2
Raise cutter arm.
3
Hold the piece firmly against top edge of cutter.
4
Draw cutting arm swiftly and cleanly down in one stroke.
5
If item is too large for one cut:
• cut through item stopping short of the end by 5 inches,
• rotate and reposition item to place uncut portion at the top of the
cutter, and
• carefully and firmly complete cut.
6
Replace arm in DOWN position and engage safety catch;
failure to engage safety catch may result in the arm springing up
and damaging the mechanism at the top of the cutter.
CAUTION: Never have a coworker assist by catching paper cuttings. Even
a dull blade can sever skin.
Continued on next page
2-12
Furniture, Continued
Paper cutter
(Continued)
Figure 2-10 shows the nomenclature of a paper cutter.
Figure 2-10. —A paper cutter.
Drafting
machines
A drafting machine combines the functions of a parallel ruler, a protractor, a
scale, and a triangle into one piece of equipment. It is available for lefthanded draftsmen. The five basic parts of a drafting machine are the
protractor head, the scale mechanism, the removable scales, the linkage, and
the table clamp.
Continued on next page
2-13
Furniture,
Drafting
machines
(Continued)
Continued
PROTRACTOR HEAD: The protractor head rotates by degrees allowing
angle selection. A lock button secures the head at the selected angle. The
head maintains a true angle throughout motion over the drawing surface.
The protractor head houses the scale mechanism that holds the scales into
place.
Figure 2-11 shows the location of the protractor head.
Figure 2-11. —A
drafting machine.
SCALE MECHANISM and REMOVABLE SCALES: There are a variety of
scales available for the drafting machine. Not only do scale faces vary, but
so does the composition of the scale. Scales can be made of clear plastic,
wood, or metal. Two removable scales attach to the scale mechanism at right
angles to each other via male and female dovetail fittings, In fitting the
scales to the mechanism, you should hear an audible click. An elongated slot
on the mechanism allows minor angular adjustments to the scale. Do not
force a scale into the fitting.
Figure 2-12 illustrates how dovetail fittings connect.
Figure 2-12. —Dovetail
fittings.
Continued on next page
2-14
Furniture, Continued
Drafting
machines
(Continued)
LINKAGE: The three most common linkages for a drafting machine are the
pin joint, the steel band, and the roller. Because of the ability to adjust
tension in the bands, steel band linkage is superior to pin joint linkage.
Drafting machines with a roller linkage are advantageous when you are
working on a large table or in a small space.
Figure 2-13 displays linkages most commonly found on drafting machines.
Figure 2-13. —Linkage types.
TABLE CLAMP: The table clamp attaches the drafting machine to the table.
Adjustments to the clearance and the position of the protractor head are made
at the clamp.
Continued on next page
2-15
Furniture, Continued
Parallel
straightedges
Parallel straightedges maintain parallel motion throughout their length. A
system of cords and internal pulleys kept at moderate tension support the
straightedge at both ends and allow travel up and down the tabletop. The
cord used in a parallel straightedge may be fiber or coated wire.
Straightedges are made in plastic, wood, or metal.
The major advantages of a parallel straightedge are as follows:
• it is used by both left- and right-handed DMs,
• it is easily restrung,
• it is ideal when space is tight, and
• it is simple to adjust and care for.
Keep the parallel straightedge clean, particularly underneath where it contacts
with the paper surface. Periodically check the tension of the cord and adjust
it as necessary. When the cord becomes frayed or kinked, restring the
internal pulleys. Never cut against the edge of a straightedge.
Figure 2-14 shows a parallel straightedge with a tension adjuster.
Figure 2-14. —A parallel straightedge.
Continued on next page
2-16
Furniture, Continued
T-squares
Use a T-square to draw straight, horizontal lines and to provide support for
triangles when you draw lines at an angle. The two parts of a T-square are
the blade and the head. The blade comes in different lengths and has a hole
in the far end for hanging the T-square up for storage. The most popular
blade length is 36 inches. The head mounts under the blade at a 90-degree
angle and rests against the table edge. It guides the T-square in an up-anddown movement on the drawing surface. Because a T-square allows very
little adjustment when it is damaged or out of true, throw it away and get
another.
Figure 2-15 shows a T-square positioned on a drawing board.
Figure 2-15. —A t-square on a
drawing board.
Figure 2-16 illustrates the direction for drawing horizontal lines against a
T-square or straightedge.
Figure 2-16. —Drawing
horizontal lines with atsquare.
Continued on next page
2-17
Furniture,
T-squares
(Continued)
Continued
Figure 2-17 illustrates the direction in which vertical lines are drawn with a
T-square or a straightedge.
Figure 2-17. —Drawing vertical lines with a
t-square.
Steel
straightedges
Draw or cut straight lines against a steel straightedge. Made of heavy gauge
steel, they have the weight and strength needed to guide a blade under
pressure. The cork on the bottom of the straightedge helps keep it in place.
Some steel straightedges are beveled. Keep the straightedge clean and do not
bend it out of true.
2-18
Cased Instruments
Introduction
Cased instruments allow the draftsman to make precision drawings and
maintain uniformity within the drawing. Quality tools improve the work.
Use these tools for their intended purpose.
Cases
Drafting instruments are delicate, precision drawing tools that require
protection. Most instruments, even when purchased separately, come in their
own case. This case protects the drawing tool. Many cases are impregnated
with a rust or corrosive inhibitor to protect the drawing tools from the
environment and atmosphere. Keep drafting instruments clean and put away
when not in use.
Figure 2-18 shows a case full of clean, properly stored drafting instruments.
Figure 2-18. —Drawing instruments in a protective case.
Continued on next page
2-19
Cased Instruments,
Proportional
dividers
Continued
Proportional dividers transfer measurements from one scale to another and
divide lines and circles into equal parts. They consist of two legs of equal
length joined by a moveable pivot. This pivot is a rack-and-gear movement
secured by a thumb nut. There is a series of scales on the divider face
ranging from 1 to 11.5. Divider points are made of hardened steel.
Protect divider points when they are not in use. Keep the dividers clean and
wipe them with a light oil cloth after use, Do not oil the movement on
proportional dividers.
Figure 2-19 shows a set of proportional dividers.
Figure 2-19. —Proportional dividers.
Dividers
Use a set of dividers to step off equal distances, to transfer measurements, or
to divide a line into equal lengths. Dividers have two legs of equal length
terminating in needlepoints. Above the needlepoints is a hinge to help the leg
maintain perpendicularity with the drawing surface. Dividers are joined at
the top.
Figure 2-20 shows a set of common dividers.
Figure 2-20. —Common dividers.
Continued on next page
2-20
Cased Instruments,
Dividers
(Continued)
Continued
To step off equal distances, follow this table:
Action
Step
1
Set dividers to a given distance.
2
Step off distance on drawing as many times as desired.
To transfer measurements, follow this table:
Action
Step
1
Set dividers to correct distance.
2
Transfer measurements to drawing.
To divide a line into equal lengths, follow this table:
Step
Action
1
Divide the line by the number of segments desired and approximate
this distance with the dividers.
Step off this distance on the line.
3
Continue with trial and error until the distances are equal.
Figure 2-21 illustrates how to step off a line.
Figure 2-21.
—Dividing a line
into equal parts.
Protect divider points with cork or eraser bits when they are not in use.
Clean dividers and wipe them with a light oil cloth before you return them to
their case. Do not oil divider joints.
Continued on next page
2-21
Cased Instruments,
Dividers
(Continued)
Continued
To sharpen divider points, follow this table:
Step
Action
1
Hold dividers vertically, legs together.
2
Grind lightly back and forth against an oilstone until even in
length.
3
Hold the dividers horizontally.
4
Whet the outside back and forth while rolling it side to side
between fingers.
5
Inside leg should remain flat and not be ground.
6
Remove all burrs and polish with a leather cloth.
Figure 2-22 illustrates the sharpening of divider points,
Figure 2-22. —A. Evening legs of
dividers. B. Sharpening divider points.
Continued on next page
2-22
Cased Instruments,
Compasses
Continued
Use a compass to draw arcs and circles. A standard compass is 6 inches long
and it has two legs. One leg holds the needlepoint and the other leg holds the
nib. The nib may be a pen nib, a pencil attachment, or another needlepoint.
The legs are often jointed above the nib to maintain perpendicularity to the
drawing surface. The joint also reduces uneven wear and friction to the nib.
To draw a circle larger than 12 inches, add an extension bar at the joint.
Figure 2-23 shows a pivot joint compass.
Figure 2-23. —A pivot
joint compass.
The type of hinge on a standard compass indicates the quality of the
instrument and its ability to hold a set. There are three types of hinges.
Figure 2-24 depicts the three types of compass hinges.
Figure 2-24.
-Compass joints.
Continued on next page
2-23
Cased Instruments,
Compasses
(Continued)
Continued
To use a compass, follow this table:
Action
Step
1
Make sure the needlepoint projects 1/64 inch beyond the nib.
2
Set compass legs to radius of desired circle or arc (Figure C).
3
Place needle carefully in exact center of proposed circle (Figure D).
4
Slowly lower nib to paper.
5
Rotate compass to complete circle (Figure E).
6
Check diameter of circle for accuracy (Figure F).
Figure 2-25 illustrates the steps for drawing a circle.
Figure 2-25. —A. Determine diameter of circle. B. Draw center
lines. C, D, E, and F follow chart.
Continued on next page
2-24
Cased Instruments,
Compasses
(Continued)
Continued
Protect the compass needle with cork or eraser bits. Periodically check the
leg alignment. Keep the pen clean and free of ink buildup. Wipe the
compass with a light oil cloth and return it to the case. Do not oil the joints.
To check compass alignment, follow this table:
Action
Step
1
Spread legs on compass.
2
Bend joints toward center.
3
Needle and nib should touch.
Figure 2-26 illustrates a test for alignment of the compass legs.
Figure 2-26. —Testing a pivot joint
compass for alignment.
Continued on next page
2-25
Cased Instruments,
Extension bars
Continued
Extension bars extend the range of a compass so you can draw larger circles.
Care for an extension bar as you would any other cased instrument.
Figure 2-27 shows a compass with and without an extension bar.
Figure 2-27. —A. A standard
length compass. B. A
standard compass with an
extension bar.
Beam
compasses
Draw an extremely large circle and arcs with a beam compass. The length of
the beam that attaches the nibs and needle is the only limitation in the size of
the radius of an arc or diameter of a circle. There are several styles and
levels of sophistication. Care for a beam compass as you would any other
cased instrument.
Figure 2-28 shows two types of beam compasses.
Figure 2-28. —Beam
compasses.
2-26
Special Cased Instruments
Introduction
Special cased instruments are uncommon drawing tools used for distinct
purposes. They are more delicate than standard cased instruments,
Bow
instruments
For drawing circles and arcs that are less than 1 inch in diameter, use bow
instruments. These delicate instruments have a side thumbscrew adjustment
that controls the diameter of the circle. There are primarily four types of
bow instruments. They are a bow pen, a bow pencil, a bow divider, and a
special tool, called a drop bow pen. A drop bow pen is for drawing circles
and arcs less than one fourth-inch in diameter. It has a rotating center shaft
that moves up and down to minimize motion during drawing.
Figure 2-29 shows bow instruments.
Figure 2-29. —Bow instruments.
Keep bow instruments clean and free of debris. Do not store dirty pen nibs.
Wipe bow instruments with a light oil cloth and store them in the case when
they are not in use.
Continued on next page
2-27
Special Cased Instruments,
Ruling pens
Continued
Ruling pens have a nib adjustment that is either the spring-type or the hingedblade type. The three types of ruling pens you will see in Navy shops are the
detail pen, the contour pen, and the railroad pen.
Figure 2-30 illustrates the differences between the two types of nibs
adjustments.
Figure 2-30. —Nib
types.
DETAIL PEN: The detail pen is sometimes called the “swede” pen. It has
broad nibs to handle a greater ink capacity. It can also handle a heavier
bodied ink.
Figure 2-31 shows a swede pen with typically broad nibs.
Figure 2-31. —Detail or swede pen.
Continued on next page
2-28
Special Cased Instruments,
Ruling pens
(Continued)
Continued
CONTOUR PEN: A contour pen lends itself to freehand, curvilinear lines.
The pen nib swivels on a shaft inside a hollow handle. It draws sharp,
precise lines and the line width is adjustable.
Figure 2-32 shows a contour pen.
Figure 2-32. —A contour pen with rotating handle.
RAILROAD PEN: Drawing parallel lines of equal or differing width is easy
with a railroad pen. Both nibs have adjustable widths. The nibs may or may
not rotate on a shaft inside a hollow handle.
Figure 2-33 shows a railroad pen.
Figure 2-33. —A railroad pen with rotating handle.
When you use a ruling pen, maintain perpendicularity with the drawing
surface and draw the line with the pen at a 60-degree angle toward the
direction the line is being drawn. Clean the pens and wipe them with a light
oil cloth before you store them.
Figure 2-34 illustrates the drawing nib angle to paper.
Figure 2-34.
—Drawing lines with a
pen.
Continued on next page
2-29
Special Cased Instruments,
Needlepoints
Continued
Needlepoints provide a stable pivot point for compasses and dividers to rotate
around while you use them. Needlepoints are either tapered, shouldered, or
a combination of the two.
Figure 2-35 shows the different combinations of needlepoints.
Figure 2-35. —Needle
points.
Protect needlepoints when they are not in use and sharpen them when
necessary.
To sharpen needlepoints, follow this table:
Step
Action
1
Wet one edge of the oilstone and place the needle shoulder against
the edge.
2
Twirl between thumb and forefinger.
3
Stroke back and forth on oilstone while twirling.
Figure 2-36 illustrates the shaping of a compass needle.
Figure 2-36. —Shaping a
compass needle.
Continued on next page
2-30
Special Cased Instruments,
Center disks
Continued
Center disks prevent the enlargement of a hole when concentric circles and
arcs are drawn. They are usually very small with a transparent center and
three needlepoint legs for holding a position on the drawing surface. Position
the center disk carefully on the drawing surface, place the compass needle
inside the center of the disk, and rotate the compass to draw concentric
circles.
Figure 2-37 shows an enlargement of a center disk.
Figure 2-37. —A center disk.
2-31
Pens
Introduction
Pens and pen nibs are used throughout Navy drafting shops. The proper care
and correct use can prolong the life of a pen nib. Pen nibs are made by many
different manufacturers in an endless variety of styles.
Pen nibs
Pen nibs are detachable from a handle or drawing instrument. They maybe
uniform in shape producing a line of equal width regardless of direction of
the stroke, or they maybe irregularly shaped to produce a line of unequal
width depending on the direction of the stroke. There are pen nibs used
exclusively for lettering and nibs used for drawing. Before you use a pen
nib, moisten it slightly to remove the manufacturer’s protective oil. To fill a
pen nib, supply ink by dropper or brush to extend 3/16 inch up the nib blade.
Figure 2-38 shows five different lettering nibs. Notice how changing the
direction of the stroke can change the width and character of the line.
Figure 2-38. -Common nib shapes.
Figure 2-39 shows quill nibs used for drawing. They have more spring than
a lettering nib. Quill pens produce an extremely fine line.
Figure 2-39. -Quill
nibs.
Continued on next page
2-32
Pens,
Continued
Reservior pens Reservoir pens, sometimes called technical pens, contain their own reservoir
of ink. These pens draw lines of uniform width. They have a conical or
tubular tip. Tubular tipped reservoir pens can fit into a hand lettering device
to do lettering work. Inside the pen there is a weighted needle to regulate ink
flow. A penis ready for use when the needle can move freely in the pen.
Figure 2-40 shows an exploded view of a reservoir pen.
Figure 2-40. —Nomenclature of a reservoir pen.
Continued on next page
2-33
Pens,
Continued
Reservoir pens
(Continued)
To use a reservoir pen, follow this table:
Figure 2-41 illustrates a correctly held reservoir pen.
Figure 2-41. —Holding a reservoir
pen.
Continued on next page
2-34
Pens,
Continued
Reservoir pens
(Continued)
Figure 2-42 illustrates the consequences of improper pen handling.
Figure 2-42. —Defective ink lines.
Pen care
Pen nibs and reservoir pens must be kept clean. Crusted ink will ruin a
drawing that is in progress, rust a nib, and permanently freeze a technical
pen. Pen nibs are easily cleaned in warm water with a mild detergent. Use
water and ammonia to remove stubborn ink, When you are using an
ultrasonic cleanser, do not leave a reservoir pen in the cleanser for a long
time. Heat from the vibrating cycles will melt the retaining cap. Before you
clean a reservoir pen, consider the following guidelines:
• thoroughly clean the pen before periods of nonuse,
• disassemble the pen only for thorough cleaning, and
• handle all parts carefully.
Continued on next page
2-35
Pens,
Continued
Reservoir pens
(Continued)
To clean a reservoir pen, follow this table:
Action
Step
1
Remove the holder, clamp ring, and reservoir cartridge.
2
Empty cartridge, rinse, and set aside to dry.
3
Remove the cap, rinse, and set aside to dry.
4
Loosen point section before soaking:
• do not force point section loose and
• allow to soak and renew attempt to loosen.
5
Soak pen in water and ammonia or mild detergent.
6
Rinse well.
7
Thoroughly dry pen parts before reassembly.
When you use an ultrasonic cleanser, do not allow the pen to remain in the
cleanser while the cleanser is on for a long period of time. Heat created by
the vibration will melt the small plastic parts of the pen.
2-36
Drawing Aids
Introduction
Lettering aids, triangles, protractors, anything that helps the draftsman create
an image, is a drawing aid. Some shops are fortunate enough to give each
worker a set of drawing aids. Other shops have to share equipment among
the workers. If your shop shares equipment among the workers, put the gear
away clean and in good repair. Keep uncommon tools in commonly
accessible places.
General care
Most drawing aids are made of plastic. Hang up drawing aids or store them
flat when they are not in use. Never cut against the edges of a drawing aid
or use them as a scraper. When a drawing aid is warped, nicked, out of true,
or broken, throw it away and get another.
Triangles
Use triangles to draw lines at various inclines to the horizontal. Two
common triangles are the 30/60- degree and the 45-degree triangle. Both of
these triangles have a 90-degree base angle. A combination of a 30/60- and a
45-degree triangle creates eleven other angles. Triangles may or may not
have an ink riser to prevent the flow of ink under the triangle edge. Plastic
triangles are the easiest to use because you can see the work through them.
Figure 2-43 illustrates the angles created when you use combinations of a
30/60- and a 45-degree triangles.
Figure 2-43. —Common angle combinations.
Continued on next page
2-37
Drawing aids,
Triangles
(continued)
Continued
Figure 2-44 shows two standard triangles.
Figure 2-44. —Drafting triangles.
Adjustable
triangles
Use an adjustable triangle for drawing lines inclined at irregular angles to the
horizontal. This type of triangle has a set of scales for measuring off an
angle and a thumbscrew for setting the angle. Care for an adjustable
triangle as you would other triangles.
Figure 2-45 shows an adjustable triangle.
Figure 2-45. —An adjustable triangle.
Continued on next page
2-38
Drawing Aids,
Irregular
curves
Continued
The two types of irregular curves common to a Navy Graphics shop are
radius curves, sometimes called railroad curves, and french curves.
RADIUS CURVES: Radius curves are used for drawing large arcs. The
radius of these arcs are from 1 1/2 to 1,000 inches. Some radius curves have
a flat segment on one end, called a tangent.
Figure 2-46 shows radius curves.
Figure 2-46. —Radius curves.
FRENCH CURVES: Use a french curve for drawing irregular or
noncircular curves. Some french curves have an ink riser as part of their
design. If your french curves do not have an ink riser, put one on with
masking tape.
Figure 2-47 shows typical shapes for french curves.
Figure 2-47. —French curves.
Continued on next page
2-39
Drawing aids,
Special
irregular
curves
Continued
In general, special irregular curves are curves not common to a Navy
Drafting shop. These include ship’s curves, mechanical engineer’s curves,
conic sections, and logarithmic spiral curves.
SHIP’S CURVES: These curves are peculiar to ship building. They are
elongated curvilinear shapes in a variety of sizes.
Figure 2-48 shows ship’s curves.
Figure 2-48.
—Ship’s curves.
MECHANICAL ENGINEER’S CURVES: Irregular noncircular curves are
drawn with mechanical engineer’s curves. These curves are very similar to
french curves.
CONIC SECTIONS and LOGARITHMIC SPIRAL CURVES: These curves
are rarely found in a Navy Drafting shop.
Flexible curve
rules
This unusual rule is used for drawing irregular curves. Completely flexible,
most bend to a minimum radius of 2 inches. They have a metal or lead core
which makes them bendable to any desired shape. Some have clear plastic
edges graduated in increments.
Continued on next page
2-40
Drawing Aids,
Using a
drawing aid
Continued
To use an irregular curve, special irregular curve, or a flexible curve rule,
follow this table:
Action
Step
1
Sketch light freehand lines of the desired curve.
2
Divide the line along its length with a series of points.
3
Select a section of curve that corresponds to at least three
consecutive points.
4
Draw curve from point A to point B stopping short of point C.
5
Move curve to next segment.
6
Extend line as before continuing until the line is complete.
Figure 2-49 illustrates using a french curve.
Figure 2-49. —Using a french curve to draw a
curved line through plotted points.
Continued on next page
2-41
Drawing Aids,
Protractors
Continued
To measure and lay off angles from the horizontal without triangles, use a
protractor. A protractor maybe circular or semicircular. Circular
protractors are labeled in quadrants from 0 to 90 degrees or double numbered
from 0 to 360 degrees. Semicircular protractors are double numbered from 0
to 180 degrees. Graduations in one-half degree increments allow accurate
angle protraction.
Figure 2-50 shows a circular and semicircular protractor.
Figure 2-50. —Protractors.
Continued on next page
2-42
Drawing Aids,
Protractors
(Continued)
Continued
To use a protractor for laying off or measuring angles, follow this table:
Action
Step
1
Place the protractor along a straight line CA.
2
Place the O degree mark at the vertex of the desired angle.
3
Locate the desired angle (b) and its corresponding compliment (d).
4
Draw line BD.
Using four points of reference decreases the possibility of error in
measurement.
Figure 2-51 illustrates the stability of a four-point reference system.
Figure 2-51. —Protracting an angle using fourpoint reference.
Continued on next page
2-43
Drawing Aids,
Templates
Continued
Frequently drawn symbols are drawn with the aid of a template. Templates
are thin plastic sheets with symbols and shapes cut out. Usually transparent,
they are available in a great variety. Keep templates clean and back them up
with an ink riser if they do not have one.
Figure 2-52 shows a collage of templates by several manufacturers.
Figure 2-52. —Templates.
Continued on next page
2-44
Drawing Aids,
Handmade
templates
Continued
Sometimes DMs require a symbol repeatedly and there is not a template
manufactured for it. In this case, a DM will have to make one. Medium to
heavy acetate, sheet metal, or cardboard will suffice as template material.
To make a template, follow this table:
Figure 2-53 shows a template in the drawing stage.
Figure 2-53. —Draw symbol one pencil width
larger than desired dimension.
Continued on next page
2-45
Drawing Aids,
Ink risers
Continued
The purpose of an ink riser is to raise the drawing aid slightly off the
drawing surface so that ink will not bleed underneath it. If you do much ink
work, put ink risers on the back of the drawing aid you use most frequently.
To make an ink riser, follow this table:
Action
Step
Clean the back of the drawing aid.
2
Evenly cover the back with masking tape, taking care not to
overlap tape.
3
Add a second layer of tape at right angles to the first layer.
4
With a fresh, sharp blade, cut openings approximately 3/32” larger
than the openings of the template or the edge of the triangle or
curve.
5
Remove unwanted tape.
6
Periodically clean riser and remove and replace as necessary.
Figure 2-54 shows a 30/60-degree triangle with an ink riser of masking tape.
Figure 2-54. —Triangle with
an ink riser.
2-46
Scales
Introduction
Scales measure increments. The most common shaped scales are the
triangular, two-bevel, opposite-bevel, and four-bevel. They vary not only in
shape, but in style, division, and type. When properly cared for, scales will
last a lifetime. Never rap a scale on a table or hard edge. Do not cut or
draw lines against the machined increments of a scale face.
Figure 2-55 shows the most common scale shapes.
Figure 2-55. —Common
scale shapes.
Triangular
scales
Triangular scales provide six scale faces on one rule. Each scale face is
double numbered except for the 16 scale which stands alone. This gives the
DM eleven scales with which to measure. The triangular scale is convenient
for most drawings. Some triangular scales have scale clips to identify the
scale in use. Scale clips also ensure that the correct side of the scale is
against the drawing surface. Large paper binder clips are a suitable
substitute for scale clips.
Continued on next page
2-47
Scales,
Triangular
scales
(Continued)
Continued
Figure 2-56 shows six scale faces on one rule.
Figure 2-56. —A triangular scale
has six faces.
Figure 2-57 shows a scale clip.
Figure 2-57. —Triangular scale with a scale clip.
Continued on next page
2-48
Scales,
Continued
Two-bevel
scales
Two-bevel scales tend to be wide-based. The two scale faces are always
visible.
Figure 2-58 shows a two-bevel scale.
Figure 2-58. —Two bevel scale.
Opposite-bevel
scale
There are two scale faces on an opposite-bevel scale, but only one scale face
is visible at a time. Because the sides of this scale are beveled, it is easy for
you to remove it from the drawing surface.
Figure 2-59 shows an opposite-bevel scale.
Figure 2-59. —Opposite
bevel scale.
Four-bevel
scale
There are four scale faces on one rule on a four-bevel scale. Both edges on
both sides are beveled. This type of scale is usually found as a small pocket
scale particularly for machinists.
Figure 2-60 shows a four-bevel scale.
Figure 2-60. —Four
bevel scale.
Continued on next page
2-49
Scales,
Continued
Division
Scales are either engine divided or stenciled/painted. Engine division is
highly accurate and etched into the scale face. Stenciled or painted
increments are less accurate and easily worn away.
Division style
A DM must know four terms relating to the way in which increments are
displayed on a scale that a DM must know. These are open divided, fully
divided, double numbered, and single numbered.
OPEN DIVIDED: On an open divided scale, only the main increments are
shown. There is one fully subdivided increment on the end of the scale to
the left of the 0 point, Measurements of full units are read from the right of
the 0, while partial increments are left of the 0.
FULLY DIVIDED: All increments on a fully divided scale are shown. This
makes it easier to use, but not easier to read.
DOUBLE NUMBERED: The convenience of a double-numbered scale are
that it reads from left to right and from right to left, allowing two different
scales to appear on the same scale face.
SINGLE NUMBERED: This is by far the easiest scale division to read
because there is only one scale per face, and it is usually fully divided.
Continued on next page
2-50
Scales,
Continued
Division style
(Continued)
Figure 2-61 illustrates how different 1 1/2 inches appear on differing scale
faces.
Figure 2-61. —Incremental divisions.
Continued on next page
2-51
Scales,
Continued
Types of scales Architect scales are the most common in a Navy Drafting shop, followed by
the chain or civil engineer’s scale. Mechanical engineer’s scales are also
found in some shops.
ARCHITECT’S SCALE: This scale is the most common because it
measures increments in terms of feet and inches. It has eleven scales on six
scale faces. All scale faces are double numbered except for the 16 scale
which stands alone. The 16 scale equates to a standard ruler. The architect’s
scale is open divided with the fully subdivided increment divided into 12
(inches). Lay off feet using the main scale to the right of the 0 mark. Lay
off inches from the subdivided increment to the left of the 0 mark.
Figure 2-62 shows the scales on an architect’s scale.
Figure 2-62. —Faces on an architect’s scale.
Continued on next page
2-52
Scales,
Continued
Types of scales CHAIN or CIVIL ENGINEER’S SCALE: This scale is ideal for graphs. It
may represent any measurable quantity in multiples of 10. It has six scale
faces fully divided into decimal units.
Figure 2-63 shows scales from a chain or civil engineer’s scale.
Figure 2-63. —Chain or civil engineer’s scale.
Continued on next page
2-53
Scales,
Continued
Types of scales
MECHANICAL ENGINEER’S SCALE: Mechanical engineer’s scales are
used for small machine parts not less than one-eighth scale. These scales are
double-numbered.
Using the scale
To use any scale, lay the scale on a surface parallel to a line. Use a sharp
pencil to mark all measurements before moving the scale. Your moving the
scale for each measurement increases the likelihood of a cumulative error.
Indicate the measurements with a sharp pencil or pin prick. Do not draw
against the machined increments of the scale or use it as a cutting edge.
Figure 2-64 illustrates the use of a pinpoint to indicate measurements.
Figure 2-64. —Measuring
increments on a triangular
scale.
Indicating scale Indicating scale on a drawing expresses the ratio of the item to the drawing.
It lends perspective to the viewer by providing a reference point. The three
ways to indicate the scale on a drawing are the factional method, the
equation method, and the graphic method.
FRACTIONAL METHOD: The tractional method is indicated by a fraction
or ratio. The drawing unit is the numerator and the object is the
denominator.
EQUATION METHOD: Scale indicated by feet and inches is the equation
method of indicating scale. Feet are followed by a single apostrophe (’) and
inches are shown with a double apostrophe (“).
Continued on next page
2-54
Scale,
Continued
Indicating scale GRAPHIC METHOD: An actual scale is drawn in the graphic method of
(Continued)
showing the scale on a drawing. This is done on maps. The primary scale is
to the right of the 0 and a subdivided scale is to the left of the 0.
Figure 2-65 illustrates the three ways of indicating scale on a drawing.
Figure 2-65. —Indicating scale.
2-55
Brushes
Introduction
It is important to have good quality brushes in the shop. We will cover two
types of brushes which are general-purpose brushes and paint brushes.
Generalpurpose
brushes
Keep shop brushes clean and free of abrasive particles that may scratch
surfaces when you use them. Use the brush for its intended purpose. Do not
whisk your drafting table with a brush just used to pickup dirt from the deck
during field day.
DRAFTSMAN’S BRUSHES: Draftsman’s brushes clean away dust and
debris from working surfaces. They should not be overly abrasive as you
will be whisking this brush over work in progress.
CAMEL HAIR BRUSHES: Camel haired brushes clean mirrored surfaces,
camera lenses, and keyboards. They should be of a high quality soft bristle
to prevent scratching optical surfaces.
PASTE BRUSHES: Use paste brushes to apply glues and for generalpurpose work. They may be cheaper in quality, as most of these brushes are
disposable.
Figure 2-66 shows the profile of common shop brushes.
Figure 2-66. —Common shop
brushes.
Continued on next page
2-56
Brushes,
Paint brushes
Continued
Lettering, illustrations, and painting are done with paint brushes that vary in
composition but have similar physical characteristics. All brushes have
bristles, a ferrule or quill, and a handle. Choice of bristle depends on the
intended use or desired effect. The size of the ferrule or quill dictates brush
size and holds the bristles tightly in place, and the handle, usually made of
hardwood, indicates the size of the brush.
Figure 2-67 shows brush nomenclature.
Figure 2-67. —Brush nomenclature.
Shapes of a
paint brush
There are four major shapes to paint brushes: fan, round, flat, and bright.
The fan shape feathers paint over a surface and responds well to a light
touch. The round shape is most commonly used for watercolor because it
picks up and retains more pigment and water. Bristles on the flat and bright
will differ according to the type of pigment used but tend to be a stiffer more
controllable brush.
Figure 2-68 shows the shape of common paint brushes.
Figure 2-68. —Brush
shapes.
Continued on next page
2-57
Brushes,
Storage
Continued
Store brushes in a clean condition and in the upright position. Never allow a
brush to dry or set on its bristles. This permanently curls the bristles and
ruins the brush for further use. Use a glass, a mug, or a brush holder to
store brushes when they are not in use.
Figure 2-69 shows correctly stored brushes.
Figure 2-69. —Store brushes.
correctly.
Brush hair
The choice of a brush depends on the intended use, the desired effect, and the
nature of the pigment. Many types of natural and synthetic bristles or hair
are available in all shapes. Your creativity will dictate selection of the
appropriate brush; however, the novice should follow these guidelines for red
sable, camel hair, and ox hair.
RED SABLE: True red sable is the most desirable brush to use. Use it
primarily for watercolor and washes. It has a great capacity for holding
pigment and water while retaining a spring in the bristles. Red sable brushes
are very responsive when used with water soluble pigments. They become
less responsive with heavy bodied pigments, such as oil and acrylic.
Continued on next page
2-58
Brushes,
Brush hair
(Continued)
Continued
CAMEL HAIR: Camel hair is a mixture of squirrel, skunk, badger, and
pony hair. These brushes are extremely soft and have less spring in the
bristles than red sable. Camel hair brushes with very long bristles letter well
on smooth surfaces. Pin stripes are made by a camel hair dagger brush.
Camel hair brights and flats are used for oil and acrylic paint.
OX HAIR: Ox hair brushes are strong bristled brushes. These coarse
bristles are made into flats and brights. Use ox hair brushes to do rigid
lettering and for painting with oils and acrylics.
SYNTHETIC HAIR: Synthetic fiber hair is rapidly replacing natural bristles
in brush construction. Synthetics have the spring and resiliency to withstand
abuse from multi-medium use and chemical cleaners. Fan-shaped brushes
most often appear with synthetic bristles. Synthetic bristle brushes work well
in any medium.
Oil brushes
If you use both water- and oil-based paints, dedicate a set of brushes to oilbased paints only. After cleaning the brushes and before storing them, add a
drop of oil to the bristles. This keeps the bristles pliable and lessens the
effect of the harsh chemicals used to clean them. Store them in an enclosed
container to m We airborne contaminants. A set of brushes dedicated to
oil-based paints will also eliminate the chance of your confusing them with
brushes used for water-based paints. Once you use a water-based paint
brush in oil-based paints, you should not use it for a water-based pigment
again.
Continued on next page
2-59
Brushes,
Caring for
brushes
Continued
After using a brush, clean it thoroughly and store it. A brush properly cared
for will last many years. Throw away crusted and curled brushes or reuse
them as disposable paste brushes.
To clean a brush, follow this table:
Action
Step
1
Remove as much color as possible:
• use water for water-based paints and
• use thinner or mineral spirits for oil-based paints.
2
Wet brush in lukewarm water.
3
Lather palm of hand with mild face soap.
4
Stroke brush back and forth in hand.
5
Rinse thoroughly in clean water.
6
Shake excess water from bristles.
7
Shape bristles gently into original shape.
8
Store brushes with bristles up.
2-60
Pencils
Introduction
A pencil is the most readily available tool for expressing ideas from mind to
paper. Limited only by imagination, use a pencil to draw the infrastructure
of a drawing or as the finish medium. Some artists specialize in the pencil
and its many variations as a form of expression.
Drawing
pencils
For general drawing, sketching, and layout, use a drawing pencil. Drawing
pencils have a wood casing around a core of graphite or composite. The
composition of the core, called a lead, and the hardness of the lead determine
the grade or rating of a pencil.
General care
Take care not to drop a pencil or rap it against a surface. This will break the
lead internally and drastically shorten the life of the pencil. Keep a drawing
pencil sharpened by using a sandpaper sharpener, a draftsman’s pencil
sharpener, or a standard office sharpener.
Lead hardness
Pencil leads are available in 17 grades from 6B which is the softest to 6H,
the hardest. Soft leads are 6B to 2B and have a thick-diameter core. Soft
leads are best used in freehand work where smudging is a creative option.
Medium-rated leads are the B to 3H pencils. These are general layout
pencils sometimes used for freehand work. Technical drawing and drawing
that requires a degree of precision are done by hard-leaded pencils in the 4H
to 6H range. Hard-leaded pencils have a small-diameter core and tend to
appear lighter in density than a soft-leaded pencil. Variations do occur
among manufacturers.
Figure 2-70 shows a chart of lead hardness.
Figure 2-70. —Lead hardness.
Continued on next page
2-61
Pencils,
Continued
Lead
composition
Lead is made of a composition of substance and binder. The substance of a
pencil lead can be graphite, carbon, charcoal, lithographic grease, colored
pigment, wax, or pastel. The binder is relatively unimportant unless you are
writing on a slick surface. The selection of a pencil lead is a matter of
personal preference and creative intent; however, some guidelines do apply.
GRAPHITE: Graphite leads leave a dense black line with a shiny surface
that can reflect light or glare when photographed for reproduction. As
humidity increases, the lead softens and smears easily. In extremely dry
conditions, the graphite produces a dusty residue.
CARBON: Carbon pencils produce a dense, dull-surfaced black line that is
not affected by humidity to the same extent that graphite is. Carbon pencils
tend to smear if they are not freed by a commercial fixative.
CHARCOAL PENCILS: Charcoal pencils are not always found in a wood
casing. Charcoal is available as sticks and in powder form. Charcoal
produces a dense, dull black line.
LITHOGRAPHIC PENCILS: This pencil produces a dense black line which
tends to be greasy. Its primary purpose is marking lithographic plates, but it
also marks well on glass and plastics.
COLOR PENCILS: In a color pencil, pigment determines the color of the
line and binder determines whether it is water soluble or waterproof. Some
binders have a waxy binder that makes it difficult to erase or blend them.
PASTEL PENCILS: Once available only in stick form, pastels are now in
pencil form. The characteristics of the pastel pigment remain the same. In
the pastel, the pigment may be dry or oil-based. They leave a dull, chalky
line and come in many colors. Pastels more popular form is still in sticks
and powder.
2-62
Pencils
Special-purpose
pencils
Special-purpose pencils are those pencils that are nonreproducing or have
waxed based cores. Use a nonreproducible blue pencil for layout work
intended for black-and-white reproduction. Most black-and-white
photographic films are blind to the light sky-blue color and will not record it
on the negative. Nonreproducing lithographic pencils are dark violet in
color. Used on a lithographic plate, this pencil will not appear in the finished
product. Waxed-based leaded pencils, sometimes called china markers, come
in a variety of colors and are capable of marking on glass, plastic, and metal
surfaces.
2-63
Basic Consumables
Introduction
Many things a DM uses in the shop are consumable items. Erasers, pencils,
and brushes are used and discarded. These items are underestimated in terms
of what they do to ease the work load of the DM.
Erasers
There are electric erasers and hand erasers.
ELECTRIC ERASERS: Electric erasers are hand-held units with a power
cord or rechargeable base. They provide a rapid and thorough erasure. Take
care not to hold the eraser in one spot for too long as the rotation of the
eraser and heat generated by it will damage the paper surface. Move the
electric eraser in a circular motion over the drawing protecting those areas to
remain with an erasing shield.
Figure 2-71 shows silhouettes of some popular electric erasers.
Figure 2-71. —Electric erasers.
Continued on next page
2-64
Basic Consumables,
Continued
Erasers
(continued)
HAND-HELD ERASERS: Hand-held erasers are available in different
grades, each with a specific purpose. Hard erasers are a white or grey color
and are very abrasive. They remove stubborn marks in pencil or ink.
Moderately abrasive erasers are red. Soft erasers remove only light lines, as
they are the least abrasive. Soft erasers are pink in color.
Types of
erasers
Erasers have specific purposes. Besides the pencil eraser, there are four
other erasers the DM uses in the work center. These are plastic erasers, art
gum, kneaded erasers, and pulverized eraser particles.
PLASTIC ERASERS: Plastic erasers work well removing unwanted marks
from drawings on Mylar. Moisten the eraser slightly before using to increase
the drag on the drawing surface. This eraser leaves no residue.
ART GUM: This eraser is excellent for removing finger marks and smudges
without marring the surface of a drawing. An art gum eraser leaves much
residue which should be whisked away with a draftsman’s brush.
KNEADED ERASERS: Kneaded erasers bring out the highlights in a
drawing and clean a drawing surface. They work by absorbing graphite
particles. Absorption increases by kneading the eraser in your hand.
Generally, it leaves no residue unless it is too old and/or too full of absorbed
particles. If this eraser becomes overly warm, the substance may break
down, leaving a stain on the drawing surface.
Continued on next page
2-65
Basic Consumables,
Types of
erasers
(Continued)
Continued
PULVERIZED ERASER PARTICLES: Pulverized eraser particles are
available as a powder or in a soft mesh bag. They clean a drawing of surface
smudges and prepare it to accept ink. Whisk away the residue of eraser
particles with a draftsman’ brush.
Figure 2-72 shows the types of erasers common to a work center.
Figure 2-72. -Common
erasers.
Continued on next page
2-66
Basic Consumables,
Erasing shields
Continued
Erasing shields protect areas of a drawing that you do not want to erase.
They are made of a light gauge, spring metal with numerous openings in
variegated shapes and sizes.
Figure 2-73 shows an erasing shield.
Figure 2-73. —Erasing shield.
Stumps and
tortillons
Stumps and tortillons blend pencil, charcoal, pastels, and crayons together in
a drawing. They are made of kraft paper twisted tightly into blunt and
pointed ends. When they are dirty, throw them away and get a clean one.
Figure 2-74 shows stumps and tortillons.
Figure 2-74. —Stumps
and tortillons.
Cutting mats
Use a cutting mat to cut out items with a blade. They are self-sealing and
stabilize the blade during cutting. Keep the cutting mat clean and remove the
wax or adhesive buildup often.
Continued on next page
2-67
Basic Consumables,
Blades
Continued
Knives or blades come in an assortment of shapes. Each shape has a specific
purpose. Blades normally found in a shop include swivel knives, craftsman
knives, and box cutters. Keep a sharp blade in the knife handle. Change
blades frequently to ensure a clean cut.
Figure 2-75 shows examples of blades. Let personal preference dictate the
blade most comfortable for you,
Figure 2-75. —Blade
shapes.
Figure 2-76 illustrates knife styles with particular purposes.
Figure 2-76. —Knife styles.
2-68
Summary
Review
This chapter covered the general types of shop furniture found in a Navy
Drafting shop and how to care for it. It described cased and special cased
instruments and the procedures to store and use them. Drawing aids and
scales are some of the simplest and most worthwhile tools to master.
Practice with them. Use the pens and pencils mentioned. Consumable
supplies represent the bulk of supplies that you, as a DM, will use. Do not
waste supplies needlessly.
Comments
Familiarity with any piece of equipment will enable the DM to assess the
limitations and capabilities of the shop accurately. Know your equipment
well. Care for the equipment in the shop as if it were your own. Maintain
an open mind to new products in the market. A good, capable shop enhances
the reputation of each worker in it. In a rate as small as DM, that reputation
could follow you throughout your career.
2-69
CHAPTER 3
COMPUTER EQUIPMENT
Overview
Introduction
You may or may not have experience in doing your job with a computer.
However, computers are rapidly supplementing traditional methods of
preparing artwork and work intended for reproduction, and you will have to
interface with them at some point in your career. Not only is computer literacy
becoming a desirable in-service job skill, but it is an essential communications
skill in the civilian arena. Learn the vocabulary and learn your way around a
computer.
Objectives
The material in this chapter enables you to do the following:
•
Identify the procedures to clean and inspect computer peripherals.
•
Identify hardware components.
•
Correctly install peripheral devices.
•
Select compatible hardware and software accessories.
•
Differentiate between hardware and software.
Continued on next page
3-1
Overview,
Acronyms
Continued
The following table contains a list of acronyms that you must know to
understand the material in this chapter:
Continued on next page
3-2
Overview,
Continued
Acronyms
(Continued)
Continued on next page
3-3
Overview,
In this chapter
Continued
This chapter covers the following topics:
Topic
See Page
Hardware
3-5
Input Devices
3-6
Edit Devices
3-12
Output Devices
3-19
Input/Output Devices
3-27
Microcomputer Setup
3-28
Software
3-31
Text Programs
3-32
Graphics Programs
3-33
Desk Top Publishing Programs
3-36
Communications
3-38
Security
3-39
3-4
Hardware
Introduction
Computer hardware is all the equipment and devices associated with the
operation of a computer system. Everything that is tangible or touchable
regarding the computer is hardware, including the disks used to program the
computer. Hardware is divided into input devices, edit devices, output
devices, and input/output devices.
General
maintenance
Practice the following general maintenance procedures to maintain your
computer in peak operating efficiency:
•
Keep devices clean and free of debris.
•
Clean the keyboard and button selection areas with a camel hair brush.
•
•
•
•
•
Clean optical surfaces with a lint-free cloth or chamois. Check the
operating manual to make sure screen surfaces are not covered with a
glare preventative spectral coating that spray cleaners could damage.
Clean exterior cases, tabletops, and mouse track with a slightly
dampened, lint-free cloth. Dampen the cloth; do not wet the components.
Do not allow food or drink near the keyboard, the mouse track, or the
pressure sensitive and electronic tablets.
Inspect connector ports (COMPORTS) and pins for damage.
Carefully align pins and never force a connection when connecting
devices.
3-5
Input Devices
Introduction
Input devices are devices that allow a system operator (SYSOP) to interface
with a computer. You interface with the computer by entering your
commands into the computer system through a keyboard, a seamer, a mouse,
a trackball or joystick, a pressure sensitive or electronic tablet, or a light pen.
These are all input devices.
Keyboards
The keyboard is the primary means for inputting data into the computer.
Based on a standard typewriter keyboard, computer keyboards have
additional special-purpose keys, function keys, cursor movement keys, and a
numeric keypad. Keystrokes input text and characters into memory or on a
screen. Combinations of keystrokes prompt key functions such as holding,
underlining, and italicizing. An enhanced keyboard minimizes keystrokes by
using function keys like F1, F2, and so forth, to access functions or
commands. The following table lists special-purpose keys and their function:
Continued on next page
3-6
Input Devices,
Continued
Function keys
Function keys are special-purpose keys, numbered F1 through F10, used to
communicate specific fictions to the operating system. These keys simplify
tasks that might otherwise require several key strokes. These keys can also
be used with other keys to increase the number of functions available. The
software program in operation defines the function of these keys. Be sure to
read the software owner/user manual to understand the purpose of these keys.
These keys are generally located at the top of the keyboard.
Cursor
movement keys
Cursor control keys move the cursor from one place to another on the display
screen. The cursor is the indicator on the display screen that lets the user
know where the next entry will be made. Cursor control keys have an
arrowhead printed on them pointing in the direction that the key will move.
Some keyboards have a separate set of keys for cursor movement; others
have the cursor movement keys incorporated into the numeric keyboard. As
long as the NUM LOCK key is OFF, the cursor movement keys function.
Some software packages use the cursor control keys in combination with each
other or with other keys to increase the number of ways and the speed with
which you can move the cursor. Another cursor movement key — the
SCROLL LOCK/BREAK key – controls screen scrolling. When in the
BREAK mode and used in conjunction with the CTRL key, the SCROLL
LOCK key will interrupt program execution.
Figure 3-1 shows cursor movement keys.
Figure 3-1. -Cursor movement
keys.
Continued on next page
3-7
Input Devices,
Numeric
keypad
Continued
To perform mathematical functions, use the numeric keypad as you would a
calculator. To activate the numeric keypad, press the NUM LOCK key. If
you do not press the NUM LOCK key, the numeric keypad will function as
cursor control keys.
Figure 3-2 shows a numeric keypad. Note the location of the cursor
movement keys on the numeric keypad.
Figure 3-2. —Numeric keypad.
Continued on next page
3-8
Input Devices,
Continued
Scanners
A scanner allows you to copy a photograph, a drawing, or a text page into
the memory of the computer. It does this by measuring tonal or color values
and converting them into a binary code that the computer can digest. You
may then “clean-up” the image using the appropriate software program
before printing a final copy for reproduction. Software for the scanner is as
important as the scanner. The software provides for image manipulation and
export format compatibility. A scanner is particularly useful for copying
large amounts of text or images not previously saved on disk that now
require revision. When using a scanner, be careful not to violate an existing
copyright.
Grey scale
scanners
Grey scale scanners read tonal values and assign density code numbers. The
density code is available from 16 to 256 levels of grey. For general-purpose
work, select a software program that offers a minimum of 64 levels of grey.
Color scanners
A color scanner reads color value and assigns it a binary code for export.
This scanner will range from 70 to 600 dots per inch (DPI) with 24 binary
digits (bits) of color. For general-purpose work, select a software program
that offers a range between 300 and 600 dpi.
Scanner types
The four types of scanners are the hand scanner, the flatbed scanner, the
copystand scanner, and the slide scanner.
HAND SCANNERS: Hand scanners are useful for small quantity scanning.
They read portions or excerpts from a document page into the memory of the
computer.
FLATBED SCANNERS: Flatbed scanners scan pages out of a book. They
scan an entire one- or two-page spread in one view.
COPYSTAND SCANNERS: Copystand scanners are capable of scanning
three-dimensional objects.
SLIDE SCANNERS: Slide scanners scan slides and transparencies into
memory. Scanners used to scan slides and transparencies require a mirrored
or reflective attachment.
Continued on next page
3-9
Input Devices,
Mice
Continued
A mouse is an input device that allows the SYSOP to stroke functions and
commands rapidly into the computer without touching a keyboard. It also
provides a synchronous movement for drawing. The two types of mice are
the mechanical mouse and the optical mouse. The mechanical mouse fits in
the palm of the hand and rolls around either on a small ball or on small
wheels that roll around the ball. This movement moves the cursor on the
screen. The optical mouse also moves the cursor, but it uses a beam of light
on a reflective mouse pad. Press or click the mouse buttons to access
functions or commands.
Figure 3-3 shows a mechanical mouse on a mouse pad. The mouse pad
protects the ball inside the mouse from collecting dust from the tabletop.
Figure 3-3. —A mechanical mouse.
Joysticks and
trackballs
Joysticks and trackballs are like mice in that they allow rapid access to
functions; however, they are most often used in game playing or contests of
skill. They resemble cockpit wheels, triggers, and guns.
Continued on next page
3-10
Input Devices,
Pressure
sensitive or
electronic
tablets
Continued
Pressure sensitive and electronic tablets are primarily freehand drawing
devices. Sensitive to pressure from the hand, the tablet recreates the thick
and thin strokes made on the tablet to the screen.
Figure 3-4 shows a pressure sensitive or electronic tablet.
Figure 3-4. —A pressure sensitive or electronic tablet.
Light pens
Light pens are similar to ball-point pens; however, the drawing surface is the
screen itself. The light pen activates the photoelectric circuits of the screen
to produce an image.
Microphones
Microphones prompt voice activated computers to perform specific functions.
The computer recognizes a voice pattern and responds by following the
command. Similarly, musical instruments can be fed through a computer to
create electronically enhanced recordings.
3-11
Edit Devices
Introduction
The primary editing device of a computer is the system unit that houses the
central processing unit (CPU) and the disk drive. The CPU reads software
and directs the actions of the peripherals, and the disk drive electronically
stores and retrieves software and information.
System unit
The large box that encloses the CPU and the disk drive is called the system
unit. A horizontally oriented system unit lies flat on a desk top. A system
unit that stands upright is a tower unit. The system unit houses the
motherboard, the disk drives, the power supply, and the expansion ports.
Figure 3-5 shows a system unit.
Figure 3-5. —The system unit.
Continued on page page
3-12
Edit Devices,
Motherboard
Continued
The motherboard or system board is the master printed circuit board that
holds the CPU chip, the Random Access Memory (RAM) chips, the Read
Only Memory (ROM) chips, a math co-processor, extra memory slots, and
the computer clock.
Central
The CPU is a integrated circuit (IC) chip on the motherboard. It is a mass of
Processing unit transistors that coordinate all activities of the computer. It accepts input,
(CPU)
interprets software, and provides output. The CPU chip also controls the
speed or processing power of the computer. The two types of CPUs are PCs
(personal computers that are IBM compatible or clones) and MACs
(Macintosh or Apple exclusives). The main difference between the two is
how the user interfaces with the system. You may find either type in your
work space. Users refer to their computer by the CPU chip numerical
generation, such as 386 or 486, inside the system unit.
Random Access Random Access Memory, or RAM memory chips, randomly store and
Memory
transmit information from memory or a disk. Sometimes referred to as
(RAM)
read/write memory, RAM memory chips determine what programs your
computer is capable of running and how much information you are able to
store. Ram memory is short term in nature; that is, you must save the
information or it will disappear when you turn the machine off. You enlarge
the memory of your computer by installing chips of a larger rated capacity.
Memory chips store bytes of information in kilobyte (KB), megabyte (MB),
or gigabyte (GB) increments. Word processing and graphics software require
a great deal of memory so be sure to coordinate or upgrade the memory
capacity of the computer when you select software packages.
Read Only
Memory
(ROM)
Read Only Memory (ROM) is the memory required by the computer to read
a disk. ROM will remain in memory until it is removed. This memory does
not allow overwriting or modification. Generally, the operating system
instructions of the computer are in ROM circuitry.
Continued on next page
3-13
Edit Devices,
Math coprocessor
Continued
The math co-processor assists the CPU chip in performing mathematical
functions. In most computers, this is a feature that is automatically built into
the motherboard circuitry.
Expansion slots On the motherboard, there are extra connections for enlarging the capabilities
of the computer. Features such as extra memory chips, called single inline
memory modules (SIMMS), a video graphic array (VGA), and network
interface cards (NICs), plug into these expansion ports to expand computer
versatility. When you upgrade software or make additional software
purchases, you may have to enlarge the memory capacity of the computer.
Clock
On the motherboard inside each computer, there is a clock. The clock
coordinates and paces the functions of the computer.
Figure 3-6 shows the motherboard and the basic circuitry found on it.
Figure 3-6. —The motherboard.
Continued on next page
3-14
Edit Devices,
Continued
Disk drives
Also inside the system unit, there is the disk drive or a combination of disk
drives. A disk drive provides direct access to data on a disk for electronic
storage and retrieval. The two basic types of disk drives are the floppy disk
and the hard disk drive. Hard disk drives can be removable as a
precautionary measure of protection for the data stored on the drive.
Floppy disk
drive
Floppy disk drives play and record on floppy diskettes. There are openings
on the face of the system unit for the insertion of a floppy disk. Inside the
disk drive are electronic heads that read and write. Single-sided disk drives
read/write on one side of the disk. Double-sided disk drives have read/write
heads on both sides. The electronic heads in each floppy disk drive
read/write slower than those of a hard disk drive.
Floppy disks
Floppy disks are round, flexible platters covered with magnetic oxide and
encased in a sturdier plastic envelope. The envelope is lined with a soft
material that continuously cleans the disks, as it spins inside the envelope.
The diskette has a hole in the middle, called a center hub. Also on the
envelope, there is a recording window that allows the read/write heads access
to the disk surface. Disks have a notch in the upper right-hand comer which
is a write protect feature to prevent the user from accidentally recording over
existing data. New disks are blank; therefore, you must initially format
every disk you use in your computer. The diskettes used with a floppy disk
drive come in two sizes: 5 1/4 and 3 ½ inch. The following table explains
other diskette features:
Feature
Meaning
Single-sided
Records on one side only
Single density
256 byte capacity per sector
Double-sided
Records on both sides of disk
Double density
512 byte capacity per sector
Quad density
1,024 byte capacity per sector
Continued on next page
3-15
Edit Devices,
Floppy disks
(Continued)
Continued
Figure 3-7 shows floppy disks and their nomenclature,
Figure 3-7. —Floppy disk nomenclature.
Continued on next page
3-16
Edit Devices,
Continued
Hard disk
drives
Hard disk drives are generally part of the system unit. These sealed units are
inside the unit as stacks or tiers of rigid metal platters that are not removable.
Some of the advantages of hard disk drives are their increased speed of
execution and memory capacity. Hard disk storage capacities range from 50
MB to 2 GB. Also, there is no need for you to open, close, file, or find a
diskette manually and no initialization or rebooting, as there is with a floppy
disk.
Removable
hard disk
drives
Data that is sensitive information and requires protection, such as classified
material or advancement examinations and results, belongs on a removable
disk drive. Programs which are large and memory intensive also belong on a
removable hard drive. Removable hard disk drives are just like built-in hard
disk drives except for their portability. You can physically remove a
removable hard disk drive from the system unit for safekeeping in a secure
area, such as a safe.
Figure 3-8 shows a removable hard disk drive.
Figure 3-8. —A removable hard drive.
Continued on next page
3-17
Edit Devices,
Compact Disk
Read Only
Memory (CD
ROM)
Continued
A compact disk read only memory (CD ROM) drive is a disk drive that reads
data stored on computer disks. It can be internal or external to the system
unit. CD ROM is used when many users need the same information and the
nature of the information remains constant over time. The expression Write
Once/Read Many (WORM) describes this type of technology. On CD ROM,
information once recorded cannot be erased or changed, only read many
times.
Video Graphics One piece of hardware that controls the size and resolution of what you see
Array (VGA)
on the computer screen is a Video Graphics Array (VGA) or graphics card,
This card, located on the motherboard, intervenes between the CPU and the
monitor to control the screen display. This graphics card is extremely
important to you as a DM. When you assess the capabilities of your
computer, you should consider upgrading your graphics card to a Super
Video Graphics Array. VGA boards are available as a grey scale display
board or as a color display board. Grey scale display boards have 4 to 8 bits
per pixel (picture element) and offer from 70 to 256 levels of grey. Color
display boards have 8 to 24 bits per pixel and offer smooth blends and
continuous color.
3-18
Output Devices
Introduction
After you enter all the data into the computer and the CPU has had time to
process the information, it exits the computer through an output device.
Monitors, plotters, printers, and film recorders are output devices. They
provide the SYSOP with an image or hard copy data.
Monitors
Monitors provide visual feedback of work in progress. The three types of
monitors are the analog monitor which is similar to a television set but
provides only a video display, the digital monitor which processes data as a
numeric value and provides only a textural display, and the multi
synchronous monitor which provides both analog and digital information.
Multi synchronous monitors
Multi synchronous monitors are capable of processing both analog and digital
information. They work on any computer system displaying text and
graphics with superb resolution and can vary resolution at the SYSOP
discretion. Resolution is the number of pixels per inch and is referred to as
dots per inch (DPI). The dpi in height and dpi in width define the display of
the monitor. A 17- or 20-inch monitor rated at 640 by 480 dpi or higher is a
good monitor for general-purpose work. This is the type of monitor you will
most likely be using.
Plotters
Plotters are output devices used for large linear drawings. The drawing or
design is conveyed to the paper surface by plotting a series of points and
connecting them with lines. Plotters are most often used for drafting or map
making.
Continued on next page
3-19
Output Devices,
Printers
Continued
Printers provide a hard copy printout of data stored electronically inside the
computer or from a disk. The two types of printers are impact printers and
nonimpact printers.
Impact printers Impact printers operate in the same manner as do typewriters. They are
either front striking where a print hammer strikes a character against an inked
ribbon and paper or hammer striking where print hammers strike a character
against paper first and then an inked ribbon. Impact printers print one
character at a time at speeds from 30 to 350 characters per second (CPS).
Impact printers use standard single, multipart, and continuous-form paper.
Dot matrix printers and daisy wheel printers are impact printers.
Dot matrix
printers
A dot matrix printer creates a character with a series of tiny pins or wires
that strike the ribbon or page and leave an image in dots. The resolution of
the matrix is defined in terms of rows and columns of dots. A 7 by 9 matrix
uses seven dots horizontally and nine dots vertically to create a character.
Some dot matrix printers have a 36 by 24 matrix. The size of the matrix
determines the quality of the printed character. Dot matrix printers are near
letter quality, faster than daisy wheel printers, and have speeds ranging from
60 to 350 cps.
Figure 3-9 shows the letter ‘L’ created by a dot matrix printer,
Figure 3-9. —The letter “L” on a dot
matrix printer.
Continued on next page
3-20
Output Devices,
Daisy wheel
printers
Continued
Daisy wheel printers are very similar to typewriters. The flat, circular
printing element contains all text and numeric characters. The element spins
rapidly, pausing only to allow the printing hammer time to strike the
character against the ribbon or paper. Daisy wheel printers are letter quality
printers but they tend to be slow.
Figure 3-10 shows a daisy wheel printer printing element.
Figure 3-10. —A daisywheel printing
element.
Nonimpact
printers
Nonimpact printers do not make contact with paper or ribbon during
printing. They use several techniques for printing, such as xerographic,
electrostatic, electrosensitive, electrothermal, ink jet, and laser. Nonimpact
printers are the fastest of printers with speeds approximating 20,000 lines of
print per minute. They are also much quieter than impact printers. Some of
the disadvantages are that they produce one copy at a time, sometimes
require specially treated paper stock, and the printed output may blur.
Continued on next page
3-21
Output Devices,
Nonimpact
printer types
Continued
Thermal transfer, ink jet, laser, wax, continuous tone die sublimation, and
color phase change are nonimpact printers that you may find in a Navy shop.
THERMAL TRANSFER PRINTERS : Thermal transfer printers use wax or
ink dies from a heated printing element to transfer an image to a page.
INK JET PRINTERS: Ink jet printers spray electrically charged ink through
tiny nozzles in the printing element. The ink passes through an electrically
charged field that forms the image in matrix form. These printers offer very
high-quality resolution and print up to 300 cps.
LASER PRINTERS: A laser printer directs a beam of light that electrically
charges an image on a photosensitive drum. Toner attracts and adheres to the
dots on the drum and a heating element fixes the image on the paper. These
printers can print in excess of 20,000 lines per minute.
WAX PRINTERS: Wax printers use a ribbon of thin transparent wax.
Ribbons are available in color and are useful for transparencies.
CONTINUOUS TONE DIE SUBLIMATION: Continuous tone die
sublimation uses color dies on a plastic film for image transfer. This is a
thermal transfer and requires specially coated papers.
COLOR PHASE CHANGE: A color phase change uses Pantone certified
colors in a wax medium. Like continuous tone die sublimation, this is a
thermal transfer, but it does not require specially coated paper.
Continued on next page
3-22
Output Devices,
Printer control
Continued
There are several buttons that control the functions of the printer. To setup
printer functions manually, you must first put the printer in an Offline status.
The following list contains some of the more common buttons:
Printer control buttons
Continued on next page
3-23
Output Devices,
Printer
indicator lights
Continued
Indicator lights, located above the control buttons, provide printer status
information and functions or features currently in effect. The following list
contains the more common indicator lights:
Printer loading A printer receives paper by being single sheet fed or tractor fed. Single sheet
fed is much like a standard copier paper tray in which paper stacks on the
side of the printer and enters the printer one sheet at a time. Tractor fed
paper is a long continuous sheet of paper with perforations and a series of
holes on each side. These holes fit onto tractor wheels under the front cover
of the printer. Location of and space between the tractor wheels is
adjustable. When it is necessary for you to change the tractor wheel
position, always leave the left tractor wheel in the same position and make
the adjustments to the right tractor wheel. This way all documents will begin
the page at the same location.
Continued on next page
3-24
Output Devices,
Continued
Printer loading Figure 3-11 shows the difference between single sheet fed and a tractor fed
(Continued)
paper.
Figure 3-11. —Single fed and tractor fed
paper.
To load a tractor fed printer, use the following table:
Continued on next page
3-25
Output Devices,
Film recorder
Continued
A film recording device attached to a computer system provides 35mm slides
and negatives of the screen output. It is a lighttight box with a small camera
inside. The lens conventionally photographs the image from the CRT screen.
The film is conventional photographic film and processes normally.
Figure 3-12 shows a film recording device.
Figure 3-12. —A film recording device.
3-26
Input/Output Devices
Introduction
Devices that provide both input and output to the system unit are called
input/output (I/O) devices. A modem is an I/O device as is a
communications local area network (LAN) or a wide area network (WAN)
NIC.
Moderns
A modem is an electronic connection, usually via telephone, between your
computer and others. Modems exchange files and data with other computers
via local networks or telephone connections. Fax moderns link a fax machine
to a modem for the direct transfer of an image to the originator. Modems
can be stand alone or board units. Stand alone units may be acoustic modems
in which a cradle holds a telephone headset and you dial the phone number of
the computer system to establish a link or direct-connect modems that plug
directly into a phone line. Board modems are built onto plug-in boards that
insert into the expansion ports inside the system unit of the computer.
Figure 3-13 shows three different types of modems.
Figure 3-13. —Modems.
3-27
Microcomputer Setup
Introduction
You may or may not have a computer in your work space. However, your
understanding how to setup a computer system will help you initially
integrate a computer system into your work space and troubleshoot simple
computer problems.
Owner’s
manuals
Owner/user manuals explain all about the hardware and how to install and
configure it. Become familiar with the documentation that comes with your
computer system and the peripherals. Spend time learning all you can about
the hardware and software. Start setting up the computer system by
thoroughly studying the installation instructions.
Power
requirements
Most microcomputers have a range of 100 to 130 volts or 200 to 230 volts
alternating current. On the back panel of the system unit, there is a voltage
or line select switch. Make sure your computer and all supporting devices
are set to the appropriate line voltage supplied to the electrical outlets in your
work space.
Surge
protectors
A surge protector is a power strip that prevents abnormally high-power
fluctuations from damaging the computer. A high-voltage surge can overload
and burn up internal components. Most surge protectors can accommodate
multiple electrical plugs. First, plug the system unit and supporting devices
into the surge protector and then plug the protector into the electrical outlet.
This allows you to turn all of your equipment ON or OFF with one switch.
Before you make any type of connection, be sure the ON/OFF switch on the
surge protector is OFF and remove the plug from the wall socket.
Figure 3-14 shows a surge protector.
Figure 3-14. —A surge
protector.
Continued on next page
3-28
Microcomputer Setup,
Continued
System unit
On the back of the system unit, there are connection ports (COMPORTS) and
a power cord connector. The monitor, the keyboard, and the printer will
connect to the system unit COMPORTS. The system unit power cord will
connect to the surge protector.
Monitor
On the back of the monitor, there is a power cable and a video input cable.
There also may be a voltage selection switch. The video input cable plugs
into the back of the system unit where the video display board is located.
The power cord plugs into the surge protector.
Keyboard
The keyboard plugs into the back of the system unit with a five-pin
connector.
Printer
The printer has a power cable and a data cable. The data cable connects to
the system unit. The power cable plugs into the surge protector.
Cable
connection
Most cables or connectors have some sort of device to ensure a firm, tight
connection between devices. This device may be a couple of screws or a
cable lock. When you plug in a cable, make sure it is properly and firmly
seated, then tighten down the cable connection locking device. Never force a
cable connection.
Figure 3-15 shows typical cable locks.
Figure 3-15. -Cable locks.
Continued on next page
3-29
Microcomputer Setup,
Connection
relationships
Continued
Figure 3-16 shows the relationship of the computer system and the peripheral
devices covered in this chapter.
Figure 3-16. —Connector relationships.
3-30
Software
Introduction
Software is the set of instructions, program parameters, or data stored on a
disk. Remember, the disk itself is hardware; the data on the disk is software.
The two categories of software are operating system software and
applications software.
Operating
Operating system software manages the operation of the entire computer
system software Its primary job is to manage the system and system resources, such
as the disks, the printers, and the modems. It also helps you to communicate
with the computer to use applications software. Install the operating system
program into the system hard drive with the distribution disks before
attempting to load any other program. Follow the owner/user manual. The
owner/user manual will tell you the setup command that will lead you
through the process from the display screen. Once you have the operating
system installed, put the original distribution disks in a safe place.
Applications
software
User or application software is program disks that help you to accomplish a
specific goal, such as DOS, Windows (PC), or System 7 (MAC).
Distribution disks for applications software require information about the
microcomputer configuration. Software programs have differing
requirements; therefore, refer to the owner/user manual for installation.
Once you have installed the applications software, put the original
distribution disks in a safe place.
Using software
Consciously develop a good, systematic approach in your work habits. Have
your reveal codes displayed on the screen while you are working. This
allows you to see any coding errors in the document. You will find it easier
to make corrections to the text of a document when you eliminate coding
errors. Break the habit of hitting the ENTER or RETURN key; it
unnecessarily enters an undesirable hard return. Save the current document
periodically. Do this more often than relying just on the timed backup
feature. This will lessen data loss should the system crash or freeze.
Another excellent work habit is to save all documents on working copy disks.
This saves memory space, facilitates safeguarding and protection, and should
the computer develop a virus or lose data during power fluctuations, the
damages would be recoverable. Although initially cumbersome, these habits
will prove well worth your effort to cultivate and maintain.
3-31
Text Programs
Introduction
Nearly every microcomputer in the Navy has some sort of word processing
program installed on it. These programs make it easier for us to complete
the myriad of administrative tasks demanded of us. To a DM, they are
invaluable at composing flawless text for subsequent reproduction.
Word
processing
programs
Word processing programs allow you to create documents with extensive
editing features that a typewriter, even a high-end electronic typewriter, does
not allow. These editing features are what distinguishes one word processing
program from another. Regardless of manufacturer and because there are so
many word processing programs used in Navy Graphics shops, this segment
covers only the features common to the majority of programs.
Word
processing
software
features
Word processing programs simplify the creation of documents. The program
features manipulate the text in every imaginable way. Read the owner/user
manual for the software on the computer at your shop. Each program offers
a combination of features in the following categories:
DOCUMENT FORMAT: Format a document before entering the text of the
document by setting the parameters for margins, justification, centering text,
aligning text with the right margin, setting headers, footers, endnotes, and
pagination.
TEXT ATTRIBUTES: Text attributes include the ability of the program to
change typefaces and sizes, to bold, underline, or italicize, and to display and
print.
EDITING FEATURES: Editing features include text search and replace,
automatic hyphenation, automatic word wrap, columnization, special
character definition, mail merge, incorporation of lines, boxes, or images,
delete, insert, block, move text, a thesaurus, a spell check, and grammar and
style checker.
SPECIALIZED FEATURES: Some programs offer index construction, table
of contents construction, line numbering, and macros which set specific
repetitive steps used frequently into one keystroke for rapid recall.
3-32
Graphics Programs
Introduction
As a DM, you will be using some type of graphics software package in your
shop. More shops are becoming computerized and just as the command
mission varies at each duty station so does the graphics software
requirements. Periodically assess the computer graphic capabilities of your
shop and stay as current as you can.
Graphics
software
Graphics software allows you to create artwork and images to stand alone or
to insert into text. Some programs create primarily presentation graphics in
the form of 35mm slides, overhead transparencies, electronic presentations,
and audience handouts. Other graphics software allows you to modify or
combine existing artwork, edit and enhance photographs, create line graphs,
pie charts, and organizational charts. The two types of graphics software
technology are bit mapping, or raster-based, and vector mapping. How
easily the graphics program permits image manipulation and how sharp the
resolution of that image is part of the software program. Monitor resolution,
the VGA card, and the devices used to make the hard copy end product also
affect resolution. Regardless of manufacturer and because there are so many
graphics software programs used in Navy Graphics shops, this segment
covers only those features common to the majority of programs.
Bit mapped
software
programs
Bit mapped images create an image using a point or hundreds of points of
light in a matrix. These images are slower to manipulate and create than
vector graphics but more spontaneous and easier to learn. Multi-layering bit
mapped matrixes into distinct gridmapped forms is called raster-based
imagery. Raster-based images create painterly effects and encourage
creativity. They also require an enormous amount of power and memory
which slows program execution. To modify or create in the bit mapped
mode is to work at the pixel level which can be time consuming and tedious.
Continued on next page
3-33
Graphics Programs,
Continued
Vector mapped Vector mapped software is ideal for drawings, charts, graphs, and diagrams.
software
It creates an image by defining line, position, shape, and fill pattern. You
programs
plot or vector a series of points to define a shape. This shape is calculated
into a mathematical formula called an algorithm. Image manipulation and
editing is automatically calculated by the computer when you change
parameters, making modifications easy and fast. The use of a vector-based
program requires preplanning and more computer savvy than a bit mapped
program.
Graphics
software
features
Drafting, drawing, and painting are distinctly different functions and not all
programs will be equally adept at processing all three. Base your choice of
program on command requirements. Also, let your software drive your
hardware. Select a software program that fulfills the needs of the command
and allows for some growth. Purchase hardware based on software
requirements. Invest in the very best monitor possible. All of this affects the
graphics resolution, the ease of processing, and the end product. In general,
graphics software programs offer the following features:
FILL: Fill is a command to fill a shape with color or pattern. Make sure the
shape is completely closed or the fill will bleed into the adjacent area. Color
or pattern selection is nearly limitless.
BELZIER CURVES: The axis of a Belzier curve automatically changes as
you move the cursor or mouse across the screen.
GEOMETRIC SHAPES: These are closed shapes whose major and minor
axis change with the movement of the cursor or mouse.
DELETE: Use a geometric shape to surround or isolate segments you want
removed from the image and click into place. Then press the DELETE key
to remove everything inside the geometric shape.
UNDO: UNDO is a feature that eliminates the last command given and its
associated affects.
Continued on next page
3-34
Graphics Programs,
Graphics
software
features
(Continued)
Continued
ONE- or MULTI-LAYERING: Graphics programs create artwork on one
layer where everything is visible to you, or on multi-layers where different
aspects of the image are on different layers. Multi-layering complicates
modification because you cannot always see how under layers are affected.
SCALE: Most programs offer scale changes to both the vertical and
horizontal dimensions.
BRUSH/PENCIL/PEN NIB/SPRAY: Selection between the effect of a brush
stroke, the nuances of a pencil or pen nib, and the splattering of an aerosol
spray are common icons that mimic traditional drawing tools.
STROKE or SPRAY WIDTH and SHAPE: A wide or narrow stroke that is
either round or square are selections available that pertain to the number of
pixels modified at once.
Your attitude
toward
graphics
software
Not only do graphics programs require more memory and power and greater
capacity VGA cards and monitors, but they also require more of you. The
only way to become proficient in graphics software is by constant use. The
computer and associated software will not supplant you. You must gain the
knowledge to master the program and use this tool beneficently. Sit down,
read the owner/user manual, and experiment with the computer.
3-35
Desk Top Publishing Programs
Introduction
As DMs, we are primarily concerned with the creation of artwork, but we
are increasingly tasked with massive text and the preparation of it for
reproduction. The distinction between Lithographer’s Mates (LI), who
traditionally use desk top publishing programs, and DMs is less distinct.
Desk top publishing (DTP), often called electronic pre-press preparation, is
gaining popularity; become familiar with it.
Desk top
publishing
software
programs
Desk top publishing software programs electronically integrate text and
graphics into newsletters, advertisements, letterheads, reports, brochures,
catalogs, and books, such as this TRAMAN. These programs allow you to
see the page and alter it on screen before committing it to print. The range
of manipulation is extensive. So, too, are the plethora of programs offered
by manufacturers. Regardless of manufacturer and because there are so
many desk top publishing programs used in Navy Graphics shops, this
segment covers only those features common to a majority of programs.
Desk top
publishing
software
features
Desk top publishing software features can be broken into three basic
categories. These categories — composition, layout, and graphics —
combine to make a comprehensive package for designing and publishing
documents.
COMPOSITION: Composition defines the sizes and styles of type, the
amount of space between horizontal letters and vertical lines, and the coding
of the text copy to meet standards. You can edit text directly or input text
from documents created in a word processing program and imported into the
DTP software.
LAYOUT: Layout involves the arrangement of text and graphics on the
page. Electronic pasting moves text from one portion to another and
incorporates illustrations into the text. Some features include multiple
columns, column widths, and gutter space manipulation, printing vertically or
horizontally on a page, automatic copyfitting, automatic page numbering, and
adding headers and footers.
Continued on next page
3-36
Desk Top Publishing Programs,
Desk top
publishing
software
features
(Continued)
Continued
GRAPHICS: Desk top publishing graphics features can scan or import
illustrations/graphics either from hard copy or digital data. You can add
images, borders, lines, and arrows. You can alter or edit images by
shrinking or expanding them and create a layered four-plate color separation
for color reproduction. You can also import images from other scanners and
programs.
3-37
Communications
Introduction
Computers can communicate electronically with other computers via a local
area network (LAN) or a wide area network (WAN). When individual
workstations interconnect and have access to each others information ardor
resources, it is called a network. These networks consist of nodes, the
hardware, and are interconnected by links, the communications media of
twisted-pair wire, coaxial cable, or fiber-optic cable.
Local area
networks
(LAN)
Workstations that use a local area network (LAN) are usually in close
proximity to each other, often in the same building. A LAN can transfer
data, files, and programs from one PC to another or even from one LAN to
another LAN.
LAN
configurations
LAN configurations or topology is the physical arrangement of the LAN
components. The three common configurations are the star, the bus, and the
ring network. In the star configuration, each component connects directly to
a central computer or network server. In the bus configuration, all
workstations connect to the same cable and the far ends of the cable never
meet. In a ring network, all components connect to a cable and this cable
forms a ring. Each configuration offers a compromise in advantages and
disadvantages. Your LAN configuration was probably already set up before
you arrived or tapped into it.
LAN
communication
It takes network software, communications software, and interfacing software
to make a LAN network work correctly. Also, each workstation must have a
network interface card (NIC).
Wide area
networks
(WAN)
Wide area networks cover a larger geographical area than a LAN system.
Examples of a WAN would include the Internet, Bulletin Board Services
(BBS), electronic mail (E-Mail), and the world wide web (WWW). You may
or may not have the opportunity to access any of these networks from your
workstation in the graphics shop.
3-38
Security
Introduction
DMs often work on classified or sensitive data. Graphics and text created
electronically and stored on disks require protection. The procedures for
protecting and marking disks, disk drives, and workstations differ slightly
from what you are familiar with for hard copy data. Security procedures for
electronic data is found in the Department of the Navy ADP Security Manual,
OPNAVINST 5239.1.
Automated
Your command will have an automated data processing security officer
data processing (ADPSO) that reports to the commanding officer concerning the protection of
security officer electronically generated data. The ADPSO is responsible for the physical
(ADPSO)
security of each computer workstation. The protection of each workstation
involves physical security, physical access control, data file protection, and
natural disaster protection. Seek out your ADPSO and make sure your
workstation complies with Navy and command regulations for the protection
of classified material.
Security
The three levels of data processed electronically are Level I, Level II, and
Level III. If your command processes Level I and/or Level II data, it must
provide a specific degree of protection. The following table defines the three
levels of data:
Continued on next page
3-39
Security,
Level I
Continued
Level I data (classified) handling requirements and procedures are similar to
those for handling hard copy classified material. You are responsible for
safeguarding this information at all times. Within Level I, the four modes of
secure electronic processing of classified data are the system high, the
dedicated, the multilevel, and the controlled mode. The following table
specifically defines the four security modes:
Mode
Definition
System high
All computers on the network and connected
peripherals protect data according to the
requirements for the highest classification category
and type of material contained in the system. This
requires a security clearance but not necessarily a
need-to-know for all material in the system.
Dedicated
Specific users or a group of users with a security
clearance and a need-to-know for the processing of a
particular type of classified material exclusively use
and control all of the computers and peripherals on a
system.
Multilevel
Various types and categories of classified material
stored and processed concurrently in a computer
system that permits selective access to material by
uncleared users and users with differing security
clearances and need-to-know. This is a function of
the operating system and associated system
software.
Controlled
A computer system in which at least some users
with access to the system have neither a security
clearance nor a need-to-know for all classified
material in the system.
Continued on next page
3-40
Security,
Continued
Level II
Level II data is unclassified data that requires special protection. Examples
are data For Official Use Only and data covered by The Privacy Act of 1974.
To assure protection for processing Level II data, the Navy established the
limited automated information system access security mode. A system or
network operating in the limited access security mode restricts the access to
data only to individuals who by their job function have a need to access the
data.
Level III
Level III does not require the safeguards of Level I or Level II data. It does
however, require proper handling to make sure that data is not lost or
destroyed.
Electronic
media
The computer system and its associated peripherals require controlling and
safeguarding at all times. This includes the disks, diskettes, disk drives,
monitors, printer ribbons, and generated hard copy. In general, the two
types of electronic media are working copy media and finished media.
WORKING COPY MEDIA: Working copy media is temporary information.
It stays within the confines and control of your activity. After creating a
working copy, retain it for 180 days before destruction. Examples of
working copy media are information used and updated at frequent intervals.
FINISHED MEDIA: Finished media is permanent information. It can be
released to other commands and activities. Finished media contains
information that does not change or is pertinent for more than 180 days.
Security
controls
Date and mark classified electronic media when it is created. Control
electronic media in the same manner prescribed for classified material.
Protect working copy media according to the highest classification ever
recorded on the media. For media classified Top Secret or Secret, maintain a
master list including the overall security classification and the identification
number permanently assigned to the disk.
Continued on next page
3-41
Security,
Continued
Disk security
markings
To avoid confusion, set aside groups of disks for recording classified data at
each security level. Mark each disk or diskette with a stick-on label with the
overall security classification and a permanently assigned identification
number. When you declassify and degauss the disks, remove all external
labels indicating the classification unless you immediately use the disk to
store information of the same classification level.
Display screen
security
markings
When you use the computer to create classified graphics and text, make sure
to mark the computer monitor at the top above the screen with the
appropriate security classification.
Hard copy
security
markings
Mark hard copy reports or printouts from a printer, terminal, plotter, or
other computer equipment at the top-and-bottom-center of each page with the
appropriate classification or the word unclassified. Number each page
consecutively. In most cases, do so as you compose the artwork or text in
the computer. If you are in doubt about security markings, consult
OPNAVINST 5510.1.
Media
disposition
Magnetic media, such as disks, eventually wear out or become damaged. If
the disk contained classified material, degauss or erase it before destruction.
Handle and dispose of printer ribbon and carbon paper used to print/transfer
classified information according to the highest classification level of the data
printed by that ribbon or carbon. Follow the requirements outlined in the
OPNAVINST 5510.1.
Equipment
inventory
In addition to safeguarding the information in a computer, protect the custody
of the system. Do not indiscriminately move the system in and out of work
spaces. If you must loan equipment, limit equipment loans and have
borrowers sign for custody of the loaned gear. Keep an inventory identifying
the equipment by make and model, the type of system the equipment is part
of, the mode the equipment operates in, what kind of information and media
the computer processes, and the level of sensitivity for the highest
classification of material processed. Post the name and phone number of the
physical security officer and/or ADPSO near the workstation.
3-42
Summary
Review
This chapter briefly covers a computer system, its associated peripherals, and
the differences between hardware and software. Because of the plethora of
applications software available in the fleet and the absence of standardized
programs in graphic shops throughout the Navy, specific software packages
were not covered in detail. Stringently follow security procedures and
provide adequate protection for classified material in the electronic format.
If you are not knowledgeable on safeguarding classified material, find the
authority in the command and assess the integrity of your shop.
Comments
Computerization is the single most significant event of the twentieth century.
It impacts every aspect of life. Take a serious look at how computers affect
you. Even your local pizza parlor can speculate on your life by analyzing
your choice of pizza ingredients and how often you order, whether you pay
by check, and how much you tip the driver. You must become computer
literate. Navy Graphic shops, printshops, and photo labs are all
incorporating electronic imagery and digitization. Future Navy and civilian
correspondence courses, such as this rate training manual, will be on CD
ROM for print on demand. You don’t have to like it, but you must master
this medium. Do not be afraid of damaging the computer; the worst that will
happen is that you lose some material you entered into it. It is here; the time
is now. It is the future — the key to the twenty-first century.
3-43
CHAPTER 4
REPRODUCTION EQUIPMENT
Overview
Introduction
A Navy Graphics shop contains a wide variety of equipment. To use the
equipment effectively and safely, you must have a working knowledge of its
characteristics, limitations, and operating and maintenance procedures. This
chapter covers the more common types of graphics shop reproduction
equipment.
Objectives
The material in this chapter enables you to do the following:
• Recognize the need for periodic cleaning and inspecting of shop
reproduction equipment.
• Select copier options and maintain toner levels.
• Describe operator checks and adjustments on diazo-type reproduction
machines.
• Explain phototypesetter operation and maintenance.
• Identify operator adjustments on pressure process lettering machines.
• Adjust copy camera settings and explain the procedures for completing
operator checks.
Continued on next page
4-1
Overview,
Acronyms
Continued
The following table contains a list of acronyms you must know to understand
the material in this chapter.
Continued on next page
4-2
Overview,
In this chapter
Continued
This chapter covers the following topics:
Topic
See Page
General Safety Precautions
4-4
General Maintenance
4-5
Copiers
4-6
Diazo Machines
4-10
Phototypesetters
4-17
Pressure Process Lettering Machines
4-22
Special Applications Graphic Machines
4-27
Cameras
4-31
4-3
General Safety Precautions
Introduction
Since most shop equipment is electrically driven, you must observe several
precautions to avoid personal injury and injury of others and to prevent
damage to the equipment.
General
precautions
Inspect reproduction equipment regularly and have all repairs done by a
qualified electrician.
Common electrical discrepancies are as follows:
• worn or frayed cords,
• bare wires, and
• broken/malfunctioning
switches.
Avoid extensive use of extension cords. Plug units into safety approved
surge protectors. Make sure power to the equipment is off before cleaning
any equipment.
CAUTION: Never touch an energized electrical plug, switch, or any part of
electrically operated equipment when you have wet hands, or while you are
standing in water on a wet deck.
Environmental
precautions
Do not expose electrically powered reproduction equipment to the elements.
During field day, do not allow water to seep under the equipment near the
electrical mechanisms. Allow for maximum air circulation when you select a
position for placing equipment, particularly if the equipment produces fumes.
4-4
General Maintenance
Introduction
Proper maintenance extends the useful life of equipment and ensures that the
equipment is in an optimum state of readiness. It is aggravating to need a
piece of equipment for a rush job and discover that you have to clean it up
before you can use it.
General
maintenance
The cleaner you keep your equipment, the better off you are. Specific
maintenance requirements for particular pieces of equipment should appear
near the equipment to which they pertain. In general, keep debris away nom
keyboards and keys. Clean monitors and mirrors periodically. Do not allow
food and especially drink near equipment and keyboards.
Equipment
movement
Do not move equipment around the shop excessively. Protect equipment
from unnecessary jarring and secure for sea before getting under way.
4-5
Copiers
Introduction
DMs interface with copiers daily. Copiers offer a selection of timesaving
options and provide good resolution reproductions. As copiers become more
sophisticated, they assume a more versatile and valuable role in the creative
process.
Copier needs
Command or shop needs determine the type of copier purchased or leased.
Copiers are classified by volume range and speed. The command or shop
may need a color copier or a black-and-white copier. Available options also
influence the choice of a copier.
Volume range
and speed
A low-volume range indicates the need for a personal copier which tends to
be slow in operation. A medium-range copier is for moderate use, and a
high-volume range indicates a heavy use, multifunction, high-speed copier
found in reprographic departments and printshops.
Standard
copiers
Standard copiers produce basic black images on either white or colored
paper. These images appear through electrostatic, thermographic, or digital
technology. Speed, resolution, and volume are the primary variables that
influence the selection of a standard copier.
Color copiers
Color copiers make the image appear through thermal fusion or laser
technology.
THERMAL: A copier scans an image at 300 dots per inch (DPI) and prints
through a ribbon that converts the image into a combination of four colors.
Heat transfers and fixes the image to paper.
LASER: Laser copiers use color toner instead of ribbon to create an image.
The color toner is available in cyan, magenta, yellow, and black. They use
digital technology to act as a laser printer, reproducing the image in very
high resolution.
Continued on next page
4-6
Copiers,
Options
Continued
Most copiers are user friendly. Standard symbology or icons represent
options and often labels do not appear on the facia of the machine. Most
copiers provide the following options.
ONE-SIDED: One side of the master copies to one side of a page.
ONE- to TWO-SIDED: A one-sided master copied to two sides of a page.
TWO-SIDED to TWO-SIDED: A two-sided master copied to two sides of a
page.
COLLATE: Combines pages of different information.
SORT: Sorts pages into like information.
STAPLE: A staple placed in either the upper left-hand comer or the left side
of the document.
LIGHT/DARK: An increase or decrease in the contrast of the image.
REDUCE: Reduction of the image, either in stepped increments or variable
increments.
ENLARGE: Enlargement of an image, either in stepped increments or
variable increments.
ELONGATE: Stretching an image to appear panoramic with some horizontal
distortion.
Figure 4-1 shows typical copier option icons.
Figure 4-1. -Sample copier symbols.
Continued on next page
4-7
Copiers,
Continued
Copier use and Copiers sometimes confuse instructions programmed into them by an
operator checks Should a copier jam or continually malfunction, call a “key”
operator. Key operators are command designated personnel that have formal
training in copier repair/adjustment.
To use a standard copier, follow this table:
Continued on next page
4-8
Copiers,
Copier
maintenance
Continued
When a copier needs more toner or a new ribbon, the copies will appear
progressively lighter in tone. They will be uneven in resolution and color
balance.
To change toner or ribbon, follow this table:
4-9
Diazo Machines
Introduction
Diazo machines have been around a long time. Navy shops still have these
workhorses tucked away in reproduction rooms. Although diminished in
importance, these machines continue to produce good quality, cost effective,
correctable reproductions on paper, Mylar, vellum, and acetate foils.
General types
Two general systems are in use in diazo process machines. The first is a
continuous gravity feed ammonia system. These machines drop ammonia at
the rate of 50 to 60 drops per minute into a tray where heater rods vaporize
the ammonia into developing fumes. The second type of diazo system is the
anhydrous ammonia system that mixes ammonia vapor with distilled water.
Figure 4-2 illustrates ammonia vapor production in a gravity feed and an
anhydrous system.
Figure 4-2. —Ammonia vapor production.
Continued on next page
4-10
Diazo Machines,
Major sections
Continued
A diazo machine has four major components. These components are a
printing section, a developing section, a cooling system, and an exhaust
system.
PRINTING SECTION: The printing section contains a light source, the
reflector assembly, a printing cylinder, and the feed belts.
Figure 4-3 shows the configuration of the printing section.
Figure 4-3. —The printing section.
Continued on next page
4-11
Diazo Machines,
Major sections
(Continued)
Continued
DEVELOPING SECTION: The developing section houses the stainless steel
developing tank and the heater rods.
Figure 4-4 shows the developing section.
Figure 4-4. —The developing section.
Continued on next page
4-12
Diazo Machines,
Major sections
(Continued)
Continued
COOLING and EXHAUST SECTIONS: The cooling section contains the
blower and timer that cool the heating rods and drip trays. The exhaust
section, monitored by the blower and timer, expels fumes through exterior
ducts and deposits residue into the residue collection bottle in the base of the
machine.
Figure 4-5 illustrates the basic ammonia flow system.
Figure 4-5. —The basic ammonia flow system.
Continued on next page
4-13
Diazo Machines,
Start-up and
shut-down
operations
Continued
The following tables give start-up and shutdown procedures and operator
checks for standard diazo-type machines:
start-up
Continued on next page
4-14
Diazo Machines,
Continued
Maintenance
Diazo machines fail to perform or become dangerous to operate without
regular maintenance. Daily maintenance consists of emptying residue bottles
every 8 hours, replenishing the ammonia supply, cleaning the outside of the
glass cylinder, and cleaning the feedboard, receiving tray, and print tray of
debris and paper scraps. Weekly maintenance is cleaning the inside of the
cylinder and wiping the lamp assembly. Lubricating all bearings using a No.
10 motor oil and cleaning the suction holes is done monthly. Remove, clean,
and dust all hoses annually.
Specific safety
precautions
In addition to precautions ascribed to electrically powered machinery, diazotype machines require the following specific safety precautions:
•
store ammonia in shatterproof bottles,
• protect bottles in storage by securing them in place,
• handle ammonia bottles carefully to prevent:
• blindness and bums to personnel,
• stripping finishes off of surfaces, and
• never turn ammonia flow completely off while machine is running.
Diazo sensitive
materials
Diazo sensitive materials are papers, acetate, and lightweight cardstock
coated with diazo salts and azo dyestuff emulsion. This emulsion is sensitive
to light. Exposure to light through a transparent or translucent master
desensitizes areas not protected by the opaque image of the master. After
development in ammonia vapor, desensitized areas appear clear and protected
areas appear as the image. Paper comes in different weights and as standard
line, continuous tone, and sepia line stock. Drafting film comes as a blueline
or sepia image stock. Foils or acetates, used for transparencies, come in
normal intensity colors and pastels, black or color on color backgrounds, and
in a variety of densities, weights, and sizes. Cardweight stock is available
with a metallic shine. All diazo materials fade in time and exposure to
daylight accelerates fading. Because developed images retain residual
ammonia vapor fumes that permeate and deteriorate paper, do not store them
with other file images, particularly photographs.
Continued on next page
4-15
Diazo Machine,
Continued
Diazo material
storage
Diazo material is stored on a first in/first out basis. Before storing, mark the
contents of the package with the date received and package contents. Diazo
materials are light and temperature sensitive. Store them in a cool, dark, dry
location.
Diazo masters
Master artwork for diazo reproduction are dense, opaque images on a
transparent or translucent base of paper or acetate. A commercial product,
called “transparentizer,” lessens the opacity of lightweight translucent
papers. When creating the master, use shading sheets judiciously; the heat of
the mercury-vapor lamp in the diazo machine can melt the adhesive. It will
also melt a master created using an image from a thermal copier. Place
registration marks outside of the image area in multifoil transparencies.
Diazo exposure
To expose diazo material, place the sensitized material on the feedboard
emulsion side up and place the master on the material emulsion side down.
Better images result from emulsion to emulsion contact. Webb belts will
slowly feed the combination through the machine. There is a slight
dimensional instability in diazo material that occurs as the cylinder rotates the
diazo material from the heat of exposure to the dampness of the development
process. The master and the material will automatically separate before the
material enters the development area.
Figure 4-6 illustrates placing a master on diazo material.
Figure 4-6. —Combining a master with
diazo material to feed into the machine.
4-16
Phototypesetters
Introduction
Phototypesetting machines expose photosensitive paper or film to a light
image of each character set, either electromechanically or by digitation
(cathode-ray tube (CRT)). The two primary components of a phototypesetter
are a keyboard and a processor. Because of rapidly changing technology,
this section provides only a brief overview of phototypesetting systems.
General
maintenance
Before covering phototypesetting theory and equipment, let’s cover basic
maintenance procedures for the equipment and the handling of the film/paper.
• Avoid excessive handling of the film/paper to minimize scraping the
sensitized surface, kinking, and increasing static discharge.
• Check the internal mechanism of the processor for:
• obstructions in the film/paper path and
• the solution level of the processor tanks.
• Rinse the roller assembly and trays daily with warm water and loosen
crystallized chemical deposits with a soft brush.
• Clean optical surfaces with a lint-free cloth or chamois and mirrored
surfaces with a camel hair brush.
• Refer to the owner’s manual for specific maintenance periodicities,
General
adjustments
With most typesetting equipment, it is possible to adjust type size, type font,
line length, letter density, word, line, and lettering spacing, type position,
and leading. Some typesetters are further divided by their ability to produce
display type or body type. Direct keyboard, magnetic storage on tape or
disk, and a retrieval system through optical character recognition (OCR) are
available on newer machines. Refer to your owner’s manual for the full
range of operator adjustments.
Continued on next page
4-17
Phototypesetters,
Continued
Typesetter
generations
The term generation classifies significant advancements in phototypesetter
technology. The first-generation phototypesetters closely resembled
machines used to cast hot type. Second-generation phototypesetters set type
by photographic projection through a font. Third-generation machines
reproduce letters on the face of a cathode-ray tube (CRT) and fourthgeneration equipment uses raster scan technology and fiber optics. Thirdgeneration phototypesetters still exist in Navy Graphics shops.
Thirdgeneration
typesetters
Third-generation phototypesetters use cathode-ray tube technology. There
are two basic categories of CRT typesetters. The first category,
electromechanical typesetters, scans a photographic master stored on grids
and strikes an image onto the face of a cathode-ray tube. This image then
passes through a lens to photographic film or paper. A letter is rescanned
each time it is used. This process is referred to as “on the fly. ” The second
category typesetter stores the font as a digital representation; a letter is
scanned only once and enters the machines memory for subsequent use.
Electromechan- Electromechanical typesetters may produce display or body type. They are
ical typesetters hand-operated by direct keystrokes. Newer machines may have magnetic
disk or tape memory and/or OCR scanning capabilities. Different type styles
and sizes are available for enlargement, reduction, or same-size reproduction.
The typesetter scans a photographic master each time a letter is used and
transfers the image on the fly to the face of a CRT screen or photosensitive
film/paper.
Continued on next page
4-18
Phototypesetters,
Digitized
typesetters
Continued
Digitized typesetters set type with greater speed and detail than
electromechanical machines. An electronic beam draws on the face of the
CRT tube in random fashion. Image refresh is greater than 30 times per
second at 2,600 lines per inch (LPI).
Figure 4-7 shows character imagery in digital phototypesetting.
Figure 4-7. —Digitized phototypesetting.
LASER
Light amplification by simulated emission of radiation (LASER)
phototypesetters raster scan an image in a very tight pattern with a narrow
beam of light or energy. This allows for precise control of the image area.
Characters, art, and halftones are generated picture element (PIXEL) by pixel
at 700 to 1,500 LPI. Point size ranges from 5 to 246 points. Note that a
point size and a pixel are not the same. Notice also that a halftone and a
pixel are not the same. A halftone is comprised of pixels and how many
depends on the resolution of the screen and the percentage of the halftone
pattern desired. This type of typesetter and processor is also known as a
raster image processor (RIP).
Continued on next page
4-19
Phototypesetters,
Continued
Phototypesetter The developing unit of a typesetter develops the image after transfer to
processors
photosensitive film or paper. The machine is self-developing. The two types
of development processes are the stabilization process and the photographic
process.
STABILIZATION PROCESS: The stabilization process is a nonpermanent
process that uses an activating solution to develop the image and a chemical
stabilizer to halt the development.
PHOTOGRAPHIC PROCESS: The photographic process is a permanent
process much like standard photographic processing. It uses a chemical
developer to mature the image, a fixer to stop development of the image, and
a water wash to remove chemical residue from the developed image.
Figure 4-8 illustrates the two types of phototypesetting processor systems.
Figure 4-8. —Two basic types of phototypesetting
processes.
Continued on next page
4-20
Phototypesetters,
Continued
Chemistry
exhaustion
Change the chemistry in the processor often to keep developed images crisp
and dense. As the chemistry oxidizes or expires, images become weak, thin,
and grey. Streaked images also indicate a need to replenish the processor
with fresh chemistry.
Typical work
flow
Your initial interface with the typesetter is at the keyboard where all
parameters are coded into the machine and the stroking of the image begins.
This keyboard connects to the processor, sometimes through a memory
storage system, and the processor develops the image. Carefully proofread
all data. Assemble the text with the artwork and conduct a final
proofreading.
Figure 4-9 shows a typical work flow pattern for a job that requires
typesetting.
Figure 4-9. —The phototypesetting process.
4-21
Pressure Process Lettering Machines
Introduction
A pressure process lettering device impresses letter fonts against a tape of
paper or acetate film transferring a carbon image of a letter or symbol and
with some machines, actually cutting the letter or symbol into the tape. This
paper or acetate film is stripped into place on artwork or a paste-up. A
number of manufacturers produce them with options that include keyboards,
memory storage, letter distortion, and color.
Manual
machines carbon image
Manual pressure process lettering machines are simple in theory and use.
They consist of a basic machine with a print button, cutter lever, and letter
disks or fonts.
To use a manual machine, follow this table:
Continued on next page
4-22
Pressure Process Lettering Machines,
Automatic
machines carbon image
Continued
Automatic pressure process lettering machines approach the sophistication of
phototypesetters, but they are less complicated to use. These machines have
a keyboard, limited memory storage, and a monitor screen to view the work
in progress.
To use an automatic machine, follow this table:
Continued on next page
4-23
Pressure Process Lettering Machines,
Manual
machines cutout image
Continued
Some pressure process lettering machines cut letters or symbols from paper
and vinyl tape. Each letter/symbol is an individual font template. The
template is inserted into a channel with the cutting edge facing the tape. A
rotating drum applies sufficient amount of pressure to cut through the paper
or vinyl as the tape and template press together. A manual machine has a
hand-operated crank, letterspacing adjustment, letter height adjustment,
pressure adjustment, tape holder, and font templates.
To use a manual machine, follow this table:
Continued on next page
4-24
Pressure Process Lettering Machines,
Continued
Automatic
machines cutout image
Automatic machines for cutout letters/symbols are exactly like their manual
counterpart except for the cutter at the back of the machine. On a manual
machine, the tape is tom by hand across a serrated edge. On an automatic
machine, the tape is cut by pushing a button that activates a guillotine-type
cutter near the tape holder. Directions for use of an automatic machine are
identical to those for a manual machine.
Tapes - carbon
Carbon image tapes are available in combinations of paper or vinyl, opaque
or transparent, adhesive or nonadhesive backed, white background, colored
background, white letters, and colored letters. Carbon image tape has a soft
surface that scratches easily. The surface of some carbon image tapes has a
low tack surface that requires sealing with a fixative. When you use a carbon
image, adhesive-backed tape in artwork that requires exposure to a heatproducing process, check the tape periodically during that process for
adhesive seeping. Seepage gums up a diazo drum or copyboard and ruins the
artwork. If a tape has lost adhesiveness, it will jar out of position on the
artwork and misalign.
Tapes - cutout
Paper and vinyl tape, used in pressure cutout systems, are available in eight
colors and are adhesive-backed. Several layers make up the tape, and these
layers facilitate an easy application of the cutout letter to the artwork. Peel a
comer of the carrier acetate away from the color tape. Turn the tape,
adhesive side up, and place it on a work surface. At a low angle to the tape,
peel the backing wax paper and the excess color tape away from the carrier
tape carefully. Watch the cutout letters/symbols to make sure they remain on
the carrier acetate. Throw away the wax paper and excess tape. Place the
carrier tape, which now supports only the desired tape letters, over the
artwork and press gently over the letters/symbols. Peel away the carrier tape
slowly and at a low angle. The letters/symbols will remain. Throw away the
carrier acetate.
Continued on next page
4-25
Pressure Process Lettering Machines,
Tapes - cutout
(Continued)
Continued
Figure 4-10 shows the different tape layers and a low angle of peel.
Figure 4-10. —Tape layers.
4-26
Special Applications Graphics Machines
Introduction
There are a number of graphics machines that have special purposes. Two
machines that you may encounter in the fleet are the engraver and a
computerized graphics machine.
Engravers
An engraver routes letters and images below the surface of metals and
plastics. Personnel name tags, doorplates, desk plates, and shipboard signage
are all examples of engraved products. Engraving is also done on plaques
and trophies and shadow boxes. Engravers work on the same principle as a
pantograph; that is, a parallelogram with repositionable tracer and drawing
points.
Figure 4-11 shows the similarities between a pantograph and an engraving
rig .
Figure 4-11.—Similarities in operation.
Continued on next page
4-27
Special Applications Graphics Machines,
Engraver
features
Continued
Manual engravers may be hand-driven or motorized. Newer, automated
engravers have keyboards, a memory system, and an editing screen.
Engravers enlarge, reduce, or create the same-size letters by tracing fonts
secured in a galley and redrawing that image into plastic or metal. Engravers
have a motor, pulleys, a galley tray, a tracing point, tracing arms, and jigs to
hold round or flat objects. Templates are slid into a galley tray and secured
by thumbscrews. Templates are available in many styles and are made of
brass. The engraver cuts the letter/symbol outline into plastic or metal, using
a cutter. Cutters are carbide steel for cutting plastic and diamond-tipped for
engraving metal. Use the motor with the carbide cutters. The diamondtipped cutters require only hand pressure to cut metal.
Figure 4-12 shows different cutter points.
Figure 4-12. —Cutter profiles.
General care
Inspect the engraving machine before using it. Like other electrically
powered tools, inspect the cords and wiring for wear. Examine the pulleys
and belts for dryness and stretching. Use sharp cutters of the correct depth
in the machine.
General
maintenance
Clean debris from all surfaces. Remove the jigs to brush away debris under
the galley. Remove the thumbscrews and brush debris from the galley trays.
Brush away debris from under the jigs and surrounding areas. Engraving
residue is similar to sawdust; it gets everywhere. Maintain sharp cutter
points and clean, sharp templates. Do not over tighten thumbscrew settings.
Continued on next page
4-28
Special Applications Graphics Machines,
Use
Continued
Select a cutter for engraving based on the material being engraved and the
desired effect. Diamond-tipped metal cutters do not require the use of a
motor. They cut a fine line into a metal surface. A wider line is possible
with a carbide cutter, but that requires the motor to rotate the cutter head.
Plastic is cut using the carbide steel cutter points and motor only. Carbide
cutters offer differing widths.
To use an engraver, follow this table:
Continued on next page
4-29
Special Applications Graphics Machines,
Computerized
graphic
machines
Continued
There are computerized graphic machines that draw, pounce, and cut letters
and graphics with the latest advances in digital typesetting. These systems
use paper, vellum, vinyl, rubylith masking film, and application tape. The
tools of these machines change from ball-point pens, to pounce wheels, and
to knife blades. Some of these machines are self-contained units and others
hook up to computer systems. Many commercial sign shops use this type of
graphics device to reduce production time and enhance quality. Few of these
machines are in Navy shops, but you should know of their existence.
4-30
Cameras
Introduction
Cameras, in one form or another, have always been one of a DM’s tools. A
DM either uses a photographic process in the creation of artwork or prepares
artwork for photographic reproduction. Knowledge of camera types and the
basic functions of camera parts are essential.
General
maintenance
Cameras may be process cameras found in large studio settings or hand-held
35mm cameras and copy cameras. Maintenance is similar for all the various
types of cameras.
PROCESS CAMERAS: Process cameras usually have an electrical power
source to drive timers, settings, and lights.
• Inspect electrical cords for fraying or bare wire.
• Clean optical surfaces with a lint-free cloth or chamois.
• Clean mirrored surfaces with a camel hair brush.
• Keep bellows, copyboard, and film plane free of debris and lint.
• Lightly oil rotating handwheels, cranks, and worm gears.
35MM and COPY CAMERAS: Small cameras like 35mm and copy cameras
rely on a battery for power.
• Check the battery compartment for battery status:
• is the battery present,
• is the battery fresh, and
• is the battery swollen or leaking.
• Clean optical surfaces with a lint-free cloth or chamois.
• Clean mirrored surfaces with a camel hair brush.
• Wipe down camera body with a lint-free cloth or chamois.
• Dust inside film back with a camera hair brush.
Continued on next page
4-31
Cameras,
Process
cameras
Continued
Process cameras are large studio-type cameras. They may be horizontal or
vertical in construction. Horizontal process cameras divide into darkroom
cameras and gallery cameras. Darkroom cameras have the back or the film
plane built into a wall. On the other side of the wall is the darkroom.
Gallery cameras are free standing units. Vertical process cameras take up
less space. Both horizontal and vertical process cameras have fully
automated exposure control.
Figure 4-13 shows various types of process cameras.
Figure 4-13. —Format types of process cameras.
Continued on next page
4-32
Cameras,
Camera
components
Continued
Cameras consist of seven basic components on three parallel planes.
Misadjustment of any component part of a process camera affects the
reproduced image in size, clarity, or density. The three parallel planes of a
copy camera are the copy plane, the lens plane, and the focal plane. Consult
the manufacturer’s operating instructions for precise operator adjustments.
COPY PLANE: The copy plane is a glass copyboard that holds the original
copy in place. The most common size is 18 by 24 inches with gridded
reference lines to help align the original copy. Vacuum pressure creates
suction to flatten the copy during a shoot. The copy plane may move on a
track for proportional reductions or enlargements.
LENS PLANE: The lens plane holds the lens in position. Some lens planes
have interchangeable lenses. The lens plane moves along a track for
proportional reductions or enlargements.
FILM or FOCAL PLANE: The film plane holds the film in place in the back
of the camera. The film plane may also have a filter attachment for halftone
or color separation work. Without film, the ground glass of the focal plane
allows for fine focusing an image.
SCALES: Most cameras reduce to 50 percent and enlarge to 300 percent or
a range in between.
FOCUSING CONTROL: Handwheels or cranks rotate to focus an image.
Newer machines have automated push-button focusing.
BELLOWS: Bellows are the accordion folded segment between the lens and
the film plane. Bellows maintain lighttight integrity during enlargements and
reductions.
EXPOSURE CONTROL: Once the copy plane, lens plane, and focal plane
are positioned correctly, the camera scales recommend settings for the f/stops
and/or the shutter speed. Some cameras are set manually and other cameras
are automated. Automated cameras are aperture priority cameras where the
operator sets the shutter speed and the camera sets the aperture opening.
Shutter priority is when the operator sets the shutter speed and the camera
selects the aperture. Little figuring is done by the operator in either case.
Continued on next page
4-33
Cameras,
Camera
components
(Continued)
Continued
Figure 4-14 shows a basic process camera with the primary components
identified.
Figure 4-14. —Process camera nomenclature.
Continued on next page
4-34
Cameras,
Lighting
Continued
You can use almost any type of light for copy work, provided the intensity of
the light is sufficient to prevent excessively long exposures. Another
principal requirement of the light source is that it produces a light with a
color temperature suitable for the type of film used. Use normal room light
to focus the image on the focal plane. Use copy lights on high to expose the
film.
Types of lights Lights maybe part of the camera, as are lamp housing units and lights in the
copyboard, or they may be separate units. Lighted copyboards illuminate
copy from underneath. This allows greater control of negative density. It is
also superior for backlighting film positives and transparencies.
Figure 4-15 shows different light configurations.
Figure 4-15. —Light configurations.
Continued on next page
4-35
Cameras,
Light
temperature
Continued
Light temperature becomes critical when reproducing color images and an
imbalance light source will skew tonal values in black-and-white
reproduction. The most common lamps in Navy Graphics shops are the
tungsten lamp, fluorescent lamp, and quartz iodine lamp variations.
TUNGSTEN LAMPS: Tungsten lamps are excellent for use in black-andwhite reproduction. Tungsten lamps are available as 3200 degrees Kelvin
(K) and 3400 degrees Kelvin. Lamps rated 3400 degrees K are used less
because they have a short life of 4 to 6 hours.
FLUORESCENT LAMPS: Use fluorescent lamps when the original has a
textured or uneven surface and little reduction or enlargement. Even
illumination of a smooth-surfaced original is difficult to obtain. When you
use fluorescent lamps, arrange the tubes in a square pattern parallel to the
edges of the copyboard.
QUARTZ IODINE LAMPS: Quartz iodine lamps produce a very intense
light particularly suited to general copy work. They maintain a fairly
constant color temperature throughout their life.
Reflectors
Reflectors evenly distribute light over the surface of an original, eliminating
hot spots. Reflectors also funnel more light toward the original that shortens
exposure times. Certain types of lights have built-in reflectors. When you
use a lamp with a built-in reflector, also use a lens hood to shade the lens
from glare and stray light.
Lamp
replacement
Keep all lamps clean and free of dust and finger smudges. Handle lamps
carefully. Replace all lamps in the system simultaneously. As lamps age,
temperature variations occur. Failure to replace all lamps creates an
imbalance in temperature and intensity of illumination.
Continued on next page
4-36
Cameras,
35mm cameras
Continued
The two types of 35mm cameras are the rangefinder camera and the single
lens reflex (SLR) camera. This classification indicates the way the image
projects on the film plane for focusing. The film size for these cameras is
35mm film, hence the name.
RANGEFINDER CAMERAS: Focus an image on the film or focal plane of
a rangefinder camera by aligning one image over another until they coincide.
The image enters the lens and diverts to the focal plane from a mirrored
surface. The distance between the viewing lens and the lens through which
the exposure is made is called parallax. Parallax is automatically corrected in
a rangefinder camera.
Figure 4-16 shows how an image passes through a rangefinder.
Figure 4-16. —View through a
rangefinder.
Continued on next page
4-37
Cameras,
Continued
35mm cameras In a single lens reflex (SLR) camera, the image enters the lens and strikes a
(Continued)
mirror. This mirror deflects the image onto a ground glass for focusing.
The mirror flips out of the way during exposure; therefore, the viewing lens
is the same lens that records the image.
Figure 4-17 shows how an image passes through an SLR.
Figure 4-17. —View through a SLR.
Camera
components
Camera components are similar to those of a process camera. There is a film
or focal plane, a lens, and the object or a copyboard. Shutter speed settings
and apertures or f/stops are adjustable. There is also a setting to indicate the
film speed to the automatic sensors in the camera. Lenses are
interchangeable on 35mm cameras.
Continued on next page
4-38
Cameras,
Lenses
Continued
Camera lenses have different ranges that make some lenses more suited to
copy work than others. Range refers to focal length or the distance between
the lens plane and the focal plane. Lens range may be long, short, standard,
variable, or macro. The speed of a lens increases as focal length decreases.
LONG RANGE: Long-range lenses are telephoto lenses. Use these lenses to
draw an image closer. Ideal for action or sports photography, they require
more light and faster film than standard lenses.
SHORT RANGE: Short-range lenses are fast lenses with a wide angle of
view. They are excellent for photographing large expanses in limited space
and panoramic views.
STANDARD RANGE: Standard-range lenses most closely record the image
as seen by the human eye. Distortion is relatively negligible.
VARIABLE RANGE: Variable-range lenses are zoom lenses or lenses in
which the focal length changes at the option of the photographer.
MACRO RANGE: Macro-range lenses are ideal for copy work, particularly
if the item being copied is small. This lens is slower in speed than standard
lenses. Available as 50mm and 100mm macros, they also perform well as a
general-purpose lens in routine shoots.
Figure 4-18 shows differences between lens ranges.
Figure 4-18. —Lens
ranges.
Continued on next page
4-39
Cameras,
Aperture
Continued
An aperture is an opening in a lens through which light can pass. Apertures
are set at standardized intervals, referred to as f/stops. F/stops help control
image sharpness by partially correcting for lens aberrations and defining
depth of field. Changing aperture settings changes the amount of light
allowed to strike the film. The greater the numerical value of the f/stop, the
less light enters the lens. Each increment divides the light by half. If your
camera or hand-held meter is not working or you find yourself in a situation
where you haven’t the time to calculate an f/stop, use the f/16 rule; that is,
set the f/stop to f/16 and the shutter speed to the film speed, or as close to the
ISO that the shutter speed adjustment will allow.
Figure 4-19 shows standard f/stop increments.
Figure 4-19. —Standard f/stop increments.
Continued on next page
4-40
Cameras,
Shutter speed
Continued
Shutter speed is the length of time light can expose the film. A camera may
have a leaf-type shutter or a focal-plane shutter. The shutter speed is set in
standardized increments. Increasing the shutter speed incrementally lessens
exposure time by half. At the “T” setting, the shutter opens the frost time
you press the shutter release button and closes the second time you press the
release button. At the“B” setting, the shutter remains open as long as you
depress the shutter release button.
Figure 4-20 shows standard shutter speed ratios,
Figure 4-20. -Shutter speed increments.
Continued on next page
4-41
Cameras,
Film speed
Continued
Film speed appears on every roll of film and is an industry-rated standard.
The standard is set by the International Standards Organization (ISO). Film
speed, sometimes referred to as film sensitivity, indicates the sensitivity of
the film emulsion to record latent images of light. Film speed may be fast or
slow. Selection of a film speed requires a knowledge of film characteristics,
lighting situations, and potential compromises.
FAST FILM: Film considered “fast” is film that requires less light for
exposure. These are the low-light film speeds of ISO 400 and higher. Image
resolution is good in small prints; however, pronounced graininess appears in
enlargements. Some of the very fast films, ISO 1000 and faster, need very
little light and an extremely short exposure time, making them more desirable
for dimly lit auditoriums and difficult to handle in daylight situations.
SLOW FILM: Slow film requires more light or longer exposure times to
record an image. Slow films, such as ISO 25, have very fine grain that
remains fine even in enlargements. These films are ideal for a controlled
studio atmosphere.
Slide
duplicators
Sometimes a photo lab is not available to produce duplicates of slides or
transparencies. The DM is able to duplicate slides using a slide duplicator
that attaches to the front of a camera body much as a lens does. The
duplication process allows the DM an opportunity to correct minor exposure
errors and perform limited cropping of the original slide. The light meter in
the camera can meter exposure. Transparencies, placed on a light table or
the illuminated copyboard of a process camera, can be re-photographed with
a 35mm camera and slide film.
4-42
Summary
Review
This chapter covers general safety precautions for and maintenance
procedures of the basic equipment used to produce a first-generation copy
from an original. Equipment and procedures are intentionally generic for
copiers, diazo machines, phototypesetters, lettering machines, and cameras
since different equipment is in every Navy shop. Familiarize yourself with
the equipment in your shop. It is not important that you learn brand name
equipment, only that you understand the theory behind the process on which
your equipment operates.
Comment
I have always found that a solid foundation in basic photographic theory,
camera operation, and film characteristics is a valuable asset as a DM. This
information applies to many aspects of our job and is a natural extension of
our creativity and visual literacy. Understanding tonal representation in
photography also helps to understand tone as it applies to the printing process
and CRT transmission. Study the Photographer’s Mate (Basic) manual. It is
well written and easily understood.
As with all processes, understanding how and why a process works unravels
the mystery of operator adjustments. Machines are logical and predictable.
Mastering reproduction equipment is essential. Knowing the processes
required to achieve an end product makes the creation of the product easier.
4-43
CHAPTER 5
AUDIOVISUAL EQUIPMENT
Overview
Introduction
Every command in the Navy has a different requirement for audiovisual
presentations. Some commands have elaborate briefing theaters with closed
circuit television or computer-assisted telecommunications and Internet, while
other commands have only an occasional overhead projector. You need a
working knowledge of the operation and basic maintenance of the common
types of audiovisual equipment.
Objectives
The material in this chapter enables you to do the following:
•
Clean and inspect visual presentation equipment.
•
Identify operator adjustments on visual presentation equipment.
•
Select audiovisual equipment appropriate to a presentation.
•
Set up and maintain a presentation theater.
Continued on next page
5-1
Overview,
Continued
Acronyms
The following table contains a list of acronyms you must know to understand
the material in this chapter:
In this chapter
This chapter covers the following topics:
Topic
See Page
Projection Devices
5-3
Audio Devices
5-19
Multimedia
5-20
Lecture Aids
5-21
Screens
5-24
Briefing Theater
5-29
5-2
Projection Devices
Introduction
The most common types of still picture projectors are the opaque, the
overhead, and the 35mm slide projector. You need a working knowledge of
the operation and the basic maintenance of the common types of projectors.
General
maintenance
For general maintenance purposes, inspect the projection device well before
presentation day to allow time for the repair of any discrepancies. Likewise,
pay attention to the following details:
•
•
•
Check the cleanliness of the lenses and projection stages:
• clean optical surfaces with a lint-free cloth, a damp chamois, or a lens
tissue;
• clean exterior surfaces with a clean, damp cloth; and
• clean mirrored or reflective condensers with a camel hair brush.
Check the device for worn or frayed electrical cords.
Test device operation by running the projector for 5 minutes before actual
use to make sure it is working properly.
•
Check the projector to screen distance.
•
Keep a spare bulb available next to the projector.
Continued on next page
5-3
Projection Devices,
Projector
support
Continued
Make sure the projector is securely supported so that it will not fall or jiggle
during the presentation. The projector should project the image over the
heads of the audience without partially projecting it onto the ceiling or floor.
Position the projector close enough to the screen to permit even illumination.
Make sure the lens projects the image at a 90-degree angle to the projection
surface to prevent keystoning, covered later in this chapter.
Figure 5-1 shows the correct positioning of a projector to prevent keystoning.
Figure 5-1. —Correct projector angles.
Continued on next page
5-4
Projection Devices,
Opaque
projectors
Continued
An opaque projector reflects light from the surface of an opaque object.
Magazines, books, photographs, full-color pictures, charts, and diagrams
project onto a screen without additional preparation. An opaque projector
will also project any relatively flat object, such as small machine parts, cams,
gears, and coins. This projector is often used for teaching, briefing, and as
an aid to draftsmen enlarging an image to redraw. Some of the limitations in
the use of an opaque projector are its cumbersome size and weight, and it
does not illuminate the screen brightly, requiring the elimination of room
lights.
Figure 5-2 shows a basic opaque projector.
Figure 5-2. —The opaque projector.
Continued on next page
5-5
Projection Devices,
Nomenclature
Continued
An opaque projector is an indirect projection system that uses a composite of
highly polished mirrored surfaces to reflect light from an object through a
lens onto a screen. Other parts of the opaque projector include an on/off
switch, a high intensity 1,000 watt bulb, an optical pointer, a focusing knob,
a roll feed assembly, a platen assembly, and a fuse holder. Most parts and
their functions are self-explanatory except for the roll feed assembly and the
platen assembly.
ROLL FEED ASSEMBLY: The roll feed assembly works like a conveyor
belt to slide objects into the projection platform. Located on the platen
assembly, it permits movement from left to right when you turn a hand crank
on the side of the machine.
PLATEN ASSEMBLY: The platen assembly raises and lowers the
projection platform. By raising and lowering the platform, you can project
objects up to 1 ½ inches thick. The lock on the platen assembly is springloaded; therefore, carefully lock and unlock the platen to prevent the
projection platform from snapping up.
Continued on next page
5-6
Projection Devices,
Nomenclature
(Continued)
Continued
Figure 5-3 shows the key elements of an opaque projector.
Figure 5-3. —Nomenclature of the opaque projector.
Continued on next page
5-7
Projector Devices,
Use
Continued
To project flat objects and objects up to 1½ inches thick with the opaque
projector, use the following tables:
Flat objects
Objects up to 1 ½ inch thick
Continued on next page
5-8
Projection Devices,
Continued
Replacing a
bulb
To remove and replace a bulb in an opaque projector, use the following
tables:
Overhead
projectors
Overhead projectors project light through a transparent visual onto a mirror
that reflects that image to a screen. Use an overhead projector for teaching,
briefing, and as a draftsman’s aid in enlarging or transferring an image to
another surface. Major advantages of the overhead projector are portability,
being able to write directly on the visuals during projection, and using the
projector in dim classrooms. Limitations include a distracting blower motor
noise, the visuals must be transparent to project, and the projector requires
close placement to the screen.
Continued on next page
5-9
Projection Devices,
Nomenclature
Continued
The overhead projector is a simple device. It consists of a three-position
on/off switch, a lamp, a fresnel lens, mirrors, a projection stage, a focusing
knob, a blower, and a condenser. The fresnel lens is the key component of
an overhead projector. This prismatic lens is a series of concentric circular
scribes calculated to concentrate and intensify the light, as it passes through
the visual onto a mirror.
Figure 5-4 shows the elements of an overhead projector.
Figure 5-4. —Overhead projector nomenclature.
Continued on next page
5-10
Projection Devices,
Continued
Use
To use an overhead projector for front screen projection, place the
projectural on the projection stage with the bottom of the projectural facing
the screen. The projectural will be legible to the operator. For rear screen
projection, place the projectural on the projection stage with the bottom of
the projectural facing the screen, but facedown so that the projectural is
illegible to the operator. When using an overhead projector, always allow
the blower motor to cool the bulb before removing power from the unit.
Replacing a
bulb
Use the following tables to remove and replace a bulb in overhead and
portable overhead projectors:
Continued on next page
5-11
Projection Devices,
Portable
overhead
projectors
Continued
Portable overhead projectors are similar to overhead projectors. Portable
projectors fold into a self-protecting carrying case. The on/off switch has a
third position which allows the blower to remain on after the projector bulb
is turned off. Also, the bulb is more intense and has a shorter life. The use
and care of a portable overhead projector is the same as for a regular
overhead projector.
Figure 5-5 shows a few of the many types of portable overhead projectors
available.
Figure 5-5. —Portable overhead projectors.
Continued on next page
5-12
Projection Devices,
Continued
Slide projectors Slide projectors are the most common still picture projectors found in
military commands. The operation of slide projectors is simple and
universal. These projectors project an image from 35mm or 126mm, slide
film in a 2- by-2-inch slide mount. Some projectors can project super slide
film in the 127mm format. Slide projectors are used in teaching, briefing,
and as a draftsman’s aid in enlarging images. The limitations of a slide
projector are that the feed mechanism easily jams, and the bulb is very
sensitive to rapid temperature fluctuations and perspiration from your hand
during handling.
Nomenclature
Although the slide projector looks difficult to adjust, its many parts have
obvious functions. A slide projector consists of a slide holder, lens, focusing
knob, forward/reverse button, on/off button, select button, remote receptacle,
dissolve receptacle, timer, and a bulb. Some of these features require further
explanation:
SLIDE HOLDER: The holder for slides fed into the slide projector is
available as a tray that holds from 60 to 180 slides or a stack loader that
feeds a stack of slides one at a time into the projector.
SELECT BUTTON: Use the select button to select a specific slide in the
slide tray. Depress SELECT and spin the tray to align the slide sequence
number with the gate. When you release the SELECT button, the desired
slide will advance into the gate for projection.
TIMER: Use the timer button to select the manual or automatic mode. In
manual, the operator has control of the amount of time the slide is on the
screen. In automatic, the operator selects the time interval and the projector
automatically changes the slide. The timer activates to prompt the projector
to change slides and refocus. The choices are in 5-, 10-, and 15-second
increments.
BULB: The bulb in a slide projector has two levels of illumination. Low
illumination is 425 watts. Using the projector bulb at low watt illumination
prolongs the life of the bulb. High illumination is 500 watts.
Continued on next page
5-13
Projection Devices,
Nomenclature
(Continued)
Continued
Figure 5-6 shows key points of adjustment on a slide projector.
Figure 5-6. —Slide projector nomenclature.
Care
Make sure the slide tray or stack loader is firmly seated on the projector. If
a slide jams, remove the tray or loader to retrieve it. Before unplugging a
slide projector, allow time for the blower to cool the bulb and the motor.
To remove the tray, follow this table:
Continued on next page
5-14
Projection Devices,
Replacing a
bulb
Continued
To replace a bulb or secure the projector, allow the blower motor to cool the
bulb before you remove the unit from the power source. To remove and
replace a projector bulb, use the following tables:
Continued on next page
5-15
Projection Devices,
Continued
Slide projector
accessories
Slide projectors have many accessories to create a custom system that works
for your needs. Slide trays hold slides in sequence, locked into place, in
increments from 60 to 180 slides. Stack loaders allow the rapid loading and
the easy rearrangement of slides. Remote control cords with connections of
varying lengths allow the operator mobility during presentation. These
remotes signal the projector to go forward, in reverse, and to power focus.
Variable focus lenses are available in long and short ranges to minimize
distortion in unusual presentation situations.
Dissolve units
One accessory that contributes to a professional presentation is a dissolve
unit. Most dissolve units are multi-functioning; that is, they fade an image
into black or into another image, or have flashing or overlay capabilities.
One or more projectors change an otherwise static presentation into a
dynamic display.
—
Programmers
Programmers offer the operator an opportunity to code a series of functions
or special effects into their slide presentation. Common special effects
programmers include the following:
AUDIBLE TONE CONTROLLER: An audible tone controller activates the
projector by impulsing a tone. This coded tone signals the projector to do
what the operator pre-programs into the device.
PUNCH TAPE: Punch tape uses programming logic or electronic circuitry
to pierce a paper tape with a code. The code punched onto this tape cues the
projector for multiple functions.
ELECTRONIC MICROPROCESSORS: Electronic microprocessors digitize
information. This “bit” information triggers the programmer’s multiple
functions automatically.
Continued on next page
5-16
Projection Devices,
Continued
Projector racks Make sure slide projectors and programmers or dissolve units are securely
mounted to a stable projector rack. Keep all electrical and connector cords
from being pinched between devices. Position the projector rack so that the
projectors are at a 90-degree angle to the screen and deck to prevent
keystoning. Also consider ventilation, cooling, and access to the projection
devices when you position the projector rack.
Video cassette
recorders
players (VCR)
Video cassette recorders/players (VCR) combine a synchronized audio and
video presentation. The operation of a VCR is easy, as many individuals are
already familiar with the operation of their home VCR. VCR presentations
are excellent for small audiences. When you give a presentation to a large
group, hook up several monitors and strategically place them throughout the
briefing theater. VCRs require the addition of a television monitor and
occasional jams will badly damage a tape.
Nomenclature
Most adjustment points of a VCR are self-explanatory. There is a cassette
port, an on/off switch, a forward/fast forward button, a rewind/reverse
button, a record button, a playback button, a pause button, a stop/eject
button, a speed control switch, and a tracking dial. The two adjustments you
may not be familiar with are the speed control switch and the tracking dial.
SPEED CONTROL SWITCH: This switch allows the operator to switch
from standard tape advance speed (SP) to long standard advance speed (LSP).
Switching from SP to LSP increases the amount of recording time on a tape.
TRACK DIAL: An incorrectly tracking tape will chatter, appear out of
synchronization, or show distinct horizontal frame lines on the monitor.
Adjust the track of the tape by moving the dial until the projected image is
steady.
Use
When you use a VCR, make sure the tape is correctly inserted into the
cassette port. Take care not to re-record inadvertently over a recorded tape.
To make sure a tape is not able to record, break the small plastic tab on the
tape cartridge and discard the tab. Occasionally, clean the tape heads with a
tape head cleaning tape.
Continued on next page
5-17
Projection Devices,
Continued
Video
projectors
Video projectors are very similar to VCR units. The major difference is that
the video projector projects the image onto a screen. The video projector is
primarily a teaching device meant for small audiences. One of the drawbacks
in using this projector is how easily it slips out of adjustment.
Nomenclature
Video projectors have the same buttons and switches as a VCR with only a
few differences. These differences are a projection lens, a focusing ring, and
input/output ports to the video cassette player.
Use
Position a video projector so that it is not in a traffic area as this projector
easily jars out of alignment. Use a special projection cart, or ideally, mount
the projector to the ceiling in a projector rack. The projector has sensitive
adjustment dials. A misadjusted projector will project an image that appears
to have a ghost or has incorrect coloration. Adjust this projector before
actual use by aligning the three primary color dots on the screen until only
white light is seen.
Monitors
Monitors are television screens connected to computers or video cassette
recorders/players to playback audiovisual tapes. Monitors have the same
adjustment features as a television. Use as large a monitor as practicable in
the classroom or theater.
Nomenclature
Monitors have an input port, an output port, an on/off switch, a screen face,
a color balance control, and a vertical/horizontal hold adjustment dial.
Use
Never force a plug into an input/output port. Monitors are hardy devices that
require little care beyond general maintenance and commonsense treatment.
5-18
Audio Devices
Introduction
Audio devices provide sound to a presentation. It maybe a narration, sound
effects, or music. A presentation is ineffective if an audience cannot hear it.
Cassette decks
Cassette decks provide the dimension of sound to a visual presentation. This
music or narration promotes the understanding of the presented material.
Cassette tapes are available in 30-, 60-, 90-, and 120-minute increments.
You can record information on a cassette tape or use pre-recorded tapes.
Some cassette decks require an additional device, called an amplifier, which
increases the sound volume before it reaches a set of speakers.
Nomenclature
Cassette decks have an on/off power switch, a play button, a record button, a
forward/fast forward button, a rewind/reverse button, a pause button, a
stop/eject button, and a tape counter. The tape counter is useful when you
are cuing sound at a specific time or interval and monitoring the amount of
tape expended.
Use
To record, most cassette players require you to depress the record button
simultaneously with the play button. Take care not to re-record over prerecorded information. To prevent this, break off the small plastic tab on the
side of the cassette cartridge. Clean the tape heads with a head cleaning tape
or an alcohol solution and cotton swab after 8 hours of play.
Speakers
Speakers transmit sound so that everyone can hear. They use a ground wire
and an input wire for connection to a player or amplifier.
Use
Place speakers far enough from the amplifier to prevent feedback or squeal.
The speakers should remain in front of and facing the audience. Place them
out of the way, preferably mounted on the ceiling.
Care
Keep the front grill of the speaker box. Replace speakers that have been tom
or crushed. Damaged speakers distort sound or buzz and are distracting to
the audience. Occasionally, disconnect the speaker and expose fresh wire to
reconnect to the terminals. Oxidation of the copper core of the wire will
cause the speaker to cut in and out.
5-19
Multimedia
Introduction
Sometimes one projector is not enough. When a speaker combines different
devices or methods of presentation, it becomes a multimedia event.
Multimedia
presentations
Multimedia describes presentations that use several different devices or
presentation methods to convey information. Another name for multimedia is
media integration. This type of presentation combines information presented
in a lecture with slide, films, video, transparencies, or other lecture aids. It
may be reactive for which the audience sits and listens, or it may be
interactive, whereby the audience is participating as well as listening. The
point is to use as many of the human senses as possible to increase audience
understanding of the material presented.
Computer
interactivity
Computers can coordinate the functions of slide projectors, video projectors,
and overhead projectors. They cue each device in sequence and provide
special effects that create dynamic and professional presentations.
Computers can also present information as a projection device by projecting
an image onto an overhead screen or for direct viewing from the computer
monitor. Software or programs are available that allow you to create a
graphics presentation with sound and project or display that presentation in a
classroom or briefing environment. Through international electronic
hookups, briefings can link commands all over the world for direct and live
transmissions.
Computer
Based
Instruction
(CBI)
Future developments to exploit the training and briefing capabilities of
computers include computer based instruction (CBI). Command ESOs will
receive Navy training material on disks for rapid distribution to the fleet.
You will be able to complete training courses at your computer station in the
work space. This interactive learning process will have the twofold benefit
of improving your computer skills as well as providing immediate feedback
on how well you assimilate the lessons taught in the training program.
5-20
Lecture Aids
Introduction
In short, any additional paraphernalia that a speaker uses in the presentation
of a program is a lecture aid.
Lectern or
podium
A lectern, or podium, focuses the audiences attention on the person
delivering the presentation. It also serves to support the speaker’s notes for
teaching or briefing.
Types
A lectern maybe static, merely a platform the speaker stands behind or near.
Lecterns may also be electrified. Lecterns with power options provide the
speaker with control over room lights, projection devices, and microphone
operation and volume. Some podiums have signal indicators or idiot lights to
alert the speaker that the behind-the-scenes crew is experiencing trouble with
the presentation.
Care
Keep a lectern clean and in good repair. Do not allow food or drink near the
podium, particularly if it is electrified. Place a command logo or Navy
emblem on the front of the podium. This may be the first and only
impression your command makes on a visiting dignitary or new personnel.
Flannel/felt
boards
Flannel/felt boards are large boards covered with felt or flannel material.
Lightweight letters and pictures with a slightly abrasive backing stick to the
board surface. Use flannel/felt boards for static displays, storytelling, and
teaching.
Figure 5-7 shows the abrasive backing on an object used on a flannel board.
Figure 5-7.
—Flannel/felt board
and backing.
Continued on next page
5-21
Lecture Aids,
Hook and loop
boards
Continued
Hook and loop boards are similar to flannel/felt boards. The material used to
cover the board is a nylon loop material. The material used to cover the back
of the objects to stick to the board is a nylon hook material. Objects used on
a hook and loop board may be larger, heavier, or have dimension to them
because of the strength in the grip of the hook and loop material. This board
is used for displays, storytelling, and teaching.
Figure 5-8 shows an enlargement of hook and loop material.
Figure 5-8. —Hook-and-loop
board and backing.
Marker board/
multipurpose
board
Marker boards are slick surfaced boards that are usually white. Use an
erasable marker to write or draw on the surface of these boards. Make sure
you use the correct type of marker on this board, as common markers will
ruin it. Some marker boards will accept magnets which make them more
versatile than flannel boards or hook and loop boards. Marker boards are
gaining popularity as status boards, in displays, for teaching, and as a
spontaneous briefing tool.
Chalkboards
Chalkboards are becoming rare with the advent of the marker board, but they
are still found in classrooms and briefing theaters for storytelling, teaching,
and briefing. Only chalk will mark the slightly abrasive surface of a
chalkboard. Chalk is available in many colors, and chalkboards are available
in green, grey, or black.
Continued on next page
5-22
Lecture Aids,
Easels
Continued
Use an easel when a lecture or brief is short or requires audience
participation. Lecture paper pads fit into the top of an easel and are easily
tom off and discarded when you complete the brief. When writing on a
lecture pad or drawing a chart or diagram, place an extra sheet of paper
between the top paper sheet and the next sheet to prevent the marker ink from
bleeding through. Write large and legibly on the lecture pad. Make sure the
markers are fresh and full of ink before you address the audience.
Figure 5-9 shows an easel with a lecture pad attached to it.
Figure 5-9. —An easel with lecture pad
paper.
5-23
Screens
Introduction
The success of a presentation is greatly dependent on your use of the correct
screen in a serviceable condition. In extreme circumstances, however, a light
color wall may have to suffice.
Purpose
A screen enlarges the image of a slide or transparency projected on it so that
it is legible to an audience. The two types of projection screens are the rear
projection, and the front projection screens. Rear projection screens are
translucent: therefore, the projector is invisible to the audience as it projects
an image through the screen. Front projection screens are reflective and
reflect the light image off the screen to the audience.
General care
Keep a screen clean and free of tears. Protect a screen from abuse and stray
chalk or pencil marks. Unless it is permanently freed, roll the screen up and
store it properly between use.
Rear projection Screens used in rear projection are found most often in permanent theater
screens
setups. Many flag staffs have such facilities. Rear screen projection allows
the production personnel behind the scenes mobility. It also decreases
audience distraction created by the whirling of a projector motor. Most rear
projection screens have a matte surface. The image is projected directly on
the screen or reflected from large mirrors located behind and at a 45-degree
angle to the screen.
Front
projection
screens
Most front projection screens are the reflective type. The four types of
screens used for front projection are the lenticular screen, the high gain
aluminum screen, the beaded screen, and the matte screen. Select the type of
screen most appropriate to the room dimensions and desired angle of
projection. They may be portable units that roll or fold up for storage or
permanently freed to a ceiling or wall.
Lenticular
screens
Lenticular screens reflect light evenly including all room light and glare.
They appear to have a striped, ribbed, rectangular, or diamond pattern, and
they have a coating that gives them an enameled, pearlescent, granular, or
smooth surface. Lenticular screens have a 70-degree width by 20-degree
height angle of projection and are brighter than beaded and matte screens.
Continued on next page
5-24
Screens,
Continued
High gain
aluminum
screens
The high gain aluminum screen is a fill-contrast screen that is six times
brighter than any other screen. This is a noncollapsible, slightly concave
screen with a grained or patterned aluminum foil laminate. It rejects room
light and glare. Use a high gain aluminum screen in a normally lighted
room. The angle of projection is 60-degree width by 30-degree height.
Beaded screens
Beaded screens have a very bright image. The image is reflected from a
white surface covered with embedded or attached clear glass beads. A
beaded screen will reflect all light including stray light and glare. Its 22degree angle of projection make it useful in long, narrow rooms.
Matte screens
Matte screens appear equally bright from all angles because they diffuse light
evenly in all directions. Their dull, matte surface may be dark grey to white
in color. They have a 30-degree angle of projection useful in wide, shallow
rooms.
Selecting a
screen
Before selecting a screen, consider the factors associated with the room you
will be using the screen in. Consider the width and length of the room and
the size of the audience, and the angle of projection of the screen.
Continued on next page
5-25
Screen,
Selecting a
screen
(Continued)
Continued
Figure 5-10 illustrates the differing angles of projection for each type of
screen.
Figure 5-10. —Angle of projection.
Continued on next page
5-26
Screen,
Screen
placement
Continued
Consider the room size, the size of the audience, and the location of the
windows, the doors, and the speakers before selecting a screen location. Seat
the audience no closer than two screen heights from the screen, and no
farther than eight screen heights back away from the screen. Position all
projectors to project an image over the heads of the audience. To prevent
keystoning, tilt the screen until the distortion disappears.
Figure 5-11 shows the position of the audience and projectors in relation to
the screen.
Figure 5-11. —Screen position.
Continued on next page
5-27
Screen,
Keystoning
Continued
Keystoning appears when the projector lens is not perpendicular to the screen
or deck. The distorted image appears as a wedge shape. To correct the
keystone effect, tilt the screen toward the projector on the end displaying the
smallest part of the wedge.
Figure 5-12 shows the keystone effect.
Figure 5-12. —The keystone effect.
5-28
Briefing Theater
Introduction
Nothing is more impressive to an individual than walking into a new
command for a presentation and seeing a state-of-the-art presentation theater.
It is especially awesome to have the presentation flawlessly executed.
Purpose
Few commands are fortunate enough to have a room specifically designated
as a briefing theater. Many commands have conference rooms and
classrooms. In each instance, this is a space set aside for the specific purpose
of teaching, briefing, meeting, or holding mast. This room warrants special
consideration for cleanliness and material condition, as it is sometimes the
frost and only contact someone may have with a command.
Theater
environment
A briefing theater, or any room used as a classroom or conference room,
should be quiet both inside and outside. Sound-absorbing material inside the
room lessens equipment noise and voices speaking at enhanced volumes.
Upholstered furniture, drapes, and carpeting all absorb sound to varying
degrees. Prohibit loitering outside the theater and post passageway signs
requesting silence. Noise from outside is distracting to those inside the
theater trying to concentrate on a speaker.
Temperature
The temperature in the briefing theater should be controllable. Keep the
room cool without coldness. Overly warm temperatures lull the audience
into slumber. Air should circulate regularly and often, particularly if the
theater is full.
Lighting
Use lighting dramatically in the theater. Light the theater in three distinct
stages: before the presentation, during the presentation, and after the
presentation. Locate lights above the speaker, in front of the screen, over the
audience, and in the back of the room. Locate light switches near exits, on
the podium, and in the projection booth. Light switches maybe on/off
switches or dimmer switches.
BEFORE THE PRESENTATION: Before the presentation begins, turn the
lights on over the audience. Once the audience is seated, the lights over
them go out and the lights behind them, in front of the screen, and over the
speaker go on.
Continued on next page
5-29
Briefing Theater,
Lighting
(Continued)
Continued
DURING THE PRESENTATION: After the welcoming of the audience and
the introduction of the speaker, the lights in front of the screen are turned off
to prevent glare on the screen and interference with the contrast of the
projected image. The light on the speaker remains on as does the light in
back of the audience. This remaining light slightly lessens the contrast of the
projected image reducing eyestrain, providing light for note taking, and
creating a social ambience within the theater.
AFTER THE PRESENTATION: After the presentation, the lights behind
the audience are turned off, the lights above the audience are turned on, the
light on the speaker remains on, and the light over the screen remains off.
Figure 5-13 shows the position of lights in the briefing theater.
Figure 5-13. —Lights in a briefing theater.
Continued on next page
5-30
Briefing Theater,
Continued
Speakers
Place the speakers in the theater in front of and facing the audience. Place
the speakers as far forward of the lectern as possible to prevent squeal or
feedback. Make sure the speaker wire does not present a trip hazard.
Facilities
Make sure the briefing theater, conference room, or classroom is near head
facilities. If gedunk machines or a smoker’s lounge are nearby, so much the
better. Presentations run smoother and on time when breaks are adequate
and convenient.
Scheduling
Only one division should be responsible for assigning and scheduling the
conference room or briefing theater. Establishing a priority method for
scheduling will eliminate conflicts. The individual responsible for scheduling
should conduct a pre- and post-presentation inspection for cleanliness and
material condition. Discourage loitering and impromptu meetings; keep the
presentation room locked when it is not in use. Field day the briefing theater
as part of the normal field day routine.
Mechanical
environment
The equipment, seating, and type of projection you use in the briefing theater
is part of the mechanical environment of the room. Your failure to maintain
ready equipment disables the command’s ability to communicate.
Equipment
Not only is the type of equipment and its material condition important, but so
is the placement of the equipment and how much noise it produces. Select
the equipment that best suites the room and audience size. For front
projection, position the equipment so that it projects over the heads of the
audience. Stagger the projectors in a projection rack to allow multimedia
capability. For rear projection, if you have the room, position the projector
to project directly onto the screen. If space is limited, reflect the light from a
mirrored surface at a 45-degree angle to the screen.
Continued on next page
5-31
Briefing Theater,
Equipment
(Continued)
Continued
Figure 5-14 shows equipment positions for front and rear screen projection.
Figure 5-14. —Equipment positions.
Continued on next page
5-32
Briefing Theater,
Continued
Seating
Often, the seating type and arrangement already existed before you arrived at
the command. Carefully assess the seating in the briefing theater. The
audience should be no closer to the screen than twice the screen width and no
farther from the screen than eight times the screen width. All seats should be
within the purview of the angle of projection for the screen in the briefing
theater. Seats should be comfortable without being plush. Seats should face
forward except in a briefing theater where the flag staff or dignitary seating
should have the ability to rotate.
Lectern
Place the lectern in front of and to one side of the screen. The lectern should
not interfere with the audience view of the screen. If the speaker uses any
lecture aids, such as an easel or marker board, place them on the opposite
side of the room, angled toward the audience, and not obstructing the
audience’s view of the screen.
Projection area
The area used to setup the projection devices is the projection area. Restrict
free movement through this area to minimize trip hazards and possible
damage to the machines and machine connections. In some commands, this
projection area is an enclosed booth; in others, it is no more than a mobile
rack in the back of a room or a projector on the end of a large table.
5-33
Summary
Review
This chapter covers the operation and maintenance of common audiovisual
projectors, such as the opaque projector, the overhead projector, and the
slide projector and their accessories. It also briefly covers audio devices,
video cassette recorders, and video projectors. The topics of screen selection
and the set up of a briefing theater or conference room complete this chapter.
Comments
One of the most interesting, demanding, and rewarding DM billets is that of
a briefing draftsman or draftsman attached to a flag staff. Nowhere else are
your professional abilities and customer service skills challenged and
scrutinized daily, and nowhere else are your creative talents more highly
visible by personnel in the upper echelon. These pressurized billets provide
immediate job satisfaction in the form of a daily summary or conference.
Another rewarding duty is at a teaching or educational command. Good
students quickly spot poor graphics or illogically planned visuals. Poor
visuals and poorly presented visuals distract, irritate, and impair
communication. Understand what you are illustrating. Understand the effect
your artwork has in the long haul. Know how to best communicate the
message. If you do not, you have missed the point of visual communication.
Think about the message the visual must convey and the method of
presentation before creating the visual.
5-34
APPENDIX I
GLOSSARY
Glossary
Introduction
One important key to success in any technical rate is the language associated
with it. Learn the glossary as an integral part of your learning process. Use the
terms other professionals are using in your field.
A
ACCENT LIGHT— A light that highlights or emphasizes the subject in a
scene.
ACETATE— Tough, transparent, or semitransparent sheets available in
various thicknesses used as overlays in color separation, friskets in retouching,
eels for animated drawings, and displays. Treated acetate readily accepts ink
and paint.
ACHROMATIC— Black, white, and the grays in between.
ACRYLIC PAINTS— See POLYMER.
ACTINIC LIGHT— The short waves of the light spectrum (green, blue, and
ultraviolet) that cause chemical changes in light-sensitive photographic
emulsions.
ACTION LINES— Extra lines drawn around or following a cartoon figure or
object to emphasize motion.
ACTIVATOR— The solution or chemical that starts the reaction of the
developing agent in a photosensitized emulsion.
ADDITIVE PROCESS— A process that produces white light by starting with
darkness and combining colored light.
ADHESIVE— (1) A gelatin or casein used as a binder in pigment; (2) A
chemical compound used as a glue.
Continued on next page
AI-1
Glossary,
A (Continued)
Continued
ADVANCING COLORS— Colors that appear to come forward, such as red,
yellow, and orange.
AESTHETIC— Pertaining to the beautiful, particularly in art.
AGATE— Type size of 5 1/2 points.
AIRBRUSH— An atomizer that applies a fine spray of paint under pressure
from a tank of compressed air or carbonic gas.
AIRBRUSHING— Using an airbrush to create art or improve the appearance
of art.
ANALOGOUS COLORS— Colors closely related to one another on a color
wheel, such as blue, blue-green, and green.
ANATOMY— The bone and muscle structure of humans and animals as it
affects the appearance of surface forms and contours.
ANGLE— A figure formed by two lines or planes extending from, or
diverging at, the same point.
ANHYDROUS AMMONIA SYSTEM— A system that uses a mixture of
water and ammonia in the developing section of some whiteprint machines.
ANILINE COLORS— Brilliant colors derived from coal tar that tend to fade
in time.
ANIMATED CARTOON— A cartoon drawn in a series of progressive
actions to give the effect of continuous movement.
ANIMATION— Sequentially drawn pictures displaying a range of motion
which, when viewed in rapid sucession, appear to be moving.
ALIGNED SECTION— A sectional view that revolves some internal features
into or out of the plane of view.
Continued on next page
AI-2
Glossary,
A (Continued)
Continued
AMERICAN STANDARDS ASSOCIATION— Also called ASA. See ISO
or EXPOSURE INDEX.
ANTIQUE STOCK— A rough-surfaced paper, such as wove or laid.
APERTURE— An opening behind the lens that allows exposure to one frame
of film.
APPLICATION BLOCK— The part of a drawing of a subassembly,
showing the reference number for the drawing of the assembly or adjacent
subassembly.
ARC— A portion of a curved line.
ARC LAMP— A light source resulting from the application of current to two
carbon electrodes that form an electric arc.
ARCHITECT’S SCALE— A scale used when dimensions or measurements
represent feet and inches.
AREA (PICTURE)— The flat surface within the border of a picture.
ARROWHEAD— An indicator shaped like an elongated triangle used at the
end of a lead line to direct attention to an object or a point of reference.
ART— Any copy other than text; any photograph, painting, or drawing in
line, halftone, or continuous tone.
ART BRUSHES— See BRUSHES.
ART GUM— A soft, grit-free eraser used to clean drawings and remove
unwanted pencil lines.
ARTIST’S BOARD— See ILLUSTRATION BOARD.
ARTWORK— Illustrations, drawings, photographs, renderings, paintings,
sketches, and copy.
Continued on next page
AI-3
Glossary,
A (Continued)
Continued
ASCENDERS— The part of lowercase letters that project above the main
body waistline, such ash, d, and f.
ASPECT RATIO— The proportion of the media format that governs the size
of the original artwork.
ASSEMBLE EDITING— Putting scenes in chronological or progressive
order.
ASYMMETRICAL— An informal balance of objects or sections of equal
mass and weight on each side of a center line.
ATTITUDE— A position or action of the body or part of the body that
approximates an emotion, character, or personality.
ATTRIBUTES OF MEDIA— Specific characteristics of a chosen medium.
AUDIO— Sound that is heard.
AUDIO-TUTORIAL— Also called AT. Instructions given to a student that
uses primarily sound.
AUDITABLE PICTURE ADVANCE SIGNAL—An auditable signal that
indicates the moment to change the image to another.
AUTO-TRACE— A software option that allows the tracing of one image into
another file option.
AUXILIARY VIEW— A drawing showing the true shape of objects that
have features not parallel to the three principal planes of projection.
AXONOMETRIC PROJECTION— A drawing that shows the inclined
position of an object in an isometric, dimetric, or trimetric format.
BACKGROUND ART— Design, texture, pattern, or other form of artwork
used to create a background effect for type and illustration.
Continued on next page
AI-4
Glossary,
B (Continued)
Continued
BACKUP— The registration of two sides of a printed sheet.
BALANCE— A harmonious arrangement of the various components in a
picture plane in a symmetrical (formal) or asymmetrical (informal) format.
BALL-AND-SOCKET JOINT— A flexible joint that rotates in all directions.
BALLOON— (1) A space containing the words spoken by cartoon characters;
(2) A distortable shape used as a base to draw a cartoon head.
BALLOON LETTERING— Informal, single-stroke lettering used in comic
strip balloons.
BAR CHART— A graphic representation comparing numerical values by
means of rectangles of equal width.
BASE ART— Also called BASIC ART and BLACK ART. See BLACK
ART.
BEADED SCREEN— A screen comprised of glass or plastic beads that
reflect light from a projected image.
BEAM COMPASS— A compass capable of drawing circles and’ arcs that
exceed the limits of a standard compass.
BEND ALLOWANCE— An additional amount of metal used in a bend in
metal fabrication.
BENDAY— Mechanical shading applied to artwork to give a variety of tones
to line drawings. Benday is named for its inventor, Benjamin Day.
CURVES— A computer tool that draws precise curves with great
accuracy.
BILL OF MATERIALS— A list of standard parts or raw materials needed to
fabricate an item.
Continued on next page
AI-5
Glossary,
B (Continued)
Continued
BINDER— An adhesive, coagulate, reducer, or extender added to pigments
to maintain consistency, to promote adhesion, and to facilitate application.
BISECT— To divide into two equal parts.
BIT– The smallest unit of electronic information a computer can handle.
BIT MAP— Also called PIXEL MAP. A matrix of dots or pixels.
BLACK ART— Also called BASE ART. Art used in making process plates
for illustrations of two or more colors.
BLACK-AND-WHITE— (1 ) Line art executed in a black-and-white medium
only; (2) Continuous-tone art executed in black, white, and intermediate
tones.
BLACK PATCH— A black masking patch pasted into the exact size and
location on artwork where a photograph is to appear on the reproduction
copy.
BLEED— The borders on the artwork and printing plate that extend beyond
the final trimmed edge of the sheet.
BLENDING— Mixing or incorporating one color or tone with another.
BLOCKING IN— Indicating the broad outline of an object or shapes in a
picture using preliminary lines.
BLOCK OUT— Elimimting an unwanted section of a picture.
BLOWUP— An enlargement.
BLUEPRINT— A direct, positive print made on chemically treated paper
from a translucent or transparent drawing.
BOARD— Any heavy material used for mounting art or making displays.
Continued on next page
AI-6
Glossary,
B (Continued)
Continued
BOARD ART— Any artwork mounted on heavy board stock.
BODY TYPE— Type used for the main body of text in printed matter.
BOLDFACE— Type emphasized by darkening or increasing letter weight.
BOOKLET— A pamphlet bound within paper covers.
BOOT-UP— Start-up of the computer.
BONE— An instrument with a plastic, agate, or metal tip used for burnishing
shading sheets, pressure-sensitive letters, and paste-ups.
BORDER AREA— The areas around a graphic that represents a protective
perimeter.
BOUNCE LIGHT— Lighting set up to reflect from nearby surfaces onto a
subject.
BOURGES PROCESS— A method of color separation using prepared
colored or toned papers or acetate sheets.
BOW INSTRUMENTS— Drafting tools that draw circles and arcs less than
one inch in diameter.
BOX— To enclose with borders or rules.
BREAK LINE— Lines to reduce the graphic size of an object, generally to
conserve paper space.
BRIEFING CHART— Also called BRIEFING PAD. A visual aid that
presents information on large paper or board.
BRIGHT— A short haired, flat, chisel-shaped brush.
BRISTLE.— A hog hair brush used primarily in oil painting.
Continued on next page
AI-7
Glossary,
B (Continued)
Continued
BRISTOL BOARD— A drawing surface made of fine, tough, flexible
cardboard available in several thicknesses and in a variety of surfaces.
BROADSIDE— Also called BROADSHEET. A large, folded advertising
piece.
BROCHURE— A bound pamphlet.
BROKEN COLOR— Two or more colors applied simultaneously to artwork
without prior mixing or blending.
BROKEN OUT SECTION— An auxiliary view used when a partial view of
an internal feature is insufficient.
BROWNPRINT— A photographic print or silverprint that produces a brown
image.
BRUSHES— A collection of bristles or hairs used to apply pigment and
glues.
BULLET— A symbol
used to preface listed items.
BURNISH— The application of pressure to secure paste-ups, shading sheets,
and lettering to artwork.
BURNISHER— Also called BONE. An instrument made of plastic, wood,
glass, metal, stone, or ivory used to flatten, smooth, or polish a surface with
hand pressure.
BUSY— Excessive or competing detail.
BUTTON BAR— Also called TOOL BOX. A program specific legend of
options available to a computer user.
Continued on next page
AI-8
Glossary,
C
Continued
CABINET PROJECTION— A type of oblique drawing with the angled
receding lines drawn to one-half scale.
CALLOUT— To call attention to a part or item in an illustration.
CAMCORDER— A video camera and recorder in one unit.
CAMEO PAPER— Paper of a dull, smooth finish used frequently for carbon
and graphite pencil drawings.
CAMERA LUCIDA— Also called LACEY LUCY. An instrument with
prism lenses used for enlarging or reducing artwork.
CAMERA-READY COPY— See REPRODUCTION COPY.
CANVAS— A surface made of cloth, usually cotton or linen, for painting.
CANVAS BOARD— Cardboard covered with cotton or linen used as a
surface for painting.
CANVASKIN— A paper with a textured surface resembling canvas.
CAPTION— Any descriptive heading or title for an illustration or table.
CARBON PENCIL— Pressed carbon in a wood casing.
CARICATURE— The deliberate exaggeration and distortion of prominent
features or mannerisms.
CARPENTER’S PENCIL— A wide, flat lead pencil ideal for chisel point
lettering or laying in broad tones.
CARTOON— A comic or satiric drawing.
CARTOUCHE— A scroll-like design used ornamentally in printing or hand
lettering.
Continued on next page
AI-9
Glossary,
C (Continued)
Continued
CASEIN— A curd of milk and lime used as a binder in tempura paint.
CAVALIER PROJECTION— A form of oblique drawing with the receding
lines drawn full scale at 45° to the orthographic front view.
CD– See COMPACT DISK.
CD ROM– See COMPACT DISK READ—ONLY MEMORY.
CEL— Acetate overlays used in television art and animation.
CEL LEVEL— The number of eels placed one over another on the same
background and photographed at the same time.
CENTER DISK— A drafting instrument that protects the paper surface from
damage when drawing multiple concentric circles with a compass.
CENTER OF INTEREST— The part of the picture that attracts the most
attention.
CENTER LINE— Lines that indicate the center consisting of alternating long
and short dashed evenly spaced.
CENTER SPREAD— Two facing pages formed by one folded sheet of
paper.
CENTRAL PROCESSING UNIT— Also called CPU. The integrated circuit
(IC) chip that controls the speed and processing power of the computer.
CHAIN or CIVIL ENGINEER’S SCALE— A scale, generally triangular,
divided in decimal units or units of 10.
CHARACTER— Any letter, number, punctuation mark, or space in printed
matter.
Continued on next page
AI-10
Glossary,
C (Continued)
Continued
CHARACTER GENERATOR— A computer hardware or software device
that provides a means for formulating a character font and as a controlling
function during printing.
CHARCOAL— Specially charred willow sticks used for drawing on a paper
with tooth.
CHARCOAL DRAWING— A drawing made with charcoal.
CHARCOAL PENCILS— Charred willow sticks encased in wood for
strength.
CHIAROSCURO— Rendering forms using a balanced contrast between
pronounced light and dark elements.
CHINESE WHITE— An opaque white watercolor pigment.
CHISEL POINT— Drawing or lettering with a wide, flat point.
CHOKES— Used to trap a dark element over a light background to avoid or
minimize white space showing around the element during press plates
misalignment.
CHROMA— See INTENSITY,
CIRCULAR SCREEN— A photographic screen used with a process camera,
which allows screen adjustment to eliminate the wavelike or checkered effect,
called moire.
CIRCUMFERENCE— The length of a line that forms a circle.
CIRCUMSCRIBED— To draw around or enclose within one geometric form
another form or object.
CLICK ON— To select a computer function by clicking the buttons on a
mouse.
Continued on next page
AI-11
Glossary,
C (Continued)
Continued
CLIP ART— A collection of artwork filed away for future use.
CMYK— An acronym for cyan, magenta, yellow, and black, a color
specification system for color separation and printing.
COATED PAPER— Paper coated with a finely ground filler or clay to
produce a smooth surface.
COBALT DRIER— A liquid agent used in a medium to accelerate the drying
of oil paints.
COLD COMPOSITION— Composition of type that uses no molten metal to
form the image.
COLD MOUNT— A method of mounting artwork or photographs to a
surface.
COLD PRESSED— A paper or illustration board with a medium to rough
surface texture.
COLLAGE— Artwork made by arranging and pasting pieces of cloth,
newspaper, and various other materials on a surface to form a composition.
COLLATING— Gathering single sheets or leaves in sequence.
COLLOTYPE— A method of reproducing paintings and drawings using a
gelatin plate.
COLOR— A sensation caused by light waves of different lengths comprised
of three elements: hue, value, and intensity.
COLOR BARS— Bars of color that appear on a video screen to facilitate fine
tuning of the color resolution.
COLOR BLENDING— Blending or combining different colors to form
another color or smooth gradient.
Continued on next page
AI-12
Glossary,
C (Continued)
Continued
COLOR CHART— An arrangement of colors.
COLOR CYCLING— A spectral effect that creates the illusion of movement
on the computer screen.
COLOR DIMENSIONS— The three elements of color: hue, value, and
intensity.
COLOR GRAPHICS ADAPTER BOARD— Also called CGA or a Video
Graphics Adapter (VGA). This IC chip defines the ability of the computer to
execute commands during the creation of artwork in the computer.
COLOR HARMONY— A unified or aesthetically pleasing effect produced
by a combination of colors.
COLOR INTERVAL— The degree of visual difference between two colors
as measured by hue, value, and intensity.
COLOR KEY— The overall effect of the selected pallette, for instance, a
high-key illustration of light, bright or vibrant color and a low-key
illustration of dull or monotonous colors.
COLOR NOTATION— The specification of color by written symbols and
numerals based on an established color system used on sketches for future
reference.
COLOR PROOF— An engraver’s or printer’s proof showing the effect of
final color in perfect registration.
COLOR SCALE— A series of colors that display a change or gradation in
hue, value, and intensity.
COLOR SCHEME— A group of colors that dominate a picture or create a
unity within it.
Continued on next page
AI-13
Glossary,
C (Continued)
Continued
COLOR SEPARATION— (1) The photographic process of separating fullcolor originals into the primary printing colors; (2) An artist manually
separating the originals for full color reproduction in the creation stage of a
master artwork.
COLOR SKETCH— A rough drawing or layout approximating the color in
the final picture.
COLOR SYMBOLISM— The use of color to signify or suggest an emotion,
idea, or characteristic.
COLOR WHEEL— A circular color chart with colors arranged according to
their positions as a primary, secondary, or tertiary color.
COLUMN— (1) A section of text or other matter that makes up a vertically
divided page; (2) A vertical section of a table.
COMBINATION PLATE— A press plate that combines both halftones and
line work.
COMIC STRIP— A series of drawings, in panel format, portraying the
adventures of characters, humorous or otherwise, usually published in
newspapers.
COMMERCIAL ART— Artwork of any kind prepared for commercial
advertising and general promotion.
COMPACT DISK— Also called CD. A small disk of electronic files
encased in a plastic casing.
COMPASS— An instrument for drawing circles and arcs.
COMPUTER DISPLAY MONITOR— An output device that allows the
computer operator to see an image of electronic media on a cathode-ray
screen similar to a television monitor.
Continued on next page
AI-14
Glossary,
C (Continued)
Continued
COMPUTER PLATFORM— The use of a particular brand of computer to
develop software programs specifically for that brand.
COMPLEMENTARY COLORS— Any two opposing hues on a color
wheel.
COMPOSITE— Comprised of two or more parts.
COMPOSITION— The arrangement of forms, colors, lines, and other
pictorial units.
COMPOSITOR— A machine that converts electronic data into an acceptable
format for a printer.
COMPREHENSIVE— A layout of art or type, either in black-and-white or
color.
COMPREHENSIVE SKETCH— A finished layout that defines all of the
elements, such as type, illustration, and spacing.
COMPRESSED FILES— Compacting computer-generated files to save disk
and memory space or to facilitate faxing.
COMPUTER GRAPHICS— Artwork created by the use of a computer.
CONSTRUCTION— The drawing of objects so that they appear solid or
three dimensional.
CONSTRUCTION LINES— Lightly drawn lines used in the preliminary
layout of a drawing.
CONTACT SCREEN— A screen placed in direct contact with the film or
plate to obtain a halftone pattern from a continuous-tone original.
CONTINUOUS-TONE ART— Artwork created using any medium that does
not use a halftone process to represent tone.
Continued on next page
AI-15
Glossary,
C (Continued)
Continued
CONTOUR PEN— Adjustable pen nibs on a rotatable shaft used for drawing
curvilinear lines.
CONTRAST— The range of tonal differences.
COOL COLOR— Colors that appear to project cooler temperatures.
COOLED COLOR— A color resulting from the addition of a cool color to a
warmer color.
COPY– Any matter, including photographs, rules, designs, and text, used
for producing printed matter.
COPYBOARD— A table or frame that holds original copy during a
photographic exposure.
COPYFIT— Scaling copy to fit into an allotted space.
COPYRIGHT— Exclusive protection of ownership given to a creator of an
original work.
COQUILLE BOARD— A drawing board that comes in a variety of
roughened surfaces that break up crayon or brush strokes into texture more
suitable for line reproduction.
COURSEWARE— All materials pertaining to a software program or course
of instruction.
CPU— See CENTRAL PROCESSING UNIT.
CRAWL DEVICE— A rotating drum used to display credit lines for
television transmissions.
CREMNITZ— See WHITE LEAD.
CROP— To cut Off.
Continued on next page
AI-16
Glossary,
C (Continued)
Continued
CROP MARKS— Marks used to define the limits of an image for
reproduction.
CROPPING— Defining the limits of an image for reproduction.
CROSSHATCH— Parallel lines drawn across other parallel lines to indicate
tone.
CROW QUILL— A fine, stiff pen nib with little spring used for drawing fine
lines and lettering.
CRT— Also called CATHODE-RAY TUBE. A screen or monitor that
converts light rays to electrical impulses for transmission or receiving.
CUBE— A solid form of six equal square sides.
CURSOR— A position indicator on a computer monitor.
CUTAWAY DRAWING— A drawing where a portion of the object is cut
away revealing the internal structure.
CUTLINE— The placing of a caption in an illustration.
CUTTING PLANE LINE— A sectional view showing a theoretical cut on
the item.
CYAN— Light blue-green color,
CYCLE OF ACTION— The completion of a single action of animated
movement.
D
DAISY WHEEL PRINTER— A spinning wheel with spokes having raised
letters and numbers.
DAMAR FINISH— Varnish used as a final protective coat over a painting or
mixed as part of the painting medium.
Continued on next page
AI-17
Glossary,
D (Continued)
Continued
DATA POINTS— Symbols used to plot information or events on a graph or
chart.
DATUM LINE— A line that indicates the position of a datum plane.
DEADLINE— Final delivery date.
DEBUGGING— Locating and eliminating software deficiencies.
DECAL— See DECALCOMANIA.
DECALCOMANIA— An image printed on specially prepared paper or film
for transfer to another surface.
DECKLE EDGE— The rough or uneven edge of paper intentionally
produced during manufacturing.
DELINEATE— To give depth to line art by making particular lines heavier.
DENSITY RANGE— Also called DENSITY SCALE. Measured differences
between the minimum and maximum densities of a particular negative or
positive.
DEPICT— To represent.
DEPTH— Thickness as measured downward from the surface of an object.
DEPTH OF FIELD— The distance between the closest sharply focused point
to the farthest point in focus.
DESCENDERS— The parts of lowercase letters that fall below the main
body base line, such as g, p, and q.
DESIGN— A planned or intended arrangement of the elements in a
composition.
DESIGNER’S COLORS— Opaque watercolors of high quality.
Continued on next page
AI-18
Glossary,
D (Continued)
Continued
DESKTOP PUBLISHING— The preparation of copy ready to go directly to
press.
DETAIL DRAWING— A drawing that gives specific information.
DETAIL PEN— Also called SWEDE PEN. Abroad nibbed, adjustable
ruling pen with greater ink capacity than a standard ruling pen.
DETAIL VIEW— A view that shows part of the principal view of an item
using the same plane and arrangement but in greater detail and in a larger
scale.
DEVELOPER— A chemical that causes a reaction in an exposed emulsion to
reveal an image in that emulsion.
DIAZO FILM— A flexible transparent base coated with an emulsion of diazo
salts and couplers.
DIAZO PAPER— Paper treated with a diazo compound and azo dyestuff
component.
DIAZOCHROME— Diazo sensitized films that produce colored dye images
on a transparent plastic base.
DIFFUSED LIGHT— Evenly spread light.
DIMENSION LINE— A thin, unbroken line with each end terminating in an
arrowhead used to define the dimensions of an object.
DIMETRIC PROJECTION— An axonometric projection of an object where
two axes make equal angles with the plane of projection and the third axis
makes a smaller or larger angle with the plane of projection.
DINGBATS— Stars or ornaments used to embellish type.
DISCHORD— Color or elements that compete or are not in visual harmony
that creates an uneasy or unattractive image.
Continued on next page
AI-19
Glossary,
D (Continued)
Continued
DISK– Also called DISC. (1) A flat photomatrix used in phototypesetting
and computer equipment; (2) A layer of magnetic oxide used to store
electronic data.
DISK DRIVE— A device that reads, adds, or deletes information stored on a
disk.
DISPLAY LETTERING— Any large, prominent lettering used to attract
attention.
DISPLAYS— A collection of objects and images arranged to tell a story.
DISPLAY TYPE— Large type used for headings and titles.
DISSOLVE— The fading of one scene as another replaces it,
DISSOLVE UNIT— An electronic device that automatically pulses a slide
projector to dissolve an image and replace it with another.
DISTORTION— Changed or twisted out of natural shape,
DIVIDERS— An instrument used for dividing lines into equal segments and
transferring measurements.
DOMINANT— Prominent or most important.
DOT MATRIX PRINTER— A printer that uses a number of pins to form
letters and numbers.
DOTS PER INCH— Also called DPI. A standard measurement for
resolution in the computer graphics industry.
DOUBLE-ACTION AIRBRUSH— An airbrush that requires the user to
push down a button to expel air through the brush and to pull back the button
to release paint.
Continued on next page
AI-20
Glossary,
D (Continued)
Continued
DRAFTING MACHINE— A machine that combines the functions of a Tsquare or straightedge, a triangle, a ruler, and a protractor.
DRAWING— The representation of objects, ideas, or emotions on a flat
surface using line, tone, or color.
DRAWING THROUGH— Sketching in the structural lines of an object as if
it were transparent.
DRIER— A substance used to hasten the drying times of paint or ink.
DROP CARDS— Drop-out or drop-in title cards rigged to fall in and out of
camera view.
DROP OUT— Masked or opaqued areas present in the halftone negative,
print, or plate.
DROP-OUT HALFTONE— A halftone reproduction that eliminates the
screen dots in white areas, often accomplished photographically by the
platemaker or by re-etching.
DRY BRUSH— Drawing or painting with a brush that contains very little
substance to create a textural effect.
DRY MOUNT— Mounting photographs without paste or rubber cement.
DRY MOUNTING PRESS— An electrically heated press that activates an
adhesive sheet or foil placed between the image and the illustration board.
DUCK— A lead weight used to position a spline while drawing irregular
curves.
DUMMY— A rough draft or proposal of printed material pasted or bound
together in exact reproduction size that show the areas illustration and text
will occupy.
DUOTONE— Two-color halftone print made from a screened photograph.
Continued on next page
AI-21
Glossary,
E
Continued
EARTH COLORS— Pigments made from earth minerals.
EDGE— The border or outline of a form or shape.
EDIT— To check, add, or delete.
EDIT CONTROLLER— A machine that locates the beginning and end of a
scene used for cueing VCRs for presentation.
EGGOIL TEMPERA— An opaque watercolor similar to egg-based tempura
but with an added oil that makes the medium easier to handle and adaptable
to a wider range of effects.
EGG TEMPURA— An opaque watercolor paint that uses egg yoke as a
binder.
ELECTRONIC IMAGING— The creation, enhancement, and alteration of
images through electronic or computer digitization.
ELEVATION— A four-view drawing of a structure showing front, sides, and
rear.
ELITE— A type size for typewriters approximating 10 point printing type
having 12 characters to the linear inch of copy and 6 lines to the vertical
inch.
ELLIPSE— The enclosed plane forming a regular oval where the shortest
dimension through the center is the minor axis and the longest dimension is
the major axis.
EM— A measure of type equal to the square of the type body, derived from
early type practices in which the letter M was cast on a square body.
EMPHASIS— Stress or accent on any part of a design or picture.
EMULSION— A suspension of fine drops or globules of one liquid in
another liquid.
Continued on next page
AI-22
Glossary,
E (Continued)
Continued
EN– A measure of type equal to one half of an EM.
ENCRUSTING— Taking a video image and wrapping it around an image of
an object.
ENGINEERING DRAWING— An orthographic drawing of a piece of
equipment or of its detailed parts containing information and instructions
sufficient for manufacture.
ENGINEER’S SCALE— A scale used whenever dimensions are in feet and
decimal parts of a foot, or when a scale ratio is a multiple of 10.
ERASING SHIELD— A small, thin spring metal plate with variously sized
and shaped openings used to protect the surrounding area of a drawing while
erasing in an adjacent area.
ESSENTIAL AREA— The part of a picture that contains all of the title or
lettering intended for viewer consumption and often corresponding with the
safe title area.
EQUALATERAL— Equal angles and equal sides.
EXPLODED VIEW— A pictorial view of a device in a state of disassembly,
showing the appearance and interrelationship of parts.
EXPOSURE INDEX— The degree of light sensitivity of film.
EXPORT— The transfer of files to another software application.
EXTENSION BAR— A leg extension to a standard compass which expands
the diameter of a circle that the compass is able to draw.
EXTENSION LINE— A line used to indicate the extent of a dimension.
EYE LEVEL— Also called HORIZON LINE. The horizontal plane at the
artist’s eye level to which that person relates linear perspective.
Continued on next page
AI-23
Glossary,
F
Continued
FACE— Also called TYPEFACE. A style of type.
FADE-IN— To bring an image from a pale version into full contrast
gradually.
FADE-OUT— To bring an image from a full contrast of darks and lights to a
pale version gradually.
FEATHER— A bleeding effect where small featherlike indications surround
the characters.
FEATURE— A cartoon panel or strip appearing regularly in a publication.
FELT NIB PEN— A drawing pen with a felt nib or tip that ink soaks through
from a reservoir.
FERRULE— The part of a brush that holds the hairs or bristles.
FIGURE— A line illustration or photograph of any kind used in a
publication.
FILLS— Color, shades, or patterns added to computer-generated imagery.
FILM NEGATIVE— A photolithographic negative produced by a process
camera.
FILM POSITIVE— A film- or acetate-based material having a black area or
image and a translucent or clear background.
FILM SPEED— The degree of light sensitivity of film.
FINE ART— The personal expression of the artist who creates it.
FINISHED ART— Any piece of artwork complete or ready for reproduction.
FINISH MARKS— Marks used to indicate the degree of smoothness of the
finish on machined surfaces.
Continued on next page
AI-24
Glossary,
F (Continued)
Continued
FIRST GENERATION— Photographically reproduced copy made from the
original.
FIX— To spray with a clear coat to protect or preserve an image surface.
FIXATIVE— Any clear solution sprayed or coated on a surface to stabilize,
protect, or preserve an image.
FIXER— A solution or chemical that stabilizes the development of
photosensitized films.
FLEXIBLE CURVE RULE— A scale or rule that bends in shape to irregular
curved surfaces.
FLAKE WHITE— See WHITE LEAD.
FLANNEL BOARD— Also called FELTBOARD. A presentation board
covered in felt or flannel that cut out shapes backed with a slightly abrasive
backing will cling to.
FLAPPING— See MOUNTING AND FLAPPING.
FLAT BRUSH— A flat oil painting brush that is thicker and with longer
bristles than the bright brush.
FLAT COLOR— Color that is dull or grayed or has a matte surface.
FLAT TONE— An area of uniform or even color.
FLIP CARD— One of a series of photographs or drawings shown in
sequence to tell a story or deliver a message.
FLOP— To reverse from right to left or vice versa.
FLOPPY DISK— A disk of magnetic oxide that stores electronic data for
retrieval by a computer disk drive.
Continued on next page
AI-25
Glossary,
F (Continued)
Continued
FLOW CHART— A chart that shows the flow of data through a data
processing system and the sequence of their performance.
FLOUROGRAPHIC— See DROP-OUT HALFTONE.
FLUSH— Even with the margin or the widest line in a column or page.
FOCAL POINT— Center of interest.
FOCAL LENGTH— The distance from the center of the lens to the film
plane.
FOCI METHOD— A method of drawing ellipses by plotting a series of
points as their circumference using two points on the major axis (foci) as
reference and connecting these points with french curves.
FOCUS— Image sharpness.
FOLIO— A sheet of paper folded once giving four pages.
FONT— Typeface designs and sizes.
FORESHORTEN— To depict an objector line in less than its true length.
FORM— The shape and structure of an object or figure.
FORMAL BALANCE— See BALANCE or SYMMETRY.
FORMAT— A general structure or composition.
F/STOP— Settings on the lens diaphragm of a camera lens that measure the
amount of light allowed to reach the film.
F/16 RULE— Setting the camera for an f/stop of f/16 and the shutter speed
close to the ASA/ISO rating of the film.
FRAME— A single unit in a storyboard, a cartoon feature or a film strip.
Continued on next page
AI-26
Glossary,
F (Continued)
Continued
FRAME GRABBER— Also called VIDEO CAPTURE. A device that
isolates one frame of a video image and inputs this frame into a computer.
FREEHAND DRAWING— Drawing without the use of mechanical aids.
FRENCH CURVES— Instruments used to draw smooth, irregular curves.
FRESCO— Painting on freshly spread, moist plaster with pigments.
FRESNEL LENS— A intense prismatic lens of concentric divisions, which
concentrate and focus light through a transparent image onto a mirror and to
a screen in an overhead projector.
FRISKET— A covering placed over part of a drawing or photograph to
protect that section while working on the rest of the artwork.
FRONTISPIECE— An illustration preceding and usually facing the title page
of a book.
FULL-COLOR PAINTING— A painting in which the three primary colors
or some variation of them is evident.
FULL MEASURE— The entire width of a line of type flush with both
margins measured in picas.
FULL SECTION— A sectional view that passes entirely through the object.
FULLER’S EARTH— A fine white powder used for preparing the surface of
a photograph to accept retouching.
G
GALLEY PROOF— A rough proof of type made for proofreading,
submitted before pages are made up.
GANG RUN— Several different jobs printed simultaneously on a large press
in the same colors on one sheet to save time and reduce costs.
Continued on next page
AI-27
Glossary,
G (Continued)
Continued
GANG SHOOTING— Photographing several pages of original copy at the
same time.
GELATIN— A pure glue made from animal or vegetable matter.
GENERATION— A single step in a reproduction process.
GIGABYTE— Approximately one billion bytes of information, a kilobyte to
the third power (1,024 x 1,024 x 1,024).
GLAZE— An application of a transparent color or value over another color
or value.
GLOSSY PRINT— A print having a shiny finish, which does not readily
absorb inks or paints.
GLYCERIN— A heavy oil, colorless and odorless, used in the preparation of
watercolor pigment.
GOLDENROD— Paper or plastic mask material used to support negatives in
making press plates.
GOTHIC— An alphabet or typeface characterized by strokes of equal or
almost equal thickness, usually without serifs.
GOUACHE— An opaque watercolor.
GRADED WASH— A wash that blends a light tone to a dark tone or vice
versa.
GRADUATED FILL— To fill with color, shade, or pattern that variegates
from dark to light or vice versa.
GRAPHIC ARTS— A form of art specializing in work prepared primarily
for conveying information.
Continued on next page
AI-28
Glossary,
G (Continued)
Continued
GRAPHIC INTERFACE— Screen graphics on the computer screen that
make the computer easier to use.
GRAPHICS PRINTER— A high-resolution printer capable of printing
graphic images.
GRAPHICS TABLET— An electronic input device that allows the user to
draw on the tablet before committing the image to memory.
GRAPHITE— The black marking substance in a lead pencil.
GRAVER— A needle or square pointed tool used to scratch lines into
scratchboard.
GRAVURE— A photomechanical printing process (intaglio) with the images
recessed below the surface of the plate.
GRAY— A color formed by mixing black and white or complementary
colors.
GRISAILLE— A decorative gray monochromatic painting designed to create
the illusion of a bias-relief sculpture.
GUM ARABIC— A water soluble gum used as a binder in some watercolors
and tempura paints.
GUTTER— (1) The inner margin of a printed page extending from the
printed portion to the fold or binding; (2) The area between two columns on
a printed page.
H
HALF SECTION— A combination of an orthographic projection and a
section view to show two halves of a symmetrical object.
HALFTONE— A tonal pattern of shades from white through black defined
by a series of dots.
Continued on next page
AI-29
Glossary,
H (Continued)
Continued
HALFTONE SCREEN— A screen placed in front of the negative material in
a process camera to break up a continuous-tone image into a dot formation.
HARD COPY— Copy of any kind produced on paper or any substrate except
film, used for proofing, checking, revising, or redrawing.
HARMONY— A pleasing arrangement of the picture elements, because of
the similarity of one or more qualities.
HEXAGON— A six-sided figure.
HIDDEN LINE— Thick, short dashed lines used to show a hidden part or
edge.
HIGHLIGHT HALFTONE.— See DROP-OUT HALFTONE
HIGH SURFACE— See HOT PRESSED.
HINGE JOINT— A joint limited to back-and-forth movement.
HOLDING LINE— A line usually drawn in black on a mechanical intended
for reproduction.
HOOK AND LOOP BOARD— A briefing board covered with nylon hook
material to which items backed with a nylon loop material will stick.
HORIZON LINE— An imaginary horizontal line representing the observer’s
line of sight.
HOT PRESSED— Also called HIGH SURFACE. A smooth art paper or
illustration board.
HUE— The name given to distinguish any color.
HYPO— See SODIUM THIOSULFATE.
Continued on next page
AI-30
Glossary,
I
Continued
ICON— Onscreen computer symbols that portray functions by graphic
images.
ILLUMINATION— The hand decoration of text in a book, a manuscript, or
a diploma.
ILLUSTRATION— A picture designed to interpret a story or an article.
ILLUSTRATION BOARD— Heavy paper board manufactured especially for
artists available in a variety of sizes, surfaces, and weights.
IMAGE AREA— An area that encompasses a printed, drawn, or
photographed image and the light or dark background space around the
image.
IMPORT — The transfer of files from other software applications.
INDEFINITE BLENDING— Adding paint or ink to a wet surface to
promote indefinite effects.
INDIA INK— Pigment made of lampblack and a binder suspended in water
as a fluid ink.
INFINITY— The farthest distance marking on a lens.
INFORMAL BALANCE— See BALANCE.
INK JET PRINTER— A high-resolution printer that uses a minute jet spray
of ink to create an image.
INPUT— Text or parameters entered into a computor memory or saved on
disk.
INPUT DEVICE— See KEYBOARD or JOYSTICK. An accessory used to
provide text or commands into a computer or disk.
INSCRIBED— An object completely enclosed by another.
Continued on next page
AI-31
Glossary,
I (Continued)
Continued
INTAGLIO— Printmaking from engraved or etched lines and surfaces.
INTENSITY— The degree of strength, saturation, or purity of a color.
INTERFACE— Interaction between accessories.
INTERMEDIATE— A copy of an original on translucent or transparentized
film, paper, or cloth, which now becomes a master to make other copies.
IRREGULAR CURVES— Curvilinear forms that do not contain arcs easily
replicated by a compass or circle template.
ISOMETRIC PROJECTION— A set of three or more views of an object
that appears rotated, giving the appearance of viewing the object from one
corner.
ITALICS— Letters whose form has an oblique slant to the right or left.
IVORY BLACK— A fine black pigment.
J
JOYSTICK— See TRACKBALL or MOUSE. A computer input device used
for remote manipulation of a cursor.
JUSTIFICATION— Spacing within the line of type of a predetermined
measure to align the margins.
JUXTAPOSITION— Side-by-side placement for a desired effect.
K
KERN— Part of a letter that appears as a hairline connection between
adjacent letters.
KERNING— The addition of space between characters.
KEY— A scale of values, tones, or hues.
KEY ART— See BLACK ART.
Continued on next page
AI-32
Glossary,
K (Continued)
Continued
KEY LINE— A line drawn in red on a mechanical to indicate position and
size of a piece of copy that will not be visible in the reproduction.
KEYBOARD— A computer input device based on the principle of a
typewriter keyboard used to input text and commands into a computer.
KEYSTONE EFFECT— Onscreen distortion created when the projector is
not parallel to the deck or screen surface.
KID FINISH— A medium-textured surface of art paper or illustration board.
KILOBYTE— Abbreviated as K, a kilobyte is 1,024 bytes of data.
L
LAMINATE— (1) A transparent plastic or acrylic cover material; (2) To
cover a surface with a transparent plastic or acrylic material.
LAMINATION— A plastic or acrylic used to cover a surface.
LAMPBLACK— A very fine black pigment used in various black paints and
inks.
LASER— An acronym for Light Amplification by Simulated Emission of
Radiation.
LASER PRINTER— A high-resolution printer that uses laser technology to
create an image.
LAYING IN— The initial broad application of tone to a picture.
LAYOUT— The arrangement of a book, a magazine, or other publication so
that text and illustrations follow a desired format.
LEADING— Spacing between lines of type, measured in points.
LEADER LINE— Thin, unbroken lines used to connect numbers, references,
or notes to appropriate surfaces.
Continued on next page
AI-33
Glossary,
L (Continued)
Continued
LEAF— A single sheet that includes both sides.
LEAK— An accidental escape of fill color or texture from an objector shape
not completely enclosed by pixels.
LENS— Optical glass components arranged in a formation that creates a focal
point at a specific distance from a screen.
LENS DIAPHRAGM— Controls the amount of light allowed to reach the
film.
LEGEND— A description of any special or unusual marks, symbols, or line
connections.
LENTICULAR SCREEN— A projection screen with a surface patterned to
reflect a projected image with minimum glare.
LETTERHEAD— (1) The printed matter, usually the name and address of a
company, at the head of a sheet of letter-quality paper; (2) A sheet of paper
bearing a letterhead.
LETTERING— Letters and words formed or printed by hand.
LETTERPRESS PRINTING— A printing process in which the raised, inked
surfaces of the type and/or plates transfer an impression directly to the paper.
LETTER-QUALITY PRINTER— A printer that imitates letters with
resolution similar to a typewriter.
LETTERSPACING— Placing additional space between the letters of words
to expand the length of a line or to improve and balance typography.
LIFT METHOD— (1) The process of using laminate material to remove or
lift an image from clay-coated stock; (2) scanning text or graphics onto disk
for importation to another application.
Continued on next page
AI-34
Glossary,
L (Continued)
Continued
LIGHT BOX— A box with a translucent glass or plexiglass top illuminated
from underneath, used for tracing and layout.
LIGHTFACE— The lightest and thinnest form of a type series.
LIGHT PEN— An electronic input device used to draw freehand against a
CRT screen.
LIMITED PALETTE— (1) A palette with a restricted number of pigments;
(2) A palette that lacks one or more of the three primary colors.
LINE— A continuous, unbroken mark made by a pen, a pencil, a brush, or
other drawing instrument.
LINE AND WASH— A technique combining a black line with transparent
wash.
LINE COPY— A composition of black lines and masses without gradation of
tone.
LINE DRAWING— A drawing composed entirely of lines, dots, and areas of
solid black.
LINE OF DIRECTION— The line the eye follows when looking at the
picture.
LINES PER INCH— Also called LPI. A standard measurement of resolution
for the color printing trade.
LINE WEIGHT— The thickness of pencil, ink, or other lines in artwork.
LINSEED OIL— An oil obtained by pressing the seeds of a plant, which
produces linen fiber used as a medium in oil painting.
Continued on next page
AI-35
Glossary,
L (Continued)
Continued
LITHOGRAPHY— See OFFSET PRINTING or OFFSET LITHOGRAPHY.
A reproduction process in which grease crayon lines and masses drawn on a
flat, polished stone print through the affinity of grease to grease (grease
crayon and printer’s ink). The wetted stone repels the ink from the other
areas not covered with crayon.
LITHOGRAPHIC PENCILS— An oily pencil or crayon used to mark
lithographic plates.
LOCAL COLOR— The actual color of an object without regard to the effect
of changing light and shadow conditions.
LOCAL COLOR VALUE— The actual lightness or darkness of a color
without regard to the effect of changing light and shadow conditions.
LOGOTYPE— Also called LOGO. The lettered signature, nameplate, or
trademark of a commercial firm.
LONGSHOT— A picture showing a full figure or a distant view.
LACEY LUCY— See CAMERA LUCIDA.
M
MACHINE COMPOSITION— Type set by a machine.
MACRO LENS— A short focal-length lens specifically designed to allow
closeup photography.
MAHLSTICK— A rod used in the palette hand to support or steady the
painting hand.
MAKEUP— See LAYOUT. The arrangement of text and illustrations on a
page in conformance to standard practices in the industry or to publication
requirements.
MAGNETIC CHALKBOARD— A briefing board that accepts chalk
markings and magnetic attachments.
Continued on next page
AI-36
Glossary,
Continued
M (Continued) MARS COLORS— Artificial earth colors.
MASKING— To block out a portion of an illustration by pasting paper over
it to prevent it from reproducing.
MASKING TAPE— An opaque, paper tape used to cover the edges of a
picture while painting and to fasten artwork temporarily to a drawing board.
MASTER— An original typed, drawn, or typeset copy intended for
reproduction.
MAT— A cardboard or paper decorative enclosure around a picture.
MATCH DISSOLVE— Holding one element on a screen as one scene
dissolves into another.
MATTE— Dull or without shine.
MATTE PRINT— A print having a dull finish.
MATTE SCREEN— A projection screen with a dull surface to reduce glare
from overhead lights.
MEASURE— The length of a line of type measured in picas.
MEATBALL— See BULLET.
MEDIA INTEGRATION— Also called MULTIMEDIA. Mixing various
presentation devices in the same presentation.
MECHANICAL— A page or layout prepared as an original for
photomechanical reproduction.
MECHANICAL DRAWING— A method of drawing using precision tools to
produce mathematically precise layouts, diagrams, and engineering drawings.
Continued on next page
AI-37
Glossary,
M (Continued)
Continued
MEDIUM— (1) A liquid that dilutes a paint without damaging its adhesive;
(2) The mode of expression employed; (3) The actual instrument or material
used by the artist.
MEGABYTE— Abbreviated MB or M, approximately one million bytes of
data.
MEMORY— That portion of computer hardware that retains data for later
retrieval.
MENU— A selection of options displayed on a computer screen.
MICROCOMPUTER— Another name for a personal computer or computer
workstation not attached to a mainframe system.
MILITARY STANDARDS— Also called MIL-STD. A formalized set of
government standards.
MIXED MEDIUM— Also called MIXED MEDIA. A combination of two or
more mediums.
MODEM— An electronic input/output device that connects computer
workstations for communications.
An wavey or checkered pattern that results when photographing a
halftone through a screen.
MONOCHROMATIC— Shades or tints of one color.
MONTAGE— See COMPOSITE. (1) Arranging a number of pictures or
designs in a combination, often with some overlapping, so that they form a
composite whole; (2) The resultant arrangement or composition.
MONITOR— The viewing screen of a computer system.
MOOD— An outward projection of a feeling or emotion that affects behavior
communicated by action, situations, or symbology in a picture.
Continued on next page
AI-38
Glossary,
Continued
M (Continued) MORGUE— See PICTURE MORGUE, CLIP ART, or RESEARCH FILE.
MOUNT— To fasten onto another surface. .
MOUNTING AND FLAPPING— Fastening original artwork or copy to a
board allowing sufficient excess around the picture borders to accommodate
attaching a protective overlay along one side.
MOUNTING BOARD— Heavy paper boards used as backboards to support
drawings, paintings, and photographs.
MOUSE— A hand-held computer input device that allows rapid movement
and selection.
MULTIMEDIA— Also called MEDIA INTEGRATION. A combination of
presentation devices used in the same presentation.
MULTIPURPOSE BOARD— A briefing board with a slick, bright, white
surface that accepts erasable, marker, marker, and magnetic backed
accessories.
MUNSELL COLOR SYSTEM— A system of color analysis and
identification that distinguishes between the three measurable dimensions of
hue, value, and chroma (intensity).
MURAL— Any picture painted or freed permanently on a wall or ceiling.
MYLAR— Tough, highly stable, polyester film used as a base for
engineering drawings, laminating, overlays, and a wide variety of other
applications.
NARRATION— Also called VOICE OVER. The description or commentary
that accompanies television and video presentations.
NCR PAPER— No Carbon Required paper; chemically coated paper that
transfers a copy of an image to the sheet directly behind it without the use of
a carbon.
Continued on next page
AI-39
Glossary,
N (Continued)
Continued
NEGATIVE, PHOTOLITHOGRAPHIC— A film negative having a
translucent image and a black background produced by a process camera and
used primarily to make printing plates.
NEUTRAL COLOR— (1) A color that lacks hue and intensity; (2) A color
that contains some amount of its complementary; (3) An earth color.
NIB— A point at the end of a pen or marker.
NOISE— Adding a random pattern of pixels over an image to add texture,
create a new value, or give a painterly effect.
NORMAL LENS— Also called STANDARD LENS. A 50mm focal-length
lens, which most closely approximates normal vision with minimal distortion.
O
OBLIQUE PROJECTION— A view produced when the projectors are at an
angle to the plane of the object illustrated.
OCTAGON— A figure having eight sides.
OFFSET LITHOGRAPHY— See LITHOGRAPHY. Lithographic printing
where an inked plate prints on a rubber blanket, which then offsets the image
to paper stock.
OFFSET SECTION— A section view of two or more planes in an object to
show features that do not lie in the same plane.
OIL PAINT— Any pigment ground in linseed oil or poppy oil.
OILSTONE— A stone or abrasive used to sharpen needlepoints and blades.
ONE POINT PERSPECTIVE— Also called PARALLEL PERSPECTIVE.
When the height and width of an object are parallel to the plane of projection.
ONION SKIN— Also called MANIFOLD PAPER. Thin, translucent paper
used to make a typewriter carbon copy or to serve as a tissue overlay for
work requiring correction or protection.
Continued on next page
AI-40
Glossary,
O (Continued)
Continued
ONSCREEN— An image that appears on the computer or television screen.
OPAQUE— (1) Impermeable to light; not transparent or translucent; (2) To
paint over unwanted portions of a negative with a solution to prevent light
from seeping through.
OPAQUE PROJECTOR— A device that projects an opaque object to a
desired size on another surface.
OPAQUE WATERCOLOR— See WATERCOLOR. A creamy, opaque
paint-like gouache or tempura, available in tubes, jars, or by mixing white
with transparent colors.
OPAQUING— Covering up with opaque paint.
OPTICAL CENTER— A point slightly above (10%) the geometric center of
a layout that the eye perceives as the center.
OPTICAL ILLUSION— An unreal or misleading image perceived by the eye
as real.
OPTICAL SPACING— The arrangement of spacing between letters for
legibility and appearance, which varies with the shape of the letters to
achieve optical equalization.
ORGANIZATION CHART— A block chart or diagram showing the names,
titles, departments, and responsibilities of personnel in an organization.
ORIGINAL— See MASTER. Copy submitted to the printer for
reproduction.
ORTHOGRAPHIC PROJECTION— A method of projection with six
principal views.
OSCILLATING AIRBRUSH— An airbrush with a reciprocating needle used
for fine detailed work.
Continued on next page
AI-41
Glossary,
O (Continued)
Continued
OUTPUT— The end product generated by an electronic device, such as a
computer, printer, or copier.
OUTPUT DEVICE— An electronic accessory to a computer system that
provides some type of end product either visually or as a hard copy.
OUTLINE— The outside edge of a shape or form.
OUTLINE DRAWING— A drawing where lines define the outer limits of
the forms without the representation of modeling, light, or shadow.
OVERHEAD PROJECTION— A projector that uses of a system of mirrors
and a fresnel lens to project a transparent image or object to another surface
or screen.
OVERLAP— To cover a part of one shape or line with another.
OVERLAY— A transparent or translucent sheet taped over the original art
for protection or to indicate instructions or corrections.
OVERPRINTING— Printing an image over another impression.
OZALID MACHINE— An ammonia process printmaking machine that
produces the same-size copy from transparent or translucent originals.
P
PAINTING KNIFE— See PALETTE KNIFE. A type of palette knife made
for applying paint to a picture.
PALETTE— (1) The surface on which the artist places paint and mixes
colors before applying them to canvas or other painting surface; (2) A group
of colors or gray values chosen for use in the same picture.
PALETTE KNIFE— A thin, flexible, steel blade set in a wooden or plastic
handle available in a variety of shapes used for mixing paints and impastos,
applying paint directly to a canvas or to create special textures directly on the
surface of a picture.
Continued on next page
AI-42
Glossary,
P (Continued)
Continued
PALETTING— Moving the pigment back and forth across a palette with a
paint brush to achieve a certain consistency in texture or color or to load the
brush with pigment adequately.
PANEL— (1) A given area in which a cartoon is drawn, with or without a
defined frame; (2) One box or frame of a comic strip; (3) One unit of a
storyboard.
PANORAMA— Also called PAN. Slow, steady camera movement from side
to side.
PANTOGRAPH— A mechanical device based on the shape of a
parallelogram, used to reduce, enlarge, or copy pictures.
PANTONE COLOR SYSTEM— An industry accepted system of color
analysis and identification which distinguishes between the three measurable
dimensions of hue, value, and chroma (intensity).
PARABOLIC REFLECTORS— Lamp reflectors that assist even
illumination and shorten exposure time.
PARALLAX— Distortion present when exposing film through a lens not
aligned with the veiwfinder, distortion corrected by a rangefinder camera.
PARALLEL PROJECTION— See ONE POINT PERSPECTIVE.
PARALLEL STRAIGHTEDGE— A long, straight edge supported at both
ends to maintain parallel motion.
PARTIAL SECTION— A sectional view consisting of less than a half
section.
PASTEL— (1) A dry pigment mixed with a variety of binders to forma stick
or crayon for application to a picture surface; (2) A picture executed in the
pastel medium.
Continued on next page
AI-43
Glossary,
P (Continued)
Continued
PASTE-UP— The process of pasting an image or part of an image on a
reproduction page or sheet before photographing for platemaking or printing.
PATTERN— (1) The regular or irregular distribution or arrangement of
elements; (2) Regularly repeated flat designs used to create two-dimensional
textures.
PENS, PLOTTER— A pen nib or jet spray attached to a plotter output
device.
PENS, STEEL BRUSH— Steel pen nibs designed to create large poster size
lettering.
PENS, TECHNICAL— Conical or tubular tipped pen nibs designed to
produce a consistently even line of a predetermined weight in a standard or
metric measurement available with and without a reservoir.
PENTAGON— A five-sided figure generally having equal sides and angles.
PERCENTAGE CHART— Also called PIE CHART. A circular chart
divided into wedges whose sum equals 100% or 360°.
PERPENDICULAR— A vertical line meeting or intersecting a horizontal
line at 90°.
PERSONIFICATION— Attributing human qualities to animals or inanimate
objects.
PERSPECTIVE— The visual impression of lines moving closer together as
distance increases.
PHANTOM LINES— Also called ALTERNATE POSITION LINES. Lines
consisting of one long and two short dashes, evenly spaced, terminating in a
long line, used to indicate an additional position of a part or object.
Continued on next page
AI-44
Glossary,
P (Continued)
Continued
PHANTOM VIEW— A view showing an alternate position of a movable
object.
PHOTOGRAPHIC TYPESETTIHIS— See TYPESETTERS,
PHOTOGRAPHIC.
PHOTOLE’ITERING— A method of simulating hand lettering or display
type by photographic means.
PHOTOLITHOGRAPHY— The transferring of a drawing to a lithographic
plate by photography.
PHOTOMECHANICAL— Pertaining to any process of printing or
duplicating images by mechanical means from a photographically prepared
printing plate.
PHOTOSTAT— Also called STAT. A photographic image recorded by a
camera so constructed that it photographs and develops directly on paper, in
negative values.
PHOTOTYPE— Type set by photographic means.
PICA— A unit of measure equal to 12 points or 1/6 of an inch.
PICKUP— A square of gum rubber used to remove excess rubber cement.
PICTORIAL DRAWING— Any drawing that depicts an object with
recognizable clarity.
PICTURE AREA— The flat surface within the borders of a picture.
PICTURE MORGUE— Also called MORGUE. See CLIP ART.
PICTURE PLANE— An imaginary plane placed between the observer and
the object, usually at right angles to an observer’s line of vision.
PIE CHART— See PERCENTAGE CHART.
Continued on next page
AI-45
Glossary,
P (Continued)
Continued
PIGMENT— Dry color matter that becomes paint when mixed with a vehicle
or binder.
PINHOLE— A small light spot that appears on a developed photographic
negative resulting from particles of dust and lint on the unexposed negative,
the camera lens, the vacuum board glass, or other parts of the camera.
PIN REGISTER— A method of holding elements in place in overlay work
and animation.
PIXEL— Also called PICTURE ELEMENT. A small bit of digital data from
a computer screen.
PIXEL MAP— Also called BIT MAP. A matrix of pixels that forma digital
image on the computer screen.
PIXELATED— Having jagged edges.
PIXELATION— Specifying the size of a pixel on the computer screen.
PLAIN TITLE CARD— Printed information only on a card for television
transmission of credit lines.
PLAN VIEW— A view of an object or area as it would appear if viewed
from directly above.
PLANE— A flat surface.
PLANNING CARDS— A small card containing a idea or point placed in
sequence on a storyboard.
PLAT— A map or plan view of a lot showing principal features, boundaries,
and location of structures.
PLATE FINISH— A smooth surfaced paper.
PLY— A single layer of drawing paper.
Continued on next page
AI-46
Glossary,
P (Continued)
Continued
POINT— A standard type measure of 1/72 of an inch or 72 points equals 6
picas.
POLYMER— Paints that have polyvinyl acetate or acrylic resin as a binder
used as either a transparent or opaque medium.
POLYGON— Common geometric constructions.
PORTRAITURE— The process or art of depicting an individual by drawing,
painting, or photographing from life.
PORTIUY— To delineate or depict.
POSTER— A large cardboard or paper display sign.
POSTER BOARD— A medium weight cardboard suitable for show cards.
POSTER COLOR— An opaque watercolor used for making show cards.
POSTERIZATION— A technique for adding poster-like qualities to a
photograph, a film, or an illustration by separating the normal tones of a
subject into distinctly separated, strong tones.
POUNCE— A powdered substance that improves the ink-absorbing qualities
of tracing cloths and papers.
PRELIMINARY DRAWINGS— Drawings done in preparation for a
finished piece of art.
PRE-PRESS— The preparatory stage of art or copy immediately before
committing the image to a plate.
PRIMARY COLORS— The red, yellow, and blue in a subtractive process
and the red, yellow, and green in the additive process of color theory.
PRINT— An image made from a master negative or plate.
Continued on next page
AI-47
Glossary,
P (Continued)
Continued
PRINTING— A process for reproducing copy.
PRINTING PLATE— Also called CUT. A flat piece of metal used on a
printing press that contains the image either engraved or etched
photographically on the surface.
PRISM— A transparent piece of crystal or optical glass having two plane
surfaces which are not parallel that separate white light into the visible colors
of the spectrum.
PROCESS COLOR REPRODUCTION— A combination of halftone plates,
usually red, yellow, blue, and black, which when printed in perfect register,
combine to produce a full-color reproduction.
PRODUCTION DEPARTMENT— The people responsible for purchasing
and maintaining schedules on printing, typography, engravings, bindings,
paper, and sometimes the purchase of art for an organization.
PROGRESSIVE PROOFS— Proofs showing the order of printing and shade
of ink for each required plate.
PROGRESSIVE DISCLOSURE— Systematically revealing information on a
partially obscured visual.
PROJECTION— The act or art of projecting lines and planes in orthographic
and perspective drawings.
PROJECTOR— A device containing a light and lenses for projecting an
image onto another surface.
PROJECTURAL— (1) An image projected onto another surface; (2) The
image so projected.
PROOF— A printed impression from a negative, a plate, or a body of type
submitted for examination or correction.
Continued on next page
AI-48
Glossary,
P (Continued)
Continued
PROOFREADER’S MARKS— Standard marks placed in the margin nearest
the word that indicate corrections in typeset copy.
PROPORTION— The relation to size of one part or thing to another or one
portion of something to the whole.
PROPORTIONAL DIVIDERS— A drafting instrument used for transferring
measurements from one scale to another or to divide lines and circles into
equal parts.
PROPORTIONAL SPACING— Also called DIFFERENTIAL
LETTERSPACING. The spacing of characters in proportion to size by
means of the typewriters and office composing machines used in the
preparation of cold composition copy.
PROPS— Accents or accessories that identify the time frame or location of a
subject.
PROTRACTOR— A circular or semicircular rule for measuring off the
degree of an angle.
Q
QUILL PEN— See CROW QUILL. A pen nib made from a feature quill.
R
RADIAL FILL— To fill an object with color, pattern, or shade that appears
to radiate from the center of the object.
RADIATION— A divergence of lines, tones, or colors from a common point
to different directions.
IUMXUS— A straight line from the center of a circle or sphere to a point on
its circumference.
RADIUS CURVE— A drawing tool used to draw arcs of a predetermined
radius.
Continued on next page
AI-49
Glossary,
R (Continued)
Continued
RANDOM ACCESS MEMORY— Also called RAM. Retrievable computer
memory accessible at will without sequential reading.
RANGEFINDER— The ground glass in a camera used to focus an image.
RASTER-BASED— An image based on the manipulation of a matrix of
pixels or dots.
RASTER IMAGE PROCESSOR— Also called RIP. A device for
converting vector-based imagery to high resolution raster images.
READ— To access electronically stored data.
REAR PROJECTION SCREEN— A matte surface, translucent screen used
when projecting an image from behind to a screen.
REBOOT— Restart the computer system.
RECEDING COLORS— Colors that appear to move away or create the
illusion of distance.
RECTANGULAR COORDINATE GRAPH— A graph based on a grid
system where values are plotted by X and Y coordinates.
REFERENCE NUMBERS— Numbers used on one drawing to refer to
another drawing for further details.
REFERENCE PLANE— The normal plane used to reference all information.
REGISTER— To align a page or any elements of an image or impression to
match the position of successive impressions.
REGISTER MARKS— Marks used to key an overlay to a drawing or
mechanical as in color separation or combination plates.
REMOVED SECTION— A drawing of the internal cross section of an object
located near the basic drawing of the object.
Continued on next page
AI-50
Glossary,
R (Continued)
Continued
RENDER— To represent, portray, or depict in a drawing or painting.
RENDERING— A drawing or painting in which tonal values vary from white
through black or from light to dark shades.
REPRODUCIBILITY— The ability of line and halftone copy to reproduce as
acceptable and legible.
REPRODUCIBLE ART— Second-generation art made from the original art
and mortised or pasted onto the reproduction page.
REPRODUCTION— Making one or more copies of an original piece of
work.
REPRODUCTION COPY— Also called CAMERA-READY COPY. Copy
ready in all respects for photomechanical reproduction.
REPRODUCTION PROOFS— Also called REPROS. Exceptionally clean,
sharp proofs on a highly coated paper used for reproduction.
REPROGRAPHICS— The reproduction of images by copying machines and
their methods and processes.
RESCALE— To enlarge or reduce in size or to change in shape without
changing proportion to fit new space configurations.
RESEARCH FILE— See MORGUE, PICTURE MORGUE, or CLIP ART.
RESOLUTION— Clarity, focus, or density.
RETOUCH— To delete unwanted image areas or make repairs to copy by
painting out with an opaque solution.
RETOUCH GRAYS— A series of opaque watercolors ranging from white to
black.
Continued on next page
AI-51
Glossary,
R (Continued)
Continued
RETOUCHING— The alteration of detail or removal of spots and blemishes
in a photographic print or negative.
RETOUCH VARNISH— A light, colorless varnish sprayed on a dull, driedout area or an unfinished oil painting to restore the “wet” colors or values,
making it easier to mate with new paint.
REVERSE— See FLOP. To turn over.
REVERSAL— See REVERSE PRINT.
REVERSE PRINT— A print where the black values of the originals are
white.
REVISION BLOCK— Space located in the upper-right comer of a drawing
to record any changes to the original drawing.
REVOLVED SECTION— A drawing of the internal cross section of an
object superimposed on the basic drawing of the object.
ROMAN— One of a group of alphabets or typefaces characterized by thick
and thin strokes and often with serifs.
ROSS BOARD— An illustration board that comes in a variety of roughened
surfaces that divide crayon or brush strokes into broken textures suitable for
reproduction.
ROTATION— A view in which the object is rotated or turned to reveal a
different plane or aspect.
ROUND BRUSH— A cylindrical brush having an evenly tapered point.
RUBBER CEMENT— Semitransparent glue consisting of gum rubber and a
petroleum or benzol solvent.
RUB-ONS— Transfer sheets containing reprinted characters, symbols, and
numerals applied by burnishing over an acetate or paper back sheet.
Continued on next page
AI-52
Glossary,
R (Continued)
Continued
RULING PEN— An instrument that holds ink between two adjustable blades.
RUNNING HEAD— The title repeated at the top of consecutive pages in a
book or magazine.
S
SABLE BRUSH— A flat or round-shaped brush made from the tail hair of a
Kolinsky (Asiatic) mink.
SAFELIGHT— A colored light used to illuminate a darkroom without
harming photosensitive film or paper.
SANDPAPER PAD— A pad of sandpaper sheets mounted on a strip of wood
used to sharpen a pencil lead or pastel.
SANS SERIF— Without serifs, a letter that does not have a finishing stroke.
SATURATION— The purity or intensity of color.
SCALE— (1) Proportions or relative dimensions; (2) To enlarge or reduce
without changing the original proportions.
SCALE CLIP— A clip attached to a scale that focuses on the scale currently
in use.
SCALE DRAWING— A drawing that shows relative sizes and proportions.
SCALING— Also called DIMENSIONING or SIZING. Enlarging or
reducing copy or an image to the correct dimensions to occupy a given area.
SCANNING AREA— The total area or picture that the camera sees.
SCRAP FILE— See RESEARCH FILE.
SCRATCHBOARD— A type of illustration board with a chalky surface
uniformly covered with ink.
Continued on next page
AI-53
Glossary, Continued
S (Continued)
SCREEN— A glass plate or film with crosshatched lines which
photographically produces a halftone for reproduction from a continuous-tone
original.
SCREEN PROCESS PRINTING— Also called SILKSCREEN. A form of
stencil printing that uses silk, nylon, or metal screen to contain the image.
SCREEN REFRESH— A continuous update of computations that create the
image on a computer screen.
SCRIPT— (1) Lettering based on hand writing; (2) A paper or papers which
describe in detail all of the elements of a commercial or story.
SCROLL— A rapid up-or-down movement of a computer screen image
during a search function.
SECONDARY COLORS— The colors (orange, green, and violet) that lie
halfway between the three primary colors.
SECTION LINE— Thin, diagonal lines used to indicate the surface of an
imaginary cut in an object.
SECTIONAL VIEW— The view obtained by cutting away part of an object
in an illustration to show the shape and construction of the interior.
SEPIA— A dark, warm brown color of low brilliance.
SEPIA INTERMEDIATE— An intermediate used in making duplicate
transparencies by the whiteprint process.
SERIF— The finishing stroke or line projecting from the end of the main
stroke of many letters in some typefaces.
SET PALETTE— One hue mixed with a group of colors to create color
harmony or unity in a chosen palette.
Continued on next page
AI-54
Glossary,
S (Continued)
Continued
SETTING— Background or surrounding.
SHADE— A mixture of pure color and black.
SHADING— Lines, values, or color applied to create form, shadow, or
pattern.
SHADING MEDIUMS— Preprinted tones and patterns used to enhance the
appearance of copy and artwork.
SHADING SHEETS— Sheets of cellophane or acetate preprinted with tones
and patterns with a low-tack adhesive for applying to artwork.
SHAPE— The flat silhouette or two-dimensional form of an object.
SHELF LIFE— The length of time before sensitized material deteriorates.
SHIP’S CURVES— Instruments for drawing elongated, irregular curves that
closely approximate the curves found in shipbuilding.
SHUTTER SPEED— A method of controlling the length of time that light
can reach a film.
SIGHT LINE— An imaginary line extending from the eyes of a figure in a
drawing to an object indicating that person’s direction of glance.
SINGLE-ACTION AIRBRUSH— A device that releases both air and
pigment by pressing down on a button.
SIGNATURE— A sheet of paper printed on both sides and folded to make up
part of a publication.
SILHOUETTE— An outline of an object or figure filled in solidly without
indication of modeling or surface structure.
SILKSCREEN— A method of printing through a stencil fixed to a screen of
natural or synthetic fiber or metal mesh.
Continued on next page
AI-55
Glossary,
S (Continued)
Continued
SIZE— Also called SIZING. Various gelatinous materials made from starch,
clay, glue, and casein used for glazing or coating papers and cloths.
SKETCH— A quickly executed drawing as a preparation toward more
finished work.
SKETCHING PENCIL— See CARPENTER’S PENCIL. A soft-leaded
pencil used for freehand sketching.
SMALL CAPS— Capital letters smaller than the standard capitals of a
typeface and the size of the body of the lowercase letters.
SODIUM THIOSULFATE— Also called HYPO. A salt with water solution
that dissolves the silver halides used in photographic papers and films.
SOFT EDGE— A blended or graduated transition from one value or color to
another.
SOFIWARE— Computer programs that direct the output devices and
determine the input devices effectivity.
SPECIAL EFFECTS GENERATOR— A device that adds or creates effects
to visual images during recording on videotape.
SPECIAL IRREGULAR CURVE— Irregular curves for a specific purpose,
such as ship’s curves, mechanical engineer’s curves, conic sections,
logarithmic spirals, and flexible curve rules.
SPECTRUM— The arrangement of colors side-by-side as refracted by a
prism.
SPEEDBALL PENS— Lettering and drawing pens manufactured by the Hunt
Manufacturing Company that are the hallmark of hand lettering pen ribs.
SPEED LINES— Extra lines following a moving figure or object in a cartoon
representing the disturbance the movement causes in the atmosphere.
Continued on next page
AI-56
Glossary,
S (Continued)
Continued
SPHERE— A form where all points are equidistant from the center.
SPINE— The bound edge of a book.
SPLINE— A flexible rule, held in place by lead ducks, used to draw irregular
curves.
SPLIT BRUSH TECHNIQUE— Also called DRY BRUSH TECHNIQUE.
Painting or drawing with a brush having the hairs separated to form more
than one point.
SPLIT COMPLEMENT— A color scheme that uses a key hue with the two
colors that lie adjacent to its opposite on the color wheel.
SPLIT FIELD— A rangefinder that focuses an image by dividing the image
in half and requiring alignment into a whole.
SPOT COLOR– Using a combination of two individual colors, a main
color, usually black, and an accent color instead of a full-color output.
SQUEEGEE— (1)An implement used on silk process printing presses that
forces ink and ink compounds through the screen and stencil onto a printing
surface to form the image; (2) The process of forcing pigment across a
surface with other than a brush.
STABILIZER— A chemical that arrests the continued development of an
image and fixes that image into the surface.
STABILO PENCIL— A pencil that uses grease or wax as a binder for
pigment and is capable of writing on glass.
STAT— See PHOTOSTAT.
STATIC— Lacking in movement.
STATION POINT— The point of observation in the making of perspective
drawings.
Continued on next page
AI-57
Glossary,
S (Continued)
Continued
STILL LIFE— A pictorial arrangement of inanimate objects.
STIPPLE— The effect obtained by using a series of dots or flicks in drawing.
STOCK— Material printed or worked on by printers or artists.
STOP BATH— A chemical solution that stops photographic development.
STOPPER— An eye-catching device in a picture that grabs and holds a
viewer’s attention.
STORYBOARD— A panel presentation of rough sketches of a proposed
series of views.
STRAIGHTEDGE— An instrument with long, straight edges.
STRIP IN— To position copy not pasted upon the mechanical before
platemaking.
STRIPPING— Cutting out and placing in position.
STUDIO CARD— Illustration or pictorial information on a card intended for
television transmission.
STUMP— A pencil-shaped roll of paper used to blend pastel, pencil, and
charcoal.
STYLIZED— Charactertied by an emphasis on style and design.
STYLUS— A scraping instrument with sharp or chiseled edge.
SUBHEAD— A secondary headline or title.
SUBTRACTIVE COLOR PROCESS— The process of forming colors by
mixing pigments.
Continued on next page
AI-58
Glossary,
S (Continued)
Continued
SUBORDINATION— Subduing part of a picture to make it less important
than another part.
SUPERIMPOSED— Also called SUPER. One image or text placed over
another without totally obscuring the first.
SUPERIMPOSED IMAGE— A rangefinder that focuses an image by
requiring the alignment of two images over each other.
SUPPORT— The reinforcement or backing for a painted surface.
SURREALISM— An art movement whose objective is to explore the realm
of unconscious emotion and dreams.
SWATCH— A small sample specimen.
SWEDE PEN— A broad nibbed, adjustable ruling pen.
SWIPE FILE— See RESEARCH FILE.
SYMBOL— A visual element that represents something else.
SYMMETRY— Similarity in size, shape, and relative position of parts on
opposite sides of a dividing line.
T
TABOURET— A portable cabinet used to hold the artist’s drawing tools and
materials.
TEAR SHEETS— Also called CLIP ART and PICTURE MORGUE.
TECHNICAL ILLUSTRATION— Drawings for technical reports,
proposals, manuals, and catalogs, as well as visual aids, briefing charts,
projecturals, slides, and posters.
TECHNIQUE— (1) The method of using a tool or medium; (2) The
characteristic appearance of a medium; (3) The particular style of an artist.
Continued on next page
AI-59
Glossary,
T (Continued)
Continued
TELEPHOTO LENS— A long focal-length lens that has the effect of
bringing far objects nearer.
TELEVISION GRAPHICS— Graphics created specifically for transmission
via television.
TEMPURA— Dry pigment mixed with an emulsion of egg yolk or milk to
form an opaque watercolor.
TEMPLATE— A guide made to ensure the uniform consistency of frequently
used symbols.
TERTIARY COLORS— Any intermediate hue that contains some part of
each of the three primary colors.
TEXT— Typewritten or printed matter forming the main body of a work.
TEXTURE— The feel or appearance of a surface created by the repetition of
forms or design.
THERMAL TRANSFER PRINTER— A printer that uses heat to fuse the
image to a paper surface.
THIRD DIMENSION— The effect of depth or bulk achieved by the artist on
a flat surface.
THREE DIMENSIONAL— Possessing height, width, and depth.
THREE-QUARTER VIEW— A view of an object rotated to a position
halfway between a front and a side view.
THREE-POINT PERSPECTIVE— A view where no dimension, height,
width, or depth, is parallel to the plane of projection.
THUMBNAIL SKETCH— Page layouts showing the allocation of space for
headings, photographs, line artwork, and text.
Continued on next page
AI-60
Glossary,
T (Continued)
Continued
THUMBSPOTS— Visual indicators placed on a slide mount to identify the
emulsion side of the film and simplify tray loading.
TILING— A fill pattern effect that repeats a pattern over and over.
TILT CARD— A vertical card that requires up-and-down camera movement.
TIME LINE— A projected plan of execution outlining significant milestones
and deadlines used to monitor work in progress closely.
TINT— A mixture of pure color and white.
TISSUE OVERLAY— Thin, translucent paper placed over artwork for
protection and corrections.
TITANIUM WHITE— An opaque white.
TITLE BLOCK— Space in the lower right comer that contains the identity
of the drawing, the subject matter, the origins, the scale, and other data.
TITLE CARD— A television card that contains text only.
TONAL— Having gradations of gray or intermediate values.
TONE— (1) A value usually predominate which sets the key; (2) A thin layer
of paint applied to a ground to eliminate the whiteness of the surface before
painting.
TOOL BOX— See BUTTON BAR.
TOOTH— The ability of the paper surface to accept various mediums.
TORTILLON— Also called STUMP or STOMP. Tightly rolled paper,
leather, or felt used to blend charcoal, pastels, pencil, chalk, or crayon.
TOUCHE— A liquid-masking agent or lithographic crayon applied by brush
to a lithographic plate or stone.
Continued on next page
AI-61
Glossary,
T (Continued)
Continued
TOUCH SCREEN TECHNIQUE— Activating the pixels on a CRT screen
through the touch of an electronic light pen or the fingertip.
TRACING PAPER— A thin, transparent, or translucent paper used for
transferring an image from one surface to another by tracing.
TRACKBALL— See JOYSTICK or MOUSE.
TRAMMEL— A mechanical device used to draw an ellipse.
TRANSFER SHEET— Preprinted characters and symbols on cellophane or
acetate used in preparing cold composition, camera-ready copy.
TRANSLUCENT— The characteristic of allowing light to pass through
without permitting objects to be seen clearly through it.
TRANSPARENCY— Any transparent material intended for projection that
bears an image.
TRANSPARENT— The characteristic of allowing light and objects to be
seen clearly through it.
TRAPS— A slight overlap of the outline of an element to prevent white space
from showing around the edges minimizing the effect of press plate
misalignment.
TRIAD— The use of any three pigments equally spaced on a color wheel.
TRIANGLE— A triangular shaped ruling guide available in various sizes and
angles usually made of clear plastic or metal.
TRIM MARKS— Marks used on printed sheets or other substrate to indicate
where to cut or trim stock both vertically and horizontally.
TRIMETRIC PROJECTION— An axonometric projection of an object
where no two axes make equal angles with the plane of projection requiring
three different foreshortening ratios.
Continued on next page
AI-62
Glossary,
T (Continued)
Continued
T-SQUARE— A ruling guide with a 90° angled crosspiece at one end used in
making horizontal lines.
TURPENTINE— A solvent distilled from the sap of pine or from pine wood
used as a thinner and to clean brushes.
TUTORIAL— A lesson guide.
TWO DIMENSIONAL— Flat, without depth, having only width and height.
TWO-POINT PERSPECTIVE— Also called ANGULAR PERSPECTIVE.
The most common type of perspective drawing where the object is sitting at
an angle to the plane of projection and each object has two vanishing points.
TYPEFACE— The printing surface of an alphabet judged by its design,
printability, wearability, and position on the letter body.
TYPE FAMILY— A group of typefaces similar although not exactly alike in
design.
TYPE SERIES— Different sizes of the same typeface.
TYPESETTERS, PHOTOGRAPHIC— Machines that supply a variety of
type designs and sizes, automatically letterspaced and justified on transparent
film or plastic-coated opaque paper.
TYPOGRAPHY— The art of type selection and arrangement.
U
ULTRAVIOLET LIGHT— Actinic (shorter wavelength) or useable part of
the light spectrum needed to reactor harden light-sensitive coatings.
UNDERTONE— A color whose effect is modified by other colors imposed
over them.
UNRETOUCHED— Not altered or improved by any means.
Continued on next page
AI-63
Glossary,
U (Continued)
Continued
UPPERCASE— The capital letters of an alphabet.
USER INTERFACE— The visual and physical attributes of a software
program including tools-, text-, and graphics-handling characteristics.
UTILITY PLAN— A floor plan of a structure showing locations of heating,
electrical, plumbing, and other service components.
V
VALUE— The relative lightness and darkness of different areas of the picture
represented in tones, shading, line balance, and layout.
VALUE SCALE— The complete range of values from the lightest to the
darkest.
VAN DYKE— A brownprint negative and sometimes a brownline positive.
VANISHING POINT— The point at which parallel lines receding from the
observer appear to converge in a perspective drawing or photograph.
VARIGRAPH— A lettering device that allows manipulation of letter size,
slant, and shape.
VARNISH— A solution made of a resin in a volatile medium.
VEHICLE— A liquid used as a carrier of pigment in paint.
VECTOR-BASED— Images based on a series of plotted points that define
precise lines and geometric shapes.
VELLUM— A kind of free, translucent paper resembling parchment or onion
skin used for duplicating copies made with a whiteprint machine.
VELOX— A print of a photograph or other continuous-tone copy prescreened
before paste-up or platemaking with line copy eliminating the need for a
composite negative.
Continued on next page
AI-64
Glossary,
V (Continued)
Continued
VERTICAL SCAN RATE— Also called FRAME RATE. The number of
times per second a screen redraws an image.
VIDEO DIGITIZING CAMERA— A camera or film recorder attached to
the front of a CRT screen used to record images.
VIDEO DISPLAY TERMINAL (VDT)— A visual display used in
photocomposition work in conjunction with a keyboard.
VIEWING PLANE LINE— See CUTTING PLANE LINE.
VIEWGRAPH— See PROJECTURAL.
VIEWPOINT— The eye level of the viewer and the distance from the scene.
VIGNETTE— Fading an image from heavier to lighter tones blending it into
the background or eliminating the background altogether.
VISIBLE LINE— The outline used for all edges seen by the eye.
VISUALIZING PAPER— A white, semitransparent paper used for making
layouts and preliminary drawings.
VISUAL LITERACY— The ability to communicate effectively using only
visual language.
W
WARM COLORS— Colors associated with heat or fire.
WASH— A monochromatic rendering with a brush and transparent
watercolor.
WASH DRAWING— A watercolor painting consisting mainly of washes.
WATERCOLOR— A dry pigment bound by an adhesive, such as gum
arabic, and applied, greatly reduced by water, to a surface in a transparent
fashion.
Continued on next page
AI-65
Glossary,
Continued
W (Continued) WAXER— A device that applies a thin layer of hot, adhesive wax to the back
of a surface.
WET BRUSH— A blending technique of laying two pigments side-by-side
and blurring the line of demarcation while the pigments are still wet.
WHITE LEAD— A free, poisonous, opaque white pigment used in flake
white and Cremnitz white oil paints.
WIDE ANGLE LENS— A very short focal-length lens that encompasses a
larger horizontal view than a standard lens. This lens, depending on the
focal length, records an image with increasingly pronounced (barrel)
distortion.
WINDOW— See BLACK PATCH.
WORD PROCESSING— The transformation of a concept or idea into
printed communication media by using mechanical or automated systems,
methods, or processes.
WORD SPACING— The adjustment of spacing between words to shorten or
extend a line to achieve justification.
WORKING DRAWING— A thorough preliminary drawing done on tracing
paper then transferred to a working surface for the finished rendering.
WOVE PAPER— A broad range of papers having an even fiber formation
produced over fine wire mesh.
WRAPPING— (1) A computer feature that automatically enters a soft return
revel code and continues to enter data on another line; (2) Selecting a pattern
or design and wrapping it around an object on the screen.
WRICO— A hand-lettering system using a set of templates and a drop fed
pen.
Continued on next page
AI-66
Glossary,
Continued
X
XEROGRAPHY— A copying process that uses electrostatic forces to form
an image.
Z
ZINC WHITE— A zinc oxide based pigment that is less opaque than titanium
and lead white.
ZIP-A-TONE— A transparent acetate sheet preprinted with patterns of dots
or lines that create tone.
ZONE NUMBERS— Numbers and letters on the border of a drawing to
provide reference points to aid in locating specific points in the drawing.
ZOOM LENS— A variable focal-length lens that functions as a telephoto lens
but allows you to select the range of the object magnification.
AI-67
APPENDIX II
References Used to Develop The NRTC
NOTE: Although the following references were current when this NRTC was published, you
will need to ensure you are studying the latest revision.
Chapter 1
Alteration of Official DoD Imagery, OPNAVNOTE 5290, Office of the Chief
of Naval Operations, Washington, DC, 1995.
Copyright in Works of Authorship Prepared by Department of the Navy
Personnel, SECNAVINST 5870.6, Department of the Navy, Office of the
Secretary, Washington, DC, 1988.
Department of the Navy Directives Issuance System, SECNAVINST 5215.1C,
Department of the Navy, Office of the Secretary, Washington, DC, 1970.
Department of the Navy Information and Personnel Security Program
Regulation, OPNAVINST 5510.1H, CH-5, Office of the Chief of Naval
Operations, Washington, DC, 1995.
Department of the Navy Publications and Printing Regulations, NAVSO P-35,
NAVPUBINST 5600.42, Navy Publications and Printing Service, Management
Office, Washington, DC, 1979.
Department of the Navy Standard Subject Identification Codes, SECNAVINST
5210.11D, Department of the Navy, Office of the Secretary, Washington, DC,
1987.
Department of the Navy Forms Management Program, SECNAVINST
5213.10D, Department of the Navy, Office of the Secretary, Washington, DC,
1992.
JCP No. 26 Government Printing and Binding Regulations, S. Pub. 101-9, Joint
Committee on Printing, 818 Hart Senate Office Building, United States Senate,
Washington, DC, 1990.
Continued on next page
AII-1
References Used To Develop The TRAMAN,
Chapter 1
(Continued)
Continued
Graphic Design Standards, SECNAVINST 5600.20, CH-2, Department of
the Navy, Office of the Secretary, Washington, DC, 1984.
Interservice, Interdepartmental, and Interagency Support, DODINST
4000.19, Department of Defense, Washington, DC 1995.
Naval Imaging Program (NAVIMP) Policy and Responsibilities,
OPNAVINST 5290.1A, Office of the Chief of Naval Operations,
Washington, DC, 1990.
Navy Performance Evaluation (EVAL) and Counseling System,
BUPERSINST 1610.10, Bureau of Naval Personnel, Washington, DC, 1995.
Navy Correspondence Manual, SECNAVINST 5216.5, Department of the
Navy, Office of the Secretary, Washington, DC, 1983.
Navy and Marine Corps Awards Manual, OPNAVINST 1650.1, Office of
the Chief of Naval Operations, Washington, DC, 1991.
Navy Customer Service Manual, NAVEDTRA 12014, Naval Education and
Training Professional Development and Technology Center, Pensacola, FL,
1994.
Navy Stocklist of Publications and Forms, NAVPUBINST P-2002,
Navy Publications and Printing Service, Management Office, Washington,
DC, 1996.
Permission to Copy Material Subject to Copyright, SECNAVINST 5870.5,
Department of the Navy, Office of the Secretary, Washington, DC, 1988.
Precious Metal Recovery Program (PMRP), NAVSEAINST 4570.3, Naval
Sea Systems Command, Washington, DC, 1987.
Preparation and Submission of JCP Forms 1, 5, and 6; Procedures for,
NAVPUBINST 5603.10, Naval Publications and Printing Service,
Management Office, Washington, DC, 1982.
Continued on next page
AII-2
References Used To Develop The TRAMAN,
Chapter 1
(Continued)
Continued
Printed Matter for Official Ceremonies, SECNAVINST 5603.2D,
Department of the Navy, Office of the Secretary, Washington, DC, 1993.
Reporting of Missing, Lost, Stolen, or Recovered (MLSR) Government
Property, SECNAVINST 5500.4G, Department of the Navy, Office of the
Secretary, Washington, DC, 1993.
Reprographics Management Program, NAVPUBINST 5600.44D, Naval
Publications and Printing Service, Management Office, Washington, DC,
1990.
Chapter 2
George, Ross F., The Speedball Textbook for Pen and Brush Lettering, 19th
ed., Hunt Manufacturing Co., Philadelphia, PA, 1965.
Chapter 3
Department of the Navy ADP Security Manual, OPNAVINST 5239.1A,
Office of the Chief of Naval Operations, Washington, DC, 1996.
Anderson, Ronald H., Selecting and Developing Media for Instruction, 2d
ed., Van Nostrand Reinhold Company Inc., New York, NY, 1983.
Biow, Lisa, How To Use Your Computer, Ziff-Davis Press, Emeryville, CA,
1993.
Kenny, Michael F., Presenting Yourself, John Wiley and Sons, Inc., New
York, NY, 1982.
Kenny, Michael F., and Raymond F. Schmitt, The Book of Programmed
Multi-Image Production, Eastman Kodak Company, Rochester, NY, 1979.
Kemp, Jerrold E., and Don C. Smellie, Planning, Producing, and Using
Instructional Technologies, 7th ed., Harpercollins College Publishers, New
York, NY, 1994.
Continued on next page
AII-3
References Used To Develop The TRAMAN,
Chapter 4
Continued
Dennis, Ervin A., and John D. Jenkins, Comprehensive Graphic Arts, 2d
ed., Glencoe Publishing Company, Mission Hills, CA, 1983.
Seybold, John W., The World of Digital Typesetting, Seybold Publications,
Inc., Media, PA, 1984.
Chapter 5
Kemp, Jerrold E., and Don C. Smellie, Planning, Producing, and Using
Instructional Technologies, 7th ed., Harpercollins College Publishers, New
York, NY, 1994.
Olsen, Gary, Getting Started in Computer Graphics, North Light Books, F &
W Publications, Inc., Cincinnati, OH, 1993.
AII-4
INDEX
A
Audio Devices, 5-19
cassette decks, 5-19
speakers, 5-19
B
Basic Consumables, 2-64
blades, 2-68
cutting mats, 2-67
erasers, 2-64, 2-65, 2-66
erasing shields, 2-67
stumps and tortillons, 2-67
Briefing Theater, 5-29
environment, 5-29
equipment positioning, 5-31, 5-32
facilities, 5-31
lectern positioning, 5-33
lighting, 5-29, 5-30
mechanical environment, 5-30
projection area, 5-33
seating, 5-33
scheduling, 5-31
speakers, 5-31
temperature, 5-29
Brushes, 2-56
bristles, 2-58, 2-59
cleaning, 2-60
shapes, 2-57
storage, 2-58
types, 2-56
Cameras, 4-31
aperture, 4-40
film speed, 4-42
general maintenance, 4-31
lenses, 4-39
lighting, 4-35
light temperature, 4-36
process cameras, 4-32, 4-33, 4-34
Continued on next page
INDEX-1
INDEX,
Continued
C (Continued)
Cameras (continued)
reflectors, 4-36
shutter speed, 4-41
slide duplicators, 4-42
35mm cameras, 4-37, 4-38
Cased Instruments, 2-19
beam compasses, 2-26
cases, 2-19
compasses, 2-23, 2-24, 2-25
dividers, 2-20, 2-21, 2-22
extension bars, 2-26
proportional dividers, 2-20
Communications, 3-38
Local-Area Networks (LAN), 3-38
Wide Area Networks (WAN), 3-38
Copiers, 4-6
color copiers, 4-6
maintenance, 4-9
options, 4-7
standard copiers, 4-6
use and operator checks, 4-8
volume range and speed, 4-6
Customer Service, 1-53
D
Desk Top Publishing Programs, 3-36
features, 3-36, 3-37
programs, 3-36
Diazo Machines, 4-10
diazo masters, 4-16
diazo material, 4-15
exposure, 4-16
maintenance, 4-15
major sections, 4-11, 4-12, 4-13
safety, 4-15
start-up and shutdown, 4-14
storage, 4-16
types, 4-10
Continued on next page
INDEX-2
INDEX,
Continued
D (Continued)
Drawing Aids, 2-37
adjustable triangles, 2-38
flexible curve rule, 2-40, 2-41
handmade templates, 2-45
ink risers, 2-46
irregular curves, 2-39
protractors, 2-42, 2-43
special irregular curves, 2-40
templates, 2-44
triangles, 2-37, 2-38
E
Edit Devices, 3-12
Central Processing Unit (CPU), 3-13
clock, 3-14
Compact Disk Read-Only Memory (CD-ROM), 3-18
disks, 3-15, 3-16
disk drives, 3-15
expansion boards, 3-14
hard disk drives, 3-17
math co-processor, 3-14
motherboard, 3-13
Random Access Memory (RAM), 3-13
removable disk drives, 3-17
Read-Only Memory (ROM), 3-13
system unit, 3-12
Video Graphics Array (VGA), 3-18
F
Files, 1-35
containers, 1-35
picture morgue, 1-36
responsibility, 1-35
systems, 1-36
Forms, 1-32
Continued on next page
INDEX-3
INDEX,
Continued
F (Continued)
Furniture, 2-3
care, 2-3
chairs, 2-8
drafting machines, 2-13, 2-14, 2-15
drafting tables, 2-3, 2-4
lighting, 2-8
light tables, 2-5
mat cutters, 2-11
paper cutters, 2-12, 2-13
parallel straightedge, 2-16
steel straightedges, 2-18
table covers, 2-6, 2-7, 2-8
tabourets, 2-6
t-square, 2-17, 2-18,
waxers, 2-9, 2-10
worktables, 2-5
G
General Maintenance, 4-5
General Safety Precautions, 4-4
Graphics Programs, 3-33
bit mapped software, 3-33
features, 3-34, 3-35
vector mapped software, 3-34
H
Hardware, 3-5
maintenance, 3-5
I
Input Devices, 3-6
joysticks and trackballs, 3-10
keyboards, 3-6
light pens, 3-11
mouses, 3-10
microphones, 3-11
pressure sensitive electronic tablets, 3-11
scanners, 3-9
Continued on next page
INDEX-4
INDEX,
Continued
I (Continued)
Input/Output Devices, 3-27
modems, 3-27
Local-Area Networks (LAN), 3-38
Wide Area Networks (WAN), 3-38
J
Job Orders, 1-50
format, 1-50
job order log, 1-50
local forms, 1-50
standard job order forms, 1-51, 1-52
L
Lecture Aids, 5-21
chalkboards, 5-22
easels, 5-23
flannel/felt boards, 5-21
hook and loop boards, 5-22
lectern or podium, 5-21
marker/multipurpose boards, 5-22
M
Multimedia, 5-20
O
Output Devices, 3-19
film recorders, 3-26
impact printers, 3-20, 3-21
monitors, 3-19
nonimpact printers, 3-21, 3-22
plotters, 3-19
printers, 3-20
printer control, 3-23
printer loading, 3-24, 3-25
Continued on next page
INDEX-5
INDEX,
P
Continued
Pencils, 2-61
care, 2-61
drawing pencils, 2-61
hardness, 2-61
lead composition, 2-62
special-purpose pencils, 2-63
Pens, 2-32
care, 2-36
pen nibs, 2-32
reservoir pens, 2-33, 2-34, 2-35, 2-36
Phototypesetters, 4-17
chemistry, 4-21
digitized typesetters, 4-19
LASER typesetters, 4-19
maintenance, 4-17
processors, 4-20
typesetter generations, 4-18
work flow, 4-21
Pressure Process Lettering Machines, 4-22
automatic cutout images, 4-25
automatic machines, 4-23
carbon tape, 4-25
cutout tape, 4-25, 4-26
manual cutout image, 4-24
manual machines, 4-22
Projection Devices, 5-3
monitors, 5-17
opaque projectors, 5-5, 5-6, 5-7, 5-8, 5-9
overhead projectors, 5-9, 5-10, 5-11
portable overhead projectors, 5-12
projector racks, 5-17
projector support, 5-4
slide projectors, 5-13, 5-14, 5-15
slide projector accessories, 5-16
video cassette recorder/player (VCR), 5-17
video projectors, 5-17
Continued on next page
INDEX-6
INDEX,
Continued
Q
Quality Control, 1-54
R
Regulations, 1-6
local policy, 1-6
governing directives, 1-6
S
Scales, 2-47
division, 2-50
division style, 2-50,
four bevel scales, 2-49
indicating scale, 2-54, 2-55
opposite bevel scales, 2-49
types of scales, 2-53, 2-54
two bevel scales, 2-49
use, 2-54
Screens, 5-24
beaded screens, 5-25
care, 5-24
front projection screens, 5-24
high gain aluminum screens, 5-25
keystoning, 5-28
lenticular screens, 5-24
matte screens, 5-25
rear projection screens, 5-24
selecting a screen, 5-25, 5-26
screen placement, 5-27
Security, electronically generated data, 3-39
Automated Data Processing Security Officer (ADPSO), 3-39
disk security markings, 3-42
display screen security markings, 3-42
electronic media, 3-41
equipment inventory, 3-42
hard copy security markings, 3-42
Level I, 3-40
Level II, 3-41
Level III, 3-41
Continued on next page
INDEX-7
INDEX,
Continued
S (Continued)
Security (continued)
media disposition, 3-42
security controls, 3-41
security levels, 3-39
Setup, Microprocessor, 3-28
cable connections, 3-29
connection relationships, 3-30
keyboard, 3-29
monitor, 3-29
owner/user manual, 3-28
power requirements, 3-28
printer, 3-29
surge protectors, 3-28
system unit, 3-29
Shop Layout, 1-4
local commitments, 1-4
external commitments, 1-4
physical environment, 1-5
Software, 3-31
applications software, 3-31
operating systems software, 3-31
use, 3-31
Special Applications Graphics Machines, 4-27
care, 4-27
computerized graphics machines, 4-30
engravers, 4-27
engraving features, 4-28
maintenance, 4-28
use, 4-29
Special Cased Instruments, 2-287
bow instruments, 2-27
center disks, 2-31
needlepoints, 2-30
ruling pens, 2-28, 2-29
Continued on next page
INDEX-8
INDEX, Continued
S (Continued)
Supervision, 1-43
coordinating, 1-46
organizing, 1-45, 1-46
planning, 1-43, 1-44
supervising, 1-46, 1-47, 1-48
training, 1-48, 1-49
Supply, 1-39
estimating supplies, 1-39
purchasing consumables, 1-39
purchasing new equipment, 1-39
requisitioning, 1-41
sources, 1-40
waste, 1-39
T
Text Programs, 3-32
word processing software features, 3-32
word processing software programs, 3-32
INDEX-9
Assignment Questions
Information: The text pages that you are to study are
provided at the beginning of the assignment questions.
ASSIGNMENT 1
Textbook Assignment:
"Shop Organization and Administration," chapter 1, pages 1-1
through 1-55.
1-1. An example of a local commitment
to work with which of the
following units is a shop
obligation?
1-6.
Ideally, a Navy drafting shop
consists of a work area and which
other areas?
1.
1.
2.
3.
4.
Printshop
Transiting SSBN
Regionally located command
A command in the same naval
district
2.
3.
4.
1-2. Generally, obligations to perform
work subject to financial
reimbursement for units and
commands outside of your command
are called what?
1.
2.
3.
4.
1-7.
1-8.
1-3. Interservice, interagency, and
interdepartmental support
agreements define external
commitments for which of the
following provisions?
1.
2.
3.
4.
1-4.
Why is it important to understand
the obligations of the shop to
provide support to other units?
1.
2.
3.
4.
1-5.
1-9.
and a
Convenience
Temperature variances
Eliminate distractions
Eliminate visual clutter
Desk light
Direct sunlight
Overhead light
Fluorescent light
Noise
Safety
Billeting
Personal space
1-10. A locally established policy or
instruction on the function and
use of the graphics shop produces
all EXCEPT which of the following
benefits?
Agreements with units that define
reoccurring services and
financial reimbursement do NOT
include which type of agreement?
1.
2.
3.
4.
and a smoke
In assessing an effective
graphics shop, which factor must
be planned intentionally?
1.
2.
3.
4.
To order supplies
To schedule liberty
To extend the importance of
the graphics shop
To effectively administer,
manage, and supervise
area and a
Which of the following light
sources is NOT considered steady
and readily available?
1.
2.
3.
4.
Reoccurring services
Financial reimbursement
Both 1 and 2 above
Positional authority
area and a
Why should you locate
reproduction and storage areas
away from work areas?
1.
2.
3.
4.
Reoccurring obligations
External commitments
Public relations (PR) work
Kumshaw
A reproduction
smoke area
A reproduction
storage area
A storage area
area
A storage area
darkroom area
1.
2.
3.
4.
MSDS
MOA
MOU
ISA
1
Curtailment of abuse
Shop chain of command
Criteria for priority work
Request approval chain of
command
1-11. Why is it important to gather and
review instructions that pertain
to the graphics shop?
1-17. When do you use the Copier
Production Log?
1.
1.
2.
3.
4.
As reference material
Instructions change
periodically
Instructions govern shop
procedures
Each of the above
2.
3.
4.
1-18. You display copier limitations at
the copy machine on which type of
log?
1-12. Which of the following
instruction provides guidance in
writing performance evaluations
and counseling procedures?
1.
2.
3.
4.
SECNAVINST
SECNAVINST
BUPERSINST
BUPERSINST
1.
2.
3.
4.
5216.5
5500.4
1610.10
1616.10
SECNAVINST
SEVNAVINST
SECNAVINST
SECNAVINST
1.
2.
3.
4.
5603.2
5290.1
5870.5
5600.20
1.
2.
3.
4.
NAVPUBINST 5600.44
SECNAVINST 5215.1
OPNAVINST 5290.1
DODINST 4000.19
1.
2.
3.
4.
Sea only
Shore only
Both sea and shore
Training
1-16. What log provides information on
the daily expenditures in stock
and toner?
1.
2.
3.
4.
5600.42
5603.10
P-2002
4570.3
Ceremonial printing
Copyright regulations
Color printing
Signage stock numbers, and
unit of issue
1-21. A job order arrives requesting a
sign that you know to be in the
supply system, which action
should you take?
1-15. The Reprographics Management
Program defines procedures,
terminology, and economical
copier limitations for what type
of commands?
1.
2.
3.
4.
NAVPUBINST
NAVPUBINST
NAVPUBINST
NAVSEAINST
1-20. The NAVPUBINST P-2002 is a
regulation that lists which of
the following information?
1-14. Formalized external agreements
between units are specifically
addressed in what instruction?
1.
2.
3.
4.
Job Log
Copier Production Log
Economical Copying Log
Reproduction Production Log
1-19. When tasked with producing a ship
or station newsletter, which
instruction should you consult?
1-13. Guidance for using copyrighted
material is found in which
instruction?
1.
2.
3.
4.
To produce items in large
quantity
To produce items in small
quantity
To eliminate job orders
To expedite job orders
Accept the job
Reject the job
Throw the job order away
Return the job order to the
requester citing supply
ordering data
1-22. Besides environmental protection,
the Precious Metals Recovery
Program provides what benefits to
the Navy?
Job Log
Copier Production Log
Economical Copying Limit Log
Reproduction Production Log
1.
2.
3.
4.
2
Reduced shop waste
Altered work routines
Waste disposal alternatives
Savings or credit
1-29. Before reproducing a local form,
what should you check?
1-23. Acceptable limitations on the
alteration of official DoD
imagery includes which of the
following categories?
1.
2.
3.
4.
1.
2.
Conventional photographic
techniques
Video imagery
Post-production enhancement
All of the above
3.
4.
1-30. Which is correct form for
reporting MLSR items?
1-24. What instruction requires you to
submit a visual information
report?
1.
2.
3.
4.
1.
2.
3.
4.
OPNAVNOTE 5290
OPNAVINST 5290.1
OPNAVINST 5510.1
NAVPUBINST 5600.44
1.
2.
3.
Semiannually
Annually
Biannually
Every third year
4.
1-26. The Navy security manual is known
by what short title?
1.
2.
3.
4.
Chapter
Chapter
Chapter
Chapter
1.
2.
3.
4.
4.
(a)
(a)
(a)
(a)
5,
5,
4,
4,
(b)
(b)
(b)
(b)
12
13
12
13
1-33. After removing an item from a
file, you should indicate its
whereabouts by what means?
8
6
10
11
1.
2.
3.
4.
1-28. The intent of the Navy Forms
Management Program does NOT
specifically include what
feature?
1.
2.
3.
To discover discrepancies
To learn shop capabilities
To drill inventory
procedures
To check custody card
signatures
1-32. The Standard Subject
Identification Code consists of
how many (a) sections and (b)
major subject groups?
SECNAVINST 5510.30A/5510.36
OPNAVINST 5290.1
SECNAVINST 5210.11
SECNAVINST 5600.20
1-27. Which chapter of the Navy
security manual identifies
marking procedures?
1.
2.
3.
4.
DD Form 200
DD Form 844
OPNAV 5213/18
OPNAV 5213/19
1-31. What is the purpose for annual
sight inventories on custody card
items?
1-25. How often should you submit a
visual information report?
1.
2.
3.
4.
The designator for an
approved current form
The local forms coordinator
signature
The administrative officer
signature
The originator's signature
A
A
A
A
blank sheet of paper
new folder
Chargeout record
backing board
1-34. When you have found an item
previously reported as lost or
stolen, you should follow
procedures outlined in what
instruction?
Standardization
Reduction of duplication
Minimization of new forms
creation
Encouragement of interservice use of forms
1.
2.
3.
4.
3
SECNAVINST
SECNAVINST
SECNAVINST
SECNAVINST
5510.11
5215.1
5216.5
5500.4
1-42. By using a standard form whenever
possible, you can save which of
the following expenditures?
1-35. A work of authorship or design
that you created as part of your
official duties is subject to
copyright protection.
1.
2.
1.
2.
3.
4.
True
False
1-36. Information on the use of
copyrighted materials is found in
what instruction?
1-43. The ability to retrieve desired
material quickly is a feature of
what managerial tool?
1.
NAVSUP P-2002
2.
OPNAVINST 3150.25
3.
OPNAVINST 5290.1
4.
OPNAVINST 5870.5
1-37. Who is held liable for copyright
infringement or violations?
1.
2.
3.
4.
1.
2.
3.
4.
1.
2.
3.
4.
Department seal
Activity seal
Logotype
Emblem
1.
2.
3.
4.
NAVSO P-35
SECNAVINST 5603.2D
NAVPUBINST P-2002
NAVPUBINST 5600.42
2.
3.
4.
1.
2.
3.
4.
Change of Command
invitations
CPO Dining-In invitations
CPO Wedding invitations
Command picnics
The
The
The
The
log
Your name
Shop code
Command name
Copyright
1-47. You should fold a picture that is
too large for a picture morgue
folder in what way?
1.
2.
3.
4.
1-41. Information to complete the
annual Visual Information (VI)
report should come directly from
what source?
1.
2.
3.
4.
Copy
Layout
Clip art
Reference
1-46. What information should you write
on the back of each picture in
your picture morgue?
1-40. Navy shops may print all EXCEPT
which ceremonial printed
material?
1.
The LPO only
The senior DM only
The DM in charge of the
files
All shop personnel
1-45. A picture morgue is meant to
provide what kind of material to
the DM?
1-39. Ceremonial paper stock in the
government supply system is found
as part of what instruction?
1.
2.
3.
4.
Good managerial decisions
An effective filing system
Good supervisory decisions
An effective storage system
1-44. Which of the following personnel
is/are responsible for checking
material into or out of shop
files?
You
The shop LPO
The department head
The user activity
1-38. The word Navy in gothic letters
is what type of official
identifier?
1.
2.
3.
4.
Time
Manpower
Supplies
Each of the above
In half
In fourths
With the picture side in
With the picture side out
1-48. Which of the following actions
will reduce the wasting of
materials in the shop?
OPTAR
job log
copier log
reproduction production
1.
2.
3.
4.
4
Curbing loans or giving
supplies away
Using limited shelf life
items
Correcting abuses
Each of the above
1-55. The process of dividing work into
manageable tasks and arranging
them into logical order is the
result of what supervisory skill?
1-49. A combination of completed jobs,
current jobs, upcoming special
projects, and prospective
deployments and exercises will
show you what trends?
1.
2.
3.
4.
1.
2.
3.
4.
Absenteeism
Worker apathy
Supply quantities
Deployment intensity
1-56. Effective supervision is being
supportive without doing which of
the following?
1-50. When do you use the first
in/first out method of storing
supplies?
1.
2.
3.
4.
1.
2.
3.
4.
When the material is small
When the material is large
When the material is light
sensitive
When the material has time
or temperature sensitivity
1.
2.
3.
4.
$100
$500
$1,000
$1,500
1.
2.
3.
4.
To log print jobs
To log job orders
To track supplies ordered
To track shop long term
goals
1.
2.
Planning
Organizing
Supervising
Coordinating
True
False
1-60. If praising a worker should take
place in public, criticizing a
worker should take place when?
1.
2.
3.
4.
1-54. An efficiently run shop is a
result of what characteristic?
1.
2.
3.
4.
To maintain good order
To prevent work stoppages
To make your shop look good
To prevent cutting into
support shop deadlines
1-59. Negative motivation results in
desirable behaviors.
1-53. Dividing a job into manageable
tasks is a function of which
supervisory skill?
1.
2.
3.
4.
Pride in accomplishment
Development of new skills
Overview of the entire
picture
Rapid production
1-58. When you coordinate support from
outside shops, it's important for
you to meet deadlines for what
primary reason?
1-52. What is the purpose of an
Operational Target (OPTAR)?
1.
2.
3.
4.
Stifling creativity
Making suggestions
Providing feedback
Monitoring
1-57. Assigning workers to complete
jobs independently does NOT
encourage what advantage?
1-51. What is the maximum dollar amount
of a purchase on an emergency
requisition signed by a supply
corps officer?
1.
2.
3.
4.
Planning
Training
Organizing
Coordinating
Abundant liberty
Excessive personnel
Extended work hours
A clear-cut chain of command
In
In
At
In
public
private
quarters
the LPO's office
1-61. As an LPO, you have direct input
into which form of tangible
feedback?
1.
2.
3.
4.
5
Awards
Evaluations
Assignments
Each of the above
1-69. As an LPO, what are you looking
for when you review a job
request?
1-62. What should you consider when
motivating your workers?
1.
2.
3.
4.
Your crew
Personal gain
Your popularity
Shop reputation
1.
2.
3.
4.
1-63. Inaccurate reporting on forms and
inventories can result in which
of the following consequences?
1.
2.
3.
4.
1-70. The reputation of the shop
depends upon the actions of what
individual?
Overstocked supplies
Underused equipment
Inaccurate time cards
Loss of funding and billets
1.
2.
3.
4.
1-64. When you are unable to complete a
task on time, you should take
which of the following actions?
1.
2.
3.
4.
Avoid the originator
Renegotiate job priorities
Reassign the job to another
worker
Follow-up and provide
updates to the originator
1.
2.
3.
4.
1.
Field day the shop
Parrot the supervisor
Answer phone inquiries
Actively learn new skills
2.
3.
4.
1.
2.
3.
4.
In the shop file
With the job
In the job log
With the originator
To prevent boredom
To cross train workers
To increase a worker's
workload
To decrease a worker's
workload
1-74. When, if ever, should a quality
control inspector mark on an
original?
1-68. When you create a local job order
form, you should include the
criteria from what report?
1.
2.
1.
2.
3.
4.
Only the DM with a keen eye
for
detail and knowledge of
drafting standards
The shop know-it-all
The junior DM
The senior DM
1-73. Why should LPOs rotate the
assignment of someone to inspect
completed jobs?
LPO
Trainee
Work shop supervisor
Each of the above
1-67. Where should job orders be kept
while a job is being worked on?
1.
2.
3.
4.
Deferring the customer
Deceiving the customer
Satisfying the customer
Accommodating the customer
no matter what
1-72. Who should the LPO assign as a
quality control inspector?
1-66. You should take responsibility
for your actions when you are in
which of the following positions?
1.
2.
3.
4.
The division officer
The supervisor
A co-worker
You
1-71. A goal that you should strive for
in customer service relations is
which of the following?
1-65. You, as a worker and new DM, are
most obliged to do which of the
following tasks?
1.
2.
3.
4.
A due date
An originator's name
An originator's phone number
Accurate and complete
information
VI report
JCP No. 1
JCP No. 5
JCP No. 6
3.
4.
6
When the marks will not be
seen
When the original will
obviously need redrawn
When the marks will not
photograph
Never
1-75. What two things should a quality
control inspector have before
evaluating artwork?
1.
2.
3.
4.
A knife and a waxer
A knife and a nonphoto blue
pencil
A copy of the original and a
red pen
A copy of the original and a
set of standards
7
ASSIGNMENT 2
Textbook Assignment: “Basic Equipment”, chapter 2, pages 2-1 through 2-71.
2-1.
You should maintain drafting shop
tools in what condition?
1.
2.
3.
4.
2-2.
3.
4.
it out of traffic areas
cover on it
it
using it
2-10.
2-11.
2-12.
A tabouret serves which of the
following functions?
1.
2.
3.
4.
As workstation at a site away
from the shop
As additional reference
material
As a coffee mess station
As a storage unit
3.
4.
8
Back
Upper left
Upper right
Directly overhead
You should attach a light source to
a table based on the right- or
left-handedness of the DM for what
reason?
2.
1.
Arms
Color
Rollers
Comfort
When you arrange light for a lefthanded draftsman, the light source
should emanate from what direction?
1.
2.
3.
4.
Tracing prints
Leaning against it
Drawing pictures
Assembling negatives
True
False
One of the key considerations in
your selection of a drafting chair
should be what feature?
1.
2.
3.
4.
To prepare tracings
To place additional reference
material on
To use as a temporary
workstation at a remote site
To keep your personal gear off
the drafting table
Cork
Mylar
Vinyl
Cellulose acetate paper
You should cover a tabletop
recently recovered with cork for
additional protection.
1.
2.
You can seriously injure yourself
with a light table by using its
glass surface to perform which of
the following activities?
1.
2.
3.
4.
2-6.
2-9.
Cork
Mylar
Vinyl
Cellulose acetate paper
What table covering, if applied
incorrectly, will snap a drawing
board?
1.
2.
3.
4.
What is the primary purpose of a
worktable?
1.
2.
2-5.
2-8.
Dirt
Loans
Misadjustment
Nicks and lacerations
Place
Put a
Paint
Avoid
What type of table covering is best
suited for permanent application?
1.
2.
3.
4.
To protect the tabletop, it is a
good practice for you to do what to
a drafting table?
1.
2.
3.
4.
2-4.
Locked up
Out of sight
Clean and uncluttered
Ready for use on the table
You must be especially cautious to
protect drafting equipment from
what type of abuse?
1.
2.
3.
4.
2-3.
2-7.
To minimize shadows cast by the
DM’s hands
To keep the light out of the
DM’s way
To avoid conflict with the
straightedge
To keep the working side of the
table free of clutter
2-13.
1.
2.
3.
4.
2-14.
4.
2-21.
full
full
full
full
2-22.
One
Two
Three
Four
10
20
30
40
4.
2-23.
Cutting
Cutting
Cutting
Cutting
4.
2-24.
2-25.
1.
2.
3.
4.
The
The
The
The
2-26.
spring mechanism
cutter board
tabletop
safety catch
inches
inches
inches
inches
Hang it up
Tell the LPO
Throw it away
Sand down the edge
How should you store a T-square
when you are not using it?
1.
2.
3.
4.
9
15
24
36
42
What should you do when a T-square
becomes out of true or damaged?
1.
2.
3.
4.
Your failure to engage the safety
catch at the base of the paper
cutter will result in damage to
what component?
Ideal use in tight quarters
Simple to adjust and care for
Useable by both left- and
right-handed DMs
Each of the above
The most commonly used T-square has
a blade of what length?
1.
2.
3.
4.
Slowly in one stroke
Swiftly in one stroke
Swiftly in rapid strokes
Carefully in rapid strokes
To attach the scales
To adjust the scale length
To make slight angular
adjustments
To align the scale on the
drafting board
Which of the following is/are
advantage(s) of the parallel
straightedge?
1.
2.
3.
film
cardstock
too much material
too little material
Phillips head screws
Dovetail fittings
Elongated screws
Pipe fittings
The elongated screws that hold the
dovetail fittings to the scales of
a drafting machine serve what
purpose?
1.
2.
3.
minutes
minutes
minutes
minutes
Straightedge, scale, and
dividers
Template, T-square, and
straightedge
parallel ruler, protractor, and
triangle
Radius curves, template, and
straightedge
You attach the removable scales to
the scale mechanism of a drafting
machine by what means?
1.
2.
3.
4.
You should draw the cutting arm
down on a paper cutter in what
manner?
1.
2.
3.
4.
2-19.
3.
When using a paper cutter,
individuals tend to make what
common mistake?
1.
2.
3.
4.
2-18.
2.
What amount of time should you wait
after changing the temperature
setting on a tabletop waxer before
running your paper through again?
1.
2.
3.
4.
2-17.
1/4
1/3
1/2
2/3
A drafting machine combines the
functions of which of the following
pieces of drawing equipment?
1.
minutes
minutes
minutes
minutes
Exactly, how many times should you
run a sheet of paper through a
waxer to ensure even coverage?
1.
2.
3.
4.
2-16.
5
10
15
20
A tabletop waxer should be a
minimum of how full before you turn
it on?
1.
2.
3.
4.
2-15.
2-20.
Approximately what minimum time
does it take a hand waxer to reach
operating temperature?
Leave
Place
Place
Place
it
it
it
it
hanging up
upright in a corner
under the tabletop
on a shelf in a locker
2-27.
What is the purpose of a steel
straightedge?
1.
2.
3.
4.
2-28.
To
To
To
To
2-35.
cut straight lines
draw straight lines
tear paper
weigh down paper
1.
2.
3.
4.
Why should you store drafting
instruments in their original case?
1.
2.
3.
4.
2-36.
To present a neat and orderly
appearance
To have a place to put them in
To protect the instruments from
corroding
To keep the instruments out of
sight
2-30
4.
Which pen should you select to draw
parallel lines of equal or
differing widths?
1.
2.
3.
4.
1.
2.
3.
4.
To
To
To
To
draw circles
transfer measurements
step off equal distances
transfer irregular curves
What is the purpose of a set of
dividers?
To
To
To
To
2-38.
transfer irregular curves
step off equal distances
divide arcs and circles
draw circles
Needlepoints for compasses and
dividers are available in which of
the following shapes?
1.
2.
3.
4.
2-39.
To
To
To
To
draw arcs and circles
draw irregular curves
divide arcs and circles
step off equal distances
1.
What distance beyond the leg of the
compass or divider should the
needlepoint project?
3.
4.
1.
2.
3.
4.
1/64
1/32
3/64
1/8
inch
inch
inch
inch
2-40.
What drawing instrument should you
select to draw a circle exceeding
64 inches in diameter?
1.
2.
3.
4.
2-34.
Blunt
Tapered
Shouldered
Tapered and shouldered
What is the purpose of a center
disk?
2.
2-33.
Swede pen
Detail pen
Contour pen
Railroad pen
What is the purpose of a compass?
1.
2.
3.
4.
2-32.
To create straight lines
To use greater ink capacity
To create freehand, curvilinear
lines
To create parallel lines of
equal or differing width
What is the purpose of proportional
dividers?
1.
2.
3.
4.
2-31.
Broad nibs
Parallel nibs
Extremely curved nibs
Hollow handle on a swivel base
The contour pen is best suited for
what purpose?
1.
2.
3.
2-37.
2-29.
Which of the following is a feature
of the Swede pen?
2-41.
A
A
A
A
set of bow dividers
drop bow pen
compass
bow pen
10
3/16 inch
1/2
inch
9/16 inch
1
inch
Before using a new pen nib, what
should you do to the nib surface?
1.
2.
3.
4.
What drafting instrument should you
select to draw a circle 1/8 inch in
diameter?
1.
2.
3.
4.
Exactly how far up the nib should
you fill a pen with ink?
1.
2.
3.
4.
A standard compass with an
extension
A hollow compass
A beam compass
A drop bow
To stabilize the compass or
dividers
To mark the center of the item
being drawn
To prevent overenlarging a
compass hole
To mark the center of the
circle being drawn
Moisten it
Oil it slightly
Sand it slightly
Marinate it in ink
2-42.
1.
2.
3.
4.
2-43.
2-47.
1.
2.
3.
4.
2-52.
True
False
2-53.
2-54.
A
A
A
A
2.
3.
4.
2.
3.
4.
2-55.
To draw irregular or
noncircular curves
To draw the curvature of a ship
To draw logarithmic curves
To draw parabolic curves
1.
2.
3.
4.
2.
3.
4.
1
inch
1 1/2 inches
2
inches
2 1/2 inches
11
To prevent the ink from
bleeding under a drawing aid
To prevent the DM from abrading
the surface of a drawing
To allow the DM to create
cleaner drawings
To allow the DM to use a
template repeatedly without
wearing it down
What is the purpose of a scale
clip?
1.
What is the dimension of the
minimum, radius of a flexible curve
rule?
Heavy acetate
Sheet metal
Cardboard
Paper
What is the purpose of an ink
riser?
1.
flat
radius
tangent
straightedge
One
Two
Three
Four
What type of material is NOT
suitable for making a template for
repeated or extended use?
1.
2.
3.
4.
Obtuse
Regular
Irregular
Supplementary
A T-square
A protractor
Dividers
A compass
In laying off an angle from a
horizontal base, to what number of
points of reference should you use?
1.
2.
3.
4.
10
11
12
13
One
Two
Three
Four
Which of the following drafting
instruments should you use to lay
off an angle from a horizontal
base?
What is the purpose of a french
curve?
1.
2-49.
Bent nibs
Extra clean pens
Melted plastic parts
Cracked plastic parts
The flat segment on a radius curve
is known by what term?
1.
2.
3.
4.
2-48.
2-51.
What type of angle is drawn with
the adjustable triangle?
1.
2.
3.
4.
When you draw an irregular curve
with a french curve, to what number
of points of contact should the
french curve correlate?
1.
2.
3.
4.
A combination of a 30/60- and a 45degree triangle can produce a total
of how many other angles?
1.
2.
3.
4.
2-46.
feed tube
clamp ring
conical tip
weighted needle
You should keep uncommon tools in
commonly accessible places.
1.
2.
2-45.
The
The
The
The
When you leave reservoir pen parts
in an ultrasonic cleanser too long,
what is the result?
1.
2.
3.
4.
2-44.
2-50.
In a reservoir pen, what component
regulates the flow of ink?
To enable quick pickup of the
scale
To keep pencils within easy
reach
To focus attention on the scale
face in use
To slide the scale along a
drawing board
2-56.
It is as convenient to measure from
left to right as it is from right
to left through the use of what
scale?
1.
2.
3.
4.
2-57.
2-63
1.
2.
3.
4.
Open division
Full division
Double numbering
Single numbering
2-64.
What scale on a triangular
architect’s scale indicates full
inches?
2-65.
What scale is ideal for making
graphs or decimal measurements?
The
The
The
The
architect’s
civil engineer’s
railroad engineer’s
mechanical engineer’s
2.
3.
4.
2-59.
To measure accurately with a scale,
you should take which of the
following actions?
1.
2.
3.
4.
2-60.
Lay the scale against your
straightedge
Slide a sharp pencil lead
carefully down the graduation
groove
Make the drawing surface with
the increment
All of the above
2-67.
The
The
The
The
2-68.
a graphic pencil and a carbon
1.
bristle thickness
ferrule or quill
bristle length
handle
3.
4.
2-62.
Red sable brushes are generally
used for what medium?
1.
2.
3.
4.
B to 3H
F to 2H
4H to 6H
6B to 2B
What is the main difference between
2.
The
The
The
The
diameter of the lead
composition of the lead
hardness of the lead
composition and hardness of
lead
pencil?
What factor dictates the size of a
brush?
1.
2.
3.
4.
The
The
The
The
the
Of the following pencil grades,
what is most suitable for technical
or precise drawing?
1.
2.
3.
4.
equation
scale
ratio
rule
Place them back in the desk
drawer
Place them on the bristles
Place them upright on the
handles
Place them on a locker shelf
What determines the rating or grade
of a pencil?
1.
2.
3.
4.
What is the ratio of the
measurements on the drawing to the
same measurements on the actual
object known as?
1.
2.
3.
4.
2-61.
2-66.
Reshape the bristles
Curl the bristles to the right
Wash them thoroughly with water
Add a drop of oil to the
bristles
How should you store brushes once
you wash them?
1.
1.
2.
3.
4.
Ox hair
Red sable
Camel hair
Both 2 and 3 above
After cleaning brushes dedicated to
oil-based paints and before storing
them, what action should you take?
1.
2.
3.
4.
1.3/16
2. 1
3. 3
4. 16
2-58.
What bristle is suitable for use
with oils and acrylics?
Acrylic color
Enamel color
Water color
Oil color
2-69.
When relative humidity is high,
what pencil should you select to
replace a 2B pencil?
1.
2.
3.
4.
12
A graphite pencil is dense
black; a carbon pencil is not
A graphite pencil reflects
light; a carbon pencil does not
A carbon pencil is affected by
humidity the graphite pencil
is not
A carbon pencil leaves a
residue;the graphite pencil
does not
2H
3B
4B
6B
2-70.
1.
2.
3.
4.
2-71.
2.
3.
4.
2.
Because no colored marks
reproduce on black-and-white
film
Because sky-blue lead fades
under the intense light of the
camera
Because photographic black-andwhite films are blind to skyblue
Because sky-blue pencil leads
are wax-based and melt under
the camera lights
3.
4.
2-74.
2.
3.
4.
2-75.
To lighten the image area
around the error
To prevent damage to the paper
surface
To keep your wrist from tiring
To blend in the correction
13
To blend pencil, charcoal,
pastels, and crayons
To blend color and ink washes
To mix binders with pigments
To mix pigments
To make sure you are making a clean
and accurate cut, when should you
change the blade in the knife?
1.
2.
3.
4.
A plastic eraser
A kneaded eraser
An art gum eraser
Pulverized eraser particles
To isolate areas you want to
erase
To shave eraser particles away
from the drawing
To protect the eraser from dirt
on the drawing
To protect the drawing surface
you do not want to erase
What is the purpose of a stump or
tortillon?
1.
What eraser should you use to pick
out highlights in a drawing?
1.
2.
3.
4.
What is the purpose of an erasing
shield?
1.
Why must you constantly move an
electric eraser over an error in a
circular pattern instead of
concentrating on it?
1.
2-72.
2-73.
Why should you use a sky-blue
pencil to mark a board before
photographing it on black-and-white
film?
Daily only
Weekly only
Monthly only
As often as you feel the blade
needs changing
ASSIGNMENT
3
Textbook Assignment: “Computer Equipment,” chapter 3, pages 3-1 through 3-43
3-1.
Computer hardware includes which of
the following items?
1.
2.
3.
4.
3-2.
3-5.
3-10.
Editing
Input
Output
Monitoring
CPU
Printer
Monitor
Trackball
Light pen
Keyboard
Scanner
Mouse
To
To
To
To
3-13.
1.
2.
3.
2.
3.
4.
4.
To scroll horizontally
To backup to the last command
To delete keystrokes to the
left of the cursor
To delete keystrokes to the
right of the cursor
3-14.
Program interruption
Screen scrolling
Cursor movement
Delete
Cursor movement
Number pad keys
Scrolling
Deletion
To copy images not already on
disk
To circumvent a copyright
To minimize keystrokes
To scan hue and tone
A general-purpose grey scale
scanner should offer a minimum of
how many levels of grey?
1.
2.
3.
4.
14
NUM LOCK keys
F1 through F1O keys
cursor control keys
SCROLL LOCK/BREAK keys
You should use a scanner for what
purpose?
1.
What is the function of the
BACKSPACE key?
The
The
The
The
When pressing the NUM LOCK key, you
activate or deactivate what
function?
1.
2.
3.
4.
italicize
key WP functions
combine keystrokes
minimize keystrokes
disk
software
hardware
keyboard
When pressing the CTRL key in
conjunction with the SCROLL LOCK
key, you access what function?
1.
2.
3.
4.
3-12.
The
The
The
The
Which of the following keys do/does
NOT control cursor movement?
1.
2.
3.
4.
3-11.
To scroll
To blank out the screen
To exit a program or situation
To send a screen image to a
printer
Special-purpose keys access
functions that are part of what
computer component?
1.
2.
3.
4.
What is the purpose of an enhanced
keyboard?
1.
2.
3.
4.
3-7.
Food
Books
Papers
Pencils
What input device is the primary
means for entering data into a
computer?
1.
2.
3.
4.
3-6.
3-9.
Which of the following items is an
input device?
1.
2.
3.
4.
What is the function of the ESC
key?
1.
2.
3.
4.
You should interface with a
computer by using what type of
device?
1.
2.
3.
4.
3-4.
Applications software
Operating software
Program data
Disks
What items should NOT be allowed
near computer input devices?
1.
2.
3.
4.
3-3.
3-8.
52
64
76
88
3-15.
1.
2.
3.
4.
3-16.
4.
3.
4.
3-21.
3-23.
To scan slides
To do small quantity scanning
To scan pages from a book
To scan three-dimensional
objects
3.
4.
3-24.
Click the mouse keys
Turn the mouse on/off
Roll the mouse around on a
mouse pad
Press INSERT once the mouse is
in position
1.
2.
3.
4.
3-26.
3-27.
3-28.
3-29.
To
To
To
To
read a disk
record a disk
power a disk drive
read and record a disk
You should upgrade the memory
capacity of a computer when you add
which of the following items?
1.
2.
3.
4.
15
Kilobyte
Megabyte
Gigabyte
Trilobite
Read Only Memory (ROM) is required
to provide what function?
1.
2.
3.
4.
CPU
tower unit
control unit
control tower
Long term
Read only
Short term
Write once/read many
Memory chips store information in
all EXCEPT which of the following
increments?
1.
2.
3.
4.
monitor
printer
mouse
CPU
Read only
Long term
Read/write
Write once/read many
You should save information in RAM
because it is what type of memory?
1.
2.
3.
4.
Leaving a latent image in ink
Clicking functions from the
menu
Activating Photoelectric cells
Electronically enhanced
recording
A
A
A
A
Memory
Software
Capabilities
User interface
3-25. RAM memory is often referred to as
what type of memory?
What terminology identifies a
system unit that stands upright?
1.
2.
3.
4.
Coordinates computer activities
Accepts input and provides
output
Controls speed or processing
power
Each of the above
What is the main difference between
PCs and MAC computers?
1.
2.
3.
4.
Mouse
Joystick
Trackball
Electronic tablet
The
The
The
The
True
False
The CPU performs which of the
following functions?
1.
2.
What component is part of the
system unit?
1.
2.
3.
4.
The motherboard is a master printed
circuit board that contains the
integrated circuit chips, the math
co-processor, the memory slots, and
the clock.
1.
2.
A light pen leaves an image on a
computer monitor by what means?
1.
2.
3-20.
500
600
700
800
What item is primarily a freehand
drawing input device?
1.
2.
3.
4.
3-19.
to
to
to
to
To access a command using a mouse,
you should take what action?
1.
2.
3.
3-18.
200
300
400
500
What is the purpose of a flatbed
scanner?
1.
2.
3.
4.
3-17.
3-22.
A general-purpose color scanner has
what dpi range?
Software
Printer
Monitor
Keyboard
3-30.
What is the purpose of a disk
drive?
1.
2.
3.
4.
3-31.
4.
3-33.
3-39.
3-40.
3-41.
3-42.
What type of technology drives
compact disk read only memory?
3-36.
3-43.
The size and resolution of a
computer screen is controlled by
what NIC?
1.
2.
3.
4.
3-44.
Impact and nonimpact
Dot matrix and daisy wheel
Daisy wheel and letter quality
Letter quality and near letter
quality
The
The
The
The
paper texture
printer setting
size of the matrix
freshness of the ribbon
Daisy wheel printers
Dot matrix printers
Nonimpact printers
Impact printers
What type of printer sprays
electrically charged ink through
nozzles in a printing element?
1.
2.
3.
4.
16
80
40
480
640
Which of the following types of
printer is considered fastest?
1.
2.
3.
4.
VGA
WORM
MODEM
CD-ROM
by
by
by
by
What determines the letter quality
of a character printed by a dot
matrix printer?
1.
2.
3.
4.
1. CD-ROM
2. WORM
3. ROM
4. RAM
40
80
640
480
What are the two classifications of
printers?
1.
2.
3.
4.
Hard disk
Floppy disk
CD ROM disk
Removable hard disk
PPI
DPI
LPI
BPI
A general-purpose 20-inch monitor
has how many dpi resolution?
1.
2.
3.
4.
A command newsletter
Personal information
A Confidential brief
Command policy and directives
Laser
Analog
Digital
Multisynchronous
Computer screen resolution is
referred to by what unit of
measure?
1.
2.
3.
4.
A sealed unit
Speed of execution
Rigid metal platters
It is part of the system unit
Film recorders
Disk drives
Monitors
Plotters
What type of monitor displays both
textural information and graphics
with equally good resolution?
1.
2.
3.
4.
To clean the disk
To keep the disk clean
To prevent over-recording
insertion into the drive
To ensure correct insertion
into the drive
When many users need the same
information and the nature of the
information remains constant, what
type of drive unit should be used?
1.
2.
3.
4.
3-35.
3-38.
What type of data belongs on a
removable hard disk drive?
1.
2.
3.
4.
3-34.
1.
2.
3.
4.
What is a major advantage of a hard
disk drive?
1.
2.
3.
4.
Which of the following items is NOT
an example of an output device?
To access data on disks
To print data from a disk
To organize data on a disk
To remove disks from the system
unit
What is the purpose of the notch in
the upper-right hand corner of the
disk?
1.
2.
3.
3-32.
3-37.
Continuous tone die sublimation
printers
Ink jet printers
Wax printers
Laser printers
3-45.
3-53.
A printer that prints with a beam
of light is what type of printer?
1.
2.
3.
4.
What is the purpose of a surge
suppressor?
1.
2.
3.
Thermal transfer
Ink jet
Laser
Wax
4.
3-46.
What must you do before manually
setting printer parameters?
3-54.
1.
2.
3.
4.
3-47.
Select MODE
Depress the RESET button
Advance the paper to the top
Put the printer in an offline
status
1.
2.
3.
4.
3-55.
To print a document with letter
quality characters, what button
would you depress?
1.
2.
3.
4.
3-57.
3-49.
Which, if any of the following,
wheels would you move when changing
the position of a printer tractor
wheel?
1.
2.
3.
4.
3-50.
3-58.
Windows
System 7
DOS
ROM
You should restrain yourself from
using the hard return key for which
of the following reasons?
1.
2.
3.
4.
Input
output
Input/output
Communications
3-59.
What is the first step you should
take when you set up a
microcomputer system?
Make
Read
Plug
Load
all necessary connections
the literature
everything in
the software
2.
3.
4.
3-60.
You must make sure the computer and
supporting devices are set to
appropriate line voltages before
connecting.
1.
2.
17
key more rapidly
prevent coding errors
eliminate work effort
maintain the reveal codes
Bypassing the timed backup
feature
Periodically saving material
Hitting the hard return key
Using reveal codes
To eliminate tedious after-editing,
what should you do to a document
before entering text?
1.
2.
3.
4.
True
False
To
To
To
To
What work habit will lessen data
loss in the event of a system
failure?
1.
1.
2.
3.
4.
3-52.
Applications
Word processing
Operating system
Desk top publishing
A modem is which type of device?
1.
2.
3.
4.
3-51.
Data stored on a disk
The monitor
A floppy disk
Program literature
What type of software is NOT an
example of applications software?
1.
2.
3.
4.
Left
Right
Both
Neither
system unit
keyboard
monitor
printer
What software program should you
enter into the computer memory bank
first?
1.
2.
3.
4.
MODE
PITCH
SPACING
TYPESTYLE
The
The
The
The
What is software?
1.
2.
3.
4.
Operating system
Word processing
Applications
Printer
3-56.
3-48.
What device should you plug into
the surge suppressor first?
1.
2.
3.
4.
When a printer is online, what type
of software controls printer
parameters?
To even current flow
To prevent a surge of current
To activate backup power in a
power loss
To surge current in the event
of current lapse
Open it
Save it
Format it
Enter all text
3-61.
What is the function of a macro?
1.
2.
3.
4.
3-62.
To calculate mathematically
To eliminate repetitive steps
To highlight special functions
To insert fractions and whole
numbers
Electronically processed classified
data stored on a disk is divided
into what three categories?
1.
2.
What are the two types of software
technology available for use in
graphic programs?
1.
2.
3.
4.
3-63.
3-68.
3.
4.
Bit mapping and vector mapping
Raster-based and bit mapping
Vector mapping and matrix
Matrix and gridmaps
3-69.
What is one disadvantage to rasterbased imagery?
Within Level I, what are the four
modes of electronic processing for
classified material?
1.
2.
1.
2.
3.
4.
Limited effects
Difficult to learn
Pixel level execution
Enormous power and memory
consumption
3.
4.
3-70.
3-64.
What is one disadvantage to vector
mapped imagery?
1.
2.
3.
4.
Enormous power and memory
consumption
Pixel level execution
Difficult to learn
Limited effects
You should base the selection of a
software program for the graphics
shop on which of the following
factors?
1.
2.
3.
4.
3-66.
3-72.
Your failure to encapsulate a shape
with pixels completely before using
the fill command will result in
what effect?
1.
2.
3.
3-67.
Bleeding
Blending
Wash out
Black out
3-73.
Immediate elimination of the
effects of the last command given
in a graphics package is done with
what key?
1.
2.
3.
4.
18
days
days
days
days
When the document is created
When the document is complete
When the document is in its
final form
After transferring to the
finished media disk
How should you mark the computer
monitor before displaying a screen
with classified material on it?
1.
2.
3.
4.
UNDO
ERASE
DELETE
BACKSPACE
90
120
150
180
When should you mark a classified
disk?
4.
1.
2.
3.
4.
True
False
How long may you store working copy
disks before you destroy them?
1.
2.
3.
4.
Hardware limitations
Budget restrictions
Personnel abilities
Command needs
System high, System low,
Controlled and Uncontrolled
System High, Dedicated,
Multilevel, and Controlled
Sensitive, Confidential,
Secret, and Top Secret
A, B, C, and D
Electronic processing at Level I in
the multilevel mode allows various
types and categories of classified
material to be stored and processed
concurrently.
1.
2.
3-71.
3-65.
Level I, Level II, and Level
III
Confidential, Secret, and Top
Secret
Classified, sensitive, and
unclassified
Privacy information, classified
material,and command policies
At the top of the monitor
At the bottom of the monitor
One both sides of the monitor
On the side of the monitor
facing traffic areas
3-74.
What action do you take before
destroying a disk containing
classified material?
1.
2.
3.
4.
3-75.
Log it in a book
Degauss or erase the disk
Get permission from the ADPSSO
Give it to the ADPSSO for
destruction
Which of the following types of
information should you record as
part of your equipment inventory?
1.
2.
3.
4.
19
Make and model
Mode of operation
Kind of information the
computer processes
All of the above
ASSIGNMENT 4
Textbook Assignment: “Reproduction Equipment,” chapter 4, pages 4-1 through 4-42.
4-1.
What should you avoid when using
reproduction equipment?
1.
2.
3.
4.
4-2.
the
the
you
you
4-10.
deck is wet
humidity is high
secure for the day
secure for the weekend
Food
Drink
Ashes
Debris
1.
2.
3.
4.
4-12.
4-6.
Unplug and clean equipment
Tie, strap, or secure equipment
Power down and unplug equipment
Power up and make ready
equipment
4-13.
1.
2.
3.
4.
4-7.
Volume range and speed
Shop or command needs
Options and speed
Options and brand
1.
2.
3.
4.
Electrostatic, thermographic,
or digital technology
Speed, resolution, and volume
Location, options, and brand
Space and electrical draw
20
Blank pages
Letter fill in
Letter drop out
Uneven resolution
What machine is capable of
producing quality copies on
vellum, acetate, and paper?
1.
2.
3.
4.
When purchasing a black-and-white
copier, what primary variables do
you consider?
To admit defeat
To have it fixed right
To have someone else fix it
To have someone trained in
copier technology fix it
A copier that is low on toner will
have which of the following
symptoms?
1.
2.
3.
4.
What criteria is used to classify
copiers?
REDUCE
ENLARGE
COLLATE
LIGHT/DARK
When a copier is consistently
troublesome, why should you notify
a key operator?
What action do you take to protect
equipment before deploying?
1.
2.
3.
4.
Electrostatic
Thermsl
Digital
Laser
You can increase the contrast in a
weak master by depressing which of
the following buttons?
1.
2.
3.
4.
4-11.
Laser
Thermal
Digital
Electrostatic
What type of copier technology uses
color toner instead of a ribbon to
create an image on paper?
1.
2.
3.
4.
Which of the following clutter is
especially dangerous near a
keyboard?
1.
2.
3.
4.
4-5.
4-9.
Turn the power on
Turn the power off
Inform the supervisor
Check out with the supervisor
When
When
When
When
What type of copier technology
fixes the toner image to paper with
heat?
1.
2.
3.
4.
When should you de-energize
electrically powered equipment?
1.
2.
3.
4.
4-4.
Too many extension cords
Surge suppressors
Using equipment too long
Using too many pieces of
equipment at once
Before cleaning a piece of
reproduction equipment, what is the
first step you should take?
1.
2.
3.
4.
4-3.
4-8.
A
A
A
A
thermographic copier
diazo machine
ditto master
typewriter
4-14.
What component of an anhydrous
diazo machine distributes the
ammonia vapor?
1.
2.
3.
4.
4-15.
3.
4.
4-18.
4.
4.
Developing
Printing
Cooling
Exhaust
4-23.
4-24.
4-25.
50
60
20
20
to 60 drops per minute
to 70 drops per minute
feet per minute
minutes
3.
4.
1.
2.
3.
4.
10
20
30
40
minutes
minutes
minutes
minutes
4-27.
Blue
Black
Clear
Yellow
Diazo images will deteriorate
Photographs will fade and
discolor
Diazo images will transfer to
the photograph surface
Photographic surfaces will
transfer to the diazo print
Diazo material is NOT sensitive to
light or temperature, but is
sensitive to time.
1.
2.
21
Smoke and fire
A pungent odor
Blindness and burns
Discoloration and fading of
surfaces
Why should you NEVER store diazo
prints and foils with conventional
photographs?
1.
2.
What is the approximate warm-up
time for a diazo machine?
Cleaning the feedboard
Lubrication of all bearings
Cleaning and dusting all hoses
Cleaning the inside of the
cylinder
Desensitized areas in a diazo
blueline print will appear as what
color after development?
1.
2.
3.
4.
4-26.
To soak up residual ammonia
To cool the printing cylinder
To prevent the web belts from
sticking
To prevent the sealing sleeve
from sticking and the belts
from residual heat
Careless handling of ammonia can
cause what problems?
1.
2.
3.
4.
Turn on the machine
Adjust the ammonia flow
Run the machine for a warm-up
period
Insert the drain tube into the
residue collection bottle
minutes
minutes
minutes
minutes
What steps are a part of daily
maintenance for a diazo machine?
1.
2.
3.
4.
To expel fumes
To cool heater rods and drip
trays
To deposit residue into the
residue collection bottle
Each of the above
10
20
30
40
When you secure the machine for the
day, why should you feed a sheet of
porous paper through the diazo
machine?
1.
2.
3.
To what speed should you adjust the
ammonia feed rate after turning the
main power switch on?
1.
2.
3.
4.
4-20.
Blower and timer
Blower and heating
Cooling and exhaust
Cooling and ejection
What is the first step in starting
up the diazo machine for use?
1.
2.
3.
4-19.
4-22.
The blower and timer serve which of
the following functions?
1.
2.
What is the approximate cool down
period for a diazo machine that has
been running continuously for 6
hours?
1.
2.
3.
4.
The heating rods of an anhydrous
diazo machine are a part of what
section?
1.
2.
3.
4.
4-17.
Drip trays
Heater rods
Blower unit
Distilled water
A diazo machine consists of four
distinct components that include a
printing section, a developing
section, and what other sections?
1.
2.
3.
4.
4-16.
4-21.
True
False
4-28.
1.
2.
3.
4.
4-29.
2.
3.
4.
4-35.
side up
side down
to emulsion
against the feedboard
4-36.
4-37.
2.
3.
4.
Rinse the roller assembly and
trays
Oil all bearings with No. 10
lube oil
Clean all mirrored surfaces
with a rag
Clean all optical surfaces with
glass cleaner
What type of phototypesetter is
commonly found in Navy Graphics
shops?
1.
2.
3.
4.
4-40.
4-33.
The term “on the fly” refers to
what type of phototypesetter
process?
1.
2.
3.
4.
22
Toward the tape
Behind the tape
Between the tape
Away from the tape
What must you do to preserve the
carbon image from a pressure
process lettering machine?
1.
2.
3.
4.
Fiber optics
Digital memory
Raster scanning
Electromechanical
Ghost
cutout
Carbon
Carbon or cutout
When you use a pressure process
lettering machine that cuts letters
from a vinyl or paper tape, how do
position the raised image on the
font in the channel?
1.
2.
3.
4.
CRT technology
Raster scan technology
First-generation technology
Fourth-generation technology
Weak images
Streaked images
Thin grey images
Each of the above
Pressure process lettering machines
produce which kind of letter?
1.
2.
3.
4.
4-39.
Stabilization
Photographic
Transfer
Therms 1
How can you tell if the chemicals
in a phototypesetter need
replenishment?
1.
2.
3.
4.
4-38.
True
False
What developing process is not
permanent?
1.
2.
3.
4.
To avoid chemical contamination
by your hands
To avoid chemical contamination
to your hands
To avoid spilling chemical
developers
To avoid damage to the soft
emulsion
Raster scan and fiber optics
Electromechanical
Cast hot type
Digitization
A halftone, point, and pixel are
synonymous units of measure for
image definition.
1.
2.
To make sure the phototypesetter
operates well, which maintenance
step should you perform daily?
1.
4-32.
Emulsion
Emulsion
Emulsion
Emulsion
What phototypesetter technology is
an example of fourth-generation
technology?
1.
2.
3.
4.
Why must you carefully handle paper
or film when you load a
phototypesetting machine?
1.
4-31.
Fluorescent
Ultraviolet
Incandescent
Mercury vapor
The best image possible from a
diazo machine occurs when the
master and the material enter the
feed assembly in what fashion?
1.
2.
3.
4.
4-30.
4-34.
What type of bulb is found in most
diazo machines?
Burnish the tape
Laminate the tape
Spray the tape with fixative
Spray the tape with clear spray
paint
4-41.
Why must you be careful when using
a carbon lettered strip on master
artwork you intend to expose to hot
lights?
1.
2.
3.
4.
4-42.
4-50.
A
A
A
A
hand-lettering set
drafting machine
pantograph
trammel
4-51.
A
A
A
A
4-52.
4-53.
4-54.
While you are engraving, what is
the purpose of your left hand?
1.
4.
To apply pressure to the cutter
To apply pressure to the tracer
To apply pressure to the
forehead
To tighten the thumbscrews in
the galley
3.
4.
23
To
To
To
To
hold
hold
hold
hold
the
the
the
the
copy in place
lens in place
film in place
lights in place
The plane that holds the lens in
place also performs which
additional function?
2.
1.
2.
3.
One
Two
Three
Four
What is the purpose of the copy
plane?
1.
2.
3.
4.
Debris in the galley
Sharp cutter points
Debris in the jaws
Sawdust
A film plane built into a wall
Absence of handwheels
Vertical orientation
Free-standing unit
How many parallel planes comprise a
process camera system?
1.
2.
3.
4.
A plastic door sign
A brass trophy plate
An aluminium desk plate
A brass shadow box plate
Battery color
Clean contacts
Dust and debris
Swollen or leaking batteries
What feature is typical of a
darkroom type process camera?
1.
2.
3.
4.
plastic water fountain sign
brass trophy plate
plastic door sign
plastic nameplate
Timers
Battery
Electricity
Rotating handwheels
What should you look for in the
battery compartment of a batterydriven camera?
1.
2.
3.
4.
When preparing to use the engraver,
in addition to cleaning away
debris, what should you be
concerned about?
1.
2.
3.
4.
4-47.
low angle
high angle
90-degree angle
45-degree angle
To apply pressure to the cutter
To apply pressure to the tracer
To apply pressure to the
forehead
To tighten the thumbscrews in
the galley
From where do process cameras
derive power?
1.
2.
3.
4.
For what item would you connect the
pulley and motor to engrave?
1.
2.
3.
4.
4-46.
4-49.
For what item would you use a
diamond-tipped cutter?
1.
2.
3.
4.
4-45.
4.
Engravers resemble what drafting
instrument in principle and
construction?
1.
2.
3.
4.
4-44.
Adhesive seepage
Melted carbon image
Melted plastic carrier
Dry and cracked carbon image
A
A
A
A
While you are engraving, what is
the purpose of your right hand?
1.
2.
3.
When you peel the backing paper
away from a strip of cutout
lettering, what angle must you
attempt to maintain?
1.
2.
3.
4.
4-43.
4-48.
To assist in proportional
reductions and enlargements
To assist in fine focusing of
the image
To align original copy
To hold filters
4-55.
You attach halftone and color
separation filters to which of the
following planes?
1.
2.
3.
4.
4-56.
copy plane
lens plane
film plane
pressure plane
The
The
The
The
4-63.
focusing control
copy plane
bellows
scales
4-64.
4-65.
4-58.
What type of light is a principal
requirement for good photographic
exposures?
1.
2.
3.
4.
4-59.
Even illumination
Light enters lens directly
Control of negative density
Minimization of surface flaws
in the artwork
2.
3.
4.
True
False
4-67.
You would NOT select a 3400 degree
Kelvin light source for generalpurpose work for what reason?
1.
2.
3.
4.
Too
Too
Too
Too
4.
24
The
the
The
The
The
way an image projects onto
film plane
shutter speed selection
aperature selection
focusing mechanism
A waxy deposit left by swollen
batteries
The spectral coating that
reflects glare from a len’s
surface
The distance between the
viewing lens and the lens
through which the exposure is
made
The distance between the film
plane and the object being
photographed
Why are certain 35mm cameras
sometimes called a single lens
reflex?
1.
2.
3.
hot a light source
cool a light source
short a useful life
expensive to replenish
They are sold in sets only
They will all be clean and new
They will all be the same brand
They will all have the same
color temperature
What is parallax?
1.
Light temperature or an unbalanced
light source will unevenly render
color on black-and-white
photographs.
1.
2.
4-61.
2.
3.
4.
4-66.
the bulb
the artwork
dust on the light
glare and stray
The main difference between a
single lens reflex and a
rangefinder camera is in what
feature?
1.
You should select a copyboard
illuminated from underneath to
shoot 35mm slide film for which of
the following effects?
1.
2.
3.
4.
4-60.
Copy
Normal
Flourescent
Temperature matched
To protect
To protect
To prevent
To prevent
light
Why is it necessary for you to
replace all lights in an assembly
when only one light burns out?
1.
2.
3.
4.
Shutter speed priority
Aperture priority
Automatic
Manual
3200 degree K
3400 degree K
Fluorescent
Quartz iodine
What is the purpose of a lens hood?
1.
2.
3.
4.
An automated camera that sets the
aperture after you set the shutter
speed is what type of camera?
1.
2.
3.
4.
What type of light would you select
to illuminate artwork created on a
heavily toothed cardstock evenly?
1.
2.
3.
4.
To maintain the lighttight
integrity of the camera system is
the function of what camera
element?
1.
2.
3.
4.
4-57.
The
The
The
The
4-62.
Only one lens is used at a time
Only one lens records on film
Only one lens is available for
a single lens reflex
The viewing lens is the same
lens that records the image
4-68.
1.
2.
3.
4.
4-69.
4-73.
With 35mm photography, what item
takes the place of the copy plane?
The
The
The
The
object
f/stops
shutter
automatic sensors
1.
2.
3.
4.
As you select a smaller focal
length lens, what, if anything, can
you expect to happen to the rated
speed of the lens?
4-74.
1.
2.
3.
4.
4-70.
It will
It will
It will
Nothing
Because the PH is not available,
you are shooting the retirement of
the command master chief in the
auditoruim. What film type
reasonably ensures correct
exposure?
be slower
be faster
be smaller
will happen to it
Your task is to photograph a small
machine part for a 35mm color
slide. What lens would you select?
2.
3.
4.
Short range
Standard
Variable
Macro
4-75.
4-71.
You are in a situation that is
deteriorating rapidly. You have
the only camera handy and know the
CO will want photographs. What
action can you take?
1.
2.
3.
4.
4-72.
2.
3.
4.
After you set the shutter speed to
T and depress the shutter button,
how long will the shutter remain
open?
1.
2.
3.
4.
1 second
2 seconds
3 seconds
Until you depress the shutter
button again
25
IS0
IS0
IS0
IS0
2000
400
200
25
You are reproducing slides for
which there is no existing artwork.
What additional corrections can
you make with a slide duplicator?
1.
Use the rule of f/16
Give the camera to the PH
Ignore the situation
Carefully determine each
exposure, risking loss of an
important scene
1000
400
125
25
The repair officer summons you to
photograph a broken pulley in the
nuclear storage facility. There is
ample light, you have a fast lens,
plenty of time, and you suspect he
or she will want detailed
enlargements. Which film should
you select?
1.
1.
2.
3.
4.
IS0
IS0
IS0
IS0
Minor exposure and
compositional errors
Extreme exposure errors
Serious compositional errors
Color balance errors
ASSIGNMENT 5
Textbook Assignment: “Audiovisual Equipment,” chapter 5, pages 5-1 through 5-32.
5-1.
Before a major presentation, what
action regarding the maintenance of
projection devices should you take?
1.
2.
3.
4.
5-2.
5-5.
4.
5-8.
A chamois
A lint-free cloth
Both 1 and 2 above
A camel hair brush
5-9.
To warm it up
To make sure it is working
To review the presentation
To prepare the audience for the
presentation
2.
3.
4.
degree
degree
degree
degree
3.
4.
5-11.
5-12.
1.
2.
True
False
Turning on the power
Warming up the bulb for 1
minute
Pluging the projector into the
socket
Cleaning the new bulb of all
fingerprints
Opaque
Translucent
Transparent
Three dimensional
What is a disadvantage to using an
overhead projector?
1.
2.
3.
4.
26
Remove the plug from the wall
socket
Allow the lamp to cool down
Press down on the bulb
Turn off the power
An overhead projector projects what
type of material?
1.
2.
3.
4.
An opaque projector will project
three-dimensional objects, such as
small machine parts, gears, and
cams.
1/2 inches
inches
1/2 inches
inches
What is the last step for replacing
a bulb in an overhead projector?
1.
2.
Transparencies
Slides
Books
Glass
1
2
2
3
What is the first step for
replacing the bulb in an opaque
projector?
1.
5-10.
30
60
90
120
To lower the assembly platform
To raise the conveyor belt into
place
To raise the projection
platform
To slide objects into the
projection platform
What is the thickest object that
will fit on the platen assembly of
an opaque projector?
1.
2.
3.
4.
The opaque projector operates by
reflecting light off of what type
of object?
1.
2.
3.
4.
5-6.
3.
What angle between the projection
lens and the screen prevents
keystoning?
1.
2.
3.
4.
What is the purpose for the roll
feed assembly of an opaque
projector?
1.
2.
Why would you run a projection
device 5 minutes before the
presentation?
1.
2.
3.
4.
5-4.
Test the device
Inspect the device
Clean all optical surfaces
Each of the above
What do you use to clean the
optical surfaces of a projection
device?
1.
2.
3.
4.
5-3.
5-7.
Heat buildup
Overly sensitive bulbs
Extended cool down periods
Distracting noise from motor
5-13.
1.
2.
3.
4.
5-14.
Simplicity
Low-watt consumption
Writing directly on the visuals
Projecting three-dimensional
objects
2.
3.
4.
Fresnel lens
Mirror assembly
Polarized spinner
Thermostatic control
5-20.
How would you place a visual on an
overhead projector for front screen
projection?
1.
2.
3.
4.
To select a particular slide in a
loaded tray during a presentation,
which action should you take?
1.
What is the name of the concentric
circular scribes that focus and
intensify the light source?
1.
2.
3.
4.
5-15.
5-19.
What is a major advantage of an
overhead projector?
When you operate a slide projector
and set the timer at the M
position, how many seconds will
each slide project?
1.
2.
3.
4.
With the bottom of the
projectural facing the screen
With the top of the projectural
facing the screen
So that the projectural is
illegible
With the face down on the
projection stage
5-21.
1.
For rear screen projection, how
would you place the projectural on
an overhead projector?
1.
2.
3.
4.
5-17.
4.
5-22.
2.
3.
4.
5-23.
To turn on the lamp and advance
the transparencies
To power the lamp and the
polarized spinner
To turn on the blower and
advance the transparencies
To power the blower to cool the
bulb once the projector is off
1.
2.
3.
4.
2.
Slide
Opaque
Overhead
Portable overhead
3.
4.
27
1
3
5
7
minute
minutes
minutes
minutes
What is the purpose of a stack
loader?
1.
What type of projector is the most
common type in military commands?
Turn off the power
Turn off the blower
Allow the bulb to cool
Remove the plug from the socket
After replacing the bulb in a
projector, how long should you run
the projector?
1.
2.
3.
4.
5-24.
Use a coin to turn the slotted
screw on the top of the tray
Turn off the projector, then
turn it back on
Jiggle the tray until it gives
way
Force it from the top
What is the first step for changing
the bulb of a slide projector?
1.
2.
3.
4.
Why is the overhead projector
equipped with a three-position
switch?
1.
5-18.
3.
With the face up
So that it is legible to the
operator
So that it is illegible to the
operator
With the bottom of the
projectural facing the screen
5
10
15
As long as the operator desires
What action do you take when it is
difficult to remove the slide tray
from a slide projector?
2.
5-16.
Remove the slide tray and
remove the slide
Set the slide timer to M and
forward through the slides
Depress the select button to
sequence through the slides
Depress the select button and
move the tray to position the
slide above the gate
To allow rapid loading and
rearrangement of slides
To permit stacking the
projectors in a projection rack
To allow the operator to stack
projection devices on the same
plug
To allow different briefs or
presentations to follow
directly after the last
5-25.
Which slide projection accessory
has flashing or overlay
capabilities?
1.
2.
3.
4.
5-26.
programmer
slide tray
stack loader
dissolve unit
5-33.
Access
Ventilation
Angle to the screen surface
Each of the above
5-34.
More recording time
Less recording time
More positive tracking
Better recording quality
1.
2.
3.
A VHS prerecorded tape chatters or
stutters when you play it. VHS
action should you take?
1.
2.
3.
4.
5-29.
4.
5-36.
Cut the tape
Degauss the tape
Break the tab on the tape
cartridge
Place masking tape over the tab
on the tape cartridge
An out-of-focus image
An image that chatters
A faded image
A ghost image
1.
2.
3.
4.
5-38.
To cue sound and monitor tape
To measure tape left on a reel
To total the amount of tape on
a cartridge
To meter time left to a
presentation
A torn speaker
A bad amplifier
A crushed speaker
An oxidized speaker wire
A speaker and a
A projector and
A projector and
A projector and
lights
slide show
a lectern
a lecture pad
controllable
A
A
A
A
script
pointer
lectern
light switch
What item would you NOT place near
an electrified podium?
1.
2.
3.
4.
28
Replace or repair them
Use them only ocassionally
Move them to the front of the
theater
Move them to the back of the
theater
What is NOT an example of a lecture
aid?
1.
2.
3.
4.
What is the purpose of a tape
counter?
hours
hours
hours
hours
What combination illustrates the
use of media integration?
1.
2.
3.
4.
5-37.
6
8
10
l8
What causes a speaker wire to cut
in and out?
1.
2.
3.
4.
A misadjusted video projector
projects what sort of image?
1.
2.
3.
4.
5-31.
Switch the speed of play
Adjust the track dial
Clean the tape heads
Rewind the tape
How do you disable the record
function of a tape cartridge?
1.
2.
3.
5-30.
5-35.
Every
Every
Every
Every
What should you do with damaged
speakers?
4.
5-28.
Play and Pause
Record and Stop
Play and Record
Record and Pause
How often should you clean the
heads on a cassette
player/recorder?
1.
2.
3.
4.
What advantage does switching from
SP to LSP give you?
1.
2.
3.
4.
To record on a cassette tape, what
buttons must you depress
simultaneously?
1.
2.
3.
4.
What should you consider when
positioning a projector rack in a
media integrated theater?
1.
2.
3.
4.
5-27.
A
A
A
A
5-32.
A
A
A
A
glass of water
pointer
script
fan
5-39.
How can you make lightweight,
cut out objects stick to a flannel
board?
1.
2.
3.
4.
5-40.
2.
3.
4.
5-42.
2.
3.
4.
5-46.
5-47.
5-48.
1.
2.
3.
4.
5-49.
To make the paper appear more
white
To make the paper surface
smoother
To prevent scoring the next
sheet of paper
To prevent ink from bleeding
through
Writing legibly and using fresh
markers will prevent embarrassment
in front of an audience.
1.
2.
5-44.
5-51.
What two basic types of projection
screens are found in presentation
theaters?
1.
2.
3.
4.
Front and rear
Front and white
White and silver
Rear and translucent
High gain aluminium
Lenticular
Beaded
Matte
How close to the screen should you
place the first row of chairs for
the audience of a classroom
presentation?
1.
2.
3.
4.
29
High gain aluminium
Lenticular
Beaded
Matte
What screen diffuses light evenly
and in all directions?
1.
2.
3.
4.
True
False
High gain aluminium
Lenticular
Beaded
Matte
What screen reflects all light
including the light from overhead?
1.
2.
3.
4.
5-50.
5-43.
Lenticular
Matte
White
Grey
What screen rejects room light from
its surface?
1.
2.
3.
4.
Why should you place an additional
sheet of paper under the lecture
pad paper you intend to mark on?
Room dimension
Screen surface
Angle of projection
Both 1 and 3 above
What screen is brighter than a
beaded screen?
1.
2.
3.
4.
Felt tip
Erasable
Pantone
Common
Set up a mirror at a 45-degree
angle
Move the projector to the front
The image is reshot as a slide
Schedule a larger theater
What criteria do you use to base
the selection of a front projection
screen for a presentation?
1.
2.
3.
4.
Objects hung on the board may
be larger or heavier
Objects hung on the board must
be lighter
Objects hung on the board may
be smaller
The board covering is more
colorful
What type of markers must you use
on a marker board?
1.
2.
3.
4.
How can you project in rear screen
projection an image that is too
large for direct projection?
1.
Pin them on the board
Put glue on the back of them
Put tape on the back of them
Put a slightly abrasive backing
on them
What is the one advantage hook and
loop boards have over a flannel
board?
1.
5-41.
5-45.
2
3
4
6
screen heights
screen heights
feet
feet
5-52.
What is the farthest distance away
from the screen that you should
place the last row of chairs for a
presentation?
1.
2.
3.
4.
5-53.
3.
4.
5-56.
5-60.
A projector not in focus
A projector too close away from
the screen
A projector too far away from
the screen
A projector not perpendicular
to the screen surface
2.
3.
4.
5-61.
Box
Cone
Wedge
Circle
2.
3.
4.
5-62.
What action can you take to lessen
the amount of sound affecting the
briefing theater or conference
room?
1.
2.
3.
4.
5-63.
1.
Why should you adjust the
temperature in a conference room
not to be overly warm?
3.
4.
1.
2.
3.
4.
5-58.
To
To
To
To
prevent numbness
prevent slumber
reduce bacteria
reduce odor
5-64.
You should divide lighting in the
theater into how many phases?
1.
2.
3.
4.
2.
3.
4.
30
in back of the room
behind the audience
over the audience
After the introduction of the
speaker
As the audience enters the
theater
As the audience leaves the
theater
After the first introductory
slide
A decrease in eyestrain
An increase in eye contact
An increase in temperature
A decrease in note taking
The lights over the
on the screen
The lights over the
over the audience
The lights over the
behind the audience
The lights in front
audience and on the
speaker and
speaker and
speaker and
of the
screen
Where would you place the speakers
in a theater to prevent squeal or
feedback?
1.
One
Two
Three
Four
in front of the
What lights are on as the audience
leaves the briefing theater?
2.
5-57.
The lights
screen
The lights
The lights
The lights
Leaving the lights on behind the
audiences provides what advantage?
1.
2.
3.
4.
Carpet the room
Post signs requesting silence
Add upholstered furniture to
the room
Each of the above
over the speaker
over the audience
in back of the room
in front of the
During the presentation, when do
you turn off the lights on the
screen?
1.
True
False
The lights
The lights
The lights
The lights
screen
Once the audience sits and just
before the presentation, you should
turn off what lights?
1.
You should groom the command
briefing theater or conference room
to make a positive first impression
on new personnel.
1.
2.
While the audience enters the
theater but before the presentation
begins, what lights in the theater
should be on?
1.
2.
3.
4.
Keystoning appears on the screen as
what shape?
1.
2.
3.
4.
5-55.
screen heights
screen heights
feet
feet
What misadjustment creates the
effect of keystoning?
1.
2.
5-54.
6
8
10
12
5-59.
In front of and to the right of
the audience and the lectern
In back of and to the right of
the lectern and the audience
In front of the lectern and
facing the audience
In back and facing the audience
and the lectern
5-65.
1.
2.
3.
4.
5-66.
To
To
To
To
4.
4.
5-70.
1.
To communicate effectively
To look good to new personnel
To control access to the
theater
To maintain cleanliness in the
theater
2.
3.
4.
5-71.
Adequate ventilation
Projector access
Untangled cords
Multimedia
1.
2.
3.
4.
The first row
The second row
The third row
Dignitary seating
31
Between the lectern and the
screen
Next to the lectern, opposite
the screen
Opposite the podium, with the
screen in between
In front of the lectern,
between the audience and the
speaker
The area surrounding the projection
devices is known by what name?
1.
2.
3.
4.
What seats in a briefing theater
should be able to rotate or move?
Near the door
In the center of the screen
To one side and even with the
screen
To one side and in front of the
screen
Where should you place a speaker
when using a lecture aid?
Staggering the projectors in a
projection rack gives you what
capability?
1.
2.
3.
4.
5-68.
Where should you place the lectern
in a theater?
1.
2.
3.
stop loitering
stop littering
control access
schedule and assign time
Why is it important to maintain the
theater in a state of optimum
readiness?
1.
2.
3.
5-67.
5-69.
Why should only one division be
responsible for maintaining the
briefing theater?
The
The
The
The
projection
projection
projection
projection
area
rack
stage
assembly