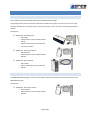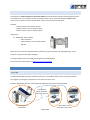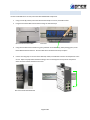
1
PRTU-FRONT-END (Web Server)
Installation and Service Manual
Short circuit or incorrect wiring may permanently damage the
controls or other equipment. Ensure proper wiring practices. If a
control failure could lead to personal and/or property damage, the
installer must add safety/interlock devices to protect against these
events.
PRTU-Front-End I&S Manual
V1.2 - 0805L
Page 1 of 16
CONTENTS
Introduction ...................................................................................................................................................................3
PRICE WEB SERVER Features .....................................................................................................................................3
Package/Component Identification ...............................................................................................................................4
WEB-MASTER ............................................................................................................................................................4
WEB ADDITIONAL ......................................................................................................................................................4
PRTU IP SWITCH ........................................................................................................................................................5
Installation and Mounting .............................................................................................................................................5
Location .....................................................................................................................................................................5
Mounting ...................................................................................................................................................................6
Wiring ........................................................................................................................................................................7
BACnet MS/TP Wiring ...........................................................................................................................................7
24VAC Power wiring .............................................................................................................................................8
Network Connections ...........................................................................................................................................8
Setup ..............................................................................................................................................................................9
IP Setup (LAN integration) .........................................................................................................................................9
Web Server Setup....................................................................................................................................................10
Summary ......................................................................................................................................................................15
Appendix A – IT Request and Information Form .........................................................................................................16
Page 2 of 16
INTRODUCTION
The PRTU-FRONT-END kit is a complete BACnet front-end solution for small to medium sized networks. It features
the Price Web Server (PRTU-WEB) which hosts all web pages containing graphics and BACnet points reported by
the system controllers.
The Web Server is accessed from any computer on the local network using a web browser with the Adobe Flash
Player plugin. Remote access is possible from across the globe with the use of Port Forwarding on the computer
network.
Contained within the webserver are pre-loaded templates with graphics and points lists for the popular Price
controls. Changes to the graphics or the creation of new custom graphics are supported right from the web
interface.
The FRONT-END kit contains all the parts required to network the controls, connect them to the web server, and
interface to the building LAN system at a single point.
PRICE WEB SERVER FEATURES
Features of the Web Server include:
•
Accessibility from any web browser with Adobe Flash Player
•
Animated graphics
•
Pre-loaded templates for Price controls
•
Drag and drop setup, no programming required;
•
Multiple simultaneous users;
•
Support for Email alerts based on user-defined conditions
Page 3 of 16
PACKAGE/COMPONENT IDENTIFICATION
WEB-MASTER
Each installation of the PRTU-FRONT-END requires the WEB-MASTER package.
This package contains all the components required for the Web Server graphics, the parts to connect to a single
PRTU (Price Rooftop Unit Controller) system, and those required to connect the system to the building computer
network.
Components:
250000-920 - Price Web Server
o PRTU-WEB
o NETC2 cable (to connect to PRTU-IP-RTR)
o DIN rail
o USB drive with manual and setup videos
o Controls screwdriver
250000-931 - PRTU Bacnet Router
o PRTU-BAC-RTR
o NETC2 cable (to connect to PRTU-IP-RTR)
o DIN Rail
250000-932 - PRTU IP Router
o PRTU-IP-RTR
o NETC12 cable (laptop setup connection)
o DIN Rail
WEB ADDITIONAL
The WEB-ADDITIONAL package is used to connect additional PRTU (Price Rooftop Unit Controller) systems to the
WEB-MASTER system.
Components:
250000-931 - PRTU Bacnet Router
o PRTU-BAC-RTR
o NETC2 cable (to connect to PRTU-IP-RTR)
o DIN Rail
Page 4 of 16
PRTU IP SWITCH
The IP-SWITCH is required if there are more than 3 PRTU (Price Rooftop Unit Controller) systems being connected
to the Web Server. This component is used to expand the “LAN” port on the IP-RTR, allowing a further 3 PRTU
systems to be connected. See the example layout section of this manual for further detail.
Examples:
1-3 PRTU Systems: No IP Switch required
4-6 PRTU Systems: Qty: 1 IP Switch required
7-9 PRTU Systems: Qty: 2 IP Switch required
Components:
250000-933 - PRTU IP Switch
o PRTU-IP-SWITCH
o NETC2 cable (to connect to PRTU-IP-RTR)
o DIN Rail
Please ensure you have all components before proceeding. Inspect components for shipping damage. Do not
install any components that appear damaged.
For support, please contact Price Application Engineering at 204-669-4220
For the latest information please visit www.price-hvac.com/literature
INSTALLATION AND MOUNTING
LOCATION
The PRTU-FRONT-END components should be mounted in an accessible location close to a network connection.
Price suggests mounting these components in the network or server room.
The PRTU-WEB, IP-RTR, BAC-RTR, and IP-SWITCH (if applicable) should all be mounted together.
Long-Distance
MS/TP connection
(see wiring section)
Mount PRTU / zone
controllers in their zones
Mount together in
Server Room
Page 5 of 16
MOUNTING
Use the include DIN rail to securely mount the PRTU-FRONT-END components.
1.
Using 3 screws (by others) mount the DIN rail horizontally to a secure, accessible surface.
2.
Hang the Price PRTU-WEB onto the DIN rail using the TOP white clips.
Back view of Price PRTU-WEB
3.
Front view
Using the Price Electronics screwdriver, gently pull down on the BLACK clip, while pushing gently on the
PRTU-WEB towards the DIN rail. The Price Web Server should click securely into place.
4.
Use the mounting clips on the rear of the BAC-RTR, IP-RTR, or IP-SWITCH to mount the components to the
din rail. Slip the top clip behind the DIN rail flange, then use steady pressure to push the component
down then back towards the DIN rail to secure.
Rear view of IP-RTR and BAC-RTR
Page 6 of 16
5.
The same section of DIN rail can be used to mount multiple components.
Sample Front-End mounting on DIN rail
WIRING
BACNET MS/TP WIRING
Connect the BACnet MS/TP wires between the BAC-RTR(s) and their respective PRTU (Price Rooftop Unit
Controller) systems. Each system requires its own BAC-RTR to avoid MAC address collisions.
For example, a building with 3 PRTU systems would require 3 total BAC-RTRs.
Wiring Detail
Twisted-pair network
cable (or CAT-5).
Use 35’ provided with
PRTU or cable by
others for long runs.
Connect as shown:
+ A/+ (Orange/White)
- B/- (Orange)
SC NetCom (Browns)
NETC35 Cable (35
foot CAT-5 cable w/
RJ-45 plugs)
provided with PIC
Note: Terminal order is
different on BAC-RTR and
PRTU
Page 7 of 16
24VAC POWER WIRING
24VAC Polarity is critical.
HOT/Common may NOT
be swapped between devices.
All components of the PRTU-FRONT-END package are powered by 24VAC.
Power requirements are as follows:
24VAC HOT
•
PRTU-WEB: 6 VA
Common
•
BAC-RTR: 4 VA
•
IP-RTR: 6VA
•
IP-SWITCH: 5VA
24VAC power typically from transformer by others.
PRTU-WEB
BAC-RTR, IP-RTR,
IP-SWITCH
NETWORK CONNECTIONS
Once the BAC-RTRs have been networked to the PIC/Prodigy controllers and the FRONT-END components have
been powered up, the IP networks can be connected and tied into the building LAN.
1.
Connect the PRTU-WEB to one of the four “LAN” ports on the IP-RTR using the included 2 foot cable.
2.
Connect the BAC-RTRs to the “LAN” ports on the IP-RTR using their included 2 foot cables.
a.
3.
If required (> 3 BAC-RTRs), the IP-SWITCH is used to expand the “LAN” ports on the IP-RTR
Connect the “WAN” port of the IP-RTR to the building LAN system.
WEB-MASTER Package
(Note to IT: WAN port is set to DHCP by default)
To Building LAN
IP-SWITCH
Only required if >3 BAC-RTRs
IP-RTR
WEB-ADDITIONALs
PRTU-WEB
BAC-RTR
BAC-RTR
Page 8 of 16
BAC-RTR
BAC-RTR
SETUP
IP SETUP (LAN INTEGRATION)
In order for the Web Server graphics to be accessible from the building
LAN, a static IP address must be assigned to the IP-RTR.
1.
Have the building IT department fill out the “IT Request and
Information Sheet” included with the IP-RTR (and at the end of
this manual).
This form should remain with the IP-RTR.
2.
Connect your computer to the IP-RTR at an unused LAN port on
the IP-RTR or IP-SWITCH. (If there are no free ports, a BAC-RTR
may be temporarily removed for the duration of the setup). A
12’ network cable is provided for this setup.
3.
Open a web browser and go to: http://192.168.97.1
4.
When prompted, enter the following:
5.
a.
User Name: admin
b.
Password: admin
Enter the information provided to you by the IT department to the “WAN Setup” section:
Do not change any settings in the “LAN Setup” section, or any of the other pages.
Set Connection Type to “Static IP”
Set IP Address as provided to you
by IT (“Static IP” on the IT form).
Set Subnet Mask as provided to
you by IT
Set Gateway as provided to you
by IT
Set DNS servers as provided to
you by IT (Servers #2 and #3 are
optional)
Page 9 of 16
6.
Click the “Save button”
7.
Wait 30 seconds, at go back to http://192.168.97.1 and verify your settings
WEB SERVER SETUP
The Price Web Server is pre-loaded with graphics and device templates. To apply these templates, the controllers
on the job must be discovered and loaded.
The Web Server (PRTU-WEB) is accessed through an internet browser with Adobe Flash Player. The latest version
of Adobe Flash Player can be obtained by www.adobe.com/products/flashplayer/ and clicking on the “Download
Flash Player” link.
1.
Access the Web Server. There are two ways to accomplish this:
a.
From the building LAN: Connect your computer to the building’s computer LAN. Open a FlashEnabled web browser and go to the address given to you by IT and set up in the previous step.
(http://xxx.xxx.xxx.xxx)
b.
If your computer is still connected on the LAN side of the IP-RTR, you can access the Web Server
directly by going to http://192.168.97.20
(Note: You may NOT use this method if you were forced to disconnect a BAC-RTR to access the
IP-RTR in the last step. If this is the case, reconnect the BAC-RTR now and connect your
computer to the Web Server using method a. above.)
Avoid removing power
from the Price Web
Server without properly
shutting it down by selecting
“Shutdown” from the
Administrator menu.
IP-RTR
http://xxx.xxx.xxx.xxx
(Static IP given by IT)
http://192.168.97.20
(only if IP-RTR has a
Free LAN port)
OR
Page 10 of 16
2.
3.
Login to the Web server:
a.
Username: admin
b.
Password: pass
Setup the Site Information. Select “Site Settings” under the tools menu. This allows for the entering of
information pertaining to the job, as well as a place to enter contact information of the service or
maintenance contractor.
4.
Add devices to the device tree.
a.
Open the Site and BACnet trees on the left
hand side of the window by clicking on them.
b.
Right-click on the Devices folder and select
“New Device”
c.
Click on the “Scan” button.
d.
Click “Finish” on the next screen.
e.
The Web Server will now scan for
devices. This will take several minutes.
Do Not click on any buttons until the
Scan Complete box appears.
Page 11 of 16
f.
You will see a dialog box filled in with all the devices the Web Server was able to discover. The
different systems are defined by their addressing scheme.
System 1: Addresses 100 (PRTU), 101, 102, 103, 104 (PIC VAV controllers)
System 2: Addresses 200 (PRTU), 201, 202, 203 (PIC VAV controllers)
RTU-2 System
RTU-1 System
g.
Select first PRTU (100 in this case), enter a label (ex: RTU-1), enter a description if desired, and
click on the “select” button in the Template heading.
2
3
4
1
Page 12 of 16
h.
Click on the “PRTU Templates” folder and select a template.
Template Type: PRTU
Units:
F = Fahrenheit
C = Celsius
Control Mode:
Poll = Polling (voting) system
with PIC/Prodigy
StAl = Standalone
Number of Heat/Cool stages:
2C0H = 2 Cool, 0 Heat stages
2C2H = 2 Cool, 2 Heat stages
Etc.
i.
Click the “Add” button.
Wait
while Web Server processes. When complete, the PRTU added will disappear from the
list of discovered devices.
j.
Next, click on the first PIC/Prodigy in the system (101) in this case.
Inter an appropriate label (ex. VAV1-1), description (ex. Bob’s Office), and select a template:
Template Type: PIC
Units:
F = Fahrenheit
C = Celsius
Box Type:
Single Duct = Single Duct
VAV box.
k.
Click the “Add” button.
Wait
while Web Server processes. Once complete the PIC will be removed from the list.
Page 13 of 16
l.
Repeat these steps until all controllers have been added to the database.
NOTE: Be sure to enter a new (unique) label to each device, and select the correct template
Note 2: There is no need to add the PRTU-BAC-RTR devices to the Web Server.
5.
Viewing points and Graphics
a.
Now that each device has been added to the Web Server,
click on the device to view its contents.
b.
By clicking on any point (an Analog Value for instance) a
box will pop up and display the current value in the
controller. You can set new values if the point is writable.
Be sure to check the manual for the specific device
For a list of BACnet points before changing any values.
c.
Click on the item in the “Graphics” folder to view the graphic for that specific controller
Page 14 of 16
d.
To change the name at the top of the graphic, right-click on the “Device Object” in the
controller’s device tree, and select “Properties”.
Change the Label (ex. RTU-1 – West Offices) and click Next
e.
, then Finish
Close the graphic by clicking on the “x” at the top of its tab,
and re-open. The name will be changed to the label input in the last step.
6.
Organizing Device Tree
a.
Folders in the device tree are useful for keeping devices organized.
b.
Right-click on the “Devices” folder, and select “New Folder”
c.
Create a label (ex. RTU-1 system) and click finish
d.
Drag devices from the device tree into this new folder.
SUMMARY
Congratulations, your PRTU-FRONT-END has been setup.
Step-by-Step video walkthroughs are also included on your USB drive.
For additional information on the PRTU, PIC, Prodigy or other Price controls, please visit www.pricehvac.com/literature.
Page 15 of 16
APPENDIX A – IT REQUEST AND INFORMATION FORM
PRTU-FRONT-END
IT Request and Information Sheet
To the installer: Please have the building IT contact fill in this form. Please request a single static IP
address for the PRTU-FRONT-END system. Please also request port forwarding for external monitoring
(remote access).
Keep one copy of this form for your records, and make one copy to leave with the PRTU-FRONT-END IPRTR.
Static IP __________________________________
(Please assign)
Subnet Mask ______________________________
Gateway _________________________________
DNS Server(s)_____________________________
SMTP Server _____________________________
(Optional – required for email alerts)
The following section is optional but required for remote monitoring.
Public (“External”) IP_______________________
Please forward external port ________________
Choose Port. Suggest: 8651
to Port 80 of the above-assigned static IP.
Page 16 of 16