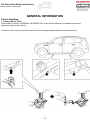
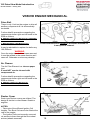
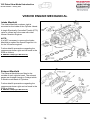
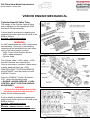
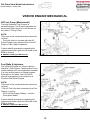
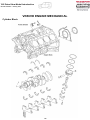
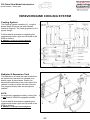
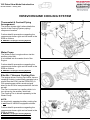
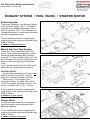
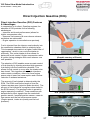
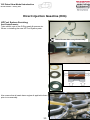
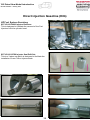
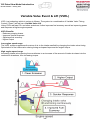
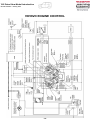
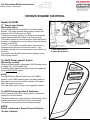
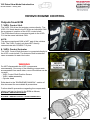
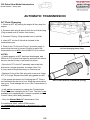
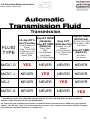
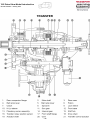
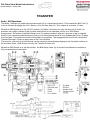
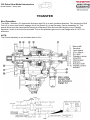
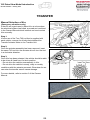
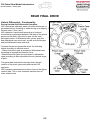
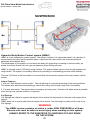
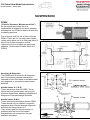
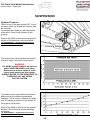
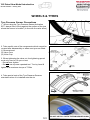
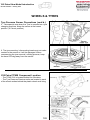
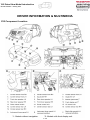
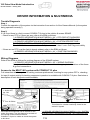
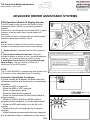
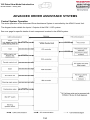
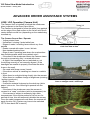
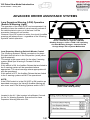
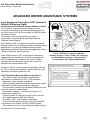
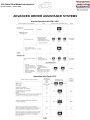
1
www.nissanlearningacademy.com.au [email protected] Foreword The information in this Training Manual should not be interpreted as a basis for warranty or goodwill claims against Nissan Motor Co. (Australia) Pty. Ltd. (NMA) unless so designated. This Technical Training Manual is intended for use by NMA & Nissan Dealership Technical Personnel. It is not designed for the use by press or for customer distribution. Before quoting any specifications be sure to check the relevant Service Manual and Technical Bulletins. Right for alteration to data and specifications at any time is reserved. Any such alterations will be advised by Nissan through Technical and Sales Bulletins. ©2013 Nissan Motor Company (Australia) Pty. Ltd. Inc. Victoria Ref: Technical Training Department. Y62 Patrol New Model Introduction Nissan Australia. January 2013 ABOUT THIS TRAINING MANUAL The purpose of this document is for Nissan Dealer Technical Staff self study purposes. If anything contained within this document gives any doubt, please contact Nissan via a Non Vehicle related TechLine enquiry to clarify the information contained within this document. The information in this Training Manual should not be interpreted as a basis for warranty or goodwill claims against Nissan Motor Co. (Australia) Pty. Ltd. (NMA) unless so designated. FUTURE UPDATE‟S OF THIS TRAINING MANUAL Additional information will be collated & added to this document at a later date. When this does occur, a special amendment document will be published on the new Nissan Learning Academy. Log onto www.nissanlearningacademy.com.au for more detail or e-mail [email protected] This actual Training Manual will also be readily available at anytime for download & printing within each Nissan Dealership. OTHER INFORMATION TO SUPPORT THIS TRAINING MANUAL This Training Manual should be used in conjunction with the “Nissan Safety Shield” and “Patrol Y62 Product Knowledge 2012” online training modules. These are located on the “Nissan Learning Academy” under the > Online Learning > Product Training selections. The Y62 “PDI Pack Insert” should also be referred to. This is also available for download from the NLA. See over page for more details. Y62 SERVICE MANUAL (ESM) Y62 Patrol; SM2E-1Y62G0 (Correct as of November 2012) These ESM‟s have been automatically issued to all Nissan dealers. (via the parts distribution system). If your dealership does not have any of them, they can be ordered via normal parts channels using the above quoted publication numbers. This Training Manual is designed for the purpose of relaying information about the vehicle & the systems within it. This Training Manual is not to be used as the Service Manual. Throughout this Training Manual, references are made to the Service Manual for additional information regarding fault diagnosis, repairs &/or maintenance. Once again should there be any doubt, please contact TechLine. SERVICE TECHNICAL BULLETINS (STB‟s) Please ensure you familiarise yourselves with all STB‟s relating to Y62. Once on the screen where all STB‟s are accessed, click on the “by Model” link & then all the STB‟s will be re-sorted so that all the Y62 STB‟s are together. 1 Y62 Patrol New Model Introduction Nissan Australia. January 2013 PRE DELIVERY INSPECTION Pre Delivery Inspection Guide All Nissan vehicles have a strict Pre Delivery Inspection (PDI) policy that must be adhered to. This package contains detailed information about the exact PDI requirements of all Nissan vehicles. A PDI is not just a matter of removing the plastic protective covers & giving the car a bit of a wash! Pre Delivery Inspection Guide Updates From time to time new models will appear & model changes will occur Therefore updates to the folder will be required. These updates are available on the Nissan Learning Academy (NLA) website as follows; www.nissanlearningacademy.com.au Grey coloured binder was distributed to all dealer Service Managers in 2008. E-mail; [email protected] for replacement binders Accessing PDI inserts Log onto your own NLA account, then click on: - COLLABORATION – tab at the far top right of screen - Search Libraries – lower left panel - Service Library folder – central on screen - Pre Delivery Inspection sub folder – central on screen Front page of the PDI inserts shown at left. 2 Y62 Patrol New Model Introduction Nissan Australia. January 2013 2013MY Y62 Patrol Overview The all-new 2011 ~ 2012 Y62 Patrol represents the 5th major change to the model since the 1st Patrol was launched in the early 1960‟s. Although an all new model – the Y62 continues with the same theme as previously. Summary of the vehicle & features as follows; - All new 5.6L Direct injection Gasoline V8 engine with Variable Valve Event & Lift (VK56VD) - 7 sp. E-A/T with Adaptive Shift Control - Hydraulic Body Motion Control suspension - Hill Descent Control / Hill Start Assist - Intelligent Cruise Control / Distance Control Assist systems (ICC / DCA) - Blind Spot Warning / Blind Spot Intervention systems (BSW / BSI) - Forward Collision Warning / Intelligent Brake Assist systems (FCW / IBA) - Lane Departure Warning / Lane Departure Prevention systems (LDW / LDP) - Tyre Pressure Monitoring System (TPMS) Spec Levels, Features & Capacities Reference should be made to the most current New Vehicle Sales brochure in order to determine the most current Specification Levels & features. The brochure will also contain information regarding Weights, Dimensions & Capacities. Country of Manufacture All Y62 models will be sourced from the Nissan Shatai plant in Japan. 3 Y62 Patrol New Model Introduction Nissan Australia. January 2013 GENERAL INFORMATION Vehicle Handling 1. Lifting (Vehicle Jack) Please refer to section “GENERAL INFORMATION” of the Service Manual for detailed instructions regarding Lifting of the vehicle. In order to avoid serious personal injury & vehicle damage, please observe these precautions. 4 Y62 Patrol New Model Introduction Nissan Australia. January 2013 GENERAL INFORMATION Vehicle Handling 2. Lifting (Hoist) Please refer to section “GENERAL INFORMATION” of the Service Manual for detailed instructions regarding Lifting of the vehicle. In order to avoid serious personal injury & vehicle damage, please observe the vehicle lifting precautions. Use the CROSS MEMBER as the Jacking Point Use the DIFFERENTIAL as the Jacking Point WARNING Do NOT jack up the front of the vehicle until you ensure that the jack makes contact with the CROSS MEMBER only. Otherwise the Engine Sump or other critical components may be seriously damaged. 5 Y62 Patrol New Model Introduction Nissan Australia. January 2013 GENERAL INFORMATION Vehicle Handling 3. Towing Please refer to section “GENERAL INFORMATION” of the Service Manual or Section 6 of the Owners Manual for information regarding the towing of the vehicle if it is unable to be driven. In order to avoid serious vehicle damage, please observe these precautions. Recovery Hooks Attach the appropriate ropes / cable to the front or rear of the vehicle as shown right. Never connect to any other part of the vehicle if it becomes stuck & requires recovery. 6 Y62 Patrol New Model Introduction Nissan Australia. January 2013 GENERAL INFORMATION HANDLING OF ELECTRICAL COMPONENTS Control Units and other Electrical Parts • Disconnect Battery prior to Disconnection & Connection of ECM. Never reverse polarity of battery terminals. • Install only parts specified for the vehicle in question. • Before replacing the control unit, check the input and output and functions of the components. • Do not shock the control unit by dropping or hitting it. • Be careful to prevent condensation in the control unit due to rapid temperature changes and do not let water get on it. • Do not let oil to get on to the control unit connector. • Do not disassemble the control unit. • When using a Digital Multi Meter (DMM), be careful not to let test probes touch each other. Short circuiting will otherwise result. • Do not apply excessive force when disconnecting a connector. • If a connector is installed by tightening bolts, loosen mounting bolt, then remove it by hand. • When installing a connector by tightening bolts, fix it by tightening the mounting bolt until the painted projection of the connector becomes even with the surface. • Before installing a connector, make sure the terminal is not bent or damaged, and then correctly connect it. • For removal of the lever type connector, pull the lever up to the direction pointed to by the arrow A in the figure, and then remove the connector. • For installation of the lever type connector, pull down the lever to the direction pointed by the arrow B in the figure, and then push the connector until a clicking noise is heard. 7 Y62 Patrol New Model Introduction Nissan Australia. January 2013 GENERAL INFORMATION Y62 Vehicle Identification Number Arrangement 8 Y62 Patrol New Model Introduction Nissan Australia. January 2013 GENERAL INFORMATION CONSULT III plus Accessible Systems The introduction of Y62 brings with it by far the most complex of Nissan vehicles to date. Dependant on variant (ST-L, Ti or Ti-L) will depend on how many systems that can communicate with CONSULT III plus. The following Control Units cannot communicate with CONSULT III plus; - Power Steering Control Unit (Speed sensitive hydraulic power steering. Ti/ Ti-L only) - Power Window Control Unit (Main Switch assembly) - Sunroof / Sunshade Control Units (Motor assemblies. Ti/ Ti-L only) CONSULT III plus communicates to the Camera C/U through the MULTI AV C/U. See the image below for the location of the Data Link Connector (DLC). 9 10 VVEL Module VVEL private CAN ECM ITS CAN Network Bosch CAN Network ADAS Control Unit (or ICC) acts as a “Gateway” between the two networks “K Line” Diagnostic circuit Y62 Patrol Ti-L CAN Network example 7 GENERAL INFORMATION - CAN Y62 Patrol New Model Introduction Nissan Australia. January 2013 ITS CAN Network The Around View Monitor module is accessed as an input to the AV Control Module. NOTE: The following modules are linked to the DLC via the “K Line” at DLC pin 7: • Air Bag Module (All) • Headlamp Leveliser Module (Ti-L) • F & R Sonar (Parking) Sensor Module (All) Y62 Patrol Ti-L CAN Network example – continued.. GENERAL INFORMATION - CAN ITS CAN Terminating Resistor Y62 Patrol New Model Introduction Nissan Australia. January 2013 11 Y62 Patrol New Model Introduction Nissan Australia. January 2013 GENERAL INFORMATION DISCONNECTION OF THE BATTERY The following systems will be affected if the battery is disconnected; - HVAC system (Temp setting trimmer / Foot position setting trimmer / Inlet port memory function Refer to ESM section as follows; VENTILATION, HEATER & AIR CONDITIONER > Heater & Air Conditioning Control System > Inspection & Adjustment If the Temperature & Foot position settings have been trimmed to suit customer preferences, they will have to be reset. - Auto Drive Positioner System Refer to section 3 of the Owners Manual or the ESM as follows; BODY INTERIOR > Automatic Drive Positioner > Inspection & Adjustment The drivers memory + 2nd drivers memory settings will have to be reset as well as matched to the ignition keys. - Power Window Control System Refer to the section 2 of the Owners Manual or ESM as follows; BODY EXTERIOR, DOORS, ROOF & VEHICLE SECURITY > Power Window Control System > Inspection & Adjustment The Auto Up / Pinch detect function will not operate. The window travel distance will have to be re-learned. - Rear View Monitor Refer to the ESM as follows; DRIVER INFORMATION & MULTIMEDIA > Audio, Visual & Navigation System > Inspection & Adjustment The centre position of the predicted course line will have to be corrected. With the engine idling, turn the steering wheel to the full lock position in both directions. - Automatic Back Door System Refer to the ESM as follows; BODY EXTERIOR, DOORS, ROOF & VEHICLE SECURITY > Door & Door Lock > Inspection & Adjustment The automatic back door system must be initialised. With the door in the fully closed position, operate the door & allow it to open itself WITHOUT interruption. Then operate the door so that it closes itself. References in this Training Manual to the ESM; ESM references in this Training Manual are the “PDF” version of the ESM. 12 Y62 Patrol New Model Introduction Nissan Australia. January 2013 VK56VD ENGINE MECHANICAL General Specifications The Y62 Patrol utilises an all new 5.6L V8 Gasoline Engine with DiG & VVEL See right for the general specifications of the VK56VD engine. Cylinder Arrangement The engine is an 8 cylinder engine. The Cylinders are in a “V” arrangement. Cylinder No. 1 / Bank 1 / Bank 2 - Cylinder No. 1 is located at the front of the engine – on it‟s LEFT. (Passenger side) - Bank 1 is on the PASSENGER side of the vehicle - Bank 2 is on the DRIVERS side of the vehicle The Bank 1 Bank 2 arrangement for Nissan V6 Gasoline engines (VQ & VG series) as well as the 3.0L V6 Diesel Engine (V9X) is the opposite to this. Engine Cover A plastic engine cover is utilised on the Y62. 13 Y62 Patrol New Model Introduction Nissan Australia. January 2013 VK56VD ENGINE MECHANICAL Drive Belt There is only 1 belt on the engine to drive all ancillary components & it is automatically tensioned. Further detail & precautions regarding the components shown right can be found in the ESM as follows; B ENGINE > EM (Engine Mechanical) > PERIODIC MAINTENANCE > DRIVE BELTS L MAINTENANCE > MA (Maintenance) Ensure that the belt is refitted in the same direction as is was prior to removal. It may be advisable to replace the belt every 100,000km‟s WARNING Once the main drive belt has been removed, it must be refitted in the same direction as it came off. Otherwise a noise may develop . Air Cleaner The Air Filter Element is a viscous paper type. It must NOT ever be cleaned with compressed air. Further detail & precautions regarding the components shown right can be found in the ESM as follows; B ENGINE > EM (Engine Mechanical) L MAINTENANCE > MA (Maintenance) Rocker Cover Resin type Rocker covers are utilised. The design is similar to other Nissan Gasoline engines. NOTES: - Take note of the different Ignition Coil lengths. The Short Coils are to be fitted at the rear of the engine. - The Ignition Coils can be easily removed via access to them through the front wheel arches (wheels removed). 14 Y62 Patrol New Model Introduction Nissan Australia. January 2013 VK56VD ENGINE MECHANICAL Intake Manifold The Intake Manifold as shown right is mounted on the inside of the Cylinder Heads. A single Electrically Controlled Throttle (ETC) valve is utilised as is the case with other Nissan Gasoline Engines. NOTE: It is NOT necessary to remove the Intake Manifold to replace the Spark Plugs like it is for the VQ series engines. Further detail & precautions regarding the components shown right can be found in the ESM as follows; B ENGINE > EM (Engine Mechanical) Exhaust Manifold The Exhaust Manifolds are fitted to the outside of each cylinder head. The exhaust gases are directed through a Catalyst which is fitted to each Bank of Cylinders. Further detail & precautions regarding the components shown right can be found in the ESM as follows; B ENGINE > EM (Engine Mechanical) 15 Y62 Patrol New Model Introduction Nissan Australia. January 2013 VK56VD ENGINE MECHANICAL Oil Pan The Oil Pan design is a Cast Alloy type. Take note of the Oil Temperature Sensor. This is discussed in more detail further on in this Training Manual. NOTE: Take special note of the Sump Plug Torque Specification. Further detail & precautions regarding the components shown right can be found in the ESM as follows; B ENGINE > EM (Engine Mechanical) Timing Chains & Gears The Camshafts are driven by a single row timing chain per cylinder bank. The arrangement is very similar to the V9X Diesel Engine fritted to R51 Pathfinder “550” & D40 Navara “550” variants. Further detail & precautions regarding the components shown right can be found in the ESM as follows; B ENGINE > EM (Engine Mechanical) 16 Y62 Patrol New Model Introduction Nissan Australia. January 2013 VK56VD ENGINE MECHANICAL Cylinder Head & Valve Train The design of the Cylinder Head & Valve train is designed to incorporate the VVEL Actuator & Ladder assembly. Further detail & precautions regarding the components shown right can be found in the ESM as follows; B ENGINE > ENGINE MECHANICAL WARNING Do NOT disassemble the VVEL components unnecessarily. Once any of the following components are separated from each other, none of the below can be re-used; - VVEL Control Shaft Position Sensor - VVEL Ladder assembly - Cylinder head. The Cylinder head / VVEL Ladder / VVEL Actuator-Sensors are matched sets. Once a new sensor / actuator / ladder assy. / cylinder head are fitted, the “VVEL CONTROL SHAFT POSITION SENSOR ADJUSTMENT” must be carried out with CONSULT III plus. From the CONSULT III plus “All System DTC”, select the following items; > ENGINE > WORK SUPPORT > VVEL CONTROL SHAFT POSITION SENSOR ADJUSTMENT WARNING - Only do this if all of the above parts have been replaced with new ones! Follow the on screen prompts. Further detail & precautions regarding the components shown right can be found in the ESM as follows; B ENGINE > ENGINE MECHANICAL Or B ENGINE > ENGINE CONTROL > BASIC INSPECTION > INSPECTION AND ADJUSTMENT 17 Y62 Patrol New Model Introduction Nissan Australia. January 2013 VK56VD ENGINE MECHANICAL HP Fuel Pump (Mechanical) The High Pressure Fuel Pump is a mechanical type. The Pump is operated via an eccentric lobe which is in turn driven via the Bank 2 Timing Chain. NOTE: Take note of the components that cannot be re-used: - The Lifter that is in contact with the HP Pump Plunger (only replace Lifter if the HP Pump or Cam Lobe is replaced). Further detail & precautions regarding the components shown right can be found in the ESM as follows; B ENGINE > EM (Engine Mechanical) Fuel Rails & Injectors The VK56VD Engine is a “Direct injection Gasoline” (DiG) engine. Therefore the Fuel is injected directly into the combustion chamber in a very similar manner to Diesel engines. Although not the same, the Fuel Rail & Injector arrangement is very similar to a Common Rail Diesel Engine. NOTE: Take note of the components that cannot be re-used: - The HP Fuel Line that connects to the Fuel Gallery / Junction - The Fuel Rail Supply Gallery / Junction - The Injector Seals. Further detail & precautions regarding the components shown right can be found in the ESM as follows; B ENGINE > EM (Engine Mechanical) 18 Y62 Patrol New Model Introduction Nissan Australia. January 2013 VK56VD ENGINE MECHANICAL Cylinder Block 19 Y62 Patrol New Model Introduction Nissan Australia. January 2013 VK56VD ENGINE LUBRICATION SYSTEM Engine Lubrication System The Engine Lubrication is similar in its design & operation to other Nissan Gasoline Engines. Further detail & precautions regarding the components shown right can be found in the ESM as follows; B ENGINE > LU (Engine Lubrication System) Engine Oil Pump The Engine Oil Pump is similar in design & operation to the VQ range of Nissan Gasoline Engines. The Engine Oil Pump is installed in the lower timing chain cover & it is driven by the crankshaft. The Oil Pump Key is removable. Further detail & precautions regarding the components shown right can be found in the ESM as follows; B ENGINE > LU > PERIODIC MAINTENANCE > ENGINE OIL (Oil Pressure Check Procedure) B ENGINE > LU > REMOVAL AND INSTALLATION (Oil Pump R&R) B ENGINE > EM > REMOVAL AND INSTALLATION (Oil Seal R&R) 20 Y62 Patrol New Model Introduction Nissan Australia. January 2013 VK56VD ENGINE LUBRICATION SYSTEM Engine Oil Filter A conventional “Spin On” type of Oil Filter is located on the front side of the engine. Further detail & precautions regarding the components shown right can be found in the ESM as follows; B ENGINE > LU > PERIODIC MAINTENANCE L MAINTENANCE > MA (Maintenance) Engine Oil Cooler The Engine Oil Cooler is attached to the Front side of the Sump. Engine Coolant circulates through the cooler in the conventional manner. Further detail & precautions regarding the components shown right can be found in the ESM as follows; B ENGINE > LU > REMOVAL AND INSTALLATION 21 Y62 Patrol New Model Introduction Nissan Australia. January 2013 VK56VD ENGINE COOLING SYSTEM Cooling System The Cooling System consists of 1 x engine driven Water Pump as per other Nissan Gasoline Engines. The cooling system is of a typical design. Further detail & precautions regarding the components shown right can be found in the ESM as follows; B ENGINE > CO (Engine Cooling System) L MAINTENANCE > MA (Maintenance) Radiator & Expansion Tank The Radiator is a cross flow type made from an aluminium core which is crimped onto plastic upper & lower tanks. Plastic fan shrouds are attached to the inner side of the radiator in order to assist the main Viscous Fan (engine driven) draw air through the radiator. NOTE: An electrically operated auxiliary cooling fan is not fitted to VK56VD equipped vehicles. Further detail & precautions regarding the components shown right can be found in the ESM as follows; B ENGINE > CO (Engine Cooling System) 22 Y62 Patrol New Model Introduction Nissan Australia. January 2013 VK56VD ENGINE COOLING SYSTEM Thermostat & Coolant Piping Arrangement The picture shown right further details the layout of the Cooling System piping / component location. Further detail & precautions regarding the components shown right can be found in the ESM as follows; B ENGINE > CO (Engine Cooling System) Water Pump The Water Pump is engine driven via the auxiliary drive belt. It is installed into the centre front of the Engine. Further detail & precautions regarding the components shown right can be found in the ESM as follows; B ENGINE > CO (Engine Cooling System) Electric / Viscous Cooling Fan The engine driven Cooling Fan has a viscous coupling & which is electrically operated via a signal from the ECM (via the IPDM E/R). A Fan speed sensor which sends a signal direct to the ECM is incorporated into the hub as well. The Fan is mounted on a pulley which is in turn driven by the auxiliary drive belt. The Cooling Fan is driven separately to the Water Pump. NOTE: An electrically operated auxiliary cooling fan is not fitted to VK56VD equipped vehicles. Further detail & precautions regarding the components shown right can be found in the ESM as follows; B ENGINE > CO (Engine Cooling System) B ENGINE > EC SYSTEM DESCRIPTION B ENGINE > EC DTC/CIRCUIT DIAGNOSIS 23 Y62 Patrol New Model Introduction Nissan Australia. January 2013 VK56VD ENGINE COOLING SYSTEM Cooling System Maintenance When the Coolant is to be replaced, please ensure the coolant is completely drained & flushed prior to new coolant being added. Drain in base of Radiator shown right: Further detail & precautions regarding the components shown right can be found in the ESM as follows; B ENGINE > CO (Engine Cooling System) L MAINTENANCE > MA (Maintenance) When re-filling, take note of the point where to bleed any air which is trapped in the system. The Air Relief Plugs in the heater hose on top of engine shown right: Further detail & precautions regarding the components shown right can be found in the ESM as follows; B ENGINE > CO (Engine Cooling System) L MAINTENANCE > MA (Maintenance) 24 Y62 Patrol New Model Introduction Nissan Australia. January 2013 EXHAUST SYSTEM / FUEL TANKS / STARTER MOTOR Exhaust System There are 4 Catalysts in the Exhaust System of the VK56VD Engine. The 1st 2 Catalysts form part of the Exhaust Manifolds in each bank of cylinders. The 2nd two Catalysts are located downstream – underneath the drivers seat & front passenger seat. Further detail & precautions regarding the components shown right can be found in the ESM as follows; B ENGINE > EX (Exhaust System) Main & Sub Fuel Tank System There are 2 Fuel Tanks fitted to the Y62 Patrol. Total fuel carrying capacity is 140Lt. When the tanks are being filled, the Main Tank fills 1st. Once the Main Tank is full, fuel will then begin to flow over into the Sub Tank which is mounted higher up that the Main Tank. Fuel is transferred from the sub Tank to the Main tank via a siphoning arrangement. SPECIAL NOTES: - An electrically operated Fuel Pump is not fitted to the Sub Tank of Y62. There is however a Fuel Level Sender unit fitted. - There is only 1 Fuel Gauge in the instrument cluster. The Main Tank & Sub Tank Fuel Gauges are wired in series. Just as the 2 x sender units in T31 / Z51 are. Further detail & precautions regarding the components shown right can be found in the ESM as follows; B ENGINE > FL (Fuel System) Starter Motor The Starter Motor assembly is mounted on top of the engine, underneath the Intake Manifold assembly. Further detail & precautions regarding the components shown right can be found in the ESM as follows; B ENGINE > STR (Starting System) 25 Y62 Patrol New Model Introduction Nissan Australia. January 2013 Direct injection Gasoline (DiG) Direct Injection Gasoline (DiG) Engine Operation The fuel delivery system on DiG engines is very similar to that on Common Rail Diesel Engines. The Fuel is injected directly into the combustion chamber under High Pressure instead of being injected under lower pressure outside of the combustion chamber. As a result – fuel efficiency & exhaust emissions have significantly improved in comparison to the In-Direct (port injection) fuel injection designs. Apart from the cylinder head design which allows for the Injector to be mounted so that Direct Fuel Injection is possible, the overall engine construction of a DiG Engine vs an in-Direct (conventional) Gasoline Engine is very similar. Piston crown design changes in order to better direct the fuel/air parcel towards the spark plug. DiG advantages over Diesel: • Engine design complexity which in turn reduces engine manufacturing costs. DiG engines are very much the same in terms of design & construction as In-Direct Injection Gasoline engines • Vehicle driveability. Performance of a DiG engine is overall better than a Diesel engine of similar size. Modern diesel engines require a Turbo Charger. The VK56VD engine does not require a Turbo Charger – yet it‟s performance (especially the torque output) is comparable to a large capacity Turbo Diesel Engine • Engine maintenance complexity & costs. Gasoline engines are more cost effective for servicing • Cost effective recovery following accidental filling of wrong fuel incidences. Diesel fuel being accidently added to the Fuel tank of a Gasoline engine will cause minimal damage • Fuel Consumption is comparable to the Fuel Consumption of large capacity Diesel engines which are required to operate complex systems such as DPF & SCR Catalysts (“Ad Blue” systems) • Long term reliability in adverse “real world” conditions. DiG engines will require regular maintenance & good supply of clean fuel. However there will be times when this may not always be possible. Modern diesel engines are unable to cope with any kind of poor serving & poor fuel quality conditions in anyway for any length of time. Although not ideal – a DiG engine will fair better in similar circumstances 26 Y62 Patrol New Model Introduction Nissan Australia. January 2013 Direct injection Gasoline (DiG) Direct injection Gasoline (DIG) Features & Advantages In comparison to In-direct Gasoline engines, the adoption of DiG provides for the following advantages: - Improves anti-knock performance (allows for higher compression ratio) - Improves fuel economy & even cleaner exhaust emissions are achievable - Engine operation is controlled more precisely Fuel is injected from the injector nozzle directly into the combustion chamber which is relatively large. This increased size results in a higher “latent heat of vaporization”, which in turn cools the intake air efficiently. This cooler intake air then allows for better anti knock control. Higher compression ratio‟s & ignition timing strategies with more advance are now possible. Conventional “In-direct” Injection (Graphic courtesy of Bosch) The adoption of DiG enables more accurate control of fuel quantity by injecting atomized high-pressure fuel directly into the combustion chamber. This allows for fuel control to occur after the intake valve has closed. This; together with multiple injections under certain conditions, allows for more engine power output, lower fuel consumption and a further reduction in exhaust emissions. The amount of fuel injected is determined by the ECM. The ECM controls the length of time the injector remains open (injection pulse duration). The amount of fuel injected is a program value stored in the ECM memory. The program value is preset by engine operating conditions. These conditions are determined by input signals from the crankshaft position sensor, camshaft position sensor, mass air flow sensor and the fuel rail pressure sensor. (Engine speed, intake air quantity and fuel rail pressure). DiG (Graphic courtesy of Bosch) Underside of VK56VD Cylinder Head 27 Y62 Patrol New Model Introduction Nissan Australia. January 2013 Direct injection Gasoline (DiG) Graphics courtesy of Bosch The Merits of Intake Air Cooling The DiG fuel injectors inject fuel directly into the combustion chamber. The injectors are located directly beneath the intake valves. The intake ports transfer air only. Because the air intake ports are not used to mix the fuel and air, air flow efficiency increases. The control of the fuel injection event is very precise resulting in better combustion efficiency and fuel consumption at all throttle openings. At times, multiple fuel injections per cycle are employed. A higher compression ratio on DiG engines is possible due to the cooling effect as the injected fuel vaporizes in the combustion chamber rather than sitting in the intake manifold. This cooling effect reduces the intake charge temperature, thus reducing the chances of spark knock. DiG fuel injectors have been developed to withstand the greater heat and pressure inside the combustion chamber, utilizing multiple outlets for precise fuel injection control – both spray quality and direction. The increased combustion efficiency and control helps reduce exhaust gas emissions, particularly during cold engine starts. Increased Power & Torque, Improved Fuel Efficiency: - Volumetric efficiency is greatly improved as the intake system is used to carry AIR ONLY. No air is displaced by fuel during the intake process. This improves engine response, thereby producing more power under rapid acceleration and high engine loads. - A DiG engine is designed to operate safely with a higher compression ratio. A much leaner mixture can be used without the occurrence of engine knock (detonation). Even though a higher compression ratio can be used, ignition timing can be set at a more advanced setting, providing greater torque. - The most common mode of operation is Homogeneous, where a stoichiometric (14.7:1) mixture is utilised. During a cold start (and warm up period), the A/F mixture can be set lean (and with delayed injection) to help the catalyst build up temperature much faster, improving cold running emissions. 28 Y62 Patrol New Model Introduction Nissan Australia. January 2013 Direct injection Gasoline (DiG) Bosch's illustration of spark-ignition-engine with DiG 1. Homogeneous Fuel Injection Homogeneous Fuel Injection is where the Air & Fuel is completely blended as it ideally should be in any Gasoline Engine. This injection mode is the most commonly used injection mode in Nissan DiG engines (once engine has warmed up a little). The Homogeneous Air & Fuel blend is the same as what is achieved in an In-direct injected engine. - The injection timing occurs similarly to that of in-direct injected engines during the intake stroke. - The “latent heat of vaporization” characteristics of the fuel help cool down the intake air thus improving the quality of the Air / Fuel mixture helping to minimize the occurrence of engine knock - To increase power during hard acceleration, the system performs two injections (during the latter part of the intake stroke and compression stroke) where the optimum amount of fuel is injected thereby reducing fuel consumption. 2. Stratified Fuel Injection The ultimate aim of engine designers is to run an engine on minimal Fuel & to have a minimal output of exhaust emissions. The Stratified Fuel Injection strategy is utilised on Nissan DiG engines for cold starting & cold idling conditions. On a conventional engine, the cold start up & idling period is a time of high fuel consumption (engine running very rich). An engine with DiG can employ a strategy where the fuel needs of a cold engine can be met, yet the overall fuel consumption is minimal & exhaust emissions are greatly improved. To be more specific, when the engine is running in the Stratified mode, a small parcel of Fuel & Air swirls around the area of the spark plug. The remaining area of the combustion chamber (away from the spark plug) contains mostly air & very little fuel. Putting it simply – it‟s a clever way of making the engine run fairly lean when it is cold. End result is less HC emission & improved cold running fuel consumption is reduced. The Stratified mode will only occur for the 1st ~30 seconds of cold engine running. Stratified combustion is active under the following conditions: - The engine coolant temperature is 10°C - 40°C (50F - 104°F) - The system employs a single injection strategy up to 1,000 rpm (30 - 40 degrees before TDC, a rich airfuel mixture is the result) - A double injection occurs above 1,000 rpm. The injection timings are approximately 120 degrees and again at 30 - 40 degrees before TDC. - Stratified combustion is employed for 15 ~ 30 seconds after the engine starts 29 Y62 Patrol New Model Introduction Nissan Australia. January 2013 Direct injection Gasoline (DiG) DiG Engine Design For the most part, the Engine design between DiG & conventional (in-direct injection) engines is very much the same. The Cylinder Head is modified to cater for the Fuel Injector which protrudes directly into the Combustion Chamber. The Piston design is slightly different. The top is designed to encourage a swirling effect when the Fuel is injected into the combustion chamber under high pressure. The Intake Ports are slightly larger as they do not have to increase the air velocity to assist with fuel atomisation outside the cylinder. Nissan DiG Combustion Chamber High Pressure Fuel Pump & Fuel Rail The HP Fuel Pump, Fuel Rail & Fuel Injector arrangement is very similar to those found on Common Rail Diesel engines. The most significant difference between CRD & DiG is the Fuel Pressures involved. CRD can operate up to a maximum of 2000 BAR. DiG will only operate up to maximum of 150 BAR. Notably, it is far easier to atomise Petrol than it is to atomise Diesel fuel. Hence diesels operating at higher Fuel pressures in comparison to Petrol engines. HP Fuel Pump Suction Control Valve The ECM switches the Solenoid ON & OFF which in turn controls the amount of Fuel entering the Fuel Rail (Fuel Rail Pressure) NOTE: The SCV solenoid does not operate in the same way as it does on the Denso CRD system. The SCV on the CRD system has a variable current applied to it. The SCV on the DiG engine is simply switched “ON & OFF” See over page for more details about the operation of the HP Fuel Pump. 30 VK56VD HP Fuel Pump, Rail & Injector arrangement Y62 Patrol New Model Introduction Nissan Australia. January 2013 Direct injection Gasoline (DiG) 31 Y62 Patrol New Model Introduction Nissan Australia. January 2013 Direct injection Gasoline (DiG) Low Pressure Fuel System (Fuel Supply from the Fuel Tank) Fuel is pumped out of the Fuel Tank up to the engine driven High Pressure Fuel Pump. The Low Pressure Fuel System construction & operation is basically the same as the Fuel system of Nissan conventional Gasoline Engines apart from the following differences: - Fuel Pressure is variable & operates up 450KPa. (Conventional systems operate at a constant 350KPa) - Fuel Pump operation is via a Fuel Pump Control Module (FPCM). This allows for the variable control of the Electric Fuel Pump (variable Fuel Pressure). The conventional engine Fuel System has a fixed power supply which drives the Fuel Pump. (Fuel Pump Relay) - The ECM monitors the Low Fuel System Pressure & the Level of Fuel in the Fuel Tank. DTC‟s for running out of Fuel can be logged. DiG Engine Safety Precautions High Injector Operating Voltage: Care should be taken when working around the DiG Wiring whilst the engine is running. Voltage peaks of up to 70V can occur on DiG engines. High Fuel Pressures: Care must also taken when loosening the Fuel Pipes on a DiG Engine. Always utilise the CONSULT III plus to determine if there is any residual Fuel Pressure in the rails prior to loosening the Fuel Pipes. If this is not possible, then the engine must rest for 1 hour with the battery disconnected prior to loosening the Fuel pipes HP Fuel Pipes: Fuel System components on the HP side of the Fuel system (between the HP Fuel Pump & Fuel Rails) must never be re-used Never Re-use after every disassembly 32 Y62 Patrol New Model Introduction Nissan Australia. January 2013 Direct injection Gasoline (DiG) HP Fuel System Servicing Seal Replacements: Take careful note of the O-Ring seals & spacers etc. When re-installing the new HP Fuel System parts. Never Re-use after every disassembly Also ensure that all seals have engine oil applied to them prior to re-assembly. 33 Y62 Patrol New Model Introduction Nissan Australia. January 2013 Direct injection Gasoline (DiG) HP Fuel System Servicing SST KV10119600 Injector Remover: This is designed to facilitate the removal of the Fuel Injectors from the cylinder head. SST KV101197S0 Injector Seal Drift Set: This is a 3 piece set which is designed to facilitate the installation of new Teflon Injector seals. 34 Y62 Patrol New Model Introduction Nissan Australia. January 2013 Variable Valve Event & Lift (VVEL) VVEL is a technology which is unique to Nissan. The system is a combination of Variable Valve Timing Control (“Event”) as well as a Variable Valve Lift. Using VVEL reduces CO2 and other emissions, further improves fuel economy as well as improving power and response at higher engine speeds. VVEL Benefits - Reduces pumping losses - Improves throttle response - Optimizes fuel economy - Higher Output Low engine speed range The VVEL system suppresses the return of air to the intake manifold by changing the intake valve timing. Optimization of the intake valve closing timing and speed improves the engine torque. High engine speed range Increasing intake valve opening time contributes to an increase of the amount of intake air drawn into the combustion chambers, thus increasing torque. 35 Y62 Patrol New Model Introduction Nissan Australia. January 2013 Variable Valve Event & Lift (VVEL) 1. Variable Valve Event (Timing) All current model Nissan gasoline engines employ a Continuously Variable Valve Timing Control system. On the VVEL equipped engines, this operates in the same way as it does on non VVEL engines. This applies to the intake camshafts only. Continuously Variable Valve Timing Control 2. Variable Valve Lift In a conventional engine in the “induction” phase of the combustion process, the throttle butterfly opens to allow air into the induction pipe leading to the cylinder. The intake valve then opens to allow a quantity of air into the combustion chamber. The amount that the intake valve opens or “lifts” is fixed, irrespective of whether you‟re in city traffic or accelerating under full throttle to overtake. This can mean that under partial throttle in town driving, the mix of fuel and air is too rich, and there will be unburned, wasted fuel. Under full throttle acceleration, there will not be enough air and therefore power will not be optimised. VVEL can continually change the lift of the valve and therefore the quantity of air entering the combustion chamber. So, at partial throttle – like stop-go traffic city traffic, it will make a small lift – like taking regular breaths as you sit quietly for example. This means that a more precise fuel / air mix can be achieved with less quantities of both – reducing fuel consumption. At full throttle, the valve lift can be greater, inducting a larger quantity of air into the combustion chamber. This is similar to a runner taking larger breaths. Variable Valve Lift 36 Y62 Patrol New Model Introduction Nissan Australia. January 2013 Variable Valve Event & Lift (VVEL) VVEL Throttle Control Under certain conditions (usually cruising) VVEL does not use a throttle butterfly to allow air into the combustion chamber – instead, because it is so precisely controlled, it uses the inlet valve to regulate the air entering the combustion chamber for the ignition phase. With a conventional engine, when the driver depresses the accelerator, the throttle butterfly is opened and the air then has to travel through the induction system before it even reaches the valve. Because the air intake is controlled with the inlet valve on the VVEL engine, the air pressure is available immediately. Slower engine response due to the Intake Air‟s travelling distance to the combustion chamber The resulting benefit is that because the air pressure is available immediately, there is no delay in creating a powerful ignition phase. This is what gives the accelerator such an immediate and powerful feel. Quicker engine response because air is gathered around at the intake valve ready for immediate induction into the combustion chamber 37 Y62 Patrol New Model Introduction Nissan Australia. January 2013 VK56VD ENGINE CONTROL 38 Y62 Patrol New Model Introduction Nissan Australia. January 2013 VK56VD ENGINE CONTROL 39 Y62 Patrol New Model Introduction Nissan Australia. January 2013 VK56VD ENGINE CONTROL Inputs to ECM 1a. Battery Voltage This is an extremely important input to the ECM for engine operation. Ensure that the voltage level remains stable, especially during cranking. A situation maybe possible where there is enough battery voltage for cranking, however there maybe an insufficient level for the ECM to operate properly. 1b. ECM Ground Even though a decent Voltage supply is available to the Engine Control System, if the ECU or major fuel system components do NOT have a decent Ground connection, then correct operation of the Engine System will NOT be possible. Please ensure any Ground connections as shown here are in good condition (Clean & Tight.) 2. Ignition Switch The ECM needs to know if the engine is being cranked, if it is simply ON & of course when it is being turned OFF. 40 Y62 Patrol New Model Introduction Nissan Australia. January 2013 VK56VD ENGINE CONTROL Inputs to ECM 3. Crankshaft Position Sensor (CKPS) The CKPS is located at the RH rear side of the Engine. It is attached to the Engine Block & protrudes through a hole facing the gear teeth (cogs) of the signal plate on the driveplate. The CKPS informs the ECM of the following information; • The position of the crankshaft (is the engine at TDC or elsewhere?) • If the crank is actually moving & if so, how fast. 2 sections of the signal plate does not have “teeth” cut into it. This is to determine the 180-degree TDC point. CAUTION Please ensure that the drive plate is installed in the same position that it was removed from. If it is installed onto the crankshaft in the wrong position (such as 1 bolt hole out) the engine may not run at all, or if it does run, loss of performance will be experienced & various DTC‟s will be logged in relation to IVT / CKPS / CMPS faults etc. 41 Y62 Patrol New Model Introduction Nissan Australia. January 2013 VK56VD ENGINE CONTROL Inputs to ECM 4. Camshaft Position Sensor (CMPS) There are 2 x CMPS‟s. They are located at the front of each cylinder head. It senses the camshaft rotation. The ECM uses this information to identify a particular cylinder's piston position and firing order. When the CKPS circuit becomes inoperative, the CMPS is able to be used as a back-up signal. This provides some control of the engine management system by utilising the timing of cylinder identification signals. 5. Engine Coolant Temperature Sensor (ECTS) The ECTS is used to detect the engine coolant temperature. The temperature sensing unit uses a thermistor which is sensitive to the change in temperature. Electrical resistance of the thermistor decreases in response to the temperature rise. It‟s design & operation is the same as other ECT sensors utilised by the Nissan engine range. 6. Manifold Air Pressure Sensor (MAPS) The MAPS works in the traditional manner. It monitors the level of air pressure in the manifold so that ECM can apply throttle in the appropriate manner for the purpose of vacuum supply when required. 42 Y62 Patrol New Model Introduction Nissan Australia. January 2013 VK56VD ENGINE CONTROL Inputs to ECM 7. Fuel Rail Pressure Sensor (High Pressure System - HP) The Fuel Rail arrangement is very similar to that found on Common Rail Diesel Engines. Given that the engine is in a V arrangement, there are 2 banks of cylinders & therefore 2 Fuel Rails. However there is only 1 Fuel Rail Pressure sensor fitted as the Fuel Pressure is common across the 2 rails. (This is the same as the V9X CRD Engine fitted to D40 / R51 “550” models) Fuel is pumped into the rail via the mechanically driven High Pressure Fuel Pump Fuel Pressure Values: - Fuel Pressure in the Fuel Rails of the Y62 VK56VD engine operates up to a max. of 15,000KPa (150 BAR). Like it does in CRD engines, the Fuel Pressure will vary dependant on load & other conditions. - Current Nissan Gasoline Engines (K13 HR12, Z51 VQ35 etc.) operate Fuel Pressure in the Fuel Rail at a constant 350 KPa (3.5 BAR). - The R51 / D40 YD25 140Kw CRD operates up to a maximum Fuel Rail Pressure of 2000 BAR. 8. Fuel Supply System Pressure Sensor (Low Pressure System - LP) The LP Fuel system consists of the Electrically operated Fuel Pump assembly in the Fuel Tank. This pump supplies fuel to the mechanically driven HP Fuel Pump for the above described High Pressure Fuel System. Fuel Pressure Values: - The maximum operating Fuel Pressure of the LP fuel system fitted to the Y62 VK56VD engine is 450KPa. (LP Fuel System is between the outlet of the fuel tank mounted Electric Fuel Pump up to the Inlet of the mechanically driven HP Fuel Pump) - The operation of the LP Fuel Pump is controlled via a Fuel Pump Control Module (FPCM). As a result Fuel Pressure in the LP Fuel System will vary 43 Y62 Patrol New Model Introduction Nissan Australia. January 2013 VK56VD ENGINE CONTROL VQ Inputs to ECM 9. Mass Air Flow Sensor (MAFS) The MAFS is placed in the stream of intake air. The ECM controls the temperature of the hot wire to a certain amount. The heat generated by the hot wire is reduced as the intake air flows around it. The more air, the greater the heat loss. Therefore, the electric current supplied to hot wire is changed to maintain the temperature of the hot wire as air flow increases. The ECM detects the air flow by means of this current change. 10. Intake Air Temperature Sensor (IATS) The IATS is built into the MAFS. The temperature sensing unit uses a thermistor which is sensitive to the change in temperature. Electrical resistance of the thermistor decreases in response to the temperature rise. 11. Accelerator Pedal Position Sensor (APPS) The APPS is installed on the upper end of the accelerator pedal assy. The sensor detects the following; - Actual Accelerator Pedal Position - If the pedal is actually moving (being pushed by the driver or not) and if it is moving, the rate of movement (rapid movement or gentle / slow movement). The ECM controls the throttle control motor based on these signals. Idle position of the accelerator pedal is determined by the ECM receiving the pre-learned signal from the APPS. The ECM uses this signal for idle control & fuel cut. 12. Throttle (valve) Position Sensor (TPS) The TPS responds to the throttle valve movement. It has two sensors. These sensors are potentiometers which transform the throttle valve position into an output voltage signal and sends the voltage signal to the ECM. The TPS detects the opening and closing speed of the throttle valve as well as the throttle valve position and sends the voltage signals to the ECM. The ECM judges the current opening angle of the throttle valve from these signals and controls the throttle control motor to set the throttle valve opening angle response to the requested driving condition. (Determined from the Accelerator Pedal Position Sensor - APPS). 44 MAFS & IATS Combined Y62 Patrol New Model Introduction Nissan Australia. January 2013 VK56VD ENGINE CONTROL VQ Inputs to ECM 13. VVEL Control Unit The VVEL C/U drives the actuator motors directly. It also feeds back to the ECM via an individual CAN the movement / position of the VVEL control shaft. The ECM directs driver command signals to the VVEL Control Unit via the same individual CAN. NOTE: - The above mentioned CAN is NOT part of the vehicles CAN. The VVEL Control unit does NOT directly communicate with CONSULT III. - Power from the battery is supplied to the VVEL C/U via a 50A fusible link which is located adjacent to the battery & VVEL C/U. 14. VVEL Control Shaft Position Sensor The VVEL CSPS detects the movement & actual position of the VVEL control shaft. This signal is fed back to the VVEL C/U. The VVEL C/U needs to know if the control shaft is moving or not. If it has moved the C/U needs to know the actual position of the shaft. In turn the C/U knows the actual opening of the inlet valves. WARNING Do NOT disassemble the VVEL components unnecessarily. Once any of the following components are separated from each other, none of the below can be re-used; - VVEL Control Shaft Position Sensor - VVEL Ladder assembly - Cylinder head Refer back to the “ENGINE MECHANICAL” section of this document for more details & precautions. Further detail & precautions regarding the components shown right can be found in the ESM as follows; B ENGINE > ENGINE MECHANICAL Or B ENGINE > ENGINE CONTROL > BASIC INSPECTION > INSPECTION AND ADJUSTMENT 45 Y62 Patrol New Model Introduction Nissan Australia. January 2013 VK56VD ENGINE CONTROL Inputs to ECM 15. Vehicle Speed Signal The ECM receives vehicle speed sensor signal via CAN communication line. The source of the signal originates from the ABS / VDC system wheel speed sensors. The ECM primarily uses this signal for ASCD control (Cruise Control). NOTE: If a Vehicle speed signal is required for the fitment of accessories such as a speed alarm etc., a VSS output can be sourced from the METER to the Power Steering Control Unit (if fitted). 16. Park Neutral Position Switch (PNP) When the gear position is in P or N, Park / Neutral position is ON. ECM detects the position because the continuity of the line (the ON signal) exists. The PNP switch is internally located & it forms part of the valve body assembly. 46 Y62 Patrol New Model Introduction Nissan Australia. January 2013 VK56VD ENGINE CONTROL Inputs to ECM 17. Stop Lamp Switch (Normally open) The stop lamp switch is installed to the brake pedal bracket. The switch senses brake pedal position and sends an ON-OFF signal to the ECM. This signal is mainly used by the ECM to decrease the engine speed when the vehicle is driving (moving). The switch reverts to a closed position when the pedal is pressed. It supplies power to the Stop Lamps as well as a signal to the ECM. For CVT / AT models, the switch has a second set of contacts which operate in the same manner. This secondary switch is for the transmission lever Shift Lock function It is found on the Brake Pedal bracket, adjacent to the ASCD Brake Switch. 18. ASCD Brake (pedal) Switch (Normally closed) When the brake pedal is depressed, ASCD brake switch is turned OFF. (ECM reads ON) The ECM / BCM detects the state of the brake pedal by these 2 SEPARATE inputs. NOTE: The ASCD Brake Switch reverts from a CLOSED position to an OPEN position when the brake pedal is depressed. As a result the ECM receives a 0V signal when the pedal is pressed. The Stop Lamp switch works in the opposite manner. 19. ASCD Steering (wheel) Switches ASCD steering switch has varying values of electrical resistance for each button. The ECM reads the voltage variation of the switch that is pressed and determines which button is operated. The switches are mounted on the steering wheel. NOTE: ASCD = Automatic Speed Control Device. (Cruise Control) 47 1: Stop Lamp Switch 2: ASCD Brake Switch Y62 Patrol New Model Introduction Nissan Australia. January 2013 VK56VD ENGINE CONTROL VQ Inputs to ECM 20. A/C Refrigerant Pressure Sensor (RPS) The RPS is installed on the high pressure pipe between the condenser & the evaporator on the A/C system. The sensor uses an electrostatic volume pressure transducer to convert refrigerant pressure to voltage. (The pressure of the liquid after it has exited the condenser is measured.) The voltage signal is sent to the ECM and it controls the cooling fan system, or disengages the compressor in the event of excessively LOW or HIGH system pressure. Due to the input of this sensor it is possible to have Electric Cooling Fan operation due to high A/C system pressure, yet the engine temperature is cool. Input from this sensor can also assist the ECM to set the most ideal idle speed control for the given conditions. Typically on a hot day, the system pressure is high, therefore the compressor load on the engine is high. The ECM will need to set a higher engine idle speed to cope with the higher load. 21. Power Steering Pressure Sensor (PSP) The PSP Sensor is installed on the power steering highpressure tube and detects a power steering load (system fluid pressure). The sensor is a potentiometer which transforms the power steering load into an output voltage. The voltage signal to the ECM. The ECM controls the Electric Throttle Control actuator (ETC) and adjusts the throttle valve opening angle to increase the engine speed (adjusts idle speed) to compensate for the increased load on the engine. 22. Knock Sensors (KS) The KS‟s are attached directly to the cylinder block. They sense engine knocking (engine ping) using a piezoelectric element. A knocking vibration from the cylinder block is sensed as vibration pressure. This pressure is converted into a voltage signal and sent to the ECM. 48 Y62 Patrol New Model Introduction Nissan Australia. January 2013 VK56VD ENGINE CONTROL VQ Inputs to ECM 23. Engine Oil Temp Sensor (EOTS) The EOTS is used to detect the engine oil temperature. The ECM utilises the signal for protection of the CVTC system. (Continuously Variable valve Timing Control) This is also an important input to the VVEL system. If the Engine Oil Temperature reaches an excessively high level (approximately 140 deg C), the engine will run in a decreased power mode until the temperature stabilises. 24. Transmission Activity. Communication via the CAN network between the ECM & the TCM is constantly taking place. The Transmission output speeds, gear position etc. is shared with the ECM. The Engine‟s activity such as Engine speeds & temperature as well as the drivers commands (Accelerator Pedal activity) is shared with the Transmission. NOTE: The Park / Neutral signal is a separate input, refer to ECM input no. 16 for more detail. 25. VDC & TCS Activity. Communication from the ABS / TCS / VDC Control Unit is sent to the ECM via CAN communication. When the vehicle is un-stabilised due to excessive wheel slip being detected or the vehicle is sliding sideways etc., the ECM assists with re-stabilising the vehicle by control of the throttle valve (ETC) in order to reduce engine power output. NOTE: VDC = Vehicle Dynamic Control 49 Y62 Patrol New Model Introduction Nissan Australia. January 2013 VK56VD ENGINE CONTROL VQ Inputs to ECM 26. Air Conditioner Request. A request for Air Conditioner operation is sent from the A/C Control Unit to the ECM via CAN. The ECM looks at various inputs of it‟s own to determine if it is OK to operate the compressor. (E.G; Eng speed, eng temp, eng loads etc as well as A/C system pressure etc.). If the ECM allows compressor operation, a signal is sent via CAN to the IPDM E/R to operate the A/C compressor relay (located within the IPDM E/R). 27. Electrical Loads. Whenever any electrical loads are switched on, a signal is sent to the ECM (typically via CAN). The ECM will then set a suitable idle speed via control of the ETC to cope with the additional load placed on the engine. 28 Battery Current Sensor The Battery Current Sensor is installed to the battery cable at the negative terminal. The sensor measures the charging / discharging current of the battery. 29. Battery Temperature Sensor The Battery Temperature Sensor is integrated in the battery current sensor. The sensor measures ambient temperature around the battery. The electrical resistance of the thermistor decreases as temperature increases. 50 Y62 Patrol New Model Introduction Nissan Australia. January 2013 VK56VD ENGINE CONTROL ECM INPUTS 30. Cooling Fan Speed Operation of the Cooling Fan Viscous Coupling is controlled by the ECM. The ECM sends an Increase or Decrease request for fan speed to IPDM E/R via the CAN Communication Network. The IPDM E/R will then run the fan controller accordingly. The Cooling Fan Coupling provides a fan speed feedback signal directly to the ECM. Cooling Fan Coupling wiring connector 31. Fuel Tank Sender Unit The Fuel Level Sensor is mounted on the Fuel Level Sensor unit. The sensor detects the fuel level in the fuel tank and transmits a signal to the combination meter in the conventional manner. The combination meter sends the fuel level sensor signal to the ECM via the CAN communication line. It consists of two parts, one is mechanical float and the other is variable resistor. Fuel level sensor output voltage changes depending on the movement of the fuel mechanical float. 51 Y62 Patrol New Model Introduction Nissan Australia. January 2013 VK56VD ENGINE CONTROL VQ Inputs to ECM 32. Oxygen Content in Exhaust Gases. Like all VQ engines (since the A33) there are 4 x sensors that monitor the Oxygen content in the Exhaust Gases. Ever since VQ35 in Z50 / 06MY-Z33, VQ40 in R51 / D40, there has been a new type of sensor utilised. The Air Fuel Ratio sensor or it is other wise known as the Wide Band type O2 sensor. In the case of these models it is a 6 wire sensor & the voltage output if the engine is running a 14.7;1 A/F ratio is 1.5V For Z51 & J32, as well as Z33 VQ35-HR, VQ37-VHR & T31 QR25, the sensors are a 4 wire type & the voltage output if the engine is running a 14.7;1 A/F ratio is 2.1 ~ 2.2V. Prior to Catalyst – Air Fuel Ratio Sensor. This is a far more accurate sensor for measuring Oxygen content in the Exhaust gas. The A/F Ratio Sensor body appearance looks similar to a Zirconia O2 sensor; however it works in a very different manner to a typical HO2S. The sensor is capable of very precise measurement not only within the ideal A/F ratio range, but also in either the lean or rich range. Basic operation of the sensor involves the flow of electrical current through an element within the sensor. The amount of Oxygen in the exhaust gases change the resistance of the element. Therefore the ECM will have to increase current output in order to maintain a set voltage. The basic principle of operation is similar to a Mass Air Flow Sensor. A typical voltage output provided the engine is functioning correctly is approximately 1.4V. After Catalyst – Heated Oxygen Sensors. A Conventional Oxygen Sensor is utilised to monitor Exhaust gases after the Catalyst. Under normal conditions the Heated Oxygen Sensor 2 is not used for engine control operation. If the Three Way Catalyst (TWC) is malfunctioning the signal from the O2 sensor will alert the ECM of the TWC problem. A DTC will be logged. NOTE: The sensor does NOT switch from rich to lean as it would in a conventional engine when it‟s installed prior to the catalyst. 52 AIR FUEL RATIO SENSOR 5 Wire A/F Ratio Sensor = ~1.5V for 14.7:1 HEATED OXYGEN SENSOR Y62 Patrol New Model Introduction Nissan Australia. January 2013 VK56VD ENGINE CONTROL VK56VD Measurement of Oxygen Content in Exhaust Gases THE EXHAUST SYSTEM MUST ALWAYS BE PERFECTLY SEALED! (NO LEAKS) OTHERWISE THE O2 SENSORS WILL DETECT O2 & THE ECM WILL ASSUME THAT THE ENGINE IS RUNNING LEAN. IN TURN THIS WILL DAMAGE THE CATALYSTS! 53 Y62 Patrol New Model Introduction Nissan Australia. January 2013 VK56VD ENGINE CONTROL Outputs from ECM 1. Fuel Injector The fuel injector is a small & precise solenoid valve. When the ECM supplies a ground to the injector circuit, the coil in the injector is energized. The energized coil pulls a ball valve back and allows fuel to flow through the injector into the intake manifold port, directly above the inlet valves. The amount of fuel injected depends upon the injection pulse duration. Pulse duration is the length of time the injector remains open. The ECM controls the injection pulse duration based on engine fuel needs. The Fuse for the Injectors is located within the IPDM E/R. The Ground is the main ECM ground . 2. Ignition Coil & Power Transistor The ignition signal from the ECM is sent to and amplified by the power transistor. The power transistor turns ON and OFF the ignition coil primary circuit. This ON/OFF operation induces the necessary high voltage in the coil secondary circuit. The Fuse for the Ignition Coils is the 20A main fuse for the ECM which is located within the IPDM E/R. The Ignition Coil Ground connection is located typically on the front of the engine. 54 Y62 Patrol New Model Introduction Nissan Australia. January 2013 VK56VD ENGINE CONTROL Outputs from ECM 3. Electric Throttle Actuator Electric throttle control actuator consists of throttle control motor & throttle position sensor (TPS). The throttle control motor is operated by the ECM and it opens and closes the throttle valve. The throttle position sensor detects the throttle valve position and the opening and closing speed of the throttle valve and sends the voltage signal to the ECM. The ECM judges the current opening angle of the throttle valve from these signals and the ECM controls the throttle control motor to make the throttle valve opening angle properly in response to driving condition. The Fuse & Relay for the ETC is located within the IPDM E/R. The Ground is the main ECM ground . 4. Fuel Pump Control Module (FPCM) The Fuel Pump Control Module (FPCM) takes place of a conventional Fuel Pump Relay. The FPCM is signaled by the ECM to control the volume of Fuel output by the Fuel Pump which is mounted inside the Fuel Tank. The FPCM regulates the voltage to the Fuel Pump in 3 stages: Low / Mid / High (depending on driving conditions) 55 2 x ETC units fitted to VQ35-HR & VQ37-VHR Y62 Patrol New Model Introduction Nissan Australia. January 2013 VK56VD ENGINE CONTROL Outputs from ECM 5. HP Fuel Pump The mechanically driven HP Fuel Pump is installed at the front of the engine (Bank 2) and it is activated by a Cam which is driven by the Timing Chain. The ECM controls the HP Fuel Pump Control Solenoid valve built into the HP Fuel Pump and adjusts the amount of discharge by changing the suction timing of fuel from the low pressure fuel system. NOTE: The SCV solenoid does not operate in the same way as it does on the Denso CRD system. The SCV on the CRD system has a variable current applied to it. The SCV on the DiG engine is simply switched “ON & OFF” 6. Intake Valve Timing (IVT) Control Solenoid Valve The ECM receives signals such as crankshaft position, camshaft position, engine speed and engine coolant temperature. The ECM then sends ON/OFF pulse duty signals to the intake valve timing control solenoid valve depending on the driving status. This makes it possible to control the shut / open timing of the intake valve to increase engine torque in low / mid speed range and output in high-speed range. There is 2 x IVT Control Solenoid Valves (1 per bank of cylinders) & they are located at the front of each rocker cover. SPECIAL NOTE: If the wrong type of Engine Oil is used or the Engine Oil is LONG OVERDUE for changing, this mechanism can jam in the one position & malfunction. Typically a DTC in relation to a fault with the CMPS / CKPS / IVT maybe logged. Ensure engines with such systems installed on them are PROPERLY SERVICED WITH THE CORRECT ENGINE OILS. 56 Y62 Patrol New Model Introduction Nissan Australia. January 2013 VK56VD ENGINE CONTROL Outputs from ECM 7. VVEL Control Unit The VVEL C/U drives the actuator motors directly. The VVEL C/U feeds back to the ECM via an individual CAN the movement / position of the VVEL control shaft. The ECM directs driver command signals to the VVEL C/U via the same individual CAN. NOTE: The above mentioned CAN is NOT part of the vehicles CAN. The VVEL Control unit does NOT directly communicate with CONSULT III plus. 8. VVEL Control Actuator The VVEL Control Shaft Actuator is connected directly to the VVEL control shaft. The Actuator Shaft rotates the cams connected to each inlet valve. WARNING Do NOT disassemble the VVEL components unnecessarily. Once any of the following components are separated from each other, none of the below can be re-used; - VVEL Control Shaft Position Sensor - VVEL Ladder assembly - Cylinder head Refer back to the “ENGINE MECHANICAL” section of this document for more details & precautions. Further detail & precautions regarding the components shown right can be found in the ESM as follows; B ENGINE > ENGINE MECHANICAL Or B ENGINE > ENGINE CONTROL > BASIC INSPECTION > INSPECTION AND ADJUSTMENT 57 Y62 Patrol New Model Introduction Nissan Australia. January 2013 VK56VD ENGINE CONTROL Outputs from ECM 9. Air Conditioner Control The ECM has the final control over the A/C compressor operation (Compressor relay). Air Conditioning is typically required due to a driver request coming from the A/C Amplifier / Control Panel on the dash via CAN. If conditions such as a demand for rapid acceleration, excessive engine temperature, excessive A/C system pressure or lack of A/C system pressure (no gas) are not evident, the ECM will send a signal via the CAN to the IPDM E/R to switch ON the A/C relay. The A/C relay is located within the IPDM E/R unit. 10. Air Fuel Ratio Sensor Heater Control The ECM performs ON/OFF duty control of the A/F sensor 1 heater corresponding to the engine operating condition to keep the temperature of A/F sensor element at the specified range. 11. O2 Sensor Heater control The ECM performs ON/OFF control of the heated oxygen sensor heater corresponding to the engine speed, amount of intake air and engine coolant temperature. 58 Y62 Patrol New Model Introduction Nissan Australia. January 2013 VK56VD ENGINE CONTROL Outputs from ECM 12. EVAP Canister Purge Volume Control Solenoid Valve The EVAP canister purge volume control solenoid valve uses a ON/OFF duty to control the flow rate of fuel vapour from the EVAP canister. The EVAP canister purge volume control solenoid valve is operated by ON/OFF pulses from the ECM. (rapidly opened & closed). The longer the ON pulse, (opened for a longer period than closed) the greater the amount of fuel vapour that will flow through the valve. 13. Cooling Fan Controller The Cooling Fan Controller is integral with the Viscous Fan Hub assembly. Following inputs such as A/C operation, A/C refrigerant pressure & engine temperature, the ECM will request the IPDM E/R to operate the Cooling Fan Controller. The IPDM E/R will send a command signal to the Fan Controller to provide the appropriate Cooling Fan speed. 59 Y62 Patrol New Model Introduction Nissan Australia. January 2013 VK56VD ENGINE CONTROL Outputs from ECM 14. Variable Charging System This system improves fuel economy by reducing unnecessary battery charging. The induction type current sensor is installed between the battery negative terminal and the body ground. With the current sensor, ECM can detect whether the current flow direction is charging or discharging. The alternator generation voltage is controlled according to this information. When the charging is sufficient, the generation voltage is decreased to 12~13V from the normal regulated voltage, which is approximately 14V. 15. Malfunction Indicator Lamp (MIL, Orange in Colour) & Self Diagnosis If a fault within the Engine System is detected, the ECM will log a Diagnostic Trouble Code (DTC). CONSULT III is required to read these codes. NOTE: There will be many cases where a DTC is logged due to the ECM detecting a fault, yet the MIL will not illuminate. This indicates that the fault is not a serious issue. 16. CRUISE & SET Lamps The CRUISE lamp will illuminate when the Cruise Control Main Switch on the steering wheel is pressed. (If the ignition is ON) Once the necessary conditions are met, the green coloured SET lamp will illuminate when the ASCD is actually functioning. SPECIAL NOTE REGARDING A BLINKING CRUISE or SET LAMP CONDITION: When the ECM detects any of the following conditions, cruise control operation is cancelled and the CRUISE or SET lamp will blink; - If the engine coolant temperature is slightly higher than the normal operating temperature, the CRUISE lamp may blink slowly. (But DTC‟s may not be logged unless the temperature becomes excessive) - If a malfunction with one of the inputs for ASCD control occurs, the CRUISE or SET lamp will blink quickly. DTC‟s will be logged. 60 Y62 Patrol New Model Introduction Nissan Australia. January 2013 VK56VD ENGINE CONTROL APPS / ETC Failsafe 1. Accelerator Pedal Stuck If the Accelerator Pedal was to jam (stuck on a floor mat etc.) the ECM would see see this stuck pedal condition as a request for more engine power, even if the driver does not want an increase in engine power. To counteract the situation, the driver will naturally apply the brake pedal in order to stop the vehicle. Therefore if the following 2 pedal conditions are present at the same time, the ECM will see this as an “emergency” situation. In turn the ECM will IGNORE the input from the Accelerator Pedal & request the ETC to close the throttle valve in the ETC unit. - The Accelerator Pedal is applied (more than 1/3) and - The Brake Pedal is applied (Stop Lamp switch closed, therefore Stop Lamps illuminated) In this case, DTC‟s will not be logged & the Engine MIL will not be illuminated. 2. Short / Fault in Accelerator Pedal Sensor or Wiring The APPS has 2 x sensors in it. If there was a fault with this dual track potentiometer (or associated wiring) in the Accelerator Pedal assembly, the fault would have to be such that the voltage signal output from Sensor no. 1 is exactly double that of the voltage signal out of Sensor no. 2. If these 2 voltage output conditions are not met, the ECM will place the ETC / Engine operation into failsafe mode. In addition to this, if the voltage signal output from Sensor no. 1 reaches 5.0V (the reference voltage supplied by the ECM to the APPS is a total of 5.0V) the ECM will immediately recognise this as a fault & cancel ETC operation. (Even with the pedal pressed to the maximum position, the maximum voltage output from sensor no. 1 will be less than 5.0V, but more than 4.0V) The same condition would be applied if the voltage signal output from Sensor no. 2 reaches / exceeds 2.5V. The 2 x sensors that form the Accelerator Pedal assembly are designed so that sensor 2 outputs exactly ½ the voltage of sensor 1 at any given time – and vice versa. If the slightest discrepancy between the 2 sensors is seen by the ECM, ETC operation is cancelled. The appropriate DTC‟s will be logged in the ECM & the Engine MIL is illuminated. 61 The above screen shot from CONSULT III shows the ECM‟s response to the ON signal from the Brake Pedal. The Throttle Valve is partially closed with Brake ON. Y62 Patrol New Model Introduction Nissan Australia. January 2013 VK56VD ENGINE CONTROL ASCD / Brake Pedal Failsafe Vehicles fitted with ASCD (Cruise Control) have mechanisms in place to avoid un-intended acceleration. Therefore ASCD is cancelled under the following situations; - Application of the Brake Pedal. This will simultaneously operate 2 different switches; - The Stop Lamp Switch becomes closed circuit. Power is fed to the Brake Lights & a 12V signal is fed to the ECM as well. - The ASCD Brake Switch becomes open circuit. As a result the permanent 12V signal sent to the ECM is interrupted. (0V) - If both of the above mentioned switches send 12V to the ECM at the same time, or they both send 0V to the ECM at the same time, the ASCD will not operate. (a Stop Lamp related DTC may eventually be logged in the ECM) - The Cancel button on the steering wheel is pressed - More than 2 switches on the ASCD steering switch assembly are pressed at the same time (Set speed will also be cleared) - Clutch pedal is depressed or gear position is changed to neutral position. (M/T models) - Selector lever is the N, P or R position (A/T models) - Vehicle speed decreased to 13 km/h (8 MPH) lower than the set speed (such as climbing a steep hill etc.) - TCS / VDC system is operated - Ignition switch is turned to the OFF position. SPECIAL NOTE REGARDING A BLINKING GREEN COLOURED CRUISE or SET LAMP CONDITION: When the ECM detects any of the following conditions, cruise control operation is cancelled and the green coloured CRUISE or SET lamp will blink; - If the Engine coolant temperature is slightly higher than the normal operating temperature, the GREEN CRUISE lamp may blink slowly. (But DTC‟s may not be logged unless the temperature becomes excessive) - If a malfunction with one of the inputs for ASCD control occurs, the CRUISE or SET lamp will blink quickly. DTC‟s will be logged. 62 1: Stop Lamp Switch 2: ASCD Brake Switch Y62 Patrol New Model Introduction Nissan Australia. January 2013 AUTOMATIC TRANSMISSION 7sp E-A/T – RE7R01B An all new 7 speed Electronically controlled Automatic Transmission produced by JATCO has been applied to the new Y62. This transmission is the same as the unit fitted to V9X equipped R51 & D40. Also, it is very similar to the RE7R01A transmission fitted to the current model Z34 370Z. SPECIAL PRECAUTIONS • ONLY USE GENUINE NISSAN MATIC S TRANSMISSION FLUID IN THIS TRANSMISSION. • Do not use any other fluid in this transmission such as NISSAN MATIC J or other Non Nissan brand of fluids. • Do not Blend or mix Matic S fluid with any other Automatic Transmission Fluid (Including Matic J). • Do not reuse transmission fluid once it has been drained. • The Fluid level inspection as well as the replacement of the fluid will require a special process to be followed. Strictly adhere to the process outlined in this Training Manual or the ESM. SPECIAL NOTE REGARDING ANY TRANSMISSION REPAIRS: • Do not attempt to disassemble the Transmission unless the directed to do so by TechLine. If the ESM directs you to replace the transmission – CONTACT TECHLINE 1ST. 63 Y62 Patrol New Model Introduction Nissan Australia. January 2013 AUTOMATIC TRANSMISSION Adaptive Shift Control (ASC) The Transmission is able to automatically select the appropriate shift pattern suitable for the various situations (such as road environment and driving style) so as to allow the vehicle to be driven efficiently and smoothly. When driving up / down a slope The ASC judges the degree of slope (up/down) according to engine torque data transmitted from the ECM and vehicle speed. Fixing at 4GR, 5GR or 6GR on an up-slope prevents shift hunting and controls the vehicle to gain optimum driving force. On a down-slope, shift-down to 4GR, 5GR or 6GR occurs automatically so that optimum engine braking is utilised. When driving on a curve TCM receives the side G sensor signal from the ABS actuator and electric unit (control unit). It locks to 4GR, 5GR or 6GR position in moderate cornering or to 3GR position in sharp cornering based on this signal. This prevents any up shift and kick-down during cornering, maintaining smooth vehicle travel. „M‟ Mode From the gear lever position described above (moved to the left in „Ds‟ mode) a simple movement forward „+‟ or movement rearward „-‟ will change the Transmission into „M‟ Mode (Manual). The transmission will remain in the one gear & up-shifts / downshifts will only occur when the gear lever is moved towards the „+‟ or the „-‟. The TCM receives the manual mode signal, non-manual mode signal, manual shift up signal and Manual shift down signal from combination meter via CAN. The TCM controls the shift pattern of the manual mode and then shifts the A/T by operating each solenoid valve according to the shift operation of the driver. 64 Y62 Patrol New Model Introduction Nissan Australia. January 2013 AUTOMATIC TRANSMISSION 65 Y62 Patrol New Model Introduction Nissan Australia. January 2013 AUTOMATIC TRANSMISSION RE7R01B Component Location 66 Y62 Patrol New Model Introduction Nissan Australia. January 2013 AUTOMATIC TRANSMISSION RE7R01B 67 Y62 Patrol New Model Introduction Nissan Australia. January 2013 AUTOMATIC TRANSMISSION A/T Fluid Level Check 1. Check for A/T fluid leakage. Ensure that there are no leaks & if a leak is detected – confirm what fluid it is that appears to be leaking. 2. Park vehicle on level surface and set parking brake. 3. Start engine. 4. Move selector lever through each gear position & then return the gear lever to the “P” position. 5. Ensure that the A/T fluid temperature is exactly 40°C. • Connect CONSULT-III • Select “TRANSMISSION” • Select “DATA MONITOR”. • Read out the value of “ATF TEMP SE 1”. • A/T fluid temperature reaches 30°C in approximately five minutes after idling and 40°C after approximately ten minutes of idling. The level checking operation must be performed quickly. Engine must be idling in P whilst checking fluid level 6. Remove Fill plug. (Plug towards front of vehicle) 7. Check A/T fluid level as follows; • If ATF overflows from the drain hole, adjust A/T fluid level to the correct level by allowing the fluid to continue draining until the fluid is slowly dripping. • If ATF does not overflow from the drain hole & fluid is not consistently dripping, more fluid will need to be added. Refer to the Changing Fluid instructions for information on how to add fluid. A: SST # 310811EA5A B: Fluid Charging Hose / Pipe WARNING This operation must be carried out with the fluid temp set at 40°C • If the fluid is too COLD at the time – the level will appear to be too LOW. • If the fluid is too HOT at the time – the fluid level will appear to be too HIGH. For additional detail, refer to ESM section; > D TRANSMISSION & DRIVELINE > TM Transmission > BASIC INSPECTION SST # 310811EA5A & 315268E000 (O-ring) 68 Y62 Patrol New Model Introduction Nissan Australia. January 2013 AUTOMATIC TRANSMISSION A/T Fluid Changing 1. Warm up ATF by running the engine & then stop the engine. 2. Remove drain plug & drain fluid & the re-fit drain plug. (Plug towards rear of vehicle. Not shown) 3. Remove Fill plug. (Plug towards front of vehicle) 4. Inject ATF via the fill tube hole located in the transmission pan. 5. Refer to the “Fluid Level Check” (previous page) to ensure that the level is correct. Ensure to warm the transmission up to 40°C. Use CONSULT III to confirm. A: SST # 310811EA5A B: Fluid Charging Hose / Pipe NOTES: • If whole quantity of ATF has been discharged, add 500ml of ATF to total fluid capacity and inject the whole amount via the fill tube in the base of the pan. • Since the ATF in the A/T assembly cannot be fully drained in a single operation, the steps (from 3 to 5) may need to be performed up to 3 times or so. • Replace O-ring of the filler plug with a new one. Apply ATF to O-rings. Replace the drain plug gasket as well. • If the special procedure for Checking the A/T Fluid is not followed then the risk of over filling the transmission can occur. Fluid leakage will occur if the Transmission is overfilled. • It will not be necessary to replace the Transmission Fluid Filter when changing the A/T fluid. The filter is not available as a separate part, it comes complete with the Control Valve (valve body) assembly. • Only use Nissan Matic S Transmission Fluid For additional detail, refer to ESM section; > D TRANSMISSION & DRIVELINE > TM Transmission > BASIC INSPECTION 69 SST # 310811EA5A & 315268E000 (O-ring) Y62 Patrol New Model Introduction Nissan Australia. January 2013 AUTOMATIC TRANSMISSION A/T Fluid Cooling Arrangement The A/T fluid cooler system is unique from other Nissan models. The A/T fluid cooler is an air-cooling type only & it is installed in the front of the radiator and condenser. Also – the fluid passes through a Fluid Warmer device. Engine coolant circulates through this assembly which in turn assist with warning up the A/T fluid at the earliest opportunity. NOTE: AT fluid is not circulated through a cooler in the bottom Radiator tank like other Nissan models. 70 Y62 Patrol New Model Introduction Nissan Australia. January 2013 AUTOMATIC TRANSMISSION 71 Y62 Patrol New Model Introduction Nissan Australia. January 2013 RE7R01B Transmission Trouble Diagnosis Basic Work Flow Chart STEP 1 Check In STEP 2 STEP 2a Verify on the vehicle what the incident is & compare to what is described by the Customer Can‟t Fault it? STEP 3 Are there any Fault Codes (DTC‟s)? STEP 5a STEP 4a Yes No STEP 5b STEP 4b 1. Refer to the *Service Manual; Perform the following; (i) A/T FLUID CHECK (condition, leakage & level.) (ii) STALL TEST (iii) ROAD TEST 1. Refer to the page in section of the *Service Manual that is relevant to the DTC recorded. Follow procedure in order to rectify fault. 2. INFORM TechLine of the Incident. Log a contact & give ALL the information you have about the incident so far... * ESM Reference; > D TRANSMISSION & DRIVELINE > TM Transmission > DTC/CIRCUIT DIAGNOSIS 2. INFORM TechLine of the Incident. Log a contact & give ALL the information you have about the incident so far... * ESM Reference; > D TRANSMISSION & DRIVELINE > TM Transmission > BASIC INSPECTION STEP 6 PRIOR TO COMPLETION OF REPAIR AND HANDING BACK TO THE CUSTOMER 1. Always carry out the below checks as follows; (i) A/T FLUID CHECK (condition, leakage & level.) (ii) CHECK / CLEAN GROUND F7 (iii) STALL TEST (iv) ROAD TEST (v) FINAL DTC CHECK WITH CONSULT III 2. PLEASE UPDATE the TechLine contact 72 Y62 Patrol New Model Introduction Nissan Australia. January 2013 Transmission 3 & 4sp A/T‟s. (RE5R05A) *4x4 Transfers 6sp A/T FWD K11-K12 Micra, All FLUID TYPE Pulsar, All Tiida, T30 X-TRAIL, All Maxima to end 05MY, All Patrol except TB48. 7sp A/T RWD 5sp A/T RWD (RE6F01A) Patrol TB48, 350Z, R51 Pathfinder D40 Navara T31 X-TRAIL Diesel New CVT (RE7R01A/B) Z34 370Z, R51 / D40 (RE0F09A/10A) V9X & 10MY> YD25 Y62 Patrol 06~08MY J31+J32 Maxima Z50+Z51 Murano 4sp A/T FWD T31 X-TRAIL Petrol (RE4F03C) J10 Dualis K13 Micra N17 Almera MATIC D YES NEVER NEVER NEVER MATIC J NEVER YES NEVER NEVER NS-2 NEVER NEVER YES NEVER MATIC S NEVER NEVER NEVER YES * Use Matic D in Part Time / All-mode Transfer units on Y61, D22, D40, R50 & R51. Do NOT use Matic D however in R51 V9X. Only use Gen. Oil KLD22-00001. GL-5 Gear Oil must be used in the Transfer unit attached to the Transaxle unit on “AWD only” type systems fitted to T30, Z50, Z51, T31 & J10. These models do not have a “4Lo” function. The transfer (electric) coupling unit attached to the Rear Final Drive is a sealed unit. 73 Y62 Patrol New Model Introduction Nissan Australia. January 2013 TRANSFER ATX90A An all new Transfer unit has been applied to Y62 variants. This is the same unit that is fitted to R51 Pathfinder Ti 550 (V9X engine) SPECIAL PRECAUTIONS • ONLY USE GENUINE NISSAN TRANSFER OIL (Nissan Part #: KLD22-00001) • Do not use any other fluid or oil in this transmission such as Matic D or other Non Nissan brand of oils / fluids. • Do not reuse the Transfer Oil once it has been drained. • Do not ever replace the Transfer Oil as part of a service. The oil level inspection should be carried out periodically. • If for any reason the Transfer Oil needs to be drained & then replaced, special procedures using CONSULT III plus need to be carried out. • If any major components of the Transfer system need to be replaced (or swapped) etc., special procedures using CONSULT III plus need to be carried out. • Replace all tyres at the same time. Always use tires of the proper size and the same brand / tread pattern. Fitting improper sized and unusually worn tyres applies excessive force to vehicle drive mechanism and can cause longitudinal vibration. SPECIAL NOTE REGARDING ANY TRANSFER REPAIRS: • It is not possible to overhaul the transfer unit. Do not disassemble it. If the ESM directs you to replace the transfer – contact TechLine 1st. 74 Y62 Patrol New Model Introduction Nissan Australia. January 2013 TRANSFER 4WD Shift Switch / 4WD Shift Indicator Operation 4WD Warning Lamp Operation (Orange coloured „4WD‟ light on the instrument cluster) 4WD Warning Buzzer Operation (Sound emits from the Transfer Control Unit which is located under the dash) 75 Y62 Patrol New Model Introduction Nissan Australia. January 2013 TRANSFER 76 Y62 Patrol New Model Introduction Nissan Australia. January 2013 TRANSFER 4WD Mode Selection System The 4WD Mode selection system is an all new feature for Nissan 4x4 vehicles. The system allows the driver to select a vehicle control strategy that better suits the type of driving environments the vehicle is subject to. Regardless of which 4WD position the 4WD Shift Dial is in (Auto, 4H or 4Lo), any of the 4WD Modes can be selected at any time. In basic terms, each of the modes will send a signal to the Engine & ABS Control Units when the corresponding button is pressed. In turn the; - Engine Control Unit will modify the engine torque (via control of the Electric Throttle) for the given condition (torque is reduced in Snow Ice conditions etc.) - ABS C/U will apply the most appropriate TCS / ABLS strategy for any of the given conditions. 77 Y62 Patrol New Model Introduction Nissan Australia. January 2013 TRANSFER 4WD Mode Selection System 78 Y62 Patrol New Model Introduction Nissan Australia. January 2013 TRANSFER 79 Y62 Patrol New Model Introduction Nissan Australia. January 2013 TRANSFER 4WD Transfer Power Flow Diagram 80 Y62 Patrol New Model Introduction Nissan Australia. January 2013 TRANSFER Auto / 4H Operation The Motor / Actuator (9) rotates the Actuator shaft (8) in a clockwise direction. This causes the Shift Fork (7) to move forward & engage the Hi-Lo Sleeve (5) to the Sun Gear (6). This outputs is a normal 1:1 ratio. When the 4WD Switch is in the “AUTO” position, the Motor / Actuator can vary the amount of Clutch (4) pressure via a slight rotation of the Actuator shaft which in turn operates a lever on a “Ball Ramp” arrangement. The action of the Ball Ramp Lever (2) rotating causes 2 aligned V grooves to be un-aligned which in turn causes the ball bearings to ride up out of the groove which in turns pushes the Piston (3) away from the lever. This action forces the clutch plates to compress. The engagement of the Clutch causes the Transfer Sprocket / Chain to apply drive to the Front Wheels. The amount of drive to the front wheels can be varied (clutches allowed slippage) via the partial rotation of the Actuator Shaft > Ball Ramp Lever by the Transfer Control Unit. When the 4WD Switch is in the 4H position, the Ball Ramp Lever (2) is turned to the Maximum position to fully compress the clutch plates 81 Y62 Patrol New Model Introduction Nissan Australia. January 2013 TRANSFER 4Lo Operation The Motor / Actuator (10) rotates the Actuator shaft (9) in an anti-clockwise direction. This causes the Shift Fork (8) to move rear-ward & engage the Hi-Lo Sleeve (4) to the Planetary Carrier Assembly (6). This directs drive from the transmission through the Planetary Gear Set and then directly to the Transfer Sprocket / chain to drive the front wheels. Due to the planetary gear set a Low Range ratio of 2.679:1 is achieved. NOTE: The Clutch assembly is not activated when in 4Lo 82 Y62 Patrol New Model Introduction Nissan Australia. January 2013 TRANSFER Transfer Oil Level Check 1. Check for Oil leakage. Ensure that there are no leaks & if a leak is detected – confirm what fluid it is that appears to be leaking. 2. Park the vehicle on a level surface and set the parking brake. Stop the engine. 3. Remove the fill plug & confirm the oil level as per the diagram shown right. WARNING The Transfer Oil is not to be replaced as part of a normal Only check the Oil Level. Never drain / Replace the service. Oil as part of a Normal Service If the Oil is drained & needs to be replaced, only ever use Genuine Nissan Oil, part #; KLD22-00001. Once new oil has been added, a special procedure using CONSULT III must be carried out. Refer to the ESM for more details; > D – TRANSMISSION & DRIVELINE > DLN Driveline > PERIODIC MAINTENANCE Special Procedures for Component Replacement If any of the following items are replaced (or swapped from another vehicle), special procedures using CONSULT III need to be carried out. - Complete Transfer assembly - Transfer C/U - Transfer Control Actuator (elec .motor) assembly - Transfer Lock Position Sensor - Transfer Rotary Position Sensor - Transfer Oil Procedure Specific instructions are detailed in the ESM. There are up to 6 different procedures that will require carrying out depending on the component that was replaced. > D – TRANSMISSION & DRIVELINE > DLN Driveline > BASIC INSPECTION Section D – DLN of the ESM 83 Y62 Patrol New Model Introduction Nissan Australia. January 2013 TRANSFER Manual Selection of 4Lo (Emergency situations only) If there is an urgent need to select 4Lo at a time when the electrical system has failed, a procedure is outlined in the Owners Manual which instructs on how to select 4Lo manually. Step 1: Via the use of the Torx T40 tool that is supplied with each vehicle, remove the 4 bolts that attached the Transfer Actuator Motor to the Transfer Unit Step 2: Once the actuator assembly has been removed, insert the same T40 tool into the actuator drive & turn the tool in a clockwise direction. Step 3: Once 4Lo has been selected, the vehicle should be able to be driven & freed from it‟s stuck position. - Do not drive the vehicle unnecessarily in 4Lo. - Do not drive the vehicle in sandy, dusty or muddy conditions with the actuator removed. Otherwise dirt etc can enter the transfer case & cause damage. For more details, refer to section 6 of the Owners Manual. Torx T40 tool that is supplied with all vehicles 84 Y62 Patrol New Model Introduction Nissan Australia. January 2013 ATX90A Transfer Trouble Diagnosis Basic Work Flow Chart STEP 1 Check In STEP 2 STEP 2a Verify on the vehicle what the incident is & compare to what is described by the Customer Can‟t Fault it? STEP 3 Are there any Fault Codes (DTC‟s)? STEP 5a STEP 4a Yes No STEP 5b STEP 4b 1. Refer to the *Service Manual; Perform the following; (i) OIL LEVEL CHECK (condition, leakage & level.) (ii) 4WD OPERATION TEST (on dirt / grass / loose surface only) (iii) CHECK POWER & GROUND 1. Refer to the page in section of the *Service Manual that is relevant to the DTC recorded. Follow procedure in order to rectify fault. 2. INFORM TechLine of the Incident. Log a contact & give ALL the information you have about the incident so far... 2. INFORM TechLine of the Incident. Log a contact & give ALL the information you have about the incident so far... * ESM Reference; > D TRANSMISSION & DRIVELINE > DLN Driveline > DTC/CIRCUIT DIAGNOSIS * ESM Reference; > TRANSMISSION & DRIVELINE > DLN Driveline > PERIODIC MAINTENANCE STEP 6 PRIOR TO COMPLETION OF REPAIR AND HANDING BACK TO THE CUSTOMER 1. Always carry out the below checks as follows; (i) OIL LEVEL CHECK (oil condition, leakage & level.) (ii) CHECK POWER & GROUND (iii) 4WD OPERATION TEST / OBSERVE OPERATION OF 4WD SHIFT INDICATOR & WARNING LIGHT (only do this on dirt / grass / loose surface. Never on a hard surface) (iii) CHECK ONCE AGAIN FOR ANY DTC‟s WITH CONSULT III 2. PLEASE UPDATE the TechLine contact 85 Y62 Patrol New Model Introduction Nissan Australia. January 2013 REAR FINAL DRIVE R248 Helical LSD with Electric Diff lock An all new Rear Final Drive has been applied to all Y62 variants. The Final Drive features a “Helical” type LSD & an Electrically operated DIFF LOCK feature has also been applied to all variants. Functionality The rear differential lock (DIFF-LOCK) is designed to transmit engine power to the left and right rear wheels equally. To lock the rear differential gear, reduce the vehicle speed below 7 km/h and turn the 4WD shift switch to the 4H or 4L position. After this, press the DIFF LOCK button which forms part of the 4WD switch assembly. The button is a “momentary contact” type of switch. The orange coloured DIFF-LOCK indicator light on the instrument cluster will blink and then stay on when the differential gear is completely locked. After using the DIFF-LOCK, or during normal driving, push the differential lock mode switch to the “OFF” position. The DIFF-LOCK indicator light will turn off after the differential lock has released itself. NOTES: - When the 4H position is selected, turn off the Vehicle Dynamic Control (VDC) system to activate the rear differential lock mode. Then push the differential lock mode switch to the “ON” position - While DIFF-LOCK is on, the Anti-lock Braking System (ABS) warning light illuminates. This indicates that anti-lock function may not fully operate - The operation of the DIFF-LOCK system will severely limit the steering capability of the vehicle (both rear wheels are locked together & will rotate at exactly the same speed). As a result, this will make turning corners very difficult to achieve - The DIFF LOCK warning buzzer will sound if the DIFF LOCK mode switch is ON & the vehicle speed is 20 km/h or more. 86 Y62 Patrol New Model Introduction Nissan Australia. January 2013 REAR FINAL DRIVE Helical Differential - Functionality When Driving Straight Ahead: The Differential case, pinion gear, and side gear rotate together as a unit. Given that the wheel speed of LH and RH wheels are equal, the traction force transmitted from the drive pinion is transferred directly to LH and RH wheels in the conventional manner. During Differential Operation (Cornering): Differential mechanism operates automatically according to the auto-rotation of the short & long pinion gear when difference of wheel speed is generated between LH and RH wheels during cornering. 87 Y62 Patrol New Model Introduction Nissan Australia. January 2013 REAR FINAL DRIVE Helical Differential - Functionality During Limited Slip Differential Operation: LSD mechanism operates when one-sided wheel spin is generated during cornering or when driving on a slippery surface (snow / mud / etc.). LSD operation is performed according to frictional forces that are generated between the teeth of the pinion gears and the teeth of the pinion gear on the inner perimeter portion of differential case, pinion gear end and differential case inner wall, as well as the side gear end and differential case inner wall. Frictional forces are generated as per the following status according to traction torque: - Status that pinion gear is pressed to differential case according to engagement reaction force. -Status that pinion gear end is pressed to differential case according to axial directional force by helical angle of gear. The generated frictional force slows down the selfrotation of the pinion gear and performs the LSD operation. LSD operation decreases the traction force of the higher rotation side. This in turn increases traction force of lower rotation side. 88 Y62 Patrol New Model Introduction Nissan Australia. January 2013 REAR FINAL DRIVE Y62 Component Location 89 Y62 Patrol New Model Introduction Nissan Australia. January 2013 REAR FINAL DRIVE Trouble Diagnosis Step 1; Confirm the operation of the system via the instruction from section 5 of the Owners Manual (Is the system operating correctly & as it was designed to do so?) Step 2; If it is found there is a fault, connect CONSULT III plus to the vehicle & access DIFF LOCK. - Check for any DTC‟s. If there are any, refer to the ESM as follows; > D TRANSMISSION & DRIVELINE > DLN > REAR FINAL DRIVE > DTC/CIRCUIT DIAGNOSIS More detail & the Diagnosis Procedure for the DTC is located here. - If there are no DTC‟s yet the fault is clearly evident, refer to the ESM as follows; > D TRANSMISSION & DRIVELINE > DLN > REAR FINAL DRIVE > SYMPTOM DIAGNOSIS Various processes are discussed dependant on the fault at hand. Wiring Diagrams Refer to the ESM as follows for a wiring diagram of the TPMS system; > E SUSPENSION > WT > WIRING DIAGRAM Here you will find Power & Ground supplies as well as the appropriate locations of the fuses & ground connections. Access to the DIFF LOCK system with CONSULT III plus Full interaction with the system for setting customer preferences, checking for any system DTC‟s, checking for input & output activity & checking component operation is available with CONSULT III plus. See below a description of each diagnosis mode available; 90 Y62 Patrol New Model Introduction Nissan Australia. January 2013 SUSPENSION Hydraulic Body Motion Control system (HBMC) HBMC is a new suspension control system. The system consists of 4 “shock absorbers” (oil cylinders), 2 accumulators and cross-linked hydraulic pipes. It performs the roles of both the conventional shock absorbers and stabilizer bars. The advantages of this system is to minimise the body roll angle when cornering on normal roads, yet allows for smooth & level ride and ground clearance when driving off-road. HBMC is typically used in Off Road racing vehicles. The system allows them to drive at high speeds over rough terrain. The system is incredibly effective for providing an outstandingly smooth ride & stability. The new Y62 Patrol is the first vehicle in the world that introduces this system to the main stream vehicle market. Unique Features 1. Anti roll / Roll stiffness control system. The roll stiffness is controlled according to the road conditions. The system also achieves both passenger vehicle-like riding comfort and a high level of drivability. 2. Full axle articulation. The system does not employ anti sway bars. Therefore full wheel travel is possible when driving over uneven surfaces / moguls etc. Coil Springs Coil Springs are utilised to support the weight of the vehicle & they provide for the basic ride height of the vehicle. HBMC does not in anyway alter the ride height of the vehicle. The ride height is preset via the use of the Coil Springs. WARNING The HBMC system contains oil which is under HIGH PRESSURE at all times. Extreme care must be taken to avoid injury when working on this system. ALWAYS REFER TO THE ESM PRIOR TO CARRYING OUT ANY WORK ON THE SYSTEM. 91 Y62 Patrol New Model Introduction Nissan Australia. January 2013 SUSPENSION HBMC Operation Mode 1 - On-road cornering When the same side of the vehicle is experiencing the same level of load on the axle, pressure will build on that same side & it is forced towards the accumulator. Therefore, if cornering left, the vehicle body leans over onto the right side of the axle front & rear, as a result, the lean is not possible because the system hydraulically stops the body roll. The same occurs if the vehicle corners to the right (load on the left side). Even sided axle movement (body leaning on same side) will mean that the 2 hydraulic circuits “lock” themselves (minimises body roll) Mode 2 - Off-road Undulations As the vehicle negotiates over un-even surfaces, rocks, moguls etc. the axles are allowed to drop down or raise up due to an exceptionally long wheel travel (axle articulation) design. The oil in the cylinders adjacent to each wheel fills & exits the cylinder at the same time (the cylinder is 2 sided, if one side empties, the other automatically will fill with oil as it is connected to the other circuit). Given that the axles are moving up & down, as long as the rear axle is moving in a different direction to the front axle (Front RH wheel is being forced up / Rear RH wheel is not being forced up or perhaps is dropping down), the system will not pressurise & limit the axles movement. Effectively, this opposing axle movement allows for a place to go for the oil flowing around the circuits. Opposing wheel / axle “up & down” movement allows for the oil to freely move around. (Oil fills & empties the oil chambers located at each wheel. The system does not “lock” itself as described above) 92 Y62 Patrol New Model Introduction Nissan Australia. January 2013 SUSPENSION Component Description 1. Shock Absorbers (Oil Chambers at each wheel) - Changes the hydraulic pressure to the force that controls the roll counterforce and bounce reducing force. 2. Accumulators - Gas filled cylinders that counteract the Body Roll force. The amount of hydraulic oil that charges and discharges to / from the accumulator changes the hydraulic pressure in the system. The system generates the roll reducing force according to the amount of hydraulic oil that charges and discharges to/from the accumulator. 3. PPMU (Passive Pressure Maintenance Unit) Reduces the hydraulic pressure change due to the hydraulic oil temperature change. As the oil temperature increases, the pressure in the system will increase. Therefore the PPMU maintains a stable system pressure regardless of temperature. The PPMU also acts as a pressure diagnosis point & oil drain / re-fill point. 4. Hydraulic Pipes / Hoses Transfers the accumulator pressure to the cylinders. The system controls the amount of oil so that the “shock absorbers” (oil chamber located at each wheel) can operate. WARNING The HBMC system contains oil which is under HIGH PRESSURE at all times. Extreme care must be taken to avoid injury when working on this system. ALWAYS REFER TO THE ESM PRIOR TO CARRYING OUT ANY WORK ON THE SYSTEM 93 Y62 Patrol New Model Introduction Nissan Australia. January 2013 SUSPENSION PPMU (“Passive Pressure Maintenance Unit”) As the temperature rises due to a combination of excessive oil flow & ambient temperature, the PPMU is able to absorb this increasing pressure. The oil forces itself via the oil tubes into the PPMU. There are 2 x normally open needle valves which allow the oil to flow past them & then it has to flow through an orifice (restrictor) into the nitrogen gas pressured chamber. (Accumulator located within the PPMU). Servicing & Diagnosis The PPMU acts as a Service & Diagnosis port if the system pressure needs to be checked or new fluid needs to be added after any diagnosis or component replacement activities. Needle Valves A, C & E: These are always kept CLOSED. These should only be opened when carrying out pressure inspections, bleeding operations & diagnosis of internal leakage activities. Needle Valves B & D: These valves should always remain OPEN. These should only be closed in a specific sequence when internal leakage diagnosis activities are being carried out. They remain open so that excessive oil pressure build up due to increased temperatures can escape into the gas pressure chambers. 94 Y62 Patrol New Model Introduction Nissan Australia. January 2013 SUSPENSION Accumulators (Anti Sway & Shock absorber function) When the vehicle is driven on a normal road & it is cornering, oil from both the front and rear “shock absorbers” (oil chambers at each wheel) enters the oil chamber of the Accumulator. The pressure of oil entering the Accumulator increases due to the pressure of the Nitrogen Gas force which is working against the oil. In turn this effectively causes a “hydraulic lock” like condition in the suspension. As a result the lean to one side as the vehicle corners is limited. The Accumulator has no role to play if the vehicle is being driven over rough - uneven surfaces, moguls etc. In these conditions, the oil is displaced into other oil chambers of wheels that are lifting / lowering over the uneven surfaces WARNING: Never remove the 4 bolts that can be seen on the base of the accumulator. Refer to the picture shown right. Shock Absorbers (Oil Chambers at each wheel) Oil enters either the upper or lower chambers via the Oil Inlet / Outlet ports. Although they are called “shock absorbers” they do not actually have a damping ability. The piston is able to move freely inside the chamber if the oil pressure on the travel of direction side allows the movement. Constant suspension oscillation is not possible as the “bouncing effect” of the wheel is arrested due to the shock absorber not being able to constantly push / suck oil in / out of the Suspension system. Front Unit Rear Unit 95 Y62 Patrol New Model Introduction Nissan Australia. January 2013 SUSPENSION System Pressure With the use of the appropriate SST, the oil pressure within the suspension system can be checked. This should be carried out with the vehicle lifted with a 2 post hoist (wheels off the ground) Refer to the ESM as follows for the specific details of the pressure check procedure: > E SUSPENSION > SCS Suspension Control System > BASIC INSPECTION The chart shown right indicates the overall pressure range the system works within. WARNING The HBMC system contains oil which is under HIGH PRESSURE at all times. Extreme care must be taken to avoid injury when working on this system. ALWAYS REFER TO THE ESM PRIOR TO CARRYING OUT ANY WORK ON THE SYSTEM This chart shown right details the pressure difference due to ambient temperature changes. This is used a reference for when new oil is being pumped into the system & the system is then bled. Refer to the ESM as follows for the specific details of the oil filling & system bleeding procedure: > E SUSPENSION > SCS Suspension Control System > BASIC INSPECTION 96 Y62 Patrol New Model Introduction Nissan Australia. January 2013 WHEELS & TYRES Tyre Pressure Monitoring System - Functionality The Tyre Pressure Monitoring System (TPMS) is a system which is able to inform the driver of the tyre pressures in all 4 tyres fitted to the vehicle. The system can also warn the driver of an excessively Low Tyre Pressure situation. The TPMS C/U illuminates a Low Tyre Pressure Warning Light (LTP-W/L) when one or more tyres are significantly under-inflated. Accordingly, when the LTP-W/L illuminates, the driver should stop and check all 4 tyres as soon as possible and inflate them to the correct tyre pressure. Otherwise, the driver can select the appropriate option on the central display screen for the current tyre pressures. Before viewing the readings, the vehicle needs to be driven at speeds above 25km/h for 30 seconds or more before the tyre pressures readings can be noted. IMPORTANT NOTES: - The TPMS is not a substitute for proper tyre maintenance. It is the driver‟s responsibility to maintain correct tyre pressures, even if under-inflation has not reached the level to trigger illumination of the TPMS LTP-W/L activation - The TPMS does not monitor the tyre pressure of the spare tyre - The TPMS will activate only when the vehicle is driven at speeds above 25 km/h. Also, this system may not detect a sudden drop in tyre pressure (for example a burst tyre while driving) - The LTP-W/L does not automatically turn off when the tyre pressure is adjusted. After the tyre is inflated to the recommended pressure, the vehicle must be driven at speeds above 25 km/h to activate the TPMS and turn off the LTP-W/L. - For accurate Tyre Pressure readings, a tyre pressure gauge should be used to check the Tyre Pressures - Tyre Pressures will rise and fall depending on the heat caused by the vehicle‟s operation and the outside temperature. Low outside temperature can lower the temperature of the air inside the tyre which can cause a lower tyre inflation pressure. This may cause the LTP-W/L to illuminate. If the warning light illuminates in low ambient temperature, check the tyre pressure of all four (4) tyres - The Tyre Pressures can be checked (except the spare tyre) on the display screen, although the use of a Tyre Pressure Gauge is recommended. The order of the tyre pressure figures displayed on the screen may not correspond with the actual order of the tyre position on the vehicle. Ensure that the Tyre Pressure Sensor “ID Registration” procedure as per the ESM is carried out correctly - When the spare tyre is fitted or a wheel is replaced, the TPMS will not function and the LTP-W/L will flash for approximately 1 minute. The light will remain on after 1 minute. System resetting will be required if the new wheel remains fitted to the vehicle. Otherwise the original tyre should be repaired & refitted to the vehicle so that the system can automatically resume normal operation - Replacing tyres with those that differ from the original specification could affect the proper operation of the TPMS - Do NOT inject any tyre inflation / puncture repair liquid or aerosol tyre sealant into the tyres, as this may cause a malfunction with the tyre pressure sensors 97 Y62 Patrol New Model Introduction Nissan Australia. January 2013 WHEELS & TYRES 98 Y62 Patrol New Model Introduction Nissan Australia. January 2013 WHEELS & TYRES Control System Operation The Low Tyre Pressure Control Unit (LTP C/U) controls the operation of the Tyre Pressure Monitoring System. Radio Frequency signals are sent from each wheel to the corresponding Tyre Pressure Receiver units. From there the tyre pressure information is sent to the LTP C/U via a wiring harness. Detailed Explanation of Tyre Pressure Sensor 99 Y62 Patrol New Model Introduction Nissan Australia. January 2013 WHEELS & TYRES ID Registration (of Tyre Pressure Sensors) When the following actions have occurred, the “ID Registration” procedure will need to be carried out: - Wheels have been rotated or replaced - The Tyre Pressure Sensor has been replaced - The Low Tyre Pressure Warning C/U has been replaced Refer to the ESM as follows for the specific details of the ID Registration procedure: > E SUSPENSION > WT Wheels & Tires > BASIC INSPECTION SPECIAL NOTES: - This operation can only be carried out via a Nissan Dealership along with the use of CONSULT III plus & Special Service Tool: KV48105500 (1) - Do NOT carry out the operation close to another TPMS equipped vehicle or where other radio waves are present - Perform the wake-up procedure in the following order: (i) front left wheel (ii) front right wheel (iii) rear right wheel (iv) rear left wheel - NEVER CHANGE THIS SEQUENCE - Tyre Pressure Sensor Activation SST Precautions 1. If the tool has not been used for a long period of time, (6 months or more) the battery inside the tool may require replacement 2. The wheel may have to be rotated on the vehicle if the activation process does not work for a specific wheel. Rotate the wheel until the valve stem is close as possible to the Receiver Unit which is installed in the wheel arch. (In the vicinity of the 12 O‟clock ~ 3 O‟ clock position) 100 Y62 Patrol New Model Introduction Nissan Australia. January 2013 WHEELS & TYRES Tyre Pressure Sensor Precautions 1. When using the Tyre Pressure Sensor Activation SST, always hold it firmly against the surface of the tyre where the sensor is located. (In line with the valve stem) 2. Take careful note of the components which cannot be re-used after disassembly or when new tyres are fitted: (i) Grommet seal (ii) Valve Core (iii) Valve Cap 3. When tightening the valve nut, the tightening speed must only ever be 10 rpm or less. - Do not over tighten - Do not use a power operated tool. Turn by hand & tighten to a maximum torque of 7.5Nm 4. Take special note of the Tyre Pressure Sensors orientation when it is installed onto the rim DO NOT INSTALL ONTO THE RIM UPSIDE DOWN 101 Y62 Patrol New Model Introduction Nissan Australia. January 2013 WHEELS & TYRES Tyre Pressure Sensor Precautions (cont‟d..) 5. Take special care when the Tyre is mounted on a tyre changing machine. Keep the sensor at the lowest position (6 0‟clock position) 6. The tyre mounting / dismounting head must not make contact to the sensor or it will be damaged. When commencing the tyre removal / refitting process, keep the head 270 deg away from the sensor Y62 Patrol TPMS Component Location - The TPMS C/U is located behind the Glovebox - The Tyre Pressure Receiver units are located in each of the wheel arches behind the plastic wheel arch lining 102 Y62 Patrol New Model Introduction Nissan Australia. January 2013 WHEELS & TYRES Trouble Diagnosis Step 1; Confirm the operation of the system via the instruction from section 4 of the Owners Manual (Is the system operating correctly & as it was designed to do so?) Step 2; If it is found there is a fault, connect CONSULT III plus to the vehicle & access AIR PRESSURE MONITOR. - Check for any DTC‟s. If there are any, refer to the ESM as follows; > E SUSPENSION > WT > DTC/CIRCUIT DIAGNOSIS More detail & the Diagnosis Procedure for the DTC is located here. - If there are no DTC‟s yet the fault is clearly evident, refer to the ESM as follows; > E SUSPENSION > WT > SYMPTOM DIAGNOSIS Various processes are discussed dependant on the fault at hand. Wiring Diagrams Refer to the ESM as follows for a wiring diagram of the TPMS system; > E SUSPENSION > WT > WIRING DIAGRAM Here you will find Power & Ground supplies as well as the appropriate locations of the fuses & ground connections. Access to the AIR PRESSURE MONITOR system with CONSULT III plus Full interaction with the system for setting customer preferences, checking for any system DTC‟s, checking for input & output activity & checking component operation is available with CONSULT III plus. See below a description of each diagnosis mode available; 103 Y62 Patrol New Model Introduction Nissan Australia. January 2013 WHEELS & TYRES 104 Y62 Patrol New Model Introduction Nissan Australia. January 2013 BRAKES Hydraulic Brake Booster An all new Hydraulic Brake Booster has been adopted. There is an Electric Motor which drives a pump which in turn pressurises an Accumulator. This pressure is utilised to assist the driver with braking pressure at the wheels. The Motor & Pump assemblies are attached to the Brake Master Cylinder assembly. The same Motor & Pump unit is also utilised by the ABS / VDC system when the ABS / VDC system has been activated. ABS Actuator C/U The ABS Actuator & Control Unit is also attached to the Brake Master cylinder assembly. The operation of the ABS /VDC system is otherwise the same as other models. Brake Master Cylinder Apart from the ABS & Brake Booster systems forming part of the Brake Master Cylinder assembly, the operation of the Brake Master Cylinder is mostly the same as other models. WARNING Be sure to follow the directions in the ESM &/or Owners Manual in regards to Brake Fluid level inspection. There are times when the level of the Brake Fluid is to be kept well below the Full Line of the Reservoir. Follow the directions in the ESM &/or OM for more details on Brake Fluid Level inspection. 105 Y62 Patrol New Model Introduction Nissan Australia. January 2013 BRAKES 106 Y62 Patrol New Model Introduction Nissan Australia. January 2013 BRAKES Brake System Maintenance Brake Pedal Height Always ensure that the Brake Pedal Height is correct. Refer to the ESM for directions on how to check the height as well as the most current specifications as follows: F > BRAKES > PERIODIC MAINTENANCE > BRAKE PEDAL F > BRAKES > SERVICE DATA AND SPECIFICATIONS Stop Lamp Switch / ASCD Brake Switch Always ensure that both of the Switches mounted on the Brake Pedal bracket are correctly adjusted. Refer to the ESM for directions on how to check the switch clearances as well as the most current specifications as follows: F > BRAKES > PERIODIC MAINTENANCE > BRAKE PEDAL F > BRAKES > SERVICE DATA AND SPECIFICATIONS Brake Pedal Free Play Ensure that the brake pedal has the correct Free Play. Refer to the ESM for directions on how to check the Free Play as well as the most current specifications as follows: F > BRAKES > PERIODIC MAINTENANCE > BRAKE PEDAL F > BRAKES > SERVICE DATA AND SPECIFICATIONS 107 Y62 Patrol New Model Introduction Nissan Australia. January 2013 BRAKES Brake System Maintenance Brake Fluid Level When carrying out the Inspection for Brake Fluid Level – follow the directions as outlined in the Owners Manual or ESM Do not overfill the Fluid Reservoir. Although the Fluid Level appears to be below the MAX. Line, this is most likely normal Refer to the ESM for directions on how to check the Fluid Level as well as the most current specifications as follows: F > BRAKES > PERIODIC MAINTENANCE > BRAKE FLUID Brake Fluid Bleeding / Changing Brake Fluid When carrying out a Brake System Bleeding procedure or when the Brake Fluid is being changed as part of a service, take note of the following points / precautions: - Do NOT use Compressed Air or other automated Brake Bleeding Equipment. A 2nd person must be on hand to operate the Brake Pedal - When bleeding the Rear Brake, the Accumulator Pump will pump the Fluid through the circuits without the need for the Brake Pedal to be pumped - For the Front Brakes, the bleeding method is via the traditional method of Pumping the Brake Pedal. - At the completion of the operation, it will be necessary to clear the DTC C118E with the use of CONSULT III plus. Refer to the ESM for directions on how to change / bleed the Brake Fluid as follows: F > BRAKES > PERIODIC MAINTENANCE > BRAKE FLUID Electric / Hydraulic Brake Booster Inspection For conventional brake systems, a vacuum supply check & leak test is necessary. For models with Electric / Hydraulic Brake Boosters, a different procedure is necessary. Refer to the ESM for directions on how to Inspect the Brake Booster as well as the most current specifications as follows: F > BRAKES > PERIODIC MAINTENANCE > HYDRAULIC BOOSTER ASSEMBLY 108 Y62 Patrol New Model Introduction Nissan Australia. January 2013 BRAKES Parking Brake All Y62 variants have the same type of “Drum in Disc” Parking Brake system. Construction is basically the same as R51 & Y61 TB48 variants. For more detail regarding repairs or adjustment please refer to the ESM as follows; F BRAKES > PB PARKING BRAKE SYSTEM Adjustment Precautions Handbrake adjustment (as is the case with ALL Nissan Models) is not a simple case of simply tightening the adjuster nut at the Handbrake Lever. In principle you must loosen the adjuster nut at the Handbrake Lever 1st, then adjust the brake shoe to Drum clearance 2nd & finally re-tighten the cable adjustment at the Handbrake Lever last until the right setting is achieved as per the directions in the Service Manual. Ensure there is a small but notable amount of free-play evident in the Park Brake Lever. PLEASE NOTE: If the Park Brake is over adjusted or incorrectly adjusted, SEVERE DRIVELINE VIBRATION may result. Ensure the correct procedure is carried out when adjusting the Park Brake. NOTE: If the Handbrake requires adjustment, follow the procedure as advised above. DO NOT ADJUST THE HANDBRAKE BY TIGHTENING THE CABLE AT THE LEVER UNTIL IT APPEARS TO “FEEL BETTER!” Severe Driveline Vibration will otherwise result! 109 Y62 Patrol New Model Introduction Nissan Australia. January 2013 DRIVER INFORMATION & MULTIMEDIA Sonar System - Functionality (Front & Rear Parking Sensors; Factory Fitted) The Parking Sensor system sounds a tone to warn the driver of obstacles near the bumper. A Parking Sensor indicator will also appear in the center display screen. - The system detects front obstacles when the selector / shift lever is in the “D” (Drive) & other gear positions except the P (Park) position. - The system detects both front and rear obstacles when the selector/shift lever is in the “R” (Reverse) position. The system may not detect objects at speeds above 10 km/h and may not detect certain angular or moving objects. The Parking Sensor system detects obstacles up to 1.2 m from the bumper with a decreased coverage area at the outer corners of the bumper. NOTES: - Keep the Sonar Sensors (located in the Front & Rear bumper fascia) free from snow, ice and large accumulations of dirt (do not clean the sensors with sharp objects). If the sensors are covered, it will affect the accuracy of the Sonar System. - A clear understanding of the limitations of the Sonar System as outlined in the OM (section 5) should be obtained. Inclement weather may affect the function of the sonar system; this may include reduced performance or a false activation. - This system is not designed to prevent contact with small or moving objects. - The system is designed as an aid to the driver in detecting large stationary objects to help avoid damaging the vehicle. - The system will not detect small objects below the bumper, and may not detect objects close to the bumper or on the ground. - If your vehicle sustains damage to the rear bumper fascia, leaving it misaligned or bent, the sensing zone may be altered causing inaccurate measurement of obstacles or false alarms. - If the sonar system malfunctions, the beep sounds for 3 seconds when the selector lever is moved to the “R” (Reverse) position. The system will require diagnosis with CONSULT III plus to determine the fault. - If a Tow Bar is to be fitted to the vehicle, ensure that the kit (tow bar & wiring) is Genuine Nissan. The kit has been designed so that when a trailer is connected, the Sonar System alarm sound is disabled. 110 Y62 Patrol New Model Introduction Nissan Australia. January 2013 DRIVER INFORMATION & MULTIMEDIA Sonar System - Operation Master Control & Driver Preferences Via the Centre Display Screen, the Parking Sensor System can be switched ON or OFF. Sensitivity settings can also be changed by the driver if so desired. Parking Sensor Off Switch If so desired by the driver, the system can be switched OFF. NOTES: - The illumination of the small indicator light = OFF - If the system has been switched OFF (via the button shown right) & then the Ignition is switched OFF & then back ON again, the system will automatically revert to ON again. (Small indicator light = OFF) - The Alarm sound will be disabled automatically when a trailer is connected via the taillight electrical connector. The Towbar & Wiring Kit fitted must only be Genuine Nissan however. Warning Alarm / Buzzer Frequency - The warning buzzer output frequency changes 4 levels (for center) and 3 levels (for corner) according to the detection distance. - The nearest sensor from the detected obstacle applies the buzzer output frequency if plural sensors detect any obstacle simultaneously. Models with Navigation: - The Alarm Sound is output through the Audio System speakers Models without Navigation: - The alarm sound for objects detected at the rear is output through a speaker in the rear of the vehicle - The alarm sound for objects detected at the front of the vehicle is output through a speaker at the front of the cabin (built into the Sonar C/U) Parking Sensor Display Screen When the Parking Sensor system is operational, the screen shown right will appear in conjunction with the above described alarm operation. 111 Y62 Patrol New Model Introduction Nissan Australia. January 2013 DRIVER INFORMATION & MULTIMEDIA Sonar System - Operation Operating Distances Customer Preference Settings It is possible to vary the detection distances via the SONAR system “Work Support” function of CONSULT III plus. Specific measurements & other important details can be found in the ESM as follows: > N DRIVER INFORMATION & MULTIMEDIA > SN > SYSTEM DESCRIPTION > DIAGNOSIS SYSTEM (SONAR CONTROL UNIT) Take note of the ”TRAILER HITCH MODE”. This should not be necessary to change if the Genuine Nissan Parts Accessory wiring harness adapter is fitted (alarm function will shut OFF if a trailer is connected). However, this feature maybe of use if a customer requires that the Tow Hitch needs to remain in place. 112 Y62 Patrol New Model Introduction Nissan Australia. January 2013 DRIVER INFORMATION & MULTIMEDIA Control System Operation The Sonar Control Unit controls the operation of the Parking Sensor System 113 Y62 Patrol New Model Introduction Nissan Australia. January 2013 DRIVER INFORMATION & MULTIMEDIA Y62 Component Location 114 Y62 Patrol New Model Introduction Nissan Australia. January 2013 DRIVER INFORMATION & MULTIMEDIA Trouble Diagnosis Step 1; Confirm the operation of the system via the instruction from section 5 of the Owners Manual (Is the system being operated correctly?) Step 2; If it is found there is a fault, connect CONSULT III plus to the vehicle & access SONAR. - Check for any DTC‟s. If there are any, refer to the ESM as follows; > N DRIVER INFORMATION & MULTIMEDIA > SN > DTC/CIRCUIT DIAGNOSIS More detail & the Diagnosis Procedure for the DTC is located here. - If there are no DTC‟s yet the fault is clearly evident, refer to the ESM as follows; > N DRIVER INFORMATION & MULTIMEDIA > SN > SYMPTOM DIAGNOSIS Various processes are discussed dependant on the fault at hand. Wiring Diagrams Refer to the ESM as follows for a wiring diagram of the SONAR system; > N DRIVER INFORMATION & MULTIMEDIA > SN > WIRING DIAGRAM Here you will find Power & Ground supplies as well as the appropriated locations of the fuses & ground connections. Access to the SONAR system with CONSULT III plus Full interaction with the system for setting customer preferences, checking for any system DTC‟s, checking for input & output activity & checking component operation is available with CONSULT III plus. See below a description of each diagnosis mode available; 115 Y62 Patrol New Model Introduction Nissan Australia. January 2013 DRIVER INFORMATION & MULTIMEDIA Around View Monitor (AVM) – Functionality The AVM system is equipped with wide-angle high-resolution cameras on the front and rear of the vehicle and on the right and left door exterior mirrors. The images from the front, rear & both sides view provides for a “Birds-Eye” like view from the top of the vehicle are displayed on the Navi Screen . The Sonar Indicator is also displayed (superimposed on the camera image) in combination with the camera images to warn of approaching obstacles. When in the front & rear view mode, the vehicle width, distance lines and predictive course lines are superimposed onto the centre screen The Birds-Eye view converts the images from 4 cameras into the overhead view and displays the status of the vehicle on display. The vehicle icon and sonar indicator that are displayed on the Birds-Eye view display are rendered by the AVM C/U. AVM Operation When the CAMERA button is pressed or the gear shift lever is moved to the Reverse position (Ign-ON), the AVM operates. The monitor displays various views of the position of the vehicle as follows: Available views: Bird-Eye View : The surrounding view of the vehicle Front-Side View: The view around and ahead of the front passenger‟s side wheel Front View: The view to the front of the vehicle Rear View: The view to the rear of the vehicle (appears when Reverse is selected) Rear-Wide View: The approximately 180-degree view to the rear of the vehicle Camera Switch on Centre Switch Panel 116 Y62 Patrol New Model Introduction Nissan Australia. January 2013 DRIVER INFORMATION & MULTIMEDIA Control System Operation The Around View Monitor C/U controls the operation of the AVM System . 117 Y62 Patrol New Model Introduction Nissan Australia. January 2013 DRIVER INFORMATION & MULTIMEDIA Y62 Component Location 118 Y62 Patrol New Model Introduction Nissan Australia. January 2013 DRIVER INFORMATION & MULTIMEDIA Trouble Diagnosis Step 1; Confirm the operation of the system via the instruction from section 4 of the Owners Manual (Is the system being operated correctly?) Step 2; If it is found there is a fault, connect CONSULT III plus to the vehicle & access SONAR. - Check for any DTC‟s. If there are any, refer to the ESM as follows; > N DRIVER INFORMATION & MULTIMEDIA > AV > DTC/CIRCUIT DIAGNOSIS More detail & the Diagnosis Procedure for the DTC is located here (AV C/U only). > N DRIVER INFORMATION & MULTIMEDIA > AV > SYSTEM DESCRIPTION > DIAGNOSIS SYSTEM > AROUND VIEW MONITOR The AVM C/U does not have direct C-III plus access. It has it‟s own Self Diagnosis ability - If there are no DTC‟s yet the fault is clearly evident, refer to the ESM as follows; > N DRIVER INFORMATION & MULTIMEDIA > AV > SYMPTOM DIAGNOSIS Various processes are discussed dependant on the fault at hand. Wiring Diagrams Refer to the ESM as follows for a wiring diagram of the SONAR system; > N DRIVER INFORMATION & MULTIMEDIA > AV > WIRING DIAGRAM Here you will find Power & Ground supplies as well as the appropriated locations of the fuses & ground connections. Access to the MULTI AV system with CONSULT III plus Full interaction with the system for setting customer preferences, checking for any system DTC‟s, checking for input & output activity & checking component operation is available with CONSULT III plus. See below a description of each diagnosis mode available; 1. OFF>ACC 1. Audio OFF, Ign. ON 2. Hold 2. Hold for 3 sec 3. Turn 40 Clicks On-board Self Diagnosis can be access for the entire AV system. Use this feature for a check of the internal communication network. CONSULT III plus is unable to check the system to this level An additional On-board Self Diagnosis feature. This allows for a button continuity check for the entire AV system > N DRIVER INFORMATION & MULTIMEDIA > AV > SYSTEM DESCRIPTION > DIAGNOSIS SYSTEM > AV CONTROL UNIT 119 Y62 Patrol New Model Introduction Nissan Australia. January 2013 ADVANCED DRIVER ASSISTANCE SYSTEMS 1. LASER Intelligent Cruise Control (ICC) - Functionality - THE DRIVER OF THE VEHICLE MUST ALWAYS REFER TO SECTION 5 OF THE OWNERS MANUAL FOR SPECIFIC DETAILS ON HOW TO OPERATE THE SYSTEM & THE SYSTEMS LIMITATIONS With the use of the front mounted ICC Sensor unit (Laser), the Intelligent Cruise Control (ICC) system automatically maintains a selected distance from the vehicle travelling in front according to that vehicle‟s speed (up to the driven vehicles set speed), or at the set speed when the road ahead is clear. The detection range of the sensor is approximately 120M ahead. The ICC function can be set to one of two cruise control modes: (i) Vehicle-to-vehicle distance control mode: For maintaining a selected distance between your vehicle and the vehicle in front of you up to the preset speed. Press & release the “CRUISE ON/OFF” Switch once (less than 1.5 seconds). (ii) Conventional (fixed speed) cruise control mode: For cruising at a preset speed like any non ICC equipped vehicle with Cruise Control. To activate this mode, press & hold the “CRUISE ON/OFF” Switch for longer than 1.5 seconds & then release. WARNING The ICC system will not automatically adapt to road conditions. It is not advisable to use the system in city traffic, congested areas, steep, hilly &/or windy roads. The ICC system is primarily intended for use on straight, dry, open roads with light, evenly flowing traffic. The use of Conventional Cruise Control Mode should also be avoided in such conditions. 120 Y62 Patrol New Model Introduction Nissan Australia. January 2013 ADVANCED DRIVER ASSISTANCE SYSTEMS ICC Operation (Laser Unit) Fitted to the front of all ICC equipped vehicles is a Sensor unit which is effectively a Laser Unit. If the Distance Sensor (ICC Sensor) detects a slower moving vehicle ahead, the system will reduce the vehicle speed so that your vehicle follows the vehicle in front at the selected distance. The system automatically controls the Electronic Throttle and applies the brakes (up to 25% of vehicle braking power) if necessary. The detection range of the sensor is approximately 120M ahead. The ICC Sensors Laser is completely dependant on reflectors being fitted to the rear of the vehicle in front. If the vehicle / object ahead does not have reflectors fitted to it, then the ICC sensor will not be able to detect anything in front & as a result, the ICC system will not function properly. The same issue will occur if the vehicle in front does have reflectors fitted to it, but they are: - Covered in heavy dust / mud / snow - Deformed, bent, broken or mounted on a deformed bracket etc. - Attached to a stationary or very slow moving vehicle. (The system is designed to ignore “cats eyes” along the road etc.) Vehicle in Front with Modifications If a malfunction occurs with the ICC operation (it doesn't appear to have “seen” the vehicle in front for example), it may have been due to modifications that can impair the reflectors operation. Modifications such as a vinyl coating or wrap (“smoked lens” appearance) may not allow the ICC Sensor to detect a vehicle in front with such modifications. 121 The sensor will require cleaning with a soft cloth from time to time Y62 Patrol New Model Introduction Nissan Australia. January 2013 ADVANCED DRIVER ASSISTANCE SYSTEMS ICC Operation (Switch & Display Screen) The system is operated by a MAIN switch and four control switches mounted on the steering wheel. 1. ACCELERATE/RESUME switch: Resumes set speed or increases speed incrementally. 2. COAST/SET switch: Sets desired cruise speed, reduces speed incrementally. 3. CANCEL switch: Deactivates the system without erasing the set speed. 4. DISTANCE switch: Changes the vehicle‟s following distance: - Long (60m) - Middle (45m) - Short (30m) 5. MAIN switch: Master switch to activate the system Small Display on the Instrument Cluster 1. MAIN switch indicator: Indicates that the MAIN switch is ON. 2. Vehicle ahead detection indicator: Indicates whether it detects a vehicle in front. (symbol disappears if there is no / unable to detect a vehicle in front) 3. Set distance indicator: Displays the selected distance between vehicles set with the DISTANCE switch (3 bars = long, 1 bar = short etc.) 4. Indicates the driven vehicle 5. Set vehicle speed indicator: Indicates the set vehicle speed 6. Intelligent Cruise Control (ICC) system warning light (orange): The light comes on if there is a malfunction in the ICC system. When the “Distance Switch” is operated (see switch 4 described above), the display will change to indicate how close the driven vehicle is able to travel behind the vehicle in front. Continually press the switch to change the distance between Long, Middle & Short. 122 Y62 Patrol New Model Introduction Nissan Australia. January 2013 ADVANCED DRIVER ASSISTANCE SYSTEMS ICC Operation Automatic Cancellation Conditions A chime sounds & the display will Blink under the following conditions and the control is automatically cancelled. - When the vehicle speed falls below approximately 24 km/h - When the system judges the vehicle is at standstill - When the shift lever is shifted to the “N” (Neutral) position - When the windshield wipers are operating at high speed. The system may cancel when the wipers are set to the “INT” or “AUTO” position. - When the VDC is turned off - When the ABS or VDC operates - When a wheel slips / spins - When the Park Brake is applied - When the ROCK, SAND or SNOW mode is selected via the variable 4 x 4 mode select switch - When the 4WD shift switch is in the 4H or 4L position - When driving into a strong light (for example, sunlight) - When distance measurement becomes impaired due to adhesion of dirt or obstruction to the sensor The ICC sensor will require cleaning Conventional Cruise Control Operation If the MAIN Switch button (switch No. 5 described on the previous page) is pressed & held for more then 1.5 seconds (& then released), the system will operate in the Conventional Cruise Control mode. It is entirely up to the driver to ensure the vehicle is operated safely & at the appropriate speeds. NOTE: The DCA system will not function when the vehicle is operated in this mode. 123 The display will Blink when Auto Cancellation occurs Y62 Patrol New Model Introduction Nissan Australia. January 2013 ADVANCED DRIVER ASSISTANCE SYSTEMS ICC Operation - System Limitations Multiple Reflectors being Detected: The approach warning chime may sound and the system display may blink when the sensor detects some reflectors which are fitted on vehicles in other lanes or on the side of the road. This may cause the Distance Control Assist (DCA) &/or Intelligent Braking System (IBA) systems to operate inappropriately. The sensor may detect these reflectors when the vehicle is driven on winding roads, hilly roads or when entering or exiting a curve. The sensor may also detect reflectors on narrow roads or in road construction zones. In these cases you will have to manually control the proper distance ahead of your vehicle. Reflectors in the Road Surface Detection Zone: The detection zone of the sensor is limited. A vehicle ahead must be in the detection zone for the system to operate. A vehicle ahead may move outside of the detection zone due to its position within the same lane of travel. Motorcycles may not be detected in the same lane ahead if they are travelling offset from the centreline of the lane. A vehicle that is entering the lane ahead may not be detected until the vehicle has completely moved into the lane. 124 Y62 Patrol New Model Introduction Nissan Australia. January 2013 ADVANCED DRIVER ASSISTANCE SYSTEMS Intelligent Cruise Control (ICC) – System Limitations -THE DRIVER OF THE VEHICLE MUST ALWAYS REFER TO SECTION 5 OF THE OWNERS MANUAL FOR SPECIFIC DETAILS ON HOW TO OPERATE THE SYSTEM & THE SYSTEMS LIMITATIONS – 1. The distance sensor will not detect the following objects: - Stationary and slow moving vehicles - even if it has reflectors fitted. The systems built in logic will assume that the stationary vehicle is a road side reflector or “cats eye” - Pedestrians or objects in the roadway - Oncoming vehicles in the same lane - Motorcycles traveling offset in the travel lane 2. As there is a performance limit to the distance control function, never rely solely on the Intelligent Cruise Control (ICC) system. This system does not correct careless, inattentive or absent-minded driving, or overcome poor visibility in rain, fog, or other bad weather. 3. If the vehicle ahead comes to a stop, the vehicle decelerates to a standstill within the limitations of the system. The system will cancel once it judges that the vehicle has come to a standstill and sound a warning chime. To prevent the vehicle from moving, the driver must depress the brake pedal. 4. The system may not function properly under the following conditions. To avoid accidents, never use the ICC system under the following conditions: - On roads where the traffic is heavy &/or the road has a lot of curves / bends &/or if there are sharp curves - On slippery road surfaces such as on mud, ice or snow, etc. - On off-road surfaces such as on sand or rock, etc. - During bad weather (rain, fog, snow, etc.) - When the windshield wipers are operating at high speed. The system may cancel when the wipers are set to the “INT” or “AUTO” position. - When strong light (for example, at sunrise or sunset) is directly shining on the front of the vehicle - When rain, snow or dirt / mud adheres to the ICC Sensor - On steep downhill roads (the vehicle may go beyond the set vehicle speed and frequent braking may result in overheating the brakes) - On repeated uphill and downhill roads - When traffic conditions make it difficult to keep a proper distance between vehicles because of frequent acceleration or deceleration - When towing a trailer with an excessive Towball download weight or there is excessive weight loaded into the rear of the vehicle - When the Sensor is subject to heavy Smoke, Snow, Mud &/or Water (heavy rain / road water spray from vehicle in front etc.) - If the Sensor is covered by a plastic bag or translucent object 125 Y62 Patrol New Model Introduction Nissan Australia. January 2013 ADVANCED DRIVER ASSISTANCE SYSTEMS ICC Sensor Cleaning & Pre-cautions From time to time the ICC sensor which is mounted at the front of the vehicle will require cleaning. Ideally it should be cleaned with a soft cloth (1st with a wet cloth if necessary & then dry it with a soft clean cloth) Take extreme caution with the sensor when cleaning it. Do NOT: - Spray it directly with a High Pressure Water Cleaner / Steam Cleaner - Spray it with harsh chemicals / solvents Ensure the sensor is kept CLEAN Licence Plate Installations Ensure that the Licence Plate does not overhang excessively when it is installed to the front of the vehicle. Other Accessories It is NOT possible to install any non Nissan approved accessories (Bull-bars, Nudge-bars etc.) to the front of the vehicle as these will interfere with the ICC Sensors operation. Also to note that insect screens / gauze etc. fitted to the front of the vehicle will also cause a system malfunction. Frontal Damage If the vehicle has been involved in any kind of Frontal Collision incident, the ICC sensor may not function correctly or it will not function at all. Ensure that a very close inspection has been carried out as the collision incident may only have been a very minor one - but enough to cause a system malfunction. 126 Take care with Licence Plate installations Y62 Patrol New Model Introduction Nissan Australia. January 2013 ADVANCED DRIVER ASSISTANCE SYSTEMS Distance Control Assist (DCA) - Functionality - THE DRIVER OF THE VEHICLE MUST ALWAYS REFER TO SECTION 5 OF THE OWNERS MANUAL FOR SPECIFIC DETAILS ON HOW TO OPERATE THE SYSTEM & THE SYSTEMS LIMITATIONS With the use of the front mounted ICC Sensor unit (Laser), the Distance Control Assist (DCA) system brakes and moves the accelerator pedal upward according to the distance from and the relative speed of the vehicle ahead to help assist the driver to maintain a following distance. The system is intended to assist the driver to keep a following distance from the vehicle ahead traveling in the same lane and direction. If the distance sensor (ICC Sensor) detects a slower moving vehicle ahead, the system will reduce the vehicle speed to help assist the driver to maintain a following distance. The system automatically controls the Accelerator Pedal (pushes back against the drivers foot) & Electronic Throttle and if necessary - apply the brakes (up to 25% of vehicle braking power) . The detection range of the sensor is approximately 120m NOTE: When the Intelligent Cruise Control (ICC) system is set, the DCA systems operation will be cancelled. ICC Operation (Laser Unit) Fitted to the front of all DCA equipped vehicles is a Sensor unit which is effectively a Laser Unit. This has already been described in the ICC section of this Training Manual As previously mentioned, the ICC Sensors Laser is completely dependant on reflectors being fitted to the rear of the vehicle in front. 127 Y62 Patrol New Model Introduction Nissan Australia. January 2013 ADVANCED DRIVER ASSISTANCE SYSTEMS DCA Operation (Switch & Display Screen) The DCA system turns on when the Dynamic Driver Assistance Switch (DDAS) on the steering wheel is pressed. When active - the Distance Control Assist (DCA) system indicator in the dot matrix liquid crystal display will illuminate. The system will start to operate after the vehicle speed becomes above approximately 5 km/h. NOTE: Ensure that the “Distance Control Assist” system is enabled in the settings menu on the center display. 1. “System Active”: Indicates that the DCA system is ON. 2. Vehicle ahead detection indicator: Indicates whether it detects a vehicle in front. (symbol disappears if there is no / unable to detect a vehicle in front) 3. Intelligent Cruise Control (ICC) system warning light (orange): The light comes on if there is a malfunction in the DCA system. NOTE: The “CLEAN SENSOR” message may also appear if the ICC sensor is dirty (described in the ICC section) Automatic Cancellation Conditions A chime sounds & the display will Blink under the following conditions and the control is automatically cancelled. - When the VDC is turned off - When the ABS or VDC operates - When a wheel slips / spins - When the Park Brake is applied - When the Conventional Cruise Control Mode is being operated - When the ROCK, SAND or SNOW mode is selected via the variable 4 x 4 mode select switch - When the 4WD shift switch is in the 4H or 4L position - When driving into a strong light (for example, sunlight) - When distance measurement becomes impaired due to adhesion of dirt or obstruction to the sensor 128 Y62 Patrol New Model Introduction Nissan Australia. January 2013 ADVANCED DRIVER ASSISTANCE SYSTEMS WARNING: When the DCA system is not necessary, it is advisable to turn off the DDAS system via the steering wheel mounted switch. Using the system when it is not necessary may result in an accident. The ICC / DCA system is primarily intended for use on straight, dry, open roads with light traffic. It is not advisable to use the system in city traffic, congested areas, steep, hilly &/or windy roads. Precautions & Limitations Refer to those described in the ICC section of the training manual for details on ICC sensor precautions & ICC limitations as these also apply to the DCA system. 129 Y62 Patrol New Model Introduction Nissan Australia. January 2013 ADVANCED DRIVER ASSISTANCE SYSTEMS DCA Operation (Accelerator Pedal) The Accelerator Pedal assembly fitted to DCA equipped vehicles is unique in it‟s construction. The pedal unit includes an electric solenoid which effectively pushes the pedal back to the “Pedal Released” condition against the pressure of the drivers foot. This action will prompt a possibly distracted driver to react to a slow moving vehicle ahead at an earlier time than would otherwise potentially occur. Also included as part of the assembly is an Accelerator Pedal Position Sensor. The action of the pedal being operated by the driver is sent to the ECM via a variable voltage signal as it does in non DCA equipped vehicle models. When vehicle approaches a vehicle ahead: 1. If the driver‟s foot is not on the accelerator pedal, the system activates the brakes to decelerate smoothly as necessary. If the vehicle ahead comes to a stop, the driven vehicle decelerates to a standstill within the limitations of the system. 2. If the driver‟s foot is on the accelerator pedal, the system moves the accelerator pedal upward to assist the driver to release the accelerator pedal. When brake operation by driver is required: 3. The system alerts the driver by a warning chime and blinking of the “Vehicle Ahead” detection indicator. If the driver‟s foot is on the accelerator pedal after the warning, the system moves the accelerator pedal upward to assist the driver to switch to the brake pedal. NOTE: Overriding of the DCA system: The DCA system will operate the stoplights of the vehicle When the driver depresses the accelerator pedal automatically as well as the brakes (via the ABS / VDC even further while the system is moving the system). accelerator pedal upward, the DCA system control of the accelerator pedal as well as braking is cancelled 130 Y62 Patrol New Model Introduction Nissan Australia. January 2013 ADVANCED DRIVER ASSISTANCE SYSTEMS Forward Collision Warning (FCW) & Intelligent Brake Assist (IBA) - Functionality - THE DRIVER OF THE VEHICLE MUST ALWAYS REFER TO SECTION 5 OF THE OWNERS MANUAL FOR SPECIFIC DETAILS ON HOW TO OPERATE THE SYSTEM & THE SYSTEMS LIMITATIONS With the use of the front mounted ICC Sensor unit (Laser), the Forward Collision Warning (FCW) system will warn the driver by a warning light and chime when the driven vehicle is getting close to the vehicle ahead in the travelling lane. The IBA system will function if the driven vehicle continues to get closer to the slower vehicle ahead. The system helps reduce the rear-end collision speed by applying the brakes when the system judges that a collision cannot be prevented. The FCW / IBA system will function when your vehicle is driven at speeds of approximately 15 km/h and above. The FCW / IBA system uses the distance sensor (ICC Sensor) located below the front bumper to measure the distance to the vehicle ahead. When the system judges that the driven vehicle is getting close to the vehicle ahead in the travel lane, the vehicle ahead detection indicator blinks and a warning chime sounds. ICC Operation (Laser Unit) Fitted to the front of all DCA equipped vehicles is a Sensor unit which is effectively a Laser Unit. This has already been described in the ICC section of this Training Manual As previously mentioned, the ICC Sensors Laser is completely dependant on reflectors being fitted to the rear of the vehicle in front. 131 Y62 Patrol New Model Introduction Nissan Australia. January 2013 ADVANCED DRIVER ASSISTANCE SYSTEMS FCW / IBA Operation (Switches & Warning Light) The IBA system turns ON via the lower dash mounted switch marked “IBA OFF” NOTE: - The IBA OFF switch is located adjacent to the DLC for CONSULT III plus - It is not clearly visible when seated in the drivers seat - The switch must be held for more than 1 second (with engine running) to either activate or deactivate the IBA system. - The IBA will remain activated / deactivated until the switch is again operated. IBA OFF Warning Light if Switch is OFF The FCW system turns on when the “Warning Systems Switch” is switched to the ON position. This switch is located on the lower dash fascia RHS. The FCW / IBA systems will start to operate after the vehicle speed becomes above approximately 15 km/h. “WARNING SYSTEMS” Switch (FCW / LDW / BSW Systems) FCW Warning Indicator on LCD screen 132 Y62 Patrol New Model Introduction Nissan Australia. January 2013 ADVANCED DRIVER ASSISTANCE SYSTEMS NOTE: Ensure that the “Forward Collision Warning” system is enabled in the settings menu on the center display. Precautions & Limitations Refer to those described in the ICC section of the training manual for details on ICC sensor precautions & ICC limitations as these also apply to the FCW / IBA system. 133 Y62 Patrol New Model Introduction Nissan Australia. January 2013 ADVANCED DRIVER ASSISTANCE SYSTEMS Control System Operation The entire operation of the Advanced Driver Assistance System is controlled by the ADAS Control Unit. The diagram below details the Inputs / Outputs of the LDW / LDP system. See over page for specific details of each component involved in the ADAS system . 134 Y62 Patrol New Model Introduction Nissan Australia. January 2013 ADAS Summary - 1 (Laser) 135 Y62 Patrol New Model Introduction Nissan Australia. January 2013 ADVANCED DRIVER ASSISTANCE SYSTEMS ADAS (ICC / DCA / FCW / IBA) Component Location (Y62 Patrol) 136 Y62 Patrol New Model Introduction Nissan Australia. January 2013 ADVANCED DRIVER ASSISTANCE SYSTEMS Trouble Diagnosis Step 1; Confirm the operation of the system via the instruction from section 5 of the Owners Manual (Is the system operating correctly & as it was designed to do so?) Step 2; If it is found there is a fault, connect CONSULT III plus to the vehicle & access ICC/ADAS, LASER &/or ACCELE PEDAL ACT. - Check for any DTC‟s. If there are any, refer to the ESM as follows; > O CRUISE CONTROL & DRIVER ASSISTANCE > CCS > ICC > DTC/CIRCUIT DIAGNOSIS > O CRUISE CONTROL & DRIVER ASSISTANCE > DAS > DCA > DTC/CIRCUIT DIAGNOSIS More detail & the Diagnosis Procedure for the DTC is located here. - If there are no DTC‟s yet the fault is clearly evident, refer to the ESM as follows; > O CRUISE CONTROL & DRIVER ASSISTANCE > CCS > ICC > SYMPTOM DIAGNOSIS > O CRUISE CONTROL & DRIVER ASSISTANCE > DAS > DCA or FCW > SYMPTOM DIAGNOSIS Various processes are discussed dependant on the fault at hand. Wiring Diagrams Refer to the ESM as follows for a wiring diagram of the ICC &/or ADAS system; > O CRUISE CONTROL & DRIVER ASSISTANCE > CCS > ICC > WIRING DIAGRAM > O CRUISE CONTROL & DRIVER ASSISTANCE > DAS > ADAS C/U > WIRING DIAGRAM Here you will find Power & Ground supplies as well as the appropriate locations of the fuses & ground connections. Access to the ICC/ADAS, LASER or ACCELE PEDAL ACT systems with C-III plus Full interaction with the system for setting customer preferences, checking for any system DTC‟s, checking for input & output activity & checking component operation is available with CONSULT III plus. See below a description of each diagnosis mode available; ICC/ADAS C/U: LASER: ACCELE PEDAL ACT: 137 Y62 Patrol New Model Introduction Nissan Australia. January 2013 ADVANCED DRIVER ASSISTANCE SYSTEMS 2. CAMERA & RADAR Lane Departure Warning / Lane Departure Prevention (LDW / LDP) - Functionality LDW LDP - THE DRIVER OF THE VEHICLE MUST ALWAYS REFER TO SECTION 5 OF THE OWNERS MANUAL FOR SPECIFIC DETAILS ON HOW TO OPERATE THE SYSTEM & THE SYSTEMS LIMITATIONS - With the use of the front mounted Camera Unit (in the top-centre of the windscreen) the Lane Departure Warning (LDW) system / Lane Departure Prevention (LDP) system will operate when the vehicle is driven at speeds of approximately 70 km/h and above, and when it is travelling close to either the left or the right of a travelling lane. NOTE: The lanes on the road must have clearly visible white lane marker lines painted onto the road surface. Each system functions as follows: (i) LDW system: Warns the driver by a warning light and chime (ii) LDP system: Warns the driver by a warning light and chime, and helps assist the driver to return the vehicle to the centre direction of the travelling lane by applying brake control to the left or right wheels individually (for a short period of time) The LDW and LDP systems monitor the lane markers on the travelling lane using the camera unit located inside the front map light cover so it can view through the windscreen. When the camera unit detects that the vehicle is travelling close to either the left or the right of the travelling lane, the LDW Warning Light on the instrument panel blinks in orange and a warning chime sounds. When the LDP system is on, it will automatically apply the brakes for a short period of time, using the function of the Vehicle Dynamic Control (VDC) system. (Brakes are applied to the wheels of one side of the vehicle which in turn will create a “veering” effect) When the Driver Wishes to Change Lanes: The driver will be required to operate the appropriate indicator (left or right turn signal via the indicator stalk) when changing lanes to overtake another vehicle etc. 138 Y62 Patrol New Model Introduction Nissan Australia. January 2013 ADVANCED DRIVER ASSISTANCE SYSTEMS LDW / LDP Operation (Camera Unit) The Camera Unit is installed in behind the windscreen glass, adjacent to the Rear Vision Mirror. The Camera is designed to follow the white lines painted on the edge of the road surface or the far left solid line & centre dotted or solid line (depending on the roads being travelled on) The Camera Cannot See / Operate: - Yellow painted lines - Unfinished / missing / faded white lines - Edges of roads / travelling lanes without any lines painted - Roads covered with water / snow / dirt etc. - Non standard painted lines - Edge of road / travelling lane where the road surface has multiple parallel white lines painted onto it - If the area of the windscreen where the Camera views through is excessively dirty / covered with snow - At night if the headlights are not switched on, not functioning correctly or not correctly aligned. (If the headlights are unable to properly illuminate the white lines on the road) - On roads with sharp curves / bends - If the driven vehicle is travelling too close to a vehicle in front - When there is sunlight shining directly into the camera - When there is a sudden change of brightness (entering / exiting tunnels etc.) - Below 70km/h - If reflective material is placed on the dash top (white paper / mirror etc. Can reflect light upwards into the camera) - If the area of the windscreen near the camera is covered in a “wrap” or stickers (solid or transparent) etc. - If the camera is subject to extremely high cabin temperatures. If the vehicle parked in the hot sun for periods of time, this will temporarily disable the camera. Once the cabin temperature cools down the camera will again function OK. (System may have to be switched OFF & then back ON to reset it) The windscreen will require cleaning with a soft cloth from time to time The Camera can only detect clearly painted white lines on straight roads / motorways The system will not function on such roads 139 Y62 Patrol New Model Introduction Nissan Australia. January 2013 ADVANCED DRIVER ASSISTANCE SYSTEMS Lane Departure Warning (LDW) Operation (Switch & Warning Light) The operation of the LDW & LDP can be separated. It is possible to have the audible & visual warning activate if the vehicle starts to veer out of the lane / but the prevention feature will not function. However if the LDP system is active, the visual & audible warnings will always occur – regardless of the “Warning Systems” switch operation. Warning Light on Instrument Cluster Green = LDP ON (no light for LDW ON) Blinking Orange + chime = LDW / LDP operating Constant Blinking Orange = Camera too Hot Orange Always ON = System Malfunction Lane Departure Warning Switch & Master Control The “Warning Systems” Switch mounted on the lower RH dash facia must be in the ON position (small yellow light illuminated). This switch is the same switch for the other 2 warning system (Blind Spot Warning & Forward Collision Warning). If this switch is ON, the Audible Chimes that are linked to the 3 warning system will be operational where appropriate. The visual warnings where appropriate will also be operational. If this switch is OFF, the Audible Chimes that are linked to the 3 warning systems will NOT be operational. NOTE: If the DDAS switch is in the ON (LDP is ON) position as described over page, the Visual & Audible warning will also occur even if the Warning Systems switch is OFF. Located in the AV / Navi system is the Master Controls for the 3 x Warning Systems. Ensure that the Lane Departure Warning feature is ON. 140 “WARNING SYSTEMS” Switch (FCW / LDW / BSW Systems) Y62 Patrol New Model Introduction Nissan Australia. January 2013 ADVANCED DRIVER ASSISTANCE SYSTEMS Lane Departure Prevention (LDP) Operation (Switch & Warning Light) Lane Departure Prevention Switch & Master Control The “Dynamic Driver Assistance System” switch mounted on the RHS of the steering wheel must be in the ON position (LDP W/L illuminated in GREEN on the instrument cluster). This switch is the same switch for the other 2 “intervention” systems (Blind Spot Intervention & Distance Control Assist). If this switch is ON, the physical intervention systems that are linked to the 3 systems will be operational where appropriate. The visual & audible warnings where appropriate will always be operational regardless of the “Warning Systems” switch position. If the DDAS switch is OFF, the physical intervention systems that are linked to the 3 warning systems will NOT be operational. (However the visual / audible warnings on the instrument cluster will continue to operate if they are switched ON) Located in the AV / Navi system is the Master Controls for the 3 x Intervention Systems. Ensure that the Lane Departure Prevention feature is ON. LDP Limitations (May &/or Will not operate if ): - The road or white line condition as previously described is unsuitable for LDW / LDP operation. - Operated in poor weather conditions - When changing lanes & using the lane change signal (indicators) or when the hazards are operating - The tyres &/or suspension has been modified or if the tyres are worn &/or underinflated - If the road is slippery / covered with snow & ice, uneven &/or winding etc. - Towing a trailer or carrying a heavy load in the rear - The vehicle speed is less than 70km/h - The ABS / TCS / VDC system is operating - The 4WD Shift switch is in 4H or 4Lo or of the 4WD mode switch is in SNOW, ROCK or SAND modes - The camera is too hot if the vehicle has been sitting in the hot sun for a period of time 141 Warning Light on Instrument Cluster Green = LDP ON (no light for LDW ON) Blinking Orange + chime = LDW / LDP operating Constant Blinking Orange = Camera too Hot Orange Always ON = System Malfunction Y62 Patrol New Model Introduction Nissan Australia. January 2013 ADVANCED DRIVER ASSISTANCE SYSTEMS Normal Operation of LDW / LDP Operation with Fault / DTC 142 Y62 Patrol New Model Introduction Nissan Australia. January 2013 ADVANCED DRIVER ASSISTANCE SYSTEMS Control System Operation The entire operation of the Advanced Driver Assistance System is controlled by the ADAS Control Unit. The diagram below details the Inputs / Outputs of the LDW / LDP system. See over page for specific details of each component involved in the ADAS system . 143 Y62 Patrol New Model Introduction Nissan Australia. January 2013 ADVANCED DRIVER ASSISTANCE SYSTEMS ADAS (LDW / LDP) Component Location (Y62 Patrol) Lane Camera Unit (covers removed) 144 Y62 Patrol New Model Introduction Nissan Australia. January 2013 ADVANCED DRIVER ASSISTANCE SYSTEMS Trouble Diagnosis Step 1; Confirm the operation of the system via the instruction from section 5 of the Owners Manual (Is the system operating correctly & as it was designed to do so?) Step 2; If it is found there is a fault, connect CONSULT III plus to the vehicle & access ICC/ADAS &/or LANE CAMERA. - Check for any DTC‟s. If there are any, refer to the ESM as follows; > O CRUISE CONTROL & DRIVER ASSISTANCE > DAS > LDW & LDP > DTC/CIRCUIT DIAGNOSIS More detail & the Diagnosis Procedure for the DTC is located here. - If there are no DTC‟s yet the fault is clearly evident, refer to the ESM as follows; > O CRUISE CONTROL & DRIVER ASSISTANCE > DAS > LDW & LDP > SYMPTOM DIAGNOSIS Various processes are discussed dependant on the fault at hand. Wiring Diagrams Refer to the ESM as follows for a wiring diagram of the ADAS system; > O CRUISE CONTROL & DRIVER ASSISTANCE > DAS > ADAS CONTROL UNIT > WIRING DIAGRAM Here you will find Power & Ground supplies as well as the appropriate locations of the fuses & ground connections. Access to the ICC/ADAS &/or LANE CAMERA systems with CONSULT III plus Full interaction with the system for setting customer preferences, checking for any system DTC‟s, checking for input & output activity & checking component operation is available with CONSULT III plus. See below a description of each diagnosis mode available; ICC/ADAS: LANE CAMERA: 145 Y62 Patrol New Model Introduction Nissan Australia. January 2013 ADVANCED DRIVER ASSISTANCE SYSTEMS Blind Spot Warning / Blind Spot Intervention (BSW / BSI) - Functionality - THE DRIVER OF THE VEHICLE MUST ALWAYS REFER TO SECTION 5 OF THE OWNERS MANUAL FOR SPECIFIC DETAILS ON HOW TO OPERATE THE SYSTEM & THE SYSTEMS LIMITATIONS With the use of 2 x Side Radar Units (LH & RH Rear) & front mounted Camera Unit, (in the top-centre of the windscreen) the Blind Spot Warning (BSW) and Blind Spot Intervention (BSI) systems can help alert the driver of other vehicles in adjacent lanes. Also when the driver wishes to change lanes, the driver is alerted of another vehicle beside the driven vehicle travelling in the intended lane. The BSI feature will further assist the driver by “veering” the driven vehicle back into the original lane so that a collision is avoided. The Blind Spot Warning (BSW) system / Blind Spot Intervention (BSI) system will operate when the vehicle is driven at speeds of approximately 32 km/h & above (BSW only) & 60km/h & above (BSW & BSI). Each system functions as follows: (i) BSW system: Warns the driver by a warning light and chime (ii) BSI system: Warns the driver by a warning light and chime, and helps assist the driver to return the vehicle to the centre direction of the travelling lane by applying brake control to the left or right wheels individually (for a short period of time) NOTE: - Only the BSI system is dependant on the Lane Camera unit installed on the inside (top centre) of the windscreen. Therefore clearly painted lines on the road are necessary for BSI operation. The 2 x Side Radar units are also required for the BSI systems operation. - The BSW system is only dependant on the Side Radar units being able to detect vehicles moving at a different speed (to the driven vehicle) along side the driven vehicle. 146 The Radar Sensors can detect vehicles on either side of the driven vehicle within the detection zones shown above. Both detection zones starts from the outside mirror of the driven vehicle and extends approximately 3m behind the rear bumper & approximately 3m sideways Y62 Patrol New Model Introduction Nissan Australia. January 2013 ADVANCED DRIVER ASSISTANCE SYSTEMS Blind Spot Warning (BSW) Operation (Switch & Warning Light) The operation of the BSW & BSI systems can be separated. It is possible to have the visual only or audible / visual warning activate if there is a vehicle alongside the driven vehicle, or if the driven vehicle starts to move across lanes into another alongside, but the prevention feature will not function. However if the BSI system is active, the visual & audible warnings will always occur – regardless of the “Warning Systems” switch operation. Indicator Light (LH & RH sides) Orange Only Constantly ON = Vehicle detected along side Flashing + Buzzer = Warning of potential collision Brightness adjusts dependant on Ambient Light Blind Spot Warning Switch & Master Control The “Warning Systems Switch” mounted on the lower RH dash facia must be in the ON position (small yellow light illuminated). This switch is the same switch for the other 2 warning systems (Lane Departure Warning & Forward Collision Warning). If this switch is ON, the Audible Chimes that are linked to the 3 warning system will be operational where appropriate. The visual warnings where appropriate will also be operational. If this switch is OFF, the Audible Chimes that are linked to the 3 warning systems will NOT be operational. NOTE: If the DDAS switch is in the ON (BSI is ON) position as described over page, the Visual & Audible warning will also occur even if the Warning Systems switch is OFF. “WARNING SYSTEMS” Switch (FCW / LDW / BSW Systems) Located in the AV / Navi system is the Master Controls for the 3 x Warning Systems. Ensure that the Lane Departure Warning feature is ON. BSW Limitations (May &/or Will not operate if ): - Operated in poor weather conditions - When the hazards are operating - If there is a motorcycle, bicycle, pedestrians &/or animals in the detection zone 147 Y62 Patrol New Model Introduction Nissan Australia. January 2013 ADVANCED DRIVER ASSISTANCE SYSTEMS Blind Spot Intervention (BSI) Operation (Switch & Warning Light) Whenever the BSI system is active, the visual & audible warnings will always occur. Blind Spot Intervention Switch & Master Control The “Dynamic Driver Assistance System” switch mounted on the RHS of the steering wheel must be in the ON position (BSI W/L illuminated in GREEN on the instrument cluster). This switch is the same switch for the other 2 “intervention” systems (Lane Departure Prevention & Distance Control Assist). If this switch is ON, the physical intervention systems that are linked to the 3 systems will be operational where appropriate. The visual & audible warnings where appropriate will also be operational if they are also switched ON. If this switch is OFF, the physical intervention systems that are linked to the 3 warning systems will NOT be operational. (However the visual / audible warnings on the instrument cluster will continue to operate if they are switched ON) Indicator Light (LH & RH sides) Orange Only Constantly ON = Vehicle detected along side Flashing + Buzzer = Warning of potential collision Brightness adjusts dependant on Ambient Light Located in the AV / Navi system is the Master Controls for the 3 x Intervention Systems. Ensure that the Blind Spot Intervention feature is ON. BSI Limitations (May &/or Will not operate if ): - The road or white line condition as previously described is unsuitable for BSI operation. - Operated in poor weather conditions - When the hazards are operating - If there is a motorcycle, bicycle, pedestrians &/or animals in the detection zone - The tyres &/or suspension has been modified or if the tyres are worn &/or underinflated - If the road is slippery / covered with snow & ice, uneven &/or winding etc. - The vehicle speed is less than 60km/h - The ABS / TCS / VDC system is operating - The 4WD Shift switch is in 4H or 4Lo or of the 4WD mode switch is in SNOW, ROCK or SAND modes - The camera is too hot if the vehicle has been sitting in the hot sun for a period of time - Bright light / sunshine is shining directly into the camera 148 Green = BSI ON Yellow = System Fault Y62 Patrol New Model Introduction Nissan Australia. January 2013 ADVANCED DRIVER ASSISTANCE SYSTEMS BSW / BSI Operation Scenarios BSW = ON BSI = ON or OFF 1. Vehicle enters detection zone (either side). The appropriate (LHS or RHS) Indicator Light on the corresponding door will illuminate (stay on constantly, not flash) when a vehicle has been detected. Visual warning only. Light will go OFF when the detection zone is clear. NOTE: May not detect Motor Cycles etc. BSW = ON or OFF BSI = ON 2. If a vehicle is in the detection zone & the driver operates the turn signal (for the side of where the vehicle in the detection zone is), the Indicator Light will FLASH & an alarm will sound. NOTE: If the turn signal is operated 1st & then a vehicle enters the detection zone, the Warning Indicator will flash, but the buzzer will not sound. BSW = ON or OFF BSI = ON 3. Regardless of turn signal (indicator) operation, if the driven vehicle starts to veer across into the area where a vehicle is in the detection zone, the BSI system will operate accordingly. The BSI system will activate the ABS system to create a braking effect on the LHS or RHS wheels which in turn creates a “veering” effect. 149 Y62 Patrol New Model Introduction Nissan Australia. January 2013 ADVANCED DRIVER ASSISTANCE SYSTEMS Normal Operation of BSW Normal Operation of BSI 150 Y62 Patrol New Model Introduction Nissan Australia. January 2013 ADVANCED DRIVER ASSISTANCE SYSTEMS Operation with Fault / DTC 151 Y62 Patrol New Model Introduction Nissan Australia. January 2013 ADVANCED DRIVER ASSISTANCE SYSTEMS Control System Operation The entire operation of the Advanced Driver Assistance System is controlled by the ADAS Control Unit. The diagram below details the Inputs / Outputs of the BSW / BSI system. See over page for specific details of each component involved in the ADAS system . 152 Y62 Patrol New Model Introduction Nissan Australia. January 2013 ADAS Summary - 2 (Camera & Radar) 153 Y62 Patrol New Model Introduction Nissan Australia. January 2013 ADVANCED DRIVER ASSISTANCE SYSTEMS ADAS (BSW / BSI) Component Location (Y62 Patrol) 154 Y62 Patrol New Model Introduction Nissan Australia. January 2013 ADVANCED DRIVER ASSISTANCE SYSTEMS Trouble Diagnosis Step 1; Confirm the operation of the system via the instruction from section 5 of the Owners Manual (Is the system operating correctly & as it was designed to do so?) Step 2; If it is found there is a fault, connect CONSULT III plus to the vehicle & access ICC/ADAS &/or LANE CAMERA. - Check for any DTC‟s. If there are any, refer to the ESM as follows; > O CRUISE CONTROL & DRIVER ASSISTANCE > DAS > BSW & BSI > DTC/CIRCUIT DIAGNOSIS More detail & the Diagnosis Procedure for the DTC is located here. - If there are no DTC‟s yet the fault is clearly evident, refer to the ESM as follows; > O CRUISE CONTROL & DRIVER ASSISTANCE > DAS > BSW & BSI > SYMPTOM DIAGNOSIS Various processes are discussed dependant on the fault at hand. Wiring Diagrams Refer to the ESM as follows for a wiring diagram of the ADAS system; > O CRUISE CONTROL & DRIVER ASSISTANCE > DAS > ADAS CONTROL UNIT > WIRING DIAGRAM Here you will find Power & Ground supplies as well as the appropriate locations of the fuses & ground connections. Access to the ICC/ADAS &/or SIDE RADAR LH / SIDE RADAR RH systems with CONSULT III plus Full interaction with the system for setting customer preferences, checking for any system DTC‟s, checking for input & output activity & checking component operation is available with CONSULT III plus. See below a description of each diagnosis mode available; ICC/ADAS: SIDE RADAR LH: SIDE RADAR RH: 155 Y62 Patrol New Model Introduction Nissan Australia. January 2013 ADVANCED DRIVER ASSISTANCE SYSTEMS 156 Y62 Patrol New Model Introduction Nissan Australia. January 2013 ADVANCED DRIVER ASSISTANCE SYSTEMS 157 Y62 Patrol New Model Introduction Nissan Australia. January 2013 ADVANCED DRIVER ASSISTANCE SYSTEMS 158 Y62 Patrol New Model Introduction Nissan Australia. January 2013 ADVANCED DRIVER ASSISTANCE SYSTEMS 159 Y62 Patrol New Model Introduction Nissan Australia. January 2013 MAINTENANCE General Apart from the Brake Bleeding Procedure, the Service & Maintenance of Y62 is fairly conventional Pre Delivery Inspection Ensure that a Pre Delivery Inspection is correctly carried out. Refer to the “Dealer PDI Pack” for more details on the PDI of Y62. Refer to page 2 of this Training Manual for details. Engine Oil for the VK56VD Engine Ensure that the Nissan 5W 30 ACEA C3 Engine Oil is used. It is to be changed every 10,000 km‟s or 6 months – whichever comes first. More frequently if the vehicle is operated under harsh conditions. Engine Oil Capacity including Filter; 6.5L. Nissan 5W 30 ACEA C3 (“Petrol Synthetic”) Engine Coolant (“Blue”) Ensure that the Coolant is not replaced until 160,000km service or 8 years – whichever comes 1st. Once it has been replaced the service interval for the coolant is every 80,000km‟s or 4 years. NOTE: Always ensure that all of the old coolant has been drained / flushed from the engine. Only use Genuine Nissan Long Life Coolant. Engine Cooling System Capacity; 15.1L (Includes Reservoir Bottle which is 0.8L) AT Fluid: Nissan Matic S There is no specific servicing requirement for the Automatic Transmission. However if the vehicle is operated in harsh conditions it is strongly recommended that the fluid is closely inspected for colour / condition / level etc. every 10,000km‟s. (otherwise every 20,000km‟s). If it is discoloured or it appears to be contaminated, drain the fluid & refill with new Nissan Matic S fluid only. AT Fluid Capacity; 10L. Only use Nissan Matic S. Brake Fluid Replace the brake fluid with a suitable DOT 3 / DOT 4 type fluid every 40,000km‟s or 2 years. Ensure that the procedure in the ESM is strictly adhered to: F > BRAKES > PERIODIC MAINTENANCE > BRAKE FLUID Air Filter Element Inspect the Air Filter element each service. Lightly blowing it to remove excess dirt is recommended. Replace it after a maximum of 40,000km‟s or every 2 years. More frequently for dusty conditions. Tyre Rotation & Wheel Balance Ideally the wheels should be rotated & balanced every 10,000km‟s. Ensure that the wheels are installed properly & that they are not tightened with an impact gun. Ensure that they are correctly tightened using a torque wrench or driveline vibration will most likely result. Wheel Alignment A front & rear wheel alignment must be carried out at the pre delivery. It is strongly recommended to inspect the front wheel alignment every 20,000km‟s or 1 year thereafter. The rear wheel alignment should also be inspected every 2 years maximum. HVAC system (in-cabin) Micro Air Filter Replace it every 20,000km‟s. More frequently in dusty conditions. 160 Y62 Patrol New Model Introduction Nissan Australia. January 2013 DRIVELINE LUBRICANTS VK56VD Engine: 5W-30 ACEA C3 Full Synthetic Replace every 10,000 km‟s Front Axle: GL5 80W-90 Diff Oil Replace every 40,000 km‟s 7 Spd. Auto Trans: Nissan Matic S (no replacement interval) Transfer: R51 - Nissan Special Oil # KLD22-00001 (no replacement interval) Rear Axle GL5 Synthetic 75W-90 Replace every 40,000 km‟s 161