1
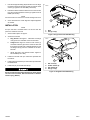
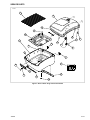
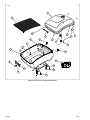
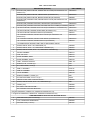
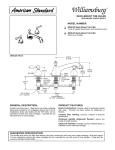
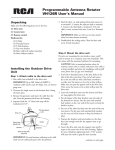
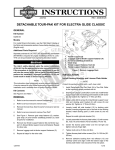
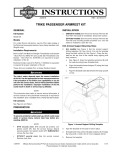
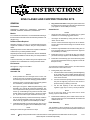
-J05391
REV. 2013-07-31
KING CLASSIC AND CHOPPED TOUR-PAK KITS
4.
GENERAL
Kit Numbers
53000375xxx, 53000377xxx, 53000399xxx, 53000402xxx,
53000404, 53000405, 92200073xxx, 92200074xxx
King Classic Tour-Paks: Install ground plate and chrome
trim strips to Tour-Pak using four 3/4-inch pan-head screws
(19). Tighten to 25-35 in-lbs (2.8-3.9 Nm).
Assemble Lid
NOTES
Models
For model fitment information, see the P&A Retail Catalog or
the Parts and Accessories section of www.harley-davidson.com
(English only).
Additional Parts Required
Separate purchase of a King or Chopped Backrest Pad is
required for installation of this kit. See your Harley-Davidson
dealer.
•
Hinges and latch hasp must be installed prior to gasket
installation to avoid damaging gasket surfaces .
•
The hinges are identified by having the letter "F"ront or
"R"ear cast into them.
•
The two screws nearest the edge of the lid are washerless and shorter than the remaining six. Install the shorter
screws first.
1.
Install the hinge assemblies to Tour-Pak lid using two 1/2inch (4) and two 3/8-inch (3) pan-head screws. Tighten to
25-35 in-lbs (2.8-3.9 Nm).
2.
Install latch hasp (7) to Tour-Pak lid using four 3/8-inch
pan-head screws (3).Tighten to 25-35 in-lbs (2.8-3.9 Nm).
3.
Install tether reel assembly (6) to Tour-Pak lid using three
1/2-inch pan-head hi/low screws (5). Tighten to 25-35 inlbs (2.8-3.9 Nm).
Separate purchase of a Tour-Pak rack is required for installation
of this kit. See your Harley-Davidson dealer.
Separate purchase of a key-matched lock, Part No. 90300030,
is required for installation of this kit. See your Harley-Davidson
dealer.
A service manual for your model motorcycle is required for this
installation and is available from a Harley-Davidson dealer.
Kit Contents
See Figure 3 or Figure 4 and Table 1.
ASSEMBLY
NOTE
To prevent the possibility of water intrusion, be careful the seal
does not bunch or kink at the corners.
4.
Assemble Tub
Install gasket (20) to Tour-Pak lid.
a.
Peel back a few inches of backing material. Beginning
at the scribe line at front middle (behind passenger
backrest area), adhere the end of the seal. Work only
a few inches at a time.
b.
Continue around the opening until the seal returns to
the point of beginning. Use care at the corners to
prevent bunching or kinking of the seal.
c.
Cut the seal squarely so the ends mate tightly
together. A gap of up to 1/16 in (1.6 mm) is allowed.
NOTES
•
Protect painted items from damage. Place on clean, soft
surfaces and cover as needed to prevent tools, hardware
and assembly processes from damaging painted surfaces.
•
If the King Classic or Chopped Tour-Pak is already painted
and assembled, proceed to INSTALLATION.
1.
See Figure 3 or Figure 4. Obtain the painted tub (1), latch
assembly (15), lock-set (B) purchased separately, four
1/2-inch pan-head screws (4) and two 3/8-inch pan-head
screws (3). If assembling a King Classic Tour-Pak, additionally obtain the ground plate (18), chrome trim strips
(13, 14) and four 3/4-inch pan-head hi/low screws (19).
2.
Orient lock (B) with key notches toward the top. Install the
lock to the latch assembly using two 3/8-inch long panhead screws (3). Tighten to 25-35 in-lbs (2.8-3.9 Nm).
3.
Install latch assembly to Tour-Pak tub using four 1/2-inch
pan-head screws (4).Tighten to 25-35 in-lbs (2.8-3.9 Nm).
NOTE
Identify and locate the right and left trims strips.
-J05391
NOTE
Do not cut seal long. Doing so may cause seal to bunch
allowing a path of water intrusion.
5.
Install load-limit label (10) to the inside surface of the lid.
Align the upper left corner of the label with the scribe lines
molded into the lid.
Final Assembly
NOTE
The installation of the lid assembly to the tub assembly is a
two-person procedure to best protect the painted surfaces from
damage.
Many Harley-Davidson® Parts & Accessories are made of plastics and metals which can be recycled.
Please dispose of materials responsibly.
1 of 5
1.
Hold the lid approximately perpendicular to the tub. Align
the holes in the hinges and secure with 1/2-inch pan-head
screws (4). Tighten to 25-35 in-lbs (2.8-3.9 Nm).
2.
Extend the tether. Install the tether anchor to the tub with
two 1/2-inch pan-head hi/low screws (5). Tighten to 25-35
in-lbs (2.8-3.9 Nm).
is07800
NOTE
Do not allow the lid to slam shut. Cosmetic damage will result.
3.
1
Close and latch lid to check alignment. Adjust alignment
as needed.
INSTALLATION
2
NOTE
An open Tour-Pak is unstable before it is secured. Use two
persons to install the Tour-Pak.
1.
Set Tour-Pak in place on support.
2.
Secure the Tour-Pak:
a.
King Classic: See Figure 1. Install four hex flange
nuts (2) from the underside of the Tour-Pak rack.
b.
Chopped: See Figure 2. Insert four hex screws (1)
and fender washers (2) from the inside the Tour-Pak
through the Tour-Pak rack. Install flat washers (3) and
hex flange nuts (4) from the underside of the TourPak rack.
c.
Figure 1. King Classic Tour-Pak Mounting
is07801
1
2
Adjust Tour-Pak to the desired location. Tighten to
60-72 in-lbs (6.8-8.1 Nm).
3.
Install the Tour-Pak rack per instructions provided with
the rack kit.
4.
Install passenger backrest per instructions provided with
the backrest kit.
5.
Install mat (21) in Tour-Pak with ribs up.
Do not exceed Tour-Pak weight capacity.Too much weight
can cause loss of control, which could result in death or
serious injury. (00401c)
-J05391
1. Stud
2. Flange nut (4)
3
4
1.
2.
3.
4.
Hex screw (4)
Fender washer (4)
Flat washer (8)
Flange nut (4)
Figure 2. Chopped Tour-Pak Mounting
2 of 5
SERVICE PARTS
is07802
21
2
20
19
18
5
7
1
4
8
4
3
3
6
5
4
9
10
3
15
13
B
14
12
Figure 3. Service Parts: King Classic Tour-Pak Kit
-J05391
3 of 5
is07804
2
21
20
5
7
4
8
4
3
3
6
17
5
16
1
4
9
10
3
11
15
12
B
A
Figure 4. Service Parts: Chopped Tour-Pak Kit
-J05391
4 of 5
Table 1. Service Parts Table
ITEM
1
DESCRIPTION (QUANTITY)
PART NUMBER
BOTTOM (TUB), KING TOUR-PAK, PAINTED SOLID COLOR (Kits 53000399xxx and
53000377xxx)
53000368xxx
BOTTOM (TUB), KING TOUR-PAK, LIMITED PAINT (Kit 92200074xxx)
53000393xxx
BOTTOM (TUB), KING TOUR-PAK, MOLDED & DRILLED (Kit 53000404)
53000083
BOTTOM (TUB), CHOPPED T-PAK, PAINTED SOLID COLOR (Kits 53000375xxx and
53000402xxx)
53000397xxx
BOTTOM (TUB), CHOPPED TOUR-PAK, LIMITED PAINT (Kit 92200073xxx)
53000394xxx
BOTTOM (TUB), CHOPPED TOUR-PAK, MOLDED, DRILLED & PRIME (Kit 53000405) 53000160
2*
LID, KING TOUR-PAK, PAINTED SOLID COLOR (Kit 53000399xxx and 92200074xxx)
53000423xxx
LID, KING TOUR-PAK, PAINTED w/PIN STRIPE (Kit 53000377xxx)
53000371xxx
LID, KING TOUR-PAK, MOLDED & DRILLED (Kit 53000404)
53000427
LID, CHOPPED TOUR-PAK, PAINTED SOLID COLOR (Kit 53000402xxx and
92200073xxx)
53000426xxx
LID, CHOPPED TOUR-PAK, PAINTED w/PIN STRIPE (Kit 53000375xxx)
53000425xxx
LID, CHOPPED TOUR-PAK, MOLDED DRILLED (Kit 53000405)
53000424
* LID SERVICE KITS INCLUDE LABEL ITEM 10 AND GASKET ITEM 20
3
SCREW, PAN HD, #8-32 x 3/8, TORX DRIVE (10)
10200062
4
SCREW, PAN HD, #8-32 x 1/2, TORX DRIVE w/WASHER (16)
10200061
5
SCREW, PAN HD HI/LOW, #8-16 x 1/2, TORX DRIVE w/WASHER (5)
10200154
6
TETHER ASSEMBLY
53000141
7
HASP, LID LATCH
53000137
8
HINGE ASSEMBLY, REAR
53000139
9
HINGE ASSEMBLY, FRONT
53000140
10
LABEL, TOUR-PAK CAPACITY
90821-74C
11
WASHER, FLAT, 1/4 NOM. (4)***
6703
12
NUT, HEX FLANGE, 1/4-20 (4)
7716
13
TRIM, LH CHROME**
53734-06
14
TRIM, RH CHROME**
53735-06
15
LATCH ASSEMBLY
53000138
16
WASHER, FENDER, 1/4 NOM. (4)***
6235
17
HEX HD CAP SCREW, 1/4-20 x 1.0 (4)***
2551W
18
GROUND PLATE, KING TOUR-PAK MOUNT**
53000091
19
SCREW, PAN HD HI/LOW, #8-16 x 3/4, TORX DRIVE (4)**
2968
20
GASKET (LID)
53000090
21
MAT, KING TOUR-PAK BOTTOM**
53000326
MAT, CHOPPED TOUR-PAK BOTTOM***
53000163
** King kits 53000399xxx, 53000377xxx, 53000404 and 92200074xxx only
*** Chopped kits 53000402xxx, 53000375xxx, 53000405 and 92200073xxx only
ITEMS MENTIONED IN TEXT BUT NOT INCLUDED IN KITS
A
TOUR-PAK RACK (stock or accessory)
VARIOUS
B
LOCK, TOUR-PAK & SADDLEBAGS
90300030
C
BACKREST PAD (not shown)
VARIOUS
-J05391
5 of 5