1
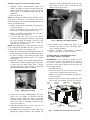
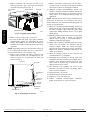
Target National Account
Coil Maintenance
and Cleaning Recommendations
for Evaporator and Air--- Cooled Condenser Coils
Aluminum -- Fin Coils, Copper/Copper Coils,
Precoated Coils, E -- Coat Aluminum -- Fin Coils,
E -- Coat Copper -- Fin Coils.
Supplemental Service Manual
NOTE: Read the entire Supplemental Service Manual
before performing any maintenance and/or cleaning of
unit coils.
CAUTION is used to identify unsafe practices, which
may result in minor personal injury or product and
property damage.
TABLE OF CONTENTS
NOTE is used to highlight suggestions which will result in
enhanced installation, reliability, or operation.
SAFETY CONSIDERATIONS . . . . . . . . . . . . . . . . . . . . 1
PERIODIC CLEANING . . . . . . . . . . . . . . . . . . . . . . . . . 2
Remove Surface Loaded Fibers . . . . . . . . . . . . . . . . . . 2
Periodic Clean Water Rinse . . . . . . . . . . . . . . . . . . . . . 2
Cleaning of Coil Surfaces . . . . . . . . . . . . . . . . . . . . . . . 2
Totaline Environmentally-- Sound Coil Cleaner:
Application Equipment . . . . . . . . . . . . . . . . . . . . . . . 2
Evaporator Coils . . . . . . . . . . . . . . . . . . . . . . . . . . . . 2
Periodic Cleaning of Air-- Cooled Condenser Coils . . 3
Cleaning of Heavily Contaminated Air-- Cooled
Condenser Coils ONLY! . . . . . . . . . . . . . . . . . . . . . . 3
SAFETY CONSIDERATIONS
Installation and servicing of air conditioning equipment can
be hazardous due to system pressure and electrical
components. Only trained and qualified service personnel
should install, repair, or service air conditioning equipment.
Untrained personnel can perform basic maintenance
functions of cleaning coils and filters and replacing filters.
Trained service personnel should perform all other
operations. When working on air conditioning
equipment,observe precautions in the literature, tags and
labels attached to the unit,and other safety precautions
that may apply. Follow all safety codes.
It is important to recognize safety information. This is the
. When you see this symbol on the
safety-- alert symbol
unit and in instructions or manuals, be alert to the
potential for personal injury.
Understand the signal words DANGER, WARNING,
CAUTION, and NOTE. These words are used with the
safety-- alert symbol.
DANGER identifies the most serious hazards which will
result in severe personal injury or death. WARNING
signifies hazards which could result in personal injury or
death.
!
WARNING
ELECTRICAL SHOCK HAZARD
Failure to follow this warning could cause personal
injury or death.
Before performing service or maintenance operations
on unit, always turn off main power switch to unit and
install lock(s) and lockout tag(s). Unit may have more
than one power switch. Ensure electrical service to
rooftop unit agrees with voltage an amperage listed on
the unit rating plate.
!
CAUTION
CUT HAZARD
Failure to follow this caution may result in personal
injury.
Sheet metal parts may have sharp edges or burrs. Use
care and wear appropriate protective clothing, safety
glasses and gloves when handling parts and servicing
air conditioning equipment.
!
CAUTION
PROPERTY DAMAGE HAZARD
Failure to follow this caution may result in damage
to roofing materials.
Membrane roofs can be cut by sharp sheet metal
edges. Be careful when placing any sheet metal parts
on such roof.
Inspect the unit interior and exterior at the beginning of
each heating and cooling season and as operating
conditions require.
PERIODIC CLEANING
!
Routine cleaning of coil surfaces is essential to maintain
proper operation of the unit. Elimination of contamination
and removal of harmful residues will greatly increase the life
of the coil and extend the life of the unit. The following
maintenance and cleaning procedures are recommended as
part of the routine maintenance activities to extend the life
of the coil.
UNIT DAMAGE HAZARD
Failure to follow this caution may result in corrosion
and damage to the unit.
Harsh chemicals, household bleach or acid or basic
cleaners should not be used to clean outdoor or indoor
coils or any kind. These cleaners can be very difficult
to rinse out of the coil and can accelerate corrosion at
the fin/tube interface where dissimilar materials are in
contact. If there is dirt below the surface of the coil
use the Totaline environmentally sound coil cleaner as
described above.
Coil Cleaning
Remove Surface Loaded Fibers
Surface loaded fibers or dirt should be removed with a
vacuum cleaner. If a vacuum cleaner is not available, a
soft nonmetallic bristle brush may be used. In either case,
the tool should be applied in the direction of the fins .Coil
surfaces can be easily damaged (fin edges bent over) if the
tool is applied across the fins.
!
NOTE: Use of a water stream, such as a garden hose,
against a surface loaded coil will drive the fibers and dirt
into the coil. This will make cleaning efforts more difficult.
Surface loaded fibers must be completely removed prior to
using low velocity clean water rinse.
CAUTION
UNIT RELIABILITY HAZARD
Failure to follow this caution may result in reduced
unit performance.
High velocity water from a pressure washer, garden
hose, or compressed air should never be used to clean
a coil. The force of the water or air jet will bend the
fin edges and increase airside pressure drop.
Periodic Clean Water Rinse
A periodic clean water rinse is very beneficial for coils that
are applied in coastal or industrial environments. However, it
is very important that the water rinse is made with very low
velocity water stream to avoid damaging the fin edges.
Monthly cleaning as described below is recommended.
CAUTION
Evaporator Coils:
1. Although Totaline Environmentally Sound Coil
Cleaner is harmless to humans, animals, marine life,
and the environment, proper eye protection, such as
safety glasses, is recommended during mixing and
application.
2. Dilute the concentrated Environmentally Sound Coil
Cleaner directly from the original container with 8
parts potable, clean water. This is the same as a
dilution of 1 pint cleaner concentrate per gallon of
clean water. Mixing should be done in a 2 1/2 - gallon
garden sprayer.
3. Remove filters from the unit. Remove any accessories
that may hamper cleaning. Refer to unit or accessory
installation instructions for removal of these items.
4. Remove all surface loaded fibers and dirt with a
vacuum cleaner as described above.
5. Spray both sides of coil with the cleaning solution
until completely saturated.
6. For best results, back flush toward the entering air
side of the coil to remove any foreign material.
Thoroughly rinse with clean potable water to remove
residual cleaning agent and contamination.
7. Flush the condensate pan after completion.
8. Reinstall filters, accessories and access panels.
Cleaning of Coil Surfaces
Periodic cleaning with Totaline Environmentally Sound Coil
Cleaner (1 gal., Totaline Pt. No. P902--0301) is essential to
extend the life of coils. It is recommended that all
evaporator and condenser coils, including standard
aluminum, precoated, copper/copper, or E--Coat coils, are
cleaned with the Totaline Environmentally Sound Coil
Cleaner as described below. Coil cleaning should be part of
the unit’s regularly scheduled maintenance procedures to
ensure long life of the coil. Failure to clean the coils may
result in reduced durability in the environment. Totaline
Environmentally Sound Coil Cleaner agent will not harm the
coil or surrounding components such as electrical wiring,
painted metal surfaces, or insulation. Use of
non--recommended coil cleaners is strongly discouraged
since coil and unit durability could be affected.
Totaline Environmentally-Sound Coil Cleaner:
Application Equipment
S 2 1/2 - gallon poly garden
sprayer
S Safety goggles
S Clean potable water rinse
with low velocity spray
nozzle
C13020
2
Periodic Cleaning of Air-- Cooled Condenser Coils:
Fig. 2 - Rinsing Coil Cleaning Solution
12. The residuals in the resulting rinse water are not
hazardous and will not harm surrounding plants,
roofs, or nearby equipment.
13. Replace condenser fan/motor/grille assemblies,
grilles, hoods, guards, or coil access panels.
Cleaning of Heavily Contaminated Two-- Piece
Air-- Cooled Condenser Coils ONLY!
IMPORTANT: It is not necessary to separate two-- piece
coils if they are cleaned on a periodic basis, however, if
the coils are heavily contaminated use the following
procedure to insure that all surfaces of the two-- piece coil
are thoroughly cleaned.
1. Turn unit power off.
2. Clean area around the unit to ensure loose debris,
such as leaves, will not be blown into the coil.
3. Remove security grilles, wind baffles, hail guards, or
coil access panels.
4. Remove top panel screws on the condenser end of the
unit. See Fig. 3 for location of screws to be removed.
TOP
PANEL
Fig. 1 - Applying Coil Cleaner
C13047
REMOVE
SCREWS
CONDENSER
FAN
CONTROL BOX
CORNER POST
C13021
9. Ensure all coil surfaces including finned area, tube
sheets, and coil headers are saturated with the
cleaning solution. Make sure cleaner thoroughly
penetrates deep into finned areas. Interior and exterior
finned areas must be thoroughly saturated for the
cleaner to be effective.
10. Allow the cleaning solution to react with the coil
contamination for 5 to 10 minutes.
11. Thoroughly rinse coil with low velocity clean water
through the openings vacated by the condenser fan
COIL CENTER
POST
REMOVE
SCREWS
CONDENSER
COIL
REMOVE COIL
CORNER POST
C13048
Fig. 3 - Location of Screws and Coil Corner Post
3
Coil Cleaning
1. Although Totaline Environmentally Sound Coil
Cleaner is harmless to humans, animals, marine life,
and the environment, proper eye protection, such as
safety glasses, is recommended during mixing and
application.
2. Turn unit power off.
NOTE: Cleaning is most effective when condenser coil is
warm from use. However, cool condenser coils can be
cleaned effectively with the Environmentally Sound Coil
Cleaner as described below.
3. Remove security grilles, wind baffles, hail guards, or
coil access panels.
4. Clean area around the unit to ensure loose debris,
such as leaves, will not be blown into the coil.
5. Remove all surface loaded fibers and dirt with a
vacuum cleaner as described above.
6. To access the back side of the coils, remove
condenser fan/motor/grille assembly by unfastening
the screws securing the assembly to the top of the
unit. Flip the assembly over and place it grill side
down to rest on top of the unit.
NOTE: Depending on the size of the unit there can be up
to six condenser fan assemblies. Be sure to only remove
the ones located closest to the condenser coils.
7. Dilute the concentrated Environmentally Sound Coil
Cleaner directly with 4 parts clean potable water. This is
the same as mixing 1 quart cleaner per gallon clean
potable water. Mixing should be done in a 2 1/2- gallon
garden sprayer.
8. Apply the coil cleaner by spraying the solution onto the
outside of the coil. Hold the garden sprayer nozzle close
to finned areas and apply cleaner with a vertical,
up--and--down motion. Avoid spraying in horizontal
pattern to minimize potential for fin damage.
assemblies. Using downward rinsing motion of water
spray nozzle as shown in Fig. 2. Protect fins from
damage from the spray nozzle.
5. Remove condenser coil corner post (see Fig. 3). To
hold top panel open, place coil corner post between
top panel and center post (see Fig. 4).
COIL CORNER
POST
CENTER BAFFLE
TOP PANEL
Coil Cleaning
CONDENSER COIL
C13049
Fig. 4 - Propping Up Top Panel
6. Remove screws securing coil to center post.
7. To access the back side of the coils, remove condenser
fan/motor/grille assembly by unfastening the screws
securing the assembly to the top of the unit. Flip the
assembly over and place it grill side down to rest on top
of the unit.
NOTE: Depending on the size of the unit there can be up
to six condenser fan assemblies. Be sure to only remove
the ones located closest to the condenser coils.
8. Remove clips securing tube sheets together at the
return bend end of the coil. Carefully separate the
outer coil section 3 to 4 inches from the inner coil
section. See Fig. 5.
TOP VIEW
TOP PANEL
CONDENSER
COIL
INNER COIL
SECTION
9. Remove all surface loaded fibers and dirt with a
vacuum cleaner as described above. Ensure surfaces
between the sections are thoroughly vacuumed.
10. Although Totaline Environmentally Sound Coil
Cleaner is harmless to humans, animals, marine life,
and the environment, proper eye protection, such as
safety glasses, is recommended during mixing and
application.
NOTE: Cleaning is most effective when condenser coil is
warm from use. However, cool condenser coils can be
cleaned effectively with the Environmentally Sound Coil
Cleaner as described below.
11. Dilute the concentrated Environmentally Sound Coil
Cleaner directly with 4 parts clean potable water. This is
the same as mixing 1 quart cleaner per gallon clean
potable water. Mixing should be done in a 2 1/2- gallon
garden sprayer.
12. Hold the garden sprayer nozzle close to finned areas
and apply cleaner with a vertical, up-- and-- down
motion. Avoid spraying in horizontal pattern to
minimize potential for fin damage.
13. Ensure all coil surfaces including finned area, tube
sheets, and coil headers are saturated with the
cleaning solution. Make sure cleaner thoroughly
penetrates deep into finned areas. Interior and exterior
finned areas must be thoroughly saturated for the
cleaner to be effective.
14. Allow the cleaning solution to react with the coil
contamination for 5 to 10 minutes.
15. Thoroughly rinse coil with low velocity clean water
through the openings vacated by the condenser fan assemblies. Using downward rinsing motion of water
spray nozzle as shown in Fig. 2. Protect fins from
damage from the spray nozzle.
16. The residuals in the resulting rinse water are not
hazardous and will not harm surrounding plants,
roofs, or nearby equipment.
17. Reposition outer coil sections.
18. Reinstall clips that secure tube sheets.
19. Replace top cover and corner post.
20. Replace condenser fan/motor/grille assemblies,
grilles, hoods, guards, or coil access panels.
CENTER
BAFFLE
4” MAX
RETURN END
OUTER COIL
SECTION
Fig. 5 - Separating Coil Sections
Copyright 2013 Carrier Corp. D 7310 W. Morris St. D Indianapolis, IN 46231
C13050
Edition Date: 01/13
Manufacturer reserves the right to change, at any time, specifications and designs without notice and without obligations.
4
Catalog No: TAR ---01SM
Replaces: New