1
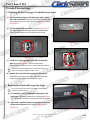
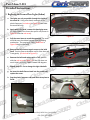
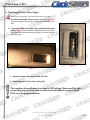
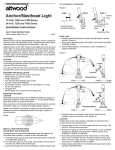
Part # Axm-9-011
CorkSport Mazda 3 LED Light Kit
2014+ Mazda 3
Thank you for purchasing the CorkSport 2014 Mazda 3
LED Light Kit. CorkSport's LED light kit replaces bulbs for
the rear dome light, vanity visor lights, front map light,
license plate, and trunk light. The lights simply plug in
with no custom adapters or wiring required. We hope
you enjoy your new interior lighting. Please let us know
your feedback by submitting a review at
http://www.corksport.com/corksport-led-light-kit-for2014-mazda-3.html
Pre-Installation Notes:
Make sure your vehicle is completely cooled down prior to starting installation. If you are
going to work on your car within an hour or two of having driven it, use a fan to cool off the car.
These instructions were written for reference only and the use of a factory service manual is
recommended. Please read these instructions thoroughly prior to starting installation
These installation instructions were written using a 2014+ Mazda 3. Other year Mazda 3
models will be similar.
Materials and Time:
General Info.
Part #: Axm-9-011
Time Est: 0.5 hours
Wrench Rating: 1/5
Tooling List
Small flat head screwdriver
Need Help With Your Installation?
Call (360) 260-CORK
Parts List
Four (4) 31mm LED bulb (pointed ends)
Two (2) T10 Wedge LED bulb
Two (2) 28mm LED bulb
One (1) T5 Wedge LED bulb
Part # Axm-9-011
Detailed Instructions
These instructions are made for a 2014 Mazda 3
1. Replacing the Front Overhead Interior Lights
LED Bulbs will only work when installed in one direction. Test each bulb in the socket during
installation. If it does not work, simply remove it, turn it around, and reinstall it.
Be careful when prying the covers off the factory bulb locations. They should come off easily. If they
are hard to come off make sure you are prying in the correct orientation.
a) Start by removing the light cover. Use a small flat head
screwdriver to pry the front side of the cover. It will not
take much effort. The cover will then come right off.
(shown in Figure 1a).
b) Pull the bulb out of the socket (circled in Figure 1b). If
you need to use something to remove the bulb make
sure it is non-metallic or you may short out a fuse.
Figure 1a
Figure 1b
c) Install one of the supplied 4 LED Festoons in the bulbs
place, (circled in Figure 1c). Check to see that it
illuminates. If it does not, turn it around and reinstall it.
Figure 1c
Face the LED bulbs straight down for maximum brightness or
angle them slightly to diffuse the light a little.
d) Replace the cover that was removed in step 1a. Slide
the back of the cover in first and then push the cover into
place (shown in Figure 1d). It will snap into place easily.
e) Repeat steps 1a-1d for the bulb on the other side.
Figure 1d
Need Help With Your Installation?
Call (360) 260-CORK
1 of 5
Part # Axm-9-011
Detailed Instructions
2. Replacing the Rear Passenger Overhead Interior Light
a) Start by gently prying out the light cover with a small
flat head screw driver. There is a small indentation in the
clear plastic lens that is there for this purpose (red arrow
in Figure 2a).
b) Pull the bulb out of the socket (circled in Figure 2b). If
you need to use something to remove the bulb make
sure it is non-metallic or you may short out a fuse.
Figure 2a
Figure 2b
c) Install one of the supplied 31mm LED’s in the bulbs
place (shown in Figure 2c). Check to see that it
illuminates. If it does not, turn it around and reinstall it.
Face the LED bulbs straight down for maximum brightness or
angle them slightly to diffuse the light a little.
Figure 2c
d) Replace the cover that was removed in the step 2a.
Slide the front of the cover in first and then push the
cover into place. It will snap into place easily.
3. Replacing the Trunk and Cargo Area Light
There are two bulbs included: one for Sedan (T5)and one for
hatchback (31mm Festoon).
a) For hatchback: Start by finding the cargo light in the
trunk area. It will have a switch on it (pictured in Figure
3a). The switch is located on the drivers side of the car.
b) Again with a small flat head, pry the light out starting
on the switch side as (shown with the red arrow in
Figure 3a).
Need Help With Your Installation?
Call (360) 260-CORK
Figure 3a
2 of 5
Part # Axm-9-011
Detailed Instructions
3. Replacing the Trunk and Cargo Area Light (continued)…
c) Once the light has been removed, pull the bulb out of the
socket (circled in Figure 3b). Again, if you need to use
something to remove the bulb make sure it is non-metallic
or you may short out a fuse.
d) Install the last 31mm LED in the bulbs place. Check to see
that it illuminates. If it does not, turn it around and
reinstall it.
Face the LED bulbs straight down for maximum brightness or
angle them slightly to diffuse the light a little.
e) Replace the cover that was removed in step 3a. Slide the
non switch side of the cover in first and then push the
cover into place. It will snap into place easily.
Figure 3b
f) For Sedan: Start by finding the cargo light in the trunk
area. It is located in the back of the trunk on top. Shown in
Figure 3c.
g) Remove trunk light housing from trunk lid by squeezing
the two longer sides of the housing and gently pulling
down. Shown with cover off in Figure 3d.
h) Once the cover has been removed, pull the bulb out of
the socket. Again, if you need to use something to remove
the bulb make sure it is non-metallic or you may short out
a fuse
Figure 3c
c) Install the last T5 LED in the bulbs place. Check to see that
it illuminates. If it does not, turn it around and reinstall it.
Shown installed in Figure 3e.
Figure 3d
Figure 3e
Need Help With Your Installation?
Call (360) 260-CORK
3 of 5
Part # Axm-9-011
Detailed Instructions
4. Replacing the License Plate Lights (Hatch Back)
a. Start by locating the license plate bulb covers (shown
with red arrows in Figure 4a). They are located on the
rear hatch above the license plate.
b. Again with a small flat head, remove the cover. Insert
the screw driver into the tab on the lens and slide the
lens to one side while pulling slightly. Slide direction of
drivers side shown with a red arrow in Figure 4b,
passenger side direction will be opposite. Both will
slide towards the center of the car.
Figure 4a
c. Once the cover is off, pull the bulb out (bulb shown in
Figure 4c). It should be snug in the socket but it will
come out by hand.
Figure 4b
Figure 4c
d. Install one of the supplied round T10 wedge type LEDs in the bulbs place. Check to see that it
illuminates. If it does not, pull it out and flip it around.
d. Replace the cover that was removed in step 4a. Slide one side in first and then the other will snap into
place as you press down.
e. Repeat steps 4a-4e for the second license plate light bulb.
Need Help With Your Installation?
Call (360) 260-CORK
4 of 5
Part # Axm-9-011
Detailed Instructions
5. Replacing the License Plate Lights (Sedan)
a. The lights are only accessible through the inside of
the trunk lid. Using a flat head, remove 4 of the
plastic fasteners (circled red in Figure 5a) that hold
the trunk lid lining.
b. Again with a flat head, remove the hand grip cover.
Pry up the side of the cover then pull it out (shown in
Figure 5a with the red arrow).
c. Pull the cover loose to reach the openings. The cover
will slide over the rubber bumpers and the lathing
mechanism. The opening to find is circled red in
Figure 5b behind the cable.
Figure 5a
d. Remove the bulb fixture to gain access to the bulb
itself. Turn the fixture clockwise until it clicks then pull
it out gently. (Circled red in Figure 5c)
e. Remove the bulb and replace with a T10. (shown
with the red arrow in Figure 5d) If the LED does not
work initially, then try it again rotated 180 degrees.
f. Repeat steps 5c – 5e to change the right side bulb.
Figure 5b
g. Re-insert the bulb fixtures back into the socket and
replace the cover.
h. Pop the plastic fasteners and cover back into place to
finish.
Figure 5c
Figure 5d
Need Help With Your Installation?
Call (360) 260-CORK
5 of 7
Part # Axm-9-011
6. Replacing the Vanity Mirror Lights
Depending on trim package, some models do not have vanity lights.
a. Locate the Vanity light in the sun visor. (Shown in Figure 5a)
To keep the light from coming on don’t open the slide all the
way.
b. Remove the cover of the light using a small flat head screw
driver. Figure 5b shows how the assembly will look once the
cover has been removed. Notice the light is off with the slide
partially open.
Figure 5b
Figure 5a
c. Replace the factory bulb with a 28mm LED bulb.
d. Repeat Steps 5a-5c for the other vanity light .
This completes the installation of your interior LED lighting. Make sure all the lights
are operating properly. If not, make sure all connections and fuses are good and the
LEDs are in the proper orientation.
Need Help With Your Installation?
Call (360) 260-CORK
5 of 5
Part # Axm-9-011
What’s Next:
The Ultimate Mazda Performance Guide
Written with the beginner/intermediate enthusiast in mind, the
Ultimate Mazda Performance guide shows you step by step how to
build the Mazda of your dreams. With detailed pictures and input
from industry experts, this guide gives you the latest information
available complete with the latest available technologies in the
performance market. Everything from what to modify and why is
covered, along with topics such as: the history of Mazda, styling,
technical and production facts and where to get the items you want
and need. From Rotary to SkyActiv, the Ultimate Mazda Performance
Guide will show you how to get the very most out of your Mazda.
CORKSPORT 2014+ Mazda 3 SkyActiv Power Series Short Ram Intake
One of the easiest and most beneficial performance enhancements
you can do for your vehicle, the CorkSport Power Series Short Ram
Intake replaces your factory airbox with an open intake system
allowing more air into the intake chamber. Engineered with exacting
tolerances, the CorkSport SkyActiv Short Ram Intake includes our
precision machined MAF housing made from billet aluminum, a
durable dry flow air filter and custom reinforced silicone connector.
Need Help With Your Installation?
Call (360) 260-CORK
4 of 4