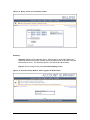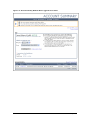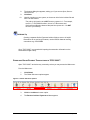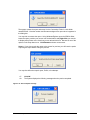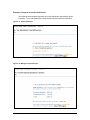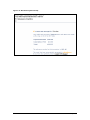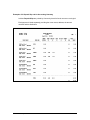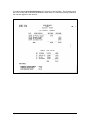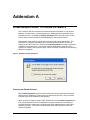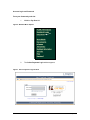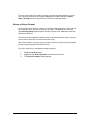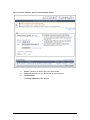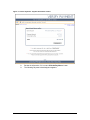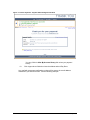
1
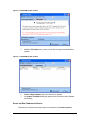
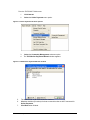
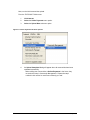
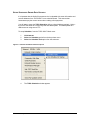
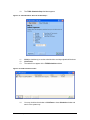
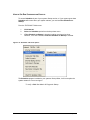
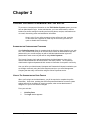
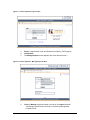
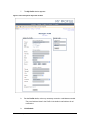
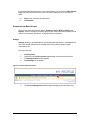
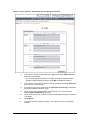
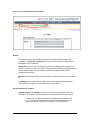
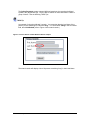
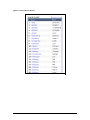
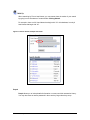
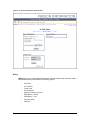
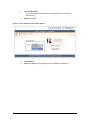
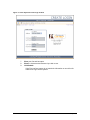
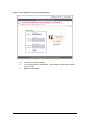
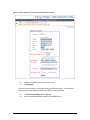
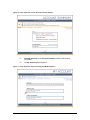
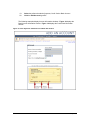
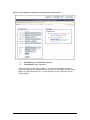
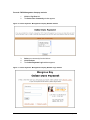
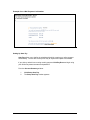
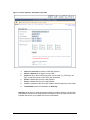
TOPS ONLINE PAYMENTS
USER GUIDE
Contents
CHAPTER 1 ..................................................................................................................................................1
INTRODUCTION .......................................................................................................................................... 1
Browser Skills......................................................................................................................................... 1
Logging On............................................................................................................................................. 2
How This Manual is Organized.............................................................................................................. 2
CHAPTER 2 ..................................................................................................................................................5
SETTING UP TOPS 2000™ DATA UPLOAD ............................................................................................... 5
Update Program Files............................................................................................................................ 5
Setup and Run Communities Upload...................................................................................................... 6
Setup Scheduled Owner Data Uploads................................................................................................... 9
How to Set Run Scheduler on Startup................................................................................................... 12
Web Site - Online Payments Link Placement........................................................................................ 13
CHAPTER 3 ................................................................................................................................................15
ONLINE PAYMENTS ADMINISTRATOR SETUP.......................................................................... 15
Administrator Username and Password............................................................................................... 15
Update The Administrator User Profile ............................................................................................... 15
Administrator Menu Options ................................................................................................................ 18
Settings ............................................................................................................................................. 18
Exports.............................................................................................................................................. 20
Using Admin Search Features .......................................................................................................... 20
People ........................................................................................................................................... 23
Billing........................................................................................................................................... 24
Summary ...................................................................................................................................... 25
CHAPTER 4 ................................................................................................................................................27
LOCKBOX DOWNLOAD TO TOPS 2000™ ............................................................................................... 27
Export Online Payment Transaction Files ........................................................................................... 27
Download Online Payment Transactions to TOPS 2000™.................................................................. 28
Handling Non-Sufficient Funds Items .................................................................................................. 38
Examples of Payment and Import Notifications............................................................................... 39
Examples of A Deposit Slip and An Accounting Summary............................................................. 41
ADDENDUM A .............................................................................................................................................1
HOMEOWNERS GUIDE TO ONLINE PAYMENTS ......................................................................................... 1
Creating an Owner Account ................................................................................................................... 1
Account Login and Password ............................................................................................................. 2
From your Community web site:.................................................................................................... 2
From the TOPS Management Company web site: ....................................................................... 10
Making an Online Payment .................................................................................................................. 11
Setting Up Auto Pay......................................................................................................................... 15
TOPS Online Payments
i
Chapter 1
INTRODUCTION
The TOPS Online Payments service provide TOPS 2000™ customers with a convenient
and easy to use online payment solution for their community residents. All financial
information is stored on a secured server with Secured Socket Layer (SSL) protection.
Each transaction is encrypted with a 128-bit level encryption. When owners first connect
to the online payments web site, they define new usernames and passwords, which are
separate and distinct from the community web site login information.
A link is added to your community web site making the interface seamless to your
community residents. If your association does not have a web site, the link is made
available on your management company’s web site. Available 24 hours a day, seven
days a week, TOPS Online Payments provides owners with numerous payment options,
including e-Checks, Visa, and Mastercard, American Express and Discover.
Residents as well as Associations can use the convenience of the TOPS Online
Payments system to make their payments. The following is a list of some of the many
types of fees and assessments your customers can pay using Online Payments.
•
•
•
•
•
•
Association dues from Homeowners
Special assessments
Rent for use of the clubhouse
Onetime fees for clubs and social events
Recurring fees for Pool Passes or Parking
Management fees from Associations to their Management Company
TOPS Online Payments provides an alert to the account administrator with a copy of the
owners emailed receipt as payments are made. Your account administrator will also
receive a daily e-mail containing transactions that have cleared the bank. Cleared
transactions are stored in a lockbox format file which you download and process into
TOPS 2000™ via the lockbox interface, eliminating the need to re-key payment
information. You can also run date specific reports to view payment information.
BROWSER SKILLS
TOPS Online Payments will operate on two browsers: Microsoft® Internet Explorer and
Netscape. This manual assumes that Online Payment users have basic browser skills.
Therefore, questions regarding your Internet browser should be referred to your systems
administrator or the browser’s user guide.
TOPS Online Payments
1
LOGGING ON
The TOPS Online Payments service is typically accessed through the community web
site. If your community does not yet have a web site, homeowners may make Online
Payments from the Management company web site. To login, go to your community or
management company web site, locate and Click the Pay Dues button.
The Online Payments login window will appear, you will be asked to enter a valid
Username and Password. The Username and Password for Online Payments is
different from your web site login and password. When logging on to Online Payments
you are accessing a secure server completely separate from your community web site.
If you are a first time user of TOPS Online Payments, you will be prompted to create a
new Username and Password with which to access this secure site.
HOW THIS MANUAL IS ORGANIZED
The TOPS Online Payments service manual provides information and instructions for
setting up, and Administrator functions for both the initial and recurring processes
contained with the TOPS 2000™ system. It also provides instructions for end users
(homeowners) setting up an owner account and making online payments using the TOPS
Online Payments service interface from their community or management company web
sites.
Introduction
TOPS 2000™ Online
Payments Data Upload
Introduction provides an overview of the features and
function provided by Online Payments.
Provides instructions for setting up the following TOPS
2000™ preliminary and recurring processes:
Updating Program Files
Setup and running Communities uploads (owner
data)
Setup Scheduled Data Uploads
Web site Online Payment Link Placement
Online Payments
Administrator Setup
Provides instructions for:
Setting up the Administrator Username and
Password
Establishing the company settings for alerts,
notifications, e-mail etc., at the Online Payments
service web site.
Lockbox Download to
TOPS 2000™
2
Lockbox Download – provides instruction on how to import
the transactions into TOPS 2000(tm).
TOPS Online Payments
Addendum A
Homeowners Guide to
Online Payments
TOPS Online Payments
Provides the homeowner instructions on how to:
Access TOPS Online Payments service
Setup an Owner Account
Create username and password
Add bank information
Make online payments
3
Chapter 2
SETTING UP TOPS 2000™ DATA UPLOAD
TOPS Software’s web support team will send an e-mail informing you that your
application(s) has been approved and you may begin setting up the Online Payments
feature for your homeowners.
An application must be completed for each individual association in
addition to your management company application.
Before you begin the initial community data uploads from TOPS 2000™, make sure that
your TOPS 2000 program files are up to date. To do so, run Check for Updates Online
using the following instructions.
UPDATE PROGRAM FILES
To update all of your TOPS program files, from the TOPS 2000™ Main menu:
1.
2.
Click Internet.
Select the Check for Updates Online menu option.
Figure 2-1 Internet Menu options
3.
4.
The TOPS WEB Updater window appears.
Select Community Web Sites from the Module to Check drop down menu list.
TOPS Online Payments
5
Figure 2-2 TOPS WEB Updater window
5.
Click the File Details tab to review a list of files the system has identified for
updates.
Figure 2-3 TOPS WEB Updater window
6.
7.
Click the Begin Updates button to initiate the file updates.
An Updates Completed dialog will appear when all files have been updated
successfully.
SETUP AND RUN COMMUNITIES UPLOAD
Next setup is to upload communities that are contracted to use Online Payments.
6
TOPS Online Payments
From the TOPS 2000™ Main menu:
1.
2.
Click Internet.
Select the Online Payments menu option.
Figure 2-4 Online Payments sub-menu options
3.
4.
Select the Community Management sub-menu option.
The TOPS Online Payments Maintain window appears.
Figure 2-5 TOPS Online Payments Maintain window
5.
6.
7.
The default is set so all communities are checked.
Click the checkbox (De-select) for those communities that are NOT contracted for
Online Payments.
Click Done when finished.
TOPS Online Payments
7
Next, run the initial communities upload.
From the TOPS 2000™ Main menu:
1.
2.
3.
Click Internet
Select the Online Payments menu option.
Select the Upload Now sub-menu option.
Figure 2-6 Online Payments sub-menu options
4.
An Upload Completed dialog will appear when all communities have been
uploaded successfully.
When adding new communities to Online Payments in the future, they
must also be setup in Community Management. Repeat the steps
outlined in this section for each new community you add.
8
TOPS Online Payments
SETUP SCHEDULED OWNER DATA UPLOADS
It is important that the Online Payments service is uploaded with owner information and
account balances from TOPS 2000™ on a scheduled basis. This ensures that
homeowners pay the correct amount when making online payments.
You will want to setup the TOPS Scheduler utility to upload this data regularly. Notice this is NOT the same as a Community Web Site data upload. This data uploads to a
different server using secure FTP.
To setup Scheduler, from the TOPS 2000™ Main menu:
1.
2.
3.
Click Internet
Select the Scheduler option from the drop down menu.
Select the Schedule Task option from the sub-menu.
Figure 2-7 Internet/ Scheduler sub-menu options
4.
The TOPS Scheduler window appears.
TOPS Online Payments
9
Figure 2-8 TOPS Scheduler window
Note the Scheduler icon on the taskbar and on the right system tray.
If Scheduler is already running, Double-Click the icon in the system tray
to open (the lower right of your screen next to the clock).
5.
6.
7.
8.
9.
Click Add to add a new task.
The TOPS Scheduler Step 1 window appears.
Enter a Task Description, typically a name that identifies the task.
Click Online Payments button (the gray house icon.).
Click Next.
Figure 2-9 TOPS Scheduler: New Job window Step 1
10
TOPS Online Payments
10.
The TOPS Scheduler Step 2 window appears.
Figure 2-10 TOPS Scheduler: New Job window Step 2
11.
12.
13.
Click the checkbox(s) to set the scheduled time and days uploads will be done.
Click Finish.
The task will now appear in the TOPS Scheduler window.
Figure 2-11 TOPS Scheduler window
14.
You may minimize the window or Click Done to close Scheduler window and
sent it to the system tray.
TOPS Online Payments
11
HOW TO SET RUN SCHEDULER ON STARTUP
To ensure Scheduler is part of your system Startup routine, or if your system goes down
Scheduler will resume when your system reboots, you must set Run Scheduler on
Startup.
From the TOPS 2000™ Main menu:
1.
2.
3.
Click Internet.
Select the Scheduler option from the drop down menu.
If Run Schedule on Startup is checked, nothing more has to be done.
However, if it is NOT checked, Click Run Schedule on Startup to activate.
Figure 2-12 Scheduler sub-menu options
The Scheduler program is added to your systems Startup folder, it will run anytime the
system restarts or a new user logs in.
To verify: Click Start Menu\ All Programs\ Startup
12
TOPS Online Payments
WEB SITE - ONLINE PAYMENTS LINK PLACEMENT
Please e-mail TOPS Software at [email protected] to let us know when you
have completed your first data upload. When you e-mail TOPS web support, also let us
know where on your web site's left-menu frame you want the link to the Online
Payments feature to appear. By default, we place it near the top right underneath the
Home link and we name the link Pay Dues. If you would like it called something else or
placed somewhere else on the menu, please let us know in your e-mail.
TOPS Online Payments
13
Chapter 3
ONLINE PAYMENTS ADMINISTRATOR SETUP
To process or view payment information on the TOPS Online Payment system you must
have an Administrator Login. As the Administrator, you have authorization to retrieve
lockbox files, define settings for sending and receiving alerts, receipts, confirmations etc.
via e-mail, researching owner and transaction information.
Keep in mind, if your online payments volume will be very high, receiving
an alert each time a payment is made may be excessive; you have the
option to disable this functionality.
ADMINISTRATOR USERNAME AND PASSWORD
Once Online Payments Setup is completed and the links have been placed on your web
site, TOPS Software will send you an e-mail that will contain an administrative login and
password for your overall company as well as individual administrative logins and
passwords for each community that will be using Online Payments.
The Overall Company login and password allows the Administrator to view <ALL>
owners and transactions for all communities in the entire portfolio. The Community
Administrative logins and passwords limit access to information for a specific community.
How you define your Administrator Username and Password will depend on whether your
are a single community using the Online Payment service or you are a Management
Company that has many communities using the Online Payments service.
UPDATE THE ADMINISTRATOR USER PROFILE
When you first login as the Administrator, you will be required to complete the profile
information. Once done, updating the Online Payment administrative account's system
settings will only be necessary for security purposes, when a new administrator is
assigned, or if your e-mail account changes.
From your web site:
1.
2.
Click Pay Dues
The Login window appears.
TOPS Online Payments
15
Figure 3-1 Online Payments Login window
3.
4.
5.
Enter the Administrator Login and Password provided by TOPS support.
Click Submit.
The Manage People window appears (this is the default window.)
Figure 3-2 Online Payments Manage People window
6.
Click the Manager hyperlink located to the left of the Logout hyperlink.
The Manager hyperlink will include the of Community Management
Company name.
16
TOPS Online Payments
7.
The My Profile window appears.
Figure 3-3 Online Payments My Profile window
8.
Review Profile details, make any necessary correction or add data as needed.
The e-mail address listed in the Profile is the default e-mail address for all
notifications.
9.
Click Submit.
TOPS Online Payments
17
It is recommended that at this time, for security purposes, you change the Administrator
Login Username and Password from the one TOPS created for you to one that you
define.
10.
11.
Enter a new Username and Password.
Click Submit.
ADMINISTRATOR MENU OPTIONS
There are five main administrator options: Summary, People, Billing, Settings and
Exports. With the exception of Settings and Exports, these options are primarily used to
search for homeowner, transaction, or payment history information.
Settings
Settings allows you to standardize the e-mail addresses that appear in the From field of
all e-mails and set preferences for sending and receiving alerts, owners receipts,
confirmations, etc.
From your web site:
1.
2.
3.
4.
Click Pay Dues.
Login with your Online Payments Administrator Username and Password.
The Manage People window appears.
Click Settings on the toolbar.
Figure 3-4 Online Payments toolbar
5.
18
The Account Management window appears displaying E-mail Preferences.
TOPS Online Payments
Figure 3-5 Online Payments Administrator Account Management window
6.
If you want to receive an alert each time a payment is made, Select Yes then
enter the e-mail address.
If your online payments volume is very high, receiving an alert each time a
payment is made may be excessive; select NO to disable this function.
7.
8.
9.
10.
11.
12.
If you want to receive an alert when an Export is ready to download, Select Yes
then enter the e-mail address.
If you want to receive an email when an application for housing is submitted?
What email address should be used?
When a payment is returned (NSF, Invalid Account, etc), enter the email
address Online Payments should notify.
When emails are sent to residents, enter the email address would you like them
to be from.
Click Update.
You will receive the following message: The preferences were successfully
updated.
TOPS Online Payments
19
Figure 3-6 Online Payments Update Confirmation
Exports
The export of lockbox data is slightly different for communities than management
companies. Companies or Exports both allow you to view, export, and download the
transactions into a lockbox file.
Companies is the term used for the Export option for the Management Company web
sites, it is a hierarchal version of Exports. When exporting lockbox files using Companies
you are asked to select a single company to search for exports or search for all
companies lockbox files.
Exports is the term used on the community web site, it takes you directly to the exports
list.
The Exports option is discussed in detail as part of the download of lockbox files to
TOPS 2000 (see Chapter 4, Lockbox Download to TOPS 2000.)
Using Admin Search Features
Summary, People, and Billing are used to search for and viewing Online Payment
information. An example of each search option is provided at the end of this section.
Communities are called Companies on the Management Company web
site. The company administrator will often have an additional filter that
allows searches by a particular community or by all communities.
20
TOPS Online Payments
The Online Payments system supports Wildcard searches; the recognized wildcard
symbol is the (%) percent sign. You are able to search for items that contain a letter or
group of letters. See the following TOPS Tips.
TOPS Tip
An example of using the wildcard % search: You remember that the Last Name of the
person you are searching for ends with “berg.” You would enter %berg in the Last Name
field, then Click Submit (refer to Figure 3-8 for search results.)
Figure 3-7 Person Search window Wildcard Search example
The search results will display a list of all persons containing “berg” in their Last Name.
TOPS Online Payments
21
Figure 3-8 ildcard Search Results
22
TOPS Online Payments
TOPS Tip
When searching by First or Last Names, you can narrow down the results of your search
by typing in more characters of a name before Clicking Submit.
For example: there are 261 Last Names that begin with “A” in this database, but only 9
Last Names that begin with “At”.
Figure 3-9 Person Search example and results
People
People allows you to lookup detailed information on owners and their transaction history.
You may also reset an owners password in the event they forgot what they set up.
TOPS Online Payments
23
Figure 3-10 Person Information Detail window
Billing
Billing allows you to view detailed information for the transactions that have been made.
Billing searches may be filtered by the following options:
No Filters
All Transfers
Credit Card
Direct Deposit
Electronic Check (e-Check)
ERentPayer™ Credit
ERentPayer™ Fee
Payment (ACH)
Reversal
24
TOPS Online Payments
Figure 3-11 Billing: Search for Transactions window
Summary
Summary displays online statement history. When logged in as the Administrator the
Statement should not list results, because online payments would not be made using the
administrator account. This Summary search is not used by the Administrator.
Figure 3-13 is an example of an owner Account Summary window.
Figure 3-12 Account Summary Window: When Logged In As Administrator
TOPS Online Payments
25
Figure 3-13 Account Summary Window: When Logged In As An Owner
26
TOPS Online Payments
Chapter 4
LOCKBOX DOWNLOAD TO TOPS 2000™
The homeowner and Online Payments Administrator will receive an email notification that
a payment was made, the e-mail does not contain payment data. Four business days
after payments are made you will receive an e-mail containing the “statement of deposit”
for payments that will be deposited to your account the following business day. Credit
Card payments are typically processed within 24 hours.
eRentPayer™ sends an e-mail notification the next morning advising the Online
Payments Administrator that there are new transactions to be exported. The export
notification contains the link to the eRentPayer™ web site login to retrieve the transaction
download. By default all payments for the prior day come in one file.
Once the file is downloaded to your system you can proceed with uploading the data to
TOPS 2000™ and updating the resident balances.
EXPORT ONLINE PAYMENT TRANSACTION FILES
To retrieve your Online Payment Transaction file from the eRentPayer™ download web
site:
While still in the email notification
1.
2.
3.
Click the e-Rent Payer™ hyperlink contained in the e-mail.
Enter the Administrator Login and Password.
If you are a Community proceed to Step 3 below. If you are a Management
Company proceed to Step 4 below.
or
From your community or the management company web site:
1.
2.
3.
Click Pay Dues.
Enter the Administrator Login and Password
If you are a community, select the Export option and proceed to Step 5.
or
4.
If you are a management company, select the Companies option.
5.
Select a particular community or Select <All Companies> to export all
transaction for all communities.
6.
The Search for Files dialog box appears.
7.
Click “Export N Transactions now.”
TOPS Online Payments
27
8.
9.
10.
The browser dialog box appears, asking you if you want to Open, Save or
Cancel the file.
Click Save.
Identify a location on your system, or the server drive for the lockbox file and
save it to that location.
The path to this location must NOT have any spaces in it. For example,
store it in T:\TOPS2000\Lockbox, but not in C:\Documents and
Settings\Owner\Desktop because that path has spaces in it. Do NOT
save it to your desktop.
TOPS2000 Tip
Creating a separate Online Payments lockbox folder to save to is helpful.
Remember do not use long file names, use the DOS 8 character naming
conventions e.g. OPLOCKBX
Go to TOPS 2000™ to proceed with importing the transaction information to the
homeowners ledger history.
DOWNLOAD ONLINE PAYMENT TRANSACTIONS TO TOPS 2000™
Open TOPS 2000™ and select any community so that you may access the Main menu.
From the Main menu:
1.
2.
Click Global
The Global Sub-menu options appear.
Figure 4-1 Global Sub-menu options
3.
4.
28
Click the Lockbox sub-menu option.
The Receive Lockbox Payments window appears.
TOPS Online Payments
Figure 4-2 Receive Lockbox Payments window
5.
6.
Click the Lockbox File Name down arrow.
The Windows Explorer Open File dialog box appears.
Figure 4-3 Windows Explorer Open File Dialog box
TOPS Online Payments
29
7.
8.
9.
Locate the file you just saved, Click Open.
You are returned to the Receive Lockbox Payment window.
The Lockbox file name appears in the Lockbox File Name field
10.
11.
Click the Process File button to the right of the file name field.
You will be prompted for the type of lockbox file to process.
Figure 4-4 Select Lockbox ID dialog box
12.
13.
14.
30
Select eRentPayer™ file format.
Click the Proceed button.
A list of all transaction batches contained in the lockbox file appears (see the
following illustration.)
TOPS Online Payments
Figure 4-5 Receive Lockbox Payments window
15.
16.
Click a Community Name to view the details for that batch.
The Lockbox Owner List for a Community window appears displaying the
Owner Names, Amount, Check # and Unit ID.
Figure 4-6 Lockbox Owner List for a Community
TOPS Online Payments
31
17.
Click the Post and Deposit radio button only if there are NO “Undefined
Communities” or Invalid Transactions listed.
Figure 4-7 Receive Lockbox Payments window
An Undefined Community indicates the AR Owner Data setup is not complete for that
community. The setup must be completed before you can continue processing the
lockbox file. Also, make sure that the community name is correct.
If the lockbox utility displays ** Community Undefined ** in the Community Name field:
18.
19.
Click Clear to undo your work and go to TOPS 2000 Setup.
The following TOPS System dialog box appears.
Figure 4-8 Clear: Purge Confirmation dialog box
32
TOPS Online Payments
20.
Click Yes, to purge the download and end the Lockbox file process.
Before you can proceed, you MUST Complete Owner Data Setup for the new
community then return to Lockbox and Repeat steps 2 through 16.
TOPS 2000 Tip
Should you misplace the lockbox file before you have a chance to process it, you
may download it again. Login to the online payments web site and go back to
the Exports/Companies feature. Then do a search for the lockbox file for the
time period in which you exported it. When it displays the lockbox export, Click
the file to download it again.
An Invalid Transaction contained in a batch indicates that data maybe missing therefore,
the transaction cannot be applied to an owner account (refer to Figure 4-7.)
If the lockbox utility displays a numeric value in the Invalid Trans column:
21.
22.
23.
24.
25.
Click the Community Name containing Invalid Transactions.
The Lockbox Owner List for a Community window appears displaying the
Owner names, payment amounts, check # and Unit ID
Find the line items that are missing data in the columns (refer to Figure 4-6.)
Click the line item.
The Edit Lockbox Transactions window appears.
Figure 4-9 Edit Lockbox Transactions
Note the Unit Key cannot be blank or zero. It must be a value greater
than zero.
TOPS Online Payments
33
26.
27.
28.
29.
Click the Unit Key down arrow.
The Lockbox Cash Receipts window appears.
The Select By default is Address.
Click the Addr # drop down arrow.
Figure 4-10 Lockbox Cash Receipts window
30.
31.
32.
33.
The Select Address window appears.
Locate the Owner Name associated with the Invalid Transaction.
Double-Click the name to select, or Click the name.
Click OK.
Figure 4-11 Select Address window
34.
34
You are returned to the Edit Lockbox Transaction window and the Unit Key
field now contains a value.
TOPS Online Payments
Figure 4-12 Edit Lockbox Transaction window
35.
36.
37.
38.
39.
Click OK.
You are returned to the Lockbox Owner List window.
Click OK.
You are returned to the Receive Lockbox Payments, the Invalid Trans. Column
is now blank.
Click the Post and Deposit radio button for the Post Options.
Figure 4-13 Post Options
40.
41.
42.
43.
Click the Post button.
The Enter Deposit Date dialog box appears.
Enter the Deposit Date
Click the checkbox if you wish to print a Deposit Slip.
TOPS Online Payments
35
Figure 4-14 Enter Deposit Date window
44.
45.
46.
Click OK.
The Lockbox Cash Receipts Report Output dialog box appears.
Select the output for your Deposit Slip.
Figure 4-15 Lockbox Cash Receipts - Report Output dialog box
Examples of Deposit Slips are provided at the end of this section.
Deposit Slip Output:
Printer: If you elect to print the report to a printer, the printer dialog box will appear.
Select the printer you wish to print the report.
File: If you elect to print the report to a file the following dialog box will appear:
36
TOPS Online Payments
The system creates the report and stores it in the Community Folder in a sub-folder
named SPOOL. Note the location and file name assigned to a report when it appears in
the dialog box.
You may wish to rename the report. Using Windows Explorer open the SPOOL folder,
locate the report, position your mouse over the desired file and Right-Click your mouse
to display a drop down menu of actions you can take with this file. Rename is one of the
options on the drop down menu. Click Rename and enter a new name.
Screen: If you elect to print the report to the screen for preview, you will have the option
of printing the report before exiting the preview.
You may also define the report Layout, Profile, or Landscape.
47.
48.
Click OK.
The System displays the following message when the post is completed.
Figure 4-16 Post Complete message
TOPS Online Payments
37
The TOPS 2000™ post function will update homeowner account history and make all G/L
entries to the appropriate accounts.
HANDLING NON-SUFFICIENT FUNDS ITEMS
Should an eCheck be returned for NSF, managers and residents are notified by e-mail.
The manager has the option to resubmit the eCheck or contact the homeowner to do so.
Returned payments will automatically be reflected on the homeowners TOPS 2000™
ledger history along with any additional NSF fees. The Online Payment service will
resubmit the NSF payment as many times as a manager likes until funds are available.
38
TOPS Online Payments
Examples of Payment and Import Notifications
The following three examples represent the e-mail notifications generated by Online
Payments. The e-mail headers have been altered to protect customer information.
Figure 4-17 Export Notification
Figure 4-18 Managers Payment Receipt
TOPS Online Payments
39
Figure 4-19 Residents Payment Receipt
40
TOPS Online Payments
Examples of A Deposit Slip and An Accounting Summary
Lockbox Deposit Slips are printed by Community therefore funds are never co-mingled.
Each payment is listed separately providing the owner name, address, the amount
received and the distribution.
TOPS Online Payments
41
A Lockbox Deposit Accounting Summary by Community is also provided. The Summary list all
the G/L accounts and the amounts distributed to each account. It also lists all charge codes and
the amounts applied to each account.
42
TOPS Online Payments
Addendum A
HOMEOWNERS GUIDE TO ONLINE PAYMENTS
The community web site Account Info window allows the homeowner to view account
balances, account history, and last payment info. Making payments using the Online
Payments service is as simple as Clicking 'Pay Dues' on the web site to login. Credit
Card or Bank Account information is transmitted over a secured connection.
Homeowners create a secure profile that is encrypted and password protected. This
information is completely separate from the community web site profile and can be
change by the user at any time. Because the Online Payments information is stored on
a separate and secure server, a community web site administrator does NOT have
access to an owner's online payment login. When accessing a secured site the following
dialog box will appear.
Figure-1 Web Security Alert dialog box
CREATING AN OWNER ACCOUNT
Before Online Payments can be used, an owner must create a new Login Username
and Password, separate from their login to the Community web site. Only one Online
Payment login can be created for each property.
When an owner is ready to create a login, whether they access Online Payments from
their community web site or the management company web site the online payment
interface identifies a valid owner by matching the street address with the owner name
entered by the user. If the owner name does not match the information on file, the
account is rejected.
1
Account Login and Password
From your Community web site:
1.
Click the Pay Dues link.
Figure-2 Web Site Menu Options
2.
The Online Payments Login window appears.
Figure 1 Online Payments Login window
2
TOPS Online Payments
3.
Click Create Login
This Login Username and Password is separate from your community
web site Login.
4.
Select your street.
Figure -2 Online Payments Choose Street window
5.
6.
Click Submit.
Select the address of your property from the Address drop-down list.
3
Figure -3 Online Payments Create Login window
7.
8.
9.
Enter your first and last name.
Enter the Username and Password you wish to use.
Click Submit.
If the First and Last names do not match the information on record for this
address the Login will be rejected.
4
TOPS Online Payments
Figure -4 Online Payments: Create Login Error Message
10.
11.
12.
Confirm your profile information.
You must provide an e-mail address. Your payment verification will be sent to
you via e-mail.
Enter all required data.
5
Figure -5 Online Payments: Owner Account Information window
13.
14.
Click the Checkbox to accept the terms of use.
Click Submit.
Once the account is setup, proceed with setting up payment options. You may enter
bank account or credit card information from which to make payments.
15.
16.
6
The Account Summary window appears.
Select a preferred payment method from the Pay list box.
TOPS Online Payments
Figure -6 Online Payments: Owner Account Summary window
17.
18.
Click My Accounts on the Account Summary toolbar to add account
information.
The My Account window appears.
Figure -7 Online Payments: My Account Payment Method Options
7
19.
20.
Select the preferred method of payment, Credit Card or Bank Account.
Click the Add Account hyperlink.
The following examples display Account Information windows. Figure -9 displays the
Bank Account information window. Figure -10 displays the Credit Card information
window.
Figure -8 Online Payments: Add An Account Bank Info window
8
TOPS Online Payments
Figure -9 Online Payments: Add An Account Add Credit Card Info window
21.
22.
Enter Banking or Credit Card information.
Click Submit to save information.
You are no ready to make online payments. You may make a onetime payment or
authorize auto pay to automatically make your payment on a specified day each month
without any further action from you. You can change your online payments account
setup at anytime.
9
From the TOPS Management Company web site:
1.
2.
Click the Pay Dues link.
The Select Your Community window appears.
Figure -10 Online Payments: Management Company Web Site window
3.
4.
5.
Select your community from the list box.
Click Continue.
The Online Payments Login window appears.
Figure -11 Online Payments: Management Company Web Site Login window
Mangrove Bay
10
TOPS Online Payments
From this point forward, the steps for creating a login are the same whether you are on
your community web site or the Property Management Company web site. Repeat
Steps 3 through 19 of the instructions in the Community web site section.
MAKING AN ONLINE PAYMENT
As soon as the owner account is setup, you can begin making payments. Payments can
be a onetime event or they can be setup as “Auto Pay”, a scheduled recurring event.
The Online Payments payment options include: E-checks, Visa, Mastercard, American
Express and Discover.
The service will pre-populate the balance owed, homeowners have the option to pay the
amount owed or enter the new amount they wish to pay.
When owners submit a payment, they will receive a reference number and receipt letting
them know that the payment has been received.
From your community or management company web site:
1.
2.
3.
Click the Pay Dues button.
Login with your Online Payments Username and Password.
The Account Summary window appears.
11
Figure -12 Online Payments: Owner Account Summary window
4.
5.
6.
7.
12
Enter the amount you wish to pay in the Amount field.
Select the Bank Account you wish to use for this transaction.
Click Continue
The Verify Payment window appears.
TOPS Online Payments
Figure -13 Online Payments: Payment Verification window
8.
9.
Review the information, if it is correct Click the Pay Now>> button.
The following Payment acknowledgment appears.
13
Figure -14 Online Payments: Payment Acknowledgement window
You may Click the View My Account History link review your payment
history.
10.
Click Logout when finished to close the window and exit Pay Dues.
An e-mail with a payment confirmation number will be sent to the e-mail address
contained in your Account Profile. See the following example.
14
TOPS Online Payments
Example of an e-Mail Payment Confirmation.
Setting Up Auto Pay
Auto Pay allows you to define the schedule with which to make your online payment
automatically. You are able to setup Auto Pay at anytime and update it as needed.
If you wish to make this a recurring monthly payment Click Pay Dues and login using
your Online Payments username and password.
From the Account Summary window:
1.
2.
Click Setup Auto Pay.
The Setup Auto Pay window appears.
15
Figure -15 Online Payments: Setup Auto Pay window
3.
4.
5.
6.
7.
8.
9.
Select the Account from which to make this payment.
Enter the Amount of the payment to be made.
Select the day of the month this payment is to be made, e.g. First Day, Last
Day, or select the numeric value of any day in-between.
Enter the Month and Year of the first payment.
Enter the Month and Year of the last payment.
Click the checkbox to the left of each month in which a payment is to be made.
Click Submit to save the information for Auto Pay.
Auto Pay can be set up to make payments monthly, bi-monthly, quarterly or bi-annually.
Payments will continue to be made regularly as defined in Auto Pay setup until the Last
Payment date occurs or you update your Account Information.
16
TOPS Online Payments