1
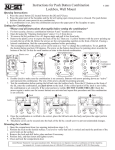
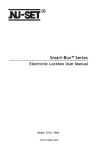
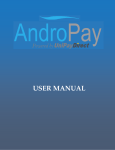
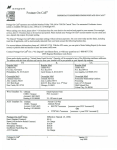
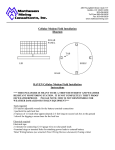
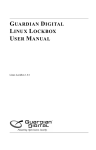
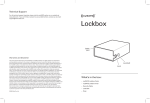
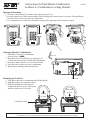
Instructions for Push Button Combination
Lockbox w/ Combination Locking Shackle
# 2084
Opening Instructions:
1. Press the cancel button [C] located between the [0] and [*] keys.
2. Press the upper part of the faceplate and the lid will spring open when pressure is released. The push button
lockbox does not come preset to any combination.
3. If a combination is set, enter the combination and press the upper part of the faceplate to open.
➊
PRESS
➋
PRESS
1
2 ABC
3 DEF
1
2 ABC
4 GHI
5 JKL
6 MNO
4 GHI
5 JKL
7 PQRS
8 TUV
0
C
7 PQRS
0
C
➌
➍
3 DEF
9 WXYZ
Changing Shackle Combination:
1. Turn dials to the last set combination
(factory preset is 0000).
2. Insert the reset tool (with tail piece pointing at 12
o’clock) into the reset hole located under the shackle.
3. Turn tool counter-clockwise to 8 o’clock and hold.
4. Turn dials one at a time to set new combination.
5. Return tool to starting position and remove.
Mounting the Lockbox:
1. Turn dials to the last set combination and lift the shackle.
2. Hang the lockbox on a stationary object.
3. Push the shackle back into body and
scramble the dials to secure. Pull on the
shackle to make sure it is locked.
Pull up
to open
Reset tool
Reset Hole
Push down
to close
Combination Dials
Limited Warranty: Warranted for 1 year against manufacturer defect. Warranty does not cover forgotten or incorrectly set combinations or if the lid or shackle has
been tampered with. For repair or replacement, please call 1-800-606-8738 for authorization. Copyright NU-SET® 2014 Patent pending.
Instructions for Push Button Combination
Lockbox w/ Combination Locking Shackle
# 2084
Setting the Combination:
*Please read all instructions thoroughly before setting the combination*
1.
2.
3.
4.
For best security, choose a combination between 4 and 7 numbers and/or letters.
Open lid using the “Opening Instructions” steps # 1 to 3.
To remove the lid, position it to a 45 degree angle and pull it free from body.
Remove the plastic cover to expose the back of the lid. There are 11 yellow buttons with the arrow pointing up
towards the top of the lid. Below the arrows are the corresponding numbers to the front of the lid. If using a
lettered combination, find the corresponding numbers before proceeding.
5. The rectangular tab on the plastic cover can be used as a “key” to change the combination. To set, push in
the desired button and turn 180 degrees. The arrow on the button should now be pointing down towards the
bottom of the lid. Do this for each number or letter in the desired combination.
Plastic cover
o
180
Correct
Incorrect
Example
Combination:
“1238”
“Key”
6. Double check to make sure the combination is set correctly. Buttons with arrow pointing down are “active”
and represent the combination. The rest of the arrows should be pointing upwards.
7. Test the combination before putting the lid back into the lockbox body. Press the [C] button on the front of
the lid, enter the combination, and push down on the latch. If the colored portion of the latch is not visible,
the combination is set correctly. If the color portion is visible, DO NOT CLOSE THE LID. Check the
arrows again to make sure the correct buttons are activated and repeat this procedure until the combination
is set correctly.
Push
Push
Push
Latch
Incorrect
Correct
8. Once the combination is verified to be correct, place the lid back onto the body and press the upper portion
of the lid to lock.
9. The plastic cover can be secured onto the back of the lid by a small screw to prevent unintended changes.
Limited Warranty: Warranted for 1 year against manufacturer defect. Warranty does not cover forgotten or incorrectly set combinations or if the lid or shackle has
been tampered with. For repair or replacement, please call 1-800-606-8738 for authorization. Copyright NU-SET® 2014 Patent pending.