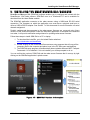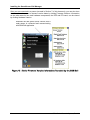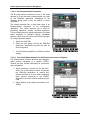
1
DOC-0100-00 VEHICLE DETECTION RADAR SYSTEM VDR24® INSTALLATION AND OPERATION MANUAL Island Radar Company Part Numbers Part Name SmartSensor™ - Rail Radar Sensor Vehicle Detection Radar Controller Extended Mounting Bracket, 48-Inch Mast Riser Cable Mast Base Junction Box Home Run Cable Part Number RAD-0500-00 RAD-0100-00 MNT-0102-00 CAB-0100-00 ENC-0100-00 CAB-0101-00 Typical Quantity 2 1 2 2 2 Up to 600 Feet per Sensor • Installation • Configuration • Operation • Support • Troubleshooting Document Number DOC-0100-00 Publication Date March 23, 2014 Rev 1.0 Island Radar Company, LLC 25055 West Valley Parkway, Suite 104 Olathe, Kansas 66061 (913) 543-3322 www.islandradar.com © 2014 The Island Radar Company. All rights reserved. Protected by Island Radar Company, LLC Patent Nos. 8,596,587, Wavetronix U.S. Patent Nos. 6,556,916; 6,693,557; 6,426,450; and 7,427,930. Other Island Radar Company and Wavetronix U.S. and international patents pending. Wavetronix, Smart Sensor, Click! and all associated logos are trademarks of Wavetronix LLC. Island Radar and ‘get out of the road’ are registered trademarks of The Island Radar Company, LLC. All other product or brand names as they appear are trademarks or registered trademarks of their respective holders. Product specifications are subject to change without notice. This material is provided for informational purposes only. ii VDR24 Radar Detection System, Rev 1.0 Notices Proprietary Notice This document and its contents are the property of the Island Radar Company. This document has been furnished to you on the following conditions: no right or license under any patents or any other proprietary right in respect of this document or its content is given or waived in supplying this document. This document or its content are not to be used or treated in any manner inconsistent with the rights of Island Radar Company, or to its detriment, and are not to be copied, reproduced, disclosed to others, or disposed of except with the prior written consent of the Island Radar Company. Important Notice The Island Radar Company constantly strives to improve our products and keep our customers apprised of changes in technology. Following the recommendations contained in the attached service manual will provide our customers with optimum operational reliability. The data contained herein purports solely to describe the product, and does not create any warranties. Within the scope of the attached manual, it is impossible to take into account every eventuality that may arise with technical equipment in service. Please consult your local Island Radar Company sales representative in the event of any irregularities with this product or system. We expressly disclaim liability resulting from any improper handling or use of this equipment, even if these instructions contain no specific indication in this respect. We strongly recommend that only approved Island Radar Company spare parts are used as replacements. Revision History REV. 1.0 DATE March 23, 2014 VDR24 Radar Detection System, Rev. 1.0 NATURE OF REVISION Initial Issue iii Table of Contents 1 . G E N E R A L I N F O R M A T I O N . . . . . . . . . . . . . . . . . . . . . . . . . . . . . . . . . . . . . . . . . . . . . . . . . . . . . . . . . . . . . . . . . . . . . . . . . . . . . . . . . 1 1 1.1. Safety and Regulatory Information ............................................................................................11 1.2. FCC Part 15 Compliance ...........................................................................................................11 1.3. Specifications ............................................................................................................................11 2 . I N T R O D U C T I O N A N D O V E R V I E W . . . . . . . . . . . . . . . . . . . . . . . . . . . . . . . . . . . . . . . . . . . . . . . . . . . . . . . . . . . . . . . . . . . . . 1 3 2.1. About This Manual .....................................................................................................................14 2.2. Glossary and Terms ..................................................................................................................15 2.3. Introduction to the Island Radar System Components ..............................................................18 2.3.1. System Layout .............................................................................................................. 18 2.3.2. About the SmartSensor-Rail Radar Sensor .................................................................. 19 2.3.3. SS300 SmartSensor-Rail Views and Features ............................................................. 19 2.3.4. About the VDR24 Controller ......................................................................................... 21 2.3.5. Island Radar Accessory Components .......................................................................... 23 3 . I N S T A L L A T I O N A N D S E N S O R S I T I N G . . . . . . . . . . . . . . . . . . . . . . . . . . . . . . . . . . . . . . . . . . . . . . . . . . . . . . . . . . . . . . 2 7 3.1. Typical Radar Siting on Entrance or Exit Gate Masts ...............................................................27 3.2. Radar Siting on Dedicated Poles ...............................................................................................28 3.3. Radar Siting on Dedicated Poles for Train Detection at Crossovers .........................................28 4 . I N S T A L L I N G T H E R A D A R S E N S O R S A N D C A B L E S . . . . . . . . . . . . . . . . . . . . . . . . . . . . . . . . . . . . . . . . . . . 2 9 4.1. Mounting the Radar Sensor to the Pole or Mast .......................................................................29 4.2. Attaching the Sensor to the Mounting Bracket ..........................................................................29 4.3. Aiming the Radar .......................................................................................................................30 4.4. Connecting the communication cable ........................................................................................31 4.4.1. Applying the Silicon Dielectric Compound .................................................................... 31 4.5. Connecting the Earth Ground Cable .........................................................................................31 4.6. Securing the Communications Cable and Earth Ground Cable ................................................31 5 . I N S T A L L I N G T H E V D R 2 4 C O N T R O L L E R . . . . . . . . . . . . . . . . . . . . . . . . . . . . . . . . . . . . . . . . . . . . . . . . . . . . . . . . . . . 3 3 5.1. Physical Mounting of the Controller ...........................................................................................33 5.1.1. DC Power Connection .................................................................................................. 33 5.1.2. Earth Ground Connection ............................................................................................. 33 5.2. Connecting the Radar Communication Cables to the Controller ...............................................33 5.3. Connecting Railroad Signals to the Controller ...........................................................................34 5.3.1. Crossing Relay Connections ........................................................................................ 34 5.3.2. Island Relay Connections ............................................................................................. 35 5.4. Connecting Controller Outputs to Other Equipment ..................................................................35 5.4.1. Zone Detection Outputs ................................................................................................ 35 5.4.2. Health Outputs .............................................................................................................. 36 6 . I N S T A L L I N G T H E S M A R T S E N S O R - R A I L M A N A G E R . . . . . . . . . . . . . . . . . . . . . . . . . . . . . . . . . . . . . . . . . . 3 7 7 . P O W E R U P A N D U S E R I N T E R F A C E N A V I G A T I O N . . . . . . . . . . . . . . . . . . . . . . . . . . . . . . . . . . . . . . . . . . . . . 3 9 7.1. Final Checkout Before Initial System Power-up ........................................................................39 7.2. VDR24 Indicators, Keyboard, and Display Familiarization ........................................................39 7.2.1. Indicators ...................................................................................................................... 39 7.2.2. Display 39 7.2.3. Keyboard Viewport Navigation ..................................................................................... 40 7.3. Apply Initial Power and Basic Checkout ....................................................................................43 iv VDR24 Radar Detection System, Rev 1.0 8 . 9 . 7.3.1. Verify VDR24 and Radar Status ................................................................................... 43 7.3.2. Verify XR and IR Circuits .............................................................................................. 44 7.3.3. Verify Radar Sensor Voltage Levels ............................................................................. 44 7.3.4. Connect SSM-Rail Application...................................................................................... 45 S E T T I N G U P L A N E S , Z O N E S , A N D C H A N N E L S . . . . . . . . . . . . . . . . . . . . . . . . . . . . . . . . . . . . . . . . . . . . . . . . . 4 9 8.1. Connect the SSM-Rail application .............................................................................................50 8.1.1. Connect the SSM-Rail Application................................................................................ 51 8.1.2. Locate Connected Sensors Using Full or Quick Search............................................... 51 8.1.3. Verify the Radar Sensor is Connected ......................................................................... 51 8.2. Assign and Verify Radar Sensor Settings .................................................................................52 8.2.1. General Tab .................................................................................................................. 52 8.2.2. Communication Parameters Tab .................................................................................. 53 8.2.3. Advance Settings Tab................................................................................................... 53 8.3. SSM-Rail Tab 1 - Establish Lanes for Traffic ............................................................................54 8.3.1. Orient Display to Match Physical Sensor Location ....................................................... 54 8.3.2. Verify Proper Physical Aiming of the Sensors .............................................................. 54 8.3.3. Set Lane Placement, Lane Widths, and Direction ........................................................ 54 8.3.4. Set Background Attenuation ......................................................................................... 55 8.4. SSM-Rail Tab 2 - Establish detection zones .............................................................................56 8.4.1. Create Physical Detection Zones ................................................................................. 57 8.4.2. Set Zone Delay and Extend Values .............................................................................. 58 8.4.3. Assign Zones to Output Channels ................................................................................ 58 8.4.4. Channel Settings .......................................................................................................... 58 8.4.5. Save Zone and Channel Settings ................................................................................. 58 8.5. SSM-Rail Tab 3 - Verify settings ...............................................................................................59 8.5.1. Watch Vehicles Traversing the Crossing to Verify Proper Detection............................ 60 8.5.2. Verify Connections to Railroad Equipment ................................................................... 60 8.5.3. Testing with a Test Vehicle ........................................................................................... 61 8.5.4. Back Up Configuration Settings and Values ................................................................. 61 M A I N T E N A N C E A N D S U P P O R T . . . . . . . . . . . . . . . . . . . . . . . . . . . . . . . . . . . . . . . . . . . . . . . . . . . . . . . . . . . . . . . . . . . . . . . . 6 3 9.1. Periodic Radar Sensor Verification and Performance Checks ..................................................63 9.1.1. Real-Time Detection Activity (Visual) ........................................................................... 64 9.1.2. VDR24 Indicator Status (Visual) ................................................................................... 64 9.1.3. Communication Quality................................................................................................. 64 9.1.4. Examination of Performance Metrics ............................................................................ 65 9.1.5. 9.1.5 Detection Levels .................................................................................................. 65 9.1.6. Verification of Radar Alignment (Visual) ....................................................................... 65 9.1.7. Verify Runtime Metrics.................................................................................................. 66 9.1.8. Verification of Radar Positioning and Alignment........................................................... 67 9.1.9. Verification of Zone Position and Boundaries ............................................................... 67 9.1.10. Verify Settings Against Backup Record ........................................................................ 67 9.1.11. Radar Self Tests ........................................................................................................... 68 9.1.12. Verification of Voltage Levels ....................................................................................... 69 9.1.13. Ground Leakage ........................................................................................................... 69 9.1.14. Re-Tighten Radar Mounting Hardware ......................................................................... 69 9.1.15. Check Radar Electrical Connections ............................................................................ 69 VDR24 Radar Detection System, Rev. 1.0 v 9.1.16. Configuration Re-Verification ........................................................................................ 69 9.2. Upgrading Radar Firmware .......................................................................................................70 9.2.1. Uploading and Installing New Radar Firmware ............................................................ 70 9.3. Backing Up and Restoring Radar Sensor Configuration Settings .............................................72 9.3.1. Creating a Backup ........................................................................................................ 72 9.3.2. Restoring Settings ........................................................................................................ 72 9.3.3. Restore Factory Settings .............................................................................................. 72 9.4. Contacting Island Radar Company for Assistance ....................................................................73 9.5. Configuration Settings Chart .....................................................................................................74 1 0 . A D D I T I O N A L I N S T A L L A T I O N O R S I T E I N F O R M A T I O N . . . . . . . . . . . . . . . . . . . . . . . . . . . . . . . . . . . . . . 7 5 vi VDR24 Radar Detection System, Rev 1.0 Figures Figure 1 – SmartSensor Radar and VDR24 Controller ...............................................................................13 Figure 2 - Overhead View of a Typical Crossing Installation ......................................................................18 Figure 3 -SmartSensor-Rail Radar Views ...................................................................................................20 Figure 4 - Typical Radar Mounting and Connections .................................................................................21 Figure 5 - VDR24 Right Side View ............................................................................................................22 Figure 6 - VDR24 Left Side View ................................................................................................................23 Figure 7 - Sensor on Elevated Mount ........................................................................................................24 Figure 8 - Mast Riser Cable With Weatherproof Connector .......................................................................24 Figure 9 - Mast Base Junction Box ............................................................................................................25 Figure 10 - Typical, Overlapping Radar Detection Footprints .....................................................................27 Figure 11 - Radar Placement in Trapezoidal Crossing Configurations ......................................................27 Figure 12 - Radar Siting on Dedicated Poles ............................................................................................28 Figure 13 - Securing the Radar Sensors and Mounts to the Mast ..............................................................29 Figure 14 - Weatherproof Connector and Earth Ground Connection .........................................................31 Figure 15 - Typical XR and IR Connections ...............................................................................................34 Figure 16 - Typical Zone and Health Output Connections ..........................................................................35 Figure 17 - SSM-Rail Version Information ..................................................................................................37 Figure 18 - Radar Firmware Version Information Revealed by the SSM-Rail ............................................38 Figure 19 - Keyboard Descriptions and Functions ......................................................................................40 Figure 20 - Menu Structure and Navigation ................................................................................................41 Figure 21 - Front Panel Keyboard/Display Navigation ...............................................................................42 Figure 22 - System Initialization Display ....................................................................................................43 Figure 23 - Home Screen ..........................................................................................................................43 Figure 24 - Measuring XR and IR Voltage Levels ......................................................................................44 Figure 25 - Confirming Radar Voltage Levels .............................................................................................44 Figure 26 - RS-232 Configuration Port .......................................................................................................45 Figure 27 - SSM-Rail Home Page Controls ................................................................................................45 Figure 28 - Setting SSM-Rail Communication Parameters ........................................................................46 Figure 29 - Search Discovers Connected Radar Sensors ..........................................................................46 Figure 30 - Verification of Connected Radar Sensor ..................................................................................47 Figure 31 - SSM-Rail Sensor Settings General Tab ...................................................................................52 Figure 32 - SSM-Rail Sensor Settings Comm Tab .....................................................................................53 Figure 33 - SSM-Rail Sensor Settings Advanced Tab ................................................................................53 Figure 34 – Lane Setup on SSM-Rail Tab 1 ...............................................................................................54 Figure 35 - Setting Lanes Attributes SSM-Rail Tab 1 .................................................................................55 VDR24 Radar Detection System, Rev. 1.0 vii Figure 36 – Accessing Attenuation Adjustment ..........................................................................................55 Figure 37 - Adjusting Attenuation and Sensitivity .......................................................................................56 Figure 38 - Clear Storage Distance ............................................................................................................56 Figure 39 - Optimum Location of Detection Zone Boundaries ....................................................................57 Figure 40 - Position Detection Zone Boundaries Using a Human Tracker .................................................57 Figure 41 - Setting the Zone's Delay and Extend Parameters ....................................................................58 Figure 42 - Mapping or Assigning a Zone to an Output Channel ...............................................................58 Figure 43 - Setting Up the SSM-Rail Display for Verification ......................................................................59 Figure 44 - Viewing Communication Quality Metrics ..................................................................................64 Figure 45 - Co-Incident Detection Metrics ..................................................................................................65 Figure 46 - Accessing the System Runtime Metric .....................................................................................66 Figure 47 - Accessing WatchDog (WD) Timer Reset Metrics .....................................................................66 Figure 48 - Accessing Radar Sensor Self Test Function ............................................................................68 Figure 49 - SSM-Rail Indication that Firmware Upgrades are Available ....................................................70 Figure 50 – Downgrade Warning ................................................................................................................70 Figure 51 - Accessing Configuration Backup and Restore Functions ........................................................72 viii VDR24 Radar Detection System, Rev 1.0 Tables Table 1 - Radar Sensor Operating Specifications ......................................................................................11 Table 2 - Radar Sensor Mechanical Specifications ....................................................................................12 Table 3 - VDR24 Operating Specifications .................................................................................................12 Table 4 - VDR24 Mechanical Specifications ...............................................................................................12 Table 5 - Glossary of Terms .......................................................................................................................15 Table 6 - Radar Cable Color Coding ..........................................................................................................34 Table 7 - Recommended Periodic Maintenance Schedule .........................................................................63 Table 8 - Configuration Settings Chart .......................................................................................................74 VDR24 Radar Detection System, Rev. 1.0 ix This page left intentionally blank x VDR24 Radar Detection System, Rev 1.0 General Information 1. GENERAL INFORMATION 1.1. Safety and Regulatory Information Read and thoroughly understand this manual before attempting any of the procedures listed. Pay particular attention to: CAUTION and Important notes, advisories or guidance are highlighted with a gray background. These headings may appear throughout this manual. Caution statements indicate conditions that could cause damage to equipment. Important notes, advisories or guidance are highlighted with a gray background. Always observe standard precautions familiar to trained electrical technicians, and always adhere to all safety regulations stipulated by the railroad. 1.2. FCC Part 15 Compliance This equipment has been tested and found to comply with the limits for a Class A digital device, pursuant to part 15 of the FCC Rules. These limits are designed to provide reasonable protection against harmful interference when the equipment is operated in a commercial environment. This equipment generates, uses, and can radiate radio frequency energy and, if not, installed and used in accordance with the instruction manual, may cause harmful interference to radio communications. Operation of this equipment in a residential area is likely to cause harmful interference in which case the user will be required to correct the interference at user’s own expense. Operation is subject to the following two conditions: (1) this device may not cause harmful interference and (2) this device must accept any interference received including interference that may cause undesired operation. This Class A digital apparatus meets all requirements of the Canadian interference causing equipment regulations. This Category II radiocommunication device complies with Industry Canada Standard RSS-310. Ce dispositif de radiocommunication de categorie II respecte la norme CNR-310 d’Industrie Canada. 1.3. Specifications The Radar sensors and centralized controller (VDR24) meets all applicable environmental, EMI, and vibration tolerance specifications for AREMA Class B and C equipment. Table 1 - Radar Sensor Operating Specifications PARAMETER System Power Source Voltages Temperature Range Humidity Vibration EMI Isolation and Protection VDR24 Radar Detection System, Rev. 1.0 VALUE 8 Vdc to 30 Vdc, 10W -40° C to +70°C 0% to 95% non-condensing per AREMA 11.15.1 Per AREMA 11.15.1 Per AREMA 11.15.1 Per AREMA 11.3.3 11 General Information Table 2 - Radar Sensor Mechanical Specifications PARAMETER Height Width Depth, including connectors Weight Mounting VALUE 11 inches 13 inches 3.5 inches 3 lbs. 18 to 22 feet height, on approved mounting bracket, unobstructed by any foreground structures Table 3 - VDR24 Operating Specifications PARAMETER System Power Source Voltages Temperature Range Humidity Vibration EMI Isolation and Protection VALUE 8 Vdc to 30 Vdc, 30W -40° C to +70°C 0% to 95% non-condensing per AREMA 11.15.1 Per AREMA 11.15.1 Per AREMA 11.15.1 Per AREMA 11.3.3 Table 4 - VDR24 Mechanical Specifications PARAMETER Height Width (including mounting flanges) Depth Weight Recommended Mounting Clearance Width Mounting Method 12 VALUE 6 inches 8 inches 3 inches 1.5 lbs. 5 inches each side, 18 inches total Flange mounting, four screws, vertically on a wood or other non-conductive surface VDR24 Radar Detection System, Rev 1.0 Introduction and Overview 2. INTRODUCTION AND OVERVIEW The Island Radar Company is pleased to provide this radar-based vehicle and train detection radar solution, powered by rugged and proven Wavetronix SmartSensor© Matrix sensors, with railroad specific application enhancements. This system is designed to provide reliable and failsafe detection of vehicles without the negative consequences associated with maintaining buried loop technologies. Unaffected by precipitation, temperature, fog, and varying light conditions, this technology is at work in tens of thousands of Intelligent Transportation System (ITS) applications worldwide. The system is comprised of two (and in some cases, more) SmartSensor-Rail radar sensors connected to a centralized controller, the VDR24. The VDR24 controller communicates with each connected radar sensor every 60msec to verify operability and to instantly get information regarding vehicle presence in any of up to 10 lanes of traffic containing up to16 configurable detection zones. The VDR24 controller’s AREMA-compliant isolated outputs are intended to connect to a crossing controller or any other equipment needing an indication of vehicle or train presence in these user configurable zones. Figure 1 – SmartSensor Radar and VDR24 Controller Two radars are used to provide 100% redundancy of the detection zone areas, a reliability feature available with no other detection system. Each radar sensor communicates with a separate output processor within the VDR24 controller, and a third supervisory processor monitors and double-checks every radar message and the resultant output processor’s response. This “no single point of failure” vital architecture is unique to the Island Radar Vehicle Detection solution – a performance attribute unavailable with any other form of vehicle detection. VDR24 Radar Detection System, Rev. 1.0 13 Introduction and Overview The Island Radar Company is committed to providing support and assistance to assure that the quality and the functionality of this vehicle detection system exceeds your expectations. In fulfilling that objective, we encourage you to contact us regarding any difficulties or additional needs you may encounter. The Island Radar, nation-wide technical support organization is available 24 hours per day at (913) 543-3322. 2.1. About This Manual This service manual covers topics pertaining to the mechanical and electrical installation and checkout of the radar sensors and the VDR24 controller. The Island Radar detection system may be used to detect vehicles at crossings as well as detecting trains at crossovers and interlocks. Accordingly, this manual describes the setup and configuration in the context of railroad crossings. Where necessary additional guidance is provided for train detection use cases. Step-by-step instructions for installation and setup are provided in this manual, which is organized into eight sections: Section 1: General Information The previous section provides general information about this Installation and Operation manual, as well as regulatory and environmental specifications. Section 2: Introduction and Overview This section (the one you’re reading now) provides an overview of the radar-based detection system and a description of the underlying technology, failsafe design, and vital-architecture. Section 3: Installation and Sensor Siting Guidelines This section provides instructions on where to mount radar sensors to achieve the best coverage of vehicle detection zones, whether on exit gate masts, entrance gate masts, or on dedicated masts adjacent to the crossing. Pole siting guidance for train detection at crossovers is also provided. Section 4: Installing the Radar Sensors and the Communication Cables This section provides details on how to connect the radar sensors atop their 18-20 foot masts to junction boxes at the mast bases, and to home run cables leading to the crossing equipment bungalow where the VDR24 controller is located. Guidance on aiming the radar sensors is also provided. Section 5: Installing and Connecting the VDR24 Controller This section covers installation and connection of the VDR24 controller that is typically located in the crossing’s equipment bungalow. Section 6: Installing the SmartSensor-Rail Manager The SmartSensor-Rail Manager is a software application that runs on a laptop PC. This Windows based application is used configure the radar sensors so that each is monitoring the same traffic lanes and detection zones. This section covers installation of this software on the computer. Section 7: Power up and Communications Following installation of radar sensors and the VDR24 controller, this section provides instructions on how to initially power the system and verify operation. Section 8: 14 Setting up Lanes, Track, Zones, and Output Channels VDR24 Radar Detection System, Rev 1.0 Introduction and Overview Using the SmartSensor-Rail Manager application, this section provides instructions on how to configure and verify lanes, detection zones, output assignments, and operating parameters for crossing applications. For train detection applications, track paths are established in lieu of lanes for vehicles. Once installed, the operational status and health of the system can be assessed by examining performance data visible on the VDR24 controller front panel display. Many different screens are viewable showing real-time performance parameters such as co-incident detection, radar sensor response times, communication quality, and accumulated, historical performance metrics. Section 9: Support, Maintenance, Troubleshooting This section provides information on maintenance and how to obtain troubleshooting assistance and user support. The Island Radar Company provides knowledgeable and experienced support through its field support resources, which is available for assistance 24 hours per day. Section 10: Additional Installation or Site Information This section provides special notes or information on equipment modifications unique to a particular application. 2.2. Glossary and Terms Some of the terms are used in this manual have connotations that are specific to the railroad industry or the Island Radar vehicle detection system. Table 5 - Glossary of Terms Term Description Attenuation Designated in unitless decibels (dB), attenuation is a relative decrease in sensitivity, Lower attenuation means greater sensitivity while higher attenuation means less sensitivity. AREMA The American Railway Engineering and Maintenance-of-Way Association (AREMA) is a North American railway industry group. It publishes recommended practices for the design, construction and maintenance of railway infrastructure, which are requirements in the United States and Canada. Channels For the purposes of the Island Radar detection system, Output Channels are the isolated interface point between Detection Zones and Railroad equipment. See Lanes and Zones. Clear Storage Distance The six-foot minimum space between the outermost rails and a lowered entrance or exit gate at a grade crossing. Closed Contacts For the purposes of the Island Radar detection system, a closed contact is an isolated, solid state, electrical switch that establishes a connection and conducts current. Crossing Island The area bounded by entrance and exit gates at a grade crossing through which a roadway passes. Crossovers or Interlockers A switchless interface between two or more tracks. For the purposes of the Island Radar detection system, a crossover is VDR24 Radar Detection System, Rev. 1.0 15 Introduction and Overview a location where the radar based detection system may be used to detect trains on track circuit dead sections. Delay Time For the purposes of the Island Radar detection system, delay is the time period during which a continuous detection state on an established zone must be present before the VDR24 Controller passes that condition to an Output Channel for signaling to railroad equipment. Device USB Port A Type B connector effecting a USB interface where a connected Host USB port supplies power and manages the communications, e.g. a device that is controlled by a laptop computer USB Port. Dry Inputs and Outputs Unpowered contacts or switches. In order for Dry Contacts to provide control (e.g. a relay) a power source must be externally provided. Extend time For the purposes of the Island Radar detection system, extend is the additional time period that a Channel Output remains in an active detection state following a valid detection event. It is intended to assure that a minimum pulse width signal is made available to connected Railroad Equipment. Firmware Microprocessor executable code that defines the operations and operating parameters of a device. Host USB Port A Type A connector effecting a USB interface that [provides power and manages communications to a USB Device Port, e.g. a laptop computer that is connected to a device being controlled by an application residing on the computer. IR Circuit Abbreviation for Island Relay Circuit, generally a series combination of vital relays that signals when a train is occupying any section of track over a Crossing Island. Railroad failsafe convention specifies that the series contacts are closed when no train is present and that the series contacts open when a train is present. ITS Intelligent Transportation System, the general category of systems that provide highway and rail traffic operational data, including radar based sensing devices. Lanes For the purposes of the Island Radar detection system, Lanes are the pathways where vehicles are intended to be detected. When the system is used for train detection at Crossovers, Lanes are synonymous with tracks. See Channels and Zones. MTCD Minimum Track Clearance Distance is the entire Crossing Island Area, the formal railroad industry name for the Crossing Island area Open Contacts For the purposes of the Island Radar detection system, an open contact is an isolated, solid state, electrical switch that does not establish a connection and therefore does not conduct current. 16 VDR24 Radar Detection System, Rev 1.0 Introduction and Overview Radar Cross Section The relative signal strength of reflected radar emissions off of a vehicle or structure. When measured and compared against background signals, meaningful levels of reflected energy are the first step in the detection analysis process. Railroad Equipment For the purposes of the Island Radar detection system, Railroad Equipment includes crossing controllers, relay logic, and vital processors that utilize vehicle or train detection to perform other functions such as changing the position of grade crossing warning system gates or signal aspects for track circuit dead sections. RS-232 A one-to-one serial communication standard. For the purposes of the Island Radar detection system, an RS-232 communication link is used to configure the radar sensors. RS-485 A multi-drop serial communication standard. For the purposes of the Island Radar detection system, RS-485 circuits are used between the VDR24 Controller and the radar sensors. An important attribute of RS-485 circuits is their ability to pass high-speed communications reliably over long distances with high immunity to electrical noise and interference. Shield or Drain A common electrical conductor used to suppress noise and interference in communication cables. SmartSensor Manager – Rail or SSM-Rail A PC application for configuring the behavior of radar sensors and establishing detection Lanes, Zones, and output Channels. SmartSensor-Matrix The general class of Wavetronix sensors containing multiple solid-state radar sensors in a single package. SmartSensor-Rail A specific firmware version of the SmartSensor-Matrix hardware that contains performance features specially intended for railroad applications. XR Circuit Abbreviation for Crossing Relay Circuit, generally the primary relay which, when de-energized by a train detection, causes activation of the Crossing Warning System. Railroad failsafe convention specifies that the XR relay contacts are closed when the crossing is not intended to be activated and open when the crossing is activated. Zones For the purposes of the Island Radar detection system, Zones are individual areas which, when a detection state is confirmed, cause an associated output Channel or Channels to be activated, opening the contacts associated with those output Channels. See Channels and Lanes. VDR24 Radar Detection System, Rev. 1.0 17 Introduction and Overview 2.3. Introduction to the Island Radar System Components 2.3.1. System Layout Each radar sensor has a detection footprint that is quarter-circle shaped, 90 degrees by 140 feet. Within this detection footprint up to 10 lanes of traffic may be configured with up to 16 foursided polygon detection zones. Each of these zones is correlated to one of four isolated outputs that are connected to the crossing controller or other equipment. The Island Radar system is designed to utilize one sensor on each side of the crossing island, for instance, one on each exit gate mast or one on each entrance gate mast. Optionally, the radar sensors can be mounted on dedicated masts but they should be in line with and spaced no more than 10 feet away from the exit or entrance gate masts. In this manner, both radars can be configured to monitor the same lanes of traffic and the same detection zones. The VDR24 controller, typically located in the crossing bungalow, will combine these outputs together so that the radar devices operate with 100% redundancy. Figure 2 - Overhead View of a Typical Crossing Installation The sensors are optimally mounted at a height of 18-22 feet above the roadway. Since most gate masts are a maximum of 15 feet, Island Radar provides a 48-inch Extended Mounting Bracket that can be clamped to the crossing gate mast. In the case of train detection at crossovers, where poles may be greater than 20 feet in height, Island Radar can provide radar sensor mounts that can extend horizontally from the top of taller poles without extending the sensors vertically. 18 VDR24 Radar Detection System, Rev 1.0 Introduction and Overview More detailed instructions regarding the physical placement and electrical installation of the radar masts and sensors may be found in Section 3 - Installation and Sensor Siting Guidelines and in Section 4 - Installing the Radar Sensors and the Communication Cables. 2.3.2. About the SmartSensor-Rail Radar Sensor The SmartSensor-Rail radar sensor is a sophisticated device that combines sixteen solid-state 24GHz radars into a single, rugged package. These radar arrays establish a detection footprint that is quarter-circle shaped, measuring 90 degrees by 140 feet. The sensor is proven in thousands of Intelligent Traffic System (ITS) applications worldwide and has been uniquely adapted and optimized for railroad detection applications. The following figure shows the primary features of the radar including: 2.3.2.1. Front Emitter Surface The front of the radar sensor is aimed at the center of the crossing from an elevation of 18-22 feet to achieve an optimum detection vantage point. 2.3.2.2. Mast Riser Cable Connector A weatherproof, avionics-class connector accepts the plug at the top end of the 7-conductor, Mast Riser Cable. This connection links the radar sensor to the bungalow-mounted VDR24 controller. 2.3.2.3. Earth Ground Lug The radar sensor is protected from transients induced by lighting and other sources through the Earth Ground Lug on the rear of the radar enclosure. It is very important that this ground be established to a solid and viable earth ground at the base of the mast. 2.3.2.4. Aiming Guide Aiming the radar is easy due to its very wide detection footprint. But the Aiming Guide embossed into the top and bottom of the radar sensor’s enclosure provides an easy way to visually point the radar sensor in the proper horizontal (left/right) direction. 2.3.2.5. Multi-Axis Mounting Bracket The mounting plate on the rear of the radar, along with the adjustable settings provided on the mast mounting bracket provide secure, multi-axis positioning of the radar sensor head above the crossing island detection zones. 2.3.3. SS300 SmartSensor-Rail Views and Features Front, back, and bottom views of the SmartSensor-Rail are shown on the following page. VDR24 Radar Detection System, Rev. 1.0 19 Introduction and Overview 16 Solid State Radar Emitters Sensor Bracket Mounting Features Communication Cable Connector Earth Ground Lug 90o Footprint Aiming Guide Figure 3 -SmartSensor-Rail Radar Views 20 VDR24 Radar Detection System, Rev 1.0 Introduction and Overview 2.3.4. About the VDR24 Controller 2.3.4.1. How the System is Connected Connections from each radar sensor are brought down the mast through the Mast Riser Cable, which is terminated at the mast base in the Mast Base Junction Box. Here, the seven conductors in the cable are connected to Home Run Cable that ultimately connected to the VDR24 Controller radar inputs in (or near) the bungalow. The Home Run Cable may be up to 500 feet in length and may be run beneath the roadway and rails, as necessary, through bored conduit passageways or may be strung overhead suspended by messenger cable similar to utility cabling. If your application requires a cable length longer than 500 ft. (152.4 m), contact Island Radar Company support for assistance. Figure 4 - Typical Radar Mounting and Connections VDR24 Radar Detection System, Rev. 1.0 21 Introduction and Overview 2.3.4.2. The VDR24 Controller Description The VDR24 Controller is a multi-processor device that is designed expressly for demanding railroad applications. Each radar sensor connects to an individual input and communicates vehicle presence and radar health information sixteen times per second to its own dedicated processor. Each radar processor instantly provides isolated Zone detection outputs to crossing controller equipment, Exit gate Management Systems, or communication devices. An “open” output signifies that a vehicle has been detected in a specific Zone and a “closed’ output designates that the Zone is clear. The VDR24 provides up to four separate Zone outputs and the device is typically configured in such a manner that both radars are watching the same Zones, with their Zone outputs combined together, but from opposite side of the crossing island. 2.3.4.3. Constant Monitoring, Failsafe Operation Each radar sensor and its dedicated radar processor also analyze several continually running processes that access radar and system health. Any missed communications from the radar sensor, any failed internal health check process, or any loss of power instantly drives the VDR24 into a failsafe state, opening all Zone outputs as well as the affected radar’s Health output. 2.3.4.4. Vital Architecture – No Single Point of Failure By utilizing separate processors for each radar sensor, the Island Radar detection solution achieves a uniquely vital architecture with no single point of failure. This is in addition to the 100% redundancy afforded by utilizing two radar devices, both monitoring the same detection zones from complimentarily positioned points on each side of the crossing island. A third processor monitors and oversees the functions of the individual radar processors. This system processor listens to communications emanating from the radar sensors and verifies that each radar processor makes the proper decisions as the output states of the Zone outputs reflect the presence/clear information communicated by the radar sensors. Display Port Keyboard Navigation Zone and Health Indicators RS-232 Configuration Port Power Terminal Figure 5 - VDR24 Right Side View 22 VDR24 Radar Detection System, Rev 1.0 Introduction and Overview IR and XR Inputs Radar 2 Input Detection Zone Outputs Health Outputs Radar 1 Input Figure 6 - VDR24 Left Side View 2.3.4.5. Front Panel The VDR24 Controller front panel provides indicators that show detection and radar communications events. A combination keyboard and display provide a viewport into the internal operation of the unit, where real time and historical performance metrics may be reviewed during regular maintenance visits. 2.3.4.6. Radar Inputs, Detection Zone Outputs On the left side of the VDR24 Controller are pluggable, cage-clamp connectors for terminating Home Run Cable wiring from the radar sensors. AREMA compliant, isolated contact pairs are provided for four Zone outputs as well as a Health circuit for each radar sensor. Two-wire, isolated, dry input terminals are provided for Island Relay and Crossing Relay signals from the railroad crossing bungalow electronics. By using these signals the VDR24 is able to ignore the many detection events that occur when a train is moving through the crossing island. This helps to preserve the value of the historical metrics accumulated by the system by registering only valid vehicle detection events. 2.3.4.7. Power and Communications Connections On the right side of the VDR24 are power connections (9-36VDC) and several communications ports. These ports include Ethernet, RS232, RS485, and both a Host and Device USB port. These ports are used for various configuration and networking functions described later in this manual. 2.3.4.8. Mounting Flanges The VDR24 is typically wall-mounted at eye level for optimum viewing, using the mounting flanges provided on the back left and right side of the device. 2.3.5. Island Radar Accessory Components There are a number of additional accessory components associated with the installation and operation of the Island Radar vehicle detection solution. VDR24 Radar Detection System, Rev. 1.0 23 Introduction and Overview 2.3.5.1. Radar Sensor Mounting Brackets Island Radar provides several different types of mounting brackets for positioning the radar sensors at the right height and location above the crossing. 2.3.5.1.1. Elevated Mounting Brackets (MNT-0101-00) The optimum vertical height for the radar sensors is between 18 and 22 feet. The most convenient location to mount the devices is atop the exit or entrance gate masts, which are typically a maximum of 15 feet in height. The primary mounting fixture for most applications, the Elevated Mounting Bracket provides an additional 48 inches of elevation and provides a universal joint sensor mounting mechanism to properly position the radar sensor above, to the side, and just within Minimum Track Clearance Distance Zone (MTCD) of the crossing island. 2.3.5.1.2. Standard Mounting Brackets (MNT-0100-00) The standard mounting bracket is intended for use on poles that are already between 18-22 feet in height and therefore do not require additional elevation. The standard mounting bracket positions the radar sensors 12 inches (horizontally) into the crossing area. 2.3.5.1.3. Extended Mounting Brackets (MNT-0102-00) The extended mounting bracket is intended for use on poles that are already between 18-22 feet in height but require additional horizontal extension for positioning the radar sensors (horizontally) into the crossing area. Figure 7 - Sensor on Elevated Mount 2.3.5.2. Mast Riser Cable To separate the longer Home Run Cable from the connection that is made to the radar sensor at the top of the mast, a shorter Mast Riser Cable is provided. At the sensor end of this cable is a preassembled, weatherproof, avionics-class plug that is latched into the sensor connector. At the mast base this cable is connected to a transitional interface in the Mast Base Junction Box where it is connected to the Home Run Cable for connection to the VDR24 in or near the crossing equipment bungalow. Figure 8 - Mast Riser Cable With Weatherproof Connector 24 VDR24 Radar Detection System, Rev 1.0 Introduction and Overview 2.3.5.3. Mast Base Junction Boxes The Mast Base Junction Box provides a weatherproof transitional interconnect between the Mast Riser Cable and the Home Run Cable leading to the VDR24 controller. The mast cable from the sensor connects to one row of terminals and the home run cable leading to the VDR24 Controller located in the equipment house connect to the complimentary set of terminals. 2.3.5.4. Home Run Cable Connecting the radar sensor communication cable from the Mast Figure 9 - Mast Base Junction Box Base Junction Box to the VDR24 controller is accomplished using up to 500 feet of Home Run Cable. This seven-conductor cable (3 twisted pairs and one shield or drain) is specially designed for use with the radar sensors. Do not substitute without the express approval of Island Radar Company. The Home Run Cable must be protected by conduit as the cable extends underground to the crossing equipment bungalow. If conduit is not available or cannot be accomplished Island Radar Company can provide cable rated for direct burial applications – however the color-coding of the individual wires may differ from the labels on the VDR24 Controller and references in this manual. If overhead wiring is to be used, be sure that the Home Run Cable is securely protected by cable messengers and not bundled in close proximity to high voltage AC power cables. 2.3.5.5. SmartSensor-Rail Manager The SmartSensor-Rail Manager is a software application written and supported by Wavetronix and available through Island Radar Company. Once installed on a laptop or handheld computer, it serially connects to the radar sensors through the VDR24 controller for the purpose of configuring the sensors and for uploading firmware upgrades to the radar sensors. New features available in periodic releases of radar software are distributed via updates in the SmartSensor-Rail Manager software application. When connected to a radar, the application will notify the user that a firmware upgrade should be accomplished. Future versions of the SmartSensor-Rail Manager will also permit USB and Ethernet based configuration of radar sensors connected to the VDR24 controller. The SmartSensor-Rail Manager also provides a means of verifying radar sensor settings and functionality. VDR24 Radar Detection System, Rev. 1.0 25 Introduction and Overview This page left intentionally blank 26 VDR24 Radar Detection System, Rev 1.0 Installation and Sensor Siting 3. INSTALLATION AND SENSOR SITING 3.1. Typical Radar Siting on Entrance or Exit Gate Masts Each SmartSensor-Rail radar is a corner radar comprised of 16 individual radar elements with a panoramic 90° by 140-ft. view. The ideal radar sensor mounting location is on each exit gate mast or on each entrance gate mast. In this way, one side of the quarter-circle shaped detection footprint is aligned with the crossing gates and the other side is positioned along the roadway. Figure 10 - Typical, Overlapping Radar Detection Footprints If the crossing island is trapezoidal, choose the masts that provide an entire view for the 90° footprint – from gates to a point beyond the side of the roadway view. Keep in mind that each radar sensor’s 90o field of view (overall detection footprint) must cover the entire crossing island. Figure 11 - Radar Placement in Trapezoidal Crossing Configurations VDR24 Radar Detection System, Rev. 1.0 27 Installation and Sensor Siting 3.2. Radar Siting on Dedicated Poles 140 foot radar range covers the entire width of the crossing If a dedicated pole is preferred it should be located so that radar sensor can be positioned at the same point relative to the rails – slightly inside a line that runs through the descended gate arms on each side of the crossing. The height of dedicated poles should be 18-22 feet above the crossing roadway for optimum radar elevation. In addition, the distance between the dedicated pole and the far side of the crossing should be less than 140 feet. Radar pole positioned inline with gate arms Radar 2 Footprint Radar 1 on dedicated pole Radar 1 Footprint Radar pole positioned inline with gate arms Radar 2 on dedicated pole Figure 12 - Radar Siting on Dedicated Poles 3.3. Radar Siting on Dedicated Poles for Train Detection at Crossovers For train detection at crossovers, dedicated poles are installed at positions around the crossover so that each radar has a complete ‘view’ of the crossover dead section. In this use case, poles should be at least 20 feet high. It is recommended that Island Radar engineering and support participate in siting radar sensors for non-crossing applications. Whether at a crossing or a crossover, Island Radar Company can provide optimum siting location guidance utilizing satellite imagery. To access this complimentary support, contact Island Radar Company with the DOT number or latitude and longitude information of the site. 28 VDR24 Radar Detection System, Rev 1.0 Installing Radar Sensors and Cables 4. INSTALLING THE RADAR SENSORS AND CABLES This section provides details on how to connect the radar sensors atop their 18-20 foot masts to junction boxes at the mast bases, and to home run cables leading to the crossing equipment bungalow where the VDR24 controller is located. Guidance on aiming the radar sensors is also provided. Steps for installing, aiming, and connecting the radar include the following: 4.1. Mounting the Radar Sensor to the Pole or Mast Regardless of the type of sensor mount being used in the installation (standard, extended, or elevated) the sensor mount must be securely attached to the vertical mast or pole. Follow the steps below to correctly attach the mount to the pole: 1. Insert ¾ inch stainless steel straps through each of the three slots in the sensor mount bracket. 2. Position the sensor mount on the pole so that the head of the mount is pointing toward the center of the intended detection area at about a 45° angle, in a manner where there are no obstructions between the head of the mount and the detection area. 3. Tighten the strap screws or clamps securely to prevent any movement. 4.2. Attaching the Sensor to the Mounting Bracket 1. Align the bolts on the sensor’s backplate with the holes in the mount bracket. The eight-pin connector receptacle on the bottom of the sensor should be pointing towards the ground. 2. Place the lock washers onto the bolts after the bolts are in the mount bracket holes. Figure 13 - Securing the Radar Sensors and Mounts to the Mast 3. Thread on the nuts and tighten so that the sensor remains in position but may still be manipulated during the aiming steps. VDR24 Radar Detection System, Rev. 1.0 29 Installing Radar Sensors and Cables 4.3. Aiming the Radar The radar sensor must be initially aimed at the area where detection zones will be established. Once the radars are connected to the VDR24 controller and the system is initially checked out, it is generally necessary fine-tune the radar position to optimize detection timing and accuracy. 1. Tilt the sensor down so it is aimed at the center of the detection zone area. 2. If necessary, rotate the sensor so that the bottom edge of the sensor is parallel with the roadway. 3. The sensor’s beams fan out 45° to the left and 45° to the right, creating a 90° corner radar field of view. In most applications, you will want to position the corner radar so that its 90° footprint covers all lanes or tracks within the detection area. 4. To visualize the extent of the sensor field of view, the 90° field of view is imprinted on the top and bottom of the sensor case. If more of a visual indicator is needed, then a square framing tool (e.g. rafter square) or other tool with a right angle can be held above the sensor. By looking down both edges of the tool, you can visualize the extent of the radar’s coverage and be sure that it covers the entire detection area of interest. 5. In a crossing application, side edge of each sensor’s quarter-circle shaped footprint is optimally aligned with the entrance and exit gates on the sensor’s side of the crossing. In this manner, the other side of the quarter-circle shaped detection footprint is aligned with the edge of the roadway. For trapezoidal-shaped crossings, the detection footprint should be centered on the extents of the crossing so that the footprint extends beyond the gates and beyond the roadway. It’s Easier If… o For better visibility of the 90 aiming pattern located on the bottom of the sensor, it is helpful to mark the edges with a black, permanent ink line. This permits better visibility by a ground level assistant when adjusting the left-right position of the radar sensor. You’ll Need This Information Later Make note of the radar sensor serial numbers for each sensor location. This information will be important in later steps when setting up the radars for configuration steps. 30 VDR24 Radar Detection System, Rev 1.0 Installing Radar Sensors and Cables 4.4. Connecting the communication cable Once the radar and mount are secured into position and initially aimed at the area where detection zones will be established, the weatherproof plug on the mast riser cable and the earth ground connection must be made to the radar sensor. Before locking down the radar sensor connector, a dielectric compound must be applied to prevent corrosive consequences of longterm weather exposure. 4.4.1. Applying the Silicon Dielectric Compound Use the following steps to correctly apply the silicon dielectric compound to the cable connector: 1. 1 Tear the tab off of the tube of silicon dielectric compound. 2. Squeeze about 25% of the silicon onto the pins of the receptacle side of the connector at the base of the SmartSensor-Rail sensor. Be sure to wipe off any excess compound. 3. The next step is to plug the SmartSensor 7conductor cable into the connector. The sensor connector is keyed to ensure proper connection; simply twist the plug end of the connector clockwise until you hear it click into place. Figure 14 - Weatherproof Connector and Earth Ground Connection 4.5. Connecting the Earth Ground Cable The Radar Sensor must now be grounded either to an earth ground stake at the base of the mast or to a lug that is welded onto the pole (in the case of a metallic pole): 1. Connect a grounding wire (16-gauge minimum) to the grounding lug on the bottom of the sensor. 2. Connect the other end of the grounding wire to the earth ground for the pole that the sensor is mounted on. Do not attempt to run the grounding wire back to the main controller cabinet. 4.6. Securing the Communications Cable and Earth Ground Cable To avoid undue movement from the wind, strap the 7-conductor cable and the earth ground cable to the pole or run it through a conduit, but leave a small amount of slack at the top of the cables to reduce cable strain. Route the cable from the sensor location to the mast junction box where it can interface to the home run cable leading back to the main controller. VDR24 Radar Detection System, Rev. 1.0 31 Installing Radar Sensors and Cables This page left intentionally blank 32 VDR24 Radar Detection System, Rev 1.0 Installing the VDR24 Controller 5. INSTALLING THE VDR24 CONTROLLER The VDR24 Controller provides power and communications to the radar sensors, as well as an interface to a crossing controller or signal system processor. Installation and connection of the Controller includes the following steps: 5.1. Physical Mounting of the Controller The VDR24 Controller mounts to a wall or backplane surface using four keyhole flanges. Mount the device at eye level, in a location where cables and connections can be conveniently routed to each side. Connections made to terminals on the sides of the unit utilized pluggable terminal strips connectors, so be sure to leave sufficient room to access the terminals and to secure them (or release them) using the small set screws on the ends of each terminal. Connecting Power to the Controller The VDR24 operates from an 8-30VDC supply, typically provided by the battery supply supporting the crossing (or interlocker single) site. Depending on the voltage level of the battery, the VDR24 requires between 25 and 30 watts at 12VDC. The VDR24 then provides an isolated 24VDC power supply to the radar sensors. An Earth Ground connection is also required for maximum surge and lightning suppression but this ground is completely isolated from the railroad battery supply. Important: Go Step-by-Step Make the initial power connections with the power terminal strip removed from its socket on the VDR24 Controller. This Power terminal strip will be initially connected in Chapter 7. 5.1.1. DC Power Connection With the three-terminal Power terminal strip disconnected from the VDR24 Controller, Connect DC power to the three terminal power supply input on the right side of the VDR24. Be sure to heed proper polarity. 5.1.2. Earth Ground Connection Connect the third terminal, labeled Earth Ground, to the main earth ground connection for the equipment house or cabinet. This potential is isolated from the remainder of the system, but necessary for maximum noise and surge protection. 5.2. Connecting the Radar Communication Cables to the Controller Each radar sensor connects to the VDR24 Controller using a seven-conductor cable. In this cable there is a pair of conductors that supply power to the radar sensors (red and black), two independent RS-485 communication circuits, and a protective ground conductor. Cable supplied by Island Radar is color-coded to match wire labels on each of the VDR24 radar connection terminals located on the left side of the device. Good Installation Practice We recommend designating the radar sensor with the lowest numerical serial number as Radar 1 in the installation and the sensor with the higher serial number as Radar 2. VDR24 Radar Detection System, Rev. 1.0 33 Installing the VDR24 Controller Connect each of the seven conductors of the home run cable from each of the radar sensors (Radar 1 and Radar 2) to the appropriate terminal using the following color-coding legend: Table 6 - Radar Cable Color Coding Terminal Label Description Wire and Label Color Legend Isolated +24VDC Power to Radar Sensors Solid Red Isolated DC Power Ground to Radar Sensors Solid Black RS-485+ Radar Control Line Blue with White Stripe RS-485- Radar Control Line Solid Blue RS-485+ Radar Data Line Orange with White Stripe RS-485- Radar Data Line Solid Orange Cable shield for noise suppression Bare Wire Position 1 2 3 4 5 6 7 PWR PWR + PWR GND CONTROL 485+ CONTROL 485DATA 485+ DATA 485SHIELD DRN 5.3. Connecting Railroad Signals to the Controller The VDR24 requires information from the crossing environment for full operation – specifically the Crossing Relay (XR) and the Island Relay (IR). The connection procedure and rationale are provided below. 5.3.1. Crossing Relay Connections In order to focus attention on actual crossing activation periods (in vehicle detection at crossings application), the VDR24 wants to know when to expect a train. In some applications, this signal - called the crossing relay or XR - is used to activate video recordings. The XR+ and XR- inputs on the left side of the VDR24 drive an opto-isolated input to signal the XR state to the VDR24. Battery should connect through the separate contacts of the railroad’s XR relay, through XR+ and from XR- to Battery ground. XR and IR Relay Contacts Normally Open +12V Battery Supply B12 + _ VDR24 + and – inputs for XR and IR Battery Supply Ground N12 Figure 15 - Typical XR and IR Connections 34 VDR24 Radar Detection System, Rev 1.0 Installing the VDR24 Controller 5.3.2. Island Relay Connections In a crossing application, when trains are occupying the crossing, the VDR24 and associated radars are responding to numerous detection events (due to the train’s chaotic radar cross section reflections). During this time it is recommended that the radar detection subsystem ignore detection events. It does so by utilizing the Island Relay or IR circuit. To connect IR to the VDR24, Battery+ should connect to separate contacts of the railroad’s IR relays, in series with all track circuits. This combined signal is then connected to IR+ and from IR- to Battery ground. ground. The connection for the IR signals is the same as the connection for the XR signal shown above. 5.4. Connecting Controller Outputs to Other Equipment The VDR provides simple interface to any type of crossing controller, vital processor, or relay circuit. Individual zone detection outputs are provided along with a health check signal for each radar sensor. 5.4.1. Zone Detection Outputs Four isolated, normally open contacts (one for each detection zone) are provided. When these contacts are closed no vehicle or train presence is detected. When contacts open, a vehicle or train within the corresponding zone has been detected. To utilize these zone detection outputs, connect system Battery+ and a solid state or mechanical relay contact from the equipment being controlled, in a high side or low side configuration, to the Zone+ and Zone - outputs and to Battery -. Each output channel can control up to 200mA of current. Zone and Health Detection Relays Normally Open VDR24 + and – outputs for Zone and Health signals + _ +12V Battery Supply B12 Relay isolated Zone and Health signal inputs to railroad equipment Battery Supply Ground N12 Figure 16 - Typical Zone and Health Output Connections VDR24 Radar Detection System, Rev. 1.0 35 Installing the VDR24 Controller 5.4.2. Health Outputs Two isolated, normally open contacts (one for each radar’s health signal) are provided. When these contacts are closed radar health is known to be good, based on internal self-check procedures that run continuously every sixteen seconds. When contacts open, health is deemed to be unsatisfactory or unknown. Internally this causes the VDR24 to revert to a failsafe state, with all detection outputs forced in to a failsafe, presumptive ‘presence’ state. These signals are also intended to be utilized by other railroad equipment which is configured to respond to potentially failed or uncertain status of the radar detection system. To utilize these health outputs, connect system Battery+ and a solid state or mechanical relay contact from the equipment being controlled, in a high side or low side configuration, to the Health+ and Healthoutputs and to Battery -. VDR24 outputs for health status connect to railroad equipment in the same manner as zone detection outputs, shown above. Like the Zone outputs, each Health output channel can control up to 200mA of current. 36 VDR24 Radar Detection System, Rev 1.0 Installing the SmartSensor-Rail Manager 6. INSTALLING THE SMARTSENSOR-RAIL MANAGER SmartSensor Manager-Rail (SSM-Rail) software enables you to configure and interact with the SmartSensor –Rail radar sensors. SSM Rail runs on a Windows® PC and is available for download from the Island Radar website. The SSM-Rail application connects to the radar sensors using a 9600-baud RS-232 serial connection. The computer on which the application runs must have a physical serial port or utilize a USB-to-RS232 adapter. See Section 7 of this document for more information on serial channel assignment. Periodic updates and improvements to the radar sensor firmware are conveyed using future versions of the SSM Rail software. When the SSM Rail application is launched and connected to a radar, it will provide notification and guidance for updating radar sensor firmware. Follow these steps to install SSM Rail on a PC or laptop: 1. To download the install file, go to the Island Radar website at www.islandradar.com/downloads. 2. Double clicking on this downloaded file executes a setup program that will copy all the necessary files to the computer and place icons in the PC Start menu and desktop. 3. The SSM Rail setup program will automatically detect whether Microsoft.NET Compact Framework v3.5 is installed. If it is not installed, you will be prompted to do so. You can confirm the version of SSM Rail and the radar sensor firmware that it conveys by right clicking on the SSM Rail application’s splash screen: Figure 17 - SSM-Rail Version Information VDR24 Radar Detection System, Rev. 1.0 37 Installing the SmartSensor-Rail Manager After you are connected to a sensor (covered in Section 7 of this document), you can also view the dates the radar sensor’s firmware version dates by clicking Firmware Versions. Information on the radar sensor’s two main hardware components, the DSP and RF board, can be viewed by clicking Hardware Version. Animated red and green arrows confirm that a radar sensor is connected and communicating with SSM-Rail application Figure 18 - Radar Firmware Version Information Revealed by the SSM-Rail 38 VDR24 Radar Detection System, Rev 1.0 Power Up and User Interface Navigation 7. POWER UP AND USER INTERFACE NAVIGATION 7.1. Final Checkout Before Initial System Power-up At this time, check to verify that the following steps have been completed: ¨ Radar sensors have been mounted, tightened, squared with the roadway, and initially aimed at the detection zone area. ¨ The radar sensor mast cable is plugged into each sensor and is connected to the junction box interface point. ¨ An earth ground wire has been connected between the earth ground lug on each radar sensor and a solid earth ground point at the mast base. ¨ The VDR24 Controller has been mounted in the equipment house or panel and wiring to external railroad equipment is complete in accordance with prevailing engineering drawings. ¨ Home run cable wiring from the junction box interface point to the controller is complete, with all seven connections double-checked for color-coding accuracy and well-clamped connections – both at the junction box and at the VDR24 Controller terminals. ¨ Nominal 12VDC and ground have been connected to the VDR24 Power terminal strip, along with a separate, isolated earth ground - ready for connecting into the VDR24 Controller. Double check polarity and voltage levels on terminal positions 1 and 2 (BAT+ and BAT -). 7.2. VDR24 Indicators, Keyboard, and Display Familiarization This section provides an introduction to the indicators, keyboard, and display located on the VDR24 radar controller. All detection decisions are made in the radar sensors themselves and are communicated to the VDR24 for interfacing to railroad equipment. In addition, while the SSM-Rail application (or more precisely the computer on which it is running) connects to the VDR24, it is actually passed through the VDR24 and is interfacing with each radar for configuration and verification. 7.2.1. Indicators Front panel indicators are provided to verify detection events for each radar along with health status for each radar. The front panel also displays the current state of the railroad equipment’s XR and IR relays. When Zone status signals are green, they indicate no detected vehicle (or train). When red, they signal a detection event or status. Health status for each radar is continuously communicated to the VDR24 by each radar sensor. When green, the radar sensor has successfully passed its continually running health check procedure. A flashing yellow indication means that the VDR24 has detected a potential problem. It takes the VDR24 about five seconds to verify whether a problem with one or both radar sensors is serious enough to warrant a failsafe state trigger. If so, a red indication signals that the radar has experienced an internal failure or has lost power or its communication connection to the VDR24 controller, and the entire system and all outputs have reverted to their failsafe states. 7.2.2. Display The front panel display provides a viewport into detailed aspects of the VDR24 operation. Information about software versions for the VDR24 and the attached radar sensors is also displayed in this area. The display will turn off to preserve power and life when no key is VDR24 Radar Detection System, Rev. 1.0 39 Power Up and User Interface Navigation depressed for a programmable period of time. Called an Inactivity Timer, this time may be set to 10, 20, 30, or 60 minutes. Pressing any key will wake the display up returning to a configurable Default Display. 7.2.3. Keyboard Viewport Navigation The front panel keypad provides viewport navigation through a structured menu system using directional and selection keys. Each of the VDR24 display menus has a title and a menu structure number (1.0, 1.1, 1.2…5.3) for easy reference. - The Left (-) Arrow navigates to the left for a selection or decreases a configurable variable The Down Arrow navigates downward for a selection The Up Arrow navigates upward for a selection + The Right (+) Arrow navigates to the right for a selection or increases a configurable variable The Up Level Arrow navigates up one level for a selection The SELECT key selects a choice to which you have navigated The CANCEL key cancels the current operation or navigation and returns to the Home position Figure 19 - Keyboard Descriptions and Functions 40 VDR24 Radar Detection System, Rev 1.0 Power Up and User Interface Navigation The menu structure map is shown on the following figure. This map is described Menu Number Menu Name/Function 1.0 Home Select Sub Menus 2, 3, 4, and 5 2.0 Current Activity Branch Observe current operating metrics 2.1 Detection Activity – Current Observe current detection activity and verification outcomes 2.2 Latency Metrics Shows quantity and time differences between radars configured using identical, redundant zones 2.3 Communication Quality – Current Shows communication events from each radar in real time, evaluated over 10 second windows 3.0 Health and History Branch Observe accumulated and averaged metrics 3.1 Detection Activity – Historical Shows number of detection events for each radar, and tracking percentage (only relevant for identically configured radar zones) 3.2 Health and System Messages Shows Operating and Failsafe status for each radar along with reset event metrics for all three processors 3.3 Communication Quality – Historical Shows number of radar messages received and validated over a moving history window 4.0 About Branch Display firmware versions and other descriptive information 4.1 System Processor Census 4.2 Output Processor 1 Census 4.3 Output Processor 2 Census 4.4 Radar 1 Information 4.5 Radar 2 Information 5.0 Administration and Preferences Branch Change operating preferences and settings, reset options, manual system tests 5.1 User Interface Preferences Set Inactivity Timer, set Default (wakeup) Display 5.2 System Reset Options Reset individual History metrics, all History Metrics, entire System reset or Factory reset 5.3 System Test Functions Conduct internal system tests for Display, Keyboard, Indicators, and Communications What You Can Do From Here Displays firmware version, power-up and watchdog reset metrics, and accumulated runtime for the system processor and each of the two output processors Displays serial number, firmware version, and setup information for each radar sensor Figure 20 - Menu Structure and Navigation VDR24 Radar Detection System, Rev. 1.0 41 Power Up and User Interface Navigation Figure 21 - Front Panel Keyboard/Display Navigation 42 VDR24 Radar Detection System, Rev 1.0 Power Up and User Interface Navigation 7.3. Apply Initial Power and Basic Checkout This section covers initial power up and check out of the entire radar system. Subsequent sections provide guidance on setting up detection zones and other operating parameters. Before setting up the radar and its detection zones, we want to be sure that everything is connected and functioning properly. It is also important to be sure that the configuration application – SSM-Rail – can communicate with each radar connected to the VDR245 Controller. 7.3.1. Verify VDR24 and Radar Status When power is applied, the VDR24 undergoes a series of setup and initialization procedures and commands the connected radar sensors to do likewise. As this process completes its steps, which takes about 45 seconds, the front panel displays progress. The successful completion of each step is designated by an * character adjacent to each of the procedural steps within the progress brackets [ ]. !!!!!!!!!!VDR!24!Startup!!!!!!!!!0.0! !!!!!![*]!I/O!Initialized! !!!!!![*]!Display!Initialized! !!!!!![*]!Memory!Initialized! !!!!!![*]!Radar!1!Initialize!! !!!!!![*]!Radar!2!Initialized! !!!!!!!Initialization!Complete! Figure 22 - System Initialization Display When completed, the VDR24 will come to rest at the Home screen, 1.0 as shown below: Home%%%%%%%%%%%%%%%%%%%%%%%%%%%%%1.0%%% >Current%Activity%(goes to level 2) %Health%and%History%(goes to level 3) %About%(goes to level 4) %Administrative%and%Preferences(to level 5) % % Figure 23 - Home Screen In addition the Health indicators for each of the connected radar sensors should be in a blinking green state, indicating that valid messages are being received from the radar sensors themselves. Zone information displayed on the front panel indicators may not be valid or meaningful at this point since detection zones and other sensor operating parameters may not have been set up. VDR24 Radar Detection System, Rev. 1.0 43 Power Up and User Interface Navigation 7.3.2. Verify XR and IR Circuits As stated previously, the state of the XR and IR circuits influence the behavior of the radar detection system. For instance, when the island relay circuit (IR) is activated, or unpowered, the VDR24 assumes that a train is occupying the crossing so detection is suppressed. This section is intended to verify that the XR and IR signals are properly connected to railroad equipment, by measuring the applied voltage at the XR and IR terminals and viewing the corresponding state of the VDR 24 front panel indicators. Located above the point where wire connections are made in the pluggable terminal strips are small holes where readings may be taken with a voltmeter. Voltage Measurements Taken Here Figure 24 - Measuring XR and IR Voltage Levels 7.3.2.1. Verify XR Circuit Verify that with the XR circuit not active (powered) that a B12-N12 Battery voltage is present across the XR+ and XR- terminals on the side of the VDR24. Also verify that the XR indicator on the VDR24 front panel is illuminated in green during this condition. Then simulate the XR signal in the activated, or unpowered, state and verify that the XR indicator on the VDR24 front panel turns red. 7.3.2.2. Verify IR Circuit Verify that with the IR circuit not active (powered) that a B12-N12 Battery voltage is present across the IR+ and IR- terminals on the side of the VDR24. Also verify that the IR indicator on the VDR24 front panel is illuminated in green during this condition. Then simulate the IR signal in the activated, or unpowered, state and verify that the IR indicator on the VDR24 front panel turns red. 7.3.3. Verify Radar Sensor Voltage Levels The VDR24 is ideally powered by B12-N12 battery voltages available in the railroad equipment house. In accordance with standard AREMA practices, this power supply is surge protected and isolated within the VDR24 power supply. This isolated supply is then made available to the components that comprise the Island Radar system. Regardless of the battery power supply connected to the VDR24, it provides approximately 24.5 volts DC to the radar sensors. While the radar sensors themselves can operate on as low as 12 volts, utilizing the higher voltage maximizes communication noise immunity and permits the home run cabling that extends between the sensors and the VDR24 controller to be 500 feet or greater in length. 44 Figure 25 - Confirming Radar Voltage Levels VDR24 Radar Detection System, Rev 1.0 Power Up and User Interface Navigation To verify that the radar sensors are properly powered, measure radar voltage levels on the PWR and GND terminals for each radar sensor connector on the side of the VDR24 enclosure. Nominally, this voltage should be 24.4VDC. This sensor voltage should be in the 23 to 24 volt level regardless of the B12-N12 battery voltage powering the system. 7.3.4. Connect SSM-Rail Application This section assumes that the software application called SSM-Rail has been installed on the computer to be used for configuration, and that an RS-232 serial connection has been confirmed (see Section 6 of this document). This section also assumes that verification of radar voltage levels and railroad equipment connections have been successfully completed and that flashing green health signals are visible on the front panel of the VDR24. This indicates that the radar sensors are now ready for the configuration phase of installation. Figure 26 - RS-232 Configuration Port Connection to each of the radar sensors and activating the SSM-Rail application involves the following steps: 7.3.4.1. Connect to the RS-2332 Configuration Port Connect the computer containing the installed SSM-Rail application to the RS-232 configuration port on the left side of the VDR24. 7.3.4.2. Open the SSM-Rail Application Click the SSM Rail shortcut icon on the computer desktop to open the configuration application. When opened, the SSM Rail application will briefly display a splash screen that shows the application version number (which should be v1.1.5 or higher). The home screen and the functions that can be enabled from this point are as follows: To Setup SSM-Rail Communication Parameters and Connect to Radar Sensors To Establish Basic Sensor Settings To Configure Radar Sensor Lanes, Zones, and Other Operating Parameters Backup/Restore, Self-Test, and other Expert User Functions Set Size of the SSM-Rail Application Window Figure 27 - SSM-Rail Home Page Controls VDR24 Radar Detection System, Rev. 1.0 45 Power Up and User Interface Navigation 7.3.4.3. Set Communication Parameters The first step before connecting to one of the radar sensors is to set the serial communication port used by the SSM-Rail application. Depending on the computer being used it may be easiest to select AutoDetect. The Internet selection tab is used when there is an Ethernet-based connection to the configuration application. The Virtual selection tab is used for simulating detections utilizing recorded emissions. This is primarily used for training purposes of for Island radar engineers to evaluate specific installation behavior. Most users will utilize the RS-232 serial port for configuring radar sensors. 1. Select the Serial Tab 2. Select the port being used by the SSM-Rail application. AutoDetect may also be used on some computers 1. Set the timeout parameter to 1000ms (nominal setting) Figure 28 - Setting SSM-Rail Communication Parameters 7.3.4.4. Search the Radar Network for the Radar Sensor to be Configured The Search control is used to discover and catalog all radar sensors connected to a specific VDR24. Sensors are then chosen individually for connection and configuration. 1. When activating a system for the first time, select Full as the search method. This allows the SSM-Rail application to resolve any address conflicts on its own when organizing radar sensors connected to the VDR24. Afterwards, the Quick search method may be used. 2. Select Search to list radars connected to the VDR24 Figure 29 - Search Discovers Connected Radar Sensors 46 VDR24 Radar Detection System, Rev 1.0 Power Up and User Interface Navigation 7.3.4.5. Connect and Verify Connection to the Radar Sensor to be Configured Following a successful search of radar sensors connected to the VDR24, a list will be shown from which a specific sensor may be chosen for configuration. The list will show the sensor ID numbers, which are typically the last few digits of the sensor serial number. If the radar sensors have never been configured, they may contain, unknown data for the Location and Approach parameters – these will be set up in subsequent configuration steps. The important thing at this point is that the radar sensors connected to the VDR24 have been found and are now available for selection and configuration. Highlight the radar sensor to be configured and click Select to connect the SSM-Rail application to the chosen sensor. When connected to the chosen radar sensor, the red and green arrows on the upper right portion of the SSM-Rail screen will animate with arrows moving in opposite directions to authenticate ongoing communications with the radar sensor. Animated arrows verify communication between the SSM-Rail App and the radar sensor Figure 30 - Verification of Connected Radar Sensor VDR24 Radar Detection System, Rev. 1.0 47 Power Up and User Interface Navigation This page left intentionally blank 48 VDR24 Radar Detection System, Rev 1.0 Setting Up Lanes, Zones, and Channels 8. SETTING UP LANES, ZONES, AND CHANNELS Setting up detection zones involves five steps, each of which includes some important substeps. Many of these settings will not need to be altered from their default values, but it is important to check them anyway to assure optimum radar performance. Also note that these steps need to be repeated for each radar sensor installed at the site. Although each sensor is positioned to monitor the site from a different perspective, in most cases the lanes and detection zones are to be the same for fully redundant operation. So it is helpful, ahead of time, to label and number the common lanes and detection zones using sitespecific nomenclature such as Northbound Lane, Southbound Lane, Zone 1, Zone 2, and so forth. Similarly the radar sensors should be numbered Radar 1 and Radar 2. For uniformity, assign Radar 1 to the lowest serial number amongst the radar sensors being installed and Radar 2 to the higher serial number. A configuration checklist follows on the next page. The sections that follow describe each of those configuration procedures in a step-by-step fashion. VDR24 Radar Detection System, Rev. 1.0 49 Setting Up Lanes, Zones, and Channels 1. Connect the SSM-Rail application to the radar sensor to be configured (Section 8.1) a. Connect the SSM-Rail application b. Do a Full Search to locate connected sensors c. Verifying that a radar is connected and ready to be configured 2. Assign and verify radar sensor settings (Section 8.2) þ þ þ a. General i. ID ii. Description iii. Location iv. Approach v. RF Channel vi. Sensor Height vii. Units – Standard or Metric b. Communication Parameters � � � � � � � i. Response Delays ii. Data Push Settings iii. Source Setting c. Advance Settings � � � i. Wash-out Time � ii. Weather Optimization levels � 3. Tab 1 - Establish lanes for traffic (Section 8.3) a. Orient display to match physical sensor location b. Verify proper physical aiming of the sensors c. Set lane placement, lane widths, and direction d. Set background attenuation 4. Tab 2 - Establish detection zones (Section 8.4) � � � � a. Create physical detection zones � b. Set zone delay and extend values � c. Assign zones to output channels � d. Set channel delay and extend values � e. Save zone and channel settings to the radar sensor � 5. Verify and save configuration settings (Section 8.5) a. Watch vehicles traversing the crossing to verify proper detection i. Verify no missed detections � ii. Verify no false detections � iii. Save configuration values � b. Verify detections and health signals are properly connected to railroad equipment i. Verify detection event connections ii. Verify health status connection iii. Testing with a test vehicle c. Backup configuration file (Section 9) � � � � 8.1. Connect the SSM-Rail application Although covered in greater detail in the prior section for the first time user, steps for connecting the SSM-Rail configuration application are reiterated below. 50 VDR24 Radar Detection System, Rev 1.0 Setting Up Lanes, Zones, and Channels 8.1.1. Connect the SSM-Rail Application The first step before connecting to one of the radar sensors is to set the serial communication port used by the SSM-Rail application. Depending on the computer being used it may be easiest to select AutoDetect. The Internet selection tab is used when there is an Ethernet-based connection to the configuration application. The Virtual selection tab is used for simulating detections utilizing recorded emissions. This is primarily used for training purposes of for Island radar engineers to evaluate specific installation behavior. Most users will utilize the RS-232 serial port for configuring radar sensors. 1. Select the Serial Tab 2. Select the port being used by the SSM-Rail application. AutoDetect may also be used on some computers 3. Set the timeout parameter to 1000ms (nominal setting) 8.1.2. Locate Connected Sensors Using Full or Quick Search The Search control is used to discover and catalog all radar sensors connected to a specific VDR24. Sensors are then chosen individually for connection and configuration. 1. When activating a system for the first time, select Full as the search method. This allows the SSM-Rail application to resolve any address conflicts on its own when organizing radar sensors connected to the VDR24. Afterwards, the Quick search method may be used. 2. Select Search to list radars connected to the VDR24 8.1.3. Verify the Radar Sensor is Connected Following a successful search of radar sensors connected to the VDR24, a list will be shown from which a specific sensor may be chosen for configuration. The list will show the sensor ID numbers, which are typically the last few digits of the sensor serial number. If the radar sensors have never been configured, they may contain, unknown data for the Location and Approach parameters – these will be set up in subsequent configuration steps. The important thing at this point is that the radar sensors connected to the VDR24 have been found and are now available for selection and configuration. Highlight the radar sensor to be configured and click Select to connect the SSM-Rail application to the chosen sensor. When connected to the chosen radar sensor, the red and green arrows on the upper right portion of the SSM-Rail screen will animate with arrows moving in opposite directions to authenticate ongoing communications with the radar sensor. Remember to Click OK – Click OK to Remember When undergoing the programming and configuration steps shown below, be sure to click OK to cause configuration settings to be consumed and remembered by the radar sensor being programmed. VDR24 Radar Detection System, Rev. 1.0 51 Setting Up Lanes, Zones, and Channels 8.2. Assign and Verify Radar Sensor Settings 8.2.1. General Tab Click on Sensor Settings to access the area for general sensor operating environment setup. Shown in the adjacent figure, fill in the detail for the General Settings category. 8.2.1.1. Serial Number The Serial Number is programmed into the radar sensor and cannot be altered by the user. But it is important that this serial number be matched to the physical location of the particular sensor at the site for identification in the following steps. 8.2.1.2. ID Similar to the sensor’s serial number, the Sensor ID is not a user-configurable parameter. 8.2.1.3. Description This field allows you to enter a description of up to 64 characters for each sensor. Information may include GPS coordinates, the name of the closest city or town, Milepost information, or a DOT number for the site. Figure 31 - SSM-Rail Sensor Settings General Tab 8.2.1.4. Location This field allows you to enter the intersection location of the sensor – for instance the cross streets or DOT number. This is the information that is revealed during a search function when connecting the SSM-Rail application. 8.2.1.5. Approach Allows you to enter supplemental information about the side of the crossing or crossover the radar is located on. This entry is limited to 32 characters. 8.2.1.6. RF Channel The RF Channel entry allows you set which one of the eight radio frequency channels the sensor is using. If desired, the radar sensors can work this detail out on their own. 8.2.1.7. Sensor Height Enter the height of the sensor in feet. This value affects the sensor’s detection algorithms. Entering an approximate height measurement for the sensor allows detections to be placed correctly on the roadway. 8.2.1.8. Units – Standard or Metric Allows sensor height, zone dimensions and road objects to be viewed in metric mode rather than standard units. 52 VDR24 Radar Detection System, Rev 1.0 Setting Up Lanes, Zones, and Channels 8.2.2. Communication Parameters Tab The Communications tab allows certain communication parameters to be set and optimized. Normally these parameters may be left in their default settings, but those settings are provided here for verification. 8.2.2.1. Response Delays Response Delay is used to configure how long the sensor will wait before responding to a message received. This is useful for some communications devices that are unable to quickly change transmission direction. The default value is 10 milliseconds. This value can be selected for both of the sensor’s ports independently. The green arrow shows what port the SSM-Rail configuration application is connected to for control of the sensor, and is typically set to Port 1. Do not change these values unless instructed to do so by Island Radar engineering and support. 8.2.2.2. Data Push Settings The VDR24 is configured to send (push) presence detection data over Port 2. Do not change these settings unless instructed to do so by Island Radar engineering and support. 8.2.2.3. Source Setting Typically set to Antenna, this setting is used by Island radar engineering and support for certain test and training functions. Do not change this setting unless instructed to do so by Island Radar engineering and support. Figure 32 - SSM-Rail Sensor Settings Comm Tab 8.2.3. Advance Settings Tab The Advance tab permits setting of certain performance filters and failsafe modes. 8.2.3.1. Wash-out Time The recommended setting for this parameter to its maximum value. Future releases will disable this parameter altogether. 8.2.3.2. Weather Optimization Levels Advanced algorithms for performance in heavy snow or precipitation conditions are enabled by checking this selection. It is recommended that this box be enabled (checked). 8.2.3.3. Blind Sensor Triggers Failsafe If a sensor happens to become totally encased in ice or sleet, its detection performance may be adversely affected. However, continuously operating self-check procedures can detect this condition and force the sensor into a failsafe mode where all detection zones revert to a ‘presence’ condition and the Health signal from the radar is disabled (the VDR24 Health contacts open for that radar sensor). It is recommended that this box be enabled (checked). VDR24 Radar Detection System, Rev. 1.0 Figure 33 - SSM-Rail Sensor Settings Advanced Tab 53 Setting Up Lanes, Zones, and Channels 8.3. SSM-Rail Tab 1 - Establish Lanes for Traffic After Sensor Settings, the next configuration step available from the main menu is Sensor Setup. When you click this option, the first screen that appears is Lanes & Stop Bars. The Lanes & Stop Bars screen shows the sensor’s 140-ft. (30.5-m), 90° degree view and provides automatic and manual controls to quickly and easily configure the sensor to the roadway. The sensor’s view has the appearance of a baseball infield with the sensor icon shown at the position where home plate would be. Right away you should see small dotted blue icons that represent return echoes from vehicles moving over the roadway (called radar “trackers”). These breadcrumb-like icons are not vehicle (or train) detections per se, but are the returned emissions from the radar elements within the sensor. These trackers are continuously evaluated by the radar for energy level, movement, position relative to lanes, and other attributes. If a group of “unconstrained trackers”, as they are called, meet all the necessary criteria they can qualify as a valid vehicle or detectable object. Then, if they are in a valid lane and detection zone they are finally detected as vehicles in an established detection zone. All this happens in a matter of milliseconds on a continuous basis. 8.3.1. Orient Display to Match Physical Sensor Location The SSM-Rail software shows the position of the radar sensor and the view is drawn from the perspective of the sensor. The sensor’s default position is in the bottom-left corner of the display. If the perspective in the software does not match your perspective of the roadway, click the Rotate View button until the sensor position matches the approach you are configuring. Click Rotate View button to orient the display to match the physical location of the radar sensor and the detection area 8.3.2. Verify Proper Physical Aiming of the Sensors Now is the time to verify that the sensor is positioned and aimed so that the crossing detection zone (or train detection zone) area is as centered as possible in the quarter-circle shaped detection footprint. Adjust the position of the sensor if necessary to be sure the intended detection zone area is well within the footprint. If there are not a sufficient number of vehicles in motion across the area, you can have someone walk around the perimeter of the crossing island. Most humans will emit a sufficient trail of radar trackers that this area can be identified on the display. This technique will be used later to precisely set the detection zone boundaries. 8.3.3. Set Lane Placement, Lane Widths, and Direction There are a number of semi-automated ways to establish lane position and other lane attributes. However, we recommend manual placement and design of the lanes within the detection footprint for optimum performance. Figure 34 – Lane Setup on SSM-Rail Tab 1 8.3.3.1. Establish Lanes in the Detection Footprint To add lanes, left click on the radar’s detection footprint (the yellow quarter-circle shaped area). A dialog box will appear providing the opportunity to add a lane. Select Add Lane and a black lane will be randomly placed in the detection footprint. Using the blue handles at the ends of the lane, move the lane in the detection footprint so that it is directly over and centered on one of 54 VDR24 Radar Detection System, Rev 1.0 Setting Up Lanes, Zones, and Channels the many lanes that have been revealed by moving traffic. If the lane has sharp bends in it, additional nodes may be established by left clicking on the lane. These can also be moved around to optimize the location of the lane. Before adding additional lanes, set the width as instructed in the next section. Then return to this part to establish additional lanes, and so on. This is necessary because lanes cannot overlap one another. 8.3.3.2. Set Lane Widths Trackers from Vehicles Moving Over Crossing Measure the starting and ending width of each lane as well as any internal nodes (vertices) within the lane. Then left click on each node and set the width accordingly. Reposition the lane if necessary to center it on trackers left behind by moving traffic. Lanes Position Centered on Trackers Lane Widths Set to Actual Measurements Lane Direction Arrow Set to Bi-Directional 8.3.3.3. Set Lane Direction Lastly, click on the directional arrow at either end of the lane so that the arrow shows a bi-directional heading. This is so that vehicles moving in both directions will be detected. Sensitivity Control Click here to set attenuation Figure 35 - Setting Lanes Attributes SSM-Rail Tab 1 8.3.4. Set Background Attenuation Finally, click on the Sensitivity Control icon (appears as colored rectangles depicting regions within the detection footprint). This allows the entire detection footprint to be fine-tuned for sensitivity as well as establishing separate levels of gain or attenuation for specific regions and features within the detection footprint. Island Radar tests have shown that this attenuation level should be set to +1 or +2 dB of attenuation for the entire region. By left clicking on the detection footprint, the Adjust All control can be accessed. This presents a slider control, permitting attenuation to be set at VDR24 Radar Detection System, Rev. 1.0 Adjusting Attenuation and Sensitivity for the Entire Detection Footprint Region Figure 36 – Accessing Attenuation Adjustment 55 Setting Up Lanes, Zones, and Channels +2dB. After establishing this sensitivity setting, close out the attenuation box and click the lane Display icon (which has the appearance of several black lanes on a yellow detection footprint) to return to the normal Tab 1 configuration display. Set attenuation using the up/down arrows or the leftright slider Click on the Lane Display icon to return to the normal configuration screen for Tab 1 Figure 37 - Adjusting Attenuation and Sensitivity 8.4. SSM-Rail Tab 2 - Establish detection zones Now that lanes have been established, Tab 2 of the SSM-Rail configuration application is used to establish detection zone boundaries. The actual area where detection zones will be placed should be positioned within the quarter-circle shaped detection footprint as much as possible for optimum radar response. For crossing applications, it is important to establish and verify zone boundaries so that moving objects and features just outside the crossing detection zones do not trigger inadvertent detection. For instance, if moving gates swaying back and forth in the wind are within the detection boundaries, they could be interpreted as vehicles by the radar system. Figure 38 - Clear Storage Distance The Clear Storage Distance is the 6-foot minimum space between the crossing gates and the rails as shown in the adjacent figure. Tests have shown that the ideal location for the outside detection zone boundaries is at the halfway point of this space as shown in the figure below. 56 VDR24 Radar Detection System, Rev 1.0 Setting Up Lanes, Zones, and Channels Figure 39 - Optimum Location of Detection Zone Boundaries Not only does this prevent inadvertent application by gates swaying in the wind, but it also prevents a vehicle that has stopped at the lowered entrance gates with its front bumper underneath and beyond the gates from triggering a detection event. Because the radar sensor’s have a detection resolution of 2 feet, this will assure detection of vehicles that are actually in the crossing, resulting in desired exit gate behavior. 8.4.1. Create Physical Detection Zones To create detection zones in each lane click on Tab 2 of the SSM-Rail application where the radars entire detection footprint and the previously established lanes are shown. Drag and drop the first detection zone, or Z1, into the detection zone footprint area. Then, using the blue handles located on each of the four zone vertices to position the detection zone over the chosen lane (or lanes) so that the detection zone covers the entire width. Adjust the corners of the detection zone so that the ends are aligned with a point that is halfway between the rails and the gates as indicated above. To accurately establish the location of the ends of the detection zones it is again helpful to have someone walk along a point that is halfway between the gate locations and the outside rails. While those trackers persist on the SSM-Rail screen, move the ends of the zone being configured to the line created by those trackers. Do the same with the remaining zones for the site. Keep in mind that a detection zone can include any number of lanes and up to 16 zones can be placed into the detection footprint. Most applications, however, will use two zones – one zone for each lane of travel where the behavior of an exit gate will need to be influenced. VDR24 Radar Detection System, Rev. 1.0 Figure 40 - Position Detection Zone Boundaries Using a Human Tracker 57 Setting Up Lanes, Zones, and Channels 8.4.2. Set Zone Delay and Extend Values Once a zone’s location and boundaries are established there are additional parameters that should be set to optimize performance. These include Delay and Extend parameters, which are accessed by clicking on the Zn (where n = 1 to 16) control on the bottom of the SSM-Rail screen. 8.4.2.1. Setting the Delay Parameter The Delay parameter is the time that a qualified vehicle must be present within a detection zone for a detection event to occur. This value is generally set at .1 or .2 seconds to provide adequate immunity from spurious movement within the detection zones. Set the Delay time to .2 seconds unless advised otherwise by Island Radar engineering and support. 8.4.2.2. Setting the Extend Parameter The Extend parameter sets a minimum output pulse time for a detection event. Unless advised otherwise by Island Radar engineering and support, this setting may be left at 0 seconds. 8.4.3. Assign Zones to Output Channels The VDR24 provides four isolated output Channels that connect to railroad equipment (controllers or relay logic circuitry). Zones that have been established must be assigned to one or more output channels. To do so, click on the LED indicator icon at the bottom of the SSM-Rail screen. This will present a matrix where zones that are configured may be assigned and correlated to any of eight output Channels. For the VDR24 however, only four output channels are provided. Click on the necessary LED icons to establish the desired Zone-Channel relationships. Figure 41 - Setting the Zone's Delay and Extend Parameters 8.4.4. Channel Settings Clicking on the CN (where N=1 to 8) icon permits other Channel level parameters to be configured. This is an alternate area to assign Delay and Extend settings similar to what was done directly with each Zone. Unless advised otherwise by Island radar engineering and support, these setting should not be configured and should be left at 0. 8.4.5. Save Zone and Channel Settings When all zones have been configured and associated parameters established, click the disk icon to store the configuration in the radar sensor itself. Figure 42 - Mapping or Assigning a Zone to an Output Channel 58 VDR24 Radar Detection System, Rev 1.0 Setting Up Lanes, Zones, and Channels 8.5. SSM-Rail Tab 3 - Verify settings The final step in the configuration process is to verify the operation of both radars – individually and together with the railroad equipment (controller or relay logic). Tab 3 of the SSM-Rail application provides real-time detection information along with moving icons that match the vehicles being tracked by the radar. Click tab 3 of the SSM-Rail application and then click each of the configured Channel Status icons. Clicking these icons (only the ones that have zones associated with them) will cause them to be illuminated with a red or green background, depending upon whether there is a detected vehicle in any of the zones associated with that output channel. This will also cause the zones to be highlighted in the detection footprint portion of the display in green. Safety Procedures Apply When configuring and testing the radar system at a crossing or crossover, be sure to follow safety procedures. Flagging the crossing and coordinating with local train traffic is mandatory when detection events are being verified. Click Channel Status Indicator Area to Illuminate Detection Zones Vehicles Appear As Real-Time Icons Moving Over the Crossing Zones and Associated Channel Indicators Turn Red When Detection Zone is Occupied Green Highlighted Detection Zones Figure 43 - Setting Up the SSM-Rail Display for Verification VDR24 Radar Detection System, Rev. 1.0 59 Setting Up Lanes, Zones, and Channels 8.5.1. Watch Vehicles Traversing the Crossing to Verify Proper Detection As vehicles move over the crossing and through the established detection zones, observe the vehicle tracking and detection zone response to verify proper detection activity. Depending on your computer speed, there may be a slight processing delay (up to 1.2 second) between the actual detection and the illumination of Channel Status indicator4s and highlighted Zones on your SSM-Rail application screen. 8.5.1.1. Verify No Missed Detections Verify that there are no missed detections as vehicles move through the detection zone area. Note that the radar system is optimized for detecting vehicles that are potentially trapped in the crossing or queued up on the crossing when the warning system starts. The radar system is not expected to instantly respond to vehicles that are moving at high speed over the crossing area. They will still be detected but the detection duration will be very short. 8.5.1.2. Verify No False Detections The dual redundant radar detection system rarely, if ever, misses any detection. A more important verification test involves false detections due to improper placement of detection zone boundaries. The reason that the boundaries are placed halfway into the Clear Storage Distance is to prevent vehicles that are partially underneath the entrance gate from triggering a detection event and to prevent moving entrance or exit gates from being falsely interpreted as part of a vehicle. Watch carefully as gates are lowered to verify that no detection events occur. After the gates are lowered, move them horizontally simulating movement in high wind to see if any gate movement from any of the gates is detected by the system. This gate movement test needs to be conducted from outside the crossing as some human presence may be detectable within the crossing island. 8.5.2. Verify Connections to Railroad Equipment If any of the preceding verification tests suggest that zone placement needs to be changed, then repeat those configuration steps and conduct the Missed and False detection verification tests once more. When satisfactory, the radar detection system interfaces to the railroad equipment must be verified. 8.5.2.1. Verify Detection Event Connections If railroad equipment (exit gate controller or relay logic) is connected to the VDR24 outputs, then verify that detections registered by the VDR24 are being received by railroad equipment (either through observing the necessary indicator lights on a controller or watching physical relays change state). 8.5.2.2. Verify Health Status Connection Any problems, circuit failures, or broken connections at any point in the radar system will cause the system to enter a failsafe mode. A failsafe mode (which can be self-healing) forces all detection zones to revert to their failsafe state – with all zones in a presence detection state. In addition, the health circuit associated with a radar in a failsafe state opens providing a separate signal that may be used by railroad equipment to react to a failsafe state, executing what over logic or procedures are designed into the entire controller logic. While there are numerous self-tests in the VDR24 and in the radars themselves that run continuously, to test for a health check failure and to verify proper connection to railroad equipment you need only disconnect a radar sensor from the VDR24. Within five seconds, the VDR24 will recognize that a problem has occurred and the system will enter a failsafe state. 60 VDR24 Radar Detection System, Rev 1.0 Setting Up Lanes, Zones, and Channels Verify that the VDR24 and the associated radar revert to a failsafe state (all detection zones and health indicate red) and any connection of the health circuit to railroad equipment properly shows the same state. 8.5.3. Testing with a Test Vehicle It is also important and recommended that the entire system be tested simulating actual operation. To do so it is recommended that a test vehicle be used as follows. 8.5.3.1. Test Exit Gate Control, Queued Vehicle Observing necessary safety criteria, position a test vehicle in the crossing just beyond the entrance gate and manually activate the crossing warning system by opening the XR circuit. Observe that the associated exit gate for that lane stays in a raised position while the exit gate for the clear lane descends. Then move the test vehicle forward to clear the crossing island and verify that the exit gate associated with the temporarily occupied lane now descends. Repeat for all other lanes and zones. 8.5.3.2. Test Exit Gate Control U-Turning Vehicle Observing necessary safety criteria, position a test vehicle in the crossing just beyond the entrance gate and manually activate the crossing warning system by opening the XR circuit. Observe that the associated exit gate for that lane stays in a raised position while the exit gate for the clear lane descends. Then execute a U-turn within the crossing island and verify that the exit gate in the opposite lane also ascends to provide an exit path. Move the test vehicle forward to completely clear the crossing island and verify that all exit gates now descend. Repeat for all other lanes and zones. 8.5.4. Back Up Configuration Settings and Values Once testing is complete, it is advisable to back up all the settings onto a maintenance computer in case setting need to be replicated and restored into in a replacement radar sensor. For backup and restore instructions see the following section, Support, Maintenance, and Troubleshooting. VDR24 Radar Detection System, Rev. 1.0 61 Setting Up Lanes, Zones, and Channels This page left intentionally blank 62 VDR24 Radar Detection System, Rev 1.0 Support, Maintenance, Troubleshooting 9. MAINTENANCE AND SUPPORT This section provides guidance for periodic maintenance and support, and includes: ¨ Periodic Maintenance, Section 9.1 – what to do when visiting the site to verify system operation, with suggestions for monthly, quarterly, and annual procedures ¨ Firmware Upgrades to Radar Sensors, Section 9.2 – how to upgrade radar sensor firmware to install new features and capabilities ¨ Backup and Restore, Section 9.3 – how to backing up and restoring radar sensor configuration settings ¨ Accessing Tier 1 and Tier 2 Support, Section 9.4 – how to access support assistance from Island Radar and Wavetronix ¨ Configuration and Settings Chart, Section 9.5 – a chart to record settings for a typical site utilizing dual radar sensors 9.1. Periodic Radar Sensor Verification and Performance Checks Periodic checking of the radar detection system is recommended. A thorough preventative maintenance schedule includes verification of the following items: Annual Quarterly Monthly Table 7 - Recommended Periodic Maintenance Schedule Category Test Type, Method, or Scope Real Time Detection Activity Procedure General Detailed Front Panel - Visual 9.1.1 8.5.1 VDR24 Indicator Status Front Panel - Visual 9.1.2 7.2.1 Communication Quality Metrics Front Panel - Visual 9.1.3 Review of Performance Metrics Front Panel - Visual 9.1.4 Coincident Detection Metrics Front Panel - Visual 9.1.5 Radar Alignment Front Panel - Visual Verify Runtime Metrics Front Panel - Visual Verification of Radar Position and Alignment SSM Configuration App 9.1.8 8.3 Verification of Zone Position and Boundaries SSM Configuration App 9.1.9 8.4 Verify Settings Against Backup Record SSM Configuration App 9.1.10 Radar Self Tests SSM Configuration App 9.1.11 Verification of Voltage Levels Voltage Measurement Ground Leakage Current Measurement Re-Tighten Radar Mounting Hardware Requires Radar Access 9.1.14 4.1-4.3 Check Radar Electrical Connections Requires Radar Access 9.1.15 4.4-4.6 Configuration Re-Verification SSM Configuration App 9.1.16 8.5.3 VDR24 Radar Detection System, Rev. 1.0 9.1.6 4.3 9.1.7 9.1.12 7.3.3 9.1.13 63 Support, Maintenance, Troubleshooting 9.1.1. Real-Time Detection Activity (Visual) A simple routine check of the radar detection system may be accomplished by watching vehicles travel through the detection zone areas and noting the detection events as evidenced on the VDR24 front panel indicators. Indicators are provided for each zone for each radar sensor. Both radar sensors should record each vehicle detection, although the detection events are not expected to be simultaneous, occurring at precisely the same instant in time. 9.1.2. VDR24 Indicator Status (Visual) Other front panel indicators provide a view of operating status and their operating state should be verified. Under normal operating modes, the Health indicator associated with each radar sensor should be flashing green. The flashing activity verifies operation of each of the radar sensor’s output processors. The green indication verifies that the radar sensors are in normal operating mode and have not entered a failsafe state. A failsafe state, the causal factors for which are set out in Section 7 of this document, is characterized by a red Health indicator and all zones in a red, or forced detection, state. As described in the foregoing sections, if the Island Relay (IR) circuit is de-energized and in an active state, front panel detection indications will be influenced. An active IR state informs the VDR24 that a train is occupying the crossing, a situation that suppresses normal detection activity. 9.1.3. Communication Quality Each radar sensor communicates with the VDR24 16 times per second. Each communication event conveys presence and other radar operating parameters to the VDR24 Controller where those states are then presented to connected railroad equipment. Each communication event also includes checksum information that allows the VDR24 Controller to verify message integrity. If there are missed communication messages because of radar failure, poor communication cable connections, or severed cables, the VDR24 knows it within one second. If the situation persists longer than 2 seconds, the affected radar channel immediately goes into failsafe and the sensor’s health circuit is de-energized (opened). Likewise, if messages do not pass the messages integrity tests, due to damaged cables or high levels of induced electrical noise the system will revert to failsafe for the affected channel. Figure 44 - Viewing Communication Quality Metrics Message frequency and the quality of the message validation checks can be viewed in real time for each radar channel by navigating to screen 2.3 (Communication Quality – Current) and screen 3.3 (Communication Quality – History). See Section 7 of this document for details on keyboard/screen navigation. 64 VDR24 Radar Detection System, Rev 1.0 Support, Maintenance, Troubleshooting Under normal operation the percentage of received and validated messages should always be 100%. If it is not, then the integrity and condition of the communication cables, junction box interconnections, need to be examined. If the cable is intact and in good condition, and interconnections are satisfactory, then there may be something related to the radar sensor itself that requires further examination. In this case contact island Radar engineering and support for guidance. 9.1.4. Examination of Performance Metrics The front panel display provides a number of operating metrics to help verify proper operation. The two key metrics involve and verify proper communication between the VDR24 and the radar sensors, and proper ‘tracking’ of each of the radars in applications where both radars are configured to detect vehicles in the same zones, but viewed from different sides of the crossing (or crossover). 9.1.5. 9.1.5 Detection Levels In most crossing applications, both radars are configured to detect vehicles in identical zones on the crossing island, but from different sides of the crossing in order to provide optimal redundant detection performance. Although both radars will detect each vehicle in the crossing area, the exact timing or each detection and release will not be identical. Moreover, there are cases where a particular vehicle may not precisely occupy a specific lane of traffic, especially in cases where there is a turning lane before or after the crossing. While the exact number of detection events for each independent radar swill not be the same, but over time a typical percentage of “co-incident” detections will be established for the traffic patterns at a particular crossing. This tracking percentage between the two radar sensors is important because any physical movement of a radar sensor will alter its detection zone location – and cause the typical tracking percentage for a site to change abruptly. Navigating to screen 3.1 will display the Figure 45 - Co-Incident Detection running total of detections for each radar Metrics and for each zone. Tests have shown that the two radars, properly configured, should track each other with a percentage higher that 90%. Any change in physical position can be identified because the tracking percentage, which should be constant over time, will degrade. This is an indication that the physical position of the radar sensor and/or the configured zones should be re-examined as instructed in Section 8 of this document. 9.1.6. Verification of Radar Alignment (Visual) As instructed during the initial installation of the radar sensors in Section 4.3, verify that the radar sensors are visually aligned with the roadway, the gates, and exceed the width of the overall detection area (including all zones). VDR24 Radar Detection System, Rev. 1.0 65 Support, Maintenance, Troubleshooting 9.1.7. Verify Runtime Metrics 9.1.7.1. Total Run Time During continuous operation the system processor keeps track of accumulated run time in Years, Days, and Hours. This value may be viewed by navigating to screen 4.1. The system is expected to run uninterrupted and any power failure or internal protective reset will restart the run time counters. If the run time counter does not accumulate as expected between maintenance visits, and there have not been known internal or external site power interruptions, then the cause for those interruptions should be investigated and discovered. It is recommended that System Runtime metrics be checked on monthly intervals. System'Processor'Census''''''''''4.1''' 'Firmware'V1.00.96''01/31/20914' 'Resets'''0003'WD'''0008'Powerup' 'Radar1'''Not'Connected' 'Radar2'''Not'Connected' 'Runtime''00Years'002Days'21Hours' ' Figure 46 - Accessing the System Runtime Metric 9.1.7.2. Watchdog Timer Resets If any internal conditions arise that suggest any of the VDR24 Controller processors are not operating correctly, the system will initiate a reset procedure, called a Watchdog Timer Reset. This is tantamount to the system re-starting itself. Because this is a metric that pertains to internal self-checks, the number of watchdog timer resets (called WD Resets) is provided on the front panel display in Screen 3.2. Health'and'System'Messages'''''''3.2''' 'Radar'1''''''''''''''SelfCheckFail' 'Radar'2''''''''''''''SelfCheckFail' 'Processor1'''''''00WD''''14Powerup' 'Processor2'''''''00WD''''14Powerup' 'SystemProcessor''00WD''''14Powerup' '''''''''''''''''''' Figure 47 - Accessing WatchDog (WD) Timer Reset Metrics These reset procedures are not representative of normal operation and any occurrences whatsoever should be discussed with Island Radar engineering and support. 66 VDR24 Radar Detection System, Rev 1.0 Support, Maintenance, Troubleshooting 9.1.8. Verification of Radar Positioning and Alignment It is recommended that re-verification of radar positioning be conducted on a quarterly basis. This verification process requires that the SSM configuration application be connected as instructed in Section 8.1. Once connected, the configuration steps provided in Section 8.3 should be reviewed, to verify that each of the radars is aimed in such a manner that the entire detection area is optimally covered by the radar’s detection footprint. In addition, it should be verified that live traffic (or test vehicles) traversing the crossing should be centered in lanes of traffic as indicated by trackers that are visible in real-time on tab 1 of the SSM application. 9.1.9. Verification of Zone Position and Boundaries As described in Section 8.4, the location of each of the detection zones within the overall detection footprint should be re-verified on tab 2 of the SSM configuration application. It is helpful, as described in Section 8.4.1, to have a person walk along a line where the zone boundaries are intended, to verify that the zones accurately cover the intended lanes and that they do not lie too close to entrance or exit gates. The outer boundary of the detection zones for each lane should be half way between the rails and the gates, in the middle of the Clear Storage Distance. 9.1.10. Verify Settings Against Backup Record As advised in Section 8 during the initial configuration of the radar sensors, a chart showing operational parameters should be available for each site. Keep in mind that each site typically has two sensors and each sensor has its own set of variables and performance parameters. On a quarterly basis it is recommended that the variables on the chart associated with the site be checked against actual values. It is also important that any changes made to any of the performance parameters for either of the radar sensors be updated on the Configuration Setting Chart associated with the site. The Configuration Setting Chart maybe found in Section 9.5, below. VDR24 Radar Detection System, Rev. 1.0 67 Support, Maintenance, Troubleshooting 9.1.11. Radar Self Tests The Sensor Self Tests screen allows you to check the sensor to verify it is working properly. To run the sensor self test, access the SSM-Rail Tools Page and select Sensor Self Tests. Click on Run Sensor Self Tests to begin the test process, which will result in either “Success” or “Failed” outcome. If the sensor fails a sensor self test, contact Island Radar engineering and support for guidance on steps to take. Figure 48 - Accessing Radar Sensor Self Test Function 68 VDR24 Radar Detection System, Rev 1.0 Support, Maintenance, Troubleshooting 9.1.12. Verification of Voltage Levels 9.1.12.1. Input Voltage Verify proper input voltage to the VDR24 at the BAT+ and BAT- terminals located on the right side of the VDR24. Although the VDR24 can continue to operate from an input voltage as low as 8 volts and as high as 30 volts, the input voltage should ideally be 12 volts +/- 2 volts. 9.1.12.2. Radar Voltage Refer to section 7.3.3 of this document for guidance on how to measure radar sensor voltages supplied by the VDR24 to the sensors. Although the radar sensors can operate on as low as 12 volts, a normally operating VDR24 with adequate input voltage and source current should be supplying a nominal 24.5 volts to the sensors. 9.1.13. Ground Leakage It is always important to verify that there is no leakage path to earth ground, to assure AREMA compliant isolation between the crossing warning system battery supply (B12+ and B12-), and earth ground. Follow standard rules and procedures for verifying required levels isolation in accordance with your organizations standards and practices. 9.1.14. Re-Tighten Radar Mounting Hardware At least annually, it is recommended that the hardware securing the radar sensors be checked to be sure that neither the straps securing the sensor mounting brackets to the masts or any of the eight (8) bolts and nuts that hold the radar sensor in position are loose. Refer to section 4 for detailed instructions on securing radar sensors into position. 9.1.15. Check Radar Electrical Connections 9.1.15.1. Communications Cable and Connector Verify that the communications cable and connector show no signs of wear or damage. Verify that the communications cable weatherproof connector is rotated clockwise and securely mated with the receptacle on the radar sensor body. At the junction box where the mast cable connects to home run cable, verify that there is no wearing of the cable jacket and that weatherproof gaskets on the junction box are securely tightened. 9.1.15.2. Earth Ground Also verify that the earth ground connector is securely screwed to the earth ground lug on the bottom side of the radar housing. Also verify that the earth ground wire is securely connected to an adequate earth ground connection at the mast base. 9.1.15.3. Cable Protection Be certain that there are no signs of visible wear on any part of the mast cable or exposed portions of home run cable. Cables should be bundled together using tie wraps or similar mechanisms. There should enough slack to avoid straining the cables, but not enough would cause significant movement due to wind. 9.1.16. Configuration Re-Verification At least annually, repeat the tests set out in section 8.5, to verify that actual test vehicles simulating the behavior of vehicles that may be queued in the crossing are properly detected. These tests, initially conducted to verify the configuration process, also verify the entire system’s response to detected vehicles during a crossing warning system activation as well as over all system response to radar or VDR24 health failures. VDR24 Radar Detection System, Rev. 1.0 69 Support, Maintenance, Troubleshooting 9.2. Upgrading Radar Firmware New firmware releases to improve or enhance radar sensor performance are made available from time to time. These upgrades are transported and uploaded into the radar sensors using new versions of the SSM-Rail configuration application. Upon connection to a radar sensor as described in the preceding sections, the SSM-Rail application will first check al the firmware versions in the radar sensor and indicate whether a new firmware versions are available. If an upgrade is necessary the SSM-Rail will interrupt its normal process and indicate this opportunity with the following screen. Figure 49 - SSM-Rail Indication that Firmware Upgrades are Available If you think you have reached this screen in error, clicking the Recheck button will have the software retry and ensure that there has not been a communication issue. Clicking the Details button will display the current sensor and software version information. 9.2.1. Uploading and Installing New Radar Firmware Click the UPLOAD FIRMWARE button to upgrade the software. Some versions of the SSM-Rail application provide the option to upgrade all radars connected to the VDR24. We advise against this and prefer that you upgrade each radar individually. If any row is highlighted in red, the firmware upgrade may need to be installed. Compare the sensor version date with the SSM-Rail version date in the Digital row of the details table. If the SSM-Rail firmware version date is more recent than the sensor firmware version date, the newer firmware will need to be installed; if the sensor’s firmware date is more recent than the SSMM firmware version date, a Downgrade Warning will appear notifying you that older firmware will be uploaded to the sensor. Firmware should not be downgraded unless it is recommended and accomplished under the guidance of Island Radar engineering and support. 70 Figure 50 – Downgrade Warning VDR24 Radar Detection System, Rev 1.0 Support, Maintenance, Troubleshooting While the upgrade process temporarily stores configuration data and reapplies it after the upgrade process, it is always a good idea to back up the radar sensor’s configuration before undergoing a firmware upgrade. You can create a back up file by going to the Tools screen (see the next section, Backing Up and Restoring Radar Sensor Configuration Settings). Click the UPLOAD FIRMWARE button to install the firmware embedded in and conveyed by the SSM-Rail application onto the radar sensor. The Recheck button will query the sensor to see if the firmware bundled in SSM-Rail is different than the version running on the sensor. VDR24 Radar Detection System, Rev. 1.0 71 Support, Maintenance, Troubleshooting 9.3. Backing Up and Restoring Radar Sensor Configuration Settings To back up or restore the sensor settings that you have changed, click the Backup/Restore control on the Tools screen. Don’t Hesitate to Ask for Help Backing up and restoring settings as well as installing new firmware upgrades is an advanced function. Island Radar Company engineering and support personnel are available to help guide you through these processes. Protecting Configuration File Integrity The backup will appear as an .mxc file. While this file can be opened as a text file by using Notepad, do not edit the file, as it will change the settings you backed up. Also, be sure to name backup files using a name that can be correlated to a specific radar at a particular site, for instance, ‘NWQuadrantMapleStreet.mxc’. 9.3.1. Creating a Backup To create a backup, click on the magnifying glass icon in the Back-up File section. Choose a destination (i.e. folder) on your connected computer and type in a recognizable filename – a name that can be easily identified with a particular radar at a particular site. Then click the Back-up Sensor Setup button 9.3.2. Restoring Settings The restore function allows you to restore a set of sensor settings you have backed up. To restore, click on Figure 51 - Accessing Configuration the magnifying glass icon in the Backup and Restore Functions Restore File section. Select the backup file you wish to restore and click OK, then click the Restore Sensor Setup button. Note that executing a Restore process will overwrite and cause you to lose the settings previously on the sensor, unless they are backed up. 9.3.3. Restore Factory Settings To restore the sensor to factory defaults, click the Restore Factory Setup button on the bottom of the screen. It is recommended that this function be invoked only under the direction and guidance of Island radar engineering and support personnel. 72 VDR24 Radar Detection System, Rev 1.0 Support, Maintenance, Troubleshooting 9.4. Contacting Island Radar Company for Assistance For technical and installation support, contact Island Radar Company Engineering and Support at (913) 543-3322. Island Radar personnel are equipped to handle virtually all aspects of vehicle and train detection utilizing the Wavetronix line of sensors in conjunction with the Island Radar Company’s line of AREMA-compliant controller devices. Where Wavetronix expertise is necessary, it must be coordinated through Island Radar. When planning a new installation, Island Radar provides no-cost support for optimizing radar location and placement. This service is highly recommended so that radar devices are installed at the best locations for maximum reliability and redundancy. Where necessary, Island Radar personnel can arrange to be on site for initial installation procedures and to assist in configuration and startup. VDR24 Radar Detection System, Rev. 1.0 73 Support, Maintenance, Troubleshooting 9.5. Configuration Settings Chart It is recommended that a copy of this chart be filled out during the radar configuration process and maintained at the site for future reference and for periodic verification procedures. Table 8 - Configuration Settings Chart Site Information DOT # MilePost Cross Streets Railroad ID # Lat Lon Radar Sensor Information By: Serial Number Side of Crossing Description Location Approach RF Channel Sensor Height Units Communication Parameters Response Delays Data Push Setting Source Setting Advance Tab Settings Wash-Out time Weather Optimization Lane and Zone Configuration Number of Lanes Attenuation Setting Zone 1 - Dimensions Zone 1 - Lane Location Zone 1 - Delay Zone 1 - Extend Zone 1 - Channel Assignments Zone 2 - Dimensions Zone 2 - Lane Location Zone 2 - Delay Zone 2 - Extend Zone 2 - Channel Assignments Zone 3 - Dimensions Zone 3 - Lane Location Zone 3 - Delay Zone 3 - Extend Zone 3 - Channel Assignments Zone 4 - Dimensions Zone 4 - Lane Location Zone 4 - Delay Zone 4 - Extend Zone 4 - Channel Assignments Channel 1 Delay Channel 2 Delay Channel 3 Delay Channel 4 Delay Additional Installation and Configuration Notes 74 Division SubDivision Branch or Line County City, State Radar #1 Date: Radar #2 VDR24 Radar Detection System, Rev 1.0 Additional Installation or Site Information 10. ADDITIONAL INSTALLATION OR SITE INFORMATION VDR24 Radar Detection System, Rev. 1.0 75 76 VDR24 Radar Detection System, Rev 1.0 Island Radar Company, LLC 25055 West Valley Parkway, Suite 104 Olathe, Kansas 66061 (913) 543-3322 www.islandradar.com