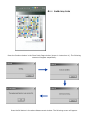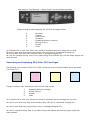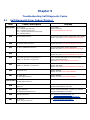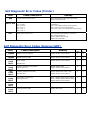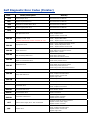
1
ES3640MFP / CX3641MFP
Service & Troubleshooting Guide
© 2008 OkiData Americas, Inc.
Disclaimer
Every effort has been made to ensure that the information in this document is complete, accurate, and up to date. The manufacturer assumes no responsibility
for the results of errors beyond its control. While all reasonable efforts have been made to make this document accurate and helpful as possible, we make no
warranty of any kind, expressed or implied, as to the accuracy or completeness of the information contained herein. For the most up-to-date service information
available, visit our website at www.okidata.com © Okidata Americas, Inc. 2008
Contents
Chapter 1
Printer Maintenance Procedures
1.1
1.2
1.3
1.4
1.5
Service Maintenance Procedures
Cleaning the Printer
Cleaning the Imaging Unit Contacts
Cleaning the LED Heads
Cleaning the Feed Rollers
Chapter 2
User Menu and Adjustments
2.1
Accessing the User Menu
Main Menus
Configuration
Print Pages
Suspend Printing
Resume Printing
Print Secure Job
Menus
Shut Down
Admin Setup
Calibration
Print Statistics
Sub Menus
Print Page Count • Finisher Count • Supplies Life
Network • Paper Size in Tray • System
Print Pages
Print Secure Job
Tray Configuration • System Adjust
Admin Setup
Exit Calibration • Auto Density Mode
Auto BG Adjust Mode • Adjust Density
Adjust Registration • Setup Calibration
Calibrate • Remove Calibration
Statistics Menu • Log Size • Reset Counter
Change Password
Service Modes and Adjustments
2.2
Accessing Service Mode
2.3
Service Diagnostics Controls
2.4
The Motor & Clutch Test
2.5
The Switch Scan Test
2.6
Service Adjustments
Removing the calibration for the Copier Screen
Calibrating the Printer / Copier Screen
Using Command WorkStation to Calibrate the Printer / Copier Screen
Calibrating the Auto Media Detection Sensor
Chapter 3
Troubleshooting Print Quality
3.1
An Overview of Print-Quality Problems
3.2
Generating and Analyzing Test Prints
3.3
Print-Quality Troubleshooting Practices
Print-Quality Problems Overview
Defects Associated with Specific Printer Components
Generating and Analyzing Control Panel Test Prints
Generating and Analyzing Service Test Prints
Generating and Analyzing Print Engine Test Prints
Light Prints in All Colors
Light Print in Only One Color
Blank Prints
Mottled or Splotchy Prints
Unexpected Colors
Repeating Bands, Lines, Marks, or Spots
Random Bands, Lines, Marks, or Missing Spots
Random Spots
Background
Ghosting or Hot Offset
Incomplete Fusing or Cold Offset
Mis-Registration, Color Layers Not Correctly Registered
Toner on Back of Print
Image Not Centered or Positioned Correctly
Process Direction Bands, Voids, or Streaks
Scan Direction Bands, Voids, or Streaks
Scan Direction Dark Streaks
Process Direction Lines or Streaks
Chapter 4
Troubleshooting Paper Jams
4.1
Paper Jam Error Code Table
4.2
Jam Troubleshooting
Code
Code
Code
Code
Code
Code
Code
Code
Code
Code
Code
Code
Code
Code
Code
Code
370:
371:
372:
373:
380:
381:
382:
383:
384:
390:
391:
392:
393:
394:
400:
401:
Paper Jam Occurred in the Duplex (Rear)
Paper Jam Occurred in the Duplex (Middle)
Paper Jam Occurred in the Duplex (Front Cover)
Paper Jam Occurred in the Duplex (Rear)
Paper Jam Occurred in the Paper Path (Side Cover)
Paper Jam Occurred in the Paper Path (Under Drums)
Paper Jam Occurred in the Paper Path (Top Cover Fuser)
Paper Jam Occurred in the Paper Path (Top Cover Fuser/Duplex)
Paper Jam Occurred in the Paper Path (Top Cover Fuser/Exit)
Paper Jam Occurred during Paper Feed (MPT)
Paper Jam Occurred during Paper Feed (Side Cover or Tray1)
Paper Jam Occurred during Paper Feed (Side Cover or Tray2)
Paper Jam Occurred during Paper Feed (Side Cover or Tray3)
Paper Jam Occurred during Paper Feed (Side Cover or Tray4)
Incorrect Size Paper has been Used (Side Cover)
Multiple Sheets of Paper were Fed (Side Cover)
User Clearable Errors 631 through 649
Chapter 5
Troubleshooting Self Diagnostic Codes
5.1
Self Diagnostic Error Codes
Self
Self
Self
Self
5.2
Diagnostic
Diagnostic
Diagnostic
Diagnostic
Error
Error
Error
Error
Codes
Codes
Codes
Codes
(Printer)
(Scanner/ADF)
(Finisher)
(Other Codes)
General Troubleshooting
No Control Panel Display
Control Panel LED is on, No Control Panel Display
Printer does not appear to Operate at Power On.
Printer Continually Displays “Warming Up” or “Initializing”
Troubleshooting AC Power Supply
Troubleshooting DC Power Supply
Troubleshooting RAM Memory Failures
Paper Size Errors
5.3
Troubleshooting Error Codes
Fuser Failure
Environmental Sensor Failure
Motor Overheating Failure
Engine Control Board Failure
LVPS Power Supply Failure
Fiery Controller Fan Failure
Power Supply Fan Failure
Fan Failure
Duplex Interface Failure
Tray 2, 3, 4 Communication Errors
Inverter Unit Interface Failure
Cyan, Magenta, Yellow, Black LED Failure
Fuser Fan Failure
Fuser 110V/220V Mismatch Error
Unsupported Duplex Unit Rom
Fuse Cut Error (Fuser)
Fuse Cut Error (Transfer Belt Unit)
Fuse Cut Error C, M, Y, K Imaging Drum Unit
Fiery Controller to Engine Board Communication Failure
Finisher Interface Error
Inverter Power Supply Failure
Control Panel Communication Failure
Error in the Transfer Belt
C, M, Y, K Imaging Drum Unit Failure
Engine Board Flash Memory Error
Unsupported ROM
Toner Sensor Detection Error
MT Home Position Detection Error
Toner Feed Switch Error/Toner Lock Error
Color Up/Down Error
Top Cover Open Error
Fuser Unit Detected as Missing
Image Drum Unit Life Error
Fuser Life Error
Belt Life Error
Toner Out Error
Chapter 1
Printer Maintenance Procedures
1.1 Service Maintenance Procedures
Perform the following procedures whenever you check, service, or repair the printer. Cleaning the
printer, as outlined in the following steps, assures proper operation of the printer and reduces the
probability of having to service the printer in the future. The frequency of use, Average Monthly
Print Volume (AMPV), type of media used, and operating environment are factors in determining
the frequency of this maintenance procedure. Be sure to record the number of sheets printed
between each service visit and attach the PS test page, Demo Page, and configuration sheets to
your service log for future reference.
Recommended Tools
•
Toner vacuum cleaner
•
Laptop computer with:
(Windows XP)
(Current Model Print Drivers)
(Current Command Workstation loaded)
(Kodak Calibration Pack)
•
Clean, dry, lint-free cloth
•
Black, light protective bag
Perform these routine maintenance procedures during the course of servicing the printer.
•
Clean the feed rollers, exit rollers, and guides; replace as necessary.
•
Remove and clean all paper trays.
•
Clean the Color Registration and Automatic Density Control Sensors.
•
Check cleanliness of interior and exterior, including fans; clean as necessary.
•
Check the print engine and Fiery Controller firmware version located on the first page of the
configuration sheet. Update as necessary.
•
Print a PS test page and Demo page, diagnose, and repair any problems as indicated.
•
Perform the Printer / Scanner calibrations in Chapter 2.
•
Review proper printer operation using a customer file, if possible. Check with the customer
regarding any special applications they may be running.
•
Review with the customer all work that was performed; and discuss proper printer care and
the importance of properly using the shut down sequence to prevent Hard Drive
issues.
1.2 Cleaning the Printer
Perform the following general cleaning steps as indicated by the printer’s operating environment.
Caution
Never apply alcohol or other chemicals to any parts in the printer. Never use a damp cloth to clean
up toner. If you remove the Image Drum Units, place them in a light protective bags or similar
means to protect the drums as exposure to light can quickly degrade performance and result in
early failure.
1. Record number of sheets printed on a service log left with the printer.
2. Print several sheets of paper to check for problems or defects.
3. Turn off the printer.
4. Clean all fans to remove excess dust.
5. Ensure that all cover vents are clean and free of obstructions.
6. Remove any debris or foreign objects from the Transfer Unit, Fuser, and Imaging Units.
7. Vacuum loose toner from the printer interior using a Type II toner vacuum only.
8. Remove and clean the paper trays.
9. Clean / inspect all rubber rollers with a lint-free cloth slightly dampened with cold water.
Replace as necessary.
1.3 Cleaning the Imaging Unit Contacts
1. Open the Top Cover.
2. Remove the Imaging Units and place it on a stable surface.
3. Working quickly to reduce light exposure, clean the 4 contacts at the front of the Imaging Unit.
4. Clean the 3 contacts at the rear of the imaging unit.
5. Clean the contacts on the Housing Bias Assembly.
1.4 Cleaning the LED Heads
Clean the LED Head if a vertical White band or White stripe appears on the print.
Caution
Always use a soft, dry, lint-free cloth to clean the LED Heads. Never use solvents to clean the lens.
1. Open the Top Cover.
2. Clean each LED Head with a clean, lint- free cloth.
1.5 Cleaning the Feed Rollers
Clean the accumulated dust from the Feed Rollers.
Caution
Use care not to scratch or otherwise abrade the roller surface while cleaning. Gently rub the
roller surface using a soft, lint-free cloth moistened with water.
1. Access the rollers by removing Tray 1 or opening the MPT tray.
2. Clean each roller with soft, lint-free cloth moistened with water.
Tray 1 Rollers
MPT Tray Rollers
Chapter 2
User Menu and Adjustments
2.1 Accessing the User Menu
Press the menu up arrow to access the User Menu.
Functions
*Configuration
Print Pages
Suspend Printing
Resume Printing
User Mode Menus
Main Menus
Configuration
Sub Menus
Print Page Count • Finisher Count • Supplies Life
Network • Paper Size in Tray • System
Print Pages
Print Pages
Suspend Printing
Resume Printing
Print Secure Job
Print Secure Job
Menus
Tray Configuration • System Adjust
Shut Down
Admin Setup
Admin Setup
Calibration
Exit Calibration • Auto Density Mode
Auto BG Adjust Mode • Adjust Density
Adjust Registration • Setup Calibration
Calibrate • Remove Calibration
Print Statistics
Statistics Menu • Log Size • Reset Counter
Change Password
Configuration
Print Page Count
Item
Description
Total Page*
Displays the total number of printed pages.
Must be enabled in printer service mode.
Color Page
Displays the number of color printed pages converted to letter equivalent.
Monochrome Page
Displays number of monochrome printed pages converted to letter equivalent.
Tray 1,2,3,4,MP
Displays the Total Pages from each Tray
Finisher Count
Item
Description
Staple
Displays total pages stapled
Punch
Displays total pages punched
Finisher
Displays total pages ejected into the finisher
Supplies Life
Item
Description
Drum C, M, Y, K
Displays the remaining life span of drum as a percentage. Select C, M, Y, or K
Belt
Displays the remaining life span of the belt unit as a percentage.
Fuser
Displays the remaining life span of the fuser unit as a percentage.
Toner C, M, Y, K
Displays the remaining life span of toner as a percentage. Select C, M, Y, or K
Network
The items and settings displayed are specific to your system. Full details are given in
the Configuration Guide. Information given is also available on the printed
configuration sheets.
Paper Size in Tray
Item
Tray
MP Tray
Description
Displays detected paper size of selected Tray
Displays detected paper size of the MP Tray.
System
Item
Description
Serial Number
Displays serial no. of the printer.
Asset Number
Displays Asset Number. Asset Number is 8
alphanumeric characters that can be assigned by
a user. Same as Asset Number of Menu Map.
CU Version
Displays version no. of CU (Fiery Controller) firmware.
Same as CU version of Menu Map.
PU Version
Displays version no. of PU (Engine Board) firmware.
Same as PU version of Menu Map.
Total Memory
Displays total RAM memory installed in the printer.
Same as Total Memory of Menu Map.
HDD
Displays size of hard disk and file system version.
Same as HDD of Menu Map.
Print Pages
Print Pages
Item
Description
PS Test Page
Prints the PostScript sample page.
Configuration
Prints printer configuration details.
Job Log
Prints EFI job log details.
Color Charts (disk only)
Prints color charts.
PS Font List
Prints PostScript font list.
PCL Font List
Prints PCL emulation font list.
Demo Page
Prints a demo page.
E-mail Log
Prints e-mail log.
FTP Log
Prints FTP log.
Usage Report*
Prints a usage report.
(must be activated from the Print Statistics menu)
Statistics Log
Prints Oki job log details.
Error Log
Prints the error log.
ID Check Pattern*
Prints an Image Drum Check Pattern.
(must be enabled in service mode)
Engine Status*
Prints Engine Status details.
(must be enabled in service mode)
Suspend Printing
Sets Printer to Off-line Status
Resume Printing
Sets Printer to On-line Status
Print Secure Job
Print Secure Job
Item
Enter Password
Not Found
Description
Enter a password to use secure printing.
Use a secure printing job (Secure Job) or a job Stored to HDD when printing.
When you print a Secure document, it is deleted from the HDD. When you print
a document Stored to HDD, it prints and remains stored on the HDD until you
manually delete it.
Not Found: (no jobs) is indicated when there is no output file.
The following messages are displayed when there are printable files.
Print: When you select Print, Set Collating Amount is displayed to enable you
to specify a number of copies. After specifying the number of copies, press
Enter to print all jobs with the specified number of copies.
Delete: When you select Delete, you are prompted to recheck by Yes/No
display, and selecting Yes deletes all jobs.
Menus
Tray Configuration
Item
Description
Paper Feed Tray1,2,3,4
MP Tray
Specifies a feed tray.
Auto Tray Switch
Sets the automatic tray switch function. ON or OFF
Tray Sequence
Down, Up, Paper feed tray- Specifies selection order priority for automatic
tray selection/automatic tray switch.
Unit of Measure
Specifies units for custom paper size. Inch or mm
Tray Config,
Sets paper configuration in paper Trays. Paper Size- Cassette size or Custom
Media Type-Plain, Letterhead, Transparency, Bond, Recycled, Card Stock,
Rough, Glossy Media weight-Auto, Light, Heavy, Ultra heavy
System Adjust
Item
Description (Printer Defaults are indicated in Blue)
Power Save Time
Sets the period after which power save mode starts. 5 min, 15 min, 30 min, 60
min, 240 min
Clearable Warning
When Online is selected, you must manually clear the warning by pressing the
Online button. Change to Job if you wish the message to automatically clear
when a new print job is received. Online or Job
Auto Continue
Sets whether the printer is automatically recovered when Memory Overflow or
Tray Request occurs. ON or OFF
Manual Timeout
If paper is not fed within this time in manual feed, the job is cancelled. OFF, 30
sec, 60 sec.
Wait Timeout
Sets the time period between stopping receipt of job data and forced print. For
PS, printing is not carried out and the job is cancelled. Range is off, 5 sec. to
300 sec. default is 40 sec.
Low Toner
Sets the printing operation when insufficient toner is detected. Continue: the
printer can continue printing while remaining online. Stop: the printer stops
printing and goes offline.
Jam Recovery
ON: continues printing the job, including any jammed pages, once the jam has
been cleared. OFF: Cancels a job including the page currently jammed.
Print Position Adjust
X Adjust - Adjusts the position of the whole printing image (0.25 mm at a time)
Range is -2.00 to +2.00 mm (horizontally). Default is 0.00mm.
Y Adjust - Adjusts the position of the whole printing image (0.25 mm at a time)
Range is -2.00 to +2.00 mm (Vertically). Default is 0.00mm.
Duplex X Adjust - During the flip-side printing of duplex printing, adjusts the
position of the whole printing image (0.25 mm at a time. Range is -2.00 to
+2.00 mm (horizontally). Default is 0.00mm.
Duplex Y Adjust - During the flip-side printing of duplex printing, adjusts the
position of the whole printing image (0.25 mm at a time. Range is -2.00 to
+2.00 mm (Vertically). Default is 0.00mm.
Darkness Cyan,
Magenta, Yellow, Black
Adjusts the engine density for Cyan, Magenta, Yellow, Black. Darkest value is
+3, Lightest value is -4. Default is 0.
Cyan Reg. Adjust
Magenta Reg. Adjust
Yellow Reg. Adjust
Makes fine adjustment to image registration against Black in the horizontal
direction. Adjust. is for Cyan, Magenta, Yellow. Range is -3 to +3. Default is 0.
Paper Black Setting
Used for micro adjustment when very visible faded print results or light specks
(or streaks) result when printing in Plain Paper/Black setting. Range is -2 to
+2. Decrease the value if light specks (or streaks) or snow flake like printing
results in high density print areas. Default is 0.
Paper Color Setting
Used for micro adjustment when very visible faded print results or light specks
(or streaks) result when printing in Plain Paper/Color setting. The range is -2 to
+2.Decrease the value if light specks (or streaks) or snow flake like printing
results in high density print areas. Default is 0.
Transparency Black
Setting
As for Paper Black Setting above. The range is -2 to +2. Default is 0.
Transparency Color
Setting
As for Paper Color Setting above. The range is -2 to +2. Default is 0.
SMR Setting (New)
allows for minor corrections in print anomalies such as "smearing" due to
environmental conditions (temperature & humidity)
BG Setting (New)
allows for minor corrections in print anomalies such as "dirty background" due
to environmental conditions (temperature, humidity, media)
Drum Cleaning
Set to produce idling of a drum before printing in order to reduce horizontal
white lines. This will shorten image drum life. Default is Off.
Hex Dump
Prints out the data received from the host PC in hexadecimal code.
Shut Down
Allows for: Restart of Server, Shut Down of the System, or Reboot of
System. Select appropriate item and execute.
Admin Setup Continue to setup: Yes / No Select yes (message: running setup)
Admin Setup
Item
Description
Exit Setup
Exits Setup Menu
Server Setup
See configuration sheet under Server Setup
Network Setup
See configuration sheet under Network Setup
Parallel Setup
See configuration sheet under Parallel Setup
USB Setup
See configuration sheet under USB Setup
Printer Setup
See configuration sheet under Printer Setup
PS Setup
See configuration sheet under PS Setup
PCL Setup
See configuration sheet under PCL Setup
Color Setup
See configuration sheet under Color Setup
Job Log Setup
See configuration sheet under Job Log Setup
Change Password
Change Admin. Password
Language
Clear Server
Clears all Server Information
Factory Defaults
Restores Printer to Factory Default
Warning: All Information such as IP addresses etc. will be lost. Be sure to print a
Configuration sheet prior to setting the printer to Factory Default.
Calibration
Exit Calibration
Item
Exit Calibration
Description
Select “enter” to exit the calibration screen
Auto Density Mode
Item
Auto Density Mode
Description
*On / Off – Turns On or Off the Auto Density Mode
Auto BG Adjust Mode
Item
Auto BG Adjust Mode
Description
*On / Off – Turns On or Off the Auto Background Adjustment Mode
Adjust Density
Item
Adjust Density
Description
*Yes / No – Select yes to execute density adjustment
Adjust Registration
Item
Adjust Registration
Description
*Yes / No– Select yes to execute registration adjustment
Set Up Calibration
Item
Description
Standard
*Auto Select / Bypass – Selects paper source for calibration
Expert
*Auto Select / Bypass – Selects paper source for calibration
Calibrate
Item
Description
*6X6 Dot Screen
Print Meas. Pg. *Yes / No See “Calibrating the Printer” in Chapter 2
12X6 Dot Screen
Print Meas. Pg. *Yes / No See “Calibrating the Printer” in Chapter 2
12X6 Line Screen
Print Meas. Pg. *Yes / No See “Calibrating the Printer” in Chapter 2
12X12 Dot Screen
Print Meas. Pg. *Yes / No See “Calibrating the Printer” in Chapter 2
Copier Screen
Print Meas. Pg. *Yes / No See “Calibrating the Printer” in Chapter 2
Remove Calibration
Item
Description
*6X6 Dot Screen
Affects all. Contin? *Yes / No ( removes previous Calibration)
12X6 Dot Screen
Affects all. Contin? *Yes / No ( removes previous Calibration)
12X6 Line Screen
Affects all. Contin? *Yes / No ( removes previous Calibration)
12X12 Dot Screen
Affects all. Contin? *Yes / No ( removes previous Calibration)
Copier Screen
Affects all. Contin? *Yes / No ( removes previous Calibration)
Print Statistics
Enter Password - Default password is 0000
Statistics Menu
Item
Statistics Menu
Enter Password “0000”
Description
*Enable / Disable – Turns On or Off the Print Statistics Menu (MFP)
To access select “Setup” from the scanner control panel. Select “Report” ,
Select “Print” from “MFP Statistics Report”
Log Size
Item
Log Size
Description
*30 – Range is 1 to 100
Reset Counter
Item
Reset Counter
Description
*No / Yes – Not used at this time
Change Password
Item
Change Password
Description
*New Password – Enter new 4 digit password
Service Modes & Adjustments
2.2 Accessing Service Mode
Enter Service Mode by holding down the menu up / menu down and help buttons
at the same time while powering up the machine. (This may take up to 60 seconds.)
The System Maintenance Menu will appear.
Initialization
Please wait…
Service Mode Menus
There are 4 menus under system maintenance described as follows:
1. OKIUSER - Used to set operating environment by country location. Should always be set to ODA
2. Maintenance Print Menu - This switches whether to Show/Hide the Print Information, ID Check
Pattern and Engine Status of the Function Menu. If this item is disabled, the Print Information, ID
Check Pattern and Engine Status of the Function Menu is never displayed. The printer is restarted
after the settings are modified and exiting from the menu.
3. Print Page Count - This sets whether to Show/Hide the display of the "Functions",
"Configuration", "Print Page Count", or "Total Page".
4. Diagnostic Mode – Used to perform diagnostic tests such as “Motor & Clutch” and “Switch Scan”
to assist in troubleshooting motor, clutch, sensor, and switch operation.
2.3 Service Diagnostics Controls
Use the Control Panel buttons to interact with Service Diagnostics’ tests and utilities.
Button
Function
_____________________________________________________________________
Back
Returns to the prior higher level menu structure, if available.
If help text is displayed, pressing Back restores the current menu item.
_____________________________________________________________________________
Cancel
Terminates the current test or cancels current Help display.
_____________________________________________________________________
Help
Provides help information, if available. Pressing Help (?) again restores
the current menu item and removes the help text.
_____________________________________________________________________________
Up Arrow
Scrolls up one menu item within a menu list. Used to increment data in
tests requiring user input.
_____________________________________________________________________________
Down Arrow
Scrolls down one menu item within a menu list. Used to decrement
data in tests requiring user input.
_____________________________________________________________________
Enter
Enters the highlighted menu. Executes the current test item. Used to
select a data value entered by the user.
_____________________________________________________________________________
Note - The best method of exiting Service Diagnostics is to cycle printer power. This insures all printer components are reset.
Also, an occasional paper jam is normal on the first print if clutch or solenoid tests were run.
2.4 Accessing the Motor & Clutch Test
The “Motor & Clutch Test” under the “Diagnostics” menu in service mode can be an important tool
in assisting in the diagnosis of service related issues in the ES3640 / CX3641 MFP. The test gives
you the ability to test the operation of all of the motors, clutches, and solenoids in the Printer,
Large Capacity Feeder, and Duplexer that are indicated below.
For additional information, see “Component Disassembly” Guide.
Using the Motor & Clutch Test
Enter Service Mode by holding down the menu up / menu down and help buttons
at the same time while powering up the machine. (This may take up to 60 seconds.)
From Diagnostic Mode Down arrow to “Motor & Clutch Test” and press “Enter”
From this menu, pressing the Down Arrow Key will scroll through the following table
of tests. Simply select “Enter to execute and “Cancel” to terminate the selected test.
Image Drum / Toner / Waste Toner Tests
Item Tested
K-ID Motor
C-ID Motor
M-ID Motor
Y-ID Motor
ID UP/DOWN
DISPOSAL TONER TUBE
TONER SUPPLY MC
TONER SUPPLY C
TONER SUPPLY M
TONER SUPPLY KY
TONER SUPPLY Y
TONER SUPPLY K
Remark
Runs black image drum motor for 10 seconds
Runs Cyan image drum motor for 10 seconds
Runs Magenta image drum motor for 10 seconds
Runs Yellow image drum motor for 10 seconds
Runs Image Drum Up/Down Motor for 10 Seconds
Runs Disposal Toner Tube for 10 Seconds
Runs the Magenta / Cyan Toner Supply Motor
Runs the Cyan Toner Supply Motor
Runs the Magenta Toner Supply Motor
Runs the Black / Yellow Toner Supply Motor
Runs the Yellow Toner Supply Motor
Runs the Black Toner Supply Motor
Printer Paper Feed Tests
Item Tested
TRAY1 GEARED MOTOR
TRAY1 MOTOR
M-ID Motor
JOB OFFSET
REGISTRATION SHUTTER
FACEDOWN SOLENOID
EXIT SOLENOID
MPT LIFT UP
MPT MOTOR
REGIST CLUTCH
REGIST MOTOR
FUSER RLS
FUSER MOTOR REVERSE
FUSER MOTOR
BELT MOTOR
Remark
Runs the Tray 1 geared motor for 10 seconds
Runs the Tray 1 motor for 10 seconds
Runs Magenta image drum motor for 10 seconds
Runs the job offset mechanism for 10 seconds
Activates the Regis. solenoid ON/OFF for 10 seconds
Face Down solenoid ON/OFF for 10 seconds
Exit solenoid ON/OFF for 10 seconds
Runs the MPT tray lift up motor
Runs the MPT tray paper feed motor
Runs the registration clutch for 10 seconds
Runs the registration motor for 10 seconds
Rotates the fuser rollers in steps
Runs the fuser motor in reverse for 10 seconds
Runs the fuser motor for 10 seconds
Runs the transfer belt motor for 10 seconds
Duplex Tests
Item Tested
DUP FAN
DUP MOTOR
Remark
Runs the Duplex Fan for 10 seconds
Runs the Duplex Motor for 10 seconds
High Capacity Paper Feeder Tests
Item Tested
TRAY5 GEARED MOTOR
TRAY4 GEARED MOTOR
TRAY3 GEARED MOTOR
TRAY2 GEARED MOTOR
TRAY5 ROLLER CLUTCH
TRAY4 ROLLER CLUTCH
TRAY3 ROLLER CLUTCH
TRAY2 ROLLER CLUTCH
TRAY5 FEED MOTOR
TRAY4 FEED MOTOR
TRAY3 FEED MOTOR
TRAY2 FEED MOTOR
TRAY5 MOTOR
TRAY4 MOTOR
TRAY3 MOTOR
TRAY2 MOTOR
Remark
Runs the
Runs the
Runs the
Runs the
Runs the
Runs the
Runs the
Runs the
Runs the
Runs the
Runs the
Runs the
Runs the
Runs the
Runs the
Runs the
Tray
Tray
Tray
Tray
Tray
Tray
Tray
Tray
Tray
Tray
Tray
Tray
Tray
Tray
Tray
Tray
5
4
3
2
5
4
3
2
5
4
3
2
5
4
3
2
geared motor for 10 seconds
geared motor for 10 seconds
geared motor for 10 seconds
geared motor for 10 seconds
roller clutch for 10 seconds
roller clutch for 10 seconds
roller clutch for 10 seconds
roller clutch for 10 seconds
feed motor for 10 seconds
feed motor for 10 seconds
feed motor for 10 seconds
feed motor for 10 seconds
motor for 10 seconds
motor for 10 seconds
motor for 10 seconds
motor for 10 seconds
Fan Tests
Item Tested
FAN ID
FAN BELT
FAN FUSER
FAN PU-BOARD
FAN POWER
Remark
Runs black image drum Fan for 10 seconds
Runs the Transfer Belt Fan for 10 Seconds
Runs the Fuser Fan for 10 Seconds
Runs the PU Board Fan for 10 Seconds
Runs the Power Supply Fan for 10 Seconds
Inverter Tests
Item Tested
INV REGIST CLUTCH
INV PRESSURE SOLENOID
INV SEPARATER
INV MOTOR B
INV MOTOR A
2.5
Remark
Inverter Registration Clutch ON/OFF for 10 seconds
Inverter Pressure solenoid ON/OFF for 10 seconds
Inverter Separator Clutch ON/OFF for 10 seconds
Runs the Inverter Motor B for 10 Seconds
Runs the Inverter Motor A for 10 Seconds
Accessing the Switch Scan Test
The “Switch Scan Test” under the “Diagnostics” menu in service mode can be an important tool in
assisting in the diagnosis of service related issues in the ES3640 / CX3641 MFP. The test gives you
the ability to test the operation of all of the sensors, and switches in the Printer, Large Capacity
Feeder, Duplexer, and finisher that are indicated below.
For additional information, see “Electronic Components and Functions” in this manual.
Using the Switch Scan Test
Enter Service Mode by holding down the menu up / menu down and help buttons
at the same time while powering up the machine. (This may take up to 60 seconds.)
The System Maintenance Menu will appear.
From Diagnostic Mode, Down arrow to “Switch Scan” and press “Enter”
From this menu, pressing the Down Arrow Key will scroll through the following table
of tests. Simply select “Enter to execute and “Cancel” to terminate the selected test.
Switch Scan Test (Printer)
Display Detail
on Printer LCD
Sensor
Tested
Location 1
Display
Condition
Location 2
Sensor
Display
Tested
Condition
Location 3
Sensor
Display
Tested
Condition
Paper Route: PU
IN1 Sensor
H - Off
L – On
IN2 Sensor
H - Off
L - On
WR Sensor
H - Off
L - On
Paper Route: Sub
IN1 Sensor
H - Off
L - On
IN2 Sensor
H - Off
L - On
WR Sensor
H - Off
L - On
Toner Sensor
Toner K
Sensor
H - Off
L - On
Toner Y
Sensor
H - Off
L - On
Toner M
Sensor
H - Off
L - On
COVER
UP_LU_FU
Cover
Upper
H - Open
L - Close
Cover Left
Upper
H - Open
L - Close
Cover
Face Up
H - Open
L - Close
STKF_FD_FU
JOBOFFHOME
Stacker Full
Sensor
(Face down)
H - Full
L - Empty
Stacker Full
Sensor
(Face up)
H - Full
L - Empty
Job Offset
Paper-End
Sensor
H:ON
L:OFF
REG L/R_
DENS_WEIGHT
Alignment
Left Sensor
AD Value:
***H
Alignment
Right Sensor
AD Value:
***H
HEATER
THERMISTER
Upper
Center
Thermister
AD Value:
***H
LowerCenterThermister
AD Value:
***H
Upper-SideThermister
AD Value:
***H
HUM_TEMP_OHP
Humidity
Sensor
AD Value:
***H
Temperature
Sensor
AD Value:
***H
OHP Sensor
AD Value:
***H
ID UP / DOWN
RFID COLOR
TAG-K
presence
UID:****H
TAG-Y
presence
UID:****H
DRUM PHASE
Sensor KYMC
K-Drum
Phase
Sensor
Port Level
H, L
Y-Drum
Phase
Sensor
Port Level
H, L
F-RLS SLK BLT
DT-DCT
Fuser
Release
H:ON
L:OFF
Paper Slack
Sensor
H:ON
L:OFF
HALL BELT_
DT-BOX_DCT
Belt Hall IC
H:ON
L:OFF
Waste
Toner Box
Hall IC
H:ON
L:OFF
DISTNR
Disposal
FULL_BOX_BOXSP toner full
H:ON
L:OFF
Disposal
toner box
H - Not
installed
L – Installed
TNR SPLY SNS
KY_MC
Port Level
H, L
Y-Toner
Supply
Port Level
H, L
K-Toner
Supply
TAG-M
presence
UID:****H
Sensor
Tested
Location 4
Display
Condition
Exit Sensor
H - Off
L - On
Toner C
Sensor
H - Off
L - On
Job Offset
Home
Pos. Sensor
H:ON
L:OFF
Media
Weight
Frequency
Detectambient
temperatureThermister
AD Value:
***H
ID Up / Down
Sensor
H - Up
L – Down
TAG-C
Presence
UID:****H
Port Level
H, L
C-Drum
Phase
Sensor
Port Level
H, L
Belt Hall IC
H:ON
L:OFF
Waste Toner
Hall IC
H:ON
L:OFF
Waste
Toner Hall
IC
H:ON
L:OFF
M-Toner
Supply
Port Level
H, L
C-Toner
Supply
Port Level
H, L
M-Drum
Phase
Sensor
MPT PE_
HOP_CVO_HOME
MPT-PaperEnd Sensor
Port Level
H, L
MPTHopping
H:ON
L:OFF
Cover-MPT
H - Open
L - Close
TRAY1 PE_
PNE_CVO
1st-PaperEnd
Port Level
H, L
1st-PaperNear-End
Port Level
H, L
Cover-1st
H - Open
L – Close
TRAY1
HOP_LIFT
1st-Hopping
Sensor
Port Level
H, L
1st-Lifter
Sensor
Port Level
H, L
1st-Feed Sens Port Level
H, L
TRAY1 CASETTE
SIZE
1st-Paper
Size1 Switch
Port Level
H, L
1st-Paper
Size 2
Switch
Port Level
H, L
1st-Paper
Size 3
Switch
Port Level
H, L
TRAY2
PE_PNE_CVO
2nd-PaperEnd Sensor
Port Level
H, L
2nd-PaperNear-End
Port Level
H, L
Cover Open
2nd Switch
Port Level
H, L
TRAY2
HOP_LIFT_FEED
2ndHopping
Port Level
H, L
2nd-Lifter
Sensor
Port Level
H, L
2nd-Feed
Sensor
Port Level
H, L
TRAY2 CASETTE
SIZE
2nd-Paper
Size1 Switch
Port Level
H, L
2nd-Paper
Size2 Switch
Port Level
H, L
2nd-Paper
Size3 Switch
Port Level
H, L
TRAY3
PE_PNE_CVO
3rd-PaperEnd Sensor
Port Level
H, L
3rd-PaperNear- End
Port Level
H, L
Cover Open
3rd Switch
Port Level
H, L
TRAY3
HOP_LIFT_FEED
3rd Hopping
Sensor
Port Level
H, L
3rd-Lifter
Sensor
Port Level
H, L
3rd-Feed
Sensor
Port Level
H, L
TRAY3 CASETTE
SIZE
3rd-Paper
Size1 Switch
Port Level
H, L
3rd-Paper
Size2 Switch
Port Level
H, L
3rd-Paper
Size 3
Switch
Port Level
H, L
TRAY4
PE_PNE_CVO
4th-PaperEnd Sensor
Port Level
H, L
4th-PaperNear- End
Port Level
H, L
CoverOpen-4th
Switch
Port Level
H, L
TRAY4
HOP_LIFT_FEED
4th Hopping
Sensor
Port Level
H, L
4th-Lifter
Sensor
Port Level
H, L
4th-Feed
Sensor
Port Level
H, L
TRAY4 CASETTE
SIZE
4th-Paper
Size1 Switch
Port Level
H, L
4th-Paper
Size2 Switch
Port Level
H, L
4th-Paper
Size3 Switch
Port Level
H, L
DUP INS_
REAR_FRONT
Duplex-In
Sensor
Port Level
H, L
Dup-Rear
Sensor
Port Level
H, L
Dup-Front
Sensor
Port Level
H, L
DUP
STACK_COVER
Duplex
Stack
Sensor
Port Level
H, L
Duplex
Cover
Open Sensor
Port Level
H, L
MPT Home
Position
H - Open
L – Close
1st-Paper
Size4 Switch
Port Level
H, L
2nd-Paper
Size4 Switch
Port Level
H, L
3rd-Paper
Size4 Switch
Port Level
H, L
4th-Paper
Size4 Switch
Port Level
H, L
Switch Scan Test (Finisher / Inverter)
Display Detail
on Printer LCD
Sensor
Tested
Location 1
Display
Condition
Location 2
Sensor
Display
Tested
Condition
Location 3
Sensor
Display
Tested
Condition
Sensor
Tested
Location 4
Display
Condition
Front door
Sensor
[PI22]
H:OPEN
L:CLOSE
Front door
SW
[MS2]
H:OPEN
L:CLOSE
Joint SW
[MS1]
H:OPEN
L:CLOSE
Bookbinding H - Paper
present
position
Sensor[PI10] L - Paper
absent
Processing
tray
Sensor [PI6]
H - Paper
present
L - Paper
Absent
Entrance
Sensor
[PI1]
H - Paper
present
L - Paper
absent
Punch timing
Sensor
H - Paper
present
L - Paper
absent
Bookbinding
tray paper
Sensor
[PI13]
H - Paper
present
L - Paper
absent
Bookbinding
home
position
Sensor
H - Home
position
L - Not in
home
position
Bookbinding
roller home
position
H - Home
position
L - Not in
home
position
Front
matching
home
position
Sensor
H - Home
position
L - Not in
the home
position
FIN S13_S14_
S15_S16
Rear
matching
home
position
Sensor
H - Home
position
L - Not in
the home
position
Belt home
position
outlet
Sensor
H - Home
position
L - Not in
the home
position
Feed roller
home
position
Sensor
H - Home
position
L - Not in
the home
position
Paddle home
position [PI2]
H - Home
position
L - Not in
the home
position
FIN S17_S18_
S19_S20
Staple / fold
motor clock
[PI14]
H/L - Clock
Self prime
Sensor
[PI21]
H - Start
staple
detection
L - Staple
Absent
Staple
Sensor
[PI20]
H - Staple
absent
L - Staple
present
Stapler
safety
SW [MS3]
H - Not to
drive
L - Drive
FIN S21_S22_
S23_S24
Staple
home
position
Sensor
H - Home
position
L - Not in
the home
position
Stapler
slide
home
position
Sensor
H - Home
position
L - Not in
the home
position
Stapler
connect
signal
Hconnected
L–
unconnected
Stack tray
lift
motor
clock[PI17]
H/L - Clock
FIN S25_S26_
S27_S28
Lower stack
tray
Sensor
H - Lower
position
L - Not in
the lower
position
Upper stack
tray
Sensor
H - Upper
position
L - Not in
the upper
position
Inter-level
stack
Tray
Sensor
Hdetected
L - not
detected
Paper stack
tray
Sensor
FIN S29_S30_
S31_S32
Stack tray
paper
Sensor
H - Paper
present
L - Paper
Absent
Punch
connect
signal
Hconnected
L–
unconnected
INV IN_OUT_
EXIT_COV
Entrance
Sensor
H:ON
L:OFF
Outlet
Sensor
H:ON
L:OFF
PU Inverter
Exit Sensor
Signal
H:ON
L:OFF
Cover open
SW
[FMS1]
INV REMAIN_
JOINT
Lower
Sensor
H:ON
L:OFF
Inverter
connected
Sensor
H:ON
L:OFF
PU Inverter
CNT2 Signal
H:ON
L:OFF
FIN S01_S02_
S03_S04
Upper
Cover
Sensor
[PI23]
FIN S05_S06_
S07_S08
FIN S09_S10_
S11_S12
H:OPEN
L:CLOSE
H - Paper
detected
L - paper
Not detect
H - Open
L - Close
2.6 Service Adjustments
Removing the calibration for the Copier Screen
1. Press the Down Arrow button until Calibration is highlighted, then press the Enter
button
2. Press the Down Arrow button until Remove Calibration is highlighted, then press
the Enter button
3. Press the Down Arrow button until Copier Screen is highlighted and then press
the Enter button
4. The next screen will display "Affects All, Cont?", press the Enter button and after
the calibration is removed you will be returned to the Calibration Menu
Calibrating the Printer Copier Screen
Tools Needed
Kodak Q-13 Gray Scale, Part Number 70051001.
Reasons that a calibration should be done
1. On initial setup, there is no copier calibration stored in the MFP unit so calibration is required.
2. Colors are off when making a copy, but are fine when printing.
3. Color is critical when making copies.
4. After servicing the printer or performing routine maintenance
IMPORTANT NOTE: If a calibration has previously been done, it is recommended that it be removed prior to
doing the procedure below.
Calibrating the Copier Screen (See Accessing the User Menu)
1. On the front panel of the printer press the Down Arrow button until Calibration is
highlighted, then press the Enter button
2. Press the Down Arrow until Adjust Density is highlighted, and press the Enter
button
3. Press the Enter button again on the next screen in order to execute the Adjust
Density procedure
4. Next, press the Down Arrow button down until Calibrate is highlighted and press
the Enter button
5. In the Screen Setting window press the Down Arrow button until Copier Screen is
highlighted, and press the Enter button
6. Press the Enter button in the next window to print out the ColorCal measurement
page
Print Meas. Pg.
*Yes
No
7. Press the Enter button again to accept the choice to measure the ColorCal page that was
just printed
8. Once the following screen appears:
Calibration
Place meas. Page on
Copier; press Enter
Place the Q-13 strip face down on the glass in the top left corner. Next place the
ColorCal measurement page over top of the Q-13 strip so that it looks like below:
9. Once the Q-13 and ColorCal page are on the copier glass, press the Enter button
10. In the next window choose whether or not to print a comparison page and press enter
11. When asked to apply the calibration, press the Enter button
Apply Calibration
*Yes
No
12. In the final window select yes, and press the Enter button in order to overwrite
the previous calibrations
Affects all. Contin?
*Yes
No
13. Press the On Line button to return the printer to normal operation
Using Command WorkStation to Calibrate the Scanner
Tools Needed
Q-13 Gray Scale, Part Number 70051001.
Reasons that a calibration should be done
1. On initial setup, there is no copier calibration stored in the MFP unit so calibration is required.
2. Colors are off when making a copy, but are fine when printing.
3. Color is critical when making copies.
4. After servicing the printer or performing routine maintenance
IMPORTANT NOTE: If a calibration has previously been done, it is recommended that it be removed prior to
doing the procedure below.
Removing the calibration for the Copier Screen
1. Press the Down Arrow button until Calibration is highlighted, then press the Enter
button
2. Press the Down Arrow button until Remove Calibration is highlighted, then press
the Enter button
3. Press the Down Arrow button until Copier Screen is highlighted and then press
the Enter button
4. The next screen will display "Affects All, Cont?", press the Enter button and after
the calibration is removed you will be returned to the Calibration Menu
Calibrating Using Command Workstation
Open the ColorWise Pro Tools (shown below) by selecting Manage Color from the
Server drop-down menu in Command WorkStation.
Double-click on the Calibrator utility (shown above). One of the following screens will
appear.
Diagram: Standard Calibrator Utility
Diagram: Expert Calibrator Utility
The Scanner unit can be calibrated via both the Standard and Expert Calibrator processes (shown above).
This article will use the Standard Calibrator to demonstrate the process for the remainder of the
document. The instructions are the same for calibrating the scanner via Standard and Expert Calibrator
modes.
In Select Measurement Method (item 1 of the above window), select ColorCal as shown below.
In Check Print Settings (item 2 of the following window), select Copier Screen as shown below.
In Generate Measurement Page (item 3 of the above window), press the Print button. The following
ColorCal Measurement Page will be printed.
In Get Measurements (item 4 of the following window), press the Measure button.
The following screen will appear.
Select “Yes” in the above window. The following screen will appear.
Press the Print button in the above screen. The following page will be printed.
The following screen will appear.
Place the Kodak Gray Scale and Kodak Color Control Patches on to the Scanner
Calibration Page as shown below.
Now place the Kodak Gray Scale, Kodak Color Control patches and Scanner Calibration Page face
down on the scanner glass and press the Continue button in the previously mentioned Scanner
Calibration Setup window. The following screens will appear sequentially.
Press the Continue button in the previous Information window. The following screen will appear.
Place the Kodak Gray Scale strip face down on the scanner glass and place the ColorCal Measurement
Page face down on top of the strip (as shown below).
Press the Continue button in the Place Patch Page window (shown in instruction 11). The following
screens will appear sequentially.
Press the OK button in the above Measurement window. The following screen will appear.
Press the Apply button in the above window. The following will appear.
Press the OK button in the above Information window. The following will appear.
Press the Done button in the above window.
The Scanner and the Printer have now been successfully calibrated.
Calibrating the Auto Media Detection Sensor
The auto media adjustment procedure is a two step process. There is a rough and fine adjustment
that needs to be made. Both of these steps should be performed when doing the calibration.
Tools Needed
Pre-Measured Transparency Pack P/N 42527801
Reasons that a calibration should be done
1. When replacing the Paper Thickness Sensor, Registration Roller and PU PCB.
2. If the sensor is suspected of being out of calibration.
3. Printer exhibits a "Non Paper Sense" error or "Paper Too Thick" error.
•
Media not fusing properly when the media setting is left at Auto, but fuses fine if a specific
media setting is selected.
Rough Adjustment
Enter Service Mode by holding down the menu up / menu down and help buttons
at the same time while powering up the machine. (This may take up to 60 seconds.)
The System Maintenance Menu will appear. Down arrow to “Diagnostics” and press
“Enter”. From Diagnostic Mode Down arrow to “Switch Scan” and press “Enter”. Up
arrow until “REG L/R_DENS_WEIGHT” appears and select “Enter”.
Switch Scan
“REG L/R_DENS_WEIGHT”
Four Hexadecimal number sets will be displayed. The Rough Adjustment is the 4th number.
Example: 09E, 27D, 000, 12C)
“REG L/R_DENS_WEIGHT”
09E, 27D, 000,
12C
Adjust the 4th number as close to the desired 12C as possible (acceptable range: 10E ~ 13E) by
rotating the adjustment screw (See illustration below).
Press the Back button three times to exit diagnostic mode, and restart the printer.
Sensor Cover
Opening for Adjustment
Media Thickness Sensor
Fine Adjustment
Re-enter Service Mode using the above procedure.
Press the Menu Down button to "Diagnostic Mode" and select “Enter”.
Press the Menu Up button to "MEDIA WEIGHT ADJ PA" and select “Enter”.
The display should now read "EDIT THICKNESS DATA", select “Enter”.
"THICKNESS SAMPLE PAGE P=3" should be displayed.
Press the Menu up button and the display should now read:
"PAPER THICKNESS=:P1"
"T=100um
OFFSET=0000H"
At this point the measurements of all 4 transparency sheets are going to be entered.
*Note: all values to be entered are located on a label on each transparency.
Enter the Values as follows:
P=1
This is the top sheet when placed in the MP tray
P=2
This is the second sheet
P=3
This is the third sheet
P=CHK This is the bottom sheet that is placed in the MP tray
To enter the value for P=1, press the Enter button so that the Ones unit columns begins flashing
(example: T=110um, the digit in red will be flashing).
Use the Menu UP & Menu Down buttons to change the value of the Ones column.
Press the On Line button to change from the Ones to the Tens column (ex. T=110um), and again
use the Menu Up & Menu Down buttons to change the value.
Last press the On Line button to change from the Tens column to the Hundreds (ex. T=110)
column and once again use the Menu Up & Menu Down buttons to change the value.
Once the T value for P=1 is set correctly press the Enter button to exit the value adjustment.
Press the Menu Up button to change between P values, and repeat the steps above to enter the
correct measurement values for P=2, P=3, & P=CHK.
Once all of the values are set correctly for all four transparency sheets, press the Back button so
that the display now reads "EDIT THICKNESS DATA" again.
Press the Menu Up button so that the display reads "WEIGHT SCAN ADJ EXEC".
Place the stack of 4 transparency sheets in the MP tray so that they are stacked according to step 6.
Press the Enter button, and the unit should begin feeding all 4 sheets.
Once all 4 sheets are fed, the display should read OK in the top left corner.
Once OK is displayed the adjustment procedure is completed. If FAIL is displayed the Auto Media
Sensor must be adjusted and/or replaced and the procedure must be done over.
Press the Back button twice, then press and hold the Shut Down/Restart button until the display
says to power off, then cycle the printer power off/on.
Chapter 3
Troubleshooting Print Quality
3.1 Print-Quality Problems Overview
Print-quality defects can be attributed to printer components, consumables, media,
internal software, external software applications, and environmental conditions. To
successfully troubleshoot print-quality problems, eliminate as many variables as
possible. The first step is to generate prints using printable pages embedded in the
printer on paper from the Supported Media List. Use paper from a fresh, unopened
ream that is acclimated to room temperature and humidity. If the print-quality
defect is still present when printing on approved media, then investigate software
applications and environmental conditions.
The printers use separate Imaging Units to develop a latent image for each color
where the colors are combined on the Transfer Unit to form the final image. In
most cases, print-quality defects are the result of one particular component in the
print engine, See the Repeating Defects chart. When a single component of the
Imaging Unit is causing a print quality defect, replace the Imaging Unit.
When analyzing a print-quality defect, first determine if the defect occurs in all
colors or only one color and if it is repeating or random. Continuous defects in the
process direction, such as voids and lines, are the most difficult to diagnose.
Inspect the visible surfaces of all rollers for obvious defects. If no defects are
observed, replace the Imaging Units, Transfer Unit, and Fuser one at a time until
the defect is eliminated.
Defects Associated with Specific Printer Components
Some print-quality problems can be associated with specific assemblies, the most
common problems and the associated assemblies are listed below. Also, refer to
the printer’s Troubleshooting Print-Quality Problems pages or a specific printquality troubleshooting procedure for more information.
Imaging Unit
•
•
•
•
•
•
Streaks in Process Direction (in the direction of feed,
parallel with paper travel)
Banding in Scan Direction (across the page,
perpendicular to paper travel)
Uneven Density
Voids
Repeating Defects
Mis-registration
Transfer Unit
•
•
•
•
Toner on the back side of the printed page
(simplex mode)
Light Prints
Repeating Defects
Mis-registration - only when there is obvious
damage to the belt.
Fuser
•
•
•
Hot or Cold Offsetting
Repeating Defects
Dark Streaks in Process Direction
•
•
Streaks in the Process Direction
Uneven Density in the Scan Direction
LED Head
Test Prints
A variety of test prints are available to aid in determining the quality of output
from the printer and to assist in troubleshooting. The next section shows how to
generate and analyze test prints
3.2 Generating and Analyzing Control Panel Test Prints
Control panel test prints must first be enabled in service mode. Enter Service
Mode by holding down the menu up / menu down and help buttons at the same
time while powering up the printer unit. (This may take up to 60 seconds.)
Select “Maintenance Print Menu” – Select “Enter”
System Maintenance
*OKIUSER
Maintenance Print Menu
Print Page Count
Select “Enable” – Select “Enter”
Maintenance Print Menu
*Enable
Disable
Select “Cancel” to exit service mode and restart server
To generate the “ID Check Pattern” test print select “Menu” arrow down to “Print Pages”
Configuration
Print Pages
Suspend Printing
Resume Printing
Arrow down to “ID Check Pattern” Select “Enter”
Usage Report
Statistics Report
Error Log
ID Check Pattern
Things to observe when analyzing the ID Check Pattern test page include:
•
•
•
•
•
•
Streaks in Process Direction (in the direction of feed, parallel with paper
travel)
Banding in Scan Direction (across the page, perpendicular to paper travel)
Uneven Density
Voids
Repeating Defects
Mis-registration
Note: Consult the “Repeating Defect Spacing Chart” below.
Repeating Defects Spacing
Component
Imaging Drum
Developer Roller
Charge Roller
Supply Roller
Fuser Belt
Heat Roller
Transfer Unit Belt
Defect Spacing
94 mm (in.)
49 mm (in.)
37.4 mm (in.)
102 mm (in.)
124 mm
87.3 mm (in.)
706 mm
Replace
Imaging Unit
Imaging Unit
Imaging Unit
Imaging Unit
Fuser
Fuser
Transfer Unit
Generating and Analyzing Service Test Prints
Generating and Analyzing 100% Solid Fill Test Pages
These prints consist of 100% solid fill in CMYK. Each color can be selected
individually or in combinations.
Enter Service Mode by holding down the menu up / menu down and help buttons at the same time
while powering up the printer unit. (This may take up to 60 seconds.
The System Maintenance Menu will appear. Down Arrow to “Diagnostic Mode” and press “Enter”
Down arrow to “Test Print” and Select “Enter”
“Print Execute” will appear. Down arrow to “Output Bin”
Test Print
Print Execute
Select “Enter” - Select either “Face Up” or “Face Down” – Select “Enter”
Output Bin
Face Down
Page down to “Job Offset” - Select “Enter” - Select “off” - Select “Enter”
Test Print
Job Offset
Page down to “Duplex”- Select “Enter”- Select “Off”- Select “Enter”
Test Print
Duplex
Page down to “Color”- Select “On”
Color
ON
Select “On Line” Key. Screen will appear where you can select each color to print. Use the “ON
Line” Key to turn off all colors you do not wish to print. Example: for a “Magenta” print, turn off
“Yellow”, “Cyan”, and “Black”. To turn “On” / “Off” the individual colors use the “On Line” key.
Once the desired color menu is set, Select “Enter”
Y:OFF
C:OFF
M:ON
K:OFF
Page down to “Page” – Select “Enter”. Select the number of prints desired – Select “Enter”
Page
0001
Page down to “Cassette” – Select “Enter” Select Tray 1,2,3,4, or MPT – Select “Enter”
Test Print
Cassette
Page down to “Test Pattern” – Select “Enter”
Test Print
Test Pattern
Select “Test Pattern 7” – Select “Enter”
Test Pattern
7
Page down to “Print Execute” – Select “Enter” to print selected test page
Test Print
Print Execute
Things to observe when analyzing the 100% fill test page include:
2
3
4
5
6
7
8
9
Wrinkling
Creases
Roller marks
Scratches
Repeating defects or banding
Missing Color(s)
Streaks
Voids
1. Consistent fills in each color. Each color should be consistent across the page with no voids.
2. Look for thin white lines that would indicate a dirty LED lens or a scratched Imaging Unit.
3. Look for dark lines that would indicate a dirty or damaged Imaging Unit.
4. Look for complete fusing. Cold or hot offset fusing could indicate the incorrect paper weight has
been selected.
Generating and Analyzing 25% Color Fill Test Pages
The following print consists of 25% fill in CMYK. Follow the service mode procedure above and select
Test Pattern # 2.
Things to observe when analyzing the 25% fill test page include:
3
4
5
6
Repeating defects or banding
Missing Color(s)
Streaks
Voids
1. Consistent fills in each color. Each color should be consistent across the page with no voids.
2. Look for thin white lines that would indicate a dirty LED lens or a scratched Imaging Unit.
3. Look for dark lines that would indicate a dirty or damaged Imaging Unit.
4. Look for complete fusing. Cold or hot offset fusing could indicate the incorrect paper weight has
been selected.
Generating and Analyzing Print Engine Test Prints
1
Analyzing the PS Test Pattern
3
1. Color Registration (Horizontal):
The colored lines should match up.
2. Color Registration (Vertical):
The colored lines should match up.
3. Uniform RGB / CMYK:
color squares should be uniformly colored
with no mottling.
2
4. Density:
The color bars should have even density
from top to bottom.
4
Analyzing the Demo Page
Compare with previous Demo page that was left with the service log
during the previous service visit and observe the following:
•
•
•
•
Consistent fills in all colors.
thin white lines
dark lines
Color registration
Comparing with the previous Demo page will ensure consistent output
that will match the customer’s expectations.
3.3
Print-Quality Troubleshooting Practices
Initial Actions to perform prior to using any of these troubleshooting procedures.
Ask specific questions of the operator to determine actual problem
Generate Configuration Pages to ascertain if all updates are installed,
consumable life and to use for reference after changes are performed
Generate ID Check Pattern test print, PS Test Page, and Demo Page
Follow Standard Preventative Maintenance procedures and clean the printer
Verify the media used is supported by the printer.
Verify the media settings are correct at the Control Panel.
Print the PS Test and Demo pages to see if it is an application problem.
Run the color calibration routine from Chapter 2
Note: For troubleshooting purposes it is important to note the direction of paper feed in
the printer to establish if the problem is a process issue or a scan issue. Use the
diagram below as a basis to determine orientation. For troubleshooting purposes this
document will assume all issues have been fed in the LEF (long edge feed) or Letter
direction.
Paper Feed Direction
Final Actions to perform after using any of these troubleshooting procedures.
•
Perform printer and scanner calibrations from printer and through Command
Workstation
•
Generate Configuration Page and attach to the Service Log
•
Generate PS Test Page, and Demo Page and attach to the Service Log
Light Prints in All Colors
The overall image density is too light in all colors. If the image is light in only one color, see
"Light Print in Only One Color".
Initial Actions to Perform
Perform Initial Actions from Print Quality Troubleshooting Practices
Verify the media used is supported by this printer.
Verify the media settings are correct at the Control Panel.
Print the PS Test and Demo pages to see if it is an application problem.
Run the color calibration routine
Areas of the Printer that Apply to Light Prints
Imaging Unit
LED Head
Transfer Unit
HVPS
Engine Control Board
Troubleshooting Steps
Resolution
1. Verify all packaging material has been removed form the toner cartridges
Yes – Go to Step 2
No - Remove packing material
2. Remove the Imaging Units and the Transfer Unit and check for toner
contamination on the high voltage contacts. Are the contacts contaminated?
Yes – Clean the contacts
No - Go to Step 3
3. Are the LED Heads dirty? Clean the heads with a clean, lint-free cloth. Did this
correct the problem?
Yes – Complete
No - Go to Step 4
4. Are the wiring harnesses on the LED Heads undamaged, properly routed and
seated?
Yes – Repair / Replace Harnesses
No - Go to Step 5
5. Inspect the high-voltage wiring harness. Reseat the wiring Harness. Did this
correct the problem?
Yes – Complete
No - Replace in the following
order: Transfer Unit / LVPS /
Imaging Unit Sensor Board / HVPS
/ Engine Control PCB
Light Print in Only One Color
Only one color; yellow, magenta, cyan, or black, is too light on the printed image.
Initial Actions to Perform
Perform Initial Actions from Print Quality Troubleshooting Practices
Verify that color calibration has been performed prior to using this troubleshooting procedure.
Check that the Toner Cartridge pull strip is completely removed from the affected color.
Areas of the Printer that Apply to Light Print in Only One Color
Imaging Unit
LED Head
Engine Control Board
Toner Supply
Troubleshooting Steps
Resolution
1. Verify all packaging material has been removed form the toner cartridges
Yes – Go to Step 2
No - Remove packing material
2. Print the 100% Solid Fill test print. Can the problem be isolated to one primary
color?
Yes – Go to Step 3
No - "Light Print in Only One
Color"
3. Remove the Toner Cartridge and check for toner starvation in the Imaging Unit.
Is there evidence of toner starvation
Yes – Replace the Toner Cartridge
No - Go to Step 4
4. Remove the Imaging Units and the Transfer Unit and check for toner
contamination on the high voltage contacts. Are the contacts contaminated?
Yes – Clean the contacts
No - Go to Step 5
5. Are the LED Heads dirty? Clean the heads with a clean, lint-free cloth. Did this
correct the problem?
6. Swap the LED Head of the problem color with any other LED Head.
Print a Solid Fill Test Pattern. Has the problem moved with the LED Head?
7. Are the wiring harnesses on the LED Heads undamaged, properly routed and
seated?
Yes – Complete
No - Go to Step 6
Yes – Replace the LED Head
No - Go to Step 7
Yes – Reseat the wiring Harnesses
No - Replace in the following
order: Transfer Unit / LVPS /
Engine Control PCB
Blank Prints
Initial Actions
Perform Initial Actions from Print Quality Troubleshooting Practices
Run a test print to help isolate the problem between the Fiery Control Board and the
Engine Control Board.
Areas of the Printer that Apply to Blank Prints
Imaging Unit
LED Head
Engine Control Board
Troubleshooting Steps
Resolution
1. Print a 100% Solid Fill Test Print from the printer’s Control Panel. Is the entire
test print blank?
Yes – Go to Step 2
No - Have the customer check
there application and printer
settings.
2. Remove the Toner Cartridge and check for toner starvation inside the Imaging
Unit. Is there evidence of toner starvation?
Yes
–
Replace
Cartridge.
No - Go to Step 3
3. Are the LED Heads dirty? Clean the heads with a clean, lint-free cloth. Did this
correct the problem?
Yes – Complete
No - Go to Step 4
4. Are the wiring harnesses on the LED Heads undamaged, properly routed and
seated?
Yes
–
Repair
Harnesses
No - Go to Step 5
5. Inspect the high-voltage wiring harness. Reseat the wiring Harness. Did this
correct the problem?
Yes – Complete
No - Replace in the following
order: Transfer Unit / LVPS /
Imaging Unit Sensor Board /
HVPS / Engine Control PCB
the
/
Toner
Replace
Mottled or Splotchy Prints
The print image has a mottled appearance.
Note: This defect is known to occur when manually duplexing, at low humidity, and when
printing on heavy weight media.
Initial Actions
Perform Initial Actions from Print Quality Troubleshooting Practices
Areas of the Printer that Apply to Mottled or Splotchy Prints
Imaging Unit
LED Head
HVPS
Engine Control Board
Troubleshooting Steps
Resolution
1. Ensure the media is approved and the Control Panel and driver settings match
the loaded media. Try different media to verify consistent, reproducible problem.
Yes – Go to Step 2
No - Have the customer load
approved media or correct the
settings.
2. Print the configuration page to verify the operating environment.
NOTE: Low humidity, less than 20% relative humidity can cause mottling on
prints.
Yes – Go to Step 3
No - Advise customer regarding
the
printer’s
environmental
specifications.
3. Check for toner contamination on the high voltage contacts. Remove the
Imaging Units and Transfer Unit. Is there contamination?
Yes – Clean the contacts
No - Go to Step 4
4. Check / Replace the Transfer Unit. Is the problem resolved?
Yes – Complete
No - Replace in the following
order: LVPS / HVPS / Engine
Control PCB
Unexpected Colors
The colors produced by the printer are dramatically different from the color expected.
Initial Actions
Perform Initial Actions from Print Quality Troubleshooting Practices
Areas of the Printer that Apply to Unexpected Colors
Imaging Unit
HVPS
Engine Control Board
Troubleshooting Steps
Resolution
1. Print the ID Check Pattern / Demo / PS Test Page and evaluate the colors. Are
the colors on the test pages representative of what the customer expects?
Yes – Complete, the problem is
with the
Customer application.
No - Go to Step 2.
2. Print a configuration page to check the Imaging Unit life remaining. If the
Imaging Unit is reaching it’s
maximum image count, this can reduce print-quality.
Yes – replace the Imaging Unit.
No - Go to Step 3.
3. Print the 100% Solid Fill Test pattern and check for any missing colors. Is the
problem with a single color?
Yes –Go to Step 4.
No - Go to Step 6
4. Is there debris or contamination on the LED Head?
Yes – Clean them with a dry, lint
free cloth.
No - Go to Step 5
5. Swap the LED Head of the problem color with any other LED Head. Print a Solid
Fill Test Pattern. Has the problem moved with the LED Head?
Yes – Replace the defective LED
Head
No – Go to Step 6
6. Swap the Imaging Unit of the problem color with any other Imaging Unit.
NOTE: Remove the keys before swapping. Print a Solid Fill Test Pattern to check
for defects. Has the problem color moved with the Imaging Unit?
Yes – Replace the Imaging Unit
No - Go to Step 7.
7. Check for toner contamination on the high voltage contacts. Remove the
Imaging Units and the Transfer Unit and Is there contamination on the contacts?
Yes – Clean the contacts.
No - Go to Step 8.
8. Are the wiring harnesses on the LED heads undamaged, properly routed and
seated?
Yes – Go to Step 9.
No - reseat the wiring harness.
9. Inspect the high-voltage wiring harness.
Yes – reseat the wiring harness.
No - Replace in the following
order: Transfer Unit / LVPS /
Imaging Unit Sensor Board / HVPS
/ Engine Control PCB
Repeating Bands, Lines, Marks, or Spots
This is usually caused by a damaged roller. In some instances, the spots may be dark
instead of white and are repeated.
Initial Actions
Perform Initial Actions from Print Quality Troubleshooting Practices
Print the Color Test pages to identify the color causing the defect.
Print multiple pages, and then measure the defect and compare it to the Repeating
Defects table (Below) to identify the problem component.
Areas of the Printer that Apply to Repeating Bands, Lines, Marks, or Spots
Imaging Unit
Fuser
Transfer Unit
Note: Consult the “Repeating Defect Spacing Chart” below.
Repeating Defects Spacing
Component
Imaging Drum
Developer Roller
Charge Roller
Supply Roller
Fuser Roller
Transfer Roller
Transfer Unit Belt
Defect Spacing
94.0-94.25 mm
49.0-49.60 mm
37.4-44.0 mm
55.8-57.8 mm
87.3-87.6 mm
57.8 mm
706 mm
Unit to Replace
Imaging Unit
Imaging Unit
Imaging Unit
Imaging Unit
Fuser
Transfer Unit
Transfer Unit
Random Bands, Lines, Marks, or Missing Spots
There are areas of the image extremely light or are missing entirely and do not appear to
be a repeating defect or in a single color.
Caution
Leaving an Imaging Unit exposed to light for periods in excess of 10 minutes can quickly
degrade its performance and result in early failure.
Initial Actions
Perform Initial Actions from Print Quality Troubleshooting Practices
Using a flashlight, carefully examine the area around the Imaging Units and the
openings between the Imaging Units and LED Heads. Small obstructions, such as hair or
fibers, can create streaks
When troubleshooting, print a test print on at least letter size paper for diagnosing this
problem. The problem may be a repeating defect that is not noticeable on smaller media.
Random missing spots can also be associated with “Cold Offset”, which lifts toner off
the page in certain areas. Usually this will occur in high-coverage areas where the fuser
temperature is not high enough to fuse the toner on the media. This causes toner to be
re-deposited further down the page.
Areas of the Printer that Apply to Random Bands, Lines, Marks, or Missing Spots
Imaging Unit
Fuser
Transfer Unit
Engine Control Board
Troubleshooting Steps
Resolution
1. Check for obstructions between the LED Heads and the Imaging Units. Remove
the Imaging Unit and inspect each Drum and corresponding area. Remove any
debris.
Yes – Remove the obstruction or
debris.
No - Go to Step 2.
2. Replace the Imaging Unit. Does the image quality improve?
Yes – Complete.
No - Go to Step 3.
3. Replace the Transfer Unit. Does the imaging quality improve?
Yes – Complete.
No - Go to Step 4.
4. Replace the Fuser. Does the image quality improve?
Yes – Complete.
No - Go to Step 5.
5. Replace the LED Head. Does the image quality improve?
Yes – Complete.
No – Replace the engine PCB.
Random Spots
There are spots of toner randomly scattered across the page. Toner melting off the Fuser
thermistors can also place random spots onto prints.
Initial Actions
Perform Initial Actions from Print Quality Troubleshooting Practices
Verify the Imaging Unit, Fuser, and Transfer Unit are not at or near end of life. Waste
toner, especially from the Transfer Unit, can cause random spots to appear on the page.
Note
Depending on the type of paper and environmental conditions, some light amount of random
background spotting is normal. The whiter and glossier the paper, the more noticeable it will
be.
Areas of the Printer that Apply to Random Spots
Imaging Unit
Fuser
Transfer Roller
Troubleshooting Steps
Resolution
1. Is there toner spilled inside the printer?
Yes – Vacuum inside the printer
and remove all visible toner.
No - Go to Step 2.
2. Check the media for spots or contamination that exists prior to printing. Try
printing on a different media, not a glossy media.
Yes – Replace with fresh paper.
No - Go to Step 3.
3. Print the Color Test Pages to determine which primary color(s) are spotting or
missing. Is the problem with one color?
Yes – Replace the Imaging Unit
No - Go to Step 4.
4. Run the SMR (Smears) and BG (Background) from the printer’s Control Panel.
Did this fix the problem?
Yes – Complete.
No - Go to Step 5.
5. Inspect the Fuser. Is there dirt, debris, or contamination on the Fuser housing
or rollers?
Yes – Clean the Fuser
No – Replace the Fuser.
Background
There is a very light covering of toner across the entire page. Background contamination
can appear in one of the primary colors or gray. The printer displays no error code.
Note
Depending on the type of paper and environmental conditions, some light amount of
random background spotting is normal. The whiter and glossier the paper, the more
noticeable it will be.
Initial Actions:
Perform Initial Actions from Print Quality Troubleshooting Practices
Ask the customer about their typical printing habits. A high daily duty cycle can
temporarily fatigue the OPC drums within the Imaging Unit and contribute to unwanted
background toner.
Areas of the Printer that Apply to Background Issues
Imaging Unit
Fuser
Transfer Unit
HVPS
Troubleshooting Steps
Engine Control Board
Resolution
1. Is the printer in direct sun light?
Yes – Move the printer.
No - Go to Step 2.
2. Does the background appear to be in only one of the primary colors?
Yes – Go to Step 3.
No - Go to Step 4.
3. Check the Imaging Unit drum for toner contamination. Remove the Imaging
Unit of the problem color.
Is there a film of toner across the surface of the drum?
Yes – Replace the Imaging Unit.
No - Go to Step 4.
4. Verify the printer is operating within its environmental specifications. Low
humidity increases the degree of background toner.
Yes – Go to Step 5.
No - Advise the customer of the
environmental specifications.
5. Check the Transfer Unit belt. Is the background contamination a mixture of
colors and excessive?
Is the Transfer Unit belt contaminated with toner?
Yes – Replace the Transfer Unit.
No - Go to Step 6.
6. Is the customer printing on high-gloss media?
Yes – Advise the customer of the
limitation of this printer.
No - Go to Step 7.
7. Check minimum clearances around the printer especially sides and back as it
can cause heat buildup.
Are clearances within specifications?
Yes – Go to Step 8.
No - Advise customer.
8. Test the Fans. Heat build-up under the Imaging Units can cause toner to stain
the background.
Are the fans operating correctly?
Yes – Go to Step 9.
No - Replace the defective fan.
9. Check that the Imaging Unit contacts are in working condition and clean.
Yes – Clean the or replace the
drum contacts.
No - Go to Step 10.
10. Remove the Imaging Units and the Transfer Unit and check for toner
contamination on the high voltage contacts.
Yes – Clean the contacts.
No - Replace in the following
order: Transfer Unit / HVPS
Ghosting or Hot Offset
There are faint, ghostly images appearing on the page. The images may be either from a
previous page or from the current page. This type of artifact can be related to the
percent coverage called out in the file being printed. If the colors are offset by
less than 10 mm, this represents mis-registration, not ghosting.
Ghosting: This can be the Imaging Unit (green roller) where a residual image is left on
the green film, which is then deposited further down the page. This is most noticeable on
images that have a dark background with light text. The text is ghosted down the page at
94 mm intervals. This is caused by a defective Imaging Unit. Ghosting every 49 mm is
caused by the developer roller and is a limitation of the design; therefore, technicians
should not replace Imaging Units for this type of ghosting.
Hot Offset: This can be characterized by a repeating image every 87.3 mm or 124 mm.
The Fuser temperature is set too high for the given media and the toner adheres to the
Fuser rollers causing the image to be deposited further down the page or on the following
pages. Offsetting occurs on media if the fuser’s temperature setting does not match the
media type loaded in the tray.
Initial Actions:
Perform Initial Actions from Print Quality Troubleshooting Practices
Verify the correct media type is set at the Control Panel
Print an internal test page to see if ghosting appears there as well.
Try printing with fresh media from a recently opened ream.
Areas of the Printer that Apply to Ghosting or Hot Offset
Imaging Unit
LVPS
Fuser
Temp/Humidity Sensor
Transfer Unit
Engine Control Board
Troubleshooting Steps
Resolution
1. Refer to the Repeating Defects Chart and compare to the customer’s print to
determine if the defect is Fuser or Imaging Unit related. Is the defect repeating
at 94 mm?
Yes – Replace the Imaging Unit.
No - Go to Step 2.
2. Run some blank pages through the printer to clean the fuser. Did this correct
the problem?
Yes – Complete.
No - Go to Step 3.
3. Check the media settings. Is the setting correct for the media loaded in the
tray?
Yes – Go to Step 4.
No - Advise the customer of the
correct media settings.
4. Try setting the Control Panel media type to the next lightest type of paper
than that loaded in the tray.
Did this correct the problem?
Yes – Advise customer of the
appropriate media type
selection.
No - Go to Step 5.
5. Remove the Fuser covers and inspect the thermistor for debris between it and
the rollers. Is there any debris build-up?
Yes – Replace the Fuser.
No - Go to Step 6.
6. Print a test print and monitor the Fuser temperature with Service Diagnostics.
Is the temperature within its optimal range?
Yes – Replace the Fuser.
No - Replace the Engine Control
Board
Incomplete Fusing or Cold Offset
The Fuser temperature is set too low for the media loaded in the tray causing improper
fusing resulting in the toner rubbing off easily.
Initial Actions:
Perform Initial Actions from Print Quality Troubleshooting Practices
Verify the correct media type is set at the printer’s Control Panel.
Areas of the Printer that Apply to Incomplete Fusing or Cold Offset
Fuser
Media Thickness Sensor
Troubleshooting Steps
Resolution
1. Remove the Fuser covers and inspect for debris between the rollers. Is there
dirt or debris wrapped around or on the Fuser rollers?
Yes – Replace the Fuser.
No - Go to Step 2.
2. Set the media type to the next heaviest setting than the type loaded. Did
this correct the problem?
Yes – Advise customer on
appropriate media type
selection.
No - Go to Step 3.
3. Print a test print and monitor the Fuser temperature with Service Diagnostics.
Is the temperature within its optimal range?
Yes – Replace the Fuser.
No - Replace in this order:
Engine Control Board / LVPS
Mis-Registration, Color Layers Not Correctly Registered
The image appears blurred and the primary colors are not aligning correctly into one
image. For a page oriented Long-Edge Feed, the following applies:
If the colors are shifted from left to right, this is mis-registration in the process direction.
If the colors are shifted from top to bottom, this is mis-registration in the scan direction.
Initial Actions:
Perform Initial Actions from Print Quality Troubleshooting Practices
If the mis-registration is in the horizontal direction, perform the color registration
adjustment
If the mis-registration is in the vertical direction, clean the Sensor.
Areas of the Printer that Apply to Mis-Registration
Imaging Unit
LED Heads
Color Registration Sensors
Transfer Unit
HVPS
Image Processor Board
Engine Control Board
Troubleshooting Steps
Resolution
1. Cycle power to the printer. Did this correct the problem?
Yes – Complete
No - Go to Step 2.
2. Process Direction: Remove the Imaging Units and Transfer Unit. Inspect the
Color Registration Sensors for dirt, debris or toner build-up. Are the sensors
clean?
Yes – Go to Step 3.
No - Clean the sensors.
3. Check the Color Registration Shutter. Run the Service Diagnostics Registration
Shutter test. Is the shutter functioning correctly?
Yes – Go to Step 4.
No - Replace the solenoid and
wiring harness.
4. Inspect the Transfer Unit for tears or damage on the edges of the belt. Is the
belt damaged?
Yes – Replace Transfer Unit.
No - Go to Step 5.
5. Check the Imaging Unit drive gears for missing or worn gear teeth. Run the
Service Diagnostics Imaging Unit Motors tests to visually inspect the gears. Are
the gears working correctly?
Yes – Go to Step 6.
No - Replace the Imaging Unit
Drive Gear.
6. Replace the Registration Sensor Board. Did this fix the problem?
Yes – Complete.
No - Go to Step 8.
7. Replace the Engine Control Board EEPROM. Did this fix the problem?
Yes – Complete.
No - Replace the Engine Control
Board
8. Scan Direction: Use the configuration page to identify the problem color.
Remove the Imaging Unit of the suspect color. Inspect the grounding shaft. Has
the shaft shifted?
Yes – Replace the Imaging Unit.
No - Go to Step 9.
9. Check the Imaging Unit guides for debris or damage. Are the guides damaged
or obstructed?
Yes – Clean the guides on the
chassis or
Replace the damaged assembly.
No - Go to Step 10.
10. Check the Color Registration Sensors for dirt or debris. Be sure to check in
and around the registration shutter.
Yes – Clean the sensor.
No - Go to Step 11.
11. Check the Color Registration Shutter. Run the Service Diagnostics Registration
Shutter test. Is the shutter functioning correctly?
Yes – Go to Step 12.
No - Replace the solenoid and
wiring harness.
12. Are the LED Head ribbon cables undamaged, properly routed and seated?
Yes – Go to Step 13.
No - Reseat, correctly route or
replace the wiring harness.
13. Swap the LED Head of the problem color with any other LED Head. Print a
Supplies page. Has the problem moved with the LED Head?
Yes – Replace the defective LED
Head
No - Go to Step14.
14. Replace the Registration Sensor Board. Did this fix the problem?
Yes – Complete.
No - Go to Step15.
15. Replace the Engine Control Board EEPROM. Did this fix the problem?
Yes – Complete.
No - Replace the Engine Control
Board
Toner on Back of Print
There is toner on the back of the printed sheet of paper.
Initial Actions:
Perform Initial Actions from Print Quality Troubleshooting Practices
Areas of the Printer that Apply to Toner on Back of Print
Imaging Unit
Transfer Unit
Troubleshooting Steps
Resolution
1. Check and clean the Exit Rollers and paper path for toner or debris. Does this
correct the problem?
Yes – Complete.
No - Go to Step 2.
2. Verify the printer is operating within its environmental specifications.
Yes – Go to Step 3.
No - Advise customer on the
specifications.
3. Inspect the Transfer Unit. Has the cleaning blade flipped or failing to clean the
Transfer Unit?
Yes – Replace the Transfer Unit.
No - Go to Step 4.
4. Select the “Special” media setting and experiment with alternate settings, such
as the next heaviest or
lightest paper type. Does this correct the problem?
Yes – Complete.
No - Go to Step 5.
5. Test the Fuser. Print a test print and monitor the Fuser temperatures. Are
temperatures within specification.
Yes – Replace Engine Control
Board
No - Replace the Fuser.
Image Not Centered or Positioned Correctly
The image is not centered on the page correctly
Initial Actions:
Perform Initial Actions from Print Quality Troubleshooting Practices
Areas of the Printer that Apply to Image Not Centered or Positioned Correctly
Imaging Unit
Transfer Unit
Troubleshooting Steps
Resolution
1. Check the user’s application and driver settings to ensure the problem is with
the printer and not with the settings. 1. Print an internal page to verify the printer
is functioning properly. 2. Check the tray setup settings and ensure Custom is set
to Off. 3. Print from a different tray. 4. Clean the Pick and Feed Rollers.
Is the problem with the printer?
Yes – Go to Step 2.
No - Advise the customer of the
problem with the application.
2. Are the paper guides set snugly against the paper?
Yes – Go to Step 3.
No - Adjust the guides.
3. Verify the size of media reported by the printer is the actual size.
Yes – Go to Step 7.
No - Go to Step 4.
4. Test the Paper Size Switches. Run the Service Diagnostics Paper Size Switch
tests. Are the switches functioning correctly?
Yes – Go to Step 5.
No - Go to Step 6.
5. Check the backside of the paper tray for proper movement of the paper size
plate while adjusting the tray guides. Did the plate move with the guides?
Yes – Go to Step 7.
No - Replace the tray.
6. Check the wiring harness to the Paper Size Switch for damage or defects. Is the
wiring harness defective?
Yes – Replace the wiring
harness.
No - Replace in this order: Paper
Size Switch, Engine Control
Board, or Option Control Board.
7. Inspect the tray pick and feed rollers for dirt, debris or excessive wear.
Yes – Clean or replace the
rollers.
No – Go to Step 8.
8. Print a test print. Did the test pattern print correctly?
Yes – Replace the Fiery Control
Board
No – Replace Engine Control
Board
Process Direction Bands, Voids, or Streaks
There are areas of the image that are extremely light or missing entirely. These missing
areas form wide bands that run along the page parallel to the leading edge of the paper.
Initial Actions:
Perform Initial Actions from Print Quality Troubleshooting Practices
Areas of the Printer that Apply to Process Direction Bands, Voids, or Streaks
Imaging Unit
Transfer Unit belt
Troubleshooting Steps
Resolution
1. Print the 100% Solid Fill Test print. Is the problem with one primary color?
Yes – Replace the defective
Imaging
Unit.
No - Go to Step 2.
2. Is the paper wrinkled, dimpled or curled Indicating a high moisture content?
Load a fresh ream of paper. Did this correct the problem?
Yes – Complete.
No - Go to Step 3.
3. Print multiple pages. Do the defects correspond to a customer Replaceable
Consumable?
Yes – See "Repeating Bands,
Lines, Marks, or Spots" on page
17.
No - Go to Step 4.
4. Inspect the Fuser housing for warping or damage.
Yes – Replace the Fuser.
No - Replace the Engine Control
Board
Scan Direction Bands, Voids, or Streaks
There are areas of the image that are extremely light or are missing entirely. The missing
areas form bands that run along the page from the leading edge to the trailing edge in the
direction of paper travel.
Initial Actions:
Perform Initial Actions from Print Quality Troubleshooting Practices
Areas of the Printer that Apply to Scan Direction Bands, Voids, or Streaks
Imaging Unit
Transfer Unit belt
LED Heads
Troubleshooting Steps
Resolution
1. Print the 100% Solid Fill test print. Are the missing bands in the process
direction?
Yes – Go to Step 2.
No - See "Process Direction
Bands, Voids, or Streaks" on
page 27.
2. Are there any obstructions, dirt or debris in the printer’s paper path?
Yes – Clean or remove
obstructions.
No - Go to Step 3.
3. Clean the LED Heads with at dry, lint free cloth. Did this fix the problem?
Yes – Complete.
No - Go to Step 4.
4. Remove the each Toner Cartridge and check for toner starvation within the
Imaging Unit(s).
Yes – Replace the Toner
Cartridge.
No - Go to Step 5.
5. Swap the LED Head of the problem color with any other LED Head. Print a Solid
Fill Test Pattern. Has the problem moved with the LED Head?
Yes – Replace the defective LED
Head
No - Go to Step 6.
6. Swap the Imaging Unit of the problem color with any other Imaging Unit.
NOTE: Remove the keys before swapping. Print a Solid Fill Test Pattern to check
for defects. Has the problem color moved with the
Imaging Unit?
Yes – Replace the defective
Imaging
Unit.
No - Go to Step 7.
7. Check the Fuser for damage.
Yes – Replace the Fuser.
No - Replace the Engine Control
Board
Scan Direction Dark Streaks
There are dark lines running parallel with the leading edge of the print.
Initial Actions:
Perform Initial Actions from Print Quality Troubleshooting Practices
Areas of the Printer that Apply to Scan Direction Dark Streaks
Imaging Unit
Transfer Unit belt
Troubleshooting Steps
Resolution
1. Print the Color Test Pages. Does the problem occur in one primary color?
Yes – Replace the Imaging Unit
of the defective color.
No – Go to Step 2.
2. Inspect the Transfer Unit. Has the cleaning blade flipped or failing to clean the
Transfer Unit?
Yes – Replace the Transfer Unit.
No - Go to Step 3.
3. Inspect the Fuser rollers for contamination. Is the Fuser contaminated?
Yes – Replace the Fuser.
No - Go to Step 4.
4. Print a test print Did the test pattern print correctly?
Yes – Replace the Fiery Control
Board
No - Replace Engine Control
Board
Process Direction Lines or Streaks
There are dark lines running along the page in the direction of paper travel from the
leading edge to the trailing edge. This is generally due to Fuser, paper path roller
and/or exit guides contaminated with toner debris.
Initial Actions:
Perform Initial Actions from Print Quality Troubleshooting Practices
Areas of the Printer that Apply to Process Direction Bands, Voids, or Streaks
Imaging Unit
Transfer Unit belt
Troubleshooting Steps
Resolution
1. Run the Remove Print Smears routine from the printers Control Panel. Did this
fix the problem?
Yes – Complete
No - Go to Step 2.
2. Are there any obstructions, dirt or debris in the printer’s paper path? Check for
toner spills.
Yes – Clean and remove
obstructions.
No - Go to Step 3.
3. Visual inspect the Imaging Units and rollers for damage.
Yes – Replace the Imaging Unit.
No - Go to Step 4.
4. Clean the Fuser where paper enters. Did this fix the problem?
Yes – Complete
No - Go to Step 5.
5. Verify the ribbon cables and wiring harnesses on the LED Heads are seated,
connected and routed properly.
Yes – Go to Step 6.
No - Reseat, re-route any
damaged wiring harnesses.
6. Print a test print Did the test pattern print correctly?
Yes – Replace the Fiery Control
Board
No - Replace Engine Control
Board
Chapter 4
Troubleshooting Paper Jams
4.1 Paper Jam Error Code Table
*Note - When a jam occurs, to display the error code, press the HELP button.
Error Code Contents of the operator panel display Area where the jam has occurred
370 : Paper jam occurred around the duplex unit. Duplex unit (Rear area)
371 : Paper jam occurred around the duplex unit. Duplex unit (Middle area)
372 : Paper jam occurred around the duplex unit. Front Cover or Duplex unit (Front area)
373 : Paper jam occurred around the duplex unit Duplex unit (Rear area)
380 : Paper jam occurred in the paper path. Side Cover
381 : Paper jam occurred in the paper path. Top Cover (Under the drums)
382 : Paper jam occurred in the paper path. Top Cover (Fuser unit)
383 : Paper jam occurred in the paper path. Top Cover (Fuser unit or Duplex Entry)
384 : Paper jam occurred in the paper path. Top Cover (Fuser unit or Exit area)
390 : Paper jam occurred during the paper feed process. Multi Purpose Tray
391 : Paper jam occurred during the paper feed. Side Cover or Tray1
392 : Paper jam occurred during the paper feed. Side Cover or Tray2
393 : Paper jam occurred during the paper feed. Side Cover or Tray3
394 : Paper jam occurred during the paper feed. Side Cover or Tray4
395 : Paper jam occurred during the paper feed. Side Cover or Tray5
400 : Incorrectly sized paper has been used. Side Cover
401 : Multiple sheets of paper were fed through together. Side Cover
Errors in the 6xx range are User Clearable Errors. These errors indicate locations where paper
remains in the printer after a jam. These errors do not reference the actual jam, which is
referenced by 3xx errors.
631: Tray 1 Side Cover
632: Tray 2 Side Cover
633: Tray 3 Side Cover
634: Tray 4 Side Cover
635: Tray 5 Side Cover
637: MP Tray Side Cover
638: Paper Transport Path (Transfer Belt)
639: Paper Exit Path
640: Duplex Entry Path
641: Duplex Reversal Path
642: Duplex Transport Path
643: Finisher: Input Area
644: Finisher: Saddle Transport Path
645: Finisher Paper Stack Eject
646: Saddle Stack Eject
647: Inverter: Paper Eject
648: Inverter: Reverse Stacker Area
649: Inverter: Input Area
4.2
Jam Troubleshooting
370: Paper Jam
Condition Paper jam 370 occurs when the paper is inverted for double-sided printing.
1. The DUP-IN1 sensor does not change to OFF-state within the predefined time after it changed to ON-state.
2. The DUP-IN2 sensor does not change to ON-state within the predefined time after the DUPIN1 sensor changed to ON-state.
3. The DUP-R sensor does not change to ON-state after the paper was inverted in the duplex unit.
The printer stops printing immediately when the jam occurs.
Cause
1. Transport rollers cannot transport paper because they have become dirty with paper dust, toner, etc.
2. A piece of paper, foreign substance, etc., has got stuck in the DUP-IN1, 2 or DUP-R sensor lever.
3. DUP-IN1, 2 or DUP-R sensor motion failure
How to remove the jammed paper
Open the duplex cover - Remove all the sheets that have jammed - Close the duplex cover.
If you have been performing continuous printing, some paper may still remain in
other areas. After opening and closing the cover, if other error code is displayed,
follow the jam clearance method of that code.
Check Points
Open the duplex unit cover and check the following areas and clean them.
371: Paper Jam
Condition Paper jam 371 occurs when paper jams in the middle area of the duplex unit.
1. The DUP-R sensor does not return to OFF-state within the predefined time after it changed to ON-state.
2. The DUP-F sensor does not change to ON-state within the predefined time after the DUP-R sensor changed to ON-state.
3. The DUP-F sensor does not return to OFF-state within the predefined time after it changed to ON-state.
The printer stops printing immediately when the jam occurs.
Cause
1. Transport rollers cannot transport paper because they have become dirty with paper Dust, toner, etc.
2. A piece of paper, foreign substance, etc., has got stuck in the DUP-R or DUP-F sensor lever.
3. DUP-R or DUP-F sensor motion failure
How to remove the jammed paper
Open the duplex cover - Remove all the sheets that have jammed - close the duplex cover.
Pull out the duplex unit - Pull the lever at the right side of the duplex open - Hold the two levers and slowly pull out the
duplex unit until it stops - Open the cover in front by grabbing the knob and remove the jammed paper - Open the inside
cover in the same manner and remove the jammed paper if any -Return the covers (2) to the original positions and the duplex
unit to the printer.
Return the covers (2) to the original positions and the duplex unit to the printer. If you have been performing continuous
printing, some paper may still remain in other areas. After opening and closing the cover, if other error code is displayed,
follow the jam clearance method of that code.
Check Points
Pull out the duplex unit and check the following areas and clean/inspect them.
Hold the two levers and slowly pull out the duplex unit until it stops. - Continue to pull it out slowly while lifting it slightly
Frequent Jams: Check the inside of the duplex unit and clean the rollers
the paper path. Check for smooth operation of the sensor arms
Check for a piece of paper or foreign substance in
Jam indication though there seems to be no jammed paper: Check for a piece of paper or foreign substance in the DUP-R and
DUP-F sensor Check for smooth operation of the sensor arms
372:Paper Jam
Condition Error 372 occurs when paper jams in the front area of the duplex unit.
1. The IN2 sensor does not change to ON-state within the predefined time after paper has exited from the duplex unit.
The printer stops printing immediately when the jam occurs.
Cause
1. Transport rollers or registration rollers cannot transport paper because they have become dirty with paper dust, etc.
2. A piece of paper, foreign substance, etc., got stuck in the IN2 sensor lever.
3. IN2 sensor motion failure
How to remove the jammed paper
Open the tray1 side cover - Pull the jammed paper in the direction shown - Close the tray1 side cover
Pull the opener and open the side cover - Remove the jammed paper and close the side cover.
Pull out the duplex unit - Pull the lever at the right side of the duplex unit open - Hold the two levers and slowly pull out the
duplex unit until it stops
Continue to pull it out slowly while lifting it slightly - Remove all the sheets that have jammed
If you have been performing continuous printing, some paper may still remain in other areas. After opening and closing the
cover, if other error code is displayed, follow the jam clearance method of that code.
Check Points
Pull out the duplex unit and check the following areas and clean them.
Hold the two levers and slowly pull out the duplex unit until it stops - Continue to pull it out slowly while lifting it slightly.
Frequent Jams: Check the inside of the duplex unit and clean the rollers Check for a piece of paper or foreign
substance in the paper path. Check for smooth operation of the sensor arms
Jam indication though there seems to be no jammed paper:
Check for a piece of paper or foreign substance in the DUP-R and DUP-F sensor. Check for smooth operation of the sensor arms
373: Paper Jam
Condition Paper jam 373 occurs when the paper is inverted for double-sided printing.
1.
The DUP-IN2 sensor does not change to OFF-state within the predefined time after the DUP-R sensor changed to ON-state.
The printer stops printing immediately when the jam occurs.
Cause
1. Transport rollers cannot transport paper because they have become dirty with paper dust, toner, etc.
2. A piece of paper, foreign substance, etc., has got stuck in the DUP-IN2 sensor lever.
3. DUP-IN2 sensor motion failure
How to remove the jammed paper
Open the duplex cover - Remove all the sheets that have jammed - Close the duplex cover.
Check Points
Open the duplex unit cover and check the following areas and clean them.
380: Paper Jam
Condition Paper jam that occurred while the paper was being transported by the registration roller after it was hopped normally.
1. The IN2 sensor does not change to ON-state within the predefined time after the registration roller started to rotate.
2. The WR sensor does not change to ON-state within the predefined time after the IN2 sensor changed to ON-state.
3. When the printer is turned on or the cover is opened and closed, IN1 or 2 is ON-state.
The printer stops printing immediately when the jam occurs.
Cause
1. Registration rollers cannot transport paper because they have become dirty with paper dust, toner, etc.
2. A piece of paper, foreign substance, etc.
How to remove the jammed paper
Open the tray1 side cover - Pull the jammed paper in the direction shown - Close the tray1 side cover
Pull the opener and open the side cover - Remove the jammed paper and close the side cover.
If you have been performing continuous printing, some paper may still remain in other areas. After opening and
closing the cover, if other error code is displayed, follow the jam clearance method of that code.
Check Points
Open the tray1 side cover and the side cover, and check the following areas and clean them.
381: Paper Jam
Condition Paper jam has occurred while the paper was being transported by the registration roller, the belt unit or the fuser.
1. The EXIT sensor does not change to ON-state within the predefined time after the WR sensor changed to ON-state.
2. The IN2 sensor does not return to OFF-state within the predefined time after the IN1 sensor returned to OFF-state.
3. The WR sensor does not return to OFF-state within the predefined time after the IN2 sensor returned to OFF-state.
The printer stops printing immediately when the jam occurs.
Cause
There are several possible causes for this problem.
2.1 Registration rollers cannot transport paper because they have become dirty with paper dust, toner, etc., and this causes the
paper to slip.
2.2 A piece of paper, foreign substance, etc., has got stuck in the IN2, WR or EXIT sensor lever.
2.3 IN2, WR or EXIT sensor motion failure
2.4 Belt unit or the fuser unit is not transporting the paper.
How to remove the jammed paper
Open the top cover - Push the blue lever of the basket handle to release the lock of the basket - Pull up the basket
Remove all the sheets that have jammed - Pull up the fuser’s blue levers (both sides) and remove the jammed paper in the
direction indicated by the arrow.
Pull down the basket and confirm that the basket is locked, and then close the top cover.
If you have been performing continuous printing, some paper may still remain in other areas. After opening and closing the
cover, if other error code is displayed, follow the jam clearance method of that code.
Check Points
Open the side cover, and check the following areas and clean them.
Jam indication though there seems to be no
jammed paper:
Check for a piece of paper or foreign
substance in the IN1 or 2 sensor.
Check if the IN1 or 2 sensor arm moves
up and down smoothly.
Frequent Jams:
Check the registration roller and clean
thoroughly.
Check for a piece of paper or
foreign substance in the paper path.
382: Paper Jam
Condition Jam near the fuser unit
1. The EXIT sensor does not return to OFF-state within the predefined time after it changed to ON-state.
The printer stops printing immediately when the jam occurs.
Cause
1. Fuser unit is not transporting paper.
2. A piece of paper, foreign substance, etc., got stuck in the EXIT sensor lever.
3. EXIT sensor motion failure
How to remove the jammed paper
Open the top cover - Push the blue lever of the basket handle to release the lock of the basket - Pull up the basket
Remove all the sheets that have jammed - Pull up the fuser’s blue levers (both sides) and remove the jammed paper in the direction
indicated by the arrow.
Press up the lock lever in the direction of arrow - Take out the fuser. Pull up the fuser’s blue levers (both side) and remove the
jammed paper – remove paper from the exit area
If you have been performing continuous printing, some paper may still remain in other areas. After opening and closing the cover, if
other error code is displayed, follow the jam clearance method of that code.
Check Points
Open the exit side cover, and check the following areas and clean them. Open the Face-up Stacker - Open the exit side cover.
Frequent Jams Check the inside of the exit side cover and rollers and clean thoroughly Check for a piece of paper or foreign
substance in the paper path. If jamming issues continue replace the fuser
383 : Paper Jam
Condition Paper jam in the fuser or near the entrance to the duplex unit
1.
The DUP-IN1 sensor does not change to ON-state within the predefined time after the Exit sensor changed to ON-state.
The printer stops printing immediately when the jam occurs.
Cause
1. Paper path switch separator does not work.
2. A piece of paper, foreign substance, etc., got stuck in the DUP-IN1 sensor lever.
3. DUP-IN1 sensor motion failure
How to remove the jammed paper
Open the duplex cover - Remove all the sheets that have jammed - Close the duplex cover.
Remove all the sheets that have jammed - Pull up the fuser’s blue levers (both sides) and remove the jammed paper in the
direction indicated by the arrow.
If you have been performing continuous printing, some paper may still remain in other areas. After opening and closing the cover,
if other error code is displayed, follow the jam clearance method of that code.
Check Points
Open the duplex unit cover and check the following areas and clean them.
Frequent Jams Check if there is a piece of paper or foreign substance in the DUP-IN1 sensor. Check if the DUP-IN1 sensor
moves up and down smoothly. Check the white lever operation.
384: Paper Jam
Condition Jam near the exit area
1.
When the printer is turned on, or the cover is opened and closed, Job-Off sensor has changed to ON-state.
The printer stops printing immediately when the jam occurs.
Cause
1. Transport rollers cannot transport paper because they have become dirty with paper Dust, toner, etc.
2. A piece of paper, foreign substance, etc., got stuck in the Job Off sensor lever.
3. The Job Off sensor motion failure
How to remove the jammed paper
Open the top cover - Check if there is a piece of paper or foreign substance near the Job Off sensor.
Open the Face-up Stacker - Open the exit side cover
Check Points
Open the exit side cover, and check the following areas and clean them.
Frequent Jams Check the inside of the exit side cover and rollers and clean thoroughly Check for a piece of paper
or foreign substance in the paper path
390: Paper Jam
Condition This is a Multi Purpose Tray mis-feed.
1. Even after the printer tries hopping operation three times, MPT HP sensor does not change to ON-state.
2. Even after the printer tries hopping operation three times, IN2 sensor does not change to ON-state, then, OFF-state.
The printer stops printing immediately when the jam occurs.
Cause
1. Hopping roller or Registration roller cannot transport paper because they have become dirty with paper powder, etc.
2. A piece of paper, foreign substance, etc., got stuck in the IN2 or MPT HP sensor lever.
3. IN2 or MPT HP sensor motion failure
How to remove the jammed paper
Remove the paper that was not loaded, in the direction shown - Remove all the paper from the Multi Purpose Tray,
then, align edges and reset them in the Multi Purpose Tray.
If you have been performing continuous printing, some paper may still remain in other areas. After opening and
closing the cover, if other error code is displayed, follow the jam clearance method of that code.
Check Points
Frequent Jams:
Check if the Hopping rollers are dirty/need replacement
Open the side cover - Open the paper supporter - Slide the paper guide to the center
Lift the white lever of the arm (left side) that supports MP Tray.
Lift MP tray slightly with left hand, move the lever inward with right hand, and free it.
Free the lever on the right in the same manner as above - Lift the cover toward the printer main unit - Slide the paper guide
to the outside.
Put finger in the hole under the roller and open the and clean or replace the three rollers
Close the cover - Slide the paper guide to the center - Return cover to the original position.
While lifting MP tray, insert the white lever in the arm that supports MP tray, and lock it by lowering the white lever. (Both sides)
Move the paper guide outward, close the paper supporter, and close the MP tray.
Frequent Jams:
Check if there is a piece of paper or foreign substance in the IN2 sensor. Check if IN2 sensor moves up
and down smoothly.
391, 392, 393, 394, Paper Jam
Condition Paper has misfed from Tray 1, 2, 3, 4.
1. Even after the printer tries hopping operation three times, Tray 1 to 4HP sensors do not change to ON-state.
2. The IN1 sensor does not return to OFF-state within the predefined time after the tray1 to 4 HP sensor changed to OFF-state.
(Error391:Tray1) (Error392:Tray2) (Error393:Tray3) (Error 394:Tray4)
The printer stops printing immediately when the jam occurs.
Cause
1. Hopping roller cannot transport paper because they have become dirty with paper dust, toner, wear, etc.
2. A piece of paper, foreign substance, etc, got stuck in IN1 or tray1 to 4 HP sensor lever.
3. IN1 or tray1 to 4 HP sensor motion failure.
How to remove the jammed paper
Open the tray1 side cover - Pull the jammed paper in the direction of the arrow - Close the tray1 side cover.
Pull out the tray - Remove the paper - Return the tray to the original position.
If you have been performing continuous printing, some paper may still remain in other areas. After opening
and closing the cover, if other error code is displayed, follow the jam clearance method of that code.
Check Points
Frequent Jams: Remove the tray and clean or Replace the hopping rollers (3). Check if the paper guide of the tray is
correctly set (if it matches the paper size). Fan paper well and align the edges, then, set them in the tray.
Pull out the tray - Open the side cover - Clean or replace the rollers.
400: Paper Size Error / 401: Multiple sheet feed error
Condition Error indicating that the detected size is not the specified size. The printer ejects the paper, then, displays the error.
* Error 401 may occur along with Error 400 when the paper is fed from the tray.
Cause
There are several possible causes for this problem.
1. Hopping roller or Registration roller cannot transport paper because they have become dirty with paper dust, etc.
2. A piece of paper, foreign substance, etc., has got stuck in the IN1 or IN2 sensor lever.
3. IN1 or IN2 sensor motion failure.
4. Sheets are sent stuck together due to large friction (due to static charge, etc) (Multi feeding).
How to remove the jammed paper
1. If Error 400 or 401 occurs by itself, paper is ejected. So there’s no need to remove the paper. Open/close the top cover.
Check Points
Frequent Error 400/401 Remove the tray and clean / replace the hopping rollers (3). For instruction on how to clean MP
tray’s HP rollers, see Error 390. Check to ensure the paper guides of the tray are correctly set (if it matches the paper size).
Open the tray1 side cover and the side cover, and check the following areas and clean them. Fan paper well and align the
edges, then, set them in the tray.
Pull out the tray - Open the side cover - Clean or replace the rollers.
Check Paper Guides
Jam indication though there seems
to be no jammed paper:
Check for a piece of paper or
foreign substance in the IN1 or 2
sensor.
Check if the IN1 or 2 sensor arm
moves up and down smoothly.
Frequent Jams:
Check the registration roller and
clean thoroughly.
Check for a piece of paper or
foreign substance in the paper path.
Chapter 5
Troubleshooting Self Diagnostic Codes
5.1
Self Diagnostic Error Codes (Printer)
Code
001 to 007
Cause/Description
Remedy
CPU Exception
001 = ASP PCB Key Chip Error
002 = Unauthorized HDD Copy
003 = Unauthorized Software Configuration
004 = EEPROM Missing
Power Off/On.
Replace Fiery PCB
(must move EEPROM to new board)
025
CU Font ROM Hash Error
Re-mount Slot B Rom DIMM / Replace Slot B Rom DIMM
Replace Fiery PCB (must move EEPROM to new board)
030
CU Resident RAM Check Error
Replace Fiery PCB (must move EEPROM to new board)
031
CU Slot 1 DIMM RAM Check Error
Re-mount RAM DIMM / Replace RAM DIMM
Replace Fiery PCB (must move EEPROM to new board)
032
CU Slot 2 DIMM RAM Check Error
Re-mount RAM DIMM / Replace RAM DIMM
Replace Fiery PCB (must move EEPROM to new board)
036
Slot 1 RAM Speed Error. Specification of
DIMM in CU RAM Slot is Unsupported
Use a Standard RAM DIMM / Re-mount RAM DIMM
Replace RAM DIMM Replace
Fiery PCB (must move EEPROM to new board)
037
Slot 1 RAM Sped Error. Specification of
DIMM in CU RAM Slot is Unsupported
Use a Standard RAM DIMM / Re-mount RAM DIMM
Replace RAM DIMM
Replace Fiery PCB (must move EEPROM to new board)
040
CU EEPROM Error
Replace EEPROM
Replace Fiery PCB (must replace EEPROM)
041
CU FLASH Error
CU PCB FLASH ROM Error
Replace EEPROM
Replace Fiery PCB (must replace EEPROM)
File Flash System Error
CU PCB FLASH ROM Error
Replace Fiery PCB (must replace EEPROM)
048
PS + PCL Model CU ROM is Mounted on a Non-PS
Model Unit
Replace Program ROM DIMM / Replace with Standard
Program ROM DIMM For that Model
049
CU Type Mismatch.
CU ROM Model Mismatches Unit
Replace Program ROM DIMM / Replace with Standard
Program ROM DIMM for that Model
050
Operator Panel Error
See “General Troubleshooting” and
“ Control Panel Communication Failure”
051
CU Fan Error
CPU Cooling Fan Abnormal
See “Fiery Controller Fan Failure”
042 to 045
Self Diagnostic Error Codes (Printer)
Code
Cause/Description
Remedy
052
Image Processor Driver Error
Replace Fiery PCB (must replace EEPROM)
060
Parallel Interface Driver Error
Replace Fiery PCB (must replace EEPROM)
062
USB Drive Error
Replace Fiery PCB (must replace EEPROM)
063
Network Communication Error
Check Connections
Replace Network PCB if applicable
Replace Fiery PCB (must replace EEPROM)
070
CANT_HAPPEN PS Firmware Abnormality Detection
Replace Fiery PCB (must replace EEPROM)
072
Engine Board Communication Error
Error Between Fiery Control Board and Engine Board
See
“Fiery Controller to Engine Board Communication Failure”
Video Overrun Detected
Check Connections
Replace Fiery PCB (must replace EEPROM)
081
Parameter Match Check Error
If Condition Does Not Change
Replace Fiery PCB (must replace EEPROM)
096
Finisher Un-restorable Error. For sub codes see
Self Diagnostic Error Codes (Finisher)
See “Finisher Interface Error”
097
Inverter Power Supply Error
See “Inverter Power Supply Failure”
Error Detected in Engine Read/Write at Power On
See “Engine Control Board Failure”
103
Error Detected in Engine SRAM Read/Write at
Power On
See “Engine Control Board Failure”
104
Error Detected in Engine EEPROM Test at Power On
See “Engine Control Board Failure”
105
Error Detected in Engine EEPROM Presence at
Power On
See “Engine Control Board Failure”
106
Error Detected in Engine Control Logic
See “Engine Control Board Failure”
073 to 075
102
Self Diagnostic Error Codes (Printer)
Code
111 to 117
Cause/Description
Remedy
An Optional Unit for Another Model is Detected
111 = Duplex 112 = 2nd Tray 113 = 3rd Tray
114 = 4th Tray 115 = 5th Tray 116 = Finisher
117 = Inverter
Install Option / Check Connections
Replace Engine Control Board
Low Voltage Power Fan Error
See “Power Supply Fan Failure”
123
Environmental Sensor Error
See “Environmental Sensor Failure”
124
Environmental Sensor Error
See “Environmental Sensor Failure”
125
MT Home Position Detection Error
See “MT Home Position Detection Error”
126
Sensor Dew Error
Wait for Printer to Acclimate to Environment
Turn On Power. See “Environmental Sensor Failure”
127
Fuser Cooling Fan Error
See “Fuser Fan Failure”
128
Engine Fan Motor Error
01 = Fuser Fan 02 = Power Fan 03 = PU Motor Fan
04 = Belt Fan 05 = ID Fan 06 = Top Cover Fan
See “Fan Failure”
121
131 to 134
See “Unsupported ROM”
LED Head Error
131 = Y Head 132 = M Head
133 = C Head 134 = K Head
See “Cyan, Magenta, Yellow, Black LED Failure”
Color Up / Down Error
See “Color Up/Down Error”
144 to 147
Toner Feed Switch Error. Toner Lock Lever Open Error
144 = Y ID 145 = M ID 146 = C ID 147 = K ID
See “Toner Feed Switch / Toner Lock Lever Error”
150 to 153
The ID Unit Fuse Can not Be Cut
150 = Y 151 = M 152 = C 153 = K
See “Fuse Cut Error C, M, Y, K Imaging Drum Unit”
154
The Belt Unit Fuse Can not By Cut
See “Fuse Cut Error (Transfer Belt Unit)”
155
The Fuser Unit Fuse Can not Be Cut
See “Fuse Cut Error (Fuser)”
Toner Sensor Detection Error
160 = Y
161 = M 162 = C
See “Toner Sensor Detection Error”
142
160 to 163
164 = Black
Self Diagnostic Error Codes (Printer)
Code
Cause/Description
167 to 169
167 = Thermistor Slope error
168 = Compensation Thermistor Error
169 = Upper Side Thermistor Error
170 to 176
Fuser thermistor Short Circuit / Open Circuit
High Temperature / Low Temperature
179
180 to 186
Remedy
See “Fuser Failure”
See “Fuser Failure”
Wrong Fuser Installed
Install Correct Fuser / Replace The Fuser
See “Fuser Mismatch Error”
Communication Error
180 = Envelope Feeder 181 = Duplex 182 = 2nd Tray
183 = 3rd Tray 184 = 4th Tray 185 = 5th Tray
186 = Finisher
Install Option / Check Connections
Replace Engine Control PCB
See “Tray 1, 2, 3, 4 Communication Errors”
187
Communication with Control Panel Error
188
Sub CPU I/F Error
189
Inverter Unit I/F Error
190
System Memory Overflow
Replace Fiery PCB (must replace EEPROM)
PU Firmware Download Error
See “Engine Control Board Failure”
200 to 202
209
203 to 208
210 to 214
See “General Troubleshooting” and
“ Control Panel Communication Failure”
Check Connection of the Motor Driver Board.
Replace the Motor Driver Board / Engine Control Board
See “Inverter Unit Interface Failure”
Custom Media Table Download Error
CU Program Error
0xFOC Error 0xFOD Error
0xFFE Error
0xFFF Error
Write Down the 24 Digit Number
Check Connection of the CU PCB
220
Print Statistic Mismatch
HDD was Removed or Print Statistic Set to On
Re-install Original HDD
230
RFID Reader Not Installed
Check Connections. Replace the RFID Relay Board
Replace the Engine Board.
231
RFID Reader I/F Error
Check to Confirm that the Number of the RFID Tags is
Correct. Check Connections. Replace Engine Control
Board.
240 to 245
247, 248
Engine Program Memory Error
240 = Flash Memory Hardware
241 = Duplex Flash Memory
243 = Tray 3 Flash Memory
244 = Tray 4 Flash Memory
245 = Tray 5 Flash Memory
247 = Sub CPU Flash Memory
248 = Inverter Flash Memory
See “Engine Board Flash Memory Error”
Self Diagnostic Error Codes (Printer)
Code
Cause/Description
Remedy
310
The Printer Engine Top Cover is Open
See “Top Cover Open Error”
320
Fuser Unit is Detected as Missing
See “Fuser Unit Detected as Missing”
321
Motor Overheated
See “ Motor Overheating Error”
Open Cover Paper Thickness Error
Check / Clean Sensor
Belt Missing Error
See “ Error in Transfer Belt”
323 to 326
330
340 to 343
ID Unit Missing Error
340 = Y 341 = M 342 = C
343 = K
350 to 353
ID Unit Life Error
350 = Y 351 = M
353 = K
See “C, M, Y, K Image Drum Unit Failure”
See “ ID Unit Life Error”
352 = C
354
Fuser Life Error
See “Fuser Life Error”
355
Belt Life Error
See “Belt Life Error”
360
Double Side Printer Unit Error
See “ Unsupported Duplex ROM Error”
370 to 372
Duplex Paper Jam
Check Sensor / Connections
See “Jam Troubleshooting Section”
380 to 383
Paper Jam Error
380 = Cassette Areas
381 = Between Black ID and Fuser
382 = Between Fuser and Delivery
383 = Duplex
Check Sensor / Connections
389 to 395
Paper Jam Error
Check Sensor / Connections
See “Jam Troubleshooting Section”
400
Paper Size Error
Adjust Paper Guides
Check / Replace Paper Size PCB
See “General Troubleshooting”
410 to 413
Toner Out Error
410 = Y 411 = M
See “Jam Troubleshooting Section”
See “Toner Out Error”
412 = C
413 = K
Self Diagnostic Error Codes (Printer)
Code
Cause/Description
Remedy
480
Paper Output Stacker Full Error
Check Sensor / Connections
Check / Replace stacker Full Sensor
490
MP Tray Out of Paper Error
Check Sensor / Connections
Check / Replace Sensor
491 to 495
Replace
Fuser
Tray Out of Paper Error
491 = Tray 1 492 = Tray 2
494 = Tray 4 495 = Tray5
493 = Tray 3
Check Sensor / Connections
Check / Replace Sensor
Fuser Counter Exceeds Life
Check Fuser Unit Life
Replace Fuser Unit
Tray Paper
Almost
Finished
Paper Near End Detection Error
Check Sensor / Connections
Check / Replace Sensor
Disk
Operation
Error
Can not Write to Hard Drive
Replace Hard Drive
910 to 914
GDDC Error / Tray Motor Error
910 = Tray 1 911 = Tray 2 912 = Tray 3
913 = Tray 4 914 = Tray5
Check Sensor / Connections / Replace Motor
See “Tray 1, 2, 3, 4 Communication Errors”
917
Belt Slit Sensor Error
Check Belt Unit is Turning. Check Sensor / Connections
See “Error in the Transfer Belt”
918
Duplex Fan Error
Check / Re-install Duplex Unit. Check Connections
See “Duplex Fan Failure”
919
Abnormal 24V to the Duplex
Check / Re-install Duplex Unit. Check Connections
See “ Duplex Interface Failure”
920 to 923
Drum Lock Error
920 = Y 921 = M
924 to 927
Abnormal Voltage Detection Cassette Error
924 = Tray 2 925 = Tray 3 926 = Tray 4
Check Sensor / Connections
See “ Tray 1, 2, 3, 4 Communication Errors”
928
Fuser Motor Lock Error
Check / Re-install Fuser Unit
Replace the Fuser Unit
Replace the Fuser Motor
929
Waste Toner Transfer Motor Lock Error
Check Waste Toner Unit Operation
Replace the Waste Toner Motor
922 = C
923 = K
Check / Re-install Drum Unit
Replace the Drum Unit
Replace the Drum Motor
Self Diagnostic Error Codes (Printer)
Code
930
931 to 935
940
Cause/Description
Remedy
Sub CPU Clock Frequency Error
Check Connections of the Engine PCB (S2M)
Replace the Engine PCB
Clock Frequency Error
931 = Duplex
932 = Inverter
933 = Tray 2
934 = Tray 3
935 = Tray 4
Check Sensor / Connections
Replace for:
931 = V72-2 Board (Duplex Control Board)
932 = V72-3 (Inverter Control Board)
933 to 935 = V72-1 (Hi Cap Feeder Control Board)
Waste Toner Transfer Error
Check that Basket Assembly is in Position
Check Holder Magnet D
Check / Replace Hall IC PCB
Replace Duct Assembly
Self Diagnostic Error Codes (Scanner/ADF)
Code
Cause/Description
Remedy
Lamp
Blink
Sense
Key
0A980
SDRAM Test Error (Flatbed)
Replace Scanner Control Board
1
4
0A980
SDRAM Test Error (ADF)
Replace Scanner Control Board
2
4
ARM7 SDRAM
Replace Scanner Control Board
3
4
A/D Dark Calibration Error(Flatbed)
Flatbed Lamp Error
Replace Flatbed Lamp
Replace Scanner Control Board
4
4
A/D Dark Calibration Error(ADF)
ADF Lamp Error
Replace Duplex Side of ADF Lamp
Replace Scanner Control Board
5
4
Home Position Sensor Error
Flatbed Motor Error
Check / Replace Home Position Sensor
Check / Replace Flatbed Scanner Motor
Replace Scanner Control Board
6
4
Lamp Check Error (Flatbed)
Replace Flatbed Lamp
7
4
Lamp Check Error (ADF)
Replace ADF Lamp
8
4
See
Lamp
Blink
See
Lamp
Blink
See
Lamp
Blink
See
Lamp
Blink
See
Lamp
Blink
See
Lamp
Blink
SDRAM Failure
Self Diagnostic Error Codes (Finisher)
Code
Cause/Description
Remedy
090
Finisher Stapler Error
See Finisher Service Manual
091
Finisher Tray Elevator Error
See Finisher Service Manual
092
Finisher Bin 2 Exit Belt Motor Error
See Finisher Service Manual
093
Finisher Jogging Motor Error
See Finisher Service Manual
094
Finisher Main Feed Motor Error
See Finisher Service Manual
Paper Eject Motor Error
Check All Connections
Check / Replace Motor
Replace Finisher Control PCB
096-02
Tray Raise / Lower Error
* Replace Shift Motor & Finisher Controller as a set.
Check / Clean / Replace Upper Limit Sensor
Check / Replace Shift Motor
Check / Replace Finisher Control PCB
096-03
Aligning Motor Error
Check / Clean / Replace Alignment Sensor
Check / Replace Alignment Motor
Check / Replace Finisher Control PCB
096-04
Staple Motor Error
Check Stapler Movement / Connections
Check Stapler Home Position Sensor
Replace Motor / Sensor
Batch Processing Motor Error
Check Delivery Belt
Check Paper ejection Belt
Check Belt Home Position Sensor
096-06
Stapler Unit Feed Motor Error
Check Slide Motor
Check Home position Sensor
096-07
Paddle Motor Error
Check
Check
Check
Check
096-08
Folding Sensor Error
See Finisher Service Manual
Backup RAM Data Error
Check All Connections
Check / Replace Interface Cable
Replace Finisher Control PCB
Replace Engine PCB
096-10
Punch Horizontal Sensor Error
Check / Replace Sensor
096-11
Punch Debris Sensor Error
Check / Replace Sensor
Punch Motor Error
Check / Replace Punch Motor Home position Sensor
Check / Replace Punch Motor
096-0B
Punch Feed Motor Error
Check / Replace Punch Feed Motor
Home Position Sensor
096-0C
Punch Interface Error
Check Connections
096-0D
Punch Power Failure Error
24V missing from Finisher Controller
Replace Finisher Controller
Replace Punch Controller
096-01
096-05
096-09
096-0A
097
186
Inverter Power Supply Error. 24V not detected
Interface Error
Paddle Movement
Paddle Home Position Sensor
Swing Guide Movement
Swing Guide Home Position Sensor
Check/Re-install all finisher connectors
Replace inverter Power supply
Replace Finisher Controller
Check All Connections
Check / Replace Interface Cable
Replace Finisher Control PCB
Replace Engine PCB
Self Diagnostic Error Codes (Other Codes)
Code
0101 to 0104
Cause/Description
The data stored in HDD may be corrupted
Remedy
Re-image Hard Drive with the latest version.
Step 1.
0201 to 0223
The Communication between a scanner
and a printer is disrupted
0301 to 0304
I/F Error between modules (Incorrect input value)
I/F Error between modules (Incorrect output value)
Failure in resource acquisition
Failure in memory allocation
Check all cable connections between Scanner & Printer
Replace cables between Scanner & Printer
Step 3. Re-image Hard Drive
Step 4. Replace Scanner
Step 5. Replace BY3 PCB and/or Hard Drive
Step.2
Re-image Hard Drive with the latest version.
5.2
General Troubleshooting
No Control Panel Display
Troubleshooting Procedure
Initial Actions:
1.
2.
3.
4.
Remove and reseat the Fiery Control Board.
Print an engine test print.
Replace the Fiery Control Board.
See “DC Power Supply Troubleshooting”.
Control Panel LED is on, No Control Panel Display
Troubleshooting Procedure
Initial Actions:
1.
2.
3.
4.
Remove and reseat the Fiery Control Board.
Replace the Control Panel.
Replace the Fiery Control Board.
Replace the Control Panel harness.
Printer does not Appear to Operate at Power On.
Troubleshooting Procedure
Initial Actions:
1.
2.
3.
4.
Check the wall outlet for available AC voltage.
Cycle printer power.
Check the Fiery Control Board LED’s for a fault indication.
Systematically remove all printer options to isolate a possible
problem component.
Printer Continually Displays “Warming Up” or “Initializing”
Troubleshooting Procedure
Initial Actions:
The most likely cause is that the Fiery Control Board has not
successfully loaded its NVRAM contents (instructions) into RAM. All
print engine operation halts, and will only become ready when the
Fiery Control Board successfully boots.
1.
2.
3.
4.
Check for media or debris in the paper path.
Power cycle the printer.
Replace the Fiery Control Board.
Replace the Hard Drive.
Troubleshooting AC Power Supply
Troubleshooting Procedure
Initial Actions:
1. Check the voltage at the AC wall outlet.
2. Check the power cord for defects or a loose connection.
3. Replace the Low Voltage Power Supply (LVPS).
Troubleshooting DC Power Supply
Troubleshooting Procedure
Initial Actions:
1. Perform the AC power supply troubleshooting procedure.
2. Replace the Low Voltage Power Supply (LVPS).
Troubleshooting RAM Memory Failures
Troubleshooting Procedure
Initial Actions:
Check that the RAM devices are making positive contact with their connectors.
1.
2.
3.
4.
Power off the printer.
Remove / re-install the RAM memory.
Replace the Ram Memory.
Replace the Fiery Control Board.
Paper Size Errors
Troubleshooting Procedure
Initial Actions:
The position of a multi-slotted plate, at the rear of the universal paper
tray, is set according to the position of the tray’s paper guides. Upon
installation of the tray, the plate’s position actuates the Paper Size
Switch. A Paper Size Mismatch error or Tray Missing error are
sometimes the result of a damaged or jammed Paper Size Switch. To
correct these types of errors, use the following procedure.
1. Remove the affected tray and examine the switch actuators for evidence
of damage or debris.
2. Check / move the tray to another location to see if the error follows.
3. Check the affected Paper Size Switch for damage or debris.
4. Check the size of the loaded media.
5. Check the adjustment of the paper guides.
6. Run the Switch Scan test to test the Paper Size Switches.
7. Replace the Paper Size Switch.
8. Replace the Motor Driver Board.
9. Replace the Motor Driver Board.
10. Replace the Engine Control Board.
3.3
Troubleshooting Error Codes
Fuser Failure
The Fuser temperature regulation has failed.
Error Codes that Apply
167 to 169 and 170 to 176
Initial Troubleshooting Actions to Take
1. Reseat the Fuser.
2. Cycle the printer's power.
3. Test wall Voltage
Parts of the Printer that Apply
1. Fuser
2. LVPS
3. Engine Control Board
Troubleshooting Procedure
Steps
Action Taken
1
Replace the Fuser.
Does the error persist?
2
Check the Fuser Heat Lamps.
Does the Fuser error occur after at
least 3 minutes of operation?
3
Did the Fuser warm up?
Yes
No
Go to Step 2
Complete.
Go to Step 3.
Go to Step 3.
Replace the Engine
Control Board
Replace the Fuser
Replace the LVPS
Environmental Sensor Failure
The Environmental Sensor has failed.
Error Codes that Apply
123 and 124
Initial Troubleshooting Actions to Take
1. Cycle the printer's power.
2. If the problem persists follow the procedure below.
Parts of the Printer that Apply
1. Environmental Sensor
2. Environmental Sensor Wiring
3. Engine Control Board
Troubleshooting Procedure
Steps
1
Action Taken
Test the Temp/Humidity Sensor.
1. Run the Scan Switch Test
HUM_TEMP_OHP
2. Verify proper operation by blowing
on the sensor. Is the sensor operating
correctly?
Yes
No
Replace the Engine
Control Board
Go to Step 2.
2
Replace the Temp/Humidity Sensor.
Does the error persist?
Go to Step 3.
Complete
3
Check the Environmental Sensor
Wiring. Is it properly connected and
undamaged?
Reconnect/Repair
Wiring Harness
Replace the Front
Sensor Board / Motor
Driver Board / Engine
Board in order.
Imaging Unit Motor Overheating Failure
Error Codes that Apply
321
Initial Troubleshooting Actions to Take
1. Ensure that the temperature and installation clearances of the printer are at specifications.
2. Clean all fan ducts.
3. Turn the printer off and allow a minimum of 30 minutes for cooling.
4. Restart the printer.
5. If the problem persists follow the procedure below.
Parts of the Printer that Apply
1. Imaging Unit Motors
2. Motor Driver Board
Troubleshooting Procedure
Steps
1
2
3
Action Taken
Test the cooling fans for proper
operation and adequate airflow.
Run the Motor Clutch Fan tests.
Do the fans operate correctly?
Test the Imaging Unit Motors.
Run the Service Diagnostics Imaging
Unit Motor tests.
Do the motors operate correctly?
Does this resolve the issue?
Yes
No
Go to Step 2.
Replace the defective
fan.
Replace the Motor
Driver Board
Replace the
defective motor
Complete
Replace the Engine
Board
Engine Control Board Failure
Error Codes that Apply
102 to 106 and 200 to 202
Initial Troubleshooting Actions to Take
1. Cycle the Printers Power
2. If the problem persists follow the procedure below.
Parts of the Printer that Apply
1. Engine Control Board EEPROM
2. Engine Control Board
Troubleshooting Procedure
Steps
Action Taken
Yes
No
1
Cycle power to the printer.
Does the error still appear?
Go to Step 2.
Complete
2
Perform a Factory Default Reset
Does the error still appear?
Go to Step 3.
Complete
3
Replace the EEPROM
Complete
Replace the Engine
Board.
LVPS Power Supply Failure
Error Codes that Apply
N/A
Initial Troubleshooting Actions to Take
1. Cycle the Printers Power
2. If the problem persists follow the procedure below.
Parts of the Printer that Apply
1. LVPS
Troubleshooting Procedure
Steps
Action Taken
Yes
1
Visually inspect the LVPS for damage
or excessive dust.
Is the LVPS damaged or dirty?
Clean the LVPS if dirty.
If damaged,
replace the LVPS
Check the LVPS output voltages at the
POWER connector on the Engine
Control Board.
Replace the Engine
Controller Board.
2
No
Go to Step 2.
Replace the LVPS
or
POWER harness.
Fiery Controller Fan Failure
Error Codes that Apply
051
Initial Troubleshooting Actions to Take
1. Cycle the Printers Power
2. If the problem persists follow the procedure below.
Parts of the Printer that Apply
1. Fiery Control Board Fan
Troubleshooting Procedure
Steps
Action Taken
Yes
No
1
Test the cooling fan for proper
operation and adequate airflow.
Run the Motor Clutch Fan test.
Does the fan operate correctly?
Replace the Engine
Control Board
Go to Step 2.
2
Check for +5 V to the fan. Is +5 V
present?
Replace the Fan
Replace the Fiery
Control Board
Power Supply Fan Failure
Error Codes that Apply
121
Initial Troubleshooting Actions to Take
1. Clear any obstructions from the LVPS Fan vent.
2. Cycle the printer's power.
3. If the problem persists follow the procedure below.
Parts of the Printer that Apply
1. LVPS Fan
2. LVPS
3. Engine Control Board
Troubleshooting Procedure
Steps
Action Taken
Yes
No
1
Test the LVPS Fan.
Run the Motor Clutch Test FAN POWER
Does the Fan operate correctly?
Replace the Engine
Control Board
Go to Step 2.
2
Check the LVPS Fan connection.
Is the fan securely connected?
Go to Step 3.
Reconnect the
Fan.
Replace the LVPS Fan
Replace the LVPS
3
Verify +24 volts is available to the
Fan. Disconnect the Fan and test at
connector. Is there +24 volts at the
Fan connector?
Fan Failure
Error Codes that Apply
127
Fuser Fan
128 01 Fuser Fan
02 Power Fan
05 Image Drum Fan
04 Belt Fan
03 PU Motor Fan
06 Top Cover Fan
918 Duplex Fan
Initial Troubleshooting Actions to Take
1.
2.
3.
4.
5.
Ensure that the temperature and installation clearances of the printer are at specifications.
Clean all fan ducts.
Turn the printer off and allow a minimum of 30 minutes for cooling.
Restart the printer.
If the problem persists follow the procedure below.
Parts of the Printer that Apply
1. Fan Associated with the code
2. Engine Control Board
Troubleshooting Procedure
Steps
1
2
Action Taken
Test the cooling fan for proper
operation and adequate airflow.
Run the Motor Clutch Fan test.
Does the fan operate correctly?
Does this resolve the issue?
Yes
No
Replace the Engine
Control Board
Check the Fan connection.
Complete
Replace the Fan.
Duplex Interface Failure
Error Codes that Apply
181, 919
Initial Troubleshooting Actions to Take
1. Reseat the Duplex Unit
2. Cycle the Printers Power
3. If the problem persists follow the procedure below.
Parts of the Printer that Apply
1. Duplex Unit
2. Motor Driver Board
Troubleshooting Procedure
Steps
Action Taken
Yes
No
1
Check the Duplex Unit connector for
damage. Is the connector damaged?
Replace the connector.
Replace the Duplex
Unit. If the error
persists, go to Step 2.
2
Check all pins on the DUPLEX Wiring
Harness for continuity.
Disconnect the DUPLEX Harness.
Is the DUPLEX Harness conductive?
Replace the Motor
Driver Board. If the
error persists, go to
Step 3.
Replace the DUPLEX
Harness.
3
Check all pins of the harness for
continuity. Disconnect the ribbon
cable. Is the cable conductive?
Replace the Engine
Control Board
Replace the Harness.
Tray 1, 2, 3, 4 Communication Errors
Error Codes that Apply
180
910
911
912
913
924
925
926
to 186
Tray 1 Motor Error
Tray 2 Motor Error
Tray 3 Motor Error
Tray 4 Motor Error
Tray 2 Abnormal Voltage Detection
Tray 3 Abnormal Voltage Detection
Tray 4 Abnormal Voltage Detection
Initial Troubleshooting Actions to Take
1. Cycle the Printers Power
2. If the problem persists follow the procedure below.
Parts of the Printer that Apply
1. High Capacity Feeder Control Board
2. Engine Control Board
Troubleshooting Procedure
Steps
Action Taken
1
Check the Hi Cap connector for
damage.
Is the connector damaged?
2
Check all pins on the Hi Cap Harness
for continuity.
Disconnect from the Engine Control
Board and Option connector.
Is the harness conductive?
Yes
No
Replace the connector.
Go to Step 2.
Replace the Hi Cap
Control Board. If the
error persists,
replace the Engine
Control Board
Replace the
Hi Cap Harness.
Inverter Unit Interface Failure
Error Codes that Apply
189
Initial Troubleshooting Actions to Take
1. Reseat the Finisher connections.
2. Cycle the printer's power.
3. If the problem persists follow the procedure below.
Parts of the Printer that Apply
1. Inverter Control Board
2. Finisher Power Cord
3. Engine Control Board
Troubleshooting Procedure
Steps
1
2
3
Action Taken
Check the following for evidence of
fault or damage:
Inverter Interface Cable
Inverter connections, Power Cord.
Is there any damage?
Check the Inverter connection.
Is the Inverter interface cable
securely connected at both ends?
Check all pins on the Interface
Harness for continuity.
Disconnect from the Engine Control
Board and Option connector.
Is the harness conductive?
Yes
No
Replace any damaged
parts.
Go to Step 2.
Go to Step 3.
Replace the Inverter
Control Board. If the
error persists,
replace the Engine
Control Board
Connect the
Inverter to the
Finisher.
Replace the
Interface Harness.
Cyan, Magenta, Yellow, Black LED Failure
Error Codes that Apply
131 Yellow, 132 Magenta, 133 Cyan, 134 Black
Initial Troubleshooting Actions to Take
1. Cycle the printer's power.
2. If the problem persists follow the procedure below.
Parts of the Printer that Apply
1. LED Head 2. LEDPWR harness 3. LED Relay Board 4. YK LED DATA harness
5. CM LED DATA harness 6. LED Relay Board 7. Engine Control Board
Troubleshooting Procedure
Steps
1
Action Taken
Check LED Head. Exchange the
affected LED Head with another LED
Head. Does the error move with the
LED Head?
2
Ensure the LED Head harness is
properly connected and not damaged.
Is the wiring harness defective?
3
Check harness continuity between the
LED Head and the Engine Control
Board. Is there continuity?
4
Check harness continuity between the
LED Head and the LED Relay Board.
Is there continuity?
5
6
Yes
No
Replace the LED Head.
Go to Step 2.
Reconnect or
replace the wiring
harness.
Go to Step 3.
Go to Step 4.
Replace the data
harness.
Go to Step 5.
Replace the power
harness.
Check for +5 V to the LED Relay
Board.
Replace the LED
Relay Board
Go to Step 6.
Check for +5 V at the LVPS.
Replace the Engine
Control Board
Replace the LVPS
Fuser Fan Failure
Error Codes that Apply
127
Initial Troubleshooting Actions to Take
1. Cycle the printer's power.
2. If the problem persists follow the procedure below.
Parts of the Printer that Apply
2
3
4
Fuser Fan
Fuser Fan harness
Engine Control Board
Troubleshooting Procedure
Steps
1
2
Action Taken
Test the cooling fan for proper
operation and adequate airflow.
Run the Motor Clutch Fan test.
Does the fan operate correctly?
Does this resolve the issue?
Yes
No
Replace the Engine
Control Board
Check the Fan connection.
Complete
Replace the Fan.
Fuser 110V/220V Mismatch Error
Error Codes that Apply
179
Initial Troubleshooting Actions to Take
1. Cycle the printer's power.
2. If the problem persists follow the procedure below.
Parts of the Printer that Apply
1. Fuser
2. Engine Control Board
Troubleshooting Procedure
Steps
1
Action Taken
Ensure the proper Fuser (110v vs.
220v) is installed in the printer.
Is the correct Fuser installed?
Yes
Replace the Engine
Control Board
No
Replace the Fuser.
Unsupported Duplex Unit Rom
Error Codes that Apply
360
Initial Troubleshooting Actions to Take
1. Reseat the Duplex Unit
2. Cycle the printer's power.
3. If the problem persists follow the procedure below.
Parts of the Printer that Apply
1. Duplex Unit
2. Engine Control Board
Troubleshooting Procedure
Steps
Action Taken
Yes
No
Check the following for evidence of
fault or damage:
Duplex Connector
Is there any damage?
Replace any damaged
parts.
Go to Step 2.
2
Check that the Duplex Unit is
correctly installed and fully seated.
Go to Step 3.
Reseat the Duplex
Unit
3
Check the Duplex Unit version using
the Printer Configuration Sheet
Is the version current?
Replace Engine
Control Board
if the error persists,
replace the DUPLEX
harness.
Replace the
Duplex Unit.
1
Fuse Cut Error (Fuser)
Error Codes that Apply
155
Initial Troubleshooting Actions to Take
1. Cycle the printer's power.
2. If the problem persists follow the procedure below.
Parts of the Printer that Apply
1. Fuser
2. Engine Control Board
Troubleshooting Procedure
Steps
Action Taken
1
Test the Fuser fuse.
Is the Fuse Cut?
2
Replace the Fuser. Cycle the power.
Does the error persist?
3
Check all pins of the harness between
the Fuser and Engine Control Board.
Yes
Replace the Engine
Control Board
Go to Step 3.
Replace Engine
Control Board
No
Go to Step 2.
Complete.
Replace the Harness.
Fuse Cut Error (Transfer Belt Unit)
Error Codes that Apply
154
Initial Troubleshooting Actions to Take
1. Cycle the printer's power.
2. If the problem persists follow the procedure below.
Parts of the Printer that Apply
1.
2.
3.
4.
Transfer Unit
HVPS Cover
HVPS
Engine Control Board
Troubleshooting Procedure
Steps
Action Taken
Yes
No
1
Test the condition of the fuse.
Is the Fuse cut?
Replace the Engine
Control Board
Go to Step 2.
2
Check the connections between HVPS,
HVPS Cover, and Transfer Unit.
Are the contacts clean and intact?
Install a new
Transfer Unit and
verify the fuse blows.
Clean or align contacts
as needed. If the
error persists, go to
Step 3.
3
Does the error persist?
Replace in the
following order:
HVPS Cover
HVPS
Complete
Fuse Cut Error C, M, Y, K Imaging Drum Unit
Error Codes that Apply
150 Yellow 151
Magenta
152
Cyan
153
Black
Initial Troubleshooting Actions to Take
1. Reseat the indicated Imaging Unit
2. Cycle the printer's power.
3. If the problem persists follow the procedure below.
Parts of the Printer that Apply
1. C, M, Y, K Imaging Unit
2. Imaging Unit Sensor Board
3. Engine Control Board
Troubleshooting Procedure
Steps
Action Taken
Yes
No
1
Check the affected Imaging Drum Unit
contacts for evidence of fault or
damage:
Is there any damage, debris or
corrosion?
Replace the damaged
parts.
Go to Step 2.
2
Test the Imaging Unit fuse.
Is the Fuse Cut?
Replace the Engine
Control Board
Go to Step 3.
3
Replace the affected Imaging Drum
Unit.
Does the error persist?
Replace the ID
Sensor Board
Complete
Fiery Controller to Engine Board Communication Failure
Error Codes that Apply
072
Initial Troubleshooting Actions to Take
1. Cycle the printer's power.
2. If the problem persists follow the procedure below.
Parts of the Printer that Apply
1. Fiery Control PCB
2. Engine Control Board
Troubleshooting Procedure
Steps
Action Taken
Yes
No
1
Cycle power to the printer.
Does the error persist?
Go to Step 2.
Complete
2
Reseat the Fiery Control Board to the
Engine Board.
Does the error persist?
Replace the Engine
Control Board
Go to Step 3.
3
Does the error persist?
Replace the Fiery
Control Board
Complete
Finisher Interface Error
Error Codes that Apply
096
Initial Troubleshooting Actions to Take
1. Cycle the printer's power.
2. If the problem persists follow the procedure below.
Parts of the Printer that Apply
1.
2.
3.
4.
Finisher Control Board
Finisher Interface Cable
Finisher Power cord
Engine Control Board
Troubleshooting Procedure
Steps
Action Taken
Yes
No
1
Check the following for evidence of
fault or damage:
Finisher Interface Cable/Power Cord
Finisher connections Is there any
damage?
Check the following for
evidence of fault or
damage:
Finisher Interface Cable
Finisher connections
Is there any damage?
Go to Step 2.
2
Check all the pins of the Finisher
Interface Cable for continuity.
Is the cable conductive?
Go to Step 3.
Replace the cable.
3
Replace the Finisher Control Board.
Does the error persist?
Replace the Engine
Control Board
Complete
Inverter Power Supply Failure
Error Codes that Apply
097
Initial Troubleshooting Actions to Take
1. Cycle the printer's power.
2. If the problem persists follow the procedure below.
Parts of the Printer that Apply
1.
2.
3.
4.
Inverter Power Supply
Inverter Interface Cable
Inverter Power cord
Engine Control Board
Troubleshooting Procedure
Steps
Action Taken
Yes
No
1
Check the following for evidence of
fault or damage:
Inverter Power Cord
Inverter Power Supply
Is there any damage?
Replace any damaged
parts.
Go to Step 2.
2
Check AC Power.
Is the AC voltage available at the
outlet?
Go to Step 3.
Advise customer.
3
Check the Inverter connection.
Is the Inverter interface cable
securely connected at both ends?
Go to Step 4.
Connect the
Inverter to the
Finisher.
4
Replace the Inverter Power Supply.
Does the error persist?
Replace the Inverter
Control Board.
Complete.
Control Panel Communication Failure
Error Codes that Apply
050 and 187
Initial Troubleshooting Actions to Take
1. Cycle the printer's power.
2. If the problem persists follow the procedure below.
Parts of the Printer that Apply
1. Control Panel
2. Control Panel Interface Cable
3. Engine Control Board
Troubleshooting Procedure
Steps
Action Taken
Yes
No
1
Check the Control Panel connection.
Is the Control Panel Harness
connected to the Engine Control
Board?
Go to Step 2.
Connect the Control
Panel harness,
2
Check all pins on the Control Panel
Harness for continuity.
Disconnect the harness from the
Engine Control Board and Control
Panel connectors.
Is the harness conductive?
Replace the Engine
Control Board
If the error persists,
replace the Control
Panel
Replace the harness.
Error in the Transfer Belt
Error Codes that Apply
330 and 917
Initial Troubleshooting Actions to Take
1. Cycle the printer's power.
2. If the problem persists follow the procedure below.
Parts of the Printer that Apply
1.
2.
3.
4.
Transfer Unit
Transfer Unit Motor
Belt Rotation Sensor
Engine Control Board
Troubleshooting Procedure
Steps
Action Taken
Yes
No
Go to Step 2.
Replace the
Sensor. If the error
persists, go to Step 3.
1
Test the Belt Rotation Sensor.
Run the Switch Scan test and test
the Hall IC.
Does the sensor function correctly?
2
Test the Transfer Unit Motor.
1. Close the Interlock Switches for the
test.
2. Run the Motor Clutch test to test
the Transfer Belt Motor.
Does the motor operate?
Replace the
Transfer Unit. If the
error persists, go to
Step 3.
Replace the motor. If
the error persists, go to
Step 3.
3
Check all pins on the HALL1 Harness
for continuity.
Disconnect HALL1 Harness.
Is the harness conductive?
Replace the Motor
Driver Board. If the
error persists, go to
Step 4.
Replace the HALL1
Harness.
4
Check all pins of the harness for
continuity. Disconnect the ribbon
cable.
Is the cable conductive?
Replace the Engine
Control Board
Replace the
Harness.
C, M, Y, K Imaging Drum Unit Failure
Error Codes that Apply
340 Yellow Image Drum Unit Failure
341 Magenta Image Drum Unit Failure
342 Cyan Image Drum Unit Failure
343 Black Image Drum Unit Failure
Initial Troubleshooting Actions to Take
1. Reseat the indicated Image Drum Unit
2. Cycle the printer's power.
3. If the problem persists follow the procedure below.
Parts of the Printer that Apply
1.
2.
3.
4.
4.
C, M, Y, K Imaging Drum Unit
C, M, Y, K Unit Motor
Imaging Drum Unit Sensor Board
Imaging Drum Unit Up/Down Mechanism
Engine Control Board
Troubleshooting Procedure
Steps
1
2
3
Action Taken
Check the following for evidence of
fault or damage:
Imaging Unit
Imaging Unit Drive Gears
Imaging Unit Sensor Board
Imaging Unit Lift Up/Down Mechanism
Is there any damage?
Test the Drum Phase Sensor.
Run the Scan Switch test for the
indicated Imaging Unit.
Does the sensor function correctly?
Yes
Replace any damaged
parts.
Go to Step 5
Use the Scan switch Test to check
the Imaging Unit Phase signal:
C-Drum Phase Sensor
M-Drum Phase Sensor
Y-Drum Phase Sensor
K-Drum Phase Sensor
Go to Step 4.
No
Go to Step 2.
Go to Step 3.
Replace the Imaging
Unit Sensor Board
Does the Drum Phase signal change
when the sensor is blocked?
4
Check the harness continuity.
Disconnect the Harness from the
Imaging Unit Sensor Board and from
the Engine Control Board.
Is the harness conductive?
Replace the Engine
Control Board
Replace the harness.
5
Test the indicated Imaging Unit Motor
1. Remove the affected Imaging Unit.
2. Close the Interlock Switches.
3. Run the Motor Clutch test for the
affected motor.
Does the motor function correctly?
6
Check the Up/Down Mechanism and
associated gears. See "Drive Motors"
for a description of Up/Down
Mechanism operation.
1. Access the Cyan Unit Motor.
2. Rotate the Cyan Motor manually in
both directions.
Do the gears and links function
properly?
7
Check for +24 V at the Motor Driver
Board
Go to Step 6.
Replace the motor. If
the error persists,
go to Step 6.
Replace the Cyan
Imaging Unit Motor. If
the error persists, go to
Step 7.
Replace the Up/Down
Mechanism.
Replace the Motor
Driver Board
Replace the LVPS
Engine Board Flash Memory Error
Error Codes that Apply
240 Flash memory Hardware
244 Tray 4 Flash Memory
241 Duplex Flash Memory
247 Sub CPU Flash Memory
243 Tray 3 Flash Memory
248 Inverter Flash Memory
Initial Troubleshooting Actions to Take
1. Cycle the printer's power.
2. If the problem persists follow the procedure below.
Parts of the Printer that Apply
1. Engine Control Board
Troubleshooting Procedure
Steps
Action Taken
Yes
No
1
Cycle power to the printer.
Does the error reappear?
Replace the Engine
Control Board
Complete
Unsupported ROM
Error Codes that Apply
111
Duplex Unit
112
Tray 2 Unit
116
Finisher Unit
117
Inverter Unit
113
Tray 3 Unit
114
Tray 4 Unit
Initial Troubleshooting Actions to Take
1. Reseat the Unit in Question
2. Cycle the Printers Power
3. If the problem persists follow the procedure below.
Parts of the Printer that Apply
1. Unit indicated by the Code
2. Engine Control Board
Troubleshooting Procedure
Steps
Action Taken
Yes
No
1
Check for evidence of fault or damage
to the indicated unit.
Is there damage evident?
Replace any damaged
parts
Go to step 2.
2
Check that the Unit is correctly
installed and fully seated.
3
Check the Unit version using
the Configuration Sheet.
Is the version current?
Go to Step 3.
Replace the Engine
Control Board
Reseat the Unit
Replace the indicated
Unit
Toner Sensor Detection Error
Error Codes that Apply
160 Yellow 161 Magenta
162 Cyan
163 Black
Initial Troubleshooting Actions to Take
1. Cycle the printer's power.
2. If the problem persists follow the procedure below.
Parts of the Printer that Apply
1.
2.
3.
4.
5.
Toner Cartridge
Image Drum Unit
Toner Motor
Imaging Drum Unit Sensor Board
Engine Control Board
Troubleshooting Procedure
Steps
1
2
Action Taken
Check the following for evidence of
fault or damage:
Toner Cartridge
Imaging Unit Agitator Bar
Low Toner Sensors
Is there any damage, debris or
blockage?
Test the affected Toner Motor.
1. Remove the Toner Cartridge.
2. Run the motor Clutch test to
test the Toner Supply Motor test.
Does the motor rotate?
3
Does the plunger that engages the
Agitation Bar move in and out while
the Toner Motor rotates?
4
Test the affected Low Toner Sensor.
1. Remove the CM or YK Imaging
Units.
2. Run the Scan switch test to test
the Toner Cart Sensor.
Does the sensor function correctly?
Yes
No
Replace any damaged
parts.
Go to Step 2.
Go to Step 3.
Replace the motor. If
the error persists,
replace the Motor
Driver Board
Go to Step 4.
Replace the Toner
Supply Camshafts
Replace the Engine
Control Board
Replace the
Imaging Unit
Sensor Board
MT Home Position Detection Error
Error Codes that Apply
125
Initial Troubleshooting Actions to Take
1. Cycle the printer's power.
2. If the problem persists follow the procedure below.
Parts of the Printer that Apply
1.
2.
3.
4.
MPT Home Position Sensor
Home Position Sensor Harness
Registration Motor
Engine Control Board
Troubleshooting Procedure
Steps
Action Taken
Yes
No
1
Check the MPT Lift Plate by printing a
job from MPT.
Does the Lift Plate operate correctly?
Go to Step 3.
Go to Step 2.
2
Test the Registration Motor
Run the Motor Clutch test to test
the motor.
Is the motor operating correctly?
Replace the MPT
Assembly
Replace the
Registration Motor
3
Test the MPT Home Position Sensor.
Run the Scan Switch test to test
the Sensor.
Does the sensor function correctly?
Replace the Engine
Control Board
Go to Step 4.
Check continuity of the MPT Home
Position Sensor harness. Is the wiring
harness conductive?
Replace the Engine
Control Board
Replace the
MPT Home Position
Sensor harness.
4
Toner Feed Switch Error/Toner Lock Lever Error
Error Codes that Apply
144 Yellow
145 Magenta
146 Cyan
147 Black
Initial Troubleshooting Actions to Take
1. Ensure that the Toner Cartridges are fully seated and locked into position
2. Cycle the printer's power.
3. If the problem persists follow the procedure below.
Parts of the Printer that Apply
1.
2.
3.
4.
5.
Toner Cartridge
Image Drum Unit
RFID Antenna
RFID Reader Board
Engine Control Board
Troubleshooting Procedure
Steps
1
2
3
4
Action Taken
Check for packaging material.
Is there packing materials present?
Remove the cartridge and tap it on a
hard surface to break up any
compacted toner. Reinstall the
cartridge. Does the error persist?
Check the RFID Harness continuity.
1. Remove the Top Cover.
2. Disconnect the RFID cable from the
RFID and on the Engine Control Board
Is the cable conductive?
Check the Antenna Harness
continuity.
Disconnect the connectors from the
RFID Reader Board and Antennas.
Is each harness conductive?
Yes
No
Remove the Material
Go to Step 2.
Go to Step 3.
Complete
Replace the RFID
Reader Board.
If the error persists, go
to Step 4.
Replace the RFID
Harness. If the error
persists, go to Step 4.
Replace the RFID
Antennas
Replace the damaged
Wiring. If the error
persists, Replace the
Engine Control Board. If
the error persists,
Replace the LVPS
Color Up/Down Error
Error Codes that Apply
142
Initial Troubleshooting Actions to Take
1. Cycle the printer's power.
2. If the problem persists follow the procedure below.
Parts of the Printer that Apply
1.
2.
3.
4.
Up/Down Motor
Front Up/Down Mechanism
Rear Up/Down Mechanism
Engine Control Board
Troubleshooting Procedure
Steps
1
2
3
Action Taken
Test the Up/Down Sensor.
Run the Scan Switch test to test
the Up/Down Sensor. Does the sensor
change state?
Test the Up/Down Motor.
1. Remove the Image Drum Units.
2. Run the motor Clutch test to test
the Up/Down Motor.
Does the motor rotate? Does the
Up/Down mechanism move smoothly?
Check the UP/Down Motor and
Up/Down Mechanism for Obstructions
or broken gears that would prevent
movement. Is there damage evident?
Yes
No
Go to Step 2.
Replace the Engine
Control Board
Replace the Engine
Control Board
Go to Step 3
Repair/Replace the
damaged parts.
Replace the Engine
Control Board
Top Cover Open Error
Error Codes that Apply
310
Initial Troubleshooting Actions to Take
1. Ensure that the Top Cover Latch is free of obstructions and fully closed.
2. Cycle the printer's power.
3. If the problem persists follow the procedure below.
Parts of the Printer that Apply
1. Top Cover Interlock Switch
2. HVPS
3. Engine Control Board
Troubleshooting Procedure
Steps
1
2
Action Taken
Check the following for evidence of
fault or damage:
Top Cover latch (right side)
Top Cover Interlock Actuator
Is there any damage or
misalignment?
Test the Top Cover Interlock Switch.
Run the Scan Switch test to test
the Switch.
Does the switch function correctly?
Yes
No
Replace any damaged
parts.
Go to Step 2.
Replace the Engine
Control Board
Go to Step 3.
3
Replace the Top Cover Interlock
Switch.
Does the error persist?
Go to step 4.
Complete
4
Check the switch voltage on the
HVPS. Is there +5 V across the
connector?
Go to Step 5.
Replace the HVPS
5
Check all pins on the HVOLT Harness
for continuity.
1. Disconnect the ribbon cable.
2. Check continuity of the ribbon
cable.
Replace the Engine
Control Board
Replace the Ribbon
cable.
Replace the HVPS
Fuser Unit Detected as Missing
Error Codes that Apply
320
Initial Troubleshooting Actions to Take
1. Ensure that the Fuser Latch is free of obstructions and fully engaged.
2. Cycle the printer's power.
3. If the problem persists follow the procedure below.
Parts of the Printer that Apply
1. Fuser
2. Fuser Release Sensor
3. Engine Control Board
Troubleshooting Procedure
Steps
1
2
3
Action Taken
Yes
No
Check the following for evidence of
fault or damage:
Fuser
Fuser Connector
Fuser Release Sensor
Is there any damage?
Replace any
damaged parts, and
then cycle printer
power.
Replace the Fuser. If
the error persists, Go to
Step 2.
Test the Fuser Release Sensor.
Run the Scan Switch test to test
the sensor.
Does the sensor function correctly?
Replace the Engine
Control Board
Replace the sensor. If
the error persists, go to
Step 3.
Check for +5 V to the sensor.
Is there +5 V?
Replace the sensor
harness.
ID Unit Life Error
Error Codes that Apply
350 Yellow
351 Magenta
352 Cyan
353Black
Initial Troubleshooting Actions to Take
1. Print a Configuration Page to verify remaining life.
2. Cycle the printer's power.
3. If the problem persists follow the procedure below.
Parts of the Printer that Apply
1. C, M, Y, K Imaging Unit,
2. Engine Control Board
Troubleshooting Procedure
Steps
Action Taken
Yes
No
1
Generate a Configuration Page and
check the indicated Drum Life counter
under “Supply Life”.
Does the counter indicate end of life?
Replace the Image
Drum
Replace the Engine
Control Board.
Fuser Life Error
Error Codes that Apply
354
Initial Troubleshooting Actions to Take
1. Replace the Fuser.
2. Cycle the printer's power.
3. If the problem persists follow the procedure below.
Parts of the Printer that Apply
1. Fuser Unit,
2. Engine Control Board
Troubleshooting Procedure
Steps
Action Taken
Yes
No
1
Generate a Configuration Page and
check the indicated Fuser Life counter
under “Supply Life”.
Does the counter indicate end of life?
Replace the Fuser.
Replace the Engine
Control Board.
Belt Life Error
Error Codes that Apply
354
Initial Troubleshooting Actions to Take
1. Replace the Transfer Unit.
2. Cycle the printer's power.
3. If the problem persists follow the procedure below.
Parts of the Printer that Apply
1. Transfer Unit,
2. Engine Control Board
Troubleshooting Procedure
Steps
1
Action Taken
Generate a Configuration Page and
check the indicated Belt Life counter
under “Supply Life”.
Does the counter indicate end of life?
Yes
No
Replace the Transfer
Belt.
Replace the Engine
Control Board.
Toner Out Error
Error Codes that Apply
410 Yellow
411 Magenta
412 Cyan
413 Black
Initial Troubleshooting Actions to Take
1. Replace the effected Cartridge
2. Cycle the printer's power.
3. If the problem persists follow the procedure below.
Parts of the Printer that Apply
1.
2.
3.
4.
5.
Toner Cartridge
RFID harness
RFID Reader Board
Engine Control Board
LVPS
Troubleshooting Procedure
Steps
Action Taken
Yes
No
Go to Step 2.
Correct the installation.
1
Check Toner Cartridge installation.
Are the Toner Cartridges properly
installed?
2
Replace the affected Toner Cartridge.
Does the error persist after a genuine
Oki Toner Cartridge is installed?
Go to Step 3.
Complete
3
Check all pins of the RFID Harness for
continuity. Remove the Top Cover.
Disconnect the RFID cable from the
RFID reader board and the Engine
Control Board.
Is the cable conductive?
Replace the RFID
Reader Board
If the error persists, go
to Step 4.
Replace the RFID
Harness. If the error
persists, go to Step 4.
4
Check continuity of the affected
Antenna Harness.
Disconnect the harness from
the RFID Reader Board and RFID
Antennas.
Is each harness conductive?
Replace the Engine
Control Board and then
Replace the LVPS in
that order.
Replace damaged
wiring.