1
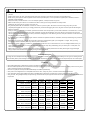
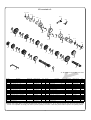
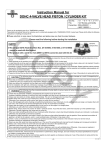
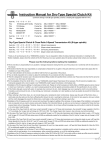
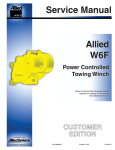
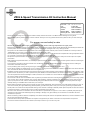
Z50J 6-Speed Transmission Kit Instruction Manual
CO
(Sport cross)
Item No.:02―04―015
Fits
Frame No.
Monkey
Z50J-1600008∼
Gorilla
Z50J-1300027∼
Monkey Baja
Z50J-1700001∼
Monkey R / RT AB22-1000017∼
о Thank you for purchasing one of our products. Please carefully read the instructions in this Manual before installing and using the Kit.
о Before installing the Kit, please be sure to check its contents. Should you have any questions about the Kit, please contact your local motorcycle dealer.
For proper use and safety’s sake
PY
о Do not use larger than 124cc engine, this transmission gear doesn't hold large displacement or higher power.
оThis product is designed for exclusive use in 4-speed manual clutch motorcycles : Monkey, Gorilla, Monkey Baja, Monkey R and Monkey RT. Please note
that this product cannot be installed onto any motorcycle with an automatic centrifugal clutch or any other type of bike.
о This product can be installed onto a stock or special clutch. Please note, however, that this product cannot be installed onto a motorcycle with our TAKEGAWA’s dry-type clutch or engine COMP because of the differences in sizes.
о The kick-starter pinion is designed to be compatible with only a B-type spindle. An A-type spindle must be replaced with a B-Type Spindle Kit of Item
No : 02-04-001. This product cannot be used without changing the A-type spindle to B-type.
о No parts for 6-speed transmission are compatible with those for 5-speed transmission. So, be sure to always use exclusive parts for 6-speed transmission.
оAfter installing the 6-speed transmission, it is necessary to adjust the final gear. Please choose the drive and driven gears to meet the mounted engine
or intended use.
о It is necessary to process the left-side crankcase of the 12V Monkey, 12V Gorilla, Monkey Baja, Monkey R and Monkey RT when installing the transmission onto these motorcycles.
Do the processing work correctly, referring to the figure. Otherwise, a mainshaft assembly as it is does not fit.
о In the case of installing onto the Monkey R or RT, it is necessary to change the neutral switch rotor. Detach a neutral switch rotor off the stock shift
drum, and install the removed neutral switch rotor to the supplied drum.
оInstallation of this Kit requires some work from removal and mounting of the engine to splitting of the crankcase. At some stages of the installation, some
special tools are required and you need to process some parts. Besides, this Instruction Manual, as well as a service manual, is prepared for those
who have acquired basic skill and knowledge. Therefore, those who are not skilled or do not have sufficient knowledge may not be able to install the
Kit correctly, leading to parts breakage.
о This instruction manual covers the installation work only after the procedures of removal of the engine for a 12V motorcycle from the body, cylinder
head, cylinder, piston, left-side crankcase cover, fly wheel, stator assembly, right-side crankcase cover, clutch assembly, primary drive and driven gears, oil pump and cam chain, with the crankcase already being split. Please do these removal and installation work properly before this stage, definitely referring to a HONDA’s service manual for your motorcycle
оPlease replace the gaskets, packings and O-rings with new ones at every disassembly. Since this Kit does not include gaskets, packings, O-rings, etc.
which are necessary for engine disassembly, please separately purchase those parts to meet your motorcycle type and engine specifications.
о Those parts to be reused must be inspected after cleaning. When the wear or damage is detected, please replace the parts with new ones. Be sure
to replace the bearing or crankcase with a new one if there is something wrong with them.
о Be sure to never use this Kit in combination with other manufacturer’s products like an engine or a clutch. There is a possibility that parts may be damaged. And we shall be held harmless against any breakage or damage of any part caused by the use of this Kit in combination with other manufacturer’s products.
о We do not take any questions about the compatibility of this Kit with motorcycles other than the specified suitable ones, or about combination of this
Kit with other manufacturer’s products.
о Instruction Manual and product specifications are subject to change without prior written notice due to the improvement to the products.
о This manual should be retained for future reference, and keep it at hand so you can refer it any time.
-1-
Jan./10/’
09
rev.Jun./20/’
11
Caution The following show the envisioned possibility of injuries to human bodies or property damage as a result of disregarding the following cautions.
・Work only when the engine is cool at below 35 degrees Celsius. If you do the work when the engine and muffler are not cool, you will burn yourself
・Prepare right tools for the work, and always tighten bolts and nuts with a torque wrench securely to the specified torque.
・Never use any other part than those supplied in this Kit and the specified parts, or never process the supplied parts. Otherwise, there is a possibility of parts breakage.
CO
・Always work with protective devices on such as dustproof glasses, a dustproof mask, and gloves.
・Make sure the motorcycle is secure on a maintenance stand on level ground during installation for safety’s sake.
(Otherwise, the motorcycle may overturn and injure you.)
・The gearshift pattern after the installation of this Kit is 1-down-5-up return system. Be sure to do the shift change only after you have
completely disengaged the clutch. If you change gears forcibly or without disengaging the clutch, the gears and other parts will be damaged, leading to accidents.
・When you start the engine with a kick starter, press down the starter arm hard just when you feel some resistance on the starter arm, or at the
time the starter pinion and rachet fit into each other. Otherwise, the gear will be damaged. And in the case of a racing motorcycle and in the case of starting the engine by moving the motorcycle forward, disengage the clutch after the gear shift, and push it forward. A violent shock to
the gear may cause it to damage.
・Do not downshift so drastically that the engine revolution exceeds the specified revolutions. Otherwise, this sharp downshifting may cause the
gear to damage.
・Before riding your motorcycle, warm up the engine first till the engine oil temperature goes up to 50 degrees C or higher. Then go driving.
The improper clearance between parts may cause the parts to break down.
・Before riding, always check every hardware for slack in parts like bolts and nuts, for abnormal sound, or for oil leakage. Besides, when you notice something unusual with your motorcycle while riding down a road, stop riding immediately, park your motorcycle in a safe place, and check what has gone wrong.
PY
・Please never use this Kit in combination with other manufacturer’s ignition-system parts because it is likely that the gear may get damaged owing to impact shock felt at the time of starting the engine with a kick starter.
Our request to you
Though we have developed and designed each tuning-up part to have a certain level of strength and durability, the wrong use or handling of them
will most likely lead to parts breakage. Therefore, you are kindly requested to use these parts with great care as special parts, not as stock parts.
Features
о The profile-shifted-gear is designed for exclusive use with a 6-speed transmission.
о We have made improvement to a shift fork itself in strength by using a forged shift fork. We taper-processed every mating surface on each gear in
order to prevent the gears from disengaging.
о The use of a guide pin has improved the maintainability and shiftfork operationality.
о This product is so designed that it is compatible with a stock clutch, heavy duty clutch, and both new and old special clutches.
о The combination of final gears makes this product compatible with a wide range of engines from normal to high-powered one.
о This gear ratio, being designed mainly for sports driving, diminishes the drop of engine revolutions at the time of shift-up, and makes best use of the
torque band.
6V motorcyle
Stock 4-speed
12V motorcycle
Stock 4-speed
TAKEGAWA's
Street 5-Speed
TAKEGAWA's
Super Street 5-Speed
TAKEGAWA's
S-Touring 5-Speed
TAKEGAWA's
Super Cross 5-Speed
TAKEGAWA's
Sports Cross 6-Speed
1-Speed
2.692
(35/13)
3.272
(36/11)
2.357
(33/14)
2.357
(33/14)
2.357
(33/14)
2.357
(33/14)
2.615
(34/13)
2-Speed
1.823
(31/17)
1.937
(31/16)
1.764
(30/17)
1.764
(30/17)
1.611
(29/18)
1.526
(29/19)
2
(32/16)
-2-
3-Speed
1.3
(26/20)
1.35
(27/20)
1.4
(28/20)
1.4
(28/20)
1.19
(25/21)
1.285
(27/21)
1.578
(30/19)
4-Speed
0.958
(23/24)
1.043
(24/23)
1.136
(25/22)
1.136
(25/22)
0.958
(23/24)
1.13
(26/23)
1.333
(28/21)
5-Speed
6-Speed
0.958
(23/24)
1
(24/24)
0.807
(21/26)
1
(24/24)
1.181
(26/22)
1.043
(24/23)
Jan./10/’
09
Kit consists of:
30
23
24
28
25
26
CO
17
18
19
21
14
5
22
21
21
27
20
34
33
8
4
33
20
33
34
12
11
29
34
6
35
PY
31
15
7
32
33
34
10
34
N
20
16
34
35
9
3
1
36
2
13
※ “N” means a normal part to be used.
Ref. No.
1
2
3
4
5
6
7
8
9
10
11
12
13
14
15
16
17
18
Description
Mainshaft (13T)
Countershaft
Gear,countershaft 1st (34T)
Gear,mainshaft 2nd (16T)
Gear,countershaft 2nd (32T)
Gear,mainshaft 3nd/4th (19T/21T)
Gear,countershaft 3rd (30T)
Gear,countershaft 4th (28T)
Gear,mainshaft 5th (22T)
Gear,countershaft 5th (26T)
Gear,mainshaft 6th (23T)
Gear,countershaft 6th (24T)
Washer,thrust,14mm (14X26X0.5)
Washer,thrust,13.5mm (13.5X26X0.5)
Washer B,thrust,17mm (17X24X0.5)
Pinion,kick starter (24T)
Fork,R.gearshift
Fork,C.gearshift
Required No.
1
1
1
1
1
1
1
1
1
1
1
1
1
1
1
1
1
1
Repair Part No.
23211-GEF-T00
23221-GEF-T00
23420-GEF-T01
23441-GEF-T01
23451-GEF-T01
23461-GEF-T00
23471-GEF-T01
23481-GEF-T01
23491-GEF-T01
23501-GEF-T00
23511-GEF-T01
23521-GEF-T00
00-02-0047
00-02-0055
00-02-0056
28211-GEF-T00
24211-181-T30
24231-181-T11
Qty
1
1
1
1
1
1
1
1
1
1
1
1
1
1
1
1
1
1
Ref. No.
19
20
21
22
23
24
25
26
27
28
29
30
31
32
33
34
35
36
Description
Fork,L.gearshift
Pin,gearshift fork guide
Clip,gearshift fork guide pin
Drum,gearshift
Plate,gearshift drum stopper
Plate,gearshift drum side
Pin,stopper plate setting
Dowel pin (4X10)
Rotor neutral switch
Stopper comp.,shift drum
Spring,shift drum stopper
Bolt,knock,6mm
Washer,plain (6X17X2.3)
Bolt,hex (6X16)
Washer,spline,17mm
Circlip,17mm
Washer S,thrust,17mm
Wrench,hex,5mm
Required No.
1
3
3
1
1
1
2
5
1
1
1
1
1
1
4
6
2
1
Repair Part No.
24221-181-T10
00-02-0048
24263-165-T00
24301-GEF-T00
24411-GEF-T01
00-02-0018
00-02-0054
00-02-0049
00-02-0028
00-02-0025
24435-GEF-T00
00-02-0013
00-02-0050
00-02-0032
00-02-0023
00-02-0005
00-02-0024
Qty
1
3
1
1
1
1
1
5
1
1
1
1
1
3
5
5
2
※Please order repair parts by indicating the Repair Part Item No. as listed above. As you see from the list, there are some parts for which
we are not in a position to accept your order in just the quantity to be used. In this case, please take the parts in the quantity packed.
-3-
Jan./10/’
09
Processing of left-side crankcase (12 V motorcycle)
Neutral switch
rotor
Ab
out
18
About 7 mm
CO
mm
Neutral switch
R
R
R
Left-side crankcase
о Peel off the gaskets on the mating surfaces of the crankcases.
If the mating surfaces are scratched or distorted, fix these portions with
an oil stone.
о Install into the crankcase the assembled set of the mainshaft,
countershaft and shift drum.
※Do above installation with the transmission in neutral, or at the position where the neutral switch and switch rotor mesh together.
※Never forget to install the thrust washer. As the stock washer is not to be
used, remove it.
※ Install the shaft with care so the lip of the countershaft oil seal will not turn up.
Kick starter spindle
PY
о Fold down the circled portion on the left-side crankcase with a plier, and
rasp the shaded portion as shown in the above figures with a file or a hand grinder.
※ Cover the bearings with a tape not to get any dirt, dust or chips into it.
※ Work with gloves on lest you should cut your hands with edges of the case.
Gearshift arm
Rasp the shaded area.
8 ∼ 7.5mm
Life size
17mm washer
Friction spring
20mm Set ring
Kick starter
pinion
20mm Set ring
Drive ratchet
17mm Washer
оRemove, from the kick starter spindle, a 17mm washer, 20mm set ring, starter drive ratchet, 20mm set ring, 20mm thrust washer and starter pinion, in this order.
о Install the supplied starter pinion onto the kick starter spindle, and
re-install the removed parts in the reverse order of removal.
Assembly and installation of transmission
о Prepare a suitable stand and place a left-side crankcase on it.
о Join together the gears of the
mainshaft and the countershaft,
and then set the shift fork in the
gear grooves.
※Apply engine oil to every gear, shift drum, shift fork and bearing.
о Attach the starter spindle to the left-side crankcase, meshing its friction
spring with grooves in the left-side crankcase.
※ Apply engine oil to the starter pinion and starter spindle.
Crankcase gaskets
Dowel pin
о Attach the crankshaft to the
left-side crankcase.
※ Apply engine oil to the ball
bearings at the ends of the crankshaft on both sides and to
the big end of the connecting rod.
о Degrease the mating surfaces
of the crankcases, and fix two
Dowel pins and new crankcase
gaskets.
-4-
Jan./10/’
09
о Put the right-side crankcase on
the left-side crankcase, and then
turn around the crankcase so the
left-side crank faces upward.
※ Take care not to split the
crankcase.
CO
Stopper arm
оPlace the spring in the stopper arm, fit them into the stopper plate
on the case, and tighten the bolt
to the specified torque.
Torque :10 N・m (1.0 kgf・m)
※Be careful not to get your fingers
caught when fitting the spring into
the case.
оInstall and tighten the crankcase
bolt diagonally in a few steps to
the specified torque.
Torque :10 N・m (1.0 kgf・m)
оInstall and tighten a shift-drum side washer with a hex bolt to the specified torque, with its round corner facing toward the
drum.
Torque :12 N・m (1.2 kgf・m)
※ Be sure to always use stock
shift-drum side washers and hex
bolts.
о Attach a rubber plug.
PY
о Turn around the crankcase so
the right-side crankcase faces upwards. And install the kick starter spring and kick spring
retainer to the starter spindle.
And fit the spring end into the case.
※Be careful not to get your fingers
caught when fitting the spring into
the case.
о Install the external circlip.
Circlip
оTurning the mainshaft with hands, rotate the dowel bolt on the stopper plate with a socket wrench, and check if the gears can be shifted smoothly.
※ Check that there is some free play in the end thrust in the mainshaft and
countershaft.
※ Do not turn the shift drum forcibly.
◎ Referring to the service manual, re-install the removed parts back in the
reverse order of removal.
о Attach five shift-drum pins and
two stopper-plate setting pins to
Pin
Shift spindle
Dowel bolt
the shift drum, and insert and
install the gear shift spindle into
the case.
※ Check the gearshift spindle for
bending, wear, damage and a loose spring. And if these
symptoms appear on the spindle,
change the spindle with a new
one.
※ Apply engine oil to the sliding surface on the shift spindle.
※ Apply grease to the left-side crankcase and lips of the oil seal
for the shift spindle.
о Install the shift-drum side plate
and shiftdrum stopper plate, meshing the holes on these plates
with the setting pin. And then,
apply thread lock cement to the
thread of the dowel bolt, and Co.,Ltd.
3-5-16 Nishikiorihigashi Tondabayashi Osaka Japan
tighten it to the specified torque.
Torque :16 N・m (1.6 kgf・m)
TEL : 81-721-25-1357 FAX : 81-721-24-5059
URL : http://www.takegawa.co.jp
-5-
Jan./10/’
09
Mainshaft assembly .
M3 (19T)
M4 (21T)
M5 (22T)
CO
M6 (23T)
Mainshaft, M1 (13T)
14mm Thrust washer
17mm Thrust washer
M2 (16T)
17mm External circlip
PY
17mm Spline washer
Countershaft assembly
C3 (30T)
C5 (26T)
C4 (28T)
C6 (24T)
C1 (34T)
C2 (32T)
Countershaft
17mm External circlip
17mm Thrust washer, S
17mm External circlip
17mm Spline washer
17mm Spline washer
13.5mm Thrust washer
17mm Spline washer
17mm Thrust washer
-6-
Jan./10/’
09