1
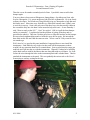
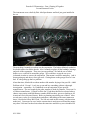
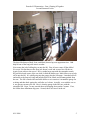
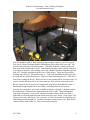
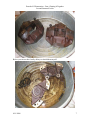
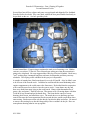
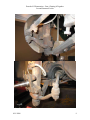
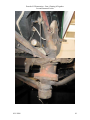
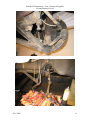
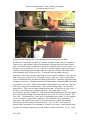
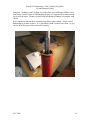
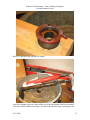
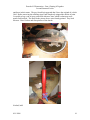
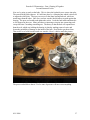
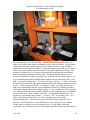
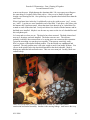
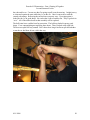
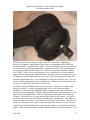
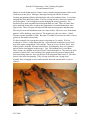
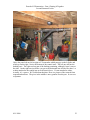
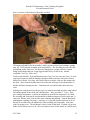
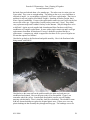
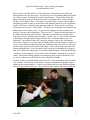
Porsche 912 Restoration – Part 4, Putting It Together
Lee and Suzanne Fowler
When we last visited the subject of 912 restoration we had gotten the car back from
Darrin and moved it into the garage. The next step was to start putting things back on the
car. Where to start! The bumpers seemed a logical choice. The new deco strips and
rubber would have to be put on the front and two rear bumpers first. Simple enough!
Wrong! You‟d think I‟d learn. The strips were not the same curvature as the bumpers
and getting the studs to mate up to the holes in the bumpers turned out to be a nightmare.
It took a while but we finally got the strips and rubber on. This required several days
effort and more than a few “wordy dirds”. The three part rear bumper (two bumpers and
middle plate) went on fairly easily. If you can call anything easy when working on a
Porsche! Next up is the front bumper. There are two “Y” shaped brackets that attach to
the inside of the bumper with four bolts. Then those two brackets are attached to the
body with six bolts. Nothing could be simpler. Wrong! The “Y” end, which is attached
to the bumper, has holes that are bigger than the bolts. Well, that makes sense. It‟s
adjustable. The problem is that once you put the bumper on the car the four bolts are
inaccessible. So how do you know how to bolt the bracket onto the bumper? SWAG of
course! So we did that and then Suzanne and I lifted the bumper up to the car. She held
one side while I got two bolts started on the other. Then I went around to the other side
and started another bolt. Sure she can put a bolt in, but she‟s left handed for crying out
loud. Don‟t know how many hours we wrestled with that bumper. With much difficulty
I could get five bolts started. No way on the sixth! Probably a sixteenth of an inch offcenter! No amount of lifting, pulling, or twisting was going to get the bolt/hole to line
up. So we walked away and let the car sit for a number of months.
Actually, it didn‟t sit without being worked on at all. The new headliner should be fairly
easy to install. I decided on a plan on how I could accomplish the installation without
running into so many problems. I called our son, Mark and my friend William Spilman,
who is an expert auto interior man. We got the job done expertly and with no problems.
8/11/2008
1
Porsche 912 Restoration – Part 4, Putting It Together
Lee and Suzanne Fowler
Then the car sat for another extended period of time. I just didn‟t want to tackle that
bumper again.
You never know what events will happen to change things. Our oldest son Scott, who
lived in Chesapeake, VA, got an unexpected job offer here in Huntsville. He is an Oracle
software developer. So I made two flying (literally) trips to Chesapeake to help him and
his family move. More time away from the car, which didn‟t matter since I didn‟t want
to work on it anyway. Scott is the only one of the three boys who has actually ridden in
the car and the only one who hasn‟t been around to help work on it. So one Saturday I
said, “Want to work on the 912?” “Sure”, he replied. “OK, let‟s pull the front bumper
and try to reattach it”. I explained to him the problem of getting it lined up and we
proceeded to unbolt it. This time I let him guess how to align the brackets on the bumper.
He moved and retightened them and we hoisted it up to the car again. He inserted the
three bolts on his side and I did the same on mine. All six went in! Why wasn‟t he here
six months ago.
Well, since he‟s so good at this parts installation I suggested that we next install the
instruments. I had labeled every single wire that came off the instruments so there
wouldn‟t be any question about how to reattach them. Scott crawled into the empty gas
tank hole and I got into the car with the instruments. I figured I‟d rather he be kneeling
on the hard concrete with his bad knees than me doing that with my old knees. So Scott
fed me the wires through the holes in the instrument panel and I attached them. Then he
attached the instruments to the panel. This was probably the easiest task so far. Here‟s
Scott trying to read my writing on the tags.
8/11/2008
2
Porsche 912 Restoration – Part 4, Putting It Together
Lee and Suzanne Fowler
The instruments were rebuilt by Palo Alto Speedometer and look just great installed in
the car.
The next thing I wanted to work on was the suspension. The brakes definitely needed to
be rebuilt/replaced as did the shocks. Also I wanted to replace all the bushings, bearings,
and seals in the suspension. There was just one problem! We had the car on wheel
dollies so we could roll it around the garage. We would have to put the car up on
jackstands in order to remove the suspension. That meant it would be stationary. And it
meant getting up and down a lot to get tools. Getting down on the garage floor isn‟t too
bad. It‟s the getting up that‟s a problem.
About that time, Mark told me about another club member buying a four post lift. Ahah!
Problem solved. Except! I can‟t just go out and buy something without a thorough
investigation…sometimes. So I embarked on an investigation of four-post lift
manufacturers. The one bought by the other member is made by Denmar. Turns out it‟s
of Chinese manufacture. Crossed it off the list! I had about decided on a brand when a
chance conversation with Bob Burruss, another HOD member, got me to looking at All
American Lifts in Newton, Kansas. Bob was planning on ordering one of theirs. After
several more weeks of reviewing theirs and others, and talking to the owner numerous
times, I decided to follow Bob‟s lead. The lifts are made in this country with American
made steel. Costs more for sure, but the construction is much more solid and the money
stays here! Bob and I ordered ours about the same time and delivery was scheduled for
8/11/2008
3
Porsche 912 Restoration – Part 4, Putting It Together
Lee and Suzanne Fowler
the same truck coming this way. Bob planned on picking his up at the shipper in
Decatur. I opted to pay extra and have it delivered to the house.
The next problem (seems there‟s always a problem) was how to get the lift from the street
to the house. In Installment Three of these articles I had pictures of us lowering the car
down our long driveway. The lift package weighed between 1,500 and 2,000 pounds. It
was thirteen feet long, about three feet tall, and about two and a half feet wide. Not
something I can get the boys to help me carry down the driveway.
Oh, one other reason for the lull in working on the car. Money! Our yard still had excess
trees. It had large rocks (boulders) in the middle which made grass cutting a real chore.
And we had virtually no back yard. So we hired a landscaping firm to tear out the yard,
remove the rocks (one was half the size of a VW), and build a new yard. This also
included building several block walls, installing underground drains, an irrigation system,
and additional concrete work in the back. I lost track of the number of loads of topsoil
the oversized dump trucks hauled in. But that‟s where the Porsche restoration money
went last year. I‟m telling you this because it‟s relevant to the story.
I was having a conversation with Calvin Ikard of Ike‟s Landscaping and asked him where
I could hire a forklift to get the package down the driveway. He has a Skidsteer so I
figured he would know. “Heck”, he said. “Let me know when it‟s coming and I‟ll come
over and take it down the driveway for you.” So on the scheduled day Calvin showed up
right after the delivery truck got there. I wish I‟d had my camera with me. Remember,
the package is thirteen feet long. The prongs on his lift are about what, four maybe five
feet. That leaves eight or nine feet hanging out in the wind. He slipped the prongs under
one end of the package and proceeded to lift. That thing came right off the bed of the
truck. He then carefully backed down the driveway. I told him that I would like it to be
put into the garage since I wouldn‟t be able to get to it until the weekend and rain was
predicted before then. He then inched forward and touched the side of the garage with
the far end of the package. After lowering it to the floor, he gently took his prongs and
nudged the whole package over snug against the wall. Piece of cake!
Now we have to assemble this thing. If the entire package weighs almost a ton, think of
what the individual pieces must weigh. However, I figured that I could get the job done.
Shouldn‟t be too much of a problem. Getting it down the driveway had been my biggest
concern. I figured all I had to do was lay out the hardware and bolt stuff together. But I
know from experience that nothing comes easy so I had to have a failsafe plan. After
much thought I figured out how I could do it. Here‟s a picture of me assembling the lift.
8/11/2008
4
Porsche 912 Restoration – Part 4, Putting It Together
Lee and Suzanne Fowler
The three Musketeers (Brad, Scott, and Mark) showed up at an opportune time. I did
help lift one of the long rails onto a crossbar.
Next comes the job of rolling the car onto the lift. First, it has to come off the dollies!
No sweat! Except that now the floor jack doesn‟t work and we need it to lift the car.
Again, Scott comes to the rescue! He is a rather large man with the strength to match.
He just lifted each corner of the car while I rolled the dollies out. Mark came over to help
roll it onto the lift. It‟s uphill going into the garage plus the lift ramps. I attached a block
and tackle to the front tow ring and pulled while Scott, Mark, and Suzanne pushed from
the rear. The lift is fitted with removable dollies so we can move it around the garage for
working and then back against the wall after we‟re done. Actually, even with the car on
it, one person can move the lift. Here‟s what the garage looks like now with the
assembled lift. Nope, I‟m not worried about oil dripping down on the Cayman. First,
the lift has three aluminum drip pans. Second, there ain‟t no oil in the car.
8/11/2008
5
Porsche 912 Restoration – Part 4, Putting It Together
Lee and Suzanne Fowler
Now we should be ready to start working on the car again. Nope! I got to fix my jack.
This jack is a Sears Craftsman (made by Blackhawk) and is about forty years old. You
just can‟t buy jacks this well built anymore. I‟d had the hydraulic cylinder rebuilt just
after we moved to Huntsville in 1988. Unfortunately, the place where I had it worked on
is no longer in business. After making a few calls I found a hydraulic shop that agreed to
look at it. I took the jack apart myself to save a little money. Turns out it just needed
bleeding and a little oil. The problem now is…I can‟t take something like that apart and
not strip and not repaint all the pieces. That was a time consuming process. Time taken
away from working on the car! But now I have a newly painted floor jack that works. Of
course, with the four-post lift I won‟t have much use for a jack but it sure looks good.
By now I had run out of excuses so I suggested to Scott that he dismantle the brakes. I
had already bought rebuild kits for the calipers, including stainless steel pistons.
Scott has two young boys so his time available to help me is limited. I decided to attack
the calipers first. Using solvent I cleaned them the best I could. Then I attempted to
remove the old pistons. If you recall, I had to loosen the calipers on the rear when I
pulled the car out from under the back deck because they were frozen. Guess what! The
caliper pistons were still frozen. Not a concern! A little solvent and a lot of pulling and
those things would pop right out. I could not get those pistons out, no way! Here are the
calipers as they came off the car. That‟s rust, not brown paint.
8/11/2008
6
Porsche 912 Restoration – Part 4, Putting It Together
Lee and Suzanne Fowler
Below you can see that I really did try to rebuild them myself.
8/11/2008
7
Porsche 912 Restoration – Part 4, Putting It Together
Lee and Suzanne Fowler
Several days later all four calipers and parts were packaged and shipped off to Stoddard
Porsche-Audi to be rebuilt. They came back with all the new parts installed and ready to
be put back on the car. See how good they look.
Lesson learned here. Forget trying to estimate the total cost of restoring a car. Hidden
costs are everywhere! Time too! Steve Baum keeps asking me when the restoration is
going to be completed. He even suggested that I develop a Project Schedule. Back in my
“real” working days I managed long-term software developments and always met my
schedules. Developing a time schedule for this project is impossible.
A number of months later, Brad came home for a week of R and R. Also, he didn‟t want
to be left out of the Porsche work. I told him he could install the sound deadening in the
engine compartment or he could remove the front struts. He decided that the suspension
work would be more fun so that‟s where he went to work. I came home one day and
there were both front struts lying on the work bench. Ninety-eight thousand miles of
grease, dirt, and grime! Then he left town. That seems to be a recurring theme with him.
I wish he‟d stay around and get his hands dirty. The front shocks consist of a strut
housing, shock insert, and metal dust cover. The metal dust covers had long ago been
removed because the front suspension flexed so much the tires would scrape them when
autocrossing. Brad removed not only the shocks, but also the hubs and rotors. He started
to remove the steering levers but the cheap pulleys I have couldn‟t do the job. Here are
some photos showing what he was up against.
8/11/2008
8
Porsche 912 Restoration – Part 4, Putting It Together
Lee and Suzanne Fowler
8/11/2008
9
Porsche 912 Restoration – Part 4, Putting It Together
Lee and Suzanne Fowler
8/11/2008
10
Porsche 912 Restoration – Part 4, Putting It Together
Lee and Suzanne Fowler
8/11/2008
11
Porsche 912 Restoration – Part 4, Putting It Together
Lee and Suzanne Fowler
Pretty gruesome looking isn‟t it? I‟m talking about the suspension, not Brad.
A while later, Scott and I were back at it and we decided to remove the rear suspension.
That too was a big job and I‟m glad I had someone with some muscle to remove those
parts. Scott took off all except for the arms that are attached to the rear torsion bars. I‟m
not sure I want to pull those off. It‟s a real pain to keep the splines properly positioned
and that‟s what determines the height of the car in the rear. Besides, I had replaced the
rubber bushings with Teflon years ago. I‟ll probably wind up doing it anyway.
I started to remove the rear brake rotors and, of course ran into a problem. The rotors are
held in place by two slot screws. They didn‟t want to come out! And I certainly didn‟t
want to round them being uncertain of finding replacements. Somebody suggested using
an impact screwdriver. I thought I owned one of those and a search through the basement
proved that I was correct. Half a dozen whacks each and the screws came out. The next
task was to remove two castellated nuts. They wouldn‟t budge either. Out comes the
impact driver. This is an excellent Craftsman driver that I‟ve had for over forty years. It
has never, ever failed to get a stubborn nut loose. Except this time! So I go
investigating! Actually, I talked to a Tech friend and told him that my heavy duty impact
driver just would not budge those nuts and what was I to do. He said, “Use mine. It‟ll
take it off.” I explain to him, “Look, this is a good impact driver and I‟ve got it attached
to a six horsepower, sixty gallon compressor. I need another way to get them off.” I
don‟t know why I think I‟m as smart as an experienced service tech. He patiently
educated me on the mechanics of impact drivers. “Lee”, he said. “It‟s not the air
pressure that‟s important; it‟s the amount of “whacks” per second. Yours probably puts
out about five-hundred impacts per second. Mine is rated at a thousand. Try it.” I took
8/11/2008
12
Porsche 912 Restoration – Part 4, Putting It Together
Lee and Suzanne Fowler
him up on his offer. Sure enough, the nuts came right off. Found out there were three
nuts…two on the suspension and one holding the impact driver.
Removing the nuts allowed me to remove the stub axles only to find that there were
bearings that had to be pressed out. I didn‟t have any way to do that. Harbor Freight did!
For a little cash they were only too happy to sell me a twelve ton hydraulic press. I don‟t
know if it will do the job or not because by now I‟ve moved back to the front suspension.
Next we would work on the shocks! I‟ll just remove the retaining nut on the top of the
shock strut, pull out the old insert and put in the new one. Did you know that Koni
doesn‟t send any instructions with their products? They send pictures with numbered
parts but there is no legend explaining what the numbers mean. And the new inserts and
hardware ain‟t the same as the original. My first attempt at removing the retaining rings
was with humongous Channel Locks. No luck and I really didn‟t want to mar the ring
nut too much. Maybe I ought to get the new inserts and see what‟s in the box. Ah ha!
New retaining nuts plus some other stuff! So it don‟t matter if I scratch the old retaining
rings. The Channel Locks come out again and this time I really clamp down. Nothing!
After a couple of day‟s frustration while sitting in the living room with my laptop I
decide to E-Mail Koni. Not that I expect to hear back from them. At least not in any
reasonable timeframe! The next morning I call Stoddard and talk to Mike Garriga who is
a 911 specialist. Mike worked as a Tech for thirty years and has moved into the parts
department. He explained what the new parts were for. About an hour later I checked
my home E-Mail and darned if there wasn‟t an E-Mail from Koni answering my
question. Thankfully, the answers from both were the same.
The insert retaining nut requires a Pen Wrench for removal and installation. It‟s a face
pen and the pens must be 4mm. It also needs at least a two inch span. After much
searching I found where I could buy an adjustable pen wrench with the correct pen
placement and size. Ok, now I can get those retaining rings off. I bolted one of the struts
to a two-by-four and mounted it in a vise. Then I started to loosen the ring. Except that it
didn‟t want to be loosened. There‟s a simple solution to this problem. I‟ll just bang the
heck out of the wrench with a hammer. That‟ll loosen it. Except it didn‟t!
What to do now! I learned when I worked at the upholstery shop that things that didn‟t
want to come unscrewed could be persuaded to with an air hammer. Great idea! I‟ll just
use an air hammer on it. Since the new insert came with a new retaining ring I don‟t care
if I damage the old one. Good solution. Except that I don‟t own an air hammer! So
Suzanne and I start out on our usual Saturday errands with an air hammer purchase on
our to-do list. First to Lowe‟s! They had a wimpy air hammer that looked more like a
toy. Same for Home Depot! Same for Harbor Freight! “I guess we could try Sears”, I
say reluctantly. I have a very large number of Sears tools but I vowed a couple of years
ago never to set foot in the place again. All over a $2.95 tool! But I really wanted to
work on the struts so we headed that way. They had an air hammer that looked slightly
better than the others…but no chisels. Good! I didn‟t want to buy anything from them
anyway. We decided to try Tractor Supply Company and if they didn‟t have one then we
would give up and work on something else. I could always order one over the Internet.
We headed up Sparkman to get to the North Parkway. Just before we got to the Parkway
I spied an O‟Reilly‟s. As we were right at their driveway I had to make a very quick,
8/11/2008
13
Porsche 912 Restoration – Part 4, Putting It Together
Lee and Suzanne Fowler
sharp turn. Probably wasn‟t as sharp as it seemed but in a Ford Ranger shallow curves
seem sharp. I didn‟t expect to find anything in there so I suggested to Suzanne that she
just wait in the truck. I found a real nice Ingersoll-Rand air hammer kit complete with
chisels.
Even with the air hammer those retaining rings didn‟t want to budge. It took a lot of
hammering to get them to move. It‟s a good thing I didn‟t need to reuse them. As you
can see from the pictures they took quite a beating.
8/11/2008
14
Porsche 912 Restoration – Part 4, Putting It Together
Lee and Suzanne Fowler
Below is a picture of the old and new inserts.
Once the retaining rings were removed the rest of the installation went fairly smoothly.
The strut is filled with oil for cooling. I‟d read on the Internet where some people put
8/11/2008
15
Porsche 912 Restoration – Part 4, Putting It Together
Lee and Suzanne Fowler
antifreeze in their struts. The guy from Koni suggested that I leave the original oil, which
I did. Before removing the retaining rings I had completely stripped the shocks of paint.
I was able to buy a can of spray paint from Advance Auto, which is almost an exact
match for Koni Red. The insert in the picture above came already painted. They look
like new. Here‟s before and after pictures of the shocks.
Not bad, huh?
8/11/2008
16
Porsche 912 Restoration – Part 4, Putting It Together
Lee and Suzanne Fowler
Now we‟re going to work on the hubs. This is where the hydraulic press comes into play.
The outer bearing falls right out. It‟s held into place by a clamping nut which is also used
to adjust the wheel play. That gave me access to the inner bearing and seal, which are
much larger than the outer. One of my sockets was the ideal diameter to push against the
bearing. The press rod would push against the socket. I took the hub inside and heated it
to 300 degrees in the oven. Same procedure as inserting wrist pins into connecting rods
except this time I‟m taking something out. The theory is that the hub will expand more
than the seal, which was holding the bearing in, thereby making removal easier and
lessen the possibility of damage to the inside of the hub. First I had to get them clean.
That took a lot of work but the result was worth it. Here‟s a before and after picture.
The press worked like a charm! Twelve tons of pressure will move most anything.
8/11/2008
17
Porsche 912 Restoration – Part 4, Putting It Together
Lee and Suzanne Fowler
Next I needed to press out the outer race. I needed an adapter that would fit the race.
None of my sockets, both Metric and English was the exact fit I needed. So I got a thick
washer and ground the outside down to the exact diameter needed. This would lay
against the race and the socket against it. Again, the hydraulic press did its job. Now all
I have to do is press out the inner race and we‟ll be ready to install the new parts. The
problem is that there‟s no way to get a tool through the small diameter outer end that
would fit the larger diameter of the inner end. I decided to take the hub over to my
friends Jay and Nick at Johnson‟s Foreign Auto. I asked Nick if he could suggest a way
to get something through the small hole that would fit the race on the larger hole. Nick
said, “You want to get that out?” “Yes, but I can‟t figure out how.” “C‟mon”, Nick says.
He heads to the back of the shop, grabs a hammer and punch and starts whacking away at
the race. “Don‟t you need to heat it?” I exclaimed. “Nope” was all the answer I got. I
didn‟t protest and tell him that my Clymers Handbook and Service Manual, printed in
1969 said to heat the hub to three-hundred degrees. A few seconds later the race popped
out. I thanked Nick and mentioned that I planned to use my hydraulic press to install the
new races and seals. “Don‟t do that!” says Nick. “You might damage the hub. You
need to use a race/bearing/seal installer.” “A what?” I ask. “Let me show you!” So I
follow Nick back to one of the Service Techs who pulls out a case with the
aforementioned tools. “I don‟t want to buy a tool that I‟ll only use this one time.” I
protested. The Tech told me I would find many uses for it and to go over to Harbor
Freight where I could buy a set at a reasonable price. I really didn‟t need much
convincing. Jay, who owns the place, came in about that time and also said that I did not
8/11/2008
18
Porsche 912 Restoration – Part 4, Putting It Together
Lee and Suzanne Fowler
want to use the press. Might damage the aluminum hub! Ok, two experts are telling me
the same thing so I ought to follow their advice. I drove over to Harbor Freight and
bought a race/bearing/seal kit. Also picked up a set of punches that looked better than the
ones I had.
When I got home later in the day I could hardly wait to play with my new “toys”, excuse
me, “tools”. I got the two races installed in one of the hubs. Took quite a few blows with
the hammer but I got them seated. About that time Scott showed up so I asked him if he
wanted to work on the other hub. It only took him a few whacks with the hammer and he
had both races installed. Maybe it was because my arms are the size of a baseball bat and
his a telephone pole.
Let‟s stop and see where we are. The shocks have been restored. The hubs cleaned and
new races, bearings, and seals installed. The brake rotors are new. The old ones
probably could have been restored but we‟re trying not to cut corners on this restoration.
I guess the next thing is to put the pieces together. That process went fairly easily.
Here‟s a picture of the almost finished product. The dust shield was sandblasted and
repainted. The only problem now is the units weigh so much I can hardly lift them. You
can see in the picture below the dust shield attached to the shock absorber. Mark is
helping me attach the hub and brake rotor. This was a two-man job. Luckily, Mark was
around to help.
There are several other pieces that remain to be worked on. One is the control
arm/torsion bar/bracket assembly. Another is the steering linkage. And last are the sway
8/11/2008
19
Porsche 912 Restoration – Part 4, Putting It Together
Lee and Suzanne Fowler
bar rods and levers. I‟m not sure that I‟m going to pull it out the steering. I might just try
to clean and repaint the parts while they‟re on the car. I don‟t want to mess with the
control rod settings. Removing the torsion bars was pretty easy. Upon inspection it
looks like they‟re in good shape. No cracks that I can see and no rust. They‟ll go back in
“as is”. All of the rubber boots in that assembly will be replaced.
The ball joints have a rubber boot for protection. The left boot looked in pretty good
shape. I was contemplating not replacing these boots. Then I looked at the right side.
The boot was split half way around. Don‟t know how long it had been split and whether
or not the car had been driven with it that way.
8/11/2008
20
Porsche 912 Restoration – Part 4, Putting It Together
Lee and Suzanne Fowler
The boots will have to be replaced. Only, they aren‟t replaceable! Might know!
Maurice, at Stoddard, suggested that I might want to try taking the arm to NAPA and
have them install a “universal” boot. Again, we‟re not taking short cuts on the restoration
so I ordered two new ball joint assemblies…another pricey item. The big problem here
was getting the other rod off the ball joint. Tried to use a gear puller but that wouldn‟t
cut it. Drat! I‟ll have to buy some more tools. So I ordered tool set for removing ball
joints of all sizes, hoping one would fill the bill. Scott and I went at it with the new tools.
Me holding and Scott on the breaker bar, of course. This part has a tapered shaft with a
similarly tapered female part. You would think it would come off fairly easily. No way!
Scott was really putting some muscle behind this one. When they do come loose they do
it with a very loud “pop”! But loose they did come!
All of the suspension hardware has a fair amount of rust. Naturally, all of that would
have to be removed. I started with paint stripper, then a wire brush, and finally a
sandblaster. I had moved the sandblaster and air compressor under the deck to make
room for the lift in the garage. Normally, after using the blaster I pull out the sleeves and
bind the ends with rubber bands. This is to keep bugs, mainly spiders, from taking up
residence. About fifty-five years ago there was this spider on our carport. We lived in
the country and large spiders and inch long roaches were commonplace. The spider was
about two inches across (legs). I reached down to pick up a stick to kill it. The stick was
about a foot from the spider. Spiders, especially large ones can move very fast. Before I
could lift the stick, that spider ran across the top of my hand. I can still feel it and I hate
spiders. When I moved the blaster cabinet I didn‟t bind the sleeves like I usually do. The
8/11/2008
21
Porsche 912 Restoration – Part 4, Putting It Together
Lee and Suzanne Fowler
blaster isn‟t used all that much so when I went to clean the suspension parts I discovered
a birds nest in one sleeve. Both got a thorough clearing out with the air nozzle.
Cleaning and painting all those individual parts takes a fair amount of time. I even clean
and paint the bolts, nuts and washers. The two steering rods have three parts which are
screwed together. Unscrewing those means changing the steering geometry. So I
decided to leave them assembled and clean/paint them as a unit. There are some other
places under the front of the car where the components were attached that show some
signs of rust. These I‟ll spray with that stuff that turns rust into primer and then paint.
The sway bar arms and attachment rods were removed also. These too were cleaned and
painted. All the bushings were replaced. The original sway bar was 16mm…I think.
The one currently installed is 19mm. But since I‟ve added a rear sway bar I don‟t want to
go back to the smaller one up front.
We don‟t normally leave garage door open except when we‟re outside. Well, on
weekends we‟ll leave it open during the day. Scott informed me that there was a bird‟s
nest in the engine compartment. Sure enough! Turns out it was a Yellow Finch. Nice
looking couple! Probably first time homeowners! Unfortunately, they were squatters
and you know what happens to those types. Yep! The landlord (me) evicted them.
There weren‟t any children involved so I don‟t feel too bad about it. They did come back
a number of times while I was working in the garage and really put up a squawk about
their home being removed. Here are pictures of the suspension after removal. The other
picture is the parts after painting. They‟re being air-dried in our “drying room”.
Actually, they‟re hanging on wires under the deck but in the summer heat it‟s just as
effective.
8/11/2008
22
Porsche 912 Restoration – Part 4, Putting It Together
Lee and Suzanne Fowler
I have the parts laid out left to right so I‟ll remember which parts go on the left side and
which go on the right. Notice the bottom of the control arms. The left one still has the
bushing on it. The right one has part of the bushing remaining, although I wasn‟t sure at
the time. On the right one just before you get to the horizontal arm it looks like there‟s a
washer attached to the control arm or to the metal sleeve. It‟s not attached to either.
Actually, it‟s a spacer. We‟ll talk about that later. Here is a picture of the restored front
suspension hardware. The piece in the middle is not a genuine Porsche part. It serves as
a separator.
8/11/2008
23
Porsche 912 Restoration – Part 4, Putting It Together
Lee and Suzanne Fowler
The new brake master cylinder will be installed before I put these back in. There‟s more
room to work with the hardware out. Probably nothing wrong with the old cylinder but
no point in taking chances. I was advised to replace it with a dual master cylinder but
opted to stay with the original type. The old one was still working at ninety-eight
thousand miles which included daily driving, road trips up and down the east coast, many
autocrosses, and numerous DE laps around Summit Point and Marlboro speedways. This
new one will probably outlast us and then it will be the boys‟ problem.
Scott removed the master cylinder then went to work on the pedal assembly. That took a
bit of work…for him, not for me. I spent my time painting other parts. After removing
the assembly we found some more rust on the floorboard. This we‟ll scrape down and
treat with POR15. Here are pictures of the floorboard and the pedal assembly.
8/11/2008
24
Porsche 912 Restoration – Part 4, Putting It Together
Lee and Suzanne Fowler
Here‟s a picture of the bottom of the pedal assembly.
I‟d bought a rebuild kit for the assembly, which consists of new brass bushings, springs,
nuts, etc. We‟ll take the assembly apart and rebuild it. The first thing to come off is the
pin holding on the clutch rod. No amount of banging on a punch with a five pound
sledge would budge that pin. Scott suggested that we try to drill it out. Sounds
reasonable! So I say, “Have at it!”
Tried several drill bits. Even had Suzanne run to Lowe‟s to buy some new ones. Several
years ago I acquired a drill bit sharpener and proceeded to turn my collection of bits to
dull pieces of metal. Now they won‟t drill a hole in soft pine. But new bits ought to do
the trick. After Scott melted the end of one of the bits in the pin we decided maybe we
had the drill press running too fast. Turned the rod over and tried the other end to no
avail.
Nothing was working and I was about to give up when Scott asked me about what looked
like another punch in one of the tool chest drawers. “Hey, good idea!” , I says. That
goes with the air hammer. Get that out and hook it up to the air compressor. So I held
the assembly and Scott put his weight and the air hammer impacts to work on the pin. It
came out! Hooray, now I can do some more cleaning and painting. Truth be known the
painting part is getting a bit weary. Anyway, we‟ve got the clutch rod pin out so all we
need to do is remove the rod and the rest of the assembly will come apart. You know
what I‟m going to say. The rod doesn‟t want to come off the shaft. I soaked it in several
kinds of rust remover to no avail. We were about to leave for the Parade so I told Scott to
8/11/2008
25
Porsche 912 Restoration – Part 4, Putting It Together
Lee and Suzanne Fowler
soak the joint in rust remover every day until we got back. It never did loosen up so
finally I put it in the vise and beat the heck out of the other end. It came off!
While working on the suspension I got to wondering where the wheel spacers were.
Haven‟t seen them in a „coons age. The car came with four and a half inch wheels. We
switched to five and a half so we could run wider tires for autocrossing. That required
adding wheel spacers. When I put the car up on jackstands under the deck many years
ago I took the wheels off. That was a while ago and I couldn‟t remember what I did with
the spacers. When I took a year off work a little while ago I completely reorganized the
basement and threw away a ton of stuff. Lasted a while but now the basement is chaos
again. The large stained glass work table is home to the 912 windshield and rear
window. The other table has boxes of Porsche parts and other stuff. The traveling
tympani cases went into the basement when the garage became home to two Porsches and
everything was thrown helter-skelter into the basement.
I made a valiant attempt to look for the spacers in the basement. Looked through every
cardboard box I could reach. Looked on shelves and in drawers and came up empty
handed. Next day I decided to try another search. No Luck! I could probably buy more
spacers but I don‟t remember the size. Tried another search! Still no spacers! This is
getting serious. Finally, I decided that the work on the 912 would cease and I would
spend a week or two in the evenings reorganizing the basement. So I started sorting and
storing things. There was an aluminum pot with a top sitting on the floor and I‟ve walked
by it many times. Got to wondering if there was anything in it. Lifted the lid and, you
guessed it, spacers. I had put them in the pot many years ago with some cleaner and then
forgot them. The cleaning stuff had turned to a purplish mush and had a really putrid
smell. Luckily, I don‟t have much of a sense of smell after having surgery as a teenager
so it didn‟t bother me too much. Caught a lot of flack from Scott when I brought it into
the garage. But, the spacers survived the extended cleaner bath and will live to serve
many more miles on the 912.
The suspension has been laid out on the workbench while we were waiting on the rear
bushings. These are two-piece metal bushings with rubber in between. When we took
off the originals I only removed one. It was hard to tell from the suspension frame what
was bushing and what was frame. I wanted to wait until the new ones got here before
removing any more pieces. Yep, the new bushings consisted of the pieces that I had left
on. No problem! The pieces remaining were a spacer and a metal sleeve. Should be able
to bang those right off. I gave that assignment to Scott. Ok, maybe we can‟t bang them
off but a gear puller should work. Scott had a fully equipped gym in his house in
Virginia. I can‟t even lift the bar on his barbell set. So I ask him, “What good does all
that weight lifting equipment do if you can‟t even turn a gear puller and get that sleeve
off?” Luckily he‟s pretty even tempered. We decided to turn to the air hammer again.
Maybe if we could get it turning then the gear puller would pull it off. Well, it took a lot
of blows to get it to even turn a little bit. Finally, using both the gear puller AND the air
hammer we were able to remove the metal sleeves.
8/11/2008
26
Porsche 912 Restoration – Part 4, Putting It Together
Lee and Suzanne Fowler
Below is a picture of the new and old parts. Notice that the new bushing is a three-piece
part with two pieces of metal sandwiching a piece of rubber. The old parts shown are just
the inner metal sleeve. The other two parts came off separately.
The two spacers look like they survived the removal and could probably be reused. But,
as usual I‟ve decided to replace them. They are on backorder so it‟ll be a week or so
before we can put the suspension parts back together. I had also decided to replace all of
8/11/2008
27
Porsche 912 Restoration – Part 4, Putting It Together
Lee and Suzanne Fowler
the brake lines and ordered them a few months ago. The tubes come in a nine-piece set.
Guess what! They come as straight tubing. The tubing on the car is curved and bent at
all kinds of angles. As you might have guessed, I don‟t have a tube bender. That‟s not a
problem for my tool supplier (not Harbor Freight). Speaking of Harbor Freight, that‟s
where I got my sandblaster. It came with replacement ceramic tips and I wore out the last
one several weeks ago. I figured that I could just buy some more. Nope! They didn‟t
carry replacement tips and I couldn‟t find any on the Internet. Why do things have to be
so difficult? Again, my tool supplier had a brand name Blast Gun that would fit my
sandblaster so I bought a replacement. It came with a single ceramic tip and I could get
replacements from them for that brand. Except, I decided to go ahead and buy a
replacement – a tungsten tip, which is supposed to last three to five years of regular use.
For me that equates to a lifetime!
I decided to go back to the floorboard and pedal assembly. Here‟s the floorboard after
being treated with POR15.
I decided to us the same stuff on the pedal assembly the plate and each part was
sandblasted and painted. Here are the parts ready to be reassembled. I hope I can
remember where they all go. Scott helped disassemble it and he was off birthday
partying with his family. Here‟s what they look like refurbished. The rebuild kit came
with new bronze bushings to replace the original plastic ones. If there were ever any
plastic bushings in that assembly they disappeared long ago. The bushings were to be
8/11/2008
28
Porsche 912 Restoration – Part 4, Putting It Together
Lee and Suzanne Fowler
soaked overnight in light oil. The bronze would absorb the oil. Also bought new brake
and clutch return springs and a new bell crank.
Luckily it went back together will little problem. Actually, getting the pin back in the
clutch rod was a bit of a problem but Scott had returned and we worked it together. Here
it is ready for reinstallation.
I can‟t reinstall anything until I get the new brake lines installed so I think we‟ll stop here
and leave the rest for the next installment.
8/11/2008
29