1
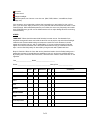
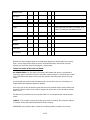
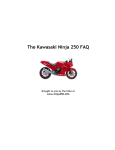
YAMAHA 650 BUYER'S GUIDE
This guide is intended to aid the purchaser or seller of a Yamaha 650 twin in evaluating the bike
and determining the ballpark costs associated with any problems found. This information is only a
guideline and cannot protect the buyer from all possible problems. Each buying decision is unique
and the buyer must use judgment and consider that the final decision is theirs alone. Prices
estimates are given for most items. These estimates will vary widely depending upon factory or
after market prices and between geographic areas. These estimates are in US dollars for parts
only, and labor will be additional.
When looking at a bike for potential purchase, it is a good idea to be well prepared. After deciding
how much you are willing to pay for your purchase and have read this guide, it is suggested that
the following items be taken along when examining a bike.
Flashlight
Rag
Friend
APPEARANCE
CHROME - A bike that has been left to the elements quickly deteriorates, and the first to go is
usually the chrome. A bike that has chrome in good to excellent shape a valuable find. When
chrome starts to break down, small surface imperfections will develop which eventually turn into
full blown rust spots. If you find small spots on the chrome that are sometimes surrounded by a
small "halo" of rust colored stain, these can usually be removed with a chrome cleaner. If the pit
has started to erupt and the chrome is lifted from the surface (a spot has formed that you can
catch with your fingernail) this can be improved but is usually always visible, even after cleaning.
If the bike is clean, it’s easy to just look the chrome over closely and make sure it is in good
shape. If the bike is dirty, use a rag to wipe down the top of a fender or any other area that looks
suspicious to see how it cleans up. A few small imperfections are not a big deal if the surface in
generally in good shape. A good coat of wax will stop the problem from proceeding. Problem
spots to look at are:
Top of the rear fender under the seat.
License plate bracket, under the license.
Bottom side of the handlebars between the two mounting clamps on the triple tree.
Inside the headlight rim.
Inside lower surface of headlight shell.
Underside of exhaust pipes and mufflers.
Value should be deducted for chrome that is pitted beyond salvage. How much is dependent
upon your personal "look pretty" preference.
PAINT - Sun fading is a common problem in early years. Later years didn’t suffer as much, but
the ‘70 through '75 models would tend to fade fairly quickly when left exposed to lots of sun. It
may be very obvious if quite bad, or subtle if just beginning. To determine how bad the color has
faded, remove a side cover and look at the bottom side and compare it to the top of the tank.
Another spot to look is on the left bottom side of the tank. This is as close to the original color as
you can get. If not obvious, it’s not a big issue. If the paint is badly faded, the bike can be
1 of 9
repainted. A paint store can match the original color with a quarter sized sample of the original
color. If the tank is pinstriped, it will take a highly skilled shop to reproduce the original quality,
and this can be expensive.
SEAT - Seats take a beating and as these bikes age, they are getting tougher to find in good
shape. Deduct for any obvious tears in the upholstery. Run your had around the bottom edge of
the seat and feel for any tears along the seat pan. Push down on the seat at several spots and
look for splits in the seams and feel for hard and/or collapsed foam. The foam breaks down and
gets hard over time, but can easily be replaced by a competent upholstery shop. Seats can be
recovered, but depending upon extent of the repair, will run around $50 to $100 for top notch
work. Replacement covers are also available from aftermarket suppliers for under $100.
If looking at a ‘70 through ‘73 model, examine the bottom of the seat pan. Early years of the 650
have a nasty habit of rusting out the seat pan from the inside, and good replacement pans are
almost impossible to find. If the seat pan is rusted out, it will probably have to be replaced with a
fiberglass item.
RUBBER - Rubber is another item that deteriorates over time, even though the bike isn’t being
ridden. If you want to see if a unit is really "showroom" condition, look for missing or torn rubber
or plastic items listed below. Some items are plastic but are listed under the Rubber area
because they are appearance rather than functional items.
Kickstart lever rubber torn or missing.
Gearshift rubber torn or missing.
Footpeg rubber split.
Rubber boot over front brake master cylinder banjo fitting missing.
Buttons that cover hex bolts in handlebar mounts missing.
Black covering over wire harness cable between headlight and tank split.
Rubber fork gaiters on early models. These are hard to find and require removing front forks to
replace.
FUNCTIONAL PARTS
ENGINE - The motor should turn over easily, even if it does not run. For a bike that does not run,
reduce the price substantially. For a bike that does not turn over, reduce the price dramatically.
Rebuilding an engine is expensive, so make sure the price leaves room to do so.
Even if the bike does not run, kick over the engine and listen for any funny noises. It should be
quiet with no clunking or heavy noises. Any clunking sounds deep in the engine spell real trouble.
If the owner is very understanding, he may let you take a compression reading. If paying top
dollar, this is something you should do. Each cylinder should read at 115 lbs. when kicked over
three or four times with the throttle wide open. If you do not have a compression gauge, take out
the spark plugs and hold a thumb over the hole while your helper kicks the bike over. It should
blow your finger off the hole. If not, it has low compression. Could be a tight valve, but plan on it
needing a valve job at least and probably a set of piston rings.
TIRES - Tires actually lose their ability to grip over time, so it may be cool to see original rubber
on a bike, but they are not as safe as fresh tires. Modern tires are far superior to the tires of only
a few years ago, so this will be a good upgrade to almost any bike.
2 of 9
The front tire will usually not wear out, but if a rider does use the front brake aggressively, the
front tire will "cup" in the tread pattern. This is normal and will cause the tire to wander a little but
small raised areas can be removed with a wood file if they are causing a problem. The main
problem with tires will be cracking of the sidewall. If any cracking is observed, it is time to replace
the tire. A rear tire will wear more quickly than the front but will be subject to the same cupping as
the front, only in the opposite direction. Again, not a big problem, but may need some attention.
Tires can run anywhere from $120 to $350 a pair so new tires are a definite plus.
CHAIN/SPROCKETS - Chains and sprockets are a high wear item and will cost from $100-$200.
As a chain wears, the small bearing surfaces inside the sideplates and rollers elongate while the
sprocket teeth open up. As the wear proceeds, the chain "stretches". The chain grows in length
because the individual link surfaces are wearing apart. Because the chain has a smaller bearing
surface than the sprocket, it wears a little faster than the sprocket. As the chain wears, it begins
to pull on only one link at a time rather than spreading out the force over several links. Thus, the
chain will wear out the sprockets. To check chain wear, grab the chain in the middle of the rear
sprocket and try to pull it outward. If you can pull the chain far enough away that you can see root
of the sprocket teeth, the chain is shot and ready for replacement. A chain should never be
replaced without also replacing sprockets. Beware of the "fixer-upper" who says that the original
chain was worn out, but he found a pretty good one on another bike and replaced it. Even a new
chain put on old sprockets will wear very quickly.
Even an old rusty chain can be squirted with oil so it looks pretty good, so don’t fully trust
appearances. When examining a bike, have your friend (the one you brought along) roll it along
for about 20 feet and look at the chain. There should be no dragging, binding or any evidence of
any links that are tight. This is another indication the chain must be replaced.
BRAKES - If the front has disc brakes, shine the flashlight inside the caliper to look at the pads.
There is a groove in the pad that is a wear indicator. If the wear is down to the groove, it’s time to
replace pads. Some years have small inspection holes on the caliper with a little cover. This
cover can be opened up and the pads inspected.
Rear brakes are usually drum, so by looking at the adjustment nut on the brake arm you get a
good idea of how much brake shoe is left. Many years also have a small indicator arm and a cast
in area which shows the "good" area for brake wear. Personally I find it easier to just look at the
arm, although it is possible for a dishonest or inept owner to move the arm a notch on the brake
shaft.
Replacement of brake pads or shoes is something a home mechanic can readily do. Pads will be
about $20 per set and shoes around $30. If the bike has high miles and/or there is any evidence
of brake fluid seepage, the caliper should be rebuilt. This is something you may want to have a
shop do so figure the shop labor rate accordingly.
BATTERY - I don't think I have ever bought a 650 with a good battery. If you find one with a new
battery, great! However, the battery deserves some attention. If the bike has a battery installed,
remove the cover and cables and lift it out of the battery compartment. Take a look down inside
and see how much rust there is. Also look over the battery for any cracks or holes. If it is full of
fluid, it may be sulfated (which is seen as a white deposit on the inside of the battery) which
means it will not hold a charge. The reason holes in the battery are important is that this has
allowed the acid to run down on the inside the frame and is slowly eating away at paint and metal.
As batteries lose their charge they also freeze at a higher temperature. When they freeze, the
fluid expands and cracks the case. If the batter has leaked on the bike, it will need a thorough
cleaning with a solution of baking soda and water to neutralize the acid. When the baking soda
hits acid it will foam, so you will know when it has all been neutralized, then rinse with clean
water. Any rust spots should be sanded and painted. Plan on $30 to $50 for a new battery.
3 of 9
STEERING HEAD BEARINGS - The 650, like about every Japanese bike of this vintage, has an
upper and lower head bearing that uses uncaged balls. Since they have a very small bearing
surface, they are prone to impact damage. What can happen is that the balls will make little dents
in the race. Whenever the front forks are turned and the balls roll in and out of the dents, the front
end will have a "notch" or spot where it seems to tighten up. This is a very dangerous situation
since it is disconcerting and can make it difficult to do quick maneuvers.
A way to check the bearings is to sit on the bike while it is on the centerstand and scoot back on
the seat until you have taken most of the weight off the front end. Then turn the handlebars slowly
from lock to lock. There should be absolutely no evidence of binding or grabbing anywhere in the
arc. If there is a problem with the bearings, the only solution is to replace them. It’s a time
consuming job, but as long as you are doing it, use tapered roller bearings. These will run about
$50 per set, but are well worth the cost. The handling of the bike will be dramatically improved.
SWING ARM BEARINGS - Factory original swing arm bearings in the XS650 were plastic. Not a
bad thing, as long as they are frequently greased, but few people do. The best way to check the
bearings is to put the bike on the centerstand. Have someone hold the bike while you grab the
rear wheel and push/pull from side to side. Look at the rear swing arm assembly and at the rear
axle area. When you are pushing and pulling, there should be no detectable movement in either
the swing arm pivot area or the rear wheel bearings. Any movement in these areas will cause the
bike to feel like it has a hinge in the middle and will tend to wander. Something that must be
remedied. Rear wheel bearings run about $15 and swing arm bearings are $50 (for bronze
bushings, which are recommended). The pivot bolt and outer bushing can also be worn, which
will be another $25 to $35.
FRONT WHEEL BEARINGS - Any easy check is to have your friend sit on the bike and hold the
handlebars straight. You can then grab the front wheel and push it back and forth while observing
the movement at the axle. If you can see any movement, it is time to replace bearings.
FORK SEALS - If the fork seals are blown, the seller will probably have wiped down the forks so
you won’t be able to see the oil residue anyway. If the forks show a very light ring of dirt about
three inches above the fork boots, that is a good sign. There will always be a little oil that gets
past the seals and is not a problem. If you can see the marks where the fork travel stopped, that
means they have not been wiped down and are in good condition. If they are very clean, pop off a
fork boot and look around the inside for a pool of oil. If the tops of the sliders are filled with oil, the
seals are gone and must be replaced. The seals will run about $30, not including labor..
ACCESSORIES - In its day there were quite a few aftermarket and Yamaha factory items
available for the 650. Nothing like today, but still, listed below is a list of common items:
Highway bars.
Case guards.
Windshield.
Faring.
Saddlebags.
Sissy Bar (high and low)
King and Queen seat.
Luggage rack.
Luggage rack/Seat combination
Fork brace.
4 of 9
Oil cooler.
Cruise control.
Halogen headlight.
Exhaust systems, two into two or two into one. (MAC, BUB, Hooker, Vance&Hines, Super
Trapp, etc.)
If the accessory your prospective purchase has is something you are looking for, then call it a
plus. If you don't care, simply remove it if you buy the bike and sell it someone who wants it. Look
carefully though. When aftermarket parts are put on bikes, the owner very frequently has to make
some modifications to get it fit or work. Make sure there is no major damage due to the mounting
of the accessory.
OTHER
TANK RUST - Bikes should be stored with full tanks but most are not. Condensation from
temperate changes will cause rust inside the tank. Be sure to pop the cap and shine a flashlight
inside the tank. Some mottled looking rust areas are normal for the 650. However, it should
appear to be surface rust only, with no visible flaking. If you see continuous areas of rust that
appear to be three dimensional, this is the stuff that will flake and clog up carburetors and fuel
taps. It can be fixed fairly easily for about $30 by lining the tank with a plastic tank liner.
Buyer’s Checklist - Below is a form that can be printed and used to check off after looking over a
prospective purchase. If several bikes are available to look at, it can become a difficult decision.
By marking down comments about each bike, it becomes much easier to make a decision on the
right bike.
Year____________________ Model ________________________
Owner __________________________________________Asking Price __________________
Poor
Fair
Excellent
APPEARANCE
Chrome
Paint
Seat
Rubber
WEAR ITEMS
Tires
Chain/Sprockets
Brakes
5 of 9
+$
-$
Comments
Steering head
Swingarm
FUNCTIONAL
Battery
Lights
Head (High and Low beam), Tail, Brake, Turn,
Warning, Instrument, High Beam and turn
Tachometer
Speedometer
Mirrors
OTHER
Tank Rust
Accessories
Now that you have made the decision, exchanged the agreed upon $$ and gotten your new toy
home - the fun begins! Don't forget to join the Yamaha 650 Society. We will help you keep
enjoying your purchase. Sorry for the plug but I couldn't resist.
THINGS TO CHECK AFTER YOU GET HOME
OIL SUMP SCREEN - On the bottom of the engine the forward drain plug is in a plate that is
secured by eight, 6 mm bolts. Secured to this plate, inside the engine, is a brass screen oil filter.
It will collect debris that drops into the sump and prevent it from being drawn into the oil pump
pickup.
A problem with the screen is that it frequently tears. Once it has a hole in it, it obviously is no
longer effective and should be repaired or replaced.
Once every year or two, the bottom engine plate should be removed and the screen cleaned and
checked for holes or tears. There is also a magnet built into the filter, so this should be cleaned
while it is out.
The filter can be purchased new and runs about $35 or it can be repaired with 100 mesh brass
screen.
TUNE-UP - This is where a shop manual will pay for itself in one sitting. Get a Clymers, Haynes
or Yamaha manual and read the maintenance section carefully.
WHENEVER you purchase a bike, at least do the following before you take it out for a trip:
6 of 9
Adjust the cam chain tension.
Set the intake and exhaust valve gap.
Check and adjust the ignition timing.
If machine has breaker points, check condition.
Check the condition of the spark plugs.
Check air cleaners - clean or replace as necessary.
Lube and adjust the drive chain tension
Check tire pressures and adjust to factory specs.
Adjust clutch rod play.
Check the operation of all lights.
Check the operation of brakes.
Check spoke tension.
Lube the swingarm, brake pedal, levers and cables.
HEADLIGHT WIRING CHECK
The headlight shell is a very busy place for the wiring harness. There are a lot of wires and
connectors that are crammed into a tight space. Frequently a wire either gets pinched or wears
due to vibration and results in a short which can do major damage - or at least leave you stranded
with some portion of your electrical system not working and a blown fuse.
Whenever preparing a new bike (new to you anyway), always remove the headlight and examine
all the wires in the headlight shell. Look for evidence of corrosion, pinching or wear on insulation.
Corrosion is taken care of by dressing the components down with some very fine sandpaper and
coating with silicone grease. Pinching and worn insulation are corrected by either wrapping any
suspect areas in electrical tape or covering with shrink tubing.
When replacing the headlight shell, try to avoid putting stress on any wires and get things
arranged so they won’t get pinched by the headlight when it is replaced. This simple check will
save lots of future problems.
FUSE HOLDERS
Later years of the 650 twin used a fuse holder that sits on top of the battery. Over time the fuse
holder fingers weaken and eventually just break off. This problem can be difficult to diagnose
because the symptom can be either a total failure of power to a circuit or intermittent lack of
power to various circuits. It appears to be a bad fuse at first, but can just be weak clips.
Although time consuming, the best fix is to just replace all the holders. A very similar fuse holder
can be purchased from Radio Shack. It comes with the holders mounted in plastic. Cut the plastic
base and remove the holders. Then cut the holders off the bike wiring harness, being careful to
retain as much of the original wiring as possible. Strip back about 1/8 of the insulation and twist
the end of the copper wire. Insert the wire into the hole in the tab projecting from the new holder.
Place a drop of solder on top of the wire. When the assembly has cooled, insert it into the fuse
holder on the bike. These new fuse brackets are much heavier than original and should last
indefinitely.
Keep in mind that fuses can weaken over time and if you see fuses with sagging links, go ahead
and replace them. You can also check a fuse with an ohmeter, but an intermittent connection will
be tough to find. When in doubt, replace them. You should be carrying spares anyway.
7 of 9
CHANGE FORK OIL
Yamaha recommends using 10W30 motor oil or 10W fork oil. Motor oils can vary in actual
viscosity and are not "calibrated" to be exactly 10W and do not contain any components to "swell"
the seals. A good quality fork oil will provide much better performance and less weeping over
time, so spring a few extra bucks for the quart of fork oil rather than the 10W30 motor oil. Some
folks use automatic transmission fluid, but again, this oil is not designed for use in forks, so I do
recommend using fork oil.
Fork oil is a neglected item probably because most people just don’t understand how important,
or how much abuse, it takes. The oil picks up grit from the fork tubes and from material sluffing off
the fork tubes and legs. Since the lower housings are aluminum, it is critical to maintain clean oil
to avoid excessive wear. Also, very small amounts of oil are left behind on the fork tubes as the
seals work up and down during normal use, so the oil is actually consumed very slowly as you
ride.
To change fork oil, put a pan under the drain screw on the side of the fork leg. Take out the screw
and while holding the front brake, push down on the front forks. This will push out the oil. After all
the oil is out, replace the screw. Repeat for the opposite side. Check a shop or owner’s manual
and use a baby bottle or measuring cup to get the correct amount of oil. Remove the fork tube
caps and SLOWLY pour the oil into the tube. I say slowly because if you get in a hurry, the leg
will trap air and overflow. Then you will have to wait for the oil to run down and drain it out of the
leg, then start over. (I speak with experience!) Once all the oil is in the tube, replace the cap.
CHANGE BRAKE FLUID
Another neglected item that will cause problems if not changed is brake fluid. Brake fluid collects
moisture, no matter how tightly the system is sealed, and this corrodes brake parts from the
inside.
At the very least, brake fluid should be drained from the system and refilled with DOT 3 or 4 every
other year. A bit of pain, because the system has to be bled again, but it will pay off with reduced
maintenance over time.
If you don’t want to mess with this process - thoroughly clean out the system so all old fluid is
gone and replace with DOT 5 fluid. DOT 5 brake fluid is silicone based and will not attract water
like DOT 3 or 4. It will also not attack paint so you don’t have to be as careful with it. Just
remember that you CANNOT mix the DOT 3/4 and DOT 5 types of fluid. DOT 5 does not work
well with some rubber compounds, but I have not had any reports of any problems with Yamaha
components. The factory used the right compound so you will not have a problem with them. If
you have aftermarket seals, you could try soaking one in DOT 5 to see what happens.
CHANGE ENGINE OIL
Yamaha recommended 20W40 oil in all the 650 twins above 32° F and 10W30 below 32° F.
There has been a lot of discussion about which viscosity and type of oil is the best to use, but I
recommend 15W50 synthetic. I have recently changed to synthetic oil in all my bikes because
the zinc and phosphorous has been reduced in SG and SH oils. The 650 was designed to
operate with SD and SE oils. SF was much better oil but recent changes have made automotive
oil less suited for air cooled motorcycle engines. I don’t have access to a reasonably priced
motorcycle oil, so I use full synthetic automotive.
If you plan on keeping your 650, use a good quality 20W40 or 20W50 that is suitable for
motorcycle engines. Either petroleum based or synthetic is debatable, so you just have to take
8 of 9
you choice. My personal preference is for mineral based oil is Castrol 20W50 while the synthetic I
use is Mobil 1 15W50.
Lube EVERYTHING that moves.
WD-40 is a good rust preventative and water repellent, but it is not a good lubricant. Use a
product that is truly a lubricant. Every motorcycle shop has a product (or several) that is designed
for lubricating moving parts and cables. Buy a can and use it. It will be more expensive than a can
of WD-40, but it will last for years and more than pay for itself by reducing cable wear.
Now that you have taken care of your new mount - have fun - and give a friendly wave to us other
folks on two wheels!
9 of 9