1
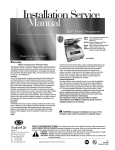
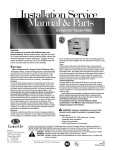
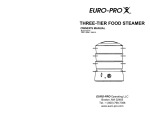
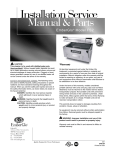
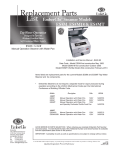
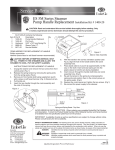
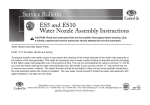
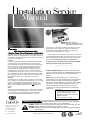
Installation Service
Manual
EmberGlo Model ES10
F u l l P an Size F ood Steam er s
ES10PB: Manual Push Button
ES10TE: Automatic, Programmable Timer
Operation-External Cycle Timer
Automatic, Programable Timer Operation
Designed to Operate Without Distilled Water
Warranty
Midco International Inc Warranty Policy
Exclusions Terms, Customer Requirements and Instructions
Only Authorized Service Providers are authorized to provide Warranty service on
all EmberGlo, a Division of Micdo International Inc., food equipment as described
under and Midco® International Warranty Policy. A list of providers can be found on
our web site: www.emberglo.com
Provisions:
In lieu of an implied warranty, all repairs and replacement parts furnished under
our Warranty shall be f.o.b. point of distribution, but the owner must pay the
necessary freight, delivery and labor costs involved when required. Any Federal,
State or Local taxes are also extra. This Warranty is effective for a period of 1
(one) Year from the date of original installation. EmberGlo® Electric Food
Preparation Equipment manufactured by Midco International, sold under the
EmberGlo trademark, are guaranteed to be free from defect in material and
workmanship under normal use and service for a period of 1 (one) year after the
date of original installation. Midco's obligation under this Warranty Policy shall be
limited to repairing or replacing, at our option, any part of said equipment which
Midco examination shall disclose to its satisfaction to be thus defective.
Exclusions:
This Warranty Policy does not apply to damages resulting from accident, misuse,
abuse or alteration, nor does it apply to limed steam generators, nor does it apply
to any consequential damages. Most geographical areas require the use of
distilled or demineralized water. Tap water is permissible only with ES Series
Steamers. Midco's obligation will be the replacement of the product or parts
removed.
Terms:
Under the terms of this Warranty Policy, models considered portable (devices with
cords and plug caps such as EmberGlo Steamers) must be taken or returned to
the nearest service provider, transportation prepaid, returned transportation
collect. Non-portable units with permanent wiring will be serviced on the
EmberGlo
A Division of Midco International Inc.
4140 West Victoria Street
Chicago, Illinois 60646
tel 866.705.0515
fax 866.580.8700
web www.emberglo.com
customer's premises. Under these terms, Midco agrees, within the terms of this
Warranty period, to make all repairs at no charge by the authorized service
provider. Labor and mileage charges submitted by any other provider not
authorized will be the responsibility of the customer.
If a part is defective due to workmanship or materials and is removed from the
product within the applicable warranty period and returned to Midco in accordance
with the following procedure described, Midco will, at its option, either repair or
replace the part. Call the factory for Instructions on returned goods.
No equipment may be returned without written authorization from MIDCO.
Returned goods must be shipped prepaid to the factory.
__________________________________
No Hood Installation Required: According to the Uniform Mechanical
Codes per the International Conference of Building Officials Code EmberGlo
Steamers do not require a separate hood for vapor produced during
operation.
NOTE: EmberGlo ES10 Series Steamers use a cast aluminum steam
generator with two cast in electric heating elements. For best steaming, the
generator casting should contain some mineral deposits. During final
inspection each generator casting is pre-seasoned with a solution of baking
soda and water. The water marks and mineral deposits seen on a new
generator casting when the perforated food pan is removed is your
assurance that the unit has passed final inspection test and will readily
produce steam.
Specifications:
- 240 volts 60HZ AC 3200 watts 13.3 amp
or 208V 60HZ AC 2400 watts 11.6 amps
- Automatic timer operation (timer models only)
- Single shot operation
- End of cycle buzzer (10 seconds)
SAFETY INFORMATION TERMS: The following terms are used to identify hazards, safety precautions or
special notations and have standard meanings throughout this manual. When you see the safety alert symbol
and one of the safety information terms, as shown below, be aware of the hazard potential.
DANGER: Identifies the most serious hazards which will result in sever personal injury or death.
WARNING: Signifies hazards that could result in personal injury or death.
CAUTION: Identifies unsafe practices which would result in minor personal injury or product and
property damage.
Quality Designed for Proven Performance
210
8470 77
Printed USA
ES10 Series Installation and Service
Specifications
ES10 Steamers feature a 4" deep full size steam table pan. The steamer lid is equipped with two
counter-balanced spring hinges and offers a convenient choice of four locations for installing the
lid handle at the side or front of either front corner. Models Available for either manual or fully
automatic steaming.
Dimensions
Inches
Centimeters
HEIGHT (lid closed)
HEIGHT (lid open 90 degrees) with lid handle mounted on
front corner of lid, projecting forward.
HEIGHT (lid open 90 degrees) with lid handle mounted on
side corner of lid, projecting to the side.
9 3/4"
24.77
29"
73.66
23"
58.42
WIDTH
WIDTH with lid handle projecting to left or right side
DEPTH
22 1/2"
28 1/2"
22"
57.15
72.39
55.88
____________________________________
Electrical
Installation
Standard ES10 Steamers are designed for use with 208 VAC to 240 VAC, 4 (3 pole with ground)
wire, single phase, 60 Hz, electrical service. (See Figure 1).
The generator casting contains two heating elements, each rated for 1600 Watts. 13.3 amps, 120
Volts, 60 Hz. Models are available for use on 50 Hz. (Non USA, Export only) electrical service.
Call your distributor for more information.
Standard units are furnished with a six foot, four conductor (2 Hot/1 Neutral/1 Ground) cord. This
cord is equipped with a male twist-lock plug and matching loose female receptacle for convenient
field installation.
____________________________________
Electrical. Female twist-lock receptacle, supplied loose with the steamer, should be installed by a
qualified electrician. Refer to wiring diagrams. Figure 1.
NOTE: Female receptacle must be wired to assure that voltage to the individual heating elements
does not exceed 150 volts. (Circuits R-W and BK-W on Fig 1 and 2.) G terminal is wired to
Ground.W terminal is wired to neutral. Protect circuit with a 15 amp double pole circuit breaker.
In the United States, Wiring to the Female receptacle must conform to local codes, or in the
absence of local codes, to the National Electrical Code ANSI/NFPA No. 70-1990, or latest
edition. In Canada, Wiring to the Female receptacle must conform to local codes, or in the
absence of local codes, to Canadian Electrical Code Part 1, CSA Standard C22.1. When
choosing a location for the steamer, be sure that there is adequate space over the unit to lift lid
completely.
Water. Connect water hose assembly to water supply system. The supply end has a 1/8" female
pipe fitting and should be attached downstream of a shut-off valve. Steamer end of hose has a
quick connect fitting which snaps onto mating fitting on steamer. This hose fitting has an
automatic shut-off valve that allows steamer to be disconnected without shutting off water supply.
After connecting, turn on water and check for leaks.
No Hood Installation Required: According to the Uniform Mechanical Codes per the
International Conference of Building Officials Code, EmberGlo Steamers do not require a separate
hood for vapor produced during operation.
____________________________________
Operation
1.
2.
3.
2
Push power switch to ON position (switch lights up). Allow approximately 15 minutes for
steamer to reach operating temperature.
MODEL ES10PB:
Push STEAM button momentarily for each shot of steam desired. Water is sprayed into the
steam generator for as long as the button is depressed. If the STEAM button is depressed
too long or too often, flooding of the steam generator will result. A one second shot of water
every 20 seconds is a good rule of thumb to avoid flooding.
MODEL ES10:
A.) For a single-shot steaming as with the ES10PB (above), flip the CYCLE/MANUAL switch
to the MANUAL side. Push the STEAM button for each shot of steam desired.
B.) For unattended steaming for up to 20 minutes, set the CYCLE/MANUAL switch to
CYCLE. Depress the STEAM button to activate a steaming cycle. Steaming will proceed
according to the timer settings.
ES10 Series Installation and Service
Installation
Continued
Timers are configured as follows:
CYCLE TIME: Sets the total length of product cooking time, during which steam is
automatically supplied at adjustable intervals. At the end of the set time, steaming
stops and the buzzer sounds. Adjustable from 0.2 to 20 minutes.
STEAM SHOT “ON” TIME: Sets the amount of time that water is supplied to the steam
generator to create steam. Adjustable from 0.1 to 0.5 seconds.
STEAM SHOT “OFF” TIME: Sets the amount of the time between steam shots when no
steam is supplied. Adjustable from 6 to 18 seconds.
BUZZER DURATION: Sets the length of time that the buzzer will sound after automatic
steaming is completed. Adjustable from 0.1 to 10 seconds.
DELAY FROM LAST SHOT TO BUZZER: Sets the length of time between the last shot
of steam and the sounding of the buzzer. This dwell time allows absorption of steam into
the food. Adjustable from 0.1 to 30 seconds.
The adjustment features have been located within the steamer control box and made accessible
only with a screwdriver in order to discourage tampering or readjustments by unauthorized
personnel.
DANGER: Use extreme caution when adjusting timers. Bare wire terminals and/or bare
wires are exposed. Unplug male twist-lock plug or use extreme caution if steamer is
plugged in when making timer adjustments. Use an insulated or fiberglass screw driver.
IMPORTANT: KEEP LID CLOSED WHEN NOT IN USE. This keeps the food pan hot and
reduces condensation in the steam chamber. When steamer is first installed, or when
reconnecting water hose, operate STEAM button several times to purge air from lines.
____________________________________
Maintenance
Daily
Food Pan and Grid on all models should be removed and washed with a detergent or run
through a dishwasher.
WARNING: Under no circumstances should the entire Steamer be run through a
dishwasher. If any of the switches or timers in electric control compartment get wet they
can malfunction. Never try to use a device that has been wet—replace it.
All exposed stainless steel surfaces should be wiped with a damp cloth or cleaned with a chlorine
free stainless steel cleaner. Rust spots can develop on stainless steel surfaces that are not
cleaned daily.
____________________________________
Figure 1: Wiring Diagram
3
ES10 Series Installation and Service
Maintenance
As Required
4
Generator: The cavity in the generator casting may accumulate lime and can be cleaned by
scraping or wire brushing. Do not remove all of this deposit since a thin coating improves
steaming.
Water Nozzles: The water nozzles may be pulled out for cleaning. Clean small holes and inside
of nozzle tube. Located in the nozzle tube is a tool to be used for cleaning the holes in the water
tube.
Water Inlet: If the nozzle socket tube through the generator is limed, remove plug at bottom and
push lime out with a wire or small rod.
Strainers: To wash strainer located in hose; first, remove hose from steamer. Remove quick
connect fitting from hose. Run water through hose in reverse direction. Return to original
connections.
There is a strainer in inlet of solenoid valve that normally does not require cleaning but under
extreme conditions may have to be removed and cleaned.
____________________________________
Trouble Shooting Chart
Trouble
Chart
DANGER: READ AND UNDERSTAND THIS BULLETIN THOROUGHLY BEFORE
STARTING ANY TROUBLE SHOOTING. AN INADVERTENT SERVICE ERROR COULD
RESULT IN SEVERE PERSONAL INJURY OR DEATH. ONLY A TRAINED EXPERIENCED
SERVICE TECHNICIAN SHOULD ATTEMPT ANY REPAIR PROCEDURE.
Qualified service agencies are available at most locations—Refer to EmberGlo listing of
AUTHORIZED SERVICE AGENCIES included in Standard Equipment Catalog.
IMPORTANT: Defective wiring or loose connections can simulate the defects outlined
below. Check associated wiring before replacing a component.
I. UNIT DOES NOT HEAT—SWITCH ON, LIGHT OUT
A. Confirm male twist-lock plug is plugged in and properly twisted (rotate clockwise).
B. Confirm twist-lock receptacle is energized—reset breaker or repair house wiring.
WARNING: The following checks through III. D. should be done with power cord
removed from receptacle.
C. Confirm continuity in 4-conductor cord—replace if defective.
D. Confirm continuity in double pole, single throw Power Switch, terminals 1-2 and 4-5—
replace Power Switch if defective.
II. UNIT DOES NOT HEAT EVENLY OR STEAMS ONLY ON ONE END OF STEAM
GENERATOR CASTING—SWITCH ON, LIGHT ON.
A. Confirm continuity of each of two Thermal Cut-offs— replace if defective.
B. Confirm continuity of each of two Thermostats—replace if defective.
C. Confirm continuity of each of two Heating Elements— replace entire Steam Generator
Casting if defective.
III. UNIT HEATS UP, BUT DOES NOT STEAM—NO WATER EVIDENT
A. Confirm Manual Water Supply Valve is open and Water Hose Assembly is properly
hooked up. Refer to INSTALLATION-Water. A quick way to confirm water line
is operational is to disconnect Water Hose at quick disconnect fitting and push a small
probe into quick disconnect fitting—water should flow freely.
B. Check and clean Water Nozzles, Water Inlet and Strainers. Refer to MAINTENANCEAS REQUIRED.
C. Confirm continuity of Steam Push Button Switch when depressed—replace if defective.
D. Confirm continuity of water Solenoid Valve—replace if defective.
E. Water Solenoid Valve—Power Switch on, light on, confirm 120 volts to GND on terminals
2 and 5 of Power Switch, both terminals of both Thermal Cut-offs, and terminal 3 of
Square Steam Button. With square Stem Button depressed, confirm 120 volts to GND
on terminal 4 of Switch and blue lead terminal of Water Solenoid Valve. An audible click
should be heard when Valve is energized—if no click, jumper white lead terminal of Valve
to GND. If click is heard with jumper attached, white neutral wires are faulty from Valve
thru both heater elements to neutral on 4-conductor cord. Locate fault and repair. If no
click, Water Solenoid Valve is defective and should be replaced.
IV. UNIT FLOODS—SELECTOR SWITCH TO MANUAL; SQUARE STEAM PUSH BUTTON
NOT DEPRESSED.
A. Water Solenoid Valve seat is dirty and valve cannot close completely or is defective—
clean or replace as required.
WARNING: The following checks through Section V part B should be done with power
cord plugged in and properly twisted. Use extreme care as bare wire terminals and/or bare
wires are exposed.
V. UNIT FLOODS—SELECTOR SWITCH TO CYCLE
A. Same as IV.A..
B. STEAM SHOT, OFF TIME set for too frequent shots—refer to OPERATION 3B.
____________________________________
5
Heating and Cooking Guide
Heating &
Cooking Guide
The suggestions are made only to help the operator get started. Since each location will have
different portions and different requirements, each operator must determine his own operation
habits. The manual model is generally operated with one or two shots at the start. If additional
heat is required, operate up to three shots per minute. Since the product to be heated can only
absorb heat at a certain rate, do not oversteam, exceeding three shots per minute will usually not
improve performance. The timer model controls the number of steam injections per minute. The
unit can be used as a warmer or cooker. When the product heating time is established, set the
timer to obtain the same results.
Breads
Refridgerated
Frozen
Bread
1 to 2 shots of steam
2 min
Bagels
1 to 2 min
3 to 4 min
Croissant
15 seconds
Muffin
1-2 shots of steam
Pastries
1 to 2 min
3 to 4 min
Tamales
5 min
10 min
Tortillas
1 shot of steam
10 seconds
Eggs
Soft Boiled
Poached
Scrambled (dz)
6 min
3 min
5 min
Meat
Bratwurst
Breakfast sausage
Chicken breast (lg)
Chicken breast (precooked)
Deli meats
Hamburger (precooked)
Hot dogs
Italian sausage
Ribs (precooked)
8 min
8 min
15 min
5 min
2 to 3 min
4 min
4 min
4 min
10 min
Noodles and Rice
Macaroni (2 qt. cooked, 1 pt. water, 2 oz. oil)
Egg Noodles (2 qt. cooked, 1 pt. water, 2 oz. oil)
Rice (precooked)
5 min
Spaghetti (2 qt. cooked, 1 pt. water)
Vegetables
Artichokes
25 to 30 min
Asparagus
10 min
Brussels
15 min
Broccoli
10 min
Carrots sliced
4 min
Carrots whole baby (2 lb)
15 to 20 min
Cauliflower
12 min
Corn on the cob
3 min
Fennel
10 min
Green beans
4 min
Pea pods
6 min
Peas
5 min
Potatoes 8 whole (3 oz each)
Potatoes mashed (2 qt)
8 min
Squash, Acorn 4 (8 oz each)12 to 20 min
Squash, Zucchini -sliced frozen (1b)
Seafood
Large clams
King crab
Snow crab
Fish filets
Lobster 8 oz Tails
Scallops
Shrimp
6
4
8
6
6
8
5
4
min
min
min
min
min
min
min
16
14
25
15
min
min
to 30 min
min
4 min
8 min
8 min
18 min
5
6
8
5
min
to 7 min
to 10 min
min
50 min
14 min
18 min
12 min
8 min
16 min
5 min
8 min
9 min
8 min
20 min
10 Min
8 min
12 min
10 min
8 to10 min
14 to16 min
8 to10 min
6 min
Accessories
Accessories
Accessories for Steamers
Increase your efficiency with accessories made just for your steamer.
Steaming Basket Sets and Steaming Racks
Take full advantage of your EmberGlo Steamer with specially designed stainless steel Steaming Basket Sets
and Steaming Racks. All sets and racks come with an easy to use removable handle. Increase your
efficiency by dual steaming different items in separate baskets or in a mesh Food Pan with a separator.
Freshen or heat up tortillas and pita bread in a TorPita Steaming rack.
Half Pan Size Basket - 5608-72
Quarter Pan Size Basket (2 pk) - 5608-73
3 in One Basket Set (1 Half and 2 Quarters) - 5608-70
(Basket Sets come with a Handle)
Generator Cleaning Brush
Scrapping off mineral build up is easy with our
sturdy stainless steel Generator Cleaning Brush.
TorPita Rack
(for Tortillas & Pitas) - 5608-71
Cleaning Brush - 8450-62
Egg Poacher
A quick and healthy way to serve poached eggs.
4 Cup Egg Poacher 2070610
6 Cup Egg Poacher 2070615
5608-71
TorPita -Tortilla/Pita Rack w/ Handle
10 1/4" L x 7 5/8" W x 3 5/32" H
5608-70
Three in 1 Basket Kit w/ Handle
10 2/3" L x 8 1/8 " W x 3" H
5608-72
1/2 Size Basket w/ Handle
10 2/3" L x 8 1/8" W x 3" H
5608-73
Two of 1/4 Size Basket w/ Handle
7 7/8" L x
2070610
4 Cup Egg Poacher
9" L x 9" W x 3" H
2070615
6 Cup Egg Poacher
12 3/4" L x 12 5/8" W x 3" H
8450-62
Steam Generator Cleaning Brush
7 3/4" L
EmberGlo
A division of Midco International Inc. 4140 West Victoria Street * Chicago, Illinois 60646
tel 773.604.8700
fax 773.604.4070
web www.em b erglo.com
email [email protected]
5 1/8" W x 3" H
210
8470 77
Printed in USA
7